1
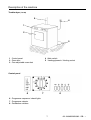
Operating Instructions
Tumble Dryers T 6185
It is essential to read these
operating instructions before installing
or using the machine to avoid the risk
of accident, or damage to the
machine.
Q
M.-Nr.04832650/02
- These instructions consist of 20 pages. - Diese Gebrauchsanweisung besteht aus 20 Seiten.-
2
«M.-Nr.04832650/02 - GB - »
Table of contents
Page
Warning and Safety instructions . . . . . . . . . . . . . . . . . . . . . . . . . . . . . . . .
4
Caring for the environment . . . . . . . . . . . . . . . . . . . . . . . . . . . . . . . . . . .
6
Description of the machine . . . . . . . .
- Machine control panel . . . . . . . . . . .
- Pushbutton switches / programme selector
- Programme sequence and check lights . .
.
.
.
.
.
.
.
.
.
.
.
.
.
.
.
.
.
.
.
.
.
.
.
.
.
.
.
.
.
.
.
.
.
.
.
.
.
.
.
.
.
.
.
.
.
.
.
.
.
.
.
.
.
.
.
.
.
.
.
.
.
.
.
.
.
.
.
.
.
.
.
.
.
.
.
.
.
.
.
.
.
.
.
.
.
.
.
.
.
.
.
.
.
.
.
.
.
.
.
.
.
.
.
.
.
.
.
.
7
7
8
9
Before using for the first time . . . .
- Preparation of washing . . . . . . . .
- Switching on and loading the machine
- Weights of load . . . . . . . . . . . .
.
.
.
.
.
.
.
.
.
.
.
.
.
.
.
.
.
.
.
.
.
.
.
.
.
.
.
.
.
.
.
.
.
.
.
.
.
.
.
.
.
.
.
.
.
.
.
.
.
.
.
.
.
.
.
.
.
.
.
.
.
.
.
.
.
.
.
.
.
.
.
.
.
.
.
.
.
.
.
.
.
.
.
.
.
.
.
.
.
.
.
.
.
.
.
.
.
.
.
.
.
.
.
.
.
.
.
.
10
10
10
10
Programme selection
.
.
.
.
.
.
.
.
.
.
.
.
. . . . . . . . . . . . . . . . . . . . . . . . . . . . . . . . . . . . . . 11
Coin operation unit . . . . . . . . . . . . . . . . . . . . . . . . . . . . . . . . . . . . . . . . 12
Notes . . . . . . . . . . . . . . . . . . . . . . . . . . . . . . . . . . . . . . . . . . . . . . . 13
- Drum lighting . . . . . . . . . . . . . . . . . . . . . . . . . . . . . . . . . . . . . . . . . . . 13
- Opening the door in a power cut . . . . . . . . . . . . . . . . . . . . . . . . . . . . . . . . . 13
Cleaning and Care . . . . . . . . . . . . . . . . . . . . . . . . . . . . . . . . . . . . . . . . 14
- Fluff filter . . . . . . . . . . . . . . . . . . . . . . . . . . . . . . . . . . . . . . . . . . . . . 14
- Dryer casing and drum . . . . . . . . . . . . . . . . . . . . . . . . . . . . . . . . . . . . . . 14
Notes for the installer
- Adjustable feet . . . .
- Electrical connection .
- Gas connection . . . .
.
.
.
.
.
.
.
.
.
.
.
.
.
.
.
.
.
.
.
.
.
.
.
.
.
.
.
.
.
.
.
.
.
.
.
.
.
.
.
.
.
.
.
.
.
.
.
.
.
.
.
.
.
.
.
.
.
.
.
.
.
.
.
.
.
.
.
.
.
.
.
.
.
.
.
.
.
.
.
.
.
.
.
.
.
.
.
.
.
.
.
.
.
.
.
.
.
.
.
.
.
.
.
.
.
.
.
.
.
.
.
.
.
.
.
.
.
.
.
.
.
.
.
.
.
.
.
.
.
.
.
.
.
.
.
.
.
.
.
.
.
.
.
.
.
.
.
.
.
.
.
.
15
16
16
16
Customer Service . . . . . . . . . . . . . . . . . . . . . . . . . . . . . . . . . . . . . . . . 17
- Data plate . . . . . . . . . . . . . . . . . . . . . . . . . . . . . . . . . . . . . . . . . . . . 17
The tumble dryer must be installed by an approved
Service engineer or authorized Service Dealer.
3
«M.-Nr.04832650/02 - GB - »
Warning and
Safety Instructions
Read the operating instructions through before using this machine for the first time. This
way you will avoid the risk of accidents and
damage to the machine.
Repairs to machines operated by gas,
steam or electricity must only be carried
out by fully trained and qualified service engineers. Unauthorized repairs could be dangerous.
The tumble dryer is only intended for drying fabrics, which have been washed in a
water solution and marked on the manufacturer’s wash care label as being suitable for
tumble drying.
The electrical safety of this appliance can
only be guaranteed when continuity is
complete between the appliance and an effective earthing system which complies with local
and national regulations.
It is most important that this basic safety requirement is regularly tested by a qualified
electrician.
The manufacturer can not be held responsible
for the consequences of an inadequate earthing system.
There is a danger of fire with the following, and on no account should they be
dried in this machine:
– Articles containing foam rubber, rubber or
rubber like materials.
– Articles which have been treated with inflammable cleaning agents.
– Articles which have been splashed with
hair lacquer, hair spray, nail varnish remover, etc.
– Kitchen overalls which may be greasy,
fatty or impregnated with other residues.
The machine is only completely isolated
from the electricity supply either when it is
switched off at the wall switch or when the
mains fuses are withdrawn from the distribution board.
Do not damage, remove or bypass the
safety components, fixtures and control
elements
of this machine.
Do not dry mops, floor cloths etc in this machine if they contain substances such as
Where there is any damage to the controls
wax or chemical cleaning agents.
or to the cable insulation the machine
must
not be used until it has been repaired.
Padded or filled fabrics (eg. jackets or
cushions) should not be dried if torn or
Faulty components must only be exdamaged. If the filling falls out it could cause
changed for Miele original spare parts.
a fire.
Only when these parts are fitted can the
safety standards of the machine be guaranSome textiles get very hot during drying
teed.
and there may be a risk of high temperatures causing them to ignite in exceptional cirWhen disposing of an old machine, make
cumstances. They should therefore be taken
the door lock inoperative and remove the
out of the machine as soon as the programme
fluff
filter access panel. This should prevent
has finished and as soon as possible if there
has been a power cut. It is advisable to keep a children at play from being accidentally locked
fire extinguisher near the machine at all times. in and endangering their lives.
Only use the machine if all of the removable outer housing parts are in place. This
way any moving parts or electrical components cannot be accessed.
The washing must not be taken from the
dryer before the drying programme has
finished, ie, the cooling down phase must
be completed.
If hot laundry items are stacked or packed
they can be liable to auto-combustion.
Do not let children play in or near the machine and do not let them play with the
controls or operate it.
4
«M.-Nr.04832650/02 - GB - »
Warning and
safety instructions
The air inlet opening is situated at the
back of the machine. Under no circumstances should this air inlet opening be
blocked. Do not therefore cover the machine
lid of the dryer with any type of covering or
cloth.
Safety precautions to take if you smell
gas
-For gas heated dryers only(Natural gas usually has no smell of its own. In
the U.K. a smell is added by British Gas for
safety reasons).
Fire and Explosion risk
Never use or store petrol or petroleum
based substances or any easily inflammable
substances near the machine.
If you smell gas you must act immediately.
Extinguish any flames.
Fire risk
Do not use the machine without the built-in
fluff filter in place. If the fluff filter is damaged
it must be replaced immediately.
A build up of fluff could block the air flow heating and ventilation, and impair the efficiency of
the machine.
Do not create any electrical sparks:
e.g. do not insert or withdraw any electrical
plugs or operate electrical switches such
as lights and door bells.
Do not enter a room with an open light
where there is the smell of gas.
Disinfecting and cleaning agents often contain chlorides (salts). If these substances
dry onto the steel surfaces the residual chlorides attack the steel and can cause rusting.
To protect your machine from rust damage we
recommend only using chloride free disinfecting and cleaning agents for washing and disinfecting and for cleaning the machine. If you
are not sure about a particular agent contact
the manufacturer for advice.
If you accidentally spill an agent containing
chloride on the machine it should be rinsed off
with water and dried with a soft cloth.
Do not light cigarette lighters or matches.
Do not smoke.
Open all doors and windows.
Close any shut off valves at the gas connection meter or mains supply immediately.
Shut off the gas-valve next to the machine.
If all gas valves are closed but there is still
the smell of gas in the room you should
call you local gas board immediately.
Do not use a high pressure cleaner or
water jet to clean the machine.
Caution If the tumble dryer switches off
prematurely during the drying cycle, without the fault indication light showing, this could
be due to high temperatures in the area of the
motor.
Heater limiters stop the tumble dryer.
In this case please check the seals and locks
on the machine door and the fluff filter.
Check the condition of the air inlet and air outlet vents. If no damage is evident to any of
the parts checked, the dryer can be re-started.
If the fault occurs again, call the approved
Service engineer.
Important: Before signing off any
commissioning, maintenance, conversion
or repair work as finished, all gas pipework
from the manual isolating valve to the
burner nozzles must be checked for soundness.
Pay special attention to the test points on
the multifunction control, the connection
pressure monitor and the burner setting
pressure.
The tests must be carried out with the
burner switched on and switched off.
5
«M.-Nr.04832650/02 - GB - »
Warning and
safety instructions
Caring for the environment
In the event of a fault or for cleaning and
maintenance the gas control valve must
be shut and the gas emergency control at the
meter shut off.
Disposal of the packing material
The transport and protective packing
has been selected from materials
which are environmentally friendly for
disposal and can normally be recycled.
Accessories
Accessory parts may only be fitted when
expressly approved by Miele. If other parts
are used, guarantee, performance and product liability claims may be invalidated.
Rather than just throwing these materials
away, please ensure they are offered for
recycling.
Disposal of your old machine
Old machines contain materials which can be
re-cycled. Please contact your local authorities or scrap merchant about potential recycling schemes, before disposing of the
appliance.
Ensure that the machine presents no danger
to children while being stored for disposal.
All personnel working with this machine must
be fully trained in all aspects of its use and
safety.
Keep these operating instructions in a safe
place and make them available to current
and future users.
6
«M.-Nr.04832650/02 - GB - »
Description of the machine
Tumble dryer (T 6185)
5
4
1
2
3
1 -Control panel
2 -Drum door
3 -Four adjustable screw feet
4 -Main switch
5 -Venting pipework / Venting socket
Control panel
6
7
8
6 -Programme sequence / check lights
7 -Programme selector
8 -Pushbutton switches
7
«M.-Nr.04832650/02 - GB - »
Description of the machine
Push button switches
Programme selector
Door “a button”
To open the drum door.
- This button does not stay pushed in.“s On-Off” switch
“L Low temperature” switch
Lowers the drying temperature for delicate fabrics (e.g. acrylics).
Press in the button switch to select this
function.
The programme selector switch is used to select the programme required.
A COTTONS
1 Extra dry
2 Normal +
3 Normal
4 Machine iron r
5 Machine iron rr
6 Machine iron rrr
“l Buzzer” switch
The end of a programme can be indicated by
a buzzer.
Press in the button switch to select this function.
“h ”Start" button
This button switch starts the programme when
pushed in.
- It does not stay pushed in.
B MINIMUM IRON
7 Normal +
8 Normal
9 Hand iron r
C TIMED DRYING
0 without heating
! with heating
Residual moisture
(-4%)
(-2%)
(3%)
(13%)
(20%)
(26%)
(-2%)
(2%)
(8%)
(15 mins)
(20 mins)
r End
8
«M.-Nr.04832650/02 - GB - »
Description of the machine
Programme sequence / check lights
If the fault message occurs again please call
the Service department.
“Venting” (without function)
On
“Check fluff filter”
The fluff filter is clogged.
Action: Clean the fluff filter at the end of the
programme.
Drying
Cool air
Anti-crease
Note:
The "Drying", "Cool air" and "Anti-crease" indicator lights flash if there is a power cut or if a
programme has been interrupted (e.g. when a
door has been opened and shut). They are
not indicative of a fault. The lights will stop
flashing when the "Start" button is pressed.
Check venting
Check fluff filter
This only applies to gas heated machines
“Gas heating”
The "Gas heating" indicator light goes out and
the dryer switches itself off after approx. 7
minutes, when
Fault messages
“Programme sequence or check lights” come
on or flash to indicate a fault or interruption.
The "Gas heating" indicator light goes out on
dryers with gas heating.
Heating
(flashes)
– The site gas supply to the machine is interrupted (e.g. gas stop valve has not been
opened).
Action: Open the gas stop valve.
– an ignition fault occurs after the start of a
programme.
Action: To restore operation switch the machine off and then on again, and press the
"Start" button.
– The venting duct is blocked or badly restricted.
Action: Check the venting duct and clean if
necessary.
– The gas connection pressure is too low
(there may be a drop in pressure in the gas
supply network).
Action: Inform your gas supplier.
Gas heating
(goes out)
Safety period
(flashes)
Venting
Check fluff filter
(lights up)
The messages are:
“Heating”
Fault in the heating system.
Action: Please inform the Service department
“Safety period”
The maximum running time of the drying programme was exceeded because the residual
moisture at the start of the programme was
too high.
Action: Where the residual moisture was too
high start the drying programme again.
If the fault is still present after these measures
have been taken, it is essential to call a Miele
authorised service technician to deal with the
fault.
9
«M.-Nr.04832650/02 - GB - »
Before using for the first time
Preparation of washing
Before using for the first time
Wipe the inside of the drum with a soft dry
cloth before loading the drum with laundry.
Sort the laundry according to the level of dryness required. It is not necessary to sort according to size.
Preparing the laundry
Sort the laundry according to fabric type and
weave in order to achieve an even drying result.
Duvet covers and pillow cases should be
closed to prevent smaller items rolling up inside them.
For greater economy dry a full load, underloading is uneconomical. Do not overload as this
will impair the drying result and the laundry finish.
Not all textiles are suitable for drying in a
tumble dryer. Therefore pay special attention
to the manufacturer’s instructions in the wash
care label.
Significance of symbols:
q = Dry at normal temperature
r = Dry at low temperature
s = Do not tumble dry
Switching on and loading the machine
Switch on the mains switch
(on site).
Articles made from pure wool and wool mixtures tend to become matted and shrink. They
should not be dried in a tumble dryer.
Press in the"s On/Off" switch.
Press in the"a door" button and open the
drum door.
The surface of pure linen is liable to be roughened by tumble drying. Consult the manufacturer’s instructions.
Load the washing
Place the pre-sorted washing loosely into
the drum.
Important! Any laundry item with metal
buckles, hooks, eyes, zip tags etc. should be
put into the dryer in a cloth bag (eg. pillowcase) to protect the drum from scratches and
dents.
Weights of load (Dry weight)
T 6185 Dryer
Closed zips in garments may bridge the sensor electrodes in the drum ribs causing the drying process not to end or to end too late. Items
with zips should be dried with the zips open.
Padded or filled fabrics (eg. jackets or cushions) should not be dried if torn or damaged.
If the filling falls out it could cause a fire
Drum volume
185 Litres
Cottons
7.5 kg
Minimum Iron and Delicates
2.5 kg
Make sure any dispenser balls or similar
have been removed from the washing and
are not loaded with it into the tumble dryer.
Some woven and loopknit materials tend to
shrink to varying extents depending on their
quality. This tendency is exaggerated by overdrying. Avoid the Extra dry programme for
such fabrics.
Starched washing can be dried in the tumble
dryer. Select the most suitable programme for
ironing by hand or machine.
10
«M.-Nr.04832650/02 - GB - »
Programme selection
IRON
B MINIMUM
For drying polyester/cotton
mixtures, delicates and synthetics
7 Normal plus + (-2%)
(2%)
8 Normal
(8%)
9 Hand Iron r
DRYING
C TIMED
Airing and timed drying
heating (15 mins)
0 without
For airing laundry
heating (20 mins)
! with
To dry small loads or
to finish off drying
individual items.
Make sure no articles of laundry are trapped
by the door, as this will cause damage to
the fabric.
Close the drum door.
If required also select the “L Low temperature” and/or “l Buzzer” functions.
Select a programme:
Press in the “h Start” button.
The dryer has an electronic sensor system
which monitors the residual moisture in the
laundry.
Once the required level of dryness has
been reached the laundry is cooled down
and the drying programme finishes automatically.
-The programme selector can be turned in
a clockwise or anti-clockwise direction.Different drying programmes can be selected with the programme selector depending on the dryness level required for
further handling:
- The drying programme selected now
starts.-
A COTTONS
For drying cotton/linen textiles-
Note
1. The door can be opened during operation
(press the door button), to add articles of
laundry or to remove articles early. Do not
reach into a moving drum.
To continue the drying process close the
door and press the “Start” button, (as a
safety precaution the fan automatically
switches on if the temperature in the dryer
interior is high and the Indicator lights “Drying”, “Cool air”, and “Anti-crease/end” are
flashing).
2. If a new programme is to be selected, first
turn the programme selector to “End” and
then to the desired programme. Press the
“Start” button to start the new programme.
-The “On” indicator light flashes if the programme selector is turned to a different
position after the start of a programme. It
stops flashing when the programme selector is turned back to the programme originally selected or is turned to “End” to finish
the programme.-
Residual moisture figures
1 Extra dry
2 Normal plus +
3 Normal
4 Machine Iron r
5 Machine Iron rr
6 Machine Ironrrr
(-4%)
(-2%)
(3%)
(13%)
(20%)
(26%)
11
«M.-Nr.04832650/02 - GB - »
Programme Selection
3. The check fluff filter light comes on if the
fluff filter needs cleaning. Clean the filter as
soon as the programme has finished (see
page 14 for more details).
4. With a gas heated dryer the "Gas heating"
indicator light goes out and after approx. 5
minutes the dryer switches off if an ignition
fault had occurred. To restore operation
switch the machine off and then on again,
and press the "Start" button.If these ignition faults happen frequently, please call a
Miele authorised service technician.
Clean the fluff filter (see page 14).
- The fluff filter should be cleaned after
every programme.-
After the final drying programme:
Close the drum door.
Press the “s On-Off” switch to switch off
the machine.
Switch off at the site main switch.
5. The washing must not be taken from the
dryer before the drying programme has finished, ie, the cooling down phase must
be completed.
If hot laundry items are stacked or packed
they can be liable to auto-combustion.
6. If the laundry is rinsed with hot water in the
final rinse, the residual heat in the laundry,
together with the reduced residual moisture
content, will lead to shorter processing
times and save energy.
The end of the drying programme is indicated by the “ ~ r Anti-crease / End”
light lighting up and the buzzer sounding, if
selected.
Coin operation unit
Drying with coin operation unit
C 4031 / C 4051 / C5002
It is important to follow the sequence below as
otherwise coins or tokens could be lost and
not credited.
Turn the programme selector to “r End”.
1. Load the laundry and close the door
Press the “a Door” button and open the
drum door.
2. Press in the “s On-Off” button.
Remove the washing
- Do not leave any items of laundry in the
drum.
The next drying programme could damage
them.
Note
If the laundry is not removed from the machine
at the end of the programme an anti-crease
phase switches in automatically. There is
drum movement at intervals to minimise creasing in the laundry.
The anti-crease phase lasts approx. 59 minutes.
3. Select a programme.
4. If required select the “L Low temperature” and/or “l Buzzer” functions.
5. Insert coins or tokens.
6. Press in the “h Start” button.
Note
Empty the coin box daily. This avoids a build
up of coins or tokens in the box which could interfere with operation.
12
«M.-Nr.04832650/02 - GB - »
Note
Drum lighting
To open the door in the event of a power
failure.
The drum interior is lit by a heat resistant bulb.
Replacement bulbs should only be ordered
from your Miele dealer or the Miele Spare
Parts department. The light bulb must not
exceed the maximum wattage quoted on
the data plate and on the light cover.
cover
bulb
Only use the flap opener supplied to open
the door.
Air inlet opening
To replace the bulb switch off the machine
at the mains switch.
The air inlet opening is at the rear of the machine. Under no circumstances must this inlet
be blocked. Avoid placing any covers or cloths
on the lid of the machine which could hang
down and obscure the inlet.
Open the drum door.
Unscrew the cover inside the drum above
the door by hand.
Exchange the bulb and screw the cover
back on.
The cover must be fixed securely, as otherwise moisture may seep in and cause a
short circuit.
13
«M.-Nr.04832650/02 - GB - »
Cleaning and Care
Fluff filter
The fluff which occurs during drying is collected in the fluff filter in the door.
The fluff filter should be cleaned after every
programme and whenever the “l Check filter”
light comes on.
Take care not to damage the filter.
Dryer casing and drum
Before cleaning disconnect the machine from
the power supply via the mains switch.
For dryers with gas heating the gas manual
stop tap must be shut and the gas valve at the
entry meter shut off.
Do not use a high pressure cleaner or
water jet to clean the machine.
The casing, control panel and plastic parts
of the dryer should be cleaned only with a
mild cleaning agent or a soft damp cloth
and then rubbed dry.
After drying starched washing the drum
should be wiped out with a soft damp cloth.
Never
use abrasive cleaning agents to clean the
machine.
Open the drum door and pull the filter upward out of its retainer.
Remove any fluff from the filter by hand
(do not use any sharp object to do this).
The following should be checked by a Service
technician once a year for build up of fluff and
cleaned if necessary:
Burner and burner cavity (with gas heating),
heater element and heater shaft (with electric
heater).
Fluff also collects in the hollow part of the
retainer. Remove any remaining fluff
through the wide slot at the lower edge.
Push the cleaned filter back down into the
retainer and close the door.
Note
If the filter is badly clogged it can be cleaned
under running water. It must be thoroughly
dried before being put back.
The whole interior of the tumble dryer
Fins on the ventilation fan
If appropriate maintenance is not carried out
regularly the efficient running of the machine
may be impaired and operational faults representing a fire hazard can occur.
14
«M.-Nr.04832650/02 - GB - »
Notes for the installer
The Tumble Dryer may only be installed and
commissioned by a Service Engineer or by an
authorized Service Dealer.
Pay careful attention to the enclosed installation instructions and the installation diagram.
Do not install the dryer in a room where there
is danger of frost.
Ensure that there is adequate ventilation for
operation in the room where it is installed.
Ensure that the air being drawn into the machine is fresh and that it does not contain
chlorine, fluoride or solvent-vapours.
Machines heated by gas and electricity must
not be installed in the same room as dry cleaning machines which use solvents containing
CFCs. Escaping vapours break down into hydrochloric acid if ignited. This would damage
any laundry as well as the machine.
If installed in an adjacent room there must be
no exchange of air between them.
To facilitate subsequent cleaning of the duct,
cleaning flaps or covers should be fitted on the
bends wherever possible.
With upward sloping exhaust ducting a condensate drain must be made at the lowest
point.
The dryer is fitted with an exhaust fan which
can be heard during operation. The noise
level of the fan can be reduced by fitting a
muffle to the dryer vent stub (available from
trade outlets).
The machine does not need to be installed on
a base, however any unevenness in the floor
must be compensated for.
The machine must be installed evenly for it to
function smoothly.
To facilitate any subsequent service or maintenance work, the minimum dimensions and distance required from the wall, as shown in the
installation diagram, must be observed.
The area around the dryer - particularly
around the central air inlet must be kept free
from fluff particles, so that these do not get
taken into the machine. Any fluff trapped in the
machine could lead to operational damage.
The exhaust must not be led into a chimney
used by another gas, coal or oil-heated appliance. The warm humid air should be directed
by the shortest route into the open air or into a
suitable venting duct. The duct must be designed and installed to accommodate the high
throughput of air (few bends, as short a duct
as possible, well shaped and leakproof joints).
No filters or louvres should be built into the exhaust duct.
The connection between the exhaust ducting
and the exhaust connection on the dryer must
be airtight.
Where the exhaust is ducted directly into the
open air, the end of the duct should be protected against the weather, ideally by a downward angle of 90o .
15
«M.-Nr.04832650/02 - GB - »
Notes for the installer
The machine can be levelled by adjusting the
screw feet.
The dryer may only be connected to the same
voltage and rated load as shown on the data
plate.
The electrical rating is usually set to 8.1 kW
ex works. Connection should be made via a
suitable isolator, with an on-off switch which is
easily accessible for servicing.
Ensure the leads for N and phase L are correctly connected. Do not transpose.
Connection must be undertaken by a fully
competent person.
All removable outer housing parts must be
refitted after electrical connection has been
made.
Once levelled the discs must be turned with a
screwdriver against the machine’s base plate.
The electrical connections to the dryer must
be in accordance with instructions given on
the installation diagram and comply with local
regulations.
Once installed in position all detachable outer
casing parts must be attached again.
Electrical connection
This machine has been constructed in accordance with current safety standards and complies with the following standards: IEC 335-1
and IEC 335-2-11.
The electrical connection may only be carried
out by a fully competent person in accordance
with local and national safety regulations.
Gas connection
The gas connection may only be carried out
by a suitably qualified (e.g. Corgi registered)
engineer, in accordance with local and national safety regulations. The enclosed installation diagram and the installation instructions
for gas must be followed to ensure correct gas
connection.
Safety regulations demand that a pressure
test nipple is installed near a gas dryer to
allow an engineer to test the pressure following servicing.
Please pay attention to the installation diagram and instructions supplied with the machine. These are important for the connection
to gas.
The gas group to which the machines have
been set at the factory is given on the Gas
Data sticker affixed to the rear of the machine.
WARNING
THIS APPLIANCE MUST BE EARTHED.
Pay attention to the switching diagram supplied (located in the machine behind the control panel) and the Installation diagram. These
diagrams are important for electrical connection.
16
«M.-Nr.04832650/02 - GB - »
Notes for the installer
Customer service
The machine must not be operated with a
different kind of gas.
Should a fault occur please contact your nearest authorised service department.
All removable outer housing parts must be refitted after the gas connection has been made.
The customer service dept requires the Model,
fabrication no., (Fabr.-Nr) and Material no. (M.Nr.).
This information can be found on the data
plate, visible with the door open below the
drum aperture, to the right or on the back
of the machine.
Do not attempt to undertake any repairs to gas
heated machines yourself. Repairs must only
be carried out by suitably competent persons
to ensure safety, e.g. gas engineers must be
registered. Please consult the Miele Customer Service department or an authorized Service dealer.
Example only:
Coin operation unit.
The dryer can be fitted with a coin operation
unit*. The appropriate adapter* is also required.The re-programming of the dryer which is
necessary for fitting a coin unit can only be carried out by the Miele Service department or a
Miele authorised service dealer.
All parts marked with an * are available from
Miele Spare Parts department and some Miele
dealers.
Noise level
registered on the “A” scale
T 6185
63.6 dB
(measured in Germany in accordance with
DIN (IEC) 45 635 machine noise regulation 3,
GSGV § 1 1.a).
1
2
3
4
5
6
7
8
9
10
11
12
13
14
15
16
17
18
19
20
21
22
*
Machine type
Serial number of the machine
Voltage/Frequency
Mains fusing
Drive motor
Plate diameter/Plate qty *
Drum data
Drum diameter/Drum depth *
Spin speeds *
Drum volume/Laundry dry weight
Kinetic Energy *
Top running time *
Braking time *
Heating
Electric heating
Fusing (on site)
Steam heating indirect *
Steam heating direct *
Gas heating
Commissioning date
Water-Registration*
Space for test certificate / e.g. CE - 0063 (Gas)
or country certificate
not valid for Tumble Dryers
Data plate: Electric heating
(up to Fabr.-Nr. 46674716)
17
«M.-Nr.04832650/02 - GB - »
Notes:
18
«M.-Nr.04832650/02 - GB - »
Notes:
19
«M.-Nr.04832650/02 - GB - »
United Kingdom
Miele Co Ltd., Fairacres, Marcham Road, Abingdon, Oxon, OX14 1TW
Tel: Abingdon (01235) 554455 - Fax (01235) 554477
Service Office, tel Abingdon (01235) 554466
Telephone calls may be monitored and recorded to improve our service.
Alteration rights reserved
This paper is made from 100% chlorine free bleached cellulose.
3201