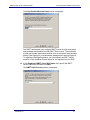
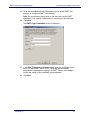
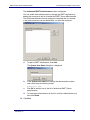
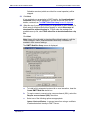
1
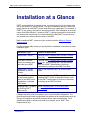
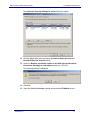
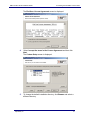
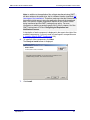
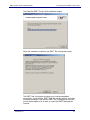
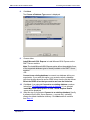
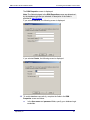
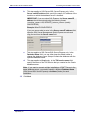
RMFT Product Suite Installation Guide Software Version 2.5 September 5, 2011 RepliWeb, Inc., 6441 Lyons Road, Coconut Creek, FL 33073 Tel: (954) 946-2274, Fax: (954) 337-6424 E-mail: [email protected], Support: http://support.repliweb.com/ RMFT Product Suite Installation Guide September 5, 2011 Copyright © 2000-2011 by RepliWeb, Inc. This product includes cryptographic software written by Eric Young ([email protected]) The information in this document has been compiled with care, but RepliWeb makes no warranties as to accurateness or completeness, as the software described herein may be changed or enhanced from time to time. This information does not constitute commitments or representations by RepliWeb, and is subject to change without notice. The software described in this document is furnished under license and may be used or copied only in accordance with the terms of this license. No part of this document may be reproduced or transmitted in any form or by any means, electronic or mechanical, for any purpose, without the express written consent of RepliWeb, Inc. Any trademarks, trade names, service marks, or service names owned or registered by any other company and used in this document are proprietary to that company. Please direct correspondence or inquiries to: RepliWeb, Inc. 6441 Lyons Road Coconut Creek FL 33073 Phone: (954) 946-2274 Fax: (954) 337-6424 E-Mail: [email protected], Support: http://support.repliweb.com/ Web Site: http://www.repliweb.com/ RepliWeb, Inc. ii RMFT Product Suite Installation Guide Table of Contents Introduction ...........................................................................................................6 Installation at a Glance .........................................................................................7 1. Installation Requirements ................................................................................8 Minimum System Requirements ...................................................................................... 8 RMFT Server ................................................................................................................ 8 RMFT Remote Administration Console ........................................................................ 8 RMFT CLI and RMFT Java CLI .................................................................................... 9 SuperFAST Daemon and FASTCopy Daemon ............................................................ 9 Database Requirements ................................................................................................. 10 Database Connections Opened by RMFT Server ...................................................... 10 Oracle Prerequisites ................................................................................................... 12 IIS Requirements ............................................................................................................ 18 Antivirus Software Requirements ................................................................................... 18 2. Installing the Full RMFT Product Suite..........................................................20 Selecting a Custom Web Site ..................................................................................... 32 3. Installing Specific RMFT Components ..........................................................36 4. Modifying, Repairing or Upgrading the Installation .....................................40 Modifying the Installation ................................................................................................ 40 Reinstalling the DMZ RMFT Server to a Different Path.............................................. 41 Repairing or Upgrading the Installation .......................................................................... 42 5. Silently Installing RMFT Components ...........................................................44 Installing RMFT Administration Console ........................................................................ 44 Upgrading the RMFT Administration Console ............................................................ 45 Installing RMFT FASTCopy and/or SuperFAST Receiving Agents ............................... 45 Optional Parameters ................................................................................................... 45 Upgrading RMFT Receiving Agents ........................................................................... 46 Installing RMFT Desktop Client ...................................................................................... 46 RepliWeb, Inc. iii RMFT Product Suite Installation Guide Optional Parameters ................................................................................................... 47 Creating and Distributing Profiles ............................................................................... 47 Upgrading RMFT Desktop Client ................................................................................ 48 A. RMFT Port Requirements ...............................................................................49 Single RMFT Server in the Intranet ............................................................................ 49 Single RMFT Server in the DMZ................................................................................. 50 Two RMFT Servers ..................................................................................................... 51 Host Port Requirements ............................................................................................. 53 B. Installing RMFT in an Existing RMFT Environment .....................................54 C. Moving the RMFT Installation or Database to another Machine ................56 Migrating the RMFT Installation ..................................................................................... 56 Migrating the RMFT Installation in a Standalone Environment .................................. 56 Migrating the Internal RMFT Installation in a DMZ Environment ................................ 56 Migrating the DMZ RMFT Installation in a DMZ Environment .................................... 57 Migrating the RMFT Database ....................................................................................... 58 RepliWeb, Inc. iv RMFT Product Suite Installation Guide Preface Purpose This guide describes how to install the RMFT Product Suite. You can install the entire RMFT Product Suite or specific components according to your needs. Audience RMFT administrators. Scope This guide does not provide operating instructions for the installed components. For operating instructions, please refer to the relevant user guides. Related Documentation RMFT Administrator’s Guide RMFT Web Client User Guide RMFT CLI Reference Guide RMFT Java CLI Reference Guide RMFT MS-Cluster Installation Guide RepliWeb, Inc. v RMFT Product Suite Installation Guide Introduction RepliWeb Managed File Transfer (RMFT) is a turnkey solution for managed, enterprise-scale file exchange. RMFT greatly improves the manageability, reliability, efficiency and security of file workflows and file transfers. RMFT's userfriendly Web interface enables end-users to exchange files with ease, while fully automated server-to-server file transfer and automated file processing provide complete "hands-off" operation. By streamlining management and administration of file transfers, RMFT removes key concerns about day-to-day file transfer processes and file workflows, allowing organizations to focus valuable resources elsewhere. This guide provides complete installation instructions for RMFT Product Suite v2.5. RMFT Product Suite consists of various client-side and server-side components, each of which can be installed individually or as part of the overall installation. For example, if you need to set up a machine to receive files sent using SuperFAST (one of RMFT's enhanced transfer protocols), installation of the SuperFAST daemon component is all that is required. Unless you choose not to install a specific component, all RMFT components will be installed. For a description of each of the available components, see 3. Installing Specific RMFT Components (36). For proper operation, RMFT must be connected to one of the supported databases (MSSQL/SQL Express, or Oracle). You can configure database connectivity either during or after the installation. For more information about RMFT database requirements, see Database Requirements (10). RepliWeb, Inc. vi RMFT Product Suite Installation Guide Installation at a Glance Installation at a Glance RMFT can be installed on a single server, on two servers (one in the intranet and one in the DMZ) or on an MS-Cluster. The type of installation that you choose will largely depend on how RMFT will be used within your organization. For instance, if RMFT is only going to be used for internal file transfer, then installation on a single server should be sufficient. If, however, RMFT is going to be used for both internal and external file transfer then it is recommended to install RMFT on two servers – one located in the intranet and the other in the DMZ. Before installing RMFT, make sure your system meets the Minimum System Requirements. Use the following table to help you quickly find the installation instructions for each installation type: Installation Type Location of Instructions Single RMFT Server Continue from 2. Installing the Full RMFT Product Suite (20). Two RMFT Servers – One in the intranet and the other in the DMZ. Continue from 2. Installing the Full RMFT Product Suite (20). After installing RMFT on both servers, refer to the RMFT Administrator’s Guide for instructions on setting up the DMZ Front End. Single RMFT Server installation on an MSCluster. Refer to the Installing RMFT on an MS-Cluster Guide. Two RMFT Servers (one in the intranet and the other in the DMZ), each installed on a separate MS-Cluster. Refer to the Installing RMFT on an MS-Cluster. After installing RMFT Server on both MS-Clusters, refer to the RMFT Administrator’s Guide for instructions on setting up the DMZ Front End. Installing RMFT on top of an Existing RMFT Environment. See B. Installing RMFT in an Existing RMFT Environment. Changes may also need to be made to your current firewall configuration. The required ports and firewall configuration are determined by several factors such as the type of installation and which protocols will be used to transfer files. For a detailed description of which ports need to be opened, see A. RMFT Port Requirements (49). RepliWeb, Inc. 7 RMFT Product Suite Installation Guide 1. Installation Requirements 1. Installation Requirements The following section describes the installation requirements for RMFT Product Suite v2.5 and each of its components. Minimum System Requirements Database Requirements IIS Requirements Minimum System Requirements Before installing RMFT Product Suite v2.5 or any of its components make sure that the following minimum requirements have been met. For information on installing individual components, see 3. Installing Specific RMFT Components (36). RMFT Server (Includes all RMFT components) Windows Server 2003/2008/2008 R2 .NET Framework 3.5 Service Pack 1 Microsoft IIS 6 or 7 (Note: FTP Sites requires IIS 7.5 with FTP 7.5) Dual Core CPU (Recommended: Quad Core CPU) 4 GB of RAM (Recommended: 8 GB RAM) Several GB of available hard disk space RMFT Remote Administration Console Windows XP and above .NET Framework 3.5 Service Pack 1 Pentium 4 512MB of RAM 20MB of available hard disk space RepliWeb, Inc. 8 RMFT Product Suite Installation Guide 1. Installation Requirements RMFT CLI and RMFT Java CLI Windows 2000 and above Pentium 3/4 256MB of RAM 10MB of available hard disk space SuperFAST Daemon and FASTCopy Daemon Windows 2000 and above Pentium 4 512MB of RAM 20MB of available hard disk space RepliWeb, Inc. 9 RMFT Product Suite Installation Guide 1. Installation Requirements Database Requirements RMFT stores system entities (user profiles, distribution lists, etc.), and package processing data in its database for immediate availability. Thus, to be able to operate properly, RMFT Server must be connected to one of the supported database types. The database can either be installed on the same machine as RMFT Server or on a remote machine. Note A single database server can be used for multiple installations of RMFT Server. The requirements are as follows: SQL Server - A unique database name should be provided during each installation of RMFT Server. Oracle - Create multiple Oracle schema and use a different schema for each RMFT Server installation. The TNS name does not have to be unique. Currently, the following databases are supported: SQL Server 2005 and 2008 IMPORTANT: MSSQL and SQL Express should be configured to run in mixed authentication mode and not Windows authentication. Oracle 9.2 and above (Standard or Enterprise) excluding Oracle 11.2 which is not currently supported. See note below regarding support for Oracle 11.1. Note: RMFT is compatible with the patched version of Oracle 11.1. For information on which patch you need for your specific platform, you need to open a service request with Oracle Support for “patch 9064352 for <platform>” where <platform> is your OS and exact Oracle version (e.g. Oracle 11.1.0.7). You also need to attach the current list of one-off patches to the service request (obtained by running the opatch lsinventory command). Note: Oracle Client 64-bit is not supported. Note: The RMFT user name is case sensitive when using Oracle v9.2. Database Connections Opened by RMFT Server RMFT opens a maximum of two database connections per logged on user. The actual number of database connections per logged on user depends on how many of the requests are submitted at the same time. The average number of database connections per logged on user is one and a half, taking in to account that not all connection requests will be made at the same time. For example, in a system with RepliWeb, Inc. 10 RMFT Product Suite Installation Guide 1. Installation Requirements 50 logged on users, the connection count can range between 50 to 100 averaging at 75. Note: These calculations are based on logged on users. Other processes managed by RMFT such as Host-to-Host transfers, inspection policies and inbox processing (if configured) also open database connections. Thus, depending on your specific RMFT configuration, the exact number of database connections established by RMFT may exceed the numbers stated above. RepliWeb, Inc. 11 RMFT Product Suite Installation Guide 1. Installation Requirements Oracle Prerequisites If you want RMFT to communicate with an Oracle database, make sure that the following prerequisites have been met. Note: Oracle Client 64-bit is not supported. Character Set Encoding Compatibility To be compatible with RMFT 2.5, the Oracle NLS_CHARACTERSET encoding needs to be AL32UTF8 and the NLS_NCHAR_CHARACTERSET encoding needs to be AL16UTF16. To check the current character set encoding, run the following database query (case-sensitive): SELECT PARAMETER, VALUE FROM SYS.NLS_DATABASE_PARAMETERS WHERE (PARAMETER = 'NLS_CHARACTERSET') OR (PARAMETER = 'NLS_NCHAR_CHARACTERSET') If the NLS_CHARACTERSET and the NLS_NCHAR_CHARACTERSET are anything other than AL32UTF8 and AL16UTF16 respectively, they need to be migrated. For a complete description of the character set migration procedure, see: http://download.oracle.com/docs/cd/B10501_01/server.920/a96529/ch10.htm Creating a TNS Server Name Create a TNS server name for RMFT on the Oracle database server. During installation, you will be required to enter the TNS server name. Granting the Oracle User the Required Permissions Make sure that the Oracle user is granted the following permissions: User Role Permissions: CONNECT - Default RESOURCE - Default RepliWeb, Inc. 12 RMFT Product Suite Installation Guide 1. Installation Requirements User System Permissions: CREATE ANY VIEW - Default SELECT ANY DICTIONARY - Default UNLIMITED TABLESPACE - Default Changing the Default Permissions of the Oracle Client Installation Directory For proper operation, RMFT requires the Internet Guest Account and the Launch IIS Process Account users to have Read & Execute, List Folder Contents and Read permissions. The default Oracle client installation does not grant these permissions. To assign the required permissions: 1. Locate the oracle client installation directory on your machine. 2. Right-click the oracle client installation directory and select Properties. The oracle Properties dialog box opens. 3. Click Add. RepliWeb, Inc. 13 RMFT Product Suite Installation Guide 1. Installation Requirements The Select Users or Groups dialog box opens. 4. Click Advanced. The advanced Select Users or Groups dialog box opens. 5. Click Find Now. RepliWeb, Inc. 14 RMFT Product Suite Installation Guide 1. Installation Requirements A list of all Users, Groups and Built-in security principals is displayed. 6. Select the names beginning with IUSR_<user> and IWAM_<user> as shown below. Note: On Windows 2008 Server, the IWAM user does not exist. 7. Click OK. RepliWeb, Inc. 15 RMFT Product Suite Installation Guide 1. Installation Requirements The names are added to the Enter the object names to select list. 8. Click OK. The user names are added to the Group or user names list in the Security tab. 9. Select Internet Guest Account and then select the Read & Execute, List Folder Contents and Read check boxes in the Allow column. Click Apply. 10. Select Launch IIS Process Account and then, as before, select the Read & Execute, List Folder Contents and Read check boxes in the Allow column. Click Apply. 11. Click Advanced. RepliWeb, Inc. 16 RMFT Product Suite Installation Guide 1. Installation Requirements The Advanced Security Settings for oracle dialog box opens. 12. Hold the Shift button down and select the Internet Guest Account and Launch IIS Process Account entries. 13. Select the Replace permission entries on all child objects with entries shown here that apply to child objects check box. Click OK. The following warning is displayed. 14. Click Yes. 15. Open the Windows Services console and restart the IIS Admin service. RepliWeb, Inc. 17 RMFT Product Suite Installation Guide 1. Installation Requirements IIS Requirements To enable RMFT Web Client users to upload and download packages/files to/from RMFT Server, Microsoft IIS 6.0 or above must be installed on the RMFT Server machine before you install RMFT Server. Additionally, if you require users to establish a secure connection to RMFT Server, you must install an appropriate certificate on the Default Web Site of the IIS. Antivirus Software Requirements During standard operation, RMFT creates and deletes a large number of temporary working files and regularly accesses its configuration files. If any of these files should be locked by an antivirus scan (or any other third party program) while RMFT is trying to access it, a number of problems could occur, ranging from slowing down the system at best to actual data loss at worst. Below is a list of files that should be excluded from the antivirus scan. The Potential Problems column indicates problems that may occur on the RMFT system if you choose not to exclude the specified file. The files in the following table are located under the RMFT installation directory (C:\Program Files\RepliWeb\RMFT by default). File to Exclude from Scan Potential Problems \monitor\messages\New_Messages.cyc Hard Disk filling up. Loss of Data. RMFT system failure. \monitor\messages\Old_Messages.cyc Hard Disk filling up. Loss of Data. RMFT system failure. \fest\central_configuration\fest.config Inability to submit jobs. RMFT malfunction. \gqs\config\gqs.cf RMFT will not be able to submit new jobs Inability to connect to RMFT manager. System jobs will not function properly. RMFT malfunction. RepliWeb, Inc. 18 RMFT Product Suite Installation Guide 1. Installation Requirements The files in the following table are located under the RMFT root directory (C:\RMFT by default). File to Exclude from Scan Potential Problems \Config\bhub.cf RMFT will not connect to RMFT Database. Inability to connect to RMFT manager. System Jobs will not function properly. RMFT malfunction. RepliWeb, Inc. 19 RMFT Product Suite Installation Guide 2. Installing the Full RMFT Product Suite 2. Installing the Full RMFT Product Suite The RMFT Product Suite can also be installed in user mode. This effectively insulates the operating system from RMFT processes. To install RMFT Product Suite v2.5: 1. Copy the RMFT self-extracting installation file (RMFT_<version>.exe) to a directory on your computer. 2. Double-click RMFT_<version>.exe. Note: On Windows Server 2008, right-click the RMFT_<version>.exe file and select Run as administrator. The RMFT Setup files are extracted to a temporary directory: After the files are extracted the Setup wizard opens and the Welcome screen is displayed. 3. Click Next. RepliWeb, Inc. 20 RMFT Product Suite Installation Guide 2. Installing the Full RMFT Product Suite The End-User License Agreement screen is displayed. 4. Select I accept the terms in the License Agreement and then click Next. The Custom Setup screen is displayed. 5. To change the default installation directory, click Browse and select a different directory. RepliWeb, Inc. 21 RMFT Product Suite Installation Guide 2. Installing the Full RMFT Product Suite Note: In addition to the application files, all data transferred using RMFT will also reside on the same drive, but in a different location (specified at a later stage of the installation). Therefore, make sure that the selected drive has sufficient disk space to store the application files and the transferred data. The amount of space required will depend on the volume of data being transferred and the RMFT package purge policy. For more information on defining a package purge policy, refer to chapter 14 of the RMFT Administrator’s Guide: Configuring the Expiration and Notification Process. A description of each component is displayed in the area to the right of the available components. If you only need to install specific components see 3. Installing Specific RMFT Components (36). 6. To install all of the components, click Next. The Ready to Install screen is displayed. 7. Click Install. RepliWeb, Inc. 22 RMFT Product Suite Installation Guide 2. Installing the Full RMFT Product Suite The RepliWeb RMFT Product Suite installation begins. When the installation completes, the RMFT Site Configurator opens. The RMFT Site Configurator requires you to configure database connectivity, e-mail settings, RMFT Web Site security options, and other site-specific settings. If you quit the RMFT Site Configurator at any time, you will be prompted to run it when you open the RMFT Management Console. RepliWeb, Inc. 23 RMFT Product Suite Installation Guide 8. 2. Installing the Full RMFT Product Suite Click Next. The Choose a Database Type screen is displayed. 9. Choose either: Install Microsoft SQL Express to install Microsoft SQL Express on the RMFT Server machine. Note: The Install Microsoft SQL Express option will not be available if one of the supported database types is already installed on the RMFT Server machine. -ORConnect to an existing database to connect to a database within your organization. If you select this option, you must also select a database type from the drop-down list and an ODBC driver from the list that follows Select the ODBC driver that you want to use from the list below. 10. Click Next. If you selected Connect to an existing database, continue below from The DSN Properties screen is displayed. If you selected Install Microsoft SQL Express, the SQL Server Express Details screen will be displayed. 11. (Skip this step if you selected Connect to an existing database) Specify a password for the SQL Server Express sa account and, optionally, change the default installation directory. Click Next and then continue from Step 13. RepliWeb, Inc. 24 RMFT Product Suite Installation Guide 2. Installing the Full RMFT Product Suite The DSN Properties screen is displayed. Note: The fields displayed in the DSN Properties screen are determined by the database type that you selected. A description of the fields is provided in step 10 below. If you selected MS-SQL, the following screen is displayed. If you selected Oracle, the following screen is displayed. 12. To enable database connectivity, complete the fields in the DSN Properties screen as follows: a. RepliWeb, Inc. In the User name and password fields, specify your database login credentials. 25 RMFT Product Suite Installation Guide b. 2. Installing the Full RMFT Product Suite This step applies to SQL Server/SQL Server Express only. In the Server name/IP address field, specify the name of IP address of the machine on which the database server is installed. IMPORTANT: If you are using SQL Express, the Server name/IP address should be entered using the following format: <machine_name>\<SQLSERVER_instance_name> (usually SQLEXPRESS) Example: MikeXP\SQLEXPRESS If you are unsure what to enter in the Server name/IP address field, open the SQL Server Management Studio Express console and copy the text from the Server name field. c. This step applies to SQL Server/SQL Server Express only. In the Database Name field, you can either keep the default name or change the database name. Setup will create the database with the specified database name. d. This step applies to Oracle only. In the TNS service name field, specify the name of the TNS Service that you created on the Oracle database server. Note: If you want to connect multiple installations of RMFT Server to the same database server, you need to specify a different Database Name (SQL Server/SQL Server Express) or schema (Oracle) for each installation. 13. Click Next. RepliWeb, Inc. 26 RMFT Product Suite Installation Guide 2. Installing the Full RMFT Product Suite The Fully Qualified Domain Name screen is displayed. The RMFT administrator can configure RMFT Server to notify users when new packages are distributed to their RMFT Server inbox. The notification e-mails can contain hyperlinks that allow users to access the new package directly (after logging in) or download the packages files without logging in. To implement the hyperlink feature, you must specify the RMFT Server machine's Fully Qualified Domain Name as it is registered on your DNS. 14. In the Registered RMFT Server DNS name field, specify the RMFT Server DNS name and then click Next. The RMFT Root Directory screen is displayed. RepliWeb, Inc. 27 RMFT Product Suite Installation Guide 2. Installing the Full RMFT Product Suite 15. Read the embedded text and then either keep the default RMFT root directory or change the RMFT root directory. Note The root directory must reside on the same drive as the RMFT installation. If you specify a different drive, a warning will be displayed. 16. Click Next. The RMFT Login Credentials screen is displayed. 17. In the User, Password and Domain fields, enter the credentials under which you want RMFT Server to run. These are also the default administrator credentials for logging in to RMFT Server. Click Verify to confirm the validity of the credentials (recommended). 18. Click Next. RepliWeb, Inc. 28 RMFT Product Suite Installation Guide 2. Installing the Full RMFT Product Suite The Authorized RMFT Administrators screen is displayed. You can enable other administrators to manage the RMFT application by adding their accounts to the list of authorized RMFT Server administrators. The default administrator account (using the credentials that you entered in the previous screen) can be deleted after you add other accounts. a. To add an RMFT administrator, click Add: The System User Name dialog box is displayed. b. In the System user name field, specify the administrator's system user name using the following format: domain\user name c. Click OK to add the user to the list of authorized RMFT Server administrators. d. To remove an administrator from the list, select the administrator and then click Delete. 19. Click Next. RepliWeb, Inc. 29 RMFT Product Suite Installation Guide 2. Installing the Full RMFT Product Suite The E-Mail Settings screen is displayed. Your e-mail settings are required in order to send e-mails to users notifying them of new or unopened packages. You can also request to receive a notification in the unlikely event that a system failure occurs. 20. Configure e-mail settings as follows: a. In the SMTP server name/address field, specify the server name or address of your SMTP server. b. If your SMTP Server requires a user name and password, select Use authentication and then specify your user name and password in the designated fields. c. In the Send as field, specify the text that you want to be displayed in the From column of the recipient’s e-mail client. d. Optionally, click the Verify button. If you click the Verify button, the SMTP Server Verification dialog box opens. e. Specify an e-mail address in the E-mail address field and then click OK to send an e-mail using the specified SMTP server. f. In the Send system critical notification to field, specify an e-mail address to which you want e-mails notifying you of system failure to be sent. System failure will occur if the RMFT Monitor Server service encounters a problem preventing it from queuing new messages for the database. In such a case, the RMFT Fest Server and RMFT RepliWeb, Inc. 30 RMFT Product Suite Installation Guide 2. Installing the Full RMFT Product Suite Scheduler services (which are critical for normal operation) will be stopped. 21. Click Next. If you provided your organization’s SMTP details, the Unauthenticated Download screen will be displayed. If you did not provide your SMTP details, continue from The RMFT Web Site Setup screen is displayed. 22. (Skip this step if you did not provide your organization’s SMTP details) To allow users to download files without logging in, select Allow users to download files without logging in. To also make the package files available as a zip file, select Also allow files to be downloaded as a zip file. Click Next. Note: Users will not be able to download files without logging in until the “New Package in Inbox (Unauthenticated Download)” notification is enabled in their account settings. The RMFT Web Site Setup screen is displayed. a. To install a fully automated system with no user interaction, clear the Create RMFT Web Site check box. b. To require users to connect using a secure channel (SSL), select the Require secure channel (SSL) check box. c. Select one of the following options as appropriate: Ignore client certificates - to prevent users from using a certificate to authenticate their identity to RMFT Server. RepliWeb, Inc. 31 RMFT Product Suite Installation Guide 2. Installing the Full RMFT Product Suite Accept client certificates - to enable users to authenticate their identity to RMFT Server, even if not required. This option requires an appropriate certificate to be installed on the IIS Server. Require client certificates - to require users to authenticate their identity when connecting to RMFT Server (only available if the Require secure channel (SSL) check box is selected). This option requires an appropriate certificate to be installed on the IIS Server. Selecting a Custom Web Site To access RMFT Web Client, RMFT users need to specify the address of the RMFT Web Site. The default address is: The address consists of a base URL (i.e. the Web site) followed by a virtual directory name. You can select a different Web site and Virtual Directory name to use instead of the defaults. This is especially useful if your users are already familiar with one of your existing Web sites or if you simply want to use your own corporate Web site address as the base URL. To further simplify access, you can configure IIS to redirect the RMFT Web Site to the RMFT Virtual Directory. This way, users will be able to access the RMFT Web Site without specifying the name of the RMFT virtual directory. For more information, please refer to Appendix L of the RMFT Administrator’s Guide. To select a different Web site: ♦ From the Web site drop-down list, select the Web site that you want to use. The drop-down list displays a list of all Web sites currently configured on your IIS. Make sure that your DNS Server is configured to resolve the selected Web site with the actual URL that your users need to specify. To select a different Virtual directory name: ♦ In the Virtual directory name field, type the virtual directory name that you want your users to specify after the base URL. RMFT will create the Virtual directory under the selected Web site. 23. Click Next. RepliWeb, Inc. 32 RMFT Product Suite Installation Guide 2. Installing the Full RMFT Product Suite If you configured the E-mail Settings screen in step 20, the Unauthenticated Download screen will be displayed. Otherwise, the Finish RMFT Site Configuration screen will be displayed. By default, users need to authenticate their identity (by entering a username and password) before downloading packages. This ensures that the package will only be downloaded by the intended recipients. In trusted environments however, the security provided by the login process may not be required and may even be a hindrance to non-savvy users. In these and similar cases, you can allow users to download packages without logging in. For more information on enabling the Unauthenticated Download feature, please refer to the RMFT Administrator’s Guide. 24. To enable users to download files without logging in, select Allow users to download files without logging in. To enable users to download package files as a zip file, select Also allow files to be downloaded as a ZIP file. RepliWeb, Inc. 33 RMFT Product Suite Installation Guide 2. Installing the Full RMFT Product Suite The Finish RMFT Site Configuration screen is displayed. 25. To open RMFT Manager when you click the Finish button, select the Open RMFT Manager check box. 26. Click the Finish button. The Configuring RMFT Site progress screen is displayed. If you selected Install SQL Server Express in Step 9, SQL Server Express will be installed at this stage. The installation does not require any user interaction. When the RMFT installation completes, the following confirmation is displayed. 27. Click OK. The final screen is displayed. 28. Click Finish to exit Setup. RepliWeb, Inc. 34 RMFT Product Suite Installation Guide 2. Installing the Full RMFT Product Suite To view the RMFT components in the Windows Start menu (excluding CLI components): ♦ In the Windows Start menu, select All Programs > RepliWeb > Managed File Transfer. For operating instructions, refer to the related documentation (v). RepliWeb, Inc. 35 RMFT Product Suite Installation Guide 3. Installing Specific RMFT Components 3. Installing Specific RMFT Components You can install any of the RMFT Product Suite components according to your needs. For instance, if you only need to send packages to an existing RMFT Server, then you should install one or more of the RMFT Sending Agents as appropriate. Likewise, if you only need to receive packages sent using FASTCopy or SuperFAST protocols, then you should install the appropriate RMFT Receiving Agent(s). The table below provides a description of each of the RMFT components as they appear in the Custom Setup screen. RMFT Product Suite Components: RMFT Component Description RMFT Product Suite Installs all of the RMFT components. See 2. Installing the Full RMFT Product Suite (20). RMFT Server Installs all of the RMFT components. See 2. Installing the Full RMFT Product Suite (20). RMFT Server Remote Administration Console Does not install RMFT Server. Only installs the remote administration component. The remote administration component enables you to manage RMFT Server from a remote machine. RMFT Agents Installs all of the RMFT sending and receiving Agents. Receiving Agents Installs all of the RMFT receiving Agents. - SuperFAST Daemon Enables receipt of files or packages sent using RepliWeb's SuperFAST protocol. - FASTCopy Daemon Enables receipt of files or packages sent using RepliWeb's FASTCopy protocol. Sending Agents Installs all of the RMFT sending Agents. - Native Agents Enables packages to be sent using RMFT CLI or RMFT Java CLI. - FASTCopy Agent Enables packages to be sent using RMFT CLI or RMFT Java CLI. RepliWeb, Inc. 36 RMFT Product Suite Installation Guide 3. Installing Specific RMFT Components To install specific components: 1. Perform steps 1-5 of 2. Installing the Full RMFT Product Suite (20). 2. To install specific components, click each of the components that you do not want to install (or - if modifying the installation - that you want to uninstall) and select Entire feature will be unavailable. The remaining components will be installed. For a description of each of the components, see RMFT Components (36). For example, to only install the RMFT Server Remote Administration Console, the Custom Setup screen should look like this: 3. After you have selected the components you want to install, click Next. RepliWeb, Inc. 37 RMFT Product Suite Installation Guide 3. Installing Specific RMFT Components The Ready to Install screen is displayed. 4. Click Install. The selected components are installed. RepliWeb, Inc. 38 RMFT Product Suite Installation Guide 3. Installing Specific RMFT Components After the selected components are installed, the final screen is displayed. 5. Click Finish. Start Menu shortcuts for the installed RMFT component(s) (excluding CLI components) will be displayed under Programs > RepliWeb > Managed File Transfer For operating instructions, refer to the related documentation (v). RepliWeb, Inc. 39 RMFT Product Suite Installation Guide 4. Modifying, Repairing or Upgrading the Installation 4. Modifying, Repairing or Upgrading the Installation You can modify your installation by removing components that you no longer require or by installing new components. You can also repair an installation (if, for example, one of the installation files is accidentally deleted or becomes corrupted) or upgrade the installation without needing to uninstall the current version. Modifying the Installation To modify the installation: 1. Double-click the RMFT installation file (RMFT_<version>.exe). Note: On Windows Server 2008, right-click the RMFT_<version>.exe file and select Run as administrator. The RMFT Setup files are extracted to a temporary directory: After the files are extracted, the Setup wizard opens and the Welcome screen is displayed. 2. Click Next. RepliWeb, Inc. 40 RMFT Product Suite Installation Guide 4. Modifying, Repairing or Upgrading the Installation The Modify, Repair or Remove installation screen is displayed. 3. Click Modify. The Custom Setup screen is displayed. A description of each component is displayed in the area to the right of the available components. 4. To change the default installation directory, click Browse and select a different directory. 5. To install all of the components, click Next. 6. To install or remove specific components, continue from Step 2 of Installing Specific RMFT Components. Reinstalling the DMZ RMFT Server to a Different Path In a setup involving an internal RMFT Server and a DMZ RMFT Server, the DMZ RMFT Server’s installation path is stored in a configuration file on the internal RMFT Server machine. If, for whatever reason (e.g. hardware failure), the DMZ RMFT Server needs to be reinstalled, installing it to a different path requires you to also perform the procedure below. On the DMZ RMFT Server machine: 1. Install RMFT Server. 2. Configure it as the DMZ RMFT Server. 3. Restore the backed up configuration. 4. Execute the following query against the DMZ RMFT database: RepliWeb, Inc. 41 RMFT Product Suite Installation Guide 4. Modifying, Repairing or Upgrading the Installation select max(BH_id) from bh_package_reports This will return the number of the last message received from the DMZ. Make a note of the number as it will be needed later on. On the internal RMFT Server machine: 1. Edit the file C:\RMFT\Config\internal_external.cf 2. Replace the values of the Softlink_dir and Root Directory fields with the new installation paths of the DMZ RMFT Server (the defaults are C:\Program Files\Repliweb\RMFT and C:\RMFT respectively) IMPORTANT: The path values are case sensitive. In other words, they must be specified exactly as defined on the RMFT Server machine. Even specifying a small drive letter is enough to cause an error. 3. Change the Username field to any value (at this stage the value is not important; it just needs to be different so the system can detect a change). 4. Save the changes. 5. Open RMFT Manager (various error messages pertaining to the DMZ will be displayed) and select DMZ Front End from the Manage menu. 6. Enter the correct username and then click OK. 7. Stop the "RMFT Admin Agent" service. 8. Edit the file ~\RMFT\Config\dmz_sync_report_ids.txt and replace the middle number with the number returned in step 4 above. 9. Start the "RMFT Admin Agent" service. 10. Send a package from a DMZ user to a DMZ user. Repairing or Upgrading the Installation The upgrade procedure does not affect existing database connectivity settings or any other settings configured using the RMFT Site Configurator. For more information about RMFT site settings, see RMFT Site Configurator (23). If you need to make any changes to database connectivity, you should uninstall the existing RMFT Product Suite before installing the newer version. IMPORTANT: In systems consisting of an internal RMFT Server and a DMZ RMFT Server, the DMZ RMFT Server must be upgraded before the internal RMFT Server. NOTE: For instructions on how to upgrade an RMFT Microsoft cluster installation, please refer to the RMFT MS-Cluster Installation Guide. RepliWeb, Inc. 42 RMFT Product Suite Installation Guide 4. Modifying, Repairing or Upgrading the Installation Before beginning the upgrade: 1. Back up your RMFT settings and packages as follows: a. Replace the existing RMFT backup utility with the one that was provided with the RMFT installation kit (refer to the readme for full instructions). Note: In a setup consisting of an internal RMFT Server and a DMZ RMFT Server, the backup procedure should be performed on the internal RMFT Server only. For detailed instructions, please refer to the RMFT Administrator’s Guide. b. Open RMFT Manager. c. From the Manage menu, select Backup and Restore > Backup. 2. Manually back up any customized website templates in ~\RepliWeb\RMFT\web\b-hub\translator and ~\RepliWeb\RMFT\web\bhub\customizer. Also back up any customized files that you may have placed under the RMFT installation directory (~\RepliWeb\RMFT). 3. Install .NET Framework 3.5 Service Pack 1, available as a free download from: http://www.microsoft.com/Net/Download.aspx To upgrade the currently installed components: 1. Double-click the RMFT installation file (RMFT_<version>.exe). Note: On Windows Server 2008, right-click the RMFT_<version>.exe file and select Run as administrator. The RMFT Setup files are extracted to a temporary directory: After the files are extracted the Welcome screen is displayed. 2. Click Upgrade. 3. Setup updates the currently installed components. When the currently installed components have been updated, the final screen is displayed. 4. Click Finish. 5. Open RMFT Manager and check the RMFT Health icon in the status bar. It should be RepliWeb, Inc. . 43 RMFT Product Suite Installation Guide 5. Silently Installing RMFT Components 5. Silently Installing RMFT Components RMFT components can be installed silently (i.e. without requiring user interaction). This option is useful, for example, if you need to install RMFT Receiving Agents on several machines in your organization. NOTE: On Windows Server 2008, to silently RMFT components under an account that is NOT the built-in administrator account, you need to first disable the UAC as follows: 1. Open the Run dialog box and type uac. Disable the UAC. 2. Restart the computer. 3. Silently install the desired component(s) as described below. 4. Enable the UAC. 5. Restart the computer. Installing RMFT Administration Console 1. Right-click the RMFT installation .exe file and extract the contents to your preferred folder using 7-Zip. Or, open a DOS prompt, change the working directory to the one containing the RMFT installation .exe file and issue the following command: >RMFT_2.5038.43105.exe -extract_msi="c:\folder name" Your folder should now contain the bhub.msi and vcredist_x86.exe (Microsoft Visual C++ 2008 Redistributable Package (x86)) files. 2. Install Microsoft Visual C++ 2008 in silent mode by changing the working directory to the one containing the extracted files and then issuing the following command: >vcredist_x86.exe /q 3. After Microsoft Visual C++ 2008 is installed, issue the following command: >msiexec /i bhub.msi ADDLOCAL=Fe_Admin INSTALLLEVEL=3 /q ARPNOMODIFY=1 /l*v c:\setup.log RepliWeb, Inc. 44 RMFT Product Suite Installation Guide 5. Silently Installing RMFT Components Upgrading the RMFT Administration Console To upgrade the RMFT Administration Console, issue the following command: >msiexec /fvasmue bhub.msi /q ARPNOMODIFY=1 /l*v c:\setup.log Installing RMFT FASTCopy and/or SuperFAST Receiving Agents RMFT Receiving Agents must be installed on any machine from or to which files are pulled/pushed using RMFT's FASTCopy and/or SuperFAST protocols. The RMFT Receiving Agents kit is provided by RepliWeb Support on an as needed basis. 1. Right-click the RMFT_ReceivingAgents_<version>.exe file (that you received from RepliWeb Support) and extract the contents to your preferred folder using 7-Zip. Or, open a DOS prompt, change the working directory to the one containing the RMFT Receiving Agents kit and issue the following command: >RMFT_ReceivingAgents_<version>.exe -extract_msi="c:\folder name" The target folder should now contain the RmftReceivingAgents.msi and vcredist_x86.exe (Microsoft Visual C++ 2008 Redistributable Package (x86)) files. 2. Install Microsoft Visual C++ 2008 in silent mode by changing the working directory to the one containing the extracted files and then issuing the following command: >vcredist_x86.exe /q 3. After Microsoft Visual C++ 2008 is installed, issue the following command: To install both FASTCopy and SuperFAST Receiving Agents: >msiexec /i RmftReceivingAgents.msi ADDLOCAL=Fe_FASTCopy_daemon,Fe_SuperFAST_daemon INSTALLLEVEL=3 /q ARPNOMODIFY=1 /l*v c:\setup.log To install only FASTCopy Receiving Agent: >msiexec /i RmftReceivingAgents.msi /q ARPNOMODIFY=1 /l*v c:\setup.log Optional Parameters Parameter Description TARGETDIR="C:\Target Dir" Changes the default installation directory to the specified path. RepliWeb, Inc. 45 RMFT Product Suite Installation Guide 5. Silently Installing RMFT Components Upgrading RMFT Receiving Agents To upgrade the RMFT Receiving Agents installation, issue the following command: >msiexec /fvasmue RmftReceivingAgents.msi /q ARPNOMODIFY=1 /l*v c:\setup.log Installing RMFT Desktop Client Note: RMFT Server must be installed prior to beginning the RMFT Desktop Client silent installation procedure. 1. Right-click the RMFT installation .exe file and extract the contents to your preferred folder using 7-Zip. Or, open a DOS prompt, change the working directory to the one containing the RMFT installation .exe file and issue the following command: >RMFT_<version>.exe -extract_msi="c:\folder name" The target folder should now contain the bhub.msi and vcredist_x86.exe (Microsoft Visual C++ 2008 Redistributable Package (x86)) files. 2. Install Microsoft Visual C++ 2008 in silent mode by changing the working directory to the one containing the extracted files and then issuing the following command: >vcredist_x86.exe /q 3. After Microsoft Visual C++ 2008 is installed, open a command prompt on the RMFT Server machine and change the working directory to the directory containing the RmftDesktopClient.msi file. The default installation directory is ~\RepliWeb\RMFT\DesktopClient for installation on 32-bit machines or ~\RepliWeb\RMFT\DesktopClient\x64 for installation on 64-bit machines. Then, issue the following command: >msiexec /i RmftDesktopClient.msi /q ARPNOMODIFY=1 /l*v c:\setup.log After completing the installation, it is recommended to perform the procedure described in Creating and Distributing Profiles below. RepliWeb, Inc. 46 RMFT Product Suite Installation Guide 5. Silently Installing RMFT Components Optional Parameters Parameter Description TARGETDIR="C:\Target Dir" Changes the default installation directory to the specified path. INSTALLMODEACTION="SetAllUsers" Installs RMFT Desktop Client for all users. OFFICE2007_ADDIN=0 Disables the Office 2007 Add-In. Creating and Distributing Profiles An RMFT Desktop Client profile contains RMFT Server connectivity information such as the RMFT Server name or IP address, the connection method and the user’s login credentials (if required). To be able to send files, at least one “Profile” needs to reside on the user’s computer. Unlike a standard installation during which a default profile is installed on the user’s computer, the silent installation of RMFT Desktop Client does not install any profiles. After the silent installation completes, you can create a RMFT Desktop Client profile and then distribute it to the computers installed with RMFT Desktop Client, using a suitable application (such as Active Directory). To create and distribute a profile: 1. On the RMFT Server machine, run the RMFT Desktop Client installation file: ~\RepliWeb\RMFT\DesktopClient\RmftDesktopClient.msi For detailed installation instructions, refer to the RMFT Desktop Client Installation Guide. 2. When the installation completes, create a new profile, remembering to select the Shared profile and Use my Windows credentials options. For detailed instructions, refer to the RMFT Desktop Client User Guide. 3. The profile settings are saved as an .xml file in: All Users\Application Data\RepliWeb\PackageSender\profiles.xml 4. Distribute the profile file to the following directory on the users’ computers: All Users\Application Data\RepliWeb\PackageSender\ 5. Optionally, set the permissions of the profiles.xml file to read-only. In the RMFT Desktop Client Profiles window, shared profiles will be icon whereas shared read-only profiles will be indicated indicated by a icon. by a RepliWeb, Inc. 47 RMFT Product Suite Installation Guide 5. Silently Installing RMFT Components Upgrading RMFT Desktop Client To upgrade the RMFT Desktop Client installation, issue the following command: >msiexec /fvasmue RmftDesktopClient.msi /q ARPNOMODIFY=1 /l*v c:\setup.log RepliWeb, Inc. 48 RMFT Product Suite Installation Guide A. RMFT Port Requirements A. RMFT Port Requirements The required ports and firewall configuration are determined by three factors: 1. Your specific RMFT deployment (see below). 2. Which transfer protocols are used to pull/push files from/to hosts. 3. How end-users upload packages to RMFT Server (HTTP/S, FASTCopy, or SuperFAST). Possible RMFT deployments are as follows: Single RMFT Server in the Intranet (49) Single RMFT Server in the DMZ (50) Two RMFT Servers (51) Taking the above factors into consideration, this section explains how to configure your organization's firewall ports for each of the above deployments. Single RMFT Server in the Intranet Note The table below assumes that packages are being exchanged between internal and external users. If RMFT is only used in the internal network the issue of which ports to open is not relevant. Component/Protocol Port Description GQS 3102 This port only needs to be opened for inbound communication if you are using the RMFT Remote Administration Console to administrate RMFT Server from outside your organization. Protocol: FASTCopy Used by: RMFT Enhanced CLI. 5745 Open this port for inbound communication if external users are using FASTCopy to upload files to RMFT Server. See also Host Port Requirements (53). Protocol: SuperFAST Used by: RMFT Enhanced CLI. 5750 Open this port for inbound communication if external users are using SuperFAST to upload files to RMFT Server. RepliWeb, Inc. 49 RMFT Product Suite Installation Guide A. RMFT Port Requirements See also Host Port Requirements (53). Protocol: HTTP/S (LiteCopy) Used by: RMFT Web Client, RMFT Java CLI and RMFT CLI. 80/443 Open this port for inbound communication if external users are using HTTP/S to upload files to RMFT Server. See also Host Port Requirements (53). S/MIME 25 Open this port for outbound communication if any of the external user accounts are configured to receive packages by e-mail. FTP 21 SSH/SFTP 22 POP3 110 IMAP 143 See Host Port Requirements (53). Single RMFT Server in the DMZ Component/Protocol Port Description GQS 3102 Firewall between RMFT Server and the internal network: Open this port for outbound communication when administrating RMFT from the internal network. Firewall between RMFT Server and the Internet: Open this port for inbound communication when administrating RMFT from the Internet. 5745 Firewall between RMFT Server and the internal network: Open this port for outbound communication if internal users are using FASTCopy to upload files to RMFT Server. Firewall between RMFT Server and the Internet: Open this port for inbound communication if external users are using FASTCopy to upload files to RMFT Server. See also Host Port Requirements (53). 5750 Firewall between RMFT Server and the internal network: Open this port for outbound communication if internal users are using SuperFAST to upload files to RMFT Server. Firewall between RMFT Server and the Internet: Open this port for inbound communication if external users are using Protocol: FASTCopy Used by: RMFT Enhanced CLI. Protocol: SuperFAST Used by: RMFT Enhanced CLI. RepliWeb, Inc. 50 RMFT Product Suite Installation Guide A. RMFT Port Requirements SuperFAST to upload files to RMFT Server. See also Host Port Requirements (53). Protocol: HTTP/S (LiteCopy) Used by: RMFT Web Client, RMFT Java CLI and RMFT CLI. Firewall between RMFT Server and the internal network: Open this port for outbound communication if internal users are using HTTP/S to upload files to RMFT Server. 80/443 Firewall between RMFT Server and the Internet: Open this port for inbound communication if external users are using HTTP/S to upload files to RMFT Server. See also Host Port Requirements (53). S/MIME 25 FTP 21 SSH/SFTP 22 POP3 110 IMAP 143 Firewall between RMFT Server and the internal network: Open this port for outbound communication if any of the external user accounts are configured to receive packages by e-mail. Firewall between RMFT Server and the Internet: Open this port for outbound communication if any of the external user accounts are configured to receive packages by e-mail. See Host Port Requirements (53). Two RMFT Servers Due to security and administrative considerations, an increasing number of organizations seek to insulate their internal network from the outside world. RMFT's DMZ Front End module addresses this need through the deployment of two RMFT servers: one in the intranet and the other in the DMZ. This enables internal and external users to exchange files while preventing external users from accessing the internal network. For a full description of the RMFT DMZ Front End module, refer to the RMFT Administrator's Guide. RepliWeb, Inc. 51 RMFT Product Suite Installation Guide A. RMFT Port Requirements Internal RMFT Server Component/Protocol Port Description GQS 3102 Firewall between RMFT Server and the DMZ: This port must be open for outbound communication. The internal RMFT Server connects to the DMZ Front End RMFT Server for the purpose of adding, deleting or editing external entities (users, hosts, etc.). Firewall between RMFT Server and the Internet: Open this port for inbound communication when administrating RMFT Server and the Internet. FASTCopy 5745 Firewall between RMFT Server and the DMZ: This port must be open for outbound communication. The internal RMFT Server uses FASTCopy to send and retrieve Admin packages to and from the DMZ Front End RMFT Server. See also Host Port Requirements (53). SuperFAST 5750 HTTP/S (LiteCopy) 80/443 FTP 21 SSH/SFTP 22 POP3 110 IMAP 143 See Host Port Requirements (53). RMFT DMZ Front End Server Component/Protocol Port Description Protocol: FASTCopy Used by: RMFT Enhanced CLI. 5745 Firewall between RMFT Server and the Internet: Open this port for inbound communication if external users are using FASTCopy to upload files to RMFT Server. See also Host Port Requirements (53). Protocol: SuperFAST Used by: RMFT Enhanced CLI. 5750 Firewall between RMFT Server and the Internet: Open this port for inbound communication if external users are using RepliWeb, Inc. 52 RMFT Product Suite Installation Guide A. RMFT Port Requirements SuperFAST to upload files to RMFT Server. See also Host Port Requirements (53). Protocol: HTTP/S (LiteCopy) Used by: RMFT Web Client, RMFT Java CLI and RMFT CLI. 80/443 Firewall between RMFT Server and the Internet: Open this port for inbound communication if external users are using HTTP/S to upload files to RMFT Server. See also Host Port Requirements (53). S/MIME 25 FTP 21 SSH/SFTP 22 S/MIME 25 POP3 110 IMAP 143 Firewall between RMFT Server and the internal network: Open this port for outbound communication if any of the external user accounts are configured to receive packages by e-mail. Firewall between RMFT Server and the Internet: Open this port for outbound communication if any of the external user accounts are configured to receive packages by e-mail. See Host Port Requirements (53). Host Port Requirements When pulling or pushing files from/to hosts the following rules are generally applicable. The firewall between RMFT Server and the internal network/Internet (depending on the location of the host) should be configured to allow outbound communication through the protocol port. The firewall behind which the Host is located should be configured to allow inbound communication through the protocol port. RepliWeb, Inc. 53 RMFT Product Suite Installation Guide B. Installing RMFT in an Existing RMFT Environment B. Installing RMFT in an Existing RMFT Environment If disk failure occurs or if the RMFT Server machine has reached End-of-Life and needs replacing, you can install RMFT on top of the existing RMFT environment. Note: Although the same results can be achieved by performing a complete backup followed by a new installation and restore, such a procedure is less suitable for production systems that require constant availability. To install RMFT in an existing RMFT environment, the RMFT environment must already contain the following elements: The installation directory defined during the original installation The root directory defined during the original site configuration The RMFT database created during the original installation IMPORTANT: If any of the above elements is either missing or corrupt, the procedure described below will not work. Example of scenarios in which RMFT can be installed on top of an existing RMFT environment are as follows: a. RMFT cluster setup – The primary machine has reached End-of-Life and needs to be replaced. Note: While failover capability can also be achieved without a primary machine (i.e. by installing an additional secondary machine), cluster setups that only contain secondary machines will not be upgradeable. b. A single RMFT Server machine with two disks – RMFT is installed on disk X. Due to disk failure, disk Y (the system disk) has been replaced. c. RMFT DMZ front end setup – Same as b. above. To install RMFT in an existing environment: 1. Optionally (but recommended), back up RMFT Server. RepliWeb, Inc. 54 RMFT Product Suite Installation Guide B. Installing RMFT in an Existing RMFT Environment For instructions on backing up RMFT Server, please refer to the RMFT Administrator’s Guide. 2. Open a command prompt and change the working directory to the directory containing the RMFT setup file. IMPORTANT: The RMFT setup file must be the same version as the existing installation. 3. Issue the following command: RMFT_<version>.exe –existing_site –rmft_installation_directory=<installation directory> –rmft_root_directory=<rmft root directory> Note: In a standalone setup, the <installation directory> must be the directory specified during the original installation. Similarly, the <rmft root directory> must be the directory specified during the original installation. In a cluster setup, the <installation directory> should be the existing shared installation path. For instructions on installing RMFT in an MS-Cluster, please refer to the manual: Installing RMFT on an MSCluster. The RMFT installation wizard opens. 4. Click Next until the installation completes. RepliWeb, Inc. 55 RMFT Product Suite Installation Guide C. Moving the RMFT Installation or Database to another Machine C. Moving the RMFT Installation or Database to another Machine In certain situations - for example, to improve performance - you may need to migrate the RMFT installation or the RMFT database to a new machine. This appendix outlines the steps needed to perform such migrations, both in a standalone environment (i.e. a single RMFT Server) and in a DMZ environment (i.e. two RMFT Servers: one in the internal network and the other in the DMZ). Note: Some of the procedures below require you to back up and restore packages and settings using RMFT's Backup and Restore feature. For a complete description of the Backup and Restore feature, please refer to the RMFT Administrator's Guide. Migrating the RMFT Installation Migrating the RMFT Installation in a Standalone Environment 1. Back up the RMFT packages and settings using RMFT's Backup and Restore feature. 2. Optionally, delete the RMFT database. This is only necessary if you want to use the same database name in the new installation. 3. Install RMFT on the new machine. If you did not delete the database, you will need to specify a different database name during the Site Configuration stage of the installation. 4. Restore the packages and settings using RMFT's Backup and Restore feature. Migrating the Internal RMFT Installation in a DMZ Environment 1. Back up the RMFT packages and settings using RMFT's Backup and Restore feature. 2. Optionally, delete the internal RMFT database. This is only necessary if you want to use the same database name in the new installation. RepliWeb, Inc. 56 RMFT Product Suite Installation Guide C. Moving the RMFT Installation or Database to another Machine 3. Install RMFT on the new machine in the internal network. If you did not delete the database, you will need to specify a different database name during the Site Configuration stage of the installation. 4. Run the DMZ Setup Wizard and configure the RMFT Server to be the internal RMFT Server. 5. Restore the packages and settings to the new RMFT installation using RMFT's Backup and Restore feature. 6. On the database server, issue the following SQL command: select max(bh_id) from bh_package_reports The output will be a number. 7. Stop the RMFT Admin Agent service. 8. Open ~\RMFT\Config\dmz_sync_report_ids.txt and replace the first number with the output of the SQL command. 9. Save the ~\RMFT\Config\dmz_sync_report_ids.txt file and start the RMFT Admin Agent service. Migrating the DMZ RMFT Installation in a DMZ Environment 1. Back up the RMFT packages and settings using RMFT's Backup and Restore feature. 2. Optionally, delete the DMZ RMFT database. This is only necessary if you want to use the same database name in the new installation. 3. Allocate the decommissioned machine's IP address to the new machine. 4. Install RMFT on the new machine in the DMZ. If you did not delete the database, you will need to specify a different database name during the Site Configuration stage of the installation. 5. On the DMZ RMFT Server, run the DMZ Setup Wizard and configure the RMFT Server to be the DMZ RMFT Server. 6. Restore the packages and settings to the new RMFT installation using RMFT's Backup and Restore feature. 7. On the database server, issue the following SQL command: select max(bh_id) from bh_package_reports The output will be a number. 8. Stop the RMFT Admin Agent service. RepliWeb, Inc. 57 RMFT Product Suite Installation Guide C. Moving the RMFT Installation or Database to another Machine 9. Open ~\RMFT\Config\dmz_sync_report_ids.txt on the internal RMFT Server machine and replace the third number with the output of the SQL command. 10. Save the ~\RMFT\Config\dmz_sync_report_ids.txt file and start the RMFT Admin Agent service. Migrating the RMFT Database The same procedure should be followed when migrating the RMFT database in a standalone environment or in an Internal-DMZ environment. 1. Back up the RMFT packages and settings using RMFT's Backup and Restore feature. 2. Stop the RMFT Services. 3. Using SQL's/Oracle's database export option, export the RMFT database from the current database server. 4. Using SQL's/Oracle's database import option, import the RMFT database to the new database server. 5. Open ~\RMFT\Config\bhub.cf and edit it as follows: a. Locate the [Database] section. b. Replace the Server parameter value with the IP address/hostname of the new database machine and then save the file. 6. Start the RMFT Services. 7. If necessary (i.e. if the database login credentials have changed), update the credentials used by RMFT to access the database as follows: a. Open a DOS prompt and change the working directory to: ~ \RepliWeb\RMFT\b-hub\bin> b. Issue the following command: ~RepliWeb\RMFT\b-hub\bin>rmft_credentials_cli database –user=new_username -pass=new_password Where new_username is the new database username and new_password is the new database password. RepliWeb, Inc. 58