1
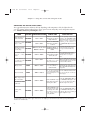
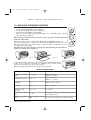
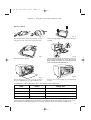
AS 1070 GB
30-10-2003
11:10
Pagina 1
CONVECTION OVEN
FOUR A CONVECTION
HORNO DE CONVECCIÓN
FORNO VENTILADO
Instructions for use
Mode d’emploi
Instrucciones de uso
Instruções
AS 1070 GB
30-10-2003
11:10
Pagina 2
CONTENTS
CHAP. 1
GENERAL
1.1
1.2
1.3
1.4
Description and accessories provided . . . . . . . . . . . . . . . . . . . . . . . . . . . . . . . . . . . 3
Important safeguards . . . . . . . . . . . . . . . . . . . . . . . . . . . . . . . . . . . . . . . . . . . . . . 4
Summary of operation . . . . . . . . . . . . . . . . . . . . . . . . . . . . . . . . . . . . . . . . . . . . . . .5
Installation . . . . . . . . . . . . . . . . . . . . . . . . . . . . . . . . . . . . . . . . . . . . . . . . . . . . . . .6
CHAP. 2
USING THE CONTROLS AND SETTING THE MODES
2.1 Bake and Fan/Bake functions . . . . . . . . . . . . . . . . . . . . . . . . . . . . . . . . . . . . . . . . .7
2.2 Broil and top brown function . . . . . . . . . . . . . . . . . . . . . . . . . . . . . . . . . . . . . . . . . .9
2.3 Keep warm function . . . . . . . . . . . . . . . . . . . . . . . . . . . . . . . . . . . . . . . . . . . . . . .10
2.4 Defrost function . . . . . . . . . . . . . . . . . . . . . . . . . . . . . . . . . . . . . . . . . . . . . . . . . . .10
2.5 Rotisserie function . . . . . . . . . . . . . . . . . . . . . . . . . . . . . . . . . . . . . . . . . . . . . . . . .10
CHAP. 3
CLEANING AND MAINTENANCE
3.1 Care and cleaning . . . . . . . . . . . . . . . . . . . . . . . . . . . . . . . . . . . . . . . . . . . . . . . .12
ELECTRICAL CONNECTIONS
All it requires is a nearby 120 Volt 60 Hz three-prong grounded power socket.
GROUNDING INSTRUCTIONS
BE SURE THAT YOUR OUTLET
IS PROPERLY GROUNDED
This appliance must be grounded. In the event of an electrical short circuit, grounding reduces the risk of
electric shock by providing an escape wire for the electric current.
This appliance is equipped with a cord having a grounding wire with a grounding plug.
The plug must be plugged into an outlet that is properly installed and grounded.
WARNING: IMPROPER USE OF THE GROUNDING PLUG CAN RESULT IN A RISK OF ELECTRIC SHOCK.
If you are uncertain that your outlets are properly grounded, please contact a qualified electrician or serviceman.
If it is necessary to use an extension cord, use only a three-wire extension cord that has a 3-blade grounding plug, and a 3-slot receptacle that will accept the plug on the appliance. The marked rating of the
extension cord shall be equal to or greater than the electrical rating of the appliance.
• The cord length of this product has been selected to reduce the possibility of tangling in or tripping
over a longer cord. If more cord length is needed, an extension cord may be used. It should be rated
no less than 15 amps., 120 volts, and have Underwriters Laboratories/CSA listing.
• A six feet long, 15 amp. extension cord may be purchased from your local authorized service facility.
When using a longer cord, be sure not to let it drape over the working area or dangle where someone
could accidentally pull or trip over it.
• Handle the cord carefully for longer life; avoid jerking or straining the cord at the plug and appliance
connections.
2
AS 1070 GB
30-10-2003
11:10
Pagina 3
CHAPTER 1 - GENERAL
1.1 - DESCRIPTION AND ACCESSORIES PROVIDED
A
B
C
D
E
F
G
H
Upper heating element
Oven light
Clasp for drop down heating element
Rotisserie spit mount
Control panel
Lower heating element
Crumb tray
Thermostat knob
I
L
M
N
O
P
Q
R
Pilot light
Timer knob
Function knob
Shallow pan
Wire rack (two provided)
Spit
CONVERSION TABLE:
Spit support
Lasagna tray
°C
°F
95
107
120
135
150
163
177
190
205
218
233
240
200
225
250
275
300
325
350
375
400
425
450
470
3
AS 1070 GB
30-10-2003
11:10
Pagina 4
Chapter 1 - General
1.2 - IMPORTANT
SAFEGUARDS
When using electric appliances basic safety precautions should always be followed, including the following:
1) Read all instructions.
2) The temperature of the door or the outer surfaces may be high when the appliance is operating: only
ever touch the plastic knobs and handles.
3) To protect against electrical shock, do not immerse cord, plugs, in water or other liquid. See instructions for cleaning.
4) The appliance is not intended for use by young children or infirm persons without supervision.
Young children should be supervised to ensure that they do not play with the appliance.
5) Unplug from outlet when not in use and before cleaning. To disconnect the appliance, turn the timer
knob (L) to “O” and the thermostat knob (H) to “●“. Then unplug the cord from the wall outlet. Allow
to cool before putting on or taking off parts and before cleaning the appliance.
6) If the supply cord is damaged, it must be replaced by the manufacturer or its service agent or a similary qualified person in order to avoid a hazard.
7) The use of accessory attachments not recommended by the appliance manufacturer may cause injuries.
8) Do not use outdoors.
9) Do not place heavy objects on the open door. Do not forcefully push the open door down. Do not
place hot pans/baking tins (just removed from the oven) onto the open door.
10) Do not let cord hang over edge of table or counter, or touch hot surfaces.
11) Do not place on or near a hot gas or electric burner, or in a heated oven. Do not place anything on
top of the oven while in use.
12) Extreme caution must be used when moving an appliance containing hot oil or other hot liquids.
13) If the plug gets hot, please call a qualified electrician.
14) Do not use this appliance for other than intended use.
15) Use extreme caution when removing the shallow pan (N) or disposing of hot grease.
16) Do not clean oven with metal scouring pads. Pieces can break off the pad and touch electrical parts
creating a risk of electric shock.
17) To assure safe operation, oversized utensils or food must not be inserted into the oven.
18) A fire may occur if this appliance is covered or touching flammable material, including curtains,
draperies, walls, etc. when in operation.
19)CAUTION: Never leave the oven unattended when in use (expecially when broiling).
20) Extreme caution should be exercised when using containers other than ovenproof metal, glass or
ceramic.
21) Do not store any materials other than the manufacturer’s recommended accessories in the oven when
not in use.
22) Do not place any of the following materials in the oven: paper, cardboard, plastic and the like.
23) Do not cover crumb tray or any part of the oven with metal foil; this can cause overheating of the oven.
Use aluminum foil on or under food only as directed in the appliance instructions.
THIS PRODUCT IS FOR HOUSEHOLD USE ONLY
SAVE THESE INSTRUCTIONS
WARNING: Once having removed the appliance from the packaging, check that the door is intact. As the
door is made from glass, it is fragile, and should be replaced if visibly chipped, scored or scratched.
Furthermore, when using, cleaning or moving the appliance, do not slam or bang the door or pour cold
liquids on the glass when the appliance is hot.
4
AS 1070 GB
30-10-2003
11:10
Pagina 5
Chapter 1 - General
PROGRAM
FUNCTION
KNOB
THERMOSTAT
KNOB
POSITION OF
WIRE RACK/
ACCESSORIES
GUIDES
1.3 - SUMMARY OF OPERATION
1
2
BAKE
BAKE
200° - 470° F
(see table on
page 8)
3
or
1
2
3
1
2
FAN/BAKE
(ONE LEVEL)
FAN/BAKE
200° - 470° F
3
(see table on
page 8)
1
2
3
1
2
FAN/BAKE
(TWO LEVEL)
3
FAN/BAKE
200° - 470° F
1
2
3
1
2
BROIL AND TOP
BROWN
BROIL
BROIL
3
1
2
3
NOTES/TIPS
You can cook in bake function with the SHALLOW PAN
(N) inserted either in slot 2 or
3 or with a ovenproof container placed on the WIRE
RACK (O), again inserted
either is slot 2 or 3. The
LASAGNA TRAY (R) may be
also placed on the WIRE
RACK (O). Bake casserole,
fruit dessert, fish, stuffed vegetables, puddings and other
moist foods that don’t require
browning and crisping.
You can cook in fan/bake
function with the SHALLOW
PAN (N) inserted either in
slot 2 or 3 or with a ovenproof container placed on
the WIRE RACK (O), again
inserted either is slot 2 or 3.
The LASAGNA TRAY (R)
may be also placed on the
WIRE RACK (O).
Roast meats and poultry
will cook faster. Use of a
meat thermometer will
help avoid overcooking.
It is possible to cook
simultaneously on two
level by inserting the
accessories as shown. An
ovenproof container or
the LASAGNA TRAY (R)
may be positioned on the
WIRE RACK (O). Ideal
for foods which can be
stirred or turned during
the cooking (e.g. roasted
potatoes, on one shelf
and chicken parts on the
second shelf).
During broiling of hamburger, sausages, kebabs and
steaks always put the WIRE
RACK (O) with the food in
slot 1 and the SHALLOW
PAN (N) in slot 2 to collect
fat dropping.
Use this function to top
brown open-face sandwiches, cheese toppings,
hors d’ouevres.
5
AS 1070 GB
30-10-2003
11:10
Pagina 6
PROGRAM
FUNCTION
KNOB
THERMOSTAT
KNOB
POSITION OF
WIRE RACK/
ACCESSORIES
GUIDES
Chapter 1 - General
1
KEEP WARM
FAN BAKE
KEEP WARM
2
3
DEFROST
DEFROST
●
Be sure tokeep
knob at this position. Only the fan
will operate
1
2
3
1
ROTISSERIE
ROTIS.
BROIL
2
3
NOTES/TIPS
Select this function to
keep hot food warm. Do
not hold food more than
an hour or reheat cold
food. If not hot enought
for serving turn temperature dial up.
To thaw frozen food in
freezer packaging place
it on wire rack f or on
shallow pan to catch any
juices. Do not try to thaw
large roasts or allow any
food to overthaw
Place the skewer and the
supports on the SHALLOW
PAN (N) as described on
page 11 Then insert the
SHALLOW PAN (N) in the
slot 3. Ideal for poultry, beef,
ecc.
1.4 - INSTALLATION
1) Check that the appliance has not suffered any damage due to transportation.
2) Place the appliance on a flat, stable surface out of the reach of children (the glass door becomes very
hot while the oven is in operation).
3) Before using this appliance, move it two to four inches away from the wall or any object on the counter
top. Remove any object that may have been placed on top of the appliance. Do not use on surfaces
where heat may be a problem.
4) When a function is started, (except Defrost function) the pilot light (I) turns on.
Note: Initial start-up operation may result in minimal smell and smoke (about 15 min.). This is normal. It is due to the protective substance on heating elements which protects them from salt effects
during shipping from the factory.
5) Condensation and a grease deposit may form around the door and the air and steam outlet vents. This
is normal.
6) Before using the appliance for the first time, remove all paper contents such as: protection cardboard,
instructions for use, plastic bags and so on.
PLEASE READ AND KEEP THIS BOOKLET HANDY.
THE IDEAS AND INSTRUCTIONS WILL HELP YOU MAKE FULL USE OF THE OVEN
6
AS 1070 GB
30-10-2003
11:10
Pagina 7
CHAPTER 2 - USING THE CONTROL AND SETTING THE
MODES
2.1 - BAKE AND FAN/BAKE FUNCTIONS
HEAT CIRC CONVECTION FEATURE WITH FAN/BAKE MODE
To get the most from convection cooking, this De’Longhi oven incorporates
our patented Heat Circ design.
How does it work? When using convection mode, the Heat Circ design
first pulls air down to the heating elements, where it circulates and
becomes very hot. Next, this heated air is transferred into the cooking
chamber and circulated there to enhance cooking results as only convection cooking can. The crumb tray is designed with special heat deflectors
to precisely direct the process.
De’Longhi's Heat Circ feature is designed so that fan-circulated air is the
hottest air in the oven. This enhances the time-saving benefit of convection cooking, and has been proven in our test kitchens to deliver the most
consistent cooking results.
In general, meats and poultry can be cooked in less time (a meat thermometer will help to prevent overcooking). Cakes, pies, cookies, etc. can
be baked at a lower temperature (see charts and recipes).
BAKE mode is used when browning and crisping are less important or
undesirable. Use it, following conventional recipes, for casseroles, stuffed
vegetables, fish, lasagna, fruit tarts, cheesecakes and other moist mixtures.
CONVECTION BAKING OF CONVENIENCE FOODS
Many convenience foods can be successfully baked or heated by convection on the FAN/BAKE function. In
general, follow the package directions for temperature and time. However, lower the temperature by 25°F.
for more even cooking of larger items, frozen foods (except waffles and pancakes) and packaged casserole
mixtures. There is such a wide choice of convenience foods on the market and variations in packaging, quantities and
initial temperatures (frozen, refrigerated and shelf temperature) that it’s best to follow the package instructions. Check
the food 5 to 10 minutes before the time is up; you may need to adjust the time and/or temperature for best results.
Here are some tips for different types of convenience foods:
- If directions call for placing the food container on a metal pan or cookie sheet to avoid spills or to aid
even cooking, use the shallow pan provided. Use it or the cookie sheets provided for foods, such as
rolls, cookies, turnovers or frozen French fries, breaded fish or chicken pieces, that are placed directly
on a pan or cookie sheet.
- Some frozen foods come in “oven-proof” plastic or paper containers which can be cooked in a
microwave oven and, within limits, a conventional oven. Be sure to follow directions for maximum baking temperature. The container can melt or scorch if too high a temperature is used. To be on the safe
side, set the oven 25°F. lower than the recommended temperature.
- When baking packaged mixtures (such as scalloped potatoes, macaroni and cheese, brownies, corn
bread, coffeecake and cake mixes) check the package directions for recommended sizes of pan, casserole
or dish and the proper baking times for each. A 9-inch round or an 11/7 - by 11/2
inch rectangular pan will fit in the oven with room on all sides for air circulation.
Layer cake mixes can be baked one layer at a time in a 8- or 9-inch round pan or all
of the batter in a 3-inch deep 9-inch round bundt or spring-form pan.
Tips for convection baking and roasting
To bake:
- Turn the thermostat knob (H) to the desired oven temperature
- Turn the timer knob (L) to the desired cooking time.
- Turn the function knob (M) to FAN/BAKE for convection cooking and to BAKE for
traditional cooking.
- When the cooking is finished, turn the thermostat knob (H) to the “●” position
and the timer knob (L) to “O” position.
7
AS 1070 GB
30-10-2003
11:10
Pagina 8
Chapter 2 - Using the control and setting the modes
TEMPERATURE AND TIME FOR TYPICAL FOODS
The suggested temperature and times will vary depending on the temperature of the food placed in the
oven, the quantity and personal preference. Times given for meat and poultry are for refrigerator temperature. Add five minutes for preheating the oven.
FOOD
FUNCTION TEMPERATURE SETTING
Whole chicken 11FAN BAKE
12 lbs. Unstuffed.
350°F to 400°F
Pork Loin or Rib FAN BAKE
Roast, 3 - 6 lbs.
350°F to 400°F
Pork Baby Back Ribs
1.75 - 2 lbs. in 6 - to FAN BAKE
10 - inch strips.
APPROX. TIME
NOTES AND TIPS
120 min. or until internal Put the poultry or the meat
temperature of 175°F in directly in the SHALLOW PAN
(N) inserted in the slot 3. If you
thigh and breast
desire to cook in a oven-proof
90 min. or until internal container, put the container on
temperature of 170°F is the WIRE RACK (O) inserted in
slot 3.
reached.
300°F for 25 min. then Total time 50 min. or
until brown and very
BROIL for 30 min.
tender.
Use SHALLOW PAN (N) lined with
foil inserted in the lower position.
See recipe to follow for full directions.
Have roast tied for even cooking.
Use SHALLOW PAN (N) in low or
central position as oven space
allows.
Beef Sirloin or Rib
Roast 5 - 7 lbs, FAN BAKE
boned.
350°F to 400°F
25 min./lb. for rare
30 min./lb for medium
35 min./lb. well
Cornish Hens 1.5
lbs. each, two split FAN BAKE
into four halves.
350°F to 400°F
45 - 50 min. or until tender and juice is clear
when pierced with fork.
Roast on SHALLOW PAN inserted in
central position, skin side up. Brush with
orange marmalade or honey. Turn and
brush several times until done.
For 6 to 8 large potatoes. 45 - 50 min. or
until fork-tender.
Wash and pierce raw potatoes with
fork. Rub skins with salad oil if desired.
Bake on the SHALLOW PAN (N) in the
lower position.
Baking Potatoes
BAKE
400°F to 450°F
Pizza, homemade.
BAKE
400°F to 450°F
20 - 25 min. depending Insert the SHALLOW PAN (N) on the
on size and topping. Bake
slot 3. Grease the pan or use the speuntil bubbling hot and
cial oven paper.
crust crisp.
350°F to 400°F
Insert the WIRE RACK (O) on
Follow traditional recipe the SHALLOW PAN (N) in slot
timing but lower temper- 2. In case of tall rising cakes,
ature by 25 to 50°F.
place the tray in the slot 3.
350°F to 400°F
Follow traditional recipe
timing but lower temperature by 25 to 50°F.
Use 7x11 inch or 8-9
inch square pan or
oven-glass dish.
Cakes: Layer, Sheet
cake or Loaf cake.
FAN BAKE
Pies: Fruit, 9- inch
double crust.
Brownies, Bar,
Cookies
FAN BAKE
Insert the WIRE RACK (O) or
the SHALLOW PAN (N) in slot
2. Grease the pan accurately if
required by the recipe.
The chart and recipe cover various types of food. You can adapt your own favorite foods and recipes by following the
directions for similar foods.
8
AS 1070 GB
30-10-2003
11:10
Pagina 9
Chapter 2 - Using the control and setting the modes
2.2 - BROIL AND TOP BROWN FUNCTIONS
Tips for broiling typical foods
- Turn the thermostat knob (H) to position BROIL
- Turn the timer knob (L) to the desired cooking time.
- Turn the function knob (M) to position BROIL
- When the function and the thermostat knob (M) are set to the BROIL position, only the
top element heats at full power.
When broiling is finished, turn the timer knob to the “O” position and the thermostat
knob to the “●” position.
Preheat the oven for 5 minutes, with the door slightly ajar (as highlighted in Figure 1).
Once the preheating time is complete, place the food being grilled directly on the wire rack
(Figure 2) and close the door, leaving it ajar, as shown in Figure 3; remember to turn the
food half way through cooking.
Important: for best results, place the food on the wire rack (O), leaving an empty space of
around 1 in near the door (see Figure 2).
1 in
fig. 1
fig. 2
fig. 3
To top-brown casseroles with crumb or cheese toppings, place the shallow pan directly
in slot 1; if the food has been prepared on a container, put the container on the
wire rack inserted in slot 2 (as shown in the figure 4).
NOTE: Oven-glass dishes should not be exposed to direct broiler heat.
SUGGESTED BROILING TIMES
FOOD
WEIGHT OR THICKNESS
APPROX. TIME (Turn at half time)
Beef Sirloin, Porterhouse 1- 1 1/ in.
2
Steak
Rare 12 - 15 min.
Medium 16 - 18 min.
Beef Flank Steak, Filet
3/4 - 1 in.
Rare 10 - 12 min.
Medium 13 - 16 min.
Hamburger
1 in.
Medium-well 15 - 18 min.
Pork Chop
3/4 - in.
Well 18 - 22 min.
Fish Fillets, Steak
(See note)
1/2 - 1 in.
10 - 16 min.
Chicken Piece, Broiler3 - 4 lb.
fryer
fig. 4
40 - 50 min. until juices run clear when fork-tested
and no pink when cut.
Bacon, Sausage, Links or Up to capacity of broil10 - 15 min. for crisp bacon, well-done sausage.
Patties
rack.
Since fish is non-fatty it can be broiled directly on shallow pan. Broil until it flakes easily with a fork. Thin
fillets need not to be turned.
9
AS 1070 GB
30-10-2003
11:10
Pagina 10
Chapter 2 - Using the control and setting the modes
To correctly toast bread, place the slices as shown in the figure to the side, that
is, leaving 1 in of free space at the ends of the wire rack.
FOR TOASTING BREAD ONLY;
the oven door must be closed completely (as shown in the figure to the side)
1 in
1 in
2.3 - KEEP WARM FUNCTION
-
Turn the thermostat knob (H) to position KEEP WARM
Turn the function knob (M) to position FAN BAKE
Turn the timer knob (L) to desired time.
When food has finished cooking it can be held at this setting on the temperature control for up to an hour. Any longer can dry out the food and risks spoilage.
If thr oven set to 200°F seems too hot, to obtain a lower serving temperature turn the
thermostat dial back to the KEEP WARM mark. Do not attempt to hold food longer or
to rewarm cold food at this setting.
When finished, turn the timer knob (H) to the “O” position and the thermostat knob to
the “●” position.
2.4 - DEFROST FUNCTION
-
-
Turn the thermostat knob (H) to position “●”
Turn the function knob (M) to position DEFROST
Turn the timer knob (L) to desired time.
Put the frozen food directly on the WIRE RACK (O) inserted in slot 2. Put the SHALLOW PAN (N) in slot 3 in order to catch the water dropping from the load during the
defrosting process.
Portions and pieces of raw meat, poultry and fish, frozen soups, pastry, fruit or leftovers will thaw more quickly on this setting than on a counter or in the refrigerator.
Thaw only pieces or portions small enough to thaw in an hor or less and do not let
food come to room temperature.
Thawed food held too long or at a warm temperature can cause serious illenss.
Large amounts of food should be defrosted in a refrigerator.
2.5 - ROTISSERIE FUNCTION
This function is ideal for cooking chickens on the spit, fowl in general, roast pork and veal.
The rotisserie function can be used for load of up to 10 pounds.
- Turn the thermostat knob (H) to position BROIL
-
Turn the function knob (M) to position ROTIS
-
Turn the timer knob (L) to desired cooking time.
10
AS 1070 GB
30-10-2003
11:10
Pagina 11
Chapter 2 - Using the control and setting the modes
Operate as follows:
fig. 5
fig. 6
Place the food on the spit (P) and hold it firm using the
forks (for best results, tie the meat using kitchen string).
Place the spit supports (Q) on the dripping pan, in the holes
provided.
fig. 8
fig. 7
Place the spit on the supports.
Slide the dripping pan with the food being cooked into
the lower guide (3), tilting the spit supports (Q) to the left.
Make sure the point of the spit 1 is facing forwards
and is correctly inserted into the hole 2.
fig. 10
fig. 9
Once the dripping pan is in place, push the spit into the
turnspit mount (D), tilting the spit supports (Q) to the right.
Close the door, leaving it slightly ajar, as highlighted in
the figure.
For information on the cooking times, refer to the instructions in the table below.
WEIGHT
APPROX. TIME
Chicken
4-5 lbs.
120 min.
Chickens (2)
9-10 lbs.
180 min.
Rost pork
3-4 lbs.
90 min.
Turkey
8-10 lbs.
180 min.
FOOD
The rotisserie function is designed for use with a strict maximum load of 10 pounds. For example, please note that turkey at
maximum 10 pound weight likely requires binding ties to comfortably clear the drip pan. Therefore, it is advised to be conservative with maximum weight when shopping for rotisserie birds. For larger loads, we recommend the Fan/Bake mode.
11
AS 1070 GB
30-10-2003
11:10
Pagina 12
CHAPTER 3 - CLEANING AND MAINTENANCE
3.1 - CARE AND CLEANING
Always unplug the oven-broiler and allow it to cool
before cleaning. This unit has been designed and
engineered with your safety in mind. To assure maximum
safe operation, keep unit clean free of grease and build up
of food particles.
The internal cavity of your oven is covered with a special
enamel to which splashes and food particles do not stick,
thus making cleaning particularly simple. Do not clean
interior with metal scouring pads.
fig. 11
C
Pieces can break off and touch electrical parts, creating
risk of electrical shock.
To clean the glass door, use a glass cleaner or a damp
cloth. Wripe dry with a clean cloth. To clean the exterior
finish, use a damp, sudsy cloth. For stubborn stains, a nonabrasive liquid cleaner or spray glass cleaner may be
used. Do not use metal scouring pads, as they might mar
the finish. Always remove cleaning agents by polishing
with a dry cloth.
A
fig. 12
Slide the crumb tray (G) out from under the bottom of your
oven (see fig. 11). Wash by hand. Should the soilage be
difficult to remove, rinse the crumb tray with hot soapy
water and if necessary, scour it delicately, without
scratching it.
fig. 13
To make the cleaning of the inside of the oven easier, the
upper heating element (A) can be lowered by pulling the
clasp for drop down heating element (C) (fig. 12-13).
IMPORTANT: after cleaning, reposition and reattach the
electrical element (fig. 14). The oven must be not used
with the element in the lowered positioned.
OVEN LIGHT
The oven light (B) is always on when the oven is on. To
replace the bulb, proceed as follows:
• unplug the appliance from the power socket
• unscrew the protective glass cover (X), by turning it
anti-clockwise, and replace the bulb (Y) with a new one
of the same type (see Fig. 15). Replace the protective
glass cover (X).
Only use bulbs suitable for ovens (T572°F)
N.B. The oven can still be used even if the bulb is burntout
fig. 14
X Y
fig. 15
12
AS 1070 GB
30-10-2003
11:10
Pagina 13
LIMITED WARRANTY
What does the warranty cover?
We warrant each appliance to be free from defects in material and workmanship. Our obligation under this
warranty is limited to repair at our factory or authorized service center of any defective parts or part thereof, other than parts damaged in transit. In the event of a products replacement or return, the unit must be
returned transportation prepaid. The repaired or new model will be returned at the company expense.
This warranty shall apply only if the appliance is used in accordance with the factory directions, which
accompany it, and on an Alternating current ( AC ) circuit.
How long does the coverage last?
This warranty runs for one year ( 1 ) from the purchase date found on your receipt and applies only to the
original purchaser for use.
What is not covered by the warranty?
The warranty does not cover defects or damage of the appliance, which result from repairs or alterations to the
appliance outside our factory or authorized service centers, nor shall it apply to any appliance, which has been
subject to abuse, misuse, negligence or accidents. Also, consequential and incidental damage resulting from the use
of this product or arising out of any breach of contract or breach of this warranty are not recoverable under this warranty. Some states do not allow the exclusion or limitation of incidental or consequential damage, so the above limitation may not apply to you.
How do you get service?
If repairs become necessary please contact our toll free hotline at 1-800-322-3848 or log onto our website
at www.delonghi.com.
The above warranty is in lieu of all other express warranties and representations. All implied warranties are
limited to the applicable warranty period set forth above. This limitation does not apply if you enter into an
extended warranty with De’Longhi. Some states do not allow limitations on how long an implied warranty
lasts, so the above exclusions may not apply to you. De’Longhi does not authorize any other person or company to assume for it any liability in connection with the sale or use of its appliance.
How does state law apply?
This warranty gives you specific legal rights, and you may also have other rights, which vary from state to
state.
13