1
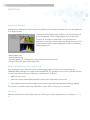
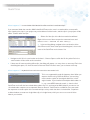
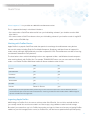
Avid Guide for AMA Workflow
QuickTime
Media Composer 6.5
Symphony 6.5
NewsCutter 10.5
www.avid.com
Avid Guide for AMA Workflow
QuickTime
CONTENTS
INTRODUCTION..................................................................................................................................................................................................................3
AVID AMA AND QUICKTIME..........................................................................................................................................................................................4
AVID QUICKTIME CODEC SUPPORT......................................................................................................................................................................5
QUICKTIME IN THE AMA ENVIRONMENT................................................................................................................................................7
WHAT HAPPENS IF…..?............................................................................................................................................................................................... 10
WORKING WITH PRORES MOVIES...................................................................................................................................................................... 17
INGESTING APPLE PRORES....................................................................................................................................................................... 18
MAKING A COMPATIBLE QUICKTIME MOVIE.................................................................................................................................................. 21
AVID MEDIA ACCESS SAMPLE WORKFLOWS............................................................................................................................................... 22
2
Avid Guide for AMA Workflow
QuickTime
Introduction
AMA (Avid Media Access) is the Avid architecture in Media Composer©, Symphony©, and NewsCutter©software
that allows you to link to file-based media for use instead of ingesting it first. It can significantly speed up your
tapeless workflow by enabling you to directly access material—without transcoding, capturing, or importing—
prior to editorial. This guide covers how to link to QuickTime files using your Avid editing software.
This is a supplementary guide to the AMA Master Guide, available at www.avid.com/AMA, which provides
detailed information about AMA, its workflows, and how to use its features. Be sure to read that guide first
before proceeding with the guide you’re reading now, which covers the specifics of using QuickTime media
within the AMA architecture.
Other AMA resources
In addition to the AMA Master Guide and this document, here are other resources you may find useful:
uickTime AMA Plug-in Guide: The QuickTime AMA plug-in is automatically installed when you first install
Q
your Avid editing software; you’ll find details about its use in this guide, available at avid.com/ama, under the
“Plug-ins” tab
Avid Editing Guide: The Media Composer, Symphony, or NewsCutter Editing Guide is the user guide (manual)
that comes with your editing software, and can also be downloaded from the Avid Knowledge Base at www.
avid.com/support
Avid Help menu: This is, in effect, the manual for your Avid application online, accessible from your editing
software; the Help menu contains the information in the Editing Guide, and is easily accessible to answer your
questions
3
Avid Guide for AMA Workflow
QuickTime
Avid AMA and QuickTime
From the beginning, Avid editing systems have been able to import many types of QuickTime movies and
export edited material as QuickTime files too. QuickTime has proven to be a quick and effective way to share
media, particularly between Avid editing systems and the graphics world. Avid has gone so far as to develop
(and distribute, free of charge) its own QuickTime codecs so that Avid-formatted QuickTime movies can be
used on any PC or Mac with the codecs installed.
This guide covers AMA, which makes great advances in QuickTime support in your Avid editing system.
Thanks to AMA, you can access and play QuickTime movies directly, wherever they’re stored, along with these
benefits:
•Edit content acquired in a QuickTime-wrapped codec, such as .mov files from Canon HD SLRs
•Screen QuickTime files quickly inside Media Composer, Symphony, or NewsCutter, without having to leave
your editing system or start another program
•Give an outside department control over some aspects of show content by having them create and manage
QuickTime files to which you’re AMA linked
•Save time, as program elements (such as After Effects animations) will automatically update whenever
changes are made (subject to certain guidelines)
•Exchange material more easily between third-party video editing systems such as Apple Final Cut Pro and
Adobe Premiere
The QuickTime AMA codec is designed to read any QuickTime movie that will play in the Apple QuickTime
Player; some uncommon QuickTime movies may not be supported.
4
Avid Guide for AMA Workflow
QuickTime
Avid QuickTime Codec Support
When you install any of the latest Avid editing applications, the QuickTime AMA plug-in also gets installed,
providing AMA support for any QuickTime movie that uses an Apple-supported codec. That means you can
quickly access many types of animations and video from other production environments. For example, with
QuickTime AMA, you can play and edit Apple Final Cut Pro videos directly, without needing to import or
transcode it first.
More than .mov
The QuickTime engine supports .mov type files, but you can link to many other types of movies and still
images—with different file extensions—using QuickTime AMA. Here are some examples; keep in mind that
your success will depend on the codecs on your computer and the nature of the essence in the file, among
other factors:
MOVIES:
.MP4
.M4V
.MPG
.MPE
.MPEG
.M2T
.QT
AUDIO:
.MP2
.MP3
.WAV
.AIFF
.AIF
.AU
.AAC
STILLS:
.JPG
.TIFF
.BMP
.PNG
.PSD
Making Avid QuickTime movies
Media captured on portable recording devices or rendered out from animation and graphics computers can
be saved using many different codecs. While the Media Composer family supports many of these QuickTime
codecs, there is an advantage to saving media for editing using an actual Avid QuickTime codec. The Avid
codecs are high quality and optimized for editing within your Avid editing environment. This means you will
often get better performance with them than with movies that use other QuickTime codecs. These Avid codecs
are installed as part of your Media Composer, Symphony, or NewsCutter installation.
You can add support for the Avid QuickTime movie types to any computer by downloading the current codec
pack(s) from the Avid website and installing it. You can also install these codec packs directly from your editing
system’s installation download package. These Avid QuickTime codecs add support for Avid formats such as:
Avid 1:1 Codecs
DNxHD codecs
DVCPRO HD
Meridian SD Codecs
AVID DV Codecs
After installing these codecs on your target computer system, you’ll be able to both read and render in the Avid
codecs on that system.
5
Avid Guide for AMA Workflow
QuickTime
PE and LE installers
The downloadable codecs on the Avid website are called “LE” (Light Edition) codecs. To find the LE installers
for use on graphics or other unlicensed systems, visit Avid.com and do a search for “download Avid codecs.”
The codecs installed with your editing system are called “PE” (Professional Edition) and are different in a slight
regard; the PE pack contains several licensed codecs that aren’t available for free distribution. Specifically, the
“PE” package that came with your editing system supports rendering or capture using the MPEG 30 Mb and
40 Mb codecs—the ones your Avid editing system uses.
With the free, downloadable “LE” package, you can play back the MPEG 30 Mb and 40 Mb codecs, but not
render or capture them. The LE installers are free to use and contain all of the other Avid codecs.
The PE installer supplied with your Avid editing system are licenced for use on Avid editing systems only.
QuickTime in the AMA Environment
What QuickTime files work with QuickTime AMA?
As we mentioned earlier, Media Composer, Symphony, and NewsCutter support many different types of
QuickTime files. With QuickTime movies, make sure that the files meet the following specifications:
•The QuickTime movie must contain video using only a single codec; be especially careful when exporting
timelines from Avid editing systems using “Same As Source” if you want to QuickTime AMA link to the
resulting movie:
• If your timeline contains shots that use different codecs, the resulting export will be mixed media and will
not AMA link
• If your timeline uses a single codec only, then a Same As Source export will create a movie of a single
codec type, which will AMA link
•The QuickTime audio and video tracks must be the same length
•The file contains a maximum of 24 audio tracks
QuickTime AMA supports QuickTime movie files whose types include those using Apple Final Cut Pro ProRes,
Animation, and H.264 codecs. It also supports QuickTime files captured on Canon 5D and 7D Digital SLR
cameras, and QuickTime movies from Flip, GoPro, AJA KiPro, Arri Alexa, JVC, and other cameras/camcorders.
6
Avid Guide for AMA Workflow
QuickTime
QuickTime level control
Avid QuickTime AMA doesn’t make a copy of the media in a new location, but directly accesses the original file
in its original location.
The Avid QuickTime AMA plug-in enables you to control aspects of
the movie playback, such as interpreting the file as Interlaced or
Progressive, and adjust its video levels. You can make these
adjustments using the SOURCE SETTINGS dialog, shown here. For
more information, please read the appropriate section in the Master
Guide for details on:
•Setting field motion
•Setting field ordering
•Choosing graphics or TV video levels (and the QuickTime Gamma Issue)
•Using the Automatic Aspect Ratio adjustment
A better method for QuickTime movie transfer
If you’re going to copy a QuickTime movie into Avid storage (local or server), we recommend that you
TRANSCODE the footage into storage rather than IMPORT. This provides a faster transfer (often half the time
or faster), and allows control over video levels and field motion. To do this:
1.
AMA link to the movie.
2.
Open the SOURCE SETTINGS and adjust for the correct interpretation of the movie.
3.
Transcode the movie into Avid storage to create a local copy with the desired Source Settings applied.
This process is covered in detail in the AMA Master Guide, which, of course, you should read.
File naming
AMA clips display offline if the file path name you are linking to contains illegal characters, including: < > : “ / |
? *.
7
Avid Guide for AMA Workflow
QuickTime
Automatic movie updates
AMA will always link to a movie with the same characteristics. In other words, if you replace an existing movie
file with one of the same name, track count, and duration, any sequences that refer to the original will be
updated with the content from the new movie. This is a powerful tool that enables you to update graphics and
animations that are going through iterations as editing continues.
For example, you may want to update a motion graphics piece created in After Effects periodically during the
edit. By placing the new render in the same location (with the same file name), the timeline will automatically
update to include the new content, without requiring you to take any additional steps.
If a sequence/clip with the related clip is already open in the Source monitor, select “Clear Monitor” and reload
the sequence to update the movie.
What happens if…?
What happens if… I rename the clip in the bin?
There is no problem with renaming a QuickTime AMA clip once it is in your bin. Feel free to rename your clips
as you wish to keep them identified. The original name is still visible in the SOURCE FILE column, and the
QuickTime file’s original location is listed in the SOURCE PATH column.
What happens if… I rename the QuickTime movie I am linked to?
The connection between your AMA clip and the actual QuickTime file is by the name of the QuickTime file
(as well as its location). This means if you rename a linked QuickTime file it will go offline. If you do this by
accident, the following three methods will restore the connection:
•Change the name back and your clip should relink automatically; if not, close and reopen the bin and the link
should be reestablished
•To use the QuickTime movie with this new name, select the clip in your bin, right-click on the clip, and from
the context menu choose RELINK TO AMA FILE(S)… ; then navigate to the renamed QuickTime file and
select it
•Create a new, separate clip using the renamed version—choose FILE > LINK TO AMA FILE(S)…; the
original clip will remain offline, as will any shots in the sequence that come from the original clip
8
Avid Guide for AMA Workflow
QuickTime
What happens if… I re-create my QuickTime movie with the same settings?
If you make changes to the QuickTime movie, this new version will link to the original clip in your bin and in your
edited timelines, without you doing anything at all. If the new version is in the same location and has the same
name, number of tracks, and duration, then that is the movie to which the AMA clip will access.
This might happen if you re-render an animation to change something like the colors that are used, the spelling
of a title, replace a logo, or replace a layer.
What happens if… I re-create my QuickTime movie using a different codec?
This is OK. In fact, it’s a common workflow to work with the same movie at different compression levels. For
example, you might edit while AMA linked to an SD or low-resolution (proxy) version of an animation, and at a
later date, you replace this movie with a high-resolution version. If you keep in mind the guidelines above, this
new version will relink automatically to your clip and timelines.
What happens if… I re-create my QuickTime movie at a different length?
The clip in your bin will not link properly to the new
QuickTime movie. You will see the dialog below, which
informs you that the original clip cannot be linked to this
new movie. It will, however, offer to create a new clip in
your bin that’s linked to the new version of the movie. The
original clip will remain offline, as will any instances of it in
your timelines.
What happens if… I re-create my QuickTime movie with a different number of tracks?
Changing the number of tracks in a QuickTime movie is
not supported. You will see the dialog below, which
informs you that the original clip cannot be linked to this
new movie. It will, however, offer to create a new clip in
your bin that’s linked to the new version of the movie. The
original clip will remain offline, as will any instances of it in
your timelines.
9
Avid Guide for AMA Workflow
QuickTime
What happens if… My QuickTime movie has an Alpha channel?
Alpha channels are not currently supported. If you perform a QuickTime AMA link to a movie with an Alpha
channel, you will see the fill only, without the Alpha cutting it. There will be no warning that the Alpha is present,
but will not be used.
To use the Alpha channel, you can still perform a FILE > IMPORT (after setting up your Import settings to
ensure proper handling of the Alpha channel).
What happens if… I move the QuickTime file to which I have linked clips?
If you move an AMA linked QuickTime file, it will become offline in your project. The link to the QuickTime file is
established by the file’s name and location. If this happens, here are three things you can do to fix this situation:
•Move the QuickTime file back to its original location and it should relink automatically; if not, close and reopen
the bin to refresh it and reestablish the link.
•Relink to the moved clip in its new location—open the original bin that contains the offline clip, select
the clip, chose FILE > RELINK TO AMA FILE(S)…, and then select the QuickTime movie file
in its new location; this will not create a new clip in the bin, but instead re-establish the link with the
clip already in the bin
•Create a new link (and clip) to the moved QuickTime movie; in any bin that does not already contain the
original clip, choose FILE > LINK TO AMA FILE(S)… to create a new clip of the moved QuickTime
movie in its new location—the original clip remains offline
10
Avid Guide for AMA Workflow
QuickTime
What happens if… I move a folder full of QuickTime files to which I have linked clips?
If you rename a folder that contains AMA linked QuickTime movies, move it to another drive, or restored it
from a backup, the clips in your project may not be able to find the movies, and the clips in your project will be
offline. To batch relink the clips:
1.
Select all of the clips in the bin that need to be relinked.
Right-click on one of them to open the contextual menu and
choose FILE > RELINK TO AMA FILE(S).
2.
In the resulting dialog, navigate to the new location of the
QuickTime movies. Note at the top of the dialog box, it shows the
name of the QuickTime movie it wants first.
3.
Navigate to this file in its new location and select it. Choose Open to relink the file. Any other files in the
same location will also relink at the same time.
4.
If there are still some remaining offline clips, the dialog will reopen—as many times as necessary. Each time
the dialog box opens, it’ll show the name of the next QuickTime file it wants you to choose at the top.
What happens if… My QuickTime movie has more than one codec in it?
This is not supported, though this happens often. When you
export a timeline using “Same As Source,” the resulting
movie contains copies of the original video files, in their
original codec. If your timeline had multiple video codecs in
it—say, some MPEG 30 and some 2:1—then the final
QuickTime movie will also have mixed video codecs files in it, and cannot be AMA linked. If you want to use
the mixed codec sequence as an exported “Same as Source” QuickTime for an AMA link, then transcode
the sequence to create copies of the unmatched clips so they match the others in the timeline. Or perform
a video mixdown to create one single video clip, of a single format, which you can use to cover all of the
video in your timeline.
11
Avid Guide for AMA Workflow
QuickTime
To transcode a sequence:
1.Create a new bin and place a copy of the sequence into this
bin.
2.Select the sequence and choose CLIP
/ TRANSCODE.
> CONSOLIDATE
3.Select the “Transcode” radio button in the top-left corner of
the dialog, then fill out the rest of the form as appropriate.
Note that you can convert the video format and audio format
using this feature.
4.Click “Transcode” at the bottom of the dialog, and only those
files that were not already in the chosen format will have new
copies made.
5.
Select the sequence and choose FILE > EXPORT to export (using “Same As Source”) this now
homogenous sequence.
To perform a video mixdown:
1.
Load the sequence into the Record monitor.
2.The Video Mixdown feature will use any marks present to indicate the
portion of the program to mix down. Either place or remove marks
within your sequence as appropriate.
12
3.
Set your Video monitoring to the top track of your timeline. Then choose SPECIAL > VIDEO MIXDOWN.
4.
In the resulting dialog, select the settings as appropriate and then click OK.
5.
The resulting clip will appear in your target bin. Edit this clip into the place in the timeline where the video
matches. Make sure it is on the top layer.
6.
Select the sequence and choose FILE > EXPORT to export (using “Same As Source”) this now
homogenous sequence.
Avid Guide for AMA Workflow
QuickTime
What happens if….I try and link to a QuickTime reference movie?
This is supported, but keep in mind these limitations:
•You cannot make a QuickTime reference file from your Avid editing software if your timeline contains AMA
clips within it
•You cannot create a QuickTime reference from your Avid editing software if your timeline contains LongGOP
media, such as XDCAM clips
Working with ProRes Movies
Apple ProRes is a popular QuickTime codec that permits the exchange of media between many devices
that use this codec, including Final Cut Pro. Media Composer, Symphony, and NewsCutter all support this
codec natively, although slightly differently on a Mac compared to a PC. These differences are due to licensing
considerations between the two platforms.
The chart below shows which Avid editing functions are supported on Mac- and Windows-based computers
when working directly with ProRes files. For example, TRANSCODE means can you transcode into a ProRes
codec—not whether ProRes AMA-linked media can be transcoded to other formats.
MAC
PC
IMPORT
yes
yes
CONSOLIDATE
yes
yes
PLAYBACK
yes
yes
CAPTURE
yes
x
TRANSCODE
yes
x
RENDER
yes
x
EXPORT
Same As Source
yes*
*P
roRes export on a PC is possible when performing a “Same as Source” export to a .mov file. However, this will
not work with sequences that contain mixed formats—meaning, media other than ProRes. AAF- or MXF-wrapped
exports as ProRes are not supported.
Ingesting Apple ProRes
AMA linking to a ProRes file is the same as with any other QuickTime file. You can link to and edit the file as
you normally would. You can also transcode it to create a copy using a different codec into Avid storage.
But what if you wanted it to stay in its ProRes format after you ingest it? Here are a few ways of getting ProRes
media into your Avid storage (local or server) as ProRes files, with the fastest speed and best possible quality.
13
Avid Guide for AMA Workflow
QuickTime
Ingesting ProRes on a PC using Consolidate
If you’re using Media Composer or Symphony 6.5.1 or later, or Avid NewsCutter 10.5.1 or later, you can
consolidate ProRes files into Avid storage. To do this, AMA link to the files, select them in the bin, and choose
. Please note that AMA does not support Alpha channels, so these will not carry over with the files during the
consolidate process.
Ingesting ProRes on a PC using Import
On a PC, you can use the Import function to move ProRes into Avid storage in its original format. This is the
method to use if you’re using Media Composer/Symphony 6.0.x or earlier, or NewsCutter 10.0.x or earlier, or if
you want to preserve the Alpha channel of a ProRes file.
This will be a fast import, as the media is simply being copied and rewrapped into your Avid system but not
transcoded. This must be done from within a project and with settings that exactly match the targeted ProRes
movie.
1.
Ensure that your project type matches the movie in frame size, edit rate, and field treatment. For example, if
your movie is 23.98 720p, perform the import in a project of this type.
2.
In your IMPORT settings, ensure that “File Pixel to Video Mapping” is set to “601 / 709.”
3.Chose FILE > IMPORT and select the movie to import.
In the import dialog, you’ll see an option to specify the
target resolution for the imported file. If your project
settings match the QuickTime ProRes movie, the movie
will be brought in as a ProRes movie, regardless of
what might be displayed as the target resolution. Click
OK.
4.If everything is set correctly, the dialog (right) will
appear. Select the “Preserve the video resolution of the
file” radio button under “Choose Video Resolution, then
select your own option from the “Apply To” section as
desired. Click OK.
The import dialog should display “Fast Import” as the ProRes
movie gets copied and rewrapped as an MXF file into your
system.
In your bin, you will see the movie came in as ProRes media.
14
Avid Guide for AMA Workflow
QuickTime
Ingesting ProRes on a Mac using Import
You can use the Import function to get ProRes media into your Mac in its original ProRes format. This will be a
quick copy (fast import), as no processing of the original video is done.
1.
In the “Media Creation” settings, select the “Import” tab and then choose the ProRes format you
are importing.
2.
In the Import settings, ensure that “File Pixel to Video Mapping” is set to “601 / 709.”
FILE > IMPORT and select the movie to import. In the Import dialog, you’ll see an option to
specify the target resolution for the imported file. If your project settings match the QuickTime ProRes
movie, your software will bring it in as a ProRes movie, despite this setting. Click OK.
3.Chose
4.
The Import dialog should display “Fast Import,” as the ProRes movie is simply being copied and rewrapped
as an MXF file into your system.
Ingesting ProRes on a Mac using Transcode
If you need to see multiple QuickTime files to choose which ones to import, they may already be AMA-linked in
a bin. You can choose the files you want to ingest and then transcode them into Avid storage. If you transcode
to the matching ProRes format, the files won’t actually transcode but simply copy into Avid storage.
15
Avid Guide for AMA Workflow
QuickTime
Making a compatible QuickTime movie
Many QuickTime movies you edit may not come from an Avid editor, but from a graphic artist or an editor using
a different editing environment or device. These files may be After Effects animations or Maya 3D movies. You
can also exchange media with other editing systems such as Apple Final Cut Pro and Adobe Premiere.
Movies from all of these sources are viable for QuickTime AMA linking into your Avid software if they meet the
requirements mentioned earlier. Additionally, if these files are rendered in these applications as Avid codec
movies, they will link via QuickTime AMA and deliver the best possible performance in your editing environment.
We mentioned earlier that the Avid codecs are available for both the Mac and PC from the Avid website. Install
these codecs on your authoring stations for these other applications, and you can choose an Avid codec for
the render target.
Possible issues
All software applications have different render dialogs, so here are some general guidelines you will need to
interpret for rendering files in your particular third-party application. These are the three most common issues:
Ensure that the frame size of your movie is an Avid-approved frame size. Each codec has a legal frame size,
and if the movie’s dimensions are off by even a single pixel, you won’t be able to use it. For example, an old
Meridien-compressed codec requires a 720 x 486 raster, while many programs commonly composite for TV
at 720 x 480 pixels. For details about frame sizes for these codecs, see the Avid Media Composer Advanced
Guide.
Ensure that your video levels are set correctly. Specifically, be sure to encode any movie made using “graphics”
levels (where digital 0 is black and 255 is white) as RGB. Encode any movie using “TV” levels (where black is
16 and white is 235) as 601(SD) / 709 (HD). Generally, most graphics applications use RGB levels internally
(this includes Photoshop and After Effects), and RGB is often the correct render setting.
Ensure that the field order is correct or motion artifacts will occur. Progressive or Interlaced:
NTSC: LFF, Lower Field, Even Field,
PAL: UFF, Upper Field, Odd Field
HDTV: UFF, Upper Field, Odd Field
16
Avid Guide for AMA Workflow
QuickTime
Avid Media Access Sample Workflows
Updating the opening animation for a program
Let’s say you’re working on a series of shows, and all 10 episodes use the same generic QuickTime opening,
which includes a specific title overlay for each episode. Near the end of the editing process, the graphic artist
needs to make changes to this opening sequence and, therefore, you’ll need to update all 10 episodes.
Once the graphic artist makes the changes to the opening and re-renders it, he places the re-rendered file
in the same location as the old version, with the same name and the same number of tracks. When you open
up the timelines for each episode, your Avid editing software will automatically link to and play the updated
opening, now that it has replaced the original version. If a sequence/clip with the related clip is already open in
the Source monitor, select “Clear Monitor” and reload the sequence to update the movie.
Editing using a proxy shot
In another example, let’s say you need to edit a program that requires using an updated movie coming from a
Final Cut Pro system, and a second movie coming from a Maya animation system.
As a stand-in for the Final Cut Pro QuickTime file, you can inquire about the exact length of this movie and the
number of audio tracks, and then quickly render a “placeholder” in any program you have on hand, such as
Adobe After Effects. This placeholder is edited into the program for the time-being.
When the Final Cut Pro QuickTime movie arrives, you can rename it and place it into the same folder as the old
placeholder. In your Avid editing system, the link to the new version of the file is automatically updated.
For the Maya animation, the animation house has FTPd an SD resolution approval copy of the animation. The
HD version is being queued for rendering later in the day and will be delivered that evening. You can use this
low resolution copy in the program for the moment.
When the HD copy of the animation file arrives, you can rename it and places it into the folder where the
placeholder was located. Again, your Avid editing system will automatically link to the new version of the file.
Link to an alternate language version of an animation
A show in Canada requires both French and English soundtracks. The original show is cut in Montreal in
French. However, it contains many animations, which will need to be replaced in the alternate English version.
You begin editing the English version and as you do, you create an English Animation bin and place copies of
the animations you have—in French—in this bin. You continue editing, placing these French animations into the
program as placeholders.
The plan is to make sure the English animations have the same names, durations, and tracks as the French
ones. When the new English animations are ready, you simply replace the French versions you have in the
Animation folder with these new English versions.
All of the clips in your bin will reconnect to the English animations and, subsequently, the Timeline will update
automatically to show these English animations.
17
Avid Guide for AMA Workflow
QuickTime
Linking to delivered media
Let’s say your colleague captured media for a project on her Final Cut Pro system, but you’re going to cut
the promo on your Avid editing system. Your colleague can just copy the required media on the Final Cut Pro
system to a folder and deliver this folder on a USB drive to you for Avid editing.
While you could edit the media directly from the drive, you wants better performance, so you copy the folder
to one of your Avid drives. You can then choose FILE > LINK TO AMA VOLUME to create a bin filled with
these clips, and begin editing the promo.
18
Corporate Headquarters 800 949 AVID (2843)
Asian Headquarters + 65 6476 7666
European Headquarters + 44 1753 655999
To find your regional Avid office, visit www.avid.com/contact
www.avid.com
©2013 Avid Technology, Inc. All rights reserved. Product features, specifications, system requirements and availability are subject to change
without notice. Avid, the Avid logo, Media Composer, NewsCutter, and Symphony are either registered trademarks or trademarks of Avid
Technology, Inc. or its subsidiaries in the United States and/or other countries. All other trademarks contained herein are the property of their
respective companies.
AMAQTWP0113