1
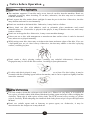
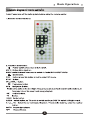
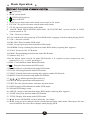
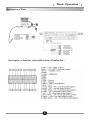
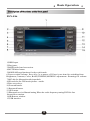
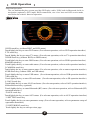
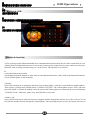
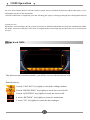
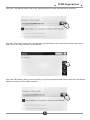
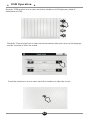
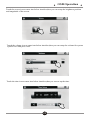
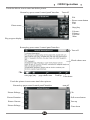
USER MANUAL
Table of Contents
Product Description
01
Product features
01
Main function
01
Product application
01
Main specifications
01
Notice before Operation
02
Safety Precautions
02
Precautions for disc application
03
Machine maintenance
03
Basic Operation
04
Schematic diagram of remote controller
04
Functional description of remote controller
05
Description of Ports
06
Description of functions at the front panel
07
OSD Operation
09
Main Menu
09
DVD function
10
USB function
12
Radio function
13
Bluetooth function
14
Phone book OSD
15
IPOD function
16
AUX function
18
System Setup
18
Display Setup
19
20
Sound Setup
Navigation path setup
Troubleshooting
21
27
Product Description
Thank you for your using our product!
Thank you for using our product, and hopefully you can understand the product operation
method conveniently and easily through the manual. Please read the manual carefully before
use so as to operate the product safely and enjoy better amusement.
Main Functions
1. 7 /6.2 -inch 16: 9 TFT high resolution LCD screen.
2. Built-in radio, DVD player, etc..
3. Compatible with DVD/VCD/CD/WMA/JPEG, etc..
4. High sensibility FM/AM reception, can save 30 stations.
5. 3D graphic touch interface, all the functions can be realized through touch operation.
6. Built-in GPS intelligence navigation system (optional).
7. Built-in Bluetooth function, with handwritten + touch input functions.
8. Optional ipod control, can be operated by touch screen.
9. Connectable with parking sensor.
10. Two-way video output, Four-way audio output.
11. Auxiliary input function, optional external audio/video input.
12. With USB interface, supporting audio play and picture browse.
13. Auto identification of NTSC/PAL system.
14. 4×45 W high fidelity and high power output.
15. Digital TV Function(Optional)
16. Real time clock display function.
17. 3G connection ready(visit www.echown.com for more details)
Product Application
The product adopts high resolution TFT touch LCD, can play majority of discs currently
available in the market, provides functions such as navigation (optional), radio, analog TV,
Bluetooth and visible reversing radar, and high fidelity power output, etc., extensively
used in various cars, special purpose vehicles and buses, etc. with 1-DIN dimensions.
Main Specifications
Power voltage: 9.5-16V
Max . current: 15A
1
Notice before Operation
Safety Precautions
Please read all instructions in detail before installation, and it is recommended that the
machine be installed by automobile sound profession sales agent.
The machine is applicable to car 12 V power supply system
(requiring grounded wire). Please don't install the machine directly
on the truck or bus with 24 V power. Otherwise, it may damage the
machine.
Please use licensed discs, don't use inferior discs or nonstandard
discs, otherwise it may cause machine failure or affect service
life.
Never replace the fuse for power supply without instructions
from professional personnel, using an improper fuse may cause
machine damage and cause fire.
In order not to breach the traffic regulations, the driver should not
watch the program and operate the machine while driving to
prevent unnecessary traffic accident.
For safety and to ensure product normal application, please invite
professional personnel from the sales dealer of the product to install.
Never disassemble or repair the machine by yourself to prevent machine
damage and accident. For detail, please consult with the local distributor
of professional automobile sound system.
Please don't place the product in a damp environment and in
water to prevent electric shock, unnecessary damage and fire due
to short circuit.
The mechanic driving part of the product display screen adopts
full-automatic precise driver assembly. Never push, pull and
rotate the machine with strong force by hand and never bump the
TFT display to prevent product damage.
-
For a safety drive, please keep the volume as low as possible for
the purpose of the noting traffic and road surface condition.
Never insert foreign article into the disc loading mechanism.
The product is a laser product; therefore, please don't aim the laser beam to the eyes
directly.
Note: To prevent short circuit, please remember turning off the automobile and
disconnecting ACC and B+ before installation.
2
Notice before Operation
Precautions of Disc Application
The machine supports 12 cm disc only, never insert 8 cm disc into the machine. Don't use
adaptable accessory when inserting 12 cm disc, otherwise, the disc may not be removed
from the machine.
Don't expose the disc under direct sunlight. It must be put in the box. Otherwise, the disc
may deform and can't be used normally.
Don't use cracked or deformed disc. Otherwise, it may lead to a failure.
Please don't use disc with adhesive such as prismatic glass membrane and rental
identification, etc. If such disc is played in the player, it may be hard to take out, and it may
lead to a failure.
Don't use an irregular disc. Otherwise, it may cause machine damage.
Please not use a disc with transparent or translucent data surface since it can't be inserted
into, taken out or played normally.
While using a new disc, there may exist bur at the inner and outer edges of the disc. If so, use
a ball-point pen, etc. to clear it away. Otherwise, the bur may adhere to the disc's playing
surface, resulting in jitter.
Bur
Bur
Don't touch a disc's playing surface (sending out colorful iridescence). Otherwise,
fingerprint may be left on the disc surface, resulting in jitter phenomena.
If a disc with dirt is played, it may result in the disc score or jitter. If a disc is dirty, it may be
cleaned with disc cleaning agent sold on the market, and it can be wiped out lightly from the
inner disc outward.
Machine Maintenance
Use soft cloth to clean dirt (silicone resin cloth, etc.). When it is very dirty, it is required to
use a piece of cloth soaked with diluted kitchen cleaning agent and wipe it after wringing the
cloth dry. Then wipe it with a piece of dry cloth. The LCD screen is easy scoring, so, please
wipe it carefully. While adopting the chemical dish cloth, please wipe it as per the Operation
Manual.
Don't use volatile agent such as benzene or sparse agent, etc. Otherwise, it may be
deteriorated or the lacquer on it may shed off.
3
Basic Operation
Schematic diagram of remote controller
4
Basic Operation
Functional description of remote controller
1.
: Power key.
2. MOD: switch mode.
3.
: DVD load in and out.
4.
: Mute ON/OFF.
5. AMS: browse function at radio mode, auto search at TV mode.
6. PU/LOC: Set up local/remote search under radio mode.
7. ST: Set up stereo/mono under radio mode.
8.
BAND: Band FM1/FM2/FM3/AM1/AM2; AUTO/NTSC/PAL system switch at DVD;
System switch at TV.
9. VOL-: Decrease volume.
10. L/R: switch track when playing VCD at DVD mode, language selection when playing DVD.
11. VOL+: Increase volume.
12. PBC: PBC function under DVD mode.
13. RPT: Set up repeat play function under DVD mode.
14. PD/RDM: Set up random play function under DVD mode (requiring disc support).
15. SCAN: browse at CD/ VCD mode.
16. PROG: Programming play function under DVD mode.
17. Numeric key: 0~9
18. If the digital input exceeds 10 under DVD mode, it is required to press respectively two
numeric keys, e.g.: 1 and 2, meaning 12.
19. DEL: Clear function under Bluetooth mode.
20.
: Stop play function under DVD mode.
21.
: Play/Pause switch function under DVD mode.
22. GOTO: Selecting function under DVD mode.
23. SUB-T: Subtitle function (requiring disc support) under DVD mode.
24. MENU: Enter/Exit menu setup under DVD mode.
25.
,
,
,
: Menu operation direction key.
26. ENTER: Menu operation confirmation key.
27. EXIT: Exit the current status, and enter the main menu.
28. OSD: Display OSD information under DVD mode.
29. ZOOM: DVD image zoom.
30. ANGLE: Angle switch function under DVD mode (requiring disc support).
31. SLOW: Slow play function under DVD mode.
32. TITLE: Display title menu under DVD mode.
33.
: Screen UP/DOWN, used to adjust the view angle.
34. 9 : : Long press for manual station search function under radio mode. Short press for auto
search function; Previous/Next chapter when playing DVD.
5
Basic Operation
Description of Ports
Description of function, color and location of leading line :
6
Basic Operation
Description of functions at the front panel
DVN-E39
1, DISK Input.
2, BAND: radio-band conversion.
3, RADIO: Radio mode.
4, Radio station select.
5, SRC: different functions for switch mode.
6, NAVI: GPS menu.
7, Power switch/Volume: Press it by 3s to power off. Press it one time for switching from
Btightness,Contrast, Color, BASS,TREBLE,MIDDLE adjustment . Rotating for volume
increasing/decreasing. Press it one time for power on
8, Reset button.
9, SD card slot: The upper for GPS, the lower for multimedia
10, Disk access keys.
11, Mute: mute button.
12, play/pause
13, Rearward button.
14, Forward button.
15, TEL: Bluetooth receive.
16, DVD: DVD mode.
17, Pick up.
18, Hang up.
19, Pick up; Rotating in media mode for previous/next
7
Basic Operation
Description of functions at the front panel
DVN-E46
1,DISK Input.
2,Play/pause.
3,BAND:radio-band conversion.
4,MUTE:Mute button.
5,MODE:different functions for the switch mode.
6,Power switch/Volume: Press it by 3s to power off. Press it one time for switching from
Btightness,Contrast, Color, BASS,TREBLE,MIDDLE adjustment . Rotating for volume
7,MIC:this for bluetooth audio input hole.
8,SD card slot for GPS/music/picture...media.
9,Disc access keys.
10,Forward button.
11,Rearward button.
12,GPS menu.
13,Bluetooth receive/Manual tuning,When the radio frequency tuning,DVD for fast
forward/slow motion.
14,IR:Remote window.
15,USB interface.
8
1
S
OSD Operation
Function Operation:
The car multimedia play system provides DVD play, radio, USB, built-in Bluetooth, built-in
navigation (optional), AUX input, IPOD connection, rear view lens and OFF screen mode,
can realize the relative function operation.
Main Menu
1.DVD touch key (without DISC, no DVD status)
Touch lightly the key to enter DVD status. (For relevant operation, refer to DVD operation interface)
2.TV touch key
Touch lightly the key to enter TV status. (For relevant operation, refer to TV operation interface)
3.IPOD touch key (without IPOD, no IPOD status)
Touch lightly the key to enter IPOD status. (For relevant operation, refer to IPOD operation interface)
4.RADIO touch key
Touch lightly the key to enter radio status. (For relevant operation, refer to radio operation interface)
5.CAMERA touch key
Touch lightly the key to enter camera status. (For relevant operation, refer to camera operation interface)
6.USB touch key (without USB, no USB status)
Touch lightly the key to enter USB status. (For relevant operation, refer to USB operation interface)
7.SD touch key
Touch lightly the key to enter SD card status. (For relevant operation, refer to SD operation interface)
8. NAVI touch key
Touch lightly the key to enter NAVI card status. (For relevant operation, refer to NAVI operation interface)
9.Bluetooth touch key (optional)
Touch lightly the key to enter Bluetooth (BT) status. (For relevant operation, refer to Bluetooth (BT)
operation interface)
10.AUX touch key
Touch lightly the key to enter AUX status. (For relevant operation, refer to AUX operation interface)
11.SETTING touch key
Touch lightly the key to enter parameter setup. (For relevant operation, refer to parameter setup of
operation interface)
12. RETURNING touch key
Touch lightly the key to enter previous page.
9
OSD Operation
DVD function
DVD play
Warning: Please use standard licensed disc, keep the disc clean, and develop a good usage habit
to guarantee the normal service life of the system.
DVD disc play
Load the disc slightly onto the disc entry port, the disc will be attracted into the machine
automatically, and the system will read the disc automatically. In the disc play process,
clicks the touch screen "EXIT"to return to the main interface of system.
1
2
3
8
9
10
11
16
17
14
15
4
5
10
6
12
18
7
13
19
7
7
OSD Operation
1.Mute Key
Touch lightly the key to stop the voice.
2.Previous track Key
Touch lightly the key for previous track
3.Next track Key
Touch lightly the key for next track
4.Play/Pause Key
Touch lightly the key, the DVD will switch between play and pause position.
5.Stop Key
Touch lightly the key to stop play.
6.Exit Key
Touch lightly the key to exit.
7.More Key
Touch lightly the key to display conceal menu.
8.RPT Key
Touch lightly the key to select among repeat chapter, repeat title, repeat play, and repeat
close modes.
9.RDM Key
Touch lightly the key to switch ON/OFF random play
10.L/R Key
Touch lightly the key to choose Left or Right channel
11.EQ Key
Touch lightly the key to setup the EQ.
12.OSD key
Touch lightly the key to display screen information.
13.SUB_T Key
Touch lightly the key to convert subtitles in different languages (CD-ROM titles such as no
more information will be invalid clicks)
14.MENU Key
Touch lightly the key for menu play
15.UP Key
Touch lightly the key for UP selection of menu, after selecting the menu, touch lightly "OK"
key to run the operation selected.
16.DOWN key
Touch lightly the key for DOWN selection of menu, after selecting the menu, touch lightly
"OK"key to run the operation selected.
17.RIGHT key
Touch lightly the key for the next menu, after selecting the menu, touch lightly "OK" key
11
OSD Operation
to run the operation selected
18. LEFT key
Touch lightly the key for the previous menu, after selecting the menu, touch lightly "OK" key
to run the operation selected
19.OK Key
Press the key lightly to confirm after selecting the menu.
USB Function
USB/SD OSD:
Interface keys:
1.touch
2.touch
3.touch
4.touch
5.touch
key lightly to listen to the musics.
key lightly to watch the pictures.
key lightly to watch the movies.
or
key lightly to turn to last page or next page
or
key lightly to choose last song or next song.
12
OSD Op eration
Radio function (system default being radio interface)
1. BAND touch key
Touch lightly the key to switch among FM1,FM2,FM2,AM1 and AM2
2.APS touch key
Long touch the key (>2s), it will scan the whole frequency bands, and will save the stations
searched to M1-M6. Short touch the key (\<1s) to browse play the station saved, and each station
will pre- play 5 seconds.
3.DOWN( < ) touch key
Long touch the key to search downward automatically
Short touch the key to search manually downward in single step for station
4.UP( > ) touch key
Long touch the key to search upward automatically
Short touch the key to search manually upward in single step for station
5.AF touch key
Touch lightly the key for alternative frequency
6.TA touch key
Touch lightly the key to exit traffic announcement and traffic information program, and with the
help of AF key, to supply auto station search
7.PTY touch key
Touch lightly the key for program type
8.Return to the main interface touch key
Touch the key to return to main interface
9.MUTE touch key
Touch lightly the key to switch ON/OFF volume
NOTE : Save radio station name instead of frequency
When station name appear on the screen, long press the corresponding
frequency to save the radio station name instead of radio frequency.
13
ÿÿ
ÿÿÿÿÿÿÿÿÿÿÿÿÿÿÿÿÿÿÿÿÿÿÿÿÿÿÿÿÿÿÿÿÿÿÿÿÿÿÿÿÿÿÿÿÿÿ
ÿ
ÿ ÿ ÿ ÿ Bluetooth OSD
ÿÿÿÿÿÿÿÿÿÿÿÿÿÿÿÿÿÿÿÿÿÿÿÿ
OSD Operation
ÿ
ÿÿÿÿÿÿÿÿÿÿÿÿÿÿÿÿÿÿÿÿÿÿÿÿÿÿÿÿÿÿÿÿÿÿÿÿÿÿÿÿÿÿÿÿÿÿÿÿÿÿÿÿÿÿÿÿÿÿÿÿÿÿÿ
ÿÿÿ
ÿÿÿÿÿÿÿÿÿÿÿÿÿÿÿÿÿÿÿÿÿÿÿÿÿÿÿÿÿÿÿÿÿÿÿÿÿÿÿÿÿÿÿÿÿÿÿÿÿÿÿÿÿÿÿÿÿÿÿÿÿÿÿÿÿÿÿ
Bluetooth function:
A.The system provides Bluetooth hands free communications function(for the first time connection) if your
cellular phone has Bluetooth function. It can create point-to-point connection of system, and it can carry out
functions such as calling and answering, etc. on the screen. The operation is as follows:
B.
1.Switch on Bluetooth function
Touch lightly Bluetooth module of main menu to enter Bluetooth interface, and switch on the Bluetooth function
of your cellular phone in the meantime.
2.Pairing
Switch on searching new equipment function of the cellular phone. After the system links the cellular phone.
There will be a prompt in the cellular phone “CONNECT EQUIP?” The cellular phone selects “YES” and enter
password “0000” to confirm he binding. After the system and cellular phone are connected, the screen will display
“CONNECT OK”. Otherwise, please retry until the link is successful.
3.Make a call
Enter the Bluetooth mode, and you can enter telephone number through the numeric key of the screen. You can
also dial the number directly through the cellular phone. After pressing the pick up key, the system will convert
14
OSD Operation
the voice from cellular phone to car-bone speaker system, and you will hear the dial tone and the other party’s voice
through the speaker in the automobile.
After the connection is completed, press the red hang pick up key or hang up through the cellular phone directly.
4.Answer a call
When there is an incoming call, the system will switch to the Bluetooth hands free function automatically under
any mode, and convert the play voice mute of original mode to incoming ring and press the key to select answer
or reject.
Phone book OSD:
This function can record the numbers you called, received call and missed call.
Interface keys:
1.touch “CALLING” key lightly to check the calling numbers.
2.touch “RECIEVEING” key lightly to check the received call.
3.touch “QUESTION” key lightly to check the missed call.
4. touch “RETURN” key lightly to return the main menu.
5. touch ”UP” key lightly to return the last catalogue.
15
OSD Operation
Ipod operation instruction
Press the IPOD button on the main menu to enter the iPod model (please make sure the iPod is
connected correctly)
A region
Touch lightly the A region to enter to the button menu.
1. MUTE touch key
Touch lightly the key to switch ON/OFF the volume
2. PREVIOUS/FRW touch key
Short touch the key or previous track, and long touch the key for fast rewind.
3. NEXT/FFW touch key
Short touch the key for next track, and long touch the key for fast forward
4. PLAY/PAUSE touch key
Touch lightly the key for play and pause function.
16
OSD Operation
5. STOP
Touch lightly the key for stop playing iPod.
6. EXIT
Touch this key to exit the interface.
7. NEXT SEGMENT
Press this key to play the next track or segment
8. RPT touch key
Touch lightly the key to start repeat play, the screen displays“RPT” in the meantime; Press the
key again for normal mode.
9. RDM touch key
Touch lightly the key to start random play; Press the key again for normal mode.
10.L/R touch key
Touch lightly the key to choose audio at iPod mode.
11.EQ setup button
Pop/Rock/Class/Jazz/Off.
12. OSD
Touch lightly the key to show the playing information at iPod mode.
13.SUB_T Key
Touch lightly the key to convert subtitles in different languages (CD-ROM titles such as no
more information will be invalid clicks)
14.MENU Key
Touch lightly the key for menu play
15.UP Key
Touch lightly the key for UP selection of menu, after selecting the menu, touch lightly “OK”
key to run the operation selected.
16.DOWN key
Touch lightly the key for DOWN selection of menu, after selecting the menu, touch lightly “OK”
key to run the operation selected.
17.RIGHT key
Touch lightly the key for the next menu, after selecting the menu, touch lightly “OK” key to run
the operation selected.
18.LEFT key
Touch lightly the key for the previous menu, after selecting the menu, touch lightly “OK” key to
run the operation selected
19.OK Key
Press the key lightly to confirm after selecting the menu.
17
OSD Operation
AUX function
MUTE
TA
CLOK
SYS
EQ
EXIT
2
3
4
5
6
AV interface operation:
1. MUTE touch key
Touch lightly the key to switch ON/OFF the volume.
2. TA touch key
Touch lightly the key to exit the traffic announcement and traffic information program.
3. CLOK touch key
Touch lightly the key to switch ON/OFF time display.
4. SEL touch key
Touch lightly the key to select the following systems:
AUTO
NTSC
PAL
5. EQ touch key
Touch lightly the key to select sound effect as follows:
FLAT
POP
ROCK
CLAS
6. EXIT touch key
Touch lightly the key to return to main menu.
System Setup
18
OSD Operation
1. Navi Sound Key
Touch
key to select “on” and “off”
On : navigation sound comes out from front speaker while music comes out from rear speaker.
Off : All speakers comes out navigation sound , music comes out after navigation sound stop
2. RDS Key
Touch
key to select “on” and “off”
3. Beep Key
Touch
key to select “on” and “off”
On: Beep when press on button or touch screen
Off: no sound when press on button or touch screen
4. Brake Key
Touch
key to select “on” and “off”
On: Need to connect the parking cable to parking gear to watching movie and TV when parking
Off: watch movie and TV while driving
5. Clock key
Click — and + to set the time.
6. RETURN touch key
Touch the key to enter previous page.
Display setup
1. Brightness Key
Touch
key to select “Bright”
2. SOFT Key
Touch
key to select “SOFT”
3. Standard Key
Touch
key to customization by user.
4. Bright key
Click — and + to set the Brightness
5. Color key
Click — and + to set the Color
6. Contrast key
Click — and + to set the Contrast
19
OSD Operation
7. RETURN touch key
Touch the key to enter previous page.
Sound setup
1.POP Key
Touch
key to select“POP”
2.Rock Key
Touch
key to select “Rock”
3.Jazz Key
Touch
key to select “Jazz”
4.Classic Key
Touch
key to select “Classic”
5.User key
Touch
key to customization by user.
6.LOUD key
Touch
key to select LOUD “on” and “off”
7.Front key
Balance setting for increasing front speaker sound.
8.Rear key.
Balance setting for increasing rear speaker sound.
9.Left key
Balance setting for increasing left speaker sound.
10.Right key
Balance setting for increasing right speaker sound.
11.Bass key
Click “+” and “-” in the menu to adjust Bass.
12.Treble key
Click “+” and “-” in the menu to adjust Treble.
13.RETURN touch key
Touch the key to enter previous page.
20
OSD Operation
Navigation path setup
NAVI
Press the GPS icon of the main interface,then appear below interface:
1).Back icon:press it to go back to main interface(it only effect when you press it 3 seconds
afer it entering any modes.
2).Setup Icon:Press it to enter into setup interface
3).Entertainment function icon:press it into navigation interface.
4).Navigation function icon:press it into navigation interface.
Press the "setup" icon on the console interface,then appear the below interface
21
OSD Operation
Press the "navigation setup"icon on the setup interface to enter into the below interface:
Press the "file folder"icon on the "navigation setup"interface to enter into below picture,and choose
and choose the map software on the picture.
Press the OK button, then you successfully set up the navigation path.Then touch the back button
button to return to the conslle interface.
22
OSD Operation
Press the "GPS monitor"icon to enter into below interface,it will display any kinds of
information of GPS.
Touch the "General setup"icon to enter into below interface,then you can ser up the language
and the selection of effect for switch.
Touch the touchscreen icon to enter into below interface to adjust the screen.
23
OSD Operation
Touch the screen icon to enter into below interface,then you can setup the brightness,position
and magnitude of the screen.
Touch the volume icon to enter into below interface,then you can setup the volume for system
system voice and press voice.
Touch the time icon to enter into below interface,then you can set up the time.
24
OSD Operation
Touch the system icon to enter into below interface,it will display the version number,the memory
capacity and the details.What's more,you can operate the initial setup and file fixing.
Touch the entertainment icon in the console interface,it will appear below picture.
Return
Turn off
Touch the Music icon to enter into below picture.
Return key:press return"control panel"interface
File
Turn off
Delete
Music menu
Turnup
Turn down
Return
Last
Next
25
OSD Operation
Touch the Movie icon to enter into below picture
Return key:press return"control panel"interface
Turn off
File
Picture zoom button
Next
Last
Photo menu
Stop/play
VolumeVolume+
Ejection
Mute
Play progress display
Return key:press return "control panel"interface.
Turn off
Ebook shows area
web page play
page shows area
Turn up Turn down
Touch the picture icon to enter into below picture.
Return key:press return"conttol panel"interface
turn off
Picture Enlarge
File
Picture Rotation
Full screen button
Picture Narrow
Turn up
Picture Enlarge
Turn down
26
OSD Operation
Symptom
Possible Reason
Remedy
Routine
The fuse of machine power supply or the fuse of
automobile battery is fused.
Can't be started. The power voltage exceeds the rating scope. of
work, the system protects automatically.
The failure is caused by illegal operation.
No sound
output or small
output volume
Incorrect connection line.
Volume setup is too small.
Speaker failure.
Volume balance setup deviated too much.
Speaker connection line partially grounded.
Replace the fuse of right specifications.
Adjust the voltage.
Press the reset key at front panel to reset
the system.
Check and correct the connection.
Increase the volume.
Replace the speaker.
Adjust volume balance setup to middle
position.
Speaker connection lines should all be
insulated.
Replace with new battery.
Install the battery again.
Remote controller Battery already exhausted.
Wrong battery installation.
no function.
Poor sound
quality, with
sever distortion
Please don't use inferior disc.
Power impedance of speaker and machine not
matched.
Speaker open circuit.
Use licensed disc.
Replace with a suitable speaker.
Check speaker connection line.
Machine autoreset when
power off
ACC and B+ connection incorrect
Check for correct connection.
Without image
Brake connection line incorrect
Non-brake status
Image output
abnormal
DVD current system video setup not cooperative
Video signal connection incorrect
Check for correct brake connection.
Park the car in a safe place and remain
brake status.
Adjust system video setup.
Check and connect correctly.
Improper image proportion setup
Use correct image proportion setup.
Auto antenna didn't stretch out completely.
LOC function placed at ON status.
Connect auto antenna correctly.
Switch off LOC function.
Disc is dirty or damaged.
File or record is damaged.
Clean or replace disc.
Replace disc or re-select saving file.
Rollover screen
(optional)
Image pulled,
stretched or
compressed
Radio
Weak reception
signal
Read disc/card
Break in the
play process
Play information
The information content is more than the screen can
with mistake
display.
display
Mistake or
not working
Illegal operation
Press down and hold JECT key 5s to reset
read disc apparatus.
Disc can't enter
There is already disc in the machine.
Take out the disc inside the machine and
load another disc.
The disc can't
work normally.
The grade of disc exceeds that of lockup function.
The district code of disc not compatible
The disc is loaded upside down.
Adjust the setup grade of lockup function.
Use compatible disc for the machine.
When inserting disc, the face with tag
heading up.
Because of SD card compatibility, not every SD
card can be read in the system.
Replace the SD card.
PBC function is under operation.
Switch off PBC function.
The SD card can
be read on the
computer, but not
on the machine.
Without repeat
and search function
when playing VCD
27
Us
erManual