1
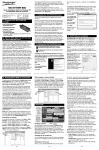
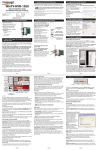
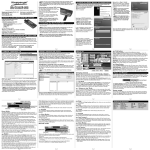
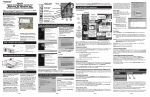
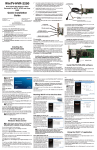
1. Removal of previous software
WinTV-CI
Quick Installation Guide
© 2008 Hauppauge Computer Works · QI-WINTV-CI-V1.1-ENG · 2008/04/10
Hauppauge Computer Works, Ltd.
10 Borough High Street
Bank Chambers
London, UK, SE1 9QQ
www.hauppauge.co.uk
Tech Support: (+44) 0207 378 0202
Telephone: (+44) 0207 378 1997
Fax: (+44) 0207 357 9171
[email protected]
Contents of the WinTV-CI package
●
●
●
●
WinTV-CI
USB Cable
WinTV-Installation CD-ROM-ROM including the
new WinTV v6 application
This installation guide
System Requirements
Compatible WinTV product e.g. WinTV-NOVA-T, WinTV-NOVA-S,
WinTV-HVR-900 or WinTV-HVR-3000
● Windows XP with Service Pack 2 or Windows Vista
● One free USB 2.0 port
The WinTV-CI is a peripheral device for your WinTV product that
allows you to connect a Conditional Access Module (CAM) with a
compatible PayTV SmartCard subscription to watch PayTV channels.
●
Page 1
4. Checking the WinTV-CI Installation
To check that you have correctly
installed you WinTV-CI, you can
check in Device Manager. First
check that "WinTV-CI USB"
(11xxx) appears under Univeral
Serial Bus Controllers.
If you have purchased the WinTV-CI as an upgrade to an existing product, then you should ensure that your previous software installation
is removed.
To do this, insert the installation CD-ROM that came with the WinTV-CI
and select Browse CD-ROM from the autorun menu. This will open up
an explorer window with the files on the CD-ROM, locate the file called HCWClear and double click on
it, from there select Remove all
WinTV drivers and applications
and Search all INF files for conflicting hardware, click OK and wait
for the black box to disappear.
Once the black box has disappeared please restart your computer.
When Windows restarts the found
new hardware wizard will open
and ask you to install drivers for your product. Select Cancel each
time this wizard appears (it may appear several times).
When Windows has fully loaded please continue to step 2.
ote: If you have any anti-virus software enabled, please disable it during the installation of the software.
N
Insert your WinTV Installation CDROM, the installation window will
automatically appear.
ote: If the autorun does not
start, browse to the files on
the disc and double click on the
file called 'Setup'.
In the installation window click on
Step 1: Install WinTV Drivers.
N
You should connect the WinTV-CI
to your computer using the supplied USB2 cable. (N.B Will not
work in a USB 1.1 port). You
should also make sure your
Hauppauge TV Card is also connected at this time.
The found new hardware wizard
will appear again, select Cancel
each time it appears.
Once complete, a message
appears in the bar. If this message
is Drivers have been updated
Successfully, click on the bar to
exit. If the message reports an
error, check the connection of
your WinTV, or contact our technical support.
Next, click on Step 2: Install
WinTV and select your language
from the list. The setup window
should appear and begin to automatically install the WinTV applications.
A blue screen will open which will
begin installing and updating the
drivers for your product.
ote: During the installation, other installation wizards may open, we recommend
following the instructions in
each of these and installing
with the default options available.
N
2. Connecting the WinTV-CI
During the installation a message
may appear warning you that it
cannot verify the publisher of the
driver, click Install this driver software anyway to proceed.
ote: For advanced users
you can select the 'Custom
Installation' which will allow
you to modify the list of applications that are installed by
default.
N
Once the WinTV installation is complete, click OK then Exit in the window "Hauppauge WinTV Installation CD". You should now be back at
your Windows desktop.
Page 2
5. WinTV® Application
To start the WinTV application double click on the WinTV icon.
When you run
WinTV for the first
time, a message will
appear asking you
to scan for tuner
channels now.
Please ensure that
the TV and/or
Satellite antenna is
connected, click
YES.
From the scan page perform a channel scan as you would normally
with your WinTV device, refer to the full manual or quick installation
guide for your WinTV product if you need assistance with this.
Secondly, click "View" and "Show
Hidden Devices".
3. Installing the drivers and application for
your WinTV product and the WinTV-CI
Page 4
Page 3
Pref button
Watch TV
TV Mode
Remove toolbars
no title mode
Channel down
Always on Top
Setup Menu
Channel surf
Mute
Last channel
Snapshot Still
capture
Close
Click your right mouse button
in the TV window to remove
toolbars. Click again to
restore toolbars.
Freeze picture
CFG
Configure Snapshot
Snapshot viewer
window:
Double click on each
thumbnail to see
image full size.Click
and hold your right
mouse button to see
image options.
Minimise
Channel up
Volume
Current TV channel
Click your right mouse
button here to see the
channel selector
TV-Mode
Pause Record
Click the Pref button to open the preferences menu:
View: These are the settings for the On Screen Display of the TV
channel and Audio Volume, where you can enable Close Captions (if
supported in your system configuration), plus controls for the Toolbar
mode (Title mode), NoToolbar mode (No Title) and Full Screen (TV
mode).
Movies: Here is where you configure some video and audio settings.
You can set the movie record directory (DVCR Record File Path).
Snapshot: Set the size of your captured images, plus single or two
field captures for capturing motion or still image video.
Audio: Your audio settings are configured here.
Menu Button
Playback
Changing channels
Click the Menu button to open the TV setup menu. Here is the main
control bar for TV channels, and duplicate controls for other functions:
Suite-Manager: Configure the TV tuner (scanning, channel pre set,
etc.) and setting up favourite channel lists.
Configuration: Duplicate configuration menus for colour, audio, etc.
View: For settings an exact TV window size: 320x240, 640x480 etc.
You can change channels by using the Channel Up or Channel Down
buttons on the WinTV. You can type a channel number (for example:
27) and WinTV will tune to that channel. If the entered channel does
not exist, you will see a black window.
You can also right click in the Current TV channel box, where you will
see a list of channels. Or type letters (for example: BBC) to access to
the list of the channels including these letters.
Now if Live TV is running you will
see a second device "WinTV-CI
BDA (11xxx)" under Sound Video
and Game Controllers. If this
device is shown your WinTV-CI is
correctly installed.
TV Mode
When you click the Full screen TV button, TV will appear full
screen on your PC monitor. When finished watching TV full screen,
click your right mouse button in the TV window. If you see video with
a black box around it, click the Pref button then click TV mode tab.
Check the box which says “Allow resolution change”.
"Always on top" Mode
The WinTV application will remain in view over any other applications even if it is not selected. To turn on, click the Always on top button. It will turn green. To turn off, click this button again.
A convenient way to use Always-on-top is to make the TV window in
the no-title mode small, and to make the TV window in the title mode
larger. Then you can switch from a small window to a larger one by
clicking the right mouse button.
Page 5
Page 6
Page 7
Page 8
Watch PayTV
To decode PayTV channels you need a suitable Conditional Access
Module (CAM) and compatible SmartCard (not included in this package).
Make sure the WinTV-CI is plugged into a USB2 port.
Insert the SmartCard into the CAM as far as it will go, insure that the
SmartCard is the correct way up (typically the pins for the chip will be
facing upright), do not force the SmartCard in it should slide in smoothly.
Insert the CAM into the WinTV-CI as far as it will go, insure that the
CAM is the correct way up (typically the coloured label will be facing
upright), do not force the CAM in it should slide in smoothly.
You can now start the WinTV application (double click on the WinTV
icon on your desktop) and change to a PayTV channel, if everything is
correct the channel should now be displayed.
From here you can use the onscreen menu to check
Subscription Status, change
Parental Controls or change your
PIN numner.
I see the message "The CAM menu is only available while recording
or watching TV"
The WinTV-CI CAM Menu
Application is only available while
WinTV is running Live TV. Please
make sure WinTV is running and
is tuned to a Digital Channel and
retry.
I just received my new CAM and Card from my Pay-TV provider and
have plugged them into the WinTV-CI correctly but I am unable to
see any Pay-TV.
Most Pay-TV providers will require the Card to be activated before it
will function. You should contact your Pay-TV provider to ensure your
card is activated and able to decrypt Pay-TV.
I see the message "No CAM detected. Please re-insert your CAM and
try again"
Please check your CAM is fully
inserted into the WinTV-CI. Try reinserting your CAM, if the problem persists, please unplug/replug your WinTV-CI USB cable
and retry.
WinTV-CI CAM Menu Application
In order to perform some operations in your CAM such as Setting the
Parental Controls, changing your PIN Number or checking your subscription status you can access these functions from within the
WinTV-CI CAM Menu Application.
When WinTV is open an icon will appear in the
taskbar. To open the WinTV-CI CAM Menu
Application you can either double left click on the icon or single right
click and choose "Open".
Troubleshooting
I see the message "Please insert your smart card"
Check your smartcard is correctly
inserted into your CAM, check it
is inserted the correct way up.
The metal contact of the Smart
Card should generally be face up.
(If you are in doubt, please check
your CAM's User Guide).
For usage instructions of your
CAM, please refer to it's User
Guide.
The following screen will appear.
I see the message "Please check your smart card"
If you see this message it may
mean the Smart Card does not
have a valid subscription for the
channel you are trying to view or
is not designed for the CAM you
are using. Please check with your
Pay-TV provider.
Page 9
FCC Statement
Radio Interference Statement:
WinTV have been tested and found to comply with the limits for a
Class B digital device, pursuant to part 15 of the FCC Rules. These
limits are designed to provide reasonable protection against harmful
interference in a residential installation. This equipment generates,
uses, and can radiate radio frequency energy and cause harmful
interference to radio communications. However, there is no guarantee
that interference will not occur in a particular installation. If this equipment does cause harmful interference to radio or television reception,
which can be determined by turning the equipment off and on, the
user is encouraged to try to correct the interference by one or more
of the following measures:
● reorient or relocate the receiving antenna.
● increase the separation between the equipment and receiver.
● connect the equipment into an outlet on a circuit different from that
to which the receiver is connected.
● consult the dealer or an experienced radio/TV technician for help.
FCC ID: H90WINTV
CAUTION: Changes or modifications not expressly approved by the
party responsible for compliance to the FCC Rules could void the
user's authority to operate the equipment.
CE Statement: This equipment has been tested and complies with
EN 55013, EN 55020 and IEC 801-3 part 3 standards.
Page 13
Page 10
Page 11
Page 12
Page 15
Page 16
Waste Electrical and Electronic Equipment
(WEEE)
The device may not be disposed of with household rubbish. This
appliance is labeled in accordance with European Directive
2002/96/EG concerning used electrical and electronic appliances
(Waste Electrical and Electronic Equipment - WEEE). The guideline
determines the framework for the return and recycling of used appliances as applicable throughout the EU. To return your used device,
please use the return and collection systems available to you.
Page 14