1
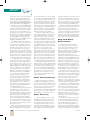
#84 Master Pages 26-49
3/22/04
4:30 PM
Page 36
Equipment
Review
Marantz VP-12S3L
High-Performance HD2+ DLP™ Video Projector
G
R E G
R
O G E R S
Marantz VP-12S3L High-Performance HD2+ DLP™ Video Projector
Third-Generation
Technology Enhances
Picture Quality
The Marantz VP-12S3 is the company’s
third-generation 720p single-chip DLP projector. It features new technology to increase
contrast, lower black levels, and automatically calibrate its gray scale. There are
short throw (VP-12S3 - $12,500) and long
throw (VP-12S3L - $16,000) versions of the
projector to accommodate different room
sizes and placement requirements. A VP12S3L was provided for this review.
“I was particularly impressed by
the color accuracy and the brilliance of color detail on network
broadcasts and D-Theater movies”
Specifications:
Innovation
The VP-12S3 utilizes Texas Instruments’
HD2+ Digital Light Processing™ technology, a
7-segment 5x-speed color wheel, and custom
Minolta optics with a remote-controlled twoposition iris that dramatically improves the contrast ratio and black level, compared to previous generation HD2 DLP projectors. In addition, the 200-watt SHP projection lamp is now
DC powered to make it less prone to flicker.
The projector’s most innovative new feature
is a unique gray scale auto-calibration system.
Each projector includes a color analyzer pod
that temporarily snaps over the lens like a
lens cap. The auto calibration system generates appropriate test patterns and reads
data from the color analyzer pod through a
cable that attaches to the rear panel RS-232
port. The projector also incorporates a color
correction filter (ORCA™) to remove excess
yellow from the light that passes through the
color wheel. A more neutral white light is
said to improve the color palette accuracy
and the green primary color in particular.
36
Texas Instruments HD2+ Digital Light Processing™
Technology
High Definition 1280 x 720 DMD™ Semiconductor
Lamp: 200 W SHP DC Powered
Lens: f: 26.5 to 30.7 / F: 3.0 - F:5.0
Contrast Ratio: > 3800:1
Light Output: > 700 ANSI LUMEN Typical
Brightness Uniformity: 90%
Long Life Lamp: (Average 2000 Hours)
Video Inputs
Composite Video:1 (RCA)
Y/C: 1 (S-Video)
Component: NTSC/ATSC 2 (3x RCA)
RGB/HD: 1 (VGA D-Sub 15)
DVI With HDCP: 1 (29 Digital Pin)
In/Outputs
RS232C: 1 (D-Sub 9)
RC-5: 2 (3.5 mm mini)
DC Trigger: 2 (3.5 mm mini)
6 Picture Modes: Theater, Standard, Dynamic,
User A, User B, User C
5 Preset User Gammas
18 Picture Memories
4 Aspect Modes
5 Color Temperatures
Black Level Selection
Economy Lamp Mode
No Light Leakage (Double Sealed Cabinet
Structure)
Extremely Quiet (Noise Canceling Construction,
Sealed Color Wheel Motor)
Power Requirement AC 100-120 V / 220-240 V,
50/60 Hz
Power Consumption: < 300 W
Dimensions (WDH In Inches): 15 15/16 x 18 9/16
x 5 3/16 (excluding feet)
Weight (In Pounds): 26.1
Price: VP-12S3 $12,500 (short throw lens)
VP-12S3L $16,000 (long throw lens)
Manufactured In Japan For:
Features
Lens Up/Down Shift
Adjustable Iris
Video Processing Using Faroudja® Processing
with DCDi™ Enhancement
2-3 Pulldown Progressive Scan Film Detection
10-bit Digital Gamma Processing
Horizontal and Vertical Keystone Correction
Widescreen Review • Issue 84 • May 2004
Marantz America, Inc.
1100 Maplewood Drive
Itasca, Illinois 60143
Tel: 630 741 0300
www.marantz.com
Page 1/7
#84 Master Pages 26-49
3/22/04
4:30 PM
Page 38
Equipment
Review
Appearance
The projector has a light gray case with
a sparkly metal-flake finish. A somewhat
darker bezel surrounds the larger than normal lens assembly, which is slightly offset
from the center of the projector. The fans
exhaust warm air through the front bezel. A
manual lens shift dial is located on top of the
case, along with a set of operating controls.
All inputs are on the recessed rear panel.
Setup
A 16:9 (1.78:1) screen should be used
to match the projector’s native aspect ratio.
With a 100-inch diagonal (87 3/16-inch x
49-inch) screen, the short throw Minolta
zoom lens provides a lens-to-screen throw
distance of between 10 feet 9 inches and
12 feet 6 inches. The long throw zoom lens
provides a throw distance of between 16
feet 8 inches and 22 feet 7 inches. Focus
and zoom are manual adjustments—not
available from the remote control.
The mechanical lens shift function permits the center of the lens to be mounted
anywhere between the top and bottom
edge of the screen, regardless of whether
the projector is ceiling mounted or table
mounted. The projector can be tilted if it
must be located above or below the screen,
but this will cause the picture to keystone.
Electronic Keystone Correction can be used
to restore the image to a rectangle, but keystone correction produces moiré patterns
on closely spaced lines, so it should be
avoided if possible.
Connections
The rear panel has six video inputs—
one composite (RCA connector), one Svideo (4-pin mini-DIN), two YPbPr (RCA
connectors), one RGB (15-pin D-sub), and
a DVI-D input. The YPbPr component video
inputs accept standard-definition or highdefinition signals. The RGB input accepts
signals with positive or negative HV sync,
but not sync on green.
The DVI-D input, which includes HDCP
(High-Definition Content Protection), can be
configured in a menu to accept digital RGB
or YCbCr signals. The latter can be set for
standard or high-definition color decoding.
You can select the Normal mode for DVI
signals with RGB-Video levels (black at digital
code 16 and 100 IRE at 235), or the Extend
mode for RGB-PC levels (black at 0 and
100 IRE at 255). The black level is switched
correctly, but you will want to re-adjust the
contrast levels if you switch signal types.
The YPbPr inputs are compatible with
480i/p, 540p, 576i/p, 720p, 1035i, and 1080i
38
video formats. In addition to the usual 50,
59.94, and 60 Hz field and frame rates, the
projector also displays 48 Hz 720p and
1080i signals at their native vertical rates. (I
wasn’t able to try that feature.) The analog
RGB input is compatible with the same
video formats, and 60 Hz PC display formats up to 1024 x 768. According to the
manual, PC formats at other vertical rates
will be accepted, but not displayed properly. The DVI digital input accepts the same
video formats and 60 Hz PC formats.
The rear panel includes an RS-232C
control port, and Remote Control In and Out
jacks for connection to a Marantz audio
component. There are also two 12V Trigger
output terminals. One is active whenever
the projector is turned on, and the user can
specify which aspect ratios enable the other
12V output to control screen masks.
The rear panel also includes a standard
three-prong power cable socket and a light
switch that illuminates the rear panel for
changing cables in a dark room. That much
appreciated feature even works when the
projector is in standby mode.
Controls
The slender 1.75-inch-wide remote control is logically laid out, but only seven of
the 25 buttons are backlit. Those include
the Menu, V-Mute (picture mute), Input,
Aspect, Pattern, Standby, and Power On
buttons. There are also six dedicated input
buttons, four Aspect Ratio buttons, and four
buttons that select Picture Modes. Onscreen menu items are navigated and
selected with a tilting cursor-pad button.
There are also buttons for changing the
deinterlacing mode and displaying status
information.
The Standby button is an annoying operator trap that immediately turns off the projection lamp without asking for conformation. If it is pressed accidentally you must
wait for the entire cooling off period before
the projector can be turned back on again.
The top of the projector includes an alternate set of buttons for on-screen menu navigation, input selection, the focus pattern, and Power
On/Standby. There are also Warning/Lamp,
Power, and Standby indicators. The maximum lamp life is 2,000 hours, but Marantz
recommends replacing the lamp after 1,000
hours. The lamp is user replaceable.
On-Screen Menus
The on-screen menus are arranged in
hierarchical levels. The Main menu includes
Picture Adjust, Setting, System, Display,
Config, Trigger 2, and Preset.
The Picture Adjust submenu provides
Widescreen Review • Issue 84 • May 2004
Contrast, Brightness, Color (Saturation), Tint
(Hue), Sharpness, Noise Reduction, Color
Temperature, and Fine Menu. When a variable Picture Adjust item is selected, the
menu disappears and is replaced by a single bar graph and numerical value near the
bottom center of the screen, which makes it
easier to perform adjustments without part
of the picture being covered. When the
adjustment is completed the menu reappears. The Picture Adjust items change
depending on the input and the signal format. For example, the Tint and Noise
Reduction controls are only available for
composite and S-video signals.
The Fine Menu item produces a submenu
that includes Luminance, Chrominance,
Sub Control, and Miscellaneous. The first
two items provide a large number of adjustments for detail and edge enhancement. I’ll
discuss those in a separate section. The
Sub Control item produces a menu that
includes red, green, and blue (RGB) Contrast
and Bright controls, which are equivalent to
the usual RGB Gain and Bias controls for
adjusting color temperature and grayscale
tracking. There are also Clamp Width and
Clamp Position adjustments for analog RGB
signals, which can be useful for signals that
have non-standard timing. The Miscellaneous
item produces a menu that includes DCDi™
(On/Off), CCS (cross color suppression)
(On/Off), FRC (frame rate conversion)
(Auto/On), and Sharpness Filter (0-4).
The Setting submenu includes Lamp
mode (High/Low), High Bright (On/Off),
Aspect Ratio, VCR mode (On/Off), Cinema
(Auto/Off), Iris (5.0/3.0), and Black Setup.
The Lamp mode changes the lamp brightness by switching the lamp power. The
High Bright mode increases brightness by
producing an overly blue gray scale and
should be avoided for critical viewing. The
VCR mode is for poor quality video sources.
It forces the projector to use intra-field vertical interpolation for deinterlacing and
should be left off for DVDs and most broadcast video. The Cinema mode enables
inverse-telecine deinterlacing for standarddefinition film sources. The F5.0 Iris mode
maximizes the contrast ratio at the expense
of picture brightness. Black level setup
selects a 0 IRE or 7.5 IRE black level for
analog input signals, and RGB-video or
RGB-PC levels for DVI signals.
The System submenu selects the signal
format (Auto, NTSC, PAL, 480i, 720p, etc.)
for each input, but the Auto value worked
fine for all of my sources. This menu also
provides RGB or YCbCr (standard or high
definition) selection for the DVI input.
The Display submenu includes Vertical and
Horizontal Keystone, Auto Adjust, Vertical
and Horizontal Size and Position, and Phase.
Page 2/7
#84 Master Pages 26-49
3/22/04
4:31 PM
Page 40
Equipment
Review
Auto Adjust determines the Size, Position and
Phase settings automatically for analog RGB
signals. The Config submenu includes Auto
Power Off, OSD Position, Language (6 choices),
Ceiling (mount) (On/Off), Rear (projection)
(On/Off), Color Temp Calibration, Reset Lamp
Life, and Reset All. The Trigger 2 submenu
selects the Aspect Ratios that enable the
12V Trigger 2 output terminal.
The Preset submenu selects the Picture
Mode (Theater, Standard, Dynamic, User
A/B/C), Index (1, 2, 3, Default), and Gamma
(A, B, C, D, E, a, b, c). The Gamma setting can
only be selected for the User picture modes.
Lamp Mode
The Lamp mode selects the brightness of
projection lamp. This is one of the quietest
projectors I have measured. In the High Lamp
mode, the fan noise measured only 51 dB,
C-weighted at 12 inches from the front
(exhaust side) of the projector. The noise level
dropped below the 50 dB sensitivity of my
sound level meter in the Low Lamp mode.
Picture Modes
Each of the six picture modes (Theater,
Standard, Dynamic, User A/B/C) stores
three sets (Index 1-3) of Picture Adjust settings and a gamma mode. These are global
settings that can be used with any input.
When an input is switched, the picture
mode and index last used with that input
are restored.
Gamma
There are eight preset gamma curves
(A-E, a-c). The gamma curves for the
Theater, Standard, and Dynamic picture
modes are ‘a’, ‘b,’ and ‘c’ respectively. Any
of the eight gamma curves can be selected
for the User picture modes.
The ‘A’ and ‘B’ gamma curve values are
relatively constant (about 1.62 and 1.73
40
respectively) from 10-60 IRE and then fall
off at higher signal levels. The ‘C’, ‘D,’ and
‘E’ gamma curve values rise below 20 IRE
(to about 2.02, 2.09, and 2.11 at 10 IRE)
and are relatively constant (about 1.85,
1.75, and 1.85) to about 70 IRE before
falling off. Therefore, dark image areas
appear darker as the gamma changes from
‘A’ to ‘E.’ The ‘a’ curve is much like ‘A’
(about 1.64) with a slight gamma increase
at the dark end. The ‘b’ curve is relatively
flat with an average gamma of about 1.83,
and the ‘c’ curve is nearly the same as ‘C’
without falling off at the bright end.
These are all unusually low gamma values. A display gamma of 2.2 is required to
produce a system gamma of 1.0, and as
I’ve indicated in previous reviews a system
gamma of 1.1 to 1.2 is advantageous when
viewing a picture with a dark surround. That
requires a display gamma of 2.45 to 2.67. I
prefer a display gamma of about 2.5.
On this projector I preferred the ‘c’
gamma curve even though ‘E’ had a higher
gamma at 10 IRE. I wasn’t sure why until I
realized that the brightest parts of the picture (above 70 IRE) were compressed (too
bright) because the gamma falls off at the
top of the ‘E’ curve. That bothered me more
than the additional brightness at the dark
end of the gamma curve, which makes
shadow details more visible, but leaves
some images a bit flat with too little contrast.
There are no controls to modify the preset gamma curves, but the manual mentions that special PC software can be used
to create custom curves. That software was
not available at time of the review.
Aspect Ratios
There are four Aspect (ratio) Modes—
Full, Normal, Zoom, and Through. The Full
mode is used to display 16:9 sources—
HDTV (720p/1080i) and 16:9 (anamorphic)
DVDs. The Normal mode is used to correctly display full frame 4:3 (1.33:1) pictures in
Widescreen Review • Issue 84 • May 2004
the center of a 16:9 screen with black sidebars. The Zoom mode is used to display 4:3
letterboxed pictures by expanding the
image proportionally in the vertical and horizontal directions to fill the width of the
screen. The Through mode displays any format with less than 720 vertical lines (or pixels) in its native pixel resolution without
scaling the image. There is no mode to nonlinearly stretch a 4:3 image to fill the screen.
Gray Scale
A custom color analyzer pod is included
to automatically calibrate the projector’s
grayscale. The color analyzer pod snaps
over the lens like a lens cap, and has a
cable that plugs into the RS-232 port on the
projector’s rear panel. To perform an automatic calibration the user only needs to initialize the sensor, center the lens shift
adjustment, snap the color analyzer over
the lens, and press a button. About 5 minutes later the process is complete.
After running the auto calibration I measured a gray scale of 6601K +267/-8K from
20-100 IRE. There was a 5-8 dE (delta-E)
deviation from D65 (x = 0.3127, y = 0.329)
over that range. The color temperature
increased to 7408K at 10 IRE with a dE of 17.
I manually calibrated the Color
Temperature and gray scale tracking to
match D65 using the red, green, and blue
Contrast (gain) and Bright (offset) adjustments in the Fine Picture menu. The manually calibrated gray scale measured 6500K
+47/-49K from 20-100 IRE, and 6702 at 10
IRE. More importantly, the gray scale deviation from D65 measured just 0-2 dE from
20-100 IRE, and 4 dE at 10 IRE.
Black Level And
Contrast Ratio
An AccuPel HDG-3000 Calibration generator (www.accupel.com) was used to generate test patterns for measuring grayscale,
Page 3/7
#84 Master Pages 26-49
3/22/04
4:31 PM
Page 42
Equipment
Review
contrast ratio, and color accuracy. Measurements were made after adjusting for the
maximum calibrated light output (Contrast
control) with a peak-white PLUGE pattern
(98 IRE stripe against a 100 IRE background),
and the optimum black level (Brightness
control) with a conventional PLUGE pattern.
With the gray scale manually calibrated
to D65, the F5.0 (high contrast)/Low Lamp
mode produced 13.4 fL from my 1.3 gain,
85.3-inch wide, 16:9 Stewart Filmscreen,
which slightly exceeds the 12 foot-Lambert
(fL) SMPTE recommendation for digital cinema. The on/off contrast ratio measured an
exceptional 3005:1, which produced an
absolute black level of just 0.0045 fL when
displaying a 0 IRE (black) field.
The F3.0/Low Lamp mode produced
16.6 fL from my screen, and a still excellent
on/off contrast ratio of 2104:1. That mode
could be used on slightly larger screens if
the F5.0 mode produced too dim of a picture. The High Lamp mode can also be
used for larger screens, but remember that
a lamp may lose 40 to 50 percent of its light
output over its useful life. So it’s a good idea
to plan your screen size with the Low Lamp
mode, and reserve the High Lamp mode for
use during the latter part of the lamp’s life.
The High Lamp mode increased brightness by about 25 percent. The F5.0 mode
produced 16.9 fL, and the F3.0 mode produced 20.7 fL from the 1.3 gain screen. The
latter is equivalent to about 454 lumens. If
additional brightness is desired for viewing
sports in a dimly lit room, the High Bright
mode can be enabled. It increased the
brightness about 20 percent, but the color
temperature increased to over 10,000K.
The on/off contrast ratio is extremely
important for DLP and LCD projectors
because it determines the absolute blackest level in the darkest scenes. A tiny
increase in the black level dramatically
reduces shadow detail discrimination in a
predominantly dark scene. I also find it
objectionable if the “black” background in
an image is noticeably brighter than the
black surrounding the screen.
A distinctly different picture quality factor
is the ability to see contrast differences
when there are bright objects in a scene.
Then the displayable contrast ratio is much
less than the on/off contrast ratio because
light from the bright objects will be scattered over the image obscuring darker
objects. The light scattering occurs within
the lens and the optical system of the projector, but it may also occur within your theatre as light reflects around the room and
back onto the screen.
There is no single measurement that can
precisely describe this intra-field contrast
ratio for all images because it depends on
42
the size and location of one or more bright
objects within each individual image. Hence
we can only define a figure-of-merit based
on an artificial test pattern. One such figureof-merit is the ANSI contrast ratio, which
involves measuring 16 blocks (8 white and
8 black) of a 4 x 4 checkerboard image and
then computing the contrast ratio from the
average luminance of the white and black
blocks. This is laborious and fraught with
practical measurement uncertainties.
I’m using a modified “ANSI” measurement that is the average contrast ratio of the
four central blocks in the 4 x 4 checkerboard. The contrast ratio for each block is
measured separately by fixing the position
and angle of the light meter a few feet in
front of the projector, and then electronically
reversing the black and white blocks of the
checkerboard pattern. This increases the
magnitude of the “black” values to minimize
the influence of room reflections and
improves the computational accuracy. It
also eliminates other issues related to making measurements off the screen. Starting
with this issue I will include this modified
“ANSI” contrast ratio measurement in each
projector review. The VP-12S3L measured
604:1. The only other HD2+ DLP projector
that I have reviewed measured 728:1. This
is outstanding performance for both products.
As video levels approach black, dithering noise has been another significant problem in earlier generation DLP projectors. An
excellent way to look for dithering noise is
to view the 1-10 IRE 10-step luma patterns
from the AccuPel generator. Dithering noise
was visible on the 1 to 3 IRE steps of the
luma pattern when viewed close to the
screen, but it was nearly invisible from a
normal seating distance.
White Field Uniformity
Brightness uniformity on a white-field
test pattern was extraordinary. There was
only a 1 percent variation in brightness from
the top to bottom center of the screen, and
7 percent or less from side to side for both
the F3.0 and F5.0 contrast modes. The
color temperature uniformity was within 70K
over most of the screen, with a variation of
about 230K at one edge in both modes.
Color Accuracy
The CIE x,y diagram shows the 720p
DVI RGB color accuracy compared to the
Rec. 709 (HDTV) colorimetry. The same
measurements are also shown on a CIE
u’,v’ diagram, which provides a more perceptually uniform presentation of the color
space. The projector primaries are slightly
more saturated than the HDTV primaries,
Widescreen Review • Issue 84 • May 2004
but they are balanced so that the position of
the yellow, cyan and magenta complementary colors are extremely close to the standard colors. The hues of flesh tones and the
other colors within the color gamut are quite
accurate and images are brilliantly vivid.
The CIE u’,v’ diagram for the 480i YPbPr
input shows that the complementary color
hues are still extremely accurate, even
though the red primary is a bit farther outside the Rec. 601 primary for standard-definition video. You will likely want to use the
YPbPr (or S-video) input, which provides a
Color control if reds are oversaturated or too
vivid on some video broadcasts or a DVD.
Edge And Detail
Enhancement
The projector includes more than a
dozen adjustments for edge and detail
enhancement that separately affect luma
and chroma portions of the image. The
Luminance submenu in the Fine Menu
includes eight adjustments for the Gain and
Threshold of the horizontal and vertical
Edge and Detail enhancement. The
Chrominance submenu includes additional
adjustments for Horizontal Edge Gain and
Threshold, Vertical Edge Gain, Enhancement,
and Delay. The Enhancement item is only
enabled for composite and S-video signals.
The Threshold adjustments determine the
minimum luma or chroma amplitudes that
the enhancement processing will affect. The
Gain adjustments control how much enhancement is applied to edges or fine details.
The Sharpness control (in the Picture
Adjust menu) acts like a master gain control
for the Luminance enhancement processing. If
the Sharpness control, or all of the Luminance
enhancement gain controls are set to zero,
there is no luma enhancement. As the
Sharpness control is increased, the enhancement increases proportional to the individual
Luminance enhancement gain settings.
The Sharpness control appears to work
more like an on-off switch for the Chrominance
enhancement. If the Sharpness is set to
zero, the Chrominance gain adjustments
seem to have no effect. But if the Sharpness
is set to ‘1’ or higher, the Chrominance gain
adjustments take full effect. When the
Enhancement item is enabled, it appears to
have master control over the Chrominance
gain adjustments.
Even when the Sharpness control and
the other Chrominance gain adjustments
are set to zero, there appears to be some
chroma edge enhancement on the Pb
channel. The leading edge transitions of
blue patches in the Snell & Wilcox pattern
of Video Essentials appear to be shortened,
and the Y/C delay pattern on AVIA: Guide
Page 4/7
#84 Master Pages 26-49
3/22/04
4:32 PM
Page 44
Equipment
Review
To Home Theater indicates a delay in the
blue channel. But the latter could also be a
result of shortening the leading edge transitions. In any event, I couldn’t identify any
related image degradation or color fringing
artifacts on DVD movies.
You can spend your rainy afternoons
individually optimizing these adjustments for
your DVD collection, or you could try the
default settings that are loaded when you
select one of the predefined Picture modes.
I found all of the default Picture mode settings to be much too aggressive, but you
might want to start with them and use the
Sharpness control to modify the overall processing gain. For most of my DVD collection I ended up setting the Sharpness control to ‘1’ with very small individual enhancement gain settings, or at zero to bypass the
enhancement. But there were a few DVDs
with rather soft transfers that I used some
additional enhancement to an advantage.
The Luminance and Chrominance
enhancement processing is not available for
analog RGB or DVI signals. For those inputs
a separate Sharpness Filter is added to the
Miscellaneous menu. It has 5 settings (0 to
4) where ‘0’ produces no edge enhancement.
The Delay control in the Chrominance
submenu was not useful. It is intended to
delay the color signals relative to the luma
signal, but it also separated the luma signal
into multiple color components creating an
effect that resembles misconvergence on a
CRT projector. Hence the Delay control should
always be left at its zero (default) position.
Standard-Definition
Scaling
Scaling performance varies depending on
the input signal type and format. The analog
480i YPbPr scaling is excellent. With the
Sharpness control turned off (zero) outlining
around horizontal and vertical edges is only
about 1 to 2 native (720p) pixels, and there
is no additional visible ringing. The 6.75
MHz burst (single-pixel black and white vertical lines) from the AccuPel generator had
negligible bandwidth loss and little aliasing.
Overscan varied between 2 to 2.5 percent
top and bottom, and 3 to 3.5 percent on the
sides. The analog RGB input also accepts
480i signals, but the deinterlacing is poor
(not done by the Faroudja components) and
I wouldn’t recommend using it.
The appearance of 480p YPbPr signals
was not as good. Outlining around horizontal edges was just 1 to 2 pixels, as it was
with 480i signals. But there were 4 to 5
(720p) pixels of outlining on vertical edges
and additional ringing when fed fast signal
transitions from the generator. I don’t
believe this was a scaling effect, but rather
44
an issue in the analog 480p YPbPr signal
path, because 480p RGB signals looked
very good. The fast signal transitions are
typical of a PC video card. When the AccuPel
generator’s slower edge transition option was
used, the outlining was reduced but still visible.
The top burst in the multiburst pattern
showed only a slight roll-off in frequency
response. Overscan was 3.5 percent on the
sides, and 2.5 percent top and bottom.
The DVI digital video input had no problem with 480p signals and provided exceptionally good scaling with the Sharpness
Filter set to zero. There were only 1 to 2
(720p) pixels of outlining on horizontal and
vertical edges, and all of the bursts in the
multiburst pattern looked excellent. In addition there was no overscan—not a pixel was
lost at the top, bottom, or sides of the image.
The S-video chroma bandwidth is excellent. The 1.5 MHz chroma stripes on Video
Essentials’ Snell & Wilcox test pattern were
bright, although not equivalent to the frequency response of the YPbPr signals. So
you should still use YPbPr signals from a
DVD player or a digital broadcast receiver
when they are available.
High-Definition Scaling
The projector produces a spatially “pixel
perfect” image when its DVI input is driven
by 720p video signals from an AccuPel
Calibration Generator. Each active (visible)
pixel from the source is mapped to a single
projector pixel. There is not a single pixel of
overscan or underscan. The single pixel
lines within a multiburst pattern are precisely rendered as single pixel lines with full resolution. The Sharpness Filter is disabled
when the DVI (or analog RGB) input
receives 720p signals.
The DVI input also worked well for 1080i
digital signals. There were only 1 to 2 pixels
of faint outlining on vertical and horizontal
lines in the Sharpness pattern, with 1 to 2
pixels missing at the edges. However, the
combined effect of the 1080i deinterlacing
(vertical-interpolation) and scaling could be
seen on the overscan patterns, where some
of the horizontal lines were 3 to 4 pixels
thick. The Sharpness Filter had little effect
on the 1080i edges, but it affected the
mulitburst response. The top burst (1920
pixels per picture width) was necessarily
aliased, but the filter rolled off the aliasing
when set below 4. The default (2) setting
was best, below that the frequency
response of the previous burst also began
to roll off.
When the analog YPbPr input is used for
720p signals, the projector scales the
image to create about 1 to 1.5 percent overscan on each edge of the screen. The signals
Widescreen Review • Issue 84 • May 2004
are apparently filtered and produce no visible lines in the top two bursts of the
AccuPel 720p multiburst pattern, which
means that the horizontal resolution is
below 640 pixels per picture width. There is
also significant outlining (about 6 pixels) on
vertical edges and additional ringing.
Slower edges only slightly reduce the outlining artifacts. The analog YPbPr input performs similarly with 1080i signals. There are
4 to 5 pixels of outlining, and the overscan
is about 1 percent on each edge. Again
there are no visible lines in the top two
bursts of the multiburst pattern, which
means that the horizontal resolution is
below 960 pixels per picture width.
Because of the poor frequency response, I
would avoid using the YPbPr inputs for
high-definition signals and use the DVI or
RGB input instead.
The analog RGB input does a much better job with 720p and 1080i signals. When
the slower AccuPel edge mode is used,
which is equivalent to a high-definition settop box, the edge outlining is acceptably
faint. But when the faster edge mode is
used, which is similar to most PC video
cards, the edge outlining was about 8 pixels to the right of vertical edges on 720p
signals (5 to 7 pixels on 1080i) and there is
additional ringing. So I would avoid the analog output of unfiltered PC video cards. The
720p single pixel lines in the top burst of
the AccuPel multiburst pattern showed
good resolution and depth of modulation.
The single pixel lines in the 1080i multiburst
were aliased. The Sharpness filter is
enabled for 1080i and the best setting was
the default (2) setting, as it was for 1080i
DVI signals. The Auto Adjust feature worked
well, and produced an image with no overscan or missing pixels for 720p. With 1080i
analog signals there was 2 percent top and
bottom overscan, 1 percent right edge, and
none on the left edge.
Deinterlacing
The projector uses Faroudja deinterlacing technology, which includes film-mode
(inverse-telecine) deinterlacing for standard-definition movies, and DCDi
(Directional Correlational Deinterlacing) processing for standard-definition original interlaced video.
Inverse-telecine deinterlacing provides
artifact-free deinterlacing of film-source
video as long as the video processor can
lock onto the 2-3 field pulldown cadence
that results from transferring 24 frame-persecond film to 60 field-per-second interlaced video. It also completely eliminates
vertical interpolation in the deinterlacing
process, thereby maintaining the full resoluPage 5/7
#84 Master Pages 26-49
3/22/04
4:32 PM
Page 46
Equipment
Review
Marantz VP-12S3
Gray Scale Tracking 720p
IRE Auto
Manual
Auto
°K
°K
dE
Manual
dE
10
20
30
40
50
60
70
80
90
100
4
2
2
2
1
0
1
0
1
1
7408
6868
6608
6608
6601
6601
6601
6593
6593
6593
6702
6451
6532
6532
6547
6492
6485
6492
6547
6547
17
5
6
6
7
7
7
8
8
8
terlacing, and regardless of the technique
there are always tradeoffs between line twitter, jaggies (static or moving stair-steps on
edges), and a loss of picture resolution. The
video segments of the Video Essentials
“Montage” provide good sequences for
comparing deinterlacers. Unlike many other
deinterlacers, the DCDi processing completely eliminates jaggies on the bobbing
frozen branch and the stripes of the rippling
American flag. But the Faroudja processing
appears to produce some color bleed
between the red and white stripes of the
flag. There is also more line twitter with vertical movement across horizontal lines in the
train yard and during the zoom-out of the city.
The DCDi processing does a good job
of minimizing jaggies on most standard-definition broadcast programming, but it was
less effective with fast motion sports. Jaggies
and line twitter were bothersome on basketball broadcasts as the camera panned
across lines and logos on the court, but they
were much worse with the DCDi disabled.
DVD Movies
tion of the film-to-video transfer. The inversetelecine film-mode processing handled a
wide range of DVD movies without any visible deinterlacing artifacts, and had no problems when jumping between DVD chapters.
The Cinema mode must be enabled to use
the film-mode deinterlacing. It will then automatically switch between inverse-telecine deinterlacing for film sources, and motion-adaptive
deinterlacing (with or without DCDi) for original
interlaced-video sources. The automatic
switching worked seamlessly without any
glitches or combing artifacts on the Video
Essentials “Montage Of Images,” which cuts
back and forth between segments transferred
from film and original interlaced video.
The DCDi processing uses directional
interpolation to reduce jaggies along edges.
The DCDi mode can be turned off in the
Miscellaneous menu, and then the video
mode deinterlacing uses only motion-adaptive
deinterlacing. The VCR mode turns off the
motion-adaptive deinterlacing for particular
poor sources, and uses a field-based vertical
interpolation algorithm regardless of video
content. That creates a substantial loss of
vertical resolution, and shouldn’t be used
unless you find other deinterlacing artifacts
with poor sources particularly objectionable.
It is much more difficult to deinterlace
original interlaced video sources than it is to
deinterlace video from film sources. There
are no ideal methods for video source dein-
46
I used the analog YPbPr and DVI digital
video inputs to evaluate picture quality with
DVD sources. All of my viewing was done in
the F5.0 (highest) contrast mode with Low
Lamp brightness. I was most impressed by
with the superior image clarity, dark blacks,
and vivid, accurate color.
At least two factors are responsible for
the exceptional clarity of the DVD images.
The analog 480i and digital 480p scaling
have minimal edge outlining, and the
Minolta lens has superior focus and little
vanishing chromatic aberration over the
entire screen. Chromatic aberration produces color fringing on gray or white lines,
similar to the effect of misconvergence on a
CRT projector. Projectors in this price range
are prone to have some chromatic aberration, which gets progressively worse toward
the edges of the picture. But test patterns
revealed that the VP-12S3L maintains sharply
focused lines with virtually no color fringing
out to the edges of the screen. That quality
of performance is normally only found on
much more expensive projectors that have
a larger, more costly lens. (I did not have a
VP-12S3 with the short throw lens to test.)
It is hard to overstate the improvements
that the HD2+ DMD™ (Digital Micromirror
Device™), 7-segment color wheel, and new
iris technology have brought to this generation of DLP projectors. The much lower
black level lifts a hazy veil that had been a
shroud over predominantly dark films, such
as The Game or Dark City. Moreover, almost
every movie contains some scenes that had
previously been partially obscured by the
Widescreen Review • Issue 84 • May 2004
black level of earlier generation projectors.
There is also a similar improvement in intrafield contrast, which enhances dark detail
recognition and image depth in scenes with
extremely bright objects. Back To The Future
and The Usual Suspects contain notable
examples. In addition, those troublesome
scenes are also free of visible contouring
artifacts (discrete brightness steps in patterns resembling a topological map surrounding bright objects).
The projector produces brilliant, vivid
colors with accurate hues. But because the
primaries are a little more saturated than the
Rec. 601 standard-definition primaries, I
slightly reduced the Color control for films
with highly saturated reds or deep skin
tones, such as The Thomas Crown Affair
(1999) and Indiana Jones And The Last
Crusade. The hues remain accurate and the
colors are still vivid with a small reduction in
color saturation (color depth). Many other
films look glorious without any color adjustments. I especially like the warm, natural
colors in Runaway Jury. The on-location
images looked especially realistic, far surpassing the believability of the script. But
the exchanges between Gene Hackman
and Dustin Hoffman are wonderfully entertaining, and the DVD transfer has excellent
detail that is superbly delineated by the projector (check out Hoffman’s sport coat).
The unusually low gamma values can be
seductive because they make the darkest
image areas brighter and expose more
shadow detail. But they also make dark
interiors and exterior night scenes brighter
than expected. I selected the ‘c’ gamma
curve because it was the setting that produced the darkest shadow regions without
compressing the brightest whites. I found it
pleasing for the widest range of movies. It
provided the most natural contrast for cruising the late-night streets of American Graffiti,
and was the most convincing gamma for
the lunar excavation and Discovery’s trip to
Jupiter in 2001: A Space Odyssey. However,
I wanted a higher, more conventional
gamma for classic black and white films
such as The Philadelphia Story, which
appeared rather flat with insufficient contrast.
I preferred a 480p or 720p DVI connection for the most highly detailed film-tovideo transfers. The digital video path provides a noticeable advantage in image definition compared to a 480i YPbPr analog
connection, which must include an additional digital-to-analog and analog-to-digital
conversion. But the advantage was less significant on DVDs with only average detail. In
fact, the 480i analog path was advantageous on transfers with softer images
because the luma and chroma enhancement processing, which is not available for
Page 6/7
#84 Master Pages 26-49
3/22/04
4:33 PM
Page 47
Equipment
Review
the DVI input, can improve the apparent
picture definition if used judiciously.
However, it is crucial to use a DVD player
that has minimal edge outlining on its 480i
analog output. It may also be necessary to
use the analog YPbPr input if the movie
contains extremely saturated red colors,
because the DVI input does not include a
Color saturation control.
HDTV
I used the DVI and analog RGB outputs
of a Samsung SIR-T165 HDTV Receiver to
feed high-definition broadcast video to the
projector. The IEEE 1394 (i.Link®/FireWire®)
output of a JVC HM-DH40000 D-VHS® DTheater™ VCR was also connected to the
Samsung, which provided an entirely digital
video path for high-definition D-Theater
movies.
My favorite D-Theater film transfer continues to be X-Men. Its exceptionally sharp
edges and fine detail present a difficult
challenge for 720p-native projectors. The
VP-12S3L rendered X-Men with more definition than any DVD movie, but the image
appeared slightly softened by the 1080i to
720p cross-conversion, and jaggies ran
along diagonal edges during camera pans.
The horizontal slats of a park bench also
exhibited line twitter during vertical camera
movement. I hope manufacturers will make
it a top priority to incorporate inversetelecine deinterlacing for 1080i film sources
in the next generation of DLP projectors.
NBC’s The Tonight Show With Jay Leno
continues to produce some of the finest
HDTV images, and it looked striking on the
Marantz projector. The cityscape backdrop
was particularly impressive with its vivid colors and fine structure. The depth-of-field of
the high-definition studio cameras maintain
splendid focus, and the projector’s scaling
produces very little edge outlining. But
there is no motion adaptive deinterlacing for
1080i video, which somewhat softens the
picture. The 1080i DVI signals produced
slightly better definition than the analog
RGB signals.
I was particularly impressed by the color
accuracy and the brilliance of color detail
on network broadcasts and D-Theater
movies. However, a few HDTV broadcasts
pushed red saturation to the limit. Although
I never found it seriously objectionable, it
would have been desirable to make a small
reduction in color saturation on some programs, which is not possible with the DVI or
analog RGB inputs.
In the F5.0 Low Lamp mode, with a peak
brightness of 13.4 fL, there was virtually no
visible pixelization or spurious digital noise
other than a small amount of dithering on
Page 7/7
47
the very darkest signals, which was virtually
invisible from a normal viewing distance.
Summary
The Marantz VP-12S3L is a third-generation 720p DLP projector. It features Texas
Instruments’ newest HD2+ DLP technology,
which provides a dramatic improvement in
black level and contrast ratio compared to
previous generation DLP and LCD projectors. It also includes a unique gray scale
auto calibration system to maintain consistent color accuracy. Faroudja deinterlacing,
excellent scaling, and a superior Minolta
long throw lens produce pristine image clarity for DVD movies from 480i YPbPr
sources. The HDCP-equipped DVI digital
video input is preferred for 480p and HDTV
sources. ■■