1
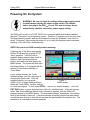
DADPRO32 System Reference Manual DADPRO32 System Reference Manual 2000 by ENCO Systems, Inc. ENCOWARE and DADPRO32 Software 1998 by ENCO Systems, Inc. DADPRO32 System Reference Manual 1997 by ENCO Systems, Inc. DAD, DAD486x, DADPRO, DADPRO32, and ENCOWARE are Trademarks of ENCO Systems, Inc., Farmington Hills, MI U.S. and Foreign Patents applied for All Rights Reserved IBM, PC, and AT are registered trademarks of the International Business Machines Corporation; MS-DOS and Windows are registered trademarks of Microsoft Corporation; NetWare is a registered trademark of the Novell Corporation; Conex is a registered trademark of Conex Electro-Systems Inc.; Dolby AC-2 is a registered trademark of Dolby Laboratories, Inc.; Zephyr is a registered trademark of TLS Corporation. DADPRO32 System Reference Manual Spring 2001 DADPRO32 System Reference Manual Condensed Table of Contents Table of Contents Introduction Warranty Statement Section 1.0: System Setup and Installation Section 2.0: Building a Library Section 3.0: Basic Tutorial Section 4.0: Recording Section 5.0: Playback Section 6.0: Editing Section 7.0: Library Management Section 8.0: User Setup Files Section 9.0: The DADPRO32 Security System Section 10.0: Integrating DADPRO32 with External Hardware Devices Section 11.0: Special Features Section 12.0: Network Operation Section 13.0: Maintenance and Troubleshooting Section 14.0: Software Information Section 15.0: Technical Specifications Section 16.0: Appendices Index A detailed table of contents follows. Section 1.0 System Setup and Installation 1.0 System Setup and Installation..................................................................................... 2 1.1 Unpacking Your DADPRO32 System ............................................................................ 3 DADPRO32 Security Keys ........................................................................................ 3 1.2 Initial Checkout - Standalone Workstations ................................................................ 5 A) Inspection and Assembly ................................................................................... 5 B) Starting the System............................................................................................ 6 1.3 Standalone Workstation Installation, Configuration, and Test .................................... 8 A) Testing the Play Function .................................................................................. 8 B) Testing the Record Function.............................................................................. 9 Introduction ii 2/9/01 Spring 2001 System Reference Manual DADPRO32 1.4 File Server Setup and Checkout ............................................................................... 10 A) Logging Into and Out of the Network ............................................................... 10 B) Checking Out the File Server........................................................................... 11 1.5 Network Workstation Checkout................................................................................. 13 A) Inspection and Assembly ................................................................................. 13 B) Starting the System.......................................................................................... 15 1.6 Network Workstation Configuration and Test............................................................ 16 A) Testing the Play Function ................................................................................ 16 B) Testing the Record Function............................................................................ 17 C) Exiting the Network .......................................................................................... 17 1.7 Mechanical Installation.............................................................................................. 20 A) Graphics Monitor Installation ........................................................................... 20 B) Mouse Installation ............................................................................................ 20 C) Keyboard Installation ....................................................................................... 21 D) Main CPU Chassis Installation ........................................................................ 21 E) Printer Installation ............................................................................................ 21 1.8 Cable Routing ........................................................................................................... 23 1.9 AC Power Considerations ......................................................................................... 25 1.10 Grounding ............................................................................................................... 27 A) Ground Loops .................................................................................................. 28 B) Shield Termination ........................................................................................... 29 1.11 Grounding DADPRO32.............................................................................................. 31 1.12 Audio Connections-Analog...................................................................................... 32 1.13 Audio Connections-Digital ....................................................................................... 33 Section 2.0 Building a Library 2.0 Building a Library ........................................................................................................ 2 2.1 Selecting a Sampling Rate .......................................................................................... 3 2.2 Selecting a Compression Format ................................................................................ 5 Listening Tests ....................................................................................................... 6 2.3 Mono or Stereo Mode ................................................................................................. 7 2.4 Other Considerations .................................................................................................. 8 A) Secondary and Tertiary Signals ......................................................................... 8 B) Fade Outs/Segues ............................................................................................. 8 C) Playback Timer Designation .............................................................................. 8 2.5 Library Management Considerations .......................................................................... 9 A) Designating Library Groups ............................................................................... 9 B) Designating Cut Numbers................................................................................ 10 C) Assigning Cut Numbers for Facilities that Operate More Than One Radio Station .................................................................................................................. 10 D) Designating Cut Label Information .................................................................. 11 2/9/01 iii Introduction DADPRO32 System Reference Manual Spring 2001 Section 3.0 Basic Tutorial 3.0 Basic Tutorial .............................................................................................................. 2 3.1 The DADPRO32 Environment ....................................................................................... 2 3.2 Entering Information into DAD .................................................................................... 4 3.3 DADPRO32 Screen Layout ........................................................................................... 5 3.4 Operational Tutorial..................................................................................................... 6 A) Touchscreen and Mouse Operation................................................................... 6 B) Loading the DEFAULT SETUP File ................................................................... 6 3.5 Recording a New Audio Cut ........................................................................................ 8 A) Testing the Record Feature ............................................................................... 8 B) Record Machine Setup ...................................................................................... 8 C) Creating a Recording......................................................................................... 9 1) Selecting a Cut Number .......................................................................... 9 2) Title.......................................................................................................... 9 3) Group....................................................................................................... 9 4) Record Machine Buttons ....................................................................... 10 5) Setting Stereo Levels ............................................................................ 10 6) Recording .............................................................................................. 10 3.6 Building a Playlist ...................................................................................................... 12 Building a Playlist ................................................................................................. 12 3.7 Loading and Playing a Playlist .................................................................................. 15 3.8 What's Next............................................................................................................... 17 3.9 Exiting the Program................................................................................................... 18 Section 4.0 Recording NOTE: this section has been updated. The updated index can be found on the first page of Section 4. 4.0 Recording.................................................................................................................... 3 4.1 Loading a User Setup ................................................................................................. 4 Loading the Default User Setup File....................................................................... 5 4.2 MAIN Screen Record Machine.................................................................................... 6 4.3 Record Control Buttons............................................................................................... 8 4.4 Record Machine Setup................................................................................................ 9 A) Modifying the Record Machine Setup on Your DADPRO32 System ............... 10 B) DATA FORMAT ............................................................................................... 10 C) MODE .............................................................................................................. 11 Mono Recording ........................................................................................ 11 D) SAMPLE RATE................................................................................................ 11 E) MAX TIME PER CUT....................................................................................... 11 Why Use MAX TIME PER CUT? ............................................................... 12 F) AUTO RECORD LEVEL .................................................................................. 12 Why Use AUTO RECORD LEVEL? .......................................................... 12 G) INSTATRIM LEVEL ......................................................................................... 13 Introduction iv 2/9/01 Spring 2001 System Reference Manual DADPRO32 Why Use INSTATRIM?.............................................................................. 13 H) NEXT AVAILABLE, LOWEST AVAILABLE, SEQUENTIAL SERIES .............. 13 I) LOCATION........................................................................................................ 14 J) SOURCE .......................................................................................................... 14 K) AUDIO INPUT.................................................................................................. 14 L) RECORD MONITOR........................................................................................ 14 M) Save and Exit Options..................................................................................... 15 4.5 Front Panel Information Displays .............................................................................. 16 A) RECORD SETUP MODE................................................................................. 16 B) DISK CAPACITY GAUGE................................................................................ 16 4.6 Recording.................................................................................................................. 18 A) Entering Cut-Specific Information .................................................................... 18 SCRIPT DESIGNATOR Field .................................................................... 19 LENGTH .................................................................................................... 19 B) Input Level Adjustment .................................................................................... 20 C) Recording Audio .............................................................................................. 21 D) Playing Back a Recording................................................................................ 22 E) Retakes............................................................................................................ 22 F) Using the APPEND Mode ................................................................................ 22 G) Completing the Recording Process ................................................................. 23 4.7 Timed Recording....................................................................................................... 24 A) Building a Recordlist ........................................................................................ 24 B) Timed Recording Function Buttons.................................................................. 25 C) Setting Timed Recording Parameters.............................................................. 27 4.8 External Input Switching Devices .............................................................................. 29 Section 5.0 Playback NOTE: this section has been updated. The updated index can be found on the first page of Section 5. 5.0 Playback ..................................................................................................................... 3 5.1 Loading User Setup Files ............................................................................................ 5 5.2 Loading a Playlist ........................................................................................................ 7 5.3 Playback Function Buttons.......................................................................................... 9 5.4 Using the Playback Machine ..................................................................................... 11 A) Playback Machine Playlist Functions ............................................................... 13 B) Playback 2000 ................................................................................................. 14 5.5 Modifying Playlists..................................................................................................... 15 A) PLAYLIST MODIFY Screen............................................................................. 15 B) Right-click menus............................................................................................. 23 5.6 Automating Audio Cuts ............................................................................................. 24 A) Setting Transition (TRANS) Status .................................................................. 25 1) Segues .................................................................................................. 26 2) Creating a Custom Segue with the Tracker 2000 Window .................... 33 3) Creating a Segue Only Transition.......................................................... 34 2/9/01 v Introduction DADPRO32 System Reference Manual Spring 2001 4) Creating a Production Element Transition ............................................. 34 5) Creating a Segue Transition with a Voiceover....................................... 35 6) Creating a Voiceover and Adding it to a Playlist .................................... 36 B) Setting the OVER Status ................................................................................. 37 C) Setting Plays Status......................................................................................... 39 D) Enabling Secondary and Tertiary Signals........................................................ 39 E) Playback Status Codes.................................................................................... 40 5.7 Automating Playlists with Control Events .................................................................. 41 A) Creating a Timed Event ................................................................................... 42 B) Creating a Branch Event.................................................................................. 44 1) Specifying Branch Event Hard Time or Soft Time ................................. 45 2) Logging Branch Events.......................................................................... 45 C) Backtime Branch Events.................................................................................. 47 D) Chain Events ................................................................................................... 47 1) Applications of Chain Events for Broadcast Stations............................. 48 2) Applications of Chain Events for Arenas and Stage Events .................. 48 3) Creating a Chain Event ......................................................................... 48 E) Spot Rotations ................................................................................................. 49 Creating a Spot Rotation ........................................................................... 50 F) Delay Events .................................................................................................... 50 Creating a Delay Event .............................................................................. 51 G) Comment Events ............................................................................................. 51 Creating a Comment Event ....................................................................... 51 H) Backtime Markers ............................................................................................ 52 I) Modifying Control Events .................................................................................. 52 5.8 Using the Playlist Modify Machine............................................................................. 53 5.9 PRIORITY PLAY Buttons .......................................................................................... 55 A) Programming P-PLAY Buttons ........................................................................ 55 B) Saving P-PLAY Assignments to a User Setup File .......................................... 56 5.10 Using the ARRAY Screen ....................................................................................... 58 A) Assigning ARRAY Buttons ............................................................................... 59 5.11 Using the GROUPS ARRAY Screen....................................................................... 62 5.12 Using the Mini-Array Machine ................................................................................. 64 Programming and Operating the Mini-Array Machines......................................... 64 5.13 Using the Quad Playback Machine ......................................................................... 65 A) Loading Audio Cuts into the Quad Playback Machine ..................................... 66 B) Playing a Cut with the Quad Playback Machine .............................................. 66 5.14 Using the 4PLAY Machine ...................................................................................... 67 A) Loading 4PLAY Machine Playback Slots ......................................................... 67 1) Loading the Next Cut in the Playlist....................................................... 67 2) Loading a Cut from the Library .............................................................. 67 B) Using the Right Click Menu.............................................................................. 67 C) Changing the 4PLAY Machine Display ............................................................ 68 D) Configuring 4PLAY Playback Transitions ........................................................ 68 5.15 Using the AirPLAY Machine .................................................................................... 70 A) Configuring the AirPLAY Machine ................................................................... 70 Introduction vi 2/9/01 Spring 2001 System Reference Manual DADPRO32 B) Loading AirPLAY Machine Playback Slots....................................................... 71 5.16 Using the MasterLog Machine................................................................................. 72 A) MasterLog Buttons........................................................................................... 73 B) Loading and Unloading Playlists ...................................................................... 75 C) Using the MasterLog Machine ......................................................................... 75 D) User Selectable MasterLog Machine Functions .............................................. 78 5.17 ASPLAY Event Logging .......................................................................................... 81 5.18 Using the Script Machine ........................................................................................ 81 Section 6.0 Editing NOTE: this section has been updated. The updated index can be found on the first page of Section 6. 6.0 Editing on the DADPRO32............................................................................................. 3 6.1 Opening the EDIT Screen ........................................................................................... 5 6.2 About the EDIT Screen ............................................................................................... 6 A) Slider Bar ........................................................................................................... 6 B) Waveform Areas ................................................................................................ 7 C) Locator Display .................................................................................................. 8 D) Edit Pointers/Edit Markers ................................................................................. 9 E) Time Readout Displays.................................................................................... 10 F) Function Buttons .............................................................................................. 11 6.3 Selecting and Using Different Edit Modes................................................................. 12 A) Using HEAD/TAIL Editing Mode ...................................................................... 12 B) Using CUT/PASTE Editing Mode..................................................................... 13 C) Using LOAD/SWAP Editing Mode ................................................................... 14 D) Adding Secondary and Tertiary Cue Points..................................................... 15 E) Setting Fade Out Points................................................................................... 16 F) Setting TALK TIME Points ............................................................................... 17 G) Setting Segue Points ....................................................................................... 17 H) Using Hooks Editing Mode .............................................................................. 18 6.4 Saving an Edited Cut ................................................................................................ 19 A) SAVE ............................................................................................................... 19 B) REWRITE ........................................................................................................ 19 C) CANCEL .......................................................................................................... 21 D) QUIT ................................................................................................................ 21 6.5 Editing Longer Programs with the Playlist Function .................................................. 22 6.6 Non-Audio Edits ........................................................................................................ 24 A) Editing a Spot Rotation Control Event ............................................................. 24 B) Editing a Timed or Branch Event ..................................................................... 24 C) Editing a Command Cut................................................................................... 25 D) Editing Playlist Information .............................................................................. 25 6.7 STRATA ................................................................................................................... 27 A) Getting Started................................................................................................. 27 1) Loading the Test Title ............................................................................ 27 2) Testing the outputs ................................................................................ 27 2/9/01 vii Introduction DADPRO32 System Reference Manual Spring 2001 3) Testing the inputs .................................................................................. 28 B) Overview .......................................................................................................... 28 Introducing STRATA Audio Suite .............................................................. 28 C) STRATA Principles .......................................................................................... 29 D) The STRATA Workspace ................................................................................ 30 Track Management.................................................................................... 31 E) Basic STRATA Operation ................................................................................ 33 1) Creating a new title ................................................................................ 33 2) Recording .............................................................................................. 35 3) Editing.................................................................................................... 37 4) Processing Effects................................................................................. 39 5) Level Editing .......................................................................................... 40 6) Using keyboard shortcuts ...................................................................... 41 7) Importing sound files ............................................................................. 41 8) Merging/exporting sound files................................................................ 42 9) Creating an audio CD ............................................................................ 43 F) Advanced STRATA Operation ......................................................................... 43 1) Synchronization ..................................................................................... 43 2) Dealing with EDLs ................................................................................. 43 3) Dealing with a sound catalog................................................................. 44 Section 7.0 Library Management NOTE: this section has been updated. The updated index can be found on the first page of Section 7. 7.0 Library Management ................................................................................................... 3 7.1 Managing Cuts within the LIBRARY Screen ............................................................... 4 A) Locating Cuts in the Library ............................................................................... 5 1) GROUP ................................................................................................... 5 2) PLAYLIST................................................................................................ 5 3) SEARCH.................................................................................................. 6 4) SORT....................................................................................................... 7 B) Managing Cuts................................................................................................... 8 1) DELETE................................................................................................... 8 2) PURGE.................................................................................................... 8 3) IN USE CHECK ..................................................................................... 10 4) MODIFY................................................................................................. 11 5) COPY .................................................................................................... 12 6) ADD ....................................................................................................... 15 7) EDIT ...................................................................................................... 17 8) PLAY ..................................................................................................... 17 9) REPORTS ............................................................................................. 17 10) KILL DATE/START DATE Management ............................................. 21 11) Importing and Exporting Audio Cuts .................................................... 22 C) LIBRARY 2000 Screen .................................................................................... 24 7.2 Managing Playlists within the PLAYLIST Environment ............................................. 25 Introduction viii 2/9/01 Spring 2001 System Reference Manual DADPRO32 A) LOAD ............................................................................................................... 25 B) DELETE........................................................................................................... 25 C) IMPORT........................................................................................................... 26 D) MERGE............................................................................................................ 27 E) SCAN............................................................................................................... 28 F) EDIT ................................................................................................................. 28 F) CANCEL........................................................................................................... 29 7.3 Managing Library Groups within the SETUP Screen ................................................ 30 A) MAINTAIN LIBRARY GROUPS ....................................................................... 30 1) ADD ....................................................................................................... 30 2) EDIT ...................................................................................................... 30 3) DELETE................................................................................................. 31 4) EXIT....................................................................................................... 31 7.4 Backing Up Library Files ........................................................................................... 32 A) Backup Hardware Choices .............................................................................. 32 B) Backup Utilities ................................................................................................ 33 C) Determining a Backup Cycle ........................................................................... 33 D) Files to Back Up............................................................................................... 33 E) Automatic Backup Within DAD ........................................................................ 34 Section 8.0 USER SETUP Files 8.0 User Setup Files.......................................................................................................... 2 8.1 About User Setups ...................................................................................................... 3 A) Record Settings ................................................................................................. 6 8.2 Customized User Setup Files...................................................................................... 8 A) Operator-Oriented User Setups ......................................................................... 8 B) Task-Oriented User Setups ............................................................................... 8 8.3 Accessing the SETUP Screen and Loading a User Setup File ................................. 10 8.4 Setting Output and Input Attenuation Defaults.......................................................... 12 8.5 Setting Configure Playback Machines Defaults ........................................................ 13 8.6 Setting Channel Assignments ................................................................................... 18 8.7 Setting Cue and Automation Defaults ....................................................................... 25 8.8 Setting Miscellaneous Defaults ................................................................................. 27 8.9 Setting Background Color ......................................................................................... 32 8.10 Setting Configure Audio Defaults ............................................................................ 33 8.11 READ E-MAIL and README Functions ................................................................. 34 8.12 Saving User Setup File Changes ............................................................................ 35 8.13 Configuring Machines on the MAIN Screen ............................................................ 36 Section 9.0 The DADPRO32 Security System 9.0 The DADPRO32 Security System ................................................................................. 2 9.1 Security Administration ............................................................................................... 3 9.2 Operational Concept ................................................................................................... 4 9.3 SUPER and DEF32 Security User Files...................................................................... 5 2/9/01 ix Introduction DADPRO32 System Reference Manual Spring 2001 9.4 Accessing the DADPRO32 Security System ................................................................. 6 9.5 Security System Functions.......................................................................................... 7 A) Logging Into and Out of the Security System .................................................... 7 B) Enabling and Disabling Security ........................................................................ 7 C) Changing Security User Settings ....................................................................... 7 D) Creating New Security Users............................................................................. 8 E) Copying Security Users...................................................................................... 8 F) Deleting Security Users...................................................................................... 9 G) Changing a Security User’s Password .............................................................. 9 H) Changing the SUPER Security User Password ................................................. 9 I) Using Single User Setup Mode ......................................................................... 10 9.6 Cut Security............................................................................................................... 11 A) Activating the Cut Security System .................................................................. 11 B) Changing Cut Security Settings ....................................................................... 12 Section 10.0 Integrating DADPRO32 with External Hardware Devices 10.0 External Automation with the DAD ............................................................................ 2 A) Satellite Applications Overview .......................................................................... 2 1. Hardware and Software Requirements.................................................... 2 2. Sample Satellite Feed Operation in Conjunction with DADPRO32 ......... 3 10.1 General Purpose Interface (GPI) Connections.......................................................... 6 A) GPI Inputs.......................................................................................................... 6 B) GPI Outputs ....................................................................................................... 6 C) GPI8 Connector Pinout Diagram ....................................................................... 7 D) GPI16 Connector Pinout Diagram ..................................................................... 7 10.2 Using GPI Inputs and Outputs .................................................................................. 8 A) Direct Programming of GPI Inputs ..................................................................... 8 B) Direct Programming of GPI Outputs .................................................................. 9 C) Logging GPI and GPO Activity......................................................................... 12 10.3 DAD Command Language Definitions .................................................................... 14 10.4 GPI Control with Command Cuts ............................................................................ 28 10.5 Serial Port Connections .......................................................................................... 30 A) Activating Serial Inputs/Outputs....................................................................... 30 B) Serial Connector Pinout Information ................................................................ 31 Pin Assignments ........................................................................................ 31 10.6 Serial Automation Protocol (SERIAL_IO in DAD.CFG file) ..................................... 33 10.7 External Routing Switcher Control Protocol (SWITCHER_IN_IO and SWITCHER_OUT_IO in DAD.CFG File)......................................................................... 34 10.8 Working with Transform Files.................................................................................. 36 Section 11.0 Special Features 11.0 Special Features ....................................................................................................... 2 11.1 Rotate Cuts ............................................................................................................... 3 Introduction x 2/9/01 Spring 2001 System Reference Manual DADPRO32 A) Creating a Rotate Cut ........................................................................................ 3 B) Creating an AutoLoad Cut for use with Rotate Cuts .......................................... 5 11.2 Playlist Cuts .............................................................................................................. 6 A) Creating a Playlist Cut ....................................................................................... 6 11.3 Command Cuts ......................................................................................................... 7 A) Programming Command Cuts ........................................................................... 8 B) Editing Command Lines................................................................................... 10 C) Preparing for GPI/Serial Programming ............................................................ 10 11.4 Send Text Feature .................................................................................................. 11 Send Text via IP ................................................................................................... 13 11.5 Displaying Scripts and Text Files on Playback........................................................ 14 A) Associating Text Files with Audio Cuts ............................................................ 14 B) Displaying SML Scripts and Text Files Using DCL Commands ....................... 16 11.6 Creating Scripts with the Script Markup Language ................................................. 18 A) Writing and Saving Scripts............................................................................... 18 B) Using the Script Markup Language.................................................................. 19 C) Script Markup Language Definitions ................................................................ 20 11.7 Autofill/Stretch and Shrink....................................................................................... 22 11.8 External Output Switching Devices ......................................................................... 24 11.9 TAMS (Time Announce and Management System)................................................ 25 A) Using TAMS..................................................................................................... 26 B) Instatrim Applications....................................................................................... 26 C) Creating a TAMS File ...................................................................................... 26 D) Naming and Saving a TAMS File..................................................................... 28 E) Recording Audio Elements .............................................................................. 28 F) Testing the TAMS File...................................................................................... 29 G) Editing TAMS Segments ................................................................................. 29 H) Modifying a TAMS File..................................................................................... 30 I) Deleting a TAMS File ........................................................................................ 31 J) Inserting a TAMS Event in a Playlist................................................................. 31 Section 12.0 Network Operation 12.0 Expanding to a Network from a Standalone Workstation.......................................... 2 12.1 Network Operation .................................................................................................... 4 12.2 Network Components................................................................................................ 5 A) File Servers........................................................................................................ 5 1. Disk Subsystems ..................................................................................... 7 2. RAID Technology................................................................................... 11 12.3 Network Interface Subsystem and Cables .............................................................. 14 A) Linear Bus Network.......................................................................................... 14 B) Distributed Star Network .................................................................................. 15 C) Selecting Your Network Topology.................................................................... 16 12.4 Logging Into and Out of the Network....................................................................... 19 12.5 Time Synchronization on the Network..................................................................... 21 12.6 Non-DAD Workstations on the Network .................................................................. 22 2/9/01 xi Introduction DADPRO32 System Reference Manual Spring 2001 12.7 Controlling Other Workstations on the Network ...................................................... 23 Section 13.0 Maintenance and Troubleshooting 13.0 Maintenance/Troubleshooting................................................................................... 2 13.1 System Adjustments ................................................................................................. 3 13.2 System Maintenance................................................................................................. 4 A) Fans and Air Filter.............................................................................................. 4 B) Disk Drives......................................................................................................... 4 C) Mouse Maintenance .......................................................................................... 4 D) Cleaning Touchscreens and Peripheral Equipment........................................... 5 13.3 In Case of Difficulty ................................................................................................... 6 A) PC Will Not Boot ................................................................................................ 6 B) The DAD Program Will Not Start ....................................................................... 7 C) The Touchscreen Needs Calibration ................................................................. 7 D) The Touchscreen Will Not Work........................................................................ 8 E) DADPRO32 Machines Appear "Off the Monitor" .................................................. 8 F) Network Workstation Will Not Connect to the Server......................................... 9 G) Erratic Operation of a DAD Workstation or File Server ..................................... 9 H) Printer Problems ................................................................................................ 9 13.4 Procedures for Maintaining Network Workstations ................................................. 11 A) Powering Down Network Workstations and the File Server............................. 11 B) Adding a Workstation to an Existing Network .................................................. 12 13.5 Notes on Swapping Components............................................................................ 13 13.6 Recommended Spares ........................................................................................... 14 13.7 Factory Training and Support.................................................................................. 15 Section 14.0 Software Information 14.0 DADPRO32 Information and Settings.......................................................................... 2 A) Loading DADPRO32 Software ............................................................................. 2 B) Running the DADPRO32 Program ....................................................................... 3 C) Working with Compressed Files ........................................................................ 3 14.1 Software Upgrades ................................................................................................... 4 A Note on Drivers ................................................................................................... 5 14.2 Accessing ENCO Updates via the Internet ............................................................... 6 14.3 Installing Major Software Updates............................................................................. 7 A) Single User Workstations .................................................................................. 7 B) Network Workstations ........................................................................................ 8 15.0 DADPRO32 Technical Specifications....................................................................... 2 15.0 DADPRO32 Technical Specifications .......................................................................... 2 15.1 Approximate Storage Requirements ......................................................................... 4 15.2 Antex SX9 Audio Adapter Specifications (16-bit PCM) ............................................. 6 15.3 Antex SX23e Audio Adapter Specifications (16-bit PCM) ......................................... 8 Introduction xii 2/9/01 Spring 2001 System Reference Manual DADPRO32 15.4 Antex SX36 Audio Adapter Specifications (16-bit PCM) ......................................... 10 15.5 Digigram DSP Board Specifications........................................................................ 12 A) Maximum Streams ........................................................................................... 12 B) Digigram PCX80, PCX11+, PCX440np, and PCX820np Specifications .......... 13 C) Digigram PCX821np and PCX924 Specifications............................................ 25 15.6 Other DSP Boards .................................................................................................. 30 15.7 Older Audio Boards................................................................................................. 31 A) Antex SX7 Audio Adapter Specifications (16-bit PCM).................................... 31 B) Antex SX20 Audio Adapter Specifications (16-bit PCM).................................. 32 C) Antex SX22 Audio Adapter Specifications (16-bit PCM).................................. 33 D) Antex SX34 Audio Adapter Specifications (16-bit PCM).................................. 34 E) Digigram PCX9, PCX20v2, PCX800np, and PCX801np Specifications .......... 36 Section 16.0 Appendices 16.0 Appendices and Reference Information.................................................................... 2 16.1 Quick Reference to Supported Keyboard Keystrokes............................................... 3 Changing DADPRO32 Text Labels ........................................................................... 4 16.2 File Locations ............................................................................................................ 5 16.3 .BAT File Definitions and Sample File....................................................................... 7 16.4 DAD.CFG Sample File and Definitions ..................................................................... 9 16.5 DAD Database Layouts - dBase III+ Compatible .................................................... 21 16.6 Cart Chunk Standard .............................................................................................. 23 16.7 It's About Time ........................................................................................................ 26 16.8 About the DAD Date Stamp .................................................................................... 27 16.9 Recent Updates to DADPRO32.TXT ...................................................................... 28 16.10 Brick II Reference Information............................................................................... 35 A) Hardware Notes and Install Instructions .......................................................... 35 B) Software Setup and Configuration ................................................................... 36 1) Configuring Brick Software to Start with a Current DADPRO32 System 36 2) Brick II GPI Output................................................................................. 39 3) Brick II GPI Inputs.................................................................................. 40 C) Brick II SETUP Screen Operation.................................................................... 40 D) Record Machine Mode..................................................................................... 41 E) Playback Machine Mode.................................................................................. 42 1) Loading a Playlist .................................................................................. 43 2) Managing Playlists in the Brick .............................................................. 43 3) Direct Operation of the Brick ................................................................. 45 F) Quad Playback Machine Mode ........................................................................ 46 1) Loading a Cut ........................................................................................ 46 2) Reading a Loaded Quad Slot ................................................................ 47 3) Playing in Quad Machine Mode............................................................. 47 4) Remote Starts and Quad Machine Mode .............................................. 47 2/9/01 xiii Introduction DADPRO32 System Reference Manual Spring 2001 Introduction Thank you for investing in an ENCO Digital Audio Delivery (DAD) System, a product that enables multiple users to access high quality CD/DAT stereo audio that is stored digitally on a shared data network. DAD is developed using a modular approach that enables a complete system to range from a single standalone workstation with a single channel of record/playback capability to a facility-wide, multi-user, multi-channel-per-user audio network. The building block for a DAD system is the DADPRO32 workstation. This unit has been specifically designed to meet the operational needs of both live broadcast and studio production as well as other mission-critical situations. It combines high quality, random access audio in a compact, self-contained package with a highly user-friendly interface. With DADPRO32 you can utilize standard record and playback functions with little or no training, while editing and many other powerful production features become routine after just a few hands-on sessions. Some of the DADPRO32 features include: • High-quality, 32-bit digital stereo audio with user-selectable sample rates up to 50 kHz • Hard disk storage for random access to all stored audio, with selectable data compression to extend available record time • Intuitive graphic interface featuring a touch screen emulating the control features of familiar broadcast hardware, maximizing operator acceptance • User-programmable PRIORITY PLAY buttons for instant access to priority playbacks • User-programmable playlist features for automatic playback sequencing • Intuitive graphic edit functions for simple start and end cue adjustment, auxiliary cue point manipulation, optional cut and paste audio construction, countdown timer programming and audio transition construction • Multiple stereo record/playback channels per workstation available with optional DSP hardware/software; multiple workstations can be networked via optional Ethernet hardware/software • Rugged, broadcast quality hardware construction. Each DADPRO32 standalone workstation is built on a PC/AT compatible platform and stores digitized audio on an internal hard drive. Each unit is built from premium grade offIntroduction xiv 2/9/01 Spring 2001 System Reference Manual DADPRO32 the-shelf computer hardware. The only non-standard component is a proprietary Digital Signal Processor (DSP) circuit board. The DSP unit handles digital signal processing functions, leaving the CPU free to run the graphic interface and database operations. Each DSP circuit board can simultaneously process two signals (one channel of stereo audio). Multiple DSP boards can be installed in each workstation, providing functions similar to multiple discrete record/playback machines. No additional rack space is required, and control is provided through a single interface. In a multi-user network configuration, individual workstations operate as described above but the audio for each workstation is no longer stored on an internal hard drive. Instead, the audio is located in a shared file server, providing each workstation with direct access to the complete database. No time or disk space is wasted while you create several copies of the same audio data. Even though all users share the same database, they operate independently of others in the system. Interconnections are accomplished via a standard category 5 twisted pair cable (coaxial or fiber optic cable also available). Additionally, most system functions are controllable via a serial port (or through a network), making the DADPRO32 ideal for remote control and automation applications. Operation of the DADPRO32 is straightforward and easy to learn, thanks to its highly intuitive graphical touchscreen interface. The system provides the user with standard record and playback functions, using a familiar pushbutton-based control panel. In addition, the operator has fingertip access to easy-to-use editing, random access playback buttons, and powerful organizational and library management functions. The DADPRO32 interface combines uncluttered graphics, intuitive labeling and a variety of helpful "pop-up" dialogue boxes to allow the operator to learn new features while working with familiar ones. DADPRO32 is designed as a direct replacement for existing tape-based record/playback systems. In most applications, it will use your existing audio and remote control connections. However, quite a number of interconnection and control options are available with this unit; we suggest that you review Sections 1 and 10 of this manual for more information. 2/9/01 xv Introduction DADPRO32 System Reference Manual Spring 2001 Using This Manual Both the DADPRO32 and this manual were developed with the user in mind. Many features of DADPRO32 are intuitive in nature, and the Graphical User Interface provides a familiar and easy to use control panel. Operation via a QWERTY keyboard is also supported. The manual guides the reader through installation and setup, a brief tutorial, and DADPRO32 features and functions, from basic to advanced. This order corresponds with the natural exploration and use of the DADPRO32. Most operators will find it easiest to learn the system by using it. This is perfectly acceptable and generally quite safe. Most controls are self-explanatory, and many of them will invoke “pop-up” information windows. These windows are graphic boxes that display choices, questions, or warnings. The DADPRO32 system always displays a CANCEL button or a QUIT button to allow you to exit a function without making any changes. In addition, the DADPRO32 Security System can be set to prevent users from selecting potentially damaging options. DADPRO32 has great flexibility and a wide selection of features. Plan to spend several days after installation familiarizing yourself with the standard features and investigating alternate features and configurations in the standard package. This will be time well spent that will enable you to avoid surprises later on and to gain full knowledge of the DADPRO32 System. Introduction xvi 2/9/01 Spring 2001 System Reference Manual DADPRO32 Conventions Used in This Manual The DADPRO32 user interface consists of several full-frame graphic screens and a variety of overlaying pop-ups, each of which contains buttons, slide controls, list areas, and other features. This guide will assume the operator is using a monitor with an integral touch screen, and will therefore instruct the operator to “touch” features on the screen. If you are using a mouse instead, perform a “touch” by placing the mouse arrow on the desired feature (“pointing”), then pressing and releasing (“clicking”) the left mouse button. Pop-up windows are used extensively in the DADPRO32 environment. Individual windows can be repositioned by touching the title bar at the top of the window and dragging the window to a new location. The new position will be retained until the program is exited, after which time the window will return to its original position. Convention UPPERCASE Plain text BOLD UPPERCASE Enclosed in < and > brackets Key refers to a full-frame screen. Example LIBRARY Screen refers to an individual window. Playlist Window refers to a labeled button or control feature within PLAY button a screen. refers to keyboard keystrokes. The name of the <Enter> key will be enclosed in brackets. This version of the DADPRO32 System Reference Manual documents changes through DADPRO32 software version 3.2c. Please be sure to review the DADpro32.TXT file for most recent DADPRO32 updates. 2/9/01 xvii Introduction DADPRO32 System Reference Manual Spring 2001 DADPRO32 EZ Modules Now you can purchase only the parts, or modules, of DADPRO32 that you need. Each module has unique functionality and corresponds to a section of this manual. The fullfeatured version of DADPRO32 Software is still suggested for many operationally intensive applications. MODULE INCLUDES: EZ-LIB The EZ-LIB Library & Playlist Modification Module includes all database maintenance functions as well as Priority Play Buttons. It is ideal for traffic and music scheduling applications. An applicable play DSP board must be installed in the workstation if audio support is desired. The EZ-LIB Module is required before any other EZ Modules may be added. EZ-ARRAY The EZ-ARRAY Module includes both the full screen and two half screen versions of the Array (cart wall) panels. Applicable play DSP boards must be installed in the workstation. SECTION 5 EZ-PLAY The EZ-PLAY Module is a single player capable of live assist or automated operation. Up to 4 EZ-PLAY players can be included in any workstation. Applicable play DSP boards must be installed. SECTION 5 EZ-MLOG The EZ-MLOG Module is the MasterLog machine, a full screen second-generation player typically preferred for fast-paced live assist formats. Applicable play DSP boards must be installed in the workstation. SECTION 5 EZ-QPLAY The EZ-QPLAY Module is the Quad Playback machine, often preferred for freeform live assist formats, or for external control by external video switchers or other automation controllers. Applicable play DSP boards must be installed in the workstation. SECTION 5 EZ-4PLAY The EZ-4PLAY Module is the 4Play machine, an enhanced version of the Quad Playback machine but with added Playlist scheduling functionality. Applicable play DSP boards must be installed in the workstation. SECTION 5 EZ-TRKR The EZ-TRKR Module is the Tracker voiceover recorder and editor, used to prepare live-sounding automated programming. Applicable play DSP boards must be installed in the workstation. SECTION 5 EZ-REC The EZ-REC Module is the Record Machine, and includes AutoRecord support. Up to four EZ-REC recorders can be included in a workstation. Applicable play DSP boards must be installed in the workstation. SECTION 4 EZ-EDIT EZ-SCRIPT The-EZ-EDIT Module is the Stereo/Mono Graphic Waveform Cut and Paste Assembly Editor. Either a play or record DSP board must be installed in the workstation. The EZ-SCRIPT Module is the Script Display machine with embedded audio support. An applicable play DSP board must be installed in the workstation in order for embedded audio functionality to be utilized. Introduction xviii CORRESPONDS TO SECTION: SECTION 4.B SECTION 6 SECTION 5 2/9/01 Spring 2001 System Reference Manual DADPRO32 Powering On the System WARNING: Be sure to check the setting of the power supply switch, located between the two AC power outlets on the CPU chassis, before you plug in the DADPRO32 unit. PCs and drive bays do not automatically check for the correct power supply setting. The DADPRO32 is built on a PC/AT ISA/PCI bus computer platform and uses standard Microsoft Windows as its operating system. Therefore, it operates much like any other Windows-based computer, and can be restarted by using the Windows start menu to select "Shut down" then turning the power off, or by using the keyboard reset command: pressing <Ctrl><Alt><Del> simultaneously. NOTE: Be sure to exit DAD normally before restarting. Following any of the above procedures, DADPRO32 will perform a typical PC/AT “boot” operation. It will first test its graphics display adapter, then check its memory, then load several device drivers, and finally load and display the MAIN Screen. The system will boot up in the Mouse Mode, or, if equipped with the optional Touch Screen package, in Touch Mode. If your system features the Touch Screen package, you have two ways of changing the input mode. With the Figure 1 program running, you can press MAIN screen <Shift><F10> to toggle between Mouse Mode and Touch Mode. Another method is to exit the program. To exit, press SETUP. The SETUP screen displays. Touch the EXIT DAD button, or press keyboard keys <Alt><X> simultaneously. At the exit prompt, select Yes. Some additional device driver information appears, then the DADPRO32 program returns to the MAIN Screen. The workstation always "remembers" its condition when it was exited or turned off. It will automatically reload any playlist that was loaded and will advance this list to load the cut that was last positioned in the playback slot. The workstation is now ready to resume operation. 2/9/01 xix Introduction DADPRO32 System Reference Manual Spring 2001 Additional Information This manual is written with the intent of providing information necessary to install and operate the DADPRO32 to its fullest potential. Please read this manual carefully, and acquaint yourself with the connections and operational procedures that are available. Certain technical information, regarding the structure and use of working files within the Microsoft Windows and/or DOS environment, is also provided for the reader with advanced knowledge of PC-based systems and digital signal processing techniques. The information in this document is subject to change without notice. All material provided is believed to be correct; however, no guarantee or warranty as to accuracy is given. Should you have any questions or comments on this manual or the DADPRO32 product, please address your comments to: ENCO Systems, Inc. 29444 Northwestern Highway Southfield, Michigan 48034 USA Sales: (800) ENCO-SYS ((800) 362-6797) Technical Support: (248) 827-4440 FAX: (248) 827-4441 World Wide Web: http://www.enco.com FTP: ftp://ftp.enco.com Your comments and suggestions are greatly appreciated. Introduction xx 2/9/01 Spring 2001 System Reference Manual DADPRO32 Limited Warranty ENCO provides the Software “as is” at the time of shipment and does not warrant operation of the Software to be uninterrupted or to be error free. ENCO warrants that for a period of 30 days after delivery of this copy of the Software to you: • The physical media on which this copy of the Software is distributed will be free from defects in materials and workmanship under normal use, and • The Software will perform in substantial accordance with the ENCO’s published specifications at the time of manufacture. This limited warranty is extended only to the original purchaser of the Software. Modification or alteration of the Software by any party other than ENCO renders this Limited Warranty null and void. To the extent permitted by applicable law, THE FOREGOING LIMITED WARRANTY IS IN LIEU OF ALL OTHER WARRANTIES OR CONDITIONS, EXPRESS OR IMPLIED, AND WE DISCLAIM ANY AND ALL IMPLIED WARRANTIES OR CONDITIONS, INCLUDING ANY IMPLIED WARRANTY OF MERCHANTABILITY OR FITNESS FOR A PARTICULAR PURPOSE, REGARDLESS OF WHETHER WE KNOW OR HAD REASON TO KNOW OF YOUR PARTICULAR NEEDS. NO EMPLOYEE, AGENT, DEALER OR DISTRIBUTOR OF OURS IS AUTHORIZED TO MODIFY THIS LIMITED WARRANTY, NOR TO MAKE ANY ADDITIONAL WARRANTIES. THE ENTIRE RISK AS TO THE QUALITY AND PERFORMANCE OF THE SOFTWARE IS WITH YOU. 2/9/01 xxi Introduction DADPRO32 System Reference Manual Spring 2001 WARNING This product generates, uses, and can radiate radio frequency energy and if not installed and used according with this manual, may cause interference to radio communications. It has been tested and found to comply with the limits for a Class A computing device pursuant to Subpart J of Part 15 of FCC Rules, which are designed to provide reasonable protection against such interference when operated in a commercial environment. Operation of this equipment in a residential area is likely to cause interference, in which case the user, at his/her own expense, will be required to correct the interference. Introduction xxii 2/9/01 Spring 2001 System Reference Manual DADPRO32 This page is intentionally blank. 2/9/01 xxiii Introduction