1
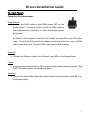
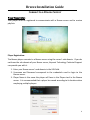
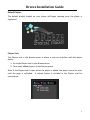
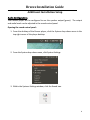
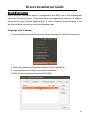
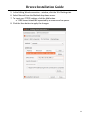
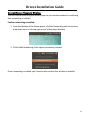
Breeze Digital Signage Installation Guide for the ASRock Motherboard Version 1.5 November 2014 Breeze Installation Guide Breeze Support Technical Technical Support is included at no charge. Questions or issues can be submitted by phone, e-mail and chat to Keywest Technology technical support. Contact information: Phone: 1-800-331-2019, Option #2 E-mail: [email protected] Chat: live chat assistance is available at http://www.breezedigitalsignage.com/support Documentation Getting Started with Breeze (Brief): http://helpdesk.keywesttechnology.com/index.php?/Knowledgebase/Article/View/124/ 0/getting-started-with-breeze Breeze Documentation (Full): http://helpdesk.keywesttechnology.com/index.php?/Knowledgebase/Article/View/167/ 0/breeze-documentation Training Videos http://www.breezedigitalsignage.com/tutorials/ 2 Breeze Installation Guide Table of Contents Breeze Support ................................................................................................ 2 Hardware......................................................................................................... 4 Player Front .................................................................................................. 4 Player Back ................................................................................................... 4 Player Accessories ........................................................................................ 4 To Install Players ........................................................................................... 5 Connect to a Breeze Server ............................................................................. 6 Player Registration........................................................................................ 6 Additional Installation Setup ........................................................................... 8 Audio Configurations .................................................................................... 8 Network Connections ................................................................................. 10 Connect Breeze Players to Wireless ........................................................... 12 Confirm Internet Connectivity .................................................................... 14 Other Player Functions .................................................................................. 15 Factory Reset .............................................................................................. 15 Stop & Restart Breeze Player ...................................................................... 16 3 Breeze Installation Guide Hardware Player Front Player Back Player Accessories Your Breeze player will include the following accessories. Accessories: 1. 19.5V power supply (1) 2. Power cord (1) 3. Wireless Antenna (1) 4. Mounting bracket (1) 5. Player-Mounting screws (4) If the player kit that you received did not include all of the accessories, please notify Keywest Technology technical support. 4 Breeze Installation Guide To Install Players Connecting the Breeze player: Video Output: 1. Connect the HDMI cable to the HDMI output (#7) on the Breeze player. Connect the other end of the HDMI cable to the display monitor, television, or video distribution system being used. An HDMI to VGA adapter is needed if the display monitor offers only VGA video input. Connect the VGA end of the adapter to the display monitor, and an HDMI cable to the other end. Plug the HDMI cable into the Breeze player. Ethernet: 1. Connect the Ethernet cable to the Ethernet input (#8) on the Breeze player. Power: 2. Plug the power cord into to the 19.5V power supply and the electrical outlet. Plug the 19.5V power supply into the Breeze player. Speakers: 3. Connect the audio cables from the display monitor to the speaker output (#11) on the Breeze player. 5 Breeze Installation Guide Connect to a Breeze Server Player Registration Your player must be registered to communicate with a Breeze server and to receive playlists. Player Registration: The Breeze player connects to a Breeze server using the server’s sub domain. If you do not know the sub domain of your Breeze server, Keywest Technology Technical Support can provide you with it. 1. Enter your Breeze server’s sub domain in the URL field. 2. Username and Password correspond to the credentials used to login to the Breeze server. 3. Player Name is the name the player will have in the Players tool in the Breeze server. It is recommended that a player be named according to its location when employing multiple players. 6 Breeze Installation Guide Default Playlist: The default playlist loaded on your player will begin showing once the player is registered. Players Tool: The Players tool in the Breeze server is where a user can interface with the player device. 1. Go to the Players tool in your Breeze server. 2. Your newly added player is in the Players group. Note: If the Players tool is open when the player is added, the player cannot be seen until the page is refreshed. A refresh button is included in the Players tool for convenience. 7 Breeze Installation Guide Additional Installation Setup Audio Configurations Your Breeze player will be configured to use the speaker output (green). The output and audio levels can be adjusted in the sound control panel. Opening the sound control panel: 1. From the desktop of the Breeze player, click the System drop down menu in the top right corner of the player desktop. 2. From the System drop down menu, click System Settings. 3. Within the Systems Settings window, click the Sound icon. 8 Breeze Installation Guide Changing the audio output: 1. Within the sound control panel, click the Output tab. 2. To switch from the headphones or speaker output (green) to the HDMI audio output, click HDMI/DisplayPort2 in the Play sound through window. a. The player volume can be increased or decreased by adjusting the Output volume slider bar at the bottom of the sound control panel. 3. Close the Sound control panel to apply the changes. 9 Breeze Installation Guide Network Connections Out of the box, the Breeze player is configured to use DHCP and it will automatically obtain an IP address for you. If the player does not automatically obtain an IP address, please contact your network administrator. A static IP address can be assigned to the wired or wireless connections using the following steps. Assigning a static IP address: 1. From the Networking and Connections drop down menu, click Edit Connections. 2. Within the Network Connections window, click the Wired tab. 3. From the Wired tab, click on your wired connection. 4. With the wired connection selected, click Edit. 10 Breeze Installation Guide 5. In the Editing Wired connection… window, click the 1Pv4 Settings tab. 6. Select Manual from the Method drop down menu. 7. To input your TCP/IP settings, click the Add button. a. DNS Servers should be separated by a comma and no spaces. 8. Click the Save button to apply the changes. 11 Breeze Installation Guide Connect Breeze Players to Wireless The first step to connecting the Breeze player to your wireless network is confirming that networking is enabled. Confirm networking is enabled: 1. From the desktop of the Breeze player, click the Networking and Connections drop down menu in the top right corner of the player desktop. 2. Click Enable Networking if this option not already checked. Once networking is enabled, you’ll need to also confirm that wireless is enabled. 12 Breeze Installation Guide Enable wireless and connect to a network: 1. From the Networking and Connections drop down menu, click Enable Wireless. 2. From the Networking and Connections drop down menu, select your wireless network. a. If your wireless network is not listed, refresh the list of available wireless networks. This can be done by unchecking and rechecking Enable Wireless from the Networking and Connections drop down menu. 3. Input the password for your wireless network and click Connect. 13 Breeze Installation Guide Confirm Internet Connectivity Once your player is connected to the wired or wireless internet connection, you can then use the Mozilla Firefox web browser to confirm internet connectivity. Opening Firefox: 1. Click the Dash Home Icon from the Launcher bar on the far left hand side of the player desktop. 2. From the Dash Home window, type Firefox into the Dash Home search bar. 3. Click the Firefox web browser icon to open. Opening web pages: 1. Within in the Firefox window, click where it says, “Go to a Website” and input the web address breezedigitalsignage.com. 2. Press the Enter key or click the green Go button to browse. 14 Breeze Installation Guide Other Player Functions Factory Reset Factory Reset returns all Breeze player software configurations to the default settings, or to the configuration the player had when it was shipped from the factory. This erases the player’s cache, where playlists and media items are stored on the player, and the registration to a Breeze server. The Ubuntu operating system configurations, such as audio and network settings, remain unchanged. Reset all player configurations: 1. Click the Dash Home Icon from the Launcher bar on the far left hand side of the player desktop. 2. From the Dash Home window, type ‘file’ into the Dash Home search bar and select the Files application. 3. In the Home directory, double-click on the Factory Reset icon. 4. After the player configuration has been reset to the default settings, the player will need to be registered to a Breeze server before it can receive playlists. 15 Breeze Installation Guide Stop & Restart Breeze Player To stop the Breeze player software, you will need to connect a mouse and keyboard to the player or establish a remote connection to the player. Stopping the Breeze player software: 1. To stop the Breeze player software, click the Escape key on your keyboard until the Breeze player desktop displays. a. Once the Breeze player software has stopped, you’ll need to also stop BreezeMonitor to prevent the software from restarting automatically. 2. Click the Dash Home Icon from the Launcher bar on the far left hand side of the player desktop. 3. From the Dash Home window, type terminal into the Dash Home search bar. 4. Click the Terminal icon to open a terminal window. 16 Breeze Installation Guide 5. Within the Terminal window, type the command pkill BreezeMonitor and press the Enter key. Restarting the Breeze player software: 1. To restart the Breeze player software, double click the BreezeMonitor desktop icon. 17