1
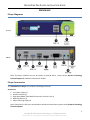
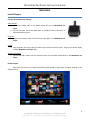
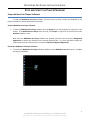
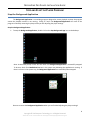
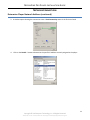
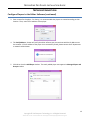
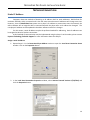
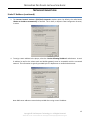
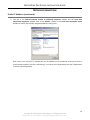
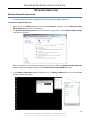
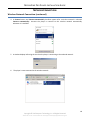
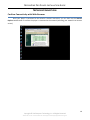
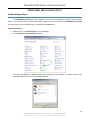
MEDIAZONE PRO PLAYER INSTALLATION GUIDE VERSION 1.1 MARCH 2015 M EDIA ZONE P RO P LAYER I NSTALLATION G UIDE 2 Copyright © 2015 Keywest Technology, Inc. All Rights Reserved 14563 W 96th Terrace • Lenexa KS 66215 USA • Need Support? Mailto:[email protected] M EDIA ZONE P RO P LAYER I NSTALLATION G UIDE MEDIAZONE PRO SUPPORT Technical Technical support is included at no charge. Questions or issues can be submitted by phone, e-mail and online chat to Keywest Technology Technical Support. Contact information: Phone: 1-800-331-2019, Option #2 E-mail: [email protected] Chat: live chat assistance is available at http://helpdesk.keywesttechnology.com/ Documentation MediaZone Pro Editor User Manual: http://helpdesk.keywesttechnology.com/index.php?/Knowledgebase/Article/View/4/31/mediazone-pro-editoruser-manual Additional Documentation: http://helpdesk.keywesttechnology.com/index.php?/Knowledgebase/Article/View/15/31/scheduling-playlists http://helpdesk.keywesttechnology.com/index.php?/Knowledgebase/Article/View/208/31/retrieving-playlistsfrom-a-mediazone-pro-player http://helpdesk.keywesttechnology.com/index.php?/Knowledgebase/Article/View/213/4/stop-and-restart-themediazone-pro-player-software Training Videos http://www.mediazonepro.com/demo-videos/ 3 Copyright © 2015 Keywest Technology, Inc. All Rights Reserved 14563 W 96th Terrace • Lenexa KS 66215 USA • Need Support? Mailto:[email protected] M EDIA ZONE P RO P LAYER I NSTALLATION G UIDE TABLE OF CONTENTS MediaZone Pro Support ................................................................................................... 3 Technical....................................................................................................................... 3 Documentation ............................................................................................................. 3 Training Videos ............................................................................................................. 3 Hardware ......................................................................................................................... 5 Player Diagrams ............................................................................................................ 5 Player Accessories ........................................................................................................ 5 Install Players ................................................................................................................ 6 Stop and Start the Player Program ................................................................................... 7 Stop and Start the Player Software ............................................................................... 7 Stop the Background Application .................................................................................. 8 Start the Background Application ................................................................................. 9 Network Connections .................................................................................................... 10 Determine Player Network Address ............................................................................ 10 Configure Players in the Editor Software .................................................................... 12 Static IP Address ......................................................................................................... 14 Wireless Network Connection .................................................................................... 17 Confirm Connectivity with Web Browser .................................................................... 19 Additional Installation Setup .......................................................................................... 20 Audio Configurations .................................................................................................. 20 4 Copyright © 2015 Keywest Technology, Inc. All Rights Reserved 14563 W 96th Terrace • Lenexa KS 66215 USA • Need Support? Mailto:[email protected] M EDIA ZONE P RO P LAYER I NSTALLATION G UIDE HARDWARE Player Diagrams (Front) (Back) Note: The player hardware may not be exactly as pictured above. Please contact Keywest Technology Technical Support for additional assistance if needed. Player Accessories Your MediaZone Pro Player will include the following accessories. Accessories: 1. 12 V power supply (1) 2. Wireless antenna (1) 3. High Speed HDMI® Cable With Ethernet with a Ferrite Core (1) 4. Mounting bracket (1) 5. Player-mounting screws (4) Note: If the player kit that you received did not include these accessories, please notify Keywest Technology Technical Support. 5 Copyright © 2015 Keywest Technology, Inc. All Rights Reserved 14563 W 96th Terrace • Lenexa KS 66215 USA • Need Support? Mailto:[email protected] M EDIA ZONE P RO P LAYER I NSTALLATION G UIDE HARDWARE Install Players Connect the MediaZone Pro Player: Video Output: 1. Connect the HDMI cable to the HDMI output (#7) on the MediaZone Pro Player. 2. Connect the other end of the HDMI cable to a display monitor, television, or video distribution system. Ethernet: 3. Connect the Ethernet cable to the Ethernet input (#6) on the MediaZone Pro Player. Power: 4. Plug the power cord into to the 12V power supply and the electrical outlet. Plug the 12V power supply into the MediaZone Pro Player (#3). Speakers (Optional): 5. Connect the audio cables from the display monitor to the speaker output (#10) on the MediaZone Pro Player. Default Playlist: After these connections are made, the default playlist loaded on your player will begin showing on the display monitor. 6 Copyright © 2015 Keywest Technology, Inc. All Rights Reserved 14563 W 96th Terrace • Lenexa KS 66215 USA • Need Support? Mailto:[email protected] M EDIA ZONE P RO P LAYER I NSTALLATION G UIDE STOP AND START THE PLAYER P ROGRAM Stop and Start the Player Software To stop the MediaZone Pro Player software, you will need to connect a mouse and keyboard to the player or establish a remote connection to the player. Stop the MediaZone Pro Player software: 1. To stop the MediaZone Pro Player software, click the Escape key on your keyboard or right-click on the mouse. If the MediaZone Pro Player does not stop, click Escape or right-click on the mouse until the Windows desktop is seen. Note: Once the MediaZone Pro Player software has stopped, you’ll also need to stop the Background Application to prevent the software from restarting automatically. For more information about this subject please see the section on the next section: Stop the Background Application. Restart the MediaZone Pro Player software: 1. To restart the MediaZone Pro Player software, double click the MediaZone Pro desktop icon. Playback will begin immediately. 7 Copyright © 2015 Keywest Technology, Inc. All Rights Reserved 14563 W 96th Terrace • Lenexa KS 66215 USA • Need Support? Mailto:[email protected] M EDIA ZONE P RO P LAYER I NSTALLATION G UIDE STOP AND START THE PLAYER PROGRAM Stop the Background Application The Background Application is a watchdog program designed to restart playback anytime the program senses the playback content is not running. Failing to “stop” the Background Application will result in the program continually restarting the player while you are adjusting the player settings. Stop the Background Application: 1. To stop the Background Application, double-click on the Stop Background App icon on the desktop. Note: A command prompt screen will flash when the Background Application is successfully stopped. To be sure, check for a MediaZone Pro icon in the system tray indicating the application is running. If there is no icon in the system tray, the Background Application has successfully been stopped. Be sure to restart the Background Application when you are finished adjusting the player settings! 8 Copyright © 2015 Keywest Technology, Inc. All Rights Reserved 14563 W 96th Terrace • Lenexa KS 66215 USA • Need Support? Mailto:[email protected] M EDIA ZONE P RO P LAYER I NSTALLATION G UIDE STOP AND START THE PLAYER PROGRAM Start the Background Application Restart the Background Application: 1. To re-enable the Background Application, double-click on Start Background App on the desktop. The player will begin playback within two minutes. Click on the MediaZone Pro desktop icon to start immediate playback. 9 Copyright © 2015 Keywest Technology, Inc. All Rights Reserved 14563 W 96th Terrace • Lenexa KS 66215 USA • Need Support? Mailto:[email protected] M EDIA ZONE P RO P LAYER I NSTALLATION G UIDE NETWORK CONNECTIONS Determine Player Network Address Out of the box, the MediaZone Pro Player is configured to use DHCP and will automatically obtain a network address for you. A network address is also called an IP address. If the player does not automatically obtain an IP address, please contact your network administrator. The MediaZone Pro Editor uses a player’s IP address to communicate over the network. Therefore, no communication is possible until the IP address is entered in the editor software. Verify the player is connected to the network before proceeding. Configure the Player IP address in the Editor software: 1. First, the IP address of the player must be determined. Right-click on the Network desktop icon and select Properties from the menu. 2. In the Network and Sharing Center, select the current network connection by clicking on the connection in the View your active networks area. 10 Copyright © 2015 Keywest Technology, Inc. All Rights Reserved 14563 W 96th Terrace • Lenexa KS 66215 USA • Need Support? Mailto:[email protected] M EDIA ZONE P RO P LAYER I NSTALLATION G UIDE NETWORK CONNECTIONS Determine Player Network Address (continued) 3. A window opens showing the connection status. IPv4 Connectivity status is the first item listed. 4. Click on the Details… button to determine the specific IP address currently assigned to the player. 11 Copyright © 2015 Keywest Technology, Inc. All Rights Reserved 14563 W 96th Terrace • Lenexa KS 66215 USA • Need Support? Mailto:[email protected] M EDIA ZONE P RO P LAYER I NSTALLATION G UIDE NETWORK CONNECTIONS Configure Players in the Editor Software After determining the player IP address, this specific address must be entered in MediaZone Pro Editor software so the editor can communicate with the player. Configure the Player IP address in the Editor software: 1. Click on Manage Player and Groups in the Share tab of the MediaZone Pro Editor toolbar. 2. Click the Add… button to add a player by entering the player’s IP address. Each newly installed player will need to be added in the MediaZone Pro Editor software. 12 Copyright © 2015 Keywest Technology, Inc. All Rights Reserved 14563 W 96th Terrace • Lenexa KS 66215 USA • Need Support? Mailto:[email protected] M EDIA ZONE P RO P LAYER I NSTALLATION G UIDE NETWORK CONNECTIONS Configure Players in the Editor Software (continued) 3. Enter a name for the player. For clarity, it is recommended that players are named according to their location. Then, enter The IP address of that player. 4. The Verify Address… button will verify the editor software can communicate with the IP address over the network. If the IP address of the player is not successfully found, please contact the IT department or network administrator. 5. Click OK to close the Add Player window. The newly added player now appears in Manage Players and Groups window. 13 Copyright © 2015 Keywest Technology, Inc. All Rights Reserved 14563 W 96th Terrace • Lenexa KS 66215 USA • Need Support? Mailto:[email protected] M EDIA ZONE P RO P LAYER I NSTALLATION G UIDE NETWORK CONNECTIONS Static IP Address Computers have two methods of obtaining an IP address: DHCP or static addresses. DHCP allows for maximum flexibility within a network and is also the most secure because IP addresses will change over time. However, since the MediaZone Pro system uses a player’s IP address to communicate over the network, the editor software will no longer be able to communicate with the player after an IP address has changed. The new player IP address must be updated in the editor software each time it changes. For this reason, a static IP address may be the preferred method for addressing. Static IP addresses can be assigned to wired or wireless connections. A third method of communication may be implemented using the player’s serial number; please contact Keywest Technology Technical Support for more information about this subject. Assign a static IP address: 1. Repeat Steps 1-3 in the Determine Player Address section to open the Local Area Connection Status window. Click on the Properties button. 2. In the Local Area Connections Properties window, select Internet Protocol Version 4 (TCP/IPv4) and click the Properties button. 14 Copyright © 2015 Keywest Technology, Inc. All Rights Reserved 14563 W 96th Terrace • Lenexa KS 66215 USA • Need Support? Mailto:[email protected] M EDIA ZONE P RO P LAYER I NSTALLATION G UIDE NETWORK CONNECTIONS Static IP Address (continued) 3. The Internet Protocol Version 4 (TCP/IPv4) Properties window opens. By default, the radio button ‘Obtain an IP address automatically’ is selected. This is DHCP, or Dynamic Host Configuration Protocol, in action. 4. To assign a static address to the player, select the ‘Use the following IP address’ radio button. A static IP address (as well as the subnet mask and default gateway) must be compatible with the connected network. This information is typically provided by the IT department or network administrator. Note: DNS server addresses must also be provided when using a static IP address. 15 Copyright © 2015 Keywest Technology, Inc. All Rights Reserved 14563 W 96th Terrace • Lenexa KS 66215 USA • Need Support? Mailto:[email protected] M EDIA ZONE P RO P LAYER I NSTALLATION G UIDE NETWORK CONNECTIONS Static IP Address (continued) 5. Click OK in the Internet Protocol Version 4 (TCP/IPv4) Properties window and the Local Area Connections Properties window. Click on the Details… button in the Local Area Connection Status window to confirm the statically assigned IP address is being used. Note: There are a myriad of IT methods that can be applied to truly complicate connections (such as virtual private networks, host files, and aliasing). It is best to work cooperatively with the IT department to ensure smooth operations. 16 Copyright © 2015 Keywest Technology, Inc. All Rights Reserved 14563 W 96th Terrace • Lenexa KS 66215 USA • Need Support? Mailto:[email protected] M EDIA ZONE P RO P LAYER I NSTALLATION G UIDE NETWORK CONNECTIONS Wireless Network Connection A wireless connection can be used with both DHCP and statically assigned addresses. To Connect to a Wireless Network: 1. Right-click on the Network desktop icon and select Properties. (See Step 1 in the Determine Player Network Address section for an illustration.) 2. The Network and Sharing Center will look similar to the image below. Select Change adapter settings from the list on the left. Note: If the player is connected to the network via an Ethernet cable, the Network and Sharing Center will look similar to the image in Step 2 of the Determine Player Network Address section. 3. In the Network Connections window, double-click on the Wireless Network icon to see the available wireless network connections. 17 Copyright © 2015 Keywest Technology, Inc. All Rights Reserved 14563 W 96th Terrace • Lenexa KS 66215 USA • Need Support? Mailto:[email protected] M EDIA ZONE P RO P LAYER I NSTALLATION G UIDE NETWORK CONNECTIONS Wireless Network Connection (continued) 4. A Connect button and Connect automatically checkbox appear after a wireless network is selected. Connect automatically… instructs the player to connect to this wireless network automatically whenever it is available. 5. A window displays informing the user that the player is connecting to the selected network. 6. The player is now connected to the wireless network. 18 Copyright © 2015 Keywest Technology, Inc. All Rights Reserved 14563 W 96th Terrace • Lenexa KS 66215 USA • Need Support? Mailto:[email protected] M EDIA ZONE P RO P LAYER I NSTALLATION G UIDE NETWORK CONNECTIONS Confirm Connectivity with Web Browser Once your player is connected to the wired or wireless connection, you can then use the Internet Explorer web browser to confirm the player is connected to the network (assuming your network has Internet access). 19 Copyright © 2015 Keywest Technology, Inc. All Rights Reserved 14563 W 96th Terrace • Lenexa KS 66215 USA • Need Support? Mailto:[email protected] M EDIA ZONE P RO P LAYER I NSTALLATION G UIDE ADDITIONAL INSTALLATION SETUP Audio Configurations Your MediaZone Pro Player will be configured to use the connected display monitor’s audio output by default. If the monitor does not have audio output, speakers can be connected to the MediaZone Pro Player. The audio output type and volume level are adjusted in the Sound tool. Open the Sound tool: 1. Double-click on the Control Panel icon on the desktop. 2. Click on Sound in the Control Panel window. 3. This opens the Sound tool window where audio settings can be modified. The audio output of the connected display monitor will be selected by default. 20 Copyright © 2015 Keywest Technology, Inc. All Rights Reserved 14563 W 96th Terrace • Lenexa KS 66215 USA • Need Support? Mailto:[email protected] M EDIA ZONE P RO P LAYER I NSTALLATION G UIDE ADDITIONAL INSTALLATION SETUP Audio Configurations (continued) Changing the audio output: 1. Select the desired audio output; speaker output is selected in the image below. 2. Click on the Set Default button to change the audio output used by the MediaZone Pro Player. A green check shows next to the icon indicating the audio output currently selected as the default audio. 3. Clicking on the Properties button opens a window with settings for the currently selected audio. The volume can be adjusted in the Levels tab of this window. 21 Copyright © 2015 Keywest Technology, Inc. All Rights Reserved 14563 W 96th Terrace • Lenexa KS 66215 USA • Need Support? Mailto:[email protected]