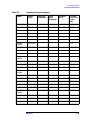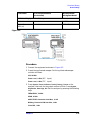
1
User’s Guide Agilent Technologies ESA Spectrum Analyzers This guide documents firmware revision A.05.xx This manual provides documentation for the following instruments: Agilent Technologies ESA-E Series E4401B (9 kHz–1.5 GHz) E4402B (9 kHz–3.0 GHz) E4404B (9 kHz–6.7 GHz) E4405B (9 kHz–13.2 GHz) E4407B (9 kHz–26.5 GHz) and Agilent Technologies ESA-L Series E4411B (9 kHz–1.5 GHz) E4403B (9 kHz–3.0 GHz) E4408B (9 kHz–26.5 GHz) Manufacturing Part Number: E4401-90189 Supersedes E4401-90174 Includes changes documented in E4401-90254 Printed in USA August 2000 © Copyright 2000 Agilent Technologies The information contained in this document is subject to change without notice. Agilent Technologies makes no warranty of any kind with regard to this material, including but not limited to, the implied warranties of merchantability and fitness for a particular purpose. Agilent Technologies shall not be liable for errors contained herein or for incidental or consequential damages in connection with the furnishing, performance, or use of this material. The following safety symbols are used throughout this manual. Familiarize yourself with the symbols and their meaning before operating this instrument. WARNING Warning denotes a hazard. It calls attention to a procedure which, if not correctly performed or adhered to, could result in injury or loss of life. Do not proceed beyond a warning note until the indicated conditions are fully understood and met. CAUTION Caution denotes a hazard. It calls attention to a procedure that, if not correctly performed or adhered to, could result in damage to or destruction of the instrument. Do not proceed beyond a caution sign until the indicated conditions are fully understood and met. NOTE Note calls out special information for the user’s attention. It provides operational information or additional instructions of which the user should be aware. The instruction documentation symbol. The product is marked with this symbol when it is necessary for the user to refer to the instructions in the documentation. This symbol is used to mark the on position of the power line switch. This symbol is used to mark the standby position of the power line switch. This symbol indicates that the input power required is AC. WARNING This is a Safety Class 1 Product (provided with a protective earthing ground incorporated in the power cord). The mains plug shall only be inserted in a socket outlet provided with a protected earth contact. Any interruption of the protective conductor inside or outside of the product is likely to make the product dangerous. Intentional interruption is prohibited. ii WARNING If this product is not used as specified, the protection provided by the equipment could be impaired. This product must be used in a normal condition (in which all means for protection are intact) only. Warranty This Agilent Technologies instrument product is warranted against defects in material and workmanship for a period of three years from date of shipment. During the warranty period, Agilent Technologies will, at its option, either repair or replace products which prove to be defective. For warranty service or repair, this product must be returned to a service facility designated by Agilent Technologies. Buyer shall prepay shipping charges to Agilent Technologies and Agilent Technologies shall pay shipping charges to return the product to Buyer. However, Buyer shall pay all shipping charges, duties, and taxes for products returned to Agilent Technologies from another country. Agilent Technologies warrants that its software and firmware designated by Agilent Technologies for use with an instrument will execute its programming instructions when properly installed on that instrument. Agilent Technologies does not warrant that the operation of the instrument, or software, or firmware will be uninterrupted or error-free. LIMITATION OF WARRANTY The foregoing warranty shall not apply to defects resulting from improper or inadequate maintenance by Buyer, Buyer-supplied software or interfacing, unauthorized modification or misuse, operation outside of the environmental specifications for the product, or improper site preparation or maintenance. NO OTHER WARRANTY IS EXPRESSED OR IMPLIED. AGILENT TECHNOLOGIES SPECIFICALLY DISCLAIMS THE IMPLIED WARRANTIES OF MERCHANTABILITY AND FITNESS FOR A PARTICULAR PURPOSE. iii EXCLUSIVE REMEDIES THE REMEDIES PROVIDED HEREIN ARE BUYER’S SOLE AND EXCLUSIVE REMEDIES. AGILENT TECHNOLOGIES SHALL NOT BE LIABLE FOR ANY DIRECT, INDIRECT, SPECIAL, INCIDENTAL, OR CONSEQUENTIAL DAMAGES, WHETHER BASED ON CONTRACT, TORT, OR ANY OTHER LEGAL THEORY. Where to Find the Latest Information Documentation is updated periodically. For the latest information about Agilent Technologies ESA Spectrum Analyzers, including firmware upgrades and application information, please visit the following Internet URL: http://www.agilent.com/find/esa iv Contents 1. Preparing for Use Initial Inspection . . . . . . . . . . . . . . . . . . . . . . . . . . . . . . . . . . . . . . . . . . . . . . . . . . . . . . . . . Power Requirements . . . . . . . . . . . . . . . . . . . . . . . . . . . . . . . . . . . . . . . . . . . . . . . . . . . . . . Checking the Fuse . . . . . . . . . . . . . . . . . . . . . . . . . . . . . . . . . . . . . . . . . . . . . . . . . . . . . . AC Power Cable . . . . . . . . . . . . . . . . . . . . . . . . . . . . . . . . . . . . . . . . . . . . . . . . . . . . . . . Preparation . . . . . . . . . . . . . . . . . . . . . . . . . . . . . . . . . . . . . . . . . . . . . . . . . . . . . . . . . . . . . Turning On the Analyzer for the First Time . . . . . . . . . . . . . . . . . . . . . . . . . . . . . . . . . . . . 1-2 1-4 1-4 1-5 1-7 1-8 2. Getting Started What You Will Find in This Chapter . . . . . . . . . . . . . . . . . . . . . . . . . . . . . . . . . . . . . . . . . 2-2 Front-Panel Features . . . . . . . . . . . . . . . . . . . . . . . . . . . . . . . . . . . . . . . . . . . . . . . . . . . . . . 2-3 Rear-Panel Features . . . . . . . . . . . . . . . . . . . . . . . . . . . . . . . . . . . . . . . . . . . . . . . . . . . . . . 2-8 Display Annotation . . . . . . . . . . . . . . . . . . . . . . . . . . . . . . . . . . . . . . . . . . . . . . . . . . . . . . 2-13 Key Overview . . . . . . . . . . . . . . . . . . . . . . . . . . . . . . . . . . . . . . . . . . . . . . . . . . . . . . . . . . 2-18 Making a Measurement . . . . . . . . . . . . . . . . . . . . . . . . . . . . . . . . . . . . . . . . . . . . . . . . . . . 2-20 Measurement Summary . . . . . . . . . . . . . . . . . . . . . . . . . . . . . . . . . . . . . . . . . . . . . . . . 2-22 Analyzer Accuracy and the Internal Alignment Process . . . . . . . . . . . . . . . . . . . . . . . . . 2-24 Warm-up Time . . . . . . . . . . . . . . . . . . . . . . . . . . . . . . . . . . . . . . . . . . . . . . . . . . . . . . . 2-24 File Menu Functions . . . . . . . . . . . . . . . . . . . . . . . . . . . . . . . . . . . . . . . . . . . . . . . . . . . . . 2-25 Locate and view files in the catalog . . . . . . . . . . . . . . . . . . . . . . . . . . . . . . . . . . . . . . . 2-25 Creating a directory . . . . . . . . . . . . . . . . . . . . . . . . . . . . . . . . . . . . . . . . . . . . . . . . . . . . 2-27 Format a Floppy Disk . . . . . . . . . . . . . . . . . . . . . . . . . . . . . . . . . . . . . . . . . . . . . . . . . . 2-28 Save a File . . . . . . . . . . . . . . . . . . . . . . . . . . . . . . . . . . . . . . . . . . . . . . . . . . . . . . . . . . . 2-29 Load a file . . . . . . . . . . . . . . . . . . . . . . . . . . . . . . . . . . . . . . . . . . . . . . . . . . . . . . . . . . . 2-33 Rename a File . . . . . . . . . . . . . . . . . . . . . . . . . . . . . . . . . . . . . . . . . . . . . . . . . . . . . . . . 2-35 Copy a File . . . . . . . . . . . . . . . . . . . . . . . . . . . . . . . . . . . . . . . . . . . . . . . . . . . . . . . . . . 2-36 Delete a File . . . . . . . . . . . . . . . . . . . . . . . . . . . . . . . . . . . . . . . . . . . . . . . . . . . . . . . . . 2-37 Printer Setup and Operation . . . . . . . . . . . . . . . . . . . . . . . . . . . . . . . . . . . . . . . . . . . . . . . 2-38 Equipment . . . . . . . . . . . . . . . . . . . . . . . . . . . . . . . . . . . . . . . . . . . . . . . . . . . . . . . . . . . 2-38 Interconnection and Setup . . . . . . . . . . . . . . . . . . . . . . . . . . . . . . . . . . . . . . . . . . . . . . . 2-38 Testing Printer Operation . . . . . . . . . . . . . . . . . . . . . . . . . . . . . . . . . . . . . . . . . . . . . . . 2-40 Analyzer Battery Information . . . . . . . . . . . . . . . . . . . . . . . . . . . . . . . . . . . . . . . . . . . . . . 2-41 3. Functional Testing What You Will Find in This Chapter . . . . . . . . . . . . . . . . . . . . . . . . . . . . . . . . . . . . . . . . . What Are the Functional Tests? . . . . . . . . . . . . . . . . . . . . . . . . . . . . . . . . . . . . . . . . . . . Functional Test Versus Performance Verification . . . . . . . . . . . . . . . . . . . . . . . . . . . . . Test Descriptions . . . . . . . . . . . . . . . . . . . . . . . . . . . . . . . . . . . . . . . . . . . . . . . . . . . . . . . . Displayed Average Noise Level . . . . . . . . . . . . . . . . . . . . . . . . . . . . . . . . . . . . . . . . . . . . . Test Limits . . . . . . . . . . . . . . . . . . . . . . . . . . . . . . . . . . . . . . . . . . . . . . . . . . . . . . . . . . . Test Description . . . . . . . . . . . . . . . . . . . . . . . . . . . . . . . . . . . . . . . . . . . . . . . . . . . . . . . Required Equipment . . . . . . . . . . . . . . . . . . . . . . . . . . . . . . . . . . . . . . . . . . . . . . . . . . . . 3-2 3-2 3-2 3-3 3-4 3-4 3-5 3-5 v Contents Procedure (10 MHz to 500 MHz) E4401B and E4411B . . . . . . . . . . . . . . . . . . . . . . . . 3-6 Procedure (501 MHz to 1.0 GHz) E4401B and E4411B . . . . . . . . . . . . . . . . . . . . . . . . 3-7 Procedure (1.01 GHz to 1.5 GHz) E4401B and E4411B . . . . . . . . . . . . . . . . . . . . . . . . 3-9 Procedure (10 MHz to 1 GHz) E4402B, E4403B, E4404B, E4405B, E4407B, E4408B . . 3-10 Procedure (1.01 GHz to 2 GHz) E4402B, E4403B, E4404B, E4405B, E4407B, E4408B . 3-11 Procedure (2.01 GHz to 3.0 GHz) E4402B, E4403B, E4404B, E4405B, E4407B, E4408B 3-12 Procedure (3.01 GHz to 6.0 GHz) E4404B, E4405B, E4407B, E4408B . . . . . . . . . . . 3-14 Procedure (6.01 GHz to 6.7 GHz) E4404B . . . . . . . . . . . . . . . . . . . . . . . . . . . . . . . . . 3-15 Procedure (6.01 GHz to 12.0 GHz) E4405B, E4407B, E4408B . . . . . . . . . . . . . . . . . 3-16 Procedure (12.01 GHz to 13.2 GHz) E4405B . . . . . . . . . . . . . . . . . . . . . . . . . . . . . . . 3-17 Procedure (12.01 GHz to 22 GHz) E4407B and E4408B . . . . . . . . . . . . . . . . . . . . . . 3-19 Procedure (22.01 GHz to 26.5 GHz) E4407B and E4408B . . . . . . . . . . . . . . . . . . . . . 3-20 Frequency Readout Accuracy . . . . . . . . . . . . . . . . . . . . . . . . . . . . . . . . . . . . . . . . . . . . . . 3-23 Test Limits . . . . . . . . . . . . . . . . . . . . . . . . . . . . . . . . . . . . . . . . . . . . . . . . . . . . . . . . . . 3-23 Test Description . . . . . . . . . . . . . . . . . . . . . . . . . . . . . . . . . . . . . . . . . . . . . . . . . . . . . . 3-23 Required Equipment . . . . . . . . . . . . . . . . . . . . . . . . . . . . . . . . . . . . . . . . . . . . . . . . . . . 3-23 Procedure . . . . . . . . . . . . . . . . . . . . . . . . . . . . . . . . . . . . . . . . . . . . . . . . . . . . . . . . . . . 3-24 Marker Count Accuracy . . . . . . . . . . . . . . . . . . . . . . . . . . . . . . . . . . . . . . . . . . . . . . . . . . 3-26 Procedure . . . . . . . . . . . . . . . . . . . . . . . . . . . . . . . . . . . . . . . . . . . . . . . . . . . . . . . . . . . 3-26 Frequency Response . . . . . . . . . . . . . . . . . . . . . . . . . . . . . . . . . . . . . . . . . . . . . . . . . . . . . 3-27 Test Limits . . . . . . . . . . . . . . . . . . . . . . . . . . . . . . . . . . . . . . . . . . . . . . . . . . . . . . . . . . 3-27 Test Description . . . . . . . . . . . . . . . . . . . . . . . . . . . . . . . . . . . . . . . . . . . . . . . . . . . . . . 3-27 Required Equipment . . . . . . . . . . . . . . . . . . . . . . . . . . . . . . . . . . . . . . . . . . . . . . . . . . . 3-28 Procedure . . . . . . . . . . . . . . . . . . . . . . . . . . . . . . . . . . . . . . . . . . . . . . . . . . . . . . . . . . . 3-29 Reference Level Accuracy . . . . . . . . . . . . . . . . . . . . . . . . . . . . . . . . . . . . . . . . . . . . . . . . 3-32 Test Limits . . . . . . . . . . . . . . . . . . . . . . . . . . . . . . . . . . . . . . . . . . . . . . . . . . . . . . . . . . 3-32 Test Description . . . . . . . . . . . . . . . . . . . . . . . . . . . . . . . . . . . . . . . . . . . . . . . . . . . . . . 3-32 Required Equipment . . . . . . . . . . . . . . . . . . . . . . . . . . . . . . . . . . . . . . . . . . . . . . . . . . . 3-33 Log Mode Procedure . . . . . . . . . . . . . . . . . . . . . . . . . . . . . . . . . . . . . . . . . . . . . . . . . . . 3-34 Linear Mode Procedure . . . . . . . . . . . . . . . . . . . . . . . . . . . . . . . . . . . . . . . . . . . . . . . . . 3-35 Resolution Bandwidth Switching Uncertainty . . . . . . . . . . . . . . . . . . . . . . . . . . . . . . . . . 3-37 Test Limits . . . . . . . . . . . . . . . . . . . . . . . . . . . . . . . . . . . . . . . . . . . . . . . . . . . . . . . . . . 3-37 Test Description . . . . . . . . . . . . . . . . . . . . . . . . . . . . . . . . . . . . . . . . . . . . . . . . . . . . . . 3-37 Required Equipment . . . . . . . . . . . . . . . . . . . . . . . . . . . . . . . . . . . . . . . . . . . . . . . . . . . 3-38 Procedure . . . . . . . . . . . . . . . . . . . . . . . . . . . . . . . . . . . . . . . . . . . . . . . . . . . . . . . . . . . 3-38 Scale Fidelity . . . . . . . . . . . . . . . . . . . . . . . . . . . . . . . . . . . . . . . . . . . . . . . . . . . . . . . . . . 3-40 Test Limits . . . . . . . . . . . . . . . . . . . . . . . . . . . . . . . . . . . . . . . . . . . . . . . . . . . . . . . . . . 3-40 Test Description . . . . . . . . . . . . . . . . . . . . . . . . . . . . . . . . . . . . . . . . . . . . . . . . . . . . . . 3-40 Required Equipment . . . . . . . . . . . . . . . . . . . . . . . . . . . . . . . . . . . . . . . . . . . . . . . . . . . 3-40 vi Contents Procedure . . . . . . . . . . . . . . . . . . . . . . . . . . . . . . . . . . . . . . . . . . . . . . . . . . . . . . . . . . . Second Harmonic Spurious Responses . . . . . . . . . . . . . . . . . . . . . . . . . . . . . . . . . . . . . . . Test Limits . . . . . . . . . . . . . . . . . . . . . . . . . . . . . . . . . . . . . . . . . . . . . . . . . . . . . . . . . . Test Description . . . . . . . . . . . . . . . . . . . . . . . . . . . . . . . . . . . . . . . . . . . . . . . . . . . . . . Required Equipment . . . . . . . . . . . . . . . . . . . . . . . . . . . . . . . . . . . . . . . . . . . . . . . . . . . Procedure . . . . . . . . . . . . . . . . . . . . . . . . . . . . . . . . . . . . . . . . . . . . . . . . . . . . . . . . . . . Tracking Generator Level Flatness: HP E4401B and E4411B, Options 1DN and 1DQ . Test Limits . . . . . . . . . . . . . . . . . . . . . . . . . . . . . . . . . . . . . . . . . . . . . . . . . . . . . . . . . . Test Description . . . . . . . . . . . . . . . . . . . . . . . . . . . . . . . . . . . . . . . . . . . . . . . . . . . . . . Required Equipment . . . . . . . . . . . . . . . . . . . . . . . . . . . . . . . . . . . . . . . . . . . . . . . . . . . Procedure . . . . . . . . . . . . . . . . . . . . . . . . . . . . . . . . . . . . . . . . . . . . . . . . . . . . . . . . . . . Tracking Generator Level Flatness: E4402B, E4403B, E4404B, E4405B, E4407B and E4408B, Option 1DN . . . . . . . . . . . . . . . . . . . . . . . . . . . . . . . . . . . . . . . . . . . . . . . . . . . . Test Limits . . . . . . . . . . . . . . . . . . . . . . . . . . . . . . . . . . . . . . . . . . . . . . . . . . . . . . . . . . Test Description . . . . . . . . . . . . . . . . . . . . . . . . . . . . . . . . . . . . . . . . . . . . . . . . . . . . . . Required Equipment . . . . . . . . . . . . . . . . . . . . . . . . . . . . . . . . . . . . . . . . . . . . . . . . . . . Procedure . . . . . . . . . . . . . . . . . . . . . . . . . . . . . . . . . . . . . . . . . . . . . . . . . . . . . . . . . . . 3-41 3-43 3-43 3-43 3-44 3-45 3-46 3-46 3-46 3-46 3-47 3-49 3-49 3-49 3-49 3-50 4. Troubleshooting What You Will Find in This Chapter . . . . . . . . . . . . . . . . . . . . . . . . . . . . . . . . . . . . . . . . . 4-2 Before You Call Agilent Technologies . . . . . . . . . . . . . . . . . . . . . . . . . . . . . . . . . . . . . . . . 4-3 Check the Basics . . . . . . . . . . . . . . . . . . . . . . . . . . . . . . . . . . . . . . . . . . . . . . . . . . . . . . . 4-3 Read the Warranty . . . . . . . . . . . . . . . . . . . . . . . . . . . . . . . . . . . . . . . . . . . . . . . . . . . . . 4-4 Service Options . . . . . . . . . . . . . . . . . . . . . . . . . . . . . . . . . . . . . . . . . . . . . . . . . . . . . . . . 4-4 How to Contact Agilent Technologies . . . . . . . . . . . . . . . . . . . . . . . . . . . . . . . . . . . . . . 4-5 How to Return Your Analyzer for Service . . . . . . . . . . . . . . . . . . . . . . . . . . . . . . . . . . . . . 4-7 Service Tag . . . . . . . . . . . . . . . . . . . . . . . . . . . . . . . . . . . . . . . . . . . . . . . . . . . . . . . . . . . 4-7 Original Packaging . . . . . . . . . . . . . . . . . . . . . . . . . . . . . . . . . . . . . . . . . . . . . . . . . . . . . 4-7 Other Packaging . . . . . . . . . . . . . . . . . . . . . . . . . . . . . . . . . . . . . . . . . . . . . . . . . . . . . . . 4-9 Error Messages . . . . . . . . . . . . . . . . . . . . . . . . . . . . . . . . . . . . . . . . . . . . . . . . . . . . . . . . . 4-10 Status Messages . . . . . . . . . . . . . . . . . . . . . . . . . . . . . . . . . . . . . . . . . . . . . . . . . . . . . . . . 4-11 Informational Messages . . . . . . . . . . . . . . . . . . . . . . . . . . . . . . . . . . . . . . . . . . . . . . . . . . 4-16 Error Queues . . . . . . . . . . . . . . . . . . . . . . . . . . . . . . . . . . . . . . . . . . . . . . . . . . . . . . . . . . . 4-21 Error Message Format . . . . . . . . . . . . . . . . . . . . . . . . . . . . . . . . . . . . . . . . . . . . . . . . . . . . 4-22 Error Message Types . . . . . . . . . . . . . . . . . . . . . . . . . . . . . . . . . . . . . . . . . . . . . . . . . . . . 4-23 0: No Error . . . . . . . . . . . . . . . . . . . . . . . . . . . . . . . . . . . . . . . . . . . . . . . . . . . . . . . . . . . . . . 4-25 –499 to –400: Query Errors . . . . . . . . . . . . . . . . . . . . . . . . . . . . . . . . . . . . . . . . . . . . . . . . . . . . . . . . . . . 4-26 –399 to –300: Device-Specific Error Messages . . . . . . . . . . . . . . . . . . . . . . . . . . . . . . . . . . . . . . . . . . . . 4-28 Device-Specific Error Message Descriptions . . . . . . . . . . . . . . . . . . . . . . . . . . . . . . . . 4-28 vii Contents –299 to –200: Execution Error Messages . . . . . . . . . . . . . . . . . . . . . . . . . . . . . . . . . . . . . . . . . . . . . . . . . 4-29 Execution Error Message Descriptions . . . . . . . . . . . . . . . . . . . . . . . . . . . . . . . . . . . . . 4-29 –199 to –100: Command Errors . . . . . . . . . . . . . . . . . . . . . . . . . . . . . . . . . . . . . . . . . . . . . . . . . . . . . . . . 4-30 201 to 799: Device-Specific Errors . . . . . . . . . . . . . . . . . . . . . . . . . . . . . . . . . . . . . . . . . . . . . . . . . . . . 4-35 Greater than 1000: Personality Specific Error Messages . . . . . . . . . . . . . . . . . . . . . . . . . . . . . . . . . . . . . . . . . 4-45 5. Menu Maps What You Will Find in This Chapter . . . . . . . . . . . . . . . . . . . . . . . . . . . . . . . . . . . . . . . . . . 5-2 6. Front-Panel Key Reference AMPLITUDE Y Scale . . . . . . . . . . . . . . . . . . . . . . . . . . . . . . . . . . . . . . . . . . . . . . . . . . . . . 6-8 Auto Couple . . . . . . . . . . . . . . . . . . . . . . . . . . . . . . . . . . . . . . . . . . . . . . . . . . . . . . . . . . . . 6-13 BW/Avg . . . . . . . . . . . . . . . . . . . . . . . . . . . . . . . . . . . . . . . . . . . . . . . . . . . . . . . . . . . . . . . 6-14 Det/Demod . . . . . . . . . . . . . . . . . . . . . . . . . . . . . . . . . . . . . . . . . . . . . . . . . . . . . . . . . . . . . 6-17 Display . . . . . . . . . . . . . . . . . . . . . . . . . . . . . . . . . . . . . . . . . . . . . . . . . . . . . . . . . . . . . . . . 6-19 Enter . . . . . . . . . . . . . . . . . . . . . . . . . . . . . . . . . . . . . . . . . . . . . . . . . . . . . . . . . . . . . . . . . . 6-25 Esc . . . . . . . . . . . . . . . . . . . . . . . . . . . . . . . . . . . . . . . . . . . . . . . . . . . . . . . . . . . . . . . . . . . 6-26 File . . . . . . . . . . . . . . . . . . . . . . . . . . . . . . . . . . . . . . . . . . . . . . . . . . . . . . . . . . . . . . . . . . . 6-27 Freq Count . . . . . . . . . . . . . . . . . . . . . . . . . . . . . . . . . . . . . . . . . . . . . . . . . . . . . . . . . . . . . 6-36 FREQUENCY Channel . . . . . . . . . . . . . . . . . . . . . . . . . . . . . . . . . . . . . . . . . . . . . . . . . . . 6-37 Help . . . . . . . . . . . . . . . . . . . . . . . . . . . . . . . . . . . . . . . . . . . . . . . . . . . . . . . . . . . . . . . . . . 6-39 Input/Output . . . . . . . . . . . . . . . . . . . . . . . . . . . . . . . . . . . . . . . . . . . . . . . . . . . . . . . . . . . . 6-40 Marker . . . . . . . . . . . . . . . . . . . . . . . . . . . . . . . . . . . . . . . . . . . . . . . . . . . . . . . . . . . . . . . . 6-44 Marker → . . . . . . . . . . . . . . . . . . . . . . . . . . . . . . . . . . . . . . . . . . . . . . . . . . . . . . . . . . . . . . . . . . . . . . . . . . . 6−49 Meas Control . . . . . . . . . . . . . . . . . . . . . . . . . . . . . . . . . . . . . . . . . . . . . . . . . . . . . . . . . . . 6-50 Meas Setup . . . . . . . . . . . . . . . . . . . . . . . . . . . . . . . . . . . . . . . . . . . . . . . . . . . . . . . . . . . . . 6-51 MEASURE . . . . . . . . . . . . . . . . . . . . . . . . . . . . . . . . . . . . . . . . . . . . . . . . . . . . . . . . . . . . 6-54 MODE . . . . . . . . . . . . . . . . . . . . . . . . . . . . . . . . . . . . . . . . . . . . . . . . . . . . . . . . . . . . . . . . 6-57 MODE SETUP . . . . . . . . . . . . . . . . . . . . . . . . . . . . . . . . . . . . . . . . . . . . . . . . . . . . . . . . . . 6-58 Next Window . . . . . . . . . . . . . . . . . . . . . . . . . . . . . . . . . . . . . . . . . . . . . . . . . . . . . . . . . . . 6-59 Peak Search . . . . . . . . . . . . . . . . . . . . . . . . . . . . . . . . . . . . . . . . . . . . . . . . . . . . . . . . . . . . 6-60 Preset . . . . . . . . . . . . . . . . . . . . . . . . . . . . . . . . . . . . . . . . . . . . . . . . . . . . . . . . . . . . . . . . . 6-65 Print . . . . . . . . . . . . . . . . . . . . . . . . . . . . . . . . . . . . . . . . . . . . . . . . . . . . . . . . . . . . . . . . . . 6-69 Print Setup . . . . . . . . . . . . . . . . . . . . . . . . . . . . . . . . . . . . . . . . . . . . . . . . . . . . . . . . . . . . . 6-70 Restart . . . . . . . . . . . . . . . . . . . . . . . . . . . . . . . . . . . . . . . . . . . . . . . . . . . . . . . . . . . . . . . . 6-72 Return . . . . . . . . . . . . . . . . . . . . . . . . . . . . . . . . . . . . . . . . . . . . . . . . . . . . . . . . . . . . . . . . . 6-73 Save . . . . . . . . . . . . . . . . . . . . . . . . . . . . . . . . . . . . . . . . . . . . . . . . . . . . . . . . . . . . . . . . . . 6-74 Single . . . . . . . . . . . . . . . . . . . . . . . . . . . . . . . . . . . . . . . . . . . . . . . . . . . . . . . . . . . . . . . . . 6-75 viii Contents Source . . . . . . . . . . . . . . . . . . . . . . . . . . . . . . . . . . . . . . . . . . . . . . . . . . . . . . . . . . . . . . . . 6-76 SPAN X Scale . . . . . . . . . . . . . . . . . . . . . . . . . . . . . . . . . . . . . . . . . . . . . . . . . . . . . . . . . . 6-78 Standby . . . . . . . . . . . . . . . . . . . . . . . . . . . . . . . . . . . . . . . . . . . . . . . . . . . . . . . . . . . . . . . 6-82 Sweep . . . . . . . . . . . . . . . . . . . . . . . . . . . . . . . . . . . . . . . . . . . . . . . . . . . . . . . . . . . . . . . . 6-83 System (Local) . . . . . . . . . . . . . . . . . . . . . . . . . . . . . . . . . . . . . . . . . . . . . . . . . . . . . . . . . 6-92 Trig . . . . . . . . . . . . . . . . . . . . . . . . . . . . . . . . . . . . . . . . . . . . . . . . . . . . . . . . . . . . . . . . . 6-100 Viewing Angle . . . . . . . . . . . . . . . . . . . . . . . . . . . . . . . . . . . . . . . . . . . . . . . . . . . . . . . . 6-104 View/Trace . . . . . . . . . . . . . . . . . . . . . . . . . . . . . . . . . . . . . . . . . . . . . . . . . . . . . . . . . . . 6-105 Zoom . . . . . . . . . . . . . . . . . . . . . . . . . . . . . . . . . . . . . . . . . . . . . . . . . . . . . . . . . . . . . . . . 6-108 7. Options and Accessories Options . . . . . . . . . . . . . . . . . . . . . . . . . . . . . . . . . . . . . . . . . . . . . . . . . . . . . . . . . . . . . . . . 7-4 How to Order Options . . . . . . . . . . . . . . . . . . . . . . . . . . . . . . . . . . . . . . . . . . . . . . . . . . . . . 7-5 Delete Manual Set (Option 0B0) . . . . . . . . . . . . . . . . . . . . . . . . . . . . . . . . . . . . . . . . . . 7-5 Additional Manual Set (Option 0B1) . . . . . . . . . . . . . . . . . . . . . . . . . . . . . . . . . . . . . . . 7-5 Component Level Service Documentation (Option 0BV) . . . . . . . . . . . . . . . . . . . . . . . 7-5 Service Documentation and Adjustment Software (Option 0BW) . . . . . . . . . . . . . . . . . . . . . . . . . . . . . . . . . . . . . . . . . . . . . . . . . . . . . . . . . 7-5 RS-232 and Parallel Interface (Option 1AX) . . . . . . . . . . . . . . . . . . . . . . . . . . . . . . . . . 7-5 Rack Mount Kit With Handles (Option 1CP) . . . . . . . . . . . . . . . . . . . . . . . . . . . . . . . . . 7-6 High Stability Frequency Reference (Option 1D5) . . . . . . . . . . . . . . . . . . . . . . . . . . . . 7-6 Time-Gated Spectrum Analysis (Option 1D6) . . . . . . . . . . . . . . . . . . . . . . . . . . . . . . . . 7-6 50 Ω to 75 Ω Matching Pad (Option 1D7) . . . . . . . . . . . . . . . . . . . . . . . . . . . . . . . . . . . 7-6 50 Ω Tracking Generator (Option 1DN) . . . . . . . . . . . . . . . . . . . . . . . . . . . . . . . . . . . . . 7-6 75 Ω Input Impedance (Option 1DP) . . . . . . . . . . . . . . . . . . . . . . . . . . . . . . . . . . . . . . . 7-6 Narrow Resolution Bandwidth (Option 1DR) . . . . . . . . . . . . . . . . . . . . . . . . . . . . . . . . 7-7 75 Ω Tracking Generator (Option 1DQ) . . . . . . . . . . . . . . . . . . . . . . . . . . . . . . . . . . . . . 7-7 Pre-amplifier (Option 1DS) . . . . . . . . . . . . . . . . . . . . . . . . . . . . . . . . . . . . . . . . . . . . . . 7-7 GPIB and Parallel Interface (Option A4H) . . . . . . . . . . . . . . . . . . . . . . . . . . . . . . . . . . . 7-7 IF, Sweep and Video Ports (Option A4J) . . . . . . . . . . . . . . . . . . . . . . . . . . . . . . . . . . . . 7-7 12 Vdc Power Cable (Option A5D) . . . . . . . . . . . . . . . . . . . . . . . . . . . . . . . . . . . . . . . . 7-8 Hard Transit Case (Option AXT) . . . . . . . . . . . . . . . . . . . . . . . . . . . . . . . . . . . . . . . . . . 7-8 Operating and Carrying Cases (Option AYT/AYU) . . . . . . . . . . . . . . . . . . . . . . . . . . . 7-8 Fast Digitized Time Domain Sweeps (Option AYX) . . . . . . . . . . . . . . . . . . . . . . . . . . . 7-8 External Mixing (Option AYZ) . . . . . . . . . . . . . . . . . . . . . . . . . . . . . . . . . . . . . . . . . . . 7-9 Benchlink Spectrum Analyzer (Option B70) . . . . . . . . . . . . . . . . . . . . . . . . . . . . . . . . . 7-9 Enhanced Memory Upgrade (Option B72) . . . . . . . . . . . . . . . . . . . . . . . . . . . . . . . . . . . 7-9 RF and Digital Communications Hardware (Option B74) . . . . . . . . . . . . . . . . . . . . . . . . . . . . . . . . . . . . . . . . . . . . . . . . . . . . . . . . . . 7-9 Performance Bundle (Option B75) . . . . . . . . . . . . . . . . . . . . . . . . . . . . . . . . . . . . . . . . . 7-9 TV Trigger and Picture on Screen (Option B7B) . . . . . . . . . . . . . . . . . . . . . . . . . . . . . 7-10 Digital Signal Processing and Fast ADC (Option B7D) . . . . . . . . . . . . . . . . . . . . . . . . 7-10 ix Contents RF Communications Hardware (Option B7E) . . . . . . . . . . . . . . . . . . . . . . . . . . . . . . . . 7-10 Distance to Fault Accessory Kit (Option B7K) . . . . . . . . . . . . . . . . . . . . . . . . . . . . . . . 7-10 FM Demodulation (Option BAA) . . . . . . . . . . . . . . . . . . . . . . . . . . . . . . . . . . . . . . . . . 7-10 APC 3.5 Input Connector (Option BAB) . . . . . . . . . . . . . . . . . . . . . . . . . . . . . . . . . . . . 7-11 cdmaOne Measurement Personality (Option BAC) . . . . . . . . . . . . . . . . . . . . . . . . . . . 7-11 GSM Measurement Personality (Option BAH) . . . . . . . . . . . . . . . . . . . . . . . . . . . . . . . 7-11 Firmware Upgrade Kit (Option UE2) . . . . . . . . . . . . . . . . . . . . . . . . . . . . . . . . . . . . . . 7-11 Commercial Calibration with Test Data (Option UK6) . . . . . . . . . . . . . . . . . . . . . . . . . . . . . . . . . . . . . . . . . . . . . . . . . . . . . . . . . 7-11 Front Panel Protective Cover (Option UK9) . . . . . . . . . . . . . . . . . . . . . . . . . . . . . . . . . 7-12 Low Frequency Extension (Option UKB) . . . . . . . . . . . . . . . . . . . . . . . . . . . . . . . . . . . 7-12 3 Year Calibration Contract (Option W32) . . . . . . . . . . . . . . . . . . . . . . . . . . . . . . . . . . 7-12 5 Year Service Support (Option W50) . . . . . . . . . . . . . . . . . . . . . . . . . . . . . . . . . . . . . . 7-12 5 Year Calibration Contract (Option W52) . . . . . . . . . . . . . . . . . . . . . . . . . . . . . . . . . . 7-12 Accessories . . . . . . . . . . . . . . . . . . . . . . . . . . . . . . . . . . . . . . . . . . . . . . . . . . . . . . . . . . . . 7-13 RF and Transient Limiters . . . . . . . . . . . . . . . . . . . . . . . . . . . . . . . . . . . . . . . . . . . . . . . 7-13 50 Ω/75 Ω Minimum Loss Pad . . . . . . . . . . . . . . . . . . . . . . . . . . . . . . . . . . . . . . . . . . . . 7-13 75 Ω Matching Transformer . . . . . . . . . . . . . . . . . . . . . . . . . . . . . . . . . . . . . . . . . . . . . . 7-13 RF Bridges . . . . . . . . . . . . . . . . . . . . . . . . . . . . . . . . . . . . . . . . . . . . . . . . . . . . . . . . . . . 7-13 HP/Agilent E1779A Battery Pack . . . . . . . . . . . . . . . . . . . . . . . . . . . . . . . . . . . . . . . . . 7-14 HP/Agilent N2717A Performance Verification Software . . . . . . . . . . . . . . . . . . . . . . . 7-14 AC Probe . . . . . . . . . . . . . . . . . . . . . . . . . . . . . . . . . . . . . . . . . . . . . . . . . . . . . . . . . . . . 7-14 Broadband Preamplifiers and Power Amplifiers . . . . . . . . . . . . . . . . . . . . . . . . . . . . . . 7-14 External Keyboard . . . . . . . . . . . . . . . . . . . . . . . . . . . . . . . . . . . . . . . . . . . . . . . . . . . . . 7-15 GPIB Cable . . . . . . . . . . . . . . . . . . . . . . . . . . . . . . . . . . . . . . . . . . . . . . . . . . . . . . . . . . 7-15 Parallel Interface Cable . . . . . . . . . . . . . . . . . . . . . . . . . . . . . . . . . . . . . . . . . . . . . . . . . 7-15 Printer . . . . . . . . . . . . . . . . . . . . . . . . . . . . . . . . . . . . . . . . . . . . . . . . . . . . . . . . . . . . . . . 7-15 RS-232 Cable . . . . . . . . . . . . . . . . . . . . . . . . . . . . . . . . . . . . . . . . . . . . . . . . . . . . . . . . . 7-15 Carrying Strap (Part Number E4411-60028) . . . . . . . . . . . . . . . . . . . . . . . . . . . . . . . . . 7-15 HP/Agilent 11970 Series Harmonic Mixers . . . . . . . . . . . . . . . . . . . . . . . . . . . . . . . . . 7-16 HP/Agilent 11974 Series Preselected Millimeter Mixers . . . . . . . . . . . . . . . . . . . . . . . 7-16 x 1 Preparing for Use This chapter provides information on how to inspect your analyzer when it arrives and what to expect when it is first powered on. It also includes the analyzer power requirements. 1-1 Preparing for Use Initial Inspection Initial Inspection Inspect the shipping container and verify that the contents are complete. Keep the container and cushioning material until you have inspected the analyzer. Table 1-1 contains the accessories shipped with the analyzer. If the contents are incomplete, or the analyzer does not pass the performance tests, notify the nearest Agilent Technologies office. If the shipping container is damaged or the cushioning material shows signs of stress, also notify the carrier. Keep the shipping materials for the carrier’s inspection. The Agilent office will arrange for repair or replacement without waiting for a claim settlement. If the shipping materials are in good condition, retain them for possible future use. You may wish to ship the analyzer to another location or to return it to Agilent Technologies for service. See “How to Return Your Analyzer for Service” in Chapter 4 for more information about shipping materials. If cleaning is necessary, use a damp cloth only. WARNING To prevent electrical shock, disconnect the analyzer mains before cleaning. Use a dry cloth or one slightly dampened with water to clean the external case parts. Do not attempt to clean internally. 1-2 Chapter 1 Preparing for Use Initial Inspection Table 1-1 Accessories Supplied with the Analyzer Description HP/Agilent Part Number Comments Adapter, Type-N (m) to BNC (f) 1250-0780 Not shipped with Option 1DP. Two adapters are shipped with Option 1DN. Adapter, BNC (m) to F (f), 75 Ω 1250-2477 Shipped only with Option 1DP. Two adapters shipped with Option 1DQ. Adapter, Type-N (m) to SMA (f) 1250-1250 Shipped only with Option 1DN for Agilent E4402B, E4403B, E4404B, E4405B, E4407B and E4408B. Not shipped with Option BAB. Adapter, BNC (f) to SMA (m) 1250-1200 Shipped only with Option BAB. Cable, BNC (m) to BNC (m), 203 mm 10502A Shipped only with Agilent E4402B, E4403B, E4404B, E4405B, E4407B and E4408B. Cable, SMA (m) to Type-N (m), 220 mm 8120-5148 Shipped only with Option 1DN for Agilent E4402B, E4403B, E4404B, E4405B, E4407B and E4408B. Power cable See the table after page 1-5. Shipped with analyzer. Chapter 1 1-3 Preparing for Use Power Requirements Power Requirements The analyzer is a portable instrument and requires no physical installation other than connection to a power source. There is no need to select a line voltage. Table 1-2 Table 1-3 AC Power Requirements Voltage 90-132 Vrms (47 to 440 Hz) Voltage 195 - 250 Vrms (47 to 66 Hz) Power Consumption, On less than 300 W Power Consumption, Standby less than 5 W DC Power Requirements Voltage 12-20 Vdc Power Consumption less than 200 W Checking the Fuse Where IEC regulations apply, use a 5 by 20 mm, rated F5A, 250 V IEC approved fuse. This fuse may be used with input line voltages of 115 V or 230 V. Its part number is 2110-0709. Where UL/CSA regulations apply, use a 5 by 20 mm rated fast blow, 5 A, 125 V UL/CSA approved fuse (part number 2110-0756). This fuse may only be used with an input line voltage of 115 V. The line fuse is housed in a fuse holder in the upper left hand corner of the rear panel. To remove the fuse, first disconnect the power cord from the instrument. Then insert the tip of a screwdriver into the slot at the middle of the fuse holder, and turn counterclockwise to extend the fuse holder. WARNING For continued protection against fire hazard, replace the line fuse only with the same type and rating. The use of other fuses or material is prohibited. 1-4 Chapter 1 Preparing for Use Power Requirements AC Power Cable The analyzer is equipped with a three-wire power cable, in accordance with international safety standards. When connected to an appropriate power line outlet, this cable grounds the instrument cabinet. WARNING Failure to ground the analyzer properly can result in personal injury. Before turning on the analyzer, you must connect its protective earth terminals to the protective conductor of the main power cable. Insert the main power cable plug only into a socket outlet that has a protective earth contact. DO NOT defeat the earth-grounding protection by using an extension cable, power cable, or autotransformer without a protective ground conductor. If you are using an autotransformer, make sure its common terminal is connected to the protective earth contact of the power source outlet socket. Various power cables are available to connect the analyzer to the types of ac power outlets unique to specific geographic areas. The cable appropriate for the area to which the analyzer is originally shipped is included with the unit. You can order additional AC power cables for use in different areas. The following table lists the available ac power cables, illustrates the plug configurations, and identifies the geographic area in which each cable is appropriate. Chapter 1 1-5 Preparing for Use Power Requirements 1-6 Chapter 1 Preparing for Use Preparation Preparation WARNING If this product is to be energized via an external autotransformer for voltage reduction, make sure that its common terminal is connected to a neutral (earthed pole) of the power supply. CAUTION This instrument has autoranging line voltage input. Be sure the supply voltage is within the specified range. (Refer to the Agilent Technologies ESA Spectrum Analyzer Specifications Guide.) CAUTION Ventilation Requirements: When installing the product in a cabinet, the convection into and out of the product must not be restricted. The ambient temperature (outside the cabinet) must be less than the maximum operating temperature of the product by 4 ˚C for every 100 watts dissipated in the cabinet. If the total power dissipated in the cabinet is greater than 800 watts, then forced convection must be used. NOTE Install the instrument so that the detachable power cord is readily identifiable and is easily reached by the operator. The detachable power cord is the instrument disconnecting device. It disconnects the mains circuits from the mains supply before other parts of the instrument. The front panel switch is only a standby switch and is not a LINE switch. Alternatively, an externally installed switch or circuit breaker (which is readily identifiable and is easily reached by the operator) may be used as a disconnecting device. Chapter 1 1-7 Preparing for Use Turning On the Analyzer for the First Time Turning On the Analyzer for the First Time Before using your analyzer, plug the power cord into the analyzer. Press | (the On key). Choose a power on preference using the switch on the rear panel (refer to Figure 2-2 on page 2-8, item 14). The PWR ALWAYS ON setting turns the analyzer on whenever external power is applied. This mode is useful if an external power switch is used to control a rack of several instruments. The PWR NORM setting (factory default) assigns analyzer on/off control to the front-panel On key (see Figure 2-1 on page 2-3, item 23); however if the external power is removed for > 20 seconds, the instrument returns to the Standby condition of the front-panel On key when external power is reconnected. When you turn on the analyzer, the information screen as shown in Figure 1-1 will be displayed during initialization of the instrument. NOTE This screen may be displayed for as long as 1 minute before the initialization process is complete. Your analyzer product number, the firmware revision number (A.04.01), and a URL for accessing product support information on the World Wide Web are shown. Figure 1-1 Information Screen Displayed During Initialization 1-8 Chapter 1 Preparing for Use Turning On the Analyzer for the First Time NOTE Record the firmware revision number and keep it for reference. If you should ever need to call Agilent Technologies for service or with any questions regarding your analyzer, it will be helpful to have the firmware revision number readily available. You can also obtain the firmware revision number by pressing System, More 1 of 3, Show System. To ensure your analyzer meets specifications, it must meet operating temperature conditions. Allow a 5 minute warm-up before making calibrated measurements. If the analyzer is an Agilent Technologies E4402B, E4403B, E4404B, E4405B, E4407B, or E4408B, connect a BNC cable from the AMPTD REF OUT to INPUT 50 Ω using an adapter. After a 5 minute warm-up, press System, Alignments, Align Now, All. NOTE It is normal to hear clicking when the Auto Alignment function is on. During the interval between sweeps, portions of the analyzer’s circuitry are realigned. Some of the circuitry is controlled by relays. It is the rapid switching of these relays between sweeps which causes the clicking sound. Under normal operation, these relays will last over 50 years. To eliminate the clicking sound, turn off the automatic alignment. (See the Alignments key description in Chapter 6 ,“Front-Panel Key Reference.”) With Auto Align turned off, however, the Align Now All function should be performed periodically. For more information on how often to perform Align Now All when the Auto Alignment function is off, refer to the appropriate “Specifications and Characteristics” chapter in the Agilent Technologies ESA Spectrum Analyzer Specifications Guide. CAUTION When operating in DC coupled mode on spectrum analyzers with Option UKB, ensure protection of the input mixer by limiting the input level to 0 VDC, +30 dBm. If you wish to use an external 10 MHz source as the reference frequency, connect an external reference source to the 10 MHz REF IN connector on the rear panel. The signal level should be greater than –15 dBm. Chapter 1 1-9 2 Getting Started 2-1 Getting Started What You Will Find in This Chapter What You Will Find in This Chapter This chapter introduces the basic functions of the analyzer. In this chapter you will: • Get acquainted with the front-panel and rear-panel features. • Get acquainted with the function keys. • Learn about display annotation. • Make a basic measurement (using the internal alignment signal). • Learn about analyzer accuracy and the internal alignment process. • Learn about file menus. • Set up your printer. • Learn about the analyzer battery for retaining internal memory. NOTE Before using your analyzer, please read Chapter 1, “Preparing for Use” which describes how to set up your analyzer and how to verify that it is operational. It also describes many safety considerations that should not be overlooked. 2-2 Chapter 2 Getting Started Front-Panel Features Front-Panel Features Figure 2-1 Front-Panel Feature Overview 1 Viewing Angle keys allow you to adjust the display so that it can be optimally viewed from different angles. 2 Esc. The Esc (escape) key cancels any entry in progress. Esc will abort a print (if one is in progress) and clear error messages from the status line at the bottom of the display. It also clears input and tracking generator overload conditions. 3 Chapter 2 Menu keys are the unlabeled keys next to the screen. The menu key labels are the annotation on the screen next to the unlabeled keys. Most of the labeled keys on the analyzer front panel (also called front-panel keys) access menus of keys having related functions. 2-3 Getting Started Front-Panel Features 4 FREQUENCY Channel, SPAN X Scale, and AMPLITUDE Y Scale are the three large keys that activate the primary analyzer functions and access menus of related functions. The secondary labels on these keys (Channel, X Scale, and Y Scale) are used in some measurements. 5 CONTROL functions access menus that allow you to adjust the resolution bandwidth, adjust the sweep time, and control the instrument display. They also set other analyzer parameters needed for making measurements. 6 MEASURE accesses a menu of keys that automate some common analyzer measurements. Once a measurement is running, Meas Setup accesses additional menu keys for defining your measurement. Meas Control and Restart access additional measurement control functions. 7 SYSTEM functions affect the state of the entire spectrum analyzer. Various setup and alignment routines are accessed with the System key. The green Preset key resets the analyzer to a known state. The File key menu allows you to save and load traces, states, limit-line tables, and amplitude correction factors to or from analyzer memory or the floppy disk drive. The Save key immediately executes the Save Now function defined under File in Chapter 6 ,“Front-Panel Key Reference.” The Print Setup menu keys allow you to configure hardcopy outputs. The Print key immediately sends hardcopy data to the printer. See Chapter 6 for more details. 8 MARKER functions control the markers, read out frequencies and amplitudes along the analyzer trace, automatically locate the signals of highest amplitude, and access functions like Marker Noise and Band Power. 9 The Media Door on the right side of the front panel accesses the 3.5 inch disk drive and the Earphone connector. The earphone connector provides a connection for an earphone jack which bypasses the internal speaker. 2-4 Chapter 2 Getting Started Front-Panel Features 10 The Data Control Keys, which include the step keys, knob, and numeric keypad, allow you to change the numeric value of an active function. Data control keys are used to change values for functions such as center frequency, start frequency, resolution bandwidth, and marker position. The data controls will change the active function in a manner prescribed by that function. For example, you can change center frequency in fine steps with the knob, in discrete steps with the step keys, or to an exact (1 Hz resolution) value with the numeric keypad. The Knob provides fine incremental changes of functions such as center frequency, reference level, and marker position. Clockwise rotation of the knob increases values. The extent of alteration is determined by the size of the measurement range. The speed at which the knob is turned affects the rate at which the values are changed. For slow sweeps, the analyzer uses a smooth panning feature which is designed to move the trace display to the latest function value as the knob is turned. When center, stop or, start frequency or reference level is adjusted, the signal will shift right or left or up or down with the rotation of the knob before a new sweep is actually taken. An asterisk is placed in the message block (the upper right-hand corner of the analyzer display) to indicate that the data on the screen does not reflect data at the current setting. The Numeric Keypad allows entry of exact values for many of the analyzer functions. You may include a decimal point in the number portion. If not, the decimal point is placed at the end of the number. Numeric entries must be terminated with a units key. When a numeric entry is begun, the menu keys show the units key labels. The units keys change depending on what the active function is. For example, the units keys for frequency span are GHz, MHz, kHz, and Hz, whereas the units for reference level are +dBm, −dBm, mV, and µV. NOTE If an entry from the numeric keypad does not coincide with an allowed function value (for example, that of a 12 MHz bandwidth), the analyzer defaults to the nearest allowable value. Chapter 2 2-5 Getting Started Front-Panel Features The Step Keys (⇓ ⇑) increase or decrease the active function value. The step size depends upon the current analyzer measurement. Each press results in a single step change. For those parameters with fixed values (resolution bandwidth), the next value in a sequence is selected each time a step key is pressed. Changes are predictable (10% of span for center frequency) and can be set for some functions (100 MHz for center frequency). Out-of-range values or out-of-sequence values will not occur using these keys. 11 VOLUME. The VOLUME knob adjusts the volume of the internal speaker. The speaker is turned on and off with the Speaker On Off key in the Det/Demod menu. 12 EXT KEYBOARD. The EXT KEYBOARD connector is a 6-pin mini-DIN connector. The keyboard can be used to enter screen titles and filenames. NOTE To avoid damage to the analyzer, always turn off power before plugging a keyboard into the instrument. 13 PROBE POWER provides power for high-impedance AC probes or other accessories. (+15 V, −12.6 V, 150 mA max) 14 LO OUTPUT provides the proper local oscillator signal for use with external mixers (Option AYZ). 15 IF INPUT connects to the IF OUTPUT of the external mixer (Option AYZ). 16 Return. The Return key accesses the previously selected menu. Continuing to press Return accesses earlier menus. 17 AMPTD REF OUT provides an amplitude reference signal of 50 MHz at –20 dBm. Agilent Technologies E4402B, E4403B, E4404B, E4405B, E4407B, and E4408B only. 18 Tab Keys are used to move around in the Limit editor and the Correction editor. 19 CAUTION INPUT 50Ω (INPUT 75Ω for Option 1DP) is the signal input for the analyzer. When operating in DC coupled mode on spectrum analyzers with Option UKB, take care to protect the input mixer by limiting the input level to 0 VDC, +30 dBm. 2-6 Chapter 2 Getting Started Front-Panel Features 20 The Next Window key can be used to select the active window in functions which support split-screen display modes, such as Zone markers. (Refer to “Zone” in Chapter 6 for more information.) In such modes, pressing Zoom allows you to switch between the split-screen and full-sized display of the active window. 21 Help. Press the Help key and then any front panel or menu key to get a short description of the key function and the associated SCPI command. The next key you press will remove the help window from the display. 22 RF OUT 50Ω (for Option 1DN) or RF OUT 75Ω (for Option 1DQ) is the source output for the built-in tracking generator. Option 1DN or 1DQ only. CAUTION If the tracking generator output power is too high, it may damage the device under test. Do not exceed the maximum power that the device under test can tolerate. 23 NOTE The | (On) key turns the analyzer on, while the (Standby) key turns most of the analyzer off. An instrument alignment is performed (if Auto Align is on) every time the analyzer is turned on. After turning on the analyzer, allow 5 minutes of warm-up time to ensure the analyzer will meet all specifications. The instrument continues to draw power even if the line power switch is in standby. The detachable power cord is the instrument disconnecting device. It disconnects the mains circuits from the mains supply before other parts of the instrument. The front-panel switch is only a standby switch and is not a LINE switch (disconnecting device). Chapter 2 2-7 Getting Started Rear-Panel Features Rear-Panel Features Figure 2-2 Rear-Panel Feature Overview 1 Power input is the input for the AC line power source. Make sure that the line-power source outlet has a protective ground contact. 2 DC Power is the input for the DC power source. Refer to the “Power Requirements” section in the specifications chapter of the Agilent ESA Spectrum Analyzers Calibration Guide. CAUTION AC line power and DC power should not be plugged in simultaneously. 3 Line Fuse. The fuse is removed by twisting counterclockwise 1/4 turn. Replace only with a fuse of the same rating. See the label on the rear panel. 2-8 Chapter 2 Getting Started Rear-Panel Features 4 Service Connector. The service connector is for service use only. 5 Inputs/Outputs (Refer to Agilent Technologies ESA Spectrum Analyzer Specifications Guide for more information.) VGA OUTPUT drives an external VGA 5a compatible monitor with a signal that has 31.5 kHz horizontal, 60 Hz vertical synchronizing rate, non-interlaced. GATE/HI SWP OUT (TTL) is high when the analyzer is sweeping or when Gate 5b (Option 1D6) is active. GATE TRIG/EXT TRIG IN (TTL) accepts the positive edge of an external voltage input that triggers the analyzer internal sweep source or the gate function (Time Gate, Option 1D6). 5c Table 2-1 and Table 2-2 show the appropriate rear panel slots to be used for the optional cards available with the Agilent ESA spectrum analyzers. Refer to Table 2-1 if you have an Agilent ESA-L Series spectrum analyzer. Refer to Table 2-2 if you have an Agilent ESA-E Series spectrum analyzer. (P) = Preferred Card Slot (A) = Acceptable Card Slot (–) = Unacceptable Card Slot Table 2-1 Agilent ESA-L Series (E4403B, E4408B, E4411B) Slot # GPIB (Opt A4H) Serial (Opt 1AX) IF and Sweep Ports (Opt A4J) Frequency Extension1 1 P P – – 2 A A – – 5 – – P – 6 – – – P 1. The Frequency Extension Assembly comes standard with the Agilent E4408B. Chapter 2 2-9 Getting Started Rear-Panel Features Table 2-2 Slot # Agilent ESA-E Series (E4401B, E4402B, E4404B, E4405B, E4407B) GPIB Serial and Parallel and Parallel (Opt A4H) (Opt 1AX) 12 P P 2 A 3 FADC (Opt AYX) IF and Sweep Ports (Opt A4J) FM Demod (Opt BAA) Frequency Exten- DSP and Fast ADC (B7D) RF Comm Hardware (B7E) – A – – – – A A A A A – – A A P A A A – – 4 A A A A P A P – 5 – – – P A A – P 6 – – – A A P – – sion1 1. The Frequency Extension Assembly comes standard with the Agilent E4404B, E4405B and E4407B. 2. Some cards may not be installed due to mechanical interference. 6 GPIB and parallel (Option A4H) is an optional interface. GPIB supports remote instrument operation. A parallel port is included for printing only. 7 RS-232 and parallel (Option 1AX) is an optional interface. RS-232 supports remote instrument operation. A parallel port is included for printing only. NOTE Printing is only supported from the parallel port. NOTE Only one optional interface (Option A4H or Option 1AX) can be installed at a time. 8 NOTE IF, Video, and Sweep Ports (Option A4J or Option AYX): (Refer to Agilent Technologies ESA Spectrum Analyzer Specifications Guide for more information.) Only one IF and Sweep Port (Option A4J or Option AYX) can be installed at a time. SWP OUT provides a voltage ramp corresponding to the sweep of the analyzer (0 V to 10 V). HI SWP IN (TTL) can be grounded to stop and reset the sweep. HI SWP OUT (TTL) is high when the analyzer is sweeping. 2-10 Chapter 2 Getting Started Rear-Panel Features AUX VIDEO OUT provides detected video output (before the analog-to-digital conversion) proportional to vertical deflection of the trace. Output is from 0 V to 1 V. Amplitude-correction factors are not applied to this signal. The output signal is blanked during retrace. AUX IF OUT is a 50 Ω, 21.4 MHz IF output that is the down-converted signal of the RF input of the analyzer. Amplitude-correction factors are not applied to this signal. This output is taken after the resolution bandwidth filters and step gains and before the log amplifier. The output signal is blanked during retrace. 9 FM Demod (Option BAA) allows you to demodulate, display, and measure deviation on FM signals. You can listen to audio signals on a built-in speaker or with an earphone. Refer to “Det/Demod” in Chapter 6 and “FM Demodulation (Option BAA)” in Chapter 7 for more information about this option. 10 Frequency Extension Assembly controls the microwave front-end components in the Agilent E4404B, E4405B, E4407B and E4408B. PRESEL TUNE OUTPUT provides a signal to control external preselected mixers (Option AYZ). Refer to “Det/Demod” in Chapter 6 or “FM Demodulation (Option BAA)” in Chapter 7 for more information about this option. 11 Card Slot Identification Numbers. Refer to Table 2-1 and Table 2-2 for card slot versus option card compatibility information. 12 10 MHz REF IN accepts an external frequency source to 13 10 MHz REF OUT provides a 10 MHz, 0 dBm minimum, provide the 10 MHz, −15 to +10 dBm as a timebase. timebase reference signal. 14 Chapter 2 Power On Selection selects an instrument power preference. The PWR ALWAYS ON setting turns the analyzer on whenever external power is applied. This mode is useful if an external power switch is used to control a rack of several instruments. The PWR NORM setting assigns analyzer on/off control to the front-panel On key (see Figure 2-1 on page 2-3, item 23); however, if the external power is removed for >20 seconds, the instrument returns to the Standby condition of the front-panel On key when external power is reconnected. 2-11 Getting Started Rear-Panel Features 15 2-12 DC Fuse protects the analyzer from drawing too much DC power. Replace only with a fuse of the same rating. See the label on the rear panel. Chapter 2 Getting Started Display Annotation Display Annotation Here is an example of the annotation that may appear on an analyzer display. The display annotation is referenced by numbers which are listed in the following table. The Function Key column indicates which key activates the function related to the annotation. Refer to Chapter 6 , “Front-Panel Key Reference” for more information on a specific function key. Figure 2-3 Screen Annotation Chapter 2 2-13 Getting Started Display Annotation Table 2-3 Screen Annotation Item Description Function Key 1 Detector mode Detector 2 Reference level Ref Level 3 Active function block Refer to the description of the activated function. 4 Screen title Change Title 5 Time and date display Time/Date On Off 6 RF attenuation Attenuation Auto Man 7 Marker frequency Marker Count On Off 8 Marker amplitude Marker 9 GPIB annunciators See Table 2-7 on page 2-17 for more information. 10 Data invalid indicator Sweep (Single) or View/Trace 11 Status Informational messages See Chapter 4 ,“Troubleshooting.” 12 Key menu title Dependent on key selection. 13 Key menu See key label descriptions in Chapter 6 ,“Front-Panel Key Reference.” 14 Frequency span or stop frequency Span or Stop Freq 15 Sweep time/Points Sweep Time Auto Man, Sweep Points 16 Video bandwidth Video BW Auto Man 17 Frequency offset Freq Offset 18 Display status line Displays instrument status and error messages. Cleared by pressing Esc key. See Chapter 4 ,“Troubleshooting.” 19 Resolution bandwidth Resolution BW Auto Man 20 Center frequency or start frequency Center Freq or Start Freq 21 Auto alignment routine is on Auto Align See below for more information. 2-14 Chapter 2 Getting Started Display Annotation Table 2-3 Screen Annotation Item Description Function Key 22 Amplitude corrections are on (This indicates that the overall correction state is On. There may be any or none of the individual corrections On.) Correction On Off 23 Trigger/Sweep Trig, Sweep See below for more information. 24 Trace mode Trace See below for more information. 25 Average Average On Off VAvg indicates video average on. PAvg indicates power average on. 26 Display line Display Line On Off 27 Amplitude offset Ref Lvl Offst 28 Amplitude scale Scale Type Log Lin When the analyzer is set to the external mixer state (Option AYZ), item 6 changes to display Ext Mix in place of Atten XdB. In addition, if Mixer Bias is on, a +I or –I is appended to Ext Mix. Item 10 refers to the data invalid indicator. When the (*) is displayed, it means that some or all trace data may not match the annotation due to possible changes in instrument settings. Item 21 refers to the auto alignment mode. AA indicates that auto alignment of all analyzer parameters, except the tracking generator and FM demodulation options, will occur. AB indicates that auto alignment of all analyzer functions except the RF section (and tracking generator and FM demodulation options) will occur. No indicator will appear if auto alignment is off. Item 23 refers to the trigger and sweep modes of the analyzer. The first letter F indicates the spectrum analyzer is in free-run trigger mode. The second letter C indicates the spectrum analyzer is in continuous-sweep mode. Refer to Table 2-5 on page 2-16 for other valid annunciators for the first letter. Refer to Table 2-6 on page 2-16 for other valid annunciators for the second letter. Chapter 2 2-15 Getting Started Display Annotation Item 24 refers to the trace modes of the analyzer. The first letter W indicates that the analyzer is in clear-write mode. The second letter is 1, representing trace 1. The trace 2 trace mode is S2, indicating trace 2 (2) is in the store-blank mode (S). The trace mode annotation for trace 3 is displayed under the trace mode annotation of trace 1. The trace 3 trace mode is S3, indicating trace 3 (3) is in the store blank mode (S). Refer to Table 2-4 for other valid trace mode annunciators. A # in front of display annotation indicates that the function is uncoupled. (Refer to “Auto Couple” in Chapter 6) Refer to the following tables for the screen annotation codes for trace, trigger, and sweep modes. Table 2-4 Table 2-5 Table 2-6 2-16 Screen Annotation for Trace Mode Screen Annotation Description W Clear Write M Maximum Hold V View S Store Blank m Minimum Hold Screen Annotation for Trigger Mode Screen Annotation Description F Free Run L Line V Video E External Screen Annotation for Sweep Mode Screen Annotation Description C Continuous S Single Sweep Chapter 2 Getting Started Display Annotation Table 2-7 Chapter 2 Screen Annotation for GPIB Annunciators Screen Annotation Description R Remote Operation L GPIB Listen T GPIB Talk S GPIB SRQ 2-17 Getting Started Key Overview Key Overview The keys labeled FREQUENCY Channel, System, and Marker are all examples of front-panel keys. Pressing most front-panel keys accesses menus of functions that are displayed along the right side of the display. These are called menu keys. Front-panel keys that are white perform an immediate action rather than bringing up a menu. Menu keys list functions other than those accessed directly by the front panel keys. To activate a menu key function, press the key immediately to the right of the annotation on the screen. The menu keys that are displayed depend on which front-panel key is pressed and which menu level is enabled. If a menu key function’s value can be changed, it is called an active function. The function label of the active function is highlighted after that key has been selected. For example, press AMPLITUDE Y Scale. This calls up the menu of related amplitude functions. Note the function labeled Ref Level (the default selected key in the Amplitude menu) is highlighted. Ref Level also appears in the active function block, indicating that it is the active amplitude function and can now be changed using any of the data entry controls. A menu key with On and Off in its label can be used to turn the menu key’s function on or off. To turn the function on, press the menu key so that On is underlined. To turn the function off, press the menu key so that Off is underlined. In the manual, when On should be underlined, it will be indicated as Function (On). A function with Auto and Man in the label can either be auto-coupled or have its value manually changed. The value of the function can be changed manually using the numeric keypad, knob, or step keys. To auto-couple a function, press the menu key so that Auto is underlined. In the manual, when Auto should be underlined, it will be indicated as Function (Auto). In some menus of keys, one key label will always be highlighted to show which key has been selected. For example, when you press Det/Demod, Demod, you will access a menu of keys in which some of the keys are grouped together by a blue bar (on analyzers with a color display) on the left side of the menu. The Off key, which is the Det/Demod, Demod menu default key, will be highlighted. When you press another key within the blue bar region, such as AM, the highlight will move to that key to show it has been selected. 2-18 Chapter 2 Getting Started Key Overview In some menus of keys, one key label will always be highlighted to show which key has been selected but the menu is immediately exited when a selection is made. For example, when you press the Orientation key (a Print Setup menu key), it will bring up its own menu of keys. The Portrait key, which is the Orientation menu default key, will be highlighted. When you press the Landscape key, the highlight will move to that key to show it has been selected. A summary of all front panel keys and their related menu keys can be found in Chapter 6 ,“Front-Panel Key Reference.” Chapter 2 2-19 Getting Started Making a Measurement Making a Measurement Let’s begin using the analyzer by measuring an input signal. Since the internal 50 MHz amplitude reference signal is readily available, we will use it as our test signal. NOTE You cannot hurt the analyzer by using this reference signal and pressing any of the keys described in this section. Don’t be afraid to play with the knob, step keys, or numeric keypad. (If you have experimented with other keys and wish to return to a known state, press the green Preset key and, if present, the Factory Preset menu key.) 1. First, turn the instrument on by pressing On. Wait for the power-up process to complete. 2. Press System, Power On/Preset, Preset (Factory). 3. Press the green Preset key. Turn on the internal 50 MHz signal by pressing Input, Amptd Ref Out (f=50 MHz) (On) and connecting a cable from the AMPTD REF OUT to the INPUT 50 Ω. NOTE For the Agilent E4401B and E4411B, the above key label is Amptd Ref (f=50 MHz), and no cable is required. 4. Set the frequency. Press the FREQUENCY Channel key. Center appears on the left side of the screen, indicating that the center-frequency function is active. The Center Freq menu key label is highlighted to indicate that center frequency is the active function. The active function block is the space on the screen within the graticule where the active function messages appear. Active function values can be changed using the knob, step keys, or numeric keypad. Set the center frequency to 50 MHz with the DATA keys by pressing 50 MHz. The knob and step keys can also be used to set the center frequency. CAUTION When operating in DC coupled mode on spectrum analyzers with Option UKB, take care to protect the input mixer by limiting the input level to 0 VDC and +30 dBm. 5. Set the span. Press SPAN X Scale. Span is now displayed in the active function block, and the Span menu key label is highlighted to indicate it is the active function. Reduce the span to 20 MHz by using the knob, pressing the down key (⇓), or pressing 20 MHz. 2-20 Chapter 2 Getting Started Making a Measurement 6. Set the amplitude. When the peak of a signal does not appear on the screen, it may be necessary to adjust the amplitude level on the screen. Press AMPLITUDE Y Scale. Ref Level 0.0 dBm appears in the active function block (48.75 dBmV with Option 1DP). The Ref Level menu key label is highlighted to indicate that reference level is the active function. The reference level is the top graticule line on the display and is set to 0.0 dBm (48.75 dBmV with Option 1DP). Changing the value of the reference level changes the amplitude level of the top graticule line. If desired, use the reference level function to place the signal peak at the top of the screen using the knob, step keys, or numeric keypad. Figure 2-4 demonstrates the relationship between center frequency and reference level. The box in the figure represents the analyzer display. Changing the center frequency changes the horizontal placement of the signal on the display. Changing the reference level changes the vertical placement of the signal on the display. Increasing the span increases the frequency range that appears horizontally on the display. NOTE Analyzers with Option 1DP default to display amplitude values in dBmV when in a log scale mode. NOTE For E4402B, E4404B, and E4405B analyzers with Option UKB, frequencies below 100 kHz can be measured by setting the input to DC coupled mode. (Input, Coupling (DC)) Figure 2-4 Relationship between Frequency and Amplitude Chapter 2 2-21 Getting Started Making a Measurement 7. Set the marker. Marker functions measure the frequency and amplitude of a signal. You can place a diamond-shaped marker on the signal peak to find the signal’s frequency and amplitude. To activate a marker, press the Marker key (located in the MARKER section of the front panel). The Normal softkey is highlighted to show that the marker is the active function. Turn the knob to place the marker at the signal peak. You can also use the Peak Search key, which automatically places a marker at the highest point on the trace. Readouts of marker frequency and amplitude appear in the active function block and in the upper right corner of the display. Look at the marker readout to determine the amplitude of the signal. If another function is activated, the marker frequency and amplitude can still be identified by looking at the marker readout in the upper right corner of the display. Measurement Summary 1. Press System, Power On/Preset, Preset (Factory). Press the green Preset key. Turn on the internal 50 MHz signal by pressing Input, Amptd Ref Out (f=50 MHz) (On), and connecting a cable from the AMPTD REF OUT to the INPUT 50 Ω. NOTE For the Agilent E4401B and E4411B, the above key label is Amptd Ref (f=50 MHz), and no cable is required. 2. Set the center frequency by pressing the following keys: Frequency, 5,0, MHz. 3. Set the span by pressing the following keys: Span, 2,0, MHz. 4. The amplitude reference signal is about −27 dBm (25 dBmV for Option 1DP) for the Agilent E4411B and E4401B. The amplitude reference signal is about – 20 dBm for the Agilent E4402B, E4403B, E4404B, E4405B, E4407B and E4408B. If desired, adjust the reference level: press AMPLITUDE Y Scale to activate the reference level, and use the knob or step keys to change the reference level and bring the signal to the top of the screen. 5. Determine the amplitude and frequency of the signal. You can either press Peak Search or press Marker and move the marker to the signal peak. Read the amplitude and frequency. The display should look like the one in Figure 2-5. Frequency is displayed horizontally, and amplitude (power) is displayed vertically. 2-22 Chapter 2 Getting Started Making a Measurement Figure 2-5 Reading the Amplitude and Frequency Chapter 2 2-23 Getting Started Analyzer Accuracy and the Internal Alignment Process Analyzer Accuracy and the Internal Alignment Process Data from the internal alignment routine is necessary for spectrum analyzer operation. The internal alignment routine runs continuously to ensure that the analyzer is using current alignment data that improves the analyzer frequency and amplitude accuracy. Press the System, Alignments keys to view the alignment menus. For more detailed information on the alignment keys, refer to “Alignments” in Chapter 6. Warm-up Time In order for the analyzer to meet its specifications, allow it to warm up for 5 minutes after being turned on before attempting to make any calibrated measurements. If the analyzer is an Agilent E4402B, E4403B, E4404B, E4405B, E4407B, or E4408B, connect a BNC cable between AMPTD REF OUT and INPUT 50 Ω using an adapter. After a 5 minute warm-up, press System, Alignments, Align Now, All. If Auto Align Off is selected, refer to the analyzer specifications for the conditions required to maintain calibration. 2-24 Chapter 2 Getting Started File Menu Functions File Menu Functions This section describes how to use the functions located under the front-panel File key. Data storage and retrieval are handled similarly to that of personal computers (PCs). Like PCs, these analyzers include an internal storage drive and a floppy disk drive, both of which have directory and sub-directory capability. NOTE The descriptions in this section assume the analyzer has firmware revision A.04.00 or later. The file menu functions in earlier firmware are different. If you would like to upgrade your analyzer to the latest firmware revision, please visit the following web site: http://www.agilent.com/find/esa You will learn how to do all of the following: • • • • • • • • NOTE locate and view files in the catalog create a directory format a floppy disk save a file load a file rename a file copy a file delete a file The display examples in this section are made using the Agilent E4407B, you may see some variations depending upon your analyzer. Locate and view files in the catalog Techniques for locating files and directories are consistent throughout the various file menu functions. Although this section provides specific information about navigation in the catalog, you may wish to refer back to this section when performing other operations of the file menu. Press File, Catalog to bring up a screen display as shown in Figure 2-6. Chapter 2 2-25 Getting Started File Menu Functions Figure 2-6 Catalog Menu 1. The entry fields show the parameters for the files viewed. Entry fields that are being modified or are modifiable are indicated by highlighting (inverse video). Each file menu function has its own unique set of entry fields pertaining to that function. Below are the fields listed under the catalog key: a. Name: field states the filename. b. Show Type: field displays the type of files viewed. c. Path: field displays the drive and directory location of the files. 2. The directory information box displays the drives, directories, and/or files currently described in the entry fields. Highlighting a row of information selects that location and updates the entry fields. There are four column headings in this area of the display. They are described as follows: a. Name: column states the drive ([-A-] or [-C-]) if at the top level on the drive, directory name, or filename. b. Type: column displays the extension of the filename, for example, .SET, .STA, .TRC. Directories are displayed as DIR and drives have nothing listed under Type:. They are only designated by the Name: column ([-A-] or [-C-]). c. Size: column displays the size of the file in bytes. 2-26 Chapter 2 Getting Started File Menu Functions d. Modified: column displays the date and time the last change occurred. 3. The softkey menu has four options: a. Type: allows you to choose the type of file you wish to view. (You may view all types by using the All key under Type.) b. Sort: Under the Sort key, you can sort by any of the four columns and you can choose up (ascending) or down (descending). c. Dir Up: moves you up one directory level. If you are already at the top level, this key moves you up to the drive level, displaying the available disk drives. d. Dir Select: moves you down into the highlighted directory or up into the next level (directory or drive) if the “. .” under the Name: column is highlighted. NOTE Navigation keys: Use the front-panel Step Keys or Knob and the Dir Up or Dir Select keys to move around in the directory information box. 4. The drive space line shows the number of bytes used on the drive and the number of bytes still free on the drive. Creating a directory Directories and sub-directories can be created on both the A: floppy disc and the internal C: drive. This allows maximum flexibility in organizing files. For this example, we will create a directory on the C: drive. 1. Press File, More 1 of 2, Create Dir. Your screen should look similar to Figure 2-6, except the entry fields will be Dir Name: and Path: and the Heading will read: Directories. 2. Navigate through the file system until the Path: field displays C:\. (Use the Step Keys, Knob, Dir Up, and/or Dir Select keys.) 3. Press Name and enter the name, “START” using the Alpha Editor. (The numeric keypad is also available for the filename.) Press Enter (hardkey) when the Dir Name: field contains this directory title. (Use the Bk Sp hardkey on the front panel to make corrections.) 4. Press Create Dir Now to execute the operation. The message: Creating Directory appears on the screen. Then the status bar displays: Directory C:\START created. 5. To make a sub-directory, scroll down to the START directory you just created and press Dir Select. The Path: field should now read: C:\START\. Repeat Steps 3 and 4 above, using a new name. The status bar now should read: Directory C:\START\new name created. Chapter 2 2-27 Getting Started File Menu Functions Format a Floppy Disk You can format a floppy disk in the analyzer. The format is MS-DOS1. Note that it is not necessary to format your floppy disk with the analyzer; preformatted disks can be used with the analyzer. 1. Place the disk you wish to format into the floppy drive (A:\) of the analyzer. NOTE Only 1.44-MB floppy disks are supported by the analyzer. 720-KB floppy disks will not work reliably. 2. Access the Format key by pressing File, More 1 of 2, and then Format. The directory information box is active (highlighted), however, only the floppy disk volume [-A-] is shown on the display. NOTE The directory information box displays all files present on the floppy disk inserted in drive (A:\). If the disk you are attempting to format has no pre-existing formatting, or is not inserted in drive (A:\), the error message: bad, missing, or unformatted disk is displayed in the status line. 3. Press Format Now. The following message appears in the display window: WARNING: You are about to destroy ALL data on Volume A:. Press Format Now again to proceed or any other key to abort. CAUTION To abort disk format, press any key but Format Now. When a disk is formatted, all data on the disk is destroyed. 4. Press Format Now a second time to format the disk. See Figure 2-7. 1. MS-DOS‚ is a U.S. registered trademark of Microsoft Corporation. 2-28 Chapter 2 Getting Started File Menu Functions Figure 2-7 Format Menu You will see the message: Formatting Disk in the display window. Pressing any other key after receiving the warning in step 3 on page 2-28, will abort the formatting process. 5. When formatting is complete, a message, Volume A: formatted appears on the status line. The format process takes approximately three minutes. Save a File You can save files (setups, states, traces, limits, corrections, or screens) to a floppy disk (A:\), or the internal drive (C:\). In this example you will save a trace to the internal C: drive. Step 1. Set up the analyzer trace 1. Turn on the 50 MHz amplitude reference signal of the analyzer. For the Agilent E4401B and E4411B, use the 50 MHz amplitude reference signal of the analyzer as the signal being measured. Press Preset, Factory Preset (if present), Input/Output, Amptd Ref (On). For all other models, connect a cable between the front-panel AMPTD REF OUT to the analyzer INPUT, then press Preset, Factory Preset (if present), Input/Output, Amptd Ref Out (On). Chapter 2 2-29 Getting Started File Menu Functions 2. Set the center frequency to 50 MHz and the span to 75 MHz: press FREQUENCY, 50 MHz, SPAN, 75 MHz. The reference signal appears on the display. 3. View trace 1 and put it into maximum hold by pressing View/Trace, Max Hold. (Trace 1 should already by underlined, but if not, press Trace 1 2 3 until 1 is underlined. and then press Max Hold.) Your analyzer display should look similar to Figure 2-8. Figure 2-8 Viewing Trace 1 4. Activate trace 2 and put it into minimum hold by pressing Trace (2), Min Hold. Your analyzer display should look similar to Figure 2-9. 2-30 Chapter 2 Getting Started File Menu Functions Figure 2-9 Viewing Traces 1 and 2 5. Activate trace 3 by pressing Trace (3), Clear Write. Your analyzer display should look similar to Figure 2-10. Figure 2-10 Viewing Traces 1, 2, and 3 Chapter 2 2-31 Getting Started File Menu Functions Step 2. Save the file 1. To access the Save menu, press, File, Save. 2. Select the type of file you want to save. In this example you are saving a trace; press Type, Trace. 3. Select the trace you wish to save (1, 2, 3, or all traces). In this example you will save trace 3; press Source (softkey), Trace 3. 4. Select the format for which you wish to save the trace: trace plus state (Trace + State) or comma separated value (CSV). In this example you will save as trace plus state; press Format, Trace + State. 5. Enter a filename by pressing Name. The Alpha Editor appears. For this example you will name the file, “TEST1”. (The numeric keypad is also available for the filename.) Note that the file extension is always set by the system and for this file type the extension is TRC. You must now press the Enter (hardkey) to get back to the Save menu. 6. The destination for the saved file is shown in the Path: field. In this example, you will select the path as C:\START\. NOTE If the correct location is not listed in the Path: field, change directories by pressing Dir Up (softkey) or using the step keys or knob, highlight the directory you wish. Pressing Dir Select then confirms your choice which is displayed in the Path: field. 7. Press Save Now or Save (hardkey) to save the file to the C:\Start\ location. The message Saving Now is displayed during this operation. For this example, the status line displays: C:\START\TEST1.TRC file saved. NOTE When saving to drive (A:), never remove the floppy disk during the save operation. To do so could corrupt all data on the floppy disk. NOTE You need to use a filename that does not already exist in the current directory. The filename is limited to eight characters, alpha (A-Z) or numeric (0-9) in any combination. The analyzer will not allow you to overwrite an existing file. If you select a filename that already exists, the status bar will display the message: File already exists. If you do not choose a filename, the analyzer will automatically generate a name based on the type of file you are saving (Setup: SETUP, State: STATE, Trace: TRACE, Limits: LIMIT, Corrections: COREC, Screen: SCREN). It also generates a three digit integer (starting at 000 and extending through 999, remembering the previously saved value through a power cycle) which it adds to the name, for example: TRACE056.TRC. Also note that this three digit integer increments upon each attempted save until a unique filename is created, without regard to the success of the save. 2-32 Chapter 2 Getting Started File Menu Functions Load a file 1. Reset the analyzer by pressing Preset, Factory Preset (if present). 2. To access the Load menu, press File, Load. 3. Select the type of file you want to load (setup, state, trace, limits, or corrections). In this example you are loading a trace file; press Type, Trace. NOTE Not all file types can be loaded back into the analyzer. For example, Screen files and CSV (comma separated value) cannot be loaded. CSV and Screen files are designed for use with a PC. 4. Select the directory where your file is located. In this example, select the C:\START\ directory. (Use the front-panel step keys, knob, Dir Up, and/or Dir Select keys to locate the directory.) 5. Select the file you want to load into the analyzer by moving the cursor with the front-panel knob to highlight the file name. In this example the file is TEST1.TRC. Select the trace into which you wish to load the file. In this example, load it into Trace 2. (Destination, Trace 2). 6. Press Load Now to load the specified file. Your display should look similar to Figure 2-11. The status bar reads: C:\START\TEST1.TRC file loaded. Figure 2-11 File Loaded Chapter 2 2-33 Getting Started File Menu Functions NOTE You should notice that the trace you saved, in this example trace 3, is loaded to trace 2. If you wish to verify this condition, remove the signal input. For Agilent E4401B and E4411B, press Input/Output, Amptd Ref On Off (Off), for all other models, press Input/Output, Amptd Ref Out On Off (Off). Note that when a trace is loaded, it is placed in view mode. To see that trace 2 is in view mode, blank traces 1 and 3 by pressing View/Trace, Trace 1, Blank, Trace 3, Blank. Then press Trace 2. Notice that trace 2 is the only trace displayed in view mode (the view key is selected, and the trace is not sweeping). Your display should look similar to Figure 2-12. Figure 2-12 Verifying Trace 1 CAUTION When operating in DC coupled mode on spectrum analyzers with Option UKB, take care to protect the input mixer by limiting the input level to O VDC and +30 dBm. NOTE When loading Limits files, be sure you have selected the appropriate X Axis Units: frequency or time (Display, Limits, Properties, X Axis Units). If you are in time X-Axis Units, and you load frequency limits, all current limit line data will be erased and the analyzer will switch to the frequency domain. The reverse of the this situation also holds true. 2-34 Chapter 2 Getting Started File Menu Functions Rename a File 1. To access the Rename menu, press File, Rename. 2. Select the type of file you want to rename (setup, state, trace, limits, screens, or corrections). In this example you are renaming a trace file; press Type, Trace. 3. Select the drive and directory where your file is located. In this example, choose drive C:\START. 4. Select the file you want to rename. In this example, choose the file TEST1.TRC. 5. Press Name to open the Alpha Editor menu. For this example, rename the file to RENAME using the Alpha Editor softkeys. (The Name: field is limited to eight characters.) Your display should look similar to Figure 2-13. 6. Press Enter, Rename Now: your file is now renamed and visible within the directory displayed on your analyzer. The status line displays the message: C:\START\TEST1.TRC file renamed to C:\START\RENAME.TRC. Figure 2-13 Renaming a File Chapter 2 2-35 Getting Started File Menu Functions Copy a File 1. To access the Copy menu, press File, Copy. This menu function brings up 2 directory boxes as described by the From: and To: fields located directly above the boxes. Refer to Figure 2-14. Figure 2-14 Copy Menu 2. Put a formatted floppy in the A: drive. 3. Select the type of file you want to copy (setup, state, trace, limits, screens, or corrections). In this example you are copying a trace file from the C: drive to the A: drive; press, Type, Trace. 4. Press Dir (in the key menu) to underline From:. Notice the From: field (just above the top directory box) highlights the location from which you will be copying. Using the navigation keys (Dir Up, Direct select, step keys, or front panel knob), locate the C:\START\ directory. 5. Scroll to highlight the file displayed in the directory box from which you wish to copy. In this example, you will need to highlight the file RENAME. 6. Press Dir (in the key menu) to underline To:. The To: field (just above the bottom directory box) is highlighting the location to which you will be copying. Using the navigation keys as described above, highlight the A:\ drive. NOTE When pressing Dir (To), the file chosen in the From: location is no longer highlighted, however the Name: field above the From directory box displays the chosen file; in this example: RENAME.TRC. 2-36 Chapter 2 Getting Started File Menu Functions NOTE Highlighting a filename in the To: directory box has no significance. The file cannot be placed inside another file. 7. Press Copy Now to execute the operation. The message: Copying file is displayed during the copying process. Upon completion, the status bar reads: C:\START\RENAME.TRC file copied. You have now copied the file RENAME from the C: drive to the A: drive. Delete a File 1. To access the Delete menu, press File, Delete. 2. Select the type of file you want to delete (setup, state, trace, limits, screens, or corrections). In this example, you are deleting a trace file; press Type, Trace. 3. Select the drive and directory where the file you wish to delete is located. In this example, choose C:\START\. Use the navigation keys (Dir Up, Dir Select, step keys, front panel knob) to highlight this location in the Path: field. (Refer to “Locate and view files in the catalog” on page 2-25 for more instructions.) 4. Select the file you want to delete. In this example, choose the file RENAME.TRC. Move the cursor with the navigation keys to highlight the file name. 5. Press Delete Now. The message: Deleting file pops up on the display during the operation. Upon completion, the status bar reads: C:\START\RENAME.TRC file deleted. Your file is now deleted and is no longer visible in the directory displayed on your analyzer. Chapter 2 2-37 Getting Started Printer Setup and Operation Printer Setup and Operation Equipment • Agilent ESA Spectrum Analyzer equipped with Options A4H (GPIB and Parallel Interface) or 1AX (RS-232 and Parallel Interface) • IEEE 1284 compliant printer cable (such as HP/Agilent C2950A) • Supported printer equipped with a parallel interface. (A supported printer is one that accepts Printer Control Language (PCL) Level 3 or 5.) — PCL3 printers include most Hewlett-Packard (HP) DeskJet printers. — PCL5 printers include most HP LaserJet printers (LaserJet III and after) and the HP 1100C, 1200C, 1600C, and 2000C DeskJet printers. (Early HP LaserJet printers, such as the HP LaserJet II, are not PCL5 compatible.) Interconnection and Setup 1. Turn off the printer and the analyzer. 2. Connect the printer to the analyzer parallel I/O interface connector using an IEEE 1284 compliant parallel printer cable. 3. If appropriate, configure your printer using configuration menus or switches. Refer to your printer’s documentation for more specific information on configuring your printer. 4. Turn on the analyzer and printer. 5. Press Print Setup on the front panel and then press the Printer Type menu key. Printer Type accesses the following keys: None None disables the analyzer from attempting to print to a printer. This is the appropriate setting if no printer is connected to the analyzer. Custom Custom allows you to access the Define Custom menu keys. The Define Custom menu keys allow you to specify printer characteristics such as PCL Level and printer color capability. Auto 2-38 Auto enables the analyzer to automatically attempt to identify the connected printer when the Print key is pressed or when Printer Type is set to Auto. Chapter 2 Getting Started Printer Setup and Operation 6. Press Printer Type to access the Printer Type menu keys. Press Auto to make the analyzer attempt to identify the connected printer. When you press Auto, the analyzer will respond in one of the three following ways: • The Print Setup menu will be displayed with the Auto key selected and no new message will be displayed in the display status line. This indicates that the analyzer has successfully identified the connected printer and no further setup is required. As long as Auto remains selected in the Printer Type menu, the analyzer will attempt to identify the printer when the front panel Print key is pressed. The selected printer will be displayed by pressing System, More 1 of 3, Show System. • The Print Setup menu will be displayed with the Custom key selected and one of the following diagnostic messages will be displayed in the display status line: Unknown printer, Define Custom to set up printer No printer response, Define Custom to set up printer Invalid printer response, Define Custom to set up printer This indicates that the analyzer was unable to automatically identify the connected printer, and Custom has been selected in the Printer Type menu. Press Print Setup, Define Custom to select specific printer characteristics such as the printer language (PCL3 or PCL5) and color printing capability. Once you have set these characteristics to match those of your connected printer, the printer setup process is complete. As long as Custom remains selected in the Printer Type menu, the analyzer will not attempt to automatically identify the connected printer when the front panel Print key is pressed. • The Print Setup menu will be displayed with the None key selected and the following message will appear in the display status line: Unsupported printer, Printer Type set to None This indicates that the analyzer has successfully identified the connected printer, but the printer is not supported by the analyzer. As long as None is selected in the Printer Type menu, the analyzer will respond to any print command by displaying the message Printer Type is None in the display status line. Chapter 2 2-39 Getting Started Printer Setup and Operation Testing Printer Operation When you have completed the analyzer’s printer setup, press Print Setup, Print (Screen) and then press Print on the front panel. If the printer is ready and the printer setup was successful, a printout of the analyzer display will be printed. If the printer is not ready, the message Printer Timeout will appear on the analyzer display. Printer Timeout will remain on the display until the printer is ready or until you press ESC to cancel the printout request. 2-40 Chapter 2 Getting Started Analyzer Battery Information Analyzer Battery Information The analyzer uses a lithium battery to enable the internal memory to retain data. The date when the battery was installed is on a label on the rear panel of the analyzer. See Figure 2-15. The minimum life expectancy of the battery is 7 years at 25 ˚C, or 1 year at 55 ˚C. If you experience problems with the battery or the recommended time period for battery replacement has elapsed, see “How to Return Your Analyzer for Service” in Chapter 4. If you wish to replace the battery yourself, you can purchase the service documentation that provides all necessary test and maintenance information. You can order the service documentation for an Agilent ESA spectrum analyzer through your Agilent Sales and Service office. The documentation is described under “Service Documentation and Adjustment Software (Option 0BW)” in Chapter 7 of this manual. After replacing the analyzer battery, write the date of battery replacement on the rear-panel label. Figure 2-15 Rear-Panel Battery Information Label Chapter 2 2-41 3 Functional Testing 3-1 Functional Testing What You Will Find in This Chapter What You Will Find in This Chapter This chapter describes the functional tests and provides information on how to perform them. What Are the Functional Tests? Functional tests are tests of various instrument parameters that give a high degree of confidence that the instrument is operating correctly. They are recommended as a check of instrument operation for incoming inspection or after a repair. Measurement uncertainty analysis is not available for functional tests, and the instrument is checked against limits that are wider than the published specifications. The functional tests are designed to test an instrument operating within the temperature range defined by the instrument specifications using a minimum set of test equipment. If a test does not pass, performance tests must be run to confirm a problem exists. Functional Test Versus Performance Verification Performance verification tests check a wide range of instrument parameters and provide the highest level of confidence that the instrument is operating satisfactorily. They are used to verify that the instrument conforms to published specifications. They are time consuming and require extensive test equipment. The functional tests check a much smaller range of parameters and a limited number of data points for each parameter. They require only limited test equipment. 3-2 Chapter 3 Functional Testing Test Descriptions Test Descriptions Each of the following test descriptions include the test limits (pass/fail criteria), a description of what the test does or what it measures, a list of equipment required for the performance of the test, an illustration of the test setup used, and a step by step test procedure. The tests are designed to be run on an instrument operating within the operational temperature range defined by the instrument specifications. Only perform tests after the specified warmup time. The tests included in this chapter are as follows: Displayed Average Noise Level page 3-4 Frequency Readout Accuracy page 3-23 Marker Count Accuracy page 3-26 Frequency Response page 3-27 Reference Level Accuracy page 3-32 Resolution Bandwidth Switching Uncertainty page 3-37 Scale Fidelity page 3-40 Second Harmonic Spurious Responses page 3-43 Tracking Generator Level Flatness (E4401B and E4411B) page 3-46 Tracking Generator Level Flatness (E4402B, E4403B, E4404B, E4405B, E4407B, E4408B) page 3-49 Chapter 3 3-3 Functional Testing Displayed Average Noise Level Displayed Average Noise Level Test Limits Frequency Range Model (50 Ω Inputs) Maximum (50 Ω Inputs) TR Entry – 119 dBm 1 501 MHz to 1.0 GHz – 117 dBm 2 1.01 GHz to 1.5 GHz – 113 dBm 3 E4402B, E4403B – 117 dBm 4 E4404B, E4405B, E4407B, E4408B – 116 dBm 5 E4402B, E4403B – 116 dBm 6 E4404B, E4405B, E4407B, E4408B – 115 dBm 7 E4402B, E4403B – 114 dBm 8 E4404B, E4405B, E4407B, E4408B – 112 dBm 9 3.01 GHz to 6.0 GHz E4404B, E4405B, E4407B, E4408B – 112 dBm 10 6.01 GHz to 6.7 GHz E4404B – 110 dBm 11 6.01 GHz to 12.0 GHz E4405B, E4407B, E4408B – 110 dBm 12 12.01 GHz to 13.2 GHz E4405B – 107 dBm 13 12.01 GHz to 22 GHz E4407B, E4408B – 107 dBm 14 22.01 GHz to 26.5 GHz E4407B, E4408B – 101 dBm 15 Maximum (75 Ω Inputs) TR Entry – 65 dBmV 16 501 MHz to 1.0 GHz – 60 dBmV 17 1.01 GHz to 1.5 GHz – 53 dBmV 18 10 MHz to 500 MHz 10 MHz to 1.0 GHz 1.01 GHz to 2.0 GHz 2.01 GHz to 3.0 GHz Frequency Range 10 MHz to 500 MHz 3-4 E4401B, E4411B Model (75 Ω Inputs) E4401B, E4411B Chapter 3 Functional Testing Displayed Average Noise Level Test Description The Displayed Average Noise Level is measured within the frequency range specified. The analyzer input is terminated into either 50 Ω or 75 Ω, depending on analyzer options. The test tunes the analyzer frequency across the band, uses the marker to locate the frequency with the highest response, and then reads the average noise in zero span. Required Equipment Adapters Termination, 50 Ω Type-N(m) Recommended HP/Agilent Model 908A Additional Equipment for 75 Ω Input Termination, 75 Ω Type-N(m) 909E Adapter, Type-N(f), to BNC (m), 75 Ω 1250-1534 Figure 3-1 Chapter 3 3-5 Functional Testing Displayed Average Noise Level Procedure (10 MHz to 500 MHz) E4401B and E4411B 1. Connect the equipment as shown in Figure 3-1. 2. Press System, Power On/Preset, Preset (Factory), Preset on the analyzer. Wait for the preset routine to finish. Set the analyzer by pressing the following keys: FREQUENCY, Start Freq, 10 MHz Stop Freq, 500 MHz AMPLITUDE, –70 dBm (50 Ω Input only) AMPLITUDE, More 1 of 2, Amptd Units, dBmV, Ref Level, –21.24 dBmV (75 Ω Input only) BW/Avg, 1 MHz Video BW Auto Man, 10 kHz 3. Press the following keys on the analyzer: Single BW/Avg, Average (On), 3, Enter Single Wait until AVG 3 is displayed to the left of the graticule (the analyzer will take 3 sweeps, then stop). 4. Press Peak Search. Record the measured frequency in the Measured Frequency column (a) in Table 3-1 on page 3-22 for 10 MHz to 500 MHz. 5. Press the following keys on the analyzer: Sweep, Sweep (Cont) BW/Avg, Average (Off) BW/Avg, Resolution BW (Auto) Video BW (Auto) SPAN, 50 kHz FREQUENCY 6. Press Center Freq, and set the center frequency of the analyzer to the frequency recorded in the Measured Frequency column (a) of Table 3-1 for 10 MHz to 500 MHz. 3-6 Chapter 3 Functional Testing Displayed Average Noise Level 7. Press the following keys on the analyzer: BW/Avg, 1 kHz Video BW Auto Man, 30 Hz Single Wait for the sweep to finish. 8. Press the following keys on the analyzer: Display, Display Line (On) Adjust the display so that it is centered on the average trace noise, ignoring any residual responses. 9. Record the display line amplitude setting as TR Entry 1 (TR Entry 16 for a 75 Ω Input) in Table 3-1. The Average Noise Level should be less than the Maximum for the appropriate input impedance. Procedure (501 MHz to 1.0 GHz) E4401B and E4411B 1. Press the following keys on the analyzer: Sweep, Sweep (Cont) FREQUENCY, Start Freq, 501 MHz Stop Freq, 1.0 GHz BW/Avg, 1 MHz Video BW Auto Man, 10 kHz 2. Press the following keys on the analyzer: Single BW/Avg, Average (On), 3, Enter Single Wait until AVG 3 is displayed to the left of the graticule (the analyzer will take 3 sweeps, then stop). 3. Press Peak Search, and record the frequency in the Measured Frequency column (b) in Table 3-1 for 501 MHz to 1.0 GHz. Chapter 3 3-7 Functional Testing Displayed Average Noise Level 4. Press the following keys on the analyzer: Sweep, Sweep (Cont) BW/Avg, Average (Off) BW/Avg, Resolution BW (Auto) Video BW (Auto) SPAN, 50 kHz FREQUENCY 5. Press Center Freq. Set the center frequency of the analyzer to the frequency recorded in the Measured Frequency column (b) in Table 3-1 for 501 MHz to 1.0 GHz. 6. Press the following keys on the analyzer: BW/Avg, 1 kHz Video BW Auto Man, 30 Hz Single Wait for the sweep to finish. 7. Press the following keys on the analyzer: Display, Display Line (On) Adjust the display line so that it is centered on the average trace noise, ignoring any residual responses. 8. Record the display line amplitude setting as TR Entry 2 (TR Entry 17 for a 75 Ω Input) in Table 3-1. The Average Noise Level should be less than the Maximum for the appropriate input impedance. 3-8 Chapter 3 Functional Testing Displayed Average Noise Level Procedure (1.01 GHz to 1.5 GHz) E4401B and E4411B 1. Press the following keys on the analyzer: Sweep, Sweep (Cont) FREQUENCY, Start Freq, 1.0 GHz Stop Freq, 1.5 GHz BW/Avg, 1 MHz Video BW Auto Man, 10 kHz 2. Press the following keys on the analyzer: Single BW/Avg, Average (On), 3, Enter Single Wait until AVG 3 is displayed to the left of the graticule (the analyzer will take 3 sweeps, then stop). 3. Press Peak Search, and record the marker frequency in the Measured Frequency column (c) in Table 3-1 for 1.01 GHz to 1.5 GHz. 4. Press the following keys on the analyzer: Sweep, Sweep (Cont) BW/Avg, Average (Off) BW/Avg, Resolution BW (Auto) Video BW (Auto) SPAN, 50 kHz FREQUENCY 5. Press Center Freq. Set the center frequency of the analyzer to the frequency recorded in the Measured Frequency column (c) in Table 3-1 for 1.01 GHz to 1.5 GHz. 6. Press the following keys on the analyzer: BW/Avg, 1 kHz Video BW Auto Man, 30 Hz Single Wait for the sweep to finish. Chapter 3 3-9 Functional Testing Displayed Average Noise Level 7. Press the following keys on the analyzer: Display, Display Line (On) Adjust the display line so that it is centered on the average trace noise, ignoring any residual responses. 8. Record the display line amplitude setting as TR Entry 3 (TR Entry 18 for a 75 Ω Input) in Table 3-1. The average noise level should be less than the Maximum for the appropriate input impedance. Procedure (10 MHz to 1 GHz) E4402B, E4403B, E4404B, E4405B, E4407B, E4408B 1. Press System, Power On/Preset, Preset (Factory), Preset on the analyzer. Wait for the preset routine to finish. Set the analyzer by pressing the following keys: FREQUENCY, Start Freq, 10 MHz Stop Freq, 1.0 GHz AMPLITUDE, –70 dBm Attenuation (Man), 0 dB BW/Avg, 1 MHz Video BW Auto Man, 10 kHz 2. Press the following keys on the analyzer: Single BW/Avg, Average (On), 3, Enter Single Wait until AVG 3 is displayed to the left of the graticule (the analyzer will take three sweeps, then stop). 3. Press Peak Search. Record the frequency in the Measured Frequency column (d) in Table 3-1 for 10 MHz to 1.0 GHz. 4. Press the following keys on the analyzer: Sweep, Sweep (Cont) BW/Avg, Average (Off) BW/Avg, Resolution BW (Auto) Video BW (Auto) SPAN, 50 kHz FREQUENCY 3-10 Chapter 3 Functional Testing Displayed Average Noise Level 5. Press Center Freq. Set the center frequency of the analyzer to the frequency recorded in the Measured Frequency column (d) in Table 3-1 for 10 MHz to 1.0 GHz. 6. Press the following keys on the analyzer: BW/Avg, 1 kHz Video BW Auto Man, 30 Hz Single Wait for the sweep to finish. 7. Press the following keys on the analyzer: Display, Display Line (On) Adjust the display line so that it is centered on the average trace noise, ignoring any residual responses. 8. If the analyzer is an E4402B or an E4403B, record the display line amplitude setting as TR Entry 4 in Table 3-1. Otherwise, record the display line amplitude setting as TR Entry 5 in Table 3-1. The average noise level should be less than the Maximum. Procedure (1.01 GHz to 2 GHz) E4402B, E4403B, E4404B, E4405B, E4407B, E4408B 1. Press System, Power On/Preset, Preset (Factory), Preset on the analyzer. Wait for the preset routine to finish. Set the analyzer by pressing the following keys: FREQUENCY, Start Freq, 1.01 GHz Stop Freq, 2 GHz AMPLITUDE, –70 dBm Attenuation (Man), 0 dB BW/Avg, 1 MHz Video BW Auto Man, 10 kHz 2. Press the following keys on the analyzer: Single BW/Avg, Average (On), 3, Enter Single Wait until AVG 3 is displayed to the left of the graticule (the analyzer will take 3 sweeps and then stop). 3. Press Peak Search. Record the frequency in the Measured Frequency column (e) in Table 3-1 for 1.01 GHz to 2 GHz. Chapter 3 3-11 Functional Testing Displayed Average Noise Level 4. Press the following keys on the analyzer: Sweep, Sweep (Cont) BW/Avg, Average (Off) BW/Avg, Resolution BW (Auto) Video BW (Auto) SPAN, 50 kHz FREQUENCY 5. Press Center Freq. Set the center frequency of the analyzer to the frequency recorded in the Measured Frequency column (e) in Table 3-1 for 1.01 GHz to 2 GHz. 6. Press the following keys on the analyzer: BW/Avg, 1 kHz Video BW Auto Man, 30 Hz Single Wait for the sweep to finish. 7. Press the following keys on the analyzer: Display, Display Line (On) Adjust the display line so that it is centered on the average trace noise, ignoring any residual responses. 8. If the analyzer is an E4402B or an E4403B, record the display line amplitude setting as TR Entry 6 in Table 3-1. Otherwise, record the display line amplitude setting as TR Entry 7 in Table 3-1.The average noise level should be less than the Maximum. Procedure (2.01 GHz to 3.0 GHz) E4402B, E4403B, E4404B, E4405B, E4407B, E4408B 1. Press System, Power On/Preset, Preset (Factory), Preset on the analyzer. Wait for the preset routine to finish. Set the analyzer by pressing the following keys: FREQUENCY, Start Freq, 2.01 GHz Stop Freq, 3.0 GHz AMPLITUDE, –70 dBm Attenuation (Man), 0 dB BW/Avg, 1 MHz Video BW Auto Man, 10 kHz 3-12 Chapter 3 Functional Testing Displayed Average Noise Level 2. Press the following keys on the analyzer: Single BW/Avg, Average (On), 3, Enter Single Wait until AVG 3 is displayed to the left of the graticule (the analyzer will take 3 sweeps and then stop). 3. Press Peak Search. Record the frequency in the Measured Frequency column (f) in Table 3-1 for 2.01 GHz to 3.0 GHz. 4. Press the following keys on the analyzer: Sweep, Sweep (Cont) BW/Avg, Average (Off) BW/Avg, Resolution BW (Auto) Video BW (Auto) SPAN, 50 kHz FREQUENCY 5. Press Center Freq. Set the center frequency of the analyzer to the frequency recorded in the Measured Frequency column (f) in Table 3-1 for 2.01 GHz to 3.0 GHz. 6. Press the following keys on the analyzer: BW/Avg, 1 kHz Video BW Auto Man, 30 Hz Single Wait for the sweep to finish. 7. Press the following keys on the analyzer: Display, Display Line (On) Adjust the display line so that it is centered on the average trace noise, ignoring any residual responses. 8. If the analyzer is an E4402B or an E4403B, record the display line amplitude setting as TR Entry 8 in Table 3-1. Otherwise, record the display line amplitude setting as TR Entry 9 in Table 3-1. The Average Noise Level should be less than the maximum. Chapter 3 3-13 Functional Testing Displayed Average Noise Level Procedure (3.01 GHz to 6.0 GHz) E4404B, E4405B, E4407B, E4408B 1. Press System, Power On/Preset, Preset (Factory), Preset on the analyzer. Wait for the preset routine to finish. Set the analyzer by pressing the following keys: FREQUENCY, Start Freq, 3.01 GHz Stop Freq, 6.0 GHz AMPLITUDE, –70 dBm Attenuation (Man), 0 dB BW/Avg, 1 MHz Video BW Auto Man, 10 kHz 2. Press the following keys on the analyzer: Single BW/Avg, Average (On), 3, Enter Single Wait until AVG 3 is displayed to the left of the graticule (the analyzer will take 3 sweeps and then stop). 3. Press Peak Search. Record the frequency in the Measured Frequency column (g) in Table 3-1 for 3.01 GHz to 6.0 GHz. 4. Press the following keys on the analyzer: Sweep, Sweep (Cont) BW/Avg, Average (Off) BW/Avg, Resolution BW (Auto) Video BW (Auto) SPAN, 50 kHz FREQUENCY 5. Press Center Freq. Set the center frequency of the analyzer to the frequency recorded in the Measured Frequency column (g) in Table 3-1 for 3.01 GHz to 6.0 GHz. 6. Press the following keys on the analyzer: BW/Avg, 1 kHz Video BW Auto Man, 30 Hz Single Wait for the sweep to finish. 3-14 Chapter 3 Functional Testing Displayed Average Noise Level 7. Press the following keys on the analyzer: Display, Display Line (On) Adjust the display line so that it is centered on the average trace noise, ignoring any residual responses. 8. Record the display line amplitude setting as TR Entry 10 in Table 3-1. The Average Noise Level should be less than the Maximum. Procedure (6.01 GHz to 6.7 GHz) E4404B 1. Press System, Power On/Preset, Preset (Factory), Preset on the analyzer. Wait for the preset routine to finish. Set the analyzer by pressing the following keys: FREQUENCY, Start Freq, 6.01 GHz Stop Freq, 6.7 GHz AMPLITUDE, –70 dBm Attenuation (Man), 0 dB BW/Avg, 1 MHz Video BW Auto Man, 10 kHz 2. Press the following keys on the analyzer: Single BW/Avg, Average (On), 3, Enter Single Wait until AVG 3 is displayed to the left of the graticule (the analyzer will take 3 sweeps and then stop). 3. Press Peak Search. Record the frequency in the Measured Frequency column (h) in Table 3-1 for 6.01 GHz to 6.7 GHz. 4. Press the following keys on the analyzer: Sweep, Sweep (Cont) BW/Avg, Average (Off) BW/Avg, Resolution BW (Auto) Video BW (Auto) SPAN, 50 kHz FREQUENCY Chapter 3 3-15 Functional Testing Displayed Average Noise Level 5. Press Center Freq. Set the center frequency of the analyzer to the frequency recorded in the Measured Frequency column (h) in Table 3-1 for 6.01 GHz to 6.7 GHz. 6. Press the following keys on the analyzer: BW/Avg, 1 kHz Video BW Auto Man, 30 Hz Single Wait for the sweep to finish. 7. Press the following keys on the analyzer: Display, Display Line (On) Adjust the display line so that it is centered on the average trace noise, ignoring any residual responses. 8. Record the display line amplitude setting as TR Entry 11 in Table 3-1. The Average Noise Level should be less than the Maximum. Procedure (6.01 GHz to 12.0 GHz) E4405B, E4407B, E4408B 1. Press System, Power On/Preset, Preset (Factory), Preset on the analyzer. Wait for the preset routine to finish. Set the analyzer by pressing the following keys: FREQUENCY, Start Freq, 6.01 GHz Stop Freq, 12.0 GHz AMPLITUDE, –70 dBm Attenuation (Man), 0 dB BW/Avg, 1 MHz Video BW Auto Man, 10 kHz 2. Press the following keys on the analyzer: Single BW/Avg, Average (On), 3, Enter Single Wait until AVG 3 is displayed to the left of the graticule (the analyzer will take 3 sweeps and then stop). 3. Press Peak Search. Record the frequency in the Measured Frequency column (i) in Table 3-1 for 6.01 GHz to 12.0 GHz. 3-16 Chapter 3 Functional Testing Displayed Average Noise Level 4. Press the following keys on the analyzer: Sweep, Sweep (Cont) BW/Avg, Average (Off) BW/Avg, Resolution BW (Auto) Video BW (Auto) SPAN, 50 kHz FREQUENCY 5. Press Center Freq. Set the center frequency of the analyzer to the frequency recorded in the Measured Frequency column (i) in Table 3-1 for 6.01 GHz to 12.0 GHz. 6. Press the following keys on the analyzer: BW/Avg, 1 kHz Video BW Auto Man, 30 Hz Single Wait for the sweep to finish. 7. Press the following keys on the analyzer: Display, Display Line (On) Adjust the display line so that it is centered on the average trace noise, ignoring any residual responses. 8. Record the display line amplitude setting as TR Entry 12 in Table 3-1. The average noise level should be less than the Maximum. Procedure (12.01 GHz to 13.2 GHz) E4405B 1. Press Preset System, Power On/Preset, Preset (Factory), Preset, on the analyzer. Wait for the preset routine to finish. Set the analyzer by pressing the following keys: FREQUENCY, Start Freq, 12.01 GHz Stop Freq, 13.2 GHz AMPLITUDE, –70 dBm Attenuation (Man), 0 dB BW/Avg, 1 MHz Video BW Auto Man, 10 kHz Chapter 3 3-17 Functional Testing Displayed Average Noise Level 2. Press the following keys on the analyzer: Single BW/Avg, Average (On), 3, Enter Single Wait until AVG 3 is displayed to the left of the graticule (the analyzer will take 3 sweeps and then stop). 3. Press Peak Search. Record the frequency in the Measured Frequency column (j) in Table 3-1 for 12.01 GHz to 13.2 GHz. 4. Press the following keys on the analyzer: Sweep, Sweep (Cont) BW/Avg, Average (Off) BW/Avg, Resolution BW (Auto) Video BW (Auto) SPAN, 50 kHz FREQUENCY 5. Press Center Freq. Set the center frequency of the analyzer to the frequency recorded in the Measured Frequency column (j) in Table 3-1 for 12.01 GHz to 13.2 GHz. 6. Press the following keys on the analyzer: BW/Avg, 1 kHz Video BW Auto Man, 30 Hz Single Wait for the sweep to finish. 7. Press the following keys on the analyzer: Display, Display Line (On) Adjust the display line so that it is centered on the average trace noise, ignoring any residual responses. 8. Record the display line amplitude setting as TR Entry 13 in Table 3-1. The Average Noise Level should be less than the Maximum. 3-18 Chapter 3 Functional Testing Displayed Average Noise Level Procedure (12.01 GHz to 22 GHz) E4407B and E4408B 1. Press System, Power On/Preset, Preset (Factory), Preset on the analyzer. Wait for the preset routine to finish. Set the analyzer by pressing the following keys: FREQUENCY, Start Freq, 12.01 GHz Stop Freq, 22 GHz AMPLITUDE, –70 dBm Attenuation (Man), 0 dB BW/Avg, 1 MHz Video BW Auto Man, 10 kHz 2. Press the following keys on the analyzer: Single BW/Avg, Average (On), 3, Enter Single Wait until AVG 3 is displayed to the left of the graticule (the analyzer will take 3 sweeps and then stop). 3. Press Peak Search. Record the frequency in the Measured Frequency column (k) in Table 3-1 for 12.01 GHz to 22 GHz. 4. Press the following keys on the analyzer: Sweep, Sweep (Cont) BW/Avg, Average (Off) BW/Avg, Resolution BW (Auto) Video BW (Auto) SPAN, 50 kHz FREQUENCY 5. Press Center Freq. Set the center frequency of the analyzer to the frequency recorded in the Measured Frequency column (k) in Table 3-1 for 12.01 GHz to 22 GHz. 6. Press the following keys on the analyzer: BW/Avg, 1 kHz Video BW Auto Man, 30 Hz Single Wait for the sweep to finish. Chapter 3 3-19 Functional Testing Displayed Average Noise Level 7. Press the following keys on the analyzer: Display, Display Line (On) Adjust the display line so that it is centered on the average trace noise, ignoring any residual responses. 8. Record the display line amplitude setting as TR Entry 14 in Table 3-1. The Average Noise Level should be less than the Maximum. Procedure (22.01 GHz to 26.5 GHz) E4407B and E4408B 1. Press System, Power On/Preset, Preset (Factory), Preset on the analyzer. Wait for the preset routine to finish. Set the analyzer by pressing the following keys: FREQUENCY, Start Freq, 22.01 GHz Stop Freq, 26.5 GHz AMPLITUDE, –70 dBm Attenuation (Man), 0 dB BW/Avg, 1 MHz Video BW Auto Man, 10 kHz 2. Press the following keys on the analyzer: Single BW/Avg, Average (On), 3, Enter Single Wait until AVG 3 is displayed to the left of the graticule (the analyzer will take 3 sweeps and then stop). 3. Press Peak Search. Record the frequency in the Measured Frequency column (l) in Table 3-1 for 22.01 GHz to 26.5 GHz. 3-20 Chapter 3 Functional Testing Displayed Average Noise Level 4. Press the following keys on the analyzer: Sweep, Sweep (Cont) BW/Avg, Average (Off) BW/Avg, Resolution BW (Auto) Video BW (Auto) SPAN, 50 kHz FREQUENCY 5. Press Center Freq. Set the center frequency of the analyzer to the frequency recorded in the Measured Frequency column (l) in Table 3-1 for 22.01 GHz to 26.5 GHz. 6. Press the following keys on the analyzer: BW/Avg, 1 kHz Video BW Auto Man, 30 Hz Single Wait for the sweep to finish. 7. Press the following keys on the analyzer: Display, Display Line (On) Adjust the display line so that it is centered on the average trace noise, ignoring any residual responses. 8. Record the display line amplitude setting as TR Entry 15 in Table 3-1. The Average Noise Level should be less than the Maximum. Chapter 3 3-21 Functional Testing Displayed Average Noise Level Table 3-1 Model Number Measured Frequency Average Noise Level (TR Entry) 10 MHz to 500 MHz (a) _________ 501 MHz to 1.0 GHz Frequency Range Maximum 50 Ω Input 75 Ω Input (1) or (16) _____ –119 dBm –65 dBmV (b) ________ (2) or (17) _____ –117 dBm –60 dBmV 1.01 GHz to 1.5 GHz (c) _________ (3) or (18) ____ –113 dBm –53 dBmV E4402B, E4403B 10 MHz to 1.0 GHz (d) _________ (4) ___________ –117 dBm N/A E4404B, E4405B, E4407B, E4408B 10 MHz to 1.0 GHz (5)___________ –116 dBm N/A E4402B, E4403B 1.01 GHz to 2.0 GHz (6) ___________ –116 dBm N/A E4404B, E4405B, E4407B, E4408B 1.01 GHz to 2.0 GHz (7) ___________ –115 dBm N/A E4402B, E4403B 2.01 GHz to 3.0 GHz (8) ___________ –114 dBm N/A E4404B, E4405B, E4407B, E4408B 2.01 GHz to 3.0 GHz (9) ___________ –112 dBm N/A E4404B, E4405B, E4407B, E4408B 3.01 GHz to 6.0 GHz (g) _________ (10) __________ –112 dBm N/A E4404B 6.01 GHz to 6.7 GHz (h) _________ (11) __________ –110 dBm N/A E4405B, E4407B, E4408B 6.01 GHz to 12.0 GHz (i) __________ (12) __________ –110 dBm N/A E4405B 12.01 GHz to 13.2 GHz (j) __________ (13) __________ –107 dBm N/A E4407B, E4408B 12.01 GHz to 22 GHz (k) _________ (14) __________ –107 dBm N/A E4407B, E4408B 12.01 GHz to 26.5 GHz (l) __________ (15) __________ –101 dBm N/A E4401B, E4411B 3-22 (e) _________ (f) _________ Chapter 3 Functional Testing Frequency Readout Accuracy Frequency Readout Accuracy Test Limits Span Minimum Maximum 10 MHz 1.48988 GHz 1.49012 GHz 100 kHz 1.4899988 GHz 1.4900012 GHz Marker Count Accuracy with Counter Resolution at 1 Hz 1.489999999 GHz 1.490000001 GHz Test Description The frequency readout accuracy of the analyzer is tested with an input signal of known frequency. Frequency reference error is eliminated by using the same frequency standard for the analyzer and the synthesized sweeper. Required Equipment Instrument Critical Specifications (for this test) Recommended HP/Agilent Model 10MHz to 1.5GHz External Reference Input 8340A/B or 836XX Series Signal Sources Synthesized Sweeper Adapters Type-N(f), to APC 3.5(f) 1250-1745 Cables Type-N,152-cm (60-in) 11500D BNC,122-cm (48-in) 10503A Additional Equipment for 75-ohm Input Pad, minimum loss 11852B Type-N(f), to BNC(m), 75 Ω 1250-1534 Chapter 3 3-23 Functional Testing Frequency Readout Accuracy Figure 3-2 Procedure 1. Connect the equipment as shown in Figure 3-2. Remember to connect the 10MHz REF OUT of the analyzer to the 10MHz REF IN of the synthesized sweeper. 2. Perform the following steps to set up the equipment: a. Press INSTRUMENT PRESET on the synthesized sweeper, then set the controls as follows: CW, 1.490 GHz POWER LEVEL, – 10dBm b. Press System, Power On/Preset, Preset (Factory), Preset on the analyzer, then wait for the preset routine to finish. Set the analyzer by pressing the following keys: Frequency, 1.490 GHz SPAN, 10 MHz BW/Avg, Resolution BW Auto Man, 100 kHz Video BW Auto Man, 30 kHz CAUTION Use only 75 Ω cables, connectors, or adapters on instruments with 75 Ω inputs, or damage to connectors will occur. 3. Press Peak Search on the analyzer to measure the frequency readout accuracy. If the instrument is functioning correctly, the result in the active function should be between 1.48991 GHz and 1.49009 GHz. Record this in the Marker Frequency Readout column in Table 3-2. 4. Press Span, 100 kHz, BW/Avg, Resolution BW (Man), 1 kHz, Video BW (Man), 1 kHz. 3-24 Chapter 3 Functional Testing Frequency Readout Accuracy 5. Repeat step 3. If the instrument is functioning correctly, the result should be between 1.4899990 GHz and 1.4900009 GHz. NOTE The Frequency Readout Accuracy in now complete. Continue with the Marker Count Accuracy functional check. Chapter 3 3-25 Functional Testing Marker Count Accuracy Marker Count Accuracy Procedure 1. Press System, Power On/Preset, Preset (Factory), Preset on the analyzer, then wait for the preset routine to finish. Set the analyzer to measure the marker count accuracy by pressing the following keys: Frequency, 1.490 GHz SPAN, 10 MHz BW/Avg, Resolution BW Auto Man, 100 kHz Freq Count, Resolution (Auto), 1 Hz 2. Press Peak Search, then wait for a count to be taken (it may take several seconds). 3. If the analyzer is functioning correctly, the Cntr1 reading in the upper left-hand corner of the display should be between 1.489999998 MHz and 1.490000002 MHz. Record the Cntr1 frequency as the Marker Frequency Readout in Table 3-2. Table 3-2 Span Minimum Marker Frequency Readout Maximum 10 MHz 1.48988 GHz 1.49012 GHz 100 kHz 1.4899988 GHz 1.4900012 GHz Marker Count Accuracy w/Counter Resolution at 1 Hz 1.489999998 GHz 1.490000002 GHz 3-26 Chapter 3 Functional Testing Frequency Response Frequency Response Test Limits ESA Model Frequency E4411B & E4401B 9 kHz to 1.5 GHz –1.5 1.5 E4402B & E4403B 9 kHz to 3 GHz –1.5 1.5 E4404B 9 kHz to 3 GHz –1.5 1.5 3.01 GHz to 6.7 GHz –3.0 3.0 9 kHz to 3 GHz –1.5 1.5 3.01 GHz to 6.7 GHz –3.0 3.0 6.71 GHz to 13.2 GHz –3.5 3.5 9 kHz to 3 GHz –1.5 1.5 3.01 GHz to 6.7 GHz –3.0 3.0 6.71 GHz to 13.2 GHz –3.5 3.5 13.21 GHz to 25 GHz –4.0 4.0 25 GHz to 26.5 GHz –4.0 4.5 E4405B E4407B & E4408B Minimum (dB) Maximum (dB) Test Description The output of the synthesized sweeper is fed through a power splitter to a power sensor and the analyzer. The synthesized sweeper’s power level is adjusted at 50 MHz to place the displayed signal at the analyzer center horizontal graticule line. Measurements are made at various points depending on the model being tested. The signal source amplitude is measured with a power meter to eliminate errors due to source flatness. The power meter is zeroed and calibrated before starting the measurement. Chapter 3 3-27 Functional Testing Frequency Response Required Equipment Instrument Critical Specifications (for this test) Recommended HP/Agilent Model Signal Sources Synthesized Sweeper 8340A/B or 83630A Series Adapters Type-N (f) to BNC (f) 1250-1474 APC 3.5 (f) to APC 3.5 (f) 5061-5311 BNC(f) to SMA(m) 1250-1237 Type-N(m), to APC 3.5(m) 1250-1743 Cables (2) APC 3.5mm (36in) 8120-4921 BNC(m) both ends, (48in) 10503A Additional Equipment for 75-ohm Input Pad, minimum loss 11852B Type-N (f), to BNC (m) 1250-1534 Misc Power Meter EPM-441A (E4418A) Power Sensor, 75 Ω 8483A Power Sensor, 50 Ω 8485A Power Splitter 11667B 3-28 Chapter 3 Functional Testing Frequency Response Figure 3-3 Procedure 1. Zero and calibrate the power meter and power sensor as described in the power meter operation manual. 2. Connect the equipment as shown in Figure 3-3 for a 50 Ω analyzer input. CAUTION Use only 75 Ω cables, connectors, or adapters on instruments with 75 Ω connectors, or damage to the connectors will occur. 3. Set the synthesized sweeper controls as follows: FREQUENCY, 50 MHz AMPLITUDE, –8 dBm 4. Press System, Power On/Preset, Preset (Factory), Preset on the analyzer and wait for the preset routine to finish. Set the analyzer by pressing the following keys. FREQUENCY, 50 MHz CF Step Auto Man, 50 MHz SPAN, 20 kHz AMPLITUDE, –10 dBm AMPLITUDE, More, Amptd Units, dBm (75 Ω RF Input Only) AMPLITUDE, –10 dBm, Attenuation Auto Man, 10 dB Scale/Div, 2 dB BW/Avg, 10 kHz Chapter 3 3-29 Functional Testing Frequency Response Video BW Auto Man, 3 kHz Peak Search FREQUENCY, Signal Track (On) 5. Adjust the synthesized sweeper amplitude for a marker amplitude reading of –14 dBm +/– 0.10 dB. NOTE The power level of the synthesized sweeper remains unchanged for the duration of the test. For each new test frequency, the power sensor cal factor should be entered to minimize measurement errors. 6. Refer to Table 3-3, “Frequency Response Report.” Enter the marker readout amplitude for 50 MHz as displayed on the analyzer in the Analyzer Amplitude column. 7. Enter the power meter reading in the Power Meter Amplitude column. 8. Compute the flatness error at 50 MHz using the following equation and record the results in the Flatness Error column: Flatness Error = Analyzer Amplitude – Power Meter Amplitude 9. Perform the following steps for each center frequency setting listed in Table 3-3. a. Tune the source to the next frequency listed in the Center Frequency column. b. Enter the power sensor cal factor for the new test frequency. c. Tune the analyzer center frequency by pressing the ⇑ key or press FREQUENCY, Center Freq, “n”, and MHz (where “n” is the next test frequency in Table 3-3). d. Press Peak Search. e. Enter the power meter reading in the Power Meter Amplitude column. f. Enter the analyzer reading in the Analyzer Amplitude column. g. Compute the flatness error using the following equation and record the results in the Flatness Error column: Flatness Error = Analyzer Amplitude – Power Meter Amplitude The flatness error should be less than the specified amount. 3-30 Chapter 3 Functional Testing Frequency Response Table 3-3 Frequency Response Report Model Center Freq All Models 50 MHz ± 1.5 100 MHz ± 1.5 750 MHz ± 1.5 1250 MHz ± 1.5 1500 MHz ± 1.5 2000 MHz ± 1.5 2500 MHz ± 1.5 3000 MHz ± 1.5 4250 MHz ± 3.0 5750 MHz ± 3.0 6700 MHz ± 3.0 8000 MHz ± 3.5 9000 MHz ± 3.5 10000 MHz ± 3.5 11000 MHz ± 3.5 13200 MHz ± 3.5 14000 MHz ± 4.0 19000 MHz ± 4.0 24000 MHz ± 4.0 26500 MHz ± 4.0 E4402B– E4408B E4404B – E4408B E4405B – E4408B E4407B & E4408B Chapter 3 Analyzer Amplitude Power Meter Amplitude Flatness Error Flatness Error Test Limits (dB) 3-31 Functional Testing Reference Level Accuracy Reference Level Accuracy Test Limits Reference Level Minimum (dB) Maximum (dB) dBm dBmV –30 21.76 Reference Reference –20 31.76 –1.40 1.40 –10 41.76 –1.40 1.40 –40 11.76 –1.40 1.40 –50 1.76 –1.40 1.40 –60 –8.24 –1.40 1.40 –70 –18.24 –2.0 2.0 Test Description A 50 MHz CW signal is applied to the Input of the analyzer. The amplitude of the source and the analyzer’s reference level are decreased in 10 dB steps. The analyzer marker functions are used to measure the amplitude difference between steps. Reference Level Accuracy is tested in both Log and Linear Scale Modes. Most of the error is contributed from the output attenuator inaccuracy in the synthesized sweeper and not the analyzer. 3-32 Chapter 3 Functional Testing Reference Level Accuracy Required Equipment Instrument Critical Specifications (for this test) Recommended HP/Agilent Model Signal Sources Synthesized Sweeper 8340A/B or 836XX Series Adapters Type-N(m), to BNC(f) 1250-1476 Cables Type-N,152-cm (60-in) 11500D BNC,122-cm (48-in) 10503A Additional Equipment for 75-ohm Input Pad, minimum loss 11852B Type-N(f), to BNC(m) 1250-1534 Figure 3-4 Chapter 3 3-33 Functional Testing Reference Level Accuracy Log Mode Procedure 1. Connect the equipment as shown in Figure 3-4. 2. Press PRESET on the synthesized sweeper. Set the synthesized sweeper controls as follows: CW, 50 MHz Power Level, –30 dBm 3. Press System, Power On/Preset, Preset (Factory), Preset on the analyzer, then wait for the preset routine to finish. Press System, Alignments, Auto Align, Off. Set the analyzer by pressing the following keys: FREQUENCY, 50 MHz SPAN, 50 kHz AMPLITUDE, –30 dBm (50 Ω Input only) AMPLITUDE, 21.76 dBmV (75 Ω Input only) Attenuation (Man), 5 dB BW/Avg, Resolution BW Auto Man, 3 kHz Video BW Auto Man, 30 Hz 4. Press Peak Search on the analyzer. Adjust the amplitude on the synthesized sweeper until the marker amplitude on the analyzer reads –30 dBm +/– 0.10 dB. Enter the synthesized sweeper power level as the Synthesized Sweeper Amplitude reference in Table 3-4 on page 3-35. NOTE Under these analyzer conditions, the sweep time is 1.7 seconds. Therefore, the marker amplitude updates are fairly slow when adjusting the synthesizer output power. 5. Now that the reference has been established in step 4, adjust the synthesized sweeper power level and the analyzer reference level according to Table 3-4 on page 3-35. (The synthesized sweeper output power and the analyzer’s reference level will be changed in 10 dB steps.) 6. On the analyzer, press Single and wait for a sweep to finish. Press Peak Search, Marker, Delta. 7. For each new synthesized sweeper power level and analyzer reference level change, press the following keys on the analyzer: Single Peak Search Record the Analyzer Marker Amplitude reading in Table 3-4. 3-34 Chapter 3 Functional Testing Reference Level Accuracy Table 3-4 Analyzer Reference Level Synthesized Sweeper Amplitude (dBm) Minimum (dB) Analyzer Marker ∆ Amplitude (dB) Maximum (dB) 0 (Reference) 0 (Reference) dBm dBmV –30 21.76 Reference + _____ 0 (Reference) –20 31.76 Reference + (10 dB) 8.60 11.40 –10 41.76 Reference + (20 dB) 18.60 21.40 –40 11.76 Reference + (–10 dB) –11.40 –8.60 –50 1.76 Reference + (–20 dB) –21.40 –18.60 –60 – 8.24 Reference + (–30 dB) –31.40 –28.60 –70 –18.24 Reference + (–40 dB) –42.0 –38.0 Linear Mode Procedure 1. Set the power level on the synthesized sweeper to –30 dBm. 2. Set the analyzer by pressing the following keys: Sweep, Sweep (Cont) AMPLITUDE, –30 dBm (50 Ω Input) AMPLITUDE, +21.76 dBmV (75 Ω Input) Scale Type (Lin) AMPLITUDE, More 1 of 2, Amptd Units, dBm (50 Ω Input) AMPLITUDE, More 1 of 2, Amptd Units, dBmV (75 Ω Input) Marker, Off 3. Adjust the amplitude on the synthesized sweeper until the marker amplitude on the analyzer reads –30 dBm +/– 0.10 dB. Enter the synthesized sweeper power level as the Synthesized Sweeper Amplitude reference in Table 3-5 on page 3-36. NOTE Under these analyzer conditions, the sweep time is 1.7 seconds. Therefore, the marker amplitude updates are fairly slow when adjusting the synthesizer output power. Chapter 3 3-35 Functional Testing Reference Level Accuracy 4. Now that the reference has been established in step 4, adjust the synthesized sweeper power level and the analyzer reference level according to Table 3-5. (The synthesized sweeper output power and the analyzer’s reference level will be changed in 10 dB steps.) 5. On the analyzer, press Single and wait for a sweep to finish. Press Peak Search, Marker, Delta. 6. For each new synthesized sweeper power level and analyzer reference level change, press the following keys on the analyzer: Single Peak Search Record the Analyzer Marker Amplitude reading in Table 3-5. Table 3-5 Analyzer Reference Level Synthesized Sweeper Amplitude (dBm) Minimum (dB) Analyzer Marker ∆ Amplitude (dB) Maximum (dB) 0 (Reference) 0 (Reference) dBm dBmV –30 21.76 Reference + _____ 0 (Reference) –20 31.76 Reference + (10 dB) 8.60 11.40 –10 41.76 Reference + (20 dB) 18.60 21.40 –40 11.76 Reference + (–10 dB) –11.40 –8.60 –50 1.76 Reference + (–20 dB) –21.40 –18.60 –60 – 8.24 Reference + (–30 dB) –31.40 –28.60 –70 –18.24 Reference + (–40 dB) –42.0 –38.0 3-36 Chapter 3 Functional Testing Resolution Bandwidth Switching Uncertainty Resolution Bandwidth Switching Uncertainty Test Limits Resolution Bandwidth Minimum (dB) Maximum (dB) 1 kHz 0 (Ref) 0 (Ref) 3 kHz –0.3 dB 0.3 dB 10 kHz –0.3 dB 0.3 dB 30 kHz –0.3 dB 0.3 dB 100 kHz –0.3 dB 0.3 dB 300 kHz –0.3 dB 0.3 dB 1 MHz –0.3 dB 0.3 dB 3 MHz –0.3 dB 0.3 dB 5 MHz –0.6 dB 0.6 dB Test Description To measure the resolution-bandwidth switching uncertainty, an amplitude reference is taken with the resolution bandwidth set to 1 kHz. The resolution bandwidth is changed to settings between 5 MHz and 3 kHz and the amplitude variation is measured at each setting using the marker delta function and compared to the specification. The span is changed as necessary to maintain approximately the same aspect ratio. Chapter 3 3-37 Functional Testing Resolution Bandwidth Switching Uncertainty Required Equipment (No Equipment Required) Procedure NOTE The 50 MHz reference output will automatically be switched internally on the E4401B and E4411B and will not require any external connections. All other ESA analyzers require that the AMPTD REF OUT be connected to the INPUT to perform this test. 1. Press System, Power On/Preset, Preset (Factory), Preset on the analyzer. Wait for the preset routine to finish. Set the analyzer by pressing the following keys: Input/Output, Amptd Ref (f=50 MHz) (On) (E4401B and E4411B) Input/Output, Amptd Ref Out (f=50 MHz (On) (E4402B, E4403B, E4404B, E4405B, E4407B and E4408B). Connect a cable from the AMPTD REF OUT to the INPUT 50 Ω. FREQUENCY, 50 MHz SPAN, 50 kHz AMPLITUDE, –20 dBm Scale/Div, 1 dB More 1 of 2, Amptd Units, dBm (75 Ω Input only) BW/Avg, 1 kHz Video BW Auto Man, 1 kHz 2. Press AMPLITUDE and use the knob to adjust the reference level until the signal appears five divisions (mid-screen) below the reference level. Press the following keys on the analyzer: Peak Search Marker, Delta FREQUENCY, Signal Track (On) 3. Set the analyzer Resolution Bandwidth and Span according to Table 3-6 on page 3-39. 4. Press Peak Search, then record the ∆ Mkr 1 amplitude reading in Table 3-6. 3-38 Chapter 3 Functional Testing Resolution Bandwidth Switching Uncertainty 5. Repeat step 3 and 4 for each of the remaining resolution bandwidth and span settings listed in Table 3-6. The ∆ Mkr 1 amplitude reading should be within the range indicated in the table “Test Limits” on page 3-37. Table 3-6 Test Limits Table Resolution Bandwidth Setting SPAN Setting 1 kHz 50 kHz 3 kHz 50 kHz 10 kHz 50 kHz 30 kHz 500 kHz 100 kHz 500 kHz 300 kHz 5 MHz 1 MHz 10 MHz 3 MHz 10 MHz 5 MHz 50 MHz Chapter 3 ∆ Mkr 1 Amplitude Reading 0 (Ref) 3-39 Functional Testing Scale Fidelity Scale Fidelity Test Limits dB from Reference Level Minimum (dB) Maximum (dB) –4 –1.0 1.0 –16 –1.40 1.40 –28 –1.40 1.40 –40 –1.40 1.40 –52 –1.40 1.40 –64 –2.0 2.0 Test Description A 50 MHz CW signal is applied from a synthesized sweeper to the input of the analyzer. The source is adjusted for a response at the reference level. The synthesized sweeper amplitude is adjusted to achieve a nominal amplitude below the reference level. The analyzer’s amplitude marker is compared to the actual source change to determine the scale fidelity error. Most of the error is the source’s output attenuator inaccuracy from the synthesized sweeper. Required Equipment Instrument Critical Specifications (for this test) Recommended HP/Agilent Model Output Level Accuracy 0 to –15 dBm: ±1.0 dB –16 dBm to –63 dBm ±1.4 dB ≤ –64 dBm: ≥2.0 dB 8340A/B or 836XX Series Signal Sources Synthesized Sweeper Adapters (2) Type-N(m), to BNC (f) 1250-1476 Cables Type-N,152-cm (60-in) 11500D BNC,122-cm (48-in) 10503A 3-40 Chapter 3 Functional Testing Scale Fidelity Instrument Critical Specifications (for this test) Recommended HP/Agilent Model Additional Equipment for 75 Ω Input Pad, minimum loss 11852B Type-N(f), to BNC (m) 1250-1534 Figure 3-5 Procedure 1. Connect the equipment as shown in Figure 3-5. 2. Preset the synthesized sweeper. Set the synthesized sweeper controls as follows: CW, 50 MHz Power Level, 0 dBm (50 Ω Input) Power Level, 4 dBm (75 Ω Input) 3. Press System, Power On/Preset, Preset (Factory), Preset on the analyzer, then wait for the preset routine to finish. Press System, Alignments, Auto Align, Off. Set the analyzer by pressing the following keys: FREQUENCY, 50 MHz SPAN, 45 kHz AMPLITUDE, Attenuation Auto Man, 10 dB BW/Avg, Resolution BW Auto Man, 3 kHz Video BW, 1 kHz Chapter 3 3-41 Functional Testing Scale Fidelity Peak Search 4. Adjust the amplitude on the sythesized sweeper until the marker amplitude on the analyzer reads 0 dBm +/– 0.10 dB. Record the synthesized sweeper output level as the reference in Table 3-7 on page 3-42. NOTE 75 Ω Input only. Adjust the synthesized sweeper amplitude until the analyzer’s marker reads 48.8 dBmV +/– 0.10 dB. 5. On the analyzer, press the following keys: Single Peak Search Marker, Delta 6. Record the marker delta reading in Table 3-7. At each new synthesized sweeper power level, press Single, Peak Search, and record the marker amplitude level. Table 3-7 Scale Fidelity Synthesized Sweeper Level Minimum (dB) Reference=______ 0 (Reference) 0 (Reference) Reference –4 dB –5.0 –3.0 Reference –16 dB –17.40 –15.60 Reference –28 dB –29.40 –26.60 Reference –40 dB –41.40 –38.60 Reference –52 dB –53.40 –50.60 Reference –64 dB –66.0 –62.0 3-42 Marker Level (dB) Maximum (dB) Chapter 3 Functional Testing Second Harmonic Spurious Responses Second Harmonic Spurious Responses Test Limits Model Number Maximum E4401B –55 dBc E4402B –55 dBc E4403B –50 dBc E4404B –55 dBc E4405B –55 dBc E4407B –55 dBc E4408B –50 dBc E4411B –55 dBc Test Description To test second harmonic distortion, a 50 MHz low pass filter is used to filter the source output, ensuring that harmonics read by the analyzer are internally generated and not coming from the source. The source power and input attenuation on the analyzer are adjusted so –20 dBm is the power level at the first mixer. Chapter 3 3-43 Functional Testing Second Harmonic Spurious Responses Required Equipment Instrument Critical Specifications (for this test) Recommended HP/Agilent Model Signal Sources Synthesized Sweeper 8340A/B or 836XX Series Misc 50 MHz Low pass filter Rejection at 80 MHz: >60dB 0955-0306 Adapters (2) Type-N(m) to BNC(f) 1250-1476 BNC(f) to BNC(f) 1250-0080 Type-N(f), to APC 3.5(f) 1250-1745 Cables (2) BNC,122-cm (48-in) 10503A Additional Equipment for 75 Ω Input Pad, minimum loss 11852B Type-N(f), to BNC(m) 1250-1534 Figure 3-6 3-44 Chapter 3 Functional Testing Second Harmonic Spurious Responses Procedure 1. Connect the equipment as shown in Figure 3-6. 2. Set the synthesized sweeper controls as follows: Frequency, 40 MHz Amplitude, –10 dBm (50 Ω Input only) Amplitude, –4.3 dBm (75 Ω Input only) NOTE 75 Ω Input only. Connect the minimum loss adapter between the low pass filter and 75 Ω Input. 3. Press System, Power On/Preset, Preset (Factory), Preset on the analyzer. Wait for the preset routine to finish. Set the analyzer by pressing the following keys: FREQUENCY, 40 MHz SPAN, 1 MHz AMPLITUDE, –10 dBm (50 Ω Input only) AMPLITUDE, 44 dBmV (75 Ω Input only) Attenuation (Man), 10 dB BW/Avg, 30 kHz 4. Adjust the synthesized sweeper amplitude to place the peak of the signal at the reference level. 5. Set the analyzer by pressing the following keys: SPAN, 50 kHz BW/Avg, 1 kHz Video BW Auto Man, 100 Hz 6. Wait for two sweeps to finish, then press the following analyzer keys: Peak Search Mkr → Mkr → CF Step Marker, Delta FREQUENCY 7. Press the ⇑ key on the analyzer to step to the second harmonic (at 80 MHz). Press Peak Search. The marker delta amplitude reading should be less than the Maximum value listed in the Test Limits Table. Chapter 3 3-45 Functional Testing Tracking Generator Level Flatness: HP E4401B and E4411B, Options 1DN and 1DQ Tracking Generator Level Flatness: HP E4401B and E4411B, Options 1DN and 1DQ Test Limits Minimum Maximum Flatness ≤ 10 MHz, 50 Ω –2.5 dB 2.5 dB Flatness > 10 MHz, 50 Ω –2.0 dB 2.0 dB Flatness > 10 MHz, 75 Ω –3.0 dB 3.0 dB Flatness > 10 MHz, 75 Ω –2.5 dB 2.5 dB Test Description A calibrated power sensor is connected to the tracking generator output to measure the power level at 50 MHz. The power meter is set for REL mode so that future power level readings are in dB relative to the power level at 50 MHz. The tracking generator is then stepped to several frequencies throughout its range. The output power difference relative to the power level at 50 MHz is measured at each frequency and recorded. Analyzers with 75 Ω tracking generators are only tested from 1 MHz to 1500 MHz. Required Equipment Instrument Critical Specifications (for this test) Recommended HP/Agilent Model Meters Power Meter RF Power Sensor 438A or E4418A, E4419A Frequency Range: 100 kHz to 1.5GHz 8482A Additional Equipment for 75 Ω Input 75 Ω Power Sensor Frequency Range: 1 MHz to 1.5GHz 8483A Type-N (f) to BNC (m), 75 Ω Adapter 3-46 Chapter 3 Functional Testing Tracking Generator Level Flatness: HP E4401B and E4411B, Options 1DN and 1DQ Figure 3-7 Procedure 1. Calibrate the tracking generator by pressing System, Alignments, Align Now, TG. Connect the RF Out to the Input when prompted. 2. Press System, Power On/Preset, Preset (Factory), Preset on the analyzer, then wait for the preset routine to finish. Set the analyzer by pressing the following keys: FREQUENCY, 50 MHz CF Step Auto Man, 500 MHz SPAN, Zero Span Source, Amplitude (On), 0 dBm (50 Ω RF Output only) Source, Amplitude (On), +42.76 dBmV (75 Ω RF Output only) 3. Zero and calibrate the power meter and RF power sensor. Make sure the power meter is reading out in dBm. Enter the power sensor 5 MHz cal factor into the power meter. NOTE 75 Ω RF Out only: Zero and calibrate the 75 Ω power sensor. 4. Connect the 100 kHz to 1.5 GHz power sensor to the RF Out on the analyzer as shown in Figure 3-7. NOTE 75 Ω RF Out only: Connect the 75 Ω power sensor through an adapter to the RF Out 75 Ω. 5. Press REL on the power meter. The power meter readout amplitudes are now relative to the power level at 50 MHz. 6. Set the analyzer center frequency to 100 kHz. NOTE 75 Ω RF Out only: Set the analyzer center frequency to 1 MHz. Chapter 3 3-47 Functional Testing Tracking Generator Level Flatness: HP E4401B and E4411B, Options 1DN and 1DQ 7. Enter the appropriate power sensor Cal Factor for the test frequency into the power meter as indicated on the label of the power sensor. 8. Record the power level displayed on the power meter as the Level Flatness in Table 3-8. 9. Repeat steps 7 through 8 to measure the flatness at each center frequency setting listed in Table 3-8. The ⇑ may be used to tune to center frequencies above 500 MHz. NOTE 75 Ω RF Out only: Repeat steps 5 through 7 to measure the flatness at the frequencies above 1 MHz listed in Table 3-8. Table 3-8 Tracking Generator Level Flatness Worksheet Center Frequency Level Flatness (dB) 100 kHz or 1 MHza 5 MHz 40 MHz 50 MHz 0 (Ref) 80 MHz 500 MHz 1000 MHz 1500 MHz a. This frequency is 100 kHz for analyzers with 50 Ω tracking generators, and 1 MHz for analyzers with 75 Ω tracking generators. 3-48 Chapter 3 Functional Testing Tracking Generator Level Flatness: E4402B, E4403B, E4404B, E4405B, E4407B and E4408B, Option 1DN Tracking Generator Level Flatness: E4402B, E4403B, E4404B, E4405B, E4407B and E4408B, Option 1DN Test Limits Minimum Maximum Flatness ≤ 10 MHz −3.5 dBm +3.5 dBm Flatness > 10 MHz −2.5 dBm −2.5 dBm Test Description A calibrated power sensor is connected to the tracking generator output to measure the power level at 50 MHz. The power meter is set for REL mode so that future power level readings are in dB relative to the power level at 50 MHz. The tracking generator is then stepped to several frequencies throughout its range. The output power difference relative to the power level at 50 MHz is measured at each frequency and recorded. Required Equipment Instrument Critical Specifications (for this test) Recommended HP/Agilent Model Meters Power Meter RF Power Sensor 438A or E4418A, E4419A Frequency Range: 100 kHz to 3.0 GHz 8482A Adapters Type-N (f) to BNC (m),75-ohm Chapter 3 1250-1534 3-49 Functional Testing Tracking Generator Level Flatness: E4402B, E4403B, E4404B, E4405B, E4407B and E4408B, Option 1DN Figure 3-8 Procedure 1. Calibrate the tracking generator by pressing System, Alignments, Align Now, TG. Connect the RF OUT to the RF INPUT when prompted. 2. Press System, Power On/Preset, Preset (Factory), Preset on the analyzer, then wait for the preset routine to finish. Set the analyzer by pressing the following keys: FREQUENCY, 50 MHz CF Step Auto Man, 100 MHz SPAN, Zero Span Source, Amplitude (On), –20 dBm System, Alignments, Auto Align, Off 3. Zero and calibrate the power meter and power sensor. Make sure the power meter is reading out in dBm. Enter the power sensor 50 MHz cal factor into the power meter. 4. Connect the power sensor to the RF Out on the analyzer as shown in Figure 3-8. 5. Press REL on the power meter. The power meter readout amplitudes are now relative to the power level at 50 MHz. 6. Set the analyzer center frequency to 100 kHz. 7. Enter the appropriate power sensor Cal Factor for the test frequency into the power meter as indicated on the label of the power sensor. This must be done at each test frequency. 8. Record the power level displayed on the power meter as the Level Flatness in Table 3-9 on page 3-51. 3-50 Chapter 3 Functional Testing Tracking Generator Level Flatness: E4402B, E4403B, E4404B, E4405B, E4407B and E4408B, Option 1DN 9. Repeat steps 5 through 7 to measure the flatness at each center frequency setting listed in Table 3-9. The ⇑ may be used to tune to center frequencies above 500 MHz. 10.Press System, Alignments, Auto Align, On. Table 3-9 Tracking Generator Level Flatness Worksheet Center Frequency Level Flatness (dB) 100 kHz 5 MHz 40 MHz 50 MHz 0 (Ref) 80 MHz 500 MHz 1000 MHz 1500 MHz 2000 MHz 2300 MHz 2500 MHz 2700 MHz 3.0 GHz Chapter 3 3-51 4 Troubleshooting 4-1 Troubleshooting What You Will Find in This Chapter What You Will Find in This Chapter This chapter includes information on how to check for a problem with your Agilent Technologies ESA spectrum analyzer, and how to return it for service. It also includes descriptions of all of the analyzer built-in messages. Your analyzer is built to provide dependable service. However, if you experience a problem, or if you desire additional information, or wish to order parts, options, or accessories, Agilent Technologies’ worldwide sales and service organization is ready to provide the support you need. In general, a problem can be caused by a hardware failure, a software error, or a user error. Follow these general steps to determine the cause and to resolve the problem. 1. Perform the quick checks listed in “Check the Basics” on page 4-3. It is possible that a quick check may eliminate your problem altogether. 2. If the problem is a hardware problem, you have several options: • Repair it yourself; see “Service Options” on page 4-4. • Return the analyzer to Agilent Technologies for repair; if the analyzer is still under warranty or is covered by an Agilent Technologies maintenance contract, it will be repaired under the terms of the warranty or plan (the warranty is at the front of this manual). If the analyzer is no longer under warranty or is not covered by an Agilent Technologies maintenance plan, Agilent Technologies will notify you of the cost of the repair after examining the instrument. See “How to Contact Agilent Technologies” and “How to Return Your Analyzer for Service” for more information. WARNING No operator serviceable parts inside the analyzer. Refer servicing to qualified personnel. To prevent electrical shock do not remove covers. 4-2 Chapter 4 Troubleshooting Before You Call Agilent Technologies Before You Call Agilent Technologies Check the Basics A problem can often be resolved by repeating the procedure you were following when the problem occurred. Before calling Agilent Technologies or returning the analyzer for service, please make the following checks: ❏ Check the line fuse. ❏ Is there power at the receptacle? ❏ Is the analyzer turned on? Make sure the fan is running, which indicates that the power supply is on. ❏ If the display is dark or dim, press the upper Viewing Angle key in the upper-left corner of the front panel. If the display is too bright, adjust the lower Viewing Angle key in the upper-left corner of the front panel. ❏ If other equipment, cables, and connectors are being used with your Agilent Technologies ESA spectrum analyzer, make sure they are connected properly and operating correctly. ❏ Review the procedure for the measurement being performed when the problem appeared. Are all the settings correct? ❏ If the analyzer is not functioning as expected, return the analyzer to a known state by pressing the Preset key. Some analyzer settings are not affected by a Preset. If you wish to reset the analyzer configuration to the state it was in when it was originally sent from the factory, press System, Power On/Preset, Preset (Factory), Preset (on the front panel). ❏ Is the measurement being performed, and the results that are expected, within the specifications and capabilities of the analyzer? Refer to the “Specifications and Characteristics” chapters in the Agilent Technologies ESA Spectrum Analyzers Specifications Guide for analyzer specifications. ❏ In order to meet specifications, the analyzer must be aligned. Either Auto Align All must be selected (press System, Alignments, Auto Align, All), or the analyzer must be manually aligned at least once per hour, or whenever the temperature changes more than 3˚ centigrade. When Auto Align, All is selected, AA appears on the left edge of the display. Chapter 4 4-3 Troubleshooting Before You Call Agilent Technologies ❏ Perform an Align Now, All. If the analyzer is an Agilent Technologies E4402B, E4403B, E4404B, E4405B, E4407B, or E4408B, connect a cable between the AMPTD REF OUT and the INPUT 50 Ω. Press System, Alignments, Align Now, All. If the analyzer is equipped with a 3.0 GHz tracking generator (Option 1DN on Agilent Technologies E4402B, E4403B, E4404B, E4405B, E4407B, or E4408B), connect a short cable from AMPTD REF OUT to INPUT 50 Ω, and press System, Alignments, Align Now, TG. If the analyzer is equipped with FM Demod (Option BAA), press System, Alignments, Align Now, FM Demod. ❏ If the previously performed alignments did not resolve the problem, press System, Alignments, Load Defaults. Now press System, Alignments, Align Now, All. If the analyzer is an Agilent Technologies E4402B, E4403B, E4404B, E4405B, E4407B, or E4408B, be sure to connect a cable from AMPTD REF OUT to INPUT 50 Ω. Since Load Defaults has been performed, the analyzer will perform three complete alignment sequences. ❏ Is the analyzer displaying an error message? If so, refer to “Error Messages” on page 4-10. ❏ If the necessary test equipment is available, perform the performance verification tests in the Agilent Technologies ESA Spectrum Analyzers Calibration Guide. Record all results on a Performance Verification Test Record form which follows the tests. ❏ If the equipment to perform the performance verification tests is not available, you may still be able to perform the functional checks in the Agilent Technologies ESA Spectrum Analyzers User’s Guide. Read the Warranty The warranty for your analyzer is at the front of this manual. Please read it and become familiar with its terms. If your analyzer is covered by a separate maintenance agreement, please be familiar with its terms. Service Options Agilent Technologies offers several optional maintenance plans to service your analyzer after the warranty has expired. Call your Agilent Technologies sales and service office for full details. If you want to service the analyzer yourself after the warranty expires, you can purchase the service documentation that provides all necessary test and maintenance information. 4-4 Chapter 4 Troubleshooting Before You Call Agilent Technologies You can order the service documentation, Option 0BW (assembly level troubleshooting and adjustment procedures) and Option 0BV (component level information including parts lists, component location diagrams and schematic diagrams), through your Agilent Technologies sales and service office. Service documentation is described under “Service Documentation and Adjustment Software (Option 0BW)” and “Component Level Service Documentation (Option 0BV)” in Chapter 7. How to Contact Agilent Technologies Agilent Technologies has sales and service offices around the world to provide you with complete support for your analyzer. To obtain servicing information or to order replacement parts, contact the nearest Agilent Technologies sales and service office listed in Table 4-1. In any correspondence or telephone conversations, refer to your analyzer by its product number, full serial number, and firmware revision. (Press System, More 1 of 3, Show System, and the product number, serial number, and firmware revision information will be displayed on your analyzer screen.) A serial number label is also attached to the rear panel of the analyzer. Chapter 4 4-5 Troubleshooting Before You Call Agilent Technologies Table 4-1 Agilent Technologies Sales and Service Offices UNITED STATES Instrument Support Center Agilent Technologies (800) 403-0801 EUROPEAN FIELD OPERATIONS Headquarters Agilent Technologies S.A. 150, Route du Nant-d’Avril 1217 Meyrin 2/ Geneva Switzerland (41 22) 780.8111 France Agilent Technologies France 1 Avenue Du Canada Zone D’Activite De Courtaboeuf F-91947 Les Ulis Cedex France (33 1) 69 82 60 60 Germany Agilent Technologies GmbH Agilent Technologies Strasse 61352 Bad Homburg v.d.H Germany (49 6172) 16-0 Great Britain Agilent Technologies Ltd. Eskdale Road, Winnersh Triangle Wokingham, Berkshire RG41 5DZ England (44 118) 9696622 INTERCON FIELD OPERATIONS Headquarters Agilent Technologies 3495 Deer Creek Rd. Palo Alto, CA 94304-1316 USA (415) 857-5027 Japan Agilent Technologies Japan, Ltd. Measurement Assistance Center 9-1, Takakura-Cho, Hachioji-Shi Tokyo 192-8510, Japan TEL (81)- 426-56- 7832 FAX (81)- 426-56- 7840 Australia Agilent Technologies Australia Ltd. 31-41 Joseph Street Blackburn, Victoria 3130 (61 3) 895-2895 Canada Agilent Technologies (Canada) Ltd. 17500 South Service Road Trans-Canada Highway Kirkland, Quebec H9J 2X8 Canada (514) 697-4232 Singapore Agilent Technologies Singapore (Pte.) Ltd. 150 Beach Road #29-00 Gateway West Singapore 0718 (65) 291-9088 Taiwan Agilent Technologies Taiwan 8th Floor, H-P Building 337 Fu Hsing North Road Taipei, Taiwan (886 2) 712-0404 China China Agilent Technologies 38 Bei San Huan X1 Road Shuang Yu Shu Hai Dian District Beijing, China (86 1) 256-6888 4-6 Chapter 4 Troubleshooting How to Return Your Analyzer for Service How to Return Your Analyzer for Service Service Tag If you are returning your analyzer to Agilent Technologies for servicing, fill in and attach a blue service tag. Several service tags are supplied at the rear of this chapter. Please be as specific as possible about the nature of the problem. If you have recorded any error messages that appeared on the display, or have completed a Performance Test Record, or have any other specific data on the performance of your analyzer, please send a copy of this information with your analyzer. Original Packaging Before shipping, pack the unit in the original factory packaging materials if they are available. If the original materials were not retained, see“Other Packaging” on page 4-9. NOTE Ensure that the instrument handle is in the rear-facing position in order to reduce the possibility of damage during shipping. Refer to Figure 4-1. NOTE Install the transportation disk into the floppy drive to reduce the possibility of damage during shipping. If the original transportation disk is not available, a blank floppy may be substituted. Chapter 4 4-7 Troubleshooting How to Return Your Analyzer for Service Figure 4-1 4-8 Chapter 4 Troubleshooting How to Return Your Analyzer for Service Other Packaging CAUTION Analyzer damage can result from using packaging materials other than those specified. Never use styrene pellets in any shape as packaging materials. They do not adequately cushion the equipment or prevent it from shifting in the carton. They cause equipment damage by generating static electricity and by lodging in the analyzer louvers, blocking airflow. You can repackage the instrument with commercially available materials, as follows: 1. Attach a completed service tag to the instrument. 2. Install the transportation disk or a blank floppy disk into the disk drive. 3. If you have a front-panel cover, install it on the instrument. If you do not have a front panel cover, make sure the instrument handle is in the forward-facing position to protect the control panel. 4. Wrap the instrument in antistatic plastic to reduce the possibility of damage caused by electrostatic discharge. 5. Use a strong shipping container. The carton must be both large enough and strong enough to accommodate the analyzer. A double-walled, corrugated cardboard carton with 159 kg (350 lb) bursting strength is adequate. Allow at least 3 to 4 inches on all sides of the analyzer for packing material. 6. Surround the equipment with three to four inches of packing material and prevent the equipment from moving in the carton. If packing foam is not available, the best alternative is S.D.-240 Air Cap™ from Sealed Air Corporation (Hayward, California, 94545). Air Cap looks like a plastic sheet filled with 1-1/4 inch air bubbles. Use the pink-colored Air Cap to reduce static electricity. Wrapping the equipment several times in this material should both protect the equipment and prevent it from moving in the carton. 7. Seal the shipping container securely with strong nylon adhesive tape. 8. Mark the shipping container “FRAGILE, HANDLE WITH CARE” to assure careful handling. 9. Retain copies of all shipping papers. Chapter 4 4-9 Troubleshooting Error Messages Error Messages The analyzer can generate various messages that appear on the display during operation. There are four types of messages. • Status Messages appear on the right side of the analyzer display and/or set status bits in the SCPI Status Register system. These messages indicate a condition that may result in erroneous data being displayed. Most messages will only be displayed until the error condition is corrected. Multiple messages can be displayed and will be listed in the display area. • Informational Messages provide information that requires no intervention. These messages appear in the status line at the bottom of the display, in green if you have a color display. The message will remain until you preset the analyzer, press ESC, or another message is displayed in the status line. • User Error Messages appear when an attempt has been made to set a parameter incorrectly or an operation has failed (such as saving a file). These messages are often generated during remote operation when an invalid programming command has been entered. These messages appear in the status line at the bottom of the display, in yellow if you have a color display. The message will remain until you preset the analyzer, press ESC, or another message is displayed in the status line. A summary of the last 11 error messages may be viewed by pressing, System then Show Errors. When generated by activity on the remote interface, the messages are output to the remote bus. When output to the remote interface, they are preceded by an error number. Note that the error number is not displayed under the System, Show Errors key sequence. • Pop-up Messages indicate a condition that may require intervention. They display in the middle of the display in a framed box. The message will remain until the appropriate intervention has taken place or the condition has been corrected. 4-10 Chapter 4 Troubleshooting Status Messages Status Messages The following messages indicate a condition that may result in erroneous data being displayed. In each case the name of the corresponding status bit is indicated in parenthesis. It will be noted if only a status bit is used (no message). * (Invalid Data) This indicator is displayed when data on the screen may not match the screen annotation, for example while analyzer settings are changing or when any trace is in view mode. 50 MHz Osc Unlevel (50 MHz Osc Unleveled) The internal 50 MHz amplitude reference source has become unleveled. This condition must be corrected before a valid alignment can be performed. (ADC Align Failure) A status bit only, no message. The alignment routine was unable to align the analog-to-digital converter (ADC). Align Now All Needed (Align Needed) The instrument requires an Align Now, All. Restore the alignment by pressing System, Alignments, Align Now, All. On all Agilent Technologies ESA spectrum analyzer models except Agilent Technologies E4401B and Agilent Technologies E4411B you must connect the AMPTD REF OUT to the INPUT with the appropriate cable to perform this alignment. Align Now RF Needed (Align Now RF Needed) The instrument requires an Align Now, RF. Restore the alignment by pressing System, Alignments, Align Now, RF (EXT Cable). On all Agilent Technologies ESA spectrum analyzer models except Agilent Technologies E4401B and Agilent Technologies E4411B, you must connect the AMPTD REF OUT to the INPUT with the appropriate cable to perform this alignment. For Agilent Technologies E4401B and Chapter 4 4-11 Troubleshooting Status Messages E4411B only: disconnect any signals from the INPUT prior to performing this procedure. Align RF Skipped (Align RF Skipped) The RF alignment has been skipped because a 50 MHz signal was detected at the INPUT; alignment will resume when the 50 MHz signal is removed. The alignment will not work when there is too much input power at 50 MHz. The instrument may not continue to measure properly. To remove the message, remove the 50 MHz input signal, then perform an Align Now, RF. Press System, Alignments, Align Now, RF. Be sure to connect the AMPTD REF OUT to the INPUT with the appropriate cable to perform the alignment. Ext Ref (no corresponding status bit) Indicates that the frequency reference is being supplied by an external 10 MHz source. Frequency Reference Error (Freq Ref Unlocked) The frequency reference has been tuned too far off of 10 MHz. This condition may be corrected by cycling power on the analyzer. (FM Demod Align Failure) status bit only, no message A failure has occurred during the FM Demod alignment. Measurement results may be invalid. (IF Align Failure) status bit only, no message A failure has occurred during the IF alignment. Measurement results may be invalid. IF Overload (IF/ADC Over Range) The IF section has been overloaded. Measurement results may be invalid. 4-12 Chapter 4 Troubleshooting Status Messages Input is internal (no corresponding status bit) This message applies to the Agilent Technologies E4401B and E4411B only. Indicates the 50 MHz Amptd Ref selection is On. With the 50 MHz amplitude reference on, the input is routed through an internal signal path. (LO Align Failure) status bit only, no message A failure has occurred during the alignment of the local oscillator (LO). Measurement results may be invalid. LO Out Unlevel (LO Out Unleveled) Indicates the output of the local oscillator (LO) has become unleveled. This condition must be corrected to make valid measurements. LO Unlevel (LO Unleveled) Indicates the internal circuitry of the local oscillator (LO) has become unleveled. This condition must be corrected to make valid measurements. LO Unlock (Synth Unlocked) Indicates the phase locked circuitry of the local oscillator (LO) has become unlocked. This condition must be corrected to make valid measurements. Meas Uncal (Oversweep) The measurement is uncalibrated. Check the sweep time, span and bandwidth settings, or press Auto Couple. Chapter 4 4-13 Troubleshooting Status Messages Overload: Reduce Signal and press <ESC> (Input Overload Tripped) This message applies to the Agilent Technologies E4401B and E4411B only. A signal has been applied to the input connector that caused the overload protection circuitry to engage. The input signal must be reduced. After the signal is reduced, press ESC to reset the overload detector so that you can continue using the analyzer. CAUTION Exposing the analyzer to high levels of input power over a prolonged period of time can damage the internal circuitry. (RF Align Failure) status bit only, no message A failure has occurred during the alignment of the RF section. Measurement results may be invalid. Signal Ident On, Amptd Uncal (Signal Ident On) Indicates that the amplitude measurement could be uncalibrated because the signal identification feature is on. Source LO Unlevel (Source LO Unleveled) The internal circuitry of the local oscillator (LO) in the tracking generator has become unleveled. This condition must be corrected to make valid measurements. Source LO Unlock (Source Synth Unlocked) The phase-locked circuitry of the local oscillator (LO) in the tracking generator has become unlocked. This condition must be corrected to make valid measurements. 4-14 Chapter 4 Troubleshooting Status Messages Source Unlevel (Source Unleveled) Indicates the source power is set higher or lower than the analyzer can provide, the frequency span extends beyond the specified frequency range of the tracking generator, or the calibration data for the source is incorrect. (TG Align Failure) status bit only, no message A failure has occurred during the tracking generator (TG) alignment. Chapter 4 4-15 Troubleshooting Informational Messages Informational Messages The following messages provide information that requires no intervention. The information provided in brackets, for example <filename> or <directory>, is a variable that represents a specific input provided previously. Informational messages are displayed at the bottom of the screen in the status line (green on color displays). <directoryname> directory deleted The directory indicated has been successfully deleted. <directoryname1> directory renamed to <directoryname2> Directory name1 has been successfully renamed to directory name2. <filename> file loaded The filename indicated has been successfully loaded. <filename> file saved The filename indicated has been successfully saved. <filename> file copied The filename indicated has been successfully copied. <filename> file deleted The filename indicated has been successfully deleted. <filename1> file renamed to <filename2> Filename1 has been successfully renamed to filename2. 4-16 Chapter 4 Troubleshooting Informational Messages Atten auto set to 15 dB Indicates that an input signal has been detected which is of sufficient level to force the input attenuator to be autocoupled at 15 dB. If the signal level is reduced, the attenuator will stay at 15 dB. This overload protection occurs at an input power level of 13 dBm (68 dBmV for Option 1DP) and ± 7 dB when the input attenuation is autocoupled and set to <15 dB. To return to the original measurement setup, reduce the input signal level and press Amplitude. Then press Attenuation (Auto). Overload protection is only available in the Agilent Technologies E4401B and E4411B. Auto ranging... Displayed during autoranging. B7D and/or B7E not found. Code Domain not available. Digital Signal Processing and Fast Analog to Digital Converter (B7D) and/or RF Communications Hardware (B7E) are not installed options on your analyzer. Code domain is therefore not available. B7D and/or B7E not found. Mod Acc not available. Digital Signal Processing and Fast Analog to Digital Converter (B7D) and/or RF Communications Hardware (B7E) are not installed options on your analyzer. Modulation accuracy is therefore not available. Carrier Not Present. A carrier signal/burst is expected at the analyzer input. This signal cannot be found; however, the measurement will still run. Channel frequency outside device’s transmit band. Reset channel number or frequency. Chapter 4 4-17 Troubleshooting Informational Messages Default spur table values loaded. No spur table has been previously saved when the Out-of-Band Spurious measurement begins. Press Meas Setup, Edit Table to enter the frequency ranges of interest and press Save Table to save that information. This saved table will be loaded the next time the measurement is run. Device = Mobile. Code Domain not available. Code Domain measurement is grayed out when the device is set to mobile under the Mode Setup front-panel key. Code Domain measurement is only accessible when the device is set to base and Digital Signal Processing and Fast Analog to Digital Converter (Option B7D) or RF Communications Hardware (Option B7E) are installed. Device = Mobile. Mod Acc not available. Modulation accuracy measurement is grayed out when the device is set to mobile under Mode Setup, front-panel key. Modulation accuracy is only accessible when the device is set to base and Digital Signal Processing and Fast Analog to Digital Converter (Option B7D) or RF Communications Hardware (Option B7E) are installed. Directory already exists Each directory and file must have a unique name. The directory name you have entered is currently being used on the selected drive. You may either enter a new name or rename the directory currently existent. Refer to “File Menu Functions” on page 2-25. Entire trace is below the threshold level. The measurement cannot operate properly because the trace has fallen completely below the threshold level. 4-18 Chapter 4 Troubleshooting Informational Messages Measurement halted. Press a measurement key to continue. This error occurs after you choose Cancel to refrain from setting the attenuator to 0 dB during the Receive Channel Power and Receive Spur measurements. Not enough frequency range to measure harmonics for channel. Selected harmonics are above the frequency range of the instrument. Option activated This message is displayed after entering the selected option’s License Key. Please set RF input range (INPUT menu) to manual first. In order to manually set the reference level and/or the attenuation under the Amplitude front-panel key, the RF Input Range menu under the Input front-panel key must be set to Man (manual). Table loaded successfully. When the Load Table key was pressed on the second page of the edit table form while in the out-of-band spurious measurement, the file was present. The information has been loaded into the measurement where it may be edited again by the user. This message will also appear when the out-of-band spurious measurement is opened if a spur table has been previously saved. Table saved successfully. This message appears after the user presses the Save Table key on the second page of the edit table for the out-of-band spurious measurement. It indicates that the current spur table has been written successfully to disk and is available to be loaded by means of the Load Table key. Chapter 4 4-19 Troubleshooting Informational Messages Table saved successfully. This message appears after the user presses the Save Table key on the second page of the edit table for the out-of-band spurious measurement. It indicates that the current spur table has been written successfully to disk and is available to be loaded by means of the Load Table key. Volume <name> formatted The indicated disk has been successfully formatted. The calibration data is invalid, and has been cleared. A parameter has changed that affects calibration. Therefore the calibration data has been reset, and for best results recalibration is recommended. The file containing the list of cable types has been updated. The file update was successful. This operation requires a measurement to be active. The analyzer cannot perform this operation, as it requires a measurement to be running. 4-20 Chapter 4 Troubleshooting Error Queues Error Queues When a user-error condition occurs in the instrument as a result of SCPI (remote interface) activity, it is reported to both the front-panel display error-queue and the SCPI error queue. If it is a result of front-panel activity, it reports to the front panel display error queue, and may also report to the SCPI error queue depending on the error. These two queues are viewed and managed separately. Table 4-2 Characteristics of the Error Queues Characteristic Front-Panel Display Error Queue SCPI Remote Interface Error Queue Capacity (number of errors) 11 30 Overflow Handling Circular (rotating). Drops oldest error as new error comes in. Linear, first-in/first-out. Replaces newest error with: Press: System, Show Errors Use SCPI query Viewing Entries –350,Queue overflow SYSTem:ERRor? Clearing the Queue Chapter 4 Press: System, Show Errors, Clear Error Queue Power up. Send a *CLS command. Read last item in the queue. 4-21 Troubleshooting Error Message Format Error Message Format The system–defined error numbers are chosen on an enumerated (“1 of N”) basis. The error messages are listed in alphabetical order within each error message type section. In this chapter, an explanation is included with each error to further clarify its meaning. The last error described in each class (for example, –400, –300, –200, –100) is a “generic” error. There are also references to the IEEE Standard 488.2-1992, IEEE Standard Codes, Formats, Protocols and Common Commands for Use with ANSI/IEEE Std 488.1-1987. New York, NY, 1992. Error messages are displayed at the bottom of the screen in the status line (yellow on color displays). 4-22 Chapter 4 Troubleshooting Error Message Types Error Message Types Events do not generate more than one type of error. For example, an event that generates a query error will not generate a device-specific, execution, or command error. –499 to –400: Query Errors These errors indicate that the instrument output queue control has detected a problem with the message exchange protocol described in IEEE 488.2, Chapter 6. Errors in this class set the query error bit (bit 2) in the event status register (IEEE 488.2, section 11.5.1). These errors correspond to message exchange protocol errors described in IEEE 488.2, 6.5. In this case: • Either an attempt is being made to read data from the output queue when no output is either present or pending, or • data in the output queue has been lost. –399 to –300: Device-Specific Error Messages These errors indicate that the instrument output queue control has detected a problem with the message exchange protocol described in IEEE 488.2, Chapter 6. Errors in this class set the query error bit (bit 2) in the event status register (IEEE 488.2, section 11.5.1). These errors correspond to message exchange protocol errors described in IEEE 488.2, 6.5. In this case: • Either an attempt is being made to read data from the output queue when no output is either present or pending, or • data in the output queue has been lost. –299 to –200: Execution Error Messages These errors indicate that an error has been detected during instrument execution. –199 to –100: These errors indicate that the instrument parser detected an IEEE Command Errors 488.2 syntax error. Errors in this class set the command error bit (bit 5) in the event status register (IEEE 488.2, section 11.5.1). In this case: • Either an IEEE 488.2 syntax error has been detected by the parser (a control-to-device message was received that is in violation of the IEEE 488.2 standard. Possible violations include a data element which violates device listening formats or whose type is unacceptable to the device.), or • an unrecognized header was received. These include incorrect device-specific headers and incorrect or unimplemented IEEE 488.2 common commands. Chapter 4 4-23 Troubleshooting Error Message Types 201 to 799: Device-Specific Errors These errors indicate that a device operation did not properly complete, possibly due to an abnormal hardware or firmware condition. These codes are also used for self-test response errors. Errors in this class set the device-specific error bit (bit 3) in the event status register (IEEE 488.2, section 11.5.1). The <error_message> string for a positive error is not part of the SCPI standard. A positive error indicates that the instrument detected an error within the GPIB system, within the instrument firmware or hardware, during the transfer of block data, or during calibration. Greater than 1000: Personality Specific Error Messages These errors indicate that an error has been detected while executing measurements requiring Option BAH. 4-24 Chapter 4 Troubleshooting 0: No Error 0: No Error 0 No error The queue is empty. Every error in the queue has been read or the queue was purposely cleared by power-on or *CLS. Chapter 4 4-25 Troubleshooting –499 to –400: Query Errors –499 to –400: Query Errors The instrument output queue control has detected a problem with the message exchange protocol described in IEEE 488.2, Chapter 6. Errors in this class set the query error bit (bit 2) in the event status register (IEEE 488.2, section 11.5.1). These errors correspond to message exchange protocol errors described in IEEE 488.2, 6.5. In this case, either an attempt is being made to read data from the output queue when no output is either present or pending, or data in the output queue has been lost. –430 Query DEADLOCKED Indicates that a SCPI output queue has filled, preventing further SCPI command execution, and there is no more room left in the corresponding SCPI input queue to accept a query to read from the output queue. The system automatically discards output to correct the deadlock. –400 Query Error This is a generic query error for devices that cannot detect more specific errors. The code indicates only that a query error as defined in IEEE 488.2, 11.5.1.1.7, and 6.3 has occurred. –410 Query INTERRUPTED Indicates that a condition causing an INTERRUPTED query error occurred (see IEEE 488.2, 6.3.2.7). For example, a query was followed by DAB or GET before a response was completely sent. –420 Query UNTERMINATED Indicates that a condition causing an UNTERMINATED query error occurred (see IEEE 488.2, 6.3.2.2). For example, the device was addressed to talk and an incomplete program message was received. 4-26 Chapter 4 Troubleshooting –499 to –400: Query Errors –440 Query UNTERMINATED after indefinite response Indicates that a query was received in the same program message after a query requesting an indefinite response was executed (see IEEE 488.2, 6.3.7.5). Chapter 4 4-27 Troubleshooting –399 to –300: Device-Specific Error Messages –399 to –300: Device-Specific Error Messages An error number in the range [−399 to −300] indicates that the instrument has detected an error where some device operations did not properly complete, possibly due to an abnormal hardware or firmware condition. This is not a error in response to a SCPI query or command, or command execution. The occurrence of any error in this class will cause the device-specific error bit (bit 3) in the event status register to be set. Device-Specific Error Message Descriptions (Number) Description (-310) System error Indicates that an error, termed “system error” by the device, has occurred. (-300) Device-specific error This is a generic device-dependent error for devices that cannot detect more specific errors. The code indicates only that a device-dependent error as defined in IEEE 488.2, 11.5.1.1.6 has occurred. 4-28 Chapter 4 Troubleshooting –299 to –200: Execution Error Messages –299 to –200: Execution Error Messages An error number in the range [–299 to –200] indicates that an error has been detected during instrument execution. Execution Error Message Descriptions –221 Settings conflict; parameter currently disabled This parameter is grayed out (unavailable) in the current context. Check the individual parameter help/documentation for more information. –223 Too much data; <description of the type of data exceeded> Indicates that a legal program data element of block, expression or string type was received that contained more data than the device could handle due to memory or related device-specific requirements. –230 Data corrupt or stale. Possibly invalid data. A new measurement was started but not completed. Chapter 4 4-29 Troubleshooting –199 to –100: Command Errors –199 to –100: Command Errors The instrument parser detected an IEEE 488.2 syntax error. Errors in this class set the command error bit (bit 5) in the event status register (IEEE 488.2, section 11.5.1). In this case: • Either an IEEE 488.2 syntax error has been detected by the parser (a control-to-device message was received that is in violation of the IEEE 488.2 standard. Possible violations include a data element which violates device listening formats or whose type is unacceptable to the device.), or • an unrecognized header was received. These include incorrect device-specific headers and incorrect or unimplemented IEEE 488.2 common commands. –160 Block data error This error, as well as errors –161 through –169, is generated when parsing a block data element. This particular error message is used if the device cannot detect a more specific error. –168 Block data not allowed A legal block data element was encountered, but not allowed by the device at this point in the parsing. –140 Character data error This error, as well as errors –141 through –149, is generated when parsing a character data element. This particular error message is used if the device cannot detect a more specific error. –148 Character data not allowed A legal character data element was encountered where prohibited by the device. –144 Character data too long The character data element contains more than twelve characters (see IEEE 488.2, 7.7.1.4). 4-30 Chapter 4 Troubleshooting –199 to –100: Command Errors –100 Command error This is a generic syntax error for devices that cannot detect more specific errors. The code indicates only that a command error as defined in IEEE 488.2, 11.5.1.1.4 has occurred. –110 Command header error An error was detected in the header. This message is used when the device cannot detect the more specific errors described for errors –111 through –119. –104 Data type error The parser recognized a data element that is not allowed. For example, numeric or string data was expected, but block data was encountered. –123 Exponent too large The magnitude of an exponent was greater than 32000 (see IEEE 488.2, 7.7.2.4.1). –170 Expression data error This error, as well as errors –171 through –179, is generated when parsing an expression data element. This particular error message is used if the device cannot detect a more specific error. –178 Expression data not allowed A legal expression data was encountered, but was not allowed by the device at this point in parsing. –105 GET not allowed A Group Execute Trigger was received within a program message (see IEEE 488.2, 7.7). Correct the GPIB controller program so that the GET does not occur within a line of GPIB program code. –111 Header separator error A character which is not a legal header separator was encountered while parsing the header. Chapter 4 4-31 Troubleshooting –199 to –100: Command Errors –114 Header suffix out of range The value of a header suffix attached to a program mnemonic makes the header invalid. –161 Invalid block data A block data element was expected, but was invalid (see IEEE 488.2, 7.7.6.2). For example, an END message was received before the end length was satisfied. –101 Invalid character A syntactic command contains a character which is invalid for that type. For example, a header containing an ampersand, such as “SETUP&”. This error might be used in place of error numbers –114, –121, –141 and some others. –141 Invalid character data Either the character data element contains an invalid character or the particular element received is not valid for the header. –121 Invalid character in number An invalid character for the data type being parsed was encountered. For example, an alpha in a decimal numeric or a “9” in octal data. –171 Invalid expression The expression data element was invalid (see IEEE 488.2, 7.7.7.2). For example, unmatched parentheses or an illegal character. –103 Invalid separator The parser was expecting a separator and encountered an illegal character. For example, the semicolon was omitted after a program message unit. 4-32 Chapter 4 Troubleshooting –199 to –100: Command Errors –151 Invalid string data A string data element was expected, but was invalid (see IEEE 488.2, 7.7.5.2). For example, an END message was received before the terminal quote character. –131 Invalid suffix The suffix does not follow the syntax described in IEEE 488.2, 7.7.3.2, or the suffix is inappropriate for this device. –109 Missing parameter Fewer parameters were received than required for the header. For example, the *ESE common command requires one parameter, so receiving *ESE is not allowed. –120 Numeric data error This error, as well as errors –121 through –129, is generated when parsing a data element which appears to be numeric, including non-decimal numeric types. This particular error message is used if the device cannot detect a more specific error. –128 Numeric data not allowed A legal numeric data element was received, but the device does not accept one in this position for the header. –108 Parameter not allowed More parameters were received than expected for the header. For example, the *ESE common command only accepts one parameter, so receiving *ESE 0,1 is not allowed. –112 Program mnemonic too long The header contains more than twelve characters (see IEEE 488.2, 7.6.1.4.1). Chapter 4 4-33 Troubleshooting –199 to –100: Command Errors –150 String data error This error, as well as errors –151 through –159, is generated when parsing a string data element. This particular error message is used if the device cannot detect a more specific error. –158 String data not allowed A string data element was encountered, but not allowed by the device at this point in the parsing. –130 Suffix error This error, as well as errors –131 through –139, is generated when parsing a suffix. This particular error message is used if the device cannot detect a more specific error. –138 Suffix not allowed A suffix was encountered after a numeric element which does not allow suffixes. –134 Suffix too long The suffix contained more than twelve characters (see IEEE 488.2, 7.7.3.4). –102 Syntax error An unrecognized command or data type was encountered. For example, a string was received when the device does not accept strings. –124 Too many digits The mantissa of a decimal-numeric data element contained more than 255 digits excluding leading zeros (see IEEE 488.2, 7.7.2.4.1). –113 Undefined header The header is syntactically correct, but it is undefined for this specific device. For example, *XYZ is not defined for any device. 4-34 Chapter 4 Troubleshooting 201 to 799: Device-Specific Errors 201 to 799: Device-Specific Errors Some device operations did not properly complete, possibly due to an abnormal hardware or firmware condition. These codes are also used for self-test response errors. Errors in this class set the device-specific error bit (bit 3) in the event status register (IEEE 488.2, section 11.5.1). The <error_message> string for a positive error is not defined by SCPI. A positive error indicates that the instrument detected an error within the GPIB system, within the instrument firmware or hardware, during the transfer of block data, or during calibration. 653 Auto Align not available when using Calibration Defaults The Auto Alignment system cannot be used until an Align Now All is executed by pressing System, Alignments, Align Now, All. For Agilent Technologies E4402B, E4403B, E4404B, E4405B, E4407B, and E4408B only, you must connect the AMPTD REF OUT to the INPUT with the appropriate cable to perform this alignment. 614 Bad or missing floppy disk The floppy is not inserted or the directory could not be read. Insert a known good disk and try again. 205 Command not recognized Indicates that the command sent from the remote interface was not recognized. Check the programming guide for correct syntax. 205 Command not recognized Indicates that the command sent from the remote interface was not recognized. Check the programming guide for correct syntax. Chapter 4 4-35 Troubleshooting 201 to 799: Device-Specific Errors 219 Command not valid in this model Indicates that the command sent from the remote interface does not apply to this model number. For example, attempting to center the preselector in an analyzer without a preselector will generate this error. 222 Command not valid when no measurement is active Indicates that the command sent from the remote interface must be issued while a measurement is running in the analyzer. 772 Cannot load a directory, please choose a file You have selected a directory instead of a file when attempting to perform the Load function under the File front-panel key. 652 Connect Amptd Ref Output to Input For Agilent Technologies E4402B, E4403B, E4404B, E4405B, E4407B, and E4408B only: you must connect the AMPTD REF OUTPUT to the analyzer INPUT with the appropriate cable. 651 Connect RF OUT to INPUT Attempt to align the tracking generator without its output connected. Connect the tracking generator RF OUT to the analyzer INPUT. 615 Corrupted file The file that you were trying to load is corrupt. 610 File access is denied The file is protected or hidden and cannot be accessed. 604 File already exists Attempt to save to a file that already exists. Delete or rename the old file and try again. 4-36 Chapter 4 Troubleshooting 201 to 799: Device-Specific Errors 607 File Name Error An invalid file name has been specified. Use filenames with a maximum of 8 characters (letters and digits only) and use a 3 character extension. Note that lowercase and uppercase are perceived as the same. This error will also occur if you attempt to delete a nonexistent file. 612 File not found The analyzer could not find the specified file. 613 Flash memory is full The internal flash memory is full. Clear some space by deleting unwanted files. You may also increase the flash memory size by purchasing Option B72. 602 Floppy disk error An unknown error has occurred while accessing the floppy disk. 601 Floppy disk full The floppy disk is full. Clear some space by deleting unwanted files. 618 Illegal write access of Flash memory Attempt to write to an unavailable area of internal flash memory. 727 In <filename>: [DATA] header missing This message indicates that the data section of a file did not begin with the token [DATA]. 728 In <filename>, line <nnn>: separator missing The [HEADER] section of a file contains entries requiring an equal (=) sign, such as <keyword> = <value>. This message appears if the equal sign does not appear on the line. Chapter 4 4-37 Troubleshooting 201 to 799: Device-Specific Errors 729 In <filename>: error reading file Appears when loading data from a limit line or corrections disk file and a failure to the file occurs. 730 In <filename>, line <numeric_value>: line too long When loading data from a limit line or corrections disk file, this message will appear if the length of any line in the file exceeds 255 characters. 731 In <command>: bad data count (<numeric_value>): expected multiple of <numeric_value> This message indicates that the data sent to a corrections or limit table via the DATA or MERGE commands does not have the expected length for the table. For example, this message would appear if an attempt were made to merge 7 numeric values into a limit table, since each logical entry requires 3 values (frequency, amplitude, and connected). 732 In <filename>, line <numeric_value>: error parsing tokens This message may appear when loading data from a limit line or corrections disk file. It indicates a problem in the attempt to break a string of text into tokens. There may be too few tokens in the string. This typically happens when there are too few numeric values in the [DATA] section of a limit or corrections file. 733 In <filename>, line <numeric_value>: <xxx> is not numeric This message may appear when loading data from a limit line or corrections disk file. It indicates that a non-numeric token <xxx> was found where a numeric token was expected. 735 In <filename>: bad amplitude unit <unit> This message indicates that unit <unit> is not recognized or supported. 4-38 Chapter 4 Troubleshooting 201 to 799: Device-Specific Errors 763 Incorrect filename, allowable extensions are .gif or .wmf Attempt to save a screen image to a file with an incorrect extension. 762 Incorrect filename, allowable extensions are .trc or .csv Attempt to save a trace to a file with an incorrect extension. 770 Instrument mode requested is not supported Instrument mode specified with: INST command is not valid. Refer to Chapter 5, “Instrument Subsystem” of Agilent Technologies ESA Series Spectrum Analyzers Programmer’s Guide for more information. 751 Instrument state may be corrupt, state has been reset to initial values An error in the internal instrument state has been detected. The state has been reset to a default value. 734 Interpolation error: cannot compute log of <negative_frequency_value> Occurs when the frequency interpolation of a limit line is set to log and the start frequency of the instrument is negative. The <negative_frequency_value> is limited to – 80 MHz, so it may not match the frequency that caused the error. 216 Invalid Baud Rate Attempt to use invalid baud rate. Refer to Chapter 5, “Instrument Subsystem” of Agilent Technologies ESA Series Spectrum Analyzers Programmer’s Guide for more information. Chapter 4 4-39 Troubleshooting 201 to 799: Device-Specific Errors 769 Invalid instrument mode You have attempted to switch to an instrument mode that is currently not installed. Confirm that the mode name (for INST:SEL) or number (for INST:NSEL) was entered correctly and that the requested personality is actually installed in the instrument. 221 Invalid option, unable to uninstall package You have attempted to remove a personality that is not currently installed. Verify command was entered correctly. 701 Invalid printer response In attempting to identify the printer an invalid response was received. Check that you are using a supported printer. Be sure you are using the proper cable and that it is securely fastened. 606 Media is corrupt A save was attempted to a corrupt device. 609 Media is not writable A save was attempted to a read-only device. 605 Media is protected A save was attempted to a write-protected device. 202 No peak found No signal peak was found. 201 Option not installed The desired operation cannot be performed because a required option is not installed. For example, pressing Source with no tracking generator installed in the analyzer will generate this error. 4-40 Chapter 4 Troubleshooting 201 to 799: Device-Specific Errors 224 Option not licensed. The selected option requires a license. Refer to the installation procedures in the user’s guide available for this particular option. 209 Preselector centering failed An attempt to center the preselector failed. 704 Printer interface error An error occurred while trying to print. Make sure the printer is turned on and properly connected. 705 Printer Type is None The current printer type is set to None, so no print operations are possible. Change the type in the Print Setup menu and try again. 211 RBW limited to 1kHz when Span > 5MHz In spans greater than 5 MHz, narrow (digital) resolution bandwidths, below 1 kHz, are not available. 217 RS-232 Interface Error An error occurred on the serial interface. 213 Span limited to 5MHz when RBW < 1kHz In narrow (digital) resolution bandwidths, below 1 kHz, spans greater than 5 MHz are not available. 771 Store Ref trace before turning on Normalize A reference trace must be available for the Normalize function to be activated. Refer to “View/Trace” on page 6-105 where the Normalize key function is explained in detail. Chapter 4 4-41 Troubleshooting 201 to 799: Device-Specific Errors 223 Trigger Offset unavailable in swept spans Trigger Offset is only available in Zero Span. Refer to “Trig” on page 6-100 for a description of this function. 215 TG start freq is less than 1/2 res bw TG uncalibrated at start frequencies below 1/2 the current resolution bandwidth. 214 TG start freq is less than 9kHz TG uncalibrated below 9 kHz. 204 TG Frequency Limit The tracking generator has reached the limit of its allowable frequency range. 736 Too many data values at <freq_or_time_value> This message may appear when data is sent to a corrections or limit table using the DATA or MERGE commands. These tables limit the number of amplitudes associated with a frequency or time to 2 or less. This message will appear if an attempt is made to attach 3 or more values to a frequency or time. 206 Unable to initialize flatness data A failure occurred in setting the flatness data in the internal EEROM. Contact your local Agilent Technologies sales and service office. 762 Unable to load file A failure occurred while loading a file; the file was not loaded. 759 Unable to load state saved from firmware Rev A.03.00 A saved state file from a newer firmware revision was attempted to be loaded into an older instrument. 4-42 Chapter 4 Troubleshooting 201 to 799: Device-Specific Errors 752 Unable to load state from file Loading of state from a file failed. 755 Unable to load state from register Loading a state from an internal state register failed. 757 Unable to load user state, factory preset was done An attempt to perform a User Preset failed, so the Factory Preset values were used. Save a valid state into User Preset and try again. 760 Unable to query state Query of state over the remote interface was unsuccessful. 764 Unable to save file A failure occurred while saving a file; the file was not saved. 756 Unable to save state to register Saving of state to an internal register failed. 753 Unable to save state to file Saving of state to a file failed. 758 Unable to save user state An attempt to save to the User Preset state failed. 761 Unable to set state Attempt to set the state over the remote interface was unsuccessful. Chapter 4 4-43 Troubleshooting 201 to 799: Device-Specific Errors 207 Unable to store flatness data A failure occurred in setting the flatness data in the internal EEROM. Contact your local Agilent Technologies sales and service office. 703 Unknown printer In attempting to identify the printer, a valid response was received but the printer is not known to the analyzer. Use the Custom printer menu under Print Setup to configure the printer. 702 Unsupported printer A printer which is recognized, but known to be unsupported was identified. This printer cannot be used with the analyzer. For example, a printer only supported by Microsoft Windows will generate this error. 617 Wrong density floppy inserted The floppy disk has the wrong density. It should be 1.44 MB. 4-44 Chapter 4 Greater than 1000: Troubleshooting Personality Specific Error Messages Greater than 1000: Personality Specific Error Messages An error detected with a number greater than 1000 indicates the instrument has detected an error relating to an installed personality. For more information on these errors, refer to the user’s guide for the personality in use. 10219 Awaiting trigger A trigger event from the selected trigger source has not been detected. 10164 Band Measurement not defined for Out of Band. User is attempting to monitor the band but has set the frequency outside the band. Reset the band for the particular standard for which you are testing or use the channel setting which does not require a frequency to be set. (Meas Setup, Method (Channel)). 10228 Cannot correlate to input signal. This error is normally generated because of one of the following reasons: 1. There is no carrier signal. 2. Walsh channels other than the pilot are active. 3. There is some other modulation problem that will prevent the measurement from being made. This problem must be corrected before the measurement can continue. 10163 Cannot find the Power vs Time Limits File. The limit line definition file for the GSM standards has been deleted. This message is displayed while the Measure key is grayed out. Reinstall the GSM measurement personality. 10166 Cannot update the list of cable types. The cable file may have been moved or deleted accidentally. Reinstall the GSM measurement personality. Chapter 4 4-45 Troubleshooting Greater than 1000: 10168 Personality Specific Error Messages Cannot update the list of cable types on drive C: The file update failed. 10179 Carrier Present. Test Stopped! A carrier was found in the transmit band. Either disable the carrier or insert a bandpass filter for the receive bandwidth. 10153 DSP algorithm timeout, aborting measurement The Digital Signal Processor demodulation algorithm timed-out for an unknown reason. This message normally indicates a problem with the modulated signal. 10230 DSP timed out, resetting DSP. Digital Signal Processor was unable to finish the selected measurement within the given period of time. Restart the measurement. 10264 Emission bandwidth not found. Consider increasing span. This error is normally generated when attempting occupied bandwidth measurements. The “X dB” value you entered (Meas Setup, Emis BW X dB) to calculate the emission bandwidth is the difference between the highest point on the trace and the point “X dB” down on either side of the maximum. If the actual difference is less than the value entered, the emission bandwidth cannot be computed. Some responses to this situation are as follows: 1. Connect a signal to the input. (If there is no signal present, the difference between the trace minimum and maximum will generally be less than “X dB”.) 2. Increase the span. (If the signal is wide, the shoulders of the signal might not be present on the screen, and again, the difference between the trace minimum and maximum will be less than “X dB”.) 4-46 Chapter 4 Greater than 1000: Troubleshooting Personality Specific Error Messages 3. Center the signal. (There must be a point on the trace that is “X dB” down from the maximum on both sides of that maximum.) 10246 Error reading file: CDMASTUN.CSV. Please reinstall cdmaOne. The file is missing or corrupt. Please reinstall the cdmaOne personality. 10247 Error reading file: CDPDMDA. Please reinstall the cdmaOne. The file is missing or corrupt. Please reinstall the cdmaOne personality. 10248 Error reading file: CDPPMCO. Please reinstall the cdmaOne. The file is missing or corrupt. Please reinstall the cdmaOne personality. 10249 Error reading file: CDPPMDA. Please reinstall cdmaOne. The file is missing or corrupt. Please reinstall the cdmaOne personality. 10256 Error reading file: OOBSTAB.CSV. Use Edit Table | Save Table. This error is generated when you try to load a table (using the Load Table key on page 2 of the edit table form menu) before a table has been saved. You must first save a table using the Save Table key before trying to load a table using the Load Table key. 10250 Error reading file: RHODMDA. Please reinstall cdmaOne. The file is missing or corrupt. Please reinstall the cdmaOne personality. Chapter 4 4-47 Troubleshooting Greater than 1000: 10251 Personality Specific Error Messages Error reading file: RHOPMCO. Please reinstall cdmaOne. The file is missing or corrupt. Please reinstall the cdmaOne personality. 10245 Error reading file: SPCLIMIT.CSV. Cannot use custom limits. The file could be missing or corrupt. Create a new limits file. Alternatively, the actual limits defined in the file might not allow the measurement to be executed. Redefine the limits or use the default limits. Restart the measurement. 10180 Gate option not installed. Results may not be accurate. This measurement method requires the use of the time-gate (option 1D6) in order to gate the spectrum during the 50-90% part of the burst. If the gate option is not installed, the measurement will still run although this warning will be displayed. 10218 Hardkeys are disabled. Some of the forms (for example Receiver Spurious in GSM) do not allow the user to close the form without either formally accepting or cancelling the form settings. For this reason, all of the hardkeys are disabled until the user terminates the form. 10233 Level is low, results may degrade. The signal being measured is of low power. The results may not be as accurate as they would be if the signal was stronger. 10152 Lost trigger, aborting measurement. The selected trigger source was present at the start of the measurement, but timed out before the measurement completed. 4-48 Chapter 4 Greater than 1000: 10161 Troubleshooting Personality Specific Error Messages Lower Custom Mask is Invalid! The user-specified lower custom mask cannot be resolved into a limit line. 10231 Measurement failed for unknown reasons. Check instrument settings and restart measurement. 10154 Measurement not defined for Out of Band. User has changed to an out-of-band frequency range. The band measurement only operates in the selected band. 10227 Measurement suspended until carrier is turned off. The receive channel power and the receive spur measurements are specified with the attenuation set to 0 dB. To prevent overload, the frequency spectrum of interest is monitored for signal levels which exceed a specified threshold before setting the attenuator to 0 dB. If a carrier is found, this message is displayed and the completion of the measurement will not occur until the carrier is removed. The carrier check may be turned off using the properties form under the front-panel Mode Setup key. You may also change the signal threshold which determines a carrier on the properties form. 10155 No Fast ADC hardware installed. Meas unavailable. The analyzer cannot use sweep times of less than 5 msec when (Option B7D or Option AYX) is not installed. Therefore the measurement will not be executed. 10147 Opt B7D bootrom requires upgrade. The (Option B7D) bootrom revision is not supported by the currently loaded personality version. Refer to the user’s guide for the personality in use. Chapter 4 4-49 Troubleshooting Greater than 1000: 10149 Personality Specific Error Messages Opt BAH DSP algorithm code file requires upgrade. The Digital Signal Processing algorithm code file revision is not supported by the currently loaded personality version. Refer to the user’s guide for the personality in use for more information on installation/upgrade. 10150 Opt BAH DSP algorithm coef. file requires upgrade. The Digital Signal Processor algorithm coefficient file revision is not supported by the currently loaded personality version. Refer to the user’s guide for the personality in use. 10151 Opt BAH DSP algorithm files failed to load, aborting measure. The Digital Signal Processor algorithm files required to perform the demodulation are corrupt and cannot be loaded properly. Reinstall measurement personality. 10148 Opt BAH DSP algorithm files not installed. Meas unavailable. The Digital Signal Processor algorithm files required to perform the demodulation are not present in the analyzer. 10145 Opt AYX hardware required. Meas unavailable. Option AYX must be installed for this measurement to be enabled. 10146 Opt B7D & B7E hardware required. Meas unavailable. The (Option B7E) and (Option B7D) cards required to perform the demodulation are not present in the analyzer. 4-50 Chapter 4 Greater than 1000: 10239 Troubleshooting Personality Specific Error Messages Opt Freq Ref setting does not match external reference. This message is generated if Source is set to External on the properties form under the front-panel Mode Setup key and the frequency on the same form is set to a frequency that does not match the frequency of the signal being used as the external reference. 10232 RF Signal not found. This message is generated if there is no signal at the center frequency that is greater than 10 dB above the displayed average noise level. 10241 RF Board could not detect any bursts in signal. This message is generated when the trigger is set to RF Burst and (Option B7E) cannot detect a burst. 10237 RF Board LO Unlocked. Contact service center. This message occurs if the local oscillator on the (Option B7E) is in an unlocked state. This indicates broken hardware. 10240 RF Board RF Osc Unlocked. Contact service center. This message occurs if the reference oscillator on the (Option B7E) is in an unlocked state. This indicates broken hardware. 10238 RF Board SR Osc Unlocked. Contact service center. This message occurs if the sample rate oscillator on Option B7E is in an unlocked state. This indicates broken hardware. 10162 Resolution BW<300kHz. This error message is a warning that the resolution bandwidth has been set below 300 kHz. The test results will not meet GSM specifications. Chapter 4 4-51 Troubleshooting Greater than 1000: 10172 Personality Specific Error Messages Sweep Time too fast(<2sec) The sweep time must be set to 2 seconds or longer for the results to be valid. 10141 Sync word not found in frame (Burst Type) One or more active GSM bursts that match the selected Burst Type have been detected in the RF Input signal, but none contain the selected Training Sequence Code (TSC). The search was performed over the complete GSM frame. 10143 Sync word not found in frame (Ref Burst) One or more active GSM bursts that match the selected Burst Type have been detected in the RF Input signal, but none contain the selected Training Sequence Code (TSC). The search was only performed using the Reference Burst type and Reference TSC settings over the complete GSM frame. 10142 Sync word not found in specified timeslot (Burst Type) One or more active GSM bursts that match the selected Burst Type have been detected in the RF Input signal, but none contain the selected Training Sequence Code (TSC). The search was only performed over the specified timeslot setting. 10259 Table could not be loaded. When trying to load a table, the previous table has been somehow corrupted. Use the Save Table key to save a valid table. Then edit the valid table, save it, and try to load it again. 10259 Table could not be saved. This message occurs if C: drive is full or corrupt. Check the amount of space left on the drive. 4-52 Chapter 4 Greater than 1000: 10170 Troubleshooting Personality Specific Error Messages The Cable Fault Measurement is active. Mode Setup is disabled. Mode setup is not available in the cable fault utility. 10177 There are no spurs to inspect. The user has attempted to switch the Inspect Spur softkey to the On position after the measurement has finished, but found no spurs. 10229 The regression portion failed. This message occurs when (Option B7D) is not functioning properly. Demodulation measurements (modulation accuracy and code domain) might fail as a result of this error. 10157 Tracking Generator hardware is not present. Meas unavailable. The measurement requires a built-in tracking generator. Unable to uninstall personality, file not deletable. This message occurs when you try to delete a personality which has been marked as non-deletable. The personality is marked non-deletable at the factory. Contact your nearest service center for further problems. 10144 Unknown demod status. Demodulation is in an unknown state. Press Preset. If the error persists, contact your service center. 10160 Upper Custom Mask is Invalid! The user-specified upper custom mask cannot be resolved into a limit line. The format is incorrect. Chapter 4 4-53 Troubleshooting Greater than 1000: 10138 Personality Specific Error Messages Valid GSM burst not found in frame (Burst Type). No active GSM bursts that match the selected Burst Type have been detected in the RF input signal. The search was performed over the complete GSM frame. 10140 Valid GSM burst not found in frame (Ref Burst). No active GSM bursts that match the selected Burst Type have been detected in the RF input signal. The search was performed using the Ref Burst type setting over the complete GSM frame. 10139 Valid GSM burst not found in specified timeslot (Burst Type). No active GSM bursts that match the selected Burst Type have been detected in the RF input signal. The search was only performed over the specified timeslot setting. 4-54 Chapter 4 5 Menu Maps This chapter provides a visual representation of the front panel keys and their associated menu keys. Refer to the Chapter 6 , “Front-Panel Key Reference” for key function descriptions. 5-1 Menu Maps What You Will Find in This Chapter What You Will Find in This Chapter This chapter provides menu maps for the front-panel keys having associated menus. The Alpha Editor Menus are associated with both the Display and File keys, but they are shown separately. The front-panel key menus appear in alphabetical order as follows: Table 5-1 Alpha Editor Menus Page 5-3 AMPLITUDE Y Scale Page 5-4 BW/Avg Page 5-5 Det/Demod Page 5-6 Display Page 5-7 File Page 5-8, 5-9, 5-10 Freq Count Page 5-11 FREQUENCY Channel Page 5-12 Input/Output Page 5-13 Marker Page 5-14 Marker → Page 5-15 Meas Control Page 5-16 Meas Setup Page 5-17 MEASURE Page 5-18 Peak Search Page 5-19 Preset Page 5-20 Print Setup Page 5-21 Source Page 5-22 SPAN X Scale Page 5-23 Sweep Page 5-24 System Page 5-25 Trig Page 5-26 View/Trace Page 5-27 5-2 Chapter 5 Menu Maps What You Will Find in This Chapter Chapter 5 5-3 Menu Maps What You Will Find in This Chapter 5-4 Chapter 5 Menu Maps What You Will Find in This Chapter Chapter 5 5-5 Menu Maps What You Will Find in This Chapter 5-6 Chapter 5 Menu Maps What You Will Find in This Chapter Chapter 5 5-7 Menu Maps What You Will Find in This Chapter 5-8 Chapter 5 Menu Maps What You Will Find in This Chapter Chapter 5 5-9 Menu Maps What You Will Find in This Chapter 5-10 Chapter 5 Menu Maps What You Will Find in This Chapter Chapter 5 5-11 Menu Maps What You Will Find in This Chapter 5-12 Chapter 5 Menu Maps What You Will Find in This Chapter Chapter 5 5-13 Menu Maps What You Will Find in This Chapter 5-14 Chapter 5 Menu Maps What You Will Find in This Chapter Chapter 5 5-15 Menu Maps What You Will Find in This Chapter 5-16 Chapter 5 Menu Maps What You Will Find in This Chapter Chapter 5 5-17 Menu Maps What You Will Find in This Chapter 5-18 Chapter 5 Menu Maps What You Will Find in This Chapter Chapter 5 5-19 Menu Maps What You Will Find in This Chapter 5-20 Chapter 5 Menu Maps What You Will Find in This Chapter Chapter 5 5-21 Menu Maps What You Will Find in This Chapter 5-22 Chapter 5 Menu Maps What You Will Find in This Chapter Chapter 5 5-23 Menu Maps What You Will Find in This Chapter 5-24 Chapter 5 Menu Maps What You Will Find in This Chapter Chapter 5 5-25 Menu Maps What You Will Find in This Chapter 5-26 Chapter 5 Menu Maps What You Will Find in This Chapter Chapter 5 5-27 6 Front-Panel Key Reference The front-panel keys in this chapter are listed alphabetically and are described with their associated menu keys. The menu keys are arranged as they appear in your analyzer menus. Use the following table to locate a specific key. 6-1 Front-Panel Key Reference Key Label Page Location Key Label Page Location < Display Line page 6-64 Auto Align page 6-93 > Display Line page 6-64 Auto Couple page 6-13 1↔2 page 6-105 Average On Off page 6-15 1→3 page 6-105 page 6-15 2→3 page 6-106 Average Type Video Power 2↔3 page 6-106 Avg Number On Off page 6-53 2 – DL → 2 page 6-106 Band Pair Start Stop page 6-45 ACP page 6-54 Band Power page 6-60 Adj Chan BW page 6-51 Bitmap page 6-29 Align Now page 6-94 Blank page 6-105 Alignments page 6-93 BW/Avg page 6-14 All page 6-94 Cable page 6-10 All but RF page 6-93 Cable page 6-29 AM page 6-17 Center Freq page 6-37 Amplitude page 6-11 CF Step Auto Man page 6-37 Amplitude page 6-22 Chan Pwr Span page 6-51 AMPLITUDE Y Scale page 6-8 Chan Spacing page 6-51 Amplitude On Off page 6-76 Change Title page 6-24 Amptd Interp Log Lin page 6-23 Channel Power page 6-54 Amptd Offset page 6-77 Clear Error Queue page 6-92 Amptd Ref (f = 50 MHz) On Off page 6-40 Clear Title page 6-24 Clear Write page 6-105 Amptd Ref Out (f=50 MHz) On Off page 6-40 Coarse page 6-94 Color Capable Yes No page 6-70 Amptd Step Auto Man page 6-77 Color On Off page 6-71 Annotation On Off page 6-24 Color Palette page 6-95 Antenna page 6-10 Connected No Yes page 6-22 Antenna page 6-29 Continuous Pk On Off page 6-62 Attenuation Auto Man page 6-8 Copy page 6-33 Attenuation Auto Man page 6-77 Correction On Off page 6-10 Auto page 6-70 6-2 Chapter 6 Front-Panel Key Reference Key Label Page Location Key Label Page Location Corrections page 6-9 Emiss BW X dB page 6-52 Corrections page 6-33 Emission BW page 6-55 Corrections On Off page 6-9 Enter page 6-25 Counter Zoom On Off page 6-53 Entire Frame page 6-101 Coupling AC DC page 6-40 Esc page 6-26 CSV page 6-29 Ext Amp Gain page 6-12 Custom page 6-70 Ext Mix Band page 6-41 Date Mode MDY DMY page 6-93 Ext Video In page 6-102 Define Custom page 6-70 External Pos Neg page 6-100 Default page 6-95 Field page 6-101 Delete page 6-32 Field One page 6-102 Delete Limits page 6-20 Field Two page 6-102 Delete Point page 6-12 File page 6-27 Delete Point page 6-23 Fine page 6-94 Delta page 6-44 FM page 6-17 Delta page 6-60 FM Demod page 6-94 Demod page 6-17 Format page 6-29 Demod Time page 6-18 Free Run page 6-100 Demod View On Off page 6-18 Freq Correct On Off page 6-94 Det/Demod page 6-17 Freq Count page 6-36 Detector page 6-17 Freq Interp Log Lin page 6-23 Diagnostics page 6-96 Freq Offset page 6-37 Display page 6-19 Frequency page 6-11 Display Line On Off page 6-19 Frequency page 6-22 EBW Span page 6-52 FREQUENCY Channel page 6-37 Edge Setup page 6-85 Front Panel Test page 6-96 Edge Pos Neg page 6-85 Full Screen page 6-19 Edit page 6-22 Full Span page 6-78 Eject Page page 6-71 Function page 6-46 EMI Res BW page 6-16 Function page 6-60 Chapter 6 6-3 Front-Panel Key Reference Key Label Page Location Key Label Page Location Gate Delay page 6-85 Load page 6-30 Gate Length page 6-85 Load Defaults page 6-94 Gate On Off page 6-84 (Local) page 6-92 Gate Setup page 6-84 Low page 6-85 Graticule On Off page 6-24 Main Chan BW page 6-51 Harmonic Auto Man page 6-42 Man Track Adj page 6-77 Harmonic Dist page 6-55 Margin On Off page 6-21 Harmonics page 6-53 Marker page 6-44 Help page 6-39 Marker → page 6-49 High page 6-85 Marker All Off page 6-48 Image Shift page 6-42 Marker Count On Off page 6-36 Image Suppress page 6-41 Marker Noise page 6-61 Input/Output page 6-40 Marker Table On Off page 6-48 Input Mixer page 6-40 Marker Trace Auto 1 2 3 page 6-45 Input Mixer Int Ext page 6-40 Max Hold page 6-105 Input Z Corr 50 Ω 75 Ω page 6-40 Max Hold On Off page 6-52 Install page 6-99 Max Mixer Lvl page 6-12 Int Preamp On Off page 6-9 Meas Control page 6-50 Integration BW page 6-51 Meas Off page 6-54 Inverse Time page 6-46 Meas Setup page 6-51 Landscape page 6-71 Meas Tools page 6-60 Language PCL3 PCL5 page 6-70 MEASURE page 6-54 Last Span page 6-79 Measure Cont Single page 6-50 Level Setup page 6-85 Metafile page 6-29 Limit 1 2 page 6-21 Min Hold page 6-105 Limit On Off page 6-21 Min Search page 6-62 Limits page 6-19 Mixer Bias On Off page 6-42 Limits page 6-19 Mixer Config page 6-42 Limits Fixed Rel page 6-20 Mixer Type Presel Unpre page 6-42 Line page 6-100 Mkr → CF page 6-49 6-4 Chapter 6 Front-Panel Key Reference Key Label Page Location Key Label Page Location Mkr → CF Step page 6-49 Other page 6-29 Mkr → Ref Lvl page 6-49 Pause page 6-50 Mkr → Start page 6-49 Peak page 6-17 Mkr → Stop page 6-49 Peak Excursn page 6-63 Mkr ∆ → Span page 6-49 Peak Readout page 6-64 MODE page 6-57 Peak Search page 6-60 Modify page 6-11 Peak Search Param Max page 6-64 Modify page 6-21 Peak Sort Freq Ampl page 6-64 Monochrome page 6-96 Peak Table page 6-64 N dB Points On Off page 6-62 Peak Table On Off page 6-64 Negative Peak page 6-17 Period page 6-46 Next Peak page 6-62 Pk-Pk Search page 6-62 Next Pk Left page 6-62 Pk Threshold page 6-63 Next Pk Right page 6-62 Point page 6-10 Next Window page 6-59 Point page 6-22 None page 6-70 Points page 6-85 Norm Ref Lvl page 6-107 Portrait page 6-71 Norm Ref Posn page 6-107 Power On Last Preset page 6-92 Normal page 6-44 Power On/Preset page 6-92 Normal page 6-64 Power Sweep On Off page 6-76 Normalize page 6-106 Preferences page 6-24 Normalize On Off page 6-106 Presel Adjust page 6-9 OBW Span page 6-52 Presel Center page 6-9 Occ BW % Pwr page 6-52 Preset page 6-65 Occupied BW page 6-55 Print page 6-69 Occupied Pwr page 6-52 Print Setup page 6-70 Operations page 6-105 Printer Type page 6-70 Optical Filter page 6-96 Prints/Page 1 2 page 6-71 Orientation page 6-71 Properties page 6-19 Other page 6-10 Readout page 6-46 Chapter 6 6-5 Front-Panel Key Reference Key Label Page Location Key Label Page Location Ref Lvl Offst page 6-9 Show System page 6-95 Ref Level page 6-8 Signal ID Mode page 6-41 Remote Port page 6-95 Signal Ident On Off page 6-41 Rename page 6-34 Signal Track On Off page 6-38 Resolution Auto Man page 6-36 Single Sweep page 6-75 Resolution BW Auto Man page 6-14 Source page 6-76 Restart page 6-50 Span page 6-78 Restore Sys Defaults page 6-96 Span Pair Span Center page 6-45 Return page 6-73 SPAN X Scale page 6-78 Reverse Bitmap page 6-29 Span Zoom page 6-78 Reverse Metafile page 6-29 Speaker On Off page 6-18 RF (Ext Cable) page 6-94 ST/Harmonic Auto Man page 6-53 SA page 6-102 Standard page 6-102 Sample page 6-17 Standby page 6-82 Save page 6-74 Start Freq page 6-37 Save page 6-74 State page 6-28 Scale/Div page 6-8 Stop Freq page 6-37 Scale Type Log Lin page 6-8 Sweep page 6-83 Screen page 6-28 Sweep Cont Single page 6-84 Search page 6-60 Sweep Time Auto Man page 6-83 Search Param page 6-63 Swp Coupling SR SA page 6-84 Segmented Sweep page 6-86 Sync Pos Neg page 6-102 Select page 6-11 System page 6-92 Select Marker 1 2 3 4 page 6-45 Test On Off page 6-21 Service page 6-99 TG (Ext Cable) page 6-94 Set Date page 6-93 Time page 6-46 Set Time page 6-93 Time/Date page 6-93 Setup page 6-28 Time/Date On Off page 6-93 Show Errors page 6-92 Time Base page 6-94 Show Hdwr page 6-95 Title page 6-24 6-6 Chapter 6 Front-Panel Key Reference Key Label Page Location Key Label Page Location Trace page 6-105 Zone Span page 6-80 Trace + State page 6-28 Zoom page 6-108 Trace 1 2 3 page 6-105 Tracking Peak page 6-77 Trig page 6-100 Trig Delay On Off page 6-103 Trig Type Edge Level page 6-84 TV page 6-100 TV Monitor page 6-102 TV Source page 6-102 TV Trig Setup page 6-101 Type Upper Lower page 6-21 User page 6-10 User page 6-29 VBW/RBW Ratio page 6-14 Video page 6-100 Video BW Auto Man page 6-14 View page 6-105 View/Trace page 6-105 Viewing Angle page 6-104 Vision Impair 1 page 6-95 Vision Impair 2 page 6-95 X Axis Units Freq Time page 6-19 Y Axis Units page 6-9 Zero Span page 6-78 Zone page 6-79 Zone Center page 6-80 Zone On Off page 6-79 Zone Pk Left page 6-81 Zone Pk Right page 6-81 Chapter 6 6-7 Front-Panel Key Reference AMPLITUDE Y Scale AMPLITUDE Y Scale Activates the reference level function and accesses the amplitude menu keys. Amplitude menu keys allow you to set functions that affect the way data on the vertical axis is displayed or corrected. Ref Level Allows the reference level to be changed. This function is activated when AMPLITUDE Y Scale is pressed. The reference level is the amplitude power or voltage represented by the top graticule on the display. Changing the value of the reference level changes the absolute amplitude level (in the selected amplitude units) of the top graticule line. The reference level can be changed using the step keys, the knob, or the numeric keypad. Pressing any digit (0 through 9) on the numeric keypad brings up the terminator menu. Attenuation Auto Man Sets the input attenuation in 5 dB increments. The analyzer input attenuator, which is normally coupled to the reference level control, reduces the power level of the analyzer input signal at the input mixer. The attenuator is recoupled when Attenuation (Auto) is selected. Attenuation can be changed using the step keys, the knob, or the numeric keypad. CAUTION To prevent damage to the input mixer, do not exceed a power level of +30 dBm at the input. To prevent signal compression, keep the power at the input mixer below 0 dBm. With the attenuator set to Auto, a signal at or below the reference level will result in a mixer level at or below the Max Mixer Lvl. Scale/Div Sets the logarithmic units per vertical graticule division on the display. The Scale/Div function is only available when the Scale Type key is set to Log. Scale/Div values may range from 0.1 to 20 dB per division (With Option BAA, the range is 1 kHz to 240 kHz/div when FM Demod View is enabled.) Scale Type Log Lin Scales the vertical graticule divisions in logarithmic units when Log is underlined. Logarithmic units may range from 0.1 to 20 dB per division. When Lin is underlined, the vertical divisions are linearly scaled and the default amplitude units are volts. The reference-level value is set to the top of the display and the bottom graticule becomes zero volts. (Each division of the graticule is one-tenth of the reference level in volts.) Pressing Scale Type Log Lin always sets the units specified for the current amplitude scale. Pressing Preset or powering on the analyzer sets the default units. 6-8 Chapter 6 Front-Panel Key Reference AMPLITUDE Y Scale Presel Center Agilent E4404B, E4405B, E4407B and E4408B only. Adjusts the frequency of the preselector filter to optimize the amplitude accuracy at the active marker frequency. With Input Mixer (Ext) selected, Presel Center adjusts the frequency of the external preselector filter to maximize the amplitude at the active marker frequency. If activated in a non-preselected band, Presel Center does nothing. Presel Adjust Agilent E4404B, E4405B, E4407B and E4408B only. Allows manual adjustment of the preselector frequency to optimize its response on the signal of interest. Y Axis Units Accesses the menu keys that change the amplitude units. Amplitude units are maintained for both logarithmic and linear modes. The amplitude units can be changed by pressing dBm, dBmV, dBµV, Volts, or Watts. Key Access: AMPLITUDE Y Scale, More 1 of 2 Ref Lvl Offst Adds an offset value to the displayed reference level. Reference-level offsets are only entered by using the numeric keypad. Entering an offset does not affect the trace or the attenuation value. Reference-level offsets are used when gain or loss occurs between a device under test and the analyzer input. Thus, the signal level measured by the analyzer may be referred to as the level at the input of an external amplitude-conversion device. When an amplitude offset is entered, its value appears on the left side of the display under Offst (as opposed to frequency offsets which appear at the bottom of the display). To eliminate an offset, press Ref Lvl Offst, 0, dB. Pressing Preset also sets the offset to zero. See also the Ext Amp Gain key description. Key Access: AMPLITUDE Y Scale, More 1 of 2 Int Preamp On Off Agilent ESA-E Series only (E4401B, E4402B, E4404B, E4405B and E4407B) with Option 1DS. Turns the internal preamp on and off. Pressing Int Preamp (On) results in a correction being applied to compensate for the gain of the preamp, so that amplitude readings show the value at the input connector. The preamp is switched off in frequency bands above 3 GHz and the correction not applied. When the preamp is on, a PA indication appears on the left side of the display. Key Access: AMPLITUDE Y Scale, More 1 of 2 Corrections Accesses the Corrections On Off and Modify keys. Pressing Corrections (On) turns on the amplitude-correction factors. Corrections will only be applied to the sets of correction factors whose correction state is set to On. To turn a set of correction factors on, use the Correction On Off key in the Modify menu. When Corrections (On) is selected, an A will appear on the screen annotation whether or not a correction set has been turned on using the Correction (On) key in the Modify menu. Pressing Modify accesses the following menu of keys that will allow you to create or modify an amplitude-correction factors table. Key Access: AMPLITUDE Y Scale, More 1 of 2 Chapter 6 6-9 Front-Panel Key Reference AMPLITUDE Y Scale Select Selects which set of correction factors is to be modified. Once the selection has been made, the menu automatically returns to the previous menu. Pressing Return will return you to the previous menu without making a selection. Key Access: AMPLITUDE Y Scale, More 1 of 2, Corrections, Modify Antenna Allows you to correct for antenna loss, but may be used for any kind of correction. Key Access: AMPLITUDE Y Scale, More 1 of 2, Corrections, Modify, Select Cable Allows you to correct for cable loss, but may be used for any kind of correction. Key Access: AMPLITUDE Y Scale, More 1 of 2, Corrections, Modify, Select Other Allows you to correct for gain or loss other than those for antenna, cable, or user. Key Access: AMPLITUDE Y Scale, More 1 of 2, Corrections, Modify, Select User Allows you to correct for gain or loss and may be used for any kind of correction. Key Access: AMPLITUDE Y Scale, More 1 of 2, Corrections, Modify, Select Correction On Off Edit Turns the amplitude correction function on or off for the selected set. The corrections state must be set to On for the correction to be applied. Key Access: AMPLITUDE Y Scale, More 1 of 2, Corrections, Modify Accesses menu keys that allow you to create and edit an amplitude-correction factor set. It puts the analyzer into a split-screen mode where the correction data is displayed in a table under the trace data. Pressing ESC while in this menu will exit the menu and remove the table from the screen. New points will be applied only after the editor is closed. The Tab keys are very useful for navigation between rows in the corrections table. Key Access: AMPLITUDE Y Scale, More 1 of 2, Corrections, Modify 6-10 Chapter 6 Front-Panel Key Reference AMPLITUDE Y Scale Point Allows you to create or edit an amplitude-correction factor data point. Up to 200 points may be defined for each set. Enter the point number to be created or edited by using the numeric keypad, then press Enter, or use the knob, Tab, or step keys to move to an existing point. Press Bk Sp to correct errors. After selecting a point, Frequency becomes active. Key Access: AMPLITUDE Y Scale, More 1 of 2, Corrections, Modify, Edit Frequency Allows you to enter the frequency value for an amplitude-correction point. Enter the frequency value by using the numeric keypad. Change the frequency value by using the step keys or the knob. Press Bk Sp to correct errors. After selecting a point, Amplitude becomes active. NOTE The amplitude correction entered for the lowest frequency will be applied to all frequencies less than the lowest frequency entered. Similarly, the amplitude correction for the highest frequency entered will be applied to all frequencies greater than the highest frequency entered. A frequency coordinate must always be specified for amplitude-correction factors. Key Access: AMPLITUDE Y Scale, More 1 of 2, Corrections, Modify, Edit NOTE For amplitude-correction factors, a maximum of two entries with the same frequency are valid. Only the first and last points of a series with the same frequency values are used; any middle points are ignored. NOTE Amplitude-correction data is sorted in the table by frequency. The sorting occurs immediately after you have entered the frequency value via the front-panel. Amplitude Allows you to enter the amplitude value for the current amplitude-correction point. After selecting a point, the point number automatically increments and Frequency becomes active to allow entry of the frequency of the next point. Press Bk Sp to correct errors. Key Access: AMPLITUDE Y Scale, More 1 of 2, Corrections, Modify, Edit Chapter 6 6-11 Front-Panel Key Reference AMPLITUDE Y Scale Delete Point Allows you to delete the amplitude-correction data for the currently selected point. The prompt If you are sure, press key again to delete will appear on the display. Pressing Delete Point again will delete the point and adjust all of the point numbers as appropriate. Key Access: AMPLITUDE Y Scale, More 1 of 2, Corrections, Modify, Edit Delete Freq Interp Log Lin Allows you to clear all data from the selected amplitude-correction set. The prompt If you are sure, press key again to delete will appear on the display. Pressing Delete again will delete the correction set. Key Access: AMPLITUDE Y Scale, More 1 of 2, Corrections, Modify Allows you to determine how trace values are computed between points in a correction table. If the linear mode is selected, a straight line is used between points in a correction table. If the logarithmic mode is selected, frequency values between points are computed by first taking the logarithm of both table values and the intermediate value. Key Access: AMPLITUDE Y Scale, More 1 of 2, Corrections, Modify Ext Amp Gain Adds a positive or negative preamplifier gain value, which is subtracted from the displayed signal. The function is similar to the Ref Lvl Offset function, however with the Ext Amp Gain function, the attenuation may be changed depending on the preamplifier gain entered. A preamplifier gain offset is used for measurements that require an external preamplifier or long cables. The offset is subtracted from the amplitude readout so that the displayed signal level represents the signal level at the input of the preamplifier. The preamplifier gain offset is displayed at the top of the screen and is removed by entering zero. The preamplifier gain offset can only be entered using the numeric keypad. The preamplifier gain value is not affected by an instrument preset or a power cycle. Key Access: AMPLITUDE Y Scale, More 1 of 2 Max Mixer Lvl Allows you to change the maximum input mixer level from 10 dBm to −100 dBm in 10 dB steps using the step keys, and 1 dB steps using the knob. The mixer level is equal to the reference level minus the attenuator setting. As the reference level changes, the input attenuator setting is changed to keep the power levels of on-screen signals less than the selected level at the input mixer. Pressing Preset resets the maximum input mixer level to −10 dBm. Key Access: AMPLITUDE Y Scale, More 1 of 2 6-12 Chapter 6 Front-Panel Key Reference Auto Couple Auto Couple Couples the following functions: resolution bandwidth, video bandwidth, sweep coupling (SR/SA), attenuation, sweep time, center-frequency step, and frequency counter resolution. NOTE Coupled functions are functions that are linked. If one function is changed, the coupled function is changed. During normal operation, the sweep time, resolution bandwidth, and video bandwidth are coupled to span, the input attenuation is coupled to the reference level, and the center frequency step is coupled to the span. NOTE This function is not available when the segmented sweep function is set to On (Segmented (On)). Chapter 6 6-13 Front-Panel Key Reference BW/Avg BW/Avg Activates the resolution bandwidth function and accesses the menu keys that control the bandwidth functions and averaging. Resolution BW Auto Man Changes the 3 dB resolution bandwidth on the analyzer from 1 kHz to 5 MHz in a 1, 3, 10 sequence using the knob or step keys. If an unavailable bandwidth is entered using the numeric keypad, the closest available bandwidth in the 1, 3, 10 sequence is used. (Option 1DR provides additional 300 Hz, 100 Hz, 30 Hz and 10 Hz bandwidths.) As the resolution bandwidth is decreased, the sweep time is increased to maintain amplitude calibration. Resolution bandwidth is also related to span. As span is decreased, the resolution bandwidth is decreased. As the resolution bandwidth changes, the video bandwidth, if in auto couple mode, changes to maintain the VBW/RBW ratio. A “#” mark appears next to Res BW on the display when it is not coupled. To recouple the resolution bandwidth, press Resolution BW (Auto) (or press Auto Couple). The resolution bandwidth can be changed using the step keys, the knob, or the numeric keypad. Video BW Auto Man Changes the analyzer post-detection filter from 30 Hz to 3 MHz in a 1, 3, 10 sequence using the knob or step keys. If an unavailable bandwidth is entered using the numeric keypad, the closest available bandwidth in the 1, 3, 10 sequence is used. (Option 1DR provides additional 1 Hz, 3 Hz and 10 Hz video bandwidths when the resolution bandwidth is ≤ 300 Hz.) As the video bandwidth is decreased, the sweep time is increased to maintain amplitude calibration. A “#” mark appears next to VBW on the bottom of the analyzer display when it is not coupled. To couple the video bandwidth, press Video BW (Auto) (or press Auto Couple). The video bandwidth can be changed by using the step keys, knob, or numeric keypad. VBW/RBW Ratio Selects the ratio between the video and resolution bandwidths. If signal responses near the noise level are visually masked by the noise, the ratio can be set to less than 1 to lower the noise. The knob and step keys change the ratio in a 1, 3, 10 sequence. Pressing Preset sets the ratio to 1.000 X. The ratio can be changed using the step keys, knob, or numeric keypad. Average On Off Turns the selected averaging function (video or power) on or off. The detector is changed to sample when averaging is on. Pressing Restart resets the average trace and set the average count to 0. 6-14 Chapter 6 Front-Panel Key Reference BW/Avg Average Type Video Power Average Type (Video) initiates a digital averaging routine that averages on a point-by-point basis over a number of successive sweeps. The effect is to minimize the impact of transients on the displayed signals and noise. The number of sweeps (N) to average is the number that is set by this function. This function automatically selects the Sample detector, but does not affect the sweep time, bandwidth, or other analog characteristics of the analyzer. Annotation on the left side of the display indicates the current number of sweeps averaged. The default number of sweeps is 100. Increasing the number of sweeps will further averages the trace. To turn off the averaging function, press Average (Off). The number of sweeps can only be entered using the numeric keypad. In single sweep mode (Sweep, Sweep (Single)), N sweeps are taken. After each sweep, the new value of each display point is averaged in with the previously averaged data using the following formula: M–1 1 A avg = -------------- A prior avg + ----- A m M M Where: A avg = new average value A prior avg = average from prior sweep A m = measured value on current sweep M = number of current sweep In continuous sweep mode (Sweep, Sweep (Cont)), the same sequence is followed until M=N. At that point, the sweeps continue rather than stopping. For each new sweep, the measured value of the current sweep divided by N is added to (N-1)/N times the prior average, creating a weighted rolling average. If any measurement parameter, such as Center Freq, Span, Ref Level, or N, is changed while Video Average is On, the video average counter is reset to 0, i.e. M=0, and the trace average resets. If the analyzer is in single sweep mode, a new set of sweeps is taken only after Sweep (Single) is pressed again. When Average Type (Video) is selected, VAvg appears on the left side of the analyzer display if Average is On. When Average Type (Power) is selected, power averaging is performed by converting the trace data from dB to power units, and then averaging the power trace data. When Average Type (Power) is selected, PAvg appears on the left side of the analyzer display if Average is On. Power averaging is slower than video averaging due to the additional computations necessary. Chapter 6 6-15 Front-Panel Key Reference BW/Avg EMI Res BW Accesses the EMI Res BW menu keys and allows you to choose between bandwidths of 120 kHz, 9 kHz and 200 Hz. The 200 Hz bandwidth is only available if Option 1DR (narrow resolution bandwidth) is installed and the span is less than 5 MHz. (Option 1DR is available with Agilent ESA-E Series only (E4401B, E4402B, E4404B, E4405B and E4407B.) This function is set to None when the resolution bandwidth is set to any other value using the Resolution BW key. 6-16 Chapter 6 Front-Panel Key Reference Det/Demod Det/Demod Accesses the menu keys controlling detector functions, demodulation functions, the speaker, and FM gain. Detector Accesses the Detector menu keys which allow you to select between Peak, Sample, and Negative Peak detection. When Peak detection is selected, Peak appears in the upper-left corner of the display. Peak detection is used primarily when measuring sinusoidal (spectral) components. Peak detection obtains the maximum video signal value between the last display point and the present display point and stores this value in memory. Peak detection is selected at power on and by pressing Preset. When Sample detection is selected, Samp appears in the upper-left corner of the display. Sample detection is used primarily to display noise or noise-like signals. This detection should not be used to make the most accurate amplitude measurement of non noise-like signals. In sample mode, the instantaneous signal value at the present display point is placed in memory. Sample detection is activated automatically for noise level markers or during averaging. Negative peak detection functions the same as peak detection, but selects the minimum video signal value. When Negative Peak is selected, NPeak appears in the upper-left corner of the screen. This detection should not be used to make the most accurate amplitude measurements of signals. Demod Accesses the menu keys to select AM demodulation, FM demodulation or demodulation Off. It also accesses the Demod View On Off, Speaker On Off, and Demod Time menu keys described below. NOTE The FM menu key only appears when the FM demod option (Option BAA) is installed. Option BAA is available on Agilent ESA-E Series spectrum analyzers only (E4401B, E4402B, E4404B, E4405B and E4407B). NOTE Segmented sweep is not available with the demodulation functions in this section. Chapter 6 6-17 Front-Panel Key Reference Det/Demod Demod View On Off When Demod View (On) is pressed, the vertical scaling of the display is in frequency, and marker will read out the FM deviation in kHz when. When Demod View is On, the following functions are not available: Log/Lin (the display is calibrated in Hz), Y Axis Units, Marker Search functions, Normalize, Display Line, Peak Excursion, and Peak Threshold. In AM Demod, pressing Demod View (On) has no effect. Speaker On Off Turns the internal speaker on and off. The volume from the speaker is controlled by the front-panel volume control knob. Pressing Preset sets the speaker function to Speaker (Off). Demod Time Allows you to set the time, in non-zero spans, to pause and demodulate the signal after each sweep. The demodulated signal can be heard during demodulation when in Speaker (On) mode. In AM, the Video BW is set to 3 kHz and the Resolution BW is set to 10 kHz. In FM, the Video BW is set to 30 kHz and the Resolution BW is set to 100 kHz. In zero span, demodulation is performed (and can be heard) throughout the sweep. When AM or FM Demod is enabled, the instrument will tune to the marker frequency and wait for the Demod to take place. For long Demod times, pressing Preset will abort the Demod function. The default value is 500 ms. Key Access: Det/Demod, Demod NOTE It is normal to hear clicking sounds when the Auto Alignment function is On. During retrace, a small portion of the analyzer circuitry is realigned. Some of the switching of the analyzer circuitry is done using relays. It is the rapid switching of these relays during retrace that causes the clicking sounds. To eliminate the clicking sounds, turn the auto alignment off by pressing System, Alignments, Auto Align, Off. When this is done, the Align Now, All function should be performed periodically. Refer to the appropriate “Specifications and Characteristics” chapter in the Agilent ESA Spectrum Analyzers Specifications Guide for more information on how often to perform Align Now, All when the auto alignment is off 6-18 Chapter 6 Front-Panel Key Reference Display Display Accesses menu keys that allow you to control what is displayed on the analyzer, including titles, the display line, graticule and annotation, as well as the testing of trace data against user entered limits. Full Screen Allows the measurement window to expand horizontally over the entire instrument display. Pressing a key that brings up a new menu will cancel the full screen function. Display Line On Off Activates an adjustable horizontal line that is used as a visual reference line. The line, which can be used for trace arithmetic, has amplitude values that correspond to its vertical position when compared to the reference level. The value of the display line appears in the active function block and on the left side of the display. The display line can be adjusted using the step keys, knob, or numeric keypad. Pressing any digit, 0 through 9, on the numeric keypad brings up the selected terminator menu. To deactivate the display line, press Display Line (Off). The display line turns off when in demod view (Det/Demod, Demod, Demod View (On) and turns back on when demod view is turned off. Limits Accesses menu keys that allow you to create, modify, and change the properties of limit lines. Properties Accesses the following Properties menu keys: X Axis Units Freq Time Selects whether limit lines will be entered using frequency or sweep time to define the segments. They can be specified as a table of limit line segments of amplitude versus frequency, or of amplitude versus time. Time values are evaluated with respect to the analyzer sweep time. A time value of zero corresponds to the start of the sweep, which is at the left edge of the graticule. Switching the limit line definition between frequency and time will erase both of the current limit lines. The message Changing X axis units will delete all limits. If you are sure, press key again to change units will appear. Press X Axis Units Freq Time again to purge both limit lines and switch between frequency and time. Key Access: Display, Limits, Properties Chapter 6 6-19 Front-Panel Key Reference Display Limits Fixed Rel Allows you to choose fixed or relative limit lines. The fixed (Fixed) type uses the current limit line as a reference with fixed frequency and amplitude values. The relative (Rel) setting causes the current limit line value to be relative to the displayed center frequency and reference level amplitude values. When limit lines are specified with time, rather than frequency, the Rel setting only affects the amplitude values. The current amplitude values will be relative to the displayed reference level amplitude, but the time values will always start at the left edge of the graticule. As an example, assume you have a frequency limit line. If the limit line is specified as fixed, entering a limit line segment with a frequency coordinate of 300 MHz displays the limit line segment at 300 MHz. If the same limit line table is specified as relative, it is displayed relative to the analyzer center frequency and reference level. If the center frequency is at 1.0 GHz, a relative limit line segment with a frequency coordinate of 300 MHz will display the limit line segment at 1.3 GHz. If the amplitude component of the relative limit line segment is –10 dB, then −10 dB is added to the reference level value to obtain the amplitude of the given segment (reference level offset included). A limit line entered as fixed may be changed to relative, and one entered as relative may be changed to fixed. When changing between fixed and relative limit lines, the frequency and amplitude values in the limit line table change so that the limit line remains in the same position for the current frequency and amplitude settings of the analyzer. If a time and amplitude limit line is used, the amplitude values change but the time values remain the same. Key Access: Display, Limits, Properties Delete Limits 6-20 Allows you to purge data from the limit-line tables. Pressing Delete Limits after the prompt, If you are sure, press key again to delete, will delete the limits. Chapter 6 Front-Panel Key Reference Display Modify Accesses menu keys that allow you to modify individual limit lines. Key Access: Display, Limits Limit 1 2 Allows you to select between the two available limits. The menu keys below the Limit 1 2 key allow you to set parameters for the selected limit. Key Access: Display, Limits, Modify Type Upper Lower Allows you to define the limit you are editing as either an upper or lower limit. An upper limit fails if the trace exceeds the limit. A lower limit fails if the trace falls below the limit. Key Access: Display, Limits, Modify Test On Off Turns the testing of the limit lines on and off. If the trace is at or within the bounds of the set limit or margin, PASS LIMIT # or PASS MARGIN # is displayed in green in the upper left corner of the measurement area where # is the number of the selected limit line. (Colored annotation appears only with a color display.) Only positive margins are allowed for lower limits and only negative margins are allowed for upper limits. If the trace is out of the limit or margin boundaries, FAIL LIMIT # or FAIL MARGIN # is displayed in red. The results for Limit 2 are displayed below those for Limit 1. Either Limit or Margin must be turned on for Test to work. Key Access: Display, Limits, Modify Limit On Off Turns limit line display on and off. Either Limit or Margin, as well as Test, must be turned on for a limit test to work. Key Access: Display, Limits, Modify Margin On Off Margin (Off) turns the margin off. Margin (On) allows you to set a limit line offset for the selected limit line. Either Limit or Margin as well as Test, must be turned on for a limit test to work. Key Access: Display, Limits, Modify Chapter 6 6-21 Front-Panel Key Reference Display Edit Accesses the Edit menu keys which include Point, Frequency, (or Time if X Axis Units (Time) has been selected), Amplitude, Connected No Yes, and Delete Point. Edit also accesses the limits table. The Tab keys allow you to move between the rows in the limits table. New limit segments will only be applied after the editor is closed. Pressing Return, or any key not associated with the editor, will close the editor. Key Access: Display, Limits, Modify, More 1 of 2 Point allows you to create or edit a limit point. Up to 200 points may be defined for each limit line. Enter the point number to be created or edited using the numeric keypad, then Press Enter, or use the knob, Tab or step keys to move to an existing point. After selecting a point, Frequency becomes active. Key Access: Display, Limits, Modify, More 1 of 2, Edit Frequency (The key label is Time if X Axis Units (Time) has been selected.) Allows you to enter the frequency value for a limit point. After entering a value, the limit table is sorted to place the frequency or time in the correct order. For a new point, Amplitude defaults to 0 dBm and Connected defaults to Yes. Amplitude then becomes active. Key Access: Display, Limits, Modify, More 1 of 2, Edit Amplitude allows you to enter the amplitude value for the current limit point. After entering a value, Connected becomes active. If a Tab key is pressed without entering a value, the current Amplitude and Connected values of the point are selected. If Tab ⇑ is pressed, the Point number automatically increments to allow entry of the amplitude of the next point, or if a new point, to allow Frequency to be entered for the new point. Key Access: Display, Limits, Modify, More 1 of 2, Edit Connected No Yes allows you to determine whether the current point will be connected to the previous point. No limit testing is performed between disconnected points. Pressing this key when the Connected field is selected toggles the Connected value of the current point and increments the Point number to allow entry or editing of the Frequency of the next point. If a Tab key is pressed without entering a value, the current Connected value of the point is selected. If Tab ⇑ is pressed, the Point number automatically increments to allow entry of the Connected value of the next point, or 6-22 Chapter 6 Front-Panel Key Reference Display if a new point, to allow Frequency to be entered for the new point. Key Access: Display, Limits, Modify, More 1 of 2, Edit Delete Point allows you delete the current point in the limit line. You will be prompted with the message If you are sure, press key again to delete. Pressing Delete Point again will delete the point. Key Access: Display, Limits, Modify, More 1 of 2, Edit Delete allows you to delete the current limit set. You will be prompted with the message If you are sure, press key again to delete. Pressing Delete again will delete the limit set. Key Access: Display, Limits, Modify, More 1 of 2 Freq Interp Log Lin allows you to determine how limit trace values are computed between points in a limit table. The available interpolation modes are linear and logarithmic. If the linear mode is used for both frequency and amplitude, a straight line is used when interpolating between points in a limit table. If frequency interpolation is logarithmic, frequency values between limit points are computed by first taking the logarithm of both the table values and the intermediate value. A linear interpolation is then performed in this logarithmic frequency space. An exactly analogous manipulation is done for logarithmic amplitude interpolation. Key Access: Display, Limits, Modify, More 1 of 2 Amptd Interp Log Lin allows you to determine how limit trace values are computed between points in a limit table. The available interpolation modes are linear and logarithmic. If the linear mode is used for both frequency and amplitude, a straight line is used when interpolating between points in a limit table. Key Access: Display, Limits, Modify, More 1 of 2 NOTE Interpolation modes determine how limit values are computed between points in the limit table. The appearance of a limit trace is also affected by the amplitude scale, which may be linear or logarithmic. Chapter 6 6-23 Front-Panel Key Reference Display Title Accesses the following Title menu keys which allows you to change or clear a title on your display. Key Access: Display Change Title NOTE Allows you to write a title across the top of the display. The marker readout may interfere with the last characters. The markers can be turned off by pressing Marker, More 1 of 2, Marker All Off. Pressing Change Title accesses the Alpha Editor Menus that contain available characters and symbols. Pressing ESC before exiting the Alpha Editor menus will retain the previous title. The display title will remain until either Change Title is pressed again, or a trace is recalled that was previously saved with a title. A display title can also be cleared by using the clear function. Press Display, Title, Clear Title. Key Access: Display, Title Clear Title Preferences Allows you to clear a title from the front-panel display. Once cleared, the title cannot be retrieved. Key Access: Display, Title Accesses a menu of the following display functions which allow you to turn the graticule and annotation on or off. Key Access: Display Graticule On Off Annotation On Off 6-24 Turns the display graticule on and off. Key Access: Display, Preferences Turns the screen annotation on or off, however, menu key annotation will remain on the screen. The screen annotation may not be required for prints or during remote operation. Key Access: Display, Preferences Chapter 6 Front-Panel Key Reference Enter Enter Terminates and enters into the analyzer a numerical value that has been entered from the front panel using the numeric keypad. (For most applications, it is better to use the units menu keys.) When using the File key menus, the Enter key is also used to terminate filename entries. When entering titles (Display, Title, Change Title), the Enter key is also used to terminate title entries. Chapter 6 6-25 Front-Panel Key Reference Esc Esc Deactivates the active function and blanks the active function text from the display. No data can be accidentally entered using the knob, step keys, or numeric keypad. Pressing Esc will also abort a print, clear input or output overloads, and clear error messages from the status line along the bottom of the display. When entering a title, pressing Esc will cause the title to revert to the previous name. If the peak threshold line is on, pressing Esc will clear it from the display (turn it off). 6-26 Chapter 6 Front-Panel Key Reference File File Accesses the menu keys used to view, save, load, and manage data on a floppy disk or the internal analyzer drive. See page 2-25 for more information. Catalog Displays all directories and files located on the selected drive, depending upon the preferences set under the Type and Sort keys defined below. Type Allows you to select all types or one type of file(s) for viewing. All Displays all files located on the selected drive. Setup Displays all setup files in the selected directory. Setups are a complete set of instrument parameters including traces, states, limits, and corrections. State Displays all state files in the selected directory. State files contain most instrument settings. Trace Displays all trace files in the selected directory. Limits Displays all limits files in the selected directory. Screen Displays all screen (GIF and WMF) files in the selected directory. Corrections Displays all correction files in the selected directory. Key Access: File, Catalog, Type, More 1 of 2 Sort Chapter 6 Accesses the Sort menu keys that allow you to sort your files according to a selected file attribute.The selections include, By Date, By Name, By Extension, By Size, and Order Up Down. Order (Up) allows you to sort files in ascending order (for instance, A,B,C). Order (Down) allows you to sort files in descending order (for instance, C,B,A). 6-27 Front-Panel Key Reference File Save Accesses menu keys that allow you to save analyzer setups, states, traces, limits, corrections and screen data to a floppy (A:) drive or internal flash (C:) drive. NOTE Never remove the floppy disk during a save operation. To do so could corrupt all data on the floppy disk. Save Now NOTE Executes the save function. When the save is complete, the message XXXXXX file saved (where XXXXXX is the filename) will appear in the status line on your display. If the Path: field above the directory box is empty when pressing Save Now, the status line will display the error message: Unable to save file, invalid path. In this case, please select a drive. Type Allows you to select the type of data you want to save. Setup Displays all previously saved setup files and detects the current setup parameters in preparation to save them in a file for retrieval at a future date. Setup files include all instrument settings including traces, states, limits, and corrections. State Displays all previously saved state files and detects the current state parameters in preparation to save them in a file for retrieval at a future date. State files include all instrument settings but not traces, limits, and corrections. (This is the default setting when power is applied to the analyzer.) Trace Displays all previously saved trace files and detects the current trace in preparation to save it in a file for retrieval at a future date. A trace can be saved individually (for importing into spreadsheets) or accompanied by the analyzer state (for later recalling into the analyzer). Refer to the Format key description. Limits Displays all previously saved limits files and detects the current limits in preparation to save them in a file for retrieval at a future date. Limits provide data sets to determine whether a trace has exceeded preset specifications. Limit sets can hold up to 200 points and 6-28 Chapter 6 Front-Panel Key Reference File can only be saved individually. Refer to the File, Source key description. Screen Displays all previously saved screen files and captures the current screen displayed in preparation to save it in a file for retrieval at a future date. Screen files can be saved in any of the following formats: Bitmap, Metafile, Reverse Bitmap, and Reverse Metafile. Refer to the Format key description. NOTE Screen files saved in WMF format can only be loaded into Microsoft1 Applications such as Microsoft Word. NOTE The screen saved is that which was displayed before pressing File. For this reason, the screens seen while in the file menus cannot be saved. Corrections Displays all previously saved correction files and detects the current corrections in preparation to save them in a file for retrieval at a future date. Corrections provide a way to adjust the trace display for preset gain factors (such as for cable loss). A correction set may hold up to 200 points. Refer to the Source key description. Key Access: File, Save, Type, More 1 of 2 Format When Type is set to Trace, Format allows you to save a trace individually or accompanied by the analyzer state. The CSV format is readable by a spreadsheet on your PC, but cannot be loaded back into the analyzer. When Type is set to Screen, Format allows you to choose between bitmap and metafile formats. Bitmap saves the screen image in Graphics Interchange Format (GIF) and Metafile saves the screen image in Windows Metafile Format (WMF). Reverse Bitmap and Reverse Metafile turn black backgrounds to white and yellow traces to green so they can be printed visibly and with less use of black ink. Screen images cannot be loaded back into the analyzer. Source When Type is set to Trace, Source allows you to save trace 1, 2, or 3, along with state. Saving trace All saves all traces in a single.trc file, along with the state. 1.Microsoft is a U.S. registered trademark of Microsoft Corporation. Chapter 6 6-29 Front-Panel Key Reference File When Type is set to Corrections, Source accesses the Antenna, Cable, Other and User menu keys, which allow you to select the type of correction to be saved. When Type is set to Limits, Source accesses the Limit 1 and Limit 2 menu keys. Limit 1 and Limit 2 provide data sets to determine whether a trace has exceeded preset specifications. Limit sets can hold up to 200 points and can only be saved individually. Name NOTE Load Accesses the Alpha Editor and allows you to enter a filename. The external keyboard can also be used to enter a filename while the alpha editor is accessed. Only capital letters (A-Z) and digits (0-9) may appear in file names (8 characters, maximum). Additionally, file names include a 3 digit extension which is automatically set by the instrument. Dir Up Allows you to move up one directory level. If at the top level, Dir Up moves to the drive level, displaying the available disk drives. Dir Select Accesses the highlighted directory on your display. Accesses menu keys that allow you to load analyzer setups, states, traces, limits and corrections into the analyzer from a floppy (A:) drive or internal flash (C:) drive. Load Now Executes the load function. When the load is complete, the message XXXXXX file loaded (where XXXXXX is the filename) will appear in the status line on your display. Type Allows you to select the type of file you want to load. Setup Displays all setup files you may wish to load (SET). Setup files include a complete set of instrument parameters including traces, states, limits, and corrections. Loading a setup restores the analyzer (as closely as possible) to all previous instrument settings at the time of the save. State Displays all state files you may wish to load (STA). Loading a state restores most settings to the previously saved values. 6-30 Chapter 6 Front-Panel Key Reference File Trace Displays all trace files you may wish to load (TRC and CSV). Traces can be loaded individually or as a group. When a trace is loaded, the state that existed when that trace was saved is loaded along with the trace. Also, the loaded trace is placed in view mode. NOTE If you wish to compare two saved traces, place traces in view mode before saving them. This prevents the trace from being rewritten based on a state change from subsequent loads. Limits Displays all limits files you may wish to load to determine whether a trace has exceeded preset specifications (LIM). Limit sets can hold up to 200 points. Limits can only be loaded individually. NOTE When loading Limits files, be sure you have selected the appropriate X Axis Units: frequency or time (Display, Limits, Properties, X Axis Units). If you are in time X-Axis Units, and you load frequency limits, all current limit line data will be erased and the analyzer will switch to frequency units. The reverse of the this situation also holds true. Corrections Displays all corrections files you may wish to load (CBL, ANT, OTH, AMP). Corrections provide a way to adjust the trace display for preset gain factors (such as for cable loss). A correction set may hold up to 200 points. Sort Accesses the Sort menu key. Sort accesses a menu of keys that allow you to view your saved files according to a selected file attribute. The selections include, By Date, By Name, By Extension, By Size, and Order Up Down. Order (Up) allows you to view files in ascending order (for instance, A,B,C). Order (Down) allows you to view files in descending order (for instance, C,B,A). Destination When Type is set to Trace, Destination allows you to direct your data to Trace 1, Trace 2, or Trace 3. If the data is for all three traces (for instance, Source was All when they were saved), the data will be returned to the original trace registers. When Type is set to Limits, Destination allows you to direct your data to Limit 1 or Limit 2. Chapter 6 6-31 Front-Panel Key Reference File Delete Dir Up Allows you to move up one directory level. If at the top level, Dir Up moves to the drive level, displaying the available disk drives. Dir Select Accesses the highlighted directory on your display. If [..] is highlighted, this key acts in the same manner as Dir Up. Allows you to delete files and directories. Delete Now Executes the delete function. If a directory is selected to be deleted, the message WARNING: You are about to delete the contents of directory XXXXXX (where XXXXXX is the full path and directory name) will appear on your display. After a successful delete, the message XXXXXX file deleted (where XXXXXX is the filename) will appear in the status line on your display. Type Allows you to select the type of file you want to delete. All Displays all files you may wish to delete. Setup Displays all setup files you may wish to delete (SET). State Displays all state files you may wish to delete (STA). Trace Displays all trace files you may wish to delete (TRC and CSV). Limits Displays all limits files you may wish to delete (LIM). Screen Displays all screen files you may wish to delete (GIF and WMF). Corrections Displays all corrections files you may wish to delete (CBL, ANT, OTH, AMP). 6-32 Chapter 6 Front-Panel Key Reference File Sort Copy Sort accesses a menu of keys that allow you view the files you wish to delete, according to a selected file attribute. The selections include, By Date, By Name, By Extension, By Size, and Order Up Down. Order (Up) allows you to view files you may wish to delete in ascending order (for instance, A,B,C). Order (Down) allows you to view files you may wish to delete in descending order (for instance, C,B,A). Allows you to copy files from one directory to another or to one or more mass storage devices. Copy Now Executes the copy function. If the copy is successful, the message xxxxx file copied (where xxxxx is the filename) will appear on the display. Type Allows you to select the type of file you want to copy. All Displays all files you may wish to copy. Setup Displays all setup files you may wish to copy (SET). State Displays all state files you may wish to copy (STA). Trace Displays all trace files you may wish to copy (TRC and CSV). Limits Displays all limits files you may wish to copy (LIM). Screen Displays all screen files you may wish to copy (GIF and WMF). Corrections Displays all corrections files you may wish to copy (CBL, ANT, OTH, AMP). Sort Sort accesses a menu of keys that allow you to view the files you wish to copy according to a selected file attribute. The selection includes, By Date, By Name, By Extension, By Size, and Order Up Down. Order (Up) allows you to view files you may wish to copy in ascending order (for instance, A,B,C). Order (Down) allows you to view files you may wish to copy in descending order (for instance, C,B,A). Chapter 6 6-33 Front-Panel Key Reference File Rename Dir From To Allows you to select the source and destination directories for your copy on one or more drives. Dir Up Allows you to move up one directory level. If at the top level, Dir Up moves to the drive level, displaying the available disk drives. Dir Select Accesses the highlighted directory on your display. Allows you to rename a file. Rename Now Executes the rename function. When the rename is complete, the message XXXXXX file renamed to YYYYYY (where XXXXXX and YYYYYY are the filenames) will appear in the status line on your display. Type Allows you to select the type of file you want to rename. All Displays all files you may wish to rename. Setup Displays all setup files you may wish to rename (SET). State Displays all state files you may wish to rename (STA). Trace Displays all trace files you may wish to rename. (TRC and CSV). Limits Displays all limit files you may wish to rename (LIM). Screen Displays all screen files you may wish to rename (GIF and WMF). Corrections Displays all corrections files you may wish to rename (CBL, ANT, OTH, AMP). Sort Sort accesses a menu of keys that allow you to view the files you wish to rename according to a selected file attribute. The selections include, By Date, By Name, By Extension, By Size, and Order Up Down. Order (Up) allows you to view files you may wish to rename in ascending order (for instance, A,B,C). Order (Down) allows you to view files you may wish to rename in descending order (for instance, C,B,A). 6-34 Chapter 6 Front-Panel Key Reference File Name NOTE Create Dir Only capital letters (A-Z) and digits (0-9) may appear in file names (8 characters, maximum). Additionally, file names include a 3 digit extension which is automatically set by the instrument. Dir Up Allows you to move up one directory level. If at the top level, Dir Up moves to the drive level, displaying the available disk drives. Dir Select Accesses the highlighted directory on your display. Allows you to create subdirectories. Create Dir Now Name NOTE Format Accesses the Alpha Editor and allows you to enter a filename. The external keyboard can also be used to enter a filename while the alpha editor is accessed. Complete your entry by pressing Return or Enter. Executes the create directory function. When the directory has been created, the message Directory XXXXXX created (where XXXXXX is the directory name) will appear in the status line on your display. Accesses the Alpha Editor and allows you to enter a filename. The external keyboard can also be used to enter a filename while the alpha editor is accessed. Complete your entry by pressing Return or Enter. Only capital letters (A-Z) and digits (0-9) may appear in file names (8 characters, maximum). Additionally, file names include a 3 digit extension which is automatically set by the instrument. Dir Up Allows you to move up one directory level. If at the top level, Dir Up moves to the drive level, displaying the available disk drives. Dir Select Accesses the highlighted directory on your display. Formats a double-density floppy disk to 1.44 MB format. 720 KB disks are not supported. Format Now Chapter 6 Executes the format function. After pressing Format Now, the following message will appear on the display: WARNING: You are about to destroy ALL data on volume A: Press Format Now again to proceed or any other key to abort. During the formatting, Formatting Disk will appear on the display. Once formatted, Volume A: formatted will appear in the status line on the display. 6-35 Front-Panel Key Reference Freq Count Freq Count Activates the Marker Normal function if there are no markers, and then turns the marker count function on. Marker Count On Off Marker Count (On) turns on the marker counter. If no marker is active before Marker Count (On) is pressed, a marker is activated at the center of the display. Press Marker Count (Off) to turn the marker counter off. Press Resolution (Man) to change the marker counter resolution to an uncoupled value. NOTE Marker Count frequency readings are not affected by the frequency offset function. An asterisk (*) may appear in the upper-right area of the display along with the message Cntr 1 (the number in the message depends on the active marker). The ratio of the resolution bandwidth to span must be greater than 0.002 for the marker count function to work properly. Marker Count iden Res BW appears on the display if the bandwidth to span ratio is less than 0.002. Widen RES BW indicates that the resolution bandwidth must be increased or the span decreased. Resolution Auto Man Allows the resolution of the marker counter to be selected manually or auto-coupled. The marker counter has a resolution range of 1 Hz to 100 kHz. The available resolution values are 1 Hz, 10 Hz, 100 Hz, 1 kHz, 10 kHz, and 100 kHz. The resolution can be changed by using the step keys or by entering the resolution using the numeric keypad or knob. The marker counter resolution can be auto coupled to the span by pressing Resolution (Auto). 6-36 Chapter 6 Front-Panel Key Reference FREQUENCY Channel FREQUENCY Channel Activates the center frequency function, and accesses the menu of frequency functions. The center frequency, or start and stop frequency values appear below the graticule on the display. Although the analyzer allows entry of frequencies greater than the specified frequency range, using frequencies greater than the frequency span of the analyzer is not recommended NOTE When changing both the center frequency and the span, change the frequency first since the span can be limited by the frequency value. CAUTION When operating in DC coupled mode on spectrum analyzers with Option UKB, take care to protect the input mixer by limiting the input level to 0 VDC and +30 dBm. Center Freq Activates the center frequency function which allows you to set the horizontal center of the display to a specific frequency. Start Freq Sets the frequency at the left side of the graticule. The left and right sides of the graticule correspond to the start and stop frequencies. When these frequencies are activated, their values are displayed below the graticule in place of center frequency and span. Stop Freq Sets the frequency at the right side of the graticule. The left and right sides of the graticule correspond to the start and stop frequencies. When these frequencies are activated, their values are displayed below the graticule in place of center frequency and span. CF Step Auto Man Changes the step size for the center frequency function. Once a step size has been selected and the center frequency function is activated, the step keys change center frequency by the step-size value. The step size function is useful for finding harmonics and sidebands beyond the current frequency span of the analyzer. When auto-coupled, the center frequency step size is set to one division (10 percent of the span). Freq Offset Allows you to input a frequency offset value that is added to the frequency readout of the marker, center frequency, start frequency and stop frequency, to account for frequency conversions external to the analyzer. Offsets may only be entered using the numeric keypad. Offsets are not added to the span or frequency count readouts. Entering an offset does not affect the trace display. To eliminate an offset, press Preset or Freq Offset, 0, Hz. Chapter 6 6-37 Front-Panel Key Reference FREQUENCY Channel When a frequency offset is entered, its value appears on the bottom of the display (as opposed to reference level offsets, which appear on the left side of the display). To eliminate an offset, press Freq Offset, 0, and Enter. Pressing Preset also sets the offset to zero. Signal Track On Off Moves the signal that is nearest to the active marker to the center of the display and keeps the signal there. ST appears in the lower-left corner of the display. An (*) may appear in the upper-right corner of the display while the analyzer is verifying that it has the correct signal. Pressing Signal Track (Off), Preset or Marker, More 1 of 2, Marker All Off turns off the signal track function. When signal track is on and the span is reduced, an automatic zoom is performed and the span is reduced in steps so that the signal remains at the center of the display. If the span is zero, signal track cannot be activated. NOTE If no marker is active, pressing Signal Track (On) will activate a marker, perform a peak search, and center the marker on the display. NOTE Pressing Marker, Delta or Marker, Normal sets Signal Track (Off). NOTE Switching to zero span sets Signal Track (Off). NOTE Segmented sweep is not available when Signal Track(On) is selected. 6-38 Chapter 6 Front-Panel Key Reference Help Help Accesses a short description of any front panel or menu key. After pressing Help, an explanation of the next key pressed will appear on the display. After the information is displayed, press ESC or any other key to remove the help window. NOTE After the help text is displayed, pressing any key will remove the help window. Pressing ESC allows you to remove the help window without changing functions. Chapter 6 6-39 Front-Panel Key Reference Input/Output Input/Output Input Z Corr 50Ω 75Ω Sets the input impedance for voltage-to-power conversions. The impedance you select is for computational purposes only, since the actual impedance is set by internal hardware to 50 Ω (except for Option 1DP). The default is 50 Ω (75 Ω with Option 1DP). Select the computational input impedance by pressing Input Z Corr (75Ω). This is useful when measuring a 75 Ω device on an analyzer having a 50 Ω input impedance, and when using a 75 Ω to 50 Ω adapter on the analyzer input. Coupling AC DC Agilent E4402B with Option UKB, E4404B and E4405B only. Specifies alternating current (AC) or direct current (DC) coupling at the analyzer input. Selecting AC coupling blocks any DC voltage at the analyzer input, but also decreases the frequency range of the analyzer. Input coupling is set to AC by an instrument preset. Amplitude specifications apply only when coupling is set to DC. CAUTION When DC coupling is selected, ensure there is no DC component to the input signal before applying the signal to the analyzer input. The analyzer’s input circuitry can be damaged if DC is applied to the analyzer input and DC coupling is selected. Amptd Ref (f=50 MHz) On Off Agilent E4401B and E4411B only. Turns the internal amplitude reference signal on or off. When the internal amplitude reference signal is on, the RF input is disabled. Amptd Ref Out (f=50 MHz) On Off Agilent E4402B, E4403B, E4404B, E4405B, E4407B and E4408B only. Turns the external amplitude reference signal on or off. Input Mixer Agilent E4407B with Option AYZ only. Accesses the following Input Mixer menu keys: Input Mixer Int Ext 6-40 Allows you to select either the internal or an externally connected mixer as the input device. Selecting Input Mixer (Ext) activates all other keys in the Input Mixer menu and changes the attenuator annotation to Ext Mix. When Input Mixer (Ext) is selected, the attenuator function in the AMPLITUDE key menu is unavailable. Chapter 6 Front-Panel Key Reference Input/Output Ext Mix Band NOTE Accesses the Ext Mix Band key menus and allows you to select one of the pre-defined bands corresponding to the external mixer being used. The start and stop frequencies and a letter corresponding to the letter suffix of the mixer model number in use, appears on each menu key. If Mixer Type (Presel) is selected, selecting (K), (E), (W), (F), (D), (G), (Y), or (J) is not allowed. If Harmonic (Man) is selected, the word User will appear on the Ext Mix Band key. Segmented sweep is only operable for this function when center frequency and span are set within the frequency band of the mixer. If the mixer range is changed, segmented sweep is turned off. Signal Ident On Off Activates a signal identification algorithm when Signal Ident (On) is selected, that either removes or aids with the identification of multiple and image responses of true input signals. Multiple and image responses maybe generated when using unpreselected external mixers. NOTE Segmented sweep is not available when Signal Ident (On) is selected. NOTE If the input signal is too broad band or unstable for the identifications process to properly identify it, turn off the signal identification and look for two similar responses separated by about 640 MHz (twice the 321.4 MHz first IF). If a “-” mixer mode (for example: 8-) is active, the right member of the response pair is the correct response; if a “+” mixer mode is active, the left member of the response pair is the correct response. The amplitude accuracy of the analyzer is degraded when signal identification is active, and the message Signal Ident On, Amptd Uncal will appear on the display. Signal ID Mode Allows you to select either of the following types of signal identification methods: Image Suppress Selects a signal identification mode that attempts to suppress all but valid responses by mathematically removing all image and multiple responses of signals present at the mixer input. The analyzer internally acquires the data in a two sweep sequence, operates on the acquired data, and displays the result in Trace 1. Chapter 6 6-41 Front-Panel Key Reference Input/Output Since two measurements are taken for each display cycle, the display update rate is reduced. Key Access: Input/Output, Input Mixer, Signal ID ModeImage Shift Image Shift Allows the analyzer, in a two sweep sequence, to place data from the first sweep in Trace 1, and data from the second (frequency shifted) sweep in Trace 2. Signal responses of Trace 1 and Trace 2 having the same horizontal position are considered to be in the current band and therefore can be analyzed with the amplitude and frequency measurement systems of the analyzer. All other responses are invalid and should be ignored. Key Access: Input/Output, Input Mixer, Signal ID Mode Mixer Config Accesses the Mixer Config menu keys allowing you to manually set the harmonic, control the preselected mixers, and adjust the internal bias source for use with mixers requiring bias. Harmonic Auto Man The harmonic value with its associated sign is automatically determined from the Ext Mix Band selected when in Harmonic (Auto) mode. Harmonic (Man) allows you to enter a harmonic value when required. If the harmonic mode for the external mixer is listed as “8 –”, for example, enter the harmonic number as “– 8”. The minus sign indicates that the tuned frequency is below the desired LO harmonic by the IF of 321.4 MHz. Similarly, if the harmonic mode of the external mixer is listed as “8 +”, enter the harmonic number as “8”. Key Access: Input/Output, Input Mixer, Mixer Config Mixer Type Presel Unpre Allows you to select which type of mixer is in use. Mixer Type (Presel) activates a tuning signal that is routed to the PRESEL TUNE OUTPUT connector on the rear panel of the analyzer. This signal has a sensitivity of 1.5V/GHz and drives the tune input of the HP/Agilent 11974 series of preselected mixers. The sweep rate in Presel mode is limited to 40 MHz/msec. Key Access: Input/Output, Input Mixer, Mixer Config Mixer Bias On Off 6-42 Chapter 6 Front-Panel Key Reference Input/Output Mixer Bias (On) activates and allows adjustment of an internal bias source for use with external mixers. The bias signal is present on the center conductor of the IF INPUT connector on the front panel. The mixer bias will be Off if Harmonic (Auto) and Mixer Type (Presel) is selected. Key Access: Input/Output, Input Mixer, Mixer Config Chapter 6 6-43 Front-Panel Key Reference Marker Marker Accesses the marker control keys which select the type and number of markers and turns them on and off. Markers are diamond-shaped characters that identify points of traces. Up to four pairs of markers may appear on the display simultaneously; only one pair can be controlled at a time. The marker that is controlled is called the “active” marker. Pressing Marker activates the Normal menu key. Select Marker 1234 Selects one of the four possible markers. A marker that has already been turned on will become active when it is selected. If a marker has been turned on and assigned to a specific trace, it will become active on that trace if that marker is selected. Normal Activates a single frequency marker at the center frequency on the active trace if a marker is not already displayed. If a marker is displayed before the Normal function is enabled, the marker is enabled at the position of the selected marker. The marker number is indicated above the marker. Use the data controls to position the marker. The knob and/or Up/Down keys move the marker left or right. If a value is entered from the numeric keypad, the marker is moved to the trace point nearest to that value. Annotation in the active function block and in the upper-right corner of the display indicates the frequency and amplitude of the marker. Pressing Normal turns off the Delta function and moves the active marker to the delta marker position. Delta Activates a second marker at the position of the first marker. (If no marker is present, two markers appear at the center of the display.) The amplitude and frequency of the first marker is fixed. The marker number is indicated above the delta marker, and the same number is indicated with an R (for example, 1R) above the reference marker. Use the data controls to position the delta marker. Annotation in the active function block and in the upper-right corner of the display indicates the frequency and amplitude differences between the two markers. The delta marker readout will be incorrect if the scale type is changed between log and linear. (For information on using this function while in segmented sweep, refer to “Interaction with Other Analyzer Functions” in the segmented sweep section of this chapter which begins on page 6-86.) NOTE Pressing Delta again moves the reference marker to the active marker position, so you can make delta measurements from differing reference points without having to turn off the markers and begin again. 6-44 Chapter 6 Front-Panel Key Reference Marker NOTE The delta marker function permits signal-to-noise measurements provided the signal is a single spectral component (sinusoid). Place a normal marker on the signal, press Delta, place the delta marker in the noise, and activate Marker Noise (see below). The indicated amplitude difference is signal-to-noise/Hz. Band Pair Start Stop Enters a mode that allows adjustment of both the ref (start) and delta (stop) markers independently. Pressing Band Pair Start Stop, toggles between the start and stop markers. The start marker number is indicated with a number and an R above the marker (for example, 1R) and the stop marker is indicated with a marker number. This mode is useful in functions such as Band Power. (For information on using this function while in segmented sweep, refer to “Interaction with Other Analyzer Functions” in the segmented sweep section of this chapter which begins on page 6-86.) Span Pair Span Center Enters a mode that allows adjustment of both the ref and delta markers. Pressing Span Pair Span Center, toggles between the span and center markers. The start marker number is indicated with a number and an R above the marker (for example, 1R) and the stop marker is indicated with a marker number. Adjusting the span changes the difference between the two markers. Changing the center changes the center point of the two markers. This mode is useful in functions such as Band Power. (For information on using this function while in segmented sweep, refer to “Interaction with Other Analyzer Functions” in the segmented sweep section of this chapter which begins on page 6-86.) Off Turns off the marker that has been selected by the Select Marker 1 2 3 4 key. Off also turns off functions related to the selected marker such as signal track and demodulation. It also removes marker annotation from the display. Select Marker 1234 Selects one of the four possible markers. A marker that has already been turned on will become active when it is selected. If a marker has already been turned on and assigned to a specific trace, it will become active on that trace if that marker is selected. Key Access: Marker, More 1 of 2 Marker Trace Auto 1 2 3 Assigns a marker to a trace. Pressing Marker Trace Auto 1 2 3 will activate a marker on trace 1 if there are no markers turned on. If a marker is currently active, press Marker Trace Auto 1 2 3 until 1, 2, or 3 are underlined. The active marker will be moved to the selected trace. Selecting the Auto mode will move the marker to the trace that is automatically selected. The selection order is to first look for a trace in the clear-write mode, in the order of trace 1, then trace 2, then trace 3. If no traces are currently being written, it will select a trace in the view-store mode, again in the order of trace 1, 2, then 3. Chapter 6 6-45 Front-Panel Key Reference Marker Key Access: Marker, More 1 of 2 Readout Accesses the following menu keys that allow you to change the active marker readout. Key Access: Marker, More 1 of 2 Frequency Sets the marker to Frequency. The default selection in non-zero spans, displays the absolute frequency of a normal marker or the frequency of the delta marker relative to the reference marker. Key Access: Marker, More 1 of 2, Readout Period Sets the marker readout to Period. Displays the reciprocal of the above frequency. Key Access: Marker, More 1 of 2, Readout Time Sets the marker readout to Time. The default selection in zero span, displays the time interval between a normal marker and the start of the sweep or the time of the delta marker relative to the reference marker. Key Access: Marker, More 1 of 2, Readout Inverse Time Function Sets the marker readout to Inverse Time. Displays the reciprocal of the above time interval. Key Access: Marker, More 1 of 2, Readout Accesses the following marker function menu keys listed below. Key Access: Marker, More 1 of 2 Band Power Indicates the power over that part of the trace between the reference and active markers. If only one marker is present when you press Band Power, a second marker is placed at the same location as the first marker. To reposition the markers, press Marker to access Band Pair and Span Pair keys. Pressing Band Power also changes the display mode to sample, the correct mode for power measurements. Key Access: Marker, More 1 of 2, Function NOTE For best accuracy, set the video bandwidth to at least ten times the resolution bandwidth to minimize its averaging effect. NOTE Band Power has no meaning in zero span, and the indicated value is independent of signal level and marker placement. Marker Noise 6-46 Reads out the average noise level, referenced to a 1 Hz noise power bandwidth. If the marker delta function is on and the noise marker is activated and moved to measure the noise floor, the marker readout will display the signal-to-noise ratio. Chapter 6 Front-Panel Key Reference Marker NOTE You can use Delta and Marker Noise to indicate noise level relative to sinusoidal signal (signal to noise). However, be sure to activate the delta marker before pressing Marker Noise or the reference marker units may be incorrect. The noise marker averages 5% of the trace data values (one-half a horizontal division), centered on the location of the marker on the frequency or time scale. Marker noise indicates noise power density per hertz or noise voltage per root hertz depending upon the amplitude units selected. The number of sweep points is noted in parenthesis to the right of the sweep time in the lower right corner of the graticule. If the analyzer has a firmware revision prior to A.04.00, 32 trace data values are averaged, and the number of points per sweep is fixed at 401. Note that the data values averaged will not always be symmetrical with respect to the marker position. If the marker is positioned within 2.5% of the beginning of the trace (one-quarter division), the trace data values in the first half-division will be averaged. Similarly, if the marker is positioned within 2.5% of the end of the trace, the trace data values in the last half-division will be averaged. If the analyzer has a firmware revision prior to A.04.00, and the marker is positioned within 16 trace points of the beginning or end of the trace, the first 32 or last 32 trace data points, respectively, will be averaged. NOTE Do not use Marker Noise to evaluate the displayed average noise level of the analyzer relative to the specification. Read the displayed average noise level directly from the display or use the normal marker. Refer to Application Note 150 for a discussion of how noise is displayed on a spectrum analyzer. A nominal correction for equivalent noise bandwidth is made by the firmware based on a nominal 3 dB resolution bandwidth. The firmware assumes the noise bandwidth is 1.12 times the resolution bandwidth. This means the shape of the resolution bandwidth filters causes the noise power to be overstated by 1.12 times. The detection mode also affects the measurement. If in log mode, the log detector understates the noise response. To compensate, 2.51 dB is added to the measurement. If the detector is in linear mode, the firmware uses 1.049 dB as a correction value. Chapter 6 6-47 Front-Panel Key Reference Marker In log detector mode, with the result reported in dBm in a 1 Hz bandwidth, the final reported value will be: ( Averaged value over 32 values ) – 10 × ( log [ 1.12 × Resolution bandwidth ] ) + 2.51 dB In linear detector mode (dBm) units, with the result reported in dBm in a 1 Hz bandwidth, the final reported value will be: ( Averaged value over 32 values ) – 10 × ( log [ 1.12 × Resolution bandwidth ] ) + 1.049 dB In linear detector mode with the normal display of voltage units, the noise marker voltage value will be related to the present marker voltage by this relation. 2 2 ( V_noise_marker ) = ( V_average ) ⁄ ( 1.12 × Resolution bandwidth × 0.7824 ) V_noise_marker = V_average ⁄ (1.12 × Resolution bandwidth × 0.7824 ) V_noise_marker = V_average × 1.06633 ⁄ ( Resolution bandwidth ) 0.5 0.5 Key Access: Marker, More 1 of 2, Function Off Turns off the active function markers. Key Access: Marker, More 1 of 2, Function Marker Table On Off Compresses the graticule and displays marker information in a table. The information includes the marker number, trace number, marker type, X axis value, and the amplitude. Key Access: Marker, More 1 of 2 Marker All Off Turns off all of the markers, including markers used for signal track and demodulation. Marker annotation is also removed. Key Access: Marker, More 1 of 2 6-48 Chapter 6 Front-Panel Key Reference Marker → Marker → Accesses the following marker function menu keys: Mkr → CF Sets the center frequency of the analyzer to the marker frequency. In Delta mode, Mkr → CF sets the center frequency to the marker delta value. Mkr → CF is not available in zero span. Mkr → CF Step Changes the center-frequency step size to match the value of the active marker. Press Frequency then CF Step Auto Man to view the step size. If marker delta is active, the step size will be set to the frequency difference between the markers. This function can be used to step from one signal harmonic to another. Mkr → CF Step is not available in zero span. Mkr → Start Changes the start frequency so that it is equal to the frequency of the active marker. In Delta mode, Mkr → Start sets the start frequency to the marker delta value. Mkr→ Start is not available in zero span. Mkr→ Stop Changes the stop frequency so that it is equal to the frequency of the active marker. In Delta mode, Mkr → Stop sets the stop frequency to the marker delta value. Mkr → Stop is not available in zero span. Mkr ∆ → Span Sets the start and stop frequencies to the values of the delta markers. Mkr ∆ → Span is not available if the marker is off, or in zero span. NOTE The above menu keys are not available when Segmented (On) is selected. Mkr → Ref Lvl Changes the reference level to the active marker value, moving the marked point to the reference level (top line of the graticule). In Delta mode, Mkr → Ref Lvl sets the reference level to the amplitude difference between the markers. Chapter 6 6-49 Front-Panel Key Reference Meas Control Meas Control Accesses a menu of keys that allow you to pause or restart one of the measurements available in the MEASURE key menu. Meas Control also allows you to select between continuous and single sweeps or measurements. Press MEASURE and then select one of the available measurements (ACP, Channel Power, Occupied BW, Emission BW, or Harmonic Dist). Once the desired measurement is selected, press Meas Control. Meas Control accesses the following keys: Restart Performs the same functions as the “Restart” front-panel key. Measure Cont Single Measure (Single) allows you to take one measurement sweep and display the measurement results. Measure (Cont) allows you to continuously run a measurement, displaying the results after each measurement sweep. Pause Allows you to pause a measurement. Pressing Pause will toggle between pausing and resuming your measurement. The key label will toggle between Pause and Resume. Resume Allows you to resume a measurement that had been paused. The key label will toggle between Pause and Resume. NOTE The measurements described above are those available in SA mode (see Mode key). Other measurements are available in other modes if an optional personality is installed. 6-50 Chapter 6 Front-Panel Key Reference Meas Setup Meas Setup If in a measurement, displays one of five measurement setup menus. The setup menu displayed depends on which measurement (ACP, Channel Power, Occupied BW, Emission BW, Harmonic Dist) has been selected in the MEASURE menu. ACP Meas Setup Menu Keys To access the following keys for setting up an adjacent channel power measurement, press MEASURE, ACP and then the front panel Meas Setup key. Avg Number On Off Press Avg Number (On) to specify the number of measurement averages used when calculating the measurement result. The average will be displayed at the end of each sweep. Avg Number (Off) disables the measurement averaging. Main Chan BW When combined with Chan Spacing, Main Chan BW allows you to specify the range of integration used in calculating the power in the center reference channel. Changing Main Chan BW automatically changes Adj Chan BW and Chan Spacing to the same value. Adj Chan BW When combined with Chan Spacing, Adj Chan BW allows you to specify the range of integration used in calculating the power for the upper and lower adjacent channels. Chan Spacing Allows you to specify the difference between the center frequency of the center channel and the center frequency of both adjacent channels. Adjacent channels must be symmetrical. Channel Power Meas Setup Menu Keys To access the following keys for setting up a channel power measurement, press MEASURE, Channel Power and then the front panel Meas Setup key. Avg Number On Off Press Avg Number (On) to specify the number of measurement averages used when calculating the measurement result. The average will be displayed at the end of each sweep. Avg Number (Off) disables the measurement averaging. Integration BW Allows you to specify the range of integration used in calculating the power in the channel. Chan Pwr Span Allows you to set the analyzer span for the channel power measurement. Chapter 6 6-51 Front-Panel Key Reference Meas Setup Occupied BW Meas Setup Menu Keys To access the following keys for setting up an occupied bandwidth measurement, press MEASURE, Occupied BW and then the front panel Meas Setup key. Avg Number On Off Press Avg Number (On) to specify the number of sweep averages used when calculating the measurement result. The average will be displayed at the end of each sweep. Avg Number (Off) disables the measurement averaging. OBW Span Allows you to specify the range of integration used in calculating the total power from which the percent occupied bandwidth is then calculated. The analyzer span will be set to the same value as the OBW Span for the measurement. OBW Span should be set to approximately 2 times the expected occupied bandwidth result. Occ BW % Pwr Allows you to change the percentage of signal power used when determining the occupied bandwidth. Emission BW Meas Setup Menu Keys To access the following keys for setting up an emission bandwidth measurement, press MEASURE, Emission BW and then the front panel Meas Setup key. Avg Number On Off Press Avg Number (On) to specify the number of sweep averages used when calculating the measurement result. The average will be displayed at the end of each sweep. Avg Number (Off) disables the measurement averaging. Max Hold On Off Max Hold (On) displays and holds the maximum responses of a signal. Max Hold (Off) disables the maximum hold feature. EBW Span Allows you to specify the measurement span over which to search for the peak level and X dB level transition points of the signal. The analyzer span will be set to the same value as the emission bandwidth span for the measurement. The emission bandwidth span should be set to approximately twice the expected emission bandwidth result. Emiss BW X dB X dB is the number of dBs below the highest point in the signal at which to measure the emission bandwidth. Harmonic Dist Meas Setup Menu Keys To access the following keys for setting up a harmonic distortion measurement, press MEASURE, Harmonic Dist and then the front panel Meas Setup key. 6-52 Chapter 6 Front-Panel Key Reference Meas Setup Avg Number On Off Press Avg Number (On) to specify the number of sweep averages used when calculating the measurement result. The average will be displayed at the end of each sweep. Avg Number (Off) disables the measurement averaging. Harmonics Harmonics indicates the number of harmonics to measure before computing the total harmonic distortion. The minimum number is 2 (only the fundamental and second harmonic will be measured). The maximum number is 10. ST/Harmonic Auto Man ST/Harmonic (Auto) sets the sweeptime to 200 divided by the resolution bandwidth or 10 ms, whichever is greater. ST/Harmonic (Man) allows you to specify any sweeptime from 10 ms to the analyzer maximum. This sweeptime is used only for measuring harmonics. The sweeptime set before the measurement began is used for finding the fundamental. Counter Zoom On Off Counter Zoom (On) ensures the correct operation of the internal NOTE frequency counter when the resolution bandwidth is relatively narrow compared to the starting span. Counter Zoom (Off) turns the counter zoom function off. The measurements described above are those available in SA mode (see Mode key). Other measurements are available in other modes if an optional personality is installed. Chapter 6 6-53 Front-Panel Key Reference MEASURE MEASURE In the Spectrum Analyzer (SA) mode, accesses a menu of keys that allow you to make adjacent channel power, channel power, occupied bandwidth, emission bandwidth, and harmonic distortion measurements. NOTE When a measurement is activated, Signal Track, Video Averaging, Segmented Sweep, Band Power and Marker Noise will be turned off. NOTE When Signal Track, Video Averaging, Band Power, Marker Noise or Span Zoom are activated, a running measurement will be turned off. Meas Off Turns the active measurement function off. ACP Sets the span slightly wider than three channels, each designated by a pair of vertical lines and double-headed arrows. Splits the screen, and in the lower window displays the absolute power in the center channel in dBm and the power in each of the adjacent channels in dB relative to the center-channel power. Also displayed are center-channel bandwidth, adjacent-channel bandwidth, and channel spacing. The resolution bandwidth is set to nominally 1 to 3 percent of the center channel bandwidth, and the video bandwidth is set ten times wider than the resolution bandwidth to minimize its averaging effect. Pressing Meas Setup after selecting ACP allows you to set the bandwidth of the center channel and the two adjacent channels. The two adjacent channels always have the same bandwidth. You may also set the channel spacing; overlapping the channels is not allowed. Channel Power Measures the power and power spectral density in the channel bandwidth specified by the user. One marker pair on the display indicates the edges of the channel bandwidth. The measurement may be configured by pressing Meas Setup after Channel Power has been selected. The measurement can be made in single or continuous sweep mode. The center frequency, reference level, and channel bandwidth must be set by the user. Pressing Meas Setup after Channel Power has been selected will access the channel power measurement setup menu. Pressing Meas Control after Channel Power has been selected will access the channel power measurement control menu which allows you to pause or restart your measurement, or toggle between continuous and single measurement. 6-54 Chapter 6 Front-Panel Key Reference MEASURE Occupied BW Integrates the power of the displayed spectrum and puts markers at the frequencies between which a selected percentage of the power is contained. The measurement defaults to 99% of the occupied bandwidth power. The power-bandwidth routine first computes the combined power of all signal responses contained in the trace. For 99% occupied power bandwidth, markers are placed at the frequencies on either side of 99% of the power. 1% of the power is evenly distributed outside the markers. The difference between the marker frequencies is the 99% power bandwidth and is the value displayed. The occupied bandwidth function also indicates the difference between the analyzer center frequency and the center frequency of the channel. The measurement can be made in single or continuous sweep mode. The center frequency, reference level, and channel spacing must be set by the user. Pressing Meas Setup after Occupied BW has been selected will access the occupied bandwidth power measurement setup menu. Pressing Meas Control after Occupied BW has been selected will access the occupied bandwidth measurement control menu which allows you to pause or restart your measurement, or toggle between continuous and single measurement. Emission BW Measures the bandwidth between 2 points on a signal which are a specified number of dBs below the highest point within the occupied bandwidth span. For example: If the Emission BW X dB is set to –26 dB, and the Occupied BW Span is set to 10 MHz, then the peak signal power level is first determined from the 10 MHz wide trace sweep. The frequency of this trace maximum is designated as f0. Next, the analyzer determines the two frequencies furthest below and furthest above f0 at which the signal level is 26 dB below the peak level; these frequencies are designated as f1 and f2 respectively. The emission bandwidth = f2 – f1. Pressing Meas Setup after Emission BW has been selected will access the emission bandwidth measurement setup menu. Pressing Meas Control after Emission BW has been selected will access the emission bandwidth measurement control menu which allows you to pause or restart your measurement, or toggle between continuous and single measurement. Harmonic Dist Measures the harmonics of a single carrier signal and computes the total harmonic distortion. The carrier must be the strongest peak (having a frequency > 0 Hz, a peak excursion > 6 dB on both sides, and an amplitude ≥–50 dBm) on the display at the time the measurement is started. The total harmonic distortion is then calculated from the measured harmonics. Chapter 6 6-55 Front-Panel Key Reference MEASURE When measuring the Nth harmonic, the analyzer will choose the narrowest resolution bandwidth that is ≥N times the resolution bandwidth used to measure the fundamental. Widening the resolution bandwidth allows the measurement to capture all modulation on the harmonics. An asterisk (*) will appear next to the amplitude of measured harmonics for which the desired resolution bandwidth could not be set. The measurement will still be accurate as long as the signal has little or no modulation. Pressing Meas Setup after Harmonic Dist has been selected will access the harmonic distortion measurement setup menu. Pressing Meas Control after Harmonic Dist has been selected will access the harmonic distortion control menu which allows you to pause or restart your measurement, or toggle between continuous and single measurement. NOTE The measurements described above are those available in SA mode (see Mode key). Other measurements are available in other modes if an optional personality is installed. 6-56 Chapter 6 Front-Panel Key Reference MODE MODE Selects the measurement mode of your analyzer. Spectrum analyzer mode (SA) is the default mode. Other modes include GSM (requires Option BAH) and cdmaOne (requires Option BAC). Chapter 6 6-57 Front-Panel Key Reference MODE SETUP MODE SETUP Brings up a menu for setting up the current mode. The SA mode has no mode setup functions. 6-58 Chapter 6 Front-Panel Key Reference Next Window Next Window Allows you to select the active window in functions which support split-screen display modes, such as zone span. In split-screen display modes, pressing Zoom allows you to switch between split-screen and full-sized displays of the active window. See also “Zoom”. NOTE The active window is indicated by a solid green box around the window. Chapter 6 6-59 Front-Panel Key Reference Peak Search Peak Search Places a marker on the highest priority peak based upon one of two criteria: Max (default) or Param (see Peak Search Param Max under Search Param below). If Max is the criterion, pressing Peak Search places a marker on the highest point of the trace excluding the LO feedthrough. If Param is the criterion, pressing Peak Search places a marker on the highest peak of the trace that meets the peak excursion criterion (see Peak Excursn under Search Param below). If no peak meets the criterion, the marker is placed at the center of the display, and the error message: No Peak Found appears (see System (Local), Show Errors below to remove the error message). When you preset the analyzer (see Preset below), the peak search criterion is set to Max unless you make Param part of the user preset conditions and select that preset option. Meas Tools Accesses the following frequently used menu keys which are replicated here for the user’s convenience. Peak Search Performs peak search as described above. Key access: Peak Search, Meas Tools Next Pk Right Refer to page 6-62. Key access: Peak Search, Meas Tools Next Pk Left Refer to page 6-62 of this chapter. Key access: Peak Search, Meas Tools Delta Refer to page 6-44. Key access: Peak Search, Meas Tools Mkr → CF Refer to page 6-49. Key access: Peak Search, Meas Tools Mkr → Ref Lvl Refer to page 6-49. Key access: Peak Search, Meas Tools Function Accesses the following menu keys. Key Access: Peak Search, Meas Tools Band Power Measures the power in a band specified by the user within the channel bandwidth. Two markers on the display indicate the edges of the band. The measurement can be made on a single sweep or can continuously update at the end of each sweep. The center frequency, reference level, channel bandwidth, and the measurement band must be set by the user. Key Access: Peak Search, Meas Tools, Function 6-60 Chapter 6 Front-Panel Key Reference Peak Search Marker Noise Reads out the average noise level, referenced to a 1 Hz noise power bandwidth. If the marker delta function is on and the noise marker is activated and moved to measure the noise floor, the marker readout will display the signal-to-noise ratio. NOTE You can use Delta and Marker Noise to indicate noise level relative to sinusoidal signal, (signal to noise). However, be sure to activate the delta marker before pressing Marker Noise or the reference marker value may be incorrect. The noise marker averages 5% of the trace data values (one-half a horizontal division), centered on the location of the marker on the frequency or time scale. Marker noise indicates noise power density per hertz or noise voltage per root hertz depending upon the amplitude units selected. The number of sweep points is noted in parenthesis to the right of the sweep time in the lower right corner of the graticule. If the analyzer has a firmware revision prior to A.04.00, 32 trace data values are averaged, and the number of points per sweep is fixed at 401. Note that the data values averaged will not always be symmetrical with respect to the marker position. If the marker is positioned within 2.5% of the beginning of the trace (one-quarter division), the trace data values in the first half-division will be averaged. Similarly, if the marker is positioned within 2.5% of the end of the trace, the trace data values in the last half-division will be averaged. If the analyzer has a firmware revision prior to A.04.00, and the marker is positioned within 16 trace points of the beginning or end of the trace, the first 32 or last 32 trace data points, respectively, will be averaged. NOTE Do not use Marker Noise to evaluate the displayed average noise level of the analyzer relative to the specification. Read the displayed average noise level directly from the display or use the normal marker. Refer to Application Note 150 for a discussion of how noise is displayed on a spectrum analyzer. A nominal correction for equivalent noise bandwidth is made by the firmware based on a nominal 3 dB resolution bandwidth. The firmware assumes the noise bandwidth is 1.12 times the resolution bandwidth. This means the shape of the resolution bandwidth filters causes the noise power to be overstated by 1.12 times. Chapter 6 6-61 Front-Panel Key Reference Peak Search The detection mode also affects the measurement. If in log mode, the log detector understates the noise response. To compensate, 2.51 dB is added to the measurement. If the detector is in linear mode, the firmware uses 1.049 dB as a correction value. Refer to “Marker Noise” (Marker, More 1 of 2, Function) for more information on this softkey. Key access: Search, Meas Tools, Function Off Key Access: Search, Meas Tools, Function Next Peak Places the marker on the next highest peak. The signal peak must exceed the peak threshold value. If there is no peak, the marker will not move. (Also see the Peak Excursn and Peak Threshold key descriptions.) Key Access: Search Next Pk Right Moves the marker to the next peak to the right of the current marker. The signal peak must exceed the peak threshold value by the peak excursion value. If there is no peak to the right, the marker will not move and the No Peak Found error message will appear on the display. (Also see the Peak Excursn and Peak Threshold key descriptions.) Key Access: Search Next Pk Left Moves the marker to the next peak to the left of the current marker. The signal peak must exceed the peak threshold value by the peak excursion value. If there is no peak to the left, the marker will not move and the No Peak Found error message will appear on the display. (Also see the Peak Excursn and Peak Threshold key descriptions.) Key Access: Search Min Search Moves the active marker to the minimum detected amplitude value. Key Access: Search Pk-Pk Search Finds and displays the frequency (or time, if in zero span) and amplitude differences between the highest and lowest trace points. Key Access: Search Continuous Pk On Off When a marker is placed on a signal and Continuous Pk (On) is pressed, the marker will remain on the signal even if the signal changes in frequency and amplitude. Key Access: Search, More 1 of 2 N dB Points On Off Activates the N dB function. Pressing N dB Points (On) turns on the N dB feature and activates two arrows that are N dB down from the marker. The frequency difference between the two arrows will be displayed in the upper right-hand corner of the display. If the feature is unable to find data N dB below the marker, the value of –100 Hz will be displayed in the upper right-hand corner of the display. 6-62 Chapter 6 Front-Panel Key Reference Peak Search NOTE For example, N dB Points can be used to measure the 3 dB bandwidth of a filter in a transmission test with the tracking generator. The default value is -3 dB. Possible values range from −1.00 dB to −80.00 dB. You can enter values to a resolution of 0.01 dB using the numeric key pad or 0.1 dB using the knob. The N dB function follows the active marker. If you turn on a marker after N dB Points has been activated, the arrows will follow that marker. If the marker associated with N dB Points moves, the arrows will move with the marker unless there is no data N dB below the marker. Key Access: Search, More 1 of 2 Search Param Accesses the following menu keys: Key access: Search, More 1 of 2 Peak Excursn NOTE Sets the minimum amplitude variation of signals that the marker can identify as a peak. If a value of 10 dB is selected, the marker moves only to peaks that rise and fall more than 10 dB above the peak threshold value. Pressing Preset or turning on power resets the excursion to 6 dB, and the threshold to 90 dB below the reference level. Two signal peaks, which are so close together that the amplitude drop between them is less than the peak-excursion value, are not recognized as two peaks. A signal peak is recognized only if it has a peak excursion drop above the noise floor, on both sides of the signal. When the peak excursion value is 6 dB or higher, the marker-peaking functions do not recognize signals less than the peak excursion value above the noise floor. To correct this, when measuring signals near the noise floor, the excursion value can be reduced even further. To prevent the marker from identifying noise as signals, reduce the noise floor variance to a value less than the peak-excursion value by reducing the video bandwidth or by using video averaging. Key access: Peak Search, More 1 of 2, Search Param Peak Threshold Chapter 6 Sets the minimum amplitude of signals that the marker can identify as a peak. For example, if a value of 90 dBm is selected, the marker moves only to peaks that rise and fall more than the peak excursion value above -90 dBm. Pressing Preset or turning the Power on resets the excursion to 6 dB and the threshold to −90 dBm. 6-63 Front-Panel Key Reference Peak Search The value of the threshold appears in the active-function block and on the lower-left side of the display. The threshold level does not influence the trace memory or marker position. The value of the peak threshold level can be changed using the step keys, the knob, or the numeric keypad. Pressing any digit, 0 through 9, on the numeric keypad brings up the selected terminator menu. Key access: Search, More 1 of 2, Search Param Peak Search Param Max Peak Table Sets the peak search mode. Peak Search (Max) places a marker on the highest peak (ignoring the LO feedthrough) when a peak search is performed. Peak Search (Param) respects the Peak Excursn and Peak Threshold parameters. If no peak satisfies the parameters, a No Peak Found error will occur. Key access: Search, More 1 of 2, Search Param Accesses the following Peak Table menu keys: Key Access: Search, More 1 of 2 Peak Table On Off Displays a list of up to ten signal peaks that is updated at the end of each sweep. The peaks can be sorted in order by descending amplitude or by ascending frequency. Peaks above or below the display line can be excluded from the table. The peak table function works with trace 1 only. Key Access: Search, More 1 of 2, Peak Table Peak Sort Freq Amptd Switches the peak table sorting routine between listing the peaks in order by descending amplitude or by ascending frequency. Key Access: Search, More 1 of 2, Peak Table Peak Readout Accesses the following Peak Readout menu keys: Key Access: Search, More 1 of 2, Peak Table Normal Shows up to ten signal peaks. Key Access: Search, More 1 of 2, Peak Table, Peak Readout >Display Line Shows only peaks above the display line. Key Access: Search, More 1 of 2, Peak Table, Peak Readout < Display Line Shows only peaks below the display line. Key Access: Search, More 1 of 2, Peak Table, Peak Readout 6-64 Chapter 6 Front-Panel Key Reference Preset Preset Provides a convenient starting point for making most measurements. You can select whether a factory preset or user preset is performed. The default is factory preset, which will always set the analyzer to the same state for a given model number. The user preset is user-defined using the Save User Preset function (System, Power On/Preset). The Preset selection (Factory or User) can be set by pressing System, Power On/Preset, and toggling the Preset menu key until the desired selection is underlined. If Factory Preset is selected: Pressing the Preset front-panel key performs a factory preset, which resets the analyzer to Spectrum Analyzer (SA) mode, brings up the frequency menu and sets certain conditions to their default values. The factory preset function performs a processor test, but does not affect alignment data. Factory Preset clears both the input and output buffers, but does not clear trace 2. Amplitude-correction factors are turned off, but remain in analyzer memory. Limit line testing is turned off, but the limit line tables remain in analyzer memory. Segmented sweep is turned off, but the segmented sweep tables remain in analyzer memory. The status byte is set to 0. See Table 6-1 on page 6-66 for the conditions established by performing a factory preset. NOTE Input coupling is set to AC by a factory preset. For Agilent E4402B with Option UKB, E4404B and E4405B only, you can specify alternating current (AC) or direct current (DC) coupling at the analyzer input. Selecting AC coupling blocks any DC voltage at the analyzer input, but also decreases the frequency range of the analyzer. Make sure the instrument is DC coupled when measuring below 100 kHz. (See “Input/Output” in this chapter for more information on this setting.) If User Preset is selected: Pressing the Preset hardkey brings up the Factory Preset and User Preset menu keys. If Factory Preset is pressed, a factory preset will be performed as described above. If User Preset is pressed, the user preset state is recalled. To set the user preset state, change the analyzer settings as desired, then press System, Power On/Preset, Save User Preset. NOTE Recalling any state, including the user preset state, will affect the conditions of more parameters than are affected by a factory preset. For example, external preamp gain and input impedance correction are not affected by a factory preset but may be affected by a user preset. Chapter 6 6-65 Front-Panel Key Reference Preset NOTE If the Power On function is set to Preset and the Preset function is set to Factory, turning on the analyzer performs a factory preset. Turning on the analyzer also fetches alignment data; clears trace 2, trace 3, and both the input and output buffers; turns off amplitude-correction factors; turns off limit line testing; and sets the status byte to 0. The last state of the analyzer (before it was turned off) is recalled if the Power On key is set to Last (System, Power On/Preset, Power On). The user preset state is recalled if the Power On key is set to Preset and User Preset is selected. Table 6-1 Factory Preset Conditions Amplitude correction factors off Amplitude Ref off Amplitude units default values Annotation and graticule display on Attenuation 10 dB (auto-coupled) Center frequency: E4401B and E4411B 750 MHz E4402B and E4403B 1.5 GHz E4404B 3.35 GHz E4405B 6.6 GHz E4407B and E4408B 13.25 GHz CF step size 10% of span Coupled functions all set to AUTO Detector Peak Display line level –25 dBm, display off Frequency offset 0 Hz Input Coupling AC Int Preamp off Limit line testing off Log scale 10 dB/division Marker count off Marker counter resolution auto-coupled Markers off Max Mixer level –10 dBm 6-66 Chapter 6 Front-Panel Key Reference Preset Table 6-1 Factory Preset Conditions Reference level 0 dBm in power-on units Reference level offset 0 dB Reference level position top (10th) graticule Resolution bandwidth 3 MHz (auto-coupled) Span E4401B and E4411B 1.5 GHz E4402B and E4403B 3.0 GHz E4404B 6.7 GHz E4405B 13.2 GHz E4407B and E4408B 26.5 GHz SRQ mask 40 Start Frequency 0 Hz Stop Frequency E4401B and E4411B 1.5 GHz E4402B and E4403B 3.0 GHz E4404B 6.7 GHz E4405B 13.2 GHz E4407B and E4408B 26.5 GHz Segmented Sweep off Sweep continuous Sweep Time E4401B and E4411B 4 ms (auto coupled) E4402B and E4403B 5 ms (auto coupled) E4404B 16.75 ms (auto coupled) E4405B 33 ms (auto coupled) E4407B and E4408B 265 ms (auto coupled) Sweep Points 401 Threshold level –90 dBm, display off Title cleared Trace 1 clear-write Trace 2 blank, at bottom of display Trace 3 blank, at bottom of display Chapter 6 6-67 Front-Panel Key Reference Preset Table 6-1 User Preset Factory Preset Conditions Trigger free run Trig Delay Off 1 µsec Trig Offset Off 0 sec VBW/RBW ratio 1.000 X Video averaging off Video bandwidth 3 MHz (auto-coupled) Loads the analyzer configuration that existed when Save User Preset was pressed. If Save User Preset has never been pressed, the factory preset state is loaded. If the user preset state has been saved but the load fails for any reason, the error message: Unable to load user state is displayed in the status line and the state is reset to whatever it was before the Preset key was pressed. This can sometimes happen if firmware has been upgraded or applications (un)installed after the user preset state was saved. Save User Preset can be accessed by pressing System, Power On/Preset. 6-68 Chapter 6 Front-Panel Key Reference Print Print Option A4H (GPIB and Parallel) and 1AX (RS-232 and Parallel) only. Print initiates an output of the display data, without an external controller, to a previously specified graphics printer. Refer to Chapter 1 of this manual or the Agilent ESA Spectrum Analyzers Programmer’s Guide for detailed information about printing. Press the Print key to immediately print the screen to the currently-defined printer. The screen remains frozen (no further sweeps are taken) until the data transfer to the printer is complete. Refer to the Print Setup key description in this chapter for more information about the structure and definitions of the printer keys. If you need to abort a print in progress, use the Esc (escape) key. NOTE Printing requires an optional interface. The Agilent ESA Spectrum Analyzers Programmer’s Guide, included with the optional interfaces, provides interface details. Refer to page 2-38 for more information about printing. Chapter 6 6-69 Front-Panel Key Reference Print Setup Print Setup Option A4H (GPIB and Parallel) or 1AX (RS-232 and Parallel) only. Accesses the menu keys which allow you to define a printer and select printer options. Printer Type Accesses the Printer Type menu keys. When you connect your printer and press the Print key, the analyzer will attempt to identify your printer. If identification is unsuccessful, None or Custom will automatically be set in the Printer Type menu. None The Printer Type will automatically be set to None when you press the Print key with an unsupported printer connected to your analyzer. Key Access: Print Setup, Printer Type Custom When you press the Print key and the analyzer cannot identify your printer, Custom will automatically be set in the Printer Type menu. Setting the Printer Type menu key to Custom allows you to define your printer using the Define Custom menu keys. Key Access: Print Setup, Printer Type Auto When Auto is selected, and the Print key is pressed, the analyzer will attempt to communicate with the printer and obtain its identification. If the printer is identified, the print will be successful and no message will appear on the display. If the analyzer is not able to identify the printer, the Printer Type will automatically be set to Custom and an error message asking you to press Define Custom to set up your printer will be displayed. If the printer is not supported, the Printer Type will automatically be set to None and an error message will inform you that your printer is unsupported. Key Access: Print Setup, Printer Type Define Custom Allows you to define your printer. Language PCL3 PCL5 Allows you to define your printer as a Hewlett-Packard PCL3. (Most DeskJets) or Hewlett-Packard PCL5 (LaserJets and DeskJets: 1100,1200,1600,2000 series) printer. Key Access: Print Setup, Define Custom Color Capable Yes No Allows you to define the color capability of your printer. Key Access: Print Setup, Define Custom 6-70 Chapter 6 Front-Panel Key Reference Print Setup Orientation Allows you to select either Portrait or Landscape printing. The Orientation key will not function with a PCL3 (HP DeskJet) printer. Color On Off Allows you to select between color or black and white printing. This key will not function when pressed unless the connected printer supports color. Prints/Page 1 2 Selects the number of prints per page when orientation is set to Portrait. In Landscape printing, Prints/Page is always set to 1. Eject Page Ejects your printed page. Chapter 6 6-71 Front-Panel Key Reference Restart Restart Restarts the current measurement activated in the Measure key menu. When in Average (On) mode, (BW/Avg, Average) the averaging function is restarted (the trace is reset and the average number is reset to zero). 6-72 Chapter 6 Front-Panel Key Reference Return Return Returns you to the previous menu. Repeated presses of this key move back through previously selected menus (including previous pages selected by the MORE key. NOTE When a menu requiring a yes or no key press has been accessed, the Return key will not respond. NOTE When entering an alphanumeric value (a screen title or filename), pressing Return terminates the entry. Chapter 6 6-73 Front-Panel Key Reference Save Save Executes a save operation as though you were in the File, Save menu and had pressed Save Now. The Save hardkey always performs the same save function as if the user had pressed File, Save, Save Now. NOTE In the event that a valid save cannot be performed because a drive has not been selected, the Save key will report the error “No drive selected”. In this case, press File, Save and select a drive. 6-74 Chapter 6 Front-Panel Key Reference Single Single When analyzer is in continuous sweep mode and not in a measurement (Measure, Meas Off), this key changes the sweep control to single sweep and executes a sweep after the trigger condition is met. If the analyzer is already in single sweep, pressing Single re-executes a new sweep after the trigger condition is met. When analyzer is in continuous sweep mode and also in a measurement (selected under the Measure key), this key changes the measurement control to take a single measurement and executes a single measurement after the trigger condition is met. If the analyzer is already in single, pressing Single re-executes a new measurement after the trigger condition is met. If Average is on (BW/Avg, Average(On)), pressing Single resets the average trace and starts the average again from a count of zero. N sweeps are then taken (where N is the average number) until the sweep is halted. Chapter 6 6-75 Front-Panel Key Reference Source Source Accesses the tracking generator key functions (Options 1DN or 1DQ only). Without Option 1DN or 1DQ, pressing Source will cause the error message “Option not installed” to appear on the analyzer display. CAUTION If Auto Align is on, the 3 GHz tracking generator will be momentarily retuned to approximately 1.557 GHz between most sweeps. Some devices under test (for example, amplifiers with AGC) may be susceptible to damage due to this momentary retuning. To avoid this momentary retuning, turn the auto align off. (Press System, Alignments, Auto Align, Off.) Refer to the appropriate “Specifications and Characteristics” chapter in the Agilent ESA Spectrum Analyzers Specifications Guide for information on using the analyzer with Auto Align Off. Amplitude On Off Activates (On) or deactivates (Off) the output power of the tracking generator. The power level can then be adjusted using the numeric keypad, step keys, or knob. Pressing any digit, 0 through 9, on the numeric keypad brings up the selected terminator menu. See the specifications chapter in the calibration guide for the available output power for your tracking generator. NOTE For spectrum analyzers with Option 1DN or Option 1DQ, the tracking generator must be turned on (Source, Amplitude (On)) before you set up the segmented sweep table. NOTE When Amplitude (Off) is selected, the output attenuation on the Agilent E4402B, E4403B, E4404B, E4405B, E4407B and E4408B is set to the maximum attenuation. Power Sweep On Off Activates (On) or deactivates (Off) the power-sweep function. The value of the power-sweep range is displayed in the active-function block when you press Power Sweep (On). The analyzer continues to sweep the specified frequency range when power sweep is on. (To do a power sweep at a fixed frequency, set the analyzer to zero span at the desired frequency.) The available power-sweep range is a function of the source attenuator setting. See the specifications chapter in the calibration guide for the available power sweep range. The output power of the tracking generator is swept according to the sweep rate of the analyzer. The output power is always swept from the source power setting to a higher power setting (negative source power sweep values are not allowed). Power-sweep measurements are particularly useful in making gain compression measurements or output power versus frequency measurements. 6-76 Chapter 6 Front-Panel Key Reference Source Attenuation Auto Man Allows you to select between automatic and manual adjustment of the tracking generator’s output attenuator. The Agilent E4401B and Agilent E4411B can be manually adjusted from 0 to 60 dB in 10 dB steps. All other Agilent ESA analyzers can be manually adjusted from 0 to 56 dB in 8 dB steps. When auto-coupled, the attenuation function automatically adjusts the attenuator to yield the source amplitude level specified by the Amplitude On Off softkey function. For the Agilent E4401B and E4411B, press Attenuation (Man) for power sweeps greater than 10 dB. Amptd Step Auto Man Allows the user to set the step size of the power level range of the tracking generator. The default setting is one vertical scale division. Amptd Offset Offsets the displayed power of the tracking generator. Using the amplitude offset capability of the tracking generator allows you to take system losses or gains into account, thereby displaying the actual power delivered to the device under test. Tracking Peak Agilent E4402B, E4403B, E4404B, E4405B, E4407B, and E4408B only. Activates a routine that automatically adjusts fine tracking adjustments to obtain the peak response of the tracking generator on the spectrum analyzer display. Tracking Peak is performed in the active resolution bandwidth. Man Track Adj Agilent E4402B, E4403B, E4404B, E4405B, E4407B, and E4408B only. Allows you to adjust the frequency of the tracking generator oscillator manually using the step keys, knob, or numeric keypad. The tracking adjust is tuned to maximize the amplitude of the trace. NOTE When Source is On, resolution bandwidths less than 1 kHz are not available. NOTE When the resolution bandwidth is less than 1 kHz, Source may not be turned on. Chapter 6 6-77 Front-Panel Key Reference SPAN X Scale SPAN X Scale Activates the Span function and accesses the menu of span functions. Pressing SPAN X Scale allows the user to change the frequency range symmetrically about the center frequency. The frequency-span readout describes the total displayed frequency range; to determine frequency span per horizontal graticule division, divide the frequency span by 10. Span Zoom Finds the highest signal peak on the display. If a marker is not already on the peak, it places a marker there, turns on the signal-track function, and activates the span function. The analyzer then reduces the span in steps, keeping the signal centered on the screen until the optimum span is reached. The analyzer is left in Signal Track mode. Pressing Span Zoom performs the routine similar to pressing the following keys: Search, Frequency, Signal Track (On), and Span. NOTE Span Zoom leaves the analyzer in Signal Track mode. NOTE Span Zoom is not available when Segmented (On) is selected. Full Span Changes the analyzer span to full span showing the full frequency range of the analyzer. Full span sets Signal Track (Off) and Segmented (Off). Zero Span Changes the frequency span to zero. In this mode, the current center frequency is displayed in the time domain (the x-axis is displayed in units of time), like a conventional oscilloscope. Sweep times faster than those in the frequency domain display mode are available if Option AYX or B7D are installed. Resolution Bandwidths less than 1 kHz are unavailable when in zero span if the sweep time is being achieved by utilizing the Option AYX or B7D. NOTE The minimum number of sweep points in zero span is 2. NOTE Sweep times that would require the Option AYX or Option B7D are not available in zero span if the Resolution Bandwidth is less than 1 kHz. NOTE Zero Span sets Signal Track (Off). 6-78 Chapter 6 Front-Panel Key Reference SPAN X Scale NOTE Zero Span is not available when Segmented (On) is selected. Segments in the segmented sweep function can be set to zero span by setting the span parameter in the segmented sweep editor to 0 Hz. (Sweep, Segmented, Modify, Edit, Span) Last Span Changes the analyzer frequency span to the previous span setting. If pressed after Signal Track is turned off, the span setting returns to the span that was in effect before Signal Track was turned on. This is true, even if Signal Track was turned on as part of Span Zoom. Last span sets Segmented (Off). Zone Accesses menu keys that allow you to control the two-window zone function. This function allows you to have an upper window with a broad display of frequency and two zone markers (vertical bars) that define the span for the lower window. Zone On Off Zone (On) allows you to change from a one-window to a two-window display. The top window will display the trace with two vertical lines (Zone Markers) displayed at center frequency plus and minus 5% of the current span. The top window will be inactive. The bottom window will display the section of the trace in the top window that is between the Zone Markers. The span of the bottom window is 10% of the span of the top window. Both windows have the same center frequency. The bottom window is active and the sweep time, resolution bandwidth, and video bandwidth have been coupled to the bottom window span. There are separate annotations for frequency, bandwidth, sweep time, reference level, amplitude scale and scale/div for each window. The values for these parameters can be changed for each window independently. To activate the top window, press the Next Window key located below the display. The active window is distinguished by a green border (for color displays only). Only the active window will have a sweep taken and updated to the display. When the active window is toggled, the state for the active window is saved, and the last state of the inactive window is recalled. When the window becomes inactive, its data invalid indicator will appear on the display. The data invalid indicator will remain until the window becomes the active window and a complete sweep has been executed. Pressing Zoom will change to a one-window display showing only the active window. Pressing Zoom again will return you to the two-window display. Chapter 6 6-79 Front-Panel Key Reference SPAN X Scale Pressing Zone (Off) will return you to a one-window display of the active window. Key Access: SPAN X Scale, Zone NOTE Pressing Zoom will set Zone (On), if it is off. Zone Center Allows you to change the frequency of the zone markers without changing the zone span. The zone markers are vertical lines marking the zone in the upper window. They determine the frequency range displayed in the lower window. As the zone markers in the upper window are moved, the center frequency of the lower window is changed but the lower window will not be updated to reflect the change unless it is selected as the active window. (See Zone On Off.) The center frequency for the lower window is not limited by the selected start and stop frequencies in the upper window. However, if the frequency span of the lower window is outside of the span for the upper window, the vertical span markers will not be displayed. When the lower window is active, the FREQUENCY Channel key will allow you to change Zone Center. Any change to the lower window while it is active will change the center frequency. Key Access: SPAN X Scale, Zone Zone Span Allows the span of the zone markers to be changed without changing the center frequency. The zone markers are vertical lines marking the zone in the upper window. They determine the frequency range displayed in the lower window. As the zone markers are moved, the span of the lower window is changed but the lower window will not be updated to reflect the change unless it is selected as the active window. (See Zone On Off.) The span limit of the lower window is the same as the span limit of the instrument. The span for the lower window is not limited to the selected span of the upper window. However, if the frequency span of the lower window is outside of the span of the upper window, the vertical span markers will not be displayed. When the lower window is active, the SPAN X Scale key will change Zone Span, and any change to Zone Span while the lower window is active, will change the span. Key Access: SPAN X Scale, Zone 6-80 Chapter 6 Front-Panel Key Reference SPAN X Scale NOTE Zone Span is not available when Segmented (On) is selected. Zone Pk Right Finds the next peak to the right of the zone center frequency on the upper window trace and then moves the zone so that it is centered around the new peak. The zone span is not changed. The center frequency of the lower window changes to reflect the new zone center frequency. The lower window will not be updated until it is made active. If no peak is found, the zone will not be moved. A signal must obey the parameters defined in Search, Search Param to be identified as a peak signal. Pressing Zone Pk Right will have no effect if the upper window is not the active window or if it is in zero span. Key Access: SPAN X Scale, Zone Zone Pk Left Finds the next peak to the left of the zone center frequency on the upper window trace and then moves the zone so that it is centered around the new peak. The zone span is not changed. The center frequency of the lower window changes to reflect the new zone center frequency. The lower window will not be updated until it is made active. If no peak is found, the zone will not be moved. A signal must obey the parameters defined in Search, Search Param to be identified as a peak signal. Pressing Zone Pk Left will have no effect if the upper window is not the active window or if it is in zero span. Key Access: SPAN X Scale, Zone Chapter 6 6-81 Front-Panel Key Reference Standby Standby Removes power from the analyzer, except for a small portion of circuitry inside the switching power supply. No internal time base circuitry, or any other function outside of the power supply is powered when the analyzer is in “standby.” 6-82 Chapter 6 Front-Panel Key Reference Sweep Sweep Activates the sweep time function and accesses the following menu keys: Sweep Time Auto Man Selects the length of time the analyzer takes to tune across the displayed frequency span (or, in zero span, the time the analyzer takes to sweep the full screen). Reducing the sweep time increases the sweep rate. The sweep time can be changed using the step keys, the knob, or the numeric keypad. In non-zero spans: When the sweep time is auto-coupled, the analyzer selects the optimum (shortest) sweep time for the current settings. This selection process is influenced by several factors: •The maximum tuning rate of the spectrum analyzer •The selected Resolution Bandwidth and Video Bandwidth filters •The maximum sample rate of the Analog-to-Digital converter (ADC) (Trace data are digitized and stored in memory) •The number of trace points (Sweep, Points) You may select a sweep time less than the auto-coupled value; however this may generate measurement errors. If this happens, the error message: Meas Uncal is displayed in the status line. In zero span: The minimum sweep time is determined by the maximum sample rate of the ADC and the number of sweep points. With Option B7D, the fastest sweep time is 2.5 microseconds (with 101 sweep points). As the number of points increases, the sweep time increases. With Option AYX, the fastest sweep time is 5 microseconds (with 101 sweep points). With neither option installed, the fastest sweep time is 1 millisecond (with 101 sweep points) and 4 milliseconds (with 401 sweep points). The maximum sweep time is 4000 seconds for any set of conditions. Refer to the Agilent Technologies ESA Spectrum Analyzers Specifications Guide for more information about Sweep Time and its relation to other instrument settings. Chapter 6 6-83 Front-Panel Key Reference Sweep Sweep Cont Single Switches the analyzer between the continuous-sweep mode and the single-sweep mode. Pressing Sweep (Single) puts the analyzer in single-sweep mode. Press Single on the front panel, to enable a sweep when in single-sweep mode. When Sweep (Cont) is selected, one sweep follows another as soon as it is triggered. Pressing Preset, or turning the power on, selects continuous sweep. Swp Coupling SR SA Selects stimulus-response (SR) or spectrum-analyzer (SA) auto-coupled sweep times. In stimulus-response mode, auto-coupled sweep times are usually much faster for swept-response measurements. Stimulus-response auto-coupled sweep times are typically valid in stimulus-response measurements when the system’s frequency span is less than 20 times the bandwidth of the device under test. Gate On Off Requires Option 1D6 (Time Gate). Turns the gate function on and off. When set to Gate (On), the video signal that is digitized is controlled by the gate circuitry. The gate circuitry switches between two states. When the gate is “open”, the normal video signal of the analyzer is passed through the video filters to the peak detectors and digitizer of the analyzer. When the gate is “closed”, the video filters, peak detectors, and digitizer are given a signal at the bottom of the display. The gate function requires that a gate trigger signal be connected to the GATE TRIG/EXT TRIG IN (TTL) input on the rear panel. When the gate function is on, the state of the gate appears at the GATE/HI SWP OUT (TTL) rear panel connector. A TTL high output indicates that the gate is open. The gate out signal is only valid while the analyzer is sweeping. Between sweeps, the gate out signal is invalid. You can adjust the gate delay and gate length using an oscilloscope to view the gate out signal. The analyzer sweep time should be set to a large value (50 sec) during the adjustment so that the gate signal is valid most of the time. When the adjustment is done you can set the analyzer back to the desired sweep time, or set it back to Auto Couple. NOTE This function is not available when Trig Delay (On) is selected. Gate Setup Requires Option 1D6 (Time Gate). Accesses the following menu keys that allow you to setup various gate parameters: Trig Type Edge Level Allows you to select between Edge and Level triggering of the gate. Trig Type (Edge) opens the gate in response to an edge trigger on the trigger input after a delay set in Gate Delay. The gate stays open for the selected Gate Length. When Trig Type (Level) is selected, the gate is open as long as the trigger input is true, as defined under the Level Setup key. Key Access: Sweep, Gate Setup 6-84 Chapter 6 Front-Panel Key Reference Sweep Edge Setup Accesses menu keys that allow you to set up edge triggering. Key Access: Sweep, Gate Setup Edge Pos Neg Sets the polarity for edge triggering of the gate. When Edge (Pos) is pressed, a positive-going edge will trigger the opening of the gate, after the delay set with the Gate Delay key. When Edge (Neg) is pressed, a negative-going edge will trigger the opening of the gate after the set delay. Key Access: Sweep, Gate Setup, Edge Setup Gate Delay Controls the length of time from the trigger until the gate is turned on. Key Access: Sweep, Gate Setup, Edge Setup Gate Length Controls the length of time that the gate is on when using edge triggering to control the gate. Key Access: Sweep, Gate Setup, Edge Setup Level Setup Sets up level polarity that will open the gate. Key Access: Sweep, Gate Setup High Selects a high TTL level to open the gate. Key Access: Sweep, Gate Setup, Level Setup Low Selects a low TTL level to open the gate. Key Access: Sweep, Gate Setup, Level Setup Points Allows you to set the number of points per sweep, from 101 to 8192 in non-zero span and 2 to 8192 in zero span. Use the knob, step keys, or numeric keypad to set this value. When the sweep time is limited by the Analog to Digital Converter (ADC) sample rate, the sweep time changes with the number of points selected. The greater the number of points, the longer the sweep time becomes. If Preset is pressed, or the analyzer power is cycled, the number of points per sweep will default to 401. The current value of points is displayed next to the sweep time (refer to page 2-14). Changing the number of points has several effects on the analyzer. Since markers are read at the point location, the marker reading may change. Press Peak Search, again for greater accuracy in the marker reading. All trace data for the current window is cleared. If in continuous sweep mode, (Sweep, Sweep (Cont)), a new sweep begins immediately. If average is on (BW/Avg, Average (On)), the averaging starts over with a count of 0. Chapter 6 6-85 Front-Panel Key Reference Sweep NOTE By selecting a number of sweep points greater than 401, you are optimizing frequency resolution and accuracy while accepting a reduced measurement speed. In addition to sweep points, the span, resolution bandwidth, video bandwidth, and center frequency will also affect measurement speed. This function is not available when signal identification is on (Input/Output, Input Mixer, Signal Ident (On)). When zone span is on (Span, Zone. Zone (On)), each window has its own value for points. This feature is not available in the E4403B, E4408B, or E4411B (ESA-L Series). The number of points per sweep for these models is always set to 401. Segmented Accesses the segmented sweep function and its editor. Segmented sweep is a method in which you can select multiple frequency bands (a maximum of 32), specify their parameters individually, and display them as a single trace. This function of the analyzer results in faster measurements and provides greater detail and resolution in particular bands of interest. To set the parameters of individual segments, go to the editor (Sweep, Segmented, Modify, Edit) and refer to the parameter key descriptions below. For measurement examples of the segmented sweep function, refer to the Agilent Technologies ESA Spectrum Analyzers Measurement Guide. NOTE This feature is only available on ESA-E series analyzers (E4401B, E4402B, E4404B, E4405B, E4407B) with firmware revision ≥ A.05.00. Displaying the Trace Turning segmented sweep on (Sweep, Segmented, Segmented (On)), displays each sweep segment from left to right in order of increasing start frequency. When segments have the same start frequency, the segments are displayed in order of increasing stop frequency. Overlapping segments are acceptable. (The reference marker for a marker delta will be displayed in the first segment). Segments are demarcated by vertical lines. The width of a given segment is determined by the ratio of the number of sweep points in the segment to the number of sweep points in the total trace. For example, if there are five segments with 101 sweep points each (505 total points), each segment occupies 20% of trace. If you increase the number of points in one of the segments to 404 (808 total points), that segment will occupy half of the trace; the other four segments, 12.5% each. You can define up to 32 segments with a total maximum number of sweep points equal to 8192. 6-86 Chapter 6 Front-Panel Key Reference Sweep Segmented Sweep Editor When the editor is entered (Sweep, Segmented, Modify, Edit), the segmented sweep mode is turned on, and a dual-display appears. The upper window shows the trace, displayed as described above. The lower window shows the editor data in tabular form: one segment per row with segment number and parameter values occupying the seven columns. The paramenters that can be set are: •Center Freq •Span •Resolution BW •Video BW •Points •Sweep Time (Zero Span only) The trace is updated after each segment has a complete row of data entered. Although thirty-two segments are possible, only 8 rows of data are shown in the table at a time. Use the softkey menu to navigate the editor. When defining a new segment, use the numeric keypad to set values. Pressing Enter places the value in the table and highlights the next parameter available for modification. NOTE The order of the segments may change when you enter center frequency or span because the sequence is based upon increasing start frequency. Various parameters are coupled to ensure accurate measurements. You will not be able to enter a value that would result in a measurement that is uncalibrated. Amplitude parameters are common to all segments and are defined via the amplitude softkey menu. Refer to page 6-8 for more information. The data in the segmented sweep table is retained through a power cycle. Table values can only be deleted by the Delete keys described below. To exit the editor press any key except Print, Help, and the viewing angle adjustments. NOTE Exiting the editor does not turn off segmented sweep. Segmented (Off) must be selected. Chapter 6 6-87 Front-Panel Key Reference Sweep Interaction with Other Analyzer Functions Certain conditions prevent segmented sweep from being activated, while others cause this mode to be turned off. For analyzers with Option AYZ, the mixer frequency range (Input, Input Mixer (Ext), Ext Mix Band) must be set to include the frequencies of interest in the segmented sweep table. If the mixer range is not the same, segmented sweep will not turn on. If the mixer range is changed, segmented sweep will be turned off. Segmented sweep is not available when the following analyzer functions are turned on: Demod, Signal ID, and Signal Track. In addition, keys which access these functions are grayed out if segmented sweep is on. This is also true for the following functions: Mkr→CF, Mkr→CF Step, Mkr→CF Start, Mkr→CF Stop, Mkr∆→Span, Span Zoom, Zone Span, and Zero Span. Confining marker pairs (marker delta, band pair, and span pair) to one segment facilitates interpretation of marker readings. However, marker pairs can provide useful information across segments. Amplitude readings are straightforward because the y-axis is consistent over all segments. Frequency or time readings require consideration of differences in sweep time, number of points, and span when interpreting measurements across segments. Marker delta functions differently depending upon the type of segment in which it is activated. If you turn on marker delta in a segment set to 0 Hz span, it remains in that segment and provides amplitude and time difference measurements. If you initiate a marker delta in a non-zero span segment, it will function across segments continuing to display frequency and amplitude information. Band pair and span pair function similarly to marker delta in segmented sweep with some characteristics which need to be noted. When a band or span pair is initiated in segmented sweep, the analyzer defaults to the frequency domain. If you wish to make time measurements in a zero-span segment, the domain must be set to time (Marker, More 1 of 2, Readout, Time). The band or span pair can traverse all segments without regard to the type of segment in which they were initiated. 6-88 Chapter 6 Front-Panel Key Reference Sweep NOTE Turn markers off (Marker, Off) when entering or exiting segmented sweep (Segmented, (On)(Off)). Performing a factory preset will turn segmented sweep off. This is also true if you select full span or last span. Functions which are parameters of segmented sweep are not available when accessed by pressing the following front-panel keys: Auto Couple, BW/Avg (Resolution BW and Video BW), Frequency (the entire softkey menu), Span (see above), and Sweep (Sweep Time and Points). When the sweep trigger is set to any of the trigger selections other than free run, no sweep occurs until the trigger condition is met. Once the trigger occurs, all segments are swept, completing the entire trace. NOTE For spectrum analyzers with Option 1DN or Option 1DQ, the tracking generator must be turned on (Source, Amplitude (On)) before you set up the segmented sweep table. The on/off state of the segmented sweep mode and the segmented sweep table can be saved as a “state” type file (see page 6-74) or as part of the power on/preset function (see page 6-92). NOTE When loading a “state” type file, segmented sweep will not turn on if any of the parameters in the file contain optional instrument settings not currently loaded on the analyzer or frequency settings outside the current range of the analyzer. Edit Accesses the segmented sweep editor, where a maximum of thirty-two segments can be defined by the segment number and the six parameters described below. Use the data control keys described on page 2-5 to enter the setting as each parameter is highlighted. Refer to the “Editor” section above for more information. Segment Allows you to select a previously defined segment or the next segment for modification. Use the numeric keypad to select a specific segment or press the Tab keys to access adjacent segments. Center Freq Allows you to specify the center frequency for a particular segment using the data control keys. For more information on this function, refer to “Center Freq” on page 6-37. Span Chapter 6 6-89 Front-Panel Key Reference Sweep Allows you to select a frequency range symmetrically about the center frequency for the current segment using the data control keys. NOTE The order of the segments may change when you enter center frequency or span because the sequence is based upon increasing start frequency. Refer to the “Displaying the Trace” section above, for clarification. Zero span is available for any or all segments. It must be set by pressing Span, 0, Hz. For more information on this function, refer to “Span X Scale” on page 6-78. Resolution BW Allows you to select the resolution bandwidth to a value between 1 kHz and 5 MHz for the current segment using the data control keys. For more information on this function, refer to “BW/Avg” on page 6-14. Video BW Allows you to set the video bandwidth for the current segment to a value between 30 Hz and 3 MHz. For more information, refer to “Video BW Auto Man” on page 6-14. Points Allows you to set the number of points for the current segment. The minimum number of points in a zero span segment is 2; in a non-zero-span segment, 101. The maximum number of points in the total sweep is 8192. If you exceed the number of points available in one segment, the message: Too much data; total sweep points limited will be displayed in the status line (yellow on color displays). Refer to “Points” on page 6-85 for more information on this parameter. Sweep Time Allows you to set the sweep time for the current zero span segment. For a non-zero span segment, the sweep time is auto-coupled to Span, Resolution Bandwidth, and Video Bandwidth and cannot be manually defined. Refer to “Sweep Time” on page 6-83 for more information. Key Access: Sweep, Segmented, Modify, Edit, More 1 of 2 NOTE The parameters for each segment are limited to ensure the occurrence of only calibrated measurements. 6-90 Chapter 6 Front-Panel Key Reference Sweep Delete Segment Deletes the highlighted segment. Key Access: Sweep, Segmented, Modify, Edit, More 1 of 2 Delete Initiates the deletion of all segments. After pressing this key once, the message: If you are sure, press key again to delete will be displayed. Pressing Delete again will complete the process. Key Access: Sweep, Segmented, Modify Chapter 6 6-91 Front-Panel Key Reference System (Local) System (Local) Accesses the System menu keys. Pressing System (Local) after the analyzer has been placed in the remote mode, places the analyzer in the local mode and enables front-panel control. During remote operation, R appears in the upper-right corner of the screen. A T, L or S may appear during remote operation, indicating talk, listen, or service request. Pressing the System (Local) key removes the R symbol in the upper-right corner. Show Errors Accesses a display of the last errors reported. The most recent error will appear at the top of the list. Next Page Allows you to access the next page of error messages. It is grayed out if you are on the last page or only one page exists. Key Access: System, Show Errors Prev Page Allows you to access the previous page of error messages. It is grayed out if you are on the first page or only one page exists. Key Access: System, Show Errors Clear Error Queue Power On/Preset Clears the error queue in the Show Errors display. Key Access: System, Show Errors Accesses the following menu keys. Power On Last Preset Determines the state of the analyzer when the analyzer is powered on. If the Power On function is set to Preset, the state of the analyzer is the same as it is after Preset is pressed, when the analyzer is powered on. If the Power On function is set to Last, then the state that the analyzer was in when it was powered off is recalled. The setting (Last or Preset) of the Power On function is not changed by pressing Preset. Use the Power On/Preset menu key function to change the setting of the analyzer state which is recalled at power on. Limit lines are not recalled when the analyzer is powered on. Refer to “Preset” in this chapter for more information. Key Access: System, Power On/Preset Preset Factory User 6-92 Pressing Preset (Factory) presets the analyzer to the configuration originally set at the factory. Refer to the “Preset” key description for the default factoryconfiguration settings. Chapter 6 Front-Panel Key Reference System (Local) Pressing Preset (User) sets the analyzer to the settings defined by the Save User Preset key. Refer to “Preset” in this chapter for more information. Key Access: System, Power On/Preset Save User Preset Time/Date Accesses the following Time/Date menu keys used to set and display the real-time clock: Time/Date On Off Date Format MDY DMY Alignments Saves the active state of the analyzer into the User Preset register for recall on Preset if Save (User) is selected. Refer to “Preset” in this chapter for more information. Key Access: System, Power On/Preset Turns the display of the real-time clock on or off. Key Access: System, Time/Date Changes the display of the date from a month-day-year format to a day-month-year format. Key Access: System, Time/Date Set Time Allows you to set the time of the real-time clock. Enter the time in 24 hour HHMMSS format, using the numeric keypad and pressing Enter. Valid hour (HH) values are from 00 to 23. Valid minute (MM) and second (SS) values are from 00 to 59. Key Access: System, Time/Date Set Date Allows you to set the date of the real-time clock. Enter the date in the YYYYMMDD format using the numeric keypad and press Enter. Valid year (YYYY) values are 0000 through 9999. Valid month (MM) values are from 01 to 12, and valid day values are from 01 to 31. Key Access: System, Time/Date Accesses the following Alignments menu keys which align the internal circuitry of the analyzer, load default values for the alignment system, and adjust the 10 MHz reference. Auto Align Chapter 6 Accesses the Auto Align menu keys. Selecting All turns on the automatic alignment of all measurement systems. All but RF turns on the automatic alignment of all measurement systems except the RF section. (Eliminating automatic alignment of the RF prevents changes in the input impedance between sweeps, which could cause input device instability.) Off turns off automatic alignment. When Auto Align, All is selected, “AA” appears along the left edge of the display. When Auto Align, All but RF is selected, “AB” appears. Key Access: System, Alignments 6-93 Front-Panel Key Reference System (Local) Align Now Accesses the Align Now menu keys and immediately executes an alignment cycle of the selected system(s). Menu key selections include All (for the alignment of all systems), RF (Ext Cable) (Internal), TG (Ext Cable) (if Option 1DN is installed in Agilent E4402B, E4403B, E4404B, E4405B, E4407B, and E4408B), and FM Demod (if Option BAA is installed). Key Access: System, Alignments After a five minute warm-up, Align Now, All (with a cable connected from AMPTD REF OUT and INPUT 50 Ω) should be performed on Agilent E4402B, E4403B, E4404B, E4405B, E4407B, and E4408B. Refer to the appropriate “Specifications and Characteristics” chapter in the Agilent ESA Spectrum Analyzers Specifications Guide for details on using Align Now when Auto Align is Off. Freq Correct On Off NOTE Controls use of some of the correction factors. When On is underlined, frequency correction factors are used. When Off is underlined, frequency correction factors are not used, and Freq Corr Off appears on the display. Turning the correction factors off degrades frequency accuracy. Key Access: System, Alignments Frequency correction factors must be on for the analyzer to meet its specified performance. Time Base Accesses the Fine and Coarse Time Base menu keys, which allow control of the 10 MHz time base frequency. This function is used to verify the settability of the 10 MHz reference and to adjust for changed operating conditions, such as temperature. Pressing Load Defaults or cycling power, resets the time base to its original value. Key Access: System, Alignments Load Defaults Loads the default values for the alignment system, turns on the frequency corrections, and resets the time base to the factory values. Align Now, All must be executed 3 times after pressing Load Defaults. Key Access: System, Alignments 6-94 Chapter 6 Front-Panel Key Reference System (Local) Remote Port With Option A4H (GPIB and Parallel) only. Selects the remote port to allow programming from an external controller over GPIB. Also, it allows the GPIB address to be entered. The default address is 18. With Option 1AX (RS-232 and Parallel) only. Selects the remote port to allow programming from an external controller over a serial communication link. Also, it allows the baud rate to be set. Baud rate values are as follows: 110, 300, 600, 1200, 2400, 4800, 9600, 19200, 38400, 57600, 115200. The default baud rate is 9600. Show System Show Hdwr Color Palette Displays the number and description of the options installed in your analyzer. It also displays the instrument model number, product number, serial number, firmware revision number, Host ID (for licensing), bootrom revision, and amount of RAM and ROM. Key Access: System, More 1 of 3 Next Page Allows you to access the next page of show system. It is grayed out if you are on the last page or only one page exists.Key Access: System, Show System Prev Page Allows you to access the previous page of show system. It is grayed out if you are on the first page or only one page exists. Key Access: System, Show System Gives detailed information about the hardware installed on your analyzer. Key Access: System, More 1 of 3 Next Page Allows you to access the next page of show hardware. It is grayed out if you are on the last page or only one page exists.Key Access: System, Show Hdwr Prev Page Allows you to access the previous page of show hardware. It is grayed out if you are on the first page or only one page exists. Key Access: System, Show Hdwr Agilent ESA-E Series only (E4401B, E4402B, E4404B, E4405B and E4407B) Accesses the Color Palette menu keys. These keys are only available with analyzers having a color display. Key Access: System, More 1 of 3 Default Sets all the display screen attributes to the factory defined colors. Key Access: System, More 1 of 3, Color Palette Vision Impair 1 and Vision Impair 2 The special colors built into the Vision Impair 1 and Vision Impair 2 keys accommodate most color-deficient vision problems. Key Access: System, More 1 of 3, Color Palette Chapter 6 6-95 Front-Panel Key Reference System (Local) Optical Filter Accommodates the use of protective goggles while viewing lasers. Key Access: System, More 1 of 3, Color Palette Monochrome Diagnostics Sets the display screen to green monochrome. The monochrome display uses different shades of green for each green value. This is especially useful for driving external monochrome monitors. Key Access: System, More 1 of 3, Color Palette Accesses the Front Panel Test menu key. Key Access: System, More 1 of 3 Front Panel Test Allows you to verify the functionality of each front-panel key (except Preset). The number next to each key name increments once each time the key is pressed. Rotating the knobs causes the number of pulses to be counted. Press Esc to exit. Key Access: System, More 1 of 3, Diagnostics Restore Sys Defaults Resets the “persistent” state variables to their defaults. These are values, such as the GPIB address, that are unaffected by a power cycle or a preset. Key Access: System, More 1 of 3 Table 6-2 System Default Settings Feature Default Setting Power On Last/Preset Preset Preset Factory/User Factory RS-232 DTR Control On (hardware pacing) RS-232 RTS Control IBFULL (hardware pacing) RS-232 Receive Pacing None (data pacing) RS-232 Transmit Pacing None (data pacing) RS-232 Baud Rate 9600 Instrument Color Palette Default palette Print Format Print screen mode Printer Selection Auto Print Orientation Portrait Custom Printer, Language PCL3 Custom Printer, Color Capability No Color Printing On Prints/ Page 1 6-96 Chapter 6 Front-Panel Key Reference System (Local) Table 6-2 System Default Settings Feature Default Setting Date Format MDY Time Date Display On GPIB Address 18 Display Viewing Angle 4 Speaker Volume 0 Manual Tracking Adjustment 2048 External Amplifier Gain 0 dBm Input Impedance 50 (Ohm)a a. This value maybe 75 ohms, depending upon the analyzer hardware configuration. Licensing Accesses the security system to enable licensing for individual options. For information on how to use this system, see the installation information for individual options in the measurement personalities’ user’s guides. NOTE Not all options can be enabled using this system and there is no way to turn off an option through this system. Once an option has been licensed for a given analyzer, it cannot be transferred to a different analyzer. Key Access: System, More 1 of 3, More 2 of 3 Option Accesses the Alpha Editor allowing you to enter a three character option number. To terminate the entry, press Enter or Return. An external keyboard may also be used for this entry. The option number will appear on the second line of the Option key. Key Access: System, More 1 of 3, More 2 of 3, Licensing License Key Accesses the Alpha Editor allowing you to enter the license key number. To terminate the entry, press Enter or Return. An external keyboard may also be used for this entry. The license key number will appear on the second line of the License Key menu key. Key Access: System, More 1 of 3, More 2 of 3, Licensing Chapter 6 6-97 Front-Panel Key Reference System (Local) Activate Allows you to activate the option. When a valid option key number and license key number have been entered, press Activate. If your entry was correct, the option will be enabled and the message: Option activated will appear in the status line of your display. The option number and license key number will also be cleared from the License Key and Option key. If your entry was incorrect, the error message Option not installed will appear in the status line of your display. The option number and license key number can be edited until they are correct. NOTE It is possible to enable an option for which the analyzer is not yet configured. Therefore, the message Option activated does not mean that the option will immediately function. For a display of options that are enabled and for which the analyzer is properly configured, press System, More 1 of 3, Show System. Key Access: System, More 1 of 3, More 2 of 3, Licensing Personalities Accesses a display listing the personalities that are currently installed in the analyzer. Information about the personalities are under the column headings Opt (option number), Name (option name), Version (personality version), Licensed (whether or not the personality is licensed), and Size (personality memory). At the bottom of the display is a line showing the available memory for installing personalities. NOTE Some files are shared between personalities. If shared files are installed, a personality may require less room than is indicated on the display. The Uninstall key will not delete any shared file unless the personality being deleted is the last personality to be deleted. Key Access: System, More 1 of 3, More 2 of 3 Next Page Allows you to view the next page of installed personalities. It is grayed out if you are on the last page or only one page exists. Key Access: System, More 1 of 3, More 2 of 3, Personalities Prev Page Allows you to view a previous page of installed personalities. It is grayed out if you are on the first page or only one page exists. Key Access: System, More 1 of 3, More 2 of 3, Personalities 6-98 Chapter 6 Front-Panel Key Reference System (Local) Install Allows you to install personalities in the analyzer. For more information on this key, see the documentation that accompanies the personalities. Key Access: System, More 1 of 3, More 2 of 3, Personalities Uninstall Allows you to uninstall a personality. Highlight the appropriate personality and press Uninstall, Uninstall Now. You will be prompted with the displayed message If you are sure you want to uninstall, press Uninstall Now again. Some personalities may not be deleted. If the attempt is made to do so, the message Can’t uninstall this program will appear on the display. Key Access: System, More 1 of 3, More 2 of 3, Personalities Service Accesses the Service menu keys which require a password. For information, refer to the troubleshooting chapter in the Agilent ESA Spectrum Analyzers Service Guide. Key Access: System, More 1 of 3, More 2 of 3 Chapter 6 6-99 Front-Panel Key Reference Trig Trig Accesses the menu of keys that allow you to select the sweep mode and trigger mode of the analyzer. Free Run New sweep starts as soon as possible after the current sweep ends. Video Activates the trigger condition that allows the next sweep to start if the detected RF envelope voltage rises to a level set by the video trigger level. When Video is pressed, a line appears on the display. The analyzer triggers when the input signal exceeds the trigger level at the left edge of the display. NOTE This function is not available when the Resolution Bandwidth is less than 1 kHz. If a Resolution Bandwidth less than 1 kHz is selected while in Video Trigger mode, the Trigger mode changes to Free Run. Line Activates the trigger condition that allows the next sweep to be synchronized with the next cycle of the line voltage. NOTE Line trigger is not available when operating from a DC power source. External Pos Neg Activates the trigger condition that allows the next sweep to start when the external voltage (connected to GATE TRIG/EXT TRIG IN on the rear panel) passes through approximately 1.5 volts. The external trigger signal must be a 0 V to +5 V TTL signal. This function also controls the trigger polarity (for positive or negative-going signals). TV Option B7B (TV Trigger and Picture on Screen) only. Activates the trigger condition that allows the next sweep to be synchronized with the next occurrence of the synchronizing pulse of a selected TV line. Line number range is dependent on the settings of the Standard and Field menus within the TV Trig Setup menu. When the line number is incremented beyond the upper limit, the value will change to the lower limit and continue incrementing from there. When the line number is decremented below the lower limit, the value will change to the upper limit and continue decrementing from there. 6-100 Chapter 6 Front-Panel Key Reference Trig TV Trig Setup Option B7B (TV Trigger and Picture on Screen) only. Accesses the setup functions for TV Trigger. Field Allows you to determine how the fields of the TV picture signal will be affected by the trigger system. One complete TV image consists of one frame of 525 or 625 horizontal lines depending on the TV standard being used. Each frame is composed of two fields of interlacing lines, each consisting of 262 1/2 lines (or 312 1/2 lines). The fields are called Field One and Field Two. Field One is viewed as having 263 lines (or 313 lines) and Field Two is viewed as having 262 lines (or 312 lines). For the 525 line NTSC video standard, we refer to TV lines as follows (these are the Field Modes): Entire Frame, lines 1 to 525 Field One, lines 1 to 263 Field Two, lines 1 to 262 (note that this really refers to “actual” lines 264 to 525) For the 625 line PAL and SECAM video standards, we refer to TV lines as follows: Entire Frame, lines 1 to 625 Field One, lines 1 to 313 Field Two, lines 314 to 625 As the Field is changed, the appropriate value for Line is chosen to keep triggering on the same line as before, or if this is not possible, the corresponding line in the new Field. For example, suppose line 264 is selected while in the NTSC-M standard and the Entire Frame mode. This is the first line in Field Two. If Field Two is then selected, the Line number changes to Line 1, the same actual line in the TV signal. If Field One is then selected, the line number stays at 1, but now we are triggering in the first line in Field One. The only exception to this is if we are on the last line of Field One and change to Field Two. In this case, we go to the last line in Field Two. Key Access: Trig, TV Trig Setup Entire Frame Causes the selected line number to be viewed as an offset into the entire frame starting with line 1, the first line in Field One. Key Access: Trig, TV Trig Setup, Field Chapter 6 6-101 Front-Panel Key Reference Trig Field One Causes the selected line number to be viewed as an offset into the first field starting with Line 1, the first line in Field One. Key Access: Trig, TV Trig Setup, Field Field Two Causes the selected line number to be viewed as an offset into the second field. If Line 1 is selected, it is the 264th line of the frame (NTSC-M, NTSC-Japan, PAL-M) or the 314th line of the frame (PAL-B,D,G,H,I, PAL-N-Combin, SECAM-L). Key Access: Trig, TV Trig Setup, Field Sync Pos Neg Refers to the nature of the video waveform. Normal baseband video has a TV line sync pulse on the bottom of the waveform (more negative voltage). This is referred to as “negative” (Sync Neg). When the analyzer is used as a TV receiver to produce baseband video, the detected video is “upside down” with the sync pulse on the top of the waveform (this is true only for NTSC and PAL transmission standards, not for SECAM). This orientation is referred to as “positive” (Sync Pos). Key Access: Trig, TV Trig Setup Standard Accesses the Standard menu keys which allow you to select from the following TV standards: NTSC-M, NTSC-Japan, PAL-M, PAL-B,D,G,H,I, PAL-N, PAL-N-Combin, SECAM-L. Key Access: Trig, TV Trig Setup TV Source Allows you to select between the internal analyzer path (SA) or the EXT VIDEO IN connector on the rear panel (Ext Video In) as the source for the TV Trigger and TV Monitor functions. Note that this does not affect the signal viewed on the analyzer. Key Access: Trig, TV Trig Setup TV Monitor NOTE When TV Monitor is pressed, the selected Standard is used to determine the proper setup of the analyzer hardware for presentation of the TV picture. When the TV picture is active and on the display, pressing a key that normally accesses a menu, instead restores the original ESA graphical display with the selected menu enabled. The active function remains active and can be adjusted while the picture is displayed. Key Access: Trig, TV Trig Setup The color decoding circuitry is always enabled, even for weak and monochrome signals. 6-102 Chapter 6 Front-Panel Key Reference Trig Trig Delay On Off Allows you to set and turn on or off a delay, during which the analyzer will wait to begin a sweep after receiving an external trigger signal. This function is not available when Gate is on. NOTE This function is not available in Free Run or Video Trigger modes. Trig Offset On Off Allows you to set and turn on or off an offset value from the trigger point of the sweep at which to begin storing data in the trace of the analyzer. The offset is specified as a function of time, and permits positive (pre trigger) and negative (post trigger) values to be specified. NOTE This function is only available when in Zero Span. (It is grayed out when in swept span.) If this key is pressed in swept spans, the error message: Trigger Offset unavailable in swept spans is displayed in the status line. The value and state of Trigger Offset is remembered if Zero Span is exited and restored when Zero Span is reselected. NOTE This function is only available with Resolution Bandwidths of 1 kHz or greater. If this key is pressed when the Resolution Bandwidths is less than 1 kHz, the error message: Trigger Offset unavailable in bandwidths < 1kHz is displayed in the status line. While Trigger Offset is on, it is not possible for the instrument to be set to a Resolution Bandwidth less than 1 kHz. Any attempt to do so will cause the error message: Bandwidths <1 kHz unavailable with Trigger Offset on to be displayed in the status line. Chapter 6 6-103 Front-Panel Key Reference Viewing Angle Viewing Angle Controls the optimum viewing angle of the display. The viewing angle keys are located next to each other at the upper left-hand corner of the analyzer, bordering the display. These two keys allow you to adjust the intensity of the objects on the display so that it can be optimally viewed from different angles. The Viewing Angle keys automatically repeat when they are held down. 6-104 Chapter 6 Front-Panel Key Reference View/Trace View/Trace Accesses the trace keys that allow you to store and manipulate trace information. Each trace is comprised of a series of data points in which amplitude information is stored. The analyzer updates the information for any active trace with each sweep. Trace 1 2 3 Selects the menu keys used for trace 1, trace 2, or trace 3 functions. Press Trace 1 2 3 until the number of the desired trace is underlined. CAUTION When using normalization, the mode of traces 2 and 3 should not be changed. Clear Write Erases any data previously stored in the selected trace and continuously displays any signals during the sweep of the analyzer. This function is activated for trace 1 at power-on and by pressing Preset. Max Hold Maintains the maximum level for each trace point of the selected trace (1, 2 or 3), and updates each trace point if a new maximum level is detected in successive sweeps. NOTE Changing the vertical scale (Amplitude, Scale Type, Log or Lin), pressing Restart, turning averaging on (BW/Avg, Average, On), or switching window in Zone Span (Span, Zone) restarts the held trace. Min Hold Maintains the minimum level for each trace point of the selected trace (1, 2 or 3), and updates each trace point if a new minimum level is detected in successive sweeps. NOTE Changing the vertical scale (Amplitude, Scale Type, Log or Lin), pressing Restart, turning averaging on (BW/Avg, Average, On), or switching window in Zone Span (Span, Zone) restarts the held trace. View Holds and displays the amplitude data of the selected trace. The trace register is not updated as the analyzer sweeps. If a trace is deactivated by pressing Blank, the stored trace data can be retrieved by pressing View. Blank Stores the amplitude data for the selected trace, and removes it from the display. The selected trace register will not be updated as the analyzer sweeps. This function is activated for traces 2 and 3 at power-on and by pressing Preset. Operations Accesses the following Operations menu keys: Key Access: View/Trace, More 1 of 2 Chapter 6 6-105 Front-Panel Key Reference View/Trace Normalize 1↔2 Exchanges the contents of the trace 1 register with the trace 2 register and puts trace 1 and 2 in view mode. Key Access: View/Trace, More 1 of 2, Operations 2 - DL → 2 Subtracts the display line from trace 2 and places the result in trace 2 and puts trace 2 in view mode. The 2 - DL → 2 function is a math operation. Key Access: View/Trace, More 1 of 2, Operations 2↔3 Exchanges the contents of trace 2 with trace 3 and puts trace 2 and 3 in view mode. Key Access: View/Trace, More 1 of 2, Operations 1→3 Copies trace 1 into trace 3 and puts trace 3 in view mode. Key Access: View/Trace, More 1 of 2, Operations 2→3 Copies trace 2 into trace 3 and puts trace 3 in view mode. Key Access: View/Trace, More 1 of 2, Operations Accesses the following Normalize menu keys: Key Access: View/Trace, More 1 of 2 Store Ref (1→ 3) Copies trace 1 into trace 3. Store Ref (1→ 3) must be pressed before pressing Normalize (On). If Normalize (On) is pressed before Store Ref (1→ 3), the error message: Store reference trace before turning on Normalize is displayed in the status line, however Normalize has been activated. Normalize On Off Normalize (On) Activates the normalize function. On each sweep, the normalized trace (Trace 3) is subtracted from Trace 1 and the result is added to the normalized reference level. The display shows the result of the following calculation: Trace 1 – Normalized Trace + Normalized Reference Level The trace data is normalized with respect to the normalized reference level, even if the value of the normalized reference level is changed. This function remains in effect on all subsequent sweeps until it is turned off. NOTE Segmented sweep is not available when Normalize (On) is selected. 6-106 Chapter 6 Front-Panel Key Reference View/Trace CAUTION Trace 1 should be in clear write mode prior to setting normalize to on. The normalize function is most useful for applying correction data to a trace while making a stimulus response measurement with a tracking generator. For example, connect the cables and a thru line, in place of the device to be measured, between a tracking generator and the analyzer input. Notice that the frequency response is not perfectly flat, showing the response of the cables, as well as the flatness of both the tracking generator and the analyzer. Press Store Ref (1→ 3), Normalize On. Notice that the displayed trace is now flat, or normalized. The position of the normalized trace can now be moved to a different position on the display by changing the normalized reference position. This may be useful if the device to be tested has positive gain, such as an amplifier. Now replace the thru line with the device under test, and an accurate measurement of the gain or loss can be made. Key Access: View/Trace, More 1 of 2, Normalize Norm Ref Lvl Sets the level (in dB) of the normalized reference. Key Access: View/Trace, More 1 of 2, Normalize Norm Ref Posn Offsets the displayed trace without affecting the instrument gain or attenuation settings. This allows the displayed trace to be moved without decreasing measurement accuracy. The normalized reference position is indicated with a (>) character on the left side of the display and a (<) character on the right side of the display. Key Access: View/Trace, More 1 of 2, Normalize Chapter 6 6-107 Front-Panel Key Reference Zoom Zoom Allows you to switch between the split-screen and full-sized display of the active window in zone span and other functions which support split-screen display modes. The active window is indicated by a solid green line surrounding the window. If Zoom is pressed while in a non-split-screen display mode, it will activate the zone span mode. (See Span, Zone, and also Next Window.) If Zoom is pressed when zone markers are off, it will turn on zone markers and put the display in split-screen mode. (See Span, Zone.) 6-108 Chapter 6 7 Options and Accessories This chapter lists the options and accessories that can be ordered along with your analyzer. The Option Table on the following page shows which options are available for your particular product. 7-1 Options and Accessories Option E4401B E4402B E4403B E4404B E4405B E4407B E4408B Option Table E4411B Table 7-1 0B0 Delete Manual Set • • • • • • • • 0B1 Add Manual Set • • • • • • • • 0BV Service Documentation, Component Level • • • • • • • • 0BW Service Documentation, Assembly Level • • • • • • • • 1AX RS-232 and Parallel Interface • • • • • • • • 1CP Rack Mount with Handles • • • • • • • • 1D5 High Stability Frequency Reference1 • • • • • 1D6 Time-Gated Spectrum Analysis • • • • • 1D7 50 to 75 Ohm Matching Pad • • • • • • • • 1DN 50 Ohm Tracking Generator • • • • • • • • 1DP 75 Ohm input2 • • 1DR Narrow Bandwidths • • • • 1DQ 75 Ohm Tracking Generator3 1DS RF Preamplifier • • • • • A4H GPIB and Parallel Interface • • • • • • • • A4J IF, Video and Sweep Ports • • • • • • • • A5D DC Power Cable • • • • • • • • AXT Transit Case • • • • • • • • AYT Gray Soft Carrying/Operating Case • • • • • • • • AYU Yellow Carrying/Operating Case • • • • • • • • AYX Fast Digitized Time Domain Sweeps • • • • • AYZ External Mixing B70 Benchlink Spectrum Analyzer B72 Enhanced Memory Upgrade B74 RF and Digital Communications Hardware B75 Performance Bundle2 B7B TV Trigger and Picture on Screen4 7-2 • • • • • • • • • • • • • • • • • • • • • • • • • • • • • • • Chapter 7 Options and Accessories E4405B E4407B • • • • B7E RF Communications Hardware • • • • B7K Distance to Fault Accessory Kit • • • • BAA FM Demodulation • • • • BAB APC 3.5 Input Connector BAC cdmaOne Measurement Personality • • • • BAH GSM Measurement Personality • • • • UE2 Firmware Upgrade Kit • • • • UKB Low Frequency Extension • • UK6 Commercial Calibration2 • • • • • • • • UK9 Front Panel Cover • • • • • • • • W32 3 Year Calibration Contract • • • • • • • • W50 5 Year Service Support • • • • • • • • W52 5 Year Calibration Contract • • • • • • • • • • • • • • E4408B E4404B E4403B Digital Signal Processing and Fast ADC • E4402B B7D Option E4401B Option Table E4411B Table 7-1 • 1. Option 1D5 is only available at time of purchase, except for the Agilent E4401B spectrum analyzer which can be retrofitted. 2. This option is only available at time of purchase. 3. This option has a 75 Ohm output impedance, and is only available with Option 1DP. 4. Option B7B requires Option BAA. Chapter 7 7-3 Options and Accessories Options Options Options can be ordered by option number when you order your analyzer. Some of the options are also available as kits that can be ordered and installed after you have received your spectrum analyzer. Refer to Table 7-1 on page 7-2 to determine which options are available for your particular product. 7-4 Chapter 7 Options and Accessories How to Order Options How to Order Options Options can be ordered using your product number and the number of the option you are ordering. For example, if you are ordering Option 1DP for an Agilent E4401B, you would order E4401B 1DP. If you are ordering an option after the purchase of your analyzer, you will need to add a U (for upgrade) to the product number and then specify which option you are ordering. Delete Manual Set (Option 0B0) Option 0B0 deletes copies of the Agilent ESA Spectrum Analyzers User’s Guide, Agilent ESA Spectrum Analyzers Calibration Guide, and the Agilent ESA Spectrum Analyzers Reference Guide. Additional Manual Set (Option 0B1) Option 0B1 provides an additional copy of the Agilent ESA Spectrum Analyzers User’s Guide, Agilent ESA Spectrum Analyzers Calibration Guide, Agilent ESA Spectrum Analyzers Specifications Guide, and the Agilent ESA Spectrum Analyzers Reference Guide. Component Level Service Documentation (Option 0BV) Option 0BV provides a copy of the Agilent ESA Spectrum Analyzers Component-Level Information. The component-level information includes parts lists, component-location diagrams, and schematic diagrams for selected repairable assemblies. Service Documentation and Adjustment Software (Option 0BW) Option 0BW provides a copy of the Agilent ESA Spectrum Analyzers Service Guide and PC-based adjustment software on CD-ROM. The service guide describes assembly level troubleshooting procedures, provides a parts list, and documents the adjustment procedures. RS-232 and Parallel Interface (Option 1AX) Option 1AX allows you to control your analyzer from a computer that uses an RS-232 interface. It includes an RS-232 9-pin connector, and a parallel interface connector for printers, and the Agilent ESA Spectrum Analyzers Programmer’s Guide. Option 1AX allows the analyzer to copy its display to a printer. Chapter 7 7-5 Options and Accessories How to Order Options Rack Mount Kit With Handles (Option 1CP) Option 1CP provides the parts necessary to mount the analyzer in an HP/Agilent System II cabinet or in a standard 19 inch (482.6 mm) equipment rack. It includes front handles and rack slides for added convenience. High Stability Frequency Reference (Option 1D5) Option 1D5 improves the frequency reference accuracy. The analyzer’s synthesizer is phase locked to an oven controlled crystal oscillator (OCXO), instead of the standard VCXO. Option 1D5 is only available at the time of purchase, except for the Agilent E4401B spectrum analyzer which can be retrofitted. Time-Gated Spectrum Analysis (Option 1D6) Option 1D6 allows you to selectively measure the spectrum of signals that may overlap in the frequency domain, but are separated in the time domain. By adjusting a time gate based on a user-supplied trigger signal, you can significantly increase the diagnostic capability of your spectrum analyzer for time-interleaved signals. 50 Ω to 75 Ω Matching Pad (Option 1D7) This option provides a 50 Ω to 75 Ω matching pad with dc block to be used on the analyzer input. The pad has a frequency range of 9 MHz to 2 GHz. It adapts your standard 50 Ω analyzer to be compatible with a 75 Ω system under test. Connector types are 50 Ω Type-N (m) to 75 Ω BNC (f). 50 Ω Tracking Generator (Option 1DN) Option 1DN provides a 9 kHz to 1.5 GHz built-in tracking generator for the Agilent E4401B and the Agilent E4411B. Option 1DN provides a 9 kHz to 3 GHz built-in tracking generator for the Agilent E4402B, E4403B, E4404B, E4405B, E4407B and E4408B. This source creates a source-receiver combination that allows insertion-loss, frequency response, and return-loss measurements. The tracking generator has a wide distortion-free dynamic range, plus good sensitivity and selectivity. 75 Ω Input Impedance (Option 1DP) This option provides a 75 Ω input impedance instead of the standard 50 Ω impedance. Analyzers with this option use cables, circuit boards, and front panels that are different from the standard units. Option 1DP is only available on the Agilent E4401B and E4411B. Option 1DP is not available after the purchase of your analyzer. 7-6 Chapter 7 Options and Accessories How to Order Options Narrow Resolution Bandwidth (Option 1DR) This option provides additional narrow resolution bandwidths of 10 Hz, 30 Hz, 100 Hz, and 300 Hz. These bandwidths improve the analyzer sensitivity and allow you to resolve closely spaced signals. 75 Ω Tracking Generator (Option 1DQ) Option 1DQ provides a 1 MHz to 1.5 GHz built-in tracking generator for the Agilent E4401B and the Agilent E4411B. Option 1DQ provides a 1 MHz to 3 GHz built-in tracking generator for the Agilent E4402B, E4403B, E4404B, E4405B, and E4407B. This source creates a source-receiver combination that allows insertion-loss, frequency response, and return-loss measurements. The tracking generator has a wide distortion-free dynamic range, plus good sensitivity and selectivity. Option 1DQ has a 75 Ω output impedance, and is only available with Option 1DP. Pre-amplifier (Option 1DS) The pre-amplifier improves the analyzer’s sensitivity (lowers the noise floor) by approximately 16 dB. GPIB and Parallel Interface (Option A4H) Option A4H allows you to control your analyzer from a computer that uses a general purpose interface bus (GPIB). Option A4H includes an GPIB connector, a parallel interface connector for printers, and the Agilent ESA Spectrum Analyzers Programmer’s Guide. Option A4H allows the analyzer to copy its display to a printer. IF, Sweep and Video Ports (Option A4J) Option A4J provides the analyzer with additional inputs and outputs. They are as follows: SWP OUT, HI SWP OUT (TTL), HI SWP IN (TTL), AUX VIDEO OUT, and AUX IF OUT. SWP OUT - sweep ramp output, provides a voltage ramp proportional to the sweep of the analyzer (0 V to 10 V). HI SWP OUT (TTL) - provides the HI SWP TTL signal as an output (TTL high during a sweep, TTL low during a retrace). It indicates when the analyzer is sweeping. HI SWP IN (TTL) - allows external sweep control. It can be grounded to stop sweeping. Chapter 7 7-7 Options and Accessories How to Order Options AUX VIDEO OUT - provides detected video output (before the analog-to-digital conversion) proportional to vertical deflection of the trace. AUX IF OUT - provides a 50 Ω, 21.4 MHz IF output that is the down-converted signal of the RF input of the analyzer. 12 Vdc Power Cable (Option A5D) Option A5D provides a 12 Vdc power cable that allows your analyzer to be powered from 12 V automotive or truck batteries. Hard Transit Case (Option AXT) Option AXT provides a hard transit case. The hard transit case will survive commercial transportation. This rugged case has two wheels and an extendible handle for easy transport. The case can also accommodate two battery packs and ac adapters. Operating and Carrying Cases (Option AYT/AYU) Options AYT and AYU are protective soft operating and carrying cases. Option AYT is made of gray rip-stop nylon and Option ATU is made of yellow rip-stop nylon. An outside pocket holds manuals or other accessories. A reinforced adjustable padded shoulder strap provides ergonomic distribution between the hand and shoulder. The front and rear panel soft covers adjust to be compatible with the front panel protective hard cover (Option UK9) and snap on battery pack (HP/Agilent E1779A). Side ventilation allows for operation without removal, but the maximum operating temperature is reduced to 45 °C. Fast Digitized Time Domain Sweeps (Option AYX) Option AYX allows fast digitized sweep times as fast as 20 µsec in spans of 0 Hz. Refer to the Sweep key description in Chapter 6 , “Front-Panel Key Reference” for information about possible sweep times. It also provides the following additional inputs and outputs: Option AYX - provides the analyzer with additional inputs and outputs. They are as follows: SWP OUT, HI SWP OUT (TTL), HI SWP IN (TTL), AUX VIDEO OUT, and AUX IF OUT. SWP OUT - sweep ramp output, provides a voltage ramp proportional to the sweep of the analyzer (0 V to 10 V). HI SWP OUT (TTL) - provides the HI SWP TTL signal as an output (TTL high during a sweep, TTL low during a retrace). It indicates when the analyzer is sweeping HI SWP IN (TTL) - allows external sweep control. It can be grounded to stop and reset the sweep. 7-8 Chapter 7 Options and Accessories How to Order Options AUX VIDEO OUT - provides detected video output (before the analog-to-digital conversion) proportional to vertical deflection of the trace. AUX IF OUT - provides a 50 Ω, 21.4 MHz IF output that is the down-converted signal of the RF input of the analyzer. External Mixing (Option AYZ) Option AYZ allows the use of HP/Agilent 11970 Series, and HP/Agilent 11974 external mixers with the Agilent E4407B analyzer to extend the frequency range to 110 GHz. Operation to 325 GHz is also possible with non-HP/Agilent mixers. Benchlink Spectrum Analyzer (Option B70) Option B70 provides the Benchlink Spectrum Analyzer software which can be used to capture screen images and trace data using a personal computer (PC). The captured information can then be used in other PC applications, including word processing and spread sheets. Enhanced Memory Upgrade (Option B72) Option B72 provides 2 SIMMS which increases the analyzer’s RAM to 32 MBytes and its flash or data storage memory to 16 MBytes (10 MBytes of which are available to the user for data storage). RF and Digital Communications Hardware (Option B74) Option B74 includes the RF Communications Hardware (Option B7E), Digital Signal Processing and Fast ADC (Option B7D), Time-Gated Spectrum Analysis (Option 1D6), Memory Extension (Option B72), High Stability Frequency Reference (Option 1D5), Preamplifier (Option 1DS), and Narrow Resolution Bandwidth (Option 1DR) assemblies. These assemblies are required for optimum performance of the cdmaOne (Option BAC) or GSM measurement personality (Option BAH). Performance Bundle (Option B75) Option B75 provides the pre-amplifier, narrow resolution bandwidths, and high stability frequency reference. Refer to Options 1DS, 1DR, and 1D5 for details. This option is only available at time of purchase. Chapter 7 7-9 Options and Accessories How to Order Options TV Trigger and Picture on Screen (Option B7B) Option B7B requires Option BAA. Option B7B allows you to trigger the analyzer sweep on a TV line of a demodulated TV waveform and view TV images in NTSC, PAL and SECAM standards on the analyzer display. Option B7B provides the following additional ports: EXT VIDEO IN/TV TRIG OUT - provides a shared baseband video input and a TTL output for the TV trigger (output through 75 Ω source impedance). EXT VIDEO OUT - provides a detected video output (before the analog-to-digital conversion) proportional to the vertical deflection of the trace (similar to Option BAA alone), and provides passthrough of the signal at EXT VIDEO IN/TV TRIG OUT, if selected (75 Ω). Digital Signal Processing and Fast ADC (Option B7D) Option B7D provides digital signal processing and fast ADC. This option is required for many of the mobile communication measurements in the GSM and cdmaOne measurement personalities. Option B7D must be ordered with Option B7E (RF communications hardware) and Option 1D5 (high stability frequency reference). RF Communications Hardware (Option B7E) Option B7E provides the communications hardware required for many digital communication measurements. Option B7E must be ordered with Option B7D (digital signal processing and fast ADC) and Option 1D5 (high stability frequency reference). Distance to Fault Accessory Kit (Option B7K) Option B7K includes the 86205A (RF bridge), 11636A (power divider), 909A (coax termination), 11512A (coax short), 8120-8687 (coax cable), and 9211-0050 (padded case). FM Demodulation (Option BAA) Option BAA allows you to demodulate, display and measure deviation on FM modulated signals. You can listen to audio signals on a built-in speaker or with an earphone. Option BAA provides the following additional port: EXT VIDEO OUT - provides a detected video output (before the analog-to-digital conversion) proportional to the vertical deflection of the trace (75 Ω). 7-10 Chapter 7 Options and Accessories How to Order Options APC 3.5 Input Connector (Option BAB) The type-N female connector is replaced with an APC 3.5 mm male connector. An APC 3.5 (f) to APC 3.5 (f), and BNC (f) to SMA (m) adapters are included for alignment purposes. cdmaOne Measurement Personality (Option BAC) Option BAC provides transmitter and receiver measurements that comply with various international digital communications standards, including TIA/EIA/IS-95-A, TIA/EIA-95-B, TIA/EIA/IS-97-A, TIA/EIA-97-B, TIA/EIA/IS-98-A, TIA/EIA-98-B, J-STD-008, J-STD-018, J-STD-019, ARIB STD-T53, CKOR, and PKOR. The set of cdmaOne measurements includes, channel power, receiver channel power, modulation accuracy (RHO), code domain power, receiver spurious, out-of-band spurious, harmonics, occupied bandwidth, monitor channel/band, and close-in spur. Option BAC includes a cdmaOne user’s guide, cdmaOne quick reference card, cdmaOne measurement guide and cdmaOne programming commands manual. GSM Measurement Personality (Option BAH) Option BAH provides transmitter and receiver measurements that comply with various international digital communications standards, including ETS 300 607-1, ETS 300 609-1, ETS 300 910, and J-STD-007. The set of GSM measurements includes, transmit power, power steps, power versus time, spurious emissions suite, intermodulation attenuation suite, phase and frequency error, cable fault location suite, slow frequency hopping cycle verification, monitor suite, and output RF spectrum suite. Option BAH includes a GSM user’s guide, GSM quick reference card, GSM measurement guide, and programming commands manual. Firmware Upgrade Kit (Option UE2) Option UE2 provides the most current ESA spectrum analyzer firmware on 3-1/2 inch floppy disks. Commercial Calibration with Test Data (Option UK6) Option UK6 provides the factory calibration test data and the standard commercial calibration certificate on the initial analyzer shipment. Option UK6 is only available at time of purchase. Chapter 7 7-11 Options and Accessories How to Order Options Front Panel Protective Cover (Option UK9) The cover assembly snaps onto the front of your analyzer to protect the front panel during travel and when the unit is not in use. The front panel protective cover includes a storage compartment to house small accessories or cables. Low Frequency Extension (Option UKB) Option UKB allows DC input (frequencies < 100 kHz) into the analyzer. This extends the frequency range on the low end to 100 Hz. 3 Year Calibration Contract (Option W32) Option W32 provides your analyzer with a 3 year instrument calibration contract. 5 Year Service Support (Option W50) Option W50 provides your analyzer with a total of 5 years of service support. This adds a 2 year service contract to the analyzer’s base 3 year warranty. 5 Year Calibration Contract (Option W52) Option W52 provides your analyzer with a 5 year instrument calibration contract. 7-12 Chapter 7 Options and Accessories Accessories Accessories A number of accessories are available from Agilent Technologies to help you configure your analyzer for your specific applications. They can be ordered through your local Agilent Sales and Service Office. Refer to Table 4-1 on page 4-6 for a list of Agilent Sales and Service Offices. RF and Transient Limiters The HP/Agilent 11867A and 11693A RF Limiters protect the spectrum analyzer input circuits from damage due to high power levels. The HP 11867A operates over a frequency range of dc to 1800 MHz and begins reflecting signal levels over 1 mW up to 10 W average power and 100 watts peak power. The 11693A microwave limiter (0.1 to 12.4 GHz, usable to 18 GHz) guards against input signals over 1 milliwatt up to 1 watt average power and 10 watts peak power. The 11947A Transient Limiter protects the spectrum analyzer input circuits from damage due to signal transients. It specifically is needed for use with a line impedance stabilization network (LISN). It operates over a frequency range of 9 kHz to 200 MHz, with 10 dB of insertion loss. 50 Ω/75 Ω Minimum Loss Pad The HP/Agilent 11852B is a low VSWR minimum loss pad that allows you to make measurements on 75 Ω devices using an analyzer with a 50 Ω input. It is effective over a frequency range of dc to 2 GHz. 75 Ω Matching Transformer The HP/Agilent 11694A allows you to make measurements in 75 Ω systems using an analyzer with a 50 Ω input. It is effective over a frequency range of 3 to 500 MHz. RF Bridges The HP/Agilent 86205A 50 Ω RF bridge and 86207A 75 Ω RF bridge can be used to make reflection measurements using an analyzer with tracking generator Option 1DN or 1DQ or with an external signal generator. These external directional bridges offer high directivity and excellent port match. The 86205A operates over a frequency range of 300 kHz to 6 GHz. The 86207A operates over a frequency range of 300 kHz to 3 GHz. Chapter 7 7-13 Options and Accessories Accessories HP/Agilent E1779A Battery Pack The E1779A is a battery pack that will power an Agilent ESA spectrum analyzer for 80 to 114 minutes, depending on the options installed in the analyzer. Refer to the E1779A Battery Pack User’s Guide for more information. HP/Agilent N2717A Performance Verification Software The N2717A provides automated performance verification software, adjustment software, and the calibration guide on CD-ROM. AC Probe The HP/Agilent 85024A high frequency probe performs in-circuit measurements without adversely loading the circuit under test. The probe has an input capacitance of 0.7 pF shunted by 1 MΩ of resistance and operates over a frequency range of 300 kHz to 3 GHz. High probe sensitivity and low distortion levels allow measurements to be made while taking advantage of the full dynamic range of the spectrum analyzer. The HP/Agilent 41800A low frequency probe has a low input capacitance and a frequency range of 5 Hz to 500 MHz. Broadband Preamplifiers and Power Amplifiers Preamplifiers and power amplifiers can be used with your spectrum analyzer to enhance measurements of very low-level signals. • The HP/Agilent 10855A preamplifier provides a minimum of 22 dB gain from 2 MHz to 1300 MHz. (Power is supplied by the probe power output of the analyzer.) • The HP/Agilent 8447D preamplifier provides a minimum of 25 dB gain from 100 kHz to 1.3 GHz. • The HP/Agilent 87405A preamplifier provides a minimum of 22 dB gain from 10 MHz to 3 GHz. (Power is supplied by the probe power output of the analyzer.) • The HP/Agilent 85905A CATV 75 ohm preamplifier provides a minimum of 18 dB gain from 45 MHz to 1 GHz. (Power is supplied by the probe power output of the analyzer.) 7-14 Chapter 7 Options and Accessories Accessories External Keyboard The HP/Agilent C1405B keyboard is an IBM AT compatible keyboard that can be connected to the external keyboard connector on the front panel of the analyzer. You may use any IBM AT compatible keyboard with a mini DIN connector. Screen titles and filenames can be entered with the external keyboard. GPIB Cable For use with Option A4H. The HP/Agilent 10833 GPIB cables interconnect GPIB devices and are available in four different lengths. GPIB cables are used to connect printers and controllers to a spectrum analyzer. Parallel Interface Cable For use with Option A4H and 1AX. The HP/Agilent C2950A parallel interface cable is a 36-pin to 25-pin male-to-male 2 meter cable used to connect supported printers to a spectrum analyzer. This cable is IEEE-1284 compliant. Printer For use with Option A4H or 1AX. The DeskJet personal printers provide black and white or color printing for another form of permanent records of your test results. The HP LaserJet series printers are also compatible. The printers connect to the parallel interface installed on the spectrum analyzer with either Option A4H or 1AX. RS-232 Cable For use with Option 1AX. The HP/Agilent 24542G is a 3 meter 9-pin (f) to 25-pin (m) RS-232 cable. The HP/Agilent 24542U is a 3 meter 9-pin (f) to 9-pin (f) RS-232 cable for serial 9-pin PC connection to an analyzer. The modem cable required is HP/Agilent 24542M 9-pin (f) to 25-pin (m), and the PC cable is HP/Agilent 24542U. Carrying Strap (Part Number E4411-60028) This carrying strap comes with Options AYT and AYU. It can also be ordered separately and used with Agilent ESA spectrum analyzers. Chapter 7 7-15 Options and Accessories Accessories HP/Agilent 11970 Series Harmonic Mixers The 11970 Series harmonic mixers are available to extend the frequency range of analyzers with Option AYZ (external mixing) up to 110 GHz. The following six models are available: HP/Agilent Model Number Frequency Range 11970K 18.0 to 26.5 GHz 11970A 26.5 to 40.0 GHz 11970Q 33.0 to 50.0 GHz 11970U 40.0 to 60.0 GHz 11970V 50.0 to 75.0 GHz 11970W 75.0 to 110 GHz HP/Agilent 11974 Series Preselected Millimeter Mixers 11974 Series preselected millimeter mixers are available to extend the frequency range of analyzers with Option AYZ (external mixing) up to 75 GHz. Preselection reduces mixer overload from broadband signals, reduces radiation of local oscillator harmonics back to the device under test, and reduces the level of image and multiple responses displayed. The following four models are available: 7-16 HP/Agilent Model Number Frequency Range 11974A 26.5 to 40.0 GHz 11974Q 33.0 to 50.0 GHz 11974U 40.0 to 60.0 GHz 11974V 50.0 to 75.0 GHz Chapter 7 Index Symbols , 6-64 (Local) key, 6-92 > Display Line, 6-64 Numerics 10 MHz REF INPUT, 2-11 10 MHz REF OUTPUT, 2-11 50 ohm RF bridge, 7-13 50 ohm/75 ohm minimum loss pad, 7-13 75 ohm matching transformer, 7-13, 7-14 75 ohm RF bridge, 7-13 A AC probe, 7-14 Accessories, 7-13 accessories AC probe, 7-14 broadband preamplifiers, 7-14 GPIB cable, 7-15 printer, 7-15 RF bridge, 7-13 RF limiters, 7-13 RS-232 cable, 7-15 transient limiters, 7-13 accessories shipped with the analyzer, 1-3 active function, 2-18 Adj Chan BW, 6-51 adjusting the display, 6-104 Align Now, 6-94 alignment load default values, 6-94 Alignments key, 6-93 All but RF, 6-93 Alpha Editor menu map, 5-3 Ampcor On Off, 6-10 amplifiers, 7-14 Amplitude, 2-21 Amplitude (Display Edit menu), 6-22 amplitude correction factors on or off, 6-10 amplitude interpolation, 6-23 Amplitude key, 2-4, 6-11 Amplitude menu map, 5-3 Amplitude On Off, 6-76 amplitude scale, 6-8 amplitude units, 6-9 AMPLITUDE Y Scale menu, 5-3 amplitude-correction factors, 6-9 Amptd Interp Log Lin, 6-23 Amptd Offset, 6-77 Index Amptd Ref (f=50 MHz) On Off, 6-40 AMPTD REF OUT, 2-6 Amptd Ref Out (f=50 MHz) On Off, 6-40 Amptd Step Auto Man, 6-77 analyzer battery, 2-41 annotation, 2-13 Annotation On Off, 6-24 Antenna, 6-10 arrow keys, 2-6 Attenuation Auto Man, 6-8, 6-77 attenuator tracking generator, 6-77 Auto Align, 6-93 Auto Couple, 6-13 Auto key, 6-70 AUX IF OUT, 2-11 Average On Off, 6-14 Average Type Video Power, 6-15 Avg Number On Off, 6-51 B Band Pair Start Stop, 6-45 Band Power, 6-46, 6-60 bandwidth ratio video bandwidth to resolution bandwidth, 6-14 battery analyzer, 2-41 Blank, 6-105 broadband preamplifiers, 7-14 BW/Avg, 6-14 BW/Avg menu map, 5-3 C Cable, 6-10 CAL, 2-24 calibration self-calibration routines, 2-24 Catalog Menu, 2-26 Center Freq, 6-37 center frequency, 6-37 CF Step Auto Man, 6-37 CF step size, 6-49 Chan Pwr Span, 6-51 Chan Spacing, 6-51 Change Title, 6-24 Channel Power, 6-54 checking the basics, 4-3 checking the fuse, 1-4 Clear Error Queue, 6-92, 6-95 Clear Title, 6-24 Clear Write, 6-105 clock setup, 6-93 Color Capable Yes No, 6-70 Color On Off, 6-71 Color Palette, 6-95 command error messages, 4-30 Connected No Yes, 6-22 connector 10 MHz ref input, 2-11 10 MHz ref output, 2-11 aux if output, 2-11 ext trig input, 2-9 external keyboard, 2-6 GPIB, 2-10 hi sweep in, 2-10 hi sweep out, 2-9, 2-10 INPUT 50 ohm, 2-6 parallel interface, 2-10 probe power, 2-6 RF OUT 50 ohm, 2-7 RS-232, 2-10 service, 2-9 Continuous Pk On Off, 6-62 continuous sweep, 6-84 CONTROL functions, 2-4 copy files, 2-36 copy trace 1 into 3, 6-106 copy trace 2 into 3, 6-106 correction factors, 6-94 Correction On Off, 6-10 Corrections, 6-9 Counter Zoom On Off, 6-53 coupled sweep time, 6-83 Coupling AC DC, 6-40 Custom key, 6-70 D data controls, 2-5 data entry keys, 2-5 data keys, 2-5 date display, 6-93 Datemode MDY DMY, 6-93 DC Fuse, 2-12 DC probes use of, 7-14 Define Custom, 6-70 Delete, 6-12 Delete (Display Edit menu), 6-23 delete files, 2-37 Delete Limits, 6-20 Delete Point, 6-12 Delete Point (Display Edit menu), 6-23 Delta, 6-44, 6-60 Demod, 6-17 demodulation, 6-17 demodulation functions, 6-17 Det/Demod, 6-17 Det/Demod menu map, 5-3 detection mode 1 Index negative peak, 6-17 positive peak, 6-17 sample, 6-17 Detector, 6-17 detector functions, 6-17 device-specific error messages 201 to 702, 4-35 Diagnostics, 6-96 Dir Select key, 2-27 Dir Up key, 2-27 directory creating, 2-27 disk format, 2-28 Display, 6-19 display line, 6-19 Display Line On Off, 6-19 Display menu map, 5-3 down arrow key, 2-6 E earphone connector, 2-4 EBW Span, 6-52 Edge Pos Neg, 6-85 Edge Setup, 6-85 Edit, 6-10, 6-22 Eject Page, 6-71 EMI Res BW, 6-16 Emiss BW X dB, 6-52 emission bandwidth span, 6-52 Emission BW, 6-55 Enter key, 6-25 Entire Frame key, 6-101 error messages -199 to -100, 4-30 201 to 702, 4-35 -499 to -400, 4-26, 4-29 command, 4-30 device-specific (201 to 702), 4-35 empty error queue, 4-25 format, 4-22 GSM, 4-45 query, 4-26, 4-29 types, 4-23 error queues empty message, 4-25 front panel, 4-21 SCPI remote interface, 4-21 errors -499 to -400, 4-29 Esc key, 2-3, 6-26 Escape, 6-26 escape key, 2-3 exchange trace 1 and 2, 6-106 exchange trace 2 and 3, 6-106 Ext Amp Gain, 6-12 EXT KEYBOARD, 2-6 Ext Mix Band key, 6-41 2 EXT TRIG IN, 2-9 external keyboard connector, 2-6 External Mixing, 7-9 External Pos Neg, 6-100 External preamplifier, 6-12 external reference, 1-9 F features front panel, 2-3 Field key, 6-101 Field One key, 6-102 Field Two key, 6-102 File, 6-27 file copying, 2-36 file deleting, 2-37 File key, 2-4 file menu functions, 2-25 copy, 2-36 delete, 2-37 format, 2-28 rename, 2-35 save, 2-29, 2-32, 2-33 File menu map, 5-3 file renaming, 2-35 file saving, 2-29, 2-32, 2-33 fixed, limit line type, 6-20 flatness, 3-23 frequency response, 3-23 test description, 3-23 floppy disk format, 2-28 format a disk, 2-28 format date, 6-93 Free Run, 6-100 Freq Correct On Off, 6-94 Freq Count, 6-36 Freq Count menu map, 5-3 Freq Interp Log Lin, 6-12, 6-23 Freq Offset, 6-37 Frequency, 2-20 frequency stop, 6-37 Frequency (Display Edit menu), 6-22 Frequency (Marker Readout menu), 6-46 FREQUENCY Channel, 6-37 FREQUENCY Channel menu map, 5-3 frequency correction, 6-94 Frequency Extension Assembly, 2-11 frequency interpolation, 6-12, 6-23 Frequency key, 2-4, 6-11 frequency offset, 6-37 frequency response, 3-23 flatness, 3-23 test description, 3-23 frequency span changing to full span, 6-78 front panel error queue characteristics, 4-21 front panel features, 2-3 Full Screen, 6-19 Full Span, 6-78 Function, 6-46, 6-60 functional test descriptions, 3-3 functional testing introduction, 3-2 performance verification, 3-2 test descriptions, 3-3 test list, 3-3 fuse, 1-4 fuse holder, 2-8 fuse location, 2-8 G Gate Delay, 6-85 Gate Length, 6-85 Gate On Off, 6-84 Gate Setup, 6-84 GATE TRIG/EXT TRIG IN (TTL), 2-9 GATE/HI SWP OUT (TTL), 2-9 GPIB cable, 7-15 GPIB connector, 2-10 Graticule On Off, 6-24 H hardware problems, 4-2 Harmonic Auto Man key, 6-42 Harmonic Dist, 6-56 harmonic distortion, 6-56 Harmonics, 6-53 Help key, 2-7, 6-39 HI SWEEP IN, 2-10 HI SWEEP OUT, 2-9, 2-10 highest peak finding next, 6-62 hold key, 2-3 how to call Agilent Technologies, 4-5 how to return your analyzer for service, 4-7 I Image Shift key, 6-42 Image Suppress key, 6-41 initial inspection, 1-2 INPUT 50 ohm, 2-6 input attenuation control, 6-8 input impedance, 6-40 Index Index Input key, 6-40 Input menu map, 5-3 Input Mixer Int Ext key, 6-40 Input Mixer key, 6-40 Input Z Corr, 6-40 Input/Output key, 6-40 instrument preset, 2-4 Int Preamp On Off, 6-9 Integration BW, 6-51 internal alignment routine, 2-24 internal alignment signal, 2-20 internal preamplifier, 6-9 Inverse Time (Marker Readout menu), 6-46 K key overview, 2-18 knob, 2-5 L Language PCL3 PCL5, 6-70 Last Span, 6-79 Level Setup, 6-85 licensing, 6-97 Limit 1 2, 6-21 limit lines fixed and relative, 6-20 select frequency or time, 6-19 Limit On Off, 6-21 limiters RF and transient, 7-13 Limits, 6-19 LIMITS FIX REL, 6-20 Limits Fixed Rel, 6-20 Line, 6-100 line fuse, 2-8 linear scale, 6-8 Load, 6-30 Load Defaults, 6-94 Load key, 2-4 load limits, 6-30 load setup files, 6-30 load states, 6-30 load traces, 6-30 log scale, 6-8 M Main Chan BW, 6-51 making a measurement, 2-20, 2-22 Man Track Adj, 6-77 Margin On Off, 6-21 Marker, 2-22, 6-44 marker selection, 6-44, 6-45 trace selection, 6-45 Index Marker All Off, 6-48 marker control keys, 6-44 marker counter, 6-36 resolution, 6-36 Marker Counter On Off, 6-36 Marker delta to span, 6-49 MARKER functions, 2-4 Marker menu map, 5-3 Marker Noise, 6-46 marker noise, 6-48 Marker Noise On Off, 6-48 Marker Normal, 2-22 marker readout, 6-46 Marker Table On Off, 6-48 marker to center frequency, 6-49, 6-60 Marker to center frequency step, 6-49 marker to reference level, 6-49, 6-60 Marker to start, 6-49 Marker to stop, 6-49 Marker Trace Auto A B C, 6-45 marker tracking, 6-38 Max Hold, 6-105 Max Hold On Off, 6-52 Max Mixer Lvl, 6-12 Meas Control, 6-50 Meas Control menu map, 5-3 Meas Off, 6-54 Meas Setup, 6-51 Meas Setup menu map, 5-3 Meas Tools, 6-60 Measure, 6-54 Measure Cont Single, 6-50 Measure key, 2-4 MEASURE menu map, 5-3 Media Door, 2-4 Menu keys, 2-3 menu keys, 2-18 menu map Alpha Editor, 5-3 Amplitude, 5-3 BW/Avg, 5-3 Det/Demod, 5-3 Display, 5-3 File, 5-3 Freq Count, 5-3 FREQUENCY Channel, 5-3 Input, 5-3 Marker, 5-3 Meas Control, 5-3 Meas Setup, 5-3 MEASURE, 5-3 Preset, 5-3 Print Setup, 5-3 Search, 5-3 Source, 5-3 SPAN X Scale, 5-3 Sweep, 5-3 System, 5-3 Trace, 5-3 Trig, 5-3 View/Trace, 5-3 Min Hold, 6-105 Min Search, 6-62 minimum to marker, 6-62 Mixer Bias On Off key, 6-42 Mixer Config key, 6-42 Mixer Type Presel Unpre key, 6-42 Mkr, 2-22 MODE, 6-57, 6-58 Modify, 6-21 monitor output, 2-9 N N db Points On Off, 6-62 Navigation keys, 2-27 negative peak detection mode, 6-17 Next Peak, 6-62 Next Pk Left, 6-60 Next Pk Right, 6-60 Next Window, 6-59 Next Window key, 2-7 noise level, 6-48 None key, 6-70 Norm Ref Lvl, 6-107 Norm Ref Posn, 6-107 Normal key, 6-44, 6-64 normal marker, 6-44 Normalize, 6-106 Normalize On Off, 6-106 number/units keypad, 2-5 O OBW Span, 6-52 Occ BW % Pwr, 6-52 occupied bandwidth, 6-52 Occupied BW, 6-55 on/off switch, 2-7 Operations key, 6-105 Option 1AX, 7-5 Option AYZ (external mixing), 7-9 Option B7B (TV trigger and picture on screen), 7-10 Options, 7-4 RS-232 and parallel interface, 7-5 ordering options, 7-5 Orientation, 6-71 Other, 6-10 output screen data, 6-69 3 Index overview, keys and key menus, 2-18 P packaging, 4-7 parallel interface connector, 2-10 Pause, 6-50 peak next, 6-62 peak detection mode positive/negative, 6-17 Peak Excursn, 6-63 Peak Readout, 6-64 Peak Search, 2-22, 6-60 Peak Search Param Max, 6-64 Peak Sort Freq Ampl, 6-64 Peak Table, 6-64 Peak Table On Off, 6-64 Peak Threshold, 6-63 peak to peak measurement, 6-62 Period (Marker Readout menu), 6-46 Pk-Pk Search, 6-62 Point, 6-11 Point (Display Edit menu), 6-22 positive peak detection mode, 6-17 power amplifiers, 7-14 power cable, 1-5 power input, 2-8 power on key, 2-7 Power On Last Preset, 6-92, 6-93 Power On/Preset, 6-92 power requirements, 1-4 Power Sweep On Off, 6-76 power-on state of spectrum analyzer, 6-92, 6-93 preamplifier gain, 6-12 preamplifiers, 7-14 Preferences, 6-24 Presel Adjust, 6-9 Presel Center, 6-9 preselector adjustment, 6-9 preselector centering, 6-9 Preset menu map, 5-3 Print key, 2-4, 6-69 Print Setup, 6-70 Print Setup menu map, 5-3 printer, 7-15 printer control, 2-4 Printer Type, 6-70 printing, 6-69 printing, parallel DeskJet, 2-38 LaserJet, 2-38 Prints/Page 1 2, 6-71 probe power connector, 2-6 4 probes AC and DC, 7-14 Properties, 6-19 Q queries error messages, 4-26, 4-29 R ratio video bandwidth to resolution bandwidth, 6-14 Readout, 6-46 real-time clock set date, 6-93 set time, 6-93 rear panel features, 2-8 rear-panel battery information label, 2-41 Ref Level, 6-8 Ref Lvl Offst, 6-9 reference level, 6-8 reference level offset, 6-9 relative, limit line type, 6-20 remote interface (SCPI) error queue, 4-21 Remote Port, 6-95 Rename, 6-34 rename correction files, 6-34 rename files, 2-35 rename limits, 6-34 rename screen files, 6-34 rename setup files, 6-34 rename states, 6-34 rename traces, 6-34 Resolution Auto Man, 6-36 resolution bandwidth, 6-14 Resolution BW Auto Man, 6-14 resolution of marker counter, 6-36 Restart, 6-50 Restart key, 6-72 Restore Sys Defaults, 6-96 Resume, 6-50 Return key, 2-6, 6-73 returning your analyzer for service, 4-7 RF bridge, 7-13 RF limiters, 7-13 RF OUT 50 ohm, 2-7 RPG knob, 2-5 RS-232 cable, 7-15 RS-232 interface connector, 2-10 S sales and service offices, 4-5 sample detection mode, 6-17 Save, 6-28 save files, 2-29, 2-32, 2-33 Save key, 2-4 save limits, 6-28 save setup files, 6-28 save states, 6-28 save traces, 6-28 Scale Type Log Lin, 6-8 Scale/Div, 6-8 SCPI remote interface error queue characteristics, 4-21 screen annotation, 2-13 on or off, 6-24 screen data output, 6-69 screen graticule, 6-24 screen title, 6-24 Search key, 6-60 Search menu map, 5-3 Search Param, 6-63 Segmented sweep, 6-86 segmented sweep changes in segment order, 6-87 displaying the trace, 6-86 editor, 6-87 interaction with other analyzer functions, 6-88 Select, 6-10 Select Marker 1 2 3 4, 6-44, 6-45 self-calibration routines, 2-24 service connector, 2-9 Service key, 6-99 service key access, 6-99 service options, 4-4 service tag, 4-7 Set Date, 6-93 Set Time, 6-93 setting the amplitude, 2-21 setting the center frequency, 2-20 setting the marker, 2-22 setting the span, 2-20 Show Errors, 6-92 Show Hdwr, 6-95 Show System, 6-95 Signal ID Mode key, 6-41 Signal Ident On Off key, 6-41 Signal Track On Off, 6-38 signal tracking, 6-38 Single Sweep, 6-75 single sweep, 6-84 Source, 6-76 Source menu map, 5-3 source power, 6-76 Span, 2-20, 6-78 span full, 6-78 Index Index last, 6-79 zero, 6-78 span functions, 6-78 Span key, 2-4 Span Pair Span Center, 6-45 SPAN X Scale, 6-78 SPAN X Scale menu map, 5-3 Span Zoom, 6-78 speaker on/off control, 2-4 speaker volume control, 2-6 spectrum analyzer attenuator, 6-8 spectrum analyzer state recalled, 6-92, 6-93 ST/Harmonic Auto Man, 6-53 Standard key, 6-102 Standby key, 6-74, 6-82 start and stop frequencies, 6-49 Start Freq, 6-37 start frequency, 6-37 state of spectrum analyzer at power on, 6-92, 6-93 step keys, 2-6 stimulus response mode, 6-84 Stop Freq, 6-37 stop frequency, 6-37 subtract display line from trace 2, 6-106 Sweep, 6-83 Sweep Cont Single, 6-84 sweep control continuous, 6-84 single, 6-84 Sweep menu map, 5-3 sweep modes, 2-15 sweep output connector SWEEP OUT, 2-10 sweep time, 6-83 Sweep Time Auto Man, 6-83 switch trace 1 and 2, 6-106 Swp Coupling SR SA, 6-84 Sync Pos Neg key, 6-102 System key, 2-4, 6-92 System menu map, 5-3 T Tab Keys, 2-6 test descriptions, 3-3 frequency response, 3-23 test list functional testing, 3-3 testing, 3-3 Test On Off, 6-21 Time (Marker Readout menu), 6-46 Time/Date, 6-93 Time/Date On Off, 6-93 Index Timebase, 6-94 timebase adjust Fine, Coarse, 6-94 timebase verification, 6-94 Title, 6-24 trace clear write, 6-105 Trace 1 2 3, 6-105 trace modes, 2-15 trace register contents, 6-105 trace registers copying contents, 6-105 exchanging contents, 6-105 tracking generator output power, 6-76 power sweep, 6-76 power sweep range, 6-77 source power offset, 6-77 source power step size, 6-77 tracking generator functions, 6-76 Tracking Peak, 6-77 transient limiter, 7-13 Trig Delay On Off, 6-103 Trig key, 6-100 Trig menu map, 5-3 Trig Type Edge Level, 6-84 trigger external, 6-100 line, 6-100 video, 6-100 trigger modes, 2-15 turning off markers, 6-48 turning on the analyzer for the first time, 1-9 TV key, 6-100 TV Monitor key, 6-102 TV Source key, 6-102 TV Trig Setup key, 6-101 TV Trigger and Picture on Screen, 7-10 Type Upper Lower, 6-21 View/Trace menu map, 5-3 Viewing Angle, 6-104 Viewing Angle keys, 2-3 volume control, 2-6 VOLUME knob, 2-6 W warm-up time, 2-24 warranty, 4-4 X X Axis Units Freq Time, 6-19 Z Zero Span, 6-78 Zone, 6-79 Zone Center, 6-80 Zone On Off, 6-79 Zone Pk Left, 6-81 Zone Pk Right, 6-81 Zone Span, 6-80 Zoom, 6-108 U up arrow key, 2-6 User, 6-10 V VBW/RBW Ratio, 6-14 VGA connector, 2-9 Video, 6-100 video averaging, 6-15 video bandwidth to resolution bandwidth ratio, 6-14 Video BW Auto Man, 6-14 video connector, 2-9 View, 6-105 View/Trace, 6-105 5