1
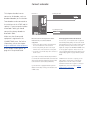
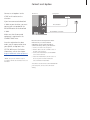
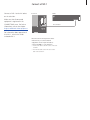
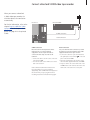
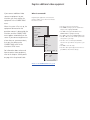
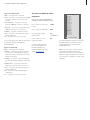
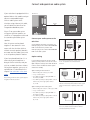
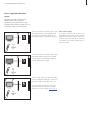
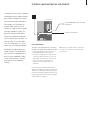
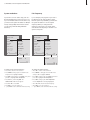
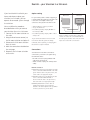
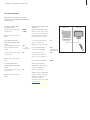
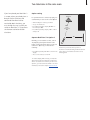
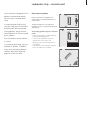
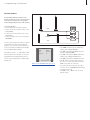
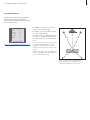
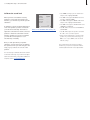
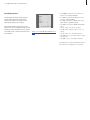
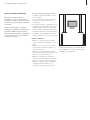
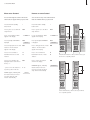
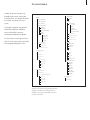
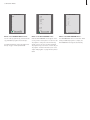
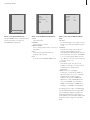
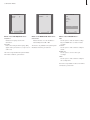
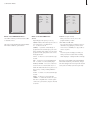
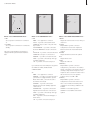
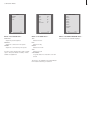
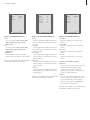
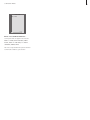
Contents
Connecting extra equipment, 3
Find out how to connect a set-top box, decoder, BeoCord V 8000 video tape
recorder or DVD 1 to your television and how to register extra equipment.
Connect and operate an audio system, 9
Find out how to connect an audio system to your television and operate an
integrated audio/video system.
Distribute sound and picture with BeoLink®, 11
Find out how to make link connections, operate a link system and set up your
television in a link room.
Loudspeaker setup – surround sound, 16
Find out how to turn your television into a surround sound system, including how
to connect loudspeakers and choose speaker combinations.
Customise Beo4, 23
Find out how to add and remove Beo4 functions.
Menus, 25
Overview of the on-screen menus.
Index, 34
2
Connect a decoder
This chapter describes how to
connect an AV decoder, such as a
baseband decoder, to the television.
Two decoders can be connected to
the television via the V.TAPE and AV
sockets*. If your setup also includes
a BeoCord V 8000, you should
connect the primary decoder to
BeoCord V 8000.
Make sure that all connected
equipment is registered in the
CONNECTIONS menu. For further
information, refer to the chapter
Register additional video equipment
or the chapter ‘Socket panels’ on
page 44 in the printed Guide.
BeoVision 3
3
Primary decoder
Secondary decoder
Disconnect all involved systems from the
mains before you connect external
equipment.
> Connect the cable from the external aerial to
the socket marked TV on the television.
> Connect the primary decoder to the 21-pin
V.TAPE socket on the television’s socket panel.
> If you have a second decoder, then connect it to
the AV socket.
If you wish to connect an RF decoder, remember
to connect the external aerial cable to the decoder
input socket and then forward the signal or cable
to the television’s aerial socket (marked TV).
If your television is equipped with the optional
Master Link module, connect your decoder to the
V.TAPE socket.
Tuned programs and decoder detection
In most cases, a connected decoder is registered
automatically during tuning. The decoder should
automatically detect those programs which require
decoding. However, if this is not the case, then
adjust the setting via the MANUAL TUNING menu
for the program in question. Please refer to the
section entitled ‘Adjust tuned TV programs’ in the
chapter Edit programs on page 30 in the printed
Guide.
*NOTE! If both sockets are occupied, you can
make further connections by connecting an
Expander box to the AV socket. For further
information about how to register a connected
Expander box, refer to the chapter Register
additional video equipment.
Connect a set-top box
Connect a set-top box* to the
V.TAPE or AV sockets on the
television.
If you have connected a BeoCord
V 8000 to your television, you must
connect your set-top box to the
DECODER socket on the BeoCord
V 8000.
BeoVision 3
4
Set-top box
AV connection
IR transmitter connection
Make sure that all connected
equipment is registered in the
CONNECTIONS menu.
Once the registration has been
made, you are requested to select
your specific set-top box in the
SET-TOP BOX menu. For further
information, refer to the chapter
Register additional video equipment.
*NOTE! Set-top boxes must be set up in
accordance with the documentation enclosed
with them.
Disconnect all involved systems from the
mains before you connect external
equipment. Use the 21-pin AV cable to
connect the set-top box to your television.
> Connect one end to the set-top box.
> Run the cable to the AV or V.TAPE socket on
the back of the television.
> Connect the IR transmitter to the IR OUTPUT
socket on the television.
> Fasten the IR transmitter to the IR receiver of
the set-top box. Follow the instructions
enclosed with the IR transmitter.
To be able to use the remote control included with
your set-top box, do not cover its IR receiver
entirely.
Connect a DVD 1
Connect a DVD 1 to the AV socket
on the television.
Make sure that all connected
equipment is registered in the
CONNECTIONS menu. For further
information, refer to the chapter
Register additional video equipment.
BeoVision 3
5
DVD 1
AV connection
For information about operation of
the DVD 1, refer to the Guide
enclosed with it.
Disconnect all involved systems from the
mains before you connect external
equipment. Use the 21-pin AV cable to
connect the DVD 1 to your television.
> Connect the cable to the AV socket on the rear
of DVD 1.
> Then run the cable to the AV socket on the
back of the television.
Connect a BeoCord V 8000 video tape recorder
When you connect a BeoCord
V 8000 video tape recorder, the
television detects the connection
automatically.
BeoVision 3
For further information, refer to the
chapter Register additional video
equipment or the chapter ‘Socket
panels’ on page 44 in the printed
Guide.
BeoCord V 8000
V. TAPE connection
Aerial connection
V.TAPE connection
Disconnect all involved systems from the
mains before you connect external
equipment. Use the 21-pin AV cable to
connect the video tape recorder to the
television.
> Connect the cable to the AV socket on the rear
of BeoCord V 8000.
> Then run the cable to the V.TAPE socket on the
back of the television.
If the connection between the television and
BeoCord V 8000 is lost or not connected
appropriately, then CONNECTION LOST appears on
the screen when you try to program a timed
recording. Restore the connection and try again.
Aerial connection
Use your external aerial connection (or cable
TV network connection) and the aerial cable
supplied with the video tape recorder.
> Connect the cable from your external aerial to
the signal input socket marked
on the rear
panel of BeoCord V 8000.
> Direct the aerial signal to the television, using
the aerial cable supplied with BeoCord V 8000.
> Plug one end into the socket marked TV on the
V 8000 and the other end into the aerial socket
marked TV on the television’s socket panel.
6
Register additional video equipment
If you connect additional video
sources or equipment to your
television, you must register the
equipment in the CONNECTIONS
menu.
When the system is first set up, the
equipment connected at that
particular moment is detected by the
television, and the CONNECTIONS
menu appears automatically on the
screen. If you connect equipment at
a later date, on a permanent basis,
then you must bring up the
CONNECTIONS menu via the
television’s SETUP menu.
For information about where and
how to connect extra equipment,
refer to the chapter ‘Socket panels’
on page 44 in the printed Guide.
What is connected?
Registering the equipment connected to the
television enables you to switch it on with the
Beo4 remote control.
> Press TV to switch on the television.
> Press MENU to bring up the TV SETUP menu
and press ▼ to highlight OPTIONS.
> Press GO to bring up the OPTIONS menu.
CONNECTIONS is highlighted already.
> Press GO to bring up the CONNECTIONS menu.
> Press ss or tt to select the V.TAPE option which
corresponds to your setup.
> Press ▼ to move to AV and press ss or tt to
select the AV option which corresponds to your
setup.
> Press GO to store this setup.
> Press ▲ to back up through previous menus or
press EXIT to exit all menus directly.
TV SETUP
PROGRAM GROUPS
TUNING
TIMER RECORDING
PLAY TIMER
OPTIONS
OPTIONS
STAND POSITIONS
CONNECTIONS
SOUND
PICTURE
CONNECTIONS
SOUND
PICTURE
CLOCK
back
GO
select BEOLINK
MENU LANGUAGE
V. TAPE
AV
back
select
GO
store
GO
CONNECTIONS
V. TAPE
V. TAPE
AV
NONE
What’s on the CONNECTIONS menu, p. 30.
7
>> Register additional video equipment
Options for V.TAPE include:
NONE… if no equipment is connected.
V.TAPE… if you have connected a BeoCord V 8000
video tape recorder or any other video tape
recorder.
V.TAPE+DECODER… if you have connected a
BeoCord V 8000 with a decoder connected to
it.
V.TAPE+STB… if you have connected a BeoCord V
8000 with a set-top box connected to it.
DECODER… if you have connected a decoder.
V.AUX… if you have connected any other type of
auxiliary equipment.
STB… if you have connected a set-top box.
If you connect a BeoCord V 8000, the only options
for V.TAPE are: V.TAPE, V.TAPE+STB and
V.TAPE+DECODER.
Options for AV include:
NONE… if no equipment is connected.
DECODER… if you have connected a decoder. If
your television is equipped with the optional
Master Link module, connect the decoder to the
V.TAPE socket instead.
EXPANDER… if you have connected an Expander
box with other auxiliary equipment connected to
it.
EXPANDER+DEC… if you have connected an
Expander box with a decoder connected to it.
V.AUX… if you have connected any other type of
auxiliary equipment.
DVD… If you have connected a DVD player or
similar devices.
STB… if you have connected a set-top box.
8
Get access to additional video
equipment
Some of the connected equipment is
accessible via the Beo4 remote control.
Press to switch on a video tape
recorder
V TAPE
Press to switch on a DVD player
DVD
Press repeatedly to display
V.AUX on Beo4
LIST
Press to switch on a source
registered as V.AUX
GO
V.AUX
STB SETUP
NOKIA 96025
NOKIA 9820T
NOKIA 9850T
PACE DTR730-IM
SKY DIGITAL
SELECTOR
CANALdig DK/S/N
MACAB DCB-101
TPS 96573D
CANAL+ SAT r2
Planet PL 9000
CANALdigital I
ECHOSTAR 9000
CANALdigital E
TV BOX 1000-S
CANALdigital NL
NOKIA D-BOX
NOKIA D-BOX II
HUMAX F1-VACI
TechniBox CAM1
store
In order to display V.AUX on
Beo4, you must add it to the
Beo4 list of functions. For
further information, refer to the
chapter Customise Beo4.
GO
If you have connected a set-top box, you will be
prompted to select your set-top box from an
on-screen list when you select STB in the
CONNECTIONS menu.
NOTE: If, for some reason, you disconnect the
extra equipment and then disconnect the
television from the mains, then you may have to
register the equipment again upon reconnection,
even if you have not changed your setup of extra
equipment.
Connect and operate an audio system
If your television is equipped with the
optional Master Link module and you
connect a compatible Bang &
Olufsen audio system to the
television using a Master Link cable,
you will obtain the benefits of an
integrated audio/video system.
Play a CD on your audio system
using your television speakers, or
switch on a TV programme and send
the sound to your audio system
speakers.
Your AV system can be placed
together in one room or in two
rooms with the television (with or
without external speakers) placed in
one room and the audio system with
a set of speakers placed in another.
If you have placed BeoVision 3 in a
room where you already have a
Bang & Olufsen television, and you
wish to use both televisions without
linking them together, you must set
up BeoVision 3 as described in the
chapter Two televisions in the same
room.
Not all Bang & Olufsen audio systems support
integration with the television.
9
BeoVision 3
MASTER
LINK
Connect your audio system to the
television
Option 2
Option 0
Using a Master Link cable, connect the one
multi-pin plug to the socket marked MASTER
LINK on the television, and the other
multi-pin plug to the socket marked MASTER
LINK on the audio system.
Option setting
If your television has been set up in an AV
system, you may need to set it to the correct
Option. Option setting is done with the Beo4
remote control and with the entire system
switched to standby.
The television and an audio system set up in one
room – all speakers are connected to the
television.
Option 1
Option setting for the television
> While holding the • button, press LIST.
> Let go of both buttons.
> Press LIST repeatedly to display OPTION? on
Beo4 and press GO.
> Press LIST repeatedly to display V.OPT on Beo4
and then key in the appropriate number
(1, 2 or 4).
Option setting for the audio system
> While holding the • button on Beo4, press LIST.
> Let go of both buttons.
> Press LIST repeatedly to display OPTION? on
Beo4 and press GO.
> Press LIST repeatedly to display A.OPT on Beo4
and then key in the appropriate number
(0, 1 or 2).
Option 1
You can choose to set up your television (with or
without connected speakers) and the audio system
(with a connected set of speakers) in the same
room.
Option 2
Option 2
You can choose to set up your audio system in
one room, and the television (with or without
connected speakers) in another.
>> Audio system with your television
10
Use an integrated audio/video
system
Integrating your audio system and your
television lets you choose speakers
appropriate to the current video or audio
program, and also makes it possible for you to
record video sound on the audio system.
To listen to sound from a television source on your
audio system speakers without switching on the
screen, press LIST repeatedly to display AV* on
Beo4, and then press a source button, such as TV.
LIST
AV
TV
To listen to sound from a television source on your
audio system speakers with the screen switched
on, press TV, press LIST repeatedly to display AV*
on Beo4, and then press TV again.
TV
LIST
AV
TV
To listen to audio sound on the television speakers,
press LIST repeatedly to display AV* on Beo4, and
then press an audio source button, such as CD.
*In order to display AV on Beo4, you must first
add it to the Beo4 list of functions. For further
information, refer to the chapter Customise Beo4.
LIST
AV
CD
Video sound recording
If you listen to sound from your television on your
Bang & Olufsen audio system’s speakers, and your
audio system has a tape recorder, you can record
television sound on the audio tape recorder. Refer
to the Guide enclosed with your audio system for
further information.
Distribute sound and picture with BeoLink
The BeoLink system makes it possible
to distribute picture and/or sound to
other rooms throughout the house.
BeoVision 3
You can connect your television in,
for example, the living room to
another video system or set of
speakers in another room, thereby
making it possible to ‘move’ the
picture or sound to other rooms.
If you have a BeoLink distribution
system installed, you can either use
your television in the main room,
such as a living room, or in a link
room, such as a study or bedroom.
Distribution of video signals to a
linked television is only possible if
your television is equipped with a
built-in system modulator. Under
certain circumstances, it may be
necessary to enter modulator
settings.
To the MASTER LINK socket on the link
room system
To a link room television
Link connections
The main room system must be connected to
the link room system with a Master Link cable:
> Connect the Master Link cable to the socket
marked MASTER LINK on the television.
> If you want to distribute video signals as well,
connect an ordinary aerial cable to the socket
marked LINK on the television. Then run both
cables to the link room and follow the
instructions enclosed with the link room
equipment.
If an audio system is already connected to the
Master Link socket and you wish to connect more
equipment, the Master Link cable must be split in
two and joined with the cable from the link room
using a special junction box. Contact your Bang &
Olufsen retailer for assistance.
NOTE! Groups of programs made on a television
in a main room cannot be accessed from a link
room television.
11
>> Distribute sound and picture with BeoLink
12
System modulator
Link frequency
If your link room is an audio setup, such as a
BeoLink Active/Passive, and you choose to set
up a non-linkable television in the same room,
you must set the system modulator to ON (the
factory setting is OFF, which must be used if
you are using a linkable Bang & Olufsen
television).
If, for example, a TV program in your area is
broadcasted on the same frequency as the
BeoLink system uses, 599 MHz, you must tune
the system modulator to an unoccupied
frequency. When you change the link
frequency in the main room system, make
sure that the link frequency in the link room
system corresponds.
TV SETUP
TV SETUP
PROGRAM GROUPS
PROGRAM GROUPS
TUNING
TUNING
TV TUNING
TV TUNING
TIMER RECORDING
EDIT PROGRAMS
TIMER RECORDING
EDIT PROGRAMS
PLAY TIMER
ADD PROGRAM
PLAY TIMER
ADD PROGRAM
OPTIONS
AUTO TUNING
OPTIONS
AUTO TUNING
STAND POSITIONS
MANUAL TUNING
STAND POSITIONS
MANUAL TUNING
LINK FREQUENCY
EDIT PROGRAM
ADD PROGRAM
AUTO TUNING
back
select
back
GO
back
select
GO
FREQUENCY
select
GO
back
select
FREQUENCY
ON
store
GO
LINK FREQUENCY
MODULATOR SETUP
MODULATOR
LINK FREQUENCY
EDIT PROGRAM
ADD PROGRAM
AUTO TUNING
FREQUENCY
599
GO
search
store
To switch on the system modulator…
> Press TV to switch on the television.
> Press MENU to bring up the TV SETUP menu
and press ▼ to highlight TUNING.
> Press GO to bring up the TV TUNING menu, and
press ▼ to highlight LINK FREQUENCY.
> Press ss twice, followed by GO. The
MODULATOR SETUP menu appears.
> Press ss or tt to reveal ON.
> Press GO to store the setting, or…
> …press EXIT to leave all menus without storing.
GO
To change the link frequency…
> Press TV to switch on the television.
> Press MENU to bring up the TV SETUP menu
and press ▼ to highlight TUNING.
> Press GO to bring up the TV TUNING menu and
press ▼ to highlight LINK FREQUENCY.
> Press GO to bring up the LINK FREQUENCY
menu. FREQUENCY is already highlighted.
> Press ss or tt to find an unused frequency.
> Press GO to store the setting, or…
> …press EXIT to leave all menus without storing.
BeoLink – your television in a link room
If you have BeoLink installed in your
home and choose to place your
television in a link room, you can
operate all connected systems through
the television.
Option setting
You must follow the procedure
described below when you connect
your television for use in a link room:
1 Connect the link room television to
the mains
2 Using the Beo4 remote control, set
the link room television to Option 6*
3 Disconnect the link room television
from the mains
4 Make the connections described on
the next page
5 Reconnect the link room television
to the mains.
> While holding the • button, press LIST.
> Let go of both buttons.
> Press LIST repeatedly to display OPTION? on
Beo4 and press GO.
> Press LIST repeatedly to display V.OPT on Beo4
and press 6*.
Main room
For your entire system to function properly, it
is essential that the television in the link room
is set to the correct Option before you
connect it to the system in the main room!
*If you connect the television for use in a link
room where other link systems are already
connected, such as speakers, you must program
the television to Option 5 instead.
Connections
Your television in the link room must be
connected to your main room system using
two different cables:
– BeoLink connection (using a Master Link
cable and a junction box).
– Aerial connection (using an ordinary aerial
cable).
BeoLink connection
In the main room: Connect the Master Link cable
to the socket marked MASTER LINK on the main
system. Run the cable to the junction box, and
cut the cable to an appropriate length.
In the link room: Connect the Master Link cable
to the socket marked MASTER LINK on
television. Run the cable to the junction box,
and cut the cable to an appropriate length.
Inside the junction box: Join the cables as
explained in the Guide enclosed with the
box/cable. This Guide explains all the possibilities
for the box, and how to join the cables.
13
Link room
Option 6
Aerial connection
Using an ordinary TV aerial cable (coaxial cable),
connect one end to the socket marked LINK on
the main system, and the other end to the aerial
input socket on the link room television.
>> BeoLink – your television in a link room
14
Link room operation
When you are in the link room, you can
operate all connected systems with the Beo4
remote control.
Use sources present only in
one of the rooms
Press the button for the source
you wish to use
RADIO
V TAPE
Operate the selected source as
usual
Use a main room source –
source type present in both
rooms
Press repeatedly on Beo4 until
LINK* is shown in the Beo4
display
Press the button for the source
you wish to use
Operate the selected source as
usual
Main room
If you want to have picture as
well as sound, press TV.
Otherwise, go to the next step
TV
Press repeatedly until AV* is
shown in the Beo4 display
LIST
Press to activate a source
connected to the main room
system, e.g. a set-top box, or…
SAT
Press to activate a DVD player
DVD
LIST
LINK
TV
Operate the selected source as
usual
Use a link room source –
source type present in both
rooms
Press the button for the source
you wish to use
Listen to stereo sound in your
link room
Usually sound distributed from a
main room video source, such as
a set-top box, to the link room is
transmitted in mono. However,
you can select stereo sound:
TV
While using this function,
distribution of other main room
sources to other link room
systems is not possible.
*NOTE! In order to display LINK
and AV on Beo4, you must first
add them to the Beo4 list of
functions. For further
information, refer to the chapter
Customise Beo4.
AV
Link room
Two televisions in the same room
If you have placed your BeoVision 3
in a room where you already have a
Bang & Olufsen television, and
commands from Beo4 can be
received by both televisions, you
must change the way in which you
switch on BeoVision 3. This prevents
simultaneous activation of both
televisions.
Option setting
For your BeoVision 3 to function properly, it is
essential that you set it to the correct Option:
> While holding the • button, press LIST.
> Let go of both buttons.
> Press LIST repeatedly to display OPTION? on
Beo4 and press GO.
> Press LIST repeatedly to display V.OPT on Beo4
and press 4.
Operate BeoVision 3 in Option 4
Normally, you can activate a source, such as
TV, simply by pressing the relevant source
button on Beo4. However, when you set your
television to Option 4, you must do the
following:
> Press LIST repeatedly until LINK* is shown in the
display.
> Press a source button, such as TV.
*In order to display LINK on Beo4, you must first
add it to the Beo4 list of functions. In order to be
able to use teletext on a television you have set to
Option 4, you must set Beo4 to VIDEO 3. For more
information, refer to the chapter Customise Beo4.
15
BeoVision 3
Option 4
LIST
LINK
TV
TV
This illustration shows how to switch on TV on the
television of your choice when you have a
BeoVision 3 and another Bang & Olufsen television
in the same room and these televisions are not
linked together.
Loudspeaker setup – surround sound
If your television is equipped with the
optional surround sound module,
you can create a surround sound
setup.
Place external speakers
A surround sound setup fits easily
into your living room. Let the picture
determine your ideal listening and
viewing position. You get the best
sound experience in the area created
by the speakers.
The three illustrations to the right show
examples of how you can place the television
and speakers.
Enter the distances to each speaker
in a menu.
In a surround sound setup, you must
calibrate the speakers. To calibrate
means to set the balance between
speakers. Refer to the following
pages for further instruction.
Please note that you should place your
speakers where you want them before you
connect them.
The following guidelines apply for all speaker
setups:
– Place your rear speakers on either side behind
your favourite listening position.
– You do not necessarily have to place the
speakers in the corners of the room.
– Always use your most powerful speakers as
front speakers.
– If you want to connect a BeoLab 2 subwoofer,
refer to the subwoofer’s own Guide.
16
>> Loudspeaker setup – surround sound
17
Connect speakers
L
R
Connect Bang & Olufsen speakers and a
BeoLab 2 subwoofer to the connection panel
at the back of the television. The speakers
must be Bang & Olufsen Power Link speakers.
To connect speakers…
> Use the cables enclosed with the speakers.
> Connect the two front speakers to the sockets
marked FRONT.
> Connect the two rear speakers to the sockets
marked REAR.
> Connect the subwoofer to the socket marked
SUBWOOFER.
FRONT
L
R
SUBWOOFER
REAR
You can loop the signals from speaker to speaker
(as described in the guide enclosed with your
speakers), or you can connect each speaker to a
socket. Longer cables and adaptors are available
from your Bang & Olufsen retailer.
Remember to set the L – R – LINE switch on both
the front and rear set of speakers to L or R (left
and right channel) to indicate their position in
each set. Set the left speakers to L and the right
speakers to R.
SPEAKER TYPE
FRONT
BEOLAB 1
REAR
BEOLAB 6000
SUBWOOFER
YES
store
GO
What’s on the SPEAKER TYPE menu p. 32
> Press MENU to bring up the TV SETUP menu
and press ▼ to highlight OPTIONS.
> Press GO to bring up the OPTIONS menu and
press ▼ to highlight SOUND.
> Press GO to bring up the SOUND SETUP menu
and press ▼ to highlight SPEAKER TYPE.
> Press GO to bring up the SPEAKER TYPE menu.
> Press ss or tt to reveal your speaker type and
▼ to move on to the next speaker set. Choose
NONE if no speakers are connected.
> If you have a BeoLab 2 subwoofer, press ▼ to
move the cursor to SUBWOOFER and press tt to
change the field to YES.
> Press GO to store or EXIT to leave the menu
without storing.
>> Loudspeaker setup – surround sound
18
Set speaker distance
Switch on the television from your favourite
viewing position. Enter the straight-line
distances in metres between your position and
the individual speakers.
SPEAKER DISTANCE
CENTRE
1M
LEFT FRONT
1M
RIGHT FRONT
1M
RIGHT REAR
1M
LEFT REAR
1M
store
GO
What’s on the SPEAKER DISTANCE menu p. 32
> Press MENU to bring up the TV SETUP menu
and press ▼ to highlight OPTIONS.
> Press GO to bring up the OPTIONS menu and
press ▼ to highlight SOUND.
> Press GO to bring up the SOUND SETUP menu
and press ▼ to highlight SPEAKER DISTANCE.
> Press GO to bring up the SPEAKER DISTANCE
menu.
> Press ▲ or ▼ to move the cursor from speaker
to speaker and press ss or tt to select the
approximate straight-line distance in metres
between your viewing position and each of the
speakers.
> When you have entered the appropriate speaker
distances, press GO to store or press EXIT to
leave the menu without storing.
TV
FRONT
FRONT
REAR
REAR
You do not have to enter a distance for a
BeoLab 2 subwoofer, as the placement of a
subwoofer has little impact on the sound.
>> Loudspeaker setup – surround sound
Calibrate the sound level
When you have connected the necessary
speakers in a surround sound setup to the
television, you will have to perform a speaker
calibration.
A calibration sound is produced alternately in
each of the speakers you have connected in
your surround sound setup. Your task is to
adjust the sound level from all the connected
speakers to match the sound level from the
television speakers. You can choose whether
you want the sound sequence to occur
automatically or manually.
Once you have performed your speaker
calibration, you will only need to re-calibrate
the speaker sound if you make changes to the
setup, e.g. if you move one or more of the
speakers.
It is not necessary to calibrate subwoofer sound in
a surround sound setup. If you still wish to adjust
subwoofer sound when your speaker calibration is
complete, refer to ‘Sound adjustments’.
19
SPEAKER LEVEL
SEQUENCE
AUTOMATIC
LEFT FRONT
........
RIGHT FRONT
........
RIGHT REAR
........
LEFT REAR
........
store
GO
What’s on the SPEAKER LEVEL menu p. 32.
> Press MENU to bring up the TV SETUP menu
and press ▼ to highlight OPTIONS.
> Press GO to bring up the OPTIONS menu and
press ▼ to highlight SOUND.
> Press GO to bring up the SOUND SETUP menu
and press ▼ to highlight SPEAKER LEVEL.
> Press GO to bring up the SPEAKER LEVEL menu.
SEQUENCE is highlighted.
> Press ss or tt to choose between AUTOMATIC
and MANUAL.
> Press ss or tt to adjust the speaker sound and
▲ or ▼ to move to another speaker.
> When you have adjusted the sound for all the
speakers in your surround sound setup, press
GO to store or press EXIT to leave the menu
without storing.
The sound level from the television speakers
functions as your point of comparison with the
external speakers and can not be adjusted here.
>> Loudspeaker setup – surround sound
20
Sound adjustments
Sound settings are preset at the factory to
neutral values which suit most listening
situations. However, if you wish, you can
adjust these settings to your liking.
The loudness feature compensates for the
human ear’s lack of sensitivity to high and low
frequencies. These frequencies are boosted at
low volume levels so that low music becomes
more dynamic.
SOUND ADJUSTMENT
VOLUME
........
BASS
........
TREBLE
........
SUBWOOFER
........
LOUDNESS
ON
store
GO
What’s on the SOUND ADJUSTMENT menu,
p. 30.
> Press MENU to bring up the TV SETUP menu
and press ▼ to highlight OPTIONS.
> Press GO to bring up the OPTIONS menu and
press ▼ to highlight SOUND.
> Press GO to bring up the SOUND SETUP menu,
ADJUSTMENT is highlighted already.
> Press GO to bring up the SOUND ADJUSTMENT
menu.
> Press ▲ or ▼ to select an item to adjust.
> Press ss or tt to adjust the values or choose a
setting.
> Press ▲ or ▼ to move through menu items.
> Press EXIT to store your settings until you switch
off BeoVision 3.
> Press GO to store your settings permanently.
Note that Balance, Loudness and Default mode are
not available if you headphones are connected.
>> Loudspeaker setup – surround sound
Choose a speaker combination
While you are watching a movie or
programme, you can choose the speaker
combination you wish to switch on, provided
that the various sound modes are available in
your system.
The television may switch on a speaker
combination automatically. This happens if a
programme or DVD contains information
about the number of speakers to be switched
on. You are still free to choose the speaker
combination you prefer.
21
To choose a speaker combination via Beo4…
> Press LIST on Beo4 until SPEAKER is shown in
the Beo4 display.
> Press the number of the speaker combination
you want. The speakers selected cut in
automatically.
> If you want to adjust the sound balance for the
programme you are watching, press ▲ or ▼ to
adjust the balance between the external front
and rear speakers, and press ss or tt to adjust
the balance between the left and right speakers.
> Press EXIT to remove SPEAKER from the Beo4
display and return to the source you were using.
Speaker combinations
SPEAKER 1… Sound in the television speakers
only. For programmes with dialogue, e.g. TV
news.
SPEAKER 2… Stereo sound in the two external
front speakers. The BeoLab 2 subwoofer is
active. For music CDs.
SPEAKER 3… The television speakers, external
front speakers and the BeoLab 2 subwoofer are
active. For TV programmes in stereo.
SPEAKER 4… Enhanced stereo sound in the
external front and rear speakers. The BeoLab 2
subwoofer is active. For music CDs or tapes.
SPEAKER 5… Surround sound from all speakers
including the BeoLab 2 subwoofer. For
programmes encoded in Surround Sound.
If you have connected only two external front
speakers to the television, you will only be able to
choose SPEAKER 1–3. You cannot store a speaker
combination you select like this.
>> Loudspeaker setup – surround sound
See the name of the active sound
system
22
SOUND SYSTEM
MONO / STEREO
You can see the name of the active sound
system for a source or programme on the
screen. However, it is not possible to adjust or
preset a sound system.
accept
GO
What’s on the SOUND SYSTEM menu, p. 33.
> Press MENU to bring up the TV SETUP menu
and press ▼ to highlight OPTIONS.
> Press GO to bring up the OPTIONS menu and
press ▼ to highlight SOUND.
> Press GO to bring up the SOUND SETUP menu
and press ▼ to highlight SOUND SYSTEM.
> Press GO to bring up the SOUND SYSTEM
menu.
Customise Beo4
23
The Beo4 buttons give direct remote
control of a large number of
television functions, and the Beo4
display gives you access to even
more functions.
Set up Beo4
Add an extra ‘button’
If you have a Beo4 remote control already you
can configure the Beo4 to work with your
television.
When you add a new function to the Beo4
list, you can then bring up this new ‘button’ in
the Beo4 display.
Whenever a source is displayed on
Beo4 (such as TV or RADIO), you can
press the LIST button and bring up
extra functions in the display to help
you operate that source, just as if
you were calling up extra buttons.
You can also switch on extra
equipment connected to your
television.
Press and hold the standby
button down
•
Press and hold the standby
button down
•
Press to get access to the Beo4
setup function
LIST
Press to get access to the Beo4
setup function
LIST
Press repeatedly until CONFIG?
appears in the display
LIST
Please note that Beo4 contains a list
of all of Bang & Olufsen’s extra audio
and video functions, but only
functions supported by the television
work when you call them up in the
Beo4 display.
Press to select the type of
configuration
GO
Press repeatedly until VIDEO?
appears in the display
LIST
Press to get access to the video
configuration
GO
Press repeatedly until VIDEO2
appears in the display*
LIST
Press to store the configuration
GO
You can customise your Beo4 list of
functions to suit your needs, and
change the order in which these
extra functions appear when you call
them up.
Let go of both buttons. ADD?
appears in the display
STORED appears, indicating that
the configuration has been
stored. You leave the Beo4 setup
function automatically
*If the video configuration does
not contain VIDEO1, select MX
instead.
ADD?
CONFIG?
VIDEO?
Let go of both buttons. ADD?
appears in the display
ADD?
Press to bring up the list of
available ‘buttons’ to add from.
The first ‘button’ appears in the
display, it flashes on and off
GO
Press to move forwards or
backwards in the list of all extra
‘buttons’
▲
Press to add and place the
‘button’ on its preset position or
as the first ‘button’ in the list,
or…
GO
…press to insert the ‘button’ at
a specific position in the list
1–9
▼
VIDEO2
STORED
ADDED appears, indicating that
the ‘button’ has been added.
You leave the Beo4 setup
function automatically
ADDED
>> Customise Beo4
24
Move extra ‘buttons’
Remove an extra ‘button’
You can rearrange the order in which the
extra ‘buttons’ appear when you press LIST.
You can remove any of the extra ‘buttons’
that are available when you press LIST.
Press and hold the standby
button down
•
Press and hold the standby
button down
•
Press to get access to the Beo4
setup function
LIST
Press to get access to the Beo4
setup function
LIST
GO
Let go of both buttons. ADD?
appears in the display
ADD?
Press repeatedly until MOVE? is
displayed
LIST
Press to bring up the list of extra
‘buttons’. The first ‘button’
appears in the display
Let go of both buttons. ADD?
appears in the display
Press repeatedly until REMOVE?
is displayed
LIST
GO
Press to bring up the list of extra
‘buttons’. The first ‘button’
appears in the display
GO
Press to move forwards or
backwards in the list of extra
’buttons’
▲
Press to move forwards or
backwards in the list of extra
’buttons’
▲
Press to move and place the
displayed ‘button’ as the first in
the list, or…
GO
Press to remove the ‘button’
shown in the display
GO
…press to move the ‘button’ to
a specific position in the list
1–9
MOVED appear, indicating that
the ‘button’ has been moved.
You leave the Beo4 setup
function automatically
MOVE?
▼
REMOVED appears, indicating
that the ‘button’ has been
removed. You leave the Beo4
setup function automatically
3
ADD?
REMOVE?
Add an extra ‘button’ to Beo4, either to the top of
the list or to a specific position.
▼
REMOVED
GO
3
MOVED
Move extra ‘buttons’, either to the top of the list
or to a specific position.
On-screen menus
In order for you to find your way
through the on-screen menus your
television offers, this chapter illustrates
the overall structure of the menu
system.
PROGRAM GROUPS
25
OPTIONS
CONNECTIONS
TUNING
V.TAPE
EDIT PROGRAMS
ADD PROGRAMS
AUTO TUNING
AV
SOUND
ADJUSTMENT
VOLUME
MANUAL TUNING
The chapter also gives you detailed
information about the individual
menus which offer numerous
setting-up and adjustment options.
BASS
SEARCH
TREBLE
FREQUENCY
SUBWOOFER
PROGRAM NUMBER
LOUDNESS ON/OFF
NAME
EXTRA
FINE TUNE
SPEAKER TYPE
SPEAKER DISTANCE
DECODER
On the overview to the right you can
click the menu name to be transferred
to the page describing this menu.
TV SYSTEM
SOUND
LINK FREQUENCY
SPEAKER LEVEL
SOUND SYSTEM
PICTURE
FREQUENCY
BRIGHTNESS
FINE TUNE
CONTRAST
MODULATOR ON/OFF
COLOUR
TINT
TIMER RECORDING
CLOCK
NOW
TIME
TELETEXT
DATE
RECORD LIST
MENU
PROGRAM
START TIME
STOP TIME
DATE
PDC/VPS
MONTH
YEAR
SYNCHRONISE
MENU LANGUAGE
DANSK
DEUTSCH
ENGLISH
ESPAÑOL
FRANÇAIS
PLAY TIMER
TIMER ON/OFF
ITALIANO
NEDERLANDS
TIMER INDEX
SVENSKA
PLAY TIMER PROGRAMMING
SOURCE
STAND POSITIONS
PROGRAM
TV ON
START TIME
TV STANDBY
STOP TIME
DAYS
The extended on-screen menu system for the
television. The presence of the greyed menu items
depends on whether these optional extras are
available in your system. Press MENU on Beo4 to
access the main menu.
>> On-screen menus
26
PROGRAM GROUPS
EDIT TV PROGRAMS
1
2
3
4
5
6
7
8
9
..
..
17
18
GROUP1
...
...
...
...
...
...
...
name
new group
move
create group
GO
What’s on the PROGRAM GROUPS menu…
You can create program Groups, name them and
copy individual TV programs into the Groups.
For further information, refer to the chapter ‘Use
Groups’ on page 14 in the printed Guide.
DR1
TV2
........
EUROSPRT
ZDF
RTL7
........
BBC
........
ADD TV PROGRAM
10
11
12
13
14
15
16
17
18
19
........
........
CNN
N3
........
SAT 1
SVT 2
NRK
TV4
........
NRK
TV4
more
name
move
What’s on the EDIT PROGRAMS menu…
When the EDIT PROGRAMS menu appears on the
screen you have several options: You can move the
TV programs to change the order in which they
appear on the TV list. You can delete unwanted
TV programs and you can name or rename all your
TV programs. For further information, refer to the
chapter ‘Edit programs’ on page 30 in the printed
Guide.
start
What’s on the ADD PROGRAMS menu…
The ADD PROGRAMS function is automatic. When
tuning of additional programs is complete, the
EDIT PROGRAMS menu appears automatically.
>> On-screen menus
27
TV AUTO TUNING
1
........
TV MANUAL TUNING
TV MANUAL TUNING
SEARCH
...
FINE TUNE
0
FREQUENCY
210
DECODER
OFF
PROGRAM NUMBER
1
TV SYSTEM
B/G
NAME
DR1
SOUND
STEREO
EXTRA
DELETES PROGRAM GROUPS
start
What’s on the AUTO TUNING menu…
The AUTO TUNING function is automatic. When
tuning of all programs is complete, the
EDIT PROGRAMS menu appears.
start
store
GO
What’s on the TV MANUAL TUNING menu…
SEARCH
Start search tuning.
FREQUENCY
Select a frequency to tune in.
PROGRAM NUMBER
Store or change program number. You can store
99 programs.
NAME
Access the naming menu and name the
program you have selected.
EXTRA
Access the extra TV MANUAL TUNING menu.
accept
GO
What’s on the extra TV MANUAL TUNING
menu…
FINE TUNE
Fine tune the frequency of a program or tuned
program. You can fine tune within the range of
-8 – +8.
(DECODER)
A decoder is necessary for the reception of
coded programs. Usually the decoder is
detected automatically during tuning, but it can
be selected via this menu option. Set DECODER
to one of following options: ON (for decoder
on) or OFF (for no decoder). If two decoders are
connected, choose 1 or 2.
(TV SYSTEM)
TV broadcast system – this option is only
available on certain types of TV sets, as the TV
broadcast system is usually selected
automatically.
SOUND (mono, stereo or language)
Several types of sound may be available for
different programs, mono, stereo or different
languages. On the relevant program or
frequency select the options MONO (FM /
NICAM mono sound), STEREO (NICAM / A2
stereo sound), MONO1 (mono language 1),
MONO2 (mono language 2), MONO3 (mono
language 3), or STEREO2 (stereo language 2).
Even though you store a type of sound/language,
you can switch between the various types while
you are watching a particular TV program. For
further information about the various types of
sound available, refer to the chapter ‘Adjust sound
and picture format’ on page 10 in the printed
Guide.
>> On-screen menus
28
LINK FREQUENCY
FREQUENCY
599
FINE TUNE
0
MODULATOR SETUP
MODULATOR
TV RECORD
ON
NOW
TELETEXT
RECORD LIST
MENU
BBC
search
store
GO
What’s on the LINK FREQUENCY menu…
FREQUENCY
Indicates the frequency used for Link
transmission.
FINE TUNE
Used for fine tuning the Link frequency. (Only
appears when your television is set up for use in
a link room).
This menu is only available if the optional Master
Link module is built into your television.
store
GO
What’s on the MODULATOR SETUP menu…
MODULATOR
Indicates whether or not the modulator is
activated. Options are ON or OFF.
This menu is only available if the optional system
Modulator is built into your television.
back
select
GO
What’s on the TV RECORD menu…
NOW
Use this option to make an instant recording.
Or, press RECORD twice to make an instant
recording.
TELETEXT
Use this option to make a timed recording via
teletext.
RECORD LIST
Use this option to check or delete your
recordings.
MENU
Use this option to make a timed recording via
the recording menu.
This menu is only available if a BeoCord V 8000 is
connected to your television.
>> On-screen menus
29
PLAY TIMER
TIMER
TIMER PROGRAMMING
ON
SOURCE
TV
PROGRAM
18 BBC
START TIME
15:40
STOP TIME
16:40
DAYS
M . . TF . S
PLAY TIMER INDEX
15:40-16:40
BBC
TV 18
M . . TF . .
6:00 - 7:00
ZDF
TV 3
MTWTF . .
20:00-22:00
CNN
TV 15
MT . . . S .
...
store
GO
What’s on the TIMER ON/OFF menu…
Select ON to activate your Timers and select OFF
to deactivate Timers.
This menu is only available if the optional Master
Link module is built into your television.
store
GO
What’s on the PLAY TIMER menu…
SOURCE
Depending upon the option you choose,
SOURCE indicates either that a specific source is
to be switched on or off. Options are:
TV… To switch on the TV.
(GROUPS)… If you have created Groups of
programs and selected a Group as your source
before entering Timer settings, you can select a
program from this group as the source for the
timed play function.
V.TAPE… To switch on a connected video tape
recorder.
DVD… To switch on a connected DVD player.
CD… To switch on a connected CD player.
N.MUSIC, N.RADIO… For access to music files
stored on a PC or to Internet radio sites. For
further information about how to get access to
these sources, consult your Bang & Olufsen
retailer.
A.TAPE… To switch on a connected audio tape
recorder.
RADIO… To switch on a connected radio.
STANDBY… To switch the television off. If you
have other compatible video or audio systems
connected to your television, they are switched
off as well.
delete
edit
GO
PROGRAM (Program number)
Once your source is chosen, choose the
program number you want.
START TIME and STOP TIME
Key in the times when you want the system to
start and/or stop playing. If you have set the
Timer source to STANDBY, it is only possible to
enter a stop time.
DAYS
Select the specific weekday(s) on which you
want your Timer executed. All the weekdays
will be displayed – starting with M for Monday.
This menu is only available if the optional Master
Link module is built into your television, and you
can enter settings in the menu only if the selected
source, such as V TAPE, is present in your setup.
>> On-screen menus
30
CONNECTIONS
STAND POSTIONS
TV ON
TV STANDBY
SOUND ADJUSTMENT
V. TAPE
V. TAPE
VOLUME
........
AV
NONE
BASS
........
TREBLE
........
SUBWOOFER
........
LOUDNESS
ON
. . . . .
. . . .
. .
. .
. .
. .
left
right
store
GO
What’s on the STAND POSITIONS menu…
TV ON
Select a position for when the TV is switched
on.
TV STANDBY
Select a position for when the TV is switched to
standby.
This menu is only available if your television is
equipped with the optional motorised stand or
base.
store
GO
What’s on the CONNECTIONS menu…
V.TAPE
NONE… if no equipment is connected.
V.TAPE… if you have connected a BeoCord
V 8000 video tape recorder or any other video
tape recorder.
V.TAPE+DECODER… if you have connected a
BeoCord V 8000 with a decoder connected to
it.
V.TAPE+STB… if you have connected a BeoCord
V 8000 with a set-top box connected to it.
DECODER… if you have connected a decoder.
V.AUX… if you have connected any other type
of auxiliary equipment.
STB… if you have connected a set-top box.
If you connect a BeoCord V 8000, the only options
for V.TAPE are: V.TAPE, V.TAPE+STB and
V.TAPE+DECODER.
AV
NONE… if no equipment is connected.
DECODER… if you have connected a decoder. If
your television is equipped with the optional
Master Link module, connect the decoder to
the V.TAPE socket instead.
EXPANDER… if you have connected an
Expander box with other auxiliary equipment
connected to it.
EXPANDER+DEC… if you have connected an
Expander box with a decoder connected to it.
V.AUX… if you have connected any other type
of auxiliary equipment.
DVD… If you have connected a DVD player or
similar devices.
STB… if you have connected a set-top box.
store
GO
What’s on the SOUND ADJUSTMENT menu…
VOLUME
Adjusts the volume level the TV uses when you
switch it on.
(CENTRE)
Only available if you have connected
loudspeakers to the television. Adjusts the
balance between the external and internal
speakers.
BALANCE
Adjusts the balance between the speakers.
BASS
Adjusts the bass level.
TREBLE
Adjusts the treble level.
(LOUDNESS)
Only available if you have connected
loudspeakers to your television. The loudness
feature compensates for the human ear’s lack of
sensitivity to high and low frequencies. These
frequencies are boosted at low volume levels so
that low music becomes more dynamic.
Loudness can be set to ON or OFF.
(DEFAULT)
Only available if you have connected
loudspeakers to the television and chosen a
video source. Indicates the default speaker
combination. The following combinations are
available:
SPEAKER 1 for the built-in speakers.
SPEAKER 3 for both built-in and external
speakers.
>> On-screen menus
31
MENU LANGUAGE
CLOCK
PICTURE
BRIGHTNESS
........
TIME
20:00
DANSK
CONTRAST
........
DATE
23
DEUTSCH
COLOUR
........
MONTH
APR
ENGLISH
YEAR
2001
ESPAÑOL
SYNCHRONISE
YES
FRANÇAIS
ITALIANO
NEDERLANDS
SVENSKA
store
GO
What’s on the PICTURE menu…
BRIGHTNESS
Adjusts the picture brightness.
CONTRAST
Adjusts the contrast level in the picture.
COLOUR
Adjusts the colour intensity in the picture.
For video sources using the NTSC signal, a fourth
option – Tint (colour shade or nuance) – will be
available for adjustment.
store
GO
What’s on the CLOCK menu…
TIME
Indicates the time.
DATE
Indicates the day.
MONTH
Indicates the month.
YEAR
Indicates the year.
SYNCHRONISE
For synchronisation of the built-in clock with
teletext.
This menu is only available if the optional Master
Link module is built into your television.
select
accept
GO
What’s on the MENU LANGUAGE menu…
Choose between the available languages.
>> On-screen menus
32
SPEAKER TYPE
SPEAKER LEVEL
SPEAKER DISTANCE
FRONT
BEOLAB 1
CENTRE
1M
SEQUENCE
AUTOMATIC
REAR
BEOLAB 6000
LEFT FRONT
1M
LEFT FRONT
........
SUBWOOFER
YES
RIGHT FRONT
1M
RIGHT FRONT
........
RIGHT REAR
1M
RIGHT REAR
........
LEFT REAR
1M
LEFT REAR
........
store
GO
What’s on the SPEAKER TYPE menu…
FRONT
Select your speakers: NONE, BEOLAB 4000,
BEOLAB 6000, BEOLAB 8000, BEOLAB 1,
BEOLAB PENTA.
REAR
Select your speakers: NONE, BEOLAB 4000,
BEOLAB 6000, BEOLAB 8000, BEOLAB 1,
BEOLAB PENTA.
SUBWOOFER
Indicate whether you have connected a
BeoLab 2 subwoofer. Options are YES and NO.
This menu is only available if the optional surround
sound module is built into your television.
store
GO
What’s on the SPEAKER DISTANCE menu…
CENTRE
Select the approximate straight-line distance in
metres between your viewing position and the
television.
LEFT FRONT
Select the approximate straight-line distance in
metres between your viewing position and the
left front speaker.
RIGHT FRONT
Select the approximate straight-line distance in
metres between your viewing position and the
right front speaker.
RIGHT REAR
Select the approximate straight-line distance in
metres between your viewing position and the
right rear speaker.
LEFT REAR
Select the approximate straight-line distance in
metres between your viewing position and the
left rear speaker.
This menu is only available if the optional surround
sound module is built into your television.
store
GO
What’s on the SPEAKER LEVEL menu…
LEFT FRONT
Adjust the sound level from your left front
speaker.
RIGHT FRONT
Adjusts the sound level from your right front
speaker.
RIGHT REAR
Adjusts the sound level from your right rear
speaker.
LEFT REAR
Adjusts the sound level from your left rear
speaker.
…the two sound sequence options
AUTOMATIC
If you select the automatic sequence, the sound
shifts automatically between the external
speakers every 2–3 seconds. To adjust the
speaker levels you must move the cursor to the
speaker you want to adjust first.
MANUAL
If you select the manual sequence, the sound
follows the speaker you highlight on the menu.
You can then adjust the sound accordingly.
When the cursor is placed on SEQUENCE you
hear sound in the centre speaker.
This menu is only available if the optional surround
sound module is built into your television.
>> On-screen menus
33
SOUND SYSTEM
MONO / STEREO
accept
GO
What’s on the SOUND SYSTEM menu…
Sound systems that can appear in the menu are:
DOLBY 3 STEREO, DOLBY PRO LOGIC, DOLBY
DIGITAL, DOLBY D + PRO LOGIC, DTS DIGITAL
SURROUND, MONO/STEREO.
This menu is only available if the optional surround
sound module is built into your television.
Index
34
Beo4 remote control
Contact
Changing the Beo4 batteries, Guide p. 47
Cleaning the Beo4, Guide p. 47
Customise Beo4, 23
Introducing BeoVision 3 and Beo4, Guide p. 4
Contact Bang & Olufsen, Guide p. 50
BeoLink
Connections – television in a link room, 13
Distribute sound and picture with BeoLink, 11
Link connections, 11
Link frequency, 12
Link room operation, 14
Master Link socket, Guide p. 44
Option setting – television in a link room, 13
System modulator, 12
What’s on the LINK FREQUENCY menu, 28
What’s on the MODULATOR SETUP menu, 28
Your television in a link room, 13
Decoder
AV socket panel, Guide p. 44
Connect a decoder, 3
Displays and menus
Displayed information and menus, Guide p. 5
On-screen menus, 25
Groups
Create Groups, Guide p. 14
Move programs within a Group, Guide p. 15
Select programs in a Group, Guide p. 14
What’s on the PROGRAM GROUPS menu, 26
Camcorder
Camcorder connection – close-up socket panel,
Guide p. 45
Watch Camcorder on your television, Guide
p. 45
Copy from a Camcorder, Guide p. 45
Headphones
Connect to close-up socket panel, Guide p. 45
Language
Clock
Set the time and date, Guide p. 37
What’s on the CLOCK menu, 31
Change sound type or language, Guide p. 10
Choose menu language, Guide p. 40
First-time setup – choose menu language,
Guide p. 28
What’s on the MENU LANGUAGE menu, 31
Connections
Loudspeakers
Aerial and mains connection, Guide p. 43
Audio system – connect to the television, 9
AV socket panel, Guide p. 44
BeoCord V 8000 video tape recorder, 6
Close-up operation and socket panel, Guide
p. 45
Connections – your television in a link room, 13
Decoder, 3
DVD 1, 5
Headphones, Guide p. 45
Link connections, 11
Loudspeakers, 16
Register additional video equipment, 7
Set-top box, 4
Speaker and digital input socket panel, Guide
p. 44
What’s on the CONNECTIONS menu, 30
Calibrate the sound level, 19
Change loudspeaker balance or combination,
Guide p. 11
Choose a speaker combination, 21
Connect loudspeakers, 17
Loudspeaker and digital input socket panel,
Guide p. 44
Loudspeaker setup – surround sound, 16
Place external loudspeakers, 16
See the name of the active sound system, 22
Set loudspeaker distance, 18
Sound adjustments, 20
>> Index
35
Maintenance
Socket panels
Tune
Set up your television, Guide p. 42
Cleaning cabinet surfaces, Guide p. 46
About the contrast screen, Guide p. 46
Cleaning the Beo4, Guide p. 47
Changing the Beo4 batteries, Guide p. 47
AV socket panel, Guide p. 44
Close-up operation and socket panel, Guide
p. 45
Loudspeaker and digital input socket panel,
Guide p. 44
Master Link
Sound
AV socket panel, Guide p. 44
Connect and operate an audio system, 9
Distribute sound and picture with BeoLink, 11
Your television in a link room, 13
Adjust or mute the sound, Guide p. 10
Change balance, bass, treble, or loudness,
Guide p. 39
Change sound type or language, Guide p. 10
Change speaker balance or combination, Guide
p. 11
Loudspeaker setup – surround sound,
pp. 16–22
What’s on the SOUND ADJUSTMENT menu, 30
What’s on the SOUND SYSTEM menu, 33
What’s on the SPEAKER DISTANCE menu, 32
What’s on the SPEAKER LEVEL menu, 32
What’s on the SPEAKER TYPE menu, 32
Add new TV programs, Guide p. 35
Adjust tuned programs, Guide p. 33
Auto-tuning – first-time setup of your
television, Guide p. 28
Delete tuned programs, Guide p. 32
Move tuned programs, Guide p. 30
Name tuned programs, Guide p. 31
Re-tune via automatic tuning, Guide p. 34
What’s on the ADD PROGRAMS menu, 26
What’s on the AUTO TUNING menu, 27
What’s on the first TV MANUAL TUNING
menu, 27
What’s on the extra TV MANUAL TUNING
menu, 27
Picture
Adjust brightness, colour or contrast, Guide
p. 38
Adjust picture format, Guide p. 9
What’s on the PICTURE menu, 31
Pincode
Stand
Activate the pincode system, Guide p. 20
Change or delete your pincode, Guide p. 20
Use your pincode, Guide p. 21
If you have forgotten your pincode, Guide
p. 21
Determine the centre position – first-time
setup, Guide p. 29
Set positions for the television to turn to,
Guide p. 36
Turn the television, Guide p. 9
What’s on the STAND POSITIONS menu, 30
Placement
Set up your television, Guide p. 42
Subtitles
TV programs
Add new TV programs, Guide p. 35
Adjust tuned programs, Guide p. 33
Auto-tuning – first-time setup of your
television, Guide p. 28
Bring up a TV list, Guide p. 8
Delete tuned programs, Guide p. 32
Move tuned programs, Guide p. 30
Name tuned programs, Guide p. 31
Re-tune via automatic tuning, Guide p. 34
Select a TV program, Guide p. 8
What’s on the ADD PROGRAMS menu, 26
What’s on the AUTO TUNING menu, 27
What’s on the EDIT PROGRAMS menu, 26
What’s on the extra TV MANUAL TUNING
menu, 27
What’s on the first TV MANUAL TUNING
menu, 27
What’s on the PROGRAM GROUPS menu, 26
Subtitles from teletext, Guide p. 12
Position of television
Set positions for the television to turn to,
Guide p. 36
Turn the television, Guide p. 9
What’s on the STAND POSITIONS menu, 30
Teletext
Basic teletext functions, Guide p. 12
Day-to-day use of MEMO pages, Guide p. 13
Store favourite teletext pages, Guide p. 13
Timed recording via teletext, Guide p. 24
Set-top box
Connect a set-top box, 3
Set-Top Box Controller menu, Guide p. 22
Universal Beo4 operation, Guide p. 23
Use the set-top box in a link room, Guide p. 23
Use the set-top box’s own menu, Guide p. 23
Timer
Make your television start and stop
automatically, Guide p. 18
Set the time and date, Guide p. 37
Timed play and timed standby, Guide p. 18
Timed recording via teletext, Guide p. 24
View, edit or delete a Timer, Guide p. 19
Video tape recorder – BeoCord
V 8000
Check the recordings already set, Guide p. 25
If you have a BeoCord V 8000…, Guide p. 24
Play and search through a tape, Guide p. 24
Record via on-screen menu, Guide p. 25
Timed recording via teletext, Guide p. 25