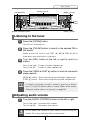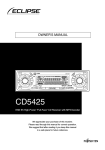
1
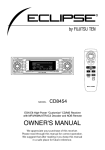
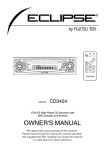
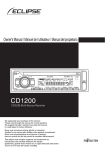
MODEL
CD3404
ESN E3 High-Power CD Receiver
OWNER'S MANUAL
We appreciate your purchase of this receiver.
Please read through this manual for correct operation.
We suggest that after reading it you keep this manual
in a safe place for future reference.
For your safety in using the
CD3404
Warnings and caution signs, illustrated below, are posted
throughout this manual as well as on the CD3404. They show safe
and correct ways to handle the product so as to prevent personal
injury to you and others and to avoid property damage.
Before reading through the manual, take time to read through and
learn the important information listed in this section.
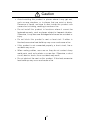
Warning
Caution
This sign indicates a situation in which
incorrect handling or disregard of this sign
might result in death or serious personal injury.
This sign indicates a situation in which
incorrect handling or disregard of this sign
might result in personal injury or may result
solely in damage to property.
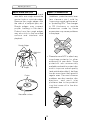
Warning
• Do not modify this system for use other than that specified
herein. Also, do not deviate from the installation procedures
described herein; Eclipse will not be held liable for damages
including, but not limited to serious injury, death or property
damage resulting from installations that enable unintended
operation.
• This unit is intended for operation in DC 12-volt, negativegrounded vehicles only. Never use it in 24-volt vehicles such as
heavy trucks or diesel cars with cold-region specifications.
• Do not change CDs while driving. Doing so may result in an
accident.
2
Warning
• Do not place the vinyl storage bag over a person. It may cause
a serious accident or death by suffocation.
• Do not adjust the controls while driving the car. To adjust the
controls, stop the car in a safe location.
• To prevent accidents, store batteries for the remote control out
of the reach of small children. In case a child swallows a
battery, consult a physician immediately.
• Do not disassemble or rebuild this product. Doing so may
cause an accident, fire or electrical shock.
• When it is necessary to replace the fuse, always use a fuse of
the correct rating (number of amperes). Use of fuses with
higher amperage ratings may cause a fire.
• Do not operate the product in a malfunctioning condition, for
instance, when the audio does not play. Doing so may result in
an accident, fire or electrical shock.
• If an abnormal situation occurs, such as foreign matter entering
or liquid splashing on the product, or smoke or a strange odor
emitting from the unit, shut off the product immediately and
consult the dealer from whom you purchased it. Continued
operation may cause an accident, fire or electrical shock.
• Do not install this product in locations where it may obstruct the
driver's view, or where it may endanger passengers in the
vehicle. Otherwise, an accident or injury may result.
• To prevent damaging the vehicle, confirm the locations of
hoses, electrical wiring, and the fuel tank prior to drilling holes
to install this product. Also, take care so that the product does
not interfere, not come in contact with them. Otherwise, a fire
may result.
• Do not install this product in locations where it may interfere
with the operation of the steering wheel, shift lever, brake
pedal, etc. Otherwise, an accident or injury may result.
• When installing this product, never use existing nuts or bolts
that secure parts of the fuel tank, or the steering or braking
systems. Otherwise improper steering or braking or a fire may
result.
3
Warning
• To prevent a short circuit from occurring, disconnect the
battery's negative terminal before installing this product.
Otherwise, an electric shock or injury may result.
• When using an existing nut and/or bolt from the vehicle to
ground this product, do not use any that secure parts of the
steering or braking systems. Otherwise, an accident may result.
• Bundle cables and harnesses with electrical tape or wire ties to
prevent them from interfering with moving parts. If they should
entangle the steering wheel, shift lever or brake pedal, an
accident may result.
• Never supply power to another electrical appliance by splicing
or tapping into this product's power lead (wire). Otherwise, the
current capacity of the wire will be exceeded, resulting in a fire
or electric shock.
• Never attempt to disassemble or modify the product.
Otherwise, an accident, fire or electric shock may result.
• When replacing fuses, be sure to use fuses of the specified
capacity (amperage). Otherwise, damage to the unit, fire or an
electric shock may result.
• When installing the product into a vehicle with a passenger
side air bag, do not secure it to the air bag's cover or in places
where it may impede air bag deployment. Otherwise, proper air
bag operation may not be ensured in the event of an accident,
causing injury or death.
• When making holes using a drill or similar tool, be sure to wear
protective eyewear. Otherwise, an injury such as loss of
eyesight may result.
• Exposed wires must be insulated with electrical tape.
Otherwise, a short circuit, fire, or electric shock may result.
4
Caution
• Play the audio at a moderate volume level that permits you to
hear sounds from outside the car. Driving without being able to
hear outside sounds may result in an accident.
• Keep foreign objects out of the disc slot. They may cause fire
or electrical shock. Another possibility is that discs may be
damaged or become stuck.
• Do not stick your fingers or hands into the disc slot. Doing so
may cause personal injury.
• This product must be operated only as on-board equipment, or
it may cause electrical shock or injury.
• Do not play distorted sounds for long periods of time;
the speakers may overheat and cause a fire.
• This product uses an invisible laser light. In case a problem
develops, be sure to consult the dealer from whom you
purchased the product. Do not disassemble or rebuild the unit;
rebuilding it may expose you and others to a dangerous laser
emission (which would damage eyesight) or cause an
accident.
• Never use batteries other than those specified. Do not mix new
and old cells. Doing so may cause a fire or personal injury due
to a battery explosion or chemical leaks.
• Pay attention to the (+) and (-) polarity of the battery when
installing them in the product. Incorrect installation may cause
personal injury or product damage spoilage due to a battery
explosion or chemical leakage.
• For best results, this product should be installed by a
professional installer.
Contact the dealer whom you purchased the product for an
appointment.
• When installing this product, be sure to use the supplied
mounting hardware. If parts other than those supplied are
used, the unit may be damaged internally, or may not be held
in place securely and become dislodged.
5
Caution
• Avoid installing this product in places where it may get wet,
such as near windows, or in places that are moist or dusty.
Presence of liquid, moisture or dust inside this product can
cause short circuiting, resulting in smoke or fire.
• Do not install this product in locations where it cannot be
fastened securely, such as places subject to frequent vibration.
Otherwise, it may become dislodged and cause an accident or
injury.
• Do not block this product's vent or heat sink. If either is
blocked, excessive heat build-up may occur and cause a fire.
• If this product is not connected properly, a short circuit, fire or
accident may occur.
• When routing cables, use care so they do not contact sharp
metal parts such as brackets or screw tips. Otherwise, a short
circuit, electric shock, fire or accident may result.
• Do not obstruct the vent on this product. If blocked, excessive
heat build-up may occur and cause a fire.
6
Table of Contents
Operating precautions ............................................. 10
Notes on operation ..................................................................... 10
About compact discs .................................................................. 11
About cleaning a CD .................................................................. 13
Names of controls and parts .................................. 14
ESN security operating procedure ......................... 15
About ESN .................................................................................. 15
How to operate the ESN (Key CD) security ................................ 16
How to program the Key CD ................................................ 16
How to cancel the Key CD ................................................... 17
How to change the Key CD .................................................. 18
How to resume normal operation (ESN security lock out) ... 18
What happens if an incorrect CD is inserted? ...................... 19
How to turn the security indicator on/off ..................................... 20
How to read the Electronic Serial Number ................................. 20
Basic operation ........................................................ 21
Turning the power on and off ..................................................... 21
Listening to a CD ........................................................................ 22
Listening to the tuner .................................................................. 23
Adjusting audio volume .............................................................. 23
Switching audio control modes ................................................... 24
VOL (VOLUME) Mode ......................................................... 24
BASS Mode ......................................................................... 24
TREB (TREBLE) Mode ........................................................ 24
BAL (BALANCE) Mode ........................................................ 25
FAD (FADER) Mode ............................................................ 25
Enabling the loudness control .................................................... 25
Making changes with Function Mode ......................................... 26
Disabling the guide tone feature (for button operation) ........ 26
Setting the time .................................................................... 27
7
How to operate the CD player ................................. 28
Listening to CDs ......................................................................... 28
Advancing to the next track or returning to the beginning of the
track being played ...................................................................... 29
Fast Forward/Rewind ................................................................. 29
Playing the beginning of tracks (SCAN) ..................................... 29
Repeating the same track (REPEAT) ......................................... 30
Playing tracks in random order (RANDOM) ............................... 30
Ejecting the disc ......................................................................... 31
Switching the display .................................................................. 31
How to operate the tuner ........................................ 32
Tuning to a station ...................................................................... 32
Entering stations into memory automatically
(The automatic preset mode: ASM) .......................................... 33
Manually setting stations into memory ....................................... 34
Preset station scan ..................................................................... 35
Switching the display .................................................................. 35
Changing the reception sensitivity for automatic scanning ........ 36
Changing the radio band location ............................................... 36
FM reception characteristics ...................................................... 37
FM reception differs from AM ............................................... 37
Fading out ............................................................................ 37
Reception area of FM broadcasts ........................................ 38
Multipath .............................................................................. 38
How to use an optional Card remote control ........ 39
Precautions in use of the remote control .................................... 39
Cleaning the remote control ....................................................... 39
Turning the power on/off ............................................................ 40
Adjusting the audio volume ........................................................ 40
Cutting the volume instantly (muting) ................................... 40
Switching playback modes ......................................................... 41
How to play the tuner ................................................................. 41
Selecting the FM/AM band ................................................... 41
Selecting a station (manually or automatically) .................... 42
Selecting preset stations ...................................................... 42
How to play CDs ......................................................................... 42
Swithcing disc mode ............................................................ 42
Advancing to the next track or returning to the beginning
of the track being played ...................................................... 43
Replacing the battery ................................................................. 44
8
How to use an optional NOB remote control ........ 45
Turning the power on/off ............................................................ 45
Adjusting the audio volume ........................................................ 45
Cutting the volume instantly (muting) ................................... 45
Switching playback modes ......................................................... 46
How to play the tuner ................................................................. 46
Selecting the FM/AM band ................................................... 46
Selecting a station (manually or automatically) .................... 47
Selecting preset stations ...................................................... 47
How to play CDs ......................................................................... 47
Swithcing disc mode ............................................................ 47
Advancing to the next track or returning to the beginning
of the track being played ...................................................... 48
Replacing the battery ................................................................. 49
If you have a question: ............................................ 51
Displayed information (for troubleshooting) ................................ 52
Specifications .......................................................... 55
Before installation ................................................... 56
Components ............................................................................... 56
Installation angle ........................................................................ 56
Mounting instruction ............................................... 57
Mounting the main unit ............................................................... 57
Names of lead wires and destinations ........................................ 59
System ....................................................................................... 60
How to contact customer service ............................64
9
Operating precautions
Operating precautions
<Your CD3404 will perform well over a long period of time through correct
handling and care.>
Notes on operation
• For your safety, play only at volume levels that allow outside sounds to be
heard.
• We recommend using with this player a disc with
the logo shown to the left.
• You can play music CDs(CD-R/CD-RW) on this
player. Be sure to use discs that have been
properly processed.
Depending on the editing equipment used, some
discs may not play properly.
• Do not insert anything other than a CD into the
disc slot.
Do not insert any foreign objects, such as coins or
credit cards, into the disc slot. Be especially
watchful of children’s mischief in this regard.
• Avoid severe mechanical shock.
When the player is subjected to severe vibration
while traveling over a rough surface, playback
may be intermittent. When a situation like this
occurs, resume playback after returning to a
smoother road.
• About dew condensation.
In cold or rainy weather, just as the interior glass
surface gets fogged, dew (water condensation)
may also settle on the deck. When this occurs,
disc playback may become intermittent or
impossible. Dehumidify the air in the vehicle for a
while before resuming playback.
• Cleaning the disc slot.
The disc slot tends to get dusty. Clean it
occasionally to prevent accumulated dust from
scratching the discs.
10
Operating precautions
About compact discs
• The signal recorded on a compact disc is read by a laser beam, so
nothing touches the disc surface. A scratch on the recorded surface or a
badly warped disc may cause deteriorated sound quality or intermittent
playback. Observe the following precautions to ensure high quality sound
performance:
• Do not leave an ejected disc in the disc slot
for very long; the disc may warp. Discs
should be stored in their cases and kept
away from high temperature and humidity.
• Do not stick a piece of paper or tape on, nor
write on or scratch either side of a disc.
• Discs spin at a high speed inside the deck.
Keep cracked or warped discs out of the
player to avoid damaging it.
• Avoid touching the recorded surface when
handling a disc; handle discs by their edges.
11
Operating precautions
About brand new CDs
• You may notice that some brand
new discs are rough around the
center hole or outside edge.
Remove the rough edges with
the side of a ballpoint pen, etc.
Rough edges may prevent
proper loading in the deck.
Flakes from the rough edges
may also stick to the recorded
surface and interfere with
playback.
About CD accessories
• Do not use accessories
(stabilizers, protective seals, laser
lens cleaners, etc.) sold for
“improving sound performance”
or “protecting CDs.” The changes
in CD thickness or outside
dimensions made by these
accessories may cause problems
in the player.
Rough Edges
Ballpoint
pen
Rough
Edges
Flakes
• Please be sure NOT to attach any
ring-shape protector (or other
accessory) to your discs. Those
protectors are commercially
available and said to protect disc
and to improve sound quality
(and antivibration effect), but they
can do more harm than good in
regular uses. The most common
problems are disc insertion, disc
ejections, and won't play
problems due to the protector
ring that came off in the disc
mechanism.
Recorded surface
12
Operating precautions
About borrowed CDs
• Do not use a CD with glue or
remnants of adhesive tape or
labels. They may cause the CD
to get stuck inside or damage
the deck.
About irregularly-shaped CDs
• Specially-shaped CDs, like
heart-shaped or octagonal CDs,
cannot be played. Do not
attempt to play them, even with
an adapter, since they may
damage the player.
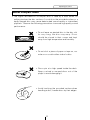
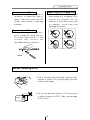
How to remove CDs
• When removing the ejected disc,
pull it straight out along the slot.
Pressing downward in the
process may scratch the
recorded surface of the disc.
OKAY
N
O
G
O
O
D
About cleaning a CD
• Use a commercially available compact disc
cleaner to clean a CD, wiping lightly from the
center to the edge.
XXXX
XXXX
XXXX
• Do not use benzine, thinner, LP record spray
or other cleaners on CDs. They may damage
a CD’s finish.
13
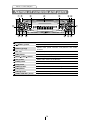
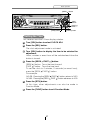
Names of controls and parts
Names of controls and parts
①②
③
④
⑤⑥
③
⑦
⑬
⑫⑪ ⑩
⑨ ⑧⑥
[DISC] button
Switches disc modes.
[
Ejects compact disc.
(EJECT) ] button
Selects radio preset channels and performs disc mode
Buttons [1] to [6]
functions.
Inserts compact discs.
Disc slot
Switches screen display.
[DISP] button
[SEEK
/FAST
] button
Automatically finds radio reception and fast forward/rewind.
[SEL] button
Selects radio stations and CD tracks.
[FUNC] button
Turns function mode ON/OFF.
[RTN] button
Returns to previous screen.
[RESET] button
Resets deck functions to default settings.
[PWR] button
Turns deck power ON/OFF.
[FM AM] button
Switches to radio mode and switches radio bands.
[AUDIO CONTROL] button
Adjusts volume and performs other functions.
14
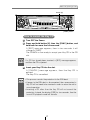
ESN security operating procedure
ESN security operating procedure
About ESN
This deck incorporates ESN (ECLIPSE Security Network). The ESN is
a security system which disables all deck functions when the power
is restored if the deck is stolen from the vehicle. Turning the power of
the deck off or switching the vehicle's ignition switch off activates the
security feature.
Setting or canceling of the security feature can be done with a "Key
CD". It is necessary to register an music CD as the "Key CD" in
advance.
15
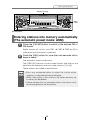
ESN security operating procedure
Button [6]
[FUNC] button
How to operate the ESN (Key CD) security
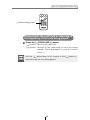
How to program the Key CD
1 Check that the Power is OFF.
2 Press and hold button [6], then the [FUNC] button, and
hold both for more than one second.
A [SEC] message appears, then in two seconds it will
change to [DISC].
The CD3404 is now ready to accept your Key CD in the CD
slot.
ATTENTION
If a CD has already been inserted, a [SEC] message appears,
and then the CD is ejected.
3 Insert the CD into the slot.
A [SEC] message appears, then the Key CD is ejected.
ATTENTION
•If there is a problem with the inserted CD, an [ERR] message
will appear for two seconds and the CD will be ejected. Reinsert
the ejected CD.
•If a CD causes the [ERR] message to appear twice in a row, a
[CHANGE] message will appear for two seconds. Try another
CD.
•The Security indicator will flash whenever the vehicle’s ignition
is switched off.
16
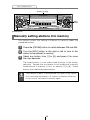
ESN security operating procedure
Button [6]
[FUNC] button
How to cancel the Key CD
1 Turn OFF the Power.
2 Press and hold button [6], then the [FUNC] button, and
hold both for more than one second.
A [SEC] message appears, then in two seconds it will
change to [DISC].
The CD3404 is now ready to accept your Key CD in the CD
slot.
ATTENTION
If a CD has already been inserted, a [SEC] message appears,
and then the CD is ejected.
3 Insert your Key CD into the slot.
A [CANCEL] message appears, then the Key CD is
ejected.
The Key CD is cancelled.
ATTENTION
•This process cancels the protection for the ESN deck.
•If power to the ESN deck is disconnected, then reconnected, a
Key CD will not need to be inserted in order to return the unit to
normal operation.
•Inserting a CD other than the Key CD will not cancel the
protection. Instead, the display [ERR] for two seconds, then the
normal CD playback mode will activate.
17
ESN security operating procedure
How to change the Key CD
1 First, cancel the existing Key CD.
Refer to “How to cancel the Key CD.”
2 Next, program a new Key CD.
Refer to “How to program the Key CD.”
How to resume normal operation (ESN security lock out)
If power is disconnected while ESN security is active (a Key
CD was programmed), operation is disabled until power is
restored and the unit unlocked. Follow this procedure to
resume normal operation.
1 When the power is turned on after disconnecting the
battery power, a [SEC] message will appear for two
seconds. Thereafter, the message changes to [DISC]
and the CD3404 is ready to accept your Key CD into the
slot.
2 Insert your Key CD into the slot.
If the correct CD is inserted, an [OK] message will appear
for two seconds and the CD will begin playing.
ATTENTION
•If an incorrect CD is inserted, an [ERR_] ("ERR" and error
number) message will appear for two seconds, after which the
CD will be ejected.
•If [ERR5] (the 5th time an error has occurred) appears, [HELP]
will appear, after which the CD will be ejected. When [HELP]
appears, carry out the operations for an ESN security lock out
by following the procedure in "What happens if an incorrect CD
is inserted?" (See next page).
•You must use the same CD used for Key CD programming; a
duplicate CD may not work properly.
18
ESN security operating procedure
Button [6]
[FUNC] button
What happens if an incorrect CD is inserted?
1 After the 5th incorrect attempt, the display reads [HELP]
for five seconds.
[HELP] will appear for five seconds, after which the serial
number will appear.
2 Press button [6], then the [FUNC] button, and hold them
for five seconds.
After the [SEC] message will appear for two seconds,
rolling code will appear.
3 Press the [FUNC] button.
A [DISC] message appears.
You will have five more attempts the correct disc.
4 Insert your Key CD into the slot.
If the correct CD is inserted, an [OK] message will appear
for two seconds and CD will be ejected.
ATTENTION
•If an incorrect CD is inserted, an [ERR_] ("ERR" and error
number) message will appear for two seconds, after which the
CD will be ejected.
•This process cancels the protection for the ESN deck.
Note
If after five tries the correct Key CD is not inserted, the display
reads [CALL800]; the unit must be returned to Eclipse to be
reset. In this case, please contact your Eclipse dealer for
assistance. For country-specific customer service information,
refer to "How to contact customer service" on page 64.
Your key CD can be easily forgotten. Write the
album name in a reminder note (See Page 67).
19
ESN security operating procedure
Button [2]
Button [4]
[FUNC] button
How to turn the security indicator on/off
Once ESN security is activated, the indicator flashes whenever the
vehicle’s ignition is turned off, warning potential thieves that the unit
is protected. However, if you do not want this visible deterrent, it may
be turned off.
1
With the power OFF, press button [2], then the [FUNC]
button and hold both for more than one second.
2
[IND. FLASH] or [IND. -----] appears on the display.
[IND. FLASH] means the security indicator will flash when the
vehicle’s ignition is off, and [IND. -----] means it will not. Repeat
the above steps to reactivate the flash mode.
How to read the Electronic Serial Number
1
Turn OFF the Power.
2
Press button [4], then the [FUNC] button, and hold both
for more than one second.
[ESN] appears on the display, followed by an eight-digit
number; this number is your electronic serial number (ESN).
You may use this number to identify your Eclipse CD3404 in
the event it is recovered after being stolen.
20
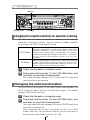
Basic operation
Basic operation
[PWR] button
This section covers basic operating procedures. For additional
details, please refer to the sections on specific functions.
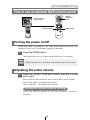
Turning the power on and off
Turning the power on and off.
When the power is turned on, the state used when the power was
turned off such as CD and tuner playing is restored.
When the vehicle has no ACC position on the ignition switch, care is
needed when turning off the deck. Follow Step 2 or Step 3 when
turning off the power.
1
When power is OFF, press [PWR] button.
The power will come ON.
ATTENTION
2
When the deck's power is turned on for the first time or if the
battery terminals have been disconnected because of a reason
such as vehicle maintenance and the power is then turned back
on, the deck will start up in FM1 mode. After this, the broadcast
stations will be searched for automatically and stored in buttons
[1] to [6].
When power is ON, press the [PWR] button for less than
two seconds.
The power will go OFF and the deck will be in Standby.
If you press the [PWR] button again for more than one second,
the power will go completely off.
3
When power is ON, press the [PWR] button for more
than two seconds.
The power will go completely OFF.
ATTENTION
If a car is not equipped with an ACC position (for example, a
European car), keep the [PWR] button depressed for more than
two seconds.
21
Basic operation
[DISC] button
Listening to a CD
1
Insert a CD into the disc slot, label side up.
The CD will start playing.
ATTENTION
When a CD is already loaded, press the [DISC] button to switch
to the CD mode.
22
Basic operation
Buttons [1] to [6]
[FM AM] button
[SEEK
] button
[SEL]
button
[AUDIO CONTROL] button
[FAST
] button
Listening to the tuner
1
Press the [FM AM] button.
This will turn the tuner on.
2
Press the [FM AM] button to switch to the desired FM or
AM bands.
Radio bands will switch from FM1 ➔ FM2 ➔ FM3 ➔ AM in
order each time the button is pressed.
3
Turn the [SEL] button to the left or right to tune to a
station.
Turn to the right: Turnes to higher frequencies.
Turn to the left: Turnes to lower frequencies.
4
Press the [SEEK /FAST ] button to start the automatic
station search.
[SEEK ] button: Starts searching toward higher frequencies.
[FAST ] button: Starts searching toward lower frequencies.
ATTENTION
If stations have been stored in memory, pressing a button
from [1] to [6] will directly select a station. (Refer to the section
“Manually setting stations into memory” on page 34)
Adjusting audio volume
1
Turn the [AUDIO CONTROL] button to the left or right.
Turn to the right: Increases the volume.
Turn to the left: Decreases the volume.
Warning
Do not adjust the volume or other controls while driving the
vehicle. Do so only while parked in a safe location.
23
Basic operation
[AUDIO CONTROL] button
Switching audio control modes
Various audio control modes may be fine-tuned using this
procedure.
1
Press the [AUDIO CONTROL] button for less than one
second to select the item to be adjusted.
Modes will switch in the order shown below each time the
button is pressed.
VOL
BASS
TREB
BAL
FAD
VOL (VOLUME) Mode
Adjusts volume.
Turn the [AUDIO CONTROL] button to the left or right.
Turn to the right: Increases the volume.
Turn to the left: Decreases the volume.
BASS Mode
Adjusts bass level. Bass mode can be adjusted for each
source (CDP, FM and AM).
Turn the [AUDIO CONTROL] button to the left or right.
Turn to the right: Emphasizes low sounds.
Turn to the left: Softens low sounds.
TREB (TREBLE) Mode
Adjusts treble level. Treble mode can be adjusted for each
source (CDP, FM and AM).
Turn the [AUDIO CONTROL] button to the left or right.
Turn to the right: Emphasizes high sounds.
Turn to the left: Softens high sounds.
24
Basic operation
[AUDIO CONTROL] button
BAL (BALANCE) Mode
Adjusts left/right speaker balance.
Turn the [AUDIO CONTROL] button to the left or right.
Turn to the right: Emphasizes right speakers.
Turn to the left: Emphasizes left speakers.
FAD (FADER) Mode
Adjusts front/rear speaker balance.
Turn the [AUDIO CONTROL] button to the left or right.
Turn to the right: Emphasizes front speakers.
Turn to the left: Emphasizes rear speakers.
Enabling the loudness control
The loudness control may be turned on to emphasize low and high
frequencies at low volume levels.
Loudness compensates for the apparent weakness of low and high
frequencies at low volume by boosting the bass and treble levels.
1
Press and hold the [AUDIO CONTROL] button until the
[LOUD ON] display appears on the screen.
ATTENTION
To disable the loudness feature, repeat the above procedure to
display the [LOUD OFF] indication.
25
Basic operation
[SEL]
button
[RTN] button
[FUNC] button
Making changes with Function Mode
A variety of settings can be changed.
1
Press the [FUNC] button.
The function mode is activated.
2
Turn [SEL] button in either direction to display setting
items for selection.
Setting items will be displayed in the following order when the
[SEL] button is turned to the right.
GUIDE TONE
CLOCK ADJ
Disabling the guide tone feature (for button operation)
The receiver is set at the factory to emit a beep tone in
response to button operation. The guide tone feature may be
disabled in the following procedure:
1 Turn [SEL] button to select GUIDE TONE.
2 Press the [SEL] button.
The Guide Tone Mode will be switched ON/OFF.
3 Turn [SEL] button to select ON or OFF.
4 Press the [RTN] button.
At this time, other adjustments can also be made in
Function Mode.
5 Press the [FUNC] button to exit Function Mode.
26
Basic operation
[SEEK
] button
[SEL]
button
[FAST
button
[RTN] button
]
[FUNC] button
Setting the Time
This receiver uses the 12-hour display notation.
1 Turn [SEL] button to select CLOCK ADJ.
2 Press the [SEL] button.
The clock adjustment mode is activated.
3 Turn [SEL] button to display the item to be selected for
adjustment.
Hours, minutes or exact hour will be switched each time the
button is turned.
4 Press the [SEEK /FAST ] button.
[SEEK ] button: Turns the time forward.
[FAST ] button: Turns the time back.
To set the clock to 0 minutes, 0 seconds (an exact hour),
press the [SEEK /FAST ] button.
For example:
At 3:29: Pressing the [SEEK /FAST ] button returns to 3:00.
At 3:30: Pressing the [SEEK /FAST ] button advances to 4:00.
5 Press the [RTN] button.
At this time, other adjustments can also be made in
Function Mode.
6 Press the [FUNC] button to exit Function Mode.
27
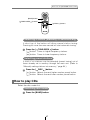
How to operate the CD player
How to operate the CD player
[DISC] button
First press the [DISC] button to switch to the disc mode. It is
assumed here that a CD has already been loaded into the unit.
Listening to CDs
1
Press the [DISC] button.
This starts CD play.
Caution
Playback may be intermittent when there is a scratch on a CD or
when the recorded side is dirty.
28
How to operate the CD player
Button [4]
[SEEK
] button
[SEL]
button
[FAST
] button
Advancing to the next track or returning to
the beginning of the track being played
1
Turn the [SEL] button to the left or right.
Turn to the right: Advances to the next track.
Turn to the left: Returns to the beginning of the track being
played. (Repeat turning for previous tracks.)
Fast Forward/Rewind
Fast forward or rewind the song currently being played.
1
Press and hold the [SEEK ] or [FAST ] button.
[SEEK ] button: Fast forward.
[FAST ] button: Rewind.
Playing the beginning of tracks (SCAN)
1
Press button [4].
Pressing the button causes the player to move up to the next
track and play it for 10 seconds, then move up to the next track
and play it for 10 seconds, and so on until the button is
pressed again.
ATTENTION
•To continue playing a desired track, press the button again to
stop scanning.
•After the entire disc is scanned once, ordinary playback starts
from the point where scanning started.
29
How to operate the CD player
Buttons [5] and [6]
Repeating the same track (REPEAT)
1
Press button [5] to repeat the track being played.
To cancel, press button [5] again.
Playing tracks in random order (RANDOM)
1
Press button [6] to play the tracks in random order.
To cancel, press button [6] again.
ATTENTION
•Doing random playback, press button [5] to repeat the track
being played. To cancel repeat play (go back to random play),
press button [5] again.
During playback of a particular track: The track being played is
played repeatedly.
While searching: The following track is played repeatedly.
•Occasionally the same track happens to be played (selected)
two or more times in a row; this is normal operation and is no
sign of a problem.
•When any of the functions - “Playing the beginning of tracks,”
“Repeating the same track” and “Playing tracks in random
order” - is selected, a message such as [SCAN], [REPEAT] or
[RANDOM] appears on the display to verify the current function.
30
How to operate the CD player
[
(EJECT)] button
[DISP] button
Ejecting the disc
1
Press the [
(EJECT)] button.
Disc is ejected.
Switching the display
1
Press the [DISP] button.
Each time the button is pressed, the following will be displayed
in order.
Elapsed time ➔ Clock
31
How to operate the tuner
How to operate the tuner
[SEEK
] button
[SEL]
button
[FAST
[FM AM] button
] button
First, press the [FM AM] button to start tuner operation.
There are automatic and manual methods for setting stations in
memory. The receiver will accept up to 24 stations in memory: six in
AM and 18 in FM (6 each for FM1, FM2 and FM3.) (Initial setting)
Tuning to a station
1
Press the [FM AM] button to switch to the desired FM or
AM bands.
Radio bands will switch from FM1 ➔ FM2 ➔ FM3 ➔ AM in
order each time the button is pressed.
2
Turn the [SEL] button to the left or right to tune to a
station.
Turn to the right: Tunes to higher frequencies.
Turn to the left: Tunes to lower frequencies.
3
Press the [SEEK /FAST ] button to start the automatic
station search.
[SEEK ] button: Starts searching toward higher frequencies.
[FAST ] button: Starts searching toward lower frequencies.
ATTENTION
At times, it may be difficult to maintain optimum reception
because the antenna affixed to your vehicle is in motion
constantly (relative to the broadcast antenna), encountering
continuous variation in the received radio signals’ strength. Other
factors affecting reception include interference from natural
obstacles, sign posts, etc.
32
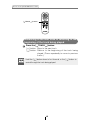
How to operate the tuner
Buttons [1] to [6]
[SEL]
button
[FM AM] button
Entering stations into memory automatically
(The automatic preset mode: ASM)
1
Press the [FM AM] button to switch to the desired FM or
AM bands.
Radio bands will switch from FM1 ➔ FM2 ➔ FM3 ➔ AM in
order each time the button is pressed.
2
Press the [SEL] button for more than two seconds until a
beep is heard.
The automatic preset mode starts.
The [ASM ON] indicator on the screen flashes, and stations are
automatically entered in memory under buttons [1] to [6].
These buttons are called preset buttons.
ATTENTION
•Press any numbered button to select the station whose
frequency is indicated right above the button.
•When a new station is set in memory, the station previously set
in memory will be deleted.
•If there are fewer than six receivable stations, the stations set in
the remaining buttons will be retained.
33
How to operate the tuner
Buttons [1] to [6]
[SEL]
button
[FM AM] button
Manually setting stations into memory
This section covers the setting of stations in memory under the
numbered buttons.
1
Press the [FM AM] button to switch between FM and AM.
2
Turn the [SEL] button to the right or left to tune to the
station to be entered in memory.
3
Select any button, from [1] to [6], and press it for more
than two seconds.
The tuned station is now memorized and set in the button
selected. Repeat the procedure to set additional manually
tuned stations in memory, in turn, for buttons [1] to [6]. These
buttons are called the preset buttons.
Caution
If the vehicle’s battery is disconnected (for repairs to the vehicle
or for removing the receiver), all stations in memory will be lost.
In such a case, set stations in memory again.
34
How to operate the tuner
Buttons [1] to [6]
[DISP] button
[SEL]
button
Preset station scan
This function enables reception of all the stations in the preset
buttons for five seconds each.
1
Press the [SEL] button for less than one second.
[P SCAN] will appear at the top of the display, and stations
stored under preset buttons [1] through [6] will be played for
five seconds each.
2
To stop the preset scan mode at a desired station, press
the [SEL] button again.
The receiver will stay tuned to the desired station.
Switching the display
1
Press the [DISP] button.
Each press of the button switches the display the clock and
current frequency.
35
How to operate the tuner
Button [1]
[FM AM] button
Button [3]
Changing the reception sensitivity for automatic scanning
The deck lets you select the reception sensitivity to be used for
automatic scanning of stations. The two sensitivity modes available
for this deck are AUTO mode and DX mode.
AUTO Mode
During automatic scanning, the reception sensitivity
switches automatically to one of two levels. Initially the
reception sensitivity is set to the low level so that only
stations with strong signals are received. If no stations
could be received, the reception sensitivity is increased
so that stations with weaker signals can also be
received.
DX Mode
Because the reception sensitivity for automatic scanning
is set to the high level from the start, even stations with
weaker signals can be received. (Signal crossover may
result in some stations being hard to hear.)
1
2
Check that the deck is in standby mode.
Press and hold the button [1], then [FM AM] button, and
hold both for more than three seconds.
The mode switches between AUTO mode and DX mode each
time the buttons are pressed.
Changing the radio band location
You can switch the location for the radio bands used between the
North American region and the Asia/Australia region. The default
setting is USA (North America).
1
2
Check that the deck is in standby mode.
Press and hold the button [3], then [FM AM] button, and
hold both for more than three seconds.
The radio band switches between USA and OTHERS each time
the buttons are pressed.
After changing the location, the power will turn on in FM1
mode. After this, the broadcast stations will be searched for
automatically and stored in buttons [1] to [6].
36
How to operate the tuner
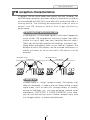
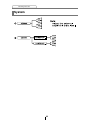
FM reception characteristics
In general, FM has much better tonal quality than AM. However, FM
and FM stereo reception encounter several characteristic problems
not encountered with AM. FM is more difficult to receive than AM in a
moving vehicle. The following are explanatory notes on what to
expect from FM reception and on how to get satisfactory
performance.
FM reception differs from AM
A characteristic of transmitted signals is that lower frequencies
travel further. FM frequencies are much higher than AM’s
(similar to a ray of light): they won’t bend but they will reflect.
Often, they will be interrupted by tall buildings, mountains, etc.,
taking direct and indirect paths to your vehicle’s antenna. The
distance at which FM stations can be received satisfactorily is
usually not nearly as far as that which AM stations can be
received.
AM Radio Waves
Ionosphere
FM Radio Waves
Ionosphere
Fading out
In weak signal or “fringe” reception areas, FM stations may
fade out completely, or fade in and out. When driving in weak
signal areas, such as near hills, through valleys or tunnels,
among tall buildings, etc., you may encounter unusual noise
interference. THIS IS NOT A TUNER PROBLEM. In this case,
you can only wait until you are in a better reception area, tune
to a stronger station, or reduce the treble level.
37
How to operate the tuner
Reception area of FM broadcasts
A home receiver can catch weak FM stereo signals through the
use of a tall, directional or ultra-sensitive antenna. In a moving
vehicle, the area for good reception is limited because of
varying conditions encountered while driving, including the
types and heights of broadcast antenna structures, signal
strength, engine noise, etc. For best reception with manual
antenna, extend the antenna mast as far as possible.
Transmitting Antenna 100 Meters High
Effective Radiation Power 1kW
FM Stereo Auto Radio 12.4 miles
FM Monaural Auto Radio 31 miles
Home FM Stereo Receiver 62 miles
Reception quality varies depending on the power of the FM
station, natural and artificial barriers,weather conditions, etc.
Multipath
The reflection characteristics of FM waves cause another
problem called multipath–FM wave signals reflecting off of
buildings, mountains, etc. When the antenna receives direct
and reflected waves at the same time, distortion of sound in the
treble range often occurs, such as static or harsh-sounding
voices. THIS IS NOT A TUNER PROBLEM. Only moving to
another area with a clearer signal path can remedy the
situation.
DIRECT
WAVE
RE
FL
EC
W TED
AV
E
38
D
TE
EC
FL
RE AVE
W
How to use an optional Card remote control
How to use an optional Card remote control
Precautions in use of the remote control
• Be careful when handling the control, especially because it is
small and light. Dropping or striking it hard may damage it,
wear out the battery or cause a malfunction.
• Keep the remote control free of moisture, dust and water. Do
not subject it to shock.
• Do not place the remote control unit where it will get hot, such
as on the dashboard or near a heater vent. Allowing the
remote control unit to overheat may warp its case or cause
other problems.
• Do not operate the remote control unit while driving because
doing so could cause an accident.
• When using the remote control, point it directly at the remote
control light receptor.
• The light receptor may not operate correctly if it is exposed to
bright light such as direct sunlight.
• Be sure to press the [PWR] button on the main unit for more
than two seconds to shut it down before leaving the car, or the
car battery may be run down. When the main unit is shut down,
the remote control will not work.
• Remove the batteries from the remote control unit whenever it
is not to be used for a long time.
Cleaning the remote control
• Use a dry cloth to keep the unit clean. If the remote control unit
gets extremely dirty, clean it with a cloth moistened in dilute
liquid detergent. Do not use alcohol or thinner; these
compounds may damage the finish.
• In no event should benzine or thinner be used. These
substances will damage the case or finish.
39
How to use an optional Card remote control
[PWR]
button
Remote-control
light receptor
[MUTE]
button
[+] button
[-] button
Turning the power on/off
When the power is turned on, the state used when the power was
turned off such as CD and tuner playing is restored.
1
Press the [PWR] button.
The power turns on or off each time the button is pressed.
When the main unit is shut down, the remote control will not work.
ATTENTION
Adjusting the audio volume
1
Press the [+] or [-] button.
[+] button: Increases the volume.
[-] button: Decreases the volume.
Cutting the volume instantly (muting)
Press the [MUTE] button to cut the volume or restore it
instantly.
40
How to use an optional Card remote control
[MODE] button
[BAND] button
Switching playback modes
1
Press the [MODE] button.
Press the button to switch modes in the following sequence:
Tuner
Disc
How to play the tuner
Select the tuner mode first.
Selecting the FM/AM band
1 Press the [BAND] button.
Each press will switch tuner modes from FM1 ➔ FM2 ➔
FM3 ➔ AM.
41
How to use an optional Card remote control
[BAND] button
[
TUNE • SEEK
[
PRESET CH
] buttons
] buttons
Selecting a station (manually or automatically)
A short tap of the button will allow manual station tuning.
Pressing for more than one second will start automatic tuning.
1 Press the [ TUNE•SEEK ] button.
[ ] button: Tunes to higher frequency stations.
[ ] button: Tunes to lower frequency stations.
Selecting preset stations
A total of six stations may be selected (preset tuning) out of
those already set in memory through the main unit. (Refer to
“Manually setting stations into memory,” page 34.)
1 Press the [ PRESET CH ] button.
[ ] button: Select the next higher number preset button.
[ ] button: Select the next lower number preset button.
How to play CDs
Select the disc mode first.
Switching disc mode
1 Press the [BAND] button.
42
How to use an optional Card remote control
[
TRACK • APS
] buttons
Advancing to the next track or returning to
the beginning of the track being played
1 Press the [ TRACK•APS ] button.
[ ] button: Skips to the next track.
[ ] button: Returns to the beginning of the track being
played. (Press repeatedly to move to previous
tracks.)
ATTENTION
Hold the [ ] button down to fast forward, or the [
rewind through the track being played.
43
] button to
How to use an optional Card remote control
Replacing the battery
Warning
To prevent accidents, store batteries out of the reach of
children. If a child has swallowed one, consult a doctor
immediately.
Use one CR2025 battery.
1
On the back of the remote control, while pressing the
locking knob on the battery slot cover toward your right,
pull out the battery carrier with your fingernail.
Unlock
2
Remove the old battery, then place the new one in the
carrier with the (+) mark facing up.
3
Push in the carrier until it snaps into place.
Be extremely careful not to swallow the battery.
Caution
44
How to use an optional NOB remote control
How to use an optional NOB remote control
P
H-M
US O
DE
Remote-control
light receptor
BAND
[AUDIO
CONTROL]
button
MODE
TRACK
TUNE SEEK
DISC
[MUTE] button
E-COM
MUTE
PWR
[PWR] button
ILLUMI
Turning the power on/off
When the power is turned on, the state used when the power was
turned off such as CD and tuner playing is restored.
1
Press the [PWR] button.
The power turns on or off each time the button is pressed.
When the main unit is shut down, the remote control will not work.
ATTENTION
Adjusting the audio volume
1
Press the [AUDIO CONTROL] button, and turn it to the
left or right.
Each press of the button will switch the audio control modes.
Turn to the right: Increases the volume.
Turn to the left: Decreases the volume.
Cutting the volume instantly (muting)
Press the [MUTE] button to cut the volume or restore it
instantly.
45
[BAND] button
H-M
US O
DE
P
How to use an optional NOB remote control
BAND
[MODE] button
MODE
TRACK
TUNE SEEK
DISC
E-COM
MUTE
PWR
ILLUMI
Switching playback modes
1
Press the [MODE] button.
Press the button to switch modes in the following sequence:
Tuner
Disc
How to play the tuner
Select the tuner mode first.
Selecting the FM/AM band
1 Press the [BAND] button.
Each press will switch tuner modes from FM1 ➔ FM2 ➔
FM3 ➔ AM.
46
[BAND] button
[
TUNE • SEEK
] buttons
H-M
US O
DE
P
How to use an optional NOB remote control
BAND
MODE
TRACK
TUNE SEEK
DISC
[
E-COM
MUTE
DISC
] buttons
PWR
ILLUMI
Selecting a station (manually or automatically)
A short tap of the button will allow manual station tuning.
Pressing for more than one second will start automatic tuning.
1 Press the [ TUNE•SEEK ] button.
[ ] button: Tunes to higher frequency stations.
[ ] button: Tunes to lower frequency stations.
Selecting preset stations
A total of six stations may be selected (preset tuning) out of
those already set in memory through the main unit. (Refer to
“Manually setting stations into memory,” page 34.)
1 Press the [ DISC ] button.
[ ] button: Selects the next higher number preset button.
[ ] button: Selects the next lower number preset button.
How to play CDs
Select the disc mode first.
Switching disc mode
1 Press the [BAND] button.
47
H-M
US O
DE
P
How to use an optional NOB remote control
BAND
[
TRACK
] buttons
MODE
TRACK
TUNE SEEK
DISC
E-COM
MUTE
PWR
ILLUMI
Advancing to the next track or returning to the
beginning of the track being played
1 Press the [ TRACK ] button.
[ ] button: Skips to the next track.
[ ] button: Returns to the beginning of the track being
played. (Press repeatedly to move to previous
tracks.)
ATTENTION
Hold the [ ] button down to fast forward, or the [
rewind through the track being played.
48
] button to
How to use an optional NOB remote control
Replacing the battery
Warning
To prevent accidents, store batteries out of the reach of children.
If a child has swallowed one, consult a doctor immediately.
Use two AA-size batteries.
1
Remove the back cover of the remote control unit by
gently pressing and sliding it in the direction indicated by
the arrow.
2
Install the two batteries provided into the compartment
as illustrated inside the compartment.
3
Return the back cover into place by sliding it in the
direction indicated by the arrow.
49
How to use an optional NOB remote control
Caution
•Be extremely careful not to swallow the battery.
•The battery life is approximately one year. If the remote control
unit does not operate correctly or if the button lamp gets dim,
replace the batteries.
•Be sure to orient the batteries correctly so that the positive and
negative poles match the diagram.
•Do not use one new battery and one old one; use two new
batteries.
•Use only two of the same kind of battery.
•If any liquid is seen leaking from the batteries, remove both
batteries and dispose of them properly. Thoroughly clean the
battery compartment with a dry cloth. Then install new
batteries.
50
If you have a question:
If you have a question:
[RESET] button
First check the items mentioned below before attempting to
troubleshoot problems.
Caution
If a problem occurs, for instance when the unit does not respond
to any button presses, or the display doesn't work correctly,
press the [RESET] button using a sharp tool.
Pressing the [RESET] button will delete all the entries from
memory. The settings will return to those made at the factory
prior to shipment.
51
If you have a question:
Displayed information (for troubleshooting)
The information listed in the chart below is displayed to show the
status of the CD player. Refer to the chart for the appropriate action.
Information Code Table
When "INFO
" flashes on the indicator
Nos.3,5 are displayed.
Information Contents
3 DISCS ARE DIRTY OR
DAMAGED
5 CD PLAYER FAILS
MECHANICALLY
Explanation and remedial action to take
The loaded disc is dirty or upside down. Check
it for proper orientation and verify it is clean.
•The CD player is inoperative for some reason.
Go through the magazine removal procedure.
•If a magazine fails to eject, have your dealer fix
the problem.
52
If you have a question:
Mode
Problem
Remedial action
to take
Causes
Is the volume control up sufficiently?
Dead or
weak sound
Refer
to page
Turn up the volume control.
23
Readjust the fader and
Is the fader or balance control set far
balance controls to more
to one side?
normal positions.
24
Other probable causes include
Have your dealer check
broken audio-signal wiring or a faulty
the problem.
speaker.
Power does
not turn on.
Are too many electrical items
installed, causing a lack of power?
Have your dealer check
the problem.
Other probable causes include a
run-down car battery, broken power
or interconnection wiring.
Have your dealer check
the problem.
Has the car battery been disconnected
for repair or checked out?
Reenter them into
memory.
Common Frequencies Are too many electrical items
to all
or titles set in installed and causing lack of
memory are available power?
deleted.
Other probable causes include rundown car battery, broken power or
interconnection wiring.
No guide
Is the guide tone disabled?
tone sounds.
33,
34
Have your dealer check
the problem.
Have your dealer check
the problem.
Enable the guide tone.
26
Is the battery low?
Replace battery.
44,
49
Is the battery installed in reverse
Reinstall the battery in the
correct polarity.
44,
49
The remote polarity?
control does
not work.
Is direct sunlight hitting the remote
control light receptor?
Use the remote control
close to the receptor.
Other probable causes include a
malfunctioning remote control.
Have your dealer check
the problem.
53
If you have a question:
Mode
Refer
to page
Is an extra label or seal
applied to the disc?
Do not apply labels or seals
to the disc.
11
Are there rough edges,
deformations or
damaged areas on the
disc?
Try inserting another disc.
Removed any burrs. Do not
use a deformed or
damaged disc.
12
Causes
The disc cannot be inserted.
The disc is ejected as soon
as it is inserted.
Or, the disc cannot be
ejected.
CD
Sound skips around.
Sound is intermittent.
Sound is bad in quality.
The disc cannot be
ejected.
Mode
Remedial action
to take
Problem
Problem
Receives
no
stations,
Tuner or
receives
static
noise.
Try another disc. Do not
Is the disc damaged?
(scratched, warped, etc.) play a damaged disc.
11
Is the disc clean?
Clean the disc.
13
Is the player mounted at
a proper angle?
Is the player mounted
loosely?
Have your dealer check it
out.
Are you driving over a
rough surface?
Avoid playback while
driving over rough surfaces.
If unknown
Press the [DISC] button a
bit longer (forced Eject).
Causes
Remedial action to take
10
Refer
to page
Is the antenna retracted?
Extend the antenna.
Is the tuner correctly tuned to a
station?
Tune to a station.
32
Are you driving outside the service
area of your preset stations?
Tune to a local station.
(Please note, there may
be no local stations
servicing the area where
you are currently driving.)
32
Are you operating other equipment
with a computer, or a mobile phone,
in your vehicle at the same time as
your receiver?
Avoid operating such
equipment while using
the receiver.
Other problems may include a loose Have your authorized
Eclipse retailer check the
or disconnected antenna cable, a,
problem.
bad antenna cable or a bad
54
Specifications
Specifications
<GENERAL>
Power Supply
Current Drain
Dimensions (W x H x D)
In-Dash Unit
Mass (weight)
Usage temperature range
Storage temperature range
14.4V DC (11-16V)
3A MAX
7" x 2" x 6-1/5" (178 x 50 x 158mm)
Approx. 1.4kg
-20°C to + 65°C (-4°F to 149°F )
-40°C to + 85°C (-20°F to 185°F )
<FM TUNER>
Frequency Range
USA:
Asia/Australia:
Usable Sensitivity
Frequency Response
Stereo Separation
87.75~107.9MHz (0.2MHz step)
87.5~108MHz (0.05MHz step)
13dBf
30~15,000Hz,
3dB
38dB
<AM TUNER>
Frequency Range
USA:
Asia/Australia:
Usable Sensitivity
530~1,710kHz (10kHz step)
522~1,629kHz (9kHz step)
20µV
<CD SECTION>
Frequency Response
Wow & Flutter
Stereo Separation
S/N Ratio (A-weighted)
Dynamic Range
Total Harmonic Distortion
20~20,000Hz,
3dB
Below measurable limits
76dB
90dB
89dB
0.02%
<AUDIO AMPLIFIER>
Power Output
Output Level/Impedance
Tone Action
Loudness
13W x 4 (20~20,000Hz, 0.8% THD,
4Ω) Max 35W x 4
2.7V (0dB) /330Ω line-out
impedance
Bass :
10dB at 100Hz
Treble :
10dB at 10kHz
+9.5dB at 100Hz/+6.0dB at 10kHz
55
Before installation
Before installation
Note
Be sure to disconnect the vehicle battery's negative terminal
before installing the receiver.
Components
No.
1
2
3
4
5
6
7
8
9
10
11
12
Item
Q'ty
Main unit
Mounting sleeve
Side bracket
Rear bracket
Bezel
Bushing
Self-tapping screw (6 x 16 mm)
Stud bolt
Flat head screw (5 x 8 mm)
Hex-head bolt (5 x 20 mm)
Hex nut (5 mm)
Interconnecting cable
1
1
2
1
1
1
2
1
4
2
2
1
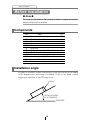
Installation angle
In order to maintain proper functioning, install the unit within an angle
of 30 degrees from horizontal (standard). If this is not done, sound
skipping or ejection of the CD may occur.
FRONT
WITHIN AN ANGLE
OF 30 DEGREES
STANDARD
56
Mounting instruction
Mounting instruction
Mounting the main unit
1
Insert the mounting sleeve into the opening in the vehicle
dash board or console box.
2
Use a screwdriver or the like to bend the tabs in the
mounting sleeve to secure the mounting sleeve.
BEND THE MOUNTING
TABS.
DASH BOARD
OR CONSOLE BOX
2
3
MOUNTING
SLEEVE
Attach the side brackets to the main unit using flathead
screws.
1
MAIN UNIT
9
3
57
FLAT HEAD
SCREWS [ x 2 ]
(5 x 8mm)
SIDE BRACKETS [ x 2 ]
Mounting instruction
4
Mount the stud bolt to the main unit.
5
Insert the main unit into the mounting sleeve until it locks
in place.
6
Fasten the rear of the main unit using either method [A]
or [B].
Select method [A] or [B] to suit the interior configuration of the
vehicle.
7
Install the bezel on the main unit.
[A]
METAL OF
VEHICLE
DASH BOARD
OR CONSOLE BOX
6
BUSHING
TO
P
8
2
5
STUD BOLT
MOUNTING SLEEVE
BEZEL
[B]
7
DASH BOARD
OR CONSOLE BOX
10
SELF TAPPING
SCREW (6 x 16mm)
11
METAL OF
VEHICLE
BOLT
(5 x 20mm)
11
TO
P
4
8
2
5
BEZEL
58
NUT (5mm)
NUT (5mm)
REAR BRACKET
STUD BOLT
MOUNTING SLEEVE
Mounting instruction
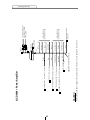
Names of lead wires and destinations (refer to Page 61)
Caution
Never connect the power supply to the speaker leads,
otherwise it cause damage to the main unit.
Note
To prevent unconnected leads from shorting out, insulate them
by wrapping their tips with electrical tape. Similarly, insulate the
ends of connected leads.
If an external amplifier is to be connected to the receiver, be
sure to ground its outside housing to the vehicle body (a metal
part).
No.
Name
Wire color
1
ACC
Red
Connect where the power comes on
when the ignition is in the ACC
position.
Destination
2
B+
Yellow
Connect where the power is
constantly available, regardless of the
ignition switch's position.
3
Ground
Black
Connect where good
grounding is available.
4
Antenna power supply Blue
Connect to the automatic-antenna
control terminal of the vehicle.
5
Illumination power supply Orange/White
Connect to where power comes on
when the headlights are turned on.
6
Control power supply Blue/White
Connect to the control terminal for
the external amplifier, etc.
7&8
Line-out terminals
Connect to the RCA input connectors
of an external amplifier.
9
Speaker leads
Connect them to their respective
speaker leads.
10
Cellular phone mute
Pink
body
Connect to the ground output
terminal on a mobile phone.
59
Mounting instruction
System
60
61
White (+)
Pink
Purple/Black (–)
Purple (+)
Green/Black (–)
Green (+)
Gray/Black (–)
Gray (+)
10 CELLULAR PHONE
ANTENNA PLUG
White/Black (–)
16P
7 FRONT
8 REAR
Never connect the power supply to the speaker leads, otherwise it cause damage to the main unit.
Caution
Black
Blue/White
Orange/White
Blue
12 INTERCONNECTING CABLE
3 TO GROUND
6 TO TURN-ON LEAD OF EACH UNIT (Supply)
5 TO HEADLIGHT SWITCH (Illumination)
4 TO POWER ANTENNA RELAY (Supply)
Yellow
Red
CD3404
2 TO BATTERY + 12V (Permanent Supply)
1 TO ACC (Power Supply)
1) CD3404 Receiver, used alone
Mounting instruction
62
(+)
(+)
12 INTERCONNECTING CABLE
Black
Blue/White
(+)
Pink
Purple/Black (–)
Purple
Green/Black (–)
Green
Blue
(+)
Gray/Black (–)
Gray
INSULATE EACH
WIRE WITH TAPE
INSULATE EACH
WIRE WITH TAPE
TO SIGNAL INPUT OF
AUXILIARY POWER
AMPLIFIER
10 CELLULAR PHONE
(For mute)
Never connect the power supply to the speaker leads, otherwise it cause damage to the main unit.
Caution
White
ANTENNA PLUG
White/Black (–)
16P
CD3404
8 REAR
7 FRONT
Red
Yellow
Orange/White
3 TO GROUND
6 TO TURN-ON LEAD OF EACH UNIT (Supply)
5 TO HEADLIGHT SWITCH (Illumination)
4 TO POWER ANTENNA RELAY (Supply)
1 TO ACC (Power Supply)
2 TO BATTERY + 12V (Permanent Supply)
2) CD3404 + Power Amplifier
Mounting instruction
Memo
••••••••••••••••••••••••••••••••••••••••••••••••••••
63
How to contact customer service
How to contact customer service
Should the product require service, please contact your nearest
following Eclipse dealer.
<U.S.A/CANADA>
DIVISION OF FUJITSU TEN CORP. OF AMERICA
19600 SOUTH VERMONT AVENUE, TORRANCE, CA 90502
Phone: (310) 327-2151
<AUSTRALIA>
FUJITSU TEN (AUSTRALIA) PTY LTD.
ECLIPSE AUSTRALIA
Phone: 1800-211-411
<MALAYSIA>
CSE Cobra. Sdn. bhd.
Level 5, Axis Plaza, Jalan U1/44, Glenmarie, 40150 Shah Alam,
Selangor D.E., Malaysia.
Phone: 03-5569-4200
Fax: 03-5569-4201
<SINGAPORE>
CSE Cobra (S) Pte Ltd
Trademart
60, Martin Road, # 05-20, Singapore 239065
Phone: 6737 2568
Fax : 6737 9538
64
How to contact customer service
<KOREA>
HYUNDAI AUTONET Co., LTD.
1st FL. Namhyoung Bldg, 746-23 Yeoksam-Dong, Kangnam-Ku,
Seoul, Korea 135-080
Phone: 02-508-6001
Fax: 02-2-508-6067
Transpectra Co., Ltd.
115-16 nonhyun dong kangnam ku Seoul, Korea.
Phone: 02-540-4595
Fax: 02-2-540-4666
<TAIWAN>
Sentrek Taiwan, LTD.
1, 9F, Lane 155, Section 3, Peishen RD., Shenkeng, Taipei Hsien,
222
Taiwan, R.O.C.
Phone: 02-2662-8110
Fax: 02-2662-8117
<THAILAND>
Sho-Ten Co., Ltd.
114/9 Soi Suwansawadi, Thungmahamek, Rama 4 Rd., Sathorn,
Bangkok 10120, Thailand.
Phone: 02-671-9610-12
Fax: 02-671-9614
65
Memo
••••••••••••••••••••••••••••••••••••••••••••••••••••
66
IMPORTANT
RECORD YOUR “KEY CD”
HERE…
STORE YOUR “KEY CD”
ALONG WITH YOUR
OWNER’S MANUAL IN
YOUR SOCK DRAWER.
67
CUSTOMER NOTICE
Please retain this booklet and write in the serial number of your CD3404 for
identification. The serial number is labeled or stamped on the chassis.
Serial No.
FUJITSU TEN LIMITED
090001-1456A700
0405 (Y.TS)