1
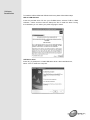
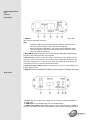
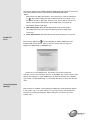
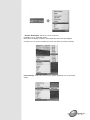
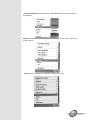
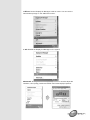
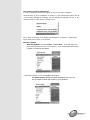
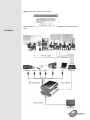
USB to HDMI Converter w/RJ45
- ID# 706
Operation Manual
Introduction
The Ethernet and USB to HDMI Converter allow users to use TV as the PC primary
display with keyboard and mouse at hand for Internet browsing, using Microsoft
Office, listening music and watching movies from a PC on the network. Simply
connect the TV to the device and then plugging the device into an Ethernet network,
this TV instantly become the PC monitor with keyboard and mouse for any computer
on that network. The device will enable this TV to be used as if it was directly
connected to the computer. The distance between TV and computer can be 100
meters apart within the same LAN.
The device removes the limitations of running expensive audio and video wiring in
long distance digital signage extending. All that is needed is an Ethernet network.
Multiple users will have the ability to access the same TV without physically connect
with computers. This will eliminate the distance limitations of conventional audio and
video cabling for easy AV sharing between computers.
Features
1.
2.
Move the complete PC operation environment into TV with 100 meters
away from computer. Original PC monitor can different content with TV.
Allow TV as the PC primary display with keyboard and mouse at hand
for Internet browsing, using Microsoft Office, listening music and watching
movies from a PC on the network.
3.
4.
Extend or mirror video through network or USB cable to HDMI display, including
both video and audio output signals.
Share HDMI displays with multiple users through your existing office or home IP
network.
5.
Add a HDMI display to your computer through a USB 2.0 port.
6.
Supports mirror and extended video modes.
7.
Friendly interface for easy configuration and monitoring.
1.
System Hardware Requirements: 2.4 Ghz CPU with 1 GB RAM for optimal
System
Requirements
performance
2.
O p e ra t i n g S ys t e m s :
3.
Windows 2K SP4
4.
Windows XP Home or Professional 32 bits SP2
5.
Windows Vista 32 bits
6.
Extending through a USB port:
7.
Available USB 2.0 port with USB to mini USB cable
8.
E x t e n d i n g t h r o u g h a n e t wo r k :
9.
Available Ethernet port on home, business or office network with RJ-45 cable
10. Keyboard and Mouse for extra pair of control tool
Software
Installation
To install the USB to HDMI and USB device drivers, please follow below steps.
USB to HDMI Software
Insert the provided driver CD into your CD-ROM driver, selected "USB to HDMI
Software " folder and then execute "Setup.exe" file to install the driver. During
the installation you can select your prefer language to install.
USB device driver
Press "XP_VS_Setup.exe" to install USB device driver. After install the driver,
select "Yes" to restart the computer.
Operating Functions
and
Controls
Front Panel
1. USB Port: Connect USB device into USB port such as, USB Hard Drive, USB
web camera, Keyboard or Mouse.
Note:
These two USB ports can't extend with other USB Hub, otherwise it will
cause the system failure to detect the external USB Hub.
Before removed the USB device, user need to follow USB device safely
remove hardware procedure to remove the device, otherwise, it will
cause the system crash down.
2. Mini USB IN: Support extends or mirror video through USB cable to HDMI display,
including both video and audio output signals.
3. Ethernet IN: Connect to home IP router or PC Ethernet port. When connect
directly to the PC Ethernet port, user need to set manually the Internet Protocol
(TCP/IP) to "169.254.10.1". If connect to IP router, the system will automatically be
connected and user do not to set up Internet Protocol.
4. Input connection switch: Switch to select the PC source from Mini USB port or
through Ethernet port.
5. Reset IP: Press to reset Ethernet IP address only if the system's IP address is incorrect
Rear Panel
1. Power: Plug the 5V DC power supply into the unit and connect the adaptor to
AC wall outlet.
2. HDMI out: Connect HDMI output port to the HDMI display.
3. EDID control switch: Default factory setting is "ON", leave as it is if the display is
properly. If the display has built-in native EDID, the screen will show display's resolution
and user can selected from SCREEN RESOLUTION. When switch OFF, the screen will
show internal EDID and user can selected from SCREEN RESOLUTION.
Note:
When switch from ON to OFF position, user need to go to "Launch USB Server
in "
to disconnect DisplayLink USB to HDMI and reconnect it again. If not,
the system will stay in ON stage. However, from OFF to ON the user do not
need to reconnect the DisplayLink USB to HDMI driver, the system will
automatically switch to ON stage.
4.
LINK LED Indicator: Blue LED will illuminate when the source signal is
connected with the input port. Blue LED blinking means its doing signal
connection.
5.
Power LED Indicator: Red LED will illuminate when the power is connected.
Launch USB
Server
Press "Launch USB Server " to connect DisplayLink USB to HDMI driver and
C-Media USB Sound Device. After connect the system the front logo will
change from GREEN sign to ORANGE sign.
Double click on the GREEN sign, the system will connect the devices
and after connect successfully it will turn to ORANGE sign. When connect other
devices with USB port, "Launch USB Server" will detect it and show out a GREEN
sign. Double click the GREEN sign to connect the device(s) in order to activate and
use it.
Using DisplayLink
Manager
After the driver is installed, a utility (DisplayLink Manager) will automatically appear
in the system tray. The utility allows you to quickly change the settings and
resolution for DisplayLink Manager. Right-clicking the icon will bring out the
context menu.
• Screen Resolution: Select the screen resolution
(available only in extended mode).
Note: When the display has built-in native EDID the screen will show display's
resolution, but if no built-in EDID the screen will have the follow resolution.
Color Quality: Select the screen color quality (available only in extended
mode).
• Screen Rotation: Rotate the screen on the additional monitor by 90, 180 or
270 degrees.
Extend to: Reposition the extended screen to the top, bottom, left or right of the
primary display.
• Extend: Set the DisplayLink Manager to Extended mode.
• Mirror: Set the DisplayLink Manager to Mirror mode. You can see the
same desktop image on the additional monitor.
• Off: Disable the DisplayLink Manager on the system.
Advanced: Directly access the Display Properties. You can also adjust the
resolution, color quality, position and refresh rate via the Display Properties.
Using More DisplayLink Manager
It is not necessary to install driver again as long as you have completed
above process of driver installation in advance. It will automatically define the ID
of new adding DisplayLink Manager. All the DisplayLink Manager will list in the
Display Properties or the display manager menu.
Note: When connecting more DisplayLink Manager to a computer, a system with
higher CPU performance is recommend.
Firmware Update
Manually Update: Click the Updates > Check Now..., and it will check and
—
download the latest firmware immediately.. Note: Please make sure that your
computer is connected to the network.
• Automatic Update: Click the Updates Configure...
the Updates Options window will appear as shown below. You can
set the update method and frequency in the windows.
Uninstall the Device Driver
Follow the steps below to uninstall the driver of the Multi View.
Step 1: Open the Control Panel: Start
→ Control Panel
→Add or Remove Programs.
Step 2: Select USB to HDMI Converter and click Remove.
Step 3: Click Yes to confirm the removal.
Step 4: Click Yes to restart your computer.
Step 5: Select Displaylink core software and click Remove to remove DisplayLink
driver.
Installation
Specifications
Input port
Output ports
Extender Ports
Power Supply
ESD Protection
Dimensions (mm)
Weight(g)
Chassis Material
Silkscreen Color
Power Consumption
Operating Temperature
Storage temperature
Relative Humidity
lx Mini USB; 1xEthernet
lx HDMI; 2xUSB
2x USB
5VDC/2.6A (US/EU standards, CE/FCC/UL
certified)
Human body model: ± 10kV (air-gap
discharge)
± 6kV (contact discharge)
Core chipset
± 2kV
210(W) x 91(D) x 30.5(H)
220
Aluminum
Metal Black
W
0°C-40°C
-20°C-60°C
20-90% RH (no condensation)