1
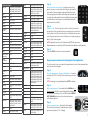
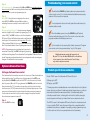
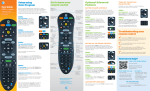
User Guide
User Guide
AT&T U-verse TV
Point Anywhere
RF Remote
Control
®
ZIMRC3033
Rev.1114
C-1
AT&T U-verse® TV
Point Anywhere
RF Remote
Control
Congratulations on your new AT&T U-verse TV Point Anywhere RF
Remote Control. The remote, with the USB converter, eliminates the
need to point your remote control at the AT&T U-verse Receiver in
order to change channels or access any of the receiver’s features. This
universal remote control allows you to control up to three additional
devices, such as a TV, DVD player, or audio device. It even has the
ability to “learn” commands from existing remote controls.
NOTE: The Point Anywhere RF Remote Control only controls the AT&T U-verse
Receiver using RF (radio frequency) technology. All other devices are controlled
with IR (infrared) signals.
Table of contents:
Getting started
Activate batteries...................................................................... 3
Install USB converter................................................................ 3
Program your remote
For popular brands...................................................................... 4
Using auto search.........................................................................5
Using manual setup.................................................................... 6
Using the learning feature.........................................................7
Remote features
Low battery indicator................................................................. 8
Disable backlighting................................................................... 9
Set USB converter Home ID.................................................... 9
Optional advanced functions
Power Macro............................................................................10
Disable RF.................................................................................. 11
Volume control....................................................................... 12
Channel lock............................................................................ 13
Blu-Ray/DVD Cont’d
20623
Samsung
20199, 20573, 21075, 21573,
22113, 22269, 21470, 22369,
22329, 22489, 22556, 23492,
21044, 20490
FCC ID Numbers:
RF Remote Control - CAC3033
USB Converter - CAC3000
Sanyo
20670
Schneider
20646
Sensory Science
21158
Sharp
22250, 20630, 20675
Sherwood
23052, 21043, 23837, 23925
Sonic Blue
20869
Sony
21516, 21633, 21033, 20864,
21070, 20772
SV2000
20675
This device complies with Part 15 of the FCC
Rules. Operation is subject to the following
two conditions:
1. This device may not cause harmful
interference, and
2. This device must accept any interference
received, including interference that may cause
undesired operation.
Privacy of communications may not be ensured
when using the AT&T U-verse® TV Point Anywhere
RF Remote Control.
Sylvania
20675
Symphonic
20675
Teac
20790
Technics
20490, 20703
Toshiba
22705, 22277, 23157, 23857,
20503, 22364, 22006, 21510,
21769
TruTech
20675
Urban Concepts
20503
Venturer
20790
Viore
22553
VIZIO
22563
WB Electronics
22555
Xbox
22083, 22627, 20522
Yamaha
22298, 20497, 23837, 20539,
20545, 20490, 21354, 20646,
21416
Zenith
20741, 20869, 20503
Learn your remote control................................14
Troubleshooting..................................................15
2
FCC Requirements
Rotel
Video—VCR
Product specifications.......................................15
DirecTV
20739
Programming codes...........................................16
Humax
20739
FCC Requirements............................................ 23
Philips
20739
RCN
20739
TiVo
20739
Note: This equipment has been tested and
found to comply with the limits for a Class B
digital device, pursuant to Part 15 of the FCC
Rules. These limits are designed to provide
reasonable protection against harmful
interference in a residential installation. This
equipment generates, uses, and can radiate radio
frequency energy and, if not installed and used
in accordance with the instructions, may cause
harmful interference to radio communications.
However, there is no guarantee that interference
will not occur in a particular installation. If this
equipment does cause harmful interference
to radio and television reception, which can be
determined by turning the equipment off and
on, the user is encouraged to try and correct
the interference by one or more of the following
measures:
1. Reorient or relocate the receiving antenna.
2. Increase the separation between the
equipment and receiver.
3. Connect the equipment into an outlet on a
circuit different from that to which the receiver is
connected.
4. Consult the dealer or experienced radio/TV
technician for help.
Warning: Changes or modifications to this unit
not expressly approved by the party responsible
for compliance could void the user’s authority
to operate the equipment.
23
Getting started
Blu-Ray/DVD Cont’d
Kenwood
20534, 20490
Craig
20831
KLH
20717, 20790
Curtis
22235, 23403, 23052, 21493
Lexicon
22545
Curtis Mathes
22331, 23925
LG
20741, 21602, 22135, 20869
Daewoo
20833, 20869
LiteOn
21738, 21158, 21416
Denon
22258, 21634, 22748, 23851,
20490
Logitech
22639
DigitalMax
21738
Magnavox
20675, 21354, 20503, 20646,
23488, 21506, 20539
Digix
22464, 23850
Marantz
22481, 22414, 20539, 23444
Directed Video
20717
McIntosh
21273
Disney
20675, 21270, 23246
Memorex
Durabrand
23464
22213, 23153, 20831, 21270,
22331
How to install the USB converter
Dynex
22596
Microsoft
22083, 22627, 20522
NOTE: Make sure the receiver is powered on before testing the USB converter.
Emerson
20675, 22213
Mintek
20717
20670
20741
Step 1:
Fisher
NAD
Funai
20675
Naxa
22235
Gateway
21158
Nesa
20717
GE
20717, 20522
New Acoustic
Dimension
20741
General Electric
20717, 20522
Nyko
22340
GFM
20675
Ölevia
22331
Go Video
20869, 21044, 20741, 21075,
20744, 20833, 21158, 20717
Onkyo
22147, 21627, 22562, 20503,
21769
GoldStar
20741, 20869
Oppo
22545, 21224
GPX
22235
Panasonic
Greenhill
20717
21641, 20490, 23641, 21579,
20703, 20503
Grundig
20539
Philco
20675, 20790
Harman/
Kardon
20702, 22927, 23228, 20582,
21229
Philips
22056, 22434, 23488, 22084,
20646, 21354, 20539, 21506,
20503, 20675, 21158
Hello Kitty
20831
Pioneer
Hitachi
20664, 20573
22442, 21571, 20631, 22854,
22847, 20142
Hiteker
20672
Polaroid
21013
Initial
20717
Polk Audio
20539
Insignia
22596, 22095, 22428, 20675,
21013, 20741
Presidian
20675, 21738
Proceed
20672
Integra
22147, 21769, 21634
Proscan
20522
Irradio
20646
RCA
JBL
20702
JVC
20623, 21164, 20867, 21602,
22855
20522, 22919, 22213, 22587,
23464, 21013, 20717, 22871,
21769, 20790
RE-BL
22555
20790
Rio
20869
Kawasaki
How to activate the batteries of the
Point Anywhere RF Remote Control
Two AA size alkaline batteries have been preinstalled for
your convenience. Pull the “Remove to Operate Remote”
plastic tab on the back of the remote control straight out
with one smooth motion. The AT&T mode key will flash red
twice. If it does not light up, please open the battery door,
reinstall the batteries, and try again.
Remove the cover from the USB converter.
Step 2:
Plug the USB converter into the USB port on the front of
your AT&T U-verse Receiver. Your port location may differ
from the picture shown. The blue power LED on the USB
converter will light up and stay on.
Step 3:
The USB converter may be swiveled up or down for
optimum performance. Press the POWER or CH+/(CHANNEL UP/DOWN) keys to ensure proper operation.
NOTE: The USB converter must be installed in the front
USB port of the AT&T U-verse Receiver. It will not operate
if installed in the USB port on the back of the receiver.
3
Program your remote
Program your device using one of the methods below:
•
•
•
•
Program your remote control for popular brands
Program your remote control using auto search
Program your remote control using manual setup
Program your remote control using the learning feature
Program your remote control for popular brands
Program your remote to control popular devices, including a TV, DVD, Blu-ray,
home theater receiver, or sound bar.
Ensure the protective battery strip has been removed. Make sure the device you
are programming is powered on and you can hear sound from it.
Step 1:
Find your device brand in the chart below – Note which number relates to your
brand. If your device brand is NOT shown, proceed to PROGRAM YOUR REMOTE
USING AUTO SEARCH.
Digit
TV Brand
Digit
DVD/Blu-Ray Brand
Digit
1
LG
1
Insignia
1
Bose
2
Panasonic
2
LG
2
Denon
3
Philips, Magnavox
3
Panasonic
3
LG
4
RCA
4
Philips, Magnavox
4
Onkyo
5
Samsung
5
Pioneer
5
Panasonic
6
Sanyo
6
RCA
6
Philips
7
Sharp
7
Samsung
7
Pioneer
8
Sony
8
Sharp
8
Samsung
9
Toshiba
9
Sony
9
Sony
0
VIZIO
0
Toshiba
0
Yamaha
Step 2:
Enter programming mode – Press and hold the OK and
MENU keys simultaneously for three seconds until all four
mode keys flash red twice and you hear two short beeps to
confirm you are in programming mode.
4
Audio Brand
Home Theater Receiver CONT’d
Sherbourn
33763
Klipsch
33092
Sherwood
Left Coast
Products
30892
31077, 31567, 31905, 32169,
33120
32197, 32676, 32284, 33285,
31293
Sherwood
Newcastle
31567, 32169
LG
Sonic Blue
31869
Linn
30189
Sony
Magnavox
30189, 31269, 31189, 31831
Marantz
31289, 30189, 32114, 31189,
31269, 32138, 30892
31622, 32172, 31759, 31822,
32475, 32522, 30158, 31058,
31441, 31758, 32860, 33257,
32671, 33372, 33456, 34107,
34032, 33903
McIntosh
31289
Stereophonics
31023
Memorex
31568
Sunfire
31313
Micromega
31189
Teac
30463, 31390
Myryad
31189
Technics
31308, 31633
Nakamichi
31313
Thorens
31189
NexxTech
31751
Toshiba
31788, 31123
Norcent
31389, 31751
Venturer
31390
Nova
31389
Wards
30158, 30189
Onkyo
31805, 32730, 32503, 31320,
30135, 34023, 31298
Yamaha
Optimus
31023
32061, 30176, 32467, 31276,
33580, 30376, 33030, 31815,
31331, 31376, 32471
Outlaw Audio
33973
Zenith
31293, 31869, 32197
Panasonic
32967, 32452, 33309, 31275,
31288, 31633, 31763, 32745,
32105, 31308, 31676
Philco
31390, 31831
Philips
32459, 31831, 32311, 31269,
30189, 32289, 31266, 31189,
33652, 33227, 30892
Pioneer
31935, 32432, 31123, 31384,
31023
Blu-Ray/DVD
Accurian
20675, 21416
Alco
20790
Allegro
20869
Apex Digital
20672, 20717
Audio Authority 22555
Audiovox
20790, 20717
BBK
21224
Bel Canto
Design
21571
Polk Audio
31289, 30189, 32270, 30892
Proscan
31254
RCA
33297, 32655, 31254, 32426,
33295, 32041, 31123, 31390,
31609, 31023
Blaupunkt
20717
BuBuGao
21224
Regent
31568
20490
Rio
31869
California
Audio Labs
Samsung
31868, 32809, 33154, 32137,
31304
Cambridge
Audio
22808
Sansui
30189
Cinea
20831
Sanyo
31801
CineVision
20833, 20869
Coby
22746, 22494, 22747, 20852,
21165, 21351
Sharp
33929
Step 3:
Sound bar/AUDio Accessory Cont’d
Home Theater Receiver
B&W
33965, 32441, 33943
Aiwa
30121, 31641, 30158, 30189
Bose
33708
Alco
31390
Boston
Acoustics
33698
AMC
31077
Bowers &
Wilkins
33965, 32441, 33943
Anam
31609
Apex Digital
31774, 31257
Curtis
33942
Arcam
31189, 30189
Definitive
Technology
33645
Audiotronic
31189
Denon
32502, 34025
Audiovox
31390
Dynavox
33231
Bose
31933, 31629, 33959
Haier
33516
Carver
30189, 30121, 31189
Harman/
Kardon
33517
Coby
31389, 32748, 32698, 33218
Curtis
31389
iLive
33175
Denon
Insignia
33951
32857, 31360, 32516, 33347,
32820, 33380, 33642, 32279,
32706, 32134
Power on or unmute device – Press the POWER key to turn
the device back on (TV or DVR) or press MUTE to unmute
(audio device only).
JBL
33756, 33535
Durabrand
31568
Step 6:
JVC
33049
Dynex
32971
Klipsch
33915
Emotiva
33763
LG
33217, 33996
Epworth
30121, 31641, 30158, 30189
Martin Logan
33526
Fisher
31801
Onkyo
33984, 33992, 33326
Garrard
30463
NOTE: Repeat this process for other devices (DVD, Blu-ray,
home theater receiver, or sound bar).
Panasonic
33323, 33409, 33767
Gateway
31567
Step 7:
Philips
33962, 32675, 33282, 34012
GE
33297
Pinnacle
Speakers
33774, 33728
General
Electric
33297
Pioneer
33956
GPX
33214
Polk Audio
33429
Proficient
33661
Harman/
Kardon
32241, 30110, 31304, 32443,
33418, 30189, 32670, 30892,
33045
RCA
33969
Hitachi
31801, 31273
Samsung
32660
Insignia
Sharp
33736, 33097
32169, 32175, 32472, 31030,
31751, 32929, 32966, 31077
Sonos
33919
Integra
31805, 32730, 31320, 34023,
32503, 30135, 31298
Sony
33700, 32610
JBL
30110, 32241
SpeakerCraft
33661
Jensen
31389
Toshiba
33627
JVC
VIZIO
32454
31676, 32040, 31374, 32331,
31495, 33115, 33274
Yamaha
32458, 32021, 33153, 33917
Kenwood
31570, 31313, 31293
ZVOX
32332, 33913, 32334
KLH
31390
Press the mode key associated with the device – Press the
mode key (TV, DVD, or AUX) for the device type you wish to
set up. The mode key will light up red and stay lit.
NOTE: AUX is the default mode key for audio devices.
Step 4:
Press the key for your brand – While pointing the remote
at your device, press and hold down the number key for your
brand. Let go of the key as soon as the device turns off (for
a TV or DVD) or mutes (for an audio device). The previously
selected mode key will blink red twice and you will hear two
short beeps to confirm that programming was successful.
Step 5:
Test volume control – Use the volume buttons to verify that the remote control
is controlling your device’s volume. If it does not work properly, go back to Step 2
and try again.
Press the AT&T mode key
for normal operation.
Program your remote control using auto search
Use the following method to program your remote for TV, DVD, or audio device
brands that do not appear in the popular manufacturer chart on page 4. Ensure
the device to be programmed is powered on and its sound can be heard.
Step 1:
Enter programming mode – Press and hold the OK and
MENU keys simultaneously for three seconds until all four
mode keys flash red twice and you hear two short beeps to
confirm you are in programming mode.
5
Step 2:
Press the mode key associated with the device – Press the
mode key (TV, DVD, or AUX) for the device type you wish to
set up. The mode key will light up red and stay lit.
NOTE: AUX is the default mode key for audio devices.
Step 3:
Press and hold the FAST FORWARD key – While pointing the remote
at your device, press and hold down the FAST FORWARD key. Let go of
the key as soon as the device turns off (for a TV or DVD) or mutes
(for an audio device).
Step 4:
Power on or unmute device – Press the POWER key to turn
the device back on (TV or DVR) or press MUTE to unmute
(audio device only).
Step 5:
Test Volume Control – Use the volume buttons to verify that the
remote control is controlling your device’s volume. If it does not
work properly, go back to Step 1 and try again.
NOTE: Repeat this process for other devices (DVD, Blu-ray,
home theater receiver, or sound bar).
Step 6:
Press the AT&T mode key for normal operation.
Program your remote control using manual setup
Step 1:
Find your device brand in the code list – Using the code list in the back of this user
guide, find your brand of TV, DVD, or audio device and note the first code listed for
that brand.
12051, 11632, 10702, 13993,
Samsung
10060, 11959, 10766, 10650,
10814
Step 2:
Enter programming mode – Press and hold the OK and
MENU keys simultaneously for three seconds until all four
mode keys flash red twice and you hear two short beeps to
confirm you are in programming mode.
6
Television CONT’d
Teknika
10180, 10060, 10150
Sceptre
13899, 12528, 12337, 14160,
11217, 11360, 10878, 11599,
12506
Telefunken
10702
Telemagic
10735
Scott
11711, 10180
TNCi
10017
Sears
10156, 10171, 11547
Toshiba
Seiki
13953, 12964, 13559, 13560
11524, 12724, 10156, 11935,
11704, 11959, 10650, 11343,
11369, 10060
Seiko Epson
11122
TruTech
11665, 11723, 12066
Sens
11865
TVS
10463
Sharp
12360, 10818, 11602, 13867,
10093
Upstar
14182
Sheng Chia
10093
US Logic
11286
Sherwood
11399, 13061
Venturer
11865, 11868
Sigmac
13477, 13423
Vidikron
11398
Silo
13794, 13477, 14182
Viewsonic
Silo Digital
13794, 13477, 14182
12014, 12087, 13706, 10864,
11330, 11627, 11755, 12049,
12277, 10885, 11564, 11578,
11742, 12101, 11365
Skyworth
13253, 11799
Viore
Solé
11623
12352, 13382, 13429, 12104,
13094, 11684, 11207, 13154
Sony
10810, 11300, 11685
VisionQuest
13154
Soundesign
10180
Vivitek
11369
Soyo
11746, 11826
VIZIO
Spectroniq
11687
11758, 13758, 12707, 12757,
13415, 13358, 11756, 10864,
10885
Speler
14105
Vuon
13418
Squareview
10171
Wards
SSS
10180
10017, 10156, 10051, 10060,
10180
Starlite
10180
Waycon
10156
SunBriteTV
12337, 11610, 12528
Westinghouse
Superscan
10864, 10093, 10171
11712, 13579, 13382, 10885,
11300, 13949, 12293, 13094,
13470, 10890, 11282, 12397,
13908, 10451, 10463, 11217
Supersonic
13154, 12104, 13595, 13204
10748, 10865, 10768, 11963
White
Westinghouse
11661, 11909, 10463
SVA
Sylvania
11864, 11886, 11394, 10171,
11963, 11665, 11314
Wyse
11365
Xiahua
10761
Symphonic
10171, 11963, 11394, 10180
Xoceco
10761
Syntax
11610, 11240, 11144, 11331
Xogego
10761
Tandy
10093
Zenith
Tatung
11286, 11756
10017, 11423, 12612, 11661,
12731, 11365, 11909, 12358,
10463
TCL
12434, 13183
Technics
10051, 10250, 10017, 10650
Techview
12004
Techwood
10051
Sound bar/AUDio Accessory
Altec Lansing
32720
AudioSource
33721
Step 3:
Television CONT’d
Philco
10171, 11665, 11963, 11394
Memorex
11570, 11670, 11938, 11892,
10463, 11665, 10060, 10150,
10877, 11687, 11924, 11927
Philips
MGA
10150
11867, 12372, 11454, 12374,
12597, 11455, 12708, 11744,
11866, 10017, 13623, 10171,
11365, 11990, 11394
MicroTEK
13951
Pioneer
11457, 10679, 11260, 11398
Midland
10017, 10051
Planar
10679, 10877, 11589
Mintek
11603, 11990
Polaroid
Misakai
10171
Mitsubishi
Electric
11250, 11797, 10150, 10093
11523, 11769, 11276, 11538,
11385, 11767, 13942, 14035,
11687, 12121, 11762, 10765,
10865, 11314, 11327, 11565,
11766, 12063, 12117, 11286,
11316, 11326, 12120
Motorola
10093
Portland
11661, 10451
MTC
10060
Prima
10761
Multitech
10180
Prism
10051
Test the code – Test the remote to see if it controls your device
as expected. If not, repeat this process using the next code listed
for your brand. Use the volume buttons to verify that the remote is
controlling your device’s volume. If that does not work properly, go
back to Step 1 and try again.
NAD
10156
Proscan
Naxa
12104, 13154, 13382, 13423
13577, 12183, 12256, 13382,
13332, 13717, 13895, 11447,
12147, 12746, 13636, 14035
NOTE: Repeat this process for other devices (DVD, Blu-ray, home
theater receiver, or sound bar). AUX is the default mode key for audio devices.
NEC
11797, 11704, 11398, 12293
Proview
11687
Step 5:
NetTV
11755
Proxima
10735
New Acoustic
Dimension
10156
Pulsar
10017
Nexus
Electronics
12183
Pyle
12641
QuantumFX
12337
Program your remote control using the learning feature
Nikko
10017, 10156
Quasar
Norcent
11365, 11589, 10824, 10748,
11590
10051, 10250, 11291, 11927,
11924, 13899, 10650
RadioShack
10180
To use this method, you must have the original remote control that came with the
device you wish to program.
Norwood
Micro
11286
RCA
NuVision
12158, 11657
Ölevia
11610, 11240, 11331, 11144
Onwa
10180
12746, 14214, 12434, 12932,
11447, 11547, 12247, 13577,
11781, 12187, 13382, 13717,
13332, 10679, 11661, 11958,
11959, 13147, 13378, 10093,
11385, 11868, 12183, 12855,
10051, 10090, 10254, 13121,
13636, 13938
Optimus
10250, 11927, 11924, 10650,
10679
Realistic
10180
Optique
12189
RevolutionHD
11623
Optonica
10093
Runco
11398, 10017
Orion
10463, 11938, 11892, 13540,
13650
Sampo
11755
Samsung
12051, 11632, 10702, 13993,
10060, 11959, 10766, 10650,
10814
Sansui
11892, 13540, 11670, 10463,
11935, 13564, 11938, 11409,
14053, 13377, 10171, 13559
Sanyo
11142, 11362, 13488, 13547,
10735, 10088
Panasonic
11480, 11291, 10250, 10650,
12264, 11927, 11947, 11924,
11941, 10051, 10060, 10093,
10150, 10156
PARK
12104
Penney
10060, 10051, 10156
Enter the code for your brand – Using the numeric key
pad on the remote, enter the first five-digit code listed for
your device. The associated mode key will blink red once
for every digit pressed. Once all five digits are entered, the
mode key associated with the device will flash red twice and
you will hear two short beeps to confirm that a valid code
was entered successfully.
Step 4:
Press the AT&T mode key for normal operation.
Step 1:
Press the mode key for the associated device – Press the
mode key (TV, DVD, or AUX) for the device type you wish to
set up.
NOTE: Learning is not available with the AT&T mode key.
Step 2:
Enter learning mode – Press and hold the LEARN key for
three seconds until all four mode keys flash red twice and
you hear two short beeps. The red LED indicator SELECT
KEY TO LEARN lights up red to confirm that you are
in the learning mode.
Step 3:
Position remote to learn – Place the Point Anywhere
RF Remote Control head-to-head with your original
device remote (about 1" to 2" apart).
7
Step 4:
Press the key you want to learn – Press the key on the
Point Anywhere RF Remote Control that you want to learn
a command. The green LED indicator READY TO LEARN
will flash green rapidly when the remote is ready to accept
the new command.
NOTE: The learning function will time out after 10 seconds of inactivity.
Step 5:
Press the key you want to learn from – Next press the corresponding
key from the device’s original remote to send the command you want
to learn. The READY TO LEARN LED will flash green twice and you will
hear two short beeps to confirm it has “learned” and saved the desired
command. Then the red LED indicator SELECT KEY TO LEARN will light
up to indicate that the remote is ready to learn the next command.
Step 6:
Television CONT’d
HP
11642
Emprex
11422, 11765
Hyundai
13418, 10849, 11219, 11294
Envision
11589, 11365, 12087, 10813,
12014
I-Inc
11746
iLo
11665, 11684, 11990, 11603,
11286, 11394
Epson
11122
Epworth
11362
Initial
11990, 11603
EQD
12014, 12087, 12277
Insignia
EQD Auria
12014, 12087, 12277
ESA
10171, 11963
12049, 11641, 11564, 11326,
11423, 11892, 11517, 10171,
10463, 11385, 11660, 11963,
12184, 13227
Favi
13382
Inteq
10017
Fisher
11362
iRIS
12189
Fluid
12964
iSymphony
13429, 13382, 13094
Fujitsu
10809, 10683, 10853
IX
10877
Funai
10171, 10180, 11394, 11963,
11864
JC Penney
10060, 10051, 10156
JCM
12189, 12256
Complete learning – Repeat Step 4 and 5 as necessary to program all
remaining functions.
Futuretech
10180
Jensen
11326, 13204, 10761, 11299
Gateway
11755, 11756
JVC
Exit learning – Once all of the keys are programmed as desired, press the LEARN
key. The previously selected mode key will blink red twice and you will hear two
beeps to indicate you have exited learning mode.
GE
10451, 11547, 11447, 10051,
10765
11774, 11601, 12321, 12271,
13650, 13854, 11670, 13841,
10683, 12264, 10463, 10650,
11892
General
Electric
10451, 11547, 11447, 10051,
10765
KC
14182
GFM
10171, 11665, 11963, 11886,
11864, 11865
KDS
11687
KEC
10180
Gibralter
10017
KLH
10765
Go Video
10060
Kolin
11240
GPX
13980, 13977, 12693, 13196
Konka
11385
Grundig
10683
KTV
10180
Grunpy
10180
Legend
12397
Haier
11748, 13382, 13429, 12293,
10768, 12494, 11034, 11570,
13204
LG
12731, 11423, 12358, 13397,
13979, 12864, 12612, 12867,
10017
Hannspree
11348, 12786
LodgingStar
13147
Harvard
10180
LXI
10156, 10017
Havermy
10093
MAG
11687
Helios
10865
Magnavox
Hello Kitty
10451
Hewlett Packard
11642
13623, 11866, 12372, 11454,
12597, 11963, 10706, 11455,
11990, 11198, 10171, 11365,
10051, 10802, 11755, 11867
Himitsu
10180
Marantz
11398, 11454
Hisense
13519, 12183, 11660, 12098,
11314, 10748, 13382
Matsushita
10051, 10250, 10650
Maxent
11755, 11757
MB Quart
11868
NOTE: When the green indicator READY TO LEARN is flashing but learning is
inactive for 10 seconds, all four mode keys will flash red once for two seconds and you
will hear a long beep. Then the remote will go back to the previous status and the red
indicator SELECT KEY TO LEARN will light again to remind you to retry learning.
NOTE: If the programming is interrupted or inactive for more than 10 seconds,
all four mode keys will flash red once for two seconds and you will hear a long beep.
The remote will then leave the learning mode and return to normal operation.
Remote features
Low battery indicator
When the battery power is low, the active mode key will flash red five times with
each key press. This indicates that it is time to replace your remote control
batteries to maintain optimal performance.
8
Hitachi
11643, 11345, 11576, 10679
Programming codes
Claris
13807
Coby
13478, 13627, 12315, 12344,
12306, 12314, 12345, 11634,
12338, 12326, 12340, 13629,
12350, 11538, 12347, 12348,
13202, 12560, 13646
Television
Turn off keypad backlighting
By default, your remote control is set with the backlight on. Here’s how you can
turn it OFF or back ON again.
Step 1:
888
14159
Acer
11339, 14143
Commercial
Solutions
11447
Press the AT&T mode key.
Admiral
10093, 10463
Contec
10180
Step 2:
Advent
10761, 11570
Contex
14053
Affinity
13717, 13716, 13870, 13577
Craig
10180, 13423
Aiwa
11362
Crown
10180
Akai
11675, 10702, 11688, 11207,
11385, 11692, 11935, 12232,
10765
Curtis
13577, 12855, 13121, 12466,
12352, 13895, 12397, 11326,
13636, 11314, 13382, 14035
America Action
10180
Curtis Mathes
Anam
10180
10060, 10451, 10702, 11661,
10093, 11959
AOC
11589, 13720, 11365, 12014,
12087, 11590, 12479, 13707
CXC
10180
Cytron
11326
Aomni
11623
Daewoo
11661, 10451, 10661, 11909
Apex Digital
10765, 12397, 10879, 10748,
11217, 10890
Dell
11264, 11080
Ario
12397
Diamond
Vision
11996, 11997
Astar
11738
Digistar
11565
Asus
13340
Digital Lifestyles
11765
Atvio
13636
Digitrex
14207
Audiovox
11865, 12413, 11951, 10846,
10180, 11564, 11868, 10802,
11276, 11766, 11769, 12121,
11937, 13065, 10451, 12513
Disney
11892, 11665
Dukane
11398
Dumont
10017
Durabrand
10463, 10171, 11570, 11665,
10180, 11034
Aumark
10060
Auria
12087, 12014, 12277
Aventura
10171
Dynex
12049, 12184
Axion
11937
Eiki
10735
BenQ
11032, 11315
Electrograph
11755, 11623
Bradford
10180
Electrohome
10463, 11570, 11670
Broksonic
10463, 11935, 11938, 11892
Electron
12466, 12855
Celera
10765
Elektra
10017, 11661
Champion
11362
Element
Changhong
10765
13559, 11687, 12183, 12964,
11886
Cineon
13951
Elite
13867
Citizen
10060, 11669, 11935
Emerson
Clarion
10180
11864, 11394, 11963, 10171,
10463, 11886, 10180, 13559,
11661, 13623, 11665, 12183,
10451, 11909, 11997
Enter programming mode – Press and hold the OK and
MENU keys simultaneously for three seconds until all four
mode keys flash red twice and you hear two short beeps to
confirm you are in programming mode.
Step 3:
Enter 9 7 2 – Using the numeric keypad on the remote, enter 9 7 2. The AT&T
mode key will flash red four times and you will hear four short beeps to indicate
that backlighting has been disabled.
If you repeat this process, the backlight will be re-enabled and the AT&T mode
key will flash red twice and you will hear two short beeps.
NOTE: Even with backlighting disabled, every press of the
Backlight key will turn the backlight on for five seconds.
Program Home ID code
Your Point Anywhere RF Remote Control and the USB converter were paired at
the factory. If you are experiencing RF interference or poor performance, you may
want to change your Home ID. To create a new Home ID, you may use any 4-digit
code from 0000 to 9999. To change the Home ID, follow the steps below.
Step 1:
USB converter pairing key – Press and hold the pairing key on the
USB converter until the blue power LED turns off. The USB converter
is now ready to be programmed.
NOTE: The USB converter will remain in programming mode for two
minutes to receive the Home ID command from the Point Anywhere
RF Remote Control. If the blue LED light turns ON, the USB converter
timed out and you must start over.
Step 2:
Select mode – Press the AT&T mode key to start the pairing process.
9
Step 3:
Enter pairing mode – Press and hold the OK and MENU keys simultaneously for
three seconds until all four mode keys flash red twice and you hear two short
beeps to confirm you are in programming mode.
Step 4:
Enter 9 6 6 – Using the numeric keypad on the remote,
enter 9 6 6. The AT&T mode key will flash red twice,
indicating the remote is ready to receive the Home ID.
Step 5:
Enter a new 4-digit Home ID – Using the numeric keypad,
enter the 4-digit Home ID you want to program (using “0–9”
such as 1234). The AT&T mode key on the Point Anywhere
RF Remote Control will flash red twice and you will hear two
short beeps. At the same time, the blue power LED on the
USB converter will flash for two seconds, then remain solid
blue. This indicates that the Home ID pairing was successful.
NOTE: If the pairing process is interrupted or inactive for
more than 10 seconds, the AT&T mode key will give a long
red flash and a long beep. This indicates the Point Anywhere RF Remote Control
has left the pairing mode and returned to normal operation without saving any
changes. You will need to start over again.
Troubleshooting your remote control
Check that the POWER key lights up when you press any button
on the remote control. If not, check whether the batteries are properly
seated or if they need to be replaced.
If one setup method does not work, try another method and you
may have better results.
When the battery power is low, the POWER key will flash red
five times with each key press. Note: The remote control cannot be
programmed when the battery power is low.
If you’re unable to set up using Auto Search, please see “Program
your remote control using manual setup” on p. 6 of this guide.
Additional remote control self-support tools:
On your TV – Press the blue HELP button on the bottom
of your remote, then select Remote Control Setup,
or go to att.com/uverseremote
Optional advanced functions
Setting up the Power Macro control
This feature will set the master power control to power on/off all selected devices
with a single key press. Power Macro can only be assigned to the AT&T mode
key. By default the POWER key will turn the AT&T U-verse Receiver on/off each
time it is pressed. Once the TV is programmed, the POWER key will turn on both
the receiver and the TV. You can also set up power control options, which can
turn the receiver, TV, DVD, and audio device on/off with a single key press. Power
sequence is determined by the order in which the devices were programmed.
Use the instructions below only if you want to change the sequence in which
these devices are powered on and off.
Step 1:
Press the AT&T mode key.
10
Product specifications and notice
Model: AT&T U-verse Point Anywhere RF Remote Control
IR Range: up to 30'*
RF Range: up to 100'*
* The range quoted is calculated based on an unobstructed line-of-sight test
under optimum conditions. Actual range will vary depending on conditions
and can be less than the maximum possible. Your actual range will be
limited by several factors, including, but not limited to, battery strength,
electromagnetic interference, infrared interference, and obstructions.
The AT&T U-verse Point Anywhere RF Remote Control is intended and sold
for use only with AT&T U-verse Receivers. May not be compatible with all
entertainment systems or capable of accepting every programming code
for other devices. Limited one-year replacement-only warranty.
15
Get to know your remote
Power key
(AT&T U-verse service)
Mode keys
(AT&T, TV, DVD, AUX)
Access the latest
On Demand content
Step 2:
Choose your favorite
channels and watch
four at once
Explore, entertain,
and interact with
U-verse Apps
Content navigation
Record TV
with one click
Go to Main Menu screen
Return to previous screen
Picture-in-Picture
channel browsing
Jump forward &
backward in set
increments
Access the Options
menu shortcuts
On-screen
navigation
Enter Pairing Mode – Press and hold the OK and MENU
keys simultaneously for three seconds until all four mode
keys flash red twice and you hear two short beeps to
confirm you are in programming mode.
Step 3:
Press POWER key – Press the POWER key.
The AT&T mode key will flash red once.
Step 4:
Program the power on/off sequence for your devices –
Press the selected mode keys in the sequence that you
want the devices to turn on and off.
Step 5:
Press OK to save – Press the OK key to save the power control
settings. The last selected mode key will flash red twice and you
will hear two short beeps to confirm successful programming.
Program details
Change to IR control only (deactivate RF control)
Return to Live TV
View and manage
DVR recordings
Go to Program Guide
Change channels/
page view within
the Guide
Your Point Anywhere RF Remote Control is set to operate your AT&T U-verse
Receiver using an RF (radio frequency) signal. If you want to deactivate the RF
control and change to IR control only:
Mute TV volume
Return to previous
live TV channel
Step 1:
Enter pairing mode – Press and hold the OK and MENU
keys simultaneously for three seconds until all four mode
keys flash red twice and you hear two short beeps to
confirm you are in programming mode.
Step 2:
Edit text on
Search screen
Select video
source on TV
Keypad
backlighting
14
Numerical keypad
Access Closed
Caption menu
Learn from
existing remote
Access Self-Support
Application
Enter 9 6 7 – Using the numeric keypad on your remote,
enter 9 6 7. The AT&T mode key on the Point Anywhere RF
Remote Control will flash red and beep twice to confirm
deactivation of RF control and change to IR control only.
NOTE: If the programming is interrupted or inactive for
more than 10 seconds, the AT&T mode key will give a long
flash and you will hear a long beep. This indicates the Point
Anywhere RF Remote Control has left the programming
mode and returned to normal operation without saving
any changes. You will have to start over again.
11
Change back to RF control (activate RF Control)
If you want to reactivate the RF control, follow the instructions below:
Step 1:
Enter pairing mode – Press and hold the OK and MENU
keys simultaneously for three seconds until all four mode
keys flash red twice and you hear two short beeps to
confirm you are in programming mode.
Step 2:
Enter 9 6 9 – Using the numeric keypad on your remote,
enter 9 6 9. The mode key will flash red twice to confirm it’s
in pairing mode. The AT&T mode key on the Point Anywhere
RF Remote Control will flash red and beep twice to confirm
activation of RF control.
NOTE: If the programming is interrupted or inactive for
more than 10 seconds, the mode key will give a long red
flash and you will hear a long beep. This indicates the Point
Anywhere RF Remote Control has left the programming
mode and returned to normal operation without saving
any changes. You will have to start over again.
Assign volume control for AT&T and DVD modes
By default, the volume controls are automatically assigned to control your TV
unless an audio device is programmed into the remote control, which then sets
the volume keys to control the audio device. The instructions below demonstrate
how the volume controls can be set to control the volume and mute function for
the device of your choice.
NOTE: This allows you to manually assign volume control to the preferred device.
Step 1:
Press the AT&T mode key.
Step 2:
Enter pairing mode – Press and hold the OK and MENU
keys simultaneously for three seconds until all four mode
keys flash red twice and you hear two short beeps to
confirm you are in programming mode.
12
Step 3:
Press VOLUME UP – Press the VOLUME UP key. The AT&T mode key
will blink red once.
Step 4:
Select the device you wish to use for volume control –
Press the selected mode key of the device you wish to use
for volume control. The selected mode key will flash red
twice and you will hear two short beeps to indicate the
volume control has been successful assigned.
Reassign Channel Lock to another mode, not AT&T mode key
Step 1:
Press the AT&T mode key.
Step 2:
Enter pairing mode – Press and hold the OK and MENU
keys simultaneously for three seconds until all four mode
keys flash red twice and you hear two short beeps to
confirm you are in programming mode.
Step 3:
Enter 9 7 3 – Using the numeric keypad on
the remote, enter 9 7 3. The AT&T mode key
will flash red twice.
Step 4:
Press CHANNEL UP – Press the CHANNEL UP
key. The AT&T mode key will flash red once.
Step 5:
Select the device you wish to use for channel control –
Press the selected mode key of the device you wish to use
for channel control. The selected mode key will flash red
twice and you will hear two short beeps to indicate the
channel control is set.
13