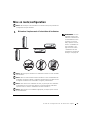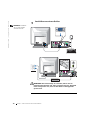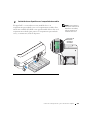
1
Dell™ OptiPlex™ SX Systems
Setup and Quick
Reference Guide
Guide de configuration et de référence rapide
Setup- und Schnellreferenzhandbuch
Guida di installazione e consultazione rapida
Guía de configuración y de referencia rápida
Kurulum ve Hızlı Başvuru Kılavuzu
Model DCT
w w w. d e l l . c o m | s u p p o r t . e u r o . d e l l . c o m
Dell™ OptiPlex™ SX Systems
Setup and Quick
Reference Guide
w w w. d e l l . c o m | s u p p o r t . d e l l . c o m
Notes, Notices, and Cautions
NOTE: A NOTE indicates important information that helps you make better
use of your computer.
NOTICE: A NOTICE indicates either potential damage to hardware or loss of
data and tells you how to avoid the problem.
CAUTION: A CAUTION indicates a potential for property damage,
personal injury, or death.
Abbreviations and Acronyms
For a complete list of abbreviations and acronyms, see the “Glossary” in the
User’s Guide.
If you purchased a Dell™ n Series computer, any references in this
document to Microsoft® Windows® operating systems are not applicable.
____________________
Information in this document is subject to change without notice.
© 2002–2003 Dell Computer Corporation. All rights reserved.
Reproduction in any manner whatsoever without the written permission of Dell Computer
Corporation is strictly forbidden.
Trademarks used in this text: Dell, OptiPlex, and the DELL logo are trademarks of Dell Computer
Corporation; Microsoft, MS-DOS, Windows NT, and Windows are registered trademarks of Microsoft
Corporation.
Other trademarks and trade names may be used in this document to refer to either the entities claiming
the marks and names or their products. Dell Computer Corporation disclaims any proprietary interest
in trademarks and trade names other than its own.
May 2003
P/N 2U454
Rev. A02
Contents
About This Guide
Features .
. . . . . . . . . . . . . . . . . . . . . . . . . .
5
. . . . . . . . . . . . . . . . . . . . . . . . . . . . . .
5
CAUTION: Safety Instructions
General
. . . . . . . . . . . . . . . . . . .
7
. . . . . . . . . . . . . . . . . . . . . . . . . . . . .
7
When Using Your Computer
. . . . . . . . . . . . . . . . . . . .
When Working Inside Your Computer
. . . . . . . . . . . . . .
11
. . . . . . . . . . . . . . . . . .
11
. . . . . . . . . . . . . . . . . . . . . . . .
11
Ergonomic Computing Habits
Getting Started/Setup
. . . . . . . . . . . . . . . . . . . . . . .
Determine the Computer’s Placement and Orientation
Attaching the Stand
12
. . . . . .
12
. . . . . . . . . . . . . .
13
. . . . . . . . . . . . . . . . . . . . . . .
14
Installing a Device in the Module Bay
Connecting the AC Adapter
Connecting External Devices
Attaching the Cable Cover .
. . . . . . . . . . . . . . . . . . .
14
. . . . . . . . . . . . . . . . . .
16
. . . . . . . . . . . . . . . . . . .
17
. . . . . . . . . . .
19
. . . . . . . . . . . . . . . .
21
. . . . . . . . . . . . . . . . . . . . . . . . . .
23
Attaching the Stand to the Mounting Plate
Finding Information and Assistance
Solving Problems
10
. . . . . . . . . . .
Protecting Against Electrostatic Discharge
Battery Disposal
9
. . . . . . . . . . . . .
24
. . . . . . . . . . . . . . . . . .
24
Using the Dell Drivers and Utilities CD
Running the Dell Diagnostics
. . . . . . . . . .
26
. . . . . . . . . . . . . . . . . . . . . .
26
Class A
. . . . . . . . . . . . . . . . . . . . . . . . . . . . .
27
Class B
. . . . . . . . . . . . . . . . . . . . . . . . . . . . .
27
Running the Dell IDE Hard-Drive Diagnostics
Regulatory Information .
Contents
3
4
Contents
About This Guide
This document contains getting started/setup; solving problems; and safety,
regulatory, and warranty information about your Dell™ OptiPlex™
computer.
To obtain the latest versions of the documents on your hard drive, go to the
Dell Support website at support.dell.com.
Regulatory Model Number
and Chassis Type
DCT = Ultra small formfactor (USF) computer
Features
2 USB slots, headphone
and microphone connectors
mounting slot
(insert stand for
vertical position)
mounting slot (insert
stand for hanging
horizontal position)
mounting slot (insert
stand for hanging
vertical position)
power button
diagnostic LEDs
module release
button
module bay
computer cover/hard-drive
cover release button
Setup and Quick Re ference Guide
5
w w w. d e l l . c o m | s u p p o r t . d e l l . c o m
cable cover
hard-drive cover (open
cover to access module
device locking switch)
power adapter
6
Setup and Quick Reference Guide
module bay
chassis-stand
mounting plate
computer cover
computer
stand
CAUTION: Safety Instructions
Use the following safety guidelines to help ensure your own personal safety and to help protect
your computer and working environment from potential damage.
General
•
Do not attempt to service the computer yourself unless you are a trained service
technician. Always follow installation instructions closely.
•
To help prevent electric shock, plug the computer and device power cables into properly
grounded electrical outlets. These cables are equipped with 3-prong plugs to help ensure
proper grounding. Do not use adapter plugs or remove the grounding prong from a cable.
If you must use an extension cable, use a 3-wire cable with properly grounded plugs.
•
To help avoid the potential hazard of electric shock, do not use your computer during an
electrical storm.
•
To help avoid the potential hazard of electric shock, do not connect or disconnect any
cables or perform maintenance or reconfiguration of this product during an electrical
storm.
•
If your computer includes a modem, the cable used with the modem should be
manufactured with a minimum wire size of 26 American wire gauge (AWG) and an FCCcompliant RJ-11 modular plug.
•
Before you clean your computer, disconnect the computer from the electrical outlet.
Clean your computer with a soft cloth dampened with water. Do not use liquid or aerosol
cleaners, which may contain flammable substances.
Setup and Quick Re ference Guide
7
w w w. d e l l . c o m | s u p p o r t . d e l l . c o m
CAUTION: Safety Instructions (continued)
8
•
To help avoid possible damage to the system board, wait 5 seconds after turning off the
computer before disconnecting a device from the computer.
•
To avoid shorting out your computer when disconnecting a network cable, first unplug
the cable from the network adapter on the back of your computer, and then from the
network jack. When reconnecting a network cable to your computer, first plug the cable
into the network jack, and then into the network adapter.
•
To help protect your computer from sudden, transient increases and decreases in
electrical power, use a surge suppressor, line conditioner, or uninterruptible power supply
(UPS).
•
Ensure that nothing rests on your computer’s cables and that the cables are not located
where they can be stepped on or tripped over.
•
Do not push any objects into the openings of your computer. Doing so can cause fire or
electric shock by shorting out interior components.
•
Keep your computer away from radiators and heat sources. Also, do not block cooling
vents. Avoid placing loose papers underneath your computer; do not place your computer
in a closed-in wall unit or on a bed, sofa, or rug.
•
Do not spill food or liquids on your computer. If the computer gets wet, consult your
User’s Guide.
•
Do not use your computer during an electrical storm unless the AC adapter cable has
been disconnected from the electrical outlet.
•
When you use the AC adapter to run the computer, place the AC adapter in a ventilated
area, such as a desk top or on the floor.
•
The AC adapter may become hot during normal operation of your computer. Use care
when handling the adapter during or immediately after operation.
Setup and Quick Reference Guide
When Using Your Computer
As you use your computer, observe the following safe-handling guidelines.
CAUTION: Do not operate your computer with any cover(s) (including computer
covers, bezels, filler brackets, front-panel inserts, and so on) removed.
•
Your computer is equipped with one of the following:
–
A fixed-voltage power supply — Computers with a fixed-voltage power supply do not
have a voltage selection switch on the back panel and operate at only one voltage (see
the regulatory label on the outside of the computer for its operating voltage).
–
An auto-sensing voltage circuit — Computers with an auto-sensing voltage circuit do
not have a voltage selection switch on the back panel and automatically detect the
correct operating voltage.
–
A manual voltage selection switch — Computers with a voltage selection switch on
the back panel must be manually set to operate at the correct operating voltage.
NOTICE: To help avoid damaging a computer with a manual voltage selection switch, set the
switch for the voltage that most closely matches the AC power available in your location. For Japan,
the voltage selection switch must be set to the 115-V position even though the AC power available in
Japan is 100 V. Also, ensure that your monitor and attached devices are electrically rated to
operate with the AC power available in your location.
•
Before working inside the computer, unplug the computer to help prevent electric shock
or system board damage. Certain system board components continue to receive power
any time the computer is connected to AC power.
Setup and Quick Re ference Guide
9
w w w. d e l l . c o m | s u p p o r t . d e l l . c o m
When Using Your Computer (continued)
When Working Inside Your Computer
Before you open the computer cover, perform the following steps in the sequence indicated.
CAUTION: Do not attempt to service the computer yourself, except as explained in
your online Dell™ documentation or in instructions otherwise provided to you by
Dell. Always follow installation and service instructions closely.
NOTICE: To help avoid possible damage to the system board, wait 5 seconds after turning off the
computer before removing a component from the system board or disconnecting a device from the
computer.
1
Perform an orderly computer shutdown using the operating system menu.
2
Turn off your computer and any devices connected to the computer.
3
Ground yourself by touching an unpainted metal surface on the chassis, such as the metal
around the card-slot openings at the back of the computer, before touching anything
inside your computer.
While you work, periodically touch an unpainted metal surface on the computer chassis
to dissipate any static electricity that might harm internal components.
4
Disconnect your computer and devices, including the monitor, from their electrical
outlets. Also, disconnect any telephone or telecommunication lines from the computer.
Doing so reduces the potential for personal injury or shock.
In addition, take note of these safety guidelines when appropriate:
•
When you disconnect a cable, pull on its connector or on its strain-relief loop, not on the
cable itself. Some cables have a connector with locking tabs; if you are disconnecting this
type of cable, press in on the locking tabs before disconnecting the cable. As you pull
connectors apart, keep them evenly aligned to avoid bending any connector pins. Also,
before you connect a cable, ensure that both connectors are correctly oriented and
aligned.
•
Handle components and cards with care. Do not touch the components or contacts on a
card. Hold a card by its edges or by its metal mounting bracket. Hold a component such
as a microprocessor chip by its edges, not by its pins.
CAUTION: There is a danger of a new battery exploding if it is incorrectly installed.
Replace the battery only with the same or equivalent type recommended by the
manufacturer. Do not dispose of the battery along with household waste. Contact
your local waste disposal agency for the address of the nearest battery deposit site.
10
Setup and Quick Reference Guide
When Using Your Computer (continued)
Protecting Against Electrostatic Discharge
Static electricity can harm delicate components inside your computer. To prevent static
damage, discharge static electricity from your body before you touch any of your computer’s
electronic components, such as the microprocessor. You can do so by touching an unpainted
metal surface on the computer chassis.
As you continue to work inside the computer, periodically touch an unpainted metal surface to
remove any static charge your body may have accumulated.
You can also take the following steps to prevent damage from electrostatic discharge (ESD):
•
Do not remove components from their antistatic packing material until you are ready to
install the component in your computer. Just before unwrapping the antistatic packaging,
discharge static electricity from your body.
•
When transporting an electrostatic sensitive component, first place it in an antistatic
container or packaging.
•
Handle all electrostatic sensitive components in a static-safe area. If possible, use
antistatic floor pads and workbench pads.
Ergonomic Computing Habits
CAUTION: Improper or prolonged keyboard use may result in injury.
CAUTION: Viewing the monitor screen for extended periods of time may result in
eye strain.
For comfort and efficiency, observe the ergonomic guidelines in your User’s Guide when setting
up and using your computer.
Battery Disposal
Your computer uses a lithium coin-cell battery. The lithium coin-cell battery is a long-life
battery, and it is very possible that you will never need to replace it. However, should you need
to replace it, see your User’s Guide.
Do not dispose of the battery along with household waste. Contact your local waste disposal
agency for the address of the nearest battery deposit site.
Setup and Quick Re ference Guide
11
w w w. d e l l . c o m | s u p p o r t . d e l l . c o m
Getting Started/Setup
NOTICE: Do not turn on your computer until all setup steps are completed.
1
Determine the Computer’s Placement and Orientation
NOTE: If you want to
orient your computer
vertically or horizontally
under a desktop or
tabletop, see "Attaching
the Stand" on page 14 and
"Attaching the Stand to
the Mounting Plate" on
page 19.
NOTICE: Do not place your monitor on the computer. Use a monitor stand.
NOTICE: Notice: In a high-vibration environment or when installing the
computer overhead, use the optional wall-mount bracket instead of the chassis
stand. To order this bracket, contact Dell.
NOTICE: To ensure proper ventilation, do not place your computer vertically
on a desktop without using the computer stand (see "Attaching the Stand").
NOTICE: To ensure proper ventilation, do not block the cooling vents.
12
Setup and Quick Reference Guide
2
Installing a Device in the Module Bay
Your Dell computer ships with either a floppy drive or an airbay installed in
the module bay. To install a CD, DVD, or second hard drive in the module
bay, first remove the airbay and then install the device.
NOTE: To locate the
module device locking
switch, remove the harddrive cover.
module device
locking switch
Setup and Quick Re ference Guide
13
w w w. d e l l . c o m | s u p p o r t . d e l l . c o m
3
Attaching the Stand
NOTE: If you are
installing the computer
under a desktop or
tabletop, first attach all
cables, and then attach
the stand to the mounting
plate (see "Attaching the
Stand to the Mounting
Plate" on page 19).
1
Raise the captive screw and slide the chassis stand slat into one of
three mounting slots on the back of the computer.
2
When the stand is in place, tighten the screw.
NOTICE: If your computer is oriented under a desktop or tabletop and is in a
high-vibration environment, use the optional wall-mount bracket instead of the
computer stand.
4
NOTE: The power
adapter LED will light
when the adapter is
properly plugged into a
wall outlet and into the
computer.
14
Connecting the AC Adapter
1
Connect the power adapter to the connector on the back of the
computer.
2
Connect the power cable to the power adapter.
NOTICE: The following steps apply to Japan only.
Setup and Quick Reference Guide
CAUTION: If you decide to connect the green ground wire to an
electrical outlet, do not permit contact between the green ground
wire and power leads because electrical shock, fire, or damage to
your computer can occur (see the following figure).
If you decide not to connect the green ground wire to an electrical
outlet, go to step 4.
3
Connect the metal ground connector to the grounding source on the
outlet (see the following figure):
a
Loosen the grounding source.
b
Slide the metal ground connector behind the grounding source,
and then tighten the grounding source.
grounding source
metal ground connector
4
Connect the AC power cable to the outlet.
Setup and Quick Re ference Guide
15
w w w. d e l l . c o m | s u p p o r t . d e l l . c o m
5
Connecting External Devices
NOTE: Connect only one
keyboard and one mouse.
CAUTION: To help prevent electric shock, use only the power
adapter and power cable provided, and ensure that they are
plugged into a properly grounded power source.
16
Setup and Quick Reference Guide
6
Attaching the Cable Cover
NOTICE: If you are installing the computer under a desktop or tabletop, do
not attach the cable cover until the computer is firmly attached to the
mounting plate (see Step 7, "Attaching the Stand to the Mounting Plate" on
page 19).
NOTICE: If you use the stand on your computer, attach the stand before
attaching the cable cover.
security cable
slot
Do not place the
computer facedown on the bezel
NOTICE: When attaching the cable cover, do not place the computer facedown so that the surface comes in contact with a hard surface. Doing so may
press the power button and may scratch the face of the computer.
1
Attach all of the cables to the back of the computer.
2
Hold the bottom piece of the cable cover and align the four tabs with
the four slots on the computer’s back panel.
3
Insert the tabs into the slots and slide the piece toward the diagnostic
lights (see the illustration) until it is securely positioned.
Setup and Quick Re ference Guide
17
w w w. d e l l . c o m | s u p p o r t . d e l l . c o m
4
Grasp the top piece of the cable cover and align the two tabs with the
two slots in the computer’s back panel.
5
Insert the tabs into the slots and slide the piece toward the diagnostic
lights (see the illustration).
6
Install a security device in the security cable slot (optional).
To remove the cable cover, remove the device installed in the security cable
slot (optional).
18
1
Grasp the top piece of the cable cover and slide it to the left until it
stops, and then lift it up and away.
2
To remove the bottom piece of the cable cover, while pressing the
lever, slide the piece to the left until it stops, and then lift it up and
away.
Setup and Quick Reference Guide
7
Attaching the Stand to the Mounting Plate
NOTICE: When installing the computer in the hanging orientation, avoid
locations where it will be bumped by a user’s legs or chair.
CAUTION: Attach the mounting plate to a solid surface capable of
supporting 40 lbs (18.1 kg) hanging weight.
screw holes (4)
mounting-plate slot
solid surface with a
1-inch (2.5 cm)
minimum thickness
release-lever tab
1
Using the four #6 wood screws (0.625 inch; 15.88 mm) provided,
attach the mounting plate to a solid surface with a minimum thickness
of 1 inch (2.5 cm).
2
Orient the computer and stand under the mounting plate
approximately 1 inch (2.5 cm) from the edge of the mounting plate.
NOTE: Before attaching
the mounting plate to a
surface, first orient
yourself with how the
stand will attach to the
mounting plate.
NOTICE: Make sure that you snap the release-lever tab securely into the
mounting-plate slot.
Setup and Quick Re ference Guide
19
w w w. d e l l . c o m | s u p p o r t . d e l l . c o m
3
Lift the computer and stand, insert the stand into the mounting
bracket, and slide the stand until the release-lever tab is inserted
through the slot in the mounting plate.
mounting-plate slot
release-lever tab
(fully seated)
4
Attach the cable cover (if used).
NOTICE: When completing your computer setup, secure all cables toward the
back of your work area to prevent the cables from being pulled, tangled, or
stepped on.
20
8
Turn on the computer, read the software license agreement, and
follow the operating system setup instructions on the screen.
9
Congratulations! You have completed your system setup.
Setup and Quick Reference Guide
Finding Information and Assistance
What Are You Looking For?
Find it Here
•
•
•
•
Drivers and Utilities CD (also known as the
ResourceCD)
A diagnostic program for my computer
Drivers for my computer
My computer documentation
My device documentation
You can use this CD to access
documentation, reinstall drivers,
or run diagnostics tools.
• Express Service Code and Service Tag
Number
• Microsoft® Windows® License Label
Express Service Code and Product Key
•
•
•
•
User’s Guide
How to remove and replace parts
Technical specifications
How to configure system settings
How to troubleshoot and solve problems
Located on your computer.
Depending on your operating system, double-click the
User’s Guides icon on your desktop or click the Start
button and then click Help and Support to access the
electronic documentation stored on your hard drive.
Setup and Quick Re ference Guide
21
w w w. d e l l . c o m | s u p p o r t . d e l l . c o m
What Are You Looking For?
Find it Here
• How to reinstall my operating system
Operating System CD and Installation Guide
If you reinstall your operating system, use the Drivers and
Utilities CD to reinstall drivers for the devices that came with
your computer.
• Latest drivers for my computer
• Answers to technical service and support
questions
• Online discussions with other users and
technical support
• Documentation for my computer
Dell Support website
•
•
•
•
•
•
Dell Premier Support website
Service call status
Top technical issues for my computer
Frequently asked questions
File downloads
Details on my computer’s configuration
Service contract for my computer
• How to use Windows XP
• Documentation for my computer and
devices
22
Setup and Quick Reference Guide
The Dell Support website provides several online tools,
including:
• Knowledge Base — hints, tips, and online courses
• Customer Forum — online discussion with other Dell
customers
• Upgrades — upgrade information for components, such as
memory, the hard drive, and the operating system
• Customer Care — contact information, order status,
warranty, and repair information
• Downloads — drivers, patches, and software updates
• Reference — computer documentation, product
specifications, and white papers
The Dell Premier Support website is customized for corporate,
government, and education customers. This site may not be
available in all regions.
Windows XP Help and Support Center
1 Click the Start button, and then click Help and Support.
2 Type a word or phrase that describes your problem, and then
click the arrow icon.
3 Click the topic that describes your problem.
4 Follow the instructions shown on the screen.
Solving Problems
Dell provides a number of tools to help you if your system does not perform
as expected. For the latest troubleshooting information available for your
system, see the Dell Support website at support.dell.com. You can also find
descriptions of Dell troubleshooting tools in the section titled "Getting
Help" in your online User’s Guide.
If computer problems occur that require help from Dell, write a detailed
description of the error, beep codes, or diagnostics light patterns; record
your Express Service Code and Service Tag Number below; and then
contact Dell from the same location as your computer.
See "Finding Information and Assistance" on page 21 for an example of the
express service code and service tag numbers.
Express Service Code:___________________________
Service Tag Number:___________________________
Your computer includes the following tools that can help you solve a
problem:
D E L L D I A G N O S T I C S — The Dell Diagnostics tests various components in
your computer and helps to identify the cause of computer problems. For more
information, see "Running the Dell Diagnostics" on page 24.
THE FOLLOWING FEATURES CAN INDICATE A POSSIBLE FAILURE AND
H E L P Y O U T R O U B L E S H O O T A C O M P U T E R P R O B L E M . S E E Y O U R User’s
Guide F O R M O R E I N F O R M A T I O N —
S Y S T E M L I G H T S — Located on the front of the computer
D I A G N O S T I C L I G H T S — Located on the back of the computer
S Y S T E M M E S S A G E S — Appear on your monitor screen
B E E P C O D E S — A series of audible beeps emitted by your computer
Setup and Quick Re ference Guide
23
w w w. d e l l . c o m | s u p p o r t . d e l l . c o m
Using the Dell Drivers and Utilities CD
To use the Dell Drivers and Utilities CD while you are running the
Microsoft® Windows® operating system, perform the following steps:
NOTE: To access device
drivers and user
documentation, you must
use the Drivers and
Utilities CD while you are
running Windows.
1
Turn on the computer and allow it to boot to the Windows desktop.
2
Insert the Dell Drivers and Utilities CD into the CD drive.
If you are using the Drivers and Utilities CD for the first time on this
computer, the installation window opens to inform you that the CD is
about to begin installation.
3
Click OK to continue.
To complete the installation, respond to the prompts offered by the
installation program.
4
Click Next at the Welcome Dell System Owner screen.
5
Choose the appropriate System Model, Operating System, Device
Type, and Topic.
Drivers for Your Computer
To display a list of device drivers for your computer, perform the following
steps:
1
Click My Drivers in the Topic pull-down menu.
The Drivers and Utilities CD scans your computer’s hardware and
operating system, and then a list of device drivers for your system
configuration is displayed on the screen.
2
Click the appropriate driver and follow the instructions to download
the driver to your computer.
To view all available drivers for your computer, click Drivers from the Topic
pull-down menu.
Running the Dell Diagnostics
The Dell Diagnostics is a program that tests various components in your
computer. Run this program whenever you have a computer problem to
help you identify the source of the problem.You can run the Dell
Diagnostics from your hard drive or the Drivers and Utilities CD.
24
Setup and Quick Reference Guide
From the Hard Drive:
NOTICE: If your hard drive fails, run the Dell IDE Hard-Drive Diagnostics
(see "Running the Dell IDE Hard-Drive Diagnostics" on page 26).
1
Shut down and restart the computer.
2
When the DELL™ logo appears, press <F12> immediately.
If you wait too long and the Windows logo appears, continue to wait
until you see the Windows desktop. Then shut down your computer
through the Start menu and try again.
3
When the boot device list appears, highlight Boot to Utility Partition
and press <Enter>.
4
When the Dell Diagnostics Main Menu appears, select the test you
want to run.
5
Close the test screen to return to the Main Menu screen. To exit the
Dell Diagnostics and restart the computer, close the Main Menu
screen.
NOTE: If you receive a
message stating that no
Diagnostics utility
partition has been found,
follow the instructions to
run the Dell Diagnostics
from your Drivers and
Utilities CD.
From the Drivers and Utilities CD:
1
Insert the Drivers and Utilities CD into the CD drive.
2
Shut down and restart the computer.
When the DELL logo appears, press <F12> immediately.
If you wait too long and the Windows logo appears, continue to wait
until you see the Windows desktop. Then shut down your computer
through the Start menu and try again.
3
When the boot device list appears, highlight IDE CD-ROM Device
and press <Enter>.
4
Select the IDE CD-ROM Device option from the CD boot menu.
5
Select the Boot from CD-ROM option from the menu that appears.
6
Type 1 to start the ResourceCD menu.
7
Type 2 to start the Dell Diagnostics.
8
Select Run the 32 Bit Dell Diagnostics from the numbered list. If
multiple versions are listed, select the version appropriate for your
platform.
NOTE: This feature
changes the boot sequence
for one time only. On the
next start-up, the
computer boots according
to the devices specified in
system setup.
Setup and Quick Re ference Guide
25
w w w. d e l l . c o m | s u p p o r t . d e l l . c o m
9
10
When the Dell Diagnostics Main Menu appears, select the test you
want to run.
When the tests are completed, remove the CD.
Running the Dell IDE Hard-Drive Diagnostics
The Dell IDE Hard-Drive Diagnostics is a utility that tests the hard drive to
troubleshoot or confirm a hard-drive failure.
1
Turn on your computer (if your computer is already on, restart it).
2
When F2 = Setup appears in the upper-right corner of the screen,
press <Ctrl><Alt><D>.
3
Follow the instructions on the screen.
If a failure is reported, see "Hard Drive Problems" in your User’s Guide.
Regulatory Information
Electromagnetic Interference (EMI) is any signal or emission, radiated in
free space or conducted along power or signal leads, that endangers the
functioning of a radio navigation or other safety service or seriously
degrades, obstructs, or repeatedly interrupts a licensed radio
communications service.
Your Dell computer system is designed to comply with applicable
regulations regarding EMI. Changes or modifications not expressly
approved by Dell could void the user’s authority to operate the equipment.
Dell computer systems are designed, tested, and classified for their
intended electromagnetic environment. These electromagnetic
environment classifications fall into two groups:
NOTE: Inspect the
regulatory label affixed to
the back or bottom of
your Dell system to
determine the
environments in which
your system may be
operated.
26
•
Class A designates a device which may be operated in business or
industrial environments only.
•
Class B designates a device which may be operated in residential
settings as well as business or industrial environments.
Setup and Quick Reference Guide
Class A
Class A equipment has been tested and found to comply with the limits for
a Class A digital device, pursuant to part 15 of the Federal Communications
Commission (FCC) Rules. These limits are designed to provide reasonable
protection against harmful interference in a commercial environment. This
equipment generates, uses, and can radiate radio frequency energy and, if
not installed and used in accordance with the instructions, may cause
harmful interference to radio communications. Operation of this
equipment in a residential area is likely to cause harmful interference, in
which case the user will be required to correct the interference at his/her
own expense.
Class B
Class B equipment has been tested and found to comply with the limits for
a Class B digital device, pursuant to part 15 of the FCC Rules. These limits
are designed to provide reasonable protection against harmful interference
in a residential installation. This equipment generates, uses, and can radiate
radio frequency energy and, if not installed and used in accordance with the
instructions, may cause harmful interference to radio communications.
However, there is no guarantee that interference will not occur in a
particular installation. If this equipment does cause harmful interference to
radio or television reception, which can be determined by turning the
equipment off and on, the user is encouraged to try to correct the
interference by one or more of the following measures:
•
Reorient or relocate the receiving antenna
•
Increase the separation between the equipment and receiver
•
Connect the equipment into an outlet on a circuit different from that
to which the receiver is connected
•
Consult Dell or an experienced radio/TV technician for help
NOTE: Additional
regulatory information
regarding your system can
be found in your User’s
Guide.
Setup and Quick Re ference Guide
27
28
Setup and Quick Reference Guide
w w w. d e l l . c o m | s u p p o r t . d e l l . c o m
Systèmes Dell™ OptiPlex™ SX
Guide de configuration
et de référence rapide
w w w. d e l l . c o m | s u p p o r t . e u r o . d e l l . c o m
Remarques, avis et précautions
REMARQUE : Une REMARQUE fournit des informations importantes qui
vous aident à mieux utiliser votre ordinateur.
AVIS : Un AVIS vous avertit d'un risque de dommage matériel ou de perte
de données et vous indique comment éviter le problème.
PRÉCAUTION : Une PRÉCAUTION indique un risque potentiel
d'endommagement du matériel, de blessure corporelle ou de mort.
Abréviations et acronymes
Pour obtenir une liste complète des abréviations et des acronymes,
reportez-vous au « glossaire » du Guide d'utilisation.
Si vous avez acheté un ordinateur Dell™ de la série n, toutes les
références faites aux systèmes d'exploitation Microsoft® Windows®
ne sont pas applicables.
____________________
Les informations contenues dans ce document sont sujettes à modification sans préavis.
© 2002-2003 Dell Computer Corporation. Tous droits réservés.
Toute reproduction sans l'autorisation écrite de Dell Computer Corporation est strictement interdite.
Marques utilisées dans ce document : Dell, OptiPlex et le logo DELL sont des marques
de Dell Computer Corporation ; Microsoft, MS-DOS, Windows NT et Windows sont des marques
déposées de Microsoft Corporation.
D'autres marques et noms commerciaux peuvent être utilisés dans ce document pour
faire référence aux entités se réclamant de ces marques et de ces noms ou à leurs produits.
Dell Computer Corporation dénie tout intérêt propriétaire aux marques et aux noms commerciaux
autres que les siens.
Mai 2003
Réf. 2U454
Rév. A02
Sommaire
Présentation de ce guide
Caractéristiques
. . . . . . . . . . . . . . . . . . . . . .
33
. . . . . . . . . . . . . . . . . . . . . . . . . .
33
PRÉCAUTION : Consignes de sécurité
Généralités
. . . . . . . . . . . . . . .
35
. . . . . . . . . . . . . . . . . . . . . . . . . . .
35
Lors de l'utilisation de votre ordinateur
. . . . . . . . . . . . . .
Intervention à l'intérieur de votre ordinateur
. . . . . . . . . .
Protection contre les décharges électrostatiques
Mise en route/configuration
39
. . . . . . . . . . . . . . . . . . .
39
40
. . . . . . . . . . . . . . . . . . . .
41
Déterminez l'emplacement et l'orientation de l'ordinateur
. . . .
41
. . . . . .
42
. . . . . . . . . . . . . . . . .
43
Installation d'un périphérique dans la baie modulaire
Installation du socle inclinable
Connexion de l'adaptateur CA/CC
. . . . . . . . . . . . . . . .
Connexion de périphériques externes
. . . . . . . . . . . . . .
Installation du capot de l'emplacement pour câble
. . . . . . . .
43
45
46
. . . .
48
. . . . . . . . . . . . . . . .
50
. . . . . . . . . . . . . . . . . . . . .
52
Installation du socle inclinable sur la plaque de montage
Recherche d'informations et d'aide .
Résolution des problèmes
38
. . . . . . . . .
. . . . . . . . . . . . . . . . . . . .
Précautions ergonomiques .
Enlèvement de la batterie
37
. . . . . . . . . . . . . .
53
. . . . . . . . . . . . . . . . .
54
Utilisation du CD Pilotes et utilitaires
Exécution des Diagnostics Dell
. . . . . . . .
56
. . . . . . . . . . . . . . . . . . . . . . . . . . .
56
Classe A
. . . . . . . . . . . . . . . . . . . . . . . . . . . .
57
Classe B
. . . . . . . . . . . . . . . . . . . . . . . . . . . .
57
Exécution des Diagnostics Dell de disque dur IDE
Réglementation
Sommaire
31
32
Sommaire
Présentation de ce guide
Ce document contient des informations sur la mise en route/configuration,
la résolution des problèmes ainsi que sur les instructions de sécurité,
les réglementations et la garantie concernant votre ordinateur
Dell™ OptiPlex™.
Pour obtenir les dernières versions des documents sur votre disque dur,
visitez le site Web de support de Dell à l'adresse support.dell.com.
Numéro de modèle de
réglementation et type
de châssis
DCT = ordinateur USF
(Ultra small form-factor)
Caractéristiques
2 emplacements USB, connecteurs
de casque et de microphone
bouton d'alimentation
fente de montage
(insérez le socle
inclinable pour la
position verticale)
fente de montage (insérez
le socle inclinable pour
la position horizontale
en suspension)
fente de montage (insérez
le socle inclinable pour
la position verticale en
suspension)
voyants de diagnostic
bouton d'éjection
du module
baie modulaire
bouton d'éjection du capot de l'unité de
disque dur/du capot de l'ordinateur
G u i d e d e c o n f i g u r a t i o n e t de r éf é r e nc e r apide
33
w w w. d e l l . c o m | s u p p o r t . e u r o . d e l l . c o m
panneau
pour câble
capot de l'unité de disque dur (ouvrez
le capot pour accéder au loquet de
verrouillage du périphérique
modulaire)
adaptateur de courant
34
Guide de configuration et d e r é f é r e n c e r a p i d e
baie modulaire
plaque de montage
du socle inclinable
de châssis
capot de
l'ordinateur
socle inclinable
de l'ordinateur
PRÉCAUTION : Consignes de sécurité
Utilisez les consignes de sécurité suivantes pour vous aider à protéger votre ordinateur
de dommages éventuels et pour garantir votre sécurité personnelle.
Généralités
•
N'essayez pas d'intervenir vous-même sur l'ordinateur à moins que vous ne soyez un
technicien qualifié. Suivez toujours scrupuleusement les consignes d'installation.
•
Pour éviter toute décharge électrique, branchez les câbles d'alimentation de l'ordinateur
et de ses périphériques à des prises électriques correctement reliées à la terre. Ces câbles
sont équipés de prises à 3 broches pour assurer une mise à la terre correcte. N'utilisez
pas de prises d'adaptateur et n'essayez pas de retirer la prise de mise à la terre d'un câble.
Si vous devez utiliser une rallonge, utilisez une rallonge à trois fils avec des prises avec
mise à la terre appropriées.
•
Pour éviter tout risque de décharge électrique, n'utilisez pas votre ordinateur pendant un orage.
•
Pour éviter tout risque de décharge électrique, n'effectuez aucun branchement ou
débranchement, ni aucune opération de maintenance ou de reconfiguration de ce
produit pendant un orage.
•
Si votre ordinateur comporte un modem, la longueur du câble utilisé avec ce modem doit
être d'une taille minimum de 26 AWG (American wire gauge) et le connecteur RJ-11 doit
être conforme à la norme FCC.
•
Avant de nettoyer votre ordinateur, débranchez-le de la prise électrique. Nettoyez
votre ordinateur à l'aide d'un chiffon doux et humidifié avec de l'eau. N'utilisez pas de
nettoyants liquides ou en aérosol, ceux-ci peuvent contenir des substances inflammables.
G u i d e d e c o n f i g u r a t i o n e t de r éf é r e nc e r apide
35
w w w. d e l l . c o m | s u p p o r t . e u r o . d e l l . c o m
PRÉCAUTION : Consignes de sécurité
36
•
Pour éviter d'endommager la carte système, patientez 5 secondes après avoir éteint
l'ordinateur avant de déconnecter un périphérique de l'ordinateur.
•
Pour éviter de provoquer un court-circuit dans votre ordinateur lorsque vous déconnectez
un câble réseau, débranchez d'abord le câble de la carte réseau situé à l'arrière de l'ordinateur,
puis débranchez-le de la prise murale du réseau. Pour reconnecter un câble réseau à votre
ordinateur, branchez d'abord le câble sur la prise du réseau, puis sur la carte réseau.
•
Pour protéger votre ordinateur des sautes de tension soudaines et passagères, utilisez un
protecteur de surtension, un filtre de conditionnement de ligne ou un onduleur (UPS).
•
Assurez-vous qu'aucun élément ne repose sur les câbles de votre ordinateur et que les
câbles ne se trouvent pas sur un lieu de passage.
•
N'insérez aucun objet dans les ouvertures de votre ordinateur. Cela risquerait de
provoquer un incendie ou un choc électrique dû à un court-circuit des composants
internes.
•
Gardez votre ordinateur éloigné des radiateurs et des sources de chaleur. Ne bloquez pas
non plus les orifices de refroidissement. Évitez de placer des papiers volants sous votre
ordinateur ; ne placez pas votre ordinateur dans une unité murale fermée ou sur un lit,
un canapé ou un tapis.
•
Ne renversez ni nourriture ni liquide sur votre ordinateur. Si l'ordinateur est mouillé,
consultez votre Guide d'utilisation.
•
N'utilisez pas votre ordinateur pendant un orage sauf si l'adaptateur CA/CC est
débranché de la prise électrique.
•
Lorsque l'adaptateur CA/CC est utilisé pour alimenter l'ordinateur, placez-le dans une
zone aérée, par exemple sur un bureau ou sur le sol.
•
L'adaptateur CA/CC peut chauffer en cours d'utilisation de votre ordinateur. Faites donc
très attention lorsque vous manipulez l'adaptateur pendant ou après son fonctionnement.
Guide de configuration et d e r é f é r e n c e r a p i d e
Lors de l'utilisation de votre ordinateur
Observez les consignes de sécurité suivantes lorsque vous utilisez votre ordinateur :
PRÉCAUTION : Ne faites pas fonctionner votre ordinateur avec un ou plusieurs
panneaux retirés (y compris le capot, les cadres, et les plaques de recouvrement
de l'ordinateur, les caches du panneau avant, etc.).
•
Votre ordinateur est équipé de l'un des éléments suivants :
–
Un bloc d'alimentation à tension fixe — Les ordinateurs dotés d'un bloc
d'alimentation à tension fixe ne disposent pas de commutateur de sélection de la
tension sur le panneau arrière et fonctionnent avec une seule tension (voir l'étiquette
de conformité aux normes située à l'extérieur de l'ordinateur pour connaître sa
tension de fonctionnement).
–
Un circuit de tension à détection automatique — Les ordinateurs dotés d'un circuit
de tension à détection automatique ne disposent pas de commutateur de sélection
de la tension sur le panneau arrière et détectent automatiquement la tension de
fonctionnement correcte.
–
Un commutateur manuel de sélection de la tension — Les ordinateurs dotés d'un
commutateur manuel de sélection de la tension sur le panneau arrière doivent être
configurés manuellement pour fonctionner avec la tension correcte.
AVIS : Pour éviter d'endommager votre ordinateur, réglez le commutateur manuel de sélection
de la tension de sorte qu'il corresponde bien au courant alternatif (CA) de votre zone géographique.
Pour le Japon, le sélecteur de tension doit être réglé sur 115 V, même si dans ce pays la puissance
en CA est de 100 V. Assurez-vous également que votre moniteur et les périphériques qui y sont reliés
sont électriquement adaptés pour fonctionner avec la puissance en CA disponible dans votre zone
géographique.
•
Avant toute intervention à l'intérieur de l'ordinateur, débranchez celui-ci pour prévenir
tour risque de décharge électrique et éviter d'endommager la carte système. Certains
composants de la carte système sont alimentés en permanence lorsque l'ordinateur est
branché à une source de CA.
G u i d e d e c o n f i g u r a t i o n e t de r éf é r e nc e r apide
37
w w w. d e l l . c o m | s u p p o r t . e u r o . d e l l . c o m
Lors de l'utilisation de votre ordinateur (suite)
Intervention à l'intérieur de votre ordinateur
Avant de retirer le capot de l'ordinateur, effectuez les étapes suivantes dans l'ordre indiqué.
PRÉCAUTION : Ne tentez pas d'intervenir vous-même sur l'ordinateur, sauf en
suivant les explications fournies dans la documentation en ligne de Dell™ ou dans
d'autres instructions provenant de Dell. Suivez toujours de près les instructions
d'installation et d'entretien.
AVIS : Pour éviter d'endommager la carte système, patientez 5 secondes après avoir éteint
l'ordinateur avant de retirer un composant de la carte système ou de déconnecter un périphérique
de l'ordinateur.
1
Arrêtez correctement votre ordinateur à l'aide du menu du système d'exploitation.
2
Éteignez l'ordinateur et tous les périphériques connectés à celui-ci.
3
Raccordez-vous à la terre en touchant une surface métallique non peinte sur le châssis,
telle que les ouvertures d'emplacement de carte à l'arrière de l'ordinateur, avant de
toucher un élément à l'intérieur de votre ordinateur.
Au cours de votre intervention, touchez régulièrement une surface métallique non
peinte sur le châssis de l'ordinateur pour dissiper toute électricité statique qui pourrait
endommager les composants internes.
4
Déconnectez votre ordinateur et ses périphériques, y compris le moniteur, de leurs
prises électriques. Déconnectez également de l'ordinateur les lignes téléphoniques
ou de télécommunication.
Vous réduirez ainsi le risque de blessure ou de décharge électrique.
Gardez également les consignes de sécurité suivantes en mémoire, le cas échéant :
38
•
Lorsque vous débranchez un câble, tirez sur le connecteur ou sur la boucle prévue à
cet effet, mais jamais sur le câble lui-même. Certains câbles sont dotés de connecteurs
équipés de pattes de fixation ; pour déconnecter ce type de câble, appuyez sur les
pattes de fixation avant de déconnecter le câble. Lorsque vous séparez des connecteurs,
conservez-les alignés de manière à éviter de tordre leurs broches. De même, avant de
connecter un câble, vérifiez que les deux connecteurs sont bien orientés et alignés.
•
Manipulez les composants et les cartes avec précaution. Ne touchez pas les composants
ou les contacts d'une carte. Tenez la carte par ses bords ou par son support de montage
métallique. Prenez un composant (comme la puce d'un microprocesseur) par ses bords,
et non par ses broches.
Guide de configuration et d e r é f é r e n c e r a p i d e
Lors de l'utilisation de votre ordinateur (suite)
PRÉCAUTION : Une nouvelle batterie mal installée risque d'exploser. Remplacez
la batterie uniquement par une batterie de type identique ou équivalent à celui
recommandé par le fabricant. Ne jetez pas la batterie avec les ordures ménagères.
Contactez le service municipal de traitement des déchets pour connaître l'adresse
du site de dépôt de batteries le plus proche de votre domicile.
Protection contre les décharges électrostatiques
L'électricité statique peut endommager les composants fragiles à l'intérieur de votre ordinateur.
Pour éviter de tels dommages, déchargez l'électricité statique de votre corps avant de toucher
tout composant électronique de votre ordinateur, comme un microprocesseur. Pour ce faire,
touchez une surface métallique non peinte du châssis de l'ordinateur.
Au cours de votre intervention à l'intérieur de l'ordinateur, touchez régulièrement une surface
métallique non peinte pour décharger toute électricité statique que votre corps peut avoir
accumulée.
Vous pouvez également prendre les mesures suivantes pour prévenir les dommages dus aux
perturbations électrostatiques (ESD) :
•
Ne retirez pas les composants de leur matériau d'emballage antistatique tant que
vous n'êtes pas prêt à les installer sur votre ordinateur. Juste avant d'ôter l'emballage
antistatique, déchargez votre corps de son électricité statique.
•
Lorsque vous transportez un composant électrostatique sensible, placez-le d'abord
dans un emballage ou un conteneur antistatique.
•
Manipulez tous les composants électrostatiques sensibles dans une zone antistatique.
Si possible, utilisez des tapis antistatiques sur le sol et sur votre plan de travail.
Précautions ergonomiques
PRÉCAUTION : Une utilisation prolongée ou inappropriée du clavier peut provoquer
des blessures.
PRÉCAUTION : Une exposition prolongée devant l'écran peut occasionner des
troubles de la vue.
Pour travailler efficacement et confortablement, suivez les conseils relatifs à l'ergonomie de
votre Guide d'utilisation lorsque vous vous installez à votre poste de travail.
G u i d e d e c o n f i g u r a t i o n e t de r éf é r e nc e r apide
39
w w w. d e l l . c o m | s u p p o r t . e u r o . d e l l . c o m
Lors de l'utilisation de votre ordinateur (suite)
Enlèvement de la batterie
Votre ordinateur utilise une pile bouton au lithium. La durée de vie de cette pile bouton est
telle qu'il est fort probable que vous n'ayez jamais besoin de la remplacer. Si vous êtes toutefois
amené à la remplacer, reportez-vous à votre Guide d'utilisation.
Ne jetez pas la batterie avec les ordures ménagères. Contactez le service municipal de
traitement des déchets pour connaître l'adresse du site de dépôt de batteries le plus proche
de votre domicile.
40
Guide de configuration et d e r é f é r e n c e r a p i d e
Mise en route/configuration
AVIS : Ne mettez pas votre ordinateur sous tension tant que la procédure de
configuration n'est pas terminée.
1
Déterminez l'emplacement et l'orientation de l'ordinateur
REMARQUE : Si vous
souhaitez orienter votre
ordinateur verticalement
ou horizontalement sous
un bureau ou sous une
table, reportez-vous à la
section « Installation du
socle inclinable » à la
page 43 et à la section
« Installation du socle
inclinable sur la plaque de
montage » à la page 48.
AVIS : Ne placez pas le moniteur sur l'ordinateur. Utilisez un socle inclinable
pour moniteur.
AVIS : Dans un environnement à fortes vibrations ou lors de l'installation de
l'ordinateur en hauteur, utilisez le support de montage mural en option au lieu
du support de châssis. Pour commander ce support, contactez Dell.
AVIS : Pour assurer une ventilation correcte, ne placez pas votre ordinateur
verticalement sur un bureau sans utiliser le socle inclinable de l'ordinateur
(reportez-vous à la section « Installation du socle inclinable »).
AVIS : Afin d'assurer une ventilation appropriée, ne bloquez pas les orifices
de refroidissement.
G u i d e d e c o n f i g u r a t i o n e t de r éf é r e nc e r apide
41
w w w. d e l l . c o m | s u p p o r t . e u r o . d e l l . c o m
2
REMARQUE : Pour
repérer le loquet de
verrouillage du
périphérique modulaire,
retirez le capot de
l'unité de disque dur.
Installation d'un périphérique dans la baie modulaire
Votre ordinateur Dell est livré avec un lecteur de disquette ou un
emplacement prédécoupé dans la baie modulaire. Pour installer un CD,
un DVD ou une deuxième unité de disque dur dans la baie modulaire,
retirez d'abord l'emplacement prédécoupé et installez le périphérique.
loquet de
verrouillage
du périphérique
modulaire
42
Guide de configuration et d e r é f é r e n c e r a p i d e
3
Installation du socle inclinable
REMARQUE : Si vous
installez l'ordinateur sous
un bureau ou sous une
table, connectez d'abord
tous les câbles, puis
installez le socle
inclinable sur la plaque de
montage (reportez-vous à
la section « Installation
du socle inclinable sur la
plaque de montage » à la
page 48).
1
Soulevez la vis imperdable et faites glisser le socle du châssis dans
l'une des trois fentes de montage à l'arrière de l'ordinateur.
2
Lorsque le socle est en place, resserrez la vis.
AVIS : Si l'ordinateur est installé sous un bureau ou sous une table et
se trouve dans un environnement à fortes vibrations, utilisez le support
de montage mural en option à la place du socle inclinable de l'ordinateur.
4
Connexion de l'adaptateur CA/CC
1
Branchez l'adaptateur d'alimentation au connecteur situé à l'arrière
de l'ordinateur.
2
Connectez le câble d'alimentation à l'adaptateur.
REMARQUE : Le
voyant de l'adaptateur
d'alimentation s'allume
lorsque l'adaptateur est
correctement branché à
une prise électrique
murale et à l'ordinateur.
G u i d e d e c o n f i g u r a t i o n e t de r éf é r e nc e r apide
43
w w w. d e l l . c o m | s u p p o r t . e u r o . d e l l . c o m
AVIS : Seules les installations japonaises sont concernées par la procédure
suivante.
PRÉCAUTION : Si vous décidez de relier le fil vert de masse à
une prise électrique, n'autorisez aucun contact entre la masse et
les conducteurs car cela pourrait provoquer un choc électrique,
un incendie ou endommager votre ordinateur (voir l'illustration
suivante).
Si vous choisissez de ne pas relier le fil vert de masse à une prise
électrique, passez à l'étape 4.
3
Reliez le connecteur métallique de masse à la source de masse sur la
prise (voir l'illustration suivante) :
a
Desserrez la source de masse.
b
Faites glisser le connecteur en métal derrière la source de masse,
puis vissez la source de masse.
source de masse
connecteur métallique de masse
4
44
Connectez le câble d'alimentation CA à la prise.
Guide de configuration et d e r é f é r e n c e r a p i d e
5
Connexion de périphériques externes
REMARQUE :
Connectez seulement un
clavier et une souris.
PRÉCAUTION : Pour prévenir tout risque de choc électrique,
n'utilisez que l'adaptateur et le câble d'alimentation fournis
et vérifiez qu'ils sont branchés sur une source d'alimentation
électrique correctement reliée à la terre.
G u i d e d e c o n f i g u r a t i o n e t de r éf é r e nc e r apide
45
w w w. d e l l . c o m | s u p p o r t . e u r o . d e l l . c o m
6
Installation du capot de l'emplacement pour câble
AVIS : Si vous installez l'ordinateur sous un bureau ou une table, ne refermez
pas le capot de l'emplacement pour câble tant que l'ordinateur n'est pas
correctement fixé sur la plaque de montage (reportez-vous à l'étape 7,
« Installation du socle inclinable sur la plaque de montage » à la page 48).
AVIS : Si vous utilisez le socle inclinable sur votre ordinateur, fixez-le avant
de refermer le panneau pour câble.
fente pour câble
de sécurité
ne placez pas
l'ordinateur face
en bas sur le cadre
AVIS : Lors de l'installation du panneau pour câble, ne placez pas l'ordinateur
face vers le bas pour éviter que la surface de celui-ci ne soit en contact avec
une surface dure. Vous risquez d'appuyer sur le bouton d'alimentation et de
rayer la surface de l'ordinateur.
46
1
Branchez tous les câbles à l'arrière de l'ordinateur.
2
Tenez la partie inférieure du panneau pour câble et alignez les
quatre pattes avec les quatre fentes situées sur le panneau arrière
de l'ordinateur.
Guide de configuration et d e r é f é r e n c e r a p i d e
3
Insérez les pattes dans les fentes et faites glisser cette partie vers
les voyants de diagnostic (voir l'illustration) jusqu'à ce qu'elle se
positionne correctement.
4
Saisissez la partie supérieure du panneau pour câble et alignez les
deux pattes avec les deux fentes sur le panneau arrière de l'ordinateur.
5
Insérez les pattes dans les fentes et faites glisser cette partie vers
les voyants de diagnostic (voir l'illustration) jusqu'à ce qu'elle se
positionne correctement.
6
Installez un dispositif de sécurité dans la fente pour câble de sécurité
(en option).
Pour retirer le panneau, enlevez le dispositif installé dans la fente pour câble
de sécurité (en option).
1
Saisissez la partie supérieure du panneau pour câble et faites la glisser
sur la gauche jusqu'à ce qu'elle s'arrête, puis soulevez-la pour la retirer.
2
Pour retirer la partie inférieure du panneau pour câble, tout en
appuyant sur le levier, faites glisser la pièce sur la gauche jusqu'à
ce qu'elle s'arrête, puis soulevez-la pour la retirer.
G u i d e d e c o n f i g u r a t i o n e t de r éf é r e nc e r apide
47
w w w. d e l l . c o m | s u p p o r t . e u r o . d e l l . c o m
7
Installation du socle inclinable sur la plaque de montage
AVIS : Lorsque vous installez l'ordinateur en position suspendue, veillez à
trouver un emplacement où il ne risque pas d'être heurté par les jambes de
l'utilisateur ou par une chaise.
PRÉCAUTION : Fixez la plaque de montage sur une surface
pleine capable de supporter 18,1 kg (40 livres) en suspension.
pas de vis (4)
fente de la plaque
de montage
surface pleine d'une
épaisseur minimum
de 2,5 cm (1 pouce)
languette du
levier d'éjection
REMARQUE : Avant
de fixer la plaque de
montage sur une surface,
vérifiez la manière dont
le socle sera fixé à la
plaque de montage.
1
À l'aide des quatre vis à bois #6 (15,88 mm ; 0,625 pouces) fournies,
fixez la plaque de montage sur une surface pleine d'une épaisseur
minimum de 2,5 cm (1 pouce).
2
Orientez l'ordinateur et le socle sous la plaque de montage à environ
2,5 cm (1 pouce) du bord de la plaque.
AVIS : Veillez à enclencher fermement la patte du levier de verrouillage dans
l'emplacement de la plaque de montage.
3
48
Soulevez l'ordinateur et le socle, insérez le socle dans le support
de montage et faites-le glisser jusqu'à ce que la languette du levier
d'éjection s'insère dans la fente de la plaque de montage.
Guide de configuration et d e r é f é r e n c e r a p i d e
emplacement de la plaque de montage
patte du levier de verrouillage
(correctement enclenchée)
4
Fixez le panneau pour câble (le cas échéant).
AVIS : Lors de la configuration de votre ordinateur, fixez tous les câbles
à l'arrière de la zone de travail afin qu'ils ne soient pas tirés, emmêlés ou
piétinés.
8
Allumez l'ordinateur, lisez l'accord de licence du logiciel et suivez
les instructions de configuration du système d'exploitation qui
s'affichent à l'écran.
9
Félicitations ! Vous avez terminé la configuration du système.
G u i d e d e c o n f i g u r a t i o n e t de r éf é r e nc e r apide
49
w w w. d e l l . c o m | s u p p o r t . e u r o . d e l l . c o m
Recherche d'informations et d'aide
Que recherchez-vous ?
Consultez les éléments suivants
• Un programme de diagnostics pour mon
ordinateur
• Des pilotes pour mon ordinateur
• La documentation de mon ordinateur
• La documentation de mon périphérique
CD Pilotes et utilitaires (également appelé
ResourceCD)
Vous pouvez utiliser ce CD pour accéder à la documentation,
réinstaller des pilotes ou exécuter les outils de diagnostic.
Code de service express et clé du produit
• Code de service express et numéro de
service
• Étiquette de licence Microsoft® Windows®
Ces deux éléments se trouvent sur votre ordinateur.
• Comment retirer et remplacer des pièces
• Caractéristiques techniques
• Comment configurer les paramètres
système
• Comment dépanner et résoudre les
problèmes
50
Guide d'utilisation
En fonction du système d'exploitation installé sur votre
ordinateur, double-cliquez sur l'icône User's Guides
(Guides d'utilisation), située sur le bureau, ou cliquez
sur le bouton Start (Démarrer) puis sur Help and
Support (Aide et support) pour accéder à la
documentation électronique stockée sur l'unité de
disque dur.
Guide de configuration et d e r é f é r e n c e r a p i d e
Que recherchez-vous ?
Consultez les éléments suivants
• Comment réinstaller mon système
d'exploitation
CD du système d'exploitation et Guide
d'installation
Si vous réinstallez le système d'exploitation, utilisez le CD
Pilotes et utilitaires pour réinstaller les pilotes des périphériques
fournis avec votre ordinateur.
• Des pilotes récents pour mon ordinateur
• Réponses aux questions sur le service
et le support technique.
• Discussions en ligne avec d'autres
utilisateurs et le support technique
• Documentation pour mon ordinateur
• État des appels de demande d'assistance
• Principaux problèmes techniques de mon
ordinateur
• Questions fréquemment posées
• Téléchargements de fichiers
• Détails sur la configuration de mon
ordinateur
• Contrat de service pour mon ordinateur
Site Web de support technique de Dell
Le site Web de support technique propose plusieurs outils en
ligne, notamment :
• Base de connaissance — astuces, conseils et cours en ligne
• Forum clients — discussion en ligne avec d'autres
clients Dell
• Mises à niveau — information de mise à niveau pour les
composants tels que la mémoire, le disque dur et le système
d'exploitation
• Service clientèle — informations sur les contacts, état des
commandes, garantie et informations sur les réparations
• Téléchargements — pilotes, correctifs et mises à jour
logicielles
• Référence — documentation de l'ordinateur,
caractéristiques des produits et livres blancs
Site Web de Dell Premier Support
Le site Web Dell Premier Support est personnalisé pour les
entreprises, l'administration publique et les établissements
d'enseignement. Il se peut que ce site ne soit pas disponible
dans tous les pays.
G u i d e d e c o n f i g u r a t i o n e t de r éf é r e nc e r apide
51
w w w. d e l l . c o m | s u p p o r t . e u r o . d e l l . c o m
Que recherchez-vous ?
Consultez les éléments suivants
• Comment utiliser Windows XP
• Documentation de mon ordinateur
et de ses périphériques
Centre d'aide et de support Windows XP
1 Cliquez sur le bouton Start (Démarrer), puis sur Help
and Support (Aide et support).
2 Entrez un mot ou une expression décrivant votre problème,
puis cliquez sur l'icône en forme de flèche.
3 Cliquez sur la rubrique qui décrit votre problème.
4 Suivez les instructions qui s'affichent à l'écran.
Résolution des problèmes
Dell fournit un certain nombre d'outils qui vous aideront si votre système
ne fonctionne pas de la manière escomptée. Pour obtenir les dernières
informations sur le dépannage disponibles pour votre système, consultez
le site Web du support technique de Dell à l'adresse support.dell.com.
Vous pouvez aussi trouver une description des outils de dépannage Dell
dans la section « Obtention de l'aide » du Guide d'utilisationen ligne.
Si des problèmes nécessitant l'aide de Dell surviennent, rédigez une
description détaillée de l'erreur, des codes sonores ou des voyants de
diagnostics, notez votre Code de service express et votre Numéro de
service et contactez Dell tout en vous trouvant à côté de votre ordinateur.
Reportez-vous à la section « Recherche d'informations et d'aide » à la
page 50 pour obtenir un exemple de code de service express et de
numéros de service.
Code de service express :___________________________
Numéro de service :___________________________
52
Guide de configuration et d e r é f é r e n c e r a p i d e
Votre ordinateur comporte les outils suivants qui peuvent vous aider à
résoudre un problème :
D I A G N O S T I C S D E L L — Les Diagnostics Dell testent les différents
composants de votre ordinateur et aident à identifier l'origine des problèmes.
Pour plus d'informations, consultez la section « Exécution des Diagnostics Dell
de disque dur IDE » à la page 56.
LES FONCTIONNALITÉS SUIVANTES PEUVENT INDIQUER UNE PANNE
ÉVENTUELLE ET VOUS AIDER À RÉSOUDRE UN PROBLÈME
D ' O R D I N A T E U R.
C O N S U L T E Z L E Guide d'utilisation P O U R P L U S
—
D'INFORMATIONS
V O Y A N T S D U S Y S T È M E — Situés à l'avant de l'ordinateur
V O Y A N T S D E D I A G N O S T I C — Situés à l'arrière de l'ordinateur
M E S S A G E S S Y S T È M E — S'affichent sur l'écran du moniteur
C O D E S S O N O R E S — Série de signaux sonores émis par votre ordinateur
Utilisation du CD Pilotes et utilitaires
Pour utiliser le CD Pilotes et utilitaires de Dell pendant l'exécution du
système d'exploitation Microsoft® Windows®, procédez comme suit :
1
Allumez l'ordinateur et démarrez-le à partir du bureau Windows.
2
Insérez le CD Pilotes et utilitaires de Dell dans le lecteur de CD.
Si vous utilisez le CD Pilotes et utilitaires pour la première fois sur cet
ordinateur, la fenêtre d'installation s'ouvre et vous indique que le CD
va commencer l'installation.
3
Cliquez sur OK pour continuer.
REMARQUE : Pour
accéder aux pilotes de
périphériques et à la
documentation utilisateur,
vous devez utiliser le CD
Pilotes et utilitaires
pendant l'exécution de
Windows.
Pour terminer l'installation, suivez les invites du programme
d'installation.
4
Cliquez sur Next (Suivant) dans l'écran Welcome Dell System Owner
(Bienvenue au propriétaire du système Dell).
5
Sélectionnez le modèle de système, système d'exploitation et type
de périphérique approprié ainsi que la rubrique qui vous intéresse.
G u i d e d e c o n f i g u r a t i o n e t de r éf é r e nc e r apide
53
w w w. d e l l . c o m | s u p p o r t . e u r o . d e l l . c o m
Pilotes pour votre ordinateur
Pour afficher la liste de tous les pilotes de périphériques pour votre
ordinateur, procédez comme suit :
1
Cliquez sur My Drivers (Mes pilotes) dans le menu déroulant Topic
(Rubrique).
Le CD Pilotes et utilitaires analyse le système d'exploitation et les
éléments matériels de votre ordinateur, puis affiche la liste des pilotes
de périphériques pour la configuration de votre système.
2
Cliquez sur le pilote approprié puis suivez les instructions pour
télécharger le pilote sur votre ordinateur.
Pour afficher la liste de tous les pilotes disponibles pour votre ordinateur,
cliquez sur Drivers (Pilotes) dans le menu Topic (Rubrique).
Exécution des Diagnostics Dell
Le programme de Diagnostics Dell teste les différents composants de votre
ordinateur. Exécutez ce programme en cas de problème avec l'ordinateur
pour vous aider à identifier l'origine du problème. Vous pouvez exécuter
les Diagnostics Dell à partir de l'unité de disque dur ou du CD Pilotes
et utilitaires.
À partir de l'unité de disque dur :
AVIS : En cas de défaillance de votre unité de disque dur, exécutez les
Diagnostics Dell de disque dur IDE (reportez-vous à la section « Exécution des
Diagnostics Dell de disque dur IDE » à la page 56).
REMARQUE : Si un
message vous informe
qu'aucune partition
d'utilitaire de diagnostics
n'a été trouvée, suivez les
instructions pour exécuter
les Diagnostics Dell à
partir de votre CD Drivers
and Utilities (Pilotes et
utilitaires).
54
1
Arrêtez puis redémarrez l'ordinateur.
2
Lorsque le logo DELL™ apparaît, appuyez immédiatement
sur <F12>.
Si vous attendez trop longtemps et que le logo Windows apparaît,
attendez encore jusqu'à ce que le bureau Windows s'affiche. Arrêtez
ensuite votre ordinateur à partir du menu Start (Démarrer) et faites
une nouvelle tentative.
3
Lorsque la liste des périphériques d'initialisation s'affiche, mettez
en surbrillance l'option Boot to Utility Partition (Initialisation sur
la partition de l'utilitaire) et appuyez sur <Entrée>.
Guide de configuration et d e r é f é r e n c e r a p i d e
4
Lorsque le menu principal des Diagnostics Dell s'affiche, sélectionnez
le test à exécuter.
5
Fermez l'écran de test pour revenir à l'écran Main Menu (Menu
principal). Pour quitter les Diagnostics Dell et redémarrer l'ordinateur,
fermez l'écran Main Menu (Menu principal).
À partir du CD Pilotes et utilitaires :
1
Insérez le CD Pilotes et utilitaires dans le lecteur de CD.
2
Arrêtez puis redémarrez l'ordinateur.
Lorsque le logo DELL apparaît, appuyez immédiatement sur <F12>.
Si vous attendez trop longtemps et que le logo Windows apparaît,
attendez encore jusqu'à ce que le bureau Windows s'affiche. Arrêtez
ensuite votre ordinateur à partir du menu Start (Démarrer) et faites
une nouvelle tentative.
3
Lorsque la liste des périphériques d'initialisation s'affiche, mettez en
surbrillance l'option IDE CD-ROM Device (Périphérique CD-ROM
IDE) et appuyez sur <Entrée>.
4
Sélectionnez IDE CD-ROM Device (Périphérique CD-ROM IDE)
dans le menu d'initialisation du CD.
5
Sélectionnez l'option Boot from CD-ROM (Initialiser à partir du
CD-ROM) dans le menu qui s'affiche.
6
Entrez 1 pour lancer le menu ResourceCD.
7
Entrez 2 pour démarrer les Diagnostics Dell.
8
Sélectionnez Run the 32-Bit Dell Diagnostics (Exécuter les
Diagnostics Dell 32 bits) dans la liste numérotée. Si plusieurs
versions sont répertoriées, sélectionnez la version appropriée pour
votre plate-forme.
9
Lorsque le menu principal des Diagnostics Dell s'affiche, sélectionnez
le test à exécuter.
10
REMARQUE : Cette
fonctionnalité change la
séquence d'initialisation
pour une fois seulement.
Lors du prochain
démarrage, l'ordinateur
s'initialisera en fonction
des périphériques
spécifiés dans la
configuration du système.
Lorsque les tests sont terminés, retirez le CD.
G u i d e d e c o n f i g u r a t i o n e t de r éf é r e nc e r apide
55
w w w. d e l l . c o m | s u p p o r t . e u r o . d e l l . c o m
Exécution des Diagnostics Dell de disque dur IDE
L'utilitaire de Diagnostics Dell de disque dur IDE teste l'unité de
disque dur pour résoudre ou confirmer une défaillance de celle-ci.
1
Allumez l'ordinateur (s'il est déjà allumé, redémarrez-le).
2
Lorsque F2 = Setup (Configuration) s'affiche dans le coin
supérieur droit de l'écran, appuyez sur <Ctrl><Alt><D>.
3
Suivez les instructions qui s'affichent à l'écran.
Si une défaillance est indiquée, reportez-vous à la section
« Problèmes liés au disque dur » de votre Guide d'utilisation.
Réglementation
Une interférence électromagnétique (EMI, Electromagnetic Interference)
est un signal ou une émission, véhiculé(e) dans l'espace libre ou par des
conducteurs électriques ou de signaux, qui peut mettre en danger le
fonctionnement d'une radionavigation ou autre service de sécurité ou
sérieusement dégrader, obstruer ou interrompre à maintes reprises un
service de communications radio autorisé.
Votre système informatique Dell est conçu pour satisfaire aux
réglementations en vigueur en matière d'interférences électromagnétiques.
Les modifications et changements non expressément approuvés par Dell
peuvent annuler vos droits d'utilisation de cet équipement.
Les systèmes informatiques Dell sont conçus, testés et classés selon
l'environnement électromagnétique auquel ils sont destinés. Cette
classification comprend deux groupes :
REMARQUE :
Examinez l'étiquette de
conformité aux normes
apposée sur la partie
arrière ou inférieure de
votre système Dell pour
déterminer le type
d'environnement dans
lequel le système peut
fonctionner.
56
•
La classe A désigne un périphérique pouvant fonctionner uniquement
dans les environnements industriels ou commerciaux.
•
La classe B désigne un périphérique pouvant fonctionner dans les
zones résidentielles aussi bien que dans les environnements industriels
ou commerciaux.
Guide de configuration et d e r é f é r e n c e r a p i d e
Classe A
Cet équipement a été testé et déclaré conforme aux limites des appareils
numériques de classe A définies par l'alinéa 15 du règlement de la FCC
(Federal Communications Commission). Ces limites ont été conçues pour
fournir une protection raisonnable contre les interférences néfastes dans un
environnement commercial. Cet équipement génère, utilise et peut émettre
de l'énergie radiofréquence et peut, s'il n'est pas installé et utilisé selon les
instructions, être la cause d'interférences néfastes sur les communications
radio. L'utilisation de cet équipement dans une zone résidentielle peut créer
des interférences néfastes, auquel cas l'utilisateur devra corriger les
interférences à ses propres frais.
Classe B
Cet équipement a été testé et déclaré conforme aux limites des appareils
numériques de classe B définies par l'alinéa 15 du règlement de la FCC.
Ces limites ont été conçues pour fournir une protection raisonnable
contre les interférences néfastes dans une installation en milieu résidentiel.
Cet équipement génère, utilise et peut émettre de l'énergie radiofréquence
et peut, s'il n'est pas installé et utilisé selon les instructions, être la cause
d'interférences néfastes sur les communications radio. Cependant, la
possibilité d'une interférence dans une installation à domicile n'est pas
entièrement exclue. Si l'équipement crée effectivement des interférences
néfastes pour la réception radio et télévision, ce qui peut être déterminé
en allumant et en éteignant cet équipement, l'utilisateur est encouragé à
essayer de corriger les interférences en prenant une ou plusieurs des mesures
suivantes :
•
Réorienter ou déplacer l'antenne de réception
•
Augmenter la distance entre l'équipement et le récepteur
•
Connecter l'équipement à une source d'alimentation sur un circuit
différent de celui sur lequel est connecté le récepteur
•
Consulter Dell ou un technicien expérimenté en radio/télévision,
pour obtenir une assistance
REMARQUE : Pour
des informations
complémentaires sur
votre système en matière
de réglementation,
consultez le Guide
d'utilisation.
G u i d e d e c o n f i g u r a t i o n e t de r éf é r e nc e r apide
57
58
Guide de configuration et d e r é f é r e n c e r a p i d e
w w w. d e l l . c o m | s u p p o r t . e u r o . d e l l . c o m
Dell™ OptiPlex™ SX-Systeme
Setup- und
Schnellreferenzhandbuch
w w w. d e l l . c o m | s u p p o r t . e u r o . d e l l . c o m
Hinweise, Vorsichtshinweise und
Warnungen
HINWEIS: Ein HINWEIS macht auf wichtige Informationen aufmerksam,
mit denen Sie das System besser einsetzen können.
VORSICHT: VORSICHT warnt vor möglichen Beschädigungen der Hardware
oder vor Datenverlust und zeigt, wie diese vermieden werden können.
WARNUNG: Eine WARNUNG weist auf Gefahrenquellen hin,
die materielle Schäden, Verletzungen oder sogar den Tod von
Personen zur Folge haben können.
Abkürzungen und Akronyme
Eine vollständige Liste von Abkürzungen und Akronymen finden Sie
im Benutzerhandbuch unter „Glossar“.
Wenn Sie einen Dell™-Computer der N-Serie besitzen, treffen alle
Referenzen in diesem Dokument auf die Microsoft® Windows®Betriebssysteme nicht zu.
____________________
Irrtümer und technische Änderungen vorbehalten.
© 2002–2003 Dell Computer Corporation. Alle Rechte vorbehalten.
Nachdrucke jeglicher Art ohne die vorherige schriftliche Genehmigung der Dell Computer
Corporation sind strengstens untersagt.
Marken in diesem Text: Dell, OptiPlex und das DELL -Logo sind Marken der Dell Computer
Corporation; Microsoft, MS-DOS, Windows NT und Windows sind eingetragene Marken der
Microsoft Corporation.
Alle anderen in dieser Dokumentation genannten Marken und Handelsbezeichnungen sind
Eigentum der entsprechenden Hersteller und Firmen. Die Dell Computer Corporation verzichtet
auf alle Besitzrechte an Marken und Handelsbezeichnungen, die nicht ihr Eigentum sind.
Mai 2003
P/N 2U454
Rev. A02
Inhalt
Über dieses Handbuch
Produktmerkmale
. . . . . . . . . . . . . . . . . . . . . . .
63
. . . . . . . . . . . . . . . . . . . . . . . . .
63
WARNUNG: Sicherheitshinweise .
Allgemein
. . . . . . . . . . . . . . . . .
65
. . . . . . . . . . . . . . . . . . . . . . . . . . . .
65
Arbeiten mit dem Computer
. . . . . . . . . . . . . . . . . . . .
Bei der Arbeit an Komponenten im Inneren des Computers
Schutz vor elektrostatischen Entladungen
. . .
67
. . . . . . . . . . . .
68
. . . .
69
. . . . . . . . . . . . . . . . . . . . .
69
Ergonomische Haltung beim Arbeiten mit dem Computer
Entsorgen von Akkus
67
Erste Schritte und Einrichten des Computers
. . . . . . . . . . .
Aufstellungsort und Gehäuseausrichtung festlegen
70
. . . . . . . .
70
. . . . . . . . . .
71
Anbringen des Standrahmens
. . . . . . . . . . . . . . . . . .
72
Anschließen des Netzadapters
. . . . . . . . . . . . . . . . . .
73
Einsetzen eines Gerätes in den Modulschacht
. . . . . . . . . . . . . . .
74
. . . . . . . . . . . . . . . . .
75
Anschließen von externen Geräten .
Anbringen der Kabelabdeckung
. . . . . . . . .
77
. . . . . . . . . . . . . .
79
. . . . . . . . . . . . . . . . . . . . . . . . . . .
82
Befestigen des Standrahmens am Montageblech
Informationsquellen und Unterstützung
Problemlösung
Verwenden der Drivers and Utilities-CD
. . . . . . . . . . . . .
83
Ausführen des Dell-Diagnoseprogramms
. . . . . . . . . . . . .
84
. . . . .
85
. . . . . . . . . . . . . . . . . . . . .
86
Klasse A
. . . . . . . . . . . . . . . . . . . . . . . . . . . .
86
Klasse B
. . . . . . . . . . . . . . . . . . . . . . . . . . . .
87
Ausführen des Dell IDE-Festplattendiagnoseprogramms
Zulassungsbestimmungen
Inhalt
61
62
Inhalt
Über dieses Handbuch
Dieses Dokument enthält Informationen zum Einrichten, Hinweise zur
Problemlösung, zur Sicherheit sowie zu den Zulassungsbestimmungen für
den Dell™ OptiPlex™-Computer.
Die neuesten Versionen der Dokumentation für Ihr Festplattenlaufwerk
können Sie im Internet von der Support-Website von Dell unter
support.dell.com herunterladen.
Modellnummer und
Gehäusetyp
DCT = USF-Computer
(Ultra Small Form-factor)
Produktmerkmale
2 USB-Steckplätze, Kopfhörerund Mikrofonanschlüsse
Netzschalter
Montage-Einschub
(Standrahmen für
vertikale Position
einsetzen)
Montage-Einschub
(Standrahmen für
hängende, horizontale
Position einsetzen)
Montage-Einschub
(Standrahmen für
hängende, vertikale
Position einsetzen)
Diagnoseanzeigen
Modulfreigabetaste
Modulschacht
Freigabetaste für Computer-/
Festplattenabdeckung
Setup- und Schnellreferenzhandbuch
63
w w w. d e l l . c o m | s u p p o r t . e u r o . d e l l . c o m
Kabelabdeckung
Festplattenabdeckung
(Abdeckung öffnen, um auf
Modulverriegelungsschalter
zuzugreifen)
Netzadapter
64
Setup- und Schnellreferenzhandbuch
Modulschacht
Montageblech für
Gehäusestandrahmen
Systemgehäuse
Gehäusestandrahmen
WARNUNG: Sicherheitshinweise
Die folgenden Sicherheitshinweise schützen den Computer sowie die Arbeitsumgebung
vor möglichen Schäden und dienen der persönlichen Sicherheit des Benutzers.
Allgemein
•
Wartungsarbeiten dürfen nur von qualifizierten Servicetechnikern vorgenommen werden.
Beachten Sie alle Installationsanweisungen stets genau.
•
Um Stromschläge zu vermeiden, schließen Sie Computer und Peripheriegeräte an
geerdete Steckdosen an. Diese Kabel haben drei Kontakte, mit denen eine sichere Erdung
gewährleistet ist. Verwenden Sie keine Adapterstecker. Entfernen Sie den Massekontakt
eines Kabels nicht. Wenn Sie ein Verlängerungskabel benötigen, verwenden Sie ein
dreiadriges Kabel mit ordnungsgemäß geerdeten Steckern.
•
Verwenden Sie den Computer nicht bei einem Gewitter, um das Risiko eines
Stromschlages zu vermeiden.
•
Um das Risiko eines Stromschlages zu vermeiden, sollten Sie bei einem Gewitter weder
Kabel anschließen oder abziehen, noch eine Wartung oder Neukonfiguration des Gerätes
vornehmen.
•
Wenn Ihr Computer mit einem Modem ausgestattet ist, sollte das für das Modem verwendete Kabel mindestens einen AWG-Wert (American Wire Gauge [Amerikanisches Eichmaß
für Kabel]) von 26 sowie einen FCC-konformen, modularen RJ-11-Stecker aufweisen.
•
Trennen Sie den Computer vor der Reinigung vom Stromnetz. Reinigen Sie den Computer
mit einem weichen Tuch, das mit Wasser befeuchtet wurde. Verwenden Sie keine flüssigen
Reinigungsmittel oder Sprühreiniger, die eventuell entflammbare Stoffe enthalten.
•
Warten Sie nach dem Ausschalten des Computers fünf Sekunden, bevor Sie eine
Komponente vom Computer trennen.
Setup- und Schnellreferenzhandbuch
65
w w w. d e l l . c o m | s u p p o r t . e u r o . d e l l . c o m
WARNUNG: Sicherheitshinweise (Fortsetzung)
66
•
Um beim Trennen eines Netzwerkkabels einen Kurzschluss am Computer zu vermeiden,
ziehen Sie erst das Kabel vom Netzwerkadapter auf der Rückseite des Computers ab
und dann aus der Netzwerkbuchse. Wird das Netzwerkkabel wieder angeschlossen,
schließen Sie es erst an die Netzwerkwandbuchse an, und verbinden Sie es dann mit
dem Netzwerkadapter des Computers.
•
Schützen Sie den Computer vor plötzlichen Spannungsschwankungen durch einen
Überspannungsschalter, Leitungsfilter oder eine unterbrechungsfreie Stromversorgung
(USV).
•
Die Kabel zum Computer sollten so verlegt werden, dass keine Gegenstände darauf stehen
und niemand darüber stolpern kann.
•
Stecken Sie keine Gegenstände in die Öffnungen des Computergehäuses. Dies kann
zu einem Kurzschluss der internen Komponenten führen und folglich einen Brand oder
einen Stromschlag verursachen.
•
Stellen Sie den Computer nicht in der Nähe von Heizgeräten und anderen Wärmequellen
auf. Achten Sie darauf, die Belüftungsöffnungen nicht zu blockieren. Legen Sie kein Papier
unter das System, und stellen Sie das System nicht in einem Schrank oder auf einem Bett,
Sofa oder Teppich auf.
•
Lassen Sie keine Flüssigkeiten in das Innere des Systems gelangen. Wenn der Computer
Feuchtigkeit oder Nässe ausgesetzt wurde, sollten Sie die entsprechenden Hinweise im
Benutzerhandbuch beachten.
•
Verwenden Sie den Computer nicht während eines Gewitters, es sei denn, der Computer
wird mit Akkustrom versorgt und ist nicht an das Stromnetz angeschlossen.
•
Um eine Überhitzung des Netzadapters zu vermeiden, sollte er in einer gut belüfteten
Umgebung, z. B. auf einer Schreibtischoberfläche oder auf dem Fußboden untergebracht
werden.
•
Der Netzadapter kann während des Normalbetriebs des Computers heiß werden. Gehen
Sie vorsichtig vor, wenn Sie den Netzadapter während oder direkt nach dem Betrieb
berühren.
Setup- und Schnellreferenzhandbuch
Arbeiten mit dem Computer
Beim Arbeiten mit dem Computer sind folgende Sicherheitshinweise zu beachten:
WARNUNG: Betreiben Sie den Computer nicht, wenn Gehäuseteile (einschließlich
Systemabdeckung, Verkleidung, Abdeckbleche, Frontblenden u. a.) entfernt wurden.
•
Ihr Computer verfügt über eines der drei folgenden Ausstattungsmerkmale:
– Festspannungsnetzteil – Computer mit einem Festspannungsnetzteil verfügen über keinen
Spannungswahlschalter auf der Rückseite und können nur mit einer einzigen, vorgegebenen
Spannung betrieben werden (Betriebsspannung: siehe Normenschild auf dem
Computergehäuse).
– Netzteil für automatische Erkennung der Betriebsspannung – Computer mit einem derartigen
Netzteil verfügen über keinen Spannungswahlschalter auf der Rückseite und erkennen die
richtige Betriebsspannung automatisch.
– Spannungswahlschalter für manuelle Auswahl der Betriebsspannung – Bei Computern mit einem
Spannungswahlschalter auf der Rückseite muss die richtige Betriebsspannung manuell
eingestellt werden.
VORSICHT: Um zu vermeiden, dass der Computer durch eine falsche Einstellung des Spannungswahlschalters
beschädigt wird, sollte der manuell eingestellte Wert der ortsüblichen Spannung so weit wie möglich entsprechen. Beim Einsatz in Japan muss der Spannungswahlschalter auf 115 Volt eingestellt werden, obwohl die
tatsächlich vorherrschende Spannung 100 Volt beträgt. Stellen Sie auch für den Monitor und angeschlossene
Geräte sicher, dass die Stromversorgungskomponenten für den Betrieb am jeweiligen Einsatzort ausgelegt sind.
•
Trennen Sie den Computer von der Stromversorgung, um Stromschläge sowie Beschädigungen der
Systemplatine zu vermeiden, wenn Sie Arbeiten an Systemkomponenten im Inneren des
Computers durchführen. Bestimmte Komponenten der Systemplatine werden weiterhin mit Strom
versorgt, solange das System an das Netz angeschlossen ist.
Bei der Arbeit an Komponenten im Inneren des Computers
Vor dem Öffnen des Systemgehäuses führen Sie folgende Schritte in der angegebenen Reihenfolge aus.
WARNUNG: Führen Sie nur Wartungsarbeiten aus, die in der Onlinedokumentation oder
einer anderen Dokumentation von Dell beschrieben werden. Halten Sie sich stets strikt an
die Installationsanweisungen und Wartungsanleitungen.
VORSICHT: Warten Sie nach dem Ausschalten des Computers fünf Sekunden, bevor Sie eine Komponente von
der Systemplatine entfernen oder ein Gerät vom Computer trennen.
Setup- und Schnellreferenzhandbuch
67
w w w. d e l l . c o m | s u p p o r t . e u r o . d e l l . c o m
Arbeiten mit dem Computer (Fortsetzung)
1
Den Computer über das Menü des Betriebssystems ordnungsgemäß herunterfahren.
2
Den Computer und alle angeschlossenen Geräte ausschalten.
3
Bevor Sie Bauteile im Inneren des Computers berühren, durch Berühren einer unbeschichteten
Metalloberfläche (beispielsweise der Metallteile der Steckplatzöffnungen auf der Rückseite des
Computers) erden.
Diese Erdung während der Arbeit im System regelmäßig wiederholen, um statische Elektrizität
abzuleiten, die interne Bauteile beschädigen könnte.
4
Den Computer und die Geräte einschließlich des Bildschirms von der Stromversorgung trennen.
Außerdem alle Telefon- und Datenübertragungskabel vom System trennen.
So wird die Gefahr von Verletzungen oder Stromschlägen verringert.
Weiterhin sind folgende Richtlinien, soweit zutreffend, zu beachten:
•
Ziehen Sie beim Trennen eines Kabels vom Gerät nur am Stecker oder an der Zugentlastung und
nicht am Kabel selbst. Manche Kabel besitzen einen Stecker mit Sicherungsklammern. Wenn
Sie ein solches Kabel abziehen, drücken Sie vor dem Herausziehen des Steckers die Sicherungsklammern nach innen. Achten Sie darauf, dass die Stecker unverkantet abgezogen werden, um ein
Verbiegen der Kontaktstifte zu vermeiden. Vor dem Anschließen eines Kabels darauf achten, dass
der Stecker geradlinig ohne Verkanten in die Buchse eingeführt werden kann.
•
Gehen Sie mit Komponenten und Erweiterungskarten vorsichtig um. Berühren Sie keine Komponenten oder Kontakte auf der Karte. Halten Sie die Karte möglichst an ihren Kanten oder dem
Montageblech. Komponenten wie einen Mikroprozessorchip an den Kanten und nicht an den
Kontaktstiften halten.
WARNUNG: Bei unsachgemäßem Einbau einer neuen Batterie besteht Explosionsgefahr.
Tauschen Sie die Batterie nur gegen denselben oder einen gleichwertigen, vom Hersteller
empfohlenen Typ aus. Entsorgen Sie die Batterie nicht im Hausmüll. Die Adresse der nächstgelegenen Annahmestelle für Altbatterien und Akkus erhalten Sie bei Ihrem örtlichen
Abfallentsorgungsbetrieb.
Schutz vor elektrostatischen Entladungen
Statische Elektrizität kann die empfindlichen Komponenten im Computer beschädigen. Um derartige
Schäden zu vermeiden, muss die statische Elektrizität aus dem Körper abgeleitet werden, bevor Sie
elektronische Komponenten im System (z. B. Erweiterungskarten) berühren. Berühren Sie dazu eine
nicht lackierte Metallfläche am Computergehäuse.
68
Setup- und Schnellreferenzhandbuch
Arbeiten mit dem Computer (Fortsetzung)
Wiederholen Sie während der Arbeit im Inneren des Systems diese Erdung regelmäßig, um statische
Aufladungen abzuleiten, die sich mittlerweile im Körper aufgebaut haben könnten.
Beachten Sie auch folgende Hinweise, um Beschädigungen durch elektrostatische Entladung (ESE)
zu vermeiden:
•
Nehmen Sie die Komponente erst unmittelbar vor dem Einbau in den Computer aus der
antistatischen Verpackung. Leiten Sie vor dem Entfernen der Schutzhülle die statische
Elektrizität aus Ihrem Körper ab.
•
Verwenden Sie für den Transport einer elektrostatisch empfindlichen Komponente einen
antistatischen Behälter oder eine antistatische Verpackung.
•
Arbeiten Sie mit allen elektrostatisch empfindlichen Komponenten in einer elektrostatisch
unbedenklichen Umgebung. Verwenden Sie nach Möglichkeit antistatische Fußmatten und
Schreibtischauflagen.
Ergonomische Haltung beim Arbeiten mit dem Computer
WARNUNG: Falsches oder länger andauerndes Arbeiten mit der Tastatur kann
gesundheitsschädlich sein.
WARNUNG: Die Arbeit am Bildschirm über längere Zeiträume kann zu einer erhöhten
Belastung der Augen führen.
An Arbeitsplätzen muss dieses System aus ergonomischen Gründen ausserhalb des Sichtfeldes des
Benutzers (z.B. unter der Arbeitsfläche) installiert werden.
Um Arbeitskomfort und Produktivität zu optimieren, beachten Sie beim Aufstellen und Verwenden
des Computers die ergonomischen Richtlinien im Online-Benutzerhandbuch.
Entsorgen von Akkus
In Ihrem Computer wird eine Lithium-Knopfzellenbatterie verwendet. Die Lithium-Knopfzellenbatterie hat eine lange Lebensdauer und muss voraussichtlich nie ausgewechselt werden. Falls diese
doch einmal ausgetauscht werden muss, beachten Sie die Informationen im Benutzerhandbuch.
Entsorgen Sie die Batterie nicht im Hausmüll. Die Adresse der nächstgelegenen Annahmestelle
für Altbatterien und Akkus erhalten Sie bei Ihrem örtlichen Abfallentsorgungsbetrieb.
Setup- und Schnellreferenzhandbuch
69
w w w. d e l l . c o m | s u p p o r t . e u r o . d e l l . c o m
Erste Schritte und Einrichten des
Computers
VORSICHT: Schalten Sie den Computer erst dann ein, wenn alle
vorbereitenden Schritte zum Einrichten des Systems abgeschlossen sind.
1
Aufstellungsort und Gehäuseausrichtung festlegen
HINWEIS: Weitere
Informationen zur
vertikalen oder horizontalen Ausrichtung des
Computers unter einer
Tisch- oder Schreibtischplatte finden Sie unter
„Anbringen des Standrahmens” auf Seite 72
und „Befestigen des
Standrahmens am
Montageblech” auf
Seite 77.
VORSICHT: Stellen Sie den Bildschirm nicht auf den Computer. Verwenden
Sie einen Bildschirmträger.
VORSICHT: Verwenden Sie die optionale Wandbefestigungshalterung
anstelle des Gehäusestandrahmens, wenn Sie den Computer in einer Umgebung
mit starken Vibrationen einsetzen oder an der Decke installieren. Diese
Wandbefestigungshalterung können Sie bei Dell bestellen.
VORSICHT: Stellen Sie den Computer nicht ohne Gehäusestandrahmen
senkrecht auf den Schreibtisch, damit eine ausreichende Belüftung gewährleistet ist. Weitere Informationen hierzu finden Sie unter Anbringen des
Standrahmens.
VORSICHT: Blockieren Sie die Belüftungsöffnungen nicht, damit eine
ausreichende Belüftung gewährleistet ist
.
70
Setup- und Schnellreferenzhandbuch
2
Einsetzen eines Gerätes in den Modulschacht
Ihr Dell-Computer wird entweder mit einem Diskettenlaufwerk oder einer
Modulattrappe im Modulschacht ausgeliefert. Entfernen Sie die Modulattrappe, bevor Sie ein CD-, DVD- oder ein zweites Festplattenlaufwerk
im Modulschacht installieren.
HINWEIS: Entfernen
Sie die Festplattenabdeckung, damit Sie auf
den Modulverriegelungsschalter zugreifen können.
Modulverriegelungsschalter
Setup- und Schnellreferenzhandbuch
71
w w w. d e l l . c o m | s u p p o r t . e u r o . d e l l . c o m
3
Anbringen des Standrahmens
HINWEIS: Bringen Sie
erst alle Kabel an, bevor
Sie für die Montage unter
einer Tisch- oder Schreibtischplatte den Standrahmen befestigen.
Weitere Informationen
hierzu finden Sie unter
„Befestigen des Standrahmens am
Montageblech“ auf
Seite 77.
1
Die selbstsichernde Schraube lösen und die Gehäusestandrahmenleiste in einen von drei Montage-Einschüben auf der Rückseite des
Computers schieben.
2
Wenn der Standrahmen richtig platziert ist, die Schraube festziehen.
VORSICHT: Verwenden Sie für die Montage unter einer Tisch- oder
Schreibtischplatte die optionale Wandbefestigungshalterung anstelle des
Gehäusestandrahmens, wenn Sie den Computer in einer Umgebung mit
starken Vibrationen einsetzen.
72
Setup- und Schnellreferenzhandbuch
Anschließen des Netzadapters
4
1
Den Netzadapter an den Anschluss auf der Rückseite des Computers
anschließen.
2
Das Netzkabel mit dem Netzadapter verbinden.
VORSICHT: Der folgende Abschnitt gilt nur für Japan.
HINWEIS: Wenn der
Adapter richtig an die
Stromversorgung angeschlossen bzw. in die
Steckdose eingesteckt
ist, leuchtet die LED
des Netzadapters.
WARNUNG: Wenn Sie den grünen Erdungsleiter an eine Steckdose anschließen, sorgen Sie dafür, dass der grüne Erdungsleiter
und stromführende Leitungen nicht miteinander in Kontakt
geraten können. Es besteht andernfalls die Gefahr von Stromschlägen, Brand oder Beschädigungen an Ihrem Computer
(siehe Abbildung).
Wenn Sie den grünen Erdungsleiter nicht an eine Steckdose
anschließen, fahren Sie mit Schritt 4 fort.
3
Den Kabelschuh des Erdungsleiters entsprechend der Abbildung
mit der Erdungsschraube der Steckdose verbinden:
a
Die Erdungsschraube lösen.
b
Den Kabelschuh des Erdungsleiters hinter die Erdungsschraube
schieben und anschließend die Erdungsschraube festziehen.
Erdungsschraube
Kabelschuh des
Erdungsleiters
4
Das Netzkabel an die Steckdose anschließen.
Setup- und Schnellreferenzhandbuch
73
w w w. d e l l . c o m | s u p p o r t . e u r o . d e l l . c o m
5
Anschließen von externen Geräten
HINWEIS: Schließen
Sie nur eine Tastatur
und eine Maus an.
WARNUNG: Um Stromschläge zu vermeiden, dürfen nur die
mitgelieferten Netzteile und -kabel verwendet werden. Außerdem
muss sichergestellt sein, dass die Anschlüsse ordnungsgemäß
geerdet sind.
74
Setup- und Schnellreferenzhandbuch
6
Anbringen der Kabelabdeckung
VORSICHT: Wenn Sie den Computer unter einer Tisch- oder Schreibtischplatte montieren, bringen Sie die Kabelabdeckung erst an, wenn der
Computer fest auf dem Montageblech angebracht ist (siehe Schritt 7,
„Befestigen des Standrahmens am Montageblech” auf Seite 77).
VORSICHT: Wenn Sie einen Standrahmen für Ihren Computer verwenden,
müssen Sie diesen montieren, bevor die Kabelabdeckung angebracht wird.
Sicherungskabeleinschub
Stellen Sie den
Computer nicht auf der
Gehäusefront auf.
VORSICHT: Stellen Sie beim Anbringen der Kabelabdeckung den Computer
nicht auf der Gehäusefront auf. Wenn die Gehäusevorderseite auf einer
harten Unterlage aufliegt, kann die Front verkratzt und versehentlich der
Netzschalter gedrückt werden.
1
Alle Kabel auf der Rückseite anschließen.
2
Die vier Haken des unteren Teils der Kabelabdeckung an den vier
Öffnungen auf der Rückseite des Computers ausrichten.
3
Die Haken in die Öffnungen einführen und das Teil entsprechend der
Abbildung in Richtung Diagnose-LEDs schieben, bis die untere Hälfte
der Abdeckung sicher einrastet.
Setup- und Schnellreferenzhandbuch
75
w w w. d e l l . c o m | s u p p o r t . e u r o . d e l l . c o m
4
Die beiden Haken der oberen Hälfte der Kabelabdeckung an den zwei
Öffnungen auf der Rückseite des Computers ausrichten.
5
Die Haken in die Öffnungen einführen und das Teil entsprechend der
Abbildung in Richtung Diagnose-LEDs schieben.
6
Gegebenenfalls eine Schutzvorrichtung im Sicherungskabeleinschub
anbringen.
Entfernen Sie gegebenenfalls eine im Sicherungskabeleinschub installierte
Schutzvorrichtung, um die Kabelabdeckung zu entfernen.
76
1
Die obere Hälfte der Kabelabdeckung bis zum Anschlag nach links
schieben und abnehmen.
2
Den Hebel drücken und die untere Hälfte der Kabelabdeckung bis
zum Anschlag nach links schieben und anschließend abnehmen.
Setup- und Schnellreferenzhandbuch
7
Befestigen des Standrahmens am Montageblech
VORSICHT: Wenn Sie den Computer hängend montieren möchten, achten
Sie bei der Wahl des Standortes darauf, dass er nicht durch Beinbewegungen
des Benutzers oder Stuhlkanten unterhalb der Tischplatte erschüttert werden
kann.
WARNUNG: Befestigen Sie das Montageblech an einer massiven
Fläche, die mindestens 18,1 kg trägt.
Schraubenbohrungen (4)
MontageblechEinschub
Massive Fläche mit
einer Dicke von
mindestens 2,5 cm
Freigabehebel
1
Das Montageblech mit den vier mitgelieferten Holzschrauben
(16 mm) an einer mindestens 2,5 cm dicken massiven Fläche
befestigen.
2
Den Computer und den Standrahmen unter dem Montageblech
ungefähr 2,5 cm von der Kante des Montageblechs entfernt
ausrichten.
VORSICHT: Stellen Sie sicher, dass der Freigabehebel ordnungsgemäß in den
Einschub des Montageblechs einrastet.
HINWEIS: Bevor
Sie das Montageblech
an einer Oberfläche
anbringen, informieren
Sie sich zunächst darüber,
wie der Standrahmen am
Montageblech befestigt
wird.
Setup- und Schnellreferenzhandbuch
77
w w w. d e l l . c o m | s u p p o r t . e u r o . d e l l . c o m
3
Den Computer und den Standrahmen anheben und den
Standrahmen in das Montageblech einführen. Anschließend den
Standrahmen nach hinten schieben, bis der Freigabehebel in den
Einschub des Montageblechs einrastet.
Montageblech-Einschub
Freigabehebel
(vollständig eingerastet)
4
Die Kabelabdeckung gegebenenfalls wieder anbringen.
VORSICHT: Wenn Sie den Computer einrichten, verlegen Sie alle Kabel
hinter Ihrem Arbeitsbereich. So können Sie ein Gewirr von Kabeln vermeiden
und verhindern, dass Kabel versehentlich herausgezogen werden oder auf die
Kabel getreten wird.
78
8
Den Computer einschalten, den Software-Lizenzvertrag lesen und
den Anweisungen auf dem Bildschirm folgen.
9
Herzlichen Glückwunsch! Das Einrichten des Computers ist
abgeschlossen.
Setup- und Schnellreferenzhandbuch
Informationsquellen und
Unterstützung
Wonach suchen Sie?
•
•
•
•
Hier finden Sie es.
Ein Diagnoseprogramm für den Computer. D i e C D D r i v e r s a n d U t i l i t i e s ( d i e s e w i r d a u c h
als ResourceCD bezeichnet).
Treiber für meinen Computer
Die Dokumentation für den Computer
Die Dokumentation für das Gerät
Mit Hilfe dieser CD können Sie auf die Dokumentation
zugreifen, Treiber neu installieren oder das Diagnoseprogramm
ausführen.
• Expressdienst-Codenummer und
Service-Kennnummer
• Microsoft® Windows®-Lizenzetikett
Expressdienst-Codenummer und
Produktschlüssel
Auf dem Computer angebracht.
• Informationen zum Entfernen und
Austauschen von Teilen
• Technische Daten
• Wie Systemeinstellungen konfiguriert
werden
• Informationen zur Fehlerbeseitigung
und Problemlösung
Benutzerhandbuch
Doppelklicken Sie, je nach Betriebssystem, auf
das Symbol für die Benutzerhandbücher auf dem
Desktop. Sie können auch auf die Schaltfläche Start
klicken und Help and Support (Hilfe und Support)
wählen, um auf die auf der Festplatte gespeicherte
Dokumentation zuzugreifen.
Setup- und Schnellreferenzhandbuch
79
w w w. d e l l . c o m | s u p p o r t . e u r o . d e l l . c o m
Wonach suchen Sie?
Hier finden Sie es.
• Wie das Betriebssystem neu
installiert wird
Betriebssystem-CD und
Installationshandbuch
Verwenden Sie die Drivers and Utilities-CD, um neuere
Treiber für die mit Ihrem Computer ausgelieferten Geräte zu
installieren, wenn Sie das Betriebssystem Ihres Computers
neu installieren.
• Aktuellste Treiber für den Computer
• Informationen zum technischen Support
und Kundendienst
• Onlinediskussionen mit anderen Benutzern
und dem technischen Support
• Dokumentation für meinen Computer
80
Setup- und Schnellreferenzhandbuch
Dell Support-Website
Die Dell Support-Website bietet verschiedene
Online-Werkzeuge, unter anderem:
• Knowledge Base (Wissensbasis) – Hinweise, Tipps und
Online-Kurse
• Customer Forum (Kundenforum) – Online-Diskussion mit
anderen Kunden von Dell
• Upgrades (Aktualisierungen) – Aktualisierungsinformationen zu Komponenten, beispielsweise Speicher, Festplatte
und Betriebssystem
• Customer Care (Kundenbetreuung) – Kontaktinformationen, Bestellstatus, Garantie und Reparaturinformationen
• Downloads – Treiber, Patches und SoftwareAktualisierungen
• Reference (Referenz) – Computer-Dokumentation,
technische Daten und White Papers
Wonach suchen Sie?
Hier finden Sie es.
• Serviceanruf-Status
• Technische Top-Themen für meinen
Computer
• Häufig gestellte Fragen
• Herunterladen von Dateien
• Details über die Konfiguration des
Computers
• Servicevertrag für den Computer
Dell Premier Support-Website
• Anleitung zum Arbeiten mit Windows XP
• Dokumentation für den Computer und
die zugehörigen Geräte
Hilfe- und Supportcenter unter Windows XP
1 Auf die Schaltfläche Start und anschließend auf Hilfe und
Support klicken.
2 Ein Wort oder einen Ausdruck eingeben, das bzw. der Ihr
Problem beschreibt, und anschließend auf das Pfeilsymbol
klicken.
3 Auf das Thema klicken, das Ihr Problem beschreibt.
4 Den Anweisungen auf dem Bildschirm folgen.
Die Dell Premier Support-Website ist speziell auf Großkunden
und Kunden aus den Bereichen öffentlicher Dienst, Regierung/Verwaltung und Bildungswesen zugeschnitten. Diese
Website ist möglicherweise nicht in allen Ländern verfügbar.
Setup- und Schnellreferenzhandbuch
81
w w w. d e l l . c o m | s u p p o r t . e u r o . d e l l . c o m
Problemlösung
Dell stellt eine Reihe von Hilfewerkzeugen zur Verfügung, die Ihnen bei
Problemen mit dem Computer weiterhelfen. Neueste Informationen
zur Fehlerbehebung finden Sie auf der Support-Website von Dell unter
support.dell.com. Online-Informationen über Tools zur Fehlerbehebung
finden Sie auch im Kapitel „Weitere Hilfe“ des Benutzerhandbuchs.
Wenn Probleme mit dem Computer auftreten, für deren Lösung Sie die
Hilfe von Dell benötigen, erstellen Sie eine detaillierte Beschreibung der
Fehler, des Signaltoncodes oder der Diagnoseanzeige. Tragen Sie unten
die Expressdienst-Codenummer und Service-Kennnummer ein, und
wenden Sie sich an die für Ihren Standort zuständige Service-Adresse.
Weitere Informationen über Service-Kennnummer und die ExpressdienstCodenummer finden Sie unter „Informationsquellen und Unterstützung“
auf Seite 79.
Expressdienst-Codenummer:___________________________
Service-Kennnummer:___________________________
Auf Ihrem System befinden sich folgende Tools, die Ihnen bei der
Problembehebung nützlich sein können:
D E L L -D I A G N O S E P R O G R A M M – Das Dell-Diagnoseprogramm überprüft
verschiedene Systemkomponenten und unterstützt Sie bei der Fehlersuche.
Weitere Informationen hierzu finden Sie unter „Ausführen des DellDiagnoseprogramms“ auf Seite 84. —
FO L G E N D E A N Z E I G E N B Z W . S I G N A L E K Ö N N E N A U F M Ö G L I C H E FE H L FUNKTIONEN HINWEISEN UND IHNEN BEIM LÖSEN VON PROBLEMEN
M I T D E M C O M P U T E R B E H I L F L I C H S E I N : WE I T E R E I N F O R M A T I O N E N
D A Z U F I N D E N S I E I M Benutzerhandbuch.
S Y S T E M A N Z E I G E N – Befinden sich auf der Vorderseite des Computers.
D I A G N O S E A N Z E I G E N – Befinden sich auf der Rückseite des Computers.
S Y S T E M M E L D U N G E N – Werden auf dem Bildschirm angezeigt.
S I G N A L T O N C O D E S – Werden als akustische Signale vom Computer
ausgegeben.
82
Setup- und Schnellreferenzhandbuch
Verwenden der Drivers and Utilities-CD
Führen Sie folgende Schritte aus, um unter dem Microsoft® Windows®Betriebssystem die Drivers and Utilities -CD zu verwenden:
1
Den Computer einschalten und warten, bis Windows gestartet wurde.
2
Die Dell Drivers and Utilities-CD in das Laufwerk einlegen.
Wenn Sie die Drivers and Utilities-CD zum ersten Mal verwenden,
wird das Fenster Installation geöffnet, das Sie über den Beginn der
Installation von der CD informiert.
3
Auf OK klicken, um fortzufahren.
HINWEIS: Verwenden
Sie für den Zugriff auf
Gerätetreiber und die
Benutzer-Dokumentationen die Drivers and
Utilities -CD, während
Windows ausgeführt
wird.
Den Bildschirmanweisungen des Installationsprogramms folgen,
um die Installation abzuschließen.
4
Im Fenster Welcome Dell System Owner (Willkommen) auf
Next (Weiter) klicken.
5
Die geeignete Auswahl für System Model (Systemmodell),
Operating System (Betriebssystem) und Topic (Thema) treffen.
Treiber für Ihren Computer
Führen Sie folgende Schritte aus, um eine Liste der Treiber für Ihren
Computer angezeigt zu bekommen:
1
Im Listenfeld Thema auf die Option My Drivers (Geeignete Treiber)
klicken.
Die Drivers and Utilities-CD prüft die Hardware-Konfiguration des
Computers und das Betriebssystem, und zeigt dann eine Liste der
Gerätetreiber an, die für Ihre Systemkonfiguration am besten geeignet
sind.
2
Den geeigneten Treiber auswählen und den Anweisungen zum
Herunterladen folgen.
Um eine Liste aller verfügbaren Treiber für Ihren Computer anzuzeigen,
im Listenfeld Thema auf Drivers (Treiber) klicken.
Setup- und Schnellreferenzhandbuch
83
w w w. d e l l . c o m | s u p p o r t . e u r o . d e l l . c o m
Ausführen des Dell-Diagnoseprogramms
Das Dell-Diagnoseprogramm überprüft verschiedene Systemkomponenten
und unterstützt Sie bei der Fehlersuche. Führen Sie dieses Programm aus,
um mögliche Fehlerquellen und Fehlfunktionen zu diagnostizieren. Das
Dell-Diagnoseprogramm kann von der Drivers and Utilities-CD oder von
der Festplatte ausgeführt werden.
Vom Festplattenlaufwerk:
VORSICHT: Wenn das Festplattenlaufwerk Fehler aufweist, führen Sie
das IDE-Festplattendiagnoseprogramm aus. Weitere Informationen hierzu
finden Sie unter„Ausführen des Dell IDE-Festplattendiagnoseprogramms”
auf Seite 85 .
HINWEIS: Wenn eine
Meldung erscheint, dass
keine Partition mit dem
Diagnosedienstprogramm
gefunden wurde, folgen
Sie den Anweisungen,
um das Dell-Diagnoseprogramm von der
Drivers and Utilities-CD
auszuführen.
1
Den Computer herunterfahren und neu starten.
2
Wenn das DELL™-Logo angezeigt wird, sofort <F12> drücken.
Falls so lange gewartet wurde, bis das Windows-Logo erscheint, noch
warten, bis der Windows-Desktop angezeigt wird. Den Computer über
das Menü Start herunterfahren und erneut starten.
3
Wenn die Liste der Startgeräte erscheint, die Option Boot to Utility
Partition (In Dienstprogrammpartition starten) markieren und
<Eingabe> drücken.
4
Wenn das Hauptmenü des Dell-Diagnoseprogramms erscheint, den
gewünschten Test auswählen
5
Das Testfenster schließen, um zum Bildschirm Main Menu
(Hauptmenü) zurückzukehren. Um das Dell-Diagnoseprogramm
zu verlassen und den Computer neu zu starten, das Fenster des
Hauptmenüs schließen.
Von der Drivers and Utilities-CD aus:
1
Die Drivers and Utilities-CD in das Laufwerk einlegen..
2
Den Computer herunterfahren und neu starten.
Wenn das DELL-Logo angezeigt wird, sofort <F12> drücken.
Falls so lange gewartet wurde, bis das Windows-Logo erscheint, noch
warten, bis der Windows-Desktop angezeigt wird. Den Computer über
das Menü Start herunterfahren und erneut starten
84
Setup- und Schnellreferenzhandbuch
3
Wenn die Liste der Startgeräte erscheint, die Option IDE CD-ROM
Device (IDE CD-ROM-Gerät) markieren und <Eingabe> drücken.
4
Die Option IDE CD-ROM Device (IDE CD-ROM-Gerät) im
CD-Startmenü auswählen.
5
Im anschließend erscheinenden Menü die Option Boot from
CD-ROM (Von CD-ROM starten) auswählen.
6
1 eingeben, um das ResourceCD-Menü aufzurufen.
7
2 eingeben, um das Dell-Diagnoseprogramm aufzurufen.
8
Run Dell 32-bit Diagnostics (Dell 32-Bit-Diagnose ausführen)
aus der nummerierten Liste auswählen. Wenn mehrere Versionen
aufgeführt werden, die Ihrer Plattform entsprechende Version
wählen.
9
Wenn das Hauptmenü des Dell-Diagnoseprogramms erscheint,
den gewünschten Test auswählen.
10
HINWEIS: Durch diese
Funktion wird die Startreihenfolge nur einmal
geändert. Beim nächsten
Start wird der Computer
gemäß den im SystemSetup festgelegten
Geräten gestartet.
Wenn die Test ausgeführt wurden, die CD entnehmen.
Ausführen des Dell IDE-Festplattendiagnoseprogramms
Das IDE-Festplattendiagnoseprogramm ist ein Dienstprogramm, mit
dem Sie die Festplatte auf Fehler überprüfen bzw. testen können, ob das
Festplattenlaufwerk ausgefallen ist.
1
Schalten Sie den Computer ein oder führen Sie einen Neustart durch,
falls er bereits eingeschaltet ist.
2
Wenn F2 = Setup in der rechten oberen Ecke des Bildschirms
angezeigt wird, die Tastenkombination <Strg><Alt><F10>
drücken.
3
Den Anweisungen auf dem Bildschirm folgen.
Im Benutzerhandbuch den Abschnitt „Probleme mit dem Festplattenlaufwerk“ lesen, wenn das Laufwerk ausgefallen ist.
Setup- und Schnellreferenzhandbuch
85
w w w. d e l l . c o m | s u p p o r t . e u r o . d e l l . c o m
Zulassungsbestimmungen
Elektromagnetische Interferenz (EMI) ist ein Signal oder eine Emission,
die in den freien Raum abgegeben bzw. entlang von Strom- oder Signalleitungen geleitet wird und den Betrieb der Funknavigation oder anderer
Sicherheitsgeräte beeinträchtigt bzw. deren Qualität extrem verschlechtert,
behindert oder wiederholt lizenzierte Funkdienste unterbricht.
Ihr Dell-Computer ist so konzipiert, dass er die geltenden EMI-Richtlinien
einhält. Änderungen, die nicht ausdrücklich von Dell genehmigt wurden,
können dazu führen, dass der Benutzer die Berechtigung zum Betrieb des
Gerätes verliert.
Computersysteme von Dell werden für die elektromagnetische Umgebung,
in der sie eingesetzt werden sollen, konzipiert, getestet und klassifiziert. Je
nach elektromagnetischer Strahlung erfolgt die Klassifizierung von Geräten
anhand zweier Kategorien bzw. Klassen:
HINWEIS: Das auf
der Computerrückseite
oder unten auf dem
Gehäuse angebrachte
Normenschild gibt Auskunft darüber, in welchen
Betriebsumgebungen
Ihr System eingesetzt
werden darf.
86
•
Geräte der Klasse A dürfen nur in gewerblichen oder industriellen
Umgebungen betrieben werden.
•
Geräte der Klasse B dürfen in Wohngebieten und häuslichen
Umgebungen wie auch in gewerblichen oder industriellen
Umgebungen betrieben werden.
Klasse A
Geräte der Klasse A wurden getestet und entsprechen den im Abschnitt 15
der FCC-Bestimmungen (Federal Communications Commission) für diese
Geräteklasse festgelegten Anforderungen. Die in diesen Bestimmungen
festgelegten Grenzwerte sollen in gewerblich genutzten Gebieten bzw. in
Industrieumgebungen einen weitgehend störungsfreien Betrieb gewährleisten. Dieses Gerät erzeugt und verwendet Hochfrequenzenergie und
kann diese abstrahlen. Wird das Gerät nicht entsprechend der Bedienungsanleitung installiert und verwendet, kann es Fernmeldeeinrichtungen
stören. Beim Betrieb des Gerätes in Wohngebieten können Störungen
auftreten. In diesem Fall müssen Sie die Störungen auf eigene Kosten
beseitigen.
Setup- und Schnellreferenzhandbuch
Klasse B
Geräte der Klasse B wurden getestet und entsprechen den im Abschnitt 15
der FCC-Bestimmungen (Federal Communications Commission) für diese
Geräteklasse festgelegten Anforderungen. Die in diesen Bestimmungen
festgelegten Grenzwerte sollen in Wohngebieten einen weitgehend
störungsfreien Betrieb gewährleisten. Dieses Gerät erzeugt und verwendet
Hochfrequenzenergie und kann diese abstrahlen. Wird das Gerät nicht
entsprechend der Bedienungsanleitung installiert und verwendet, kann es
Fernmeldeeinrichtungen stören. Es kann jedoch nicht garantiert werden,
dass bei einer bestimmten Installation nicht doch Störungen auftreten.
Wenn dieses Gerät den Radio- oder Fernsehempfang stört, was sich durch
Ein- und Ausschalten des Gerätes überprüfen lässt, sollte der Benutzer
versuchen, die Störung durch eine oder mehrere der folgenden Maßnahmen
zu beheben:
•
Die Empfangsantenne neu ausrichten oder an einem anderen Ort
aufstellen.
•
Den Abstand zwischen Gerät und Empfänger vergrößern.
•
Das Gerät an eine Steckdose eines anderen Stromkreises als das
Empfangsgerät anschließen.
•
Mit der Bitte um technische Unterstützung an Dell oder einen
erfahrenen Radio- und Fernsehtechniker wenden.
HINWEIS: Weitere
Informationen zu
Betriebsbestimmungen
für den Computer
finden Sie im
Benutzerhandbuch.
Setup- und Schnellreferenzhandbuch
87
88
Setup- und Schnellreferenzhandbuch
w w w. d e l l . c o m | s u p p o r t . e u r o . d e l l . c o m
Sistemi Dell™ OptiPlex™ SX
Guida di installazione e
consultazione rapida
w w w. d e l l . c o m | s u p p o r t . e u r o . d e l l . c o m
Note, avvisi e messaggi di attenzione
NOTA: una NOTA evidenzia informazioni importanti per un uso ottimale
del computer.
AVVISO: un AVVISO può indicare un potenziale danno a livello di hardware
o una perdita di dati e consiglia come evitare il problema.
ATTENZIONE: un messaggio di ATTENZIONE indica un rischio di
danni alla proprietà, lesioni personali o morte.
Abbreviazioni ed acronimi
Per un elenco completo delle abbreviazioni e degli acronimi, vedere la
sezione Glossario nella Guida dell’utente.
Se il computer acquistato è un Dell n Series, qualsiasi riferimento fatto
in questo documento al sistema operativo Microsoft® Windows® non
è applicabile.
____________________
Le informazioni contenute nel presente documento sono soggette a modifiche senza preavviso.
© 2002–2003 Dell Computer Corporation. Tutti i diritti riservati.
È severamente vietata la riproduzione, con qualsiasi strumento, senza l’autorizzazione scritta di
Dell Computer Corporation.
Marchi di fabbrica usati nel presente documento: Dell, OptiPlex e il logo DELL sono marchi di
fabbrica di Dell Computer Corporation; Microsoft, MS-DOS, Windows NT e Windows sono marchi
depositati di Microsoft Corporation.
Altri marchi di fabbrica e nomi commerciali possono essere utilizzati in questo documento sia in
riferimento alle aziende che rivendicano il marchio e i nomi che ai prodotti stessi.
Dell Computer Corporation nega qualsiasi partecipazione di proprietà relativa a marchi di fabbrica
e nomi commerciali diversi da quelli di sua proprietà.
Maggio 2003
N/P 2U454
Rev. A02
Sommario
Informazioni sulla guida
Funzioni
. . . . . . . . . . . . . . . . . . . . . .
93
. . . . . . . . . . . . . . . . . . . . . . . . . . . . . . .
93
ATTENZIONE: Istruzioni di sicurezza
. . . . . . . . . . . . . . .
95
. . . . . . . . . . . . . . . . . . . . . .
95
. . . . . . . . . . . . . . . . . . . . . . . . . .
97
Informazioni generali
Uso del computer
Interventi sui componenti interni del computer
Protezione dalle scariche elettrostatiche .
. . . . . . . . .
98
. . . . . . . . . . . .
99
Abitudini ergonomiche nell’uso del computer
Smaltimento della batteria
. . . . . . . . . .
. . . . . . . . . . . . . . . . . .
Operazioni preliminari e installazione
. . . . . . . . . . . . . .
Determinazione della posizione e dell’orientamento
del computer . . . . . . . . . . . . . . . . . . .
101
. . . . . .
101
. . . . . . .
102
. . . . . . . . . . . . . . . . . . .
103
Installazione di una periferica nell’alloggiamento
dei moduli . . . . . . . . . . . . . . . . . . . .
Installazione del sostegno
99
100
Collegamento dell’adattatore c.a.
. . . . . . . . . . . . . . .
103
Connessione di periferiche esterne
. . . . . . . . . . . . . . .
105
Montaggio della protezione per i cavi
. . . . . . . . . . . . .
Montaggio del sostegno alla piastra di montaggio
107
. . . . . . . . . . . . . . .
110
. . . . . . . . . . . . . . . . . . . . . .
112
Ricerca di informazioni e assistenza
Soluzione di problemi .
106
. . . . . . .
Uso del CD Dell Drivers and Utilities
. . . . . . . . . . . . .
Esecuzione del programma Dell Diagnostics
. . . . . . . . . .
Esecuzione del programma Dell IDE Hard-Drive
Diagnostics . . . . . . . . . . . . . . . . . . .
. . . . . . .
113
114
116
Sommario
91
Informazioni sulle normative
92
Sommario
. . . . . . . . . . . . . . . . . . .
116
Classe A
. . . . . . . . . . . . . . . . . . . . . . . . . . . .
117
Classe B
. . . . . . . . . . . . . . . . . . . . . . . . . . . .
117
Informazioni sulla guida
Il presente documento contiene informazioni introduttive e di
configurazione, sulla sicurezza, sulle normative e sulla garanzia
relative al computer Dell™ OptiPlex™.
Per accedere alle versioni più recenti dei documenti presenti sul disco rigido,
visitare il sito Web del supporto tecnico di Dell all’indirizzo
support.dell.com.
Numero di modello e tipo
di telaio in conformità
alle normative
DCT = computer USF (ultra
small form-factor)
Funzioni
2 slot USB e connettori
per cuffia e microfono
Pulsante di accensione
Guida di montaggio
(per l’inserimento
del sostegno in
posizione verticale)
Guida di montaggio
(per l’inserimento del
sostegno sospeso in
posizione orizzontale)
Guida di montaggio
(per l’inserimento del
sostegno sospeso in
posizione verticale)
Indicatore di diagnostica
Pulsante di
sblocco del
modulo
Alloggiamento dei moduli
Pulsante di sblocco del coperchio del
disco rigido/coperchio del computer
Guida di installazione e consultazione rapida
93
w w w. d e l l . c o m | s u p p o r t . e u r o . d e l l . c o m
Protezione per
i cavi
Coperchio del disco rigido (aprire il coperchio per
Coperchio del
accedere all’interruttore di accesso
computer
all’alloggiamento dei moduli)
Alloggiamento dei moduli
Adattatore di alimentazione
94
Guida di installazione e consultazione rapida
Piastra di montaggio
del sostegno del telaio
Sostegno del
computer
ATTENZIONE: Istruzioni di sicurezza
Per proteggere il computer e l’ambiente di lavoro da eventuali danni e per la sicurezza
personale, attenersi alle seguenti indicazioni di sicurezza.
Informazioni generali
•
Non cercare di riparare il computer da soli se non si è un addetto esperto al supporto
tecnico. Seguire sempre attentamente le istruzioni di installazione.
•
Per evitare scariche elettriche, collegare i cavi di alimentazione del computer e delle
periferiche a prese elettriche correttamente messe a terra. I cavi sono forniti di spina a tre
poli per garantire una corretta messa a terra. Non usare adattatori per spine né rimuovere
il polo di messa a terra dai cavi. Se è necessario l’uso di un cavo di prolunga, usare un cavo
a tre fili con spine correttamente messe a terra.
•
Per evitare potenziali rischi di scariche elettriche, non usare il computer durante
un temporale.
•
Per evitare potenziali rischi di scariche elettriche, non collegare o scollegare cavi, né
eseguire operazioni di manutenzione o riconfigurazione del prodotto durante
un temporale.
•
Se il computer è dotato di modem, il cavo usato con il modem deve avere dimensioni
minime pari a 26 AWG (American Wire Gauge) e un connettore modulare RJ-11
conforme alle normative FCC.
•
Prima di eseguire la pulizia del computer, scollegarlo dalla presa elettrica. Pulire il
computer con un panno morbido inumidito con acqua. Non usare detergenti spray
o liquidi che potrebbero contenere sostanze infiammabili.
•
Per evitare possibili danni alla scheda di sistema, attendere 5 secondi dallo spegnimento
del computer prima di scollegare una periferica.
•
Per evitare di causare un corto circuito del computer quando si disconnette un cavo di
rete, scollegare prima il cavo dall’adattatore di rete sul retro del computer, poi dalla
spinotto di rete a muro. Quando si riconnette un cavo di rete al computer, inserire prima il
cavo nello spinotto di rete a muro, poi collegarlo all’adattatore di rete.
Guida di installazione e consultazione rapida
95
w w w. d e l l . c o m | s u p p o r t . e u r o . d e l l . c o m
ATTENZIONE: Istruzioni di sicurezza
96
•
Per proteggere il computer da sovracorrenti transitorie e cali di tensione improvvisi,
utilizzare un soppressore di sovracorrente, uno stabilizzatore di tensione o un gruppo di
continuità (UPS).
•
Accertarsi che non vi siano oggetti appoggiati sopra i cavi del computer e che i cavi non
siano di intralcio o possano essere calpestati.
•
Non inserire oggetti nelle fessure del computer. Ciò potrebbe causare un corto circuito dei
componenti interni, con conseguenti incendi o scariche elettriche.
•
Mantenere il computer lontano da termosifoni e fonti di calore e non ostruire le prese di
raffreddamento. Non appoggiare il computer su pile di carta, non racchiuderlo tra pareti o
posarlo su letti, divani o tappeti.
•
Non rovesciare cibo o liquidi sul computer. Se il computer entra in contatto con liquidi,
vedere la Guida dell’utente.
•
Non usare il computer durante un temporale a meno che il cavo dell’adattatore c.a. sia
stato scollegato dalla presa di corrente.
•
Quando si usa l’adattatore c.a. per alimentare il computer, posizionarlo in una zona
ventilata, ad esempio il piano di una scrivania o il pavimento.
•
Durante il normale funzionamento del computer l’adattatore c.a. può raggiungere
temperature elevate. Maneggiare con cautela l’adattatore durante o subito dopo
il funzionamento.
Guida di installazione e consultazione rapida
Uso del computer
Durante l’utilizzo del computer, attenersi alle seguenti indicazioni di sicurezza.
ATTENZIONE: non usare il computer senza le relative coperture di protezione,
inclusi i coperchi del computer, il pannello frontale, le staffe di copertura, gli
inserti del pannello frontale, ecc.
•
Il computer Dell viene fornito con una delle opzioni di alimentazione descritta di seguito.
–
Alimentatore a tensione fissa. I computer con un alimentatore a tensione fissa non
dispongono dell’interruttore di selezione della tensione sul pannello posteriore e
possono operare solo a una determinata tensione (vedere l’etichetta di conformità
alle normative sulla parte esterna del computer per determinare la tensione di
funzionamento del computer).
–
Circuito di regolazione automatica della tensione. I computer con un circuito di
regolazione automatica della tensione non dispongono dell’interruttore di selezione
della tensione sul pannello posteriore e rilevano automaticamente la corretta tensione
di funzionamento.
–
Interruttore manuale di selezione della tensione. Nei computer che dispongono di un
interruttore di selezione della tensione sul pannello posteriore è necessario impostare
manualmente la corretta tensione di funzionamento.
AVVISO: per evitare di danneggiare il computer, accertarsi che l’interruttore di selezione della
tensione sia impostato compatibilmente con l’alimentazione c.a. disponibile localmente. In
Giappone, l’interruttore di selezione della tensione deve essere impostato su 115 V anche se la
tensione di alimentazione in Giappone è di 100 V. Assicurarsi inoltre che il monitor e le periferiche
collegate siano compatibili con la tensione di alimentazione disponibile localmente.
•
Prima di eseguire qualsiasi operazione all’interno del computer, scollegare il sistema dalla
rete elettrica per evitare scariche elettriche o danni alla scheda di sistema. Alcuni
componenti della scheda di sistema sono alimentati quando il computer è collegato alla
fonte di alimentazione c.a.
Guida di installazione e consultazione rapida
97
w w w. d e l l . c o m | s u p p o r t . e u r o . d e l l . c o m
Uso del computer (continua)
Interventi sui componenti interni del computer
Prima di aprire il coperchio del computer, eseguire la procedura descritta rispettando la
sequenza indicata.
ATTENZIONE: non eseguire interventi di riparazione sul computer da soli se non
attenendosi alle istruzioni fornite nella documentazione Dell™ in linea o in altro
modo indicate da Dell. Seguire sempre attentamente le istruzioni di installazione
e di riparazione.
AVVISO: per evitare possibili danni alla scheda di sistema, attendere 5 secondi dallo spegnimento
del computer prima di rimuovere un componente dalla scheda di sistema o scollegare una periferica
dal computer.
1
Eseguire la normale procedura di chiusura della sessione di lavoro dal menu del
sistema operativo.
2
Spegnere il computer e tutte le periferiche ad esso collegate.
3
Prima di toccare qualsiasi componente interno del computer, scaricare a terra l’elettricità
statica del corpo toccando una superficie metallica non verniciata sul telaio, ad esempio la
superficie metallica intorno alle aperture degli slot delle schede sul retro del computer.
Durante l’intervento toccare periodicamente una superficie metallica non verniciata sul
telaio del computer per scaricare l’elettricità statica eventualmente accumulata che
potrebbe danneggiare i componenti interni.
4
Scollegare il computer e le periferiche, incluso il monitor, dalle prese elettriche. Scollegare
dal computer eventuali linee telefoniche o altre linee di telecomunicazione.
Tale accorgimento contribuisce a ridurre il rischio di scariche elettriche e lesioni personali.
Inoltre attenersi alle seguenti indicazioni di sicurezza, qualora appropriato.
98
•
Per scollegare un cavo, afferrare il connettore o il serracavo, non il cavo stesso. Alcuni cavi
sono dotati di connettore con linguette di bloccaggio; per scollegare questo tipo di cavo,
fare pressione sulle linguette di blocco prima di estrarlo. Mentre si estrae il connettore,
tenerlo correttamente allineato per evitare che i piedini si pieghino. Inoltre, prima di
collegare un cavo accertarsi che entrambi i connettori siano allineati e orientati in
modo corretto.
•
Maneggiare con cura componenti e schede. Non toccare i microcomponenti o i
contatti di una scheda, bensì afferrarla per i bordi o per la staffa metallica di montaggio.
I componenti quali il microprocessore devono essere afferrati dai bordi e non dai piedini.
Guida di installazione e consultazione rapida
Uso del computer (continua)
ATTENZIONE: se la pila non viene correttamente installata, potrebbe esplodere.
Sostituire la pila con una dello stesso tipo o di tipo equivalente consigliato dal
produttore. Non gettare le batterie insieme ai rifiuti domestici. Per informazioni
sul più vicino centro di raccolta di batterie esaurite, contattare i responsabili del
servizio smaltimento rifiuti di zona.
Protezione dalle scariche elettrostatiche
L’elettricità statica può danneggiare i componenti interni più delicati del computer. Per evitare
possibili danni, scaricare l’elettricità statica dal proprio corpo prima di toccare un qualsiasi
componente elettronico del computer, ad esempio il microprocessore. A tale scopo è
sufficiente toccare una superficie metallica non verniciata sul telaio del computer.
Mentre si lavora sui componenti interni del computer, toccare periodicamente una
superficie metallica non verniciata per scaricare l’eventuale carica elettrostatica accumulata
dal proprio corpo.
Per evitare danni causati dalle scariche elettrostatiche è inoltre possibile adottare le
seguenti precauzioni:
•
Rimuovere i componenti dall’involucro antistatico solo al momento dell’installazione nel
computer. Prima di aprire l’involucro antistatico, scaricare l’elettricità statica dal corpo.
•
Prima di trasportare un componente sensibile alle cariche elettrostatiche, riporlo in un
contenitore o un involucro antistatico.
•
Maneggiare tutti i componenti sensibili alle cariche elettrostatiche in un’area priva di
energia elettrostatica. Se possibile, usare tappeti antistatici per il pavimento e il banco
di lavoro.
Abitudini ergonomiche nell’uso del computer
ATTENZIONE: l’uso prolungato o improprio della tastiera può comportare lesioni.
ATTENZIONE: osservare lo schermo del monitor per periodi prolungati può causare
disturbi alla vista.
Per migliorare il comfort e l’efficienza, quando si configura e si usa il computer osservare le
indicazioni ergonomiche fornite nella Guida dell’utente.
Guida di installazione e consultazione rapida
99
w w w. d e l l . c o m | s u p p o r t . e u r o . d e l l . c o m
Uso del computer (continua)
Smaltimento della batteria
Il computer usa una pila a disco al litio. La durata della pila a disco al litio è estremamente
lunga ed è possibile che non ne sia mai richiesta la sostituzione. Se fosse necessario sostituirla,
vedere la Guida dell’utente.
Non gettare le batterie insieme ai rifiuti domestici. Per informazioni sul più vicino centro di
raccolta di batterie esaurite, contattare i responsabili del servizio smaltimento rifiuti di zona.
100
Guida di installazione e consultazione rapida
Operazioni preliminari e installazione
AVVISO: non accendere il computer prima del completamento della
procedura di installazione.
1
Determinazione della posizione e dell’orientamento
del computer
NOTA: per orientare il
computer verticalmente
od orizzontalmente sotto
una scrivania o un tavolo,
vedere "Installazione del
sostegno” a pagina 103 e
“Montaggio del sostegno
alla piastra di
montaggio” a
pagina 107.
AVVISO: non appoggiare il monitor sul computer. Usare un piedistallo
del monitor.
AVVISO: per installare il computer in ambienti soggetti a vibrazioni oppure
per installazioni sospese, usare la staffa opzionale di montaggio a muro
anziché il sostegno del telaio. Per ordinare la staffa, contattare Dell.
AVVISO: per garantire una corretta ventilazione, non posizionare il
computer verticalmente su un piano senza utilizzare l’apposito sostegno
(vedere Installazione del sostegno).
AVVISO: per assicurare una ventilazione appropriata, non ostruire le prese
di raffreddamento.
Guida di installazione e consultazione rapida
101
w w w. d e l l . c o m | s u p p o r t . e u r o . d e l l . c o m
2
NOTA: per individuare
l’interruttore di accesso
all’alloggiamento dei
moduli, rimuovere il
coperchio del disco rigido.
Installazione di una periferica nell’alloggiamento
dei moduli
Dell fornisce il computer con un’unità a dischetti o un modulo di
riempimento installato nell’alloggiamento dei moduli. Per installare
un’unità CD, DVD o un secondo disco rigido nell’alloggiamento dei
moduli, rimuovere prima il modulo di riempimento.
Interruttore di
accesso
all’alloggiamento
dei moduli
102
Guida di installazione e consultazione rapida
3
Installazione del sostegno
NOTA: se il computer
viene installato sotto il
piano di una scrivania o di
un tavolo, collegare prima
tutti i cavi quindi montare
il sostegno alla piastra di
montaggio (vedere
“Montaggio del sostegno
alla piastra di
montaggio” a
pagina 107).
1
Sollevare la vite prigioniera e fare scivolare il sostegno del telaio in una
delle tre guide di montaggio sul retro del computer.
2
Quando il sostegno è in posizione, stringere la vite.
AVVISO: in ambienti soggetti a vibrazioni, usare la staffa opzionale di
montaggio a muro anziché il sostegno del computer per installare il computer
sotto il piano di una scrivania o un tavolo.
4
Collegamento dell’adattatore c.a.
1
Collegare l’adattatore di alimentazione al connettore sul retro
del computer.
2
Collegare il cavo di alimentazione all’adattatore di alimentazione.
AVVISO: la seguente procedura è applicabile solo al Giappone.
NOTA: l’indicatore
dell’adattatore di
alimentazione si illumina
quando l’adattatore è
correttamente collegato
a una presa di corrente e
al computer.
Guida di installazione e consultazione rapida
103
w w w. d e l l . c o m | s u p p o r t . e u r o . d e l l . c o m
ATTENZIONE: se si collega il filo verde di messa a terra a una
presa di corrente, evitare il contatto tra tale filo e i conduttori
della linea di alimentazione, in quanto potrebbe causare
scariche elettriche, incendi o danni al computer (vedere la
seguente figura).
Se non si collega il filo verde di messa a terra a una presa di corrente,
passare al punto 4.
3
Collegare il connettore metallico di messa a terra alla vite di messa a
terra della presa (vedere la seguente figura).
a
Allentare la vite di messa a terra.
b
Inserire il connettore metallico di messa a terra dietro la vite di
messa a terra, quindi stringere la vite.
Vite di messa
a terra
Connettore metallico di messa a terra
4
104
Collegare il cavo di alimentazione c.a. alla presa elettrica.
Guida di installazione e consultazione rapida
5
Connessione di periferiche esterne
NOTA: collegare solo una
tastiera e un mouse.
ATTENZIONE: per evitare scariche elettriche, usare solo
l’adattatore e il cavo di alimentazione forniti e assicurarsi di
collegarli a una fonte di alimentazione correttamente messa
a terra.
Guida di installazione e consultazione rapida
105
w w w. d e l l . c o m | s u p p o r t . e u r o . d e l l . c o m
6
Montaggio della protezione per i cavi
AVVISO: se il computer viene installato sotto il piano di una scrivania o di un
tavolo, non montare la protezione per i cavi fino a quando il computer non è
saldamente fissato alla piastra di montaggio (vedere il punto 7 in "Montaggio
del sostegno alla piastra di montaggio” a pagina 107).
AVVISO: se si usa il sostegno del telaio, montarlo sul computer prima della
protezione per i cavi.
Slot per cavo
di sicurezza
Non appoggiare il
computer sul
pannello frontale
AVVISO: quando si monta la protezione per i cavi, non appoggiare il
computer sul pannello frontale perché potrebbe venire in contatto con una
superficie rigida. Se questo avviene, il pulsante di accensione potrebbe essere
attivato accidentalmente e il pannello frontale potrebbe rigarsi.
106
1
Collegare tutti i cavi sul retro del computer.
2
Allineare le quattro linguette del pezzo inferiore della protezione per i
cavi ai quattro slot sul pannello posteriore del computer.
3
Inserire le linguette negli slot e fare scorrere il pezzo di protezione
verso gli indicatori di diagnostica (come illustrato in figura) in modo
che risulti saldamente fissato.
Guida di installazione e consultazione rapida
4
Allineare le due linguette del pezzo superiore della protezione per i
cavi ai due slot sul pannello posteriore del computer.
5
Inserire le linguette negli slot e fare scorrere il pezzo di protezione
verso gli indicatori di diagnostica (come illustrato in figura).
6
Installare un dispositivo di sicurezza nello slot per il cavo di
sicurezza (opzionale).
Per rimuovere la protezione per i cavi, rimuovere il dispositivo di sicurezza
installato nello slot per il cavo di sicurezza (opzionale).
1
Afferrare il pezzo superiore della protezione per i cavi e farlo scorrere
verso sinistra fino ad arresto, quindi sollevarlo e rimuoverlo.
2
Per rimuovere il pezzo inferiore della protezione per i cavi, farlo
scorrere verso sinistra fino ad arresto mentre si tiene premuta la
levetta, quindi sollevarlo e rimuoverlo.
Guida di installazione e consultazione rapida
107
w w w. d e l l . c o m | s u p p o r t . e u r o . d e l l . c o m
7
Montaggio del sostegno alla piastra di montaggio
AVVISO: quando si appende il computer sotto un piano, evitare posizioni in
cui può essere colpito dalle gambe o dalla sedia degli utenti.
ATTENZIONE: fissare la piastra di montaggio a una superficie
compatta in grado di supportare un peso appeso di 18,1 kg
(40 libbre).
Fori delle viti (4)
Slot della piastra
di montaggio
Superficie
compatta con
spessore minimo
2,5 cm (1 pollice)
Linguetta di
rilascio
NOTA: prima di fissare
la piastra di montaggio a
una superficie, decidere
come il sostegno verrà
montato sulla piastra
di montaggio.
1
Fissare la piastra di montaggio a una superficie solida con uno spessore
minimo di 2,5 cm (1 pollice) usando le quattro viti per legno n. 6
(15,88 mm - 0,625 pollici) fornite.
2
Posizionare il computer e il sostegno sotto la piastra di montaggio a
circa 2,5 cm (1 pollice) dal bordo della piastra.
AVVISO: accertarsi di inserire fermamente la linguetta di rilascio nello slot
della piastra di montaggio.
108
Guida di installazione e consultazione rapida
3
Sollevare il computer e il sostegno, inserire il sostegno nella staffa di
montaggio e farlo scivolare finché la linguetta di rilascio scatta nello
slot della piastra di montaggio.
Slot della piastra di montaggio
Linguetta di rilascio
(completamente
inserita)
4
Montare la protezione per i cavi (se usata).
AVVISO: quando si installa il computer, fissare tutti i cavi verso il
retro dell’area di lavoro per evitare che i cavi vengano tirati, calpestati
o si ingarbuglino.
Accendere il computer, leggere il contratto di licenza del
software e seguire le istruzioni di installazione del sistema
operativo visualizzate.
8
Procedura guidata terminata. L’installazione del computer
è terminata.
9
Guida di installazione e consultazione rapida
109
w w w. d e l l . c o m | s u p p o r t . e u r o . d e l l . c o m
Ricerca di informazioni e assistenza
110
Tipo di informazioni
Dove cercare
• Un programma di diagnostica per
il computer
• Driver per il computer
• Documentazione per il computer
• Documentazione per le periferiche
CD Drivers and Utilities
(noto anche come ResourceCD)
• Codice di servizio espresso e numero
di servizio
• Etichetta della licenza di
Microsoft® Windows®
Codice di servizio espresso e numero di
identificazione del prodotto
• Procedure di rimozione e sostituzione
di componenti
• Specifiche tecniche
• Procedure di configurazione delle
impostazioni di sistema
• Procedure di risoluzione dei problemi
Guida dell’utente
È possibile usare il CD per
accedere alla documentazione,
reinstallare i driver o eseguire gli
strumenti di diagnostica.
Situati sul computer.
A seconda del sistema operativo in uso, fare doppio clic
sull’icona Guide dell’utente sul desktop oppure fare
clic sul pulsante Start, quindi scegliere Guida in linea
e supporto tecnico per accedere alla documentazione
memorizzata sul disco rigido.
Guida di installazione e consultazione rapida
Tipo di informazioni
Dove cercare
• Procedure di reinstallazione del
sistema operativo
CD del sistema operativo e
Guida all’installazione
Se si reinstalla il sistema operativo, usare il CD Drivers and
Utilities per reinstallare i driver richiesti dalle periferiche
fornite con il computer.
• Driver più recenti per il computer
• Risposte a domande di supporto tecnico
e di assistenza
• Discussioni in linea con altri utenti ed
esperti del supporto tecnico
• Documentazione per il computer
Sito Web del supporto tecnico di Dell
• Stato delle chiamate al servizio
di assistenza
• Informazioni sui problemi tecnici più
frequenti del computer
• Domande frequenti
• Scaricamento di file
• Dettagli sulla configurazione del computer
• Contratto di assistenza per il computer
Sito Web Dell Premier Support
Il sito Web del supporto tecnico di Dell fornisce diversi
strumenti in linea quali:
• Database Knowledge Base: consigli, suggerimenti e corsi
in linea
• Forum clienti: discussione in linea con altri clienti Dell
• Aggiornamenti: informazioni di aggiornamento per
componenti quali memoria, dico rigido e sistema operativo
• Servizio clienti: informazioni di contatto, sullo stato
dell’ordine, sulla garanzia e sulle riparazioni
• Scaricamento di file: driver, patch e aggiornamenti
del software
• Riferimenti: documentazione per il computer, specifiche dei
prodotti e white paper
Il sito Web Dell Premier Support è una risorsa in linea
espressamente studiata per aziende, entità governative e
istituzioni scolastiche. Il sito potrebbe non essere disponibile in
tutti i paesi.
Guida di installazione e consultazione rapida
111
w w w. d e l l . c o m | s u p p o r t . e u r o . d e l l . c o m
Tipo di informazioni
Dove cercare
• Uso di Windows XP
• Documentazione per il computer e
le periferiche
Guida in linea e supporto tecnico di
Windows XP
1 Fare clic sul pulsante Start, quindi scegliere Guida in linea e
supporto tecnico.
2 Digitare una parola o una frase che descriva il problema,
quindi fare clic sull’icona a forma di freccia.
3 Fare clic sull’argomento che descrive il problema.
4 Seguire le istruzioni visualizzate.
Soluzione di problemi
Dell fornisce una serie di strumenti per assistere l’utente se il computer non
funziona nel modo previsto. Per ottenere le informazioni più aggiornate per
la risoluzione dei problemi, visitare il sito Web del supporto tecnico di Dell
all’indirizzo support.dell.com. Una descrizione degli strumenti di
diagnostica di Dell è disponibile nella sezione “Assistenza” della Guida
dell’utente in linea.
Se i problemi riscontrati richiedono l’intervento di Dell, descrivere
dettagliatamente l’errore, i codici bip o la sequenza degli indicatori di
diagnostica, annotare di seguito il codice di servizio espresso e il numero di
servizio, quindi contattare Dell dalla postazione di lavoro del computer.
Vedere “Ricerca di informazioni e assistenza” a pagina 110 per un esempio
di codice di servizio espresso e numero di servizio.
Codice di servizio espresso:___________________________
Numero di servizio:___________________________
112
Guida di installazione e consultazione rapida
Con il computer sono forniti i seguenti strumenti per la risoluzione
dei problemi.
D E L L D I A G N O S T I C S . Con il programma Dell Diagnostics è possibile verificare
diversi componenti del computer e determinare la causa dei problemi del
computer. Per ulteriori informazioni, vedere “Esecuzione del programma Dell
Diagnostics” a pagina 114.
LE SEGUENTI FUNZIONI POSSONO INDICARE UN POSSIBILE GUASTO
E CONSENTONO DI INDIVIDUARE UNA SOLUZIONE AL PROBLEMA
D E L C O M P U T E R.
PER ULTERIORI INFORMAZIONI, VEDERE LA
Guida dell’utente.
I N D I C A T O R I D I S I S T E M A . posizionati sul pannello frontale del computer
I N D I C A T O R I D I D I A G N O S T I C A . posizionati sul pannello posteriore
del computer
M E S S A G G I D I S I S T E M A . vengono visualizzati sullo schermo
C O D I C I B I P . una serie di bip emessi tramite l’altoparlante del computer
Uso del CD Dell Drivers and Utilities
Per usare il CD Dell Drivers and Utilities durante l’esecuzione del sistema
operativo Microsoft® Windows®, seguire la procedura descritta.
1
Accendere il computer e attendere che venga visualizzato il desktop
di Windows.
2
Inserire il CD Dell Drivers and Utilities nell’unità CD.
La prima volta che si usa il CD Drivers and Utilities sul computer
viene visualizzata una finestra che comunica l’inizio dell’installazione
del CD.
3
Fare clic su OK per continuare.
NOTA: per accedere ai
driver di periferica e alla
documentazione per
l’utente, è necessario
usare il CD Drivers and
Utilities mentre sul
computer è in esecuzione
un sistema operativo
Windows.
Per completare l’installazione, rispondere alle domande visualizzate
dal programma di installazione.
4
Nella finestra Introduzione fare clic su Avanti.
5
Selezionare le voci appropriate per Modello del sistema, Sistema
operativo, Tipo di periferica e Argomento.
Guida di installazione e consultazione rapida
113
w w w. d e l l . c o m | s u p p o r t . e u r o . d e l l . c o m
Driver per il computer
Per visualizzare un elenco di driver di periferica per il computer, seguire la
procedura descritta.
1
Fare clic su Cerca driver nella casella di riepilogo a discesa Argomento.
Viene effettuata la scansione dell’hardware e del sistema operativo del
computer e, al termine, viene visualizzato l’elenco dei driver di
periferica per l’attuale configurazione del sistema.
2
Fare clic sul driver desiderato e seguire le istruzioni per scaricare il file
sul computer.
Per visualizzare un elenco di tutti i driver disponibili per il computer, fare
clic su Driver nella casella di riepilogo a discesa Argomento.
Esecuzione del programma Dell Diagnostics
Dell Diagnostics è una programma usato per verificare diversi componenti
del computer. Eseguire questo programma per identificare la fonte di un
possibile problema. Il programma Dell Diagnostics può essere eseguito dal
disco rigido o dal CD Drivers and Utilities.
Esecuzione dal disco rigido
AVVISO: se si verifica un guasto al disco rigido, eseguire la diagnostica Dell
del disco rigido IDE (vedere “Esecuzione del programma Dell IDE Hard-Drive
Diagnostics” a pagina 116).
NOTA: se viene
visualizzato un messaggio
che indica che la
partizione dello
strumento di diagnostica
non è stata trovata,
seguire le istruzioni
visualizzate per eseguire
il programma Dell
Diagnostics dal CD
Drivers and Utilities.
114
1
Arrestare il sistema e riavviare il computer.
2
Quando viene visualizzato il logo di Dell™, premere
<F12> immediatamente.
Se si attende troppo a lungo e viene visualizzato il logo di Windows,
attendere la visualizzazione del desktop di Windows. Arrestare quindi
il sistema dal menu Start e riprovare.
3
Quando viene visualizzato l’elenco delle unità di avvio, evidenziare
Boot to Utility Partition (avvio dalla partizione dello strumento di
diagnostica) e premere <Invio>.
Guida di installazione e consultazione rapida
4
Quando viene visualizzato il menu principale Dell Diagnostics,
scegliere il tipo di prova da eseguire.
5
Chiudere lo schermo della prova per tornare allo schermo Main Menu.
Per uscire da Dell Diagnostics e riavviare il computer, chiudere lo
schermo Main Menu.
Apertura dal CD Drivers and Utilities
1
Inserire il CD Drivers and Utilities nell’unità CD.
2
Arrestare il sistema e riavviare il computer.
Quando viene visualizzato il logo di DELL, premere
<F12> immediatamente.
Se si attende troppo a lungo e viene visualizzato il logo di Windows,
attendere la visualizzazione del desktop di Windows. Arrestare quindi
il sistema dal menu Start e riprovare.
3
Quando viene visualizzato l’elenco delle unità di avvio, evidenziare
IDE CD-ROM Device (unità IDE CD-ROM) e premere <Invio>.
4
Scegliere l’opzione IDE CD-ROM Device (periferica IDE CD-ROM)
dal menu di avvio del CD.
5
Scegliere l’opzione Boot from CD-ROM (avvio da CD-ROM) dal
menu visualizzato.
6
Digitare 1 per avviare il menu di ResourceCD.
7
Digitare 2 per avviare Dell Diagnostics.
8
Selezionare Run the 32 Bit Dell Diagnostics (esegui Dell Diagnostics
a 32 bit) dall’elenco numerato. Se sono elencate più versioni, scegliere
quella appropriata per la piattaforma in uso.
9
Quando viene visualizzato il menu principale Dell Diagnostics,
scegliere il tipo di prova da eseguire.
10
NOTA: la seguente
procedura modifica la
sequenza di avvio solo
temporaneamente, infatti
al successivo avvio del
computer verrà rispettata
la sequenza di periferiche
definita nella
configurazione
del sistema.
Al termine delle prove rimuovere il CD.
Guida di installazione e consultazione rapida
115
w w w. d e l l . c o m | s u p p o r t . e u r o . d e l l . c o m
Esecuzione del programma Dell IDE Hard-Drive Diagnostics
Il programma Dell IDE Hard-Drive Diagnostics è un’utilità che verifica il
disco rigido per risolvere o confermare un guasto al disco rigido.
1
Accendere il computer; se il computer è acceso, riavviarlo.
2
Quando viene visualizzato F2 = Setup nell’angolo superiore destro
della finestra, premere <Ctrl><Alt><D>.
3
Seguire le istruzioni visualizzate.
Se viene riportato un guasto, vedere Problemi relativi al disco rigido
nella Guida dell’utente.
Informazioni sulle normative
Con interferenza elettromagnetica (EMI) si indica un qualsiasi segnale o
emissione, irradiato nello spazio o trasmesso tramite cavi di alimentazione o
di segnale, che può compromettere il funzionamento di dispositivi di
navigazione radio o servizi di sicurezza di altro tipo, o che in modo
significativo disturba, attenua o interrompe ripetutamente un servizio di
radiocomunicazione a norma di legge.
Il computer Dell è progettato per essere conforme alle normative applicabili
relative all’interferenza elettromagnetica. Eventuali modifiche o variazioni
non espressamente approvate da Dell potrebbero annullare il diritto
dell’utente di usare l’apparecchiatura.
I computer Dell sono progettati, collaudati e classificati per l’ambiente
elettromagnetico di utilizzo. La classificazione dell’ambiente
elettromagnetico è suddivisa in due gruppi.
NOTA: verificare
l’etichetta di conformità
alle normative affissa sul
retro o sotto il computer
Dell per determinare
l’ambiente in cui il
computer può operare.
116
•
Classe A indica che il dispositivo può essere usato solo ambiente di
lavoro o industriale.
•
Classe B indica che il dispositivo può essere usato sia in ambito
residenziale che in un ambiente di lavoro o industriale.
Guida di installazione e consultazione rapida
Classe A
La presente apparecchiatura è stata collaudata e dichiarata conforme ai
limiti imposti per i dispositivi digitali di Classe A, ai sensi della Parte 15
delle normative della Federal Communications Commission (FCC). Tali
limiti sono stabiliti per fornire una protezione adeguata contro le
interferenze dannose in un’installazione commerciale. La presente
apparecchiatura genera, usa e può irradiare energia in frequenza radio e, se
non installata e usata in conformità alle istruzioni del fabbricante, può
causare interferenze dannose con le comunicazioni radio. L’uso di questa
apparecchiatura in aree residenziali può creare interferenze dannose;
in tal caso l’utente dovrà provvedere ad eliminare tali interferenze a
proprio carico.
Classe B
La presente apparecchiatura è stata collaudata e dichiarata conforme ai
limiti imposti per i dispositivi digitali di Classe B, ai sensi della Parte 15
delle normative della Federal Communications Commission (FCC). Tali
limiti sono stabiliti per fornire una protezione adeguata contro le
interferenze dannose in un’installazione residenziale. La presente
apparecchiatura genera, usa e può irradiare energia in frequenza radio e, se
non installata e usata in conformità alle istruzioni del fabbricante, può
causare interferenze dannose con le comunicazioni radio. Non esiste
tuttavia alcuna garanzia che tali interferenze non si verifichino in una
particolare situazione. Qualora la presente apparecchiatura provocasse
interferenze dannose con segnali radiofonici o televisivi, verificabili
accendendo e spegnendo l’apparecchio stesso, si consiglia di cercare di
rimediare all’inconveniente mediante una o più delle seguenti misure.
•
Cambiare l’orientamento o la posizione dell’antenna di ricezione.
•
Aumentare la distanza tra l’apparecchiatura e l’apparecchio ricevente.
•
Collegare l’apparecchiatura a una presa elettrica su un circuito diverso
da quello a cui è collegato l’apparecchio ricevente. In caso di necessità,
consultare Dell o un tecnico radio/TV specializzato.
NOTA: ulteriori
informazioni sulle
normative relative al
computer sono reperibili
nella Guida dell’utente.
Guida di installazione e consultazione rapida
117
118
Guida di installazione e consultazione rapida
w w w. d e l l . c o m | s u p p o r t . e u r o . d e l l . c o m
Sistemas Dell™ OptiPlex™ SX
Guía de configuración
y de referencia rápida
w w w. d e l l . c o m | s u p p o r t . e u r o . d e l l . c o m
Notas, avisos y precauciones
NOTA: Una NOTA proporciona información importante que le ayuda a
utilizar su equipo de la mejor manera posible.
AVISO: Un AVISO indica un posible daño en el hardware o la pérdida
de datos y le explica cómo evitar el problema.
PRECAUCIÓN: Una PRECAUCIÓN indica un posible daño
material, lesión corporal o muerte.
Abreviaturas y acrónimos
Para obtener una lista completa de abreviaturas y acrónimos, consulte
el “Glosario” de la Guía del usuario.
Si ha adquirido un equipo Dell™ n Series, no podrá aplicar ningún de las
referencias al sistema operativo Microsoft® Windows® que aparece en este
documento.
____________________
La información contenida en este documento puede modificarse sin aviso previo.
© 2003 Dell Computer Corporation. Reservados todos los derechos.
Queda estrictamente prohibida la reproducción de este documento de cualquier manera sin la
autorización por escrito de Dell Computer Corporation.
Marcas comerciales utilizadas en este texto: Dell, OptiPlex y el logotipo de DELL son marcas
comerciales de Dell Computer Corporation; Microsoft, MS-DOS, Windows nt y Windows son
marcas comerciales registradas de Microsoft Corporation.
Este documento puede incluir otras marcas registradas y nombres comerciales para referirse a las
entidades que son propietarias de los mismos o a sus productos. Dell Computer Corporation renuncia
a cualquier interés sobre la propiedad de marcas y nombres comerciales que no sean los suyos.
Mayo de 2003
N/P 2U454
Rev. A02
Contenido
Acerca de esta guía
Características
. . . . . . . . . . . . . . . . . . . . . . . .
123
. . . . . . . . . . . . . . . . . . . . . . . . . .
123
PRECAUCIÓN: instrucciones de seguridad
General
. . . . . . . . . . .
125
. . . . . . . . . . . . . . . . . . . . . . . . . . . .
125
Cuando utilice el equipo
. . . . . . . . . . . . . . . . . . . . .
Al trabajar en el interior de su equipo
. . . . . . . . . . . . .
Protección contra descargas electrostáticas
. . . . . . . . . .
129
129
. . . . . . . . . . . . . . . . . . . .
130
Determine la colocación y orientación del equipo
. . . . . . .
Instalación de un dispositivo en el compartimiento
modular . . . . . . . . . . . . . . . . . . . . . .
130
. . . . . .
131
. . . . . . . . . . . . . . . . . . .
132
Conexión del adaptador de CA
. . . . . . . . . . . . . . . .
Conexión de dispositivos externos
. . . . . . . . . . . . . . .
Acoplamiento de la cubierta de los cables
. . . . . . . . . . .
133
134
135
. . . . . . . .
136
. . . . . . . . . . . .
139
. . . . . . . . . . . . . . . . . . . . . .
141
Acoplamiento de la base a la placa de montaje
Localización de información y asistencia .
Solución de problemas
128
. . . . . . . . .
Cómo desechar las baterías
Acoplamiento de la base
127
. . . . . . . . . . . . . . . . . .
Hábitos ergonómicos cuando utilice el equipo
Introducción e instalación
127
Uso del CD Drivers and Utilities
(Controladores y utilidades) de Dell
. . . . . . . . . . . . . .
142
Cómo ejecutar los Diagnósticos Dell
. . . . . . . . . . . . . .
143
Ejecución de las pruebas IDE Hard-Drive Diagnostics
(Diagnósticos de disco duro IDE) de Dell . . . . . .
. . . . .
145
Contenido
121
Información sobre normativas .
122
Contenido
. . . . . . . . . . . . . . . . . .
145
Clase A
. . . . . . . . . . . . . . . . . . . . . . . . . . . .
146
Clase B
. . . . . . . . . . . . . . . . . . . . . . . . . . . .
146
Acerca de esta guía
Este documento contiene una introducción, así como información sobre
configuración, solución de problemas, seguridad, regulaciones y condiciones
de la garantía de su equipo OptiPlex™ de Dell™.
Para obtener la versión más actualizada de los documentos en la unidad
de isco duro, vaya al sitio Web Dell | Support en la dirección
support.dell.com.
Número de modelo
reglamentario y tipo
de chasis
DCT = equipo de factor de
forma ultra pequeño (USF,
ultra small form-factor)
Características
2 ranuras USB, conectores
de auriculares y micrófono
botón de encendido
ranura de montaje
(insertar la base
para colocar en
posición vertical)
ranura de montaje
(insertar la base
para colocar en
posición horizontal)
ranura de montaje
(insertar la base
para colocar en
posición vertical)
Indicadores LED de diagnóstico
botón de
liberación
del módulo
compartimiento
modular
botón de liberación de la cubierta
de la unidad de disco duro o de la
cubierta del equipo
Guía de configuración y de referencia rápida
123
w w w. d e l l . c o m | s u p p o r t . e u r o . d e l l . c o m
cubierta
del cable
cubierta de la unidad de disco duro
(abra la cubierta para acceder al
interruptor de bloqueo de dispositivos
del compartimiento modular)
adaptador de corriente
124
Guía de configuración y de referencia rápida
compartimiento
modular
placa de montaje de la
base del chasis
cubierta del
equipo
base del
equipo
PRECAUCIÓN: instrucciones
de seguridad
Aplique las siguientes pautas de seguridad para garantizar su propia seguridad personal y
para ayudarle a proteger el equipo y su entorno de trabajo contra posibles daños.
General
•
No intente reparar el equipo usted mismo a menos que sea una persona del servicio
técnico cualificado. Siga siempre exactamente las instrucciones de instalación.
•
Para prevenir una descarga eléctrica, enchufe el equipo y los cables de alimentación de los
dispositivos a suministros de energía con toma de tierra. Estos cables están equipados con
enchufes de 3 bornes para garantizar una toma de tierra adecuada. No utilice enchufes
adaptadores ni retire el borne de toma de tierra del enchufe. Si debe utilizar un alargador,
utilice un cable de tres hilos con enchufe con toma de tierra.
•
Para evitar el peligro potencial de descargas eléctricas, no use el equipo durante las
tormentas eléctricas.
•
Para evitar el peligro potencial de sufrir una descarga eléctrica, no conecte ni desconecte
ningún cable ni realice el mantenimiento o la reconfiguración de este producto en el
transcurso de una tormenta eléctrica.
•
Si el equipo incluye un módem, el cable utilizado con el módem debe poseer un tamaño
mínimo de 26 AWG (American wire gauge, calibre de alambre americano) y un enchufe
modular RJ-11 que cumpla el estándar de la Comisión Federal de
Comunicaciones-(FCC, del inglés Federal Communications Commission).
•
Antes de limpiar el equipo, desconéctelo del enchufe eléctrico. Limpie el equipo con
un paño suave humedecido en agua. No utilice ningún líquido limpiador o aerosol que
pudiera contener sustancias inflamables.
•
Para evitar un posible daño en la placa base, una vez apagado el equipo, espere 5 segundos
antes de desconectar los dispositivos de éste.
Guía de configuración y de referencia rápida
125
w w w. d e l l . c o m | s u p p o r t . e u r o . d e l l . c o m
PRECAUCIÓN: instrucciones
de seguridad (continuación)
126
•
Para evitar posibles descargas eléctricas al desconectar un cable de red, desconecte
primero el cable del adaptador de red de la parte posterior del equipo y, a continuación,
del enchufe de red. Cuando vuelva conectar un cable de red al equipo, conecte primero
dicho cable al enchufe de red de la pared y después al adaptador de red.
•
Para proteger el equipo contra las subidas y bajadas de tensión transitorias, utilice
un supresor de sobrevoltaje, un acondicionador de línea o un sistema de energía
ininterrumpida (UPS).
•
Asegúrese de que no haya nada sobre los cables del equipo y que éstos no estén situados
dónde se puedan pisar o sea fácil tropezar con ellos.
•
No inserte ningún objeto en los orificios del equipo. Si lo hace y hubiera un cortocircuito
en los componentes internos, se podría ocasionar un incendio o una descarga eléctrica.
•
Mantenga alejado el equipo de los radiadores u otras fuentes de calor. Asimismo, no
bloquee las rejillas de ventilación. Evite poner papeles bajo el equipo; no lo coloque
en una unidad encastrada en la pared ni sobre una cama, un sofá o una alfombra.
•
No derrame alimentos o líquidos sobre el equipo. Si el equipo se moja, consulte la
Guía del usuario.
•
No use el equipo durante una tormenta eléctrica a no ser que el adaptador de CA
esté desconectado del enchufe eléctrico.
•
Cuando utilice el adaptador de CA para alimentar el equipo, coloque el adaptador en
una zona bien ventilada, por ejemplo sobre un escritorio o en el suelo.
•
El adaptador de CA puede que se caliente durante un funcionamiento normal del equipo.
Tenga cuidado al manejar el adaptador durante o inmediatamente después de su uso.
Guía de configuración y de referencia rápida
Cuando utilice el equipo
Cuando utilice el equipo, observe las siguientes pautas de seguridad:
PRECAUCIÓN: No utilice el equipo si tiene alguna cubierta quitada (incluidos
biseles, soportes de relleno, cubiertas del equipo, carátulas del panel anterior, etc.).
•
El equipo dispone de los siguientes elementos:
–
Un suministro de energía de voltaje fijo: los equipos con suministros de energía de
voltaje fijo no tienen un interruptor de selección de voltaje en el panel posterior y
funcionan a un único voltaje (consulte la etiqueta reglamentaria de la parte exterior
del equipo para comprobar su voltaje de funcionamiento).
–
Un circuito de voltaje de detección automática: los equipos con un circuito de voltaje
de detección automática no tienen un interruptor de selección de voltaje en el panel
posterior y averiguan automáticamente el voltaje de funcionamiento correcto.
–
Un interruptor de selección de voltaje manual: los equipos con un interruptor de
selección de voltaje en el panel posterior se deben configurar manualmente para
que funcionen al voltaje correcto.
AVISO: Para evitar que se dañe un equipo con un interruptor de selección de voltaje manual, ajuste
el interruptor seleccionando el voltaje que más se asemeje a la alimentación de CA de su zona. Para
Japón, el interruptor de selección de voltaje se debe ajustar a la posición de 115 V incluso si la
alimentación de CA utilizada en Japón es de 100 V. Asimismo, asegúrese de que el monitor y los
dispositivos conectados tienen una clasificación eléctrica adecuada para funcionar con la
alimentación de CA utilizada en su zona.
•
Antes de trabajar en el interior del equipo, desenchúfelo para evitar una descarga eléctrica
o que se dañe la placa base. Algunos componentes de la placa base continúan recibiendo
alimentación si el equipo está conectado al suministro de energía de CA.
Al trabajar en el interior de su equipo
Antes de abrir la cubierta del equipo, siga estos pasos en el mismo orden en que se indican.
PRECAUCIÓN: No intente reparar el equipo usted mismo, salvo si lo hace tal y como
se explica en la documentación o las instrucciones de Dell™ proporcionadas en línea
o en otro soporte. Siga exactamente las instrucciones de instalación y servicio.
AVISO: Para evitar un posible daño en la placa base, una vez apagado el equipo, espere 5 segundos
antes de quitar un componente de la placa base o de desconectar un dispositivo del equipo.
Guía de configuración y de referencia rápida
127
w w w. d e l l . c o m | s u p p o r t . e u r o . d e l l . c o m
Cuando utilice el equipo (continuación)
1
Apague el equipo de manera correcta, a través del menú del sistema operativo.
2
Apague el equipo y los dispositivos conectados a él.
3
Conéctese a tierra tocando una superficie metálica sin pintar del chasis, por ejemplo el
metal que rodea las aberturas de las ranuras para tarjetas de la parte posterior del equipo,
antes de tocar cualquier componente interno de éste.
Mientras trabaja, toque periódicamente una superficie metálica no pintada del chasis del
equipo para disipar cualquier electricidad estática que pudiera dañar los componentes
internos.
4
Desconecte el equipo y los dispositivos, incluido el monitor, de sus enchufes eléctricos.
Además, desconecte cualquier línea telefónica o de telecomunicación del equipo.
De este modo se reducirá la posibilidad de daños personales o de descarga eléctrica.
A su vez, tenga en cuenta estas pautas de seguridad cuando proceda:
•
Cuando desconecte un cable, tire del conector o del protector, no tire directamente
del cable. Algunos cables tienen un conector con lengüetas de bloqueo; si desconecta
este tipo de cable, presione las lengüetas de bloqueo antes de desconectarlo. Cuando
desenchufe los conectores, manténgalos alineados para evitar que se doblen las patas.
Asimismo, antes de conectar un cable, asegúrese de que los dos conectores estén
orientados y alineados correctamente.
•
Maneje los componentes y las tarjetas con cuidado. No toque los componentes o los
contactos de una tarjeta. Sostenga la tarjeta por sus extremos o por su soporte de montaje
metálico. Sujete un componente (por ejemplo, un chip del microprocesador) por los
bordes, no por las patas.
PRECAUCIÓN: Existe peligro de explosión si una batería nueva se instala
incorrectamente. Sustituya la batería únicamente por una del mismo tipo o de un
tipo equivalente recomendado por el fabricante. No tire las baterías con la basura
doméstica. Póngase en contacto con su agencia local de eliminación de residuos
para obtener la dirección del contenedor de baterías más cercano.
Protección contra descargas electrostáticas
La electricidad estática puede dañar los delicados componentes que hay en el interior del
equipo. Para evitar el daño por descargas electrostáticas, antes de tocar cualquiera de los
componentes electrónicos del equipo, descargue la electricidad estática de su cuerpo. Para ello,
toque una superficie metálica no pintada del chasis del equipo.
A medida que continúe trabajando en el interior del equipo, toque periódicamente una
superficie metálica no pintada para descargar la energía estática que se haya podido acumular
en su cuerpo.
128
Guía de configuración y de referencia rápida
Cuando utilice el equipo (continuación)
Asimismo, puede observar las siguientes medidas para prevenir los posibles daños por descargas
electrostáticas (ESD):
•
No saque los componentes de su embalaje antiestático hasta que vaya a instalarlos en el
equipo. Justo antes de abrir los embalajes antiestáticos, descargue la electricidad estática
de su cuerpo.
•
Cuando transporte un componente sensible a la electricidad estática, colóquelo en un
contenedor o embalaje antiestático.
•
Manipule todos los componentes sensibles a la electricidad estática en un área libre de
ésta. Si es posible, utilice alfombrillas antiestáticas en el suelo y en la mesa de trabajo.
Hábitos ergonómicos cuando utilice el equipo
PRECAUCIÓN: El uso inadecuado o prolongado del teclado puede ser nocivo.
PRECAUCIÓN: La visualización de la pantalla del monitor durante largos períodos
de tiempo puede producir fatiga visual.
Por comodidad y eficacia, observe las pautas ergonómicas que se indican en la Guía del usuario
cuando configure y use el equipo.
Cómo desechar las baterías
El equipo utiliza una batería de celda de litio del espesor de una moneda. Esta batería es de
larga duración y es muy posible que nunca necesite reemplazarla. Sin embargo, si tuviera que
reemplazarla, consulte la Guía del usuario.
No tire las baterías con la basura doméstica. Póngase en contacto con su agencia local de
eliminación de residuos para obtener la dirección del contenedor de baterías más cercano.
Guía de configuración y de referencia rápida
129
w w w. d e l l . c o m | s u p p o r t . e u r o . d e l l . c o m
Introducción e instalación
AVISO: No encienda el equipo hasta que haya finalizado todos los pasos de
instalación.
1
Determine la colocación y orientación del equipo
NOTA: Si desea colocar
el equipo horizontal o
verticalmente debajo de
una mesa o escritorio,
consulte “Acoplamiento
de la base” en la
página 132 y
“Acoplamiento de la base
a la placa de montaje” en
la página 136.
AVISO: No coloque el monitor sobre el equipo. Use una base para el monitor.
AVISO: En un entorno donde se producen fuertes vibraciones o cuando esté
instalando el ordenador, use el soporte de pared opcional en lugar del soporte
del chasis. Para pedir este soporte, póngase en contacto Dell.
AVISO: A fin de garantizar una ventilación apropiada, no coloque el equipo
en posición vertical sobre un escritorio sin utilizar la base del chasis (consulte
la sección “Acoplamiento de la base”).
AVISO: Para garantizar una ventilación adecuada, no bloquee las rejillas de
ventilación.
130
Guía de configuración y de referencia rápida
2
Instalación de un dispositivo en el compartimiento modular
El equipo Dell™ se comercializa con una unidad de disco o un
compartimiento para unidades vacío en el compartimiento modular. Para
instalar una unidad de CD, DVD o una segunda unidad de disco duro en el
compartimiento modular, quite primero el compartimento para unidades
vacío y, a continuación, instale el dispositivo.
NOTA: Para localizar el
interruptor de bloqueo de
dispositivos del módulo,
quite la cubierta de la
unidad de disco duro.
interruptor de
bloqueo de
dispositivos
del módulo
Guía de configuración y de referencia rápida
131
w w w. d e l l . c o m | s u p p o r t . e u r o . d e l l . c o m
3
Acoplamiento de la base
NOTA: Si va a instalar el
equipo bajo una mesa o
escritorio, enchufe todos
los cables y, a
continuación acople la
base a la placa de montaje
(consulte “Acoplamiento
de la base a la placa de
montaje” en la
página 136).
1
Eleve el tornillo cautivo y deslice la regleta de la base del chasis dentro
de una de las tres ranuras de montaje situadas en la parte posterior del
equipo.
2
En cuanto la base quede acoplada, apriete el tornillo.
AVISO: Si el equipo se encuentra debajo de una mesa o escritorio y en ese
lugar se producen fuertes vibraciones, use el soporte de pared opcional en
lugar de la base del equipo.
132
Guía de configuración y de referencia rápida
Conexión del adaptador de CA
4
1
Conecte el adaptador de alimentación al conector en la parte posterior
del equipo.
2
Conecte el cable de alimentación al adaptador de alimentación.
AVISO: Los siguientes pasos sólo se aplican a Japón.
NOTA: El indicador
LED del adaptador de
alimentación se iluminará
cuando el adaptador esté
conectado correctamente
a un enchufe de pared y al
equipo.
PRECAUCIÓN: Si decide conectar el hilo verde de tierra a un
enchufe eléctrico, no permita que haya contacto entre dicho hilo
de tierra y las clavijas de alimentación. Esto podría provocar una
descarga eléctrica o un incendio o causar daño al equipo (consulte
la siguiente figura).
Si decide no conectar el hilo verde de tierra a un enchufe eléctrico,
vaya al paso 4.
3
Enchufe el conector de tierra metálico a la conexión de tierra del
enchufe (consulte la siguiente figura):
a
Afloje la conexión a tierra.
b
Deslice el conector de tierra metálico tras la conexión a tierra y,
a continuación, vuelva a apretar ésta.
conexión a tierra
conector de tierra metálico
4
Conecte el cable de alimentación de CA al enchufe.
Guía de configuración y de referencia rápida
133
w w w. d e l l . c o m | s u p p o r t . e u r o . d e l l . c o m
5
Conexión de dispositivos externos
NOTA: Conecte sólo un
teclado y un ratón.
PRECAUCIÓN: Para evitar en lo posible descargas eléctricas, use
únicamente el adaptador de corriente y el cable de alimentación
proporcionados y asegúrese de que están enchufados a un
suministro de energía conectado a tierra.
134
Guía de configuración y de referencia rápida
6
Acoplamiento de la cubierta de los cables
AVISO: Si va a instalar el ordenador debajo de un escritorio o una mesa, no
conecte el cable hasta que el ordenador esté conectado firmemente a la placa
de montaje (consulte el paso 7, “Acoplamiento de la base a la placa de
montaje” en la página 136).
AVISO: Si utiliza la base en el equipo, acople la base antes de colocar la
cubierta de los cables.
ranura para cable
de seguridad
No coloque el
equipo boca abajo
sobre el bisel
AVISO: Al colocar la cubierta de los cables, no sitúe el equipo boca abajo
de modo que quede en contacto con una superficie dura. Si lo hace, podría
presionarse el botón de encendido y rayarse el exterior del equipo.
1
Conecte todos los cables a la parte posterior del equipo.
2
Sostenga la pieza inferior de la cubierta de los cables y alinee las cuatro
lengüetas con las cuatro ranuras del panel posterior del equipo.
3
Inserte las lengüetas en las ranuras y deslice la pieza hacia los indicadores
de diagnóstico (consulte la ilustración) hasta que quede bien sujeta.
4
Sujete la pieza superior de la cubierta de los cables y alinee las
dos lengüetas con las dos ranuras del panel posterior del equipo.
Guía de configuración y de referencia rápida
135
w w w. d e l l . c o m | s u p p o r t . e u r o . d e l l . c o m
5
Inserte las lengüetas en las ranuras y deslice la pieza hacia los
indicadores de diagnóstico (consulte la ilustración).
6
Instale un dispositivo de seguridad en la ranura del cable de
seguridad (opcional).
Para retirar la cubierta de los cables, extraiga el dispositivo instalado en la
ranura del cable de seguridad (opcional).
1
Sujete la pieza superior de la cubierta de los cables, deslícela hacia la
izquierda hasta que se detenga y, a continuación, levántela y retírela.
2
Para extraer la pieza inferior de la cubierta de los cables, mientras
mantiene presionada la palanca, deslice la pieza hacia la izquierda
hasta que se detenga y, a continuación, levántela y retírela.
7
Acoplamiento de la base a la placa de montaje
AVISO: En instalaciones realizadas debajo de una mesa u otra superficie, evite
las zonas en las que las piernas o la silla del usuario puedan golpear el equipo.
PRECAUCIÓN: Acople la placa de montaje a una superficie sólida
capaz de soportar 18,1 kg de peso.
136
Guía de configuración y de referencia rápida
agujeros para los tornillos (4)
ranura de la placa
de montaje
superficie sólida
con un grosor
mínimo de 2,5 cm
(una pulgada)
lengüeta de la
palanca de
liberación
1
Con los cuatro tornillos de madera del nº 6 (de 15,88 mm)
suministrados, acople la placa de montaje a una superficie
sólida con un grosor mínimo de 2,5 cm.
2
Coloque el equipo y la base debajo de la placa de montaje a
aproximadamente 2,5 cm de su borde.
AVISO: Asegúrese de que encaja firmemente lengüeta de la palanca de
desacoplamiento en la ranura de la placa de montaje.
3
NOTA: Antes de acoplar
la placa de montaje a una
superficie, oriéntese
primero con respecto a
la posición en la que se
acoplará la base a la
placa de montaje.
Levante el equipo y la base, inserte esta última en el soporte de
montaje y deslice la base hasta que la lengüeta de la palanca de
liberación quede insertada en la ranura de la placa de montaje.
Guía de configuración y de referencia rápida
137
w w w. d e l l . c o m | s u p p o r t . e u r o . d e l l . c o m
ranura de la placa de montaje
lengüeta de la palanca
de desacoplamiento
(completamente
acoplado)
4
Coloque la cubierta de los cables (si la utiliza).
AVISO: Cuando haya terminado de instalar el equipo, dirija todos los cables
hacia la parte posterior del área de trabajo para evitar tirones, enredos o
pisotones.
138
8
Encienda el equipo, lea el contrato de licencia de software y siga las
instrucciones de instalación del sistema operativo que aparecen en
la pantalla.
9
Enhorabuena. Ya ha terminado de instalar el sistema.
Guía de configuración y de referencia rápida
Localización de información y asistencia
Si busca
•
•
•
•
Aquí lo encontrará
Un programa de diagnóstico para el equipo E l C D D r i v e r s a n d U t i l i t i e s ( C o n t r o l a d o r e s
y utilidades), (también conocido como
Controladores para el equipo
ResourceCD [CD de recursos])
La documentación del equipo
La documentación del dispositivo
Puede utilizar este CD para acceder a la documentación,
volver a instalar los controladores o ejecutar las herramientas
de diagnóstico.
• Código de servicio rápido y número
de etiqueta de servicio
• Etiqueta de licencia de Microsoft®
Windows®
Código de servicio rápido y clave del producto
Se encuentran en el equipo.
• Cómo quitar y sustituir componentes
• Especificaciones técnicas
• Cómo configurar los valores de
configuración del sistema
• Cómo diagnosticar y solucionar problemas
Guía del usuario
Según el sistema operativo, haga doble clic en el icono
User's Guides (Guías del usuario) del escritorio o bien
en el botón Start (Inicio) y, después, haga clic en Help
and Support (Ayuda y soporte técnico) para acceder a
la documentación almacenada en la unidad de disco
duro.
Guía de configuración y de referencia rápida
139
w w w. d e l l . c o m | s u p p o r t . e u r o . d e l l . c o m
Si busca
Aquí lo encontrará
• Cómo volver a instalar el sistema operativo
CD del sistema operativo y Guía de
instalación
Si vuelve a instalar el sistema operativo, utilice el CD Drivers
and Utilities (Controladores y utilidades) para volver a instalar
los controladores de los dispositivos incluidos en el equipo en el
momento de su compra.
140
• Controladores actualizados para el equipo
• Respuesta a preguntas relacionadas con la
asistencia y el servicio técnico
• Conversaciones en línea con otros usuarios
y asistencia técnica
• Documentación del equipo
Sitio Web Dell | Support
•
•
•
•
•
•
Sitio Web Dell Premier Support (asistencia
preferente)
Estado de la llamada de reparación
Principales problemas técnicos del equipo
Preguntas frecuentes
Descargas de archivos
Detalles de la configuración del equipo
Contrato de servicio del equipo
El sitio Web Dell | Support proporciona varias herramientas en
línea, incluidas:
• Knowledge Base: consejos, sugerencias y cursos en línea
• Customer Forum: conversaciones en línea con otros clientes
de Dell
• Actualizaciones: información de actualización para
componentes, como la memoria, la unidad de disco duro
y el sistema operativo
• Atención al cliente: información de contacto, así como
información sobre el estado de los pedidos, la garantía y
las reparaciones
• Descargas: controladores, revisiones y actualizaciones
de software
• Referencia: documentación del equipo, especificaciones
del producto y otros documentos
El sitio Web Dell Premier Support está personalizado para
empresas e instituciones gubernamentales y educativas.
Es posible que este sitio no esté disponible en todos los países
o regiones.
Guía de configuración y de referencia rápida
Si busca
Aquí lo encontrará
• Cómo utilizar Windows XP
• Documentación del equipo y de los
dispositivos
Centro de ayuda y soporte técnico de
Windows XP
1 Haga clic en el botón Start (Inicio) y, a continuación,
en Help and Support (Ayuda y soporte técnico).
2 Escriba una palabra o frase que describa el problema y,
a continuación, haga clic en el icono de la flecha.
3 Haga clic en el tema que describa el problema.
4 Siga las instrucciones que aparecen en pantalla.
Solución de problemas
Dell proporciona una serie de herramientas para ayudarle en el caso de que
el equipo no funcione como es de esperar. Para obtener la información más
reciente sobre solución de problemas de su equipo, consulte el sitio Web
Dell | Support en la dirección support.dell.com. También encontrará
descripciones de las herramientas de solución de problemas de Dell en la
sección “Obtención de ayuda” de la Guía del usuario en línea.
Si se produce algún problema en el equipo que necesite la ayuda de Dell,
escriba una descripción detallada del error, los códigos de sonido o los
patrones de los indicadores de diagnóstico, anote el código de servicio
rápido y el número de etiqueta de servicio que aparece a continuación y
póngase en contacto con Dell desde la misma ubicación que el equipo.
Consulte “Localización de información y asistencia” en la página 139 para
obtener un ejemplo de el código de servicio rápido y de los números de
etiqueta de servicio.
Código de servicio rápido:___________________________
Número de la etiqueta de servicio:___________________________
El equipo incluye las siguientes herramientas de ayuda para la solución
de problemas:
Guía de configuración y de referencia rápida
141
w w w. d e l l . c o m | s u p p o r t . e u r o . d e l l . c o m
D I A G N Ó S T I C O S D E L L — Los Diagnósticos Dell prueban varios componentes
del equipo y ayudan a identificar la causa de los problemas de éste. Para obtener
más información, consulte “Cómo ejecutar los Diagnósticos Dell” en la
página 143.
L AS SIGUIENTES FUNCIONES PUEDEN INDICAR UN POSIBLE FALLO Y
A Y U D A R A S O L U C I O N A R P R O B L E M A S D E L E Q U I P O . C O N S U L T E L A Guía
del usuario P A R A O B T E N E R M Á S I N F O R M A C I Ó N . —
I N D I C A D O R E S D E L S I S T E M A — Situados en la parte anterior del equipo
I N D I C A D O R E S D E D I A G N Ó S T I C O — Situados en la parte posterior del
equipo
M E N S A J E S D E L S I S T E M A — Aparecen en la pantalla del monitor
C Ó D I G O S D E S O N I D O — Una serie de sonidos audibles emitidos por el equipo
Uso del CD Drivers and Utilities (Controladores y utilidades)
de Dell
Para utilizar el CD Drivers and Utilities (Controladores y utilidades) de Dell
mientras trabaja con el sistema operativo Microsoft® Windows®, lleve a
cabo estos pasos.
NOTA: Para acceder a
los controladores del
dispositivo y a la
documentación del
usuario, debe utilizar el
CD Drivers and Utilities
(Controladores y
utilidades) mientras
ejecuta Windows.
1
Encienda el equipo y permita que se inicie en el escritorio de Windows.
2
Inserte el CD Drivers and Utilities (Controladores y utilidades) de Dell
en la unidad de CD.
Si utiliza el CD Drivers and Utilities (Controladores y utilidades) por
primera vez en este equipo, la ventana de instalación le informará de
que el CD va a comenzar la instalación.
3
Haga clic en OK (Aceptar) para continuar.
Para finalizar la instalación, responda a los mensajes mostrados por el
programa de instalación.
142
4
Haga clic en Next (Siguiente) en la pantalla Welcome Dell System
Owner (Bienvenido al propietario de sistema Dell).
5
Seleccione el System Model (Modelo del sistema), Operating System
(Sistema operativo), Device Type (Tipo de dispositivo) y Topic
(Tema) adecuados.
Guía de configuración y de referencia rápida
Controladores para el equipo
Para mostrar una lista de los controladores de dispositivos para el equipo,
lleve a cabo estos pasos:
1
Haga clic en My Drivers (Mis controladores) en el menú descendente
Topic (Tema).
El CD Drivers and Utilities (Controladores y utilidades) examina el
hardware y el sistema operativo del equipo y, a continuación, muestra
una lista de controladores de dispositivos para la configuración del
sistema en la pantalla.
2
Haga clic en el controlador adecuado y siga las instrucciones para
descargarlo al equipo.
Para ver todos los controladores disponibles para el equipo, haga clic en
Drivers (Controladores) en el menú descendente Topic (Tema).
Cómo ejecutar los Diagnósticos Dell
Los Diagnósticos Dell son un programa que prueba varios componentes
del equipo. Ejecute este programa siempre que tenga un problema en el
equipo para que le ayude a identificar el origen de dicho problema. Puede
ejecutarlo desde la unidad de disco duro o desde el CD Drivers and Utilities
(Controladores y utilidades).
Desde la unidad de disco duro:
AVISO: Si el disco duro falla, ejecute los Diagnósticos de disco duro IDE de
Dell (consulte “Ejecución de las pruebas IDE Hard-Drive Diagnostics
(Diagnósticos de disco duro IDE) de Dell” en la página 145).
1
Apague y reinicie el equipo.
2
Cuando aparezca el logotipo de DELL™, presione <F12>
inmediatamente.
Guía de configuración y de referencia rápida
143
w w w. d e l l . c o m | s u p p o r t . e u r o . d e l l . c o m
NOTA: Si recibe un
mensaje indicando que no
se ha encontrado ninguna
partición para la utilidad
de diagnóstico, siga las
instrucciones para
ejecutar los Diagnósticos
Dell desde el CD Drivers
and Utilities
(Controladores y
utilidades).
Si espera demasiado y aparece el logotipo de Windows, siga esperando
hasta que aparezca el escritorio de Windows. A continuación, cierre el
equipo mediante el menú Start (Inicio) e inténtelo de nuevo.
3
Cuando aparezca la lista de dispositivos de inicio, resalte Boot to
Utility Partition (Iniciar en la partición de la utilidad) y presione
<Intro>.
4
Cuando aparezca la opción Main Menu (Menú principal) de los
Diagnósticos Dell, seleccione la prueba que desea ejecutar.
5
Cierre la pantalla de la prueba para volver a la pantalla Main Menu
(Menú principal). Para salir de los Diagnósticos Dell y reiniciar el
equipo, cierre la pantalla Main Menu (Menú principal).
Desde el CD Drivers and Utilities (Controladores y utilidades):
1
Inserte el CD Drivers and Utilities (Controladores y utilidades) en la
unidad de CD.
2
Apague y reinicie el equipo.
Cuando aparezca el logotipo de DELL, presione <F12>
inmediatamente.
Si espera demasiado y aparece el logotipo de Windows, siga esperando
hasta que vea el escritorio de Windows. A continuación, cierre el
equipo mediante el menú Start (Inicio) e inténtelo de nuevo.
NOTA: Esta
característica cambia la
secuencia de inicio sólo
una vez. En el siguiente
inicio, el equipo se inicia
con los dispositivos
especificados en la
configuración del sistema.
3
Cuando aparezca la lista de dispositivos de inicio, seleccione IDE CDROM Device (Dispositivo CD-ROM IDE) y presione <Intro>.
4
Seleccione la opción IDE CD-ROM Device (Dispositivo CD-ROM
IDE) en el menú de inicio del CD.
5
Seleccione la opción Boot from CD-ROM (Iniciar desde el CDROM) en el menú que aparece.
6
Escriba 1 para abrir el menú ResourceCD (CD de recursos).
7
Escriba 2 para iniciar los Diagnósticos Dell.
8
Seleccione Run the 32 Bit Dell Diagnostics (Ejecutar los Diagnósticos
Dell de 32 bits) en la lista numerada. Si aparecen varias versiones,
seleccione la versión apropiada para su plataforma.
9
Cuando aparezca la opción Main Menu (Menú principal) de los
Diagnósticos Dell, seleccione la prueba que desea ejecutar.
10
144
Una vez finalizadas las pruebas, extraiga el CD.
Guía de configuración y de referencia rápida
Ejecución de las pruebas IDE Hard-Drive Diagnostics
(Diagnósticos de disco duro IDE) de Dell
Se trata de un programa que prueba la unidad de disco duro para solucionar
problemas o confirmar la existencia de fallos en ésta.
1
Encienda el equipo (si ya está encendido, reinícielo).
2
Cuando aparezca F2 = Setup (F2 = Configuración) en la esquina
superior derecha de la pantalla, presione <Ctrl><Alt><D>.
3
Siga las instrucciones que aparecen en pantalla.
Si se informa de un fallo, consulte “Problemas con la unidad de disco
duro” en la Guía del usuario.
Información sobre normativas
Una interferencia electromagnética (EMI, Electromagnetic Interference)
es cualquier señal o emisión, radiada en el espacio o conducida a través de
un cable de alimentación o señal, que pone en peligro el funcionamiento de
la navegación por radio u otro servicio de seguridad, o degrada seriamente,
obstruye o interrumpe de forma repetida un servicio de comunicaciones
por radio autorizado.
Su equipo Dell está diseñado para cumplir las normativas aplicables
concernientes a EMI. Los cambios o modificaciones no aprobados
expresamente por Dell podrían invalidar la autorización del usuario
para utilizar el equipo.
Los sistemas Dell están diseñados, probados y clasificados según sus
diseñados entornos electromagnéticos. Los entornos electromagnéticos
se clasifican en dos grupos:
•
La Clase A designa un dispositivo que puede funcionar únicamente
en entornos empresariales o industriales.
•
La Clase B designa un dispositivo que puede funcionar tanto en
entornos domésticos como en entornos empresariales o industriales.
NOTA: Consulte la
etiqueta reglamentaria
situada en la parte
trasera o inferior del
equipo Dell para
determinar el entorno en
el que puede funcionar.
Guía de configuración y de referencia rápida
145
w w w. d e l l . c o m | s u p p o r t . e u r o . d e l l . c o m
Clase A
El equipo de Clase A ha sido probado y cumple con los límites establecidos
para los dispositivos digitales de Clase A, de conformidad con lo dispuesto en
la Sección 15 de la Normativa de la Comisión Federal de Comunicaciones
(FCC, Federal Communications Commission). Estos límites están diseñados
para proporcionar una protección razonable contra interferencias perjudiciales
en un entorno comercial. Este equipo genera, utiliza y puede radiar energía por
radiofrecuencia, y si no se instala y utiliza de acuerdo con las instrucciones,
puede provocar interferencias perjudiciales para comunicaciones por radio. El
funcionamiento de este equipo en un área residencial puede llegar a provocar
interferencias perjudiciales, en cuyo caso se le pedirá al usuario que corrija las
interferencias y que se haga cargo del gasto generado.
Clase B
El equipo de Clase B se ha probado y cumple con los límites establecidos
para los dispositivos digitales de clase B, de conformidad con lo dispuesto en
la Sección 15 de la Normativa de la FCC. Estos límites están diseñados para
proporcionar una protección razonable contra interferencias perjudiciales
en instalaciones residenciales. Este equipo genera, utiliza y puede radiar
energía por radiofrecuencia, y si no se instala y utiliza de acuerdo con las
instrucciones, puede provocar interferencias perjudiciales para
comunicaciones por radio. Sin embargo, no existe garantía de que no
ocurran interferencias en una instalación en particular. Si el equipo produce
interferencias perjudiciales en las recepciones por radio o televisión, lo cual
se puede determinar apagando el equipo y volviéndolo a encender, se
aconseja al usuario que intente corregir la interferencia adoptando una o
varias de las siguientes medidas:
NOTA: Puede encontrar
información reglamentaria
relativa al equipo en la
Guía del usuario.
146
•
Vuelva a orientar o ubicar la antena de recepción
•
Aumente la separación entre el equipo y el receptor
•
Conecte el equipo a un enchufe en un circuito diferente del que esté
conectado al receptor
•
Consulte a Dell o a un técnico con experiencia en radio o televisión
para obtener ayuda
Guía de configuración y de referencia rápida
Dell™ OptiPlex™ SX Sistemleri
Kurulum ve Hızlı Başvuru
Kılavuzu
w w w. d e l l . c o m | s u p p o r t . e u r o . d e l l . c o m
Not, Uyarı ve Dikkat başlıklı
açıklamalar
NOT: NOT başlıklı açıklamalar, bilgisayarınızı daha iyi kullanmanıza yardımcı
olacak önemli bilgileri belirtir.
UYARI: UYARI başlıklı açıklamalar, donanımınızda meydana gelebilecek bir
hasarı veya veri kaybını belirtir ve sorunu nasıl önleyebileceğinizi anlatır.
DİKKAT: DİKKAT başlıklı açıklamalar, meydana gelebilecek
yaralanma, mal veya can kaybını belirtir.
Kısaltmalar ve Kısaadlar
Kısaltmaların ve kısaadların tam listesi için bkz. Kullanma Kılavuzu'ndaki
"Terimler Sözlüğü".
Dell™ n serisinden bir bilgisayar satın aldıysanız, bu belgede Microsoft
Windows işletim sistemlerine yapılan göndermeler geçerli değildir.
____________________
Bu belgede yer alan bilgiler, önceden bildirilmeksizin değiştirilebilir.
© 2002-2003 Dell Computer Corporation. Her hakkı saklıdır.
Her ne olursa olsun, Dell Computer Corporation şirketinin yazılı izni olmadan herhangi bir şekilde
çoğaltılması kesinlikle yasaktır.
Bu metinde kullanılan ticari markalar: Dell, OptiPlex ve DELL logosu, Dell Computer Corporation
şirketinin ticari markalarıdır; Microsoft, MS-DOS, Windows NT ve Windows, Microsoft Corporation
şirketinin tescilli ticari markalarıdır.
Bu belgede, çeşitli marka ve adlar veya bu marka ve adlar altındaki ürünler üzerinde hak iddia eden
taraflara göndermede bulunmak üzere başka ticari markalar ve ticari adlar kullanılmış olabilir. Dell
Computer Corporation, kendisine ait olanlar dışındaki ticari markalar ve ticari adlar hakkında
mülkiyet hakkı iddia etmez.
Mayis 2003
P/N 2U454
Rev. A02
İçindekiler
Bu Kılavuz Hakkında
Özellikleri
. . . . . . . . . . . . . . . . . . . . .
151
. . . . . . . . . . . . . . . . . . . . . . . . . . .
151
DİKKAT: Güvenlik Talimatları .
Genel
. . . . . . . . . . . . . . . .
153
. . . . . . . . . . . . . . . . . . . . . . . . . . .
153
Bilgisayarınızı Kullanırken
. . . . . . . . . . . . . . . . . .
Bilgisayarınızın İçiyle Uğraşırken
. . . . . . . . . . . . . . .
156
. . . . . . . . . . . . . .
157
. . . . . . . . . . . . . . . . . . . . . . .
157
Ergonomik Bilgisayar Alışkanlıkları
İşe Koyulma / Kurulum
. . . . . . . . . . . . . . . . . . . .
Bilgisayarın Yerinin ve Yerleştirme Şeklinin Belirlenmesi
Modül Bölmesine Aygıt Kurulması
Tabanın Takılması .
Harici Aygıtların Takılması
Kablo Kapağının Takılması
. . . . .
158
159
. . . . . . . . . . . . . . . .
Sorunların Çözülmesi
160
161
. . . . . . . . . . . . . . . . . .
162
. . . . . . . . . . . . . . . . .
163
. . . . . . . . . . . . .
165
. . . . . . . . . . . . . . . . . . . . .
167
. . . . . . . . . . . . . . . . . . . .
169
Tabanın Montaj Plakasına Takılması
Bilgi ve Yardım Alma
158
. . . . . . . . . . . . . .
. . . . . . . . . . . . . . . . . . . . .
AC Adaptörünün Bağlanması
Dell Drivers and Utilities (Sürücüler ve
Yardımcı Programlar) CD'sinin Kullanımı
Dell Tanıları'nın Çalıştırılması .
. . . . . . . . . . .
170
. . . . . . . . . . . . . . . .
171
Dell IDE Hard-Drive Diagnostics
(Dell IDE Sabit Sürücü Tanıları) Programının Çalıştırılması .
Yasal Bilgiler
155
. . . . . . . . . . . . .
Elektrostatik Boşalıma Karşı Korunma
Pillerin Atılması
155
. . .
173
. . . . . . . . . . . . . . . . . . . . . . . . .
173
Class A (A Sınıfı)
. . . . . . . . . . . . . . . . . . . . . .
174
Class B (B Sınıfı)
. . . . . . . . . . . . . . . . . . . . . .
174
İçindekiler
149
150
İ ç i nd ek i l er
Bu Kılavuz Hakkında
Bu belgede, Dell™ OptiPlex™ bilgisayarınızla ilgili işe koyulma, kurulum,
sorun çözme, güvenlik, yasal ve garanti konularında bilgi verilmiştir.
Sabit sürücünüzdeki belgelerin son sürümlerini elde etmek için,
support.dell.com adresindeki Dell Support (Dell Destek) Web sitesine gidin.
Yasal Model Numarası
ve Şasi Türü
DCT = Çok küçük düzenlenmiş
(USF) bilgisayar
Özellikleri
2 USB yuva, kulaklık
ve mikrofon bağlayıcıları
montaj yuvası (düşey
yerleştirme için tabanı
buraya sokun)
montaj yuvası (asılı
yatay yerleştirme için
tabanı buraya sokun)
montaj yuvası (asılı
düşey yerleştirme için
tabanı buraya sokun)
güç düğmesi
modül serbest
bırakma düğmesi
modül bölmesi
bilgisayar kapağı / sabit
sürücü kapağı serbest
bırakma düğmesi
tanı LED'leri
Kurul u m ve H ı z l ı B a ş vu ru K ı lavu z u
151
w w w. d e l l . c o m | s u p p o r t . e u r o . d e l l . c o m
kablo kapağı
sabit sürücü kapağı (modül
aygıt kilitleme mandalına
erişmek için kapağı açın)
güç adaptörü
152
Kurul u m ve H ı z l ı B a ş vu ru K ı lavu z u
modül
bölmesi
şasi taban
montaj plakası
bilgisayar
kapağı
bilgisayar
tabanı
DİKKAT: Güvenlik Talimatları
Aşağıdaki güvenlik yönergelerine uymanız, kişisel güvenliğinizi sağlamanıza ve hem
bilgisayarınızı hem de çalışma ortamınızı olası tehlikelerden korumanıza yardımcı olacaktır.
Genel
•
Eğitimli servis teknisyeni değilseniz, bilgisayarınızın bakım ve onarımını kendiniz yapmaya
çalışmayın. Kurulum talimatlarına daima harfiyen uyun.
•
Elektrik çarpmasından korunmak için, bilgisayar ve aygıt güç kablolarını, düzgün şekilde
topraklanmış elektrik prizlerine takın. Bu kabloların ucunda, uygun şekilde topraklanmayı
sağlamak amacıyla, 3 uçlu fiş takılıdır. Fiş adaptörü kullanmayın ve kabloların toprak
bağlantısını çıkartmayın. Uzatma kablosu kullanmak zorunda kalırsanız, uygun şekilde
topraklanmış fişleri olan 3 telli kablo kullanın.
•
Olası elektrik çarpmasından korunmak için, bilgisayarınızı, elektrik fırtınaları sırasında
kullanmayın.
•
Olası elektrik çarpmasından korunmak için, elektrik fırtınası sırasında, herhangi bir kabloyu
çıkartmayın veya takmayın veya bakım ve yeniden yapılandırma işlemi yapmayın.
•
Bilgisayarınızda modem varsa, modemin kablosu, Amerikan kablo ölçüsüne (AWG) göre
en az 26 kalınlığında olmalı ve FCC uyumlu RJ-11 modüler fişi olmalıdır.
•
Bilgisayarınızı temizlemeden önce, bilgisayarın elektrik fişini prizden çıkartın. Bilgisayarınızı
suyla nemlendirilmiş yumuşak bir bezle temizleyin. Yanıcı ve parlayıcı maddeler
içerebilecek sıvı veya sprey temizleyiciler kullanmayın.
•
Sistem kartını olası zararlardan korumak için, herhangi bir aygıtı bilgisayardan ayırmadan
önce, bilgisayarı kapattıktan sonra 5 saniye bekleyin.
Kurul u m ve H ı z l ı B a ş vu ru K ı lavu z u
153
w w w. d e l l . c o m | s u p p o r t . e u r o . d e l l . c o m
DİKKAT: Güvenlik Talimatları (devam)
•
Bilgisayarınızın ağ kablosunu çıkartırken kısa devre oluşmasını önlemek için, kabloyu önce
ağ adaptöründen sonra ağ prizinden çıkartın. Ağ kablosunu bilgisayarınıza geri takarken,
kabloyu önce ağ prizine sonra ağ adaptörüne takın.
•
Bilgisayarınızı elektrik gücünde kısa süreli ani yükselme ve düşmelerden korumak için, aşırı
gerilim baskılayıcı, hat stabilizatörü veya kesintisiz güç kaynağı (UPS) kullanın.
•
Bilgisayarınızın kabloları üzerine herhangi bir şey konmamasına, bunların, üzerine
basılabilecek veya ayağa takılabilecek yerlerden geçmemesine dikkat edin.
•
Bilgisayarınızın deliklerine herhangi birey sokmayın. Aksi taktirde iç bileşenlerde kısa devre
meydana gelebilir ve yangına veya elektrik çarpmasına neden olabilir.
•
Bilgisayarınızı radyatörlerden ve sıcak cisimlerden uzak tutun. Ayrıca, soğutma yarıklarının
önünün tıkanmamasına da dikkat edin. Bilgisayarınızın altına kağıt koymaktan kaçının;
bilgisayarınızı kapalı duvarlı bir bölme içine veya yatak, kanepe veya halı üzerine
koymayın.
•
Bilgisayarınızın üstüne yiyecek veya içecek dökmeyin. Bilgisayarınız ıslanacak olursa,
Kullanma Kılavuzu'na bakın.
154
•
AC adaptörü kablosunu elektrik prizinden çıkartmadan, bilgisayarınızı elektrik fırtınası
sırasında kullanmayın.
•
Bilgisayarınızı AC adaptörüyle kullanıyorsanız, AC adaptörünü masa üstü veya zemin gibi,
havadar bir yere koyun.
•
Bilgisayarınızın normal çalışması sırasında AC adaptörü ısınabilir. Çalıştığı sırada veya
çalıştıktan hemen sonra, adaptörünüze dikkatle yaklaşın.
Kurul u m ve H ı z l ı B a ş vu ru K ı lavu z u
Bilgisayarınızı Kullanırken
Bilgisayarınızı kullandığınız sırada, aşağıdaki güvenli kullanım yönergelerine uyun.
DİKKAT: Bilgisayarınızı, herhangi bir kapağı (bilgisayar kapakları, çerçeveler,
dolgu destekleri, ön panel geçmeleri vb.) açıkken kullanmayın.
•
Bilgisayarınızda aşağıdakilerden biri vardır:
–
Sabit voltajlı güç kaynağı - Sabit voltajlı güç kaynağı bulunan bilgisayarların arka
panelinde voltaj seçim anahtarı yoktur ve yalnızca belirli bir voltajla çalışır
(bilgisayarınızın hangi voltajda çalıştırılacağını anlamak için, dış tarafında bulunan
yasal etikete bakın).
–
Otomatik sensörlü voltaj devresi - Otomatik sensörlü voltaj devresi bulunan
bilgisayarların arka panelinde voltaj seçim anahtarı yoktur ve doğru işletim voltajını
otomatik olarak algılar.
–
Manüel voltaj seçim anahtarı - Arka panelinde voltaj seçim anahtarı bulunan
bilgisayarların doğru işletim voltajında çalışmak üzere elle ayarlanması gerekir.
UYARI: Manüel voltaj seçim anahtarlı bilgisayarların hasara uğramasını önlemek için, voltaj
anahtarını, bulunduğunuz yerde kullanılan AC güç voltajına en yakın değere getirin. Japonya'da
kullanılan AC güç 100 V olduğu halde, Japonya'da, voltaj seçim anahtarının 115-V konumuna
getirilmesi gerekir. Aynı şekilde, monitörünüzün ve bilgisayara bağlı diğer aygıtların, bulunduğunuz
yerde kullanılan AC güç voltajına uygun olmasına dikkat edin.
•
Elektrik çarpmasını veya sistem kartının zarar görmesini önlemek için, bilgisayarın içini
açmadan önce, fişini prizden çekin. Bilgisayar AC güç kaynağına bağlıyken, sistem
kartının bazı bileşenlerine elektrik gitmeğe devam eder.
Bilgisayarınızın İçiyle Uğraşırken
Bilgisayar kapağını açmadan önce, belirtilen sırayla, aşağıdakileri uygulayın.
DİKKAT: Çevrimiçi Dell™ belgelerinizde veya size Dell tarafından sağlanmış
olan diğer talimatlarda belirtilen durumlar dışında bilgisayarınızın bakım veya
onarımını kendiniz yapmaya çalışmayın. Kurulum ve servis talimatlarına daima
harfiyen uyun.
UYARI: Sistem kartını olası zararlardan korumak için, herhangi bir bileşeni sistem kartından
çıkartmadan veya herhangi bir aygıtı bilgisayardan ayırmadan önce, bilgisayarı kapattıktan sonra
5 saniye bekleyin.
Kurul u m ve H ı z l ı B a ş vu ru K ı lavu z u
155
w w w. d e l l . c o m | s u p p o r t . e u r o . d e l l . c o m
Bilgisayarınızı Kullanırken (devam)
1
İşletim sisteminin menüsünü kullanarak, bilgisayarı gerektiği şekilde kapatın.
2
Bilgisayarı ve bilgisayara bağlı tüm aygıtları kapatın.
3
Bilgisayarınızın içindeki herhangi bir yere dokunmadan önce, şasi üzerindeki, boyalı
olmayan bir metal yüzeye (örneğin, bilgisayarın arkasındaki kart giriş yuvalarının
çevresindeki metal yüzeye) dokunarak kendinizi topraklayın.
Çalışmanız sırasında, iç bileşenlere zarar verebilecek statik elektriği boşaltmak için arada
sırada, bilgisayar şasisindeki boyalı olmayan bir yüzeye dokunun.
4
Bilgisayarınızı ve monitörünüz de dahil olmak üzere tüm aygıtları, elektrik prizlerinden
çıkartın. Tüm telefon veya telekomünikasyon hatlarını da bilgisayardan ayırın.
Böylece, yaralanma veya elektrik çarpması olasılığını azaltmış olursunuz.
Ayrıca, ilgili işlemleri yaparken, aşağıdaki güvenlik yönergelerine de dikkat edin:
•
Bir kabloyu çıkartırken, kablodan değil, bağlayıcısından veya (varsa) kopmaz halkasından
tutarak çekin. Bazı kabloların bağlayıcıları üzerinde kilitli kanatçıklar vardır; bu türden
kabloları çıkartırken, kabloyu çıkartmadan önce kilitli kanatçıkları içeri bastırın. Bağlayıcıları
çıkartırken, pinlerinin eğilmesini önlemek için, kanırtmadan çekin. Aynı şekilde, kabloları
takarken de erkek ve dişi bağlayıcıların tam olarak karşı karşıya gelmesine ve düz olarak
itmeye dikkat edin.
•
Bileşenlere ve kartlara dikkatle yaklaşın. Kartlar üzerindeki bileşenlere veya temas
noktalarına dokunmayın. Kartları, kenarlarından veya metal montaj desteğinden tutun.
Mikroişlemci devresi gibi bileşenleri, pinlerinden değil kenarlarından tutun.
DİKKAT: Yeni piller yanlış şekilde takılırsa patlama tehlikesi vardır. Pilleri
yalnızca, üretici tarafından önerilenle aynı veya eşdeğer türden pillerle
değiştirin. Pilleri, normal ev çöpleriyle birlikte atmayın. En yakınınızdaki pil
atım merkezinin adresini öğrenmek için yetkili yerel çöp atım kurumuna
başvurun.
Elektrostatik Boşalıma Karşı Korunma
Statik elektrik, bilgisayarınızın içindeki hassas bileşenlere zarar verebilir. Statik hasarını önlemek
için, bilgisayarınızın içindeki, mikroişlemci gibi elektronik bileşenlerden birine dokunmadan önce
vücudunuzdaki statik elektriği boşaltın. Bunun, bilgisayar şasisindeki boyalı olmayan bir metal
yüzeye dokunarak yapabilirsiniz.
156
Kurul u m ve H ı z l ı B a ş vu ru K ı lavu z u
Bilgisayarınızı Kullanırken (devam)
Bilgisayarın içinde çalışmayı sürdürürken, vücudunuzda birikmiş olabilecek statik yükü boşaltmak
için, arada sırada , boyalı olmayan bir metal yüzeye dokunun.
Elektrostatik boşalmadan (ESD) kaynaklanacak hasarları önlemek için aşağıdakileri de
uygulayabilirsiniz:
•
Bileşenleri bilgisayarınıza takmaya hazır olana kadar, bunları antistatik paketlerinden
çıkartmayın. Antistatik paketi açmadan hemen önce, vücudunuzdaki statik elektriği boşaltın.
•
Elektrostatik bakımdan hassas bir bileşeni taşırken, önce antistatik bir kutuya veya pakete
koyun.
•
Elektrostatik bakımdan hassas olan tüm bileşenler üzerinde çalışırken, statik elektrikten
korunmuş bir alandan yararlanın. Mümkünse, antistatik zemin kaplamaları ve masa örtüleri
kullanın.
Ergonomik Bilgisayar Alışkanlıkları
DİKKAT: Yanlış veya uzun süre klavye kullanımı, yaralanmalara yol açabilir.
DİKKAT: Monitör ekranına uzun süre bakmak, göz yorgunluğuna yol açabilir.
Bilgisayarınızı kurar ve kullanırken rahatlık ve verimlilik için, Kullanma Kılavuzu'ndaki ergonomik
yönergelere uyun.
Pillerin Atılması
Bilgisayarınızda ince lityum pil kullanılmıştır. İnce lityum pil, uzun ömürlü bir pildir ve belki de
hiçbir zaman değiştirmeniz gerekmeyebilir. Ancak, değiştirmeniz gerekecek olursa, Kullanma
Kılavuzu'na bakın.
Pilleri, normal ev çöpleriyle birlikte atmayın. En yakınınızdaki pil atım merkezinin adresini
öğrenmek için yetkili yerel çöp atım kurumuna başvurun.
Kurul u m ve H ı z l ı B a ş vu ru K ı lavu z u
157
w w w. d e l l . c o m | s u p p o r t . e u r o . d e l l . c o m
İşe Koyulma / Kurulum
UYARI: Bütün kurulum aşamaları tamamlanıncaya kadar bilgisayarınızı
açmayın.
1
Bilgisayarın Yerinin ve Yerleştirme Şeklinin
Belirlenmesi
NOT: Bilgisayarınızı
düşey veya yatay olarak
masa altına yerleştirmek
istiyorsanız, bkz. "Tabanın
Takılması" sayfa 160
ve "Tabanın Montaj
Plakasına Takılması"
sayfa 165.
UYARI: Monitörünüzü bilgisayarın üzerine koymayın. Monitör tabanı kullanın.
UYARI: Titreşimli ortamlarda bilgisayar tepegözünü monte ederken, şasi tabanı
yerine isteğe bağlı olarak satın alınan duvar montaj desteğini kullanın.
Bu desteği ısmarlamak için Dell şirketine başvurun.
UYARI: Yeterli havalandırma sağlamak için, bilgisayarı, bilgisayar tabanını
kullanmadan masa altına düşey olarak koymayın (bkz. "Tabanın Takılması").
UYARI: Yeterli havalandırma sağlamak için, soğutma yarıklarının önünün
tıkanmamasına dikkat edin.
158
Kurul u m ve H ı z l ı B a ş vu ru K ı lavu z u
2
Modül Bölmesine Aygıt Kurulması
Dell bilgisayarınızı satın aldığınızda içinde ya disket sürücü ya da
havalandırma bölmesi vardır. Modül bölmesine CD, DVD veya ikinci sabit
sürücü takmak için, önce havalandırma bölmesini çıkartın.
NOT: Modül aygıt
kilitleme mandalına
ulaşmak için, sabit sürücü
kapağını açın.
modül aygıt
kilitleme mandalı
Kurul u m ve H ı z l ı B a ş vu ru K ı lavu z u
159
w w w. d e l l . c o m | s u p p o r t . e u r o . d e l l . c o m
3
Tabanın Takılması
NOT: Bilgisayarı masa
altına kuruyorsanız, önce
tüm kabloları takın, sonra
da tabanı montaj
plakasına takın
(bkz. "Tabanın Montaj
Plakasına Takılması"
sayfa 165).
1
Tutucu vidayı gevşetip şasi tabanı çubuğunu, bilgisayarın arkasındaki üç
montaj yuvasından birine sokun.
2
Taban yerine oturduğunda vidayı sıkıştırın.
UYARI: Bilgisayarınız masa altına yerleştirilmişse ve ortam titreşimliyse, montaj
için, bilgisayar tabanı yerine, isteğe bağlı olarak satın alınan duvar montaj
desteğini kullanın.
160
Kurul u m ve H ı z l ı B a ş vu ru K ı lavu z u
4
AC Adaptörünün Bağlanması
1
Güç adaptörünü, bilgisayarın arkasındaki bağlayıcıya takın.
2
Güç kablosunu güç adaptörüne takın.
UYARI: Aşağıdaki adımlar yalnızca Japonya için geçerlidir.
NOT: Adaptör duvar
prizine ve bilgisayara
düzgün olarak
takıldığında, güç
adaptörünün LED ışığı
yanar.
DİKKAT: Yeşil toprak kablosunu elektrik prizine bağlamayı
düşünüyorsanız, yeşil toprak kablosunun ucuyla güç bağlantı
uçlarının birbirine temas etmemesine dikkat edin; aksi taktirde
elektrik çarpması, yangın veya bilgisayarda hasar meydana
gelebilir (bkz. aşağıdaki resim).
Yeşil toprak kablosunu elektrik prizine bağlamayacaksanız, şu adıma
geçin: madde 4.
3
Metal toprak bağlayıcısını, prizdeki topraklama ucuna bağlayın
(bkz. aşağıdaki resim):
a
Topraklama ucunu gevşetin.
b
Metal toprak bağlayıcısını, topraklama ucunun altına sokup
topraklama ucunu sıkıştırın.
topraklama ucu
metal toprak bağlayıcısı
4
AC güç kablosunu prize takın.
Kurul u m ve H ı z l ı B a ş vu ru K ı lavu z u
161
w w w. d e l l . c o m | s u p p o r t . e u r o . d e l l . c o m
5
Harici Aygıtların Takılması
NOT: Yalnızca bir klavye
ve bir fare takın.
DİKKAT: Elektrik çarpmasını önlemek için, bilgisayarınızla
birlikte gelen güç adaptörü ve güç kablosundan başkasını
kullanmayın ve bunların düzgün şekilde topraklanmış bir güç
prizine takılmasına dikkat edin.
162
Kurul u m ve H ı z l ı B a ş vu ru K ı lavu z u
6
Kablo Kapağının Takılması
UYARI: Bilgisayarı masa altına kuruyorsanız, bilgisayarı montaj plakasına tam
olarak monte etmeden kabloları takmayın (bkz. 7. Bölüm, "Tabanın Montaj
Plakasına Takılması" sayfa 165).
UYARI: Bilgisayarınızdaki tabanı kullanacaksanız, tabanı, kablo kapağından
önce takın.
güvenlik kablosu
yuvası
Bilgisayarı, ön
yüzünün üstüne, yüzü
koyun koymayın.
UYARI: Kablo kapağını takarken, bilgisayarı, yüzeyi sert bir zemine değecek
şekilde yüzü koyun koymayın. Aksi taktirde güç düğmesi basılabilir veya
bilgisayarın üzeri çizilebilir.
1
Bütün kabloları, bilgisayarın arkasına takın.
2
Kablo kapağının alt parçasını tutarak, dört kanatçığı, bilgisayarın arka
panelindeki dört yarığın üzerine getirin.
3
Kanatçıkları yarıklara sokun ve parçayı, yerine iyice oturuncaya kadar,
tanı ışıklarına doğru itin (resme bakın).
4
Kablo kapağının üst parçasını tutarak, iki kanatçığı, bilgisayarın arka
panelindeki iki yarığın üzerine getirin.
Kurul u m ve H ı z l ı B a ş vu ru K ı lavu z u
163
w w w. d e l l . c o m | s u p p o r t . e u r o . d e l l . c o m
5
Kanatçıkları yarıklara sokun ve parçayı, tanı ışıklarına doğru itin (resme
bakın).
6
Güvenlik kablo yuvasına, güvenlik aygıtını takın (isteğe bağlı).
Kablo kapağını açmak için, güvenlik kablo yuvasına takılı (isteğe bağlı) aygıtı
çıkartın.
164
1
Kablo kapağının üst parçasını tutup, gittiği yere kadar, sola doğru
kaydırın ve kaldırarak açın.
2
Kablo kapağının alt parçasını açmak için, kola bastırarak, parçayı
gittiği yere kadar, sola doğru kaldırın ve kaldırarak açın.
Kurul u m ve H ı z l ı B a ş vu ru K ı lavu z u
7
Tabanın Montaj Plakasına Takılması
UYARI: Bilgisayarı asılı konumda kurarken, kullanıcının bacağının veya
sandalyenin çarpabileceği yerlere kurmaktan kaçının.
DİKKAT: Montaj plakasını, asılı halde 18,1 kg (40 pound)
taşıyabilecek güçte sert bir yüzeye takın.
vida delikleri (4)
montaj plakası yarığı
en az 2,5 cm (1 inç)
kalınlığında sert
plaka
serbest bırakma
kolunun kanatçığı
1
Verilen dört adet #6 ahşap vidasını (15.88 mm; 0.625 inç) kullanarak,
montaj plakasını, en az 2,5 cm (1 inç) kalınlığındaki sert bir plakaya
tutturun.
2
Bilgisayarı ve tabanı, montaj plakasının kenarından yaklaşık olarak
2,5 cm (1 inç) öteye getirerek ayarlayın.
NOT: Montaj plakasını
bir yüzeye tutturmadan
önce, önce tabanın
montaj plakasına
takılacağı yöne dönün.
UYARI: Serbest bırakma kolunun kanatçığını montaj plakası yarığına sıkıca
oturttuğunuzdan emin olun.
Kurul u m ve H ı z l ı B a ş vu ru K ı lavu z u
165
w w w. d e l l . c o m | s u p p o r t . e u r o . d e l l . c o m
3
Bilgisayarı ve tabanı kaldırın, tabanı montaj desteğine sokun ve serbest
bırakma kolu kanatçığı montaj plakasındaki yarığa girene kadar
kaydırın.
montaj plakası yarığı
serbest bırakma
kolunun kanatçığı
(tamamen oturmuş)
4
(Varsa) kablo kapağını takın.
UYARI: Bilgisayarınızın kurulumunu tamamlarken, kabloların çekilmesini, bir
yerlere takılmasını veya üzerlerine basılmasını önlemek için, bütün kabloları
çalışma alanınızın arka bölümüne tutturun.
166
8
Bilgisayarı açın, yazılım lisans anlaşmasını okuyun ve ekrandaki
işletim sistemi kurulum talimatlarını izleyin.
9
Tebrikler! Sistem kurulumunu tamamladınız.
Kurul u m ve H ı z l ı B a ş vu ru K ı lavu z u
Bilgi ve Yardım Alma
Aradığınız Ne?
Burada Bulabilirsiniz
•
•
•
•
Drivers and Utilities (Sürücüler ve
Ya r d ı m c ı P r o g r a m l a r C D ' s i ) ( R e s o u r c e C D
(Kaynak CD'si) olarak da bilinir)
Bilgisayarım için bir tanı programı
Bilgisayarım için sürücüler
Bilgisayarımın belgeleri
Aygıt(lar)ımın belgeleri
Bu CD'yi, belgelere erişmekte,
sürücüleri yeniden kurmakta veya
tanı araçlarını çalıştırmakta
kullanabilirsiniz.
• Acele Hizmet Kodu ve Servis Etiketi
Numarası
• Microsoft Windows Lisans Etiketi
Acele Hizmet Kodu ve Ürün Anahtarı
• Parçaları nasıl çıkartacağım ve
değiştireceğim hakkında bilgi
• Teknik özellikler
• Sistem ayarlarını nasıl yapılandıracağım
hakkında bilgi
• Sorunları nasıl gidereceğim hakkında bilgi
Kullanma Kılavuzu
Bilgisayarınızın üzerindedir.
İşletim sisteminize bağlı olarak, masaüstünüzdeki
Kullanma Kılavuzları ikonunu çift tıklatın veya Start
(Başlat) düğmesini tıklatıp Help and Support (Yardım ve
Destek) seçeneğini tıklatarak sabit sürücünüzde bulunan
elektronik belgelere erişin.
Kurul u m ve H ı z l ı B a ş vu ru K ı lavu z u
167
w w w. d e l l . c o m | s u p p o r t . e u r o . d e l l . c o m
Aradığınız Ne?
Burada Bulabilirsiniz
• İşletim sistemimi nasıl yeniden kurabileceğim O p e r a t i n g S y s t e m C D ( İ ş l e t i m S i s t e m i
hakkında bilgi
CD'si) ve Kurulum Kılavuzu
İşletim sisteminizi yeniden kuracak olursanız, bilgisayarınızla
birlikte gelen aygıtların sürücülerini yeniden kurmak için, Drivers
and Utilities (Sürücüler ve Yardımcı Programlar) CD'sini kullanın.
• Bilgisayarım için en son sürücüler
• Teknik servis ve destek sorularına yanıtlar
• Başka kullanıcılarla ve teknik destekle
çevrimiçi görüşme olanağı
• Bilgisayarımın belgeleri
Dell Support (Dell Destek) Web sitesi
•
•
•
•
•
Dell Premier Support (Dell Ana Destek)
Web sitesi
Servis arama durumu
Bilgisayarımla ilgili en önemli teknik konular
Sık sorulan sorular
Dosya yükleme
Bilgisayarımın yapılandırması hakkındaki
ayrıntılar
• Bilgisayarımın servis kontratı
168
Kurul u m ve H ı z l ı B a ş vu ru K ı lavu z u
Dell Support (Dell Destek) Web sitesinde, aralarında
aşağıdakilerin de bulunduğu bazı çevrimiçi araçlar sunulmuştur:
• Knowledge Base (Bilgi Tabanı) - öğütler, ipuçları ve çevrimiçi
kurslar
• Customer Forum (Müşteri Tartışma Alanı) - başka Dell
müşterileriyle çevrimiçi tartışma
• Upgrades (Yükseltme) - bellek, sabit sürücü ve işletim sistemi
gibi bileşenlerin yükseltilmesi hakkında bilgiler
• Customer Care (Müşteri Desteği) - başvuru bilgileri, sipariş
durumu, garanti ve onarım bilgileri
• Downloads (Yükleme) - sürücü, yama ve yazılım
yükseltmelerinin yüklenmesi
• Reference (Başvuru) - bilgisayar belgeleri, ürün özellikleri ve
şirket bültenleri
Dell Premier Support (Dell Ana Destek) Web sitesi, şirket, devlet
ve eğitim müşterileri için ayrı ayrı özelleştirilmiştir. Siteye her
bölgeden erişilemeyebilir.
Aradığınız Ne?
Burada Bulabilirsiniz
• Windows XP kullanımı hakkında bilgi
• Bilgisayarımın ve aygıtlarımın belgeleri
Windows XP Help and Support Center
( W i n d o w s X P Ya r d ı m v e D e s t e k M e r k e z i )
1 Başlat düğmesini, sonra da Help and Support (Yardım ve
Destek) düğmesini tıklatın.
2 Sorununuzu tanımlayan bir kelime veya cümlecik yazıp ok
ikonunu tıklatın.
3 Sorununuzu tanımlayan konuyu tıklatın.
4 Ekrandaki talimatları uygulayın.
Sorunların Çözülmesi
Dell, sisteminiz beklendiği şekilde çalışmadığı taktirde size yardımcı olmak
üzere birçok araç sunmuştur. Sisteminiz için hazırlanmış olan en son sorun
giderme bilgileri için, support.dell.com adresindeki Dell Support (Dell Destek)
Web sitesine bakın. Ayrıca, çevrimiçi Kullanma Kılavuzu'nuzun "Getting
Help" (Yardım Alma) başlıklı bölümünde de Dell sorun giderme araçlarının
açıklamalarını bulabilirsiniz.
Dell'in yardımını gerektiren bilgisayar sorunları çıkarsa, hatanın ayrıntılı
tarifini, sesli hata kodlarını veya ışıklı tanı işaretlerini yazın; aşağıdaki Acele
Hizmet Kodu'nu ve Servis Etiketi Numarası'nı kaydedin; daha sonra
bilgisayarınızın bulunduğu yerden Dell'i arayın.
Acele hizmet kodu ve servis etiketi numaralarının örneğini görmek için bkz.
"Bilgi ve Yardım Alma" sayfa 167.
Acele Hizmet Kodu:___________________________
Servis Etiketi Numarası:___________________________
Kurul u m ve H ı z l ı B a ş vu ru K ı lavu z u
169
w w w. d e l l . c o m | s u p p o r t . e u r o . d e l l . c o m
Bilgisayarınız sorun çözmenize yardımcı olabilecek aşağıdaki araçları içerir:
D E L L TA N ı L A R ı — Del Tanıları, bilgisayarınızdaki çeşitli bileşenleri test eder
ve bilgisayar sorunlarının nedenini belirlemenize yardımcı olur. Daha fazla bilgi
edinmek için, bkz. "Dell Tanıları'nın Çalıştırılması" sayfa 171.
A Ş A Ğ İ D A K I Ö Z E L L I K L E R, O L A S ı B I R H A T A Y A I Ş A R E T E D E B I L I R V E
B I L G I S A Y A R S O R U N L A R ı N ı G I D E R M E N I Z E Y A R D ı M C ı O L A B I L I R.
D A H A F A Z L A B I L G I E D I N M E K I Ç I N , B K Z . Kullanma Kılavuzu —
S I S T E M I Ş ı K L A R ı — Bilgisayarın ön tarafındadır
TA N ı I Ş ı K L A R ı — Bilgisayarın arka tarafındadır
S I S T E M İ L E T I L E R I — Monitör ekranınızda belirir
S E S L I U Y A R ı K O D L A R ı — Bilgisayarınızın çıkardığı bir dizi bip sesi
Dell Drivers and Utilities (Sürücüler ve Yardımcı Programlar)
CD'sinin Kullanımı
Microsoft Windows işletim sistemini çalıştırırken Dell Drivers and Utilities
(Sürücüler ve Yardımcı Programlar) CD'sini kullanmak için, aşağıdakileri
yapın:
NOT: Aygıt sürücülerine
ve kullanma belgelerine
erişmek için, Drivers and
1
Bilgisayarı açıp, Windows masaüstüne önyükleme yapın.
2
Dell Drivers and Utilities (Sürücüler ve Yardımcı Programlar) CD'sini CD
sürücüye takın.
Utilities (Sürücüler ve
Yardımcı Programlar)
Drivers and Utilities (Sürücüler ve Yardımcı Programlar) CD'sini bu
bilgisayarda ilk kez kullanıyorsanız, CD'nin kurulmaya başlayacağını
belirten kurulum penceresi açılır.
CD'sini, Windows içinden
kullanmanız gerekir.
3
OK (Tamam) düğmesine basıp devam edin.
Kurulumu tamamlamak için, kurulum programının bilgi istemlerini
yanıtlayın.
170
4
Welcome Dell System Owner (Hoşgeldin Dell Sistem Sahibi) ekranında
Next (İleri) düğmesini tıklatın.
5
System Model (Sistem Modeli), Operating System (İşletim Sistemi),
Device Type (Aygıt Türü), ve Topic (Konu) alanlarında sizin durumunuza
uyanları seçin.
Kurul u m ve H ı z l ı B a ş vu ru K ı lavu z u
Bilgisayarınızın Sürücüleri
Bilgisayarınıza uygun aygıt sürücüleri listesini görüntülemek için, aşağıdakileri
yapın:
1
Topic (Konu) açılır menüsünde My Drivers (Sürücülerim) seçeneğini
tıklatın.
Drivers and Utilities (Sürücüler ve Yardımcı Programlar) CD'si
bilgisayarınızın donanımını ve işletim sistemini tarar ve ardından da
ekranda, sistem yapılandırmanıza uygun olan aygıt sürücülerinin listesi
görüntülenir.
2
Uygun sürücüyü tıklatın ve talimatları yerine getirerek, sürücüyü
bilgisayarınıza yükleyin.
Bilgisayarınıza uygun olan tüm sürücüleri görmek için, Topic (Konu) açılır
menüsünden Drivers (Sürücüler) seçeneğini tıklatın.
Dell Tanıları'nın Çalıştırılması
Dell Tanıları, bilgisayarınızdaki çeşitli bileşenleri test eden bir programdır.
Herhangi bir bilgisayar sorunuyla karşılaştığınızda, sorunun kaynağını
belirlemenize yardımcı olması için, bu programı çalıştırın. Dell Tanıları
programını, sabit sürücünüzden de Drivers and Utilities (Sürücüler ve Yardımcı
Programlar) CD'sinden de çalıştırabilirsiniz.
Sabit Sürücüden:
UYARI: Sabit sürücünüz hata verirse, Dell IDE Hard-Drive Diagnostics (Dell IDE
Sabit Sürücü Tanıları) programını çalıştırın (bkz. "Dell IDE Hard-Drive Diagnostics
(Dell IDE Sabit Sürücü Tanıları) Programının Çalıştırılması" sayfa 173).
1
Bilgisayarı kapatıp yeniden başlatın.
2
Ekranda DELL™ logosu çıkar çıkmaz <F12> tuşuna basın.
Tuşa zamanında basamazsanız ve Windows logosu çıkarsa, Windows
masaüstünü görünene kadar bekleyin. Daha sonra bilgisayarı Start
(Başlat) menüsünden kapatıp yeniden deneyin.
3
Önyükleme aygıtları listesi belirdiğinde Boot to Utility Partition (Yardımcı
Program Bölümü’ne önyükle) seçeneğini vurgulayın ve <Enter> tuşuna
basın.
NOT: Tanılama yardımcı
programı bölümü
bulanamadığı belirten bir
ileti alırsanız, Drivers and
Utilities (Sürücüler ve
Yardımcı Programlar)
CD’nizden Dell
Diagnostics’i (Dell Tanıları)
çalıştırma yönergelerini
izleyin.
Kurul u m ve H ı z l ı B a ş vu ru K ı lavu z u
171
w w w. d e l l . c o m | s u p p o r t . e u r o . d e l l . c o m
4
Dell Diagnostics Main Menu (Dell Tanıları Ana Menüsü) belirdiğinde,
çalıştırmak istediğiniz testi seçin.
5
Main Menu (Ana Menü) ekranına geri dönmek için test ekranını
kapatın. Dell Diagnostics’ten (Dell Tanıları) çıkmak ve bilgisayarı
yeniden başlatmak için Main Menu (Ana Menü) ekranını kapatın.
Drivers and Utilities (Sürücüler ve Yardımcı Programlar) CD'sinden:
1
Drivers and Utilities (Sürücüler ve Yardımcı Programlar) CD'sini CD
sürücüye takın.
2
Bilgisayarı kapatıp yeniden başlatın.
Ekranda DELL logosu çıkar çıkmaz <F12> tuşuna basın.
Tuşa zamanında basamazsanız ve Windows logosu çıkarsa, Windows
masaüstünü görünene kadar bekleyin. Daha sonra bilgisayarı Start
(Başlat) menüsünden kapatıp yeniden deneyin.
NOT: Bu özellik,
önyükleme sırasını
yalnızca bir kerelik
değiştirir. Bir sonraki
başlatmada bilgisayar,
sistem kurulumunda
belirtilmiş olan aygıtlara
göre önyükleme yapar.
3
Önyükleme aygıtları listesi belirdiğinde IDE CD-ROM Device (IDE CDROM Aygıtı) seçeneğini vurgulayın ve <Enter> tuşuna basın.
4
CD önyükleme menüsünden IDE CD-ROM Device (IDE CD-ROM Aygıtı)
seçeneğini seçin.
5
Ekranda beliren menüde Boot from CD-ROM (CD-ROM'dan
önyükleme) seçeneğini seçin.
6
ResourceCD (KaynakCDsi) menüsünü başlatmak 1 girin.
7
Dell Diagnostics’i (Dell Tanıları) başlatmak için 2 girin.
8
Numaralı listeden Run the 32 Bit Dell Diagnostics (32 Bit Dell Tanıları’nı
çalıştır) seçeneğini seçin. Birden çok sürüm sıralanmışsa, kendi
platformunuza uygun olan sürümü seçin.
9
Dell Diagnostics Main Menu (Dell Tanıları Ana Menüsü) belirdiğinde,
çalıştırmak istediğiniz testi seçin.
10
172
Testler tamamlandığında CD’yi çıkartın.
Kurul u m ve H ı z l ı B a ş vu ru K ı lavu z u
Dell IDE Hard-Drive Diagnostics (Dell IDE Sabit Sürücü
Tanıları) Programının Çalıştırılması
Dell IDE Hard-Drive Diagnostics (Dell IDE Sabit Sürücü Tanıları), herhangi bir
sabit sürücü hatası durumunda, sorun gidermek veya hatayı doğrulamak
üzere sabit sürücüyü test eden bir yardımcı programdır.
1
Bilgisayarınızı açın (zaten açıksa, yeniden başlatın).
2
Ekranın sağ üst köşesinde F2 = Setup (F2 = Kurulum) yazısını
gördüğünüzde, <Ctrl><Alt><D> tuşlarına basın.
3
Ekrandaki talimatları uygulayın.
Hata bildirilirse, Kullanma Kılavuzu'nuzda "Sabit Sürücü Sorunları"
konusuna bakın.
Yasal Bilgiler
Elektromanyetik Enterferans (EMI), açık alanda yayılan ya da güç veya sinyal
hatları üzerinden gönderilen ve bir radyo navigasyonunun veya başka bir
güvenlik hizmetinin işleyişini tehlikeye sokan, ya da lisanslı bir radyo iletişim
hizmetini ciddi şekilde zayıflatan, engelleyen veya tekrar tekrar kesintiye
uğratan her türlü sinyal veya yayındır.
Dell bilgisayar sisteminiz, uygulamalı EMI talimatlarıyla uyumlu olacak şekilde
tasarlanmıştır. Dell tarafından açıkça belirtilmeyen değişiklikler, kullanıcının,
donanımı çalıştırma yetkisini geçersiz kılabilir.
Dell bilgisayar sistemleri, amaca uygun elektromanyetik ortamlarına göre
tasarlanmış, test edilmiş ve sınıflandırılmıştır. Bu elektromanyetik ortam
sınıflandırmaları iki gruba girer:
•
Class A (A Sınıfı), yalnızca iş veya sanayi ortamlarında çalıştırılabilecek
aygıtları gösterir.
•
Class B (B Sınıfı), hem iş veya sanayi ortamlarında hem de yerleşim
alanlarında ortamlarında çalıştırılabilecek aygıtları gösterir.
NOT: Sisteminizin
çalıştırılabileceği ortamları
saptamak için, Dell
sisteminizin arkasına veya
tabanına tespit edilmiş
yasal etikete bakın.
Kurul u m ve H ı z l ı B a ş vu ru K ı lavu z u
173
w w w. d e l l . c o m | s u p p o r t . e u r o . d e l l . c o m
Class A (A Sınıfı)
Class A (A Sınıfı) donanımlar test edilmiş ve FCC (Federal Communications
Commission; Federal İletişim Komisyonu) Kuralları'nın 15'inci bölümüne göre
A Sınıfı dijital aygıt sınırlandırmalarıyla uyumlu olduğu görülmüştür. Bu
sınırlandırmalar, ticari ortamlarda zararlı enterferanslara karşı makul bir
koruma sağlamak amacını taşır. Bu donanım, radyo frekansı enerjisi üretir,
kullanır ve çevreye yayabilir ve talimatlara uygun olarak kurulmaz ve
kullanılmazsa, radyo iletişimine zararlı enterferansa neden olabilir. Bu
donanımın yerleşim bölgelerinde çalıştırılması durumunda zararlı enterferansa
yol açması muhtemeldir; bu durumda kullanıcının söz konusu enterferansı
gidermek ve bundan kaynaklanacak tüm masrafları kendisi karşılamakla
yükümlüdür.
Class B (B Sınıfı)
Class B (B Sınıfı) donanımlar test edilmiş ve FCC Kuralları'nın 15'inci
bölümüne göre B Sınıfı dijital aygıt sınırlandırmalarıyla uyumlu olduğu
görülmüştür. Bu sınırlandırmalar, yerleşim alanlarında zararlı enterferanslara
karşı makul bir koruma sağlamak amacını taşır. Bu donanım, radyo frekansı
enerjisi üretir, kullanır ve çevreye yayabilir ve talimatlara uygun olarak
kurulmaz ve kullanılmazsa, radyo iletişimine zararlı enterferansa neden
olabilir. Ancak, her kurulumda enterferans meydana gelmeyeceği konusunda
bir garanti yoktur. Eğer bu donanım radyo veya televizyonların çekmesine
zararlı enterferansa neden olursa (bunun tespiti, donanımın açılıp
kapatılmasıyla yapılabilir), kullanıcının, enterferansı gidermek için aşağıdaki
önlemlerden bir veya birden çoğunu denemesi tavsiye edilir:
NOT: Sisteminiz hakkında
diğer yasal bilgileri,
Kullanma Kılavuzu'nuzda
bulabilirsiniz.
174
•
Alıcı antenin yönünü veya yerini değiştirin
•
Donanımla alıcı arasındaki mesafeyi artırın
•
Donanımı, alıcınızın bağlı olduğu prizinkinden başka bir hattaki bir
prize bağlayın
•
Dell'e veya tecrübeli bir radyo/TV tamircisine başvurun
Kurul u m ve H ı z l ı B a ş vu ru K ı lavu z u
Printed in Ireland.
Imprimé en Irlande.
Gedruckt in Irland.
Stampato in Irlanda
Impreso en Irlanda.
İrlanda’da basılmıştır.
02U454A01
w w w. d e l l . c o m | s u p p o r t . e u r o . d e l l . c o m