1
Motorola
iDEN
Digital Multi-service Data-capable Phone
i880 Phone User’s Guide
@NNTN6997A@
NNTN6997A
IMPORTANT NOTICE: PLEASE READ
PRIOR TO USING YOUR PHONE
The SIM card provided with this kit is intended for use
with the phone provided in this package.
Loss of certain features will result when using a SIM
card from one of the following models: i30sx, i35s,
i50sx, i55sr, i58s, i60c, i80s, i85s, i88s, i90c, i95cl
series, and the i2000 series.
For more information on SIM card compatibility, go to
www.motorola.com/iden/support.
Defects or damage to your Motorola phone that result
from the use of non-Motorola branded or certified
Accessories, including but not limited to replacement
housings and or other peripheral accessories, are
excluded from warranty coverage. Please refer to the
text of Motorola's Limited One Year warranty located in
this user’s guide for complete details.
Contents
Getting Started........................................... 1
Using Speakerphone.......................................23
Using Mute ......................................................23
Making Emergency Phone Calls .....................23
Locating Your SIM Card ....................................3
Battery ...............................................................4
Activating Service..............................................6
Powering On and Off.........................................6
Enabling Over-the-Air Security..........................7
Finding Your Phone Number and LINC ID ........8
Phone Basics ....................................................8
Using the Memory Card ..................................13
SIM Card Security ...........................................13
Antenna ...........................................................17
Accessories .....................................................18
For More Information.......................................18
LINCaroundSM...................................................... 25
Making Calls............................................. 19
Viewing the Recent Calls List..........................34
Calls and Call Alerts........................................34
LINC Feature Items in InstantLINC Mobile to
Mobile Calls ................................................35
Storing Items to Contacts ................................38
Deleting Items .................................................39
Making Calls From the Recent Calls List ........39
Phone Calls .....................................................19
InstantLINC Mobile to Mobile Calls .................19
Receiving Calls................................................20
Choosing a Number to Call .............................21
Missed Phone Calls.........................................22
Channels and Codes.......................................26
Private LINCaround Calls................................28
Making Emergency Calls While in
LINCaroundSM Mode ..................................29
Setup Options .................................................29
Call Alerts..................................................31
Sending Call Alerts..........................................31
Receiving Call Alerts .......................................31
Using the Call Alert Queue..............................32
Recent Calls..............................................34
i
Contacts ................................................... 41
Accessing Contacts.........................................42
Creating Entries...............................................42
Storing Numbers Faster ..................................44
Editing Entries .................................................45
Viewing Entries................................................45
Deleting Entries ...............................................47
Checking Capacity ..........................................47
Creating Pauses and Waits.............................48
International Numbers .....................................48
Making Calls From Contacts ...........................48
Accessing Contacts with GSM Phones ...........49
Call Forwarding........................................ 50
Forwarding All Calls ........................................50
Turning Off Call Forwarding ............................51
Forwarding Missed Calls .................................51
Viewing Call Forwarding Settings....................52
Advanced Calling Features..................... 53
Call Waiting .....................................................53
Switching Between Calls .................................53
Putting a Call on Hold......................................54
ii
Calling 2 People ..............................................54
Creating Pauses and Waits While Dialing.......55
Making International Calls ...............................55
Setting Flip Actions .........................................55
Group Calls .....................................................56
Call Timers ......................................................57
Using Your Phone as a Modem ......................58
Features for the Hearing Impaired ..................59
Memo .........................................................63
Ring Tones ................................................64
Setting Your Phone to Vibrate.........................64
Ring and Vibrate .............................................65
Assigning Ring Tones to Contacts ..................65
Viewing Ring Tone Assignments ....................65
Downloading More Ring Tones.......................66
About DRM Ring Tones ..................................66
Managing Memory ..........................................66
Deleting Custom Ring Tones ..........................66
Entering Text ............................................68
Using Word Mode ...........................................68
Special Function Keys.....................................69
Using Numeric Mode.......................................70
Messages ................................................. 71
Message Notifications .....................................71
Message Center ..............................................72
Voice Mail Messages ............................... 73
Receiving a Message ......................................73
Accessing Voice Mail From
the Message Center ...................................73
Sending Unanswered Calls to Voice Mail .......73
Text Messaging........................................ 74
Setting Up........................................................74
Receiving a Message ......................................75
Reading from the Message Center .................75
Creating and Sending Messages ....................75
Quick Notes.....................................................77
Drafts...............................................................78
Outbox.............................................................78
Sorting Messages............................................79
Managing Memory...........................................80
Using a Memory Card ..............................81
Ensuring Files on the Memory Card Are
Compatible With Your Phone .....................81
Using the Memory Card With
Your Phone.................................................84
Using the Memory Card With
Your Computer ...........................................86
Memory Cards Compatible
With Your Phone.........................................90
Camera ......................................................91
Accessing the Camera ....................................91
Taking Pictures ...............................................91
More Actions for Captured Pictures ................93
Recording Videos............................................94
Changing Storage Preference.........................96
Accessing the Media Center ...........................96
Customizing the Camera.................................96
Managing Memory ..........................................97
Media Center .............................................98
Viewing the Media Center ...............................98
Forward Locked Items...................................100
DRM Items ....................................................101
iii
Pictures .........................................................101
Videos ...........................................................102
Audio Recordings ..........................................103
Renaming Items ............................................104
Locking Items ................................................104
Deleting Items ...............................................104
Copying and Moving Items............................105
Changing Storage Preference.......................106
Accessing the Camera ..................................106
Accessing the Audio Player...........................106
Managing Memory.........................................106
Audio Player........................................... 108
Playing Audio Files with the Flip Closed .......108
Playing Audio Files with the Flip Open..........109
Adjusting the Volume ....................................110
How Your Audio Files Are Organized............110
Playing Music While Files Are Loading .........111
Searching By First Letter...............................111
Playing a List and Using Repeat and Shuffle 111
Working With Playlists...................................112
Working With Podcast ...................................115
Deleting Audio Files ......................................117
iv
DRM Items ....................................................118
Setting Audio and Visual Options..................118
Digital Rights Management ...................119
Installing Items ..............................................119
Understanding DRM Status Icons.................119
Sharing Items ................................................119
Managing DRM Items ...................................120
Using LINC Features ..............................122
LINC Feature Icons .......................................122
LINC Messages.............................................123
LINC Pictures ................................................125
LINC Events ..................................................129
LINC My Info .................................................132
LINC Contact.................................................133
LINC Manager .........................................135
Accessing LINC Features
From LINC Manager .................................135
Turning LINC Features On and Off ...............135
Changing the Quick Notes List......................135
Setting One Touch PTT ................................136
Setting My Info Sending Option ....................137
My Info .................................................... 139
Viewing My Info .............................................139
Editing My Info...............................................139
Datebook ................................................ 141
Viewing Datebook .........................................141
Creating Events.............................................142
Editing Events ...............................................144
Deleting Events .............................................144
Receiving Reminders ....................................145
Making Calls From Datebook and Datebook
Reminders ................................................145
Customizing Datebook Setup........................146
Java Applications .................................. 148
Installing Applications....................................148
Running Applications.....................................148
Suspending Applications ...............................148
Resuming Applications..................................149
Ending Applications.......................................149
Downloading Applications .............................149
Deleting Applications.....................................150
Managing Memory.........................................150
Storing Java Applications on the Memory Card ..
151
Shortcuts on the Main Menu .........................152
Java Applications and GPS Enabled ............152
Bluetooth® ..............................................155
Understanding Bluetooth® Access Settings ..155
Setting Your Phone for Bluetooth® .................... 156
Accessing Bluetooth® ...................................157
Making a Bluetooth® Connection ..................157
Setting Device Details ...................................160
Sending Contacts, Datebook Events,
and Media Center Items ...........................161
Receiving Items.............................................162
GPS Enabled ...........................................164
IMPORTANT: Things to Keep in Mind ..........164
Making an Emergency Call ...........................166
Viewing Your Approximate Location .............167
Enhancing GPS Performance .......................168
Setting Privacy Options .................................169
Using GPS with Map Software......................170
v
Voice Records........................................ 173
Viewing Voice Records .................................173
Creating Voice Records ................................173
Playing Voice Records ..................................174
Labeling Voice Records ................................174
Locking Voice Records..................................174
Deleting Voice Records.................................175
Managing Memory.........................................175
Customizing Your Phone ...................... 176
Setting the Volume ........................................176
Setting Your Phone to Vibrate.......................176
Changing the Look of Your Phone ................177
Temporarily Turning Off Transmissions ........180
Using Settings ...............................................180
Deleting Profiles ............................................188
Setting Call Filtering ......................................189
Setting a Profile for Use With a Car Kit .........190
Shortcuts.................................................191
Creating a Shortcut .......................................191
Using a Shortcut............................................191
Editing a Shortcut..........................................192
Deleting Shortcuts.........................................192
Using a Headset .....................................193
Using a Bluetooth Headset ...........................193
Attaching a Headset......................................193
Using a Remote PTT Button .........................193
Understanding Status Messages ..........195
Profiles ................................................... 186
Safety and General Information ............198
Viewing Profiles.............................................186
Switching Profiles ..........................................186
How Changing Settings Affects Profiles........186
Temporary Profiles ........................................187
Creating Profiles............................................188
Editing Profiles ..............................................188
RF Operational Characteristics .....................198
Portable Radio Product Operation and EME
Exposure...................................................198
Electromagnetic Interference/Compatibility...201
Medical Devices ............................................201
Operational Warnings ...................................202
vi
Operational Cautions.....................................203
Accessory Safety Information........................204
Hearing Aid Compatibility..................... 206
Caring for the Environment
by Recycling ....................................... 208
Disposal of your Mobile Telephone and
Accessories ..............................................208
MOTOROLA LIMITED WARRANTY ...... 209
Patent and Trademark Information ...... 213
Index ....................................................... 214
Driving Safety Tips ................................ 221
vii
DECLARATION OF CONFORMITY
Per FCC CFR 47 Part 2 Section 2.1077(a)
Responsible Party Name: Motorola, Inc.
Address: 8000 West Sunrise Boulevard
Plantation, FL 33322 USA
Phone Number: 1 (800) 453-0920
Hereby declares that the product:
Product Name: i880
Model Number: H94XAH6RR4AN
Conforms to the following regulations:
FCC Part 15, subpart B, section 15.107(a),
15.107(d) and section 15.109(a)
Class B Digital Device
As a personal computer peripheral, this device
complies with Part 15 of the FCC Rules. Operation
is subject to the following two conditions: (1) this
device may not cause harmful interference, and (2)
this device must accept any interference received,
including interference that may cause undesired
operation.
viii
Note: This equipment has been tested and
found to comply with the limits for a Class
B digital device, pursuant to part 15 of the
FCC Rules. These limits are designed to
provide reasonable protection against
harmful interference in a residential
installation. This equipment generates,
uses and can radiate radio frequency
energy and, if not installed and used in
accordance with the instructions, may
cause harmful interference to radio
communications. However, there is no
guarantee that interference will not occur
in a particular installation.
If this equipment does cause harmful
interference to radio or television reception,
which can be determined by turning the
equipment off and on, the user is
encouraged to try to correct the interference
by one or more of the following measures:
• Reorient or relocate the receiving
antenna.
• Increase the separation between the
equipment and receiver.
• Connect the equipment into an outlet on
a circuit different from that to which the
receiver is connected.
• Consult the dealer or an experienced
radio/TV technician for help.
AgION AntimicrobialTM —
Built-in Protection for
Your Phone
Motorola has incorporated AgION antimicrobial
into the painted surfaces of your phone to help
provide protection against a broad range of product
damaging bacteria, mold, and mildew.
Motorola is the first wireless phone manufacturer to
incorporate AgION antimicrobial into the phone's
painted surfaces.
The antimicrobial technology is an example of
Motorola's pursuit for innovation and creativity to
produce the best quality wireless experience.
The antimicrobial technology in the paint on
Motorola iDEN® phones helps provide protection
against product damage caused by microbes, but
does not extend such protection to the user.
Versatile in application, the EPA-registered AgION
additive is recommended for institutional,
commercial and consumer applications. AgION
antimicrobials are used in many settings including
hospitals, offices, schools and food processing
facilities. They can also be found in leading
footwear, fabrics, appliances, water coolers and
architectural hardware.
Benefits of AgIONTM*
• AgION antimicrobial technology helps provide
protection against product damaging bacteria on
the painted surfaces of the phone.
• AgION antimicrobial is effective in protecting the
product against a broad spectrum of bacteria.
• AgION helps inhibit the ability of microbes to
grow and spread on the painted surfaces of the
phone.
• The active ingredient helps break down
enzymes in the microbe, inhibiting its ability to
reproduce and spread on the painted surfaces of
the phone.
• Studies have shown that surfaces with AgION
antimicrobial can reduce the amount of certain
product damaging bacteria by 99%.
• The AgION coating will protect the painted
surfaces of the product against product
damaging bacteria for the life of the product.
* The antimicrobial technology is applied only to the painted
surfaces of the Motorola iDEN phones, thereby providing
protection against damage to such surfaces caused by microbes,
but does not extend such protection to the end user.
ix
Safety
Accreditation
• AgION antimicrobial protection is based on
silver, a safe, non-toxic additive to the phone
paint. Silver is widely used as an antimicrobial
agent in many environments and industries.
• AgION antimicrobial technology is safe to use.
Thorough testing has shown the additive to be
less toxic than table salt and less irritating than
talcum powder.
• The AgION antimicrobial compound is
registered with the Environmental Protection
Agency (EPA) as a preservative and
bacteriostatic agent for use in the manufacturing
of polymers and plastics.
• NSF, FDA-listed
How It Works
• The technology continuously inhibits the growth
of product damaging bacteria on the phone's
painted surfaces.The active ingredient helps
break down enzymes in the microbe, inhibiting
its ability to reproduce and spread on the painted
surfaces on the phonee.
• The active ingredient in AgION is silver, in the
form of silver ions.
x
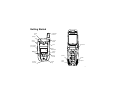
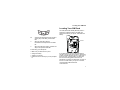
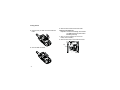
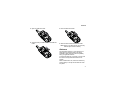
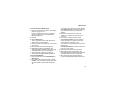
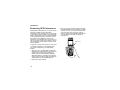
Getting Started
camera
lens
retractable
antenna
spotlight
volume
controls
Push-To-Talk
(PTT) button
flip open
button
light sensor
mirror
stereo
headset jack
audio player
keys
external
display
memory
card slot
accessory
connector
backlit
logo
speaker
speaker
power
button
microphone
1
Getting Started
2
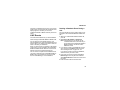
Navigation key — press the arrows to
scroll through menus and lists.
t
O
Acts like s when the flip is closed; turns
speaker on; used with voice names and
voice records.
OK key — selects highlighted item;
answers calls.
.
m
Menu key — accesses context-sensitive
menus.
Acts like e when the flip is closed;
accesses recent calls; sends incoming
calls to voice mail.
c
Camera key — accesses camera;
captures picture.
A
Option key — selects the option
appearing above it on the display.
s
Send key — places phone calls.
e
End key — ends phone calls; returns to
idle screen.
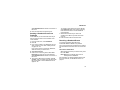
Locating Your SIM Card
Locating Your SIM Card
Your SIM (Subscriber Identity Module) card is a
small piece of plastic located in the SIM card
holder in the back of your phone, underneath the
battery.
y
Accesses the audio player when the flip is
closed; plays audio files; pauses audio
files.
z
When an audio file is playing,
fast-forwards and skips to the next audio
file.
x
When an audio file is playing, rewinds and
skips to the previous audio file.
SIM card
To start using your i880 phone:
•
•
•
•
Make sure your SIM card is in place.
Charge the battery.
Activate your service.
Enable over-the-air security if you are prompted
to.
If your SIM card is not in the SIM card holder, it
may be in the box your phone came in, attached to
a piece of plastic about the size of a credit card. If
this is the case, carefully detach your SIM card
from the surrounding plastic and insert it as
described in “Inserting Your SIM Card” on page 15.
If there is no SIM card in your phone or the box,
contact SouthernLINC Wireless at
1-800-406-0151.
3
Getting Started
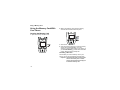
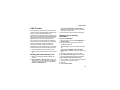
Battery
Inserting the Battery
Removing the Battery Door
Your phone comes with a High Performance
Lithium Ion Battery.
1 Make sure the phone is powered off. See
“Powering On and Off” on page 6.
2 Slide the release button back until it releases the
battery door.
1 Remove the battery door.
2 Insert the battery into the battery area. Press the
battery down to secure it.
release
button
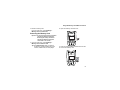
3 Allow the battery door to pop up, slide it forward,
and remove it from the back of your phone.
4
3 Replace the battery door and press it gently until
you hear a click.
Battery
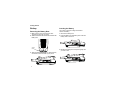
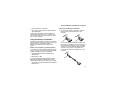
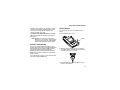
Charging the Battery
Your phone comes with a rapid travel charger.
1 Plug the charger into an electrical outlet.
2 Open the connector cover.
Charger Attached or Device Attached appears
on the internal display.
Tip: To remove the charger from the accessory
connector: Press the buttons on the sides
of the plug. Pull the plug straight out.
4 If you have purchased optional batteries or
chargers, see “Charging Times” on page 5.
Charging Times
connector
cover
See your battery and charger to determine the
appropriate charging time.
Battery
Charger
Rapid
3 Plug the other end of the charger into the
accessory connector.
Standard
2.5 hours
High
Performance
5 hours
Maximum
Capacity
6 hours
3.5 hours
For best results, charge the batteries within the
temperature range of 50°F to 104°F (10°C to
40°C).
Prolonged charging is not recommended.
5
Getting Started
Removing the Battery
1 With the phone powered off, remove the battery
door.
2 Remove the battery by pushing it toward the
antenna and lifting it out.
• Lithium Ion batteries have a self discharge rate
and without use, lose about 1% of their charge
per day.
• The battery capacity is degraded if the battery is
stored for long periods while fully charged. If
long term storage is required, store at half
capacity.
Activating Service
The first time you power on your phone, you must
be in your local calling area. This activates your
service.
Powering On and Off
Battery Use and Maintenance
• The Motorola iDEN Approved Lithium Ion
chargers provide optimum performance. Other
chargers may not fully charge the iDEN Lithium
Ion battery or may yield a reduced number of
lifetime charge cycles.
• Extreme temperatures degrade battery
performance. Do not store the battery where
temperatures exceed 140°F (60°C) or fall below
-4°F (-20°C).
6
The first time you power your phone on, a screen
may appear asking you to update your browser
information. This means you must enable security.
To power your phone on:
1 Open the flip.
Tip: Press the flip open button to open the flip
easily.
2 Press p.
Enabling Over-the-Air Security
Note: When powering on, if you press p for
more than 5 seconds, you will turn off
calls and other transmissions. See
“Temporarily Turning Off Transmissions”
on page 180.
As your phone connects to the network, you will
see a welcome message and a connecting
message. When the idle screen appears, the
phone is ready to use.
To power your phone off:
1 Open the flip.
2 Press and hold p.
When You Power On For the First
Time
If the Enter SIM PIN Code screen appears, enter
your SIM PIN. See “Entering the PIN” on page 13.
Press A under Ok.
When you receive your phone, the SIM PIN is
0000. Change your PIN to prevent fraudulent use
of the SIM card (see “Changing the PIN” on page
13).
Enabling Over-the-Air
Security
If you are set up to receive over-the-air
programming from SouthernLINC Wireless, you
must enable security the first time you power on
your phone or within 10 days of first activation of
your phone:
1 When you power on your phone for the first time,
after the idle screen appears, you will be
prompted to select Ok to update your browser
information.
7
Getting Started
2 Press A under Ok.
3 You are prompted to enable security. Press A
under Yes. A series of screens appears. If you
subscribe to the appropriate SouthernLINC
Wireless plan, your home page appears.
4 Press e to return to the idle screen.
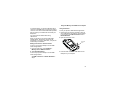
Flip Open Button
Finding Your Phone Number
and LINC ID
Any time your phone is powered on, the display
provides you with information and options.
My Info lets you view your phone number, LINC ID,
and other phone information:
Press m to access the main menu.
Scroll to My Info.
Press O.
Scroll to see your information.
1
2
3
4
Line 1 and Line 2 are your phone numbers. LINC
ID is the number that others use to contact you
using InstantLINC Mobile to Mobile. These
numbers appear when you receive your alert
notification after enabling security on your phone.
See “My Info” on page 139 for more information
about this feature.
Phone Basics
Any time your phone is powered on, the display
provides you with information and options.
8
The flip open button located on the upper right
corner of your phone enables you to quickly open
the flip by pushing the button.
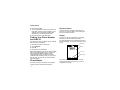
Display
The external display shows a shortened version of
the internal display. To see more information, open
the flip.
status icons
text area
menu icon
display options
The screen shown is the idle screen. The idle
screen appears when your phone is on, but not
engaged in any activity.
Phone Basics
Text Area
This area displays menus, messages, names,
phone numbers, and other information.
Display Options
Two display options appear at the bottom of most
screens. You select a display option by pressing
the option key below it.
Menus and Lists
Your phone’s features are arranged in menus,
submenus, and lists.
To access the items in a menu or list, scroll using
the navigation key at the top of your keypad. This
key lets you scroll up, down, left, or right. Holding
down the appropriate part of the navigation key
speeds up scrolling.
In this guide, this symbol > tells you to select a
menu or list item. For example, Settings >
Security means:
1
2
3
4
Scroll to Settings on the main menu.
Press O to see the Settings screen.
Scroll to Security.
Press O to see the Security screen.
OK Key
Pressing O:
•
•
•
•
Selects the highlighted menu item or list item
Sets options
Confirms actions
Places and answer calls
Menu Key
Many features provide context-sensitive menus
that let you access related features and actions.
This icon S appears any time a context-sensitive
menu is available. Press m to access the menu.
Main Menu
All your phone’s features can be accessed through
the main menu. You can set the main menu to
appear as a list or as large icons.
a Browser
Browse the Web.
q Java Apps
Java applications on your
phone. See page 148.
b Settings
Customize your phone.
See page 176.
9
Getting Started
c VoiceRecord
Record and play audio
messages. See page 173.
p Profiles
d Contacts
Create, view, store, and
edit Contacts. See
page 41.
Groups of settings you
apply together. See
page 186.
k Call Alert
Lists call alerts. See
page 31.
e Messages
Access messages. See
page 71.
B Bluetooth
Connect to a device with
Bluetooth. See page 155.
f Call Forward
Set call forwarding options.
See page 50.
l GPS
o Datebook
Schedule appointments.
See page 141.
Find your approximate
geographical location. See
page 164.
m Ring Tones
g Memo
Store a number to access
later. See page 63.
Assign ring tones and turn
ringer off. See page 64.
M LINCaround
h
Phone usage information.
See page 57.
Launch/Exit LINCaround.
Access LINCaround Setup
and Help. See page 25.
C Camera
Access camera and take
pictures and videos. See
page 91.
m
Access stored pictures,
videos, and audio
recordings. See page 98.
Call Timers
i Recent Calls
Lists recent calls. See
page 34.
s Shortcuts
Create shortcuts to
screens. See page 191.
j My Info
View personal phone
information, including
phone number and LINC
ID. See page 8.
10
Media Center
Phone Basics
*
Music Player
& LINC Manager
Access the MP3 audio
player. See page 108.
6
Access and set options
related to InstantLINC
Mobile to Mobile calls. See
page 135.
No Service — Your phone is
without service. You cannot make
or receive any type of call.
A
Phone In Use — Your phone is
active on a phone call.
B
InstantLINC Mobile to Mobile In
Use — Your phone is active on an
InstantLINC Mobile to Mobile call.
C
Talkgroup In Use — Your phone is
active on a group call.
Quick Access to Main Menu Items
Each arrow in the navigation key and O can be
used to access a main menu item from the idle
screen. Each of these keys is assigned to a main
menu item when you receive your phone. To
assign different main menu items, see “Personalize
Features” on page 182.
Status Icons
Status icons appear at the top of the display. Some
appear at all times. Others appear only when your
phone is engaged in certain activities or when you
have activated certain features.
abcd Battery Strength — A fuller battery
efgd indicates a greater charge.
opqr
s
Signal Strength — More bars next
to the antenna indicate a stronger
signal.
1
2
Active Phone Line — 1 indicates
phone line 1 is ready to make calls;
2 indicates phone line 2 is ready to
make calls.
B
Bluetooth In Use — Your phone is
using Bluetooth. If this icon is
blinking, then your phone is in
discoverable mode. If this icon is
static, your phone is active in a
Bluetooth connection.
G J
H K
I L
Call Forward — Your phone is set
to forward calls. See page 50.
11
Getting Started
QRM
Ringer Off — Your phone is set to
not ring. See page 64.
Y Z
u
Speaker Off — Sounds associated
with InstantLINC Mobile to Mobile
and group calls are set to come
through the earpiece rather than
through the speaker.
Packet Data — You are ready to
transfer packet data or are
transferring packet data. See
page 58.
7
Hearing Aid — Your phone is set
for use with a hearing aid and is
active on a phone call.
u M Q
Ringer Off — Your phone is set to
not ring. See page 64.
N
w xT
yz
Messages — You have one or
more messages. See page 71.
DE
Internet — You are ready to
browse the internet.
9
Transmitters — Your phone is set
not to receive calls and other
transmissions. See “Temporarily
Turning Off Transmissions” on
page 180.
435
Music Player — The audio player
is active.
c
Voice Record — You have one or
more voice records stored. See
page 173.
12
O
TTY — You are ready to use your
phone to make calls using a
teletypewriter device. See page 59.
t
Roaming — You are using your
phone outside of the SouthernLINC
Wireless network.
U
USB Mass Storage — You are
using the USB mass storage
feature. See page 88.
Entering Numbers From the Keypad
To enter numbers at the idle screen or any screen
that requires you to enter numbers, press the
numbers on the keypad.
If you make a mistake:
• To clear a digit, press A under Delete.
• To clear all digits, press and hold A under
Delete.
Using the Memory Card
• To insert or delete a digit anywhere in the string
of digits you have entered, scroll left or right.
• To cancel, press e.
Entering the PIN
Using the Memory Card
When you receive your phone, the SIM PIN is
0000. Change your PIN to prevent fraudulent use
of the SIM card.
Your i880 phone comes with a memory card,
memory card reader, and memory card adaptor.
For complete instructions on using the memory
card with your phone and with your computer, see
“Using a Memory Card” on page 81.
SIM Card Security
Your SIM card protects your personal information.
The SIM card stores all your Contacts information.
Since this information is stored on your SIM card,
not in your phone, you can remove the information
by removing your SIM card.
Note: Except for making emergency calls, your
phone will not function without the SIM
card.
To prevent unauthorized use of your phone, your
SIM card may be protected by a PIN that you enter
each time the phone is powered on. You can
change the PIN or turn off the requirement that it
be entered.
You may be required to enter a SIM PIN when you
first use your phone.
Important: If you enter your PIN incorrectly 3 times,
your SIM card is blocked. To unblock
your SIM card, you must contact
SouthernLINC Wireless at
1-800-406-0151. See “Unblocking the
PIN”.
1 When the Enter SIM PIN Code screen appears,
enter your SIM PIN. An asterisk appears for
each character entered.
2 Press A under Ok.
Changing the PIN
1 From the main menu, select Settings >
Security > Change Passwords > SIM PIN.
2 At the Enter Old SIM PIN screen, enter the
current SIM PIN.
3 Press A under Ok.
4 At the Enter New SIM PIN screen, enter the
new 4- to 8-digit SIM PIN.
5 Press A under Ok.
13
Getting Started
6 At the Re-enter New SIM PIN screen, re-enter
the new SIM PIN to confirm.
7 Press A under Ok.
Turning the PIN Requirement On and
Off
When the SIM PIN requirement is on, you are
prompted to enter your PIN each time you turn on
your phone.
Note: If a SIM PIN is required, your phone will
not function until the SIM PIN is entered,
except for making emergency calls.
When the PIN requirement is off, your phone can
be used without entering a PIN.
Important: When the SIM PIN requirement is off,
the personal data on your SIM card is
not protected. Anyone can use your
phone and access your personal data.
1 From the main menu, select Settings >
Security > SIM PIN.
2 Select On or Off.
3 Enter the current SIM PIN.
4 Press A under Ok.
Unblocking the PIN
If you enter your PIN incorrectly 3 times, your SIM
card is blocked. To unblock your SIM card, you
must contact SouthernLINC Wireless at
1-800-406-0151 to get a PIN Unblock Code (PUK).
Important: If you unsuccessfully enter the PUK
code 10 times, your SIM card is
permanently blocked and must be
replaced. If this happens, all data is
lost. You will get a message to contact
SouthernLINC Wireless. Except for
making emergency calls, your phone
will not function with a blocked SIM
card.
To unblock the PIN:
1 Press * # m 1.
2 At SouthernLINC Wireless representative’s
request, provide the information needed to give
you a PUK code.
3 Select Unblock PIN.
4 Enter the PUK code.
5 Enter a new 4- to 8-digit SIM PIN.
6 Re-enter your SIM PIN.
If you entered the codes properly, SIM Unlocked
appears on the display.
14
SIM Card Security
Inserting and Removing Your SIM
Card
Important: Do not touch the gold-colored areas of
your SIM card.
Switching SIM Cards
Moving your SIM card from one phone to another
moves all your Contacts information, but erases
other information. If you remove your SIM card and
use it with another phone, or use another SIM card
with your phone, the following information is
erased:
•
•
•
•
•
•
•
•
•
The recent calls list
Call forwarding settings
Net alerts
Text Message drafts, outbox messages, and
customized quick notes
Information stored in Memo
Pictures, video, and audio recordings accessible
through the media center that are saved in your
phone’s memory, except those that are forward
locked. (No items saved to the memory card are
erased.)
3 most recent GPS Enabled locations
Voice records
Voice names
• Datebook events
• Options set using the Personalize menu
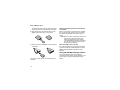
Inserting Your SIM Card
1 With your phone powered off, remove the
battery door and battery.
2 Slide the latch away from the SIM card holder.
latch
3 Open the SIM card holder.
15
Getting Started
6 Slide the latch toward the SIM card holder.
4 Carefully slide your SIM card into the SIM card
holder.
Removing Your SIM Card
Important: To avoid loss or damage, do not remove
your SIM card from your phone unless
absolutely necessary.
1 With your phone powered off, remove the
battery door and battery.
2 Slide the latch away from the SIM card holder.
latch
5 Close the SIM card holder.
16
Antenna
3 Open the SIM card holder.
4 Carefully slide your SIM card out of the SIM card
holder.
5 Close the SIM card holder.
6 Slide the latch toward the SIM card holder.
Note: Protect your SIM card as you would any
delicate object. Store it carefully.
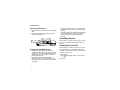
Antenna
The retractable antenna on your i880 phone is
designed to be extended during calls and is
essential to attain the hearing aid compatibility
rating on applicable models.
To extend the antenna, pull gently on the tip until
the antenna is fully extended and clicks into
position.
When finished with a call, retract the antenna by
pushing gently on the tip until the antenna clicks
into place.
17
Getting Started
To optimize your phone’s performance, extend the
antenna when you make or receive a call, and
avoid touching the antenna with any body part.
Important: Failure to fully extend or retract the
antenna until the antenna clicks into
place causes severely degraded
performance, which may result in
missed calls, dropped calls, or garbled
audio.
Accessories
To order accessories, log on to the SouthernLINC
Wireless website at www.southernlinc.com/store or
contact your SouthernLINC Wireless sales
representative.
18
For More Information
If you have questions about your i880 phone,
contact your sales representative or SouthernLINC
Wireless at 1-800-406-0151.
Making Calls
Your i880 phone makes two types of calls: digital
cellular phone calls and InstantLINC Mobile to
Mobile calls. With InstantLINC Mobile to Mobile
calls, you use your phone as a long-range, digital
walkie-talkie.
Phone Calls
With the Flip Closed
You can make phone calls with the flip closed
using a voice name or the recent calls list to select
the number you want to call. See “Using a Voice
Name” on page 21 and “Making Calls From the
Recent Calls List” on page 39.
To end the call, press ..
With the Flip Open
InstantLINC Mobile to Mobile
Calls
1 Enter the number you want to call.
2 To place the call:
1 If the flip is open, enter the LINC ID you want to
call. -or-
Press s. -orIf you entered the number from the idle screen,
press O.
3 To end the call:
Press e. -orClose the flip.
To end a call by closing the flip, you must have the
Flip to End feature turned on (see “Setting Flip
Actions” on page 55).
If the flip is closed, choose the number as you
would when making a phone call.
2 Press and hold the PTT button on the side of
your phone. Begin talking after your phone emits
a chirping sound.
3 Release the PTT button to listen.
4 To end the call:
If the flip is closed, press .. -orPress e. -orPress A under Exit. -orClose the flip.
19
Making Calls
An InstantLINC Mobile to Mobile call ends
automatically if there is no activity on the call for a
few seconds.
Tip: To let someone know you want to talk to
him or her on an InstantLINC Mobile to
Mobile call, send a call alert. See “Call
Alerts” on page 31.
Receiving Calls
Phone Calls
When you receive a phone call, your phone rings,
vibrates, or lights up its backlights.
Answering
If the flip is closed, press t. -orOpen the flip. -or-
To answer a call by opening the flip, you must have
the Flip to Ans feature turned on (see “Setting Flip
Actions” on page 55). To answer a call by pressing
any number key, you must have the Any Key Ans
feature turned on (see “Phone Calls Features” on
page 181).
Sending to Voice Mail
If the flip is closed, press .. -orPress e. -orPress A under No.
Ending
If the flip is closed, press .. -orPress e. -orClose the flip.
Press s. -or-
InstantLINC Mobile to Mobile Calls
Press O. -or-
When you receive a InstantLINC Mobile to Mobile
call, your phone emits a chirping sound and the
PTT button backlight flashes rapidly, or your phone
vibrates.
Press A under Yes. -orPress any number key.
Answering
1 Wait for the caller to finish speaking.
20
Choosing a Number to Call
2 Press and hold the PTT button on the side of
your phone. Begin talking after your phone emits
a chirping sound.
3 Release the PTT button to listen.
Ending
If the flip is closed, press .. -orPress e. -orPress A under Exit. -orClose the flip.
An InstantLINC Mobile to Mobile call ends
automatically if there is no activity on the call for a
few seconds.
Choosing a Number to Call
You can choose the number you want to call in
many ways:
• Enter the number on the keypad. See “Entering
Numbers From the Keypad” on page 12.
• Say a voice name into your phone. See “Using a
Voice Name”.
• Use Speed Dial or Turbo Dial® to make a phone
call. See “Using Speed Dial and Turbo Dial®” on
page 22.
• Redial the last phone number called. See
“Redialing the Last Number” on page 22.
• Select the number from the recent calls list. See
“Making Calls From the Recent Calls List” on
page 39.
• Select the number from Contacts. See “Making
Calls From Contacts” on page 48.
• Select a number stored in Datebook. See
“Making Calls From Datebook and Datebook
Reminders” on page 145.
• Use One Touch PTT to make an InstantLINC
Mobile to Mobile call. See “Setting Flip Actions”
on page 55.
• Use the number in Memo. See “Memo” on page
63.
• Select the number in a text message you have
received. See “Receiving a Message” on page
75.
Using a Voice Name
If you have created a voice name in Contacts for
the number you want to call, say the voice name
into your phone to enter the number. See page 44
for information on voice names.
21
Making Calls
You can use a voice name to enter a number with
the flip open or closed.
1 Press and hold t until a prompt appears telling
you to say the voice name.
2 Speaking into the microphone, say the voice
name assigned to the number you want to call.
Your phone plays the name back to you.
3 If you are making a phone call, the call is placed
automatically.
Tip: To stop a phone call from being completed,
press . if the flip is closed or press e.
If you are making an InstantLINC Mobile to
Mobile call, press and hold the PTT button to
place the call.
Using Speed Dial and Turbo Dial®
Each phone number stored in Contacts is assigned
a Speed Dial number, which you can use to call
that number.
Speed Dial
1 From the idle screen, use the keypad to enter
the Speed Dial number assigned to the phone
number you want to call.
2 Press #.
3 Press s.
22
Turbo Dial
From the idle screen, press and hold the Speed
Dial number (1 through 9) assigned to the phone
number you want to call.
Redialing the Last Number
Press and hold s to place a call to the last phone
number you called.
Missed Phone Calls
When you miss a call, this icon V and the number
of phone calls you have missed appear briefly.
With the Flip Open
If you want to dismiss the missed call message,
press A under Back. -orIf you want to view the missed call on the recent
calls list, press A under View.
With the Flip Closed
If you want to dismiss the missed call message,
press ..
If you want to view the missed call on the recent
calls list, press . twice.
Using Speakerphone
Using Speakerphone
To turn mute off:
Turning on speakerphone makes incoming sound
come out of the phone’s speaker instead of the
earpiece. Speakerphone is available whenever you
are on an active phone call.
Making Emergency Phone
Calls
With the Flip Open
To turn speakerphone on or off:
Press A under Speaker. -orPress t.
With the Flip Closed
When you make a call with the flip closed,
speakerphone is always on.
Opening the flip turns speakerphone off.
Using Mute
Muting calls lets you listen to incoming sound
without transmitting sound. Mute is available
whenever you are on an active call.
To turn mute on:
Press A under Mute.
While mute is on, Unmute appears as a display
option.
Press A under Unmute.
Your phone supports emergency calling.
Emergency phone calls can be made even when
your SIM card is blocked or not in your phone.
Dial 911 to be connected to an emergency
response center. If you are on an active call, you
must end it before calling 911.
When you make an emergency call, your phone’s
GPS Enabled feature can help emergency service
personnel find you, if you are in a location where
your phone's GPS antenna has established a clear
view of the open sky and your local emergency
response center has the equipment to process
location information. See “GPS Enabled” on page
164, and particularly “IMPORTANT: Things to
Keep in Mind” on page 164 and “Making an
Emergency Call” on page 166, for more
information on the limitations of this feature.
Because of the limitations of this feature, always
provide your best knowledge of your location to the
emergency response center when you make an
emergency call.
23
Making Calls
Important: Emergency calls cannot be placed
while the keypad is locked.
Important: If you have not registered on the
network, emergency calls cannot be
placed while your SIM card is in your
phone.
24
LINCaroundSM
Note: This is an optional feature. Go to
www.southernlinc.com/downloads or
contact SouthernLINC Wireless at
1-800-406-0151 about its availability for
purchase.
LINCaround allows direct two-way phone-to-phone
communications between two or more phones
equipped for LINCaround. You can make and
receive LINCaround calls even when network
service is not available. You can talk to anyone on
your code and channel within your range.
•
•
•
•
•
•
•
•
•
•
Incoming message notification
Musical ring tones
Datebook
Audio player
Call forwarding
Messages
Call Timers
Call alerts
Voice records
USB mass storage feature
LINCaround allows you to:
Using LINCaround
• Use code or private mode operation
• Use up to 10 channels
• Communicate with standalone LINCaround
radios
Note: LINCaround is not compatible with older
Family Radio Services products.
To set your phone to LINCaround:
The following features and main menu items will
not be available while in LINCaround:
• On-network phone calls
• On-network InstantLINC Mobile to Mobile calls
• Data transmission
1 From the main menu, scroll to LINCaround and
press O.
2 Select Go to LINCaround.
Switching to LINCaround Please Wait
displays.
After a few seconds, the LINCaround idle screen
appears. The channel you are set to appears on
the first line of the display. The code you are set to
appears on the second line of the display. LA
Ready appears on the third line of the display.
25
LINCaroundSM
Note: When switching from the network to
LINCaround, the last channel and code
that were set appear on the LINCaround
idle screen.
While in LINCaround, this icon M appears on the
display, indicating that there is no network signal
and LINCaround is active.
Exiting LINCaround
To set your phone to network mode when
LINCaround is active:
1 From the LINCaround idle screen, press m.
2 Scroll to LA Options and press O.
3 Select Exit LINCaround.
Tip: You can also exit LINCaround from the
LINCaround idle screen by pressing e for
3 seconds.
Switching to Network Please Wait displays. After
a few seconds, the network idle screen appears.
Talk Range
Phones used in LINCaround mode should be a
minimum of 6 feet apart to maximize performance
and improve transmission range.
26
Channels and Codes
Your phone has 10 channels and 15 codes.
Channels are divided into sets of frequencies that
allow you to make and receive LINCaround calls.
Other parties may also be talking on the same
channel.
Codes help minimize interference from unwanted
messages and other disturbances when you are on
the same channel as others.
To have a conversation, all parties must be on the
same channel and code. For private LINCaround
calls, the person you are calling must be in
LINCaround and set to the same channel to
receive your call.
Note: When making a code call, all parties that
are on your code and channel can hear
your conversation.
To set a channel:
1 From the LINCaround idle screen, press A
under Edit.
2 Scroll to Channel.
3 Press A under Edit.
4 Select a channel.
5 When you are finished, press A under Back to
return to the LINCaround idle screen.
Channels and Codes
To set a code:
1 From the LINCaround idle screen, press A
under Edit.
2 Scroll to Code.
3 Press A under Edit.
4 Select a code.
5 When you are finished, press A under Back to
return to the LINCaround idle screen.
Making and Receiving Code Calls in
LINCaround
To make a code call in LINCaround:
1 Press and hold the PTT button. Transmit
appears on the first line of display. Begin
speaking after your phone emits the
LINCaround tone.
2 Release the PTT button to listen.
The tone emitted from your phone when using
LINCaround is 4 beeps and sounds different from
the standard tone heard with on-network
InstantLINC Mobile to Mobile calls and group calls.
If you receive an error message:
• There may be no parties on your channel or
code.
• You are out of range.
When you receive a code call using LINCaround,
Receive appears on the first line of the display.
Note: An incoming LINCaround call can be
terminated at any time by pressing e.
Receive All
You can set your phone to receive LINCaround
transmissions from any phone that is set to the
same channel, regardless of the code (1-15), by
setting the code to Receive All. When you receive
transmissions with the code set to Receive All, the
display changes from Receive All to the code on
which the transmission was received.
Tip: You can reply to an incoming call within 6
seconds after hearing the short ending
beep by pressing the PTT button.
Note: You cannot initiate a code call when the
code is set to Receive All. If you press
the PTT button with the code set to
Receive All, you will receive an error
message.
To set the code to Receive All:
1 From the LINCaround idle screen, press A
under Edit.
2 Scroll to Code.
3 Press A under Edit.
27
LINCaroundSM
4 Select Receive All.
5 When you are finished, press A under Back to
return to the LINCaround idle screen.
To reply to a call when the code is set to Receive
All:
Press the PTT button.
Private LINCaround Calls
You can have a private conversation with another
person using LINCaround. When on a private
LINCaround call, no other parties can hear your
conversation. In order to make a private
LINCaround Call, you must use the valid 10-digit
Personal Telephone Number (PTN) of the person
you are calling. The person you are calling must be
in LINCaround and set to the same channel to
receive your call.
If you receive an error message:
• You may not be using a valid PTN.
• The person that you are trying to reach may not
be in LINCaround.
• The person that you are trying to reach is set to
a different channel or is out of range.
Private Only
To limit LINCaround to private conversation only,
set your code to Pvt Only. In this mode, code calls
will be ignored and only private calls can be made
or received.
Note: You will be required to enter a valid PTN
before pressing the PTT button.
To set the code to Pvt Only:
1 From the LINCaround idle screen, press A
under Edit.
2 Scroll to Code.
3 Press A under Edit.
4 Select Pvt Only.
Making a Private LINCaround Call
1 Enter the 10-digit PTN of the person you want to
call on your channel. -orScroll to a number or name in Contacts. -orScroll to a number in the recent calls list.
2 Press and hold the PTT button. Begin speaking
after your phone emits the LINCaround tone.
3 Release the PTT button to listen.
The number or name of the person you are calling
will appear in the first line of the display.
28
Making Emergency Calls While in LINCaroundSM Mode
Receiving a Private LINCaround Call
The number or name of the person who initiated
the call will appear in the first line of the display.
Note: You can reply within 6 seconds simply by
pressing the PTT button.
Ending a Private LINCaround Call
A private LINCaround call will end if there is no
communication for 6 seconds.
Note: A private LINCaround call may be
interrupted during the 6 second idle time
by another code call or private call.
You must wait until the phone reconnects to the
network before attempting to make an emergency
911 cellular call.
Setup Options
LINCaround setup options are available in the LA
Options screen in both network and LINCaround
modes.
To access Setup Options in network:
1 From the main menu, select LINCaround.
2 Select Setup.
To access Setup Options in LINCaround:
The display will return to the LINCaround idle
screen.
1 From the main menu, select LA Options.
2 Select Setup.
Making Emergency Calls
While in LINCaroundSM Mode
You can set your phone to:
If you attempt to make an Emergency 911 call
while in LINCaround mode, your phone will
automatically exit LINCaround mode and attempt
to find a network signal.
• Launch directly into LINCaround when you
select LINCaround from the main menu.
• Notify you periodically with a tone that you are in
LINCaround.
If you are out of network coverage your phone will
not be able to make an emergency 911 cellular call
until you go back into the network coverage area.
29
LINCaroundSM
Using Direct Launch
To set your phone to launch LINCaround when you
select LINCaround from the main menu:
1 From the Setup screen, scroll to Direct Launch
and press O.
2 Select On.
Note: If Direct Launch is set to On, you will not
see LA Options when you select
LINCaround from the main menu. In order
to have access to your setup options,
Direct Launch must be set to Off. Or you
can access setup options while in
LINCaround by pressing m and selecting
LA Options.
To turn off Direct Launch:
1 From the Setup screen, scroll to Direct Launch
and press O.
2 Select Off.
Your phone now displays LA Options when you
select LINCaround from the main menu.
Using State Tone
To set your phone to notify you with a tone that you
are in LINCaround:
1 From the Setup screen, scroll to State Tone and
press O.
30
2 Select the time frame during which you want to
be notified that you are in LINCaround.
For example, if you select 1 hour, you will be
notified every hour that you are in LINCaround.
To turn off State Tone:
3 From the Setup screen, scroll to State Tone and
press O.
4 Select Off.
Call Alerts
Sending a call alert lets the recipient know you
want to talk to him or her on an InstantLINC Mobile
to Mobile call.
When you send a call alert, the recipient’s phone
displays your name. The recipient’s phone emits a
series of beeps and the PTT button backlight
flashes slowly, or the phone vibrates.
The recipient can:
• Answer — begin an InstantLINC Mobile to
Mobile call with the sender
• Queue — store the call alert to the call alert
queue, which is a list of call alerts
• Clear — dismiss and delete the call alert
Sending Call Alerts
1 Enter the LINC ID you want to send to, as you
would when making an InstantLINC Mobile to
Mobile call.
2 Press A under Alert. Ready to Alert appears
on the display.
3 Press the PTT button until Alert Successful
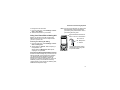
appears on the display.
Note: If the alert is not successful, the person
you are trying to reach is on a call or has
the phone turned off.
Receiving Call Alerts
When you receive a call alert, you must answer,
queue, or clear it. You cannot receive phone calls
or InstantLINC Mobile to Mobile calls until you do.
To answer a call alert:
Press the PTT button to make an InstantLINC
Mobile to Mobile call to the sender.
To queue a call alert:
Press A under Queue.
To clear a call alert:
Press O. -orPress A under Clear. -orIf the flip is closed, press ..
Note: The recent calls list also stores call alerts
you have received. They appear as
InstantLINC Mobile to Mobile calls. Call
alerts remain in your recent calls list until
you delete them or until they reach the
end of the list.
31
Call Alerts
Using the Call Alert Queue
Sending a Call Alert to the Sender
When you queue a call alert, it remains in the call
alert queue until you make an InstantLINC Mobile
to Mobile call to the sender or delete it.
1 From the main menu, select Call Alert.
2 Scroll to the call alert you want to respond to.
3 Press A under Alert. Ready to Alert appears
on the display.
4 Press the PTT button until Alert Successful
appears on the display.
Viewing Call Alerts
1 From the main menu, select Call Alert.
2 Scroll through the list.
Deleting Call Alerts
Viewing Date and Time
To delete a call alert from the queue:
To view the date and time a call alert was received:
1 From the call alert queue, scroll to the call alert
you want to delete.
2 Press m.
3 Select Delete.
4 Press O or press A under Yes to confirm.
1 From the main menu, select Call Alert.
2 Select the call alert you want information on.
Responding to Call Alerts in the
Queue
After you queue a call alert, you can respond to it
by making an InstantLINC Mobile to Mobile call to
the sender or sending a call alert to the sender.
Making an InstantLINC Mobile to Mobile Call to
the Sender
1 From the main menu, select Call Alert.
2 Scroll to the call alert you want to respond to.
3 Press the PTT button to begin the call.
This removes the call alert from the queue.
32
To delete all call alerts from the queue:
1 From the call alert queue, press m.
2 From the call alert menu, select Delete All.
3 Press O or press A under Yes to confirm.
Sorting Call Alerts
Tip: You must have at least one call alert in the
queue to access this feature.
Using the Call Alert Queue
To sort call alerts by the order they were received:
1
2
3
4
From the main menu, select Call Alert.
Press m.
Select Sort By.
Select First on Top or Last on Top.
33
Recent Calls
The recent calls list contains information
associated with calls you have made and received
and call alerts you have received.
When you send or receive InstantLINC Mobile to
Mobile calls, the recent call list contains the
following LINC feature items with those calls:
•
•
•
•
•
contact information received
My Info received
short text messages received
pictures sent or received
Datebook events received
The recent calls list displays up to 20 of the most
recent calls and call alerts.
Viewing the Recent Calls List
With the Flip Open
1 From the main menu, select Recent Calls.
2 Scroll through the list.
To view the details of an item on the list:
From the recent calls list, select the item you
want information on.
34
Tip: To view the details of more items, scroll left
or right.
With the Flip Closed
1 Press ..
2 If you want to view the rest of the recent calls
list, press the volume controls.
3 Press . to dismiss the recent calls list.
Choosing Picture View or List View
You can set your phone to show the picture
associated with each item as you view the recent
calls list or show the list without pictures.
1 From the recent calls list, press m.
2 Select Recent Calls View.
3 Select List View to show the recent calls list
without pictures. -orSelect Picture View to show the picture
associated with each entry.
Calls and Call Alerts
When you make or receive a call to or from a
number not stored in Contacts, the number
appears on the recent calls list.
If the number of a recent call is stored in Contacts,
the following information appears:
LINC Feature Items in InstantLINC Mobile to Mobile Calls
• The name assigned to the number
• The picture assigned to the number, if your
phone is set to show pictures on the recent calls
list. See “Choosing Picture View or List View” on
page 34.
• The Contacts type icon associated with the
number. If the Contacts entry containing the
number has more than one number or address
stored, <> surrounds the Contacts type icon.
For information on Contacts types, see page 41.
When you select a call to view its details, you see
information such as the name associated with the
call, the number, date, time, and duration of the
call.
The LINC ID Contacts type icon appears when you
receive an InstantLINC Mobile to Mobile call or call
alert, even if the number is not stored in Contacts.
LINC Feature Items in
InstantLINC Mobile to Mobile
Calls
Call alerts you have received appear as
InstantLINC Mobile to Mobile calls. Like all items in
the recent calls list, they remain listed until you
delete them or until they reach the end of the list.
For phone calls, an additional icon appears giving
information about the call:
If you select a InstantLINC Mobile to Mobile call,
you see information on the call as well as any LINC
feature items associated with the call. To see more
information about the InstantLINC Mobile to Mobile
call itself from this view, select the call information
displayed.
When you receive a LINC feature item in an
InstantLINC Mobile to Mobile call, an icon appears
indicating the type of item:
d Contact information
X A call you made.
j My Info
W A call you received.
g Picture
V A missed call.
o Events
35
Recent Calls
w Message
# More than one type of LINC feature item from
one LINC ID
Contact Information From Other
Phones
Contact information in the recent calls list displays:
• The name contained in the contact information
• The Contacts type icon associated with the
number or address contained in the contact
information. If the item contains more than one
number or address stored, <> surrounds the
Contacts type icon.
The name or LINC ID of the person who sent the
contact information appears as a separate item on
the recent calls list, above the information sent. If
one person sends you more than one item of
contact information, all the items appear below the
person’s name or LINC ID.
When you select contact information to view its
details, you see the name or LINC ID of the person
who sent the information and all the information in
the item.
36
If you receive contact information with the same
name from the same phone more than once, only
the most recently sent version appears in the
recent calls list.
Messages
The 5 most recent messages received from a LINC
ID are stored with that LINC ID on the recent calls
list.
To view the messages:
1 View the details of the call containing the
messages.
2 Select Messages.
3 If the call contains more than one message,
select the message you want to read.
Delete Messages
To delete one message:
1 While viewing the message you want to delete,
press A under Clear.
2 Press O or press A under Yes to confirm.
To delete all messages contained in a call:
1 View the details of the call containing the
messages.
2 Scroll to Messages.
3 Press A under Clear All.
LINC Feature Items in InstantLINC Mobile to Mobile Calls
4 Press O or press A under Yes to confirm.
To view the events:
Pictures
1 View the details of the call containing the events.
2 Select Events.
3 If the call contains more than one event, select
the event you want to read.
The recent call list contains most recent picture
sent to or received from a LINC ID.
To view the picture:
1 View the details of the call containing the
picture.
2 Select Picture.
Clear the Picture
1 View the details of the call containing the
picture.
2 Select Picture.
3 Press A under Clear.
This does not delete the picture from your phone’s
media center, but it removes it from the recent calls
list, and the picture will not appear on the display
again the next time you receive an InstantLINC
Mobile to Mobile call from the person who sent it.
Datebook Events
The 5 most recent Datebook events received from
a LINC ID are stored with the that LINC ID on the
recent calls list.
Store Events to Datebook
While viewing the event you want to store, press
A under Save.
Note: Save does not appear if the event is
already stored in Datebook.
Delete Events
To delete one event:
1 While viewing the event you want to delete,
press A under Clear.
2 Press O or press A under Yes to confirm.
To delete all events contained in a call:
1 View the details of the call containing the
messages.
2 Scroll to Events.
3 Press A under Clear All.
4 Press O or press A under Yes to confirm.
37
Recent Calls
My Info From Other Phones
My Info from other phones always includes the
sender’s LINC ID. Depending on how the sender
has filled in My Info and set sending options, it may
include the sender names, phone numbers for
phone lines 1 and 2, carrier IP, and circuit data
number.
To view My Info sent to you from other phones:
View the details of the call containing the
messages.
If you receive My Info from the same phone more
than once, only the most recently sent version
appears in the recent calls list.
Storing Items to Contacts
Calls, My Info from other phones, and contact
information from other phones can be stored to
Contacts.
1 From the recent calls list, scroll to or select the
item you want to store.
2 Press A under Save. -orIf Save is not one of your options: Press m.
Select Save or Update Contacts.
38
Tip: If the item you want to store is a call, Save
does not appear if the number is already
stored in Contacts.
3 To store the item as a new entry, select [New
Contact]. -orTo store the number to an existing entry, select
the entry.
Note: Storing My Info or contact information
from another phone to a Contacts entry
that has a name assigned to it does not
change the name of the Contacts entry.
4 If the item you want to store is a call, you must
assign a Contacts type to the number:
With the Contacts type field highlighted, scroll
left or right to display the Contacts type you want
to assign the number.
5 If you want to add more information to the entry,
follow the applicable instructions in “Creating
Entries” on page 42.
6 Press A under Save.
Deleting Items
Deleting Items
To delete an item from the recent calls list:
1 From the recent calls list, scroll to or select the
item you want to delete.
2 Press A under Delete. -orIf Delete is not one of your options: Press m.
Select Delete.
3 Press O or press A under Yes to confirm.
To delete all items on the recent calls list:
1 From the recent calls list, press m.
2 Select Delete All.
3 Press O or press A under Yes to confirm.
Making Calls From the Recent
Calls List
With the Flip Open
1 From the main menu, select Recent Calls.
2 Scroll to the item containing the number you
want to call.
• If you scroll to a call, you can make a call to
the number that made the call. If the number
is stored in Contacts, you can make a call to
any of the numbers stored with it.
• If you scroll to contact information from
another phone, you can make a call to any of
the numbers in the contact information.
3 To place the call now, go to step 4. -orScroll left or right to display the Contacts type for
the number you want to call.
4 To make a phone call, press s. -orTo make an InstantLINC Mobile to Mobile call,
press the PTT button.
You can also make calls while viewing the details
of an item on the recent calls list:
1 From the recent calls list, select the item
containing the number you want to call.
• If you select a call or contact information from
another phone, you can make a call to the
number shown first on the details screen.
• If you scroll to My Info from another phone,
you can make a call to the LINC ID of the
phone that sent the information.
2 To make a phone call, press s. -orTo make an InstantLINC Mobile to Mobile call,
press the PTT button.
39
Recent Calls
With the Flip Closed
1 Press . to display the most recent call.
2 Press the volume controls to scroll to the name
or number you want to call.
• If you scroll to a call, you can make a call to
the number that made the call.
• If you scroll to contact information from
another phone, you can make a call to the
number currently displayed.
3 To make a phone call, press t on the top of
your phone. -orTo make an InstantLINC Mobile to Mobile call,
press the PTT button.
40
Contacts
Contacts stores up to 600 numbers or addresses.
Each Contacts entry can store several numbers or
addresses.
Information stored in Contacts is saved on your
SIM card.
A Contacts entry contains:
• A name — A name is required if you are storing
more than one number or address to the entry;
otherwise, it is optional. Typically, this is the
name of the person whose contact information is
stored in the entry.
• A ring tone — This is the sound your phone
makes when you receive phone calls or call
alerts from any of the numbers stored in the
entry. You can assign the ring tone from your list
of ring tones. If you do not assign a ring tone, the
entry is created with a default ring tone
assigned.
• A picture — This picture appears on the display
when you receive calls from the LINC ID or any
of the phone numbers stored in the entry. You
can assign the picture from the pictures stored
accessible through media center. If you do not
assign a picture, the entry is created with no
picture assigned.
• A Contacts type — Each number or address
stored must be assigned a Contacts type:
A
Mobile
phone number
B
LINC ID
LINC ID number
C
Work1
phone number
D
Work2
phone number
E
Home
phone number
F
Email
email address
G
Fax
phone number
H
Pager
phone number
I
Talkgroup
Talkgroup number
J
IP
IP address
K
Other
phone number
• A number or address — Each Contacts entry
must contain a number or address. This may be
any type of phone number, LINC ID, Talkgroup
number, email address, or IP address.
41
Contacts
Note: You can store numbers up to 64 digits
long, but every 20 digits must be
separated by a pause or wait. See
“Creating Pauses and Waits” on page 48.
• A Speed Dial number — When you store a
phone number, it is assigned a Speed Dial
number. You can accept the default Speed Dial
number or change it.
• A voice name — If you create a voice name for a
number, you can then dial that number by
saying the voice name into your phone. This
icon P appears to the left of the Contacts type
icon if a voice name is assigned.
Accessing Contacts
From the main menu, select Contacts. -orIf you are on a call: Press m. Select Contacts.
Creating Entries
A number or address and a Contacts type are
required for all Contacts entries. Other information
is optional. You may enter the information in any
order by scrolling through the entry details.
After you have entered the number or address,
Contacts type, and any other information you want,
you can press A under Save to save the entry to
Contacts.
42
To cancel a Contacts entry at any time, press e
to return to the idle screen.
To create a Contacts entry:
1 To access the entry details screen:
Select Contacts > [New Contact]. -orFrom the Contacts list, press m. Select New
Contact.
2 If you want to assign a name to the entry:
Select Name.
Enter the name. See “Entering Text” on page
68. When you are finished, press O.
Tip: Press A under Browse to select a name
already in Contacts.
3 If you want to assign a ring tone or picture to the
entry, select [Ring Tone/Picture]. See
“Assigning a Ring Tone or Picture” on page 43.
4 To assign a Contacts type to the number or
address being stored:
Select the Contacts type field.
Select the Contacts type you want to assign.
5 To store a number or address:
Select the # field (or ID for an email address, or
IP for an IP address).
Creating Entries
Enter the number or address. For phone
numbers, use the 10-digit format. For email
addresses, see “Entering Text” on page 68.
Tip: Press A under Browse to select a number
or address from Contacts, the recent calls
list, or Memo.
When you are finished, press O.
2 If you want to assign a ring tone:
With Ringer highlighted, scroll left or right to
choose a ring tone from the list of ring tones.
-orSelect Ringer. Select the ring tone you want to
assign from the ring tones available in the media
center.
6 If you want to change the default Speed Dial
number or a create a voice name for the entry,
select [Options]. See “Assigning a Speed Dial
Number or Voice Name” on page 44.
7 If you want to add more numbers or addresses
to the entry:
3 If you want to assign a picture from the media
center:
Scroll past the information you already entered.
Note: If you choose a picture that is stored on
the memory card, that picture file is
automatically copied or moved to your
phone’s memory according to the rules
described in “Pictures Stored on the
Memory Card” on page 102.
Enter the additional information for the entry
using step 3 through step 6. You must assign a
name to the entry, if you have not already.
8 Press A under Save.
Assigning a Ring Tone or Picture
Note: This feature may require a subscription to
Caller ID to function properly. Contact
your sales representative or
SouthernLINC Wireless.
Select Picture. Select the picture you want to
assign.
Some large pictures cannot be assigned.
Tip: If an entry has a picture assigned and you
want the entry to have no picture, select
[No Picture] or press A under Unassign.
4 When you are finished, press A under Back.
1 If you have not already, select [Ring
Tone/Picture].
43
Contacts
Assigning a Speed Dial Number or
Voice Name
1 If you have not already, select [Options].
2 The default Speed Dial number assigned to a
phone number is displayed in the Speed # field.
This is always the next available Speed Dial
location.
If you want to assign the phone number to a
different Speed Dial location:
With the Speed # field highlighted, press O.
Press A under Delete to delete the current
Speed Dial number.
Enter the new Speed Dial number using the
keypad.
When you are finished, press O.
3 If you want to create a voice name for a phone
number, select Voice Name.
As directed by the screen prompts, say and
repeat the name you want to assign to the
number. Speak clearly into the microphone.
4 When you are finished, press A under Back.
44
Storing Numbers Faster
To store numbers to Contacts from the recent calls
list, see “Storing Items to Contacts” on page 38.
To store numbers to Contacts from Memo, see
“Memo” on page 63.
To store numbers to Contacts from the idle screen:
1 Use the keypad to enter the number you want to
store.
2 Press m.
3 Select Store Number.
4 To store the number as a new entry, select [New
Contact]. -orTo store the number to an existing entry, select
the entry.
5 With the Contacts type field highlighted, scroll
left or right to display the Contacts type you want
to assign the number.
6 If you want to add more information to the entry,
follow the applicable instructions in “Creating
Entries” on page 42.
7 Press A under Done.
Editing Entries
Editing Entries
To view entries from the Contacts list:
1 From the Contacts list, scroll to or select the
entry you want to edit.
2 Press A under Edit. -or-
1 Access Contacts.
2 Scroll to view entries.
Tip: To find Contacts entries faster, use the
keypad to enter the first letter of the name.
If Edit is not one of your options: Press m. Select
Edit.
The entry details screen displays.
3 Follow the applicable instructions in “Creating
Entries” on page 42 to edit the various fields.
Viewing Entries
When you view Contacts entries, you can choose
how much detail you want to see.
Viewing the Contacts List
In this view, each entry shows:
• The name assigned to the entry
• A small version of the picture assigned to the
entry, if you have set Contacts to show pictures
in the Contacts list. See “Choosing Picture View
or List View” on page 46.
• The types of numbers and addresses stored in
the entry
3 If an entry has more than one number or
address stored, <> surrounds the Contacts type
icon. Scroll left or right to view the icon for each
number stored in the entry.
Selecting an Entry
In this view, each entry shows:
• The name assigned to the entry
• A small version of the picture assigned to the
entry
• The name of the ring tone assigned to the entry
• The numbers and addresses stored in the entry
To select an entry:
1 From the Contacts list, select the entry you want
to view.
2 Scroll to view the numbers and addresses
stored in the entry.
Tip: To select other entries: Scroll left or right.
Or, press # or *.
45
Contacts
To return to the Contacts list, press A under
Back.
To return to the entry, press A under Back or
press O.
Viewing More Details
Choosing Picture View or List View
When an entry is selected, you can view more
details about the entry by selecting items within the
entry.
You can set Contacts to show the picture assigned
to each entry as you view the Contacts list or show
the Contacts list without pictures.
Viewing Details of a Number or Address
1 From the Contacts list, press m.
2 Select Contacts View.
3 Select List View to show the Contacts list
without pictures. -or-
1 Select the entry.
2 Select the number or address you want to view
details of.
If you select a phone number, you can view its
Speed Dial number and see whether it has a
voice name.
To return to the entry, press A under Back or
press O.
Viewing a Large Picture
To view a large version of the picture assigned to
an entry:
1 Select the entry.
2 Select the first item shown on the entry screen.
This item shows the name assigned to the entry
or No Name.
Note: You cannot make calls from this view.
46
Select Picture View to show the picture
assigned to each entry.
Searching for a Name
To search for a name in Contacts:
1 From the Contacts list, press A under Search.
-orIf Search is not one of your options: Press m.
Select Search.
2 Enter the name you want to see. See “Entering
Text” on page 68.
3 Press O.
Your phone finds the name you entered or the
nearest match.
Deleting Entries
Showing Only LINC IDs and
Talkgroups
To set Contacts to show only entries that contain
LINC IDs and Talkgroup entries:
1 From the Contacts list, press m.
2 Select Filter.
3 Set this option to Show Prvt/Grp.
To set Contacts to show all entries:
Delete a Number or Address
1 From the Contacts list, scroll to the entry that
contains the number or address you want to
delete.
2 Scroll left or right to display the Contacts type for
the number you want to delete. -orSelect the entry. Scroll to or select the number
you want to delete.
Deleting Entries
3 Press m.
4 Select Delete Number.
5 Press O or press A under Yes to confirm.
Note: If an entry contains only one number or
address, deleting the number or address
deletes the entry.
Delete an Entry
Checking Capacity
1 From the Contacts list, scroll to or select the
entry you want to delete.
2 Press m.
3 To delete the entire entry, select Delete
Contact.
4 Press O or press A under Yes to confirm.
To see how many numbers are stored in Contacts:
1 From the Contacts list, press m.
2 Select Filter.
3 Set this option to Show All.
1 From the Contacts list, press m.
2 Select Capacity.
47
Contacts
Creating Pauses and Waits
When storing a number, you can program your
phone to pause or wait between digits while
dialing. A pause makes your phone pause for 3
seconds before dialing further. A wait makes your
phone wait for your response before dialing further.
This feature is useful when using voice mail or
other automated phone systems that require you to
dial a phone number and then enter an access
number.
To program a pause:
Press and hold * until the letter P appears. The
P represents a 3-second pause.
If you store 17035551235W1234, when you select
this number and make a call, your phone dials the
first 11 digits and then waits. A message appears
asking if you want to send the rest of the digits.
Press A under Yes to dial the last 4 digits.
Tip: You can create pauses and waits while
dialing a number from the keypad. See
“Creating Pauses and Waits While Dialing”
on page 55.
International Numbers
For more information, please contact your sales
representative or SouthernLINC Wireless at
1-800-406-0151.
If you store 17035551235P1234, when you select
this number and make a call, your phone dials the
first 11 digits, pauses for 3 seconds, then dials the
last 4 digits.
Making Calls From Contacts
If you want a pause longer than 3 seconds, press
and hold * more than once. Each P represents a
3-second pause.
1 Access Contacts.
2 Scroll to the name or number you want to call.
Tip: To find Contacts entries faster, use the
keypad to enter the first letter of the name.
To program a wait:
Press and hold * until the letter W appears. The
W means your phone waits before dialing
further.
48
While Viewing the Contacts List
3 To place the call now, go to step 4. -orScroll left or right to display the Contacts type for
the number you want to call.
Accessing Contacts with GSM Phones
4 To make a phone call, press s. -orTo make an InstantLINC Mobile to Mobile call,
press the PTT button.
If you are making an InstantLINC Mobile to Mobile
call, your phone places the call to the LINC ID
stored in the Contacts entry, even if the
InstantLINC Mobile to Mobile icon is not displayed.
If you are making a phone call:
• Your phone places the call to the phone number
assigned to the Contacts type displayed.
• If the Contacts type displayed is not a phone
number, your phone places the call to the phone
number stored in the Contacts entry.
• If the Contacts type displayed is not a phone
number and you have more than one phone
number stored in the Contacts entry, your phone
prompts you to select the phone number you
want to place the call to.
To make an InstantLINC Mobile to Mobile call,
press the PTT button.
If you try to make a type of call that does not match
the Contacts type of the number you chose, no call
is placed.
Accessing Contacts with GSM
Phones
If you plan to use the information stored in
Contacts with an i2000, i2000plus, or any other
GSM phone, download iDEN Phonebook Manager.
Go to idenphones.motorola.com/iden/support for
more information.
You can use iDEN Phonebook Manager to make
the Contacts information saved to your i880
phone’s SIM card accessible in this type of phone.
After Selecting an Entry
1 Access Contacts.
2 Select the Contacts entry that contains the
number you want to call.
3 Scroll to or select number you want to call.
4 To make a phone call, press s. -or-
49
Call Forwarding
Call forwarding sends calls to the phone numbers
you specify. You can forward all calls to one
number or forward missed calls to different
numbers depending on the reason you missed the
call.
You can forward phone lines 1 and 2
independently.
Forwarding All Calls
When you set your phone to forward all calls, an
icon appears in the top row of the display:
G Phone line 1 is active; calls to phone line 1
are being forwarded.
I Phone line 1 is active; calls to phone line 2
are being forwarded.
H Phone line 1 is active; calls to phone lines 1
and 2 are being forwarded.
J Phone line 2 is active; calls to phone line 1
are being forwarded.
L Phone line 2 is active; calls to phone line 2
are being forwarded.
50
K Phone line 2 is active; calls to phone lines 1
and 2 are being forwarded.
To forward all calls:
1 From the main menu, select Call Forward >
Forward > All Calls.
2 Select To.
If you specified a forwarding number for all calls
before, this number displays.
To forward calls to this number, press A under
Back.
To delete this number, press O, then press and
hold A under Delete.
3 To enter the number you want to forward calls to:
Enter the number using your keypad. -orPress A under Search. Select Contacts,
Recent Calls, or Memo. Select the number you
want to enter.
4 Press O.
All your calls are now forwarded to the number
you specified.
Turning Off Call Forwarding
Turning Off Call Forwarding
If you do not want all your calls forwarded, turn the
feature off:
1 From the main menu, select Call Forward > To.
2 Set this option to Off.
All your calls are now sent to your phone.
Calls you miss are forwarded according to the
options set for missed calls. By default, missed
calls are forwarded to voice mail.
Note: To receive voice mail messages, you
must first set up a voice mail account with
SouthernLINC Wireless.
Forwarding Missed Calls
Note: If you want a type of missed call sent to
voice mail, the call forwarding number for
that type of missed call must be your
voice mail access number.
To forward missed calls:
1 From the main menu, select Call Forward >
Forward > Detailed.
2 Select If Busy to specify a forwarding number
for calls received when your phone is busy.
3 If you specified a forwarding number for this type
of call before, this number displays.
To forward calls to this number, press B under
Back and go to step 6. -orTo delete this number, press O, then press and
hold A under Delete.
You can specify a forwarding number for each type
of missed call:
4 To enter the number you want to forward this
type of call to:
• If Busy — Your phone is on a call or transferring
data.
• If No Answer — You do not answer on the first
4 rings.
• If Unreachable — Your phone is out of
coverage or powered off.
Enter the number using your keypad. -orPress A under Search. Select Contacts,
Recent Calls, or Memo. Select the number you
want to enter.
5 Press O.
6 Repeat step 2 through step 5 for If No Answer
and If Unreachable.
7 When you are finished, press A under Back.
51
Call Forwarding
Viewing Call Forwarding
Settings
1 From the main menu, select Call Forward >
Forward > All Calls.
2 With To highlighted, press A under Status.
52
Advanced Calling
Features
Call Waiting
Call Waiting lets you receive a second call while on
an active call. Call Waiting is always available,
unless you turn it off for a specific call.
If you are on a call and receive a second call, your
phone emits a tone and displays a message saying
you are receiving a second call.
To accept the second call and put the active call on
hold:
Press A under Yes.
To accept the second call and end the active call:
1 Press e.
Your phone rings with the second call.
2 Answer the second call.
To decline the second call:
Press A under No. If you subscribe to voice
mail, the call is forwarded to your voice mail box,
unless you set Call Forward for If Busy to a
different number.
Turn Off Call Waiting
To turn off Call Waiting during a call:
1 Press m.
2 Select In Call Setup > Call Waiting.
3 Set this option to Off.
Tip: To turn Call Waiting back on while still on
the call, set this option to On.
To turn off Call Waiting for the next call you make
or receive:
1 From the main menu, select Settings > Phone
Calls > Call Waiting.
2 Set this option to Off.
Call Waiting is turned back on when you end the
call.
Switching Between Calls
Any time you have one call active and one call on
hold, to make the call on hold active and put the
active call on hold:
Press A under Switch. -orIf Switch is not one of your options: Press m.
Select Switch.
53
Advanced Calling Features
Putting a Call on Hold
Merging 2 Calls Into a 3-Way Call
1 While on an active call, press m.
2 Select Hold.
After you put a call on hold and place a second
call, you can combine these calls into a 3-way call:
If you want to make the call active again, press A
under Resume.
1 Press m.
2 Select Join.
Calling 2 People
All 3 people in the call can speak to and hear each
other.
Note: To disconnect one party from a 3-way call,
you must advise either caller to hang up.
You cannot disconnect one party at a
time.
Putting a Call on Hold, Making a
Second Call
1
2
3
4
Place or receive a phone call.
While the call is active, press m.
Select 2nd Call. This puts the call on hold.
Enter the second phone number you want to
call.
Tip: For quick ways to enter the number, press
m.
5 Press s to place the call.
To end the second call and make the call on hold
active again:
Press e.
To make the call on hold active and put the active
call on hold:
Press A under Switch.
54
Making a 3-Way Call
1
2
3
4
Place or receive a phone call.
While the call is active, press m.
Select 3 Way. This puts the call on hold.
Enter the second phone number you want to
call.
Tip: For quick ways to enter the number, press
m.
5 Press s to place the call.
6 Press A under Join.
All 3 people in the call can speak to and hear each
other.
Creating Pauses and Waits While Dialing
Note: You cannot make any other calls after you
have joined a 3-way call, even if one party
disconnects.
Creating Pauses and Waits
While Dialing
You can enter a pause or wait while dialing a
number. For information on using pauses and
waits, see “Creating Pauses and Waits” on page
48.
To create a pause while dialing a phone number:
1 From the keypad, enter the digits you want to
occur before the pause.
2 Press m.
3 Select Insert Pause.
4 Enter the digits you want to occur after the
pause.
Making International Calls
For more information, please contact your sales
representative or SouthernLINC Wireless at
1-800-406-0151.
Setting Flip Actions
For Answering Calls
To set your phone to answer calls when you open
the flip:
1 From the main menu, select Settings > Phone
Calls > Flip Activation > Flip to Ans.
2 Set this option to On.
To set your phone not to answer calls when you
open the flip:
Set Flip to Ans to Off in step 2.
To create a wait while dialing a phone number:
For Ending Calls
1 From the keypad, enter the digits you want to
occur before the wait.
2 Press m.
3 Select Insert Wait.
4 Enter the digits you want to occur after the wait.
To set your phone to end calls when you close the
flip:
1 From the main menu, select Settings > Phone
Calls > Flip Activation > Flip to End.
2 Set this option to On.
55
Advanced Calling Features
To set your phone not to end calls when you close
the flip:
Set Flip to End to Off in step 2.
Note: If you are using your phone with a
headset, and you have the Flip to End
option set to On, closing your flip sends
incoming sound to the headset and does
not end the call.
Group Calls
A group call is similar to an InstantLINC Mobile to
Mobile call, but is made to all members of a
Talkgroup at once. A Talkgroup is a predetermined
group of SouthernLINC Wireless customers.
Before you can make or receive group calls, a
Talkgroup must be established. After the Talkgroup
is established, you must join the Talkgroup.
Joining a Talkgroup
Your sales representative or SouthernLINC
Wireless establishes Talkgroups for you and
assigns each Talkgroup a Talkgroup number. You
can choose a name for each of your Talkgroups
when you create entries for them in Contacts.
56
To receive group calls made to any of these
Talkgroups, you must join the Talkgroup.
1 Press A under Contcs. -orFrom the main menu, scroll to Contacts and
press O.
2 Scroll to the Talkgroup you want to join.
3 Press A under Join.
Note: You can only monitor one Talkgroup at a
time.
Making Group Calls
1 Press #. Then enter the Talkgroup number
using the keypad. -orChoose the Talkgroup name from Contacts or
recent calls list.
2 Proceed as if making an InstantLINC Mobile to
Mobile call.
Receiving Group Calls
To answer a group call:
Proceed as if answering an InstantLINC Mobile
to Mobile call. Only one person at a time may
speak on a group call.
Call Timers
The LINC ID or name of the person who is
speaking will appear on the display below the
Talkgroup number.
Turning off Group Calls
To set your phone to prevent you from hearing
group calls to your Talkgroup:
1 From the main menu, select Settings >
InstantLINC > Tkgrp Silent.
2 Set this option On.
To set your phone to let you hear group calls to
your Talkgroup:
Set Tkgrp Silent to Off in step 2.
Call Timers
Call timers measure the duration of your phone
calls, InstantLINC Mobile to Mobile calls, or group
calls, and circuit data use, as well as the number of
Kilobytes sent and received by your phone:
• Last Call — displays the duration of your most
recent phone call.
• Phone Reset — keeps a running total of your
phone call minutes, until you reset it.
• Phone Lifetime — displays the total minutes of
all your phone calls.
• Prvt/Grp Reset — keeps a running total of all of
your InstantLINC Mobile to Mobile calls and
group call minutes, until you reset it.
• Prvt/Grp Lifetime — displays the total minutes
of all your InstantLINC Mobile to Mobile calls
and group calls.
• Circuit Reset — keeps a running total of all of
your circuit data use, until you reset it.
• Circuit Lifetime — displays the total minutes of
all of your circuit data use.
• Kbytes Reset — keeps a running total of the
number of Kilobytes sent and received by your
phone, until you reset it.
To view or reset a timer:
1 From the main menu, select Call Timers.
2 Select the feature you want to view or reset.
3 To view a feature without resetting: Press O
when you are finished viewing. -orTo reset a feature: Press A under Reset. Press
O or press A under Yes to confirm.
Note: The values displayed by Call Timers
should not be used for billing. Call timers
are estimates only.
57
Advanced Calling Features
Using Your Phone as a
Modem
Note: Contact your SouthernLINC Wireless
sales representative for more information
on this feature.
You can use your phone as a modem with a laptop,
handheld device, or desktop computer. In order to
use your phone as a modem, you must create
either a wired or wireless connection between your
phone and the other device.To connect your phone
wirelessly, you must have a Bluetooth adapter for
the other device. To create a wired connection, use
a data cable.
Connecting with a Data Cable
To use a data cable to connect your phone to a
laptop, handheld device, or desktop computer:
1 Open the connector cover.
connector
cover
2 With the phone’s display facing up, insert a data
cable’s connector into the accessory connector,
until you hear a click.
58
Features for the Hearing Impaired
3 Insert the data plug into the data port of the
other device.
When used as a modem, your phone has these
data transfer modes:
Connecting with Bluetooth
• Circuit data — used for sending and receiving
faxes and for transferring large files
• Packet data — used for small file transfers such
as email
To use your phone as a modem via Bluetooth, the
laptop, handheld device, or desktop computer you
want to connect to must have a Bluetooth adapter
installed.
Check that the adapter is properly installed, and
then follow the specific instructions outlined in the
device’s user guide to connect the device to your
phone.
Features for the Hearing
Impaired
Making TTY Calls
About Data Transfer Modes
To use your phone to make phone calls using a
teletypewriter (TTY) device:
When used as a modem, your phone has these
data transfer modes:
1 Connect one end of a 2.5mm cable into the
audio jack on your phone. Connect the other
end of the cable to your TTY device.
2 Make sure that your phone’s TTY feature is on
and select the TTY mode you want to use.
3 Use your phone to enter phone numbers and
make calls.
• Circuit data — used for sending and receiving
faxes and for transferring large files
• Packet data — used for small file transfers such
as email
To use these services, you must install the iDEN
Wireless Data Services software (available
separately). For more information on setting up
your computer and your i880 phone for packet and
circuit data calls, refer to the Wireless Data
Services User’s Guide or contact SouthernLINC
Wireless.
When you make a TTY call, these icons appear on
the phone’s display:
N Phone call is active.
O Phone call is on hold.
59
Advanced Calling Features
TTY device features such as Turbo-Code,
High-Speed, and Interruption are not supported by
your phone. These features must be turned off or
disabled to use your TTY device with your phone.
Turning On the TTY Feature
Your phone’s TTY feature must be on if you want
to make TTY calls, set the TTY mode, or change
the TTY baud rate. To make sure the TTY feature
is on:
From the main menu, select Settings > Phone
Calls > TTY > Use TTY. This field must say On.
Choosing a Mode
Your phone supports these TTY modes:
• TTY — You type and read text on your TTY
device.
• VCO (Voice-Carry-Over) — You speak into your
phone and read text replies on your TTY device.
• HCO (Hearing-Carry-Over) — You type text on
your TTY device and listen to voice replies on
your phone speaker.
To change mode while not in a call:
1 From the main menu, select Settings > Phone
Calls > TTY > Type.
2 Select the TTY mode you want.
60
When you make a TTY call, the call begins in the
TTY mode you last selected.
To change mode during a call using your phone:
1 Press m.
2 Select In Call Setup > TTY > Type.
3 Select the mode you want.
To change mode during a call using your TTY
device, issue one of the following commands:
• “VCO please” — to select VCO mode
• “HCO please” — to select HCO mode
• “HCO off please” — to turn off HCO mode
Important: When you are using HCO, the sound
coming from your phone speaker may
be uncomfortably loud. Use caution
when putting the phone to your ear.
(For information on setting the volume
of your phone speaker, see “Setting the
Volume” on page 176.)
Changing the TTY Baud Rate
By default, your phone’s TTY baud rate is set to
45.45, the baud rate required for TTY calls within
the U.S. To make calls outside the U.S., set your
TTY baud rate to 50.00.
Features for the Hearing Impaired
To change the TTY baud rate:
1 From the main menu, select Settings > Phone
Calls > TTY > Baud.
2 Select the baud rate for your location.
Using Your Phone With a Hearing Aid
Note: If you are unsure whether your hearing aid
is equipped with a telecoil, please ask
your hearing care professional or refer to
your hearing aid user guide.
Approximate telecoil location is
within 6-13 mm of this location.
Setting your phone for use with a hearing aid
affects sounds from the phone’s earpiece when
you are in a phone call.
Off - Shut off
Choosing Your Hearing Air Setting
T - Telecoil
1 From the main menu, select Settings > Phone
Calls > Hearing Aid.
2 Set this option to Telecoil. Telecoil coupling is
now optimized. -orSet this option to Microphone. Microphone
coupling is now optimized.
M - Microphone
Approximate telecoil location,
check hearing aid user guide
for specific location.
If Your Hearing Aid Is Equipped With a Telecoil
Activate the telecoil setting for your behind the ear
hearing aid (BTE). Once the telecoil is activated,
your hearing aid will be adjusted for optimum
handset use. When the telecoil is active, the
microphone is inactive, eliminating any chance of
feedback (squeal). The handset is inductively
coupled directly to your hearing aid, enabling clear,
feedback-free telephone usage.
61
Advanced Calling Features
Optimize Your Handset Orientation for Telecoil
Slide your phone up and down, left and right, then
rotate for the best coupling alignment of the telecoil
in the hearing aid with the telecoil in the phone.
62
Memo
Memo lets you store a number, make a call to that
number, and save it to Contacts.
To create a memo:
1 From the main menu, select Memo.
2 Enter the number using your keypad.
3 Press O.
To view the memo later:
From the main menu, select Memo.
To delete the memo:
To store the memo number to Contacts:
1
2
3
4
From the main menu, select Memo.
Press m.
Select Store to Contacts.
To store the number as a new entry, select [New
Contact]. -orTo store the number to an existing entry, select
the entry.
5 With the Contacts type field highlighted, scroll
left or right to display the Contacts type you want
to assign the number.
6 Press A under Save.
1 From the main menu, select Memo.
2 Press and hold A under Delete.
3 Press O.
To edit the memo:
1 From the main menu, select Memo.
2 Enter the new number.
3 Press O.
To make a call to the memo number:
1 From the main menu, select Memo.
2 To make a phone call, press s. -orTo make an InstantLINC Mobile to Mobile call,
press the PTT button.
63
Ring Tones
To set the ring tone your phone makes when you
receive phone calls, call alerts, message
notifications, pictures sent using LINC View, or
Datebook reminders:
1 From the main menu, select Ring Tones.
2 Make sure Vibrate All is set to Off.
3 Scroll through the list of ring tones and select the
one you want to assign. Vibrate sets your phone
to vibrate instead of making a sound; Silent sets
your phone to neither vibrate nor make a sound.
Tip: Highlighting a ring tone lets you hear it.
4 Select the features you want to assign the ring
tone to.
5 When you are finished, press A under Done.
Note: This icon M appears on the display if you
set your phone to neither vibrate nor make
a sound for phone calls.
Setting Your Phone to Vibrate
You can set your phone to vibrate instead of
making a sound when you receive all phone calls,
InstantLINC Mobile to Mobile calls, group calls, call
alerts, messages notifications, pictures sent using
LINC View, and Datebook reminders.
64
1 From the main menu, select Ring Tones >
Vibrate All.
2 Set this option to On or Locked.
Setting this option to On lets you turn Vibrate All
off by pressing the up volume control. Setting this
option to Locked requires you to press and hold
the up volume control to turn Vibrate All off. The
Locked option helps prevent you from accidentally
turning Vibrate All off.
Tip: To set Vibrate All to On or Locked using
the volume controls: Press the volume
controls to turn down the volume as far as
possible to set Vibrate All to On. Continue
to hold the down volume control to set
Vibrate All to Locked.
To set your phone to vibrate instead of making a
sound for some features but not others:
1
2
3
4
From the main menu, select Ring Tones.
Make sure Vibrate All is set to Off.
Select Vibrate from the list of ring tones.
Select the features you want to set to make no
sound.
5 When you are finished, press A under Done.
Note: To set ring options for InstantLINC Mobile
to Mobile calls and group calls, see
“Setting Your Phone to Vibrate” on page
176.
Ring and Vibrate
These icons indicate how the ringer is set.
Q The phone always vibrates instead of making
a sound.
Assigning Ring Tones to
Contacts
Note: This feature requires a subscription to
Caller ID to function properly. Contact
your sales representative or
SouthernLINC Wireless for more
information.
R The phone vibrates instead of making a
sound for phone calls.
u Group calls and InstantLINC Mobile to Mobile
calls are heard through the earpiece, not the
speaker.
These icons may appear at the same time.
Ring and Vibrate
To set your phone to ring and vibrate when you
receive phone calls or call alerts:
1 From the main menu, select Ring Tones.
2 Make sure Vibrate All is set to Off.
3 Scroll through the list of ring tones and highlight
the one you want to assign.
4 Press m.
5 Select Assign w/Vibe.
6 Select the features you want to set to ring and
vibrate.
7 When you are finished, press A under Done.
This icon S appears on the display.
You can set the ring tone your phone makes when
you receive phone calls or call alerts from
someone you have stored in Contacts.
1 From the main menu, select Ring Tones.
2 Make sure Vibrate All is set to Off.
3 Scroll through the list of ring tones and select the
one you want to assign.
4 Select A Contact.
5 Select the Contacts entry you want to assign the
ring tone to.
Viewing Ring Tone
Assignments
1
2
3
4
From the main menu, select Ring Tones.
Make sure Vibrate All is set to Off.
Highlight any ring tone.
Press m.
65
Ring Tones
5 Select Overview.
6 Scroll to view ring tones assigned to features
and Contact entries.
Managing Memory
Downloading More Ring
Tones
1
2
3
4
5
If you want to use other ring tones, you can
download them into your phone for a fee. Go to
www.southernlinc.com/downloads for a selection
of custom ring tones and downloading instructions.
Note: Ring tones purchased from this web site
may be downloaded only once. If you
delete a ring tone from your phone, you
must purchase it again to download it
again.
About DRM Ring Tones
Your phone supports gifting and Tell-A-Friend
services for DRM ring tones. However, these
services may not be offered by SouthernLINC
Wireless. Please contact SouthernLINC Wireless
for more information about these services.
For more information about DRM items, see
“Digital Rights Management” on page 119.
66
To view the amount of memory available for
custom ring tones:
From the main menu, select Ring Tones.
Make sure Vibrate All is set to Off.
Highlight any ring tone.
Press m.
Select Memory Usage.
Deleting custom ring tones frees memory.
Note: Ring tones are stored in your phone using
the same memory space used to store
messages, voice records, pictures,
videos, audio recordings, and Java
application data that are stored in your
phone’s memory. Deleting or moving
some of these other items frees memory
for ring tones.
Deleting Custom Ring Tones
Deleting a ring tone from the list of ring tones
deletes it from all parts of your phone, including the
media center and Contacts.
Deleting Custom Ring Tones
Except for DRM ring tones, if you delete a ring tone
that you purchased from your phone, you will have
to purchase it again. Under certain conditions,
some DRM vendors will not charge you if you
download an item multiple times within a given time
frame. Please contact the DRM vendor to learn
more about their download regulations.
To delete a custom ring tone:
1
2
3
4
5
6
From the main menu, select Ring Tones.
Make sure Vibrate All is set to Off.
Scroll to the ring tone you want to delete.
Press m.
Select Delete.
Press A under Yes to confirm.
67
Entering Text
Using Word Mode
You can enter text, numbers, and symbols into
your phone using Alpha, Word, Numeric, or
Symbol text input modes.
In Word mode, T9 Text Input analyzes the letters
on the keypad button you press and arranges them
to create words. As you type, T9 Text Input
matches your keystrokes to words in its database
and displays the most commonly used matching
word. You can add your own words to this
database.
l Alpha — Press a key several times for each
character.
j Word — Press a key once for each letter
while words likely to be the one you want are
chosen from a database.
k Numeric — Enter numbers.
i Symbols — Enter punctuation and other
symbols.
When you access a screen that requires you to
enter text, you start in the mode last used.
To choose a text input mode:
1 At a screen that requires you to enter text, press
m.
2 Select the text input mode you want to use. A
checkmark appears next to the current mode.
68
Entering a Word
1 Select Word as your text input mode.
2 Type a word by pressing one key for each letter.
For example, to type “test” press 8 3 7 8.
The displayed word may change as you type it.
Do not try to correct the word as you go. Type to
the end of the word before editing.
3 If the word that appears is not the desired word,
press 0 to change the word on the display to
the next most likely word in the database.
Repeat until the desired word appears.
If the desired word does not appear, you can add it
to the database.
Special Function Keys
Adding Words to the Database
Capitalization
1
2
3
4
When you press and hold the # key, it acts as a
3-way toggle. Press and hold # to make the next
letter typed uppercase (shift), to make all
subsequent letters typed uppercase (caps lock), or
to go back to lowercase letters.
Select Alpha as your text input mode.
Type the word using Alpha mode.
Select Word as your text input mode.
Press #.
The word you typed in Alpha text entry mode is
now in the database.
Note: You cannot store alphanumeric
combinations, such as Y2K.
Choosing a Language
To change the language of the database:
1 At a screen that requires you to enter text, press
m.
2 Select Languages.
3 Select the language you want for your database.
Special Function Keys
Some of the phone’s keys assume different
functions while in Alpha or Word mode.
Spaces
Press # for a space.
These icons appear:
m or X Shift is on.
n or W Caps lock is on.
When neither of these icons appear, letters typed
are lowercase. Scrolling up after typing a letter
makes that letter uppercase.
Note: When creating a text message, you may
not be able to make a letter uppercase by
scrolling up, depending on the type of text
message and the text entry mode.
Your phone automatically makes the first letter of a
sentence uppercase.
Punctuation
Press 1 or 0 to insert punctuation. Continue to
press the key to view the list of symbols available
through that key. Pause to select the symbol you
want.
69
Entering Text
Note: Additional punctuation symbols are
available in Symbols mode.
Deleting Characters
Press * or press A under Delete.
Using Numeric Mode
1 Select Numeric as your text input mode.
2 Press the number buttons on your keypad to
enter numbers.
Using Symbols Mode
1 Select Symbols as your text input mode.
A row of symbols appears along the bottom of
the phone’s display. Scroll right to view the
complete row.
Press O to select the highlighted symbol.
70
Messages
You can receive the following types of messages
on your phone:
• Voice mail messages
• Depending on your service provider, you may
have the option to receive Short Message
Service (SMS) text messages, fax mail, and Net
alerts.
If you dismiss the notification, the message is not
deleted. It can be accessed through the message
center.
If you are not on a phone call when you receive a
message, your phone sounds a notification tone
every 30 seconds until you access the message,
you dismiss the notification, or the alert time-out
expires.
Setting Notification Options
You have 2 ways to access the messages you
receive:
To control whether your phone sounds message
notification tones while you are on phone calls:
• Respond to the message notification that
appears when the message is received.
• Dismiss the message notification and access
the message later through the message center.
1 From the main menu, select Settings > Phone
Calls > Notifications.
2 Select the option you want:
• Receive All — Tones sound during calls for
all types of messages.
• Message Mail Only — Tones sound during
calls for SMS messages; tones for all other
types of messages are held until you end
calls.
• Delay All — Tones for all types of messages
are held until you end calls.
Tip: To set notification options during a call:
Press m. Select In Call Setup >
Notifications.
You can listen to or view these messages, delete
them, or continue to store them in the message
center.
Message Notifications
When you receive a message, your phone notifies
you with text on the display and a notification tone
or vibration. You can access the message or
dismiss the notification.
71
Messages
Message Center
The message center manages your messages.
All your messages are stored in the message
center. The message center shows how many
messages you have of each type.
To access your messages through the message
center:
1 From the main menu, select Messages.
2 Scroll to the type of message you want to
access.
3 Press O or press A under the display option on
the left.
72
Voice Mail Messages
Note: To receive voice mail messages, you
must first set up a voice mail account with
SouthernLINC Wireless.
Receiving a Message
When you receive a voice mail message, New
Voice Mail Message appears on the display.
Sending Unanswered Calls to
Voice Mail
To send a phone call to voice mail instead of
answering it:
If the flip is closed, press .. -orPress e. -orPress A under No.
To call the SouthernLINC Wireless voice mail
system and listen to the message:
Press A under Call.
To dismiss the message notification:
If the flip is closed, press .. -orIf the flip is open, press O or press A under
Back, or close the flip.
If the caller leaves a message, this icon y
appears on the display, reminding you that you
have a new message.
Accessing Voice Mail From
the Message Center
From the main menu, select Messages > Voice
Mail.
73
Text Messaging
Your phone can send and receive short messages.
Setting Up
Before you begin using Text messaging, you may
need to set up your signature, service center
number, and expiration information:
1
2
3
4
5
From the main menu, select Messages.
Scroll to Text Inbox.
Press m.
Select Text Msg Setup.
Select Signature.
Enter your signature. It may be up to 11
characters long. When you are finished, press
O.
6 Select Dlvy Rpt Default.
Set this option to On if you want your messages
to be automatically set to send you a report
confirming that your message was delivered.
You can change the delivery report setting for
each message as you create that message.
74
7 Select Srvc Cntr No.
Enter the phone number of your service center.
If you do not know this number, contact
SouthernLINC Wireless.
When you are finished, press O.
8 Select Expire After.
This is the amount of time messages you send
are saved at the service center if they cannot be
delivered. After this period, they are discarded.
Scroll to select the number of days you want
your messages to be saved.
When you are finished, press O.
9 Select Auto Clean Up. Set this option to On if
you want your phone to delete sent messages.
If you set Auto Clean Up to On, select Clean
Up After to set the number of days after which
sent messages are deleted or the number of
messages to be kept.
10Press A under Done to save the information
you entered.
Receiving a Message
Receiving a Message
To view the message:
Press A under Read.
To dismiss the message notification:
If the flip is closed, press .. -orIf the flip is open, press A under Back or close
the flip.
If your phone is powered off when you receive a
text message, your phone notifies you the next
time you power it on. If you are out of your
coverage area, your phone alerts you when you
return to your coverage area.
Tip: While reading a text and numeric message
that contains a phone number, you can
press s to call that number.
Reading from the Message
Center
1 From the main menu, select Messages > Text
Inbox.
2 Select the message you want to read. -orPress the number of the message you want to
read.
3 If the message fills more than one screen, scroll
to read it.
Tip: Scrolling through one message lets you
view the next message.
4 To save the message, press O. -orTo reply to the message, press A under Reply.
-orTo see all other choices, including forwarding
and deleting the message, calling the sender, or
storing the sender’s number in Contacts, press
m.
Creating and Sending
Messages
From the Message Center
1 From the main menu, select Messages.
2 Select [Create Message]. -orSelect Text Inbox, Drafts, or Text Outbox.
Then select [Create Message].
3 To address the message:
Use the keypad to enter the phone number of
the person you want to send the message to and
press O. -or-
75
Text Messaging
Press A under Concts. Scroll to the entry
containing the phone number you want to send
the message to. If the entry has more than one
phone number stored, scroll left or right to view
the Contacts types until you see the icon for the
phone number you want to send a message to
Press O. -orPress m. Select Recent Calls. Select the
number you want to enter from the recent calls
list. -orPress m. Press A under Browse. Select
Contacts, Recent Calls, or Memo. Select the
number you want to enter.
Repeat this action to enter more phone
numbers.
When you are finished, press under Back.
4 Enter the text of the message. -orTo use a quick note: Press A under Browse.
Scroll to the quick note you want. For more
information on quick notes, see “Quick Notes”
on page 77.
When you are finished, press O.
5 If you want to send the message, press A
under Send. -orTo edit the message, scroll to Msg and press O.
-or76
To delete the message without sending it, press
A under Cancel. -orIf you want to change the delivery report setting
for this message only, save the message as a
draft, or set the sending method, press m. Select
the option you want.
From Contacts
1 From the Contacts list, scroll to or select the
entry containing the phone number you want to
send the message to.
2 If the entry has more than one phone number
stored, view the phone number you want to send
the message to.
3 Press A under Create. -orIf Create is not one of your options: Press m.
Select Compose SMS.
The message is automatically addressed to the
phone number you chose.
4 Follow step 4 through step 5 of “Creating and
Sending Messages” on page 75.
Quick Notes
From the Recent Calls List
Quick Notes
1 From the recent calls list, scroll to the name you
want to send a message to.
2 If the entry has more than one phone number
stored, view the phone number you want to send
the message to.
3 Press A under Create. -or-
Quick notes are short, pre-written text messages
that you can insert as the text of a message. After
are quick note is inserted, you can edit it as you
would any other text.
If Create is not one of your options: Press m.
Select Compose SMS.
The message is automatically addressed to the
phone number you chose.
4 Follow step 4 through step 5 of “Creating and
Sending Messages” on page 75.
From the Idle Screen
1 Using the keypad, enter the number you want to
send a message to.
2 Press m.
3 Select Compose SMS.
The message is automatically addressed to the
phone number you chose.
4 Follow step 4 through step 5 of “Creating and
Sending Messages” on page 75.
You can add to or change the quick notes stored in
your phone. Your phone stores up to 20 quick
notes. A quick note may be up to 30 characters
long.
Creating New Quick Notes
To create a quick note and save it in the list of
quick notes stored in your phone:
1 From the main menu, select Messages > Quick
Notes.
2 Select [New Note]. -orPress A under Create.
3 Enter text. -orTo choose from existing notes to edit and save,
press A under Browse and select the note you
want to edit.
4 Press O to save the new quick note. If you
edited an existing note, that now is overwritten
with the new note.
77
Text Messaging
Beginning a Message With a Quick
Note
1 From the main menu, select Messages > Quick
Notes.
2 Select the quick note you want to send in your
message.
3 If you want to change the way the quick note
appears in this message: Select Msg. Edit the
quick note. When you are finished, press O.
Outbox
Messages you have sent are stored in the outbox.
These icons appear next to messages in the
outbox:
4
Sent and confirmed.
9
Send attempted.
0
Forwarded.
5
Received by addressee.
6
Not received by addressee.
8
Send failed.
7
Re-sent.
To edit a draft:
R
Locked.
1 From the main menu, select Messages >
Drafts.
2 Select the draft you want to edit.
3 To edit the fields you want to change, follow
step 3 through step 5 in “Creating and Sending
Messages” on page 75.
Resending Messages
This does not affect the quick notes stored in
your phone.
Drafts
When you save a message as a draft, it is saved in
the drafts folder.
To resend a message:
1 From the main menu, select Messages > Text
Outbox.
2 Scroll to the message you want to resend. -orPress the number of the message you want to
resend.
78
Sorting Messages
3 Press s. -or-
Deleting Sent Messages
2 Scroll to the message you want to lock or
unlock.
3 Press m.
4 Select Lock.
To delete a sent message:
Unlocking a Message
1 From the main menu, select Messages > Text
Outbox.
2 Scroll to the message you want to delete.
3 Press A under Delete.
4 Press A under Yes to confirm.
1 From the main menu, select Messages > Text
Outbox.
2 Scroll to the message you want to lock or
unlock.
3 Press A under Unlock.
To delete all unlocked sent messages:
Sorting Messages
1 From the main menu, select Messages > Text
Outbox.
2 Press m.
3 Select Delete All.
4 Press A under Yes to confirm.
You can sort messages in your inbox by sender,
time and date, and status. You can sort messages
in your outbox by recipient, time and date, and
status.
Press m. Select Resend.
Locking and Unlocking Sent
Messages
When you lock a message, it cannot be deleted
until you unlock it.
Locking a Message
1 From the main menu, select Messages > Text
Inbox or Messages > Text Outbox.
2 Highlight any messages.
3 Press m.
4 Select Sort and Order.
5 Select Sort By to specify the sorting method.
6 Select Order By to specify the sorting order.
1 From the main menu, select Messages > Text
Outbox.
79
Text Messaging
Managing Memory
Your text inbox, outbox, and drafts folder have a
set amount of memory available for storing
messages.
The text inbox holds 20 messages. If the text inbox
is full, you cannot receive messages until you
delete some.
The outbox and drafts folder share memory space.
Together they can hold 30 messages. If the outbox
and drafts folder memory is full, you cannot send
messages or save drafts until you delete some.
To view the amount of memory available in your
text inbox:
1 From the main menu, select Messages.
2 Scroll to Text Inbox.
3 Press A under Memory.
To view the amount of memory available in your
outbox and drafts folder:
1 From the main menu, select Messages.
2 Scroll to Text Outbox or Drafts.
3 Press A under Memory.
80
Using a Memory Card
Your i880 phone comes with a memory card,
memory card adapter, and memory card reader.
A memory card is a removable flash memory card
that you can use to store pictures, videos, and
audio files from your phone or your computer.
When the memory card is in your phone, many
types of pictures, videos, and audio files stored on
the memory card can be viewed or played using
your phone's media center. Music files and
podcasts stored on the memory card can be played
using your phone's audio player.
You can use the memory card reader and adapter
or a USB data cable to connect to your computer’s
USB port and access the memory card from your
computer. This lets you save files from your
computer to your memory card or save files from
your memory card to your computer.
Ensuring Files on the Memory
Card Are Compatible With
Your Phone
When your memory card is connected to your
computer, your computer lets you save files to your
memory card in ways that may not allow you to
access these files when the memory card is in your
i880 phone.
To ensure the files on your memory card are
compatible with your i880 phone, use the folder
structure, file name rules, and formats described in
the following sections.
Folder Structure
The first time you insert the memory card into your
phone, your phone creates folders on the memory
card. When you save files from your computer to
the memory card, save each file to the appropriate
folder:
• The Music folder is for music files you will play
using the audio player. Files in this folder cannot
be accessed from the media center.
• The Podcast folder is for podcasts you will play
using the audio player. Files in this folder cannot
be accessed from the media center.
81
Using a Memory Card
• The Audio folder is for audio files you will play
using the media center. Files in this folder
cannot be accessed from the audio player.
• The Image folder in for pictures you will view
using the media center.
• The Video folder is for videos you will play using
the media center.
Note: Only files with names no longer than 32
characters can be stored in your phone’s
memory. When you copy or move a file
with a longer name to your phone’s
memory, you are prompted to rename the
file.
Because your phone creates these folders the first
time the memory card is inserted, you should insert
the memory card into your phone at least once
before using it with your computer.
• The file name must be in a language your phone
can display. To see which languages your
phone can display, select Settings >
Display/Info > Language. Your phone can
display the languages listed and other
languages that use the same alphabets.
File Name Rules
File Formats
When naming files stored on the memory card, the
following rules apply:
Audio Player
• The file name can contain both ASCII and
Unicode characters.
• File names up to 32 characters long, including
the file extension, can be displayed by your
phone. File names up to 255 characters long,
including the file extension, can be read by your
phone. If a file name is more than 32 characters
long, but no more than 255 characters long, your
phone displays an abbreviated name for the file,
but does not change the name of the file on the
memory card.
82
These file formats are compatible with your
phone’s audio player:
MP3 version
MPEG-1, MPEG-2, MPEG-2.5.
Bit Rates (kbits/sec)
32, 40, 48, 56, 64, 80, 96, 112,
128,160, 192, 224, 256, 320.
Sampling Rates (kHz)
8, 11.025, 12,16, 22.05, 24, 32,
44.1, 48.
Ensuring Files on the Memory Card Are Compatible With Your Phone
AAC LC
AAC+ v1,
AAC+ v2
Bit Rates (kbits/sec)
32, 40, 48, 56, 64, 80, 96, 112,
128, 160, 192, 224, 256, 320.
Sampling Rates (kHz)
8, 11.025, 12,16, 22.05, 24, 32,
44.1, 48.
Bit Rates (kbits/sec)
32, 40, 48, 56, 80,96, 112, 128.
Sampling Rates (kHz)
8, 11.025, 12,16, 22.05, 24, 32,
44.1, 48.
These types of audio files and picture files are
compatible with the media center:
File Type
Task
Formats
Audio
Playback
MIDI (FM-Midi, Type-0, 16
Polyphony, SP-Midi
compliant), WAV (8 kHz,
8-bit Mono PCM Canonical
Format), AMR, AU, MP3,
AAC, AAC+.
Picture
View
GIF (GIF89A and GIF87A),
JPEG, WBMP, PNG.
Capture
JPEG.
Media Center
These types of video files are compatible with the
video playback capabilities of your phone’s media
center:
Video Formats
M-JPEG, MPEG-4, H.263.
Audio Formats AMR-NB, AMR-WB.
Bit Rates
(kbits/sec)
Up to 128.
83
Using a Memory Card
Using the Memory Card With
Your Phone
2 Slide in the memory card. Push the memory
card into the slot until it clicks into place.
Inserting the Memory Card
1 Open the memory card slot cover.
1 Close the memory card slot cover.
2 Your phone may prompt you to use the memory
card to store new media items, go to the
camera, go to the media center, or do nothing. If
you select Do Nothing, you will return to the idle
screen. Respond to the prompt now.
Formatting a New Card
The first time you insert a memory card in your
phone, you may be prompted to format the card.
Important: The Format Card option erases any data
saved to the memory card. It should
only be used if your phone prompts you
to format the memory card.
84
Using the Memory Card With Your Phone
To format a memory card:
2 Open the memory card slot cover.
From the main menu, select Settings >
Memory Card > Format Card.
Removing the Memory Card
Important: Do not remove the memory card before
selecting the Remove Card option.
Removing the memory card before
selecting the Remove Card option
could result in loss of data.
1 From the main menu, select Settings >
Memory Card > Remove Card.
Tip: The Remove Card option can also be
accessed by pressing m while using the
camera, media center, or audio player.
3 Push the memory card to release it from the slot.
4 Pull out the memory card.
85
Using a Memory Card
5 Close the memory card slot cover.
Note: If you select the Memory Card > Remove
Card option but do not remove the
memory card, you cannot use the memory
card until you remove it and insert it again.
Setting Your Phone’s Storage
Preference
Accessing Files on the Memory Card
To set the media storage option in Settings:
Pictures, videos, and audio files stored on the
memory card are accessed using your phone's
media center.
1 From the main menu, select Settings >
Memory Card > Store Media.
2 Select On Phone to set your phone to save
media items to the phone’s memory. -or-
Music files stored on the memory card can be
played using your phone's audio player.
Saving Files to the Memory Card
When the memory card is in your phone, you can
save these media items to it:
• Pictures received in InstantLINC Mobile to
Mobile calls
• Pictures and videos taken with your phone’s
camera
• Pictures, videos, and audio recordings received
via Bluetooth
You can choose whether media items are saved to
your phone’s memory or to a memory card inserted
in your phone’s memory card slot.
Select Prefer On Card to set your phone to
save media items to the memory card if it is in
the phone. If no memory card is in the phone,
even if you choose Prefer On Card, the media
items are saved to your phone’s memory.
If you set the media storage option to save to your
phone’s memory, when you insert the memory
card your phone prompts you to switch to storing to
the memory card.
Using the Memory Card With
Your Computer
You can access the memory card with your
computer in two ways:
86
Using the Memory Card With Your Computer
• Using the memory card reader.
• Using your phone’s USB mass storage feature
with a USB cable.
In either case, the memory card is treated as a
removable storage drive by your computer. You
can navigate to this drive as you would any other
drive on your computer.
Setting Up the Memory Card Reader
1 To connect the memory card reader, insert its
USB connector into the USB port on your
computer.
Using the Memory Card Reader
These instructions refer to the memory card reader
that came with your i880 phone. If you are using a
different memory card reader, follow the
instructions provided with that memory card
reader.
What Is Your Computer’s Operating System?
If you have any of these operating systems running
on your computer, you do not need any additional
software to install the memory card reader:
You can also use the USB cable provided with
the memory card reader to connect the memory
card reader to the USB port on your computer.
Connect one end of the USB cable to the USB
connector on the memory card reader and
connect the other end to the USB port on your
computer.
• Microsoft® Windows 2000, Windows XP. or
Windows ME
• MAC OS 8.6 or later
If you have Microsoft Windows 98SE, download
and install the Windows 98SE driver from this
website before setting up the memory card reader:
http://www.motorola.com/mdirect/drivers/USB-S
Ddrivers.html
87
Using a Memory Card
The green light on the memory card reader turns
on when the memory card reader is connected.
2 Insert the memory card into the memory card
adapter until it does not go in any further.
Removing the Memory Card From the Memory
Card Reader
When you are ready to use the memory card with
the your phone again, pull the memory card from
the memory card adapter and insert it into your
phone.
Note: When you read or write files to or from the
memory card using the memory card
reader, the green light on the memory
card reader flashes rapidly to show that it
is in use. Do not remove the card while
the green light is flashing.
3 Insert the memory card adapter into the memory
card reader.
More information, Hints, and Tips
For more information on the memory card reader,
go to www.motorola.com/iden/support to find the
USB 2.0 SD Card Reader manual in Product
Manuals.
Using the USB Mass Storage Feature
Your memory card can now be accessed by your
computer.
88
You can access the memory card with your
computer while the memory card is inserted in your
phone using your phone’s USB mass storage
feature.
Using the Memory Card With Your Computer
To use this feature, you need a USB cable with a
connector compatible with your phone’s accessory
connector. You cannot use the USB cable provided
with the memory card reader that came with your
i880 phone.
You cannot use this feature while using
LINCaround.
When you are using your phone’s USB mass
storage feature, the memory card cannot be
accessed by your phone. Otherwise, your phone’s
functionality is not affected.
Setting Your Phone to Use the Feature
Using the Feature
To use your phone’s USB mass storage feature:
1 Ensure that your phone is powered on and not
set to LINCaround, the memory card is inserted
in your phone, and USB Connection is set to
Reader Enabled.
2 Open the connector cover.
connector
cover
To turn on your phone’s ability to use the USB
mass storage feature:
1 From the main menu, select Settings >
Memory Card > USB Connection.
2 Select Reader Enabled.
To turn off your phone’s ability to use the USB
mass storage feature:
3 Insert the other end of the USB cable into the
USB port of your computer.
Set USB Connection to Reader Disabled in
step 2.
89
Using a Memory Card
4 With the phone’s display facing up, insert the
USB cable’s connector into the accessory
connector, until you hear a click.
Your memory card can now be accessed by your
computer.
Memory Cards Compatible
With Your Phone
If you want to purchase and use additional memory
cards, TransFlash and MicroSD memory cards are
compatible with your i880 phone.
90
Camera
Taking Pictures
The camera in your i880 phone takes pictures and
records videos. You can save these pictures and
videos to your phone’s memory or the memory
card, depending on the storage preference you
chose. You can access these saved pictures and
videos through the media center.
1 Access the camera.
2 If you want to adjust the zoom, spotlight, picture
quality, picture size, or a timer, set these options.
See “Setting Picture Options” on page 92.
3 Aim the camera lens on the flip. Use the internal
display as the viewfinder.
4 When the image you want to capture is in view,
press c or press O or press A under Capture.
Note: If you insert the memory card into the
phone now, you are prompted to save the
picture you have just captured to the
memory card. Choosing to save the
picture to the memory card does not
change your storage preferences after the
picture is saved.
You can send the pictures you take either in
InstantLINC Mobile to Mobile calls or with
Bluetooth. You can also assign them to Contacts
entries, or set them as your phone’s wallpaper.
The pictures the camera takes are JPEG files.
The videos the camera records have the following
file formats:
•
•
•
•
H.263 video format
128 kbps bit rate for 176 x 144 resolution
64 kbps bit rate for 128 x 96 resolution
AMR audio format with 4.75 kbps bit rate
Accessing the Camera
There are many ways to access the camera. The
simplest way is to press c.
5 To save the picture, press c or press O or press
A under Store. -orTo discard the picture without saving it, press A
under Discard. -orTo choose another action, see “More Actions for
Captured Pictures” on page 93.
91
Camera
Setting Picture Options
1X is the default.
When you take a picture, you can set the zoom,
spotlight, picture quality, and picture size, and set a
timer to delay capturing the picture.
Spotlight
To set any of these options:
1 Press m.
2 Select the option you want.
3 Select the value you want for that option.
Tip: You can also set zoom from the viewfinder
by scrolling up and down and set picture
size by scrolling left and right.
If you either discard the picture or save it by either
pressing O or selecting Save from the
context-sensitive menu, the only picture option that
changes is the timer. The timer returns to its
default: Off.
The Spotlight option turns on or off the camera’s
spotlight to provide additional light for close-up
pictures.
Off is the default.
Picture Quality
The Picture Quality option lets you choose the
sharpness the picture will have after it is captured.
The values are:
• Normal — no change
• Fine — higher resolution
When you receive your phone, Normal is the
default. You can choose a new default for this
option. See “Customizing the Camera” on page 96.
If you choose any other action, all picture options
return to their defaults.
Pictures taken with this option set to Fine use more
memory space.
Zoom
Picture Size
The Zoom option lets you choose a closer view.
The values are:
The Picture Size option lets you choose the size
the picture will have after it is captured.*
• 1X — no change
• 2X — twice as large
• 4X — 4 times as large
• Max — 1600 x 1200 resolution
• XLarge — 1280 x 1024
• Large — 640 x 480
92
More Actions for Captured Pictures
•
•
•
•
Medium — 320 x 240
Small — 160 x 120
Wallpaper1 — 176 x 220
Wallpaper2 — 96 x 65
If you plan to use the image as wallpaper, it is best
to select Wallpaper1 for wallpaper on the internal
display or Wallpaper2 for wallpaper on the external
display.
When you receive your phone, Medium is the
default. You can choose a new default for this
option. See “Customizing the Camera” on page 96.
Larger pictures use more memory space.
Self-Timer
The Self-Timer option lets you delay capturing the
picture for the number of seconds you choose. The
camera captures the picture after the amount of
time you chose elapses.
To turn off the timer before the picture is captured,
press A under Cancel.
The values are: Off, 10 seconds, 15 seconds, 20
seconds.
Off is the default.
More Actions for Captured
Pictures
After you capture a picture as described in “Taking
Pictures” on page 91, you can send it in an
InstantLINC Mobile to Mobile call or with Bluetooth,
assign it to a Contacts entry, or set it as your
phone’s wallpaper.
You can also access the media center to view and
perform actions on the pictures there.
Choosing any of these options automatically saves
the captured picture.
Sending in InstantLINC Mobile to
Mobile Calls
For information on sending captured pictures in
InstantLINC Mobile to Mobile calls, see “Starting a
Call by Sending a Picture” on page 126.
Assigning to Contacts
Note: This feature may require a subscription to
Caller ID to function properly. Contact
your sales representative or
SouthernLINC Wireless.
1 After you have captured a picture, press m.
2 Select Set As Caller ID.
93
Camera
3 To store the picture to a new entry, select [New
Contact]. -orTo store the picture to an existing entry, select
the entry.
Only entries that include phone numbers or
LINC IDs are displayed. This icon g appears
next to entries that have pictures assigned.
4 If you selected an entry with a picture assigned,
press O or press A under Yes to overwrite the
assigned picture. -orPress A under No to return to the list of entries
without overwriting the assigned picture.
Setting as Wallpaper
1 After you have captured a picture, press m.
2 Select Set As Wallpaper.
3 To choose where you want the wallpaper to
appear, select Internal Display, External
Display, or Both.
Recording Videos
Recording a video is similar to taking a picture. If
you store videos you record in phone memory, you
can record videos up to 30 seconds long. If you
record video onto the memory card, the video
length is limited by how much memory is available
on the card, with a maximum length of 1 hour.
1
2
3
4
5
6
7
8
9
94
Access the camera.
Press m.
Select Record Video.
If you want to adjust the zoom, spotlight, video
size, or video length, set these options. See
“Setting Video Options”.
Aim the camera lens on the flip. Use the internal
display as the viewfinder.
If you want to zoom in or out, scroll up or down.
If you want to change the image size, scroll left
or right.
When you are ready to record, press and
release c, press and release O, or press and
release A under Record. Releasing the key
starts the recording.
If you want to end the video, press c or press A
under Stop.
To save the video, press c or press O. -or-
Recording Videos
To view the video without saving it, press m and
select Review. -orTo discard the video without saving it, press A
under Discard.
Spotlight
The Spotlight option turns on or off the camera’s
spotlight to provide additional light for close-up
videos.
Setting Video Options
Off is the default.
When you record a video, you can set the zoom,
spotlight, video size, and video length.
Video Size
To set any of these options:
The Video Size option lets you choose the size the
video will have after it is recorded.
1 Press m.
2 Select the option you want.
3 Select the value you want for that option.
Tip: You can also set zoom from the viewfinder
by scrolling up and down and set picture
size by scrolling left and right.
The values are: Min (128 x 96) and Max (176 x
144).
Zoom
• Short (for messages) — limits the video size is
limited to 97 KB.
• Maximum — the maximum video length is
determined by where you store videos you
record. If you store videos you record in phone
memory, you can record videos up to 30
seconds long. If you record video onto a
memory card, you can record videos up to 2
hour long if enough memory is available on the
memory card.
The Zoom option lets you choose a closer view.
The values are:
• 1X — no change
• 2X — twice as large
• 4X — 4 times as large
1X is the default.
Video Length
The Video Length options let you choose how long
you can record video.
The values are:
95
Camera
Changing Storage Preference
Customizing the Camera
While you are using the camera, you can choose
whether media items are saved to your phone’s
memory or to the memory card.
The Camera Setup menu lets you customize the
camera:
1
2
3
4
Access the camera.
Press m.
Select Memory Card > Store Media.
Select On Phone to set your phone to save
media items to the phone’s memory. -orSelect Prefer On Card to set your phone to
save media items to the memory card if it is in
the phone. If the memory card is not in the
phone, even if you choose Prefer On Card, the
media items are saved to your phone’s memory.
The location that you choose becomes the Store
Media option in Settings.
Accessing the Media Center
You can access the media center from the camera
at any time, except when you are using the
Camera Setup menu or viewing the memory
screen.
1 Press m.
2 Select Media Center.
96
• Ask for Name — If you set this option to On,
you are prompted to enter a name for each
picture before you save it. Otherwise, pictures
are automatically saved with the date and a
number as their names.
• Shutter Sound — sets the sound the camera
makes as it captures a picture or begins and
ends recording a video.
Note: The volume of the shutter sound is
controlled by your phone’s speaker
volume.To set your phone’s speaker
volume, see “Setting the Volume” on page
176.
If the camera is currently ready to take pictures,
you can set these picture set-up options:
• Default Size — sets the default value for the
Picture Size option.
• Default Quality — sets the default value for the
Picture Quality option.
If the camera is currently ready to record video,
you can set this video set-up option:
• Default Video Size — sets the default value for
the Video Size option.
Managing Memory
To access the Camera Setup menu:
1 Access the camera.
2 Press m.
3 Select Camera Setup.
Tip: This option is available from many
context-sensitive menus when you are
using the camera.
Managing Memory
While you are taking pictures, the percentage of
free memory in the default storage location
appears on the screen. To view details about
memory on either the memory card or your phone,
access the Memory Usage screen.
To view your used memory, free memory, memory
capacity, and number of files in phone memory:
1 Access the camera.
2 Press m.
3 Select Memory Usage.
Tip: This option is available from many
context-sensitive menus when you are
using the camera.
To free memory on your phone, delete items from
the media center, voice records, or Java
applications. To free memory on the memory card,
delete items from the card’s folders.
97
Media Center
The media center lets you access pictures, videos,
and audio recordings stored in your phone’s
memory or on a memory card inserted in your
phone’s memory card slot.
All pictures and videos stored in your phone’s
memory can be accessed through the media
center.
Items in the media center can be sent with
Bluetooth. See “Sending Contacts, Datebook
Events, and Media Center Items” on page 161.
Pictures in the media center can be sent in
InstantLINC Mobile to Mobile calls using LINC
View. See “Using LINC Features” on page 122.
Viewing the Media Center
To access the media center:
The following audio recordings can be accessed
through the media center:
From the main menu, select Media Center. -orFrom the camera, press m. Select Media
Center.
• Voice records created when your phone was not
in a call
• Musical ring tones in the list of ring tones
• Audio recordings you downloaded to your phone
Scroll to view the items in the media center.
Because the memory card inserted in your phone
may contain files saved to it using a device other
than your phone, not all types of pictures, videos,
and audio recordings on the memory card may be
accessed through your phone’s media center.
You can set the media center to show a thumbnail
of each picture as you view the list of items or show
the list of items without thumbnails.
For information on determining whether the files on
the memory card can be accessed through the
Media Center, see “Ensuring Files on the Memory
Card Are Compatible With Your Phone” on page
81.
98
Choosing Thumbnail View or List
View
To change views:
1
2
3
4
Access the media center.
Press m.
Select Set View.
Select Plain List View or Thumbnail List View.
Viewing the Media Center
Filtering by Media Type
You can set the media center to show all types of
media items, only pictures, only videos, or only
audio recordings. If you have the memory card in
your phone, the items stored in your phone’s
memory are listed separately from the items stored
on the memory card.
If you do not have the memory card in your phone,
you have these filtering options:
• All — all items accessible through the Media
Center.
• Pictures — all pictures.
• Audio — all audio recordings accessible
through the media center.
• Video — all videos.
If you have the memory card in your phone, you
have these filtering options:
• Phone: All — all items in your phone’s memory
that are accessible through the media center.
• Phone: Pictures — all pictures in your phone’s
memory.
• Phone: Audio — all audio recordings in your
phone’s memory that are accessible through the
media center.
• Phone: Video — all videos in your phone’s
memory.
• Card: All — all items on the memory card that
are accessible through the media center.
• Card: Pictures — all pictures on the memory
card that are accessible through the media
center.
• Card: Audio — all audio recordings on the
memory card that are accessible through the
Media Center.
• Card: Video — all videos on the memory card
that are accessible through the media center.
Setting Filtering
1
2
3
4
Access the media center.
Press m.
Select Filter.
Select the filtering option you want.
Tip: You can also scroll through these options
while viewing the list of items by either
scrolling left or right or pressing * or #.
Keeping the Last Filter Setting
You can set the media center to show all items
every time you access it or to keep the filtering
setting you had when you last viewed it.
1 Access the media center.
99
Media Center
2
3
4
5
Press m.
Select Setup.
Select Remember Filter.
Select On to keep the filtering setting you had
when you last viewed the media center.
When you receive your phone, the media center is
set to show all items every time you access it.
Accessing Items Listed
To access a picture, video, or audio recording,
select it from the list of items in the media center.
With an item selected, scroll right or left to access
the items that appear before and after it in the list.
Sorting by Time or Name
You can set the media center to sort items by the
time the item was created or by the name of the
item.
1
2
3
4
5
Access the media center.
Press m.
Select Setup.
Select Sort.
Select By Time or By Name.
When you receive your phone, the media center is
set to sort items by time.
100
Forward Locked Items
Some items saved to the media center from
InstantLINC Mobile to Mobile calls or by
downloading may be forward locked. Forward
locked items are usually copyright protected, and
you cannot share them with anyone, such as in
InstantLINC Mobile to Mobile calls, or by uploading
them from your phone.
You cannot remove forward locking from an item.
When you view items in the media center, one of
these icons appears next to each forward locked
item:
f Forward locked.
c Forward lock and locked.
When an item is locked, it cannot be deleted from
the media center. See “Locking Items” on page
104. Locking an item has no effect on its forward
locking.
DRM Items
DRM Items
Pictures
Except for Java applications, which download to
Java Apps, the default location for any DRM items
that you download is the media center. Depending
on the storage preference you have chosen, these
items may be saved to your phone’s memory or the
memory card inserted in your phone.
The media center lets you view pictures, send
them in InstantLINC Mobile to Mobile calls, send
with Bluetooth, assign them to Contacts entries, or
set them as your phone’s wallpaper.
Depending on how a given third-party vendor has
set rights for an item, the item may include the
following status icons.
To view a picture, select it from the list of items in
the media center.
c
The item is a DRM item.
e The DRM item has expired.
All DRM items are forward locked. As with other
items in the media center, you can lock DRM
items. See “Locking Items” on page 104.
Note: While your phone supports gifting and
Tell-A-Friend services for DRM items,
these services may not be offered by
SouthernLINC Wireless. Please contact
SouthernLINC Wireless for more
information.
Viewing
If your phone is set to show thumbnails, a
thumbnail of each picture appears next to the
picture in the list of items. If your phone is not set to
show thumbnails, this icon g appears next to the
picture.
To zoom in while viewing a picture, scroll up. To
zoom out while viewing a picture, scroll down.
If you zoom in until the picture is larger than the
display, the Pan option appears above the left
option key. To go into pan mode, press A under
Pan. You can then view different parts of the
picture by scrolling up, down, left, and right. To
leave pan mode, press A under Back.
101
Media Center
Assigning to Contacts
Note: This feature may require a subscription to
Caller ID to function properly. Contact
your sales representative or
SouthernLINC Wireless.
1 Scroll to or select the picture you want to assign
to a Contacts entry.
2 Press m.
3 Select Set As Caller ID.
4 To store the picture to a new entry, select [New
Contact]. -orTo store the picture to an existing entry, select
the entry.
Only entries that include phone numbers or
LINC IDs are displayed. This icon g appears
next to entries that have pictures assigned.
5 If you selected an entry with a picture assigned,
press O or press A under Yes to overwrite the
assigned picture. -orPress A under No to return to the list of entries
without overwriting the assigned picture.
Setting as Wallpaper
1 Scroll to or select the picture you want to set as
wallpaper.
2 Press m.
102
3 Select Set As Wallpaper.
4 To choose where you want the wallpaper to
appear, select Internal Display, External
Display, or Both.
Note: If you later set your wallpaper to Auto
Cycle, the picture is included and will
appear on the idle screen. See
“Wallpaper” on page 177.
Pictures Stored on the Memory Card
When you assign a picture stored on the memory
card to a Contacts entry or set it as wallpaper, your
phone copies or moves the picture file to your
phone’s memory according to these rules:
• DRM pictures cannot be copied. Some DRM
pictures cannot be moved, depending on their
rights settings.
• If the picture cannot be copied to your phone’s
memory but can be moved, it is moved.
• If the picture can be copied to your phone’s
memory, it is copied.
Videos
The media center lets you play videos. You can
also send them with Bluetooth.
Audio Recordings
Playing
To play a video, select it from the list of items in the
media center.
This icon V appears next to each video in the list of
items.
Tip: When viewing the list of items in the media
center, you can scroll left or right, or press
* or #, to change the type of media that is
displayed in the list.
To stop the video before it has finished playing,
press O or scroll down.
To restart the video, press O.
To to fast forward, scroll right. To rewind, scroll left.
The longer you hold the scroll key, the faster the
video fast forwards or rewinds.
This icon a appears next to each audio recording
in the list of items.
Tip: When viewing the list of items in the media
center, you can scroll left or right, or press
* or #, to change the type of media that is
displayed in the list.
To stop the audio recording before it has finished
playing, press O or scroll down.
To restart the audio recording, press O.
To to fast forward, scroll right. To rewind, scroll left.
The longer you hold the scroll key, the faster the
audio recording fast forwards or rewinds.
When you play an audio recording, an animated
image appears on the display.
Assigning to Contacts
Audio Recordings
To assign an audio recording in the media center
as a ring tone:
The media center lets you play audio recordings,
assign them to Contacts entries, and send them
with Bluetooth.
1 Scroll to or select the audio recording you want
to assign.
2 Press m.
3 Select Assign As Ringer.
4 Select the features you want to assign the audio
recording to.
5 If you want to assign the audio recording as the
ring tone for a Contacts entry: Select A Contact.
Playing
To play an audio recording, select it from the list of
items in the media center.
103
Media Center
Select the Contacts entry you want to assign the
ring tone to.
6 When you are finished, press A under Done if
Done is one of your options.
Locking Items
Rules for Assigning Ring Tones
1 Access the media center.
2 Scroll to or select the item you want to lock or
unlock.
3 Press m.
4 Select Lock to lock the item. -or-
Not all audio files can be assigned as ring tones:
• Ring tones purchased or received from
SouthernLINC Wireless can be assigned as ring
tones. Other audio files may not be supported as
ring tones.
• Non-DRM items and expired DRM items cannot
be assigned as ring tones.
• Files on the memory card inserted in your phone
cannot be assigned as ring tones.
• Voice records cannot be assigned as ring tones.
Renaming Items
1
2
3
4
5
6
Access the media center.
Scroll to or select the item you want to rename.
Press m.
Select Rename.
Delete the item’s name and enter a new name.
Press O.
104
When you lock an item in the media center, it
cannot be deleted until you unlock it.
Select Unlock to unlock the item.
When you view items in the media center, one of
these icons appears next to each locked item:
R Locked.
c Forward lock and locked.
Deleting Items
Deleting items from the media center means they
can no longer be accessed anywhere in your
phone, including the list of ring tones, the list of
voice records, and Contacts.
Copying and Moving Items
Under certain conditions, some DRM vendors will
not charge you if you download an item multiple
times within a given time frame. Please contact the
DRM vendor to learn more about their download
regulations.
Deleting an Item
1
2
3
4
Scroll to or select the item you want to delete.
Press m.
Select Delete.
Press O or A under Yes to confirm.
Deleting All Items
You can delete all unlocked items currently in view,
depending on how media center filtering is set. See
“Filtering by Media Type” on page 99. If filtering is
set to show all types of media center items, all
unlocked items are deleted.
1
2
3
4
Access the media center.
Press m.
Select Delete All.
Press O or A under Yes to confirm.
Copying and Moving Items
If you have the memory card in your phone, you
can copy and move items in the media center from
your phone’s memory to the memory card or from
the memory card to your phone’s memory.
1
2
3
4
Access the media center.
Scroll to or select the item you want to move.
Press m.
To copy the item, select Copy To Phone or
Copy To Card. -orTo move the item, select Move To Phone or
Move To Card.
Some items cannot be copied or moved:
• DRM pictures and ring tones cannot be copied.
Some DRM pictures and ring tones cannot be
moved, depending on their rights settings.
• Forward locked pictures and ring tones cannot
be copied or moved to the memory card.
• Videos over 30 seconds long cannot be copied
or moved to your phone’s memory.
• Pictures assigned to a Contacts entry cannot be
moved to the memory card.
If you try to copy or move an item that cannot be
copied or moved, your phone displays a message
telling you that this action cannot be performed.
105
Media Center
Changing Storage Preference
Accessing the Audio Player
While you are using the media center, you can
choose whether media items are saved to your
phone’s memory or to the memory card.
Your i880 phone includes an audio player that you
can use to play MP3 audio files stored on the
memory card inserted in your phone.
1
2
3
4
To access the audio player from the media center:
Access the media center.
Press m.
Select Memory Card > Store Media.
Select On Phone to set your phone to save
media items to the phone’s memory. -orSelect Prefer On Card to set your phone to
save media items to the memory card if it is in
the phone. If the memory card is not in the
phone, even if you choose Prefer On Card, the
media items are saved to your phone’s memory.
The location that you choose becomes the Store
Media option in Settings.
Accessing the Camera
1 Access the media center.
2 To view the audio recordings on your memory
card, press m. Select Filter > Card: Audio.
3 Select [Music Player] Play Music. -orPress A under Player.
Managing Memory
To view your used memory, free memory, and
memory capacity of your phone and the memory
card:
1 Access the media center. -orScroll to or select any item in the media center.
To access the camera from the media center at
any time, press c.
2 Press m.
3 Select Memory Usage.
You can also select [Camera] from the list of items
or press A under Camera when these options
appear.
To free memory, delete or move items.
106
Managing Memory
Note: Items accessible through the media
center that are stored in your phone’s
memory use the same memory space
used to store messages, Java application
data, and voice records created when
your phone is in a call. Deleting some of
these other items frees memory.
107
Audio Player
Your i880 phone includes an audio player that you
can use to play audio files stored in your phone’s
memory or on the memory card inserted in your
phone.
The audio player groups the audio files into folders
and lists. When you select an audio file to play, the
audio player plays this audio file and then plays the
other audio files grouped with it.
In addition to music, the audio player plays
podcasts that you have downloaded to your
computer and then saved on the memory card
inserted in your phone. You can mark highlights
within a podcast file to help you find the parts of the
podcast you most want to listen to.
If you receive a phone call, Private call, group call,
Talkgroup call, call alert, message notification, a
Datebook reminder, or a GPS notification while
playing an audio file with the audio player, the
audio file pauses and a prompt appears asking you
if you want to accept the incoming item or ignore it.
The audio player begins playing at the currently
selected volume, even when Vibrate All is set to
On.
108
Playing Audio Files with the
Flip Closed
The controls on the front of your phone enable you
to use the audio player with your phone’s flip
closed:
• To access the audio player, press and hold y
any time your phone is not in a call or
transferring data.
• To play an audio file once you have accessed
the audio player, press y.
• To pause an audio file or resume playing it
again, press y.
• To skip to the next audio file, press z.
• To skip to the previous audio file, press x.
• To fast-forward, press and hold z.
• To rewind, press and hold x.
• To adjust the volume, use the volume keys.
• To suspend the audio player, press .. This
pauses the audio player and clears it from your
phone’s display. The next time you access the
audio player, you can continue playing the song
you were playing when you suspended it.
Playing Audio Files with the Flip Open
Playing Audio Files with the
Flip Open
When your phone’s flip is open, you have more
ways to access the audio player and play the audio
files on the memory card.
Accessing the Audio Player
From the Main Menu
From the main menu, select Music Player.
From the Media Center
1 Access the media center.
2 To view the audio recordings on your memory
card, press m. Select Filter > Card: Audio.
3 Select [Music Player] Play Music. -orPress A under Player.
Tip: The Songs folder contains all the audio files
on the memory card in a single list.
3 To play the first audio file in the folder, press A
under Play. (If the folder you scrolled to contains
subfolders, this plays the first audio file in the
first of these subfolders.) -orPress O to view the contents of the folder. Then
scroll to an audio file and press A under Play to
play it, or scroll to a folder and press A under
Play to play the first audio file in it.
Any time you are viewing a list of folders with the
audio player, you can scroll to a folder and press
A under Play to start playing the contents of that
folder or press O to view the contents of the folder.
Any time you are viewing a list of audio files, you
can scroll to an audio file and press A under Play
to play it.
Exiting the Audio Player
To stop viewing a folder and return to the folder or
list that contains it, press A under Back.
To exit the audio player, press A under Exit.
Pause and Resume
If Exit is not one of your options, press A under
Back or Cancel until it is.
Playing Audio Files
1 Access the audio player.
2 Scroll to a folder.
To pause a playing audio file, press A under
Pause or press O.
To resume playing a paused audio file, press A
under Play or press O.
109
Audio Player
Skip to Next and Skip to Previous
To skip to the next audio file, press and release the
right side of the navigation key, as if scrolling right.
Do not hold the right side of the navigation key.
To skip to the previous audio file, press and
release the left side of the navigation key, as if
scrolling left. Do not hold the left side of the
navigation key.
Fast-Forward and Rewind
To fast-forward a playing audio file, press and hold
the right side of the navigation key for 2 seconds,
as if scrolling right.
To rewind a playing audio file, press and hold the
left side of the navigation key for 2 seconds, as if
scrolling left.
Adjusting the Volume
To adjust the volume, use the volume keys.
How Your Audio Files Are
Organized
The audio player groups the audio files on the
memory card into folders and lists.
110
Since you will probably want to use the audio
player primarily to play songs, the audio player
treats the audio files on the memory card as songs
when grouping and organizing them, unless the
audio player determines that the audio file is a
podcast.
The audio player uses metadata found in most
audio files to group the files on the memory card by
album, artist, and genre, or to classify them as
podcasts. You can also create your own groupings
of audio files, called playlists.
When you access the audio player, you see that
the audio files are grouped into these folders:
• Songs — All audio files on the memory card
inserted in your phone, except podcasts, listed
alphabetically by title.
• Playlists — Folders and lists you have created.
If you have not created any playlists, this folder
contains only the Favorite playlist, which is
empty.
• Albums — Songs grouped by album. The
albums are listed alphabetically by title. The
songs on the albums are listed in the order that
they normally appear on the album.
• Artists — Songs grouped by artist. The artists
are listed alphabetically by name. Within each
artist’s folder, the songs are listed alphabetically
by title.
Playing Music While Files Are Loading
• Genres — Songs grouped by genre. The genres
are listed alphabetically by name. Within each
genre folder, the songs are listed alphabetically
by title.
• Podcasts — Podcast episodes grouped by
program. The programs are listed alphabetically
by name. Within each program folder, the
episodes are listed by date with the newest first.
In the Albums, Artists, and Genres folders, any
audio files that do not contain enough metadata to
be grouped by album, artist, or genre are placed in
a folder labeled “Unknown”.
Playing Music While Files Are
Loading
Searching By First Letter
Any time you are viewing an alphabetical list of
audio files or folders, you can go to the items
starting with any letter by using your phone’s
keypad to enter that letter.
Playing a List and Using
Repeat and Shuffle
When you select an audio file to play, the audio
player plays this audio file and then plays the other
audio files grouped with it. The repeat and shuffle
features help determine which of these songs are
played.
To play music while files are loading:
If you are not using the repeat or shuffle features,
the audio player plays the audio file you select and
then plays the rest of the files in the list or folder, in
the order they appear, until it gets to the end of the
list or folder. The audio player then goes to the
beginning of the list and pauses until you resume
playing.
1 Access the audio player.
2 From the loading screen, press A under View.
3 In the folder view screen, scroll to a music file
and press A under Play. -or4 Press O
The repeat feature lets you set the audio player to
play all the audio files in a list or folder, in order,
starting again at the beginning of the list when it
gets to the end, without pausing or stopping. It also
lets you set the audio player to play one audio file
repeatedly, starting over as soon as it ends.
The first time the audio player encounters music
files on your memory card, it must load and
organize these files. If a large number of files must
be loaded, this may take a long time.
While music is playing, file loading is suspended.
111
Audio Player
The shuffle feature lets you set the audio player to
play the audio files in a list or folder in random
order, until you stop it.
Setting Repeat
1 While viewing a list, viewing the details of the
audio file currently playing, or viewing visuals,
press m.
2 Select Setup.
3 Select Shuffle/Repeat.
4 Scroll to Repeat.
5 To set the audio player to repeatedly play the
contents of a list or folder, in order, select All.
-orTo set the audio player to play one song
repeatedly, select One. -orTo turn off the repeat feature, select Off.
Setting Shuffle
1 While viewing a list, viewing the details of the
audio file currently playing, or viewing visuals,
press m.
2 Select Setup.
3 Select Shuffle/Repeat.
4 Scroll to Shuffle.
112
5 To set the audio player to play the audio files in
a list or folder in random order, select On. -orTo turn off the shuffle feature, select Off.
Working With Playlists
Playlists are lists of audio files you create from the
files already available through the audio player.
Playlists enable you to group audio files as you like
them, but they do not change anything in the other
folders or on the memory card. Adding a file to a
playlist does not copy it or move it. Removing a file
from a playlist, or deleting the playlist that a file is
listed in, does not delete the file from any other
location.
Creating a Playlist
1
2
3
4
Access the audio player.
Select Playlists.
Select [Create New].
If you want to give the playlist a name, enter the
name. See “Entering Text” on page 68. When
you are finished, press A under OK.
Working With Playlists
Note: If you do not assign a name, the playlist is
named “playlist” followed by the number
of unnamed playlists you have, including
this one. For example, the first playlist you
create without naming is automatically
named “Playlist-1”.
5 Select [Add Songs].
A list of all audio files on the memory card
appears.
Tip: For options to help you sort through this list,
press m.
6 Select each audio file you want to put on the
playlist. A checkmark appears next to each
selected file.
Tip: To deselect a selected item: Scroll to a
selected file and press O.
7 When you are finished selecting files, press A
under Done.
8 If you want to change the order of the audio files
on a playlist, see “Reordering a Playlist”.
9 Select Save.
Editing a Playlist
After you have created a playlist, you can change
its name, add audio files, remove audio files, and
change the order of the audio files.
1
2
3
4
5
6
7
Access the audio player.
Select Playlists.
Scroll to the playlist you want to edit.
Press m.
Select Edit Playlist.
Make the changes you want.
Select Save.
Reordering a Playlist
You can change the order of the audio files on a
playlist before you save a new playlist or later,
while editing the playlist.
1 Before you have saved a new playlist or while
editing a playlist, press m.
2 Select Reorder Songs.
3 Scroll to the audio file you want to move.
4 Press A under Grab.
5 Scroll to the place where you want the audio file
to appear.
6 Press A under Insert.
113
Audio Player
7 Repeat step 3 through step 6 for all the items
you want to move.
8 Press A under Done.
9 Press A under Save.
Removing Audio Files
You can remove some or all audio files from a
playlist before you save a new playlist or later,
while editing the playlist.
Removing an Audio File From a Playlist
1 Before you have saved a new playlist or while
editing a playlist, press m.
2 Scroll to the audio file you want to remove.
3 Press m.
4 Select Remove Song.
5 Press A under Save.
Reordering Playlists
To change the order of the playlists in the Playlists
folder:
1
2
3
4
5
6
7
Access the audio player.
Select Playlists.
Press m.
Select Reorder Playlists.
Scroll to the playlist you want to move.
Press A under Grab.
Scroll to the place where you want the playlist to
appear.
8 Press A under Insert.
9 Repeat step 5 through step 8 for all the items
you want to move.
10 Press A under Done.
Removing All Audio Files From a Playlist
Deleting Playlists
1 Before you have saved a new playlist or while
editing a playlist, press m.
2 Select Remove All Songs.
3 Press O or A under Yes to confirm.
4 Press A under Save.
Deleting a Playlist
114
1
2
3
4
5
6
Access the audio player.
Select Playlists.
Scroll to the playlist you want to delete.
Press m.
Select Delete Playlist.
Press O or A under Yes to confirm.
Working With Podcast
Deleting All Playlists
Add Any Audio File
1
2
3
4
5
1
2
3
4
5
Access the audio player.
Select Playlists.
Press m.
Select Delete All Playlists.
Press O or A under Yes to confirm.
Access the audio player.
Select Songs.
Scroll to the audio file you want.
Press m.
Select Add to Favorites.
This deletes all playlists except the Favorites
playlist.
Working With Podcast
Using the Favorites Playlist
To access podcasts:
The Favorites playlist is a permanent playlist. You
can add audio files, remove audio files, and
change the order of the audio files, but you cannot
rename it or delete it.
You can add audio files to the Favorites playlist as
you would any other playlist.
You can also add audio files to the Favorites
playlist using the Add to Favorites shortcut.
Add the Audio File Currently Playing
1 While viewing a list, viewing the details of the
audio file currently playing, or viewing visuals,
press m.
2 Select Add to Favorites.
1 Access the audio player.
2 Select Podcasts.
Note: The Podcasts option does not appear if
you have no podcasts.
3 Scroll to view individual podcast episodes or
folders containing multiple episodes of the same
program.
4 Press O to view the podcast episodes within a
folder or the details screen of an individual
podcast episode.
Playing a podcast is similar to playing any other
audio file. You can pause, resume, fast-forward,
and rewind just as with any other audio file.
Some functions differ when you a playing a
podcast:
115
Audio Player
• Pressing O when you have scrolled to a podcast
displays a screen showing details of the
podcast, but does not play the podcast. To play
the podcast, press under A. After you begin
playing the podcast, pressing O pauses and
resumes the podcast.
• If the podcast you are playing contains
highlights, pressing and releasing the right or left
side of the navigation key skips to the next or
previous highlight within the podcast, or to the
beginning or the end of the podcast, rather that
skipping to the next or previous audio file.
Highlights
Highlights are portions of a podcast that are
marked to help you find them more easily.
Some podcasts you download my already have
highlights marked. You can use the audio player to
add and delete highlight markers.
Finding and Playing Highlights
To find and play highlights in the podcast you are
playing, press and release the right or left side of
the navigation key, as if scrolling right or left. Do
not hold the right or left side of the navigation key.
To play all the highlights in a podcast, and skip
everything that is not marked as a highlight:
1 While a podcast is playing or paused, press m.
116
2 Select Highlights Only. If the podcast has no
highlights, this option is not displayed.
Adding Highlight Markers
To add a highlight to a podcast:
1 While playing or paused within a portion of the
podcast that is not already marked as a
highlight, press m.
2 Select Add Highlights.
3 To mark the beginning of the highlight, press A
under On.
4 Go to the point in the podcast that you want to
mark as the end of the highlight. To do this,
fast-forward or let the podcast play to that point.
If you go too far, rewind.
If you reach the beginning of another highlight,
the beginning of that highlight automatically
becomes the end of the highlight you are
creating.
5 To mark the end of the highlight, press A under
Off.
6 Press A under Back.
Deleting Highlight Markers
Deleting Audio Files
To delete the beginning and end markers from a
highlight:
1 While playing or paused within the highlight you
want to delete the markers from, press m.
2 Press A under Clear.
To delete all highlight markers in a podcast:
1 While playing or paused within a podcast that
contains highlights, press m.
2 Select Add Highlights or Edit Highlights.
3 Press m.
4 Select Clear All Highlights.
Deleting Audio Files
You can delete audio files from the memory card
one at a time, by album, by artist, or by genre.
You can also delete all audio files from the memory
card by deleting everything in the Songs, Albums,
Artists, or Genres folder.
Deleting an audio file removes it from all playlists it
appears on.
Deleting an Audio File
1 Access the audio player.
2 Select the folder containing the audio file you
want to delete.
3 If the folder you selected contains more folders,
within that folder, select the folder containing the
audio file you want to delete.
4 Scroll to the audio file you want to delete.
5 Press m.
6 Select Delete Song or Delete Podcast.
7 Press A under Yes to confirm.
Deleting an Album, Artist, or Genre
1 Access the audio player.
2 Select the folder containing the audio files you
want to delete: Albums, Artists, or Genres.
3 Scroll to the album, artist, or genre you want to
delete.
4 Press m.
5 Select Delete Album, Delete Artist, or Delete
Genre.
6 Press O or A under Yes to confirm.
Deleting All Audio Files
Deleting everything in the Songs, Albums, Artists,
or Genres folder deletes all audio files from the
memory card.
1
2
3
4
Access the audio player.
Scroll to Songs, Albums, Artists, or Genres.
Press m.
Select Delete All Music.
117
Audio Player
5 Press A under Yes to confirm.
Choosing a Theme
DRM Items
The theme you choose controls the appearance of
the audio player screens.
Some of the audio files on the memory card may
be DRM items. When a DRM items has expired,
you can no longer play it.
1 Access the audio player.
2 Press m.
3 Select Setup > Themes.
If you scroll to an audio file that is expired and try to
play it, a message saying you cannot play it
appears. If you play a list containing an expired
audio file, the audio player skips over the expired
item and no message is displayed.
Setting Audio and Visual
Options
A checkmark appears next to the theme that is
in use.
4 Select the theme you want.
Viewing Visuals
To view visuals on the display instead of the details
of the song currently playing:
You can customize the sound of the audio player
by setting the equalizer. You can customize the
look of the audio player screen by choosing a
theme or by viewing visuals while listening to an
audio file.
1 While viewing the details of the audio file
currently playing, press m.
2 Select Setup > Turn On Visuals.
Setting the Equalizer
1 While viewing visuals press m.
2 Select Setup > Turn Off Visuals.
1 From anywhere in the audio player, press m.
2 Select Setup > Equalizer.
A checkmark appears next to the equalizer
mode that is in use.
3 Select the equalizer mode you want.
118
To view the details of the song currently playing
instead of visuals:
Installing Items
Digital Rights
Management
When you download multimedia content available
online, such as audio, images, or Java
applications, these items may be subject to DRM
restrictions. DRM, or digital rights management, is
a system that defines how copyrighted multimedia
content can be distributed and used.
DRM sets items to time-based or count-based
usage settings. Time-based settings let you use
the given item for a specified interval. Examples of
time-based settings include being able to use an
item for a specified number of days from the date
of purchase, a specified number of days from the
date that the item is first used, or a specified
number of minutes. Count-based settings let you
use an item for a specified number of times after
you download it or for unlimited use.
Installing Items
Except for DRM Java applications, DRM items will
automatically install once they have finished
downloading.
To install DRM Java applications, see “Installing
Applications” on page 148.
To send the DRM installation to the background,
press e.
Understanding DRM Status
Icons
Depending on how a given third-party vendor has
set rights for an item, the item may include the
following status icons:
c
The item is a DRM item.
e
The DRM item has expired.
As with other items in media center, you can lock
DRM items. See “Locking Items” on page 104.
Note: All DRM items are forward locked. See
“Forward Locked Items” on page 100.
Sharing Items
Note: These features may not be offered by
SouthernLINC Wireless.
You can gift a DRM item to a friend’s phone. Gifting
is when you purchase a copy of a DRM item and
send it to someone. If you do not want to gift an
item, you can send a message to a friend’s phone
119
Digital Rights Management
that contains the link for purchasing the item. The
friend can then purchase the item quickly and
easily. Sending this type of message is called
Tell-A-Friend.
Gifting
To check if a DRM item is giftable:
1 Go to the location on your phone that contains
the item you want.
2 Highlight the DRM item you want to gift.
3 Press m. If Gift is an option, the item is giftable.
To gift a DRM item:
1 Go to the location on your phone that contains
the item you want.
2 Highlight the DRM item you want to gift.
3 Press m.
4 Select Gift.
5 Select the contact you want to send the item to.
-orIf the person you want to send the item to is not
in contacts, select [New Number]. Enter the
number.
6 Press O.
7 Follow the vendor’s instructions for purchasing
an additional license.
120
Tell-A-Friend
1 Go to the location on your phone that contains
the item you want.
2 Highlight the DRM item you want to tell your
friend about.
3 Press m.
4 Select Tell-A-Friend.
5 Complete and send the message.
Managing DRM Items
Note: Depending on how the third-party vendor
has set rights for the given DRM item, you
may be unable to perform some of the
following tasks.
Viewing License Information
You can check a DRM item’s license to view the
following information:
• For time-based items, either the date and time
the item is scheduled to expire, or the number of
days left
• For count-based items, the number of credits
(uses) left or an unlimited use notice
• The name of the item’s vendor
Managing DRM Items
To view the license of a DRM item:
1 Go to the location on your phone that contains
the item you want.
2 Highlight the DRM item you want to view license
information for.
3 Press m.
4 Select License Info.
Renewing DRM Licenses
Note: You can only renew DRM licenses if the
license contains a link to the page where
you purchased the item.
1 Go to the location on your phone that contains
the item you want.
2 Highlight the DRM item you want to renew.
3 Press A under Renew or press m. Select
Renew.
4 Select the link to the page where you purchased
the item.
5 Follow the vendor’s instructions for purchasing
an additional license.
Deleting Items
If you delete a DRM item that you purchased from
SouthernLINC Wireless from your phone, you will
have to purchase it again to download it.
Under certain conditions, third-party vendors will let
you download an item multiple times within a given
time frame, even if you deleted the item. Please
contact the third-party vendor of an item to learn
more about the vendor’s download regulations.
To delete an item:
1 Go to the location on your phone that contains
the item you want.
2 Highlight the DRM item you want to delete.
3 Press m.
4 Select Delete.
5 If prompted, press A under Yes.
About Expired Items
If you are using an item when it expires, once you
finish your session with the item, you will be unable
to use the item.
When ring tones and wallpapers expire, they are
automatically removed from their respective lists.
For expired items that continue to display in their
respective lists, you can either choose to renew the
license for the item or else manually delete the
item.
Note: You cannot delete locked items.
121
Using LINC Features
Note: Some LINC features require a
subscription. Please contact your sales
representative or SouthernLINC Wireless
at 1-800-406-0151 for more information.
Your phone can send and receive the following
items through InstantLINC Mobile to Mobile calls
with other phones that have this capability:
•
•
•
•
•
short text messages*
Datebook events
pictures*
My Info
contact information
* Additional charges may apply.
You can choose to send My Info and contact
information to any LINC ID.
You can choose to send pictures, messages,
events to the LINC ID you are engaged in an
InstantLINC Mobile to Mobile with, LINC IDs on the
recent calls list, and LINC IDs stored in Contacts.
122
When you make or receive an InstantLINC Mobile
to Mobile call, your phone automatically
determines whether the phone you are in an
InstantLINC Mobile to Mobile with is able to receive
each of these items. Your phone saves this
information for as long as the LINC ID is on your
recent calls list or is saved in your Contacts. Your
phone updates the saved information each time
you make or receive a call to or from that LINC ID.
You can turn your phone’s ability to send and
receive messages, pictures, events on and off. See
“Turning LINC Features On and Off” on page 135.
You cannot send LINC feature items during
Talkgroup calls.
LINC Feature Icons
When you are in an InstantLINC Mobile to Mobile
call, icons appear on your phone’s display
indicating which types of LINC feature items you
can send and receive. These icon also indicate
when you have received a LINC feature item of
each type.
LINC Messages
If the icon appears dimly, you can send and
receive the indicated type of LINC feature item in
the current call. When the icon appears brightly,
you have received indicated type of LINC feature
item in the current call.
When you send a message, it appears on the
display of the phone you are engaged in the
InstantLINC Mobile to Mobile call with. After the
call, the message appears in the recent call list of
that phone.
d Contact information
Beginning a Message and Choosing a
Recipient
j My Info
g Picture
o Events
w Message
z
LINC Messages
Note: This features requires a subscription.
Please contact your sales representative
or SouthernLINC Wireless at
1-800-406-0151 for more information.
The LINC Messages feature lets you send short
text messages through InstantLINC Mobile to
Mobile calls.
You can begin a message during an InstantLINC
Mobile to Mobile call, from Contacts, from the
recent calls list, or from LINC Manager.
Note: The first time you send a message after
turning the phone on, Data Fees May
Apply. Continue? appears and you are
prompted to respond. Press O or press
A under Yes to continue sending the
message. Press A under No to cancel
sending the message.
During a InstantLINC Mobile to Mobile Call
1 Press m.
2 Select Use LINC Feature > LINC Message.
The message will be sent to the LINC ID that you
are engaged in the InstantLINC Mobile to Mobile
call with.
123
Using LINC Features
If these options do not appear on the
context-sensitive menu, the LINC ID you are
engaged in the InstantLINC Mobile to Mobile call
with is not able to receive messages.
From the Contacts or the Recent Calls List
1 Scroll to or select the entry containing the LINC
ID you want to send the message to.
2 Press m.
3 Select Use LINC Feature > LINC Message.
If these options do not appear on the
context-sensitive menu, the LINC ID you chose is
not able to receive messages.
From LINC Manager
LINC Manager lets you select the LINC ID you
want to send the message to from Contacts or the
recent calls list.
1 From the main menu, select LINC Manager >
LINC Message.
2 To choose a LINC ID from Contacts, select A
Contact. A list of Contacts entry that have LINC
IDs and are able to receive messages appears.
-orTo choose a LINC ID from the recent calls list,
select A Recent Call. A list of calls containing
LINC IDs that are able to receive messages
appears.
124
3 Select the Contacts entry or recent call
containing the LINC ID you want to send a
messages to.
Creating and Sending a Messages
After you have begun a message and chosen a
recipient, a screen appears that lets you create the
text of the message you want to send. Your
message may be up to 400 characters long.
To create your message, you can choose from a
list of ready-made words or short phrases called
Quick Notes. When you choose a Quick Note, you
can use it as it is or edit it before you send it.
Editing a Quick Note while creating a message
changes the Quick Note for this message only and
will not change how the Quick Note appears on the
list.
Sending a Quick Note
1 Select the Quick Note you want to send.
2 Press the PTT button to send the message.
Sending an Edited Quick Note
1 Scroll to the Quick Note you want.
2 Press A under Edit.
3 Edit the Quick Note. Press O when you are
finished editing.
4 Press the PTT button to send the message.
LINC Pictures
Sending Text Not Based On a Quick Note
1
2
3
4
Select [New Message].
Enter the text you want.
When you are finished, press O.
Press the PTT button to send the message.
Receiving Messages
When you receive a message, a message
notification appears on the display.
To view the message:
Press A under Read.
To dismiss the message notification:
If the flip is closed, press .. -orIf the flip is open, press A under Back or close
the flip.
The 5 most recent messages received from a LINC
ID are stored with the that LINC ID on the recent
calls list.
For information on viewing messages from the
recent calls list, see “Messages” on page 36.
Replying to a Message
1 View the message.
2 Press A under Reply.
3 Create and send the message. See “Creating
and Sending a Messages” on page 124.
LINC Pictures
Note: This features requires a subscription.
Please contact your sales representative
or SouthernLINC Wireless at
1-800-406-0151 for more information.
The LINC Pictures feature lets you send pictures
through InstantLINC Mobile to Mobile calls.
When you send a picture, it appears on the display
of the phone you are engaged in the InstantLINC
Mobile to Mobile call with.
You can send a picture send a picture stored in
your phone’s media center or use your phone’s
camera to take a new picture to send.
If the person you sent the picture to accepts the
picture, the picture is saved by that phone. The
picture then appears in the recent call list of that
phone is accessible through that phone’s media
center.
Sending a Picture During a Call
Note: You cannot talk or listen on an
InstantLINC Mobile to Mobile call while a
picture is being transmitted.
125
Using LINC Features
Taking a Picture to Send
Note: For more information on taking pictures,
see “Taking Pictures” on page 91.
1 While in an InstantLINC Mobile to Mobile call:
Press c or press A under Camera. -orPress m. Select Use LINC Feature > LINC
Picture.
2 When the picture you want to capture is in view,
press c or press O or press A under Capture.
3 To save the picture so you can send it, press O.
-orTo discard the picture without sending it, press
A under Discard. Repeat step 2 until you
capture a picture you want to send.
4 Press the PTT button to send the picture.
5 Wait while the picture is transmitted. The
InstantLINC Mobile to Mobile call is temporarily
interrupted while a picture is transmitted.
6 When prompted, press the PTT button to
resume the InstantLINC Mobile to Mobile call.
Sending a Stored Picture
1 While in an InstantLINC Mobile to Mobile call:
Press A under Picture. -or-
126
Press m. Select Use LINC Feature > LINC
Picture.
A list of pictures that can be included in an
InstantLINC Mobile to Mobile call appears.
2 Select the picture you want to send.
3 Press the PTT button to send the picture.
4 Wait while the picture is transmitted. The
InstantLINC Mobile to Mobile call is temporarily
interrupted while a picture is transmitted.
5 When prompted, press the PTT button to
resume the InstantLINC Mobile to Mobile call.
Note: The first time you send a stored picture
after turning the phone on, Picture Fees
May Apply. Continue? appears and you
are prompted to respond. Press A under
Yes to send the picture. Press A under
No to not send the picture.
Starting a Call by Sending a Picture
You can start an InstantLINC Mobile to Mobile call
after you capture a picture with the camera or by
choosing a stored picture from the media center.
You can start from the camera or media center, or
use the LINC Manager.
LINC Pictures
From the Camera or Media Center
1 Capture a picture with the camera. See “Taking
Pictures” on page 91. -orFrom the media center, scroll to or select the
picture you want to send in an InstantLINC
Mobile to Mobile call.
2 Press m.
3 Select LINC Picture.
A list of Contacts that have LINC IDs and are
able to receive pictures appears.
4 Select the name of the person you want to send
the picture to.
5 Press the PTT button to send the picture.
6 Wait while the picture is transmitted. The
InstantLINC Mobile to Mobile call is temporarily
interrupted while a picture is transmitted.
7 When prompted, press the PTT button to
resume the InstantLINC Mobile to Mobile call.
From the LINC Manager
1 From the main menu, select LINC Manager >
LINC Picture.
2 To choose a LINC ID from Contacts, select A
Contact. A list of Contacts entry that have LINC
IDs and are able to receive pictures appears.
-or-
To choose a LINC ID from the recent calls list,
select A Recent Call. A list of calls containing
LINC IDs that are able to receive pictures
appears.
3 Select the Contacts entry or recent call
containing the LINC ID you want to send a
picture to.
4 If you want to capture a picture to send:
Select Capture Picture. Use the camera to
capture the picture you want to send. (See
“Taking Pictures” on page 91.) -orIf you want to choose a stored picture from the
media center:
Select Browse Picture. Scroll to or select the
picture you want to send.
5 Press the PTT button to send the picture.
6 Wait while the picture is transmitted. The
InstantLINC Mobile to Mobile call is temporarily
interrupted while a picture is transmitted.
7 When prompted, press the PTT button to
resume the InstantLINC Mobile to Mobile call.
127
Using LINC Features
Receiving a Picture
When someone sends you a picture, your phone
emits a tone or vibrates and a message appears
on the display asking you if you want to accept the
picture.
Pictures you receive are saved to your phone’s
memory or to a memory card inserted in your
phone’s memory card slot, depending on the
storage preference you chose, and are then
accessible through the media center.
The most recent picture sent to or received from a
LINC ID are stored with the that LINC ID on the
recent calls list.
For information on viewing pictures from the recent
calls list, see “Pictures” on page 37.
When you receive a picture, it appears every time
you are in an InstantLINC Mobile to Mobile call with
the person who sent it unless you clear the picture
from the display or from the recent calls list, or
delete it from the media center. This occurs for the
last 20 people who sent you pictures.
Accepting a Picture
1 When you see the message asking you if you
want to accept the picture, press A under Yes.
128
2 Wait while the picture is transmitted. The
InstantLINC Mobile to Mobile call is temporarily
interrupted while a picture is transmitted.
3 When prompted, press the PTT button to
resume the InstantLINC Mobile to Mobile call.
Note: The first time you accept a stored picture
after turning the phone on, Data Fees
May Apply appears and you are
prompted to respond. Press A under
Yes to accept the picture. Press A under
or No to not accept the picture.
Tip: If you want to stop the transmission before it
is finished, press A under Cancel.
Declining a Picture
When you see the message asking you if you
want to accept the picture, press A under No.
The picture is not transmitted.
Clearing a Picture From The Display
If you want to remove a picture from your phone’s
display while still in the InstantLINC Mobile to
Mobile call in which you received it or while in a
subsequent InstantLINC Mobile to Mobile call with
the person who sent it:
1 Press m.
2 Select Clear Screen.
LINC Events
This does not delete the picture from your phone’s
media center, but the picture will not appear on the
display again the next time you receive a
InstantLINC Mobile to Mobile call from person who
sent it.
LINC Events
The LINC Events feature lets you send Datebook
events through InstantLINC Mobile to Mobile calls.
You can send an event already stored in your
phone’s Datebook or create a new Datebook event
to send. When you create a new event to send, the
event is stored to your Datebook.
When you send an event, it appears on the display
of the phone you are engaged in the InstantLINC
Mobile to Mobile call with. After the call, the event
appears in the recent call list of that phone.
You can chose a recipient for the Datebook event
you want to send during an InstantLINC Mobile to
Mobile call, from Contacts, from the recent calls
list, from LINC Manager, or from Datebook
Sending a Datebook Event During a
Call
The event will be sent to the LINC ID that you are
engaged in the InstantLINC Mobile to Mobile call
with.
1 While in an InstantLINC Mobile to Mobile call,
press m.
2 Select Use LINC Feature > LINC Event.
Note: If these options do not appear on the
context-sensitive menu, the LINC ID you
are engaged in the InstantLINC Mobile to
Mobile call with is not able to receive
Datebook events.
3 If you want to create a new Datebook event to
send, press A under New. Create the event.
See “Creating Events” on page 142. -orIf you want to chose an event from Datebook,
select the event you want to send.
4 If the event is a recurring event: Select This
Event Only to send only the event selected.
Select Repeat Event to send all occurrences of
the event.
5 Press the PTT button to send the event.
129
Using LINC Features
Sending a Datebook Event From the
Contacts or the Recent Calls List
Sending a Datebook Event From LINC
Manager
1 While viewing Contact or the recent calls list,
scroll to or select the entry containing the LINC
ID you want to send the event to.
2 Press m.
3 Select Use LINC Feature > LINC Event.
Note: If these options do not appear on the
context-sensitive menu, the LINC ID you
are engaged in the InstantLINC Mobile to
Mobile call with is not able to receive
Datebook events.
LINC Manager lets you select the LINC ID you
want to send the event to from Contacts or the
recent calls list.
4 If you want to create a new Datebook event to
send, press A under New. Create the event.
See “Creating Events” on page 142. -orIf you want to chose an event from Datebook,
select the event you want to send.
5 If the event is a recurring event: Select This
Event Only to send only the event selected.
Select Repeat Event to send all occurrences of
the event.
6 Press the PTT button to send the event.
1 From the main menu, select LINC Manager >
LINC Event.
2 To choose a LINC ID from Contacts, select A
Contact. A list of Contacts entry that have LINC
IDs and are able to receive Datebook events
appears. -orTo choose a LINC ID from the recent calls list,
select A Recent Call. A list of calls containing
LINC IDs that are able to receive Datebook
events appears.
3 Select the Contacts entry or recent call
containing the LINC ID you want to send a event
to.
4 If you want to create a new Datebook event to
send, press A under New. Create the event.
See “Creating Events” on page 142. -orIf you want to chose an event from Datebook,
select the event you want to send.
5 If the event is a recurring event: Select This
Event Only to send only the event selected.
130
LINC Events
Select Repeat Event to send all occurrences of
the event.
6 Press the PTT button to send the event.
Sending a Datebook Event From
Datebook
From Datebook you can select the LINC ID you
want to send the event to from Contacts or the
recent calls list.
1 From the main menu, select Datebook.
2 Press m.
3 If you want to create a new Datebook event to
send, create the event. See “Creating Events”
on page 142. -orIf you want to chose an event from Datebook,
select the event you want to send.
4 Select Send via PTT.
5 If the event is a recurring event: Select This
Event Only to send only the event selected.
Select Repeat Event to send all occurrences of
the event.
6 To choose a LINC ID from Contacts, select A
Contact. A list of Contacts entry that have LINC
IDs and are able to receive Datebook events
appears. -or-
To choose a LINC ID from the recent calls list,
select A Recent Call. A list of calls containing
LINC IDs that are able to receive Datebook
events appears.
7 Select the Contacts entry or recent call
containing the LINC ID you want to send an
event to.
8 Press the PTT button to send the event.
Receiving a Datebook Events
To view the information while still in the
InstantLINC Mobile to Mobile call, press O.
The 5 most recent events received from a LINC ID
are stored with the that LINC ID on the recent calls
list.
Store Events to Datebook
While viewing the event you want to store, press
A under Save.
Note: Save does not appear if the event is
already stored in Datebook.
For information on viewing Datebook events from
the recent calls list, see “Datebook Events” on
page 37.
131
Using LINC Features
LINC My Info
Starting a Call by Sending My Info
The LINC My Info feature lets you send My Info
through InstantLINC Mobile to Mobile calls.
1 From the main menu, select LINC Manager >
LINC My Info. -or-
When you send My Info, the information you sent
appears on the display of the phone you are
engaged in the InstantLINC Mobile to Mobile call
with. After the call, the information appears on the
recent call list of that phone.
You can control what portion of the information in
My Info is sent and whether it is sent automatically
in every InstantLINC Mobile to Mobile call or only
when you choose to send it.
Tip: When you send My Info, certain
information, such as your email address or
fax number, cannot be included. To send
complete contact information, create an
entry for yourself in Contacts and send it.
From the main menu, select My Info. Press m.
With LINC My Info highlighted, press O.
2 Use the keypad to enter the LINC ID you want to
send the information to. -orPress A under Browse. Select Contacts,
Recent Calls, or Memo. Select the number you
want to enter.
3 When Ready to Send appears on the display,
press the PTT button to send the information.
Receiving My Info Sent to You
To view the information while still in the
InstantLINC Mobile to Mobile call:
Sending Information During a Call
1 Press m.
2 Select View Contact.
1 While in an InstantLINC Mobile to Mobile call,
press m.
2 With LINC My Info highlighted, press O. -or-
If you receive My Info from the same phone more
than once, only the most recently sent version
appears in the recent calls list.
Select Use LINC Feature > LINC My Info.
For information on viewing My Info from the recent
calls list, see “My Info From Other Phones” on
page 38.
3 When Ready to Send appears on the display,
press the PTT button to send the information.
132
LINC Contact
LINC Contact
The LINC Contact feature lets you send Contacts
entries through InstantLINC Mobile to Mobile calls.
When you send contact information, the
information you sent appears on the display of the
phone you are engaged in the InstantLINC Mobile
to Mobile call with. After the call, the information
appears on the recent call list of that phone.
You can send contact information by selecting a
Contacts entry or an item from the recent calls list.
Contacts entries that contain only addresses
cannot be sent. When Contacts entries are
received, they do not include ring tones or pictures.
These items from the recent calls list can be sent:
• Contact information sent from other phones
• Calls to or from numbers stored in your Contacts
list
Sending Information During a Call
1 While in a InstantLINC Mobile to Mobile call,
press m.
2 Select Contacts or Recent Calls. Scroll to the
Contacts entry or item in the recent calls list you
want to send. Then press m and select Send
Contact via LINC View. -or-
Select Use LINC Feature > LINC Contact.
Select the Contacts entry or item in the recent
calls list you want to send.
3 Press the PTT button to send the information.
Starting a Call by Sending
Information
From the LINC Manager
1 From the main menu, select LINC Manager >
LINC Contacts.
2 Choose the LINC ID you want to send the
contact information to:
Use the keypad to enter the LINC ID you want.
-orPress A under Browse. Select Contacts,
Recent Calls, or Memo. Select the number you
want.
3 Select the contact entry you want to send.
4 When Ready to Send appears on the display,
press the PTT button to send the information.
From Contacts or the Recent Calls List
1 From Contacts or the recent calls list, scroll to or
select the entry you want to send.
2 Press m.
3 Select LINC Contact.
133
Using LINC Features
4 Choose the LINC ID you want to send the
contact information to:
Use the keypad to enter the LINC ID you want.
-orPress A under Browse. Select Contacts,
Recent Calls, or Memo. Select the number you
want.
5 When Ready to Send appears on the display,
press the PTT button to send the information.
Receiving Contact Information Sent
to You
To view the contact information while still in the
InstantLINC Mobile to Mobile call:
1 Press m.
2 Select View Contact.
For information on viewing contact information
from the recent calls list, see “Contact Information
From Other Phones” on page 36.
134
LINC Manager
LINC Manager lets you quickly access LINC
features, and other InstantLINC Mobile to Mobile
call features, from the main menu.
Using LINC Manager, you can send any type of
LINC feature item, turn your phone’s ability to send
and receive messages and pictures on and off,
control your My Info sending options, and change
the Quick Notes list.
You can also access the Quick PTT feature and
set the One Touch PTT feature.
Accessing LINC Features
From LINC Manager
1 From the main menu, select LINC Manager.
2 Select Send Message, Send Picture, Send
Event, Send My Info, or Send Contacts.
3 Choose a LINC ID to send the item to and send
the item. The steps you take depend on the type
of item.
Turning LINC Features On and
Off
You can turn your phone’s ability to send and
receive messages, pictures, and Datebook events
on and off.
You cannot turn your phone’s ability to send and
receive My Info and contact information on and off.
1 From the main menu, select LINC Manager >
Configure > On/Off LINC Features.
2 A checkmark appears next to Messages,
Pictures, or Events if your phone’s ability to
send and receive that type or item is on. To add
or remove the checkmark, select the field.
3 Press A under Done.
Changing the Quick Notes
List
You can edit the Quick Notes on the Quick Notes
list. When you do this, your changes are saved to
the Quick Notes list.
You can started editing a Quick Note starting with
the text that is already there or clear the text in the
Quick Note before you start editing.
135
LINC Manager
Quick Notes can be up to 30 characters.
1 From the main menu, select LINC Manager >
Configure > LINC Notes.
2 Scroll to the Quick Note you want to edit.
3 If you want to clear the text in the Quick Note
before you start editing:
Press A under Clear.
Press A under Yes to confirm.
4 Press O.
5 Edit the existing text or enter new text.
6 When you are finished editing, press O.
Tip: To clear the text in all Quick Notes on the
Quick Notes list: Press m. Select Clear All.
Press A under Yes to confirm.
Setting One Touch PTT
One Touch PTT sets your phone to do any of the
following each time you press the PTT button:
• call the most recent LINC ID or Group List on the
recent calls list
• call a LINC ID you assign
• go to LINC Manager
• go to the first screen for sending a message,
sending a picture, sending a Datebook event,
sending My Info, or send contact information in
an InstantLINC Mobile to Mobile call
Setting the PTT Button to Call the
Most Recent Private ID or Group List
1 From the main menu, select LINC Manager >
Configure > One Touch PTT.
2 Select Last Call.
Setting the PTT Button to Call an
Assigned Private ID
1 From the main menu, select LINC Manager >
Configure > One Touch PTT > Assigned
Number.
2 To enter the LINC ID you want your phone to
call every time you press the PTT button:
Enter the number using your keypad. -orPress A under Search. Select Contacts,
Recent Calls, or Memo. Select the number you
want to enter.
Tip: If you are entering a Talkgroup number,
enter # before the number.
3 Press O.
136
Setting My Info Sending Option
Setting the One Touch PTT to Any
Other Option
1 From the main menu, select LINC Manager >
Configure > One Touch PTT.
2 To set your phone to go to LINC Manager each
time you press the PTT button, select LINC
Manager. -orTo set your phone to go to the first screen for
sending a message in an InstantLINC Mobile to
Mobile call each time you press the PTT button,
select LINC Message. -orTo set your phone to go to the first screen for
sending a picture in an InstantLINC Mobile to
Mobile call each time you press the PTT button,
select LINC Picture. -orTo set your phone to go to the first screen for
sending a Datebook event in an InstantLINC
Mobile to Mobile call each time you press the
PTT button, select LINC Events. -orTo set your phone to go to the first screen for
sending My Info in each time you press the PTT
button, select LINC My Info. -orTo set your phone to go to the first screen for
sending My Info in each time you press the PTT
button, select LINC Contact.
Turning Off One Touch PTT
1 From the main menu, select Settings >
InstantLINC Mobile to Mobile > One Touch
PTT.
2 Select Off.
Setting My Info Sending
Option
You can control what portion of the information in
My Info is sent and whether it is sent automatically
in every InstantLINC Mobile to Mobile call or only
when you choose to send it.
Information Sent
The information your phone sends always includes
My Name and InstantLINC Mobile to Mobile.
Line 1, Line 2, Carrier IP, and Circuit Data may
also be sent, depending on how you set your
sending options.
To change which fields are sent:
1 From the main menu, select LINC Manager >
Configure > LINC My Info > Info to Send.
2 A checkmark appears next to the fields that will
be sent. To add or remove the checkmark, select
the field.
137
LINC Manager
3 When you are finished, press A under Done.
Automatic Sending
To control whether your information is sent
automatically:
1 From the main menu, select LINC Manager >
Configure > LINC My Info > Auto Send.
2 To set your information to be sent automatically,
set this option to On. -or3 To set your information to be sent only when you
choose to send it, set this option to Off.
When you make an InstantLINC Mobile to Mobile
call in which your information is sent automatically,
the name you entered in the My Name field of My
Info appears on the display of the recipient’s
phone, even if your name and LINC ID are not
stored in the recipient’s Contacts.
138
My Info
My Info lets you view information about your
phone. Depending on SouthernLINC Wireless, you
may also be able to send this information to other
phones.
Viewing My Info
1 From the main menu, select My Info.
2 Scroll to see the entire screen.
The My Info screen contains:
• My Name — You can enter your name here.
• Line 1 and Line 2 — your phone numbers for
phone lines 1 and 2. Each number appears
when you receive your first call on that line.
• LINC ID — Your LINC ID is the number that
others use to contact you using InstantLINC
Mobile to Mobile calls. This number appears
when you receive your first InstantLINC Mobile
to Mobile call.
• Group ID — the number of the Talkgroup you
have joined.
• Carrier IP — the IP address assigned to
SouthernLINC Wireless. This number appears
when you register for packet data services.
• IP1 Address and IP2 Address — the IP
addresses you use to access the Internet with
your phone.
• Circuit Data — the number you use if you want
to use your phone to transfer circuit data. See
“Using Your Phone as a Modem” on page 58.
You receive this number from SouthernLINC
Wireless.
Note: If you request equipment-related
transactions on your account,
SouthernLINC Wireless may require you
to provide specific information about your
phone. By pressing m anytime while in My
Info, a submenu will appear that includes
your phone's service status, unit
information, and phone identification
numbers including IMEI, SIM ID, and
Serial Number (SN). Please be prepared
to supply the representative with this
information when requesting these types
of transactions.
Editing My Info
To edit My Info to enter or change the text that
appears in My Name:
1 From the main menu, select My Info.
2 Press A under Edit.
3 Select Name.
139
My Info
4 Enter the name you want to appear. See
“Entering Text” on page 68. When you are
finished, press O.
You can also edit the information in Line 1, Line 2,
and Circuit Data, but your changes are only
temporary. The next time your phone registers on
the network, your actual phone numbers and circuit
data number appear again in My Info.
140
Datebook
Datebook stores up to 250 events. You can store
events over a 13 month period — 12 months after
and 1 month before the current date.
A Datebook event contains:
• A subject — A name you assign to the event.
You can also enter a phone number, LINC ID, or
Talkgroup number here. After the event is
stored, you can call this number from Datebook
or when you get a reminder of this event.
• A location — The location of the event. You can
also enter a phone number, LINC ID, or
Talkgroup number here. After the event is
stored, you can call this number from Datebook
or when you get a reminder of this event.
• A start time — The start time automatically
assigned to an event is the beginning of the day.
You can change the start time, or assign no start
time, before storing the event.
• A duration — The length of time the event lasts.
• A date — The date automatically assigned to an
event is the date that was highlighted or
selected when you began creating the event.
You can change this date before storing the
event.
• A repeat — lets you store the event as a
recurring event.
• A reminder — If an event has a start time, you
can set Datebook to remind you that the event is
going to start.
• a ring tone for the reminder
• a profile that your phone is switched to while the
event is occurring
• a Java application that starts when the event
starts
Only the subject and date are required.
Viewing Datebook
To access Datebook:
From the main menu, select Datebook.
You can view Datebook by the day, by the week, or
by the month. You can also view the details of any
event.
In day view, brief information about each event for
that day appears.
In week view, events appear as markers
corresponding to their times.
In month view, days with events appear with a
marker in the corner.
141
Datebook
To view an event:
Creating Events
1 Select the day the event occurs.
2 Select the event.
Every Datebook event must have a subject and be
stored to a date. Other information is optional.
To change the current view:
You may enter the information in any order by
scrolling through the event details.
1 While viewing Datebook, press m.
2 Select the view you want.
Navigating Datebook
After you have entered the information you want,
you can press A under Done to store the event to
Datebook.
To scroll through Datebook:
If you decide you do not want to store the event:
Scroll left and right using the navigation key. -orIn week view and month view, press * or #.
To see more in day view:
Scroll up and down using the navigation key.
To highlight a day in month view:
Enter the date using the keypad.
To go to today’s date:
1 While viewing Datebook, press m.
2 Select Go To Today.
To go to any date in Datebook:
1 While viewing Datebook, press m.
2 Select Go To Date.
3 Select the date you want.
142
Press A under Cancel.
To create a Datebook event:
1 While viewing Datebook, press A under New.
-orIn day view, select [New Event].
2 To assign a subject to the event:
Select Subject.
Enter the name. -orPress A under Browse to choose from
common event names. -orEnter a phone number, LINC ID, or Talkgroup
number. After the event is stored, you can call
this number.
When you are finished, press O.
Creating Events
3 If you want to assign a location to the event:
Select Location.
Enter the date you want.
7 If you want to make the event a recurring event:
Enter the location. -or-
Select Repeat.
Enter a phone number, LINC ID, or Talkgroup
number. After the event is stored, you can call
this number.
Select the repeat cycle you want.
When you are finished, press O.
Press A under Done.
4 The start time automatically assigned to an
event is the beginning of the day. If you want to
change the start time or assign no start time:
Select Start.
If the event occurs more than once a week:
Select Multiple Day. Select the days you want.
Select End. Select the date you want this event
to stop recurring.
8 If you want to create a reminder for this event:
Enter the start time you want. -or-
Select Reminder.
Press A under No Time to assign no start time.
Select the reminder time you want. -or-
5 If you want to assign a duration to the event:
Select Duration.
Select the duration you want. -orSelect Custom to enter a duration.
6 The date automatically assigned to an event is
the date that was highlighted or selected when
you began creating the event.
Select Custom to enter a reminder time.
Note: If an event has no start time, you cannot
create a reminder for it.
9 If you have entered all the information you want
for this event, press A under Done. -orIf you want to assign a ring tone, a profile, or a
Java application to the event, see “Assigning
More Options” on page 144.
To change the date of the event:
Select Date.
143
Datebook
Assigning More Options
Editing Events
To assign more options before storing an event:
To change the details of an event:
1 If you have created a reminder for the event and
want to set the ring tone for that reminder:
1
2
3
4
Select Ring Tone.
Select the ring tone you want from the ring tones
stored in your phone.
2 If you want to assign a profile that your phone is
switched to while the event is occurring:
Select Profile.
Select the profile you want from the profiles
stored in your phone.
Your phone switches to this profile when the
event starts and switches back to the previous
profile when the event ends.
3 If you want to assign a Java application to start
when the event starts:
Select the day the event occurs.
Select the event.
Press A under Edit.
Follow the applicable instructions in “Creating
Events” on page 142 to edit the various fields.
To copy an event to another date:
1
2
3
4
5
6
7
8
Select App.
Select the day the event occurs.
Select the event.
Press m.
Select Copy.
Press A under Yes to confirm.
Enter the date you want.
Press O.
If you want to change more information, follow
the applicable instructions in “Creating Events”
on page 142 to edit the various fields.
Select the application you want from the Java
applications stored in your phone.
Deleting Events
If you created a reminder for this event, your
phone prompts you to start the Java application
when you get the reminder.
1
2
3
4
144
Select the day the event occurs.
Select the event.
Press m.
Select Delete.
Receiving Reminders
5 If the event is not a recurring event, press O or
press A under Yes to confirm. -orIf the event is a recurring event:
Select This Event Only to delete only the event
selected in step 2.
Select Repeat Event to delete all occurrences
of the event.
Receiving Reminders
If you created a reminder for a Datebook event,
when the reminder time occurs, your phone notifies
you with text on the display, a reminder tone, and a
slow flash of the logo backlight.
To view more details about the event:
Open the flip. -orPress A under View.
To dismiss the reminder:
If the flip is closed, press .. -orIf the flip is open, press O, press A under
Dismiss, or close the flip.
For Events With Java Applications
If you assigned a Java application to start when the
event starts, you can start the application when you
get the reminder.
1 Press m.
2 Select Launch.
Making Calls From Datebook
and Datebook Reminders
If you stored a phone number, LINC ID, or
Talkgroup number in the Subject or Location field
of a Datebook event, you can call or send a call
alert to that number from Datebook or from the
reminder of that event.
If you store numbers in both the Subject and
Location fields, you can call or send a call alert to
the number stored in Subject and the number
stored in Location as long as the number stored in
Subject is a LINC ID or Talkgroup number and the
number stored in Location is a phone number.
If both are the same type of number, the number in
Subject is called or sent a call alert. To call or send
a call alert to the number stored in Location, you
must delete the number stored in Subject.
145
Datebook
Making Calls From Datebook
To make a phone call:
1 Highlight or select the event containing the
number you want to call.
2 Press s. -orPress m. Select Call # in Event.
To make a InstantLINC Mobile to Mobile call or
Talkgroup call:
1 Highlight or select the event containing the
number you want to call.
2 Press and hold the PTT button on the side of
your phone. -orIf you did not include a # before the Talkgroup
you want to call: Press m. Select Talkgroup.
Press the PTT button.
To send a call alert:
1 Highlight or select the event containing the
number you want to call or send a call alert to.
2 Press m. Select Alert # in Event. Press the PTT
button.
Making Calls From Datebook
Reminders
To make a phone call:
Press s. -orPress m. Select Call # in Event.
To make a InstantLINC Mobile to Mobile call or
Talkgroup call:
Press the PTT button. -orIf you did not include a # before the Talkgroup
you want to call: Press m. Select Talkgroup.
Press the PTT button.
To send a call alert:
Press m. Select Alert # in Event. Press the PTT
button.
Customizing Datebook Setup
To access Datebook set up options:
1 From the main menu, select Datebook.
2 Press m.
3 Select Setup.
You can view or change these options:
146
Customizing Datebook Setup
• Start View — sets Datebook to start in day view,
week view, or month view when you access
Datebook.
• Daily Begin — sets the beginning of your day.
This is the earliest time of day displayed in week
view, if you have a 12-hour day view.
• Delete After — sets the amount of time
Datebook waits to delete an event after it
occurs.
• Time Shift — lets you shift the times of all
Datebook events. This is useful if you are
traveling to a different time zone.
• Alert Timeout — sets the amount of time a tone
continues to sound when you receive a
Datebook reminder.
• Clock — controls whether the time and date
appear on the idle screen; sets time and date
format; sets year.
147
Java Applications
Running Applications
Your phone arrives with Java applications
preloaded. These preloaded applications
autoinstall the first time you open them.
To run an application that has a shortcut on the
main menu:
You can download and install more Java
applications.
Note: Using Java applications may cause your
phone to use up more battery power than
other uses of your phone.
Installing Applications
1 From the main menu, select Java Apps.
2 Select the application or suite of applications
you want to install.
Installation messages appear as the application
installs.
3 If you want to create a shortcut to the Java
application on the main menu: Press A under
Next. Press A under Yes. Press O.
4 Press A under Done.
1 From the main menu, select the application or
suite of applications you want to run.
2 If you have selected a suite of applications,
select the application you want to run.
To run an application that does not have a shortcut
on the main menu:
1 From the main menu, select Java Apps.
2 Select the application or suite of applications
you want to run.
3 If you have selected a suite of applications,
select the application you want to run.
Tip: If you do not hear the sounds associated
with the Java application, select Settings >
Volume and check the volumes of Java
Speaker and Java Earpiece.
Suspending Applications
When you suspend an application, it does not stop
running. It goes to the background so that you can
run another application in the foreground.
To suspend an application:
Press e or close the flip.
148
Resuming Applications
To view your suspended applications:
From the Java menu, select Suspended Apps.
You can have up to 3 applications running at one
time — 1 running in the foreground and 2 in the
background.
Resuming Applications
You can resume a suspended application at any
time. This brings it to the foreground.
1 From the Java menu, select Suspended Apps.
2 Select the application you want to resume.
Ending Applications
To end an application:
1 From the main menu, select Java Apps.
2 If the application you want to end is part of a
suite of applications, select the suite.
3 Scroll to the application you want to end.
To end all applications:
1
2
3
4
5
6
From the main menu, select Java Apps.
Scroll to Suspended Apps.
Press m.
Select End All.
Press O or press A under Yes to confirm.
If you want to end all applications without letting
them exit, press A under EndNow.
Downloading Applications
If you want to run more Java applications, you can
download them into your phone.
Go to www.southernlinc.com/downloads for a
selection of Java applications and downloading
instructions.
About DRM Java Applications
If End is not one of your options: Press m. Select
End.
Your phone supports gifting and Tell-A-Friend
services for DRM Java applications. However,
these services may not be offered by
SouthernLINC Wireless. Please contact
SouthernLINC Wireless for more information about
these services.
Tip: You can also end applications from the
Suspended Apps screen.
For more information about DRM items, see
“Digital Rights Management” on page 119.
Press A under End. -or-
149
Java Applications
Deleting Applications
Note: Under certain conditions, some DRM
vendors will not charge you if you
download an item multiple times within a
given time frame. Please contact the DRM
vendor to learn more about their
download regulations.
To delete an application:
1
2
3
4
5
6
From the main menu, select Java Apps.
Scroll to the application you want to delete.
Press m.
Select Deinstall.
Press O or press A under Yes to confirm.
When your phone has finished deleting the
application, press A under Done.
To delete all Java applications:
1
2
3
4
5
From the main menu, select Java Apps.
Scroll to Java System.
Press m.
Select Delete All.
Press O or press A under Yes to confirm.
150
Managing Memory
To view the amount of memory available for Java
applications:
1 From the main menu, select Java Apps > Java
System.
2 Press A under Next.
3 To see more memory information, press A
under Next again.
Deleting Java applications frees memory.
Note: Java application data is stored in your
phone using the same memory space
used to store messages, voice records,
and items accessible through the media
center that are stored in your phone’s
memory. Deleting or moving some of
these other items frees memory for Java
applications.
Storing Java Applications on the Memory Card
Storing Java Applications on
the Memory Card
Moving an Application Back to Your
Phone
To free memory, you can temporarily move Java
applications from your phone’s memory to the
memory card inserted in your phone. When you do
this, the application is deinstalled and deleted from
your phone. To run the Java application again, you
must move it back to your phone and install it
again.
Only Java applications that came preloaded on
your phone or were downloaded to your phone can
be moved to your phone from the memory card.
Moving an Application to the Memory
Card
1 From the main menu, select Java Apps.
2 Scroll to the application you want to move to the
memory card inserted in your phone.
3 Press m.
4 Select Move To Card.
5 Press O or press A under Yes to confirm.
The Java application is placed in a folder called
Midlets, which is automatically created the first
time you insert the memory card into your phone.
1 From the main menu, select Java Apps.
2 If the memory card containing the application
you want to move is not inserted in your phone,
insert it now.
3 Select Memory Card.
A list of Java applications you have moved from
your phone to the memory card appears.
4 Select the application you want to move back to
your phone.
5 Press O or press A under Yes to confirm.
The application you selected now appears on the
Java Apps screen, but is not installed. You must
install the application before running it.
Deleting Applications From the
Memory Card
To delete an application from the memory card
inserted in your phone:
1 From the main menu, select Java Apps.
2 Select Memory Card.
151
Java Applications
3
4
5
6
Scroll to the application you want to delete.
Press m.
Select Remove.
Press O or press A under Yes to confirm.
Shortcuts on the Main Menu
When you install an application, you can create a
shortcut to the application on the main menu.
To create a shortcut to an application that is
already installed:
1 From the main menu, select Settings >
Personalize > Menu Options > Add/Remove
Apps. -orFrom the main menu: Press m. Select Main
Menu Setup > Add/Remove Apps.
2 Scroll to view the list of Java applications. Any
application that has a shortcut on the main menu
has a checkmark next to it.
3 Scroll to the application you want to create a
shortcut for.
4 Press O.
5 Press A under Done.
152
To remove a shortcut:
1 From the main menu, select Settings >
Personalize > Menu Options > Add/Remove
Apps. -orFrom the main menu: Press m. Select Main
Menu Setup > Add/Remove Apps.
2 Scroll to view the list of Java applications. Any
application that has a shortcut on the main menu
has a checkmark next to it.
3 Scroll to the application you want to remove the
shortcut for.
4 Press O.
5 Press A under Done.
Java Applications and GPS
Enabled
Some Java applications can make use of your
phone’s GPS feature to determine the approximate
geographical location of your phone. (See “GPS
Enabled” on page 164 for more information on the
GPS feature.) However, for privacy reasons, you
may not always want Java applications to access
the location of your phone. Your phone protects
your privacy by giving you the option to block all or
some Java applications from accessing the
location of your phone.
Java Applications and GPS Enabled
Setting Privacy for All Java
Applications
These options control the privacy of all Java
applications on your phone:
• Restricted — No Java or similar software
applications may access the location of your
phone. However, location information may still
be available to the phone’s owner, fleet
manager, or account administrator.
• Unrestricted — All Java applications may
access the location of your phone, without
notifying you.
• By Permission — When a Java application
attempts to access the location of your phone,
you are prompted to give permission. However,
location information may still be available to the
phone’s owner, fleet manager, or account
administrator.
See “Setting Privacy Options” on page 169 for
information on choosing these options.
Granting or Denying Permission
If you choose By Permission, you must grant or
deny each Java application access to the location
of your phone when the application requests
access for the first time. You may be required to
grant or deny subsequent requests from the same
application, depending on the privacy setting you
choose for the individual Java application (see
“Setting Privacy for Each Java Application” on
page 154).
When a Java application requests access to the
location of your phone, a screen appears informing
you.
To deny this request:
1 Press A under Deny. The application does not
access the location of your phone.
2 Select the denying option you want:
• Always — If the application requests access
to the location of your phone again, the
request is denied without notifying you.
• For this session — If the application
requests access to the location of your phone
again before you power off your phone, the
request is denied without notifying you.
153
Java Applications
• Only Once — If the application requests
access to the location of your phone again,
you are prompted to grant or deny
permission.
To grant this request:
1 Press A under Grant. The application
accesses your phone’s location.
2 Select the granting option you want:
• Always — If the application requests access
to the location of your phone again, the
request is granted without notifying you.
• For this session — If the application
requests access to the location of your phone
again before you power off your phone, the
request is granted without notifying you.
• Only Once — If the application requests
access to the location of your phone again,
you are prompted to grant or deny
permission.
Setting Privacy for Each Java
Application
After a given Java application requests access to
the location of your phone for the first time, you
have the opportunity to set the GPS privacy
options for that Java application.
1 From the main menu, select Java Apps.
154
2 Scroll to the application or suite of applications
you want to set the privacy options for.
3 Press m.
4 Select Permissions.
5 Select the privacy options you want for this
application:
• Always — The application always has
permission to access the location of your
phone, without notifying you.
• Ask — When the application requests access
to the location of your phone, you are
prompted to grant or deny permission (see
“Granting or Denying Permission” on page
153).
• Never — When the application requests
access to the location of your phone, the
request is denied without notifying you.
Understanding Bluetooth® Access Settings
Bluetooth®
Your i880 phone is a Bluetooth device. Bluetooth
devices create seamless voice and data
connections with other Bluetooth devices, such as
another Bluetooth phone, a Bluetooth pen,
headset, or desktop adapter. These connections
are made wirelessly.
You can use your i880 phone to send Contacts
entries, Datebook events, or audio files, pictures,
and videos in the media center to another
Bluetooth device.
Files sent or received may be up to 1 MB.
Devices must be within 32 feet (10 meters) of your
phone to be recognized.
Note: This measurement represents optimal
conditions. Actual conditions may require
you to position your phone closer.
You can only connect your phone to one device at
a time.
Understanding Bluetooth®
Access Settings
A Bluetooth device can have either Automatic or
Ask security access. The first time a Bluetooth
device connects to your i880 phone, you must
grant the device permission to connect. You can
then change the access setting of the device to
either Automatic or Ask.
If you set a device to Automatic, then that device
can connect automatically to your phone when it is
in range. If you set a device to Ask, then that
device must request permission before it can
connect to your phone.
Devices are automatically granted permission
during the 10 seconds after bonding. For more
information about bonding, see “Bluetooth®
Bonds” on page 158.
The default for hands free devices, such as
Bluetooth headsets, is Automatic.
155
Bluetooth®
Setting Your Phone for
Bluetooth®
You can configure the following aspects of
Bluetooth:
•
•
•
•
Power
Device name
Voice recognition and dialing
Find Me duration
Turning Bluetooth® On or Off
You can turn power to your phone’s Bluetooth
feature on or off. While Bluetooth power is on, your
phone can communicate with other devices.
You can turn off Bluetooth if you want to prolong
battery life or you enter an area where Bluetooth is
prohibited.
The default setting is Off.
1 From the main menu, select Bluetooth > Setup
> Power.
2 Select the setting you want.
156
Renaming Your Phone
Bluetooth devices are listed by their Bluetooth
addresses unless you name them. Your i880
phone comes with a default device name of
“Motorola Phone”. Renaming your i880 phone with
a unique device name makes it easier for you to
distinguish your phone from other Bluetooth
devices.
1 From the main menu, select Bluetooth > Setup
> Name.
2 Enter the name you want for your phone.
3 Press O.
Setting Voice Dialing
Some Bluetooth devices use voice dialing. When
you receive your phone, Bluetooth voice dialing is
turned off.
To activate voice dialing for Bluetooth:
1 From the main menu, select Bluetooth > Setup
> Voice Dial.
2 Select the setting you want.
Accessing Bluetooth®
Setting a Find Me Duration
You can change how long your phone remains
discoverable to other devices. The default duration
is 1 minute. See “Sharing Your Phone’s
Bluetooth® Address” on page 157.
To select a default duration for Find Me:
1 From the main menu, select Bluetooth > Setup
> Find Me Duration.
2 Select the setting you want.
Accessing Bluetooth
®
From the main menu, select Bluetooth. -orWhile in a call, press m. Select Use Bluetooth.
Note: If Bluetooth power is set to Off on your
phone, you will be prompted to
temporarily turn power on in order to use
Bluetooth.
Making a Bluetooth®
Connection
The following sections cover how to connect your
phone to another Bluetooth device.
Note: Some Bluetooth devices only have full
functionality when DTMF dialing is set to
On. See “Phone Calls Features” on
page 181.
Sharing Your Phone’s Bluetooth®
Address
To bond with your phone, devices must have your
phone’s Bluetooth address. To find devices that
you want to bond with, you can make your phone
discoverable, so that other devices learn your
phone’s Bluetooth address. You can also have
your phone search for Bluetooth devices to learn
their addresses.
Allowing Bluetooth® Devices to Find Your
Phone
To let devices find your phone and its Bluetooth
address, place your phone in discoverable mode.
157
Bluetooth®
Discoverable mode lasts for the duration selected
under Find Me Duration in the Bluetooth Setup
menu. During this time, other devices that are
within range can detect your phone. You can then
choose to grant or deny each device’s request to
bond.
Note: You must grant the device’s request in
order to receive information from the
device on your phone.
To start discoverable mode, from the main
menu, select Bluetooth > Find Me.
Discovering Bluetooth® Devices
To have your phone search for Bluetooth devices:
From the main menu, select Bluetooth > Hands
Free > [Find Devices].
A list of hands free devices displays. Devices
that do not have a name are listed by their
Bluetooth address.
To stop the search and go to the list of found
devices, press A under Stop.
To stop the search and return to the previous
screen, press A under Cancel.
158
Bluetooth® Bonds
A bond is an encryption key that is generated when
two Bluetooth devices exchange a common PIN.
This key verifies the identity of each device, and
encrypts any data transferred between the devices.
Once the PIN is exchanged, the devices do not
have to be in discoverable mode in order to
exchange information. You only need to create a
bond once between two devices.
If you search for devices and you select a device
that you are currently bonded with from the list of
found devices, then the current bond with that
device will be voided. You will have to re-establish
the bond.
Your i880 requires that you create a bond in order
to connect with another device. However, you can
choose to establish bonds with devices without
connecting.
Note: Devices are automatically granted
permission during the 10 seconds after
bonding.
Bluetooth® PINs
Bluetooth devices exchange PINs (also known as
passkeys or pass codes) in order to establish
encrypted transfers between them. When
prompted, enter the Bluetooth PINs.
Making a Bluetooth® Connection
Some Bluetooth devices ship with Bluetooth PINs.
Please refer to your Bluetooth device’s user guide
to locate this information.
7 Select Bond With if you are prompted to do so.
If a device ships without a Bluetooth PIN, then you
can enter any PIN for that device. To establish a
connection to that device, enter the same PIN for
both your phone and the device. For example, if
you enter 1234 as the device’s PIN, then enter
1234 as your phone’s PIN.
If you have previously connected to a device, the
device will be stored on your phone so you can
connect with it easily.
In some cases, you may not be required to enter
the Bluetooth PIN.
To create a bond between your phone and another
device:
1 From the main menu, select Bluetooth.
2 If you want to create a bond and connect with
the given device, select Hands Free > [Find
Devices]. -orIf you want to create a bond to have it available
for future use, select Link to Devices.
3 Select the device you want.
4 Press A under Yes if you are prompted to do
so.
5 Enter a PIN if you are prompted to do so. Then
press A under OK.
6 If necessary, enter the same PIN for the other
device.
Connecting to a Stored Device
1 From the main menu, select Bluetooth > Hands
Free.
2 Select the device you want to connect to.
3 If prompted whether you want to bond with the
device, press A under Yes.
4 If prompted, enter the Bluetooth PIN.
Your phone will connect to the device.
Using Bluetooth® During a Call
During a call, you can connect with available
Bluetooth devices.
Note: If the Hands Free menu contains only one
device, then your phone will automatically
try to connect to that device.
1 While in a call, press m. Select Use Bluetooth.
2 Select the device you want to connect to.
159
Bluetooth®
Disconnecting From a Device
Viewing Device Details
To disconnect from a device:
To view the name and the access setting of a
device:
1 From the main menu, select Bluetooth >
Hands Free.
2 Press A under Drop.
Note: Pressing A under No when prompted
exits the menu without disconnecting the
device.
1 From the main menu, select Bluetooth >
Device History.
2 Select the device you want.
Editing Device Names
3 Press A under Yes.
You can edit a device name so the device is easier
to identify.
Setting Device Details
1 From the main menu, select Bluetooth >
Device History.
2 Scroll to the device you want to rename.
3 Press A under Edit or press O.
4 Select Name.
5 Enter the new name.
Note: A device name can have a maximum of
40 characters.
The device history stores a list of up to 20 devices
that have connected with your phone.
To view the device history, from the main menu,
select Bluetooth > Device History.
From the device history, you can:
• Edit device names
• Change device access settings
• Delete devices
Note: If you delete a device from device history,
you will have to find the device to connect
with it. See “Discovering Bluetooth®
Devices” on page 158.
160
6 Press O.
Editing Device Access Settings
1 From the main menu, select Bluetooth >
Device History.
2 Scroll to the device you want to set access for.
3 Press A under Edit or press O.
Sending Contacts, Datebook Events, and Media Center Items
Search for the device you want to transfer to by
selecting [Find Devices].
4 Select Access.
5 Select the setting you want.
Deleting Devices
1 From the main menu, select Bluetooth >
Device History.
2 Scroll to the device you want to delete.
3 Press m.
4 Select Delete.
5 To delete the device, press O.
Sending Contacts, Datebook
Events, and Media Center
Items
Bluetooth lets you send Contacts entries,
Datebook events, or audio files, pictures, and
videos in the media center to connected devices.
Sending Contacts
1
2
3
4
5
6
From the main menu, select Contacts.
Highlight the contact you want to send.
Press m.
Select Send Via....
Select Bluetooth.
Select the device you want to transfer to. -or-
7 If prompted, bond with the device.
Your phone connects to the device and transfers
the contact.
Sending Datebook Events
1
2
3
4
5
From the main menu, select Datebook.
Highlight the event you want to send.
Press m.
Select Send Via....
If the event you select repeats, then you will be
prompted to choose whether to send the
selected instance of the event or all instances of
the event.
To send only the selected instance of the event,
select This Event Only. -orTo send all instances of the event, select
Repeat Events.
6 Select Bluetooth.
7 Select the device you want to transfer to. -orSearch for the device you want to transfer to by
selecting [Find Devices].
161
Bluetooth®
8 If prompted, bond with the device.
Your phone connects to the device and transfers
the event.
Sending Audio Files, Pictures, and
Videos
Note: You can only send audio files, pictures,
and videos if they are not forward locked
and if their DRM settings do not prevent
you from sending.
1 From the main menu, select Media Center.
2 Scroll to the audio file, picture, or video you want
to send.
3 Press m.
4 Select Send Via....
5 Select Bluetooth.
6 Select the device you want to transfer to. -orSearch for the device you want to transfer to by
selecting [Find Devices].
7 If prompted, bond with the device.
Your phone connects to the device and transfers
the audio file, picture, or video.
162
Receiving Items
You receive a prompt when your phone has an
incoming transfer. You must either accept or reject
the transfer.
Audio files, pictures, and videos you receive must
be compatible with your phone’s media center.
Canceling Transfers
You can cancel a transfer while the transfer is in
progress.
Note: If a transfer is interrupted, the
Connection Failed prompt displays.
1 Press A under Cancel.
2 Press A under Yes to cancel. -orPress A under No to continue with the transfer.
Tip: If you close the flip while transferring an
item, you will end the transfer.
Viewing and Storing Received Items
After an incoming transfer is complete, your phone
translates the item. The item appears on your
phone’s display.
Receiving Items
You can choose to either store or discard the item.
Items are stored as follows:
• Contact entries are stored to Contacts.
• Audio files, pictures, and videos are saved to
your phone’s memory or to the memory card
inserted in your phone and are accessible
through the media center.
• Datebook events are stored to Datebook.
To store the item, press A under Store or press
O. -orTo discard an item without saving it, press A
under Discard.
163
GPS Enabled
Your phone’s GPS Enabled feature uses
information from Global Positioning System (GPS)
satellites orbiting the Earth to determine the
approximate geographical location of your phone,
expressed as latitude and longitude. The
availability and accuracy of this location
information (and the amount of time that it takes to
calculate it) will vary depending on the environment
in which you are using the GPS feature. For
example, GPS location fixes are often difficult to
obtain indoors, in covered locations, between high
buildings, or in other situations where you have not
established a clear broad view of the sky. Also,
nearby radio and electronic equipment may block
or interfere with reception from these distant
satellites. SEE: “IMPORTANT: Things to Keep in
Mind”.
When you make a 911 emergency call, the GPS
feature of your phone can help emergency
personnel locate you if your phone has adequate
access to GPS satellite signals and your
emergency response center is equipped to process
such information.
You can also use the GPS feature to view your
approximate location. Location information
appears on the phone’s display.
164
Java applications loaded on your phone can also
request your location. If your phone is connected to
a laptop computer or similar device, software
running on that device can request your location.
To protect your privacy, you can control whether
these requests are granted.
IMPORTANT: Things to Keep
in Mind
If you are using the GPS feature of your phone
while driving, please give full attention to driving
and to the road.
Where adequate signals from multiple satellites
are not available (usually because your GPS
antenna cannot establish a view of a wide area of
open sky), the GPS feature of your phone WILL
NOT WORK. Such situations include but are
not limited to:
• In underground locations
• Inside of buildings, trains, or other covered
vehicles
• Under any other metal or concrete roof or
structure
• Between tall buildings or under dense
tree-cover
• Near a powerful radio or television tower
IMPORTANT: Things to Keep in Mind
• Some radios, entertainment equipment and
other electronic devices may generate
signals that can block or interfere with the
GPS receiver ability to receive the distant
satellite signals, particularly when such
devices are operating in close proximity to
the GPS receiver. Therefore, in a 911 call, or
when otherwise using the GPS location
function, always move your phone away
from any such devices.
• When your GPS antenna is covered (for
example, by your hand or other object) or
facing the ground
• In temperature extremes outside the
operating limits of your phone
Walking or driving very slowly may also
substantially reduce GPS performance.
Even where location information can be
calculated in such situations, it may take much
longer to do so, and your location estimate may
not be as accurate. Therefore, in any 911 call,
always report the location to the emergency
response center if you can and if you cannot,
remain on your phone for as long as the
emergency response center instructs you.
Even where adequate signals from multiple
satellites are available, your GPS feature will
only provide an approximate location, often
within 150 feet (45 meters) but sometimes
much further from your actual location. Advice
on how to improve GPS performance is
provided in “Enhancing GPS Performance” on
page 168.
While the GPS feature of your phone can be a
valuable navigational aid, it does not replace the
need for careful navigating and good judgment.
Never rely solely on one device for navigation.
Remember that the accuracy of the location
information and the time needed to obtain it will
vary depending on circumstances, particularly the
ability to receive signals from adequate numbers of
satellites.
On emergency calls, your phone uses assistance
information from the phone network to improve the
speed and accuracy of your phone’s location
calculation: if such assistance information
becomes unavailable, it may reduce the speed and
accuracy of the location calculation.
165
GPS Enabled
The satellites used by the GPS feature of your
phone are controlled by the U.S. government and
are subject to changes implemented in accordance
with the Department of Defense GPS user policy
and the Federal Radionavigation Plan. These
changes may affect the performance of the GPS
feature of your phone.
Making an Emergency Call
Dial 911 to be connected to an emergency
response center. If you are on an active call, you
must end it before calling 911.
When you make an emergency 911 call, the GPS
feature of your phone begins to seek information to
calculate your approximate location. It will take
the GPS feature of your phone some time to
determine your approximate location. Even
where your phone has good access to sufficient
GPS satellite signals and network assist data, it
may take 30 seconds or more to determine the
approximate location. This time will increase where
there is reduced access to satellite signals. When
your approximate location is determined, it is made
available to the appropriate emergency response
center.
166
In some cases, your local 911 emergency
response center may not be equipped to
receive GPS location information. For this
reason, and because the GPS location information
reported is only approximate or may not be
available in your location (see “IMPORTANT:
Things to Keep in Mind” on page 164), always
report your location to the 911 operator you
speak to when making an emergency call, if able,
just as you would when using a phone without GPS
capabilities.
Note: If you are concerned about whether your
local 911 emergency response center is
equipped to receive GPS location
information, contact your local authorities.
In general, if your phone has access to signals
from more GPS satellites, your location will be
determined faster and more accurately than if your
phone has access to signals from fewer GPS
satellites.
If your phone does not have adequate access to
GPS satellites signals, the location of the nearest
cell tower in contact with your phone is
automatically made available to the emergency
response center, if the center has the capability to
receive such information.
Viewing Your Approximate Location
See “Enhancing GPS Performance” on page
168 for information on how to help your phone
determine your location.
Viewing Your Approximate
Location
It may take your phone several minutes to
complete the process of determining your location.
During this time, a message usually appears on
your phone’s display saying your phone is
scanning for satellites. For tips on getting the best
location calculation, see “Enhancing GPS
Performance” on page 168.
1 From the main menu, select GPS > Position.
2 Scroll to view the entire screen.
The Position screen displays the updated
information.
This displays the following information about the
last time your location was calculated:
To cancel a location calculation before it is
completed:
• The time (as Greenwich Mean Time) and date
that the location was last calculated
• The approximate location, expressed as latitude
and longitude
• The estimated accuracy of the calculated
location. This estimate of accuracy is only a very
rough estimate and may vary substantially from
the actual accuracy of the approximate location
information reported.
• The number of satellites used to calculate the
location. In general, more satellites make for
better accuracy.
To calculate your location again:
Press A under Refresh.
Press A under Cancel to return to the Position
screen. -orPress e to return to the idle screen.
Each time approximate location of your phone is
calculated, the latest location information is stored
in your phone and remains there even when your
phone is powered off. You will see this information
the next time you view the Position screen.
If you received a phone call or alert while
attempting to determine your location, the Position
screen will disappear, but your phone will continue
attempting to determine its location. If it is
successful, the new location information will be
displayed the next time you view the Position
screen.
167
GPS Enabled
Enhancing GPS Performance
Sometimes the GPS feature of your phone may be
unable to complete a location calculation
successfully. If this happens when you are making
an emergency call, the location of the nearest cell
tower in contact with your phone is made available
to the appropriate emergency response center if
the center has the capability to receive such
information. If this happens when you are trying to
view your location on the phone’s display, you will
see a message indicating that your phone cannot
access satellites.
To improve accuracy and increase your chances of
a successful calculation, do the following while
your phone is determining your approximate
location:
• Stay in the open. The GPS feature works best
where there is nothing between your phone and
a large amount of open sky. If possible, go
outside, away from tall buildings and foliage.
While performance in a building is improved by
moving closer to windows, glass with certain sun
shielding films may block satellite signals.
• Extend your phone antenna.
168
• Hold your phone to enhance reception. Signals
from GPS satellites are transmitted to your GPS
antenna, which is in your phone antenna. Hold
your phone away from your body, giving the
antenna clear access to satellite signals. Do not
cover the antenna area with your fingers or
anything else.
GPS antenna
Setting Privacy Options
• Move away from electronic devices. Radios,
entertainment devices, and other electronic
devices may generate interfering signals that
may prevent GPS receiver operation if they are
in close proximity to the phone. Move your
phone away from such devices when using the
GPS-Enabled feature.
• Stand still. If possible, stand still until your phone
is finished determining your location. Moving
your phone at a walking pace while your phone
is calculating your approximate location may
substantially decrease GPS performance.
• In a car. When using the GPS Enabled feature in
a car, position your phone so that the GPS
antenna has good access to GPS signals
through the car’s windows. Typically, the GPS
antenna has best access to GPS signals in a car
when placed near a window.
Note: Although moving your phone at a walking
pace decreases GPS performance,
moving it at the speed of a moving car
does not.
• Stay in SouthernLINC Wireless network
coverage. The SouthernLINC Wireless network
will provide your phone with information that
helps determine your location more quickly and
accurately.
Setting Privacy Options
Your phone’s GPS privacy options control whether
Java applications on your phone or other software
applications may view the location of your
phone.You may set your phone to one of these
GPS privacy options.
Note: Privacy options do not apply to the
transmission of location information
during emergency 911 calls.
To set your GPS privacy options:
1 From the main menu, select GPS > Privacy.
2 If your GPS PIN security feature is enabled,
enter your GPS PIN. (See “Setting the GPS PIN
Security Feature” on page 170 for more
information.)
3 Select the privacy option you want:
• Restricted — No Java or similar software
applications may view the location of your
phone. However, location information may still
be available to the phone’s owner, fleet
manager, or account administrator.
• Unrestricted — All applications may view the
location of your phone, without notifying you.
169
GPS Enabled
• By Permission — When an application
attempts to view the location of your phone,
you will be prompted to give permission.
However, location information may still be
available to the phone’s owner, fleet
manager, or account administrator.
Setting the GPS PIN Security Feature
To prevent your GPS privacy settings from being
altered without your knowledge, your GPS privacy
option can be protected by a PIN.
When you receive your phone, the GPS security
feature is turned off, so you do not have to enter a
GPS PIN to access your GPS privacy options. If
you turn this feature on, you will be required to
enter a GPS PIN to access your GPS privacy
options.
To turn the GPS Enabled security feature on or off:
1 From the main menu, select Settings >
Security > GPS PIN.
2 Select On or Off.
3 Enter the current GPS PIN.
Note: When you receive your phone, your GPS
PIN is 0000.
4 Press A under Ok.
170
To change your GPS PIN:
1 From the main menu, select Settings >
Security > Change Passwords > GPS PIN.
2 Enter the current GPS PIN.
Note: When you receive your phone, your GPS
PIN is 0000.
3
4
5
6
7
Press A under Ok.
Enter the new 4- to 8-digit GPS PIN.
Press A under Ok.
Enter the new 4- to 8-digit GPS PIN to confirm.
Press A under Ok.
Using GPS with Map Software
You can use the GPS feature of your phone to
provide approximate location data to a laptop
computer or similar device that is running
interactive map software such as that made by
DeLorme or Microsoft. This way, if your phone has
good access to GPS signals, your approximate
position on a map can be made available as you
travel in a vehicle.
To do this, connect your phone to your laptop (or
other device) with a serial data cable, and set your
phone to transmit data (see “Getting Started” on
page 171). Your phone then provides your
approximate location to the device running the map
Using GPS with Map Software
software, which displays your location on a map.
Your phone provides an updated location every
second and the map software displays your
changing location on its map.
Getting Started
See “Enhancing GPS Performance” on page
168 for more details on obtaining good location
information.
1 Open the connector cover.
Note: Because your phone is continuously
determining your location, using the GPS
feature of your phone with map software
uses the phone’s battery power quickly.
To connect your phone to your laptop or other
device:
connector
cover
Software Compatibility
Your phone sends location information to your
laptop or other device using the standard National
Marine Electronics Association (NMEA) format.
Your phone supports output messages in
NMEA-0183 format and supports the following
NMEA-0183 sentences: GGA, GLL, GSA, GSV,
RMC, and VTG.
2 With the phone’s display facing up, insert the
serial data cable’s connector into the accessory
connector, until you hear a click.
The map software running on your laptop or other
device must support NMEA 3.0.
3 Insert the data plug into the COM port of your
laptop or other device.
171
GPS Enabled
Make sure no other application is using the COM
port selected.
Make sure the COM port settings of your laptop or
other device are set to the following:
•
•
•
•
•
Bits per second: 4800
Data bits: 8
Parity: None
Stop bits: 1
Flow control: Hardware
To set your phone to send location information to
your laptop or other device:
1 From the main menu, select GPS > Interface.
2 Set NMEA OUT to On.
Your phone is now sending location data to your
laptop or other device.
To stop your phone from sending location data to
your laptop or other device:
Set NMEA OUT to Off.
Each time you power your phone on, NMEA OUT
is automatically set to Off.
172
Voice Records
A voice record is a recording you make with your
phone and can play back. You can record notes to
yourself when your phone is not in a call or record
phone calls when your phone is in a call.
Voice records created when your phone is not in a
call can be accessed through the media center.
See “Media Center” on page 98.
Viewing Voice Records
To view your list of voice records:
1 From the main menu, select VoiceRecord.
2 Scroll to view more voice records.
Voice Record Icons
One of these icons appears next to each voice
record:
c A voice record made while your phone was
not in a call.
v A voice record made while your phone was in
a call.
Filtering by Voice Record Type
You can set your phone to show all voice records,
only voice records created when your phone was in
a call, or only voice records created when your
phone was not in a call.
1
2
3
4
From the main menu, select VoiceRecord.
Press m.
Select Filter.
Select the option you want:
• All — show all voice records.
• In Call — show only voice records created
when your phone was in a call.
• Standard — show only voice records created
when your phone was not in a call.
Tip: You can also press * or # to scroll through
these options while viewing the list of voice
records.
Creating Voice Records
Phone Not in a Call
To record a note to yourself:
1 From the main menu, select VoiceRecord >
[New VoiceRec].
173
Voice Records
2 Say the message you want to record into the
microphone.
3 When you are finished recording, press O.
Phone in a Call
To record a phone call:
1 While on an active call, press m.
2 Select Record.
3 To stop recording and discard the voice record
at any time, press A under Cancel.
4 When you are finished recording, press O.
Note: Recording of phone calls is subject to
applicable laws regarding privacy and
recording of phone conversations.
Playing Voice Records
1 From the main menu, select VoiceRecord.
2 Select the voice record you want to play.
3 To stop the voice record while it is playing, press
O.
Labeling Voice Records
When you create a voice record, it is labeled with
the time and date it was recorded. You can then
rename it with a custom label.
1
2
3
4
From the main menu, select VoiceRecord.
Scroll to the voice record you want to label.
Press A under Label.
Enter the label you want to assign. See
“Entering Text” on page 68.
5 Press O.
Locking Voice Records
When you lock a voice record, it cannot be deleted
until you unlock it.
1 From the main menu, select VoiceRecord.
2 Scroll to the voice record you want to lock or
unlock.
3 Press m.
4 Select Lock to lock the message. -orSelect Unlock to unlock the message.
When a voice record is locked, this icon R appears
next to it.
174
Deleting Voice Records
Deleting Voice Records
Deleting a voice record from the voice record list
deletes it from all parts of your phone, including the
media center.
Deleting a Voice Record
1 From the main menu, select VoiceRecord.
2 Scroll to the unlocked voice record you want to
delete.
3 Press m.
4 Select Delete.
5 Press O or A under Yes to confirm.
Deleting All Voice Records
1
2
3
4
5
From the main menu, select VoiceRecord.
Scroll to any voice record.
Press m.
Select Delete All.
Press O or A under Yes to confirm.
2 With [New VoiceRec] highlighted, press A
under Memory. -orWith any voice record highlighted, press m.
Select Memory.
To free memory by deleting all unlocked voice
records:
1 From the voice records memory screen, press
A under Delete.
2 Press O or A under Yes to confirm.
Note: Voice records are stored in your phone
using the same memory space used to
store messages, Java application data,
and items accessible through the media
center stored in your phone’s memory.
Deleting or moving some of these other
items frees memory for voice records.
Managing Memory
To view the amount of memory available for voice
records:
1 From the main menu, select VoiceRecord.
175
Customizing Your Phone
Setting the Volume
Of the Earpiece and Speaker
1 From the main menu, select Settings > Volume.
2 Scroll to Earpiece to set the earpiece volume.
-orScroll to Speaker to set the speaker volume.
3 To set the volume:
Scroll left or right. -orPress the volume controls.
Of the Ringer
Press the volume controls.
Setting Your Phone to Vibrate
To set your phone to vibrate instead of making a
sound when you receive phone calls, InstantLINC
Mobile to Mobile calls, group calls, call alerts,
message notifications, pictures sent using LINC
View, and Datebook reminders, see “Setting Your
Phone to Vibrate” on page 64.
176
To set your phone to vibrate instead of making a
sound when you receive InstantLINC Mobile to
Mobile calls, group calls, and LINCList calls, even if
you want your phone to ring for other features:
1 From the main menu, select Settings >
InstantLINC > Alert Type.
Tip: If Alert Type does not appear: From the
main menu, select Ring Tones. Make sure
Vibrate All is set to Off. Repeat step 1.
2 Select Vibrate to set your phone to vibrate.
Tip: Select Silent in step 2 to set your phone to
neither vibrate nor make a sound.
Changing the Look of Your Phone
Changing the Look of Your
Phone
Tip: If you want to see what the wallpaper looks
like, scroll to the wallpaper you want to view
and press A under View.
Wallpaper
Setting Wallpaper Placement
A wallpaper is an image that appears as the
background on your phone’s internal display. You
can set wallpaper to appear on the idle screen only
or on screens throughout your phone. You can set
wallpaper to appear on your phone’s external
display, internal display, or both.
After you choose a wallpaper, you can set it to
appear on the idle screen only or on screens
throughout your phone:
Note: If you set an picture that is stored on the
memory card as a wallpaper, that picture
is automatically copied or moved to your
phone’s memory according to the rules
described in “Pictures Stored on the
Memory Card” on page 102.
Choosing a Wallpaper
1 From the main menu, select Settings >
Display/Info > Wallpaper.
2 To choose a wallpaper for the internal display,
select Internal. -orTo choose a wallpaper for the external display,
select External.
3 Select the wallpaper you want.
1 From the main menu, select Settings >
Display/Info > Wallpaper.
2 To set wallpaper placement for the internal
display, select Internal. -orTo set wallpaper placement for the external
display, select External.
3 Select Placement.
Note: If you do not see the Placement option,
make sure you have chosen a wallpaper
and not a theme. Themes always appear
throughout the phone.
4 To place wallpaper on the idle screen only,
select Idle Only. -or5 To place wallpaper on screens throughout the
phone, select Throughout.
Setting Wallpaper to Change Automatically
1 From the main menu, select Settings >
Display/Info > Wallpaper > Auto Cycle.
177
Customizing Your Phone
2 For the internal display, select Internal. -orFor the external display, select External.
3 Select how often you want the wallpaper to
change.
4 Select Select Pictures.
5 Select the pictures you want to appear as
wallpaper.
6 Press A under Done.
Setting Text Size
To set the size of the text on the internal display:
1 From the main menu, select Settings >
Display/Info > Text Size.
2 Select the option you want:
• Zoom — 11 characters per line
• Standard — 14 characters per line
• Compressed — 18 characters per line
Setting the Menu View
You can set the items on your main menu and Java
applications menu to appear as large icons or a
list:
1 From the main menu, select Settings >
Display/Info > Menu View. -orFrom the main menu: Press m. Select Main
Menu Setup > Menu View.
2 To choose a list, select List View. -orTo choose large icons, select Icon View.
Setting the Backlights
Your phone has backlights that light each of the
following areas: the internal display, the external
display, the keypad, the logo on the flip, the PTT
button, and audio player buttons.
To set your phone to briefly display very large
digits when you enter numbers at the idle screen:
These backlights can light up together or
independently, depending on what your phone is
doing an what settings you have chosen.
1 From the main menu, select Settings >
Display/Info > Large Dialing.
2 Set this option to Large Digits.
To save battery power, the internal display and
external display backlights fade before going off
and the external display shows only the time or
phone status as the backlight fades.
178
Changing the Look of Your Phone
Internal and External Display, Keypad, and
Logo Backlight
A backlight lights the internal display, the external
display, the keypad, and the logo when you make
or receive a call, open or close the flip, or press
keys or buttons.
To control how long the backlight stays on:
Logo Flash
The logo backlight flashes rapidly when you
receive a phone call. It flashes slowly when you
receive messages and reminders, until the alert
times out. If your phone is set to sound no alert
tone when you receive messages and reminders,
the logo does not flash.
1 From the main menu, select Settings >
Display/Info > Backlight > Timer.
2 Select the number of seconds you want the
backlight to stay on.
To set the phone’s logo to flash:
To control how long the backlight stays on for Java
applications:
Push-To-Talk Button Backlight
1 From the main menu, select Settings >
Display/Info > Backlight > Java Timer.
2 Select the number of seconds you want the
backlight to stay on for Java applications.
Keypad Low Light Sensor
To set the keypad backlight to light up only in low
light conditions:
1 From the main menu, select Settings >
Display/Info > Backlight > Sensor.
2 Set this option to On.
1 From the main menu, select Settings >
Display/Info > Backlight > Logo Flash.
2 Set this option to On.
The PTT button backlight lights up when you are
starting to send a LINC feature item or call alert. It
flashes rapidly when you receive an InstantLINC
Mobile to Mobile call, group, or an item sent in a
InstantLINC Mobile to Mobile call. It flashes slowly
when you receive a call alert.
To set the PTT button backlight to light up and
flash:
1 From the main menu, select Settings >
Display/Info > Backlight > PTT Backlight.
2 Set this option to On
179
Customizing Your Phone
You can also set the PTT button backlight to light
up and flash using this option:
1 From the main menu, select Settings >
InstantLINC Mobile to Mobile > PTT
Backlight.
2 Set this option to On
Temporarily Turning Off
Transmissions
Sometimes you may want to have your phone on,
but turn off its ability to make and receive calls and
other transmissions.
To set your phone so that it cannot make or receive
phone calls, InstantLINC Mobile to Mobile calls,
group calls, or Talkgroup calls; or transfer data:
1 From the main menu, select Settings >
Advanced > Transmitters.
2 Set this option to Off.
This icon 9 appears.
Note: While powering on your phone, you can
turn transmitters off by pressing p for
more than 5 seconds.
To restore your phone’s ability to do all these
things:
Set this option to On.
180
Note: When Transmitters is set to Off, your
phone’s Bluetooth capability is disabled,
and all active Bluetooth connections are
dropped.
Using Settings
Settings contains many submenus that let you
customize your phone.
For information on applying groups of settings to
your phone together, see “Profiles” on page 186.
Note: Because your phone’s audio player is
actually a Java application that you
access from the main menu, the settings
described here will not affect the audio
player unless they affect Java
applications.
Display/Info Features
The Display/Info menu controls how the keypad
and display appear:
• Wallpaper — changes the wallpaper that
appears on the internal and external display
screens.
• Text Size — sets the size of text on the display.
• Theme — changes the look of the display.
Using Settings
• Home Icons — controls whether main menu
icons appear on the idle screen.
• Backlight — controls backlight illumination.
• Clock — controls whether the time and date
appear on the idle screen; sets time and date
format; sets year.
• Menu View — controls whether the items on
your main menu and Java applications menu
appear as large icons or a list.
• Large Dialing — sets large digits to appear on
the idle screen when you enter a number.
• Language — sets the language that your phone
displays.
Phone Calls Features
The Phone Calls menu controls how your phone
handles phone calls:
• Set Line — sets phone line 1 or phone line 2 as
the active line for outgoing calls.
• Any Key Ans — If this feature is on, you can
answer calls by pressing any key on the keypad.
• Auto Redial — sets your phone to automatically
redial calls you make when the system is busy.
• Call Waiting — See “Call Waiting” on page 53.
• Auto Ans — sets your phone to automatically
answer an incoming call after a specified
number of rings. When this feature is on, the
phone answers by connecting you to the caller;
it does not send the call to voice mail, unless
you are out of coverage or on the line.
• Flip Activation — See “Setting Flip Actions” on
page 55.
• Minute Beep — causes a beep to sound every
minute of an active call.
• Call Duration — causes the duration of a call to
appear on the display when the call ends.
• TTY — See “Making TTY Calls” on page 59.
• Hearing Aid — sets your phone for use with a
hearing aid when you are in a phone call. Set to
Microphone for most hearing aids; set to
Telecoil for telecoil hearing aids. This setting
affects only sounds from the phone’s earpiece.
• Notifications — See “Message Notifications” on
page 71.
• DTMF Dialing — sets whether you can hear
DTMF (dual tone multi-frequency) tones with
your keypad presses. Set to Always to always
hear keypad presses; set to Never to never hear
keypad presses; set to In Call Only to hear
keypad presses only while in a call.
181
Customizing Your Phone
InstantLINC Features
The InstantLINC menu controls how your phone
handles InstantLINC Mobile to Mobile calls and
group calls:
• Tkgrp Silent — controls whether you hear
group calls to your Talkgroup. See “Group Calls”
on page 56.
• Tkgrp Area — lets you define your Talkgroup
area.
• One Touch PTT — See “Setting Flip Actions” on
page 55.
• Alert Type — controls how your phone notifies
you when you receive InstantLINC Mobile to
Mobile calls and group calls.
• LINC Notes — lets you edit the Quick Notes on
the Quick Notes list for the LINC Message
feature.
• On/Off LINC Features — sets your phone’s
ability to send and receive PTX items in
InstantLINC Mobile to Mobile calls.
• Store Received Info — lets you specify a prefix,
such as a country code for international calls, to
be automatically added to phone numbers you
receive in My Info from other phones, when you
store the My Info to Contacts. Select Prefix to
enter the prefix to be added. Set Add Prefix to
182
Ask Me to set your phone to display a prompt
asking you whether you want the prefix added
as you save My Info from other phones to
Contacts.
• PTT Backlight — set the PTT button backlight.
Personalize Features
The Personalize menu makes main menu items
easier to access.
• Menu Options — Reorder Menu lets you
change the order of the items on the main menu
by grabbing and moving them; Add/Remove
Apps lets you create a shortcut to a Java
application on the main menu.
• Up Key — sets the main menu item you access
when you scroll up from the idle screen.
• Down Key — sets the main menu item you
access when you scroll down from the idle
screen.
• Left Key — sets the main menu item you
access when you scroll left from the idle screen.
• Right Key — sets the main menu item you
access when you scroll right from the idle
screen.
• Center Key — sets the main menu item you
access when you press O from the idle screen.
Using Settings
• Left Softkey — sets the main menu item you
access when you press the left option key from
the idle screen.
• Right Softkey — sets the main menu item you
access when you press the right option key from
the idle screen.
• Power Up — sets the main menu item you see
when you power on your phone. To set the idle
screen to be the first thing you see when you
power on your phone, select Default Ready.
Volume Features
The Volume menu sets the volume of sounds your
phone makes:
• Line 1 — sets ringer volume for phone line 1.
• Line 2 — sets ringer volume for phone line 2.
• Messages — sets the volume of message
notifications and Datebook reminders.
• Earpiece — sets the volume of sound coming
out of the earpiece.
• Speaker — sets the volume of sound coming
out of the speaker.
• Keypad — sets the volume of sound associated
with pressing keys and buttons.
• Java Earpiece — sets the volume of sound
associated with Java applications coming out of
the earpiece.
• Java Speaker —sets the volume of sound
associated with Java applications coming out of
the speaker.
• Data — sets the volume of sounds that notify
you that you are receiving a circuit data call.
Memory Card Features
The Memory Card menu controls how media items
are stored and lets you remove and format the
memory card:
• Remove Card — enables you to safely remove
the memory card from the phone.
• Store Media — controls whether pictures,
videos, and audio files are saved to the phone’s
memory or to a memory card inserted in your
phone’s memory card slot.
• USB Connection — sets your phone’s ability to
use the USB mass storage feature. Enable
Reader turns on your phone’s ability to use the
USB mass storage feature. Disable Reader turn
of your phone’s ability to use the USB mass
storage feature.
• Format Card — formats the memory card so
that data can be saved to it.
183
Customizing Your Phone
Important: The Format Card option erases any data
saved to the memory card. It should
only be used if your phone prompts you
to format the memory card.
Security Features
The Security menu lets you turn security features
on and off and change passwords:
• Phone Lock — turns on a feature that locks
your phone: Lock Now takes effect
immediately; Auto Lock takes effect when your
phone is powered off and then on. An unlock
code is required to enable this feature, to unlock
the phone, and to set a new unlock code.
Contact SouthernLINC Wireless for your default
unlock code.
• Keypad Lock — locks the phone’s keypad,
either immediately or automatically after a set
period of inactivity.
• SIM PIN — enables and disables your phone’s
SIM PIN security feature. See “Turning the PIN
Requirement On and Off” on page 14.
• GPS PIN — enables and disables your phone’s
GPS PIN security feature. See “Setting the GPS
PIN Security Feature” on page 170.
• Change Passwords — changes your phone
unlock code, security code, SIM PIN, and GPS
PIN.
184
Advanced Features
The Advanced menu contains advanced Settings
features.
• Alert Timeout — sets the amount of time a tone
continues to sound when you receive a
message notification, call alert, or Datebook
reminder.
• Headset/Spkr — sets headset option. See
“Using a Headset” on page 193.
• Connectivity — Network ID sets the phone’s
network IDs and their roaming options under the
direction of SouthernLINC Wireless; Master
Reset lets SouthernLINC Wireless reset your
service in the event of a security or provisioning
problem.
• Reset Defaults — Reset Settings returns all
settings to their original defaults; Reset All
returns all settings to their original defaults and
erases all stored lists. Use only under the
direction of SouthernLINC Wireless.
• Return to Home — After Phone controls how
long the recent calls list displays after phone
calls; After Prvt controls how long the recent
calls list displays after InstantLINC Mobile to
Mobile calls.
Using Settings
• Transmitters — prevents your phone from
making or receiving phone calls, InstantLINC
Mobile to Mobile calls, group calls, or LINCList
calls; or transferring data.
• Phone Only — prevents your phone from
making or receiving InstantLINC Mobile to
Mobile calls or group calls; or transferring data.
• Baud Rate — sets the baud rate at which your
phone communicates with a laptop computer,
PC, or similar device.
185
Profiles
Viewing Profiles
A profile is a group of settings saved together so
that you can apply them to your phone easily.
To view the profiles stored in your phone:
A profile contains these settings:
• Ring Tones — sets all options described in
“Ring Tones” on page 64, except assigning ring
tones to Contacts.
• Display/Info — sets Wallpaper, Theme, Text
Size, and Backlight options. See “Display/Info
Features” on page 180.
• Phone Calls — sets Set Line and Auto
Answer options. See “Phone Calls Features” on
page 181.
• Volume — sets all options described in “Volume
Features” on page 183.
• Call Filter — controls which calls, call alerts,
and message notifications your phone responds
to. See “Setting Call Filtering” on page 189.
• Advanced — sets headset option. See “Using a
Headset” on page 193.
Your phone arrives with preset profiles. You can
also create your own profiles.
186
1 From the main menu, select Profiles.
2 Scroll to the profile you want to view.
Tip: The profile that is currently in effect on your
phone has a checkmark next to it.
3 Press A under View.
4 Scroll to view settings.
Switching Profiles
To apply a profile to your phone:
1 From the main menu, select Profiles.
2 Scroll to the profile you want to apply.
3 Press O.
The profile you selected is now in effect.
How Changing Settings
Affects Profiles
Many of the settings contained in profiles can be
set without switching or editing profiles — for
example, by selecting Settings or Ring Tones to
set options, or by setting the volume of the phone’s
ring using the volume controls.
Temporary Profiles
When you do this, your phone either:
• Updates the profile in effect to reflect these
changes, without notifying you -or• Creates a temporary profile that contains these
changes
Note: This feature may not be offered by
SouthernLINC Wireless.
To set your phone to create a temporary profile
that contains changes you make to settings:
1
2
3
4
From the main menu, select Profiles.
Press m.
Select Setup > Temp Profile.
Set this option to On.
To set your phone to update the profile in effect to
reflect any changes you make to settings:
Set Temp Profile to Off in step 4.
A temporary profile is based on the profile in effect
when you made the changes, but reflects the
changed settings. Making more changes further
updates the temporary profile, for as long as it is in
effect.
A temporary profile stays in effect until you switch
profiles, power off your phone, or delete it (or the
profile it is based on) from the list of profiles.
If you do not store a temporary profile, it is deleted
when you switch profiles, switch between
LINCaround and network mode, or power off your
phone.
A temporary profile is automatically given the same
name as the profile it is based on, but with an
asterisk (*) in front of it.
When you view a temporary profile’s settings, the
options that differ from the profile it is based on
have an asterisk in front of them.
Temporary Profiles
Storing a Temporary Profile
If your phone is set to create temporary profiles, a
temporary profile is created when you make
changes to settings without switching or editing
profiles.
To store a temporary profile as a new profile:
1
2
3
4
5
From the main menu, select Profiles.
Scroll to the temporary profile.
Press m.
Select Store As New.
Enter the name you want to give the profile.
187
Profiles
When you are finished, press O.
To overwrite the profile the temporary profile is
based on:
1
2
3
4
From the main menu, select Profiles.
Scroll to the temporary profile.
Press m.
Select Store Changes.
The temporary profile is stored with the name of
the profile it is based on. The profile it is based on,
as it existed before you made changes to settings,
is gone.
6 Scroll through the list of options and set their
values.
7 Press A under Done.
Editing Profiles
1
2
3
4
5
From the main menu, select Profiles.
Scroll to the profile you want to edit.
Press m.
Select Edit.
Scroll through the list of options and set their
values.
Creating Profiles
Deleting Profiles
1 From the main menu, select Profiles.
2 Select [New Profile]. -or-
To delete a profile:
Scroll to any profile. Press m. Select New.
3 Enter the name you want to give the profile.
When you are finished, press O.
4 If you want to base this profile on an existing
profile: Select Copy from. Select the profile you
want to base this profile on. If you do not choose
a profile to copy from, the new profile is based
on a default profile.
5 Press A under Create.
188
1 From the main menu, select Profiles.
2 Scroll to the profile you want to delete.
Note: A temporary profile is automatically
deleted when the profile it is based on is
deleted.
3 Press m.
4 Select Delete.
5 Press O or press A under Yes to confirm.
To delete all profiles:
1 From the main menu, select Profiles.
Setting Call Filtering
2 Press m.
3 Select Delete All.
4 Press O or press A under Yes to confirm.
Setting Call Filtering
The call filtering setting in each profile lets you
control which calls, call alerts, and message
notifications your phone notifies you of, and which
it ignores.
To set call filtering:
1 While setting options for a profile, select Call
Filter.
2 To set filtering options for phone calls, select
Phone.
• Off sets your phone to notify you of all phone
calls.
• All sets your phone to ignore all phone calls.
• All Contacts sets your phone to notify you
only of phone calls from numbers stored in
Contacts.
• Some Contacts sets your phone to notify you
only of phone calls from numbers you select
from Contacts.
3 If you set the Phone option to Some Contacts,
select up to 5 Contacts entries that contain
phone numbers you want to be notified of calls
from.
When you are finished, press A under Done.
4 To set filtering options for InstantLINC Mobile to
Mobile calls and group calls, select Prvt/Grp.
• Off sets your phone to notify you of all
InstantLINC Mobile to Mobile calls and group
calls.
• On sets your phone to ignore all InstantLINC
Mobile to Mobile calls and group calls.
5 To set filtering options for call alerts, select
Alerts.
• Off sets your phone to notify you of all call
alerts.
• On sets your phone to ignore all call alerts.
6 To set filtering options for message notifications,
select Notifications.
• Off sets your phone to notify you of all
messages.
• Voice Messages sets your phone not to
sound a tone or vibrate when you receive
voice messages.
• Text Messages sets your phone not to sound
a tone or vibrate when you receive text
messages.
• All sets your phone not to sound a tone or
vibrate when you receive any message.
189
Profiles
Note: When you receive a type of message you
have set not to sound a tone or vibrate,
the message notification screen appears
as usual.
7 Press A under Done.
Setting a Profile for Use With
a Car Kit
You can choose a profile for use when your phone
is attached to a car kit.
When you attach your phone to a non-Bluetooth
car kit that is authorized for use with your phone,
the profile you chose automatically becomes the
profile in effect. When you remove the phone from
the car kit, the last profile you used goes back into
effect.
To set the profile that automatically becomes the
profile in effect when your phone is attached to a
car kit:
1 From the main menu, select Profiles.
2 Press m.
3 Select Setup > Use w/Car Kit.
All profiles except temporary profiles are listed.
4 Select the profile you want.
190
Shortcuts
Shortcuts lets you access most menu options by
pressing a number on your keypad (1 through 9) or
saying the voice name of the shortcut. You create
the shortcut and then use it to take you to that
screen any time.
Creating a Shortcut
Note: When you receive your phone, all number
keys may already be assigned to
shortcuts. If this is the case, you can
create new shortcuts by deleting or
replacing existing shortcuts.
1 Go to the menu item you want to create a
shortcut for.
For example, if you want to create a shortcut to
the screen for creating a new Contacts entry:
From the main menu, select Contacts, then
highlight [New Contact].
2 Press and hold m until a confirmation screen
appears.
3 Press O or press A under Yes.
4 Select Key.
5 Press the number key you want to assign to the
shortcut.
6 Press O.
7 If you want to record a voice name for the
shortcut: Select Voice. As directed by the
screen prompts, say and repeat the name you
want to assign to the number. Speak clearly into
the microphone.
8 Press A under Done.
9 If the number key you chose is already assigned
to a shortcut, a prompt appears asking if you
want to replace the existing shortcut.
Press A under Yes to replace the existing
shortcut. -orPress A under No if you want to keep the
existing shortcut and assign another number key
to the shortcut.
Using a Shortcut
If you know the shortcut number:
1 From the idle screen, press m.
2 On your keypad, press the number assigned to
the shortcut.
If you do not know the shortcut number:
1 From the main menu, select Shortcuts.
2 Scroll to the shortcut you want to use. -or-
191
Shortcuts
If you assigned a voice name to the shortcut:
Press and hold t. Say the voice name into your
phone. The shortcut with that voice name is then
highlighted.
3 Press O.
Editing a Shortcut
To change the number assigned to a shortcut:
1
2
3
4
5
6
From the main menu, select Shortcuts.
With any shortcut highlighted, press m.
Select Reorder.
Scroll to the shortcut you want to move.
Press A under Grab.
Scroll to the place where you want the shortcut
to appear.
7 Press A under Insert.
8 Repeat step 4 through step 7 for all the items
you want to move.
9 Press A under Done.
To change the number or voice name assigned to
a shortcut:
1 From the main menu, select Shortcuts.
2 Highlight any shortcut.
3 Press A under Edit.
192
4 With Key or Voice highlighted, press O to
change assignments.
Deleting Shortcuts
To delete a shortcut:
1
2
3
4
5
From the main menu, select Shortcuts.
Scroll to the shortcut you want to delete.
Press m.
Select Delete.
Press O or press A under Yes to confirm.
To delete all shortcuts:
1
2
3
4
From the main menu, select Shortcuts.
With any shortcut highlighted, press m.
Select Delete All.
Press O or press A under Yes to confirm.
Using a Headset
Using a Bluetooth Headset
If you use a headset or similar device with your
phone, you can set your phone to send incoming
sound to the headset only, or to the headset and
the speaker at the same time:
You can use your i880 wirelessly with a Bluetooth
headset. This type of wireless headset lets you
connect quickly to devices that are within range.
Note: The preferred connection to your phone is
a wired audio device. If you insert a wired
headset into the audio jack on your
phone, audio will be routed to the wired
headset and you will lose your Bluetooth
headset connection.
1 From the main menu, select Settings >
Advanced > Headset/Spkr.
2 Select HdsetOnly to send incoming sound to
the headset only. -orSelect Hdset&Spkr to send incoming sound to
the headset and ring tones to the speaker.
Note: If you are using your phone with a
headset, and you have the Flip to End
option set to On, closing your flip sends
incoming sound to the headset and does
not end the call. See “Setting Flip Actions”
on page 55.
For more information, refer to your Bluetooth
headset’s user guide.
Tip: For optimum performance, the headset
should be worn on the same side of your
body as the phone.
Attaching a Headset
1 Lift the audio jack cover.
2 Insert the headset connector firmly into the
audio jack. You may have to rotate the headset
connector until it fits securely into the audio jack.
Using a Remote PTT Button
If you are using a headset or other accessory with
a remote PTT button, you can use the remote PTT
button for phone calls, InstantLINC Mobile to
Mobile calls and group calls.
193
Using a Headset
For phone calls, use the remote PTT button to
answer calls, switch between calls, and end calls.
Hold the remote PTT button for less than 2
seconds to answer calls and switch between calls.
Hold the remote PTT button for more than 2
seconds to end calls.
For InstantLINC Mobile to Mobile calls, group calls,
and LINCList calls, use the remote PTT button as
you would the PTT button on your phone.
Note: When using a headset, the PTT button on
your phone works the same way as when
you are not using a headset. Sounds
associated with InstantLINC Mobile to
Mobile calls and group calls calls are
heard through the headset.
194
Understanding Status
Messages
You may receive status messages under certain
conditions. Before contacting SouthernLINC
Wireless Customer Care, note the message,
numeric code, and the conditions under which it
appeared. The following table lists and describes
the status messages.
Status
Messages
Message Description
Service Not
Available
You are either out of coverage or
having problems with provisioning.
System Busy
The system is experiencing heavy
traffic. Please try again later.
Service Conflict This service cannot be enabled
because an incompatible service has
already been turned on.
Status
Messages
Message Description
Please Try
Again
An error occurred. Please try again.
Number Not in
Service
The number that you entered is not
valid.
You have entered an incorrect PIN
number.
User Not
Available
The phone that you called is either
busy, out of coverage, or turned off.
Please try again later.
SIM PIN
incorrect. Try
again.
Please Enter
Special Code
User Not
Authorized
The person that you called has not
purchased this service.
You have inserted a SIM card that will
not work with your SouthernLINC
Wireless phone. Contact
SouthernLINC Wireless Customer
Care if you believe this is a valid SIM
card.
Please Try Later This service is temporarily not
available. Please try again later.
Service
Restricted
This service was restricted by
SouthernLINC Wireless, or this service
was not purchased.
Self Check Error A fault was detected with your phone.
+ Number Code If this error recurs, note the error code
and contact SouthernLINC Wireless
Customer Care.
195
Understanding Status Messages
Status
Messages
Message Description
Self Check Fail An operational fault was detected with
+ Number Code your phone. Note the numeric code,
turn your phone off, and contact
SouthernLINC Wireless Customer
Care.
PIN Blocked
Insert SIM
The incorrect PIN was entered 3
consecutive times. You will be unable
to place or receive calls on your
phone. Contact SouthernLINC
Wireless Customer Care to have them
obtain the PIN Unblocking Key (PUK)
code.
Your SIM card is not being detected.
Please check to ensure that you have
inserted the SIM card correctly into
your phone.
Status
Messages
Message Description
Resource Not
Available
Your phone’s camera is temporarily
unavailable for use. Please try again
later.
Scanning for
Satellites
Searching for GPS satellites.
Unable to
Locate Sats
Could not find GPS satellites.
Technical Error A problem occurred in your phone’s
GPS circuitry. If this error occurs,
contact SouthernLINC Wireless
Customer Care.
No Devices
Found
No devices were found during your
Bluetooth search.
Enter SIM PIN
Please enter your 4- to 8- digit SIM
PIN code.
Bluetooth Link
Is Busy
A Bluetooth error occurred. Please try
again.
Enter Unlock
Code
Auto Phone Lock is activated. Enter
your unlock code.
Invalid PIN
The incorrect PIN for the given
Bluetooth device was entered. Please
try again.
New Browser
Message
Memory Full!
Warns of low memory for Net Alerts.
Bluetooth
Power Failed
An error occurred with Bluetooth
power. Please try again.
Hardware
Failure
A problem occurred in your phone’s
camera. If this error occurs, contact
SouthernLINC Wireless.
Unable to
Connect
Your phone could not establish a
Bluetooth connection. Please try
again.
196
Status
Messages
Message Description
Status
Messages
Message Description
Bluetooth Not
Initialized
Bluetooth is not ready. Please try
again.
Unable To
Store: Space
Exceeded
The object cannot be stored because
you do not have enough space in
Contacts/Datebook/Media Center.
Unable to Bond Bonding has timed out. Please try
again.
Bluetooth Bond A new device is trying to bond with
Failed: List Full your phone, but the device history is at
its maximum of 20 devices.
Bluetooth
Device
Database Error
An error with the Bluetooth device
database has occurred. Please
contact SouthernLINC Wireless.
Bluetooth
Service
Database Error
An error with the Bluetooth service
database has occurred. Please
contact SouthernLINC Wireless.
Connection
Failed!
A Bluetooth error has occurred while
trying to transfer an object.
Object Too
Large For
Transfer!
The object you are trying to transfer is
too large.
Unsupported
Object Type!
The object being transferred is of an
unsupported type.
197
Safety and General
Information
IMPORTANT INFORMATION ON SAFE AND
EFFICIENT OPERATION.
READ THIS INFORMATION BEFORE USING
YOUR INTEGRATED MULTI-SERVICE
PORTABLE RADIO.
RF Operational
Characteristics
Your radio product contains a radio frequency
transmitter to convey the information you wish to
send as well as occasional automatic signals used
to sustain connection to the wireless network, and
a receiver which enables you to receive
communication and connection information from
the network.
Portable Radio Product
Operation and EME Exposure
Your Motorola radio product is designed to comply
with the following national and international
standards and guidelines regarding exposure of
human beings to radio frequency electromagnetic
energy (EME):
198
• United States Federal Communications
Commission, Code of Federal Regulations; 47
CFR part 2 sub-part J.
• American National Standards Institute (ANSI) /
Institute of Electrical and Electronics Engineers
(IEEE). C95. 1-1992.
• Institute of Electrical and Electronics Engineers
(IEEE). C95. 1-1999 Edition.
• International Commission on Non-Ionizing
Radiation Protection (ICNIRP) 1998.
• Ministry of Health (Canada). Safety Code 6.
Limits of Human Exposure to Radiofrequency
Electromagnetic Fields in the Frequency Range
from 3 kHz to 300 GHz, 1999.
• Australian Communications Authority
Radiocommunications (Electromagnetic
Radiation - Human Exposure) Standard 2003.
• ANATEL, Brasil Regulatory Authority, Resolution
303 (July 2, 2002) "Regulation of the limitation of
exposure to electrical, magnetic, and
electromagnetic fields in the radio frequency
range between 9 kHz and 300 GHz."
"Attachment to Resolution 303 from July 2,
2002."
Portable Radio Product Operation and EME Exposure
To assure optimal radio product performance
and make sure human exposure to radio
frequency electromagnetic energy is within the
guidelines set forth in the above standards,
always adhere to the following procedures:
Phone Operation
When placing or receiving a phone call, hold your
radio product as you would a wireline telephone.
Speak directly into the microphone.
Two-way radio operation
Your radio product has been designed and tested
to comply with national and international standards
and guidelines regarding human exposure to RF
electromagnetic energy, when operated in the
two-way mode (at the face, or at the abdomen
when using an audio accessory) at usage factors
of up to 50% talk/50% listen.
Transmit no more than the rated duty factor of 50%
of the time. To transmit (talk), push the
Push-To-Talk (PTT) button. To receive calls,
release the PTT button. Transmitting 50% of the
time or less, is important because this radio
generates measurable RF energy only when
transmitting (in terms of measuring for standards
compliance).
When using your radio product as a
traditional two-way radio, hold the
radio product in a vertical position
with the microphone one to two
inches (2.5 to 5 cm) away from the
lips.
Body-worn operation
To maintain compliance with FCC RF exposure
guidelines, if you wear a radio product on your
body when transmitting, always place the radio
product in a Motorola approved clip, holder,
holster, case or body harness for this product.
Use of non-Motorola-approved accessories may
exceed FCC RF exposure guidelines. If you do
not use a Motorola approved body-worn
accessory and are not using the radio product
in the intended use positions along side the
head in the phone mode or in front of the face
in the two-way radio mode, then ensure the
antenna and the radio product are kept the
following minimum distances from the body
when transmitting
• Phone or Two-way radio mode: one inch (2.5
cm)
• Data operation using any data feature with or
without an accessory cable: one inch (2.5
cm)
199
Safety and General Information
ALL MODELS WITH FCC ID AZ489FT5853 MEET THE
GOVERNMENT’S REQUIREMENTS FOR EXPOSURE
TO RADIO WAVES.
Your wireless phone is a radio transmitter and receiver. It
is designed and manufactured not to exceed the emission
limits for exposure to radiofrequency (RF) energy set by
the Federal Communications Commission of the U.S.
Government. These limits are part of comprehensive
guidelines and establish permitted levels of RF energy for
the general population. The guidelines are based on
standards that were developed by independent scientific
organizations through periodic and thorough evaluation of
scientific studies. The standards include a substantial
safety margin designed to assure the safety of all persons,
regardless of age and health.
The exposure standard for wireless mobile phones
employs a unit of measurement known as the Specific
Absorption Rate, or SAR. The SAR limit set by the FCC is
1.6W/kg.1 Tests for SAR are conducted using standard
operating positions reviewed by the FCC with the phone
transmitting at its highest certified power level in all tested
frequency bands. Although the SAR is determined at the
highest certified power level, the actual SAR level of the
phone while operating can be well below the maximum
value. This is because the phone is designed to operate at
multiple power levels so as to use only the power required
to reach the network. In general, the closer you are to a
wireless base station antenna, the lower the power output.
Before a phone model is available for sale to the public, it
must be tested and certified to the FCC that is does not
exceed the limit established by the government-adopted
requirement for safe exposure. The tests are performed in
positions and locations (e.g., at the ear and worn on the
200
body) as required by the FCC for each model. The highest
SAR value for this model phone when tested for use at the
ear is 1.30 W/kg and when tested on the body, as
described in this user guide, is 1.57 W/kg during packet
data transmission. (Body-worn measurements differ
among phone models, depending upon available
accessories and FCC requirements.)2
While there may be differences between the SAR levels of
various phones and at various positions, they all meet the
government requirement for safe exposure.
The FCC has granted an Equipment Authorization for this
model phone with all reported SAR levels evaluated as in
compliance with the FCC RF exposure guidelines. SAR
information on this model phone is on file with the FCC
and can be found under the Display Grant section of
http://www.fcc.gov/oet/fccid after searching on FCC ID
AZ489FT5853.
Additional information on Specific Absorption Rates (SAR)
can be found on the Cellular Telecommunications Industry
Association (CTIA) web-site at http://www.wow-com.com.
In the United States and Canada, the SAR limit for
mobile phones used by the public is 1.6 watts/kg (W/kg)
averaged over one gram of tissue. The standard
incorporates a substantial margin of safety to give
additional protection for the public and to account for any
variations in measurements.
2 The SAR information reported to the FCC includes the
FCC-accepted Motorola testing protocol, assessment
procedure, and measurement uncertainty range for this
product.
1
Electromagnetic Interference/Compatibility
Antenna Care
Facilities
Use only the supplied or an approved
replacement antenna. Unauthorized antennas,
modifications, or attachments could damage the
radio product and may violate FCC regulations.
To avoid electromagnetic interference and/or
compatibility conflicts, turn off your radio product in
any facility where posted notices instruct you to do
so. Hospitals or health care facilities may be using
equipment that is sensitive to external RF energy.
DO NOT hold the antenna when the radio
product is “IN USE”. Holding the antenna affects
call quality and may cause the radio product to
operate at a higher power level than needed.
Approved Accessories
For a list of approved Motorola accessories call
1-800-453-0920, or visit our website at
www.motorola.com/iden.
Electromagnetic
Interference/Compatibility
Note: Nearly every electronic device is
susceptible to electromagnetic
interference (EMI) if inadequately
shielded, designed or otherwise
configured for electromagnetic
compatibility.
Aircraft
When instructed to do so, turn off your radio
product when on board an aircraft. Any use of a
radio product must be in accordance with
applicable regulations per airline crew instructions.
Medical Devices
Pacemakers
The Advanced Medical Technology Association
(AdvaMed) recommends that a minimum
separation of 6 inches (15 cm) be maintained
between a handheld wireless radio product and a
pacemaker. These recommendations are
consistent with those of the U.S. Food and Drug
Administration.
Persons with pacemakers should:
• ALWAYS keep the radio product more than 6
inches (15 cm) from their pacemaker when the
radio product is turned ON.
201
Safety and General Information
• Not carry the radio product in a breast pocket.
• Use the ear opposite the pacemaker to minimize
the potential for interference.
• Turn the radio product OFF immediately if you
have any reason to suspect that interference is
taking place.
Hearing Aids
Some digital wireless radio products may interfere
with some hearing aids. In the event of such
interference, you may want to consult your hearing
aid manufacturer to discuss alternatives.
Other Medical Devices
If you use any other personal medical device,
consult the manufacturer of your device to
determine if it is adequately shielded from RF
energy. Your physician may be able to assist you
in obtaining this information.
Use While Driving
Check the laws and regulations on the use of radio
products in the area where you drive. Always obey
them.
When using the radio product while driving, please:
• Give full attention to driving and to the road.
• Use hands-free operation, if available.
202
• Pull off the road and park before making or
answering a call if driving conditions so require.
Operational Warnings
For Vehicles with an Air
Bag
!
Do not place a portable radio product in the area
over the air bag or in the air bag deployment area.
Air bags inflate with great force. If a portable radio
is placed in the air bag deployment area and the air
bag inflates, the radio product may be propelled
with great force and cause serious injury to
occupants of the vehicle.
Potentially Explosive Atmospheres
Turn off your radio product prior to entering any
area with a potentially explosive atmosphere,
unless it is a radio product type especially qualified
for use in such areas as “Intrinsically Safe” (for
example, Factory Mutual, CSA, or UL approved).
Do not remove, install, or charge batteries in such
areas. Sparks in a potentially explosive
atmosphere can cause an explosion or fire
resulting in bodily injury or even death.
Operational Cautions
Note: The areas with potentially explosive
atmospheres referred to above include
fueling areas such as below decks on
boats, fuel or chemical transfer or
storage facilities, areas where the air
contains chemicals or particles, such
as grain, dust or metal powders, and
any other area where you would
normally be advised to turn off your
vehicle engine. Areas with potentially
explosive atmospheres are often but
not always posted.
Blasting Caps and Areas
To avoid possible interference with blasting
operations, turn off your radio product when you
are near electrical blasting caps, in a blasting area,
or in areas posted: “Turn off two-way radio”. Obey
all signs and instructions.
For Phones With Music Players
Listening to music at high volumes over extended
periods of time may be harmful to a user's hearing.
User should take precautions to minimize this risk
by moderating volume levels. If you experience
ringing or other hearing-related discomfort, lower
volume or discontinue use.
Operational Cautions
Batteries
!
All batteries can cause property damage and/or
bodily injury, such as burns if a conductive material
such as jewelry, keys, or beaded chains touches
exposed terminals. The conductive material may
complete an electrical circuit (short circuit) and
become quite hot. Exercise care in handling any
charged battery, particularly when placing it inside
a pocket, purse, or other container with metal
objects. To reduce the risk of injury, batteries
should not be exposed to fire, disassembled, or
crushed.
Cleaning and Drying Considerations
Using a leather carry case may help protect the
surfaces and help prevent liquids (e.g., rain) from
entering into the interior of the radio product. This
product is not water proof, and exposing the unit to
liquids may result in permanent damage to the unit.
If your radio product interior gets wet, then do not
try to accelerate drying with the use of an oven or a
dryer as this will damage the radio product and
void the warranty. Instead, do the following:
1 Immediately power off the radio product.
203
Safety and General Information
2 Remove Battery and SIM card (if so equipped)
from radio product.
3 Shake excess liquid from radio product.
4 Place the radio product and battery in an area
that is at room temperature and has good air
flow.
5 Let the radio product, battery, and SIM card dry
for 72 hours before reconnecting the battery
and/or powering on the radio product.
If the radio product does not work after following
the steps listed above, contact your dealer for
servicing information.
Clean the external surfaces of the radio product
with a damp cloth, using a mild solution of
dishwashing detergent and water. Some
household cleaners may contain chemicals that
could seriously damage the radio product. Avoid
the use of any petroleum-based solvent cleaners.
Also, avoid applying liquids directly on the radio
product.
Accessory Safety Information
Important: Save these accessory safety
instructions.
204
• Before using any battery or battery charger, read
all the instructions for and cautionary markings
on (1) the battery, (2) the battery charger, which
may include a separate wall-mounted power
supply or transformer, and (3) the radio product
using the battery.
• Do not expose any battery charger to water,
rain, or snow as they are designed for indoor or
in-vehicle use only.
!
Warning: To reduce the risk of injury,
charge only the rechargeable
batteries described in “Battery” on
page 4. Other types of batteries may
burst, causing personal injury and
damage.
• To reduce the risk of damage to the cord or plug,
pull by the plug rather than the cord when you
disconnect the battery charger from the power
source outlet.
• Do not operate any battery charger with a
damaged cord or plug — replace them
immediately.
• Battery chargers may become warm during
operation, but not hot. If it becomes hot to the
touch, unplug it from the power outlet
immediately and discontinue its use.
Accessory Safety Information
• Use of a non-recommended attachment to a
battery charger may result in a risk of fire,
electric shock, or injury to persons.
• Make sure the battery charger power cord is
located so that it will not be stepped on, tripped
over, or subjected to damage or stress.
• An extension cord should not be used with any
battery charger unless absolutely necessary.
Use of an improper extension cord could result
in a risk of fire and electric shock. If an extension
cord must be used, make sure that:
• The pins on the plug of the extension cord are
the same number, size, and shape as those
on the plug of the charger.
• The extension cord is properly wired and in
good electrical condition.
• The cord size is 18AWG for lengths up to 100
feet and 16AWG for lengths up to 150 feet.
• Do not operate any battery charger if it has
received a sharp blow, has been dropped, or
has been damaged in any way; take it to a
qualified service technician.
• Do not disassemble a battery charger; take it
to a qualified service technician when service
or repair is required. Incorrect reassembly
may result in a risk of electric shock or fire.
• Maximum ambient temperature around the
power supply or transformer of any battery
charger should not exceed 40°C (104°F).
• The output power from the power supply or
transformer must not exceed the rating given
on the Desktop Dual-Pocket Charger.
• The disconnection from the line voltage is
made by unplugging the power supply from
the AC receptacle.
• To reduce risk of electric shock, unplug any
battery charger from the outlet before
attempting any maintenance or cleaning.
For optimum charging performance, turn off the
radio product while charging it in any battery
charger.
205
Hearing Aid Compatibility
Hearing Aid
Compatibility
When some mobile phones are used with certain
hearing devices (including hearing aids and
cochlear implants), users may detect a noise which
can interfere with the effectiveness of the hearing
device.
Some hearing devices are more “immune” than
others to this interference noise, and mobile
phones can also vary in the amount of interference
noise they may generate at any given time. ANSI
standard C63.19 was developed to provide a
standardized means of measuring both mobile
phone and hearing devices to determine usability
rating categories for both.
Ratings have been developed for mobile phones to
assist hearing device users find phones that may
be compatible with their particular hearing device.
Not all mobile phones are rated for compatibility
with hearing devices, but mobile phones that are
rated should have the rating available. This rating
may depend on the position of a retractable
antenna.
206
Results will vary depending on the user’s hearing
device and individual type and degree of hearing
loss. If a hearing device is particularly vulnerable to
interference noise, even a mobile phone with a
higher rating may still cause unacceptable noise
levels in the hearing device. Evaluate your
personal needs by trying out the mobile phone with
your hearing device.
“M” Rating: Mobile phones rated M3 or M4 meet
FCC requirements for hearing aid compatibility and
are likely to generate less interference to hearing
devices than phones that are not labeled. (M4 is
the “better” or higher of the two ratings.)
"T" Rating: Mobile phones rated T3 or T4 meet
FCC requirements for compatibility with
telecoil-type ("T Switch" or "Telephone Switch")
hearing devices and are likely to be more usable
with such hearing devices than unrated phones.
(T4 is the "better" or higher of the two ratings.)
Hearing devices may also be measured for
immunity to interference noise from mobile phones.
In some cases, hearing devices can be modified or
“hardened” to improve operation with a mobile
phone. Your hearing device manufacturer or
hearing health professional may help you improve
the interaction of your mobile phone and hearing
device. Not all hearing devices are rated for
compatibility with mobile phones, but hearing
devices that are rated should have the rating
available. Be sure to evaluate your personal needs
by trying out this mobile phone with your specific
hearing device, using both antenna positions if
equipped with a retractable antenna.
More information about hearing aid compatibility
may be found at:
http://commerce.motorola.com/consumer/QWhtml/
accessibility/default.html, www.fcc.gov,
www.fda.gov, and www.accesswireless.org.
207
Caring for the Environment by Recycling
Caring for the
Environment
by Recycling
This symbol on a Motorola product means the
product should not be disposed of with household
waste.
Disposal of your Mobile
Telephone and Accessories
Please do not dispose of mobile telephones or
electrical accessories, such as chargers or
headsets, with your household waste. In some
countries or regions, collection systems have been
set up to handle waste electrical and electronic
items. Please contact your regional authorities for
208
more details. If no suitable scheme exists, you
may return unwanted mobile telephones and
electrical accessories to any Motorola Approved
Service Centre in your region.
MOTOROLA LIMITED
WARRANTY
Note: FOR IDEN SUBSCRIBER PRODUCTS,
ACCESSORIES AND SOFTWARE
PURCHASED IN THE UNITED STATES
OR CANADA
PRODUCTS
COVERED
LENGTH OF
COVERAGE
Products as defined
above.
One (1) year from the
date of purchase by the
first consumer
purchaser of the
product.
Accessories as
defined above.
One (1) year from the
date of purchase by the
first consumer
purchaser of the
product.
What Does this Warranty Cover?
Subject to the exclusions contained below,
Motorola, Inc. warrants its Motorola iDEN Digital
Mobile and Portable Handsets ("Products"),
Motorola-branded or certified accessories sold for
use with these Products ("Accessories") and
Motorola software contained on CD-Roms or other
tangible media and sold for use with these
Products ("Software") to be free from defects in
materials and workmanship under normal
consumer usage for the period(s) outlined below.
This limited warranty is a consumer's exclusive
remedy, and applies as follows to new
Products, Accessories and Software
purchased by consumers in the United States
or Canada, which are accompanied by this
written warranty:
Products or
The balance of the
Accessories that are original warranty or
Repaired or Replaced. for ninety (90) days
from the date returned
to the consumer,
whichever is longer.
Software as defined
Ninety (90) days from
above. Applies only to the date of purchase.
physical defects in the
media that embodies
the copy of the software
(e.g. CD-ROM, or
floppy disk).
209
MOTOROLA LIMITED WARRANTY
What is not covered? (Exclusions)
Normal Wear and Tear. Periodic maintenance,
repair and replacement of parts due to normal wear
and tear are excluded from coverage.
Ornamental Decorations. Ornamental
decorations such as emblems, graphics,
rhinestones, jewels, gemstones and their settings,
and other decorative elements, are excluded from
coverage.
Batteries. Only batteries whose fully charged
capacity falls below 80% of their rated capacity and
batteries that leak are covered by this limited
warranty.
Abuse & Misuse. Defects or damage that result
from: (a) improper operation, storage, misuse or
abuse, accident or neglect, such as physical
damage (cracks, scratches, etc.) to the surface of
the product resulting from misuse; (b) contact with
liquid, water, rain, extreme humidity or heavy
perspiration, sand, dirt or the like, extreme heat, or
food; (c) use of the Products or Accessories for
commercial purposes or subjecting the Product or
Accessory to abnormal usage or conditions; or (d)
other acts which are not the fault of Motorola, are
excluded from coverage.
210
Use of Non-Motorola Products and
Accessories. Defects or damage that result from
the use of Non-Motorola branded or certified
Products, Accessories, Software or other
peripheral equipment are excluded from coverage.
Unauthorized Service or Modification. Defects
or damages resulting from service, testing,
adjustment, installation, maintenance, alteration,
including without limitation, software changes, or
modification in any way by someone other than
Motorola, or its authorized service centers, are
excluded from coverage.
Altered Products. Products or Accessories with
(a) serial numbers or date tags that have been
removed, altered or obliterated; (b) broken seals or
that show evidence of tampering; (c) mismatched
board serial numbers; or (d) nonconforming or
non-Motorola housings, antennas, or parts, are
excluded from coverage.
Communication Services. Defects, damages, or
the failure of Products, Accessories or Software
due to any communication service or signal you
may subscribe to or use with the Products,
Accessories or Software is excluded from
coverage.
Software Embodied in Physical Media. No
warranty is made that the software will meet your
requirements or will work in combination with any
hardware or software applications provided by third
parties, that the operation of the software products
will be uninterrupted or error free, or that all defects
in the software products will be corrected.
How to Obtain Warranty Service or Other
Information? To obtain service or information,
please call:
Software NOT Embodied in Physical Media.
Software that is not embodied in physical media
(e.g. software that is downloaded from the
internet), is provided "as is" and without warranty.
Or visit us online at
http://www.motorola.com/iden/support
Who is covered? This warranty extends only to
the first consumer purchaser, and is not
transferable.
What will Motorola Do? Motorola, at its option,
will at no charge repair, replace or refund the
purchase price of any Products, Accessories or
Software that does not conform to this warranty.
We may use functionally equivalent
reconditioned/refurbished/pre-owned or new
Products, Accessories or parts. No data, software
or applications added to your Product, Accessory
or Software, including but not limited to personal
contacts, games and ringer tones, will be
reinstalled. To avoid losing such data, software
and applications please create a back up prior to
requesting service.
Motorola iDEN Customer Services
1-800-453-0920 or 954-723-4910
TTY-877-483-2840
You will receive instructions on how to ship the
Products, Accessories or Software, at your
expense, to a Motorola Authorized Repair Center.
To obtain service, you must include: (a) a copy of
your receipt, bill of sale or other comparable proof
of purchase; (b) a written description of the
problem; (c) the name of your service provider, if
applicable; (d) the name and location of the
installation facility (if applicable) and, most
importantly; (e) your address and telephone
number.
What Other Limitations Are There? ANY
IMPLIED WARRANTIES, INCLUDING WITHOUT
LIMITATION THE IMPLIED WARRANTIES OF
MERCHANTABILITY AND FITNESS FOR A
PARTICULAR PURPOSE, SHALL BE LIMITED
TO THE DURATION OF THIS LIMITED
WARRANTY, OTHERWISE THE REPAIR,
REPLACEMENT, OR REFUND AS PROVIDED
UNDER THIS EXPRESS LIMITED WARRANTY IS
211
MOTOROLA LIMITED WARRANTY
THE EXCLUSIVE REMEDY OF THE
CONSUMER, AND IS PROVIDED IN LIEU OF
ALL OTHER WARRANTIES, EXPRESS OF
IMPLIED. IN NO EVENT SHALL MOTOROLA BE
LIABLE, WHETHER IN CONTRACT OR TORT
(INCLUDING NEGLIGENCE) FOR DAMAGES IN
EXCESS OF THE PURCHASE PRICE OF THE
PRODUCT, ACCESSORY OR SOFTWARE, OR
FOR ANY INDIRECT, INCIDENTAL, SPECIAL OR
CONSEQUENTIAL DAMAGES OF ANY KIND, OR
LOSS OF REVENUE OR PROFITS, LOSS OF
BUSINESS, LOSS OF INFORMATION OR DATA,
SOFTWARE OR APPLICATIONS OR OTHER
FINANCIAL LOSS ARISING OUT OF OR IN
CONNECTION WITH THE ABILITY OR INABILITY
TO USE THE PRODUCTS, ACCESSORIES OR
SOFTWARE TO THE FULL EXTENT THESE
DAMAGES MAY BE DISCLAIMED BY LAW.
Some states and jurisdictions do not allow the
limitation or exclusion of incidental or
consequential damages, or limitation on the
length of an implied warranty, so the above
limitations or exclusions may not apply to you.
This warranty gives you specific legal rights,
and you may also have other rights that vary
from state to state or from one jurisdiction to
another.
212
Laws in the United States and other countries
preserve for Motorola certain exclusive rights for
copyrighted Motorola software such as the
exclusive rights to reproduce and distribute copies
of the Motorola software. Motorola software may
only be copied into, used in, and redistributed with,
the Products associated with such Motorola
software. No other use, including without limitation
disassembly of such Motorola software or exercise
of the exclusive rights reserved for Motorola, is
permitted.
Patent and Trademark
Information
MOTOROLA, the Stylized M Logo and all other
trademarks indicated as such herein are
trademarks of Motorola, Inc. ® Reg. U.S. Pat. &
Tm. Off. © 2006 Motorola, Inc. All rights reserved.
Microsoft and Microsoft Internet Explorer are
registered trademarks of Microsoft Corporation.
T9 is a trademark owned by Tegic
Communications.
T9® Text Input Patent and Trademark Information
This product is covered by U.S. Pat. 5,818,437,
U.S. Pat. 5,953,541, U.S. Pat. 6,011,554 and other
patents pending.
Java and all other Java-based marks are
trademarks or registered trademarks of Sun
Microsystems, Inc. in the U.S. and other countries.
Software Copyright Notice
The Motorola products described in this manual
may include copyrighted Motorola and third party
software stored in semiconductor memories or
other media. Laws in the United States and other
countries preserve for Motorola and third party
software providers certain exclusive rights for
copyrighted software, such as the exclusive rights
to distribute or reproduce the copyrighted software.
Accordingly, any copyrighted software contained in
the Motorola products may not be modified,
reverse-engineered, distributed, or reproduced in
any manner to the extent allowed by law.
Furthermore, the purchase of the Motorola
products shall not be deemed to grant either
directly or by implication, estoppel, or otherwise,
any license under the copyrights, patents, or patent
applications of Motorola or any third party software
provider, except for the normal, non-exclusive,
royalty-free license to use that arises by operation
of law in the sale of a product.
All other product names or services mentioned in
this manual are the property of their respective
trademark owners.
213
Index
Index
Numerics
2-way radio 182
see also Private calls, group
calls, SDG calls, and call
alerts
3-way calling 54
A
Accessories 18
safety 204
AgION antimicrobial ix
Antenna 17
Audio player
accessing from media center
106
deleting files 117
equalizer 118
folders and lists 110
playlists 112
searching for songs 111
visuals 118
Audio recordings 103
playing 103
214
B
Backlight 180, 181
Battery
care 6
charging 5
door 4
inserting 4
safety 203
Baud rate 185
Bluetooth 155
access settings 155
access settings, editing 160
accessing 157
bonds 155, 158
connections, making 157
deleting received items 162
device details 160
device names, editing 160
devices, deleting 161
devices, disconnecting 160
devices, discovering 158,
160
discoverable mode 157
during an active call 159
headset 193
icons 10
PINs 158
reassigning a device name
156
receiving items 162
selecting a Find Me duration
157
sending Contacts 161
sending Datebook events
161
setting device details 160
setting voice dialing 156
setting your phone 156
status icons 11
storing received items 162
transfers, canceling 162
Transmitters 180
turning on or off 156
viewing received items 162
C
Call alerts 31
deleting 32
queue 32
receiving 31
responding 31, 32
sending 31
sorting 32
viewing 32
Call filtering 189
Call forwarding 50
all calls 50
missed calls 51
off 51
Call Timers 57
Call Waiting 53
off 53
Calls
3-way 54
answering automatically 181
answering with any key 20,
181
emergency 23
ending 20, 21
entering number 21
from memo 63
from recent calls 39
group, see Group calls
InstantLINC Mobile to Mobile
calls 19, 182
international 55
making 19
on hold 54
phone calls 19
receiving 20
redialing 22, 181
remote PTT 193
settings 182
Speed Dial 22
TTY, see TTY calls
Turbo Dial 22
voice name 21
Camera 91
see also pictures
accessing 91
accessing during private calls
126
accessing from media center
106
picture options 92
setting up 96
storing pictures 91
taking pictures 91
Circuit data 59
Clock 181
Contact information
receiving 36, 134
Send via PTT 133
Contacts 41
accessing 42
capacity 47
creating entries 42
creating text messages 76
deleting 47
editing entries 45
icons 41
iDEN Phonebook Manager
49
international numbers 48
pictures 41, 42, 43, 46, 93,
102
ring tones 41, 42, 43
searching 46
showing all entries 47
showing only LINC IDs 47
SIM card 41
storing fast 44
storing from idle screen 44
storing from Memo 44, 63
storing from recent calls 38,
215
Index
44
type 41
voice name 44
with non-i880 phones 49
D
Data transfers 59
Datebook
profiles 144
Digital rights management, see
DRM
Direct Launch 30
Display
backlight 180, 181
options 9
screen 8
Drafts 78
see also Text messages,
drafts
DRM
count-based usage 119
default location 101
definition 119
deleting items 67, 105, 121,
150
216
expired items 121
gifting 101, 120
installing items 119
java applications 149
managing items 120
media center 101, 118
renewing license 121
ring tones 66
sharing items 119
status icons 101, 119
Tell-A-Friend 101, 120
time-based usage 119
viewing license information
120
DTMF dialing 157, 181
E
Email 41, 43, 59
Emergency calls 23
End key 2
F
Faxes
receiving 59
sending 59
Flip action 19, 20, 55
G
GPS Enabled 164
best results 168
emergency calls 23, 166
map software 170
privacy options 169
security 170
viewing location 167
GPS PIN 184
GPS, see GPS Enabled
Group calls 56, 182
making 56
off 57
receiving 56
H
Handset, see phone
Headset 193
Hearing Aid Compatibility 206
I
Icons
Bluetooth 10, 11
Contacts 41
DRM 119
mobile originated text
messaging 78
status 11
text entry 68
voice records 173
iDEN Phonebook Manager 49
Idle screen 8
creating Text messages 77
storing to Contacts 44
International numbers 55
storing 48
J
Java applications
deleting 150
DRM 149
memory 150
K
Keypad 2
locking 184
L
Language 181
LINCaround 25
channels 26
Codes 26
emergency calls 29
private LINCaround calls 28
setup options 29
talk range 26
Lists, see menus
M
Media center 98
accessing audio player 106
audio recordings 103
deleting 104
DRM items 101, 118
forward locked 100
locking 104
memory 106
pictures 101
renaming 104
viewing 98
Memo 63
calling from 63
creating 63
editing 63
storing to Contacts 44, 63
viewing 63
Memory
Java applications 150
media center 106
ring tones 66
text messages 80
voice records 175
Memory card 13
audio player 108
copying items 105
folders and files 82
inserting 84
moving items 105
removing 85, 183
setting storage preference
86, 96, 106, 183
storing pictures from camera
91
Menu key 2, 9
Menus 9
context-sensitive 2, 9
main menu 9
Message center 71, 73
see also messages
text messages 75
Message notifications 71
217
Index
setting options 71
Messages 71
see also voice mail, MOSMS
messages, and SMS
messages
receiving 71
Mobile originated text
messaging
icons 78
outbox 78
Modem
data transfer modes 59
with a data cable 58
with Bluetooth 59
MP3 files 86, 106
Mute 23
My Info 139
editing 139
receiving 38, 132
Send via PTT 132
sending 132
viewing 139
N
Navigation key 2
218
O
Over-the-air programming 7
P
Packet data 59
Passwords 184
Patent information 213
Pauses
dialing 55
storing 48
Phone 1, 8
active line 181
flip action 19, 20, 55
locking 184
modem 58
off 7
on 6
only 185
setting up 3
Pictures 101
accessing the camera 91
Contacts 41, 42, 43, 46, 93,
102
inserting in messages 93,
102
receiving 128
recent calls 34
taking 91
Profiles 186
call filtering 189
changing settings 186
creating 188
Datebook 144
deleting 188
editing 188
switching 186
temporary 187
viewing 186
Programming, over-the-air 7
PUK code 14
Q
Quick notes 77
see also Text messages,
quick notes
R
Radio frequency 198
Recent calls 34
call alerts 35
calling from 39
contact information 36
creating text messages 77
deleting 39
display time 184
My Info 38
pictures 34
storing to Contacts 38, 44
viewing 34
Redialing 22, 181
Ring tones 64
deleting 67
downloading 66
DRM 66
in Contacts 41, 42, 43
memory 66
off 64
setting 64
setting in Contacts 65
vibrate 64
viewing assigned 65
Ringer 176
see also Ring tones
off 176
S
Safety 198
accessory 204
battery 203
driving 221
electromagnetic interference
201
medical devices 201
radio frequency 198
Security 184
Send via PTT
contact information 133
My Info 132
Service, activating 6
Settings 180
resetting 184
Shortcuts
creating 191
deleting 192
editing 192
using 191
SIM card 3, 13, 15
Contacts 41
inserting 15
removing 16
with non-i880 phones 49
SIM PIN 13, 184
changing 13
default 13
entering 13
requirement 14
unblocking 14
SMS messages 71
Speakerphone 23
Speed Dial 22, 42, 44
State Tone 30
Status messages 195
T
T9 Text Input, see text entry
Talkgroups 56, 182
joining 56
Text display area 9
Text entry 68
database 68, 69
icons 68
mode 68
Word mode 68
Text messages
219
Index
creating 75
deleting 79, 80
drafts 78
memory 80
message center 75
quick notes 77
receiving 75
sending 75
sent messages 79
setting up 74
sorting 79
Text messaging, see Text
messages
Trademark information 213
Transmitters 12, 180
power button 7
settings 185
turning on and off 180
TTY calls 59
baud rate 60
making 59
mode 60
on 60
Turbo Dial 22
220
U
USB mass storage 88
V
Video 94
Voice mail 71, 73
receiving 73
sending calls to 20, 73
setting up 51, 73
Voice name 21, 42
creating 44
Voice records 173
creating 173
deleting 175
icons 173
labelling 174
locking 174
memory 175
playing 174
viewing 173
Volume, setting 176, 183
W
Waits
dialing 55
storing 48
Wallpaper 94, 102, 177
Warranty 212
Word mode 68
Driving Safety Tips
“Safety is your most important call!”
Your Motorola wireless telephone gives you the
powerful ability to communicate by voice — almost
anywhere, anytime, wherever wireless phone
service is available and safe conditions allow. But
an important responsibility accompanies the
benefits of wireless phones, one that every user
must uphold.
When driving a car, driving is your first
responsibility. If you find it necessary to use your
wireless phone while behind the wheel of a car,
practice good common sense and remember the
following tips:
• Get to know your Motorola wireless phone and
its features such as speed dial and redial. If
available, these features help you to place your
call without taking your attention off the road.
• When available, use a hands-free device. If
possible, add an additional layer of convenience
to your wireless phone with one of the many
Motorola Original hands-free accessories
available today.
• Position your wireless phone within easy reach.
Be able to access your wireless phone without
removing your eyes from the road. If you receive
an incoming call at an inconvenient time, if
possible, let your voice mail answer it for you.
• Let the person you are speaking with know you
are driving; if necessary, suspend the call in
heavy traffic or hazardous weather conditions.
Rain, sleet, snow, ice, and even heavy traffic can
be hazardous.
• If you receive an incoming call at an
inconvenient time do not take notes or look up
phone numbers while driving. Jotting down a “to
do” list or going through your address book
takes attention away from your primary
responsibility — driving safely.
• Dial sensibly and assess the traffic; if possible,
place calls when you are not moving or before
pulling into traffic. Try to plan calls when your car
will be stationary. If you need to make a call
while moving, dial only a few numbers, check
the road and your mirrors, then continue.
• Do not engage in stressful or emotional
conversations that may be distracting. Make
people you are talking with aware you are
driving and suspend conversations which have
the potential to divert your attention away from
the road.
221
Driving Safety Tips
• Your phone can perform many other functions
besides allowing you to make and receive calls.
Do not let these features distract you from
driving. Use them only when it is safe to do so.
• Use your wireless phone to call for help. Dial
9-1-1 or other local emergency number in the
case of fire, traffic accident or medical
emergencies.
• Use your wireless phone to help others in
emergencies. If you see an auto accident, crime
in progress or other serious emergency where
lives are in danger, call 9-1-1 or other local
emergency number, as you would want others to
do for you.
• Call roadside assistance or a special
non-emergency wireless assistance number
when necessary. If you see a broken-down
vehicle posing no serious hazard, a broken
traffic signal, a minor traffic accident where no
one appears injured, or a vehicle you know to be
stolen, call roadside assistance or other special
non-emergency wireless number.
222