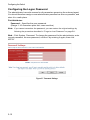
1
Powered by Accton
ES4308-PoE
8-Port Web-Smart
PoE Switch
Management Guide
www.edge-core.com
Management Guide
Web-Smart PoE Switch
with 7 10/100/1000BASE-T (RJ-45) Ports
and 1 Gigabit Combination (RJ-45/SFP) Port
ES4308-PoE
E022009/ST-R02
F2.00 149100036400A
About This Guide
Purpose
This guide gives specific information on how to operate and use the management
functions of the switch.
Audience
The guide is intended for use by network administrators who are responsible for operating
and maintaining network equipment; consequently, it assumes a basic working
knowledge of general switch functions, the Internet Protocol (IP), and Simple Network
Management Protocol (SNMP).
Conventions
The following conventions are used throughout this guide to show information:
Note:
Emphasizes important information or calls your attention to related features or
instructions.
Caution: Alerts you to a potential hazard that could cause loss of data, or damage the
system or equipment.
Warning: Alerts you to a potential hazard that could cause personal injury.
Related Publications
The following publication details the hardware features of the switch, including the
physical and performance-related characteristics, and how to install the switch:
The ES4308-PoE Installation Guide
Also, as part of the switch’s software, there is an online web-based help that describes all
management related features.
Revision History
This section summarizes the changes in each release of this guide.
December 2008 Revision
This is the second release of this guide. It includes the following updated and additional
information:
• Added the Power Saving Mode option to the Port Configuration screen (page 3-15).
• Updated descriptive text under “Introduction to VLANs” on page 3-24.
• Updated descriptive text under “Creating VLANs and Assigning Port Members” on page
3-24.
• Updated descriptive text under “VLAN Port Configuration” on page 3-26.
i
•
•
•
•
•
•
Added the Ingress Filtering Enabled option to the VLAN Port Configuration screen
(page 3-26).
Updated descriptive text under “802.1X” on page 3-28.
Added description of counters under “Displaying 802.1X Statistics” on page 3-30.
Added “RSTP” on page 3-35.
Added “QoS Settings” on page 3-42.
Updated descriptive text under “PoE” on page 3-47.
August 2007 Revision
This is the first release of this guide.
ii
Contents
Chapter 1: Introduction
Description of Software Features
1-1
1-1
Chapter 2: Initial Configuration
2-1
Chapter 3: Configuring the Switch
Using the Web Interface
Navigating the Web Browser Interface
Home Page
Configuration Options
Panel Display
Main Menu
Web Configuration
Displaying Status Overview
Showing Port Statistics
Displaying the System Name
Setting the Switch’s IP Address
Manual Configuration
Configuring the Logon Password
Tools
Restore to Factory Defaults
Upgrade Firmware
Upload/Download Configuration
Restart Switch
Register Product
Port Configuration
Storm Control
Port Mirroring
Cable Diagnostic
Trunk Membership
Trunk Configuration
LACP Setup
LACP Status
Configuring VLAN Groups
Introduction to VLANs
Creating VLANs and Assigning Port Members
Configuring VLAN Members
VLAN Port Configuration
3-1
3-1
3-1
3-2
3-3
3-3
3-4
3-6
3-6
3-9
3-10
3-10
3-11
3-12
3-13
3-13
3-13
3-14
3-14
3-15
3-15
3-17
3-18
3-19
3-20
3-21
3-21
3-23
3-24
3-24
3-24
3-26
3-26
iii
Contents
802.1X
Configuring 802.1X
Displaying 802.1X Statistics
LLDP Settings
LLDP Neighbor Table
RSTP
Configuring RSTP
Displaying RSTP Status
QoS Settings
SNMP
PoE
Power over Ethernet Settings
3-28
3-29
3-30
3-34
3-35
3-35
3-36
3-40
3-42
3-47
3-48
3-49
Appendix A: Software Specifications
Software Features
Management Features
Standards
Management Information Bases
A-1
A-1
A-2
A-2
A-3
Appendix B: Troubleshooting
Forgot or Lost Password
Changing a PC’s IP Address
B-1
B-1
B-1
iv
Tables
Table 3-1
Table 3-2
Table 3-3
Table 3-3
Table 3-3
Table 3-4
Web Page Configuration Buttons
Switch Main Menu
Port Statistics
Recommended STA Path Cost Range
Default STA Path Costs
Mapping CoS Values to Egress Queues
3-3
3-4
3-9
3-38
3-38
3-43
v
Tables
vi
Figures
Figure 3-1
Figure 3-2
Figure 3-3
Figure 3-4
Figure 3-5
Figure 3-6
Figure 3-7
Figure 3-8
Figure 3-9
Figure 3-10
Figure 3-11
Figure 3-12
Figure 3-13
Figure 3-14
Figure 3-15
Figure 3-16
Figure 3-17
Figure 3-18
Figure 3-19
Figure 3-20
Figure 3-21
Figure 3-22
Figure 3-23
Figure 3-24
Figure 3-25
Figure 3-26
Figure 3-27
Figure 3-28
Figure 3-29
Figure 3-30
Figure 3-31
Figure 3-32
Figure 3-33
Figure 3-34
Home Page
Front Panel Indicators
System Information
Port Statistics
System Name
LAN Settings
Password Settings
Reset to Factory Defaults
Upgrade Firmware
Upload/Download Configuration
Restart Switch
Register Product
Port Configuration
Port Broadcast Control
Port Mirroring
Cable Diagnostics
Trunk Membership
Trunk Configuration
LACP Port Configuration
LACP Status Overview
VLAN Settings
VLAN Group Settings
VLAN Settings
802.1X Configuration
802.1X Statistics
LLDP Configuration
LLDP Neighbor
RSTP Configuration
RSTP Configuration
Port-based QoS Settings
802.1p Configuration
DSCP Configuration
SNMP Configuration
POE Configuration
3-2
3-3
3-8
3-9
3-10
3-11
3-12
3-13
3-13
3-14
3-14
3-15
3-16
3-17
3-18
3-19
3-20
3-21
3-22
3-23
3-25
3-26
3-27
3-30
3-33
3-34
3-35
3-39
3-41
3-44
3-44
3-45
3-46
3-48
vii
Figures
viii
Chapter 1: Introduction
The ES4308-PoE is a web-managed Gigabit PoE switch that delivers performance
and control to your network. It provides 8 full-duplex 1000BASE-T ports that
significantly improve network performance and boost throughput using features
configured through a web-based management interface. With 16 Gigabits of
throughput bandwidth, this switch provides an effective solution to meeting the
growing demands on your network.
Description of Software Features
The switch provides a wide range of advanced performance enhancing features.
Flow control eliminates the loss of packets due to bottlenecks caused by port
saturation. Broadcast storm suppression prevents broadcast traffic storms from
engulfing the network. CoS priority queueing ensures the minimum delay for moving
real-time multimedia data across the network. While multicast filtering provides
support for real-time network applications. Some of the management features are
briefly described below.
Configuration Backup and Restore – You can save the current configuration
settings to a file on the web management station, and later download this file to
restore the switch configuration settings.
Authentication – The switch supports port-based user authentication via the
IEEE 802.1X protocol. This protocol uses the Extensible Authentication Protocol
over LANs (EAPOL) to request user credentials from the 802.1X client, and then
verifies the client’s right to access the network via an authentication server.
Port Configuration – You can manually configure the speed, duplex mode, and
flow control used on specific ports, or use auto-negotiation to detect the connection
settings used by the attached device. Use the full-duplex mode on ports whenever
possible to double the throughput of switch connections. Flow control is enabled to
control network traffic during periods of congestion and prevent the loss of packets
when port buffer thresholds are exceeded. The switch supports flow control based
on the IEEE 802.3x standard.
Port Mirroring – The switch can unobtrusively mirror traffic from any port to a
monitor port. You can then attach a protocol analyzer or RMON probe to this port to
perform traffic analysis and verify connection integrity.
Port Trunking – Ports can be combined into an aggregate connection. Trunks can
be manually set up or dynamically configured using IEEE 802.3ad Link Aggregation
Control Protocol (LACP). The additional ports dramatically increase the throughput
across any connection, and provide redundancy by taking over the load if a port in
the trunk should fail. The switch supports up to 4 trunks.
Broadcast Storm Control – Broadcast suppression prevents broadcast and
multicast traffic from overwhelming the network. When enabled on a port, the level
1-1
Introduction
of broadcast traffic passing through the port is restricted. If broadcast traffic rises
above a pre-defined threshold, it will be throttled until the level falls back beneath the
threshold.
Static Addresses – A static address can be assigned to a specific interface on this
switch. Static addresses are bound to the assigned interface and will not be moved.
When a static address is seen on another interface, the address will be ignored and
will not be written to the address table. Static addresses can be used to provide
network security by restricting access for a known host to a specific port.
IEEE 802.1D Bridge – The switch supports IEEE 802.1D transparent bridging. The
address table facilitates data switching by learning addresses, and then filtering or
forwarding traffic based on this information. The address table supports up to 8K
addresses.
Store-and-Forward Switching – The switch copies each frame into its memory
before forwarding them to another port. This ensures that all frames are a standard
Ethernet size and have been verified for accuracy with the cyclic redundancy check
(CRC). This prevents bad frames from entering the network and wasting bandwidth.
To avoid dropping frames on congested ports, the switch provides 400 KB for frame
buffering. This buffer can queue packets awaiting transmission on congested
networks.
Spanning Tree Algorithm – The switch supports these spanning tree protocols:
Spanning Tree Protocol (STP, IEEE 802.1D) – This protocol provides loop detection
and recovery by allowing two or more redundant connections to be created between
a pair of LAN segments. When there are multiple physical paths between segments,
this protocol will choose a single path and disable all others to ensure that only one
route exists between any two stations on the network. This prevents the creation of
network loops. However, if the chosen path should fail for any reason, an alternate
path will be activated to maintain the connection.
Rapid Spanning Tree Protocol (RSTP, IEEE 802.1w) – This protocol reduces the
convergence time for network topology changes to 3 to 5 seconds, compared to 30
seconds or more for the older IEEE 802.1D STP standard. It is intended as a
complete replacement for STP, but can still interoperate with switches running the
older standard by automatically reconfiguring ports to STP-compliant mode if they
detect STP protocol messages from attached devices.
Virtual LANs – The switch supports up to 64 VLANs. A Virtual LAN is a collection of
network nodes that share the same collision domain regardless of their physical
location or connection point in the network. The switch supports tagged VLANs
based on the IEEE 802.1Q standard. Ports can be manually assigned to a specific
set of VLANs. This allows the switch to restrict traffic to the VLAN groups to which a
user has been assigned. By segmenting your network into VLANs, you can:
• Eliminate broadcast storms which severely degrade performance in a flat network.
• Simplify network management for node changes/moves by remotely configuring
VLAN membership for any port, rather than having to manually change the
network connection.
1-2
Description of Software Features
• Provide data security by restricting all traffic to the originating VLAN.
Traffic Prioritization – This switch prioritizes each packet based on the required
level of service, using four priority queues with Weighted Round Robin Queuing. It
uses IEEE 802.1p and 802.1Q tags to prioritize incoming traffic based on input from
the end-station application. These functions can be used to provide independent
priorities for delay-sensitive data and best-effort data.
This switch also supports a method of prioritizing layer 3/4 traffic to meet application
requirements. When this service is enabled, the priorities are mapped to a Class of
Service value by the switch, and the traffic then sent to the corresponding output
queue.
Link Layer Discovery Protocol (LLDP) – LLDP is used to discover basic
information about neighboring devices on the local broadcast domain. It uses
periodic broadcasts to advertise information about the sending device. Advertised
information can include details such as device identification, capabilities and
configuration settings. This information can be used by SNMP applications to
simplify troubleshooting, enhance network management, and maintain an accurate
network topology.
Power-over-Ethernet (PoE) – The switch’s eight RJ-45 ports support the
IEEE 802.3af PoE standard that enables DC power to be supplied to attached
devices over wire pairs in the connecting Ethernet cable. Any 802.3af compliant
device attached to a port can directly draw power from the switch over the Ethernet
cable without requiring its own separate power source. This capability gives network
administrators centralized power control for devices such as IP phones and wireless
access points, which translates into greater network availability.
A maximum PoE power budget for the switch (power available to all switch ports) is
defined so that power can be centrally managed, preventing overload conditions at
the power source. If the power demand from devices connected to the switch
exceeds the power budget, the switch uses port power priority settings to limit the
supplied power.
1-3
Introduction
1-4
Chapter 2: Initial Configuration
To make use of the management features of your ES4308-PoE, you must first
configure it with an IP address that is compatible with the network in which it is being
installed. This should be done before you permanently install the switch in the
network.
Follow this procedure:
1.
Place the switch close to the PC that you intend to use for configuration. It helps
if you can see the front panel of the switch while working on your PC.
2.
Connect the Ethernet port of your PC to any port on the front panel of the
switch. Connect power to the switch and verify that you have a link by checking
the front-panel LEDs.
3.
Check that your PC has an IP address on the same subnet as the switch. The
default IP address of the switch is 192.168.2.10 and the subnet mask is
255.255.255.0, so the PC and switch are on the same subnet if they both have
addresses that start 192.168.2.x. If the PC and switch are not on the same
subnet, you must manually set the PC’s IP address to 192.168.2.x (where “x” is
any number from 1 to 255, except 10). If you are unfamiliar with this process,
see “Changing a PC’s IP Address” on page B-1.
4.
Open your web browser and enter the address http://192.168.2.10. If your PC is
properly configured, you will see the login page of the switch. If you do not see
the login page, repeat step 3.
5.
Enter the default password “admin” and click on the Login button.
6.
From the menu, click on SYSTEM, then click on LAN Settings. On the LAN
Settings page, enter the new IP address, Subnet Mask and Gateway IP
Address for the switch, then click on the APPLY button.
No other configuration changes are required at this stage, but it is recommended
that you change the administrator’s password before logging out. To change the
password, click SYSTEM, Password, and then fill in all the fields on the Password
Settings page before clicking on the APPLY button.
2-1
Initial Configuration
2-2
Chapter 3: Configuring the Switch
Using the Web Interface
This switch provides an embedded HTTP web agent. Using a web browser you can
configure the switch and view statistics to monitor network activity. The web agent
can be accessed by any computer on the network using a standard web browser
(Internet Explorer 5.5 or above, or Mozilla Firefox 1.0 or above).
Prior to accessing the switch from a web browser, be sure you have first performed
the following tasks:
1. Configure the switch with a valid IP address, subnet mask, and default gateway.
(Defaults: IP address 192.168.2.10; Subnet mask 255.255.255.0;
Gateway 0.0.0.0)
2. Set a new password using the web interface. (Default: “admin”). Access to the
web interface is controlled by the password. See “Configuring the Logon
Password” on page 3-12.
Note: If you cannot remember the switch's IP address, you can restore the original
settings by following the procedure described in the “Troubleshooting” section.
Navigating the Web Browser Interface
To access the web-browser interface you must first enter a password. The user has
read/write access to all configuration parameters and statistics. The default
password for the switch is “admin.”
Note: If user input is not detected within five minutes, the current session is terminated.
3-1
Configuring the Switch
Home Page
When your web browser connects with the switch’s web agent, the home page is
displayed as shown below. The home page displays the Main Menu on the left side
of the screen and System Information on the right side. The Main Menu links are
used to navigate to other menus, and display configuration parameters and
statistics.
Figure 3-1 Home Page
3-2
Navigating the Web Browser Interface
Configuration Options
Configurable parameters have a dialog box or a drop-down list. Once a configuration
change has been made on a page, be sure to click on the Apply button to confirm
the new setting. The following table summarizes the web page configuration
buttons.
Table 3-1 Web Page Configuration Buttons
Button
Action
Apply
Sets specified values to the system.
Cancel
Discards all changes and restores current values.
Help
Links directly to web help.
Note: To ensure proper screen refresh, be sure that Internet Explorer is configured as
follows: Under the menu “Tools / Internet Options / General / Temporary Internet
Files / Settings,” the setting for item “Check for newer versions of stored pages”
should be “Every visit to the page.”
Panel Display
The web agent displays an image of the switch’s ports. The port will turn green when
the corresponding front-panel port is in connection with another device. To show the
port number, place mouse pointer onto the intended port.
Figure 3-2 Front Panel Indicators
3-3
Configuring the Switch
Main Menu
Using the onboard web agent, you can define system parameters, manage and
control the switch, and all its ports, or monitor network conditions. The following
table briefly describes the selections available from the web-browser interface.
Table 3-2 Switch Main Menu
Menu
Description
STATUS
Page
3-6
Overview
Provides a basic system description, including system 3-6
name, IP address, port, trunk, and VLAN information.
Statistics
Shows statistics for port and interface.
3-9
Name
Shows the name of the switch.
3-10
IP Settings
Sets the LAN IP address, subnet mask, and gateway IP 3-10
address.
Password
Changes the password.
SYSTEM
3-10
Tools
3-12
3-13
Restore to Factory Defaults Force the switch to perform a power reset and restore 3-13
the original factory settings.
Upgrade Firmware
Upgrade the switch system firmware using a file
provided by Edgecore.
3-13
Upload/Download
Configuration
Uploads or downloads the configuration file.
3-14
Restart
Restarts the switch.
3-14
Configure the speed and duplex mode of ports.
3-15
Storm Control
Sets the broadcast storm control parameters.
3-17
Port Mirroring
Sets up the port mirroring features of the switch to
enable traffic monitoring.
3-18
Cable Diagnostic
Diagnoses cable faults.
3-19
PORTS
Settings
3-15
TRUNKS
3-19
Membership
Selects ports to group into static trunks.
3-21
Settings
Configures trunk connection settings.
3-21
LACP Setup
Configures Link Aggregation Control Protocol (LACP)
on the switch.
3-21
LACP Status
Shows the LACP groups status.
3-23
3-4
Navigating the Web Browser Interface
Table 3-2 Switch Main Menu (Continued)
Menu
Description
Page
VLAN Membership
Configure VLAN port groups.
3-24
VLAN Port Config
Configures VLAN behavior for individual ports and
trunks.
3-26
VLANS
3-24
802.1X
3-28
Settings
Sets up 802.1X port authentication.
3-29
Statistics
Displays the 802.1X statistics collected by the switch.
3-30
Settings
Configures LLDP functions.
3-34
Neighbor
Displays neighboring device LLDP statistics.
3-35
Settings
Configures global and port-specific settings.
3-36
Status
Shows Spanning Tree bridge and port status.
3-40
LLDP
3-34
RSTP
3-35
QOS
Settings
3-42
Sets the priority of packets forwarded through the
switch.
3-42
Configures SNMP settings.
3-46
Configures PoE settings.
3-47
SNMP
Settings
3-46
POE
Settings
LOGOUT
3-47
Quits to the Login page.
3-5
Configuring the Switch
Web Configuration
Displaying Status Overview
You can easily identify the system by displaying the device name, location and
contact information.
Field Attributes
System Information
•
•
•
•
•
•
•
System Name – Name assigned to the switch system.
System Location – Specifies the system location.
System Contact – Administrator responsible for the system.
Number of Ports – Number of built-in ports.
Hardware Version – Hardware version of the main board.
Software Version – Version number of the code.
Serial Number – The serial number of the switch.
Address Information
•
•
•
•
•
Management VLAN – ID of a configured VLAN through which you can manage
the switch. By default, all ports on the switch are members of VLAN 1. The
management station must always be attached to a port on the management
VLAN.
IP Address – Address of the VLAN to which the management station is attached.
(Note that the management station must always be on VLAN 1. Valid IP
addresses consist of four decimal numbers, 0 to 255, separated by periods.
Subnet Mask – This mask identifies the host address bits used for routing to
specific subnets. (Default: 255.255.255.0)
Gateway IP Address – IP address of the gateway router between the switch and
management stations that exist on other network segments. (Default: 0.0.0.0)
MAC Address – The physical layer address of the switch.
Port Information
•
•
•
Type – Indicates the port type.
Link Status – Indicates if the link is Up or Down.
Speed/Duplex Status – Shows the current speed and duplex mode.
- Auto: Not currently connected, will auto-negotiate these settings.
- 10HDX: 10 Mbps half duplex.
- 10FDX: 10 Mbps full duplex.
- 100HDX: 100 Mbps half duplex.
- 100FDX: 100 Mbps full duplex.
- 1000FDX: 1000 Mbps full duplex.
3-6
Web Configuration
•
•
•
•
Flow Control Status – Indicates whether flow control is enabled or disabled.
(IEEE 802.3x, or Back-Pressure)
Auto-negotiation – Shows if auto-negotiation is enabled or disabled.
Frame Type – Either “Tagged” or “All.” “Tagged” means that the port will only
receive VLAN-tagged frames. When set to “All,” the port will also receive untagged
frames.
PVID – The VLAN ID assigned to untagged frames received on the interface.
Outgoing frames are tagged unless the frame’s VLAN ID is the same as the PVID.
When the PVID is set to “None,” all outgoing frames are tagged. (Default: 1)
Trunk Information
•
•
•
Trunk/LACP – The trunk label. “T1” through “T4” are used as trunk labels.
Type – All trunks and ports on this switch are 10/100/1000Mbps
Trunk/LACP Status – Indicates the speed and duplex setting of the trunk. This
can be changed on the TRUNKS > Settings page.
- Auto: Not currently connected, will auto-negotiate these settings.
- 10HDX: 10 Mbps half duplex.
- 10FDX: 10 Mbps full duplex.
- 100HDX: 100 Mbps half duplex.
- 100FDX: 100 Mbps full duplex.
- 1000FDX: 1000 Mbps full duplex.
•
Ports – The ports that are members of the trunk.
VLAN Information
• VLAN ID – A number in the range 1 - 4094 which identifies the VLAN.
• VLAN Members – A list of the ports that are members of the VLAN. By default, all
ports are members of VLAN 1.
3-7
Configuring the Switch
Web – Click STATUS, Overview.
Figure 3-3 System Information
3-8
Web Configuration
Showing Port Statistics
You can display statistics on network traffic from the ports. These statistics can be
used to identify potential problems with the switch (such as a faulty port or unusually
heavy loading). All values displayed have been accumulated since the last system
reboot, but can be reset to zero by clicking the CLEAR button. The current statistics
are refreshed every few seconds, but the refresh can be paused by clicking the
PAUSE button.
Table 3-3 Port Statistics
Parameter
Description
Interface Statistics
Received Octets
The total number of octets received on the interface, including framing
characters.
Received Packets
The number of subnetwork-unicast packets delivered to a higher-layer
protocol.
Received Broadcast/Multicast
Packets
The number of packets, delivered by this sub-layer to a higher (sub-)layer,
which were addressed to a multicast address at this sub-layer.
Received Errors
The number of inbound packets that contained errors preventing them
from being deliverable to a higher-layer protocol.
Transmitted Octets
The total number of octets transmitted out of the interface, including
framing characters.
Transmitted Packets
The total number of packets that higher-level protocols requested be
transmitted to a subnetwork-unicast address, including those that were
discarded or not sent.
Transmitted Broadcast/Multicast The total number of packets that higher-level protocols requested be
Packets
transmitted, and which were addressed to a multicast address at this
sub-layer, including those that were discarded or not sent.
Transmitted Errors
The number of outbound packets that could not be transmitted because
of errors.
Web – Click STATUS, Statistics.
Figure 3-4 Port Statistics
3-9
Configuring the Switch
Displaying the System Name
You can easily identify the system by displaying the device name and other
descriptive information.
Field Attributes
•
•
•
Switch Name – A name assigned to the switch system.
System Location – Specifies the system location.
System Contact – Administrator responsible for the system.
Web – Click System, Name.
Figure 3-5 System Name
Setting the Switch’s IP Address
This section describes how to configure an initial IP interface for management
access over the network. The IP address for this switch is 192.168.2.10 by default.
To manually configure an address, you need to change the switch’s default settings
(IP address 192.168.2.10 and netmask 255.255.255.0) to values that are compatible
with your network. You may also need to a establish a default gateway between the
switch and management stations that exist on another network segment (if routing is
not enabled on this switch).
Field Attributes
•
•
DHCP Enabled – Check the box to enable DHCP. (Default: Enabled)
LAN IP Address – Address of the VLAN interface that is allowed management
access. Valid IP addresses consist of four numbers, 0 to 255, separated by
periods. (Default 192.168.2.10)
• Subnet Mask – This mask identifies the host address bits used for routing to
specific subnets. (Default: 255.255.255.0)
• Gateway IP Address – IP address of the gateway router between this device and
management stations that exist on other network segments. (Default: 0.0.0.0)
• Management VLAN – ID of a configured VLAN (1-4094) through which you can
manage the switch. By default, all ports on the switch are members of VLAN 1.
However, if the management VLAN is changed, the management station must be
attached to a port belonging to this VLAN.
3-10
Web Configuration
Note: If you cannot remember the switch’s IP address, you can restore the original
settings by following the procedure described in the “Troubleshooting” section.
Manual Configuration
Web – Click SYSTEM, LAN Settings. Enter the IP address, subnet mask and
gateway, then click APPLY. Note that if you change the switch IP address, you must
close the web interface and start a new session using the new IP address.
Figure 3-6 LAN Settings
3-11
Configuring the Switch
Configuring the Logon Password
The administrator has write access for all parameters governing the onboard agent.
You should therefore assign a new administrator password as soon as possible, and
store it in a safe place.
Field Attributes
Password – Specifies the user password.
(Range: 1-16 characters plain text, case sensitive)
Note: If you cannot remember the password, you can restore the original settings by
following the procedure described in “Forgot or Lost Password” on page B-1.
Web – Click System, Password. To change the password for the administrator, enter
current password, the new password, confirm it by entering it again, then click
APPLY.
Figure 3-7 Password Settings
3-12
Web Configuration
Tools
On the Tools page, you can restore the switch to default settings, upgrade the
firmware of the switch, or restart the switch.
Restore to Factory Defaults
Forces the switch to restore the original factory settings. To reset the switch, select
“Reset to Factory Defaults” from the drop-down list and click APPLY. The LAN IP
Address, Subnet Mask and Gateway IP Address will be reset to their factory
defaults.
Web – Click System, Tools, Reset to Factory Defaults.
Figure 3-8 Reset to Factory Defaults
Upgrade Firmware
Upgrades the switch system firmware using a file provided by Edgecore. Select
“Upgrade Firmware” from the Tools drop-down list then click on the “Browse” button
to select the firmware file. Click the APPLY button to upgrade the selected switch
firmware file. You can download firmware files for your switch from the Support
section of the Edgecore web site at www.edge-core.com.
Web – Click System, Tools, Reset to Factory Defaults.
Figure 3-9 Upgrade Firmware
3-13
Configuring the Switch
Upload/Download Configuration
Web – Click SYSTEM, Tools, Upload/Download Configuration. To upload or
download the configuration file, select “Upload/Download Configuration” from the
Tools drop-down list, then click “Upload” or “Download,” and then click on the
“Browse” button to select the file. Then click the APPLY button to transfer the switch
configuration file.
Figure 3-10 Upload/Download Configuration
Restart Switch
Web – Click SYSTEM, Tools, Restart Switch. To restart the switch, select from the
Tools drop-down list, and then click APPLY. The reset will be complete when the
user interface displays the login page.
Figure 3-11 Restart Switch
3-14
Web Configuration
Register Product
Edgecore requests that you register your switch online, if you have not already done
so. The Register Product page provides a convenient link to the Edgecore web site
for this purpose.
Web – Click System, Register Product. Click the Register Now button to access the
Edgecore web site and register your switch.
Figure 3-12 Register Product
Port Configuration
You can use the Port Configuration page to manually set the speed, duplex mode,
and flow control.
Field Attributes
• Enable Jumbo Frames – This switch provides more efficient throughput for large
sequential data transfers by supporting jumbo frames on Gigabit Ethernet ports up
to 9216 bytes. Compared to standard Ethernet frames that run only up to 1.5 KB,
using jumbo frames significantly reduces the per-packet overhead required to
process protocol encapsulation fields.
• Power Saving Mode – Adjusts the power provided to ports based on the length
of the cable used to connect to other devices. Only sufficient power is used to
maintain connection requirements.
IEEE 802.3 defines the Ethernet standard and subsequent power requirements
based on cable connections operating at 100 meters. Enabling power saving
mode can significantly reduce power used for cable lengths of 20 meters or less,
and continue to ensure signal integrity.
• Speed/Duplex – Allows you to manually set the port speed and duplex mode.
• Flow Control – Allows flow control to be enabled or disabled. When the box is
checked, flow control is enabled.
• Trunk – Indicates if a port is a member of a trunk.
Note: Ports within a trunk cannot be configured individually. However, you can use the
“Trunk Configuration” page to manually set the same speed, duplex mode, and
flow control for every port in a trunk.
3-15
Configuring the Switch
Web – Click PORTS, Settings. Enable or disable jumbo frames, select the required
settings for any port, and then click APPLY.
Figure 3-13 Port Configuration
3-16
Web Configuration
Storm Control
Broadcast storms may occur when a device on your network is malfunctioning, or if
application programs are not well designed or properly configured. If there is too
much broadcast traffic on your network, performance can be severely degraded or
everything can come to complete halt.
You can protect your network from broadcast storms by setting a threshold for
broadcast traffic for each port. Any broadcast packets exceeding the specified
threshold will then be dropped.
Field Attributes
•
Type – List the type of traffic which can be rate limited, including broadcast and
multicast frames.
• Enable Rate Limits – Click the check box to enable storm control.
• Rate (number of frames per second) – The Rate field is set by a single drop-down
list. The same threshold is applied to every port on the switch. When the threshold
is exceeded, packets are dropped, irrespective of the flow-control settings.
Web – Click PORTS, Storm Control. This page enables you to set the broadcast
storm control parameters for every port on the switch.
Figure 3-14 Port Broadcast Control
3-17
Configuring the Switch
Port Mirroring
You can mirror traffic from any source port to a target port for real-time analysis. You
can then attach a logic analyzer or RMON probe to the target port and study the
traffic crossing the source port in a completely unobtrusive manner.
Field Attributes
• Port to Mirror to – The port that will “duplicate” or “mirror” the traffic on the source
port. Only incoming packets can be mirrored. Packets will be dropped when the
available egress bandwidth is less than ingress bandwidth.
• Ports to Mirror – Select the ports that you want to mirror from this section of the
page. A port will be mirrored when the “Mirroring Enabled” check-box is checked.
Note: If the total ingress bandwidth exceeds the mirror port’s egress bandwidth, packets
will eventually be dropped on ingress to the switch, which means they will not
reach the mirror port or their intended destination port. Input rate-limiting in
conjunction with port flow-control should be used to ensure that the total ingress
bandwidth never exceeds the egress bandwidth.
Web – Click PORTS, Port Mirroring.
Figure 3-15 Port Mirroring
3-18
Web Configuration
Cable Diagnostic
You can perform cable diagnostics for all ports or selected ports to diagnose any
cable faults (short, open etc.) and feedback a distance to the fault.
Field Attributes
•
Cable Diagnostics – Cable diagnostics is performed on a per-port basis. Select
the port number from the drop-down list.
•
Cable Status – Shows the cable length, operating conditions and isolates a
variety of common faults that can occur on Category 5 twisted pair cabling.
Web – Click PORTS, Cable Diagnostics.
Figure 3-16 Cable Diagnostics
3-19
Configuring the Switch
Trunk Membership
You can create multiple links between devices that work as one virtual, aggregate
link. A port trunk offers a dramatic increase in bandwidth for network segments
where bottlenecks exist, as well as providing a fault-tolerant link between two
devices.
This page allows you to create a maximum of four trunks of up to eight ports per
trunk. The Membership Table has one row for each port and six columns. Each row
contains five radio buttons which are used to indicate which trunk (if any) to which
the port belongs.
When a trunk is first created it is given the following default configuration:
• Speed/Duplex is set to Auto Speed (TRUNKS > Settings).
• Flow Control is turned off (TRUNKS > Settings).
• The trunk is a member of VLAN 1 (VLANS > VLAN Membership) with a PVID of 1.
The trunk will accept both tagged and untagged packets.
Field Attributes
•
•
•
Port – The front panel port number.
Not a Trunk Member – If the radio button in this column is selected, the port is
not a member of any trunks. This is the default state.
Trunk T1-T4 – These columns correspond to the four trunks that are supported
by the switch. To assign a port to a trunk, click on the radio button in the
corresponding column, then click APPLY.
Web – Click TRUNKS, Membership. To assign a port to a trunk, click the required
trunk number, then click APPLY.
Figure 3-17 Trunk Membership
3-20
Web Configuration
Trunk Configuration
This page allows you to configure the speed, duplex mode, and flow control for a
trunk.
Field Attributes
•
•
•
•
Trunk – Indicates trunk identification.
Speed/Duplex – Allows you to manually set the port speed and duplex mode for
all ports in the trunk.
Flow Control – Allows flow control to be enabled or disabled. When the box is
checked, flow control is enabled.
Ports – Indicates which ports belong to the trunk.
Web – Click TRUNKS, Settings.
Figure 3-18 Trunk Configuration
LACP Setup
This page allows you to enable 802.3ad Link Aggregation Control Protocol (LACP)
for the selected port.
You can configure any number of ports on the switch to use LACP. If ports on
another device are also configured for LACP, the switch and the other device will
negotiate a trunk link between them. However, before making any physical
connections, consider the following points:
• To avoid creating a loop in the network, be sure you enable LACP before
connecting the ports, and also disconnect the ports before disabling LACP.
• If the target switch has also enabled LACP on the connected ports, the trunk will
be activated automatically.
• A trunk formed with another switch using LACP will automatically be assigned the
next available trunk ID.
• All ports on both ends of an LACP trunk must be configured for full duplex, either
by forced mode or auto-negotiation.
• The ports at both ends of a trunk must be configured in an identical manner,
including communication mode (i.e., speed, duplex mode and flow control), VLAN
assignments, and CoS settings.
3-21
Configuring the Switch
Field Attributes
•
•
Port – The port number.
Enabled – Enables LACP on the associated port.
•
Key Value – Configures a port's LACP administration key.
The port administrative key must be set to the same value for ports that belong to
the same link aggregation group (LAG). If this administrative key is not set when
an LAG is formed (i.e., it has the null value of 0), this key will automatically be set
to the same value as that used by the LAG.
Web – Click TRUNKS, LACP Setup. Enable LACP on each port to be configured as
a member of an LAG. Leave the administrative key set to a null value to allow the
switch to automatically configure this attribute, or set it a specific value to maintain
more precise control over the ports which will be connected to another device. Click
APPLY.
Figure 3-19 LACP Port Configuration
3-22
Web Configuration
LACP Status
This page allows you display the operational state for the local and remote side of an
link aggregation.
Field Attributes
Aggregation Information
•
•
Aggregation Group - Identifier for a local link aggregation group.
Partner MAC Address - Physical address of device at other end of link.
•
•
Local Ports Aggregated - Local ports participating in this LAG.
Seconds Since Last Change - Time since the last LACP packet was received.
LACP Port Status
•
Port - The port number.
• Port Active - Shows if the port is a member of an active LACP group.
• Partner Port Number - A list of the ports attached at the remote end of this LAG
link member.
• Operational Port Key - Current operational value of the key used by this LAG.
Web – Click TRUNKS, LACP Status.
Figure 3-20 LACP Status Overview
3-23
Configuring the Switch
Configuring VLAN Groups
The 802.1Q VLAN Configuration page allows you to create and delete VLANs
(Virtual LANs), and set up or modify VLAN group members.
Introduction to VLANs
VLANs are logical partitions of the physical LAN. You can use VLANs to increase
network performance or improve internal network security.
If the network has adequate performance and security for your current needs, it is
recommended that you leave the VLAN settings in the default configuration. The
default configuration is as follows:
•
•
•
•
All ports are members of VLAN 1
The switch management interface is on VLAN 1
All ports have a Port VLAN ID (PVID) of 1
All ports can send and receive both VLAN-tagged and untagged packets (that is,
they are hybrid ports)
In the default configuration, any port is able to send traffic to any other port and a PC
connected to any port will be able to access the management interface. Broadcast
traffic, for example, will be flooded to all ports on the switch.
The VLAN parameters that can be configured for each port on the switch include
VLAN Aware Enabled, Ingress Filtering Enabled, Packet Type, and PVID. Note that
the ports within a trunk cannot be configured individually; configure the static trunk
instead (trunks are labelled T1 to T4). Also, note that the VLAN parameters of a
dynamic link aggregation group formed through LACP cannot be configured. The
port members of a dynamic link aggregation group must be configured prior to
setting up the group.
Creating VLANs and Assigning Port Members
Use the 802.1Q VLAN Setup page to create or remove VLAN groups. To create a
new VLAN, enter an identifier in the Add VLAN section, click the Add button, and
then configure the port or static trunk members on the 802.1Q VLAN Group page. To
modify the membership settings for an existing VLAN, select a VLAN from the VLAN
List, and click Modify. The 802.1Q VLAN Group table displays membership
information for individual ports, static trunks, and dynamic link aggregation groups.
Trunked ports cannot be configured individually. Also, note that the VLAN
membership of dynamically configured LACP trunks cannot be modified.
Field Attributes
• VLAN ID – ID of configured VLAN (1-4094, no leading zeroes).
• VLAN List – Lists all the current VLAN groups created for this system. Up to 64
VLAN groups can be defined. VLAN 1 is the default untagged VLAN.
3-24
Web Configuration
Web – Click VLANS, VLAN Membership. Create a new VLAN by giving it an ID
(Range: 1~4094) and then clicking Add. Modify or delete a VLAN by selecting its
radio button and clicking Modify or Delete.
Figure 3-21 VLAN Settings
3-25
Configuring the Switch
Configuring VLAN Members
After creating a new VLAN, configure port and trunk members.
Field Attributes
• Port – Adds a port to the newly created VLAN.
• Trunk – Adds a static trunk to the newly created VLAN.
• LACP – Adds an LACP trunk to the newly created VLAN.
Web – After creating a new VLAN, the following screen displays. Assign the ports
and trunks associated with the VLAN, and click Apply.
Figure 3-22 VLAN Group Settings
VLAN Port Configuration
The 802.1Q Per Port Configuration page allows you to change the VLAN
parameters for individual ports or trunks. You can configure VLAN behavior for
specific interfaces, including the accepted frame types and default VLAN identifier
(PVID). Each row of the table corresponds to one port or trunk; trunked ports cannot
be configured individually; configure the trunk instead.
Field Attributes
• Port/Trunk – The port number of the port or the ID of a trunk.
• VLAN Aware Enabled – VLAN aware ports are able to use VLAN tagged frames
to determine the destination VLAN of a frame. (Default: Enabled)
3-26
Web Configuration
VLAN aware ports will strip the VLAN tag from received frames and insert the tag
in transmitted frames (except for the PVID). VLAN unaware ports will not strip the
tag from received frames or insert the tag in transmitted frames.
• Ingress Filtering Enabled – If enabled, incoming frames for VLANs which do not
include this ingress port in their member set will be discarded. (Default: Disabled)
• Packet Type – Sets the interface to accept all frame types, including tagged or
untagged frames, or only tagged frames. (Default: All)
If the Packet Type is set to “All,” the port can accept incoming tagged and
untagged packets. Any received packets that are untagged are assigned to the
default VLAN. Any tagged packets will be dropped unless the port is a member of
the VLAN identified by the VLAN tag in the packet.
If the Packet Type is set to “Tagged Only,” the port will drop untagged packets and
will only receive tagged packets. Tagged packets will be dropped unless the port
is a member of the VLAN identified by the VLAN tag in the packet. Switches should
be connected to each other with the Packet Type set to “Tagged Only.”
• PVID – The PVID (Port VLAN ID) is associated with untagged, ingress packets. It
is assigned to untagged frames received on the specified interface. The PVID has
no effect on ports that have Packet Type set to “Tagged Only.” (Default PVID: 1)
It is not possible to remove a port from VLAN 1 unless its PVID has been changed
to something other than 1.
Outgoing packets are tagged unless the packet’s VLAN ID is the same as the PVID.
When the PVID is set to “None,” all outgoing packets are tagged.
Note: If you select “Tagged Only” mode for a port, we recommend setting the PVID to
“None” as the standard configuration.
Web – Click VLANS, VLAN Port Configuration. Fill in the required settings for each
interface, and click Apply.
Figure 3-23 VLAN Settings
3-27
Configuring the Switch
802.1X
Network switches can provide open and easy access to network resources by
simply attaching a client PC. Although this automatic configuration and access is a
desirable feature, it also allows unauthorized personnel to easily intrude and
possibly gain access to sensitive network data.
The IEEE 802.1X (dot1x) standard defines a port-based access control procedure
that prevents unauthorized access to a network by requiring users to first submit
credentials for authentication. Access to all switch ports in a network can be
centrally controlled from a server, which means that authorized users can use the
same credentials for authentication from any point within the network.
This switch uses the Extensible Authentication Protocol over LANs (EAPOL) to
exchange authentication protocol messages with the client, and a remote RADIUS
authentication server to verify user identity and access rights. When a client (i.e.,
Supplicant) connects to a switch port, the switch (i.e., Authenticator) responds with
an EAPOL identity request. The client provides its identity (such as a user name) in
an EAPOL response to the switch, which it forwards to the RADIUS server. The
RADIUS server verifies the client identity and sends an access challenge back to the
client. The EAP packet from the RADIUS server contains not only the challenge, but
the authentication method to be used. The client can reject the authentication
method and request another, depending on the configuration of the client software
and the RADIUS server. The encryption method used to pass authentication
messages can be MD5 (Message-Digest 5), TLS (Transport Layer Security), or
TTLS (Tunneled Transport Layer Security). TLS, TTLS, and PEAP will be supported
in future releases. The client responds to the appropriate method with its credentials,
such as a password or certificate. The RADIUS server verifies the client credentials
and responds with an accept or reject packet. If authentication is successful, the
switch allows the client to access the network. Otherwise, network access is denied
and the port remains blocked.
The operation of dot1x on the switch requires the following:
•
•
•
•
•
The switch must have an IP address assigned.
The IP address of the RADIUS server must be specified.
802.1X must be enabled globally for the switch.
Each switch port that will be used must be set to dot1x “Auto” mode.
Each client that needs to be authenticated must have dot1x client software
installed and properly configured.
• The RADIUS server and client also have to support the same EAP authentication
type – MD5. (Some clients have native support in Windows, otherwise the dot1x
client must support it.)
3-28
Web Configuration
Configuring 802.1X
Use the 802.1X Configuration page to specify global or port-specific parameters for
the IEEE 802.1X Port Authentication Protocol.
Field Attributes
System Setting
• Mode - Enables or disables 802.1X globally for all ports on the switch. The 802.1X
protocol must be enabled globally for the switch before the port settings are active.
(Default: Disabled)
• RADIUS IP - Address of authentication server.
• RADIUS UDP Port - Network port of authentication server used for authentication
messages. (Range: 1-65535; Default: 1812)
• RADIUS Secret - Sets the text string used for encryption between the switch and
the RADIUS server. This key is used to authenticate logon access for the client.
Do not use blank spaces in the string. (Maximum length: 48 characters)
• Reauthentication Enabled - Sets the client to be re-authenticated after the
interval specified by the Re-authentication Period. Re-authentication can be used
to detect if a new device is plugged into a switch port. (Default: Disabled)
• Reauthentication Period - Sets the time period after which a connected client
must be re-authenticated. (Range: 1-3600 seconds; Default: 3600 seconds)
• EAP timeout - The time the switch shall wait for the supplicant response before
re-transmitting a packet. (Range: 1-255; Default: 30 seconds
Port Settings
•
•
Port - The port number.
Admin State - Sets the authentication mode to one of the following options:
- Auto - Requires a 802.1X-aware client to be authorized by the authentication
server. Clients that are not 802.1X-aware will be denied access.
- Force-Authorized - Forces the port to grant access to all clients, either
802.1X-aware or otherwise. (This is the default setting.)
- Force-Unauthorized - Forces the port to deny access to all clients, either
802.1X-aware or otherwise.
•
•
Port State - Administrative state for port access control.
Reset - The two available options include:
- Re-Authenticate - Schedules a reauthentication to whenever the quiet-period
of the port runs out.
- Force-Reinitialize - Bypasses the quiet-period of the port and enables
immediate reauthentication regardless of the status for the quiet-period.
The re-authentication process verifies the connected client’s user ID and password
on the RADIUS server. During re-authentication, the client remains connected the
network and the process is handled transparently by the dot1x client software. Only
if re-authentication fails is the port blocked.
3-29
Configuring the Switch
If a re-authentication fails, the IEEE802.1X standard enforces a so-called
“quiet-period” in which the authenticator (switch) shall be quiet and not re-try another
authentication – also packets from the supplicant are discarded during this quiet
period – this way 'brute-force' attacks are prevented.
Web – Click 802.1X, Settings. Enable 802.1X globally for the switch, modify the
global and port-specific parameters required, and click APPLY.
Figure 3-24 802.1X Configuration
Displaying 802.1X Statistics
Use the 802.1X Statistics page to display statistics for dot1x protocol exchanges for
any port.
Field Attributes
Port Statistics
•
Port Number – A front panel port number. Select the port that you want to view.
Authenticator Counters
• EntersConnecting – The number of times that the state machine transitions to the
CONNECTING state from any other state.
• EntersWhileAuthenticating – he number of times that the state machine transitions
from CONNECTING to AUTHENTICATING, as a result of an EAP-Response/
Identity message being received from the Supplicant.
3-30
Web Configuration
• AuthTimeoutsWhileAuthenticating – The number of times that the state machine
transitions from AUTHENTICATING to ABORTING, as a result of the Backend
Authentication state machine indicating authentication timeout.
• AuthEapStartsWhileAuthenticating – the number of times that the state machine
transitions from AUTHENTICATING to ABORTING, as a result of an EAPOL-Start
message being received from the Supplicant.
• AuthReauthsWhileAuthenticated – The number of times that the state machine
transitions from AUTHENTICATING to ABORTING, as a result of a
reauthentication request.
• AuthEapLogoffWhileAuthenticated – The number of times that the state machine
transitions from AUTHENTICATING to ABORTING, as a result of an
EAPOL-Logoff message being received from the Supplicant.
• EapLogoffsWhileConnecting – The number of times that the state machine
transitions from CONNECTING to DISCONNECTED as a result of receiving an
EAPOL-Logoff message.
• AuthSuccessesWhileAuthenticating – the number of times that the state machine
transitions from AUTHENTICATING to AUTHENTICATED, as a result of the
Backend Authentication state machine indicating successful authentication of the
Supplicant.
• AuthFailWhileAuthenticating – The number of times that the state machine
transitions from AUTHENTICATING to HELD, as a result of the Backend
Authentication state machine indicating authentication failure.
• AuthEapLogoffWhileAuthenticating – The number of times that the state machine
transitions from AUTHENTICATING to ABORTING, as a result of an
EAPOL-Logoff message being received from the Supplicant.
• AuthEapStartsWhileAuthenticated – The number of times that the state machine
transitions from AUTHENTICATING to ABORTING, as a result of an EAPOL-Start
message being received from the Supplicant.
Backend Authenticator Counters
• backendResponses – The number of times that the state machine sends an initial
Access-Request packet to the Authentication server (i.e., executes
sendRespToServer on entry to the RESPONSE state). Indicates that the
Authenticator attempted communication with the Authentication Server.
• backendOtherRequestsToSupplicant – The number of times that the state
machine sends an EAP-Request packet (other than an Identity, Notification,
Failure or Success message) to the Supplicant (i.e., executes txReq on entry to the
REQUEST state). Indicates that the Authenticator chose an EAP-method.
• backendAuthFails – The number of times that the state machine receives an
EAP-Failure message from the Authentication Server. Indicates that the Supplicant
has not authenticated to the Authentication Server.
• backendAccessChallenges – The number of times that the state machine receives
an initial Access-Challenge packet from the Authentication server. Indicates that
the Authentication Server has communication with the Authenticator.
3-31
Configuring the Switch
• backendAuthSuccesses – The number of times that the state machine receives an
EAP-Success message from the Authentication Server. Indicates that the
Supplicant has successfully authenticated to the Authentication Server.
Dot1x MIB Counters
• EapolFramesRx – The number of valid EAPOL frames of any type that have been
received by this Authenticator.
• EapolStartFramesRx – The number of EAPOL Start frames that have been
received by this Authenticator.
• EapolRespIdFramesRx – The number of EAP Resp/Id frames that have been
received by this Authenticator.
• EapolReqIdFramesTx – The number of EAP Req/Id frames that have been
transmitted by this Authenticator.
• InvalidEapolFramesRx – The number of EAPOL frames that have been received
by this Authenticator in which the frame type is not recognized.
• LastEapolFrameVersion – The protocol version number carried in the most
recently received EAPOL frame.
• EapolFramesTx – The number of EAPOL frames of any type that have been
transmitted by this Authenticator.
• EapolLogoffFramesRx – The number of EAPOL Logoff frames that have been
received by this Authenticator.
• EapolRespFramesRx – The number of EAP Resp/Id frames that have been
received by this Authenticator.
• EapolReqFramesTx – The number of EAP Req/Id frames that have been
transmitted by this Authenticator.
• EapLengthErrorFramesRx – The number of EAPOL frames that have been
received by this Authenticator in which the Packet Body Length field is invalid.
• LastEapolFrameSource – The source MAC address carried in the most recently
received EAPOL frame.
Other Statistics
• Last Supplicant identity – MAC address of last authorized client.
3-32
Web Configuration
Web – Click 802.1X, Statistics.
Figure 3-25 802.1X Statistics
3-33
Configuring the Switch
LLDP Settings
This page allows you to configure the Link Layer Discovery Protocol (LLDP). LLDP
allows devices in the local broadcast domain to share information about themselves.
LLDP-capable devices periodically transmit information in messages called Type
Length Value (TLV) fields to neighbor devices. Advertised information is represented
in Type Length Value (TLV) format according to the IEEE 802.1ab standard, and can
include details such as device identification, capabilities and configuration settings.
This information can be used by SNMP applications to simplify troubleshooting,
enhance network management, and maintain an accurate network topology.
Field Attributes
•
•
Port - The port number.
State - You can choose to disable or enable LLDP for each port. Enabling LLDP
will allow the port to receive and transmit TLVs.
Web – Click LLDP, Settings.
Figure 3-26 LLDP Configuration
3-34
Web Configuration
LLDP Neighbor Table
This page provides information on neighboring devices.
Field Attributes
• Local Port - The local port to which a remote LLDP-capable device is attached.
• Chassis ID - An identifier for the particular chassis in this system. In most cases,
this is the MAC address of the remote device.
• Remote Port ID - The port from which this LLDPDU was transmitted.
• System Name - The neighboring device’s full name. This string indicates the
system’s administratively assigned name.
• Port Description - The port description and information of the neighboring device.
• System Capabilities - The capabilities that define the primary function(s) of the
system. (A “+” symbol indicates that the displayed capabilities are enabled.)
• Management Address - The IPv4 address of the remote device. (If no
management address is available, the address should be the MAC address for the
CPU or for the port sending this advertisement.)
Web – Click LLDP, Neighbor.
Figure 3-27 LLDP Neighbor
RSTP
The Spanning Tree Algorithm (STA) can be used to detect and disable network
loops, and to provide backup links between switches, bridges or routers. This allows
the switch to interact with other bridging devices (that is, an STA-compliant switch,
bridge or router) in your network to ensure that only one route exists between any
two stations on the network, and provide backup links which automatically take over
when a primary link goes down.
STA uses a distributed algorithm to select a bridging device (STA-compliant switch,
bridge or router) that serves as the root of the spanning tree network. It selects a
root port on each bridging device (except for the root device) which incurs the lowest
path cost when forwarding a packet from that device to the root device. Then it
selects a designated bridging device from each LAN which incurs the lowest path
cost when forwarding a packet from that LAN to the root device. All ports connected
to designated bridging devices are assigned as designated ports. After determining
3-35
Configuring the Switch
the lowest cost spanning tree, it enables all root ports and designated ports, and
disables all other ports. Network packets are therefore only forwarded between root
ports and designated ports, eliminating any possible network loops.
Once a stable network topology has been established, all bridges listen for Hello
BPDUs (Bridge Protocol Data Units) transmitted from the Root Bridge. If a bridge
does not get a Hello BPDU after a predefined interval (Maximum Age), the bridge
assumes that the link to the Root Bridge is down. This bridge will then initiate
negotiations with other bridges to reconfigure the network to reestablish a valid
network topology.
RSTP (Rapid Spanning Tree Protocol, IEEE 802.1w) is designed as a general
replacement for the slower, legacy Spanning Tree Protocol (STP, IEEE 802.1D).
RSTP achieves much faster reconfiguration (i.e., around 1 to 3 seconds, compared
to 30 seconds or more for STP) by reducing the number of state changes before
active ports start learning, predefining an alternate route that can be used when a
node or port fails, and retaining the forwarding database for ports insensitive to
changes in the tree structure when reconfiguration occurs.
Configuring RSTP
Use the RSTP Configuration page to specify global or port-specific parameters for
the Rapid Spanning Tree Protocol.
Field Attributes
RSTP System Configuration
• System Priority – Bridge priority is used in selecting the root device, root port, and
designated port. The device with the highest priority becomes the STA root device.
However, if all devices have the same priority, the device with the lowest MAC
address will then become the root device. (Note that lower numeric values indicate
higher priority.) (Default: 32768; Range: 0-61440, in steps of 4096)
• Hello Time – Interval (in seconds) at which the root device transmits a
configuration message.
- Default: 2
- Minimum: 1,
- Maximum: The lower of 10 or [(Max. Message Age / 2) - 1]
• Max Age – The maximum time (in seconds) a device can wait without receiving a
configuration message before attempting to reconfigure. All device ports (except
for designated ports) should receive configuration messages at regular intervals.
Any port that ages out STA information (provided in the last configuration
message) becomes the designated port for the attached LAN. If it is a root port, a
new root port is selected from among the device ports attached to the network.
- Default: 20
- Minimum: The higher of 6 or [2 x (Hello Time + 1)]
- Maximum: The lower of 40 or [2 x (Forward Delay - 1)]
3-36
Web Configuration
• Forward Delay – The maximum time (in seconds) this device will wait before
changing states (i.e., discarding to learning to forwarding). This delay is required
because every device must receive information about topology changes before it
starts to forward frames. In addition, each port needs time to listen for conflicting
information that would make it return to a discarding state; otherwise, temporary
data loops might result.
- Default: 15
- Minimum: The higher of 4 or [(Max. Message Age / 2) + 1]
- Maximum: 30
• Force Version – RSTP supports connections to either RSTP or STP nodes by
monitoring the incoming protocol messages and dynamically adjusting the type of
protocol messages the RSTP node transmits, as described below:
- Normal (RSTP Mode) – If RSTP is using 802.1D BPDUs on a port and receives
an RSTP BPDU after the migration delay expires, RSTP restarts the migration
delay timer and begins using RSTP BPDUs on that port.
- Compatible (STP Mode) – If the switch receives an 802.1D BPDU (i.e., STP
BPDU) after a port’s migration delay timer expires, the switch assumes it is
connected to an 802.1D bridge and starts using only 802.1D BPDUs.
RSTP Port Configuration
• Port – The number of a port or all aggregations (i.e., static trunks). Note that the
spanning tree attributes for dynamically configured LACP trunks cannot be
modified.
• Enabled – Enables/disables RSTP on an interface. (Default: Disabled).
• Edge Port (Fast Forwarding) – You can enable this option if an interface is
attached to a LAN segment that is at the end of a bridged LAN or to an end node.
Since end nodes cannot cause forwarding loops, they can pass directly through to
the spanning tree forwarding state. Specifying Edge Ports provides quicker
convergence for devices such as workstations or servers, retains the current
forwarding database to reduce the amount of frame flooding required to rebuild
address tables during reconfiguration events, does not cause the spanning tree to
initiate reconfiguration when the interface changes state, and also overcomes
other STA-related timeout problems. However, remember that Edge Port should
only be enabled for ports connected to an end-node device. (Default: Enabled)
• Path Cost – This parameter is used by the STA to determine the best path
between devices. Therefore, lower values should be assigned to ports attached to
faster media, and higher values assigned to ports with slower media. (Path cost
takes precedence over port priority.)
(Range: 0 for auto-configuration, 1-65535 for the short path cost method,
1-200,000,000 for the long path cost method)
By default, the system automatically detects the speed and duplex mode used on
each port, and configures the path cost according to the values shown below. Path
cost “0” is used to indicate auto-configuration mode.
3-37
Configuring the Switch
Note that when Force Version is set to Compatible mode (STP) and the default
path cost recommended by the IEEE 8021w standard exceeds 65,535, the default
is set to 65,535.
Table 3-3 Recommended STA Path Cost Range
Port Type
IEEE 802.1D-1998
IEEE 802.1w-2001
Ethernet
50-600
200,000-20,000,000
Fast Ethernet
10-60
20,000-2,000,000
Gigabit Ethernet
3-10
2,000-200,000
Port Type
Link Type
IEEE 802.1w-2001
Ethernet
Half Duplex
Full Duplex
Trunk
2,000,000
1,000,000
500,000
Fast Ethernet
Half Duplex
Full Duplex
Trunk
200,000
100,000
50,000
Gigabit Ethernet
Full Duplex
Trunk
10,000
5,000
Table 3-3 Default STA Path Costs
3-38
Web Configuration
Web – Click RSTP, Settings. Set any required system or port-specific attributes for
RSTP, and click APPLY.
Figure 3-28 RSTP Configuration
3-39
Configuring the Switch
Displaying RSTP Status
Use the RSTP Status page to display global and port-specific status and attribute
settings for the Rapid Spanning Tree Protocol.
Field Attributes
RSTP Bridge Overview
• Hello Time – Interval (in seconds) at which the root device transmits a
configuration message.
• Max Age – The maximum time (in seconds) a device can wait without receiving a
configuration message before attempting to reconfigure. All device ports (except
for designated ports) should receive configuration messages at regular intervals.
Any port that ages out STA information (provided in the last configuration
message) becomes the designated port for the attached LAN. If it is a root port, a
new root port is selected from among the device ports attached to the network.
• Fwd Delay – The maximum time (in seconds) the root device will wait before
changing states (i.e., discarding to learning to forwarding). This delay is required
because every device must receive information about topology changes before it
starts to forward frames. In addition, each port needs time to listen for conflicting
information that would make it return to a discarding state; otherwise, temporary
data loops might result.
• Topology – Indicates if spanning tree topology is steady or undergoing
reconfiguration. (The time required for reconfiguration is extremely short, so no
values other that “steady” state are likely to be seen in this field.)
• Root ID – The priority and MAC address of the device in the Spanning Tree that
this switch has accepted as the root device, and the port connected to the root
device.
RSTP Port Status
• Port/Trunk – The number of a port or the ID of a static trunk.
• Path Cost – The cost for a packet to travel from this port to the root in the current
Spanning Tree configuration. The slower the media, the higher the cost.
• Edge Port – Shows if this port is functioning as an edge port, either through
manual selection (see the RSTP Port Configuration table) or auto-detection. Note
that if the switch detects another bridge connected to this port, the manual setting
for Edge Port will be overridden, and the port will instead function as a
point-to-point connection.
• P2P Port – Shows if this port is functioning as a Point-to-Point connection to
exactly one other bridge.
The switch can automatically determine if the interface is attached to a
point-to-point link or to shared media. If shared media is detected, the switch will
assume that it is connected to two or more bridges.
• Protocol – Shows the spanning tree protocol functioning on this port, either RSTP
or STP (that is, STP-compatible mode).
3-40
Web Configuration
• Port Role – Roles are assigned according to whether the port is part of the active
topology connecting the bridge to the root bridge (i.e., root port), connecting a LAN
through the bridge to the root bridge (i.e., designated port); or is an alternate or
backup port that may provide connectivity if other bridges, bridge ports, or LANs
fail or are removed. The role is set to disabled (i.e., disabled port) if a port has no
role within the spanning tree.
• Port State – Displays current state of this port within the Spanning Tree:
- Discarding – Port receives STA configuration messages, but does not forward
packets.
- Learning – Port has transmitted configuration messages for an interval set by
the Forward Delay parameter without receiving contradictory information. Port
address table is cleared, and the port begins learning addresses.
- Forwarding – Port forwards packets, and continues learning addresses.
- Disabled – Spanning tree is enabled on this port, but it has no role within the
spanning tree.
- Non-STP – Spanning tree is not enabled on this port.
Web – Click RSTP, Status.
Figure 3-29 RSTP Configuration
3-41
Configuring the Switch
QoS Settings
QoS (Quality of Service) is a mechanism that is used to prioritize traffic as it is
forwarded through the switch. Both the queue service mode (strict or weighted
round robin), and the method of classifying the priority of ingress traffic can be
configured on this page.
Traffic can be classified as high, medium, normal or low priority. When the switch is
heavily loaded, lower priority traffic is dropped first. You can select how to prioritize
traffic by using one of the QoS modes (none, 802.1p, or DSCP).
Selecting the Queue Mode
You can set the switch to service the queues based on a strict rule that requires all
traffic in a higher priority queue to be processed before lower priority queues are
serviced, or use Weighted Round-Robin (WRR) queuing that specifies a relative
weight of each queue.
Strict priority requires all traffic in a higher priority queue to be processed before
lower priority queues are serviced.
WRR uses a relative weighting for each queue which determines the amount of
packets the switch transmits every time it services each queue before moving on to
the next queue. Thus, a queue weighted 8 will be allowed to transmit up to 8
packets, after which the next lower priority queue will be serviced according to it’s
weighting. This prevents the head-of-line blocking that can occur with strict priority
queuing.
Selecting the Method of Priority Processing
This switch supports several common methods of prioritizing traffic to meet
application requirements. It can process traffic priorities specified by the IEEE
802.1p priority bits in Layer 2 traffic, or the Differentiated Services Code Point
(DSCP) service priority bits found in Layer 3/4 traffic. When either of these services
are enabled, the priorities are mapped to a Class of Service value by the switch, and
the traffic then sent to the corresponding output queue.
If the QoS mode is set to 802.1p, and the ingress packet type is IPv4, then priority
processing will be based on the 802.1p value in the ingress packet. For an untagged
packet, the default port priority is used for priority processing (i.e., CoS value 0,
which maps to the Normal Queue).
If the QoS mode is set to DSCP, and the ingress packet type is IPv4, then priority
processing will be based on the DSCP value in the ingress packet.
3-42
Web Configuration
Field Attributes
Queue Mode
• Strict – Services the egress queues in sequential order, transmitting all traffic in
the higher priority queues before servicing lower priority queues.
• WRR – Weighted Round-Robin shares bandwidth at the egress ports by using
scheduling weights with default values of 1, 2, 4, 8 for queues 0 through 7,
respectively. (This is the default selection.)
Note that WRR can only be selected if Jumbo Frame mode is disabled on the Port
Configuration page (see “Port Configuration” on page 3-15).
QoS Mode
• Port-based – Manually sets the priority for each port.
You can use the Prioritize Traffic drop-down list to quickly map the values in the
802.1p Configuration table to the same priority queue. Use Custom if you want to
set each value individually.
• 802.1p – Packets are prioritized using the 802.1p field in the VLAN tag. This field
is three bits long, representing the values 0 - 7. When the QoS Mode is set to
802.1p, the 802.1p Configuration table appears, allowing you to map each of the
eight 802.1p values to a local priority queue (low, normal, medium or high). The
default settings are shown below.
Table 3-4 Mapping CoS Values to Egress Queues
Egress Queue
low
normal
medium
high
802.1-p Priority
1,2
0,3
4,5
6,7
You can use the Prioritize Traffic drop-down list to quickly map the values in the
802.1p Configuration table to the same priority queue. Use Custom if you want to
set each value individually.
Note that end-stations, like PCs, are not usually VLAN aware, so they do not create
VLAN-tagged frames. As a result, 802.1p is not an ideal method to use when there
are a lot of PCs connected to the switch.
• DSCP – Packets are prioritized using the DSCP (Differentiated Services Code
Point) value.
The Differentiated Services Code Point (DSCP) is a six-bit field that is contained
within an IP (TCP or UDP) header. The six bits allow the DSCP field to take any
value in the range 0 - 63. When QoS Mode is set to DSCP, the DSCP Configuration
table is displayed, allowing you to map each of the DSCP values to a hardware
output queue (low, normal, medium or high). The default settings map all DSCP
values to the high priority egress queue.
You can use the Prioritize Traffic drop-down list to quickly set the values in the
DSCP Configuration table to a common priority queue. Use Custom if you want to
set each value individually.
3-43
Configuring the Switch
Web – Click QOS, Settings. In QoS Mode, select Port-based, 802.1p, or DSCP to
configure the related parameters. When the QoS Mode is set to Port-based, the
following table is displayed.
Figure 3-30 Port-based QoS Settings
When the QoS Mode is set to 802.1p, the 802.p Configuration table is displayed as
shown below.
Figure 3-31 802.1p Configuration
3-44
Web Configuration
When the QoS Mode is set to DSCP, the DSCP Configuration table is displayed as
shown below.
Figure 3-32 DSCP Configuration
3-45
Configuring the Switch
SNMP
Use the SNMP Settings page to configure the Simple Network Management
Protocol (SNMP), including enabling the local SNMP agent on this switch, specifying
a trap manager, and setting the access strings.
Simple Network Management Protocol (SNMP) is a communication protocol
designed specifically for managing devices on a network. Equipment commonly
managed with SNMP includes switches, routers and host computers. SNMP is
typically used to configure these devices for proper operation in a network
environment, as well as to monitor them to evaluate performance or detect potential
problems. The switch includes an onboard SNMP agent that continuously monitors
the status of its hardware, as well as the traffic passing through its ports. A network
management station can access this information using network management
software. Access rights to the onboard agent are controlled by community strings. To
communicate with the switch, the management station must first submit a valid
community string for authentication.
Field Attributes
•
•
•
•
SNMP Enabled - Enables or disables SNMP on the switch. Supports SNMP
version 1and 2c management clients.
SNMP Trap Destination - IP address of the trap manager to receive notification
messages from this switch. Traps indicating status changes are issued by the
switch to specified trap managers. You must specify trap managers so that key
events are reported by this switch to your management station.
SNMP Read Community - A community string that acts like a password and
permits access to the SNMP database on this switch. Authorized management
stations are only able to retrieve MIB objects.
SNMP Trap Community - Community string sent with the notification operation.
Web – Click SNMP, Configuration.
Figure 3-33 SNMP Configuration
3-46
Web Configuration
PoE
The switch can provide DC power to a wide range of connected devices, eliminating
the need for an additional power source and cutting down on the amount of cables
attached to each device. Once configured to supply power, an automatic detection
process is initialized by the switch that is authenticated by a PoE signature from the
connected device. Detection and authentication prevent damage to non-802.3af
compliant devices.
The switch’s power management enables individual port power to be controlled
within the switch power budget. Port power can be automatically turned on and off
for connected devices, and a per-port power priority can be set so that the switch
never exceeds its power budget. When a device is connected to a switch port, its
power requirements are detected by the switch before power is supplied. If the
power required by a device exceeds the power budget of the port or the whole
switch, power is not supplied.
Ports can be set to one of four power priority levels, critical, high, medium, or low.
To control the power supply within the switch’s budget, ports set at critical to medium
priority have power enabled in preference to those ports set at low priority. For
example, when a device is connected to a port set to critical priority, the switch
supplies the required power, if necessary by denying power to ports set for a lower
priority during bootup. If a device is connected to a switch port and the switch
detects that it requires more than the power budget of the port, no power is supplied
to the device (i.e., port power remains off).
If the power demand from devices connected to switch ports exceeds the power
budget set for the switch, the port power priority settings are used to control the
supplied power. For example:
• If a device is connected to a low-priority port and causes the switch to exceed its
budget, port power is not turned on.
• If a device is connected to a critical or high-priority port and would cause the switch
to exceed its power budget as determined during booting up, power is provided to
the port only if the switch can drop power to one or more lower-priority ports and
thereby remain within its overall budget.
• If a device is connected to a port after the switch has finished booting up and would
cause the switch to exceed its budget, power will not be provided to that port.
Note: Power is dropped from low-priority ports in sequence starting from port number 1.
3-47
Configuring the Switch
Power over Ethernet Settings
Configures Power over Ethernet (PoE) parameters for the switch.
Field Attributes
• Port 1 Power Mode – Port 1 may be configured to supply as much as 25 watts of
power when set to High mode. In normal mode it can supply a maximum of 15.4
watts. (Default: Normal)
• Power Reserve – Displays the percentage of the power budget (70W) being
drawn by attached devices.
• Port – The port number.
• PoE Enabled – The administrative status of PoE power on the port. Power is
automatically supplied when a device is detected on the port, providing that the
power demanded does not exceed the power budget for the switch or port.
• Delivering Power – The PoE power being delivered by the port.
•
•
Current – The electrical current being delivered by the port.
Priority – The port’s configured power priority setting. (Range: Low, Medium,
High, Critical; Default: Low)
• Allocation – The configured power budget for the port. (Range: 0-15.4 watts when
operating at Normal power mode, 0-25 watts for Port 1 when set to operate at High
power mode; Default: 15.4 watts)
Web – Click PoE, Settings.
Figure 3-34 POE Configuration
3-48
Appendix A: Software Specifications
Software Features
Authentication
RADIUS, Port (802.1X), Port Security
DHCP Client
Port Configuration
100BASE-TX: 10/100 Mbps, half/full duplex
1000BASE-T: 10/100 Mbps at half/full duplex, 1000 Mbps at full duplex
Flow Control
Full Duplex: IEEE 802.3-2005
Half Duplex: Back pressure
Broadcast Storm Control
Traffic throttled above a critical threshold
Port Mirroring
One source port, one destination port
Rate Limits
Input Limit
Output limit
Range (configured per port)
Port Trunking
Static trunks
Dynamic trunks (Link Aggregation Control Protocol)
Up to 4 port trunks
Spanning Tree Algorithm
Spanning Tree Protocol (STP, IEEE 802.1D)
Rapid Spanning Tree Protocol (RSTP, IEEE 802.1w)
VLAN Support
Up to 64 VLANs; port-based or tagged (802.1Q)
A-1
Software Specifications
Class of Service
Supports two levels of priority
(which can be configured by VLAN tag or port),
Layer 3/4 priority mapping: IP DSCP
Additional Features
SNMP (Simple Network Management Protocol)
Management Features
In-Band Management
Web-based HTTP, SNMP manager
Software Loading
HTTP in-band
SNMP
Management access via MIB database
Trap management
Standards
IEEE 802.1D Bridging
IEEE 802.1p Priority tags
IEEE 802.1Q VLAN
IEEE 802.1w Rapid Spanning Tree Protocol
IEEE 802.1X Port Authentication
IEEE 802.3-2005
Ethernet, Fast Ethernet, Gigabit Ethernet
Link Aggregation Control Protocol (LACP)
Full-duplex flow control (ISO/IEC 8802-3)
IEEE 802.3ac VLAN tagging
DHCP Client (RFC 2131)
RADIUS+ (RFC 2618)
SNMPv2 (RFC 1901)
A-2
Management Information Bases
Management Information Bases
Bridge MIB (RFC 1493)
Entity MIB (RFC 2737)
Ether-like MIB (RFC 3635)
Extended Bridge MIB (RFC 2674)
Extensible SNMP Agents MIB (RFC 2742)
Forwarding Table MIB (RFC 2096)
Interface Group MIB (RFC 2233)
Interfaces Evolution MIB (RFC 2863)
MAU MIB (RFC 3636)
MIB II (RFC 1213)
Port Access Entity MIB (IEEE 802.1X)
Private MIB
RADIUS Authentication Client MIB (RFC 2621)
SNMP Community MIB (RFC 3584)
SNMPv2 IP MIB (RFC 2011)
TCP MIB (RFC 2012)
Trap (RFC 1215)
UDP MIB (RFC 2013)
A-3
Software Specifications
A-4
Appendix B: Troubleshooting
Forgot or Lost Password
If you have forgotten the administration password you can return the switch to its
factory default state by following these steps:
1.
Remove the power cord from the back of the switch.
2.
Remove all cables from the front-panel ports.
3.
Connect port 1 to port 2 on the front panel, using a standard network cable.
4.
Reconnect the power cord to the rear of the switch.
5.
Wait at least 40 seconds before disconnecting port 1 from port 2.
After completing this procedure, the password will be “admin” and the network
address will be returned to the default; 192.168.2.10.
Changing a PC’s IP Address
To change the IP address of a Windows Vista PC:
1.
Click Start and then Control Panel.
2.
Double-click “Network and Sharing Center.”
3.
Click “View status.”
4.
Click “Properties.” If the “User Account Control” window appears, click
“Continue.”
5.
Highlight “Internet Protocol Version 6 (TCP/IPv6)” or “Internet Protocol Version
4 (TCP/IPv4),” and click “Properties.”
6.
In the Internet Protocol (TCP/IP) Properties dialog box, click to select Use the
following IP address. Then type your intended IP address, Subnet mask, and
Default gateway in the provided text boxes
7.
Click OK to save the changes.
To change the IP address of a Windows XP PC:
1.
Click Start, Control Panel, then Network Connections.
2.
For the IP address you want to change, right-click the network connection icon,
and then click Properties.
B-1
Troubleshooting
3.
In the list of components used by this connection on the General tab, select
Internet Protocol (TCP/IP), and then click the Properties button.
4.
In the Internet Protocol (TCP/IP) Properties dialog box, click to select Use the
following IP address. Then type your intended IP address, Subnet mask, and
Default gateway in the provided text boxes
5.
Click OK to save the changes.
To change the IP address of a Windows 2000 PC:
1.
Click Start, Settings, then Network and Dial-up Connections.
2.
For the IP address you want to change, right-click the network connection icon,
and then click Properties.
3.
In the list of components used by this connection on General tab, select Internet
Protocol (TCP/IP), and then click the Properties button.
4.
In the Internet Protocol (TCP/IP) Properties dialog box, click to select Use the
following IP address. Then type your intended IP address, Subnet mask, and
Default gateway in the provided text boxes.
5.
Click OK to save the changes.
Note: For users of other operating systems, refer to your system documentation for
information on changing the PC’s IP address.
B-2
ES4308-PoE
E022009/ST-R02
149100036400A