1
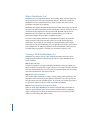
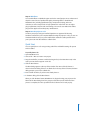
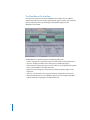
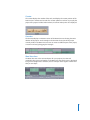
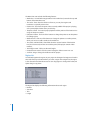
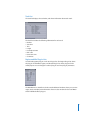
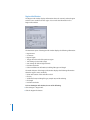
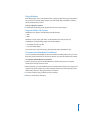
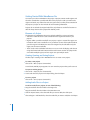
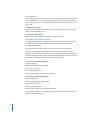
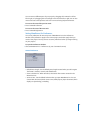
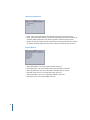
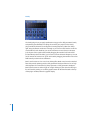
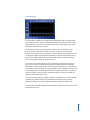
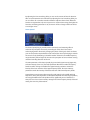
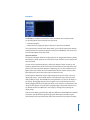
1
Using WaveBurner Pro
Using WaveBurner Pro, you can master and burn
professional-quality audio CDs that are compliant with
the Red Book standard. You can also create premasters
for CD production.
Table of Contents
“What Is WaveBurner Pro?” on page 2
“Creating a CD With WaveBurner Pro” on page 2
“Quick Start” on page 3
“The WaveBurner Pro Interface” on page 4
“Getting Started With WaveBurner Pro” on page 12
“Working With Regions” on page 17
“Working With Tracks” on page 22
“Working With Markers” on page 24
“Working With Effects” on page 26
“Burning a Project to a CD” on page 39
“WaveBurner Pro Keyboard Shortcuts” on page 42
1
What Is WaveBurner Pro?
WaveBurner Pro is an application that lets you assemble, master, and burn audio CDs
using a SuperDrive or CD burner supported by Mac OS X. Audio CDs created with
WaveBurner Pro can be played back on any audio CD player, and can be used as
premasters to produce CDs in quantity.
WaveBurner Pro supports all Red Book options for CD audio data storage. You can add
up to 99 tracks and 99 subindexes per track, include ISRC codes for each track, set copy
prevention and pre-emphasis for each track, and add UPC/EAN codes for the CD.
WaveBurner Pro also supports the CD TEXT standard, allowing you to add text
information readable on any CD TEXT-compatible CD player.
You create a CD by adding audio files to a WaveBurner Pro project. The audio files
appear as regions in the project window, where you can edit and arrange them
graphically or numerically. You can add effects to both individual regions and the
overall project using the included plug-ins or using Audio Units plug-ins you install on
your computer. You can edit pauses between tracks and add fade-ins, fade-outs, and
crossfades. When your project is complete, you can burn the project to a CD.
Creating a CD With WaveBurner Pro
WaveBurner Pro makes it easy to create professional-quality audio CDs using a
straightforward workflow. The following steps outline a typical WaveBurner Pro
project workflow.
Step 1: Add audio files
You start by creating a new project and adding audio files to the project. When you
add an audio file it is imported as a region, which you can arrange and edit in the Wave
View area and the Region list. A track is created for each new region, and you can edit
the track in the Wave View area and the Track list.
Step 2: Edit regions and tracks
You can edit regions and tracks in a variety of ways, working either graphically in the
Wave View area or numerically in the Region list and Track list. You can copy, reorder,
trim, split, adjust gain, and normalize regions. As you work, you can play the project or
any part of the project to hear the results of your edits immediately.
Step 3: Preview the project and adjust crossfades
When you add a region, WaveBurner Pro creates a track and adds track markers to
define the pause between tracks. You can create crossfades between overlapping
regions, and adjust the crossfades in the Wave View area. You can also insert index
markers to create index points within a track.
2
Step 4: Add effects
You can add effects to individual regions and to the overall project mix to enhance and
shape the sound. A set of professional-quality mastering effects is bundled with
WaveBurner Pro, including equalization (EQ), compression, limiting, and noise
reduction, as well as analysis tools to help optimize the overall mix. You can adjust
plug-in parameters and save and recall settings. You can also use Audio Units effects
plug-ins from Apple or from third-party manufacturers.
Step 5: Burn the project to a CD
You burn your project using an installed SuperDrive or supported CD burning
hardware connected to your computer. Before burning the project to a CD, you can use
Simulation Mode to test your system and find the maximum usable speed at which
your system can write the CD data to a blank CD-R.
Quick Start
You can quickly burn a CD using existing audio files and default settings for pauses
and crossfades.
To quickly burn a CD:
1 Open WaveBurner Pro.
2 Choose File > New to create a new project.
3 Drag the audio files you want to add to the Region list (or the Wave View area) in the
order you want them to appear on the CD.
4 Click the Burn button.
The Burn dialog appears at the top of the window. The name of the CD burner is
shown in the Burn dialog. If there is no blank disc in the tray of the CD burner, the Burn
dialog prompts you to insert a blank disc.
5 Insert a blank CD-R disc, if you have not already done so.
6 In the Burn dialog, click the Burn button.
When you click the Burn button, WaveBurner Pro begins burning your project to the
blank CD. The Burn dialog shows the progress of the burn process. When the burn
process is complete, the CD is ejected from the CD burner and is ready to play.
3
The WaveBurner Pro Interface
You create your projects in the main WaveBurner Pro window. You can add and
organize the regions in your project, graphically edit regions, pauses, and crossfades,
play the project to preview your changes, and add effects plug-ins in the
WaveBurner Pro window.
The WaveBurner Pro interface features the following main areas:
• Counter: Displays the current track number and the position of the Position Line.
• Overview: Displays a timeline of the entire project, including all regions.
• Wave View area: Displays the regions in time order. You can graphically edit regions,
pauses, and crossfades in the Wave View area.
• Region list: Lists the regions in time order. You add and organize regions in the
Region list.
• Track list: Lists the tracks in the project and displays information for each track.
• Region and Mix Plug-In lists: You add effects plug-ins and can organize and adjust
plug-in parameters in the Region and Mix Plug-In lists.
4
Counter
The counter displays the number of the track, and displays the current position of the
Position Line in minutes and seconds. The counter updates in real time as you play the
project. If the project includes index markers, the current index point is also displayed.
Overview
The Overview displays a miniature version of the Wave View area showing the entire
duration of the project. A red rectangle in the Overview shows part of the project
currently visible in the Wave View area. You can move to a different part of the project,
or zoom in and out, by dragging the rectangle.
Wave View Area
The Wave View area is the main workspace for your projects, You view and
graphically edit regions and markers in the Wave View area. Each region is displayed
as a green rectangle with a waveform, and an envelope of the region’s volume level
that you can adjust.
5
The Wave View area includes the following features:
• Marker bars: You add and arrange markers in the marker bars, located at the top and
bottom of the Wave View area.
• Time rulers: These show the divisions of time so you can place regions and
transitions at a specific point in time.
• Position Line: This shows the point in time currently audible if the project is playing,
or the point playback starts when you click Play.
• Transport controls: You control project playback and the position of the Position Line
using the Transport controls.
• Edit pointer buttons: Click one of the buttons to change the pointer to an edit pointer
for editing regions.
• Marker buttons: Click one of the buttons to change the pointer to a marker pointer,
which you can use to add a marker to the marker bar.
• Time, Track, and Index fields: These fields show the current location of the Position
Line, the current track, and the current index point (if the project contains index
markers).
• Track height control: Click to set the track height.
• Horizontal zoom control: Click the control or drag the slider to zoom in or out.
• Scroll bar: Drag to change the visible area of the project.
Region List
You add and organize the regions in your project in the Region list. Regions are listed in
time order from top to bottom. When you select a region in the Region list, the region
is also selected in the Wave View area. You can drag regions to change their order, and
Option-drag to copy them.
The Region list displays the following information about each region:
•
•
•
•
6
Number
Start time
Title
Length
Track List
The track list displays the track order, and shows information about each track.
The Track list includes the following information for each track:
•
•
•
•
•
•
•
•
Number
Start time
Title
Length
Pre-emphasis state
ISRC code
Pause start time
Comments
Region and Mix Plug-In Lists
You add and organize plug-ins in the two Plug-In lists. The Region Plug-In list shows
the plug-ins for individual regions, and the Mix Plug-In list shows plug-ins for the
overall project. You can change the order of plug-ins and view plug-in parameters.
The WaveBurner Pro interface includes several additional windows where you can view
region, track, and index point information. There are also windows for the Level Meter
and for individual effects plug-ins.
7
Region Info Window
The Region Info window displays information about the currently selected region
and the source audio file for the region. You can edit the information in the
Region Info window.
The Parameters pane of the Region Info window displays the following information:
•
•
•
•
•
•
•
•
Region name
Comments
Region length
The gap from the end of the previous region
Trim settings (at start and at stop)
Gain settings for left and right channels
Peak time and value
Fade-in and fade-out information, including fade type and length
The Audio File pane of the Region Info window displays the following information
about the region’s source audio file:
•
•
•
•
•
8
Name and location of the audio file on disk
File size
Audio file format, including file type, sample rate, and bit ordering
File length
Peak time and value
m
To show the Region Info window, do one of the following:
Choose Region > Region Info.
m
Click the Region Info button.
Track Info Window
The track Info window displays information about the current track. You can edit the
information in the Track Info window.
The General pane of the Track Info window displays the following information:
•
•
•
•
•
•
•
•
Track number
Disc Time (the absolute time where the track starts)
Name
Comment
Pause duration (the pause length before the track starts)
ISRC code
Pre-emphasis
SCMS
The CD TEXT pane of the Track Info window displays the following information:
•
•
•
•
•
•
•
Track number
Title
Performer
Songwriter
Composer
Arranger
Message
m
To show the Track Info window, do one of the following:
Select the track in the Track list, then choose Disc > Track Info
m
Click the track start marker for the track, then choose Disc > Track Info.
m
Double-click the track start marker for the track.
9
Index Point Info Window
The Index Point Info window displays information about the currently selected index
point.You can edit the information in the Index Point Info window.
The Index Point Info window displays the following information:
•
•
•
•
•
•
Track number
Index point number
Disc Time (the absolute time where the index point starts)
Track Time
Name
Comment
m
To show the Index Point Info window, do one of the following:
Click the index marker for the track, then choose Disc > Index Point Info.
m
Double-click the index marker.
Level Meter
The Level Meter window displays the volume level of the left and right channels of
your project in real time as the project plays.
m
To show the Level Meter window:
Click the Level Meter button.
For more information about using the Level Meter, see “Level Meter” on page 34.
10
Plug-In Windows
Each effect plug-in has its own window, with controls to adjust the plug-in parameters.
The controls can include sliders, buttons, and value fields, and are labeled to indicate
which parameter they control.
m
To show a plug-in’s window:
In the Region or Mix Plug-In list, double-click the name of the plug-in.
Supported Audio File Formats
WaveBurner Pro supports the following audio file formats:
• AIFF
• WAV
Audio files can be mono, split stereo, or interleaved stereo, and can have any
combination of the following sample rates and bit depths:
• All sample rates up to 96 kHz
• 8, 16, and 24-bit depths
You can also open Jam and CD Copy disk images directly in WaveBurner Pro.
Customizing the WaveBurner Pro Window
You can customize the WaveBurner Pro main window by adding buttons for your most
frequently used commands. You choose the buttons you want to add from the Toolbar.
To customize the WaveBurner Pro window:
1 Control-click the top part of the WaveBurner Pro window, then choose Customize
Toolbar pane from the shortcut menu.
2 Drag the buttons you want to add from the Customize Toolbar pane to any empty area
along the top of the window. If you drag a button between two existing buttons, they
adjust their position to make space for the new button.
3 To remove a button, drag it off the top of the window.
4 When you are finished, click Done.
11
Getting Started With WaveBurner Pro
You create your CDs in a WaveBurner Pro project. A project contains audio regions and
CD tracks created when you add audio files to the project, the edits you make to the
regions and tracks, any markers for track start, pause start, or index points contained in
the project. A project can also include disc and mastering information.
Projects do not include the original audio files, only references to the files’ location on
disk. This keeps the size of the project file relatively small.
Elements of a Project
The elements of a WaveBurner Pro project include audio files, regions, and tracks.
• Audio files: Audio files are the source material for the regions and tracks in your
projects.
• Regions: When you add an audio file to a project, a region is created. The region can
include the entire source audio file or any continuous section of the audio file. When
you edit a region in the Wave View area or the Region list, the edits affect only the
region, not the source audio file.
• Tracks: Tracks are the individual selections a user sees in the CD display, and chooses
using the forward and back buttons and the track buttons on their CD player. Tracks
can include multiple regions, and one region can span multiple tracks.
Creating, Opening, and Saving Projects
The first step in creating a CD in WaveBurner Pro is to create a new project.
m
To create a new project:
Choose File > New (or press Command-N).
A new blank, untitled project appears. You can name the project when you first save it.
To open an existing project:
1 Choose File > Open (or press Command-O).
2 Locate and select the project in the Open dialog, then click Open.
m
To save a project:
Choose File > Save (or press Command-S).
Adding Audio Files to a Project
12
m
To add an audio file to a project, do one of the following:
Drag the audio file from the Finder to the Region list.
m
Drag the audio file from the Finder to the Wave View area.
m
Click the Import button, select the audio file you want to add, then click Open.
m
Choose Region > Add Audio File, select the audio file you want to add, then click Open.
Previewing Projects and Controlling Playback
As you work on a project, you can play the project to hear the regions, tracks, pauses,
and crossfades in the project. You can control project playback using the Transport
controls or by moving the Position Line.
Using the Transport Controls
You can control playback of your project and set the position of the Position Line using
the Transport controls, which are located at the bottom center of the Wave View area.
The Transport controls include, from left to right:
• Go to Region Start: Sets the Position Line to the beginning of the current region. If
•
•
•
•
•
•
the project is currently playing, playback continues from this point.
Go to Region End: Moves the Position Line to the end of the current region. If the
project is currently playing, playback continues from this point.
Catch: Turns Catch mode on or off. When Catch mode is turned on, the visible part of
the Wave View area changes so that the Position Line remains visible.
Play: Starts playback from the current Position Line position.
Stop: Stops playback.
Back: Moves the Position Line back towards the start of the project.
Forward: Moves the Position Line forward towards the end of the project.
m
To start playback:
Click the Play button in the Transport controls (or press the Space bar).
m
To stop playback:
Click the Stop button in the Transport controls (or press the Space bar again).
There are keyboard shortcuts for other playback functions. For a list of keyboard
shortcuts, see “WaveBurner Pro Keyboard Shortcuts” on page 42.
Moving the Position Line
You can move the Position Line directly to any position.
m
To move the Position Line, do one of the following:
Double-click either time ruler to start playback from that point.
m
Click either time ruler at the point where you want to move the Position Line.
m
Drag the Position Line to the point in time where you want to move the Position Line.
13
Looping Playback
You can loop (or cycle) a section of your project, so that it plays back repeatedly. This
can be useful when you are editing part of the project and want to hear the results
of your edits as you work. You loop playback by defining a Cycle area in either of the
time rulers.
m
m
To define a Cycle region:
In either time ruler, drag from the point where you want looping to start to the point
where you want looping to end.
To remove the Cycle region:
Click anywhere in the time ruler outside the current Cycle region.
Navigating in the Wave View Area
You navigate in the Wave View area using the track height control, zoom control, and
scroll bar. You can also move to different parts of the Wave View area using the
rectangle in the Overview.
You can zoom to make precise edits, or zoom out to see more of your project.
The Zoom control features a slider on a graduated scale. Moving the slider left or
clicking the left side of the scale zooms in for a closer view of a small part of the Wave
View area. Moving the slider right or clicking the right side of the scale zooms out for a
wider view. You can also zoom in or out using menu commands.
m
To zoom in, do one of the following:
Drag the slider left.
m
Click the left part of the Zoom control.
m
Choose View > Zoom In.
m
Press Command-Up Arrow.
m
Drag the red rectangle in the Overview upwards.
m
To zoom out, do one of the following:
Drag the slider right.
m
Click the right part of the Zoom control.
m
Choose View > Zoom Out.
m
Press Command-Up Arrow.
m
Drag the red rectangle in the Overview downwards.
You can also choose View > Maximum Zoom Out to show as much of your project as
possible in the Wave View area.
14
You can move to different parts of your project by dragging the horizontal scroll bar
left or right, or by dragging the red rectangle in the Overview left or right. You can also
move to the start of the previous track or the next track using keyboard shortcuts.
m
To move to the start of the previous track:
Press Command-Left Arrow
m
To move to the start of the next track:
Press Command-Right Arrow
Setting WaveBurner Pro Preferences
You can set preferences for various aspects of WaveBurner Pro in the Preferences
window. Some preferences apply to the current project, and others apply when you
create a new project. You may want to set some preferences before you begin working
on your projects.
m
To open the Preferences window:
Choose WaveBurner Pro > Preferences (or press Command-comma).
General Preferences
• Default Pause Length: Sets the default pause length inserted when you add a region.
The format is minutes, seconds, and CDDA frames.
• Zoom to Position Line: When turned on, the Position line remains centered in the
Wave View area.
• Action at Start: Sets the default behavior when you open WaveBurner Pro. You can
choose New document (which creates a new, blank project), Open document (which
displays an Open dialog), or Nothing.
15
Audio Driver Preferences
• Driver: Choose the audio device for input and output from the pop-up menu.
• Input: Choose the input channel or channels from the pop-up menu. The number of
channels available depends on the device selected in the Driver pop-up menu.
• Output: Choose the output channel or channels from the pop-up menu. The number
of channels available depends on the device selected in the Driver pop-up menu.
Burn Preferences
•
•
•
•
•
•
16
Write CD TEXT Data: Turn on to include CD TEXT on the CD.
Write Index Points: Turn on to include index point information on the CD.
Write UPC/EAN Code: Turn on to include UPC and EAN codes on the CD.
Write ISRC Codes: Turn on to include ISRC codes on the CD.
Write Pre-Emphasis: Turn on to include pre-emphasis on the CD.
Write SCMS: Turn on to include SCMS on the CD.
Bounce Preferences
• Dithering: Choose the type of dithering to use when the project is bounced or
burned from the pop-up menu. The choices are: POW-r #1 (Dithering), POW-r #2
(Noise Shaping), POW-r #3 (Noise Shaping), and No Dithering.
For information about when to use dithering, see the Logic Pro 7 Reference Manual.
• Replace Region with Bounce: When turned on, the new region created by choosing
Region > Bounce Region replaces the original region being bounced.
• Clipping detection stops Bounce: When turned on, the bounce process is stopped
when clipping is detected in the region or project being bounced.
Working With Regions
Regions are the building blocks of your WaveBurner Pro projects. Regions can include
the entire source audio file or any continuous section of an audio file. The edits you
make to a region do not change the source audio file, so you can always go back to the
file’s original state.
When you add an audio file to a project, a region is created from the file. The new
region appears in the Wave View area and in the Region list. In the Wave View area,
regions are displayed in time order from left to right. Regions are displayed alternately
in the upper or lower half of the Wave View area, making it easier to view overlapping
areas of two regions. In the Region list, regions are displayed in order from top to
bottom. A track is also added for the new region, and appears in the Track list.
You can edit regions in a variety of ways. You can copy, reorder, trim, and split regions,
adjust their volume level, normalize them, and add fade-ins, fade-outs, and crossfades.
17
Selecting Regions
Before you edit a region, you must select it.
m
To select a region:
Click the region in the Region list.
When you select a region, it appears darker in the Wave View area.
Copying Regions
You can copy a region in the Region list.
m
To copy a region:
In the Region list, Option-drag the region up or down.
As you Option-drag, a dark, horizontal line appears to show you where the copy of the
region will be placed.
Reordering Regions
Regions are displayed in the order they appear in the project. In the Region list, regions
appear in order from top to bottom. In the Wave View area, regions appear in order
from left to right. You can reorder regions in the Region list.
m
To reorder a region:
In the Region list, drag the icon for the region, located in the left column, up or down.
Moving Regions
You can move a region to a new time position, along with its markers, by dragging the
region in the Wave View area.
m
To move a region in time:
In the Wave View area, drag the region left or right to the new time position.
When you drag a region to the right, the pause length (the duration between the track
start marker and the previous pause start marker) increases. When you drag a region to
the left so that it overlaps the previous region, the pause length becomes zero, and
crossfades are added to the region and the previous region, so that the overlapped
area is crossfaded. You can adjust the crossfades. For information about adjusting
crossfades, see “Adding and Adjusting Fades” on page 20.
18
Trimming Regions
You trim a region by shortening either the beginning or end of the region.
To trim the start or end point:
1 Move the pointer over the left or right edge of the region.
The pointer changes to a trim pointer.
2 Drag the edge of the region. You can drag the start point to the right, or drag the end
point to the left.
As you drag, the region is trimmed, and all subsequent regions move to the left.
Splitting Regions
You can split a region into two regions. This is useful if you want to remove part of a
region, or move part of the region to another point in time.
To split a region:
1 Click the Split (scissors) button.
2 In the Wave View area, click the region at the point where you want to split it.
The region is split, and the part of the region after the split now appears in the other
half (upper or lower) of the Wave View area from the part before the split.
Adjusting Levels
In the Wave View area, a horizontal line, called the region’s envelope, appears overlaid
over each region. The envelope shows the volume level (also called gain) for the region.
You can adjust the region’s volume level by moving the envelope.
To adjust the level of a region:
1 Move the pointer over the region you want to adjust.
The pointer changes to a vertical line with arrows pointing up and down.
2 Drag the envelope up or down to a new value.
Checking a Region for Clipping
You can check individual regions for clipping.
To check a region for clipping:
1 Select the region, in either the Wave View area or the Region list.
2 Choose Region > Check Region for Clipping.
If a region clips, you can find where clipping occurs by observing the Level Meter as
the region plays. Clipping can occur either because the levels are too high in the region
itself or because the envelope is set too high. If there are plug-ins added to the region,
the plug-ins may be causing the clipping.
19
Normalizing Regions
Typically, you want the volume level to be as high as possible without causing clipping.
Changing the level of a region to the maximum possible without causing clipping is
called normalizing the region. You can normalize a region to achieve the widest
dynamic range.
When you normalize a region, WaveBurner Pro analyzes the region and locates the
peak (the point in the region with the highest level). The gain for the region is adjusted
so that the peak level is 0 dBFS. This ensures that the region will not clip.
To normalize a region:
1 Select the region in the Region list.
2 Choose Region > Normalize Region.
Adding and Adjusting Fades
In music production, fade-ins and fade-outs are often used at the beginning and end of
songs. Commercial record albums make frequent use of these edits to create a sense of
continuity and of moving from one track to the next.
To add a fade-in:
1 Move the pointer over the envelope point at the left edge of the region.
The pointer changes to a hand with an extended finger.
2 Drag the envelope point to the right to set the length of the fade-in.
As you drag, the envelope changes to show the length of the fade-in.
To add a fade-out:
1 Move the pointer over the envelope point at the right edge of the region.
The pointer changes to a hand with an extended finger.
2 Drag the envelope point to the left to set the length of the fade-out.
As you drag, the envelope changes to show the length of the fade-in.
When you drag a region in the Wave View area so that it overlaps another region,
crossfades are added so that the overlapping portions of the regions are evenly
crossfaded. That is, a fade-out is added to the earlier region, and a fade-in is added to
the later region.
You can adjust fade-ins, fade-outs, and by dragging the envelope point in the region’s
envelope. By default the fade curve is linear, which means that the level increases
evenly (linearly) for the duration of the fade. You can adjust the fade curve so the level
increases more quickly or slowly as the fade progresses.
m
20
To adjust the fade curve:
Drag one of the envelope points with the two plus (+) signs.
Bouncing Regions
In music production, the term bouncing usually refers to mixing down several tracks to
a single mono or stereo track. When you bounce a region in WaveBurner Pro, the
region’s audio, the edits you’ve made (including level changes, fades and, and
trimming), and any plug-ins added to the region are combined into a new audio file.
Note: Region Plug-Ins are included when you bounce a region, but Mix Plug-Ins are not.
Bouncing a region saves both processing power and disk performance when you burn
a CD. The computer simply reads from the bounced file, and does not have to process
the edits or effects in real time.
To bounce a region:
1 Select the region in the Region list.
2 Choose Region > Bounce Region.
3 In the Bounce dialog, browse to the location you want to save the bounced file, then
click Save.
Renaming Regions
When a region is created, by default it has the name of the source audio file. You can
rename regions in the Region list.
m
To rename a region:
In the Region list, click the region name to select it, then type a new name.
Deleting Regions
You can remove a region from the project if you decide you no longer want to include it.
m
To delete a region:
Select the region, then choose Edit > Delete (or press Delete).
21
Working With Tracks
Tracks are the individual selections on a CD, which a listener selects using the track
number buttons or the forward and back buttons on a CD player.
By default, a track is created for each region in a project. Tracks are defined by track
start markers and pause start markers, which are automatically inserted when you add
a region. You can move these markers from their default positions and insert additional
markers. For information about inserting and moving markers, see “Working With
Markers” on page 24.
The Track List
Tracks are displayed in the Track list in order from top to bottom. If you reorder regions
in the Region list, the Track list is updated to show the new order.
The Track list displays information about each track, including the track name, track
length, start time, and track pause. You can edit the track information in the Track list.
You can add comments, add ISRC codes, and set pre-emphasis for the track.
Adding Comments
Comments give you a way to save information about a track. You can see a track’s
comments in the Track list, but users will not see them.
m
To add track comments:
Click the track’s Comments field, then type the comments in the field.
Adding ISRC Codes
The International Standard Recording Code, or ISRC, serves as a unique registration
code for phonograph and audio-visual recordings. The ISRC standard was established in
1986 by the ISO (International Standards Organization) in ISO document No. 3901. The
IFPI (International Federation of the Phonographic Industry) was designated as the
international registration agency in 1989. The IFPI recommends that members include
the ISRC in the subcode as a “fingerprint” for all digital recordings. In 1992, all member
companies received their “first owner” codes.
The ISRC is permanently stored in the subcode of a recording. When the recording is
altered or edited, a new ISRC has to be used. An ISRC can be allocated only once. The
first owner can integrate ISRCs into an existing coding system, as long as doing so
requires no more than five digits (designation code). A complete ISRC contains 12
characters, such as that shown below:
DE-K22-98-256-12
•
•
•
•
22
Country code (compliant with ISO 3166, in this case, Germany)
First owner code (record company, in this case, Polydor)
Year of recording code (2 digits)
Designation code (5 digits)
The ISRC is used by radio stations to archive recordings. Royalty collection societies
such as GEMA or MCPS/PRS also use the code to automate generation of transmission
logs, and thus simplify licensing accounting. For commercial recordings, the ISRC
should only consist of the code provided by the record label. If the record label
company has not been issued a first owner code, you should contact the IFPI.
m
To add an ISRC code:
Click the track’s ISRC field, then type the ISRC code in the field.
The CD Track Info Window
You can also view and edit track information in the CD Track Info window, including
copy protection and pre-emphasis
m
To show the CD Track Info window, do one of the following:
Select the track in the Track list, then choose Disc > Track Info
m
Click the track start marker for the track, then choose Disc > Track Info.
m
Double-click the track start marker for the track.
Setting the Copy Prohibit Bit
You can set a Copy Prohibit Bit for a track. When a track’s Copy Prohibit Bit is set, the
track cannot be copied digitally more than once by recording devices that support the
Serial Copy Management System (SCMS). These devices automatically write a copy
prohibit bit to prevent further generations of digital copies of the track.
Consumer-level DAT recorders (but frequently not professional-level ones) are usually
equipped with SCMS. However, because many recording devices do not include this
type of copy protection, setting the Copy Prohibit Bit does not guarantee that the track
cannot be copied multiple times. WaveBurner Pro provides the option to set the Copy
Prohibit Bit in order to comply with the Red Book standard.
m
To set the Copy Prohibit Bit:
In the General Pane of the CD Track Info window, choose “Protected original” or
“Protected copy” from the SCMS pop-up menu.
23
Setting Track Pre-Emphasis
The use of pre-emphasis dates from the early days of digital sound reproduction, when
14-bit A/D converters without oversampling were frequently used. The high frequencies
of digital recordings were boosted or “emphasized” during conversion (similar to the
RIAA EQ process for vinyl records), then were attenuated (de-emphasis) after D/A
conversion. This process tended to mask the inaccuracies of the conversion.
With today’s advanced digital recording technology, it is recommended that you leave
pre-emphasis turned off, because modern converters are capable of delivering linear
conversion that produces substantially fewer errors than de-emphasis filters.
WaveBurner Pro supports pre-emphasis only so that old digital recordings that were
processed using pre-emphasis can be marked as such. Pre-emphasis is a display-only
option, and will not change the way in which the audio is processed when you burn a CD.
m
To turn on pre-emphasis:
In the General Pane of the CD Track Info window, turn on Pre-Emphasis.
Bouncing Tracks
You can bounce a track. As with bouncing a region, bouncing a track has two
benefits: it lets you save an archive of the track, and it can help conserve processing
power when you burn a CD.
To bounce a track:
1 In the Track list, select the track.
2 Choose Disc > Bounce Track.
3 In the Save dialog, choose a location to save the track, then click OK.
Working With Markers
Markers are part of the Red Book standard for the CD format. You use markers to
indicate a specific point in time on the CD. There are several types of markers, including
track start, pause start, and index markers.
Types of Markers
WaveBurner Pro supports the following types of markers:
• Track start markers: Indicate the start of a track, when someone playing the finished
CD uses the forward, back, or track number controls on their CD player.
• Pause start markers: Indicate the start of a short period of silence before the next
track starts.
• Index markers: Indicate the position of index points, which are additional points in
time within a track. Not all CD players can recognize and locate index points.
24
Inserting and Deleting Markers
When you add an audio file to a project, a track start marker is inserted at the
beginning of the region created from the audio file, and a pause start marker is
inserted at the end of the preceding region (including the first region). You can use the
default placement of the markers, or move them to adjust the pause length.
You can insert track start markers manually to define tracks separately from the
beginning and end of regions in the project. You insert a track start marker and a pause
start marker together, separated by a short period of silence called the pause length.
The default pause length is defined in the General Preferences pane. For information
about setting the default pause length, see “General Preferences” on page 15.
To insert track start and pause start markers:
1 Click the Track Start Marker button (the purple marker button to the left of the
Transport controls).
2 Click either marker bar at the point in time you want to insert the track start marker.
The track start marker and pause start marker are inserted at the point where you click.
You can move the pause start marker left to create a pause before the track starts.
Index markers indicate index points, which are specific time positions within a track.
However, not all CD players can recognize index points.
To insert an index marker:
1 Click the Index Marker button (the orange marker button to the left of the
Transport controls).
2 Click either marker bar at the point in time you want to insert the index marker.
m
To delete a marker:
Click the marker to select it, then press the Delete key.
Moving Markers
You can move track start, pause start, and index markers in the Wave View area. You can
move the track start marker and pause start marker for a region together or separately.
Moving Track Start and Pause Start Markers Together
You can move the track start marker and pause start marker for a region together to
change the track start time while preserving the pause length.
To move a track start and pause start marker together:
1 Place the pointer between the pause start marker and the track start marker.
The pointer changes to the shape of the head of a marker.
2 Drag the two markers together to the point in time where you want to place them.
25
Moving Track Start and Pause Start Markers Separately
You can move the track start marker and pause start marker for a region separately,
keeping one of them in the same position and changing the pause length.
To move a track start and pause start marker separately:
1 Place the pointer directly over the head of whichever marker you want to move.
The pointer changes to the shape of the head of a marker.
2 Drag the marker to the point in time where you want to place it.
Working With Effects
You can add effects to individual regions or to the overall project mix. Effects let you
modify and shape the sound of regions or projects in a variety of ways.
You add effects to your project using effects plug-ins. WaveBurner Pro includes a
complete set of professional-quality plug-ins you can use for mastering a CD. You can
also add effects plug-ins in Audio Units format, including plug-ins developed by
third-party vendors. You can adjust the parameters of effects plug-ins in
WaveBurner Pro to get exactly the sound you want.
Types of Effects
There are several different types of effects commonly used in mastering a CD, including:
• Dynamics: These effects let you shape the volume level of your projects over time.
• Equalization (or EQ): These effects let you change the level of selected frequencies.
EQ provides a powerful way of shaping the sound of your projects.
• Noise reduction: These effects help you eliminate pops, cracks, hum, and other
unwanted noise.
• Stereo enhancement: These effects change how listeners perceive the placement of
sounds in the stereo field.
• Audio analysis: These are not effects per se, but tools which let you analyze the audio
signal, in order to spot clipping and optimize the mix for specific listening environments.
Effects Plug-Ins Included With WaveBurner Pro
WaveBurner Pro includes a full suite of mastering effects you can use in your projects.
The effects bundled with WaveBurner Pro include:
• Dynamics: Compressor, Multipressor, and Limiter
• Equalization: Fat EQ and Linear Phase EQ
• Noise reduction: Denoiser
• Stereo enhancement: Stereo Spread
• Audio analysis: Correlation Meter, Multimeter, and Level Meter
The following section briefly describes each of the bundled plug-ins.
26
Compressor
The Compressor tightens up the dynamics of a signal by lowering the volume when it
rises above a certain level, called the Threshold. This decreases the difference between
the softest and loudest parts of the music, increasing the perceived volume. This can
give the sound more focus by making the key parts stand out while preventing the
accompanying parts from becoming lost or inaudible.
In addition to the Threshold parameter, the most important parameter for the
Compressor is the Ratio. The Ratio parameter determines how much sounds above the
threshold are lowered. The Ratio is expressed as a percentage of the original signal. For
example, if you set the Threshold to –12 dB and set the Ratio to 2:1, a sound at –7 db
(5 dB above the Threshold) is reduced by 2.5 dB, and a sound at –2 dB (10 dB above the
Threshold) is reduced by 5 dB.
Two other important parameters are Attack and Release. The Attack parameter controls
how quickly the Compressor reacts when sounds reach the threshold. At higher values,
the compressor does not fully compress the signal after the attack time ends. This
ensures that the original attack transient (for example, the sound of a pick or finger
striking a guitar string) remains intact or clearly audible.
The Release parameter determines how quickly the Compressor reacts once the sound
falls below the threshold again. If the compressor produces an undesirable “pumping”
sound, adjusting the Release parameter can eliminate or minimize the pumping sound.
Because the compressor lowers sounds above the threshold, the overall output signal is
often lower than the input signal. You can compensate for the decreased output level
by raising the Gain parameter. Turning on Auto Gain ensures that a normalized input
signal is amplified so that the output signal is also normalized, regardless of the values
for Threshold and Ratio (at least when you are working with relatively static signals).
The Compressor can use one of two methods to determine when an input signal
reaches or exceeds the threshold: either the Peak or RMS level. RMS level is a better
indication of the signal’s perceived loudness. However, turning on Auto Gain and RMS
simultaneously may cause the signal to become saturated. If the signal sounds
distorted, turn auto gain off, and adjust the gain parameter instead.
27
Multipressor
The Multipressor (short for multiband compressor) is used as a mastering tool in many
different situations. The Multipressor splits the incoming signal into two to four
different frequency bands, each of which is compressed independently. This permits
higher levels of compression without producing a pumping effect.
As the name suggests, the Multipressor is like a set of compressors, each working
independently on a different part of the frequency range of an input signal. For each
frequency band, you set the Threshold, Ratio, Attack, and Release parameters as with the
Compressor. Using the Multipressor allows you to raise the overall volume level, which
can dramatically increase the amount of low-level noise (known as the noise floor).
To reduce the noise floor, each frequency band features Expansion (also called
downward expansion), which acts as a counterpart to the compressor for that band. The
compressor decreases the dynamic range at higher volume levels, and Expansion
increases the dynamic range at lower volume levels. When you apply Expansion, the
signal is reduced when it is lower than the threshold. The effect is similar to a noise
gate, but instead of cutting off the sound abruptly, it smoothly fades the volume using
an adjustable ratio.
The Multipressor has several other important parameters, including Bands and
Lookahead. The Bands parameter lets you choose whether two, three, or four
independent frequency bands are compressed; the higher the number, the more
processing power the Multipressor uses. Classic multi-band compressors typically use
three bands.
The Lookahead parameter lets you control how far ahead in time from the current
point in the signal the Multipressor “looks” or analyzes the signal, allowing it to react
more quickly to peak volumes. Unlike hardware compressors, using Lookahead does
not cause a delay in the signal, because the Multipressor can read the audio file on disk
and does not need to analyze the signal in real time.
28
Limiter
The Limiter prevents the audio signal from exceeding a maximum volume level. While a
compressor gradually lowers levels above the threshold, the Limiter puts a hard limit
on any signal louder than the Gain level (analogous to the threshold setting on a
hardware limiter). By keeping the Gain parameter below 0 dB, the Limiter can help your
projects have the greatest perceived loudness without clipping.
The Limiter has lookahead and release parameters which work similarly to those for the
Compressor and Multipressor. In addition, it has an Output Level slider and a Softknee
button. The Output Level parameter controls the output volume, independent of the
Gain setting. Turning on the Softknee button, as the name suggests, slightly softens the
degree to which sounds above the Gain setting are lowered. When the Softknee button
is turned off, sounds above the Gain setting are limited using a completely linear curve.
29
Fat EQ
The Fat EQ plug-in lets you apply equalization using up to five fully parametric bands,
and provides great flexibility in shaping the sound of your projects. In the Fat EQ
plug-in window, the bands are arranged in increasing frequency order from left to
right. Using the buttons numbered 1 through 5, you can turn each band on or off. The
circular slider for each band lets you set the amount to increase (boost) or decrease
(cut) the part of the signal in that band. By dragging the number in the value field
(located directly above the slider), you can raise or lower the band’s frequency. You can
set the amount of resonance or “Q” for each band by dragging the number in the value
field located just above the on/off button.
Band 1 can function as a low cut or low shelving filter. Bands 2 and 4 can be switched
from their normal operating mode as fully parametric band pass filters to low or high
shelving filters. The center band (3) always operates as a fully parametric band pass.
Band 5 can function as either a high cut or high shelving EQ. You select the filter type
for each band by turning on or off the graphic button for the band located at the top
of the plug-in window, above the graphic display.
30
Linear Phase EQ
The Linear Phase EQ offers up to eight bands of equalization and an integrated Fast
Fourier Transform (FFT) analyzer. It features linear-phase filtering, which means using
the Linear Phase EQ results in no phase distortion on the audio signal. Linear-phase
filtering does add latency, about 50 ms.
The parameters for the Linear Phase EQ are similar to those for Fat EQ. For each
frequency band, you drag the number up or down to raise or lower the band’s
frequency and resonance (“Q”). Instead of a slider to adjust the amount of boost or cut,
you drag the number (expressed in dB, except for the bottom and top bands, where
the low cut and high cut filters are expressed in dB/Octave). You can also drag the
curves in the graphic display to edit them directly.
You can also turn on the Analyzer to view the frequency content of the signal as it
plays. You can set the resolution of the Analyzer by clicking the bottom rectangle
button below the Post-Fader button, then choosing the resolution you want from the
shortcut menu. High resolutions are recommended to achieve reliable results with very
low bass frequencies. The bands derived from FFT analysis are divided in accordance
with the frequency linear principle—meaning that there are many more bands for
higher octaves than for lower ones.
You can reset all parameters by Option-clicking in the display area, or reset individual
parameters by Option-clicking in the parameter area. After boosting or cutting
frequency bands, you can use the Master Gain fader to adjust the Output level.
Use the scales to the left and right of the EQ display to change the vertical scale of the
EQ and analyzer curves.
31
Denoiser
Using the Denoiser, you can eliminate or reduce many kinds of low-level noise (noise
floor) from an audio signal. The main parameters of the Denoiser are Threshold, Reduce,
and Noise Type. The Threshold parameter sets how high the noise floor is for the audio
signal. The recommended method for setting the Threshold is to find a passage where
you hear only noise, then set the Threshold so that signals at this volume level are
filtered out.
The Reduce parameter sets the level to which amount the noise floor is reduced. You
use the Noise Type parameter to set the type of noise that the Denoiser reduces. There
are three choices of noise type:
• Setting the Noise Type to 0 (zero) causes the Denoiser to reduce “white noise” (all
frequencies reduced equally).
• Setting the Noise Type to a positive value causes the Denoiser to reduce “pink noise”
(harmonic noise; greater bass response).
• Setting the Noise Type to a negative value causes the Denoiser to reduce “blue noise”
(hiss, sibilants, tape noise).
The Denoiser recognizes frequency bands with a lower volume and less complex
harmonic structure, and then reduces them to the desired dB value. This method is not
completely precise, and neighboring frequencies are also reduced. Using the Denoiser
at too-high settings can produce the “glass-noise” effect, which is usually less desirable
than the existing noise.
There are three smoothing parameters that you can use to minimize the “glass-noise”
effect: Frequency smoothing, Time smoothing, and Level smoothing. Raising the
Frequency smoothing slider results in a smoother transition of denoising to the
neighboring frequencies. When the Denoiser recognizes that only noise is present in a
certain frequency band, the higher the Frequency smoothing parameter is set, the
more it will also change the neighboring frequency bands to avoid glass noise.
32
By adjusting the Time smoothing slider, you can set the amount of time the Denoiser
takes to reach maximum noise reduction. By adjusting the Level smoothing slider, you
can set a factor for a smoother transition between adjacent volume levels. When the
Denoiser recognizes that only noise is present in a certain volume range, the higher the
Transition smoothing parameter is set, the more it will also change similar level values
to avoid glass noise.
Stereo Spread
The Stereo Spread plug-in provides another commonly used mastering effect. It
enhances the perception of stereo by extending the stereo base. Some stereo
enhancing algorithms function by changing the phase of the signal, which can distort
your mix and produce unpredictable results. Instead, the Stereo Spread plug-in extends
the stereo base by distributing a selectable number of bands in the middle frequency
range alternately left and right. This increases the perception of stereo without causing
unnatural-sounding distortion of the mix.
The main parameters of the Stereo Spread plug-in are Order, Upper Intensity (Upper Int.),
and Lower Intensity (Lower Int.). The Order parameter determines number of frequency
bands into which the signal is divided. The Upper Intensity parameter controls the
intensity of the base extension of the upper frequency bands. The Lower Intensity
parameter controls the intensity of the base extension of the lower frequency bands.
Human beings perceive stereo placement of sounds mainly in the middle and high
frequencies. If very low frequencies are distributed between the left and right speakers,
the energy distribution for both speakers will be significantly worse. Therefore, it is
always best to select a lower intensity setting for the lower frequency bands, and avoid
setting the Lower Freq. below 300 Hz.
33
Level Meter
The Level Meter displays the volume level for both left and right channels of a stereo
signal. The Level Meter shows the current level on a logarithmic scale using two blue
bars. If the level is higher than 0 dB, the portion of the bar above the 0 dB point turns
red. Above the level meter, the current peak values are displayed in dB numerically. You
reset the values by clicking in the graphic display.
While the separate Level Meter plug-in can display peaks using either Peak or RMS, the
Level Meter section of the MultiMeter shows Peak and RMS values simultaneously. The
RMS level is represented by a dark blue bar while the peak level has a light blue color.
Correlation Meter
The Correlation meter displays the phase relationship of a stereo signal. A correlation of
+1 (plus one, the far right position) means that the left and right channels “correlate”
100% (that is, they are completely in phase). A correlation of 0 (zero, the center position)
indicates the widest permissible left/right divergence, often audible as an extremely wide
stereo effect. Correlation values less than zero indicate that out-of-phase material is
present, which can lead to phase cancellations if the stereo signal is combined into a
monaural signal.
34
MultiMeter
The MultiMeter combines the functions of the Level Meter and Correlation Meter
(as described above) with several other analysis tools:
• A Spectrum Analyzer
• A Goniometer for judging the phase coherency in the stereo sound field
The control panel to the left of the display allows you to switch between the Analyzer
and Goniometer and contains parameter controls for the MultiMeter. The Stereo Level
and Correlation Meter are always visible.
Spectrum Analyzer
The Spectrum Analyzer divides the audio signal into 31 independent frequency bands.
Each frequency band represents one third of an octave. The filter curves comply to IEC
document 1260.
You turn on the Spectrum Analyzer by clicking the Analyzer button. Turning on the
Spectrum Analyzer turns off the Goniometer. The four buttons below determine what
portion of the input signal the Analyzer is displaying. You can choose between Left or
Right channel only. LR max shows the maximum band levels of either channel, while
Mono displays the levels of the stereo signal summed to mono.
The View options determine the level represented by the top line of the scale in the
display (Top; range: –40 to +20 dB) and the overall dynamic range of the Spectrum
Analyzer (Range; range: 20 to 80 dB). These two parameters can also be set directly in
the display: By dragging directly on the bar graph, you can shift the top line of the
display. Dragging directly on the dB scale allows you to compress or expand the scale’s
range. The View options are useful when analyzing highly compressed material as you
can identify smaller level differences more easily by moving and/or reducing the
display range.
There are three display respond modes: RMS Slow, RMS Fast, and Peak. RMS Slow and RMS
Fast modes show the effective signal average (Root Mean Square) and offer a good
representation of the perceived volume levels. Peak mode shows level peaks accurately.
35
Goniometer
The Goniometer helps you to determine the coherence of the stereo image. Using the
Goniometer, you can see phase problems as trace cancellations along the center-line
(M=mid/mono). Goniometers developed when early two channel oscilloscopes first
appeared. Users would connect the left and right stereo channels to the X and Y inputs
while rotating the display by 45 degrees, resulting in a useful visualization of the
signal’s stereo phase.
The signal trace slowly fades to black, imitating the glow of the tubes found in older
Goniometers, and at the same time enhancing readability.
Clicking the Goniometer button turns on the Goniometer and turns off the Spectrum
Analyzer. You can use the Auto Gain display parameter in order to obtain a higher readout
on low-level passages. Auto Gain allows the display to automatically compensate for low
input levels. You can set the amount of compensation with the Auto Gain parameter, or
set Auto Gain by dragging directly in the display area of the Goniometer.
Note that Auto Gain is a display parameter only and increases the display for better
readability. The actual audio levels are not touched by this parameter.
Using Audio Effects Plug-Ins
In addition to the included effects plug-ins, you can add plug-ins in the Audio Units
format. Audio Units plug-ins are available from Apple and third-party manufacturers.
When adding third-party plug-ins to your computer, be sure to read the documentation,
including any Read Me and installation files that came with the plug-in.
Apple Audio Units plug-ins appear in the Apple submenu of the Add Plug-in pop-up
menu. Third-party Audio Units plug-ins appear in the submenu with the manufacturer’s
name in the Add Plug-In pop-up menu.
You add Audio Units plug-ins in the same way as the included effects, by choosing the
plug-in you want to add from the appropriate submenu of the Add Plug-In menu. You
adjust Audio Units plug-in parameters, view a plug-in’s window, and delete a plug-in
just as you do with the included plug-ins.
36
Adding and Deleting Plug-Ins
You add plug-ins to regions in the Region Plug-Ins list, and add plug-ins to the overall
project in the Mix Plug-Ins list.
To add a plug-in to a region:
1 Click the Region Plug-Ins tab to show the Region Plug-Ins list.
2 In the Region list, click the region to which you want to add the plug-in.
3 Choose the category of plug-in you want to add from the Add Plug-In pop-up menu,
then choose the plug-in from the submenu.
The plug-in appears in the Region Plug-Ins list, below any plug-ins already added to
the region.
To add a plug-in to the overall project:
1 Make sure no region is selected in the Region Plug-Ins list.
2 Click the Mix Plug-Ins tab to show the Mix Plug-Ins list.
3 Choose the category of plug-in you want to add from the Add Plug-In pop-up menu,
then choose the plug-in from the submenu.
The plug-in appears in the Mix Plug-Ins list, below any plug-ins already added to
the project.
If you no longer want to use a plug-in, you can delete it from the list.
m
To delete a plug-in:
Select the plug-in in either the Region Plug-Ins or Mix Plug-Ins list, then press the
Delete key.
Bypassing Plug-Ins
You can bypass a plug-in in order to hear the region or project without the plug-in,
without losing the changes you’ve made to the plug-in’s parameters.
m
To bypass a plug-in:
In the Plug-In list containing the plug-in, click the checkbox at the right of the row.
Click the checkbox again to hear the plug-in again.
37
Adjusting Plug-In Parameters
Each plug-in contains a set of parameters you use to control the way the plug-in
shapes the sound. You can view and adjust a plug-in’s parameters in its Plug-In window.
m
To view a plug-in’s parameters:
In the Plug-In list in which the plug-in appears, click the plug-in’s disclosure triangle.
m
To view the Plug-In window for a plug-in:
In the Plug-In list in which the plug-in appears, double-click the name of the plug-in.
The Plug-In window for the plug-in appears. You can adjust the plug-in’s parameters in
the Plug-In window.
m
To adjust plug-in parameters:
In the Plug-In window, move the slider, type in the field, or click the button for the
parameter you want to adjust.
Using the Level Meter
The Level Meter shows the level of the input signal in real time. When recording digital
audio, it is important that the input level not exceed 0 dB, or clipping will occur. Unlike
analog clipping, which can produce musically desirable results, digital clipping results
in harsh distortion that is undesirable in most situations.
You can monitor the audio output levels of your projects using the Level Meter. As a
project plays back, the levels in each stereo channel change constantly with the rising
and falling of the audio signal. The Level Meter shows these changes as blue bars
moving from left to right; the farther right, the higher the level for that channel.
Momentary peaks are shown as thin yellow bars in each channel.
If there is clipping at any point in the project, the bars in the Level Meter become red
past the 0 dB mark, acting as clipping indicators.
You can check your project for clipping.
38
m
To check a project for clipping, do one of the following:
Choose Disc > Check Disc for Clipping.
m
Click the Check Disc for Clipping button.
Burning a Project to a CD
When your project is complete, you burn the project to a CD. The resulting audio CD
conforms to Red Book standards and can be played on any audio CD player.
Getting Ready to Burn a CD
m
Before you burn your project to a CD, there are several things you should do to prepare:
Check that the CD burner is connected, turned on, and working.
m
Check that WaveBurner Pro recognizes the CD burner.
m
Preview the transitions between tracks.
m
Set Disc Options for the project.
Supported CD Burners
WaveBurner Pro supports all CD burners supported by Mac OS X, including SuperDrives
and external third-party CD burners.
Setting Disc Options
You can set many disc options for a project, including the following:
• Adding a UPC/EAN code
• Setting offsets for start points, stop points, and indexes
• Setting the default pause length
• Adding a period of silence at the end of the CD
• Adding CD TEXT information, including title, performer, songwriter, composer, and
arranger information, and a text message.
Adding a UPC/EAN Code
Commercially produced CDs typically include a Universal Product Code (UPC) and a
European Article Number (EAN). These codes contain information about the record
company producing the CD, and may contain additional information.
To add a UPC/EAN code:
1 Choose Disc > Disc Options, then click the General tab.
2 Type the code in the UPC/EAN Code field.
3 When you are finished, click OK.
39
Setting Offsets
You can change the position of start point, end point, and index markers globally by
setting an offset. The unit of value for offsets is one CDDA frame (1/75th of a second).
When you set an offset, the markers are moved immediately before the project is
burned to a CD, then moved back to their original positions after the CD is burned.
The purpose of setting offsets is to compensate for inaccurate timing in some CD
players, particularly older players.
The Disc Options window includes offset fields for the first start point, other start
points, stop points, and index points, allowing you to offset any or all of these markers.
The first start point is a special case, because the Red Book standard stipulates that there
must be a two- to three-second pause before the first track begins. Typing a value greater
than 0 (zero) in the First Start Point field, WaveBurner Pro inserts a corresponding period
of silence before the first track, and every track is shifted by the amount of time required
to maintain the period of silence. The overall length of the CD is increased by the number
of CDDA frames required to maintain the initial period of silence.
To set offsets:
1 Choose Disc > Disc Options, then click the General tab.
2 Type the offsets you want to set in the First Start Point, Other Start Points, End Points,
and Indexes fields. (in CDDA frames)
3 When you are finished, click OK.
Saving Mastering Notes
You can save several types of mastering information about your project in
WaveBurner Pro, in case you need to refer to it later. You can save information about the
session, the client, the plug-ins and dithering used, and information about each track.
• Session Info includes the Session ID, date and time, company, studio, engineer,
source media, bit depth and sample rate, and comments.
• Client Info includes the disc title, client, artist, producer, copyright, and comments.
• Processing Info includes the dithering method and effect plug-ins used.
• CD Track Info includes the start time, track name, track length, track stop, track pause,
copy prohibit, pre-emphasis, ISRC code, track comment, and index points for each track.
40
To add mastering information to a project:
1 Choose Disc > Mastering Notes to show the Mastering Notes window.
2 Click the tab for the category to which you want to add information.
3 Type the information in the appropriate field.
4 Click Apply to dismiss the window.
Burning the CD
After completing the steps outlined in “Getting Ready to Burn a CD” on page 39, you
are ready to burn the project to a CD.
To burn a project to a CD, do one of the following:
1 Choose Burn > Burn Disc, or click the Burn button.
The Burn dialog appears, with the name of the CD burner listed in the dialog. If you
have not previously inserted a blank CD-R in the tray of the CD burner, the Burn dialog
prompts you to insert a blank CD-R.
2 Insert a blank CD-R in the CD burner tray, if you have not already done so.
Note: The CD-R must be blank. WaveBurner Pro does not support burning a CD-R
containing other CDDA sessions.
3 In the Burn dialog, click Burn.
The Burn dialog displays the progress of the burn process. When the burn process is
complete, the CD is ejected.
Note: Be sure to add the title of the CD to the project before burning it to a CD. After
the CD is burned, you cannot change the title or any other information on the CD.
41
WaveBurner Pro Keyboard Shortcuts
File
Function
Keyboard shortcut
New
Command-N
Open
Command-O
Close
Command-W
Save
Command-S
Save As
Command-Shift-S
Import Audio File
Command-I
Burn Disc
Command-B
Edit
Function
Keyboard shortcut
Undo
Command-Z
Redo
Command-Shift-Z
Cut
Command-X
Copy
Command-C
Paste
Command-Shift-V
Select All
Command-A
Disc
Function
Keyboard shortcut
Eject Disc
Command-E
View
42
Function
Keyboard shortcut
Zoom In
Command-Down Arrow
Zoom Out
Command-Up Arrow
Previous Track Start
Command-Left Arrow
Next Track Start
Command-Right Arrow
Window
Function
Keyboard shortcut
Minimize
Command-M
Open Level Meter
Command-L
Help
Function
Keyboard shortcut
WaveBurner Pro Help
Command-? (question mark)
© 2004 Apple Computer, Inc. All rights reserved.
Apple, the Apple logo, Logic, and Mac OS are trademarks of Apple Computer, Inc., registered in the U.S. and other countries.
Finder, GarageBand, SuperDrive, and WaveBurner Pro are trademarks of Apple Computer, Inc.