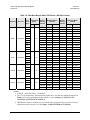
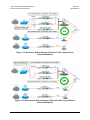
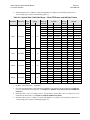
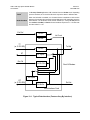
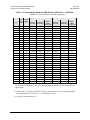
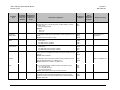
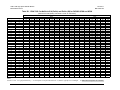
1
CDM-710G High-Speed Satellite Modem Installation and Operation Manual (Includes data for the CDM-710G [70-140 MHz] and CDM-710GL [L-Band] Configurations) IMPORTANT NOTE: The information contained in this document supersedes all previously published information regarding this product. Product specifications are subject to change without prior notice. Part Number MN-CDM710G Revision 1 Errata A Comtech EF Data Documentation Update Update ‘FLT’ serial remote control query in Appendix A. REMOTE CONTROL Subject: Original Manual Part Number/Rev: MN-CDM710G Rev 1 Errata Number/ PLM Document ID: ER-CDM710G-EA1 PLM CO Number: C-0025029 Comments: The updated information will be incorporated into the next formal revision of the manual. Update the ‘FLT’ Serial Remote Control Query as highlighted on pages 3 and 4 of this document – see Appendix A. REMOTE CONTROL, pp. A-9 / A10, and A-35 / A36. ER-CDM710G-EA1 THIS DOCUMENT IS NOT SUBJECT TO REVISION/UPDATE! PLM CO C-0025029 Page 1 of 4 Errata A for MN‐CDM710G Rev 1 Update 'FLT' Serial Remote Control Query This page is intentionally blank. ER-CDM710G-EA1 THIS DOCUMENT IS NOT SUBJECT TO REVISION/UPDATE! PLM CO C-0025029 Page 2 of 4 Errata A for MN‐CDM710G Rev 1 Parameter Type Faults and Status Command (Instruction Code and Qualifier) Arguments for Command or Response to Query N/A 4 bytes ER-CDM710G-EA1 Description of Arguments Query Only. Unit returns the current fault and status codes for the Unit (hardware), Tx Traffic and Rx Traffic, in the form abcde, where: a = Unit Faults: 0=No faults 1=Framer FPGA Load 2=Power supply fault, +1.5 Volts, Framer Card 3=Power supply fault, +1.5 Volts, Interface #1 4=Power supply fault, +1.5 Volts, Interface #2 5=Power supply fault, +3.3 Volts, Framer Card 6=Power supply fault, +5.0 Volts, Framer Card 7=Power supply fault, +12.0 Volts, Framer Card 8=Power supply fault, -12.0 Volts, Framer Card 9=Power supply fauilt, +18.0 Volts, Framer Card A=FLASH Checksum B=FEC1 Load C=FEC2 Load D=Interface #1 Load E=Interface #2 Load F=192 MHz PLL G=External Reference H=Framer Card Temperature I=Modem Temperature J=Cooling Fans K=Interface #1 Removed L=Interface #2 Removed b = Tx Traffic Status: 0=No faults 1= +1.5V Power Supply Unit (Modulator Card) 2= FPGA Failed to Load (Modulator Card) 3= Symbol Rate PLL Clock 4= Tx Synthesizer Unlocked 5= Tx Digital Clock Manager Unlocked 6= I & Q Baseband Channels are Inactive 7= FPGA Temperature (Modulator Card) 8= Reserved 9= TX Clock Failure (Interface 1) Response to Command FLT? FLT* THIS DOCUMENT IS NOT SUBJECT TO REVISION/UPDATE! PLM CO C-0025029 Update 'FLT' Serial Remote Control Query Query (Instruction Code and Qualifier) FLT? Response to Query FLT=abcde d= New faults since last check Note: Each section has faults listed in order of priority. For each section, only the highest priority fault is returned. There maybe multiple faults for each section, but only the highest fault is returned. Page 3 of 4 Errata A for MN‐CDM710G Rev 1 Update 'FLT' Serial Remote Control Query A= TX Clock Failure (Interface 2) B= GBEI Card Data rate > + 200 PPM C= GBEI Card Data rate < - 200 PPM D= GBEI No PHY Link E= Encoder FIFO Empty F= Encoder FIFO Full G= SERDES Parity Errors H=Reserved. I=Tx Ais Interface 1 J=Tx Ais Interface 2 K=Tx Cable Interface 1 L=Tx Cable Interface 2 c=Rx Traffic Status 0=No faults d=New Faults 0=No new faults 1=New faults, since last check e=Configuration change 0=Modem configuration has not been changed 1= Modem configuration has been changed ER-CDM710G-EA1 THIS DOCUMENT IS NOT SUBJECT TO REVISION/UPDATE! PLM CO C-0025029 Page 4 of 4 CDM-710G High-Speed Satellite Modem Installation and Operation Manual (Includes data for the CDM-710G [70-140 MHz] and CDM-710GL [L-Band] Configurations) Part Number MN-CDM710G Revision 1 September 21, 2009 Copyright © 2009 Comtech EF Data. All rights reserved. Printed in the USA. Comtech EF Data, 2114 West 7th Street, Tempe, Arizona 85281 USA, 480.333.2200, FAX: 480.333.2161 This page is intentionally blank. Table of Contents TABLE OF CONTENTS .............................................................................................................. III TABLES ....................................................................................................................................... X FIGURES .................................................................................................................................... XI PREFACE ................................................................................................................................. XIII About this Manual ................................................................................................................................... xiii Reporting Comments or Suggestions Concerning this Manual ............................................................. xiii Electrical Safety ....................................................................................................................................... xiv Fuses ...................................................................................................................................................... xiv Environmental ........................................................................................................................................ xiv Installation.............................................................................................................................................. xiv International Symbols ............................................................................................................................. xv Telecommunications Terminal Equipment Directive ............................................................................ xv CE Mark .................................................................................................................................................... xv RoHS Compliancy ..................................................................................................................................... xv EMC (Electromagnetic Compatibility) ................................................................................................... xv Warranty Policy ...................................................................................................................................... xvii Customer Support .................................................................................................................................... xix Online Customer Support ...................................................................................................................... xix CHAPTER 1. INTRODUCTION ............................................................................................. 1–1 1.1 Overview ...................................................................................................................................... 1–1 1.1.1 Standard and Optional Features ............................................................................................ 1–2 1.1.2 Applications .......................................................................................................................... 1–2 1.2 Functional Description ............................................................................................................... 1–3 1.3 Features ........................................................................................................................................ 1–5 1.3.1 Physical Description ............................................................................................................. 1–5 1.3.2 Major Assemblies ................................................................................................................. 1–5 1.3.3 Dimensional Envelope .......................................................................................................... 1–6 1.3.4 Physical Features .................................................................................................................. 1–7 1.3.4.1 Front Panel ........................................................................................................................................ 1–7 iii CDM-710G High-Speed Satellite Modem Table of Contents Revision 1 MN-CDM710G 1.3.4.2 Rear Panel ......................................................................................................................................... 1–8 1.3.5 Allowable Data Interface Combinations ............................................................................... 1–8 1.3.5.1 Additional Data Interface Information............................................................................................ 1–8 1.3.5.2 Data Interface Support in 1:1, 1:N Redundancy Configurations .................................................. 1–9 1.3.6 Verification ........................................................................................................................... 1–9 1.3.7 Flash Upgrading Modem Firmware .................................................................................... 1–10 1.3.8 Fully Accessible System Topology (FAST) ....................................................................... 1–10 FAST System Theory.................................................................................................. 1–10 FAST Implementation................................................................................................. 1–10 FAST Accessible Options ........................................................................................... 1–10 1.4 New in this Manual ................................................................................................................... 1–11 1.4.1 CDM-710G Modem Firmware Release Notes .................................................................... 1–11 1.5 Summary of Specifications ....................................................................................................... 1–12 1.5.1 Environmental and Physical................................................................................................ 1–14 1.5.2 Modulator ............................................................................................................................ 1–15 1.5.2.1 CDM-710G 70/140 MHz Modulator ........................................................................................... 1–15 1.5.2.2 CDM-710GL L-Band Modulator ................................................................................................. 1–16 1.5.3 Demodulator ....................................................................................................................... 1–16 1.5.3.1 CDM-710G 70/140 MHz Demodulator ....................................................................................... 1–16 1.5.3.2 CDM-710GL L-Band Demodulator ............................................................................................. 1–17 1.5.4 Test Functions ..................................................................................................................... 1–19 1.5.5 Monitor Functions ............................................................................................................... 1–19 1.5.6 Remote Port Operation........................................................................................................ 1–19 1.5.7 Data Rate Range ................................................................................................................. 1–19 CHAPTER 2. INSTALLATION .............................................................................................. 2–1 2.1 Unpacking and Inspection .......................................................................................................... 2–1 2.2 Mounting ...................................................................................................................................... 2–2 2.2.1 Method A: Optional Rear-Mounting Support Brackets ........................................................ 2–2 2.2.2 Method B: Optional Bearingless Side-Railings .................................................................... 2–4 CHAPTER 3. ETHERNET NETWORK CONFIGURATIONS ............................................... 3–1 3.1 Introduction ................................................................................................................................. 3–1 3.2 Ethernet Routers and Switches .................................................................................................. 3–1 3.3 Ethernet Configuration Examples ............................................................................................. 3–2 3.3.1 Ethernet Network Overview ................................................................................................. 3–2 3.3.2 Ethernet Redundancy with CRS-300 .................................................................................... 3–3 3.3.2.1 Wired-thru Connection .................................................................................................................. 3–3 3.3.2.2 Wired-around Connection............................................................................................................. 3–3 3.3.3 Hub-to-Hub with Standard Traffic using Switches ............................................................... 3–4 3.3.4 Hub-to-Hub with Standard Traffic using Routers ................................................................. 3–6 3.3.5 Hub-to-Remotes with Standard Traffic using Routers or Switches ................................................... 3–8 iv CDM-710G High-Speed Satellite Modem Table of Contents Revision 1 MN-CDM710G 3.3.6 Hub-to-Remotes, Split-path Traffic using Routers (Point-to-Multipoint) .......................... 3–10 3.3.7 Hub-to-Remotes, Split-path Traffic using Switches (Point-to-Multipoint) .............................................. 3–12 CHAPTER 4. REAR PANEL CONNECTOR PINOUTS ........................................................ 4–1 4.1 External Connections.................................................................................................................. 4–1 4.2 IF Connections ............................................................................................................................ 4–2 4.2.1 J1 Tx IF Connectors .............................................................................................................. 4–2 4.2.2 J3 Rx IF Connectors.............................................................................................................. 4–2 4.3 Terrestrial Data Connections ..................................................................................................... 4–3 4.3.1 J4 10/100 Ethernet Remote Port Connector, RJ-45 .............................................................. 4–3 4.3.2 J6 ASYNC Channel Port Connector, DB-9F (Non-operational).......................................... 4–3 4.4 Utility Connections...................................................................................................................... 4–4 4.4.1 P1 Alarms Connector, DB-15M............................................................................................ 4–4 4.4.2 P2 Remote Port Connector (RS-232/-485), DB-9M ............................................................. 4–5 4.4.3 J7 External Reference Input .................................................................................................. 4–5 CHAPTER 5. FLASH UPGRADING ...................................................................................... 5–1 5.1 Flash Updating via Internet ....................................................................................................... 5–1 5.2 Base Modem Ethernet FTP Upload Procedure ........................................................................ 5–2 5.3 10/100/1000 BASE-T (GigE) INTERFACE (CDI-70) FTP Upload Procedure ..................... 5–4 5.4 USB Procedure ............................................................................................................................ 5–4 CHAPTER 6. FRONT PANEL OPERATION ......................................................................... 6–1 6.1 Introduction ................................................................................................................................. 6–1 6.1.1 Front Panel LED Indicators .................................................................................................. 6–2 6.1.2 Front Panel Keypad............................................................................................................... 6–3 6.1.3 Front Panel Vacuum Fluorescent Display (VFD) ................................................................. 6–4 6.1.4 Menu Matrix ......................................................................................................................... 6–5 6.2 Opening Screen ........................................................................................................................... 6–6 6.3 SELECT: (Main) Menu .............................................................................................................. 6–6 6.3.1 (SELECT:) Config ................................................................................................................ 6–7 6.3.1.1 (CONFIG:) Remote Control............................................................................................................ 6–8 (CONFIG:) Remote Control Æ Local .......................................................................................... 6–8 (CONFIG:) Remote Control Æ Serial .......................................................................................... 6–8 (CONFIG:) Remote Control Æ Ethernet ...................................................................................... 6–9 6.3.1.2 CONFIG: Tx................................................................................................................................... 6–11 (CONFIG:) Tx Æ FEC ............................................................................................................... 6–11 (CONFIG:) Tx Æ Mod ............................................................................................................... 6–11 v CDM-710G High-Speed Satellite Modem Table of Contents Revision 1 MN-CDM710G (CONFIG:) Tx Æ Code ............................................................................................................. 6–13 (CONFIG:) Tx Æ SymRate ........................................................................................................ 6–13 (CONFIG:) Tx Æ Frequency ...................................................................................................... 6–16 (CONFIG:) Tx Æ Pwr ................................................................................................................ 6–16 (CONFIG:) Tx Æ Scram ............................................................................................................ 6–17 6.3.1.3 CONFIG: Rx .................................................................................................................................. 6–17 (CONFIG:) Rx Æ FEC ............................................................................................................... 6–17 (CONFIG:) Rx Æ Dem (Demod) ............................................................................................... 6–18 (CONFIG:) Rx Æ Code .............................................................................................................. 6–19 (CONFIG:) Rx Æ SymRate ........................................................................................................ 6–20 (CONFIG:) Rx Æ Freq ............................................................................................................... 6–20 (CONFIG:) Rx Æ Eb/No ............................................................................................................ 6–21 (CONFIG:) Rx Æ PLL ............................................................................................................... 6–21 6.3.1.4 CONFIG: Int1 (CDI-10-1 Single G.703 Interface Only) ............................................................ 6–22 (CONFIG:) Intfc1 E3/T3/STS1 Æ Port1 .................................................................................... 6–22 (CONFIG:) Intfc1 E3/T3/STS1 Æ Ext-Clk ................................................................................ 6–26 6.3.1.5 CONFIG: Int1 (CDI-60 HSSI Interface Only)............................................................................. 6–27 (CONFIG:) Intfc1 HSSI Æ Tx ................................................................................................... 6–27 (CONFIG:) Intfc1 HSSI Æ Rx ................................................................................................... 6–28 (CONFIG:) Intfc1 HSSI Æ RTS/CTS ........................................................................................ 6–30 6.3.1.6 CONFIG: Int2 (CDI-70 Gigabit Ethernet Interface Only) .......................................................... 6–30 (CONFIG:) Intfc2 Gigabit Ethernet Æ Tx.................................................................................. 6–30 (CONFIG:) Intfc2 Gigabit Ethernet Æ Rx ................................................................................. 6–31 (CONFIG:) Intfc2 Gigabit Ethernet Æ Man ............................................................................... 6–31 (CONFIG:) Intfc2 Gigabit Ethernet Æ Stats .............................................................................. 6–32 (CONFIG:) Intfc2 Gigabit Ethernet Æ SWOP (SWitch OPeration) .......................................... 6–34 6.3.1.7 CONFIG: Ref ................................................................................................................................. 6–35 6.3.1.8 CONFIG: Aux ................................................................................................................................ 6–36 6.3.1.9 CONFIG: Alarms ........................................................................................................................... 6–37 (CONFIG:) Alarm Mask: Æ Tx ................................................................................................. 6–37 (CONFIG:) Alarm Mask: Æ Rx ................................................................................................. 6–37 (CONFIG:) Alarm Mask: Æ Intfc1 ............................................................................................ 6–37 (CONFIG:) Alarm Mask: Æ Intfc1 (CDI-10-1 Single G.703 Interface Card) ................................ 6–38 (CONFIG:) Alarm Mask: Æ Intfc1 (CDI-60 HSSI Interface Card) ........................................... 6–39 (CONFIG:) Alarm Mask: Æ Intfc2 (CDI-70 GigE Interface Card) ........................................... 6–39 6.3.2 SELECT: Monitor ............................................................................................................... 6–40 6.3.2.1 (SELECT:) Monitor Æ Alarms .................................................................................................... 6–40 6.3.2.2 (SELECT:) Monitor Æ Rx_Stats.................................................................................................. 6–41 6.3.2.3 (SELECT:) Monitor: Æ Event-Log.............................................................................................. 6–41 6.3.3 SELECT: Test ..................................................................................................................... 6–44 6.3.3.1 (SELECT:) Test Æ Mode.............................................................................................................. 6–44 6.3.4 SELECT: INFO .................................................................................................................. 6–46 6.3.4.1 (SELECT:) INFO Æ Rem............................................................................................................. 6–46 6.3.4.2 (SELECT:) INFO Æ Tx ................................................................................................................ 6–46 6.3.4.3 (SELECT:) INFO Æ Rx................................................................................................................ 6–47 6.3.5 SELECT: Save/Load ........................................................................................................... 6–47 6.3.5.1 (SELECT:) Save/Load Æ Save .................................................................................................... 6–48 6.3.5.2 (SELECT:) Save/Load Æ Load .................................................................................................... 6–48 6.3.6 SELECT: Util (Utility)........................................................................................................ 6–49 6.3.6.1 (SELECT:) UTIL Æ RT-Clk ........................................................................................................ 6–49 vi CDM-710G High-Speed Satellite Modem Table of Contents Revision 1 MN-CDM710G 6.3.6.2 (SELECT:) UTIL Æ Ref ............................................................................................................... 6–49 6.3.6.3 (SELECT:) UTIL Æ ID ................................................................................................................ 6–50 6.3.6.4 (SELECT:) UTIL ÆDisplay ......................................................................................................... 6–50 6.3.6.5 (SELECT:) UTIL Æ Firmware..................................................................................................... 6–50 (Firmware:) Firmware Images Æ Info ........................................................................................ 6–50 (Firmware:) Firmware Images Æ Select..................................................................................... 6–51 Utility: Firmware Æ Info Æ Image#1 .......................................................................................... 6–52 Utility: Firmware Æ Info Æ Image#2 .......................................................................................... 6–52 6.3.6.6 (SELECT:) UTIL Æ FAST........................................................................................................... 6–53 (UTIL:) FAST ÆCnfg (Configuration) ...................................................................................... 6–53 (UTIL:) FAST Æ View .............................................................................................................. 6–53 CHAPTER 7. WEB SERVER INTERFACE ........................................................................... 7–1 7.1 Overview ...................................................................................................................................... 7–1 7.1.1 Web Server Interface Introduction ........................................................................................ 7–1 7.2 User Login.................................................................................................................................... 7–2 7.2.1 Web Server Menu Tree ......................................................................................................... 7–3 7.3 Web Server Page Descriptions ................................................................................................... 7–4 7.3.1 Home Page ............................................................................................................................ 7–4 7.3.1.1 Home | Home Page........................................................................................................................... 7–4 7.3.1.2 Home | Contact Page ........................................................................................................................ 7–5 7.3.1.3 Home | Support Page........................................................................................................................ 7–6 7.3.2 Admin Pages ......................................................................................................................... 7–7 7.3.2.1 Admin | Access ................................................................................................................................. 7–7 7.3.2.2 Admin | Remote................................................................................................................................ 7–9 7.3.3 Config Mdm (Configure Modem)....................................................................................... 7–10 7.3.3.1 Config Mdm | Interface .................................................................................................................. 7–10 7.3.3.2 Config Mdm | Modem ................................................................................................................... 7–12 7.3.3.3 Config Mdm | Modem Utilities ..................................................................................................... 7–13 7.3.4 Stats (Statistics) Pages ........................................................................................................ 7–14 7.3.4.1 Stats | Modem Status ...................................................................................................................... 7–14 7.3.4.2 Stats | Events & Statistics ............................................................................................................... 7–15 7.3.5 Maint | Unit Info Page ......................................................................................................... 7–16 CHAPTER 8. SNMP INTERFACE ......................................................................................... 8–1 8.1 SNMP Interface ........................................................................................................................... 8–1 8.2 Management Information Base (MIB) Files ............................................................................. 8–1 8.3 SNMP Community Strings ......................................................................................................... 8–2 8.4 SNMP Traps ................................................................................................................................ 8–2 8.5 Common Private MIB ................................................................................................................ 8–3 vii CDM-710G High-Speed Satellite Modem Table of Contents Revision 1 MN-CDM710G CHAPTER 9. TELNET INTERFACE ..................................................................................... 9–1 9.1 Telnet Interface ........................................................................................................................... 9–1 9.2 Caution Using Windows Telnet Client ...................................................................................... 9–2 9.3 Using Telnet ................................................................................................................................. 9–4 9.3.1 Telnet Examples.................................................................................................................... 9–4 CHAPTER 10. CLOCK MODES ......................................................................................... 10–1 10.1 Introduction ............................................................................................................................... 10–1 10.2 CDI-10-1 Single G.703 Interface.............................................................................................. 10–3 10.2.1 CDI-10-1 Single G.703 Interface Transmit Clocking ......................................................... 10–3 10.2.2 CDI-10-1 Single G.703 Interface Receive Clocking .......................................................... 10–3 10.3 CDI-60 HSSI Interface ............................................................................................................. 10–4 10.3.1 CDI-60 HSSI Interface Transmit Clocking......................................................................... 10–4 10.3.2 CDI-60 HSSI Interface Receive Clocking .......................................................................... 10–4 10.4 CDI-70 10/100/1000 Base-T Gigabit Ethernet (GigE) Interface ........................................... 10–5 CHAPTER 11. FORWARD ERROR CORRECTION OPTIONS ......................................... 11–1 11.1 Introduction ............................................................................................................................... 11–1 11.2 LDPC and BCH......................................................................................................................... 11–1 11.2.1 Range of Data Rates ............................................................................................................ 11–2 11.2.2 Eb/No, Es/No Spectral Efficiency and Occupied Bandwidth ............................................. 11–2 11.3 End-to-End Processing Delay (Latency) ................................................................................. 11–9 CHAPTER 12. SINGLE G.703 (E3/T3/STS-1) INTERFACE (CDI-10-1).......................................... 12–1 12.1 Introduction ............................................................................................................................... 12–1 12.2 Physical Description.................................................................................................................. 12–2 12.3 CDI-10-1 Connector Pinouts .................................................................................................... 12–3 12.4 Summary of Specifications ....................................................................................................... 12–4 CHAPTER 13. HSSI INTERFACE (CDI-60) ....................................................................... 13–1 13.1 Introduction ............................................................................................................................... 13–1 13.2 Physical Description.................................................................................................................. 13–2 viii CDM-710G High-Speed Satellite Modem Table of Contents Revision 1 MN-CDM710G 13.3 Connector Pinout ...................................................................................................................... 13–3 13.4 General Specifications .............................................................................................................. 13–4 13.5 Environmental And Physical Specifications ........................................................................... 13–5 CHAPTER 14. 10/100/1000 BASE-T GIGABIT ETHERNET (GIGE) INTERFACE (CDI-70) .... 14–1 14.1 Introduction ............................................................................................................................... 14–1 14.2 Physical Description.................................................................................................................. 14–2 14.3 J1 Connector Pinout, RJ45 ...................................................................................................... 14–3 14.4 Specifications ............................................................................................................................. 14–4 14.5 Flash Upgrading the CDI-70 GigE Interface.......................................................................... 14–6 14.6 GigE Operational Setups .......................................................................................................... 14–9 APPENDIX A. REMOTE CONTROL .................................................................................... A–1 A.1 Overview ..................................................................................................................................... A–1 A.2 RS-485 ......................................................................................................................................... A–1 A.3 RS-232 ......................................................................................................................................... A–2 A.4 Basic Protocol ............................................................................................................................. A–2 A.5 Packet Structure......................................................................................................................... A–2 A.5.1 Start Of Packet ..................................................................................................................... A–3 A.5.2 Address ................................................................................................................................ A–3 A.5.3 Instruction Code ................................................................................................................... A–3 A.5.4 Instruction Code Qualifier ................................................................................................... A–3 A.5.5 Message Arguments ............................................................................................................. A–4 A.5.6 End Of Packet ...................................................................................................................... A–4 A.6 Remote Commands and Queries .............................................................................................. A–5 A.6.1 Modulator ............................................................................................................................. A–6 A.6.2 Demodulator ...................................................................................................................... A–15 A.6.3 Modem ............................................................................................................................... A–27 A.6.4 Priority System................................................................................................................... A–33 A.6.5 Modem Global Configuration (MGC) Command.............................................................. A–44 A.6.5.1 MGC Format ................................................................................................................................. A–44 APPENDIX B. EB/NO MEASUREMENT .............................................................................. B–1 APPENDIX C. FAST ACTIVATION PROCEDURE .............................................................. C–1 ix CDM-710G High-Speed Satellite Modem Table of Contents C.1 Revision 1 MN-CDM710G Introduction ................................................................................................................................ C–1 C.2 Activation Procedure ................................................................................................................. C–2 C.2.1 Obtain Unit Serial Number .................................................................................................. C–2 C.2.2 View currently installed features ......................................................................................... C–2 C.2.3 Purchase FAST Access Code ............................................................................................... C–2 C.2.4 Enter FAST Access Code .................................................................................................... C–2 C.3 Using FAST Demo Mode ........................................................................................................... C–4 Tables Table 1-1. Allowable Unit/Switch Data Interface Configurations............................................................ 1–9 Table 1-2. Definition of Points For Spectral Mask ................................................................................. 1–13 Table 1-3. CDM-710/710G Power Consumption ................................................................................... 1–14 Table 1-4. Eb/No Performance at Quasi Error Free PER = 10-7 with AWGN for DVB-S2 Operations 1–18 Table 1-5. Data Rate Range: Standard FECFrame* (188 Byte Format) ................................................. 1–20 Table 1-6. Data Rate Range: Short FECFrame* (188 Byte Format) ...................................................... 1–21 Table 4-1. CDM-710G Rear Panel Connectors Reference ....................................................................... 4–2 Table 6-1. Symbol Rate / Data Rate Range – Standard FECFrame* and 188 Byte Format ................... 6–14 Table 6-2. Symbol Rate / Data Rate Range – Short FECFrame* and 188 Byte Format ........................ 6–15 Table 6-3. Statistics for the Gigabit Ethernet Interface........................................................................... 6–33 Table 6-4. Summary of Faults/Alarms (as reported per category).......................................................... 6–42 Table 6-5. Summary of Firmware Info Screens (Image#1 and Image#2) .............................................. 6–52 Table 11-1. Occupied Bandwidth for DVB-S2 Standard FECFrame = 64, 800 bits .............................. 11–3 Table 11-2. Occupied Bandwidth for DVB-S2 Short FECFrame = 16,200 bits* ................................... 11–4 Table B-1. CDM-710G Co+No/No to C/N (Es/No) and Eb/No (dB) for DVB-S2 QPSK and 8PSK ..... B–3 Table B-2. CDM-710G Co+No/No to C/N (Es/No) and Eb/No (dB) for DVB-S2 16APSK and 32APSK ......................................................................................................................................................... B–4 x CDM-710G High-Speed Satellite Modem Table of Contents Revision 1 MN-CDM710G Figures Figure 1-1. CDM-710G High-Speed Satellite Modem (L-Band version shown) ..................................... 1–1 Figure 1-2. CDM-710G Block Diagram ................................................................................................... 1–3 Figure 1-3. Dimensional Envelope ............................................................................................................ 1–6 Figure 1-4. Front Panel View.................................................................................................................... 1–7 Figure 1-5. Rear Panel View (shown with optional G.703 and GigE Interfaces)........................................ 1–8 Figure 1-6. Spectral Mask ....................................................................................................................... 1–13 Figure 1-7. Demodulator Input Level ..................................................................................................... 1–17 Figure 2-1. Installation of Optional Rear-Mounting Support Brackets (KT/6228-2) .............................. 2–3 Figure 2-2. Installation of Optional Side-Railings (FP/SL0006) ............................................................. 2–4 Figure 3-1. Networking Loop with Switches ............................................................................................ 3–2 Figure 3-2. Networking Loop Example .................................................................................................... 3–4 Figure 3-3. Networking Loop Example (Simplified)................................................................................ 3–4 Figure 3-4. Hub-to-Hub with Standard Traffic using Routers .................................................................... 3–6 Figure 3-5. Wired-thru for Hub-to-Hub with Standard Traffic using Routers.......................................... 3–7 Figure 3-6. Wired-around for Hub-to-Hub with Standard Traffic using Routers ..................................... 3–7 Figure 3-7. Hub-to-Remotes with Standard Traffic using Routers or Switches ....................................... 3–8 Figure 3-8. Wired-thru for Hub-to-Remotes with Standard Traffic using Routers or Switches ........................ 3–9 Figure 3-9. Wired-around for Hub-to-Remotes with Standard Traffic using Routers or Switches .................... 3–9 Figure 3-10. Point-to-Multipoint using Routers ..................................................................................... 3–10 Figure 3-11. Wired-thru for Point-to-Multipoint with Routers ............................................................... 3–11 Figure 3-12. Wired-around for Point-to-Multipoint with Routers .......................................................... 3–11 Figure 3-13. Point-to-Multipoint using Switches ................................................................................... 3–12 Figure 3-14. Wired-thru, Hub-to-Remotes, Split-path Traffic using Switches (Point-to-Multipoint) .... 3–13 Figure 3-15. Wired-around, Hub-to-Remotes, Split-path Traffic using Switches (Point-to-Multipoint) 3–13 Figure 4-1. Rear Panel View (CDM-710G shown w/optional interfaces installed) ................................. 4–1 Figure 5-1. Flash Update via Internet ....................................................................................................... 5–1 Figure 6-1. CDM-710G Front Panel View (L-Band version shown) ....................................................... 6–1 Figure 6-2. Traffic Data Flow – Loopback Block Diagrams .................................................................. 6–45 Figure 7-1. CDM-710G Satellite Modem Home page .............................................................................. 7–4 Figure 7-2. Home | Contact Information page .......................................................................................... 7–5 Figure 7-3. Home | Customer Support page.............................................................................................. 7–6 Figure 7-4. Admin | Access page .............................................................................................................. 7–7 Figure 7-5. Admin | Remote page ............................................................................................................. 7–9 Figure 7-6. Config Mdm | Interface page................................................................................................ 7–10 Figure 7-7. Config Mdm | Interface Page (with Empty Slot).................................................................. 7–11 Figure 7-8. Config Mdm | Modem page ................................................................................................. 7–12 Figure 7-9. Config Mdm | Modem Utilities page ................................................................................... 7–13 Figure 7-10. Stats | Modem Status page.................................................................................................. 7–14 Figure 7-11. Stats | Events & Statistics page .......................................................................................... 7–15 Figure 7-12. Maint | Unit Info page ........................................................................................................ 7–16 Figure 10-1. Typical Data Interface (Features Vary By Interface) ........................................................ 10–2 Figure 10-2. CDI-10-1 Single G.703 Interface ....................................................................................... 10–3 Figure 10-3. CDI-60 HSSI Data Interface .............................................................................................. 10–4 Figure 11-1. DVB-S2 QPSK Packet Error Rate versus Es/No ............................................................... 11–5 Figure 11-2. DVB-S2 8PSK Packet Error Rate versus Es/No ................................................................ 11–6 Figure 11-3. DVB-S2 16APSK Packet Error Rate versus Es/No ........................................................... 11–7 xi CDM-710G High-Speed Satellite Modem Table of Contents Revision 1 MN-CDM710G Figure 11-4. DVB-S2 32APSK Packet Error Rate versus Es/No ........................................................... 11–8 Figure 11-5. CDM-710G Gigabit Ethernet Latency With Modem In IF Loopback ............................... 11–9 Figure 11-6. CDM-710G HSSI Latency With Modem In IF Loopback ............................................... 11–10 Figure 12-1. CDI-10-1 Single G.703 (E3/T3/STS-1) Data Interface Module ........................................ 12–1 Figure 12-2. CDI-10-1 Block Diagram .................................................................................................. 12–2 Figure 12-3. CDI-10-1 Rear Panel View ............................................................................................... 12–2 Figure 13-1. CDI-60 HSSI Data Interface Module ................................................................................ 13–1 Figure 13-2. CDI-60 HSSI Data Interface Module Block Diagram ..................................................... 13–2 Figure 13-3. CDI-60 HSSI Data Interface Module – Rear Panel View ................................................ 13–3 Figure 13-4. Continuous and Gap Clock at TT ...................................................................................... 13–4 Figure 14-1. CDI-70 10/100/1000 Base-T Gigabit Ethernet (GigE) Interface Module .......................... 14–1 Figure 14-2. CDI-70 Interface Module Block Diagram.......................................................................... 14–2 Figure 14-3. Flash Update via Internet ................................................................................................... 14–6 Figure 14-4. GigE Interface Example: Bridging Remote Host on Common LAN Over Satellite ................ 14–9 Figure 14-5. M&C Port Assignment Example: IP Address NOT on Common LAN ........................... 14–10 xii PREFACE About this Manual This manual provides installation and operation information for the Comtech EF Data CDM-710G High-Speed Satellite Modem. This is a technical document intended for earth station engineers, technicians, and operators responsible for the operation and maintenance of the 70-140 MHz CDM-710G and its L-Band counterpart, the CDM-710GL. Reporting Comments or Suggestions Concerning this Manual Comments and suggestions regarding the content and design of this manual will be appreciated. To submit comments, please contact the Comtech EF Data Technical Publications Department: [email protected] Metric Conversion Metric conversion information is located on the inside back cover of this manual. This information is provided to assist the operator in cross-referencing non-metric to metric conversions. Cautions and Warnings WARNING indicates a potentially hazardous situation that, if not avoided, could result in death or serious injury. CAUTION indicates a hazardous situation that, if not avoided, may result in minor or moderate injury. CAUTION may also be used to indicate other unsafe practices or risks of property damage. IMPORTANT or NOTE Indicates information critical for proper equipment function. Recommended Standard Designations Recommended Standard (RS) Designations have been superseded by the new designation of the Electronic Industries Association (EIA). References to the old designations are shown only when xiii CDM-710G High-Speed Satellite Modem Preface Revision 1 MN-CDM710G depicting actual text displayed on the screen of the unit (RS-232, RS-485, etc.). All other references in the manual will be shown with the EIA designations. The user should make special note of the following information and instructions: IMPORTANT Electrical Safety The CDM-710G High-Speed Satellite Modem has been shown to comply with safety standard EN 60950: Safety of Information Technology Equipment, including Electrical Business Machines. The equipment is rated for operation over the range 100 to 240 VAC. It has a maximum power consumption of 88 watts, and draws a maximum of 770 mA. Fuses FOR CONTINUED OPERATOR SAFETY, ALWAYS REPLACE THE FUSES WITH THE CORRECT TYPE AND RATING. CAUTION The CDM-710G is fitted with two fuses - one each for line and neutral connections. These are contained within the body of the IEC power inlet connector, behind a small plastic flap. • For 115 and 230 volt AC operation, use T2.00A, 20mm fuses. • For 48 VDC operation, use T6.25A, 6.3x32mm fuses. Environmental The CDM-710G shall not be operated in an environment where the unit is exposed to extremes of temperature outside the ambient range 0 to 50°C (32° to 122°F), precipitation, condensation, or humid atmospheres above 95% RH, altitudes (unpressurized) greater than 2000 meters, excessive dust or vibration, flammable gases, corrosive or explosive atmospheres. Operation in vehicles or other transportable installations that are equipped to provide a stable environment is permitted. If such vehicles do not provide a stable environment, safety of the equipment to EN60950 may not be guaranteed. Installation The installation and connection to the line supply must be made in compliance to local or national wiring codes and regulations. The CDM-710G is designed for connection to a power system that has separate ground, line and neutral conductors. The equipment is not designed for connection to power system that has no direct connection to ground. The CDM-710G is shipped with a line inlet cable suitable for use in the country of operation. If it is necessary to replace this cable, ensure the replacement has an equivalent specification. Examples of acceptable ratings for the cable include HAR, BASEC and HOXXX-X. Examples of xiv CDM-710G High-Speed Satellite Modem Preface Revision 1 MN-CDM710G acceptable connector ratings include VDE, NF-USE, UL, CSA, OVE, CEBEC, NEMKO, DEMKO, BS1636A, BSI, SETI, IMQ, KEMA-KEUR and SEV. International Symbols International Symbols Symbol Definition Symbol Definition ~ Alternating Current Protective Earth Fuse Chassis Ground Telecommunications Terminal Equipment Directive In accordance with the Telecommunications Terminal Equipment Directive 91/263/EEC, this equipment should not be directly connected to the Public Telecommunications Network. CE Mark Comtech EF Data declares that the CDM-710G High-Speed Satellite Modem meets the necessary requirements for the CE Mark. RoHS Compliancy This unit satisfies (with exemptions) the requirements specified in the European Union Directive on the Restriction of Hazardous Substances, Directive 2002/95/EC, (EU RoHS). EMC (Electromagnetic Compatibility) In accordance with European Directive 89/336/EEC, the CDM-710G High-Speed Satellite Modem has been shown, by independent testing, to comply with the following standards: Emissions: EN 55022 Class B - Limits and methods of measurement of radio interference characteristics of Information Technology Equipment. (Also tested to FCC Part 15 Class B) Immunity: EN 50082 Part 1 - Generic immunity standard, Part 1: Domestic, commercial and light industrial environment. Additionally, the CDM-710G has been shown to comply with the following standards: EN 61000-3-2 EN 61000-3-3 EN 61000-4-2 EN 61000-4-4 Harmonic Currents Emission Voltage Fluctuations and Flicker ESD Immunity EFT Burst Immunity xv CDM-710G High-Speed Satellite Modem Preface EN 61000-4-5 EN 61000-4-6 EN 61000-4-8 EN 61000-4-9 EN 61000-4-11 EN 61000-4-13 IMPORTANT Revision 1 MN-CDM710G Surge Immunity RF Conducted Immunity Power frequency Magnetic Field Immunity Pulse Magnetic Field Immunity Voltage Dips, Interruptions, and Variations Immunity Immunity to Harmonics To ensure that the Modem continues to comply with these standards, observe the following instructions: • Connections to the transmit and receive IF ports (‘N’ type female connectors) should be made using a good quality coaxial cable - for example, RG213/U. • All 'D' type connectors attached to the rear panel must have back-shells that provide continuous metallic shielding. Cable with a continuous outer shield (either foil or braid, or both) must be used, and the shield must be bonded to the back-shell. • The equipment must be operated with its cover on at all times. If it becomes necessary to remove the cover, the user should ensure that the cover is correctly re-fitted before normal operation commences. xvi CDM-710G High-Speed Satellite Modem Preface Revision 1 MN-CDM710G Warranty Policy Comtech EF Data products are warranted against defects in material and workmanship for a specific period from the date of shipment, and this period varies by product. In most cases, the warranty period is two years. During the warranty period, Comtech EF Data will, at its option, repair or replace products that prove to be defective. Repairs are warranted for the remainder of the original warranty or a 90 day extended warranty, whichever is longer. Contact Comtech EF Data for the warranty period specific to the product purchased. For equipment under warranty, the owner is responsible for freight to Comtech EF Data and all related customs, taxes, tariffs, insurance, etc. Comtech EF Data is responsible for the freight charges only for return of the equipment from the factory to the owner. Comtech EF Data will return the equipment by the same method (i.e., Air, Express, Surface) as the equipment was sent to Comtech EF Data. All equipment returned for warranty repair must have a valid RMA number issued prior to return and be marked clearly on the return packaging. Comtech EF Data strongly recommends all equipment be returned in its original packaging. Comtech EF Data Corporation’s obligations under this warranty are limited to repair or replacement of failed parts, and the return shipment to the buyer of the repaired or replaced parts. Limitations of Warranty The warranty does not apply to any part of a product that has been installed, altered, repaired, or misused in any way that, in the opinion of Comtech EF Data Corporation, would affect the reliability or detracts from the performance of any part of the product, or is damaged as the result of use in a way or with equipment that had not been previously approved by Comtech EF Data Corporation. The warranty does not apply to any product or parts thereof where the serial number or the serial number of any of its parts has been altered, defaced, or removed. The warranty does not cover damage or loss incurred in transportation of the product. The warranty does not cover replacement or repair necessitated by loss or damage from any cause beyond the control of Comtech EF Data Corporation, such as lightning or other natural and weather related events or wartime environments. The warranty does not cover any labor involved in the removal and or reinstallation of warranted equipment or parts on site, or any labor required to diagnose the necessity for repair or replacement. The warranty excludes any responsibility by Comtech EF Data Corporation for incidental or consequential damages arising from the use of the equipment or products, or for any inability to use them either separate from or in combination with any other equipment or products. A fixed charge established for each product will be imposed for all equipment returned for warranty repair where Comtech EF Data Corporation cannot identify the cause of the reported failure. xvii CDM-710G High-Speed Satellite Modem Preface Revision 1 MN-CDM710G Exclusive Remedies Comtech EF Data Corporation’s warranty, as stated is in lieu of all other warranties, expressed, implied, or statutory, including those of merchantability and fitness for a particular purpose. The buyer shall pass on to any purchaser, lessee, or other user of Comtech EF Data Corporation’s products, the aforementioned warranty, and shall indemnify and hold harmless Comtech EF Data Corporation from any claims or liability of such purchaser, lessee, or user based upon allegations that the buyer, its agents, or employees have made additional warranties or representations as to product preference or use. The remedies provided herein are the buyer’s sole and exclusive remedies. Comtech EF Data shall not be liable for any direct, indirect, special, incidental, or consequential damages, whether based on contract, tort, or any other legal theory. xviii CDM-710G High-Speed Satellite Modem Preface Revision 1 MN-CDM710G Customer Support Contact the Comtech EF Data Customer Support Department for: • Product support or training • Reporting comments or suggestions concerning manuals • Information on upgrading or returning a product A Customer Support representative may be reached at: Comtech EF Data Attention: Customer Support Department 2114 West 7th Street Tempe, Arizona 85281 USA 480.333.2200 (Main Comtech EF Data number) 480.333.4357 (Customer Support Desk) 480.333.2161 FAX To return a Comtech EF Data product (in-warranty and out-of-warranty) for repair or replacement: • Contact the Comtech EF Data Customer Support Department. Be prepared to supply the Customer Support representative with the model number, serial number, and a description of the problem. • Request a Return Material Authorization (RMA) number from the Comtech EF Data Customer Support representative. • Pack the product in its original shipping carton/packaging to ensure that the product is not damaged during shipping. • Ship the product back to Comtech EF Data. (Shipping charges should be prepaid.) Online Customer Support An RMA number request can be requested electronically by contacting the Customer Support Department through the online support page at www.comtechefdata.com/support.asp: • Click on “Service” for detailed instructions on our return procedures. • Click on the “RMA Request Form” hyperlink, then fill out the form completely before sending. • Send e-mail to the Customer Support Department at [email protected]. For information regarding this product’s warranty policy, refer to the Warranty Policy, p. xvi. xix CDM-710G High-Speed Satellite Modem Preface Revision 1 MN-CDM710G Notes: xx Chapter 1. INTRODUCTION 1.1 Overview The CDM-710G High-Speed Satellite Modem (Figure 1-1) provides transmission of data using the same powerful DVB-S2 techniques developed for video delivery in Digital Video Broadcast (DVB) applications. It operates over satellite links with programmable symbol / data rates up to 45 Msps. The CDM-710G is intended for transmission of non-MPEG2 data. Its companion product, the CDM-710, supports MPEG2 formats with various data interfaces. Figure 1-1. CDM-710G High-Speed Satellite Modem (L-Band version shown) Various modulations and coding combinations compliant with DVB-S2 are provided. The modulation types supported include DVB-S2 QPSK, 8PSK, 16APSK and 32APSK. Note: DVB-S and DVB-DSNG are not supported. Constant Coding and Modulation (CCM) operation with a single input stream is provided for operation. The unit is available in modulator only, demodulator only, and modem configurations. The operating frequency of the CDM-710G is available in the following versions: CDM-710G (70/140 MHz) 52 to 88 MHz and 104 to 176 MHz in 100 Hz resolution CDM-710GL (L-Band) 950 to 1950 MHz in 100 Hz resolution The terrestrial data interfaces, as depicted in the block diagram shown in Figure 1-2, are field removable to allow different interface types: • CDI-10-1 Single G.703 E3/T3/STS1 Interface • CDI-60 HSSI Interface • CDI-70 1000 Base-T Ethernet (GigE) Interface The CDM-710G is compact, being 1RU high x 18.65 inches deep, with low power consumption. It has a front panel Vacuum Fluorescent Display (VFD) and keypad for local configuration and 1–1 CDM-710G High-Speed Satellite Modem Introduction Revision 1 MN-CDM710G control, although it can be fully remote-controlled via its RS-485 bus or 10/100 Base-T Ethernet Interface. 1.1.1 Standard and Optional Features The CDM-710G operates in DVB-S2 (QPSK, 8PSK, 16APSK, and 32APSK) mode only. The CDM-710G is operated from the front panel using the keypad and display or remote controlled via an RS-232 / RS-485 2/4 Wire bus or 10/100 Base-T Ethernet port located on the base unit. The CDM-710G is available for either 70/140 MHz or L-Band applications. The standard 70/140 MHz Tx-IF port has a BNC female connector that is programmable for either with 50Ω or 75Ω impedance operations. Spectral rolloffs of 20, 25, and 35% are available. 1.1.2 Applications The CDM-710G’s bandwidth and power-efficient operation is ideal for: • Transmission of non-transport stream data (referred to as Generic Data in DVB-S2) • Business enterprise data distribution • Broadband Interactive and Internet services • Any networking application relying on o Point-to-point transmission o Point-to-multipoint transmission o Arbitrary topology With a Gigabit Ethernet (GigE) data interface and either a 70/140 MHz (CDM-710G) or L-Band (CDM-710GL) IF, the CDM-710G is equipped with the configuration most frequently requested by users. This is ideal for data transmission formats that take advantage of the Ethernet packets for digital one-way, two-way and any network applications. The HSSI interface enables IP or other data formats via a serial interface, and telecom applications are supported with the G.703 interface. DVB-S2 offers new opportunities for data transmission applications. With a broad range of modulation and coding formats, it permits the user to tailor a link for the available bandwidth and power to optimize link performance. Whether a link is point-to-point or point-to-multipoint, there is a format available to suit each application. 1 1 The DVB-S2 logo is a trademark of the DVB Digital Video Broadcasting Project (1991 to 1996). 1–2 CDM-710G High-Speed Satellite Modem Introduction 1.2 Revision 1 MN-CDM710G Functional Description A block diagram of the CDM-710G is shown in Figure 1-2. CDM-710G Figure 1-2. CDM-710G Block Diagram The CDM-710G is constructed as a 1RU-high rack-mounting chassis, which can be freestanding if desired. Rack handles at the front facilitate removal from and placement into a rack. The CDM-710G performs several key functions: • • • • • • • It accepts incoming data from the terrestrial interface and converts it into appropriate clock and data signals. The modulator operates on the data to frame and encode it for transmission. Encoded information is mapped for modulation. A modulated carrier is transmitted from the IF interface for use by uplink equipment for delivery to the satellite. A carrier received from the satellite link is acquired and demodulated to recover symbols and timing. Error correction and deframing are performed. User data is delivered to the to the data interface. 1–3 CDM-710G High-Speed Satellite Modem Introduction Revision 1 MN-CDM710G Transmit (Tx) data is delivered to the data interface where it is converted to clock and data signals for further processing. Depending upon the type of interface, clock and data are provided or in other cases the clock is embedded in the data and clock recovery is performed to generate clock and data signals. A First-In–First-Out (FIFO) follows the terrestrial interface to facilitate delivery of the data to the framing card. Data is passed to the Forward Error Correction (FEC) Encoder where the data is framed and encoded in accordance with only DVB-S2 formats. After encoding, the data is passed to the modulator where the I and Q signals are mapped to generate the appropriate constellation (QPSK, 8PSK, 16APSK, and 32APSK) and filtered to provide the desired spectral rolloff. Finally, a carrier is generated by a frequency synthesizer in conjunction with the I and Q signals to produce a frequency range, as follows: CDM-710G (70/140 MHz) 52 to 88 MHz and 104 to 176 MHz IF output signal at the connector on the CDM-710G. CDM-710GL (L-Band) 950 to 1950 MHz output signal at the Frequency connector on the CDM-710GL. An Rx carrier from the satellite is received by the demodulator and reverses the process performed by the modulator. The demodulator has an FEC decoder that corrects errors incurred during transmission to improve the integrity of the data delivered to the data interface. A synthesizer in the demodulator is programmed to select the desired carrier from the transponder. Physically, the CDM-710G is comprised of several main card assemblies: • The Data Interface card is a plug-in module that is readily installed or removed at the rear of the unit. Note: Power must be turned off to remove or install the data interfaces. Any attempt to remove or install a data face without first turning off the power to the unit will result in damage to the data interface. • The Framer Card receives signals from the data interface card and routes signals to the FEC Encoder and Modulator. The microcontroller for the unit also resides on the Framer Card and is the embedded controller for the entire unit. The microcontrollers handles all of the monitor and control for unit including the front panel keypad and display, the RS232 and RS-485 2Wire / 4Wire remote port and the 10/100 Ethernet port. Interface with the other the modules in the CDM-710G is provided by the framer assembly. • The FEC Encoder and Decoder cards are plug-in modules that reside on the Framer card. They generate the encoded streams used by the modulator card. • Depending on the ordered configuration, a modulator and/or demodulator card may be installed. 1–4 CDM-710G High-Speed Satellite Modem Introduction 1.3 1.3.1 Revision 1 MN-CDM710G Features Physical Description The CDM-710G is constructed as a 1RU-high rack-mount chassis, which can be free-standing if desired. Rack handles at the front facilitate removal from and placement into a rack. The operator may configure and monitor the CDM-710G from the front panel, or through the remote M&C port. Control and status is provided through the RS-232, RS-485 (2Wire or 4Wire) port or 10/100 Base-T Ethernet port. The management Ethernet port supports SNMP, Telnet and HTTP (Web browser) operation. 1.3.2 Major Assemblies Assembly Description PL/10002-1 Modulator, 70/140 MHz PL/12113-1 Modulator, L-Band Card PL/10003-1 Demodulator, 70/140 MHz PL/11571-1 Demodulator, L-Band PL/12148-1 Encoder Assembly, Tx DVB-S2 Long/Short Frame PL/12169-1 Decoder Assembly, Rx DVB-S2 Long/Short Frame PL/10008-2 CDI-10-1 G.703 Interface PL/11582-1 CDI-60 HSSI Interface PL/11509-3 CDI-70 10/100/1000 Base-T Ethernet (GigE) Interface (FW12738) 1–5 CDM-710G High-Speed Satellite Modem Introduction 1.3.3 Revision 1 MN-CDM710G Dimensional Envelope Figure 1-3. Dimensional Envelope 1–6 CDM-710G High-Speed Satellite Modem Introduction 1.3.4 Revision 1 MN-CDM710G Physical Features 1.3.4.1 Front Panel LED Indicators Keypad Vacuum Fluorescent Display (VFD) Figure 1-4. Front Panel View Figure 1-4 shows the front panel of the CDM-710G High-Speed Satellite Modem. The front panel features (from left) Light-Emitting-Diode (LED) indicators; a keypad; and a Vacuum Fluorescent Display (VFD): • The eight (8) LEDs indicate, in a summary fashion, the status of the unit. • The keypad comprises six individual keyswitches. They have a positive ‘click’ action, which provides tactile feedback. The user enters data via the keypad, and messages are displayed on the VFD. • The VFD is an active display showing two lines of 24 characters each. It produces a blue light with adjustable brightness. Compared to a Liquid Crystal Display (LCD), the VFD has greatly superior viewing characteristics and does not suffer problems of viewing angle or contrast. The function and behavior of the LED indicators, keypad, and VFD is described in detail in Chapter 6. FRONT PANEL OPERATION. 1–7 CDM-710G High-Speed Satellite Modem Introduction 1.3.4.2 Revision 1 MN-CDM710G Rear Panel Figure 1-5. Rear Panel View (shown with optional G.703 and GigE Interfaces) Figure 1-5 shows the rear panel of the CDM-710G. External cables are attached to connectors on the rear panel of the CDM-710G. Each connector is described in detail in Chapter 4. REAR PANEL CONNECTOR PINOUTS. They comprise: Connector Group (Chapter 4 Sect. Ref.) Ref Des / Name CDM-710GL (L-Band): Type ’N’ female IF (Sect 4.2) CDM-710G (70/140 MHz band): BNC female J3 Rx Utility (Sect 4.4) 1.3.5 Function CDM-710G (70/140 MHz band): BNC female J1 Tx Terrestrial Data (Sect 4.3) Connector Type CDM-710GL (L-Band): Type ’N’ female IF Output IF Input J4 Ethernet RJ-45 Female 10/100 Base-T Remote Interface J6 Async Channel (non-operational) 9-pin Type ‘D’ female Asynchronous Engineering Channel P1 Alarms 15-pin Type ‘D’ male Form C Alarms (relay closures) P2 Remote 9-pin Type ‘D’ male Serial Remote Interface (RS232/485) J7 Ext Ref BNC female External Reference Input Allowable Data Interface Combinations Data interfaces are installed or removed from the rear of the CDM-710G chassis into Slot 1 and Slot 2 of the CDM-710G. The allowable combination of data interfaces and the data interfaces that are supported for redundancy are found in the table below. In all cases, only one data interface is active at a time. 1.3.5.1 Additional Data Interface Information Interface G.703 (CDI-10-1) Number 1:1 Capability 1:N Capability PL/10008-2 (Also see Chapter 12) OK Tx, Rx or Duplex OK Tx, Rx or Duplex HSSI (CDI-60) PL/11582-1 (Also see Chapter 13) OK Tx, Rx or Duplex OK Tx, Rx or Duplex Gigabit Ethernet (CDI-70) PL/11509-3 (Also see Chapter 14) OK Tx, Rx or Duplex OK Tx, Rx or Duplex 1–8 CDM-710G High-Speed Satellite Modem Introduction 1.3.5.2 Revision 1 MN-CDM710G Data Interface Support in 1:1, 1:N Redundancy Configurations 1:1 Redundancy with the CRS-180 (70/140 MHz) or CRS-170A (L-Band) Redundancy Switch: The “CDM-710G Unit Configuration” column in Table 1-1 shows the CDM-710G data interface combinations that are supported by the CRS-180 and CRS-170A 1:1 Redundancy Switches. First, the 1:1 switch is selected depending upon the operating frequency, and then a data interface kit for Slot 1 and Slot 2 is chosen. More information on these kits is provided in the CRS-170A or CRS-180 1:1 Redundancy Switch datasheet and Installation and Operation manual. When a CDM-710G is used as a Tx Only unit in 1:1 Redundancy, the demodulator card must be removed. Similarly, when used as an Rx Only unit in 1:1 Redundancy, the modulator card must be removed. 1:N Redundancy with the CRS-300: The CRS-300 was originally designed for operation with the CDM-600 and subsequently adapted to a number of other modems. It is capable of supporting interfaces up to the point where there are no more paths left to route traffic; this is the reason why the CRS-300 supports a limited set of the interface combinations supported by the CDM-710G. Table 1-1. Allowable Unit/Switch Data Interface Configurations CDM-710G Unit Configuration 1:N CRS-300 Configuration Notes Interface Slot 1 Interface Slot 2 G.703 (CDI-10-1) None G.703 (CDI-10-1) GigE (CDI-70) HSSI (CDI-60) None None GigE (CDI-70) HSSI (CDI-60) GigE (CDI-70) TMI Card RMI Card CRS-325 CRS-306 Can be used as Redundant Unit - CRS-336 CRS-306 Can be used as Redundant Unit Notes: 1. The Redundant Unit must have the same interface cards in each slot as any of the Traffic Units. 2. The Traffic Unit must have the same interface cards in each slot as any of the other Traffic Units have, or a blank panel installed. 3. Interface Slots 1 and 2 are not active simultaneously. 1.3.6 Verification The unit includes a number of tests for rapid verification of the correct functioning of the unit. Selection of a CW carrier permits measurement of carrier center frequency or phase noise characteristic. A single-sideband carrier also is available at the operating symbol rate to check I and Q phase and amplitude balance. When normal operation is again selected, all of the previous values are restored. 1–9 CDM-710G High-Speed Satellite Modem Introduction 1.3.7 Revision 1 MN-CDM710G Flash Upgrading Modem Firmware The internal firmware is both powerful and flexible, permitting storage and retrieval of up to 10 different modem configurations. The CDM-710G uses ‘flash memory’ technology internally, and new firmware can be uploaded to the unit from an external PC. This simplifies software upgrading, and updates can be sent via the Internet (from Comtech EF Data’s Web server), E-mail, or on CD. The upgrade can be performed without opening the unit, by simply connecting the CDM-710G to the Ethernet port of a computer. See Chapter 5. FLASH UPGRADING for further information. 1.3.8 Fully Accessible System Topology (FAST) The CDM-710G is extremely flexible and powerful, and incorporates a large number of optional features. In order to permit a lower initial cost, the modem may be purchased with only the desired features enabled. If, at a later date, a user wishes to upgrade the functionality of a modem, Comtech EF Data provides Fully Accessible System Topology (FAST), which permits the purchase and installation of options through special authorization codes loaded into the unit either via the front panel keypad or entered remotely via the remote port located on the modem rear panel. These unique access codes may be purchased at any time from Comtech EF Data. FAST System Theory FAST facilitates on-location upgrade of the operating feature set without removing a modem from the setup. With FAST technology, operators have maximum flexibility for enabling functions as they are required. FAST allows an operator to order a modem precisely tailored for the initial application. When service requirements change, the operator can upgrade the topology of the modem to meet those requirements within minutes. This accelerated upgrade can be accomplished because of FAST’s extensive use of the programmable logic devices incorporated into Comtech EF Data products. FAST Implementation Comtech EF Data’s FAST system is factory-implemented in the modem. All FAST options are available through the basic platform unit at the time of order – FAST allows immediate activation of available options, after confirmation by Comtech EF Data, through the front panel keypad or via the remote control interface. See Appendix C. FAST ACTIVATION PROCEDURE for further information. FAST Accessible Options Hardware options for basic modems can be ordered and installed either at the factory or in the field. The operator can select options that can be activated easily in the field, depending on the current hardware configuration of the modem. A unique access code enables configuration of the available hardware. 1–10 CDM-710G High-Speed Satellite Modem Introduction Revision 1 MN-CDM710G The following tables show the available FAST and FAST-accessible hardware options: Transmit Configurations Tier FAST Option 3 DVB-S2 4 DVB-S2 8 DVB-S2 Modulation Max Symbol Rate (Msps) QPSK, 8PSK 45 QPSK, 8PSK 45 16APSK 35 QPSK, 8PSK 45 16APSK 35 32APSK 28 Receive Configurations Tier FAST Option Modulation 1 DVB-S2 QPSK, 8PSK 45 QPSK, 8PSK 45 2 DVB-S2 4 1.4 DVB-S2 Max Symbol Rate (Msps) 16APSK 35 QPSK, 8PSK 45 16APSK 35 32APSK 28 New in this Manual Firmware revisions incorporate additional features and operational fixes/enhancements. Users are strongly urged to upgrade the CDM-710G to its most current firmware release – for further information, refer to Chapter 5. FLASH UPGRADING. 1.4.1 CDM-710G Modem Firmware Release Notes FW-0000114 Release Ver. 5.1.2 (9/16/09) New Features: • Enhanced Front Panel and/or Web Server Interface Operation functionality: o Invalid Tx parameter display via unit front panel; o Rx/Tx symbol rate configuration matching; o BER Monitor/Threshold configuration features; o Provision of Organized GBEI Statistics; o Progress displays to guide the user through the GBEI reflash process. For detailed information, refer to Chapter 6. FRONT PANEL OPERATION or Chapter 7. WEB SERVER INTERFACE. FW-0000114 Release Ver. 5.1.1 (4/10/09) New Features: • Initial bulk firmware release for the CDM-710G and CDM-710GL modems. 1–11 CDM-710G High-Speed Satellite Modem Introduction 1.5 Revision 1 MN-CDM710G Summary of Specifications Description Requirements Type: DVB-S2 EN 302 307 Symbol Rate: DVB-S2 1 to 45 Msps (QPSK, 8PSK), 35 Msps (16APSK), 28 Msps (32APSK) Data Rate Corresponds to symbol rate. See paragraph 1.5.7 Symbol Rate / Data Rate See modulator/demodulator Modulation/FEC: DVB-S2 QPSK 1/2, 3/5, 2/3, 3/4, 4/5, 5/6, 8/9, 9/10 LDPC + BCH 8PSK 3/5, 2/3, 3/4, 5/6, 8/9, 9/10 LDPC + BCH 16APSK 2/3, 3/4, 4/5, 5/6, 8/9, 9/10 LDPC + BCH 32APSK 3/4, 4/5, 5/6, 8/9, 9/10 Operating Modes CCM only Transport Streams Only Single Transport Stream supported Spectral Mask 20%, 25%, or 35% (per DVB- S2) – See Figure 1-6 and Table 1-2. M&C/Remote Port RS-232 and RS-485 2W/4W with Comtech EF Data protocol 10/100 Base-T Ethernet with HTTP, SNMP or Telnet Physical (PL) Layer Scrambling User specified value (one) of n = 0 to 262,141, per EN 302 307. Pilot Insertion Selection for On or Off Reflash Ethernet port Frequency Reference Selectable Internal Reference 10 MHz for data and IF, stability ± 1.5 ppm External Clock For data interfaces only, not IF. Clock Input depends upon data interface module. External Ref 1, 2, 5, 10 or 20 MHz for IF, internally phase locked. Input is 50 or 75Ω compatible with 0.5 to 4.0 Vp-p sine or square wave. Requires high stability source. 1:1 Redundancy Built in controller for operation with optional CRS-170A for L-Band and CRS-180 for 70/140 MHz 1: N Redundancy Supported by CRS-300 Fault Form C, see connector pinout information and notes Configuration Non-volatile for 1-year minimum and returns upon power up. External Tx Carrier Off TTL low signal – path bypasses microprocessor (Alarm Conn) Agency Approval Safety, conducted and radiated emissions and Immunity sufficient for CE certification 1–12 CDM-710G High-Speed Satellite Modem Introduction Revision 1 MN-CDM710G Relative power (dB) 10 A C E G I J 0 B D F H L K -10 P M -20 Q -30 N -40 S -50 0 0,5 1 1,5 2 2,5 3 f/f N Figure 1-6. Spectral Mask Table 1-2. Definition of Points For Spectral Mask Point A B C D E F G H I J K L M N P Q S Frequency for α=0,35 0,0 fN 0,0 fN 0,2 fN 0,2 fN 0,4 fN 0,4 fN 0,8 fN 0,8 fN 0,9 fN 1,0 fN 1,0 fN 1,2 fN 1,2 fN 1,8 fN 1,4 fN 1,6 fN 2,12 fN Frequency for α=0,25 0,0 fN 0,0 fN 0,2 fN 0,2 fN 0,4 fN 0,4 fN 0,86fN 0,86 fN 0,93 fN 1,0 fN 1,0 fN 1,13 fN 1,13 fN 1,60 fN 1,30 fN 1,45 fN 1,83 fN Frequency for α=0,20 0,0 fN 0,0 fN 0,2 fN 0,2 fN 0,4 fN 0,4 fN 0,89 fN 0,89 fN 0,94 fN 1,0 fN 1,0 fN 1,11 fN 1,11 fN 1,5 fN 1,23 fN 1,4 fN 1,7 fN 1–13 Relative power (dB) +0,25 -0,25 +0,25 -0,40 +0,25 -0,40 +0,15 -1,10 -0,50 -2,00 -4,00 -8,00 -11,00 -35,00 -16,00 -24,00 -40,00 Group delay +0,07/fN -0,07/fN +0,07/fN -0,07/fN +0,07/fN -0,07/fN +0,07/fN -0,07/fN +0,07/fN +0,07/fN -0,07/fN - CDM-710G High-Speed Satellite Modem Introduction 1.5.1 Revision 1 MN-CDM710G Environmental and Physical Description Operating Temperature Storage Operating Humidity Storage AC Power Supply Input DC AC Fuse DC Power Consumption AC Power Cord Retainer Modular design Dimensional Envelope, 1RU Weight Front Panel Operational Features Keypad Display LEDs Requirements 0 to 50ºC (32 to 122ºF) -20 to 70ºC (-4 to 158ºF) 95% maximum, non-condensing 99% maximum, non-condensing 100-240AC 50/60Hz, auto-ranging 48 VDC T2.00A 5x20 mm 250VAC time lag T6.25A 6.3x32 mm See Table 1-3 Standard Simplex or Duplex 1.72H x 19.00W x 18.65D inches (4.37H x 48.26W x 47.37D cm) 15lbs (6.8 kg) Up, down, left, right, Clear, and Enter keys 24-characters/line x 2 lines Vacuum Fluorescent Display (VFD) 8 status LEDs Table 1-3. CDM-710/710G Power Consumption Product Configuration Voltage Frequency Watts Amps VA CDM-710G (70/140 MHz) LDPC+BCH 32APSK 8/9 28Msps S2-TS 120 MHz 48 VDC N/A 81.2 1.69 - 120 VAC 60 83.5 0.738 89 230 VAC 50 83.0 0.503 116 CDM-710GL (L-Band) LDPC+BCH 32APSK 8/9 28Msps S2-TS 120 MHz 48 VDC N/A 85.92 1.79 - 120 VAC 60 87.2 0.770 93 230 VAC 50 86.5 0.579 133 1–14 CDM-710G High-Speed Satellite Modem Introduction 1.5.2 Revision 1 MN-CDM710G Modulator 1.5.2.1 CDM-710G 70/140 MHz Modulator Description Requirements Frequency 52 to 88 MHz or 104 to 176 MHz in 100Hz steps. Bandwidth of transmitted spectrum is within IF frequency range. Impedance 75 Ω or 50 Ω, programmable Connector BNC Female Return Loss 18 dB Output Power 0 to -20 dBm in 0.1 dB steps. Carrier is not interrupted when changing between output power levels or removing data connections. Output Power Accuracy ± 0.5 dB at 25°C Output Power Stability Within ± 0.5 dB of 25C value over all specified environments Carrier Mute 55 dB below main carrier output Harmonics and Spurious -55 dBc/4 kHz over operating frequency range (excludes spectral mask area) and is with a modulated carrier -55 dBc/4 kHz 10 to 52 MHz, 176 to 250 MHz Integrated Phase Noise Continuous component < 1 degrees RMS double-sided, 100 Hz to 10 MHz Spectral Inversion Normal or Inverted Quadrature Phase Error < 2° Quadrature Amplitude Imbalance 0.2 dB maximum Carrier Null 35 dB below an unmodulated carrier Combined Amplitude Imbalance and Quadrature Phase Error Single sideband test with suppressed sideband 35 dB minimum below unmodulated carrier 1–15 CDM-710G High-Speed Satellite Modem Introduction 1.5.2.2 Revision 1 MN-CDM710G CDM-710GL L-Band Modulator Description Frequency Requirements 950 to 1950 MHz in 100Hz steps. Bandwidth of transmitted spectrum is within IF frequency range. Impedance 50 Ω Connector Type N Male Return Loss 15 dB Output Power -5 to -25 dBm in 0.1 dB steps. Carrier is not interrupted when changing between output power levels or removing data connections. Output Power Accuracy ± 0.5 dB at 25°C Output Power Stability Within ± 0.5 dB of 25C value over all specified environments Carrier Mute 55 dB below main carrier output Harmonics and Spurious -55 dBc/4 kHz over operating frequency range (excludes spectral mask area) and is with a modulated carrier -55 dBc/4 kHz 250 to 950 MHz, 1950 to 2500 MHz Integrated Phase Noise Continuous component < 1 degrees RMS double-sided, 100 Hz to 10 MHz Spectral Inversion Normal or Inverted Quadrature Phase Error < 2° Quadrature Amplitude Imbalance 0.2 dB maximum Carrier Null 35 dB below an unmodulated carrier Combined Amplitude Single sideband test with suppressed sideband 35 dB minimum below unmodulated Imbalance and Quadrature carrier Phase Error 1.5.3 Demodulator 1.5.3.1 CDM-710G 70/140 MHz Demodulator Description Frequency Range Impedance/Connector Requirements 52 to 88 and 104 to 176 MHz in 100 Hz steps 50 Ω or optional 75 Ω/BNC Female Return Loss Input Power, Minimum 18 dB -58 + 10xLog(Symbol Rate in MHz) dBm, -58 dBm at 1 Msps, -41.5 dBm at 45 Msps. See Figure 1-7. AGC Range Max Composite Level Acquisition Range 45 dB above minimum +20 dBc composite to desired up to +10 dBm Acquisition Time Adaptive Equalizer BER Performance IQ Test Point Typical < 10 seconds, DVB-S2 Pilots On. Up to 3 dB tilt See Table 1-4. ± 100 kHz programmable in 1 kHz steps Accessible from rear panel Alarm connector 1–16 CDM-710G High-Speed Satellite Modem Introduction Revision 1 MN-CDM710G Carrier Input Level (vs) Symbol Rate 10 Carrier Input Level (dBm) 0 Maximum Level -10 -20 -30 -40 Minimum Level -50 -60 -70 1 10 Symbol Rate (Msps) Figure 1-7. Demodulator Input Level 1.5.3.2 CDM-710GL L-Band Demodulator Description Requirements Frequency Range 950 MHz to 1950 MHz in 100 Hz steps Impedance/Connector 50 Ω/Type N Female Return Loss 15 dB Input Power, Minimum -58 + 10xLog(Symbol Rate in MHz) dBm, -58 dBm at 1 Msps, -41.5 dBm at 45 Msps AGC Range 45 dB above minimum Max Composite Level +30 dBc composite to desired up to +10 dBm Acquisition Range ± 100 kHz programmable in 1 kHz steps Acquisition Time Typical < 10 seconds, DVB-S2 Pilots On Adaptive Equalizer Up to 3 dB tilt BER Performance See Table 1-4 IQ Test Point Accessible from rear panel Alarm connector 1–17 100 CDM-710G High-Speed Satellite Modem Introduction Revision 1 MN-CDM710G Table 1-4. Eb/No Performance at Quasi Error Free PER = 10-7 with AWGN for DVB-S2 Operations FECFRAME = 64,800 or 16,200 Bits and no pilot Modulation DVB-S2 QPSK 8PSK 16APSK 32APSK Code Rate 1/4 1/3 2/5 1/2 3/5 2/3 3/4 4/5 5/6 8/9 9/10 3/5 2/3 3/4 5/6 8/9 9/10 2/3 3/4 4/5 5/6 8/9 9/10 3/4 4/5 5/6 8/9 9/10 Spectral Spectral Specified Efficiency Efficiency Es/No (dB) FECFrame = FECFrame = See Notes 64,800 bits 16,200 bits 0.490243 0.365324 -1.85 0.656448 0.629060 -0.74 0.789412 0.760928 0.20 0.988858 0.848840 1.50 1.188304 1.156532 2.73 1.322253 1.288400 3.60 1.487473 1.420269 4.53 1.587196 1.508181 5.18 1.654663 1.596093 5.68 1.766451 1.727961 6.70 1.788612 NA 6.92 1.779991 1.725319 6.20 1.980636 1.922040 7.32 2.228124 2.118761 8.61 2.478562 2.381056 10.15 2.646012 2.577778 11.49 2.679207 NA 11.78 2.637201 2.548792 9.97 2.966728 2.809662 11.21 3.165623 2.983575 12.03 3.300184 3.157488 12.61 3.523143 3.418357 13.89 3.567342 NA 14.13 3.703295 3.493093 13.73 3.951571 3.709309 14.64 4.119540 3.925526 15.28 4.397854 4.249850 16.69 4.453027 NA 17.05 Eb/No (dB) See Notes 1.25 1.09 1.23 1.55 1.98 2.39 2.81 3.17 3.49 4.23 4.39 3.70 4.35 5.13 6.21 7.26 7.50 5.76 6.49 7.03 7.42 8.42 8.61 8.04 8.67 9.13 10.26 10.56 Remarks Information Information Information Notes: 1. Eb/No = Es/No – 10 Log (Spectral Efficiency). 2. BER ≈ 10-9 at PER = 10-7 3. Performance with FECFRAME = 16,200 Bits and no pilot is typically 0.2 to 0.3 dB higher. 1–18 CDM-710G High-Speed Satellite Modem Introduction 1.5.4 Revision 1 MN-CDM710G Test Functions Description Requirements CW Generates a narrow carrier at the programmed frequency at the programmed power level. Used in testing. SSB Carrier Provides desired sideband, suppressed carrier and suppressed sideband. Loopback Modes • Modulator to Demodulator • I/O Loopback where applicable • Digital Loopback where applicable 1.5.5 Monitor Functions Description Requirements Status Items – available via Front Panel Fault Log with fault type and time stamp Receive Signal Level Report within ± 5 dB, typical Es/No Report within ± 0.5 dB, typical Eb/No Report within ± 0.5 dB, typical 1.5.6 Remote Port Operation Description Requirements Comtech EF Data Remote Port See Appendix A. REMOTE CONTROL Ethernet Telnet Ethernet transport of standard Remote Control commands. Ethernet SNMP See Chapter 8. SNMP. Ethernet HTTP Support all control and monitor parameters. 1.5.7 Data Rate Range Symbol Rate and Data Rate Range for DVB-S2. There is some roundoff in the data rate ranges in the last digit. Table 1-5 is for the Standard FEC frame, and Table 1-6 is for the Short Frame. The tables are based on a 188-byte transport stream packet (only 188 is available). DVB recommends turning the Pilot ON for 8PSK and higher modulation orders, particularly when phase noise is present. The following modes may need Pilot ON for low C/N operation: 8PSK 1/2, 16APSK 2/3 and 3/4, and 32APSK 3/4 to assist carrier recovery. QPSK 1/4, 1/3, and 2/5 data is for information only. 1–19 CDM-710G High-Speed Satellite Modem Introduction Revision 1 MN-CDM710G Table 1-5. Data Rate Range: Standard FECFrame* (188 Byte Format) Modulation QPSK 8PSK FEC Code LDPC+BCH LDPC+BCH Inner Code Rate Symbol Rate Spectral (Msps) Efficiency Pilot OFF Min Max 32APSK LDPC+BCH LDPC+BCH Min Max Spectral Efficiency Pilot ON Data Rate (Mbps) Pilot ON Min Max 1/4 0.490243 0.490243 22.060942 0.478577 0.478577 21.535965 1/3 0.656448 0.656448 29.540166 0.640827 0.640827 28.837209 2/5 0.789412 0.789412 35.523546 0.770627 0.770627 34.678204 1/2 0.988858 0.988858 44.498615 0.965327 0.965327 43.439697 3/5 1.188304 1.188304 53.473684 1.160026 1.160026 52.201190 2/3 1.322253 1.322253 59.501385 1.290788 1.290788 58.085452 3/4 1.487473 1.487473 66.936288 1.452076 1.452076 65.343429 4/5 1.587196 1.587196 71.423823 1.549426 1.549426 69.724175 5/6 1.654663 1.654663 74.459834 1.615288 1.615288 72.687939 8/9 1.766451 1.766451 79.490305 1.724416 1.724416 77.598702 9/10 1.788612 1.788612 80.487535 1.746049 1.746049 78.572201 3/5 1.779991 1.779991 80.099585 1.739569 1.739569 78.280616 2/3 1.980636 1.980636 89.128631 1.935658 1.935658 87.104623 2.228124 2.228124 100.265560 2.177525 2.177525 97.988646 2.478562 2.478562 111.535270 2.422276 2.422276 109.002433 2.646012 2.646012 119.070539 2.585924 2.585924 116.366586 3/4 5/6 1 1 45* 45* 8/9 16APSK Data Rate (Mbps) Pilot OFF 9/10 2.679207 2.679207 120.564315 2.618365 2.618365 117.826440 2/3 2.637201 2.637201 92.302026 2.574613 2.574613 3/4 2.966728 2.966728 103.835482 2.896320 2.896320 101.371209 4/5 3.165623 3.165623 110.796808 3.090495 3.090495 108.167326 3.300184 3.300184 115.506446 3.221863 3.221863 112.765192 5/6 1 35* 90.111471 8/9 3.523143 3.523143 123.310006 3.439530 3.439530 120.383555 9/10 3.567342 3.567342 124.856967 3.482680 3.482680 121.893803 3/4 3.703295 3.703295 103.692261 3.623332 3.623332 101.453291 4/5 3.951571 3.951571 110.643985 3.866247 3.866247 108.254911 4.119540 4.119540 115.347126 4.030589 4.030589 112.856500 5/6 1 28* 8/9 4.397854 4.397854 123.139923 4.302894 4.302894 120.481032 9/10 4.453027 4.453027 124.684751 4.356875 4.356875 121.992503 * Notes: • DVB-S2 – Standard FECFrame = 64,800 Bits. • For G.703 fixed data rates, limit maximum symbol rate to less than the maximum indicated in Table 1-5. For more information on this interface, refer to Chapter 12. SINGLE G.703 (E3/T3/STS-1) INTERFACE (CDI-10-1). • HSSI data rate limit of 70 Mbps may be reached before symbol rate limit is reached. For more information on this interface, refer to Chapter 13. HSSI INTERFACE (CDI-60). 1–20 CDM-710G High-Speed Satellite Modem Introduction Revision 1 MN-CDM710G Table 1-6. Data Rate Range: Short FECFrame* (188 Byte Format) Modulation QPSK FEC Code LDPC+BCH Inner Code Rate Symbol Rate Spectral (Msps) Efficiency Pilot OFF Min Max LDPC+BCH Min Max 1/4 0.357467 16.086022 1/3 0.629060 0.629060 28.307692 0.615532 0.615532 27.698925 2/5 0.760928 0.760928 34.241758 0.744564 0.744564 33.505376 1/2 0.848840 0.848840 38.197802 0.830585 0.830585 37.376344 3/5 1.156532 1.156532 52.043956 1.131661 1.131661 50.924731 1.288400 1.288400 57.978022 1.260693 1.260693 56.731183 3/4 1.420269 1.420269 63.912088 1.389725 1.389725 62.537634 4/5 1.508181 1.508181 67.868132 1.475747 1.475747 66.408602 5/6 1.596093 1.596093 71.824176 1.561768 1.561768 70.279570 8/9 1.727961 1.727961 77.758242 1.690800 1.690800 76.086022 N/A N/A N/A 2/3 1 45* N/A 1.725319 1.725319 77.639344 1.692033 1.692033 76.141479 1.922040 1.922040 86.491803 1.884959 1.884959 84.823151 2.118761 2.118761 95.344262 2.077885 2.077885 93.504823 3/4 5/6 1 45* 2.381056 2.381056 107.147541 2.335120 2.335120 105.080386 2.577778 2.577778 116.000000 2.528046 2.528046 113.762058 N/A N/A N/A N/A N/A N/A 2/3 2.548792 2.548792 89.207729 2.505223 2.505223 87.682811 3/4 2.809662 2.809662 98.338164 2.761633 2.761633 96.657170 4/5 5/6 1 35* 2.983575 2.983575 104.425121 2.932574 2.932574 102.640076 3.157488 3.157488 110.512077 3.103514 3.103514 108.622982 3.418357 3.418357 119.642512 3.359924 3.359924 117.597341 N/A 9/10 LDPC+BCH N/A 2/3 8/9 32APSK N/A 3/5 9/10 LDPC+BCH Max Data Rate (Mbps) Pilot ON 0.357467 8/9 16APSK Min Spectral Efficiency Pilot ON 0.365324 0.365324 16.439560 9/10 8PSK Data Rate (Mbps) Pilot OFF N/A N/A N/A N/A 3.419165 95.736626 3/4 3.493093 3.493093 97.806607 4/5 3.709309 3.709309 103.860661 3.630805 3.630805 101.662551 3.925526 3.925526 109.914715 3.842446 3.842446 107.588477 4.249850 4.249850 118.995796 4.159906 4.159906 116.477366 5/6 8/9 9/10 1 28* N/A N/A N/A 3.419165 N/A N/A N/A N/A * Notes: • DVB-S2 – Short FECFrame = 16,200 Bits. • For G.703 fixed data rates, limit maximum symbol rate to less than the maximum indicated in Table 1-6. For more information on this interface, refer to Chapter 12. SINGLE G.703 (E3/T3/STS-1) INTERFACE (CDI-10-1). • HSSI data rate limit of 70 Mbps may be reached before symbol rate limit is reached. For more information on this interface, refer to Chapter 13. HSSI INTERFACE (CDI-60). 1–21 CDM-710G High-Speed Satellite Modem Introduction Revision 1 MN-CDM710G Notes: 1–22 Chapter 2. INSTALLATION 2.1 Unpacking and Inspection The CDM-710G High-Speed Satellite Modem and its Installation and Operation Manual are packaged in a pre-formed, reusable, cardboard carton containing foam spacing for maximum shipping protection. Be sure to keep all shipping materials for the carrier's inspection. IMPORTANT Inspect shipping containers for damage. If the shipping containers are damaged, keep them until the contents of the shipment have been carefully inspected and checked for normal operation. Do not use any cutting tool that will extend more than 1” into the container and cause damage to the unit. CAUTION Unpack and inspect the modem as follows: Step Description 1 Cut the tape at the top of the carton indicated by “OPEN THIS END.” 2 Remove the cardboard/foam space covering the modem. 3 Remove the modem, manual, and power cord from the carton. 4 Save the packing material for storage or reshipment purposes. 5 Inspect the equipment for any possible damage incurred during shipment. 6 Check the equipment against the packing list to ensure the shipment is correct. 7 Refer to the following sections for further installation instructions. 2–1 CDM-710G High-Speed Satellite Modem Installation 2.2 Revision 1 MN-CDM710G Mounting If the modulator is to be mounted in a rack, ensure that there is adequate clearance for ventilation, particularly at the sides. In rack system where there is high heat dissipation, forced air-cooling must be provided by top or bottom mounted fans or blowers. Under no circumstance should the highest internal rack temperature be allowed to exceed 50°C (122°F). 2.2.1 Method A: Optional Rear-Mounting Support Brackets Install optional rear-mounting support brackets using mounting kit KT/6228-2: Optional Rear-Mounting Support Brackets Kit KT/6228-2 Quantity CEFD Part Number Description 2 HW/10-32SHLDR Screw, #10 Shoulder 4 HW/10-32FLT Washer, #10 Flat 2 HW/10-32SPLIT Washer, #10 Split 2 HW/10-32HEXNUT Nut, #10 Hex 2 FP/6138-1 Bracket, Rear Support 4 HW/10-32x1/2RK Bolt, #10 Rack Bracket The tools required for this installation are a medium Phillips™ screwdriver and a 5/32-inch SAE Allen™ Wrench. The kit is installed as illustrated in Figure 2-1 and per the following procedure: Step Description 1 Secure the #10 shoulder screws to the unit chassis through the rear right and left side mounting slots, using the #10 flat washers, #10 split washers, and #10 hex nuts as shown. 2 Install the rear support brackets onto the equipment rack threaded rear mounting rails, using the #10 rack bracket bolts. 3 Mount the unit into the equipment rack, ensuring that the shoulders of the #10 shoulder screws properly engage into the rear support bracket slots. 2–2 CDM-710G High-Speed Satellite Modem Installation Revision 1 MN-CDM710G Equipment Rack Rear Mounting Rail #10 Shoulder Screw Support Bracket #10 Flat Washer #10 Flat Washer #10 Bracket Bolt #10 Split Washer #10 Hex Nut Back of unit Figure 2-1. Installation of Optional Rear-Mounting Support Brackets (KT/6228-2) 2–3 CDM-710G High-Speed Satellite Modem Installation 2.2.2 Revision 1 MN-CDM710G Method B: Optional Bearingless Side-Railings Figure 2-2 depicts installation of the optional side-railings FP/SL0006, using standard shop tooling and customer-furnished standard shop hardware: Optional Side-railings FP/SL0006 Quantity 2 CEFD Part Number Description FP/SL0006 Bearingless Side-Railing Figure 2-2. Installation of Optional Side-Railings (FP/SL0006) 2–4 Chapter 3. ETHERNET NETWORK CONFIGURATIONS 3.1 Introduction For operations requiring Ethernet-based terrestrial data handling, it is important to emphasize the need for users to avoid Ethernet looping connection problems – with or without use of the CDM-710G in redundancy. These issues are specifically addressed with a CDM-710G redundancy configuration that uses Comtech EF Data’s CRS-300 1:10 Redundancy Switch. 3.2 Ethernet Routers and Switches Routers and switches allow connection of one or more computers or networked devices to other computers or network devices. Each has two or more connectors, called ports, in which cables connect to other network devices. An Ethernet switch examines the traffic that comes across it, and learns where particular MAC addresses are. An Ethernet switch maintains what is known as a Content Addressable Memory (CAM) table, listing the MAC addresses for each switch port. The Ethernet switch uses the CAM table to determine where to forward Ethernet frames. By default, Ethernet switches will update the CAM table automatically; for example, if an Ethernet switch sees traffic from ‘Machine A’ coming in on ‘Port 2’, it now knows that ‘Machine A’ is connected to that port, and that traffic destined for ‘Machine A’ needs to only be sent to that port and not any of the others. An Ethernet router determines where to forward IP traffic based upon the destination IP address and the Route table entries in the router. An Ethernet router can be programmed to understand and route the data it is directed to handle; for example, broadband routers include the ability to "hide" computers behind a type of firewall, which involves slightly modifying the packets of network traffic as they traverse the device. All routers include some kind of user interface for configuring how the router will treat traffic: larger routers include the equivalent of a full-blown programming language to describe how they should operate, as well as the ability to communicate with other routers to describe or determine the best way to direct network traffic from ‘Point A’ to ‘Point B’. 3–1 CDM-710G High-Speed Satellite Modem Ethernet Network Configurations 3.3 Revision 1 MN-CDM710G Ethernet Configuration Examples This section explains the problems with Ethernet Networking Loops, and how to properly design applications architecture for handling Standard traffic and Split-path traffic. Standard traffic is defined as Rx and Tx Ethernet traffic using the same port on the same router or switch, whereas split-path traffic is Rx and Tx Ethernet traffic using different ports of the same router or switch. The following sections in this chapter provide examples of applications architecture designed to handle near-to-far end Ethernet network configurations: • Chapter 3.3.3 Hub-to-Hub with Standard Traffic using Switches • Chapter 3.3.4 Hub-to-Hub with Standard Traffic using Routers • Chapter 3.3.5 Hub-to-Remotes with Standard Traffic using Routers or Switches • Chapter 3.3.6 Hub-to-Remotes, Split-path Traffic using Routers (Point-to-Multipoint) • Chapter 3.3.7 Hub-to-Remotes, Split-path Traffic using Switches (Point-to-Multipoint) 3.3.1 Ethernet Network Overview When placing modems in a network, there are a number of issues that must be addressed – first and foremost on the list of concerns is whether implementation of the switches in the network will cause a Networking Loop. This is problematic because a Networking Loop will cause a Broadcast Storm, which shuts down the network and causes harm to devices in that network. Figure 3-1. Networking Loop with Switches Figure 3-1 illustrates a Networking Loop with switches. The problem with this configuration is that ‘Switch 1’ will send out an ARP request looking for a particular MAC, then each subsequent switch passes along that request until ‘Switch 1’ receives it again. At this point, two things could happen: 1. The switch could continue to forward all requests out all ports, creating more and more traffic on the network until there is no bandwidth available and the switch either reboots or locks up. 2. The switch could sense that the ARP request came back to the switch on a different port. The switch could then stop forwarding traffic out the proper port. Other factors will affect the network: e.g., if the switch is running Spanning Tree Protocol, VLANs, etc. 3–2 CDM-710G High-Speed Satellite Modem Ethernet Network Configurations Revision 1 MN-CDM710G 3.3.2 Ethernet Redundancy with CRS-300 After the customer has determined the best configuration for near-to-far end Ethernet networks, the CRS-300 1:10 Redundancy Switch may now be added to one or both ends of the link(s). Ethernet redundancy using the CRS-300 can be accomplished using a wired-thru or wired-around configuration. 3.3.2.1 Wired-thru Connection IMPORTANT This redundancy approach is the recommended and preferred connection method. The wired-thru Ethernet connection on the CRS-300 is the easiest and simplest choice for Ethernet redundancy. This connection method – the same as used on the standard serial data interface – provides a single connection for the User Data Interface and provides simple Form-C relays that route the Ethernet connection from the user connection to either the Traffic or Redundant Modem. 3.3.2.2 Wired-around Connection This redundancy approach is not recommended. IMPORTANT The wired-around Ethernet connection is used with the CDM-710G modem and CRS-300 1:10 Redundancy Switch, where both modem data interface slots are needed; e.g., where one slot is HSSI or G.703 and the other slot is GigE. With the Ethernet slot configured for the wired-around method, this gives full redundancy capability to both data slots. However, care must be taken to ensure there are no Ethernet network loops or connection problems – this method should only be used if both modem data slots are used. In general, the wired-around approach can be used in a hub-to-remotes configuration with standard traffic. 3–3 CDM-710G High-Speed Satellite Modem Ethernet Network Configurations Revision 1 MN-CDM710G 3.3.3 Hub-to-Hub with Standard Traffic using Switches When connecting two or more “hub-sites” where there are multi-paths between each site, care must be taken to ensure no network loops occur. Figure 3-2 depicts two hub-sites connected with two or more modems where all the traffic being transmitted and received is on the same LAN/VLAN. Figure 3-3 shows a simplified version of the Networking Loop. Since there is no router in the network and all the traffic is destined to the same network, routing loops have been created. As illustrated, two switches have been connected, each with two or more separate connections. This is not how the Ethernet switches were designed to be used, and this configuration will cause a network outage. Figure 3-2. Networking Loop Example Figure 3-3. Networking Loop Example (Simplified) 3–4 CDM-710G High-Speed Satellite Modem Ethernet Network Configurations Revision 1 MN-CDM710G This page is intentionally blank. 3–5 CDM-710G High-Speed Satellite Modem Ethernet Network Configurations 3.3.4 Revision 1 MN-CDM710G Hub-to-Hub with Standard Traffic using Routers Figure 3-4 shows two hub-sites connected with standard Ethernet traffic, using routers instead of switches for Ethernet connection. The routers will block the broadcasts coming from the remote network. Therefore, no broadcast storm can be created or the possibility of having a remote MAC on the Hub networks. Figure 3-4. Hub-to-Hub with Standard Traffic using Routers A wired-thru Ethernet redundancy example is shown in Figure 3-5. When the CRS-300 1:10 Redundancy Switch “backs-up” a faulted Traffic Modem, the physical port on the router does not change, because the Ethernet connection is properly rerouted within the CRS-300 from the Traffic Modem to the Redundant Modem. A wired-around Ethernet redundancy example is shown for the CDM-710G user in Figure 3-6. When the CRS-300 1:10 Redundancy Switch backs-up a faulted Traffic Modem, the physical port on the router needs to change from the Traffic Modem port to the Redundant Modem port. Because of this, special router configuration is required for successful operation – the user may need to consult with the router manufacturer. The wired-around redundancy approach is not recommended. IMPORTANT 3–6 CDM-710G High-Speed Satellite Modem Ethernet Network Configurations Revision 1 MN-CDM710G Figure 3-5. Wired-thru for Hub-to-Hub with Standard Traffic using Routers Figure 3-6. Wired-around for Hub-to-Hub with Standard Traffic using Routers 3–7 CDM-710G High-Speed Satellite Modem Ethernet Network Configurations 3.3.5 Revision 1 MN-CDM710G Hub-to-Remotes with Standard Traffic using Routers or Switches Figure 3-7 shows hub-to-remotes configuration with standard Ethernet traffic using routers or switches. The routers/switches will block broadcasts coming from the hub and remote networks. Therefore, no broadcast storm can be created or the possibility of having a remote MAC on the Hub networks. Figure 3-7. Hub-to-Remotes with Standard Traffic using Routers or Switches A wired-thru Ethernet redundancy example is shown in Figure 3-8. When the CRS-300 1:10 Redundancy Switch backs-up a faulted Traffic Modem, the physical port, (on the router) does not change because the Ethernet connection is properly rerouted within the CRS-300 from the Traffic Modem to the Redundant Modem. A wired-around Ethernet redundancy example for the CDM-710G user is shown Figure 3-9. When the CRS-300 1:10 Redundancy Switch backs-up a faulted Traffic Modem, the Dwitch will learn the new MAC address of the redundant unit and traffic will be passed again. This type of architecture will slow down the switching time, because the Switch will need to re-learn the correct port connection. 3–8 CDM-710G High-Speed Satellite Modem Ethernet Network Configurations Revision 1 MN-CDM710G Figure 3-8. Wired-thru for Hub-to-Remotes with Standard Traffic using Routers or Switches Figure 3-9. Wired-around for Hub-to-Remotes with Standard Traffic using Routers or Switches 3–9 CDM-710G High-Speed Satellite Modem Ethernet Network Configurations 3.3.6 Revision 1 MN-CDM710G Hub-to-Remotes, Split-path Traffic using Routers (Point-to-Multipoint) Figure 3-10 shows hub-to-remotes configuration with standard and split-path Ethernet traffic, using routers. A Static ARP Entry is needed in the switch so that routing of the Tx side of the modems will be on the correct port of the router. For example, the Rx side of the Ethernet connection for ‘Traffic Modem #N’ comes in the bottom port of the Router, but the Tx Ethernet connection must be connected through the same port as ‘Traffic Modem #1’, as shown in this figure. Figure 3-10. Point-to-Multipoint using Routers A wired-thru Ethernet redundancy example is shown in Figure 3-11. When the CRS-300 1:10 Redundancy Switch backs-up a faulted Traffic Modem, the physical port on the router does not change, because the Ethernet connection is properly rerouted within the CRS-300 from the Traffic Modem to the Redundant Modem. A wired-around Ethernet redundancy example is shown for the CDM-710G user in Figure 3-12. When the CRS-300 1:10 Redundancy Switch backs-up a faulted Traffic Modem, the physical port on the router needs to change from the Traffic Modem port to the Redundant Modem port. Because of this, special router configuration is required for successful operation – the user may need to consult with the router manufacturer. The wired-around redundancy approach is not recommended. IMPORTANT 3–10 CDM-710G High-Speed Satellite Modem Ethernet Network Configurations Revision 1 MN-CDM710G Figure 3-11. Wired-thru for Point-to-Multipoint with Routers Figure 3-12. Wired-around for Point-to-Multipoint with Routers 3–11 CDM-710G High-Speed Satellite Modem Ethernet Network Configurations 3.3.7 Revision 1 MN-CDM710G Hub-to-Remotes, Split-path Traffic using Switches (Point-to-Multipoint) With switches used, the hub and remote are on the same subnet as shown in Figure 3-13, meaning that broadcasts will be allowed to transverse the network. Learning Mode must be disabled on the Hub Tx/Rx modem, because if a computer on the remote sends a broadcast out to the Hub, the modem learns that MAC is local – when in fact it is not. Figure 3-13. Point-to-Multipoint using Switches A wired-thru Ethernet redundancy example is shown in Figure 3-14. When the CRS-300 1:10 Redundancy Switch backs-up a faulted Traffic Modem, the physical port on the Switch does not change, because the Ethernet connection is properly rerouted within the CRS-300 from the Traffic Modem to the Redundant Modem. A wired-around Ethernet redundancy example is shown for the CDM-710G user in Figure 3-15. When the CRS-300 1:10 Redundancy Switch backs-up a faulted Traffic Modem, the Switch will learn the new MAC address of the redundant unit and traffic will be passed again. This type of architecture will slow down the switching time, because the Switch will need to re-learn the correct port connection. 3–12 CDM-710G High-Speed Satellite Modem Ethernet Network Configurations Revision 1 MN-CDM710G Figure 3-14. Wired-thru, Hub-to-Remotes, Split-path Traffic using Switches (Point-to-Multipoint) Figure 3-15. Wired-around, Hub-to-Remotes, Split-path Traffic using Switches (Point-to-Multipoint) 3–13 CDM-710G High-Speed Satellite Modem Ethernet Network Configurations Revision 1 MN-CDM710G Notes: 3–14 Chapter 4. REAR PANEL CONNECTOR PINOUTS 4.1 External Connections Figure 4-1 shows the rear panel view of the CDM-710G High-Speed Satellite Modem. External cables are attached to connectors on the rear panel. The connector configurations differ based upon the operating frequency offered via the specific chassis (70/140 MHz [CDM-710G] vs. L-Band [CDM-710GL]). Slot 1 Slot 2 Figure 4-1. Rear Panel View (CDM-710G shown w/optional interfaces installed) Note: The CDM-710G supports Simplex (Tx Only or Rx Only) operation; Duplex (Tx/Rx) operation; and 1:1 or 1:N redundant operation. The European EMC Directive (EN55022, EN50082-1) requires using properly shielded cables for DATA I/O. These cables are double-shielded from end-to-end, ensuring a continuous ground shield. Table 4-1 summarizes the connectors provided on the CDM-710G rear panel. Refer to the applicable Data Interface chapter in this manual for information on, and connector pinouts for, the available G.703, HSSI, and GigE Data Interfaces. 4–1 CDM-710G High-Speed Satellite Modem Rear Panel Connector Pinouts Revision 1 MN-CDM710G Table 4-1. CDM-710G Rear Panel Connectors Reference Connector Group Ref Des / Name Connector Type CDM-710G (70/140 MHz band): BNC female J1 Tx CDM-710GL (L-Band): Type ’N’ female IF Sect. 4.2 CDM-710G (70/140 MHz band): BNC female J3 Rx Terrestrial Data Sect. 4.3 Utility Sect. 4.4 Power/Ground 4.2 CA UTIO N IF Input J4 Ethernet RJ-45 Female 10/100 BaseT Remote Interface J6 Async Channel (non-operational) 9-pin Type ‘D’ female Asynchronous Engineering Channel P1 Alarms 15-pin Type ‘D’ male Form C Alarms (relay closures) P2 Remote 9-pin Type ‘D’ male Serial Remote Interface (RS232/485) J7 Ext Ref BNC female External Reference Input AC IEC Chassis prime power input DC Terminal block Chassis prime power input Ground #10-32 stud Common Chassis Ground There may be DC voltages present on the Type ‘N’ Rx and Tx IF connectors, up to a maximum of 48 volts. J1 Tx IF Connectors Ref Des J1 4.2.2 IF Output IF Connections 4.2.1 CDM-710GL (L-Band): Type ’N’ female Function Connector Type Description CDM-710G (70/140 MHz band): BNC female 70/140 MHz Tx IF signal CDM-710GL (L-Band): Type ’N’ female L-Band Tx IF signal Direction Out J3 Rx IF Connectors Ref Des J2 Connector Type Description CDM-710G (70/140 MHz band): BNC female 70/140 MHz Rx IF Signal CDM-710GL (L-Band): Type ’N’ female L-Band Rx IF Signal 4–2 Direction In CDM-710G High-Speed Satellite Modem Rear Panel Connector Pinouts 4.3 4.3.1 Revision 1 MN-CDM710G Terrestrial Data Connections J4 10/100 Ethernet Remote Port Connector, RJ-45 The J4 Ethernet connector is a RJ-45 female interface. The J4 connector pinout is as follows: Pin # 1 2 3 4 5 6 7 8 4.3.2 Description Direction Tx+ TXRx+ N/A N/A RxN/A N/A Out Out In In J6 ASYNC Channel Port Connector, DB-9F (Non-operational) At present, Asynchronous Engineering Channel operation is not implemented in the CDM-710G; this connection is therefore non-operational. 4–3 CDM-710G High-Speed Satellite Modem Rear Panel Connector Pinouts 4.4 4.4.1 Revision 1 MN-CDM710G Utility Connections P1 Alarms Connector, DB-15M The P1 Alarms connector is a 15-Pin Type ‘D’ male interface with threaded jack nuts. The pinout depends upon whether the unit is in the Normal or Redundancy mode for use with the CRS-170A (L-Band) and CRS-180 (70/140 MHz) or CRS-300 redundancy switches. The unit is put into 1:1 mode under the Config: AUX Æ 1:1 Mask Æ Ena/Dis menu by selecting Enable. The P2 connector pinout is as follows: P1 Alarms Connector Pinout – Normal Mode Pin # Description 8 15 7 14 6 13 5 12 4 11 3 10 2 9 1 Rx Traffic (De-energized, Faulted) Note 1, 2 Rx Traffic (Energized, No Fault) Rx Traffic Tx Traffic (De-energized, Faulted) Note 1, 2 Tx Traffic (Energized, No Fault) Tx Traffic Unit Fault (De-energized, Faulted) Note 1, 2 Unit Fault (Energized, No Fault) Unit Fault Rx I Channel (Constellation Monitor) Rx Q Channel (Constellation Monitor) No Connection AGC Voltage (Rx signal level, 0-10 volts) Ext Carrier Off (TTL Lo = Mute, Open = Tx) Ground Name Rx-NC Rx-NO Rx-COM Tx-NC Tx-NO Tx-COM Unit-NC Unit-NO Unit-Com Rx-I Rx-Q NC AGC EXT-OFF GND Direction I/O I/O I/O I/O I/O I/O I/O I/O I/O O O NC O I Gnd P1 Alarms Connector Pinout – 1:N (CRS-300/710G) and 1:1 Mode (CRS-170A, CRS-180) Pin # Description 8 15 7 14 6 13 5 12 4 11 3 10 2 9 1 Summary Relay NC (De-energized, Faulted) Summary Relay NO (Energized, No Fault) Summary Relay COM Note 1, 2 Clock Detect Aux Tx Enable No Connection Fused -12 VDC Output (160 mA max) Fused +12 VDC Output (160 mA max) Online Serial Clock Serial Data Receive Serial Data – auxiliary channel Transmit Serial Data – auxiliary channel Ext Carrier Off (TTL Lo = Mute, Open = Tx) Ground 4–4 Name PR-NC, * PR-NO PR-COM Clk Det Red_Out_4 NC -12VDC +12VDC Red_In_2 Red_Out_1 Red_Out_2 Red_In_3 Red_Out_3 Red_In_1 GND Direction I/O I/O I/O I O NC O O I O O I O I Gnd CDM-710G High-Speed Satellite Modem Rear Panel Connector Pinouts Revision 1 MN-CDM710G P1 Notes : 1. The relays have low voltage contacts with transient suppressors across each pin to ground. The Summary Relay combines Tx, Rx, and Unit Faults into a single relay. 2. The maximum working voltage is 18VDC or 13VAC. The maximum current rating is 1 Amp DC or 0.5 Amp AC. 4.4.2 P2 Remote Port Connector (RS-232/-485), DB-9M The P2 Remote port connector is a 9-pin Type ‘D’ male interface with threaded jack nuts. It is intended for connection to an M&C computer or terminal device, and is user selectable for either RS-232 or RS-485.The connector pinout is as follows: Pin # 1 2 3 4 5 6 7 8 9 Description Direction Ground RS-232 Transmit Data RS-232 Receive Data Not Used Not Used RS-485 Receive Data B * RS-485 Receive Data A * RS-485 Transmit Data B RS-485 Transmit Data A Out In In In Out Out * Use for 2-wire RS-485 operation 4.4.3 J7 External Reference Input The Ext Ref (External Reference) input is a female BNC connector, used to supply a master reference to the entire chassis. The clocks on the Framer Card and the Modulator and Demodulator Synthesizers are locked to this input, when it is used. Note that some data interfaces have an Ext-Clk input for synchronizing the data sources. Refer to the applicable Data Interface chapter in this manual for details. 4–5 CDM-710G High-Speed Satellite Modem Rear Panel Connector Pinouts Revision 1 MN-CDM710G Notes: 4–6 Chapter 5. FLASH UPGRADING 5.1 Flash Updating via Internet The CDM-710G High-Speed Satellite Modem eliminates the need for updating firmware by physically replacing EPROMs. Instead, the CDM-710G uses ‘Flash memory’ technology internally. This makes software upgrading very simple, and updates can now be sent via the Internet (Figure 5-1), via E-mail, or on CD. This chapter outlines the complete upgrading process as follows: • New firmware can be downloaded via the Internet to an external PC. • The upgrade can be performed without opening the CDM-710G by simply connecting the unit to the Ethernet port of a computer. • Once downloaded, the firmware update is transferred via File Transfer Protocol (FTP) to the CDM-710G; the update is then activated upon modem reboot. Figure 5-1. Flash Update via Internet 5–1 CDM-710G High-Speed Satellite Modem Flash Upgrading 5.2 Revision 1 MN-CDM710G Base Modem Ethernet FTP Upload Procedure 1. Identify the reflashable product, firmware number, and version for download. The current base modem M&C version can be viewed at the top level menu of the front panel display (press the CLEAR key several times to view). The firmware information can also be found within the SELECT: UTILÆ Firmware Æ Info Æ Image#1 or Image#2 menu trees. Using serial remote control, the firmware revision levels can be queried with the remote queries <0/SWR? (abbreviated) or <0/FRW? (detailed). See Appendix A. REMOTE CONTROL for more information on using remote commands and queries. Alternately, when using the Base Modem Web Server Interface, the Bootrom, Bulk1 and Bulk2 firmware loads may be viewed after selecting the Unit Info hyperlink (available under the Maint [Maintenance] page tab). For more information, refer to Chapter 7. WEB SERVER INTERFACE. 2. Create a temporary directory (folder) on an external PC. Windows: Select File > New > Folder, then rename the New Folder to "temp" or another convenient, unused name. Assuming "temp" works, a "c:\temp" folder should now be created. Note: The c: is the drive letter used in this example. Any valid writable drive letter can be used. CMD Prompt: At the command prompt (c:\>), type "mkdir temp” or “MD temp" without quotes (mkdir and MD stand for make directory). This is the same as creating a new folder from Windows. There should now be a "c:\temp" subdirectory created (where c: is the drive letter used in the example). 3. Download the correct firmware file to this temporary folder. Access the download server with the flash firmware data files link as shown in Figure 5-1: 1. Go online to: www.comtechefdata.com; 2. Click on: Support tab; 3. Click on: Software Downloads drop-down or hyperlink from Support page; 4. Click on: Download Flash and Software Update Files icon; 5. Click on: (Select a Product Line) Satellite Modems hyperlink; 6. Select the CDM-710G product hyperlink; 7. Select the appropriate firmware hyperlink. About Firmware Numbers, File Versions, and Formats: The flashable files on the download server are organized by product prefix; firmware number (verify that the correct firmware number is known – see Step 1); revision letter, if applicable; version; and release date. The base modem bulk firmware for the CDM-710G is FW0000114*_*_* (where the asterisks signify revision, version and release date). The current version firmware release is provided. If applicable, a minimum of one version prior to the current release is also available. Be sure to identify and download the desired version. 5–2 CDM-710G High-Speed Satellite Modem Flash Upgrading Revision 1 MN-CDM710G The downloadable files are stored in two formats: *.exe (self-extracting) and *.zip (compressed). Some firewalls will not allow the downloading of *.exe files. In this case, download the *.zip file instead. For additional help with "zipped" file types, refer to PKZIP for Windows, WinZip, or ZipCentral help files. PKZIP for DOS is not supported due to file naming conventions. 4. Unzip the files in the temporary folder on the PC. At least three files should be extracted: • FW0000114x.bin, where "x" is the version (bulk image file). • CDM710G Release Notes.pdf (or a variation of this filename). • Readme_vx.txt, where "x" is the version (installation notes). 5. Confirm that the files have been extracted to the specified temporary folder on the PC. In DOS, use “cd c:\temp” to change to the temporary directory created in Step 2, then use the “dir” command to list the files extracted from the downloaded archive file. 6. Connect the external PC to the CDM-710G modem 10/100 Ethernet M&C port via a hub or a switch, or directly to a PC with a crossover cable. IMPORTANT BASE MODEM firmware can only be loaded via the Ethernet M&C port; do not use the Ethernet Traffic port. 7. Send a “ping” command to the modem to verify the connection and communication. First, determine the IP address of the modem remotely or using the front panel: • Remotely - use the <0/IPA? command • Front panel – Use the SELECT: CONFIG Æ Remote Æ Remote ÆEthernet menu. Then, using DOS to PING (and FTP): Click “Start” on the Windows toolbar, then select the “Run...” option. As an alternative, use the “DOS Prompt” or “Command Prompt” icons in the Start Menu: • Using Win95 or Win98: Type “command”. • Using WinNT, Win2K or WinXP: Type “cmd”. At the DOS prompt, type “ping xxx.xxx.xxx.xxx” (where "xxx.xxx.xxx.xxx" is the modem IP address). The results should confirm whether or not the modem is connected and communicating. 8. Initiate an FTP session with the modem (the example uses a DOS window): a. From the PC, type "ftp xxx.xxx.xxx.xxx" where "xxx.xxx.xxx.xxx" is the IP address of the CDM-710G. b. ENTER your admin user name and password to complete login. c. Verify the FTP transfer is binary by typing "bin". d. Type "prompt" then type "hash" to facilitate the file transfers. 5–3 CDM-710G High-Speed Satellite Modem Flash Upgrading Revision 1 MN-CDM710G 9. Transfer the files. Type "put FW0000114*.bin bulk:" to begin the file transfers. The destination “bulk:” must be all lower case. It will take approximately one minute to transfer the file. 10. Verify the file transfer. a. The PC should report that the file transfer has occurred, and the display on the modem will report: Programming flash sector #xx Please wait… b. The process sequences through several blocks – this will take several minutes. When it has finished, the modem front panel will display: Bulk FTP done. Press CLEAR. c. Terminate the FTP session by typing "bye" and closing the DOS window. d. Verify that the new file loaded using the procedure in Step 1. e. Change the desired image to boot from the modem font panel menu: SELECT: UTIL Æ Firmware Æ Select and use the left or right arrows (◄►) on the front panel keypad to change to the other image, then reboot the modem. f. Verify the new software versions are booting by observing the following messages on the modem display: CDM-710G Modem Firmware Ver x.x.x 5.3 10/100/1000 BASE-T (GigE) INTERFACE (CDI-70) FTP Upload Procedure Refer to Chapter 14. 10/100/1000 BASE-T (GigE) INTERFACE (CDI-70) for information on and instructions for flash upgrading this optional data interface. 5.4 USB Procedure USB reflash is not available in this firmware release – please consult Comtech EF Data Customer Support for release schedule. IMPORTANT 5–4 Chapter 6. FRONT PANEL OPERATION 6.1 Introduction LED Indicators Keypad Vacuum Fluorescent Display (VFD) Figure 6-1. CDM-710G Front Panel View (L-Band version shown) The user can fully control and monitor the operation of the CDM-710G from the front panel using the keypad and display. Nested menus are used that display all available options and prompt the user to carry out a required action. Figure 6-1 identifies the key features of the front panel that are explained in greater detail in this section. 6–1 CDM-710G High-Speed Satellite Modem Front Panel Operation 6.1.1 Revision 1 MN-CDM710G Front Panel LED Indicators IMPORTANT In general, the Alarm relay state will reflect the state of the Front Panel LEDs. For instance, if the Unit Status LED is red, the Unit Alarm relay will be active, etc. The one exception is the Transmit Traffic relay; this will only be activated if a Transmit Traffic Fault exists – it does not reflect the state of the Tx carrier. The behavior of the eight front panel LEDs adjacent to the keypad indicate the operation status of the CDM-710G, and are described as follows: LED COLOR CONDITION/STATE Green No Unit Faults or Alarms exists. Orange A Unit Alarm exists. Red A Unit Fault exists. Green No Tx Traffic Faults or Alarms exists. Orange A Tx Traffic Alarm exists. Red A Traffic Fault exists. Off Unit not configured for Modulator. Green No Rx Traffic Faults or Alarms exists. Orange An Rx Traffic Alarm exists. Red An Rx Fault exists. Off Unit not configured for Demodulator. Green The Unit is On Line, and carrying traffic Off The Unit is Off Line (standby) – forced by externally connected 1:1 or 1:N redundancy system STORED EVENT Orange There is a Stored Event in the log that may either be viewed from the front panel or retrieved via the remote control interface. Off There are no Stored Events. TRANSMITTER ON Green Transmitter is currently on. This indicator reflects the actual condition of the transmitter, as opposed to the programmed condition. UNIT STATUS Tx STATUS Rx STATUS ONLINE Off Transmitter is currently OFF. Green The Unit is in Remote Communication Mode. Local monitoring is possible, but no local control. Off The Unit is in Local Mode – remote monitoring is possible, but no remote control. Green A Test Mode is selected; e.g., IF Loopback. Off There is no Test Mode currently selected. REMOTE TEST MODE 6–2 CDM-710G High-Speed Satellite Modem Front Panel Operation 6.1.2 Revision 1 MN-CDM710G Front Panel Keypad IMPORTANT The keypad has an auto-repeat feature. If a key is held down for more than 1 second, the key action will repeat, automatically, at the rate of 15 keystrokes per second. This is particularly useful when editing numeric fields, with many digits, such as frequency or Data Rate. The keypad features six individual key switches with a positive ‘click’ action – this provides the user with tactile feedback. These function of these keys is as follows: ENTER Used to select a displayed function or to execute a modem configuration change. CLEAR Used to back out of a selection or to cancel a configuration change that has not been executed using ENTER. Pressing CLEAR generally returns the display to the previous selection. W X (Left, Right) Used to move to the next selection or to move the cursor functions. At times, they may also used to move from one section to another. S T (Up, Down) Used primarily to change configuration data (numbers). At times, they may also be used to move from one section to another. 6–3 CDM-710G High-Speed Satellite Modem Front Panel Operation 6.1.3 Revision 1 MN-CDM710G Front Panel Vacuum Fluorescent Display (VFD) The CDM-710G features a Vacuum Fluorescent Display (VFD). The VFD is an active display showing two lines of 24 characters each. It produces a blue light, the brightness of which can be controlled by the user. Compared to a Liquid Crystal Display (LCD), it has greatly superior viewing characteristics and does not suffer problems of viewing angle or contrast. As shown above, the ‘welcome screen’ is displayed whenever power is first applied to the unit. The top line identifies the unit model (i.e., CDM-710G, or CDM-710GL as shown); the bottom line displays the CDM-710G’s installed Firmware Version (version number varies). Pressing any key takes the user to the top-level Select menu. On most menu screens, users will see a flashing, solid-block cursor that blinks at a once-per-second rate. This indicates the currently selected item, digit, or field: CONFIG: Remote Tx Rx Int1 Int2 Ref Aux Alarms Where this solid block cursor would obscure the item being edited (e.g., a numeric field), the cursor will automatically change to an underline cursor: Tx Freq: 0140.0000 MHz (◄ ► ▲ ▼ ENTER) To prevent the display from becoming burnt by a constant image, the unit employs a screen saver feature that activates after one hour and constantly scrolls and wraps a message across the screen. The top line of the screen saver display shows the Circuit ID, which is user-configurable; the bottom line displays the message ‘Press any key…’ as shown: Circuit ID:-----------------Press any key... Press any key to restore the previously active screen. 6–4 CDM-710G High-Speed Satellite Modem Front Panel Operation 6.1.4 Revision 1 MN-CDM710G Menu Matrix Sect. Description Remarks 6.2 Opening Screen 6.3 Select (Main) Menu Select: Config; Monitor; Test; Info; Save/Load; Util 6.3.1 Configuration Select: Remote; Tx; Rx: Int1; Int2; Ref, Aux, Alarms 6.3.1.1 (CONFIG:) Remote Control Select: Local; Serial; Ethernet 6.3.1.2 (CONFIG:) Tx Select: FEC; Mod; Code; SymRate; Freq, Pwr; Scram 6.3.1.3 (CONFIG:) Rx Select: FEC; Dem; Code; SymRate; Freq; Eb/No; PLL 6.3.1.4 (CONFIG:) Intfc1 (CDI-10-1 E3T3STS1 Interface only) Select: Tx; Rx; Config 6.3.1.5 (CONFIG:) Intfc1 (CDI-60 HSSI Interface only) Select: Tx, Rx, CTS/RTS 6.3.1.6 (CONFIG:) Intfc2 Select: Tx; Rx; Man; Stats; SWOP (CDI-70 Gigabit Ethernet Interface only) 6.3.1.7 (CONFIG:) Ref 6.3.1.8 (CONFIG:) Aux Select: Ena/Dis; Force (1:1) 6.3.1.9 (CONFIG:) Alarms Select: Tx; Intfc1; Intfc2 6.3.2 Monitor 6.3.2.1 (Monitor:) Alarms 6.3.2.2 (Monitor:) Rx Stats 6.3.2.3 (Monitor:) Event-Log Select: Alarms; Rx_Stats; Event-Log Select: Transmit; Receive; Unit Select: View; Clear-All 6.3.3 Test Select: Mode 6.3.4 Info Select: Rem; Tx; Rx; Intfc1; Intfc2 6.3.5 Save/Load Select: Save; Load 6.3.5.1 (Save/Load:) Save 6.3.5.2 (Save/Load:) Load 6.3.6 Utility Select: RT-CLK; Ref; ID; Display; Firmware; FAST 6.3.6.1 (Utility:) RT-Clk 6.3.6.2 (Utility:) Ref 6.3.6.3 (Utility:) ID 6.3.6.4 (Utility:) Display 6.3.6.5 (Utility:) Firmware Select: Info; Select 6.3.6.6 (Utility:) FAST Select: Cnfg; View Notes: 1. Because the CDM-710G operates only in DVB-S2 mode, many of the Rx parameters are readonly. 2. Refer to CONFIG: Tx Æ SymRate for the Data Rate table. 3. The Impedance selection appears when the 70/140 MHz Modulator card is installed. 4. Because the CDM-710G operates only in DVB-S2 mode, the Scrambler and pilot selections are always available. 6–5 CDM-710G High-Speed Satellite Modem Front Panel Operation 6.2 Revision 1 MN-CDM710G Opening Screen The opening ‘welcome screen’ shown here is representative of what displays whenever power is first applied to the unit (the Firmware Version may differ). Pressing any key takes the user to the top-level Select menu. IMPORTANT 6.3 For purposes of this documentation, a CDM-710GL (L-Band) unit is shown; the unit in use could be either a CDM-710G or CDM-710GL High-Speed Satellite Modem. SELECT: (Main) Menu SELECT: Config Monitor Test Info Save/Load Util Move the cursor to the desired choice using the W X arrow keys, then press ENTER. The following table describes the function of each menu branch (along with the section in this chapter that provides information on that branch and its accompanying submenus): SELECTION MENU BRANCH DESCRIPTION Config (Configuration) Provides the user selections for the desired Interface, Transmit, and Receive operations Monitor Permits the user to monitor the alarm status of the unit, to view the log of stored events, and to display the Receive Parameters screen. Test Permits the user to configure the modem into one of several Test modes; e.g., CW and Loopback Info (Information) Provides a summary/display of the Interface, Transmit, Receive, and M&C configurations. Save/Load Permits the user to save and retrieve up to 10 different modem configurations. Util (Utility) Permits the user to perform miscellaneous functions, such as setting the RealTime Clock, adjusting the display brightness, etc. 6–6 CDM-710G High-Speed Satellite Modem Front Panel Operation 6.3.1 Revision 1 MN-CDM710G (SELECT:) Config CONFIG: Remote Tx Rx Int1 Int2 Ref Aux Alarms The submenus available are: SELECTION SECT SUBMENU DESCRIPTION Remote 6.3.1.1 (Remote Control) Permits defining whether the unit is being controlled locally or remotely (see IMPORTANT note). Tx 6.3.1.2 (Transmit) Permits defining, on a parameter-by-parameter basis, the Tx configuration of the unit. These submenu branches would be used if the user wished to change, e.g., just the Tx Frequency. Rx 6.3.1.3 (Receive) Permits defining, on a parameter-by-parameter basis, the Rx configuration of the unit. These submenu branches would be used if the user wished to change, e.g., just the Rx Frequency. (Interface) Permits configuring Interfaces plugged into Slot 1 or Slot 2 on the back of the unit. The menus change depending on the type of interface – as of this manual revision, Single G.703, HSSI, or Gigabit Ethernet (GigE) are available: 6.3.1.4 Int1 CDI-10-1 Single G.703 Interface only. 6.3.1.5 Int1 CDI-60 HSSI Interface only. 6.3.1.6 Int2 CDI-70 Gigabit Ethernet Interface only. Ref 6.3.1.7 (Reference) Permits selection of the internal 10MHz Reference or allows the unit to phase lock to an External Reference of 1, 2, 5, 10, or 20 MHz. The unit reverts to Internal if the External Reference is not present or is faulted. Aux 6.3.1.8 (Auxiliary) Permits configuring the 1:1 Modem Switching parameters of the unit. Alarms 6.3.1.9 Provides Alarm action of certain parameters. Int1 Int2 IMPORTANT The modem may be monitored over the remote control bus at any time. When in Local mode, however, configuration parameters may only be changed through the front panel. Conversely, when in Remote mode, the unit may be monitored from the front panel, but configuration parameters may only be changed via the remote control bus. 6–7 CDM-710G High-Speed Satellite Modem Front Panel Operation 6.3.1.1 Revision 1 MN-CDM710G (CONFIG:) Remote Control Remote Control: Local Serial Ethernet Select Local, Serial or Ethernet using the W X arrow keys, then press ENTER. Note the following: SELECTION ACTION Local Remote control is disabled. Remote monitoring is still possible. Serial RS232, RS485-2W, and RS485-4W menus are accessed. Ethernet Additional sub-menus will be displayed. (CONFIG:) Remote Control Æ Local When Local is selected, remote control is disabled and local control enabled. Once ENTER is pressed, the user is returned to the CONFIG: menu. IMPORTANT When Remote is selected, menu operations associated with Local control are disabled, and the user may see the following messages and prompts when menu or command access associated with Local control is attempted (follow the prompt as shown): THIS UNIT IS CURRENTLY IN REMOTE MODE!! DO YOU WANT IN LOCAL MODE? ENT=Yes CLR=No (CONFIG:) Remote Control Æ Serial Serial CONFIG: Interface Baudrate (E) Select Interface or Baudrate using the W X arrow keys, then press ENTER. If Serial CONFIG: Æ Interface is selected: M&C Bus Interface: RS232 RS485-2W RS485-4W (E) Select RS232 or RS485-2W (2-wire) or RS485-4W (4-wire) using the W X arrow keys, then press ENTER. Note: At this point the user will be further prompted to enter the bus address. 6–8 CDM-710G High-Speed Satellite Modem Front Panel Operation Revision 1 MN-CDM710G If Interface Æ RS232 is selected: In RS232 Mode the Bus Address is fixed at 0000 If Interface Æ RS485 is selected, the user will be further prompted: RS485 Mod Address: 0001 (E) The valid range of addresses is from 1 to 9999. To edit the RS485 address of the modem, use the W X arrow keys to select the digit to be edited, then use the ST arrow keys to change the value of the digit. Press ENTER when done. If Serial CONFIG: Æ Baudrate is selected: Local M&C Bus Baud Rate: 9600 Baud ( E ) Values of 1200, 2400, 4800, 9600, 19200, 38400, and 57600 baud are possible for the Baud rate of the remote control bus connected locally to the M&C computer. Use the ST arrow keys to change the value, then press ENTER. Note: The Asynchronous character format is FIXED at 8 data bits, No parity, and 1 stop bit (8-N-1). (CONFIG:) Remote Control Æ Ethernet Ethernet CONFIG: Gateway Address MAC SNMP ( E) Select Gateway, Address, MAC, or SNMP using the W X arrow keys, then press ENTER. If Ethernet CONFIG: Æ Gateway is selected: Ethernet IP Gateway: 063.168.001.127 ( E ) Use the ◄ ► arrow keys to select the digit to be edited, then use the W X arrow keys to change the value of the digit. Press ENTER when done. If Ethernet CONFIG: Æ Address is selected: Ether IP Address/Range: 192.168.001.001/24 () The range is adjustable from 08 to 30. Use the W X arrow keys to select the digit to be edited, then use the ST arrow keys to change the value of the digit. Press ENTER when done. 6–9 CDM-710G High-Speed Satellite Modem Front Panel Operation Revision 1 MN-CDM710G If Ethernet CONFIG: Æ MAC is selected: M&C Port MAC Address: 00-06-B0-00-56-33 This is a ‘status only’ display. Press ENTER or CLEAR to return to the previous menu. Note: The preceding address is representative of a typical MAC address. If Ethernet CONFIG: Æ SNMP is selected: SNMP: Community Traps (LRE) This is a ‘status only’ message. Submenus enable setting of the destination IP address for SNMP traps. Press ENTER or CLEAR to return to the previous menu. If SNMP Æ Community is selected: SNMP Community: Read ( E ) If Community ÆRead is selected: Read Community: public ( E ) If SNMP Æ Traps is selected: SNMP Trap IP Address: IP1 IP2 Version Select IP1, IP2, or Version using the W X arrow keys, then press ENTER. If SNMP Trap IP Address: Æ IP1 or IP2 is selected: Trap ID #X: 000.000.000.000 ( E ) To edit the SNMP Trip IP#1 or IP#2 Address, use the W X arrow keys to select the digit to be edited, then use the ST arrow keys to change the value of the digit. Press ENTER when done. If SNMP Trap IP Address: Æ Version is selected: Trap Version: SNMPv1 SNMPv2 (E ) Select SNMPv1 or SNMPv2 using the W X arrow keys, then press ENTER. 6–10 CDM-710G High-Speed Satellite Modem Front Panel Operation 6.3.1.2 Revision 1 MN-CDM710G CONFIG: Tx The CDM-710G operates only in DVB-S2 mode. IMPORTANT Tx: FEC Mod Code Freq Pwr Scram SymRate (E) Select FEC, Mod, Code, SymRate, Freq, Pwr, or Scram using the W X arrow keys, then press ENTER. (CONFIG:) Tx Æ FEC Tx FEC: LDPC + BCH (E) This is a ‘status only’ message. Press ENTER or CLEAR to return to the previous menu. (CONFIG:) Tx Æ Mod Tx Modulation: Type Inv α Pilot Frame (E) Select Type, Inv, α, Pilot, or Frame using the W X arrow keys, then press ENTER. If Tx Modulation Æ Type is selected: Tx Mod: QPSK 8PSK 16APSK 32APSK 16QAM (E) Use the W X arrow keys to select the Transmit Modulation Type (QPSK, 8PSK, 16APSK, or 32APSK), then press ENTER. Note: While16QAM is displayed in this menu, it is not selectable and not supported in DVB-S2 mode. If the Tx Modulation selection gives an invalid data rate or symbol rate, the following menu appears after the error message – it will query the configuration change for a valid configuration: Cfg TXMod=8PSK TxCR=2/3 TxSR=18.903085 Msps? Y N If ‘N’ (No) is selected, the unit returns to the original configuration. If ‘Y’ (Yes) is selected, the unit is configured with the displayed parameters. 6–11 CDM-710G High-Speed Satellite Modem Front Panel Operation Revision 1 MN-CDM710G If Tx Modulation Æ Inv is selected: Tx Spectrum: Inverted Normal (E) Select Normal or Invert using the W X arrow keys, then press ENTER. If Tx Modulation Æ α is selected: Tx (α) Rolloff %: 35 20 25 (E) The default Rolloff (α) setting is 20%. Whenever the Mode is changed, (α) reverts to 20%, but (α) can be modified to 25% or 35% from this menu. Select the value using the W X arrow keys, then press ENTER. Tx Modulation Pilot: Off/On Avg/Peak (E) Select Off/On or Avg/Peak using the W X arrow keys, then press ENTER. Tx Modulation Pilot: Off/On Avg/Peak (E) The default value is Off. Select Off to disable insertion of pilot symbols into the physical layer frame. Select On to enable insertion of pilot symbols into the physical layer frame. Use the W X arrow keys to make the selection, then press ENTER. Tx Modulation Pilot: Average Peak (E) The solid cursor indicates the current configuration choice. The CDM-710G automatically adjusts, but the default value is Average. Select Average or Peak using the W X arrow keys, then press ENTER. • Select Average to set the pilots and header to the average power band of the transmitted constellation (QPSK, 8PSK, 16APSK or 32APSK) per DVB-S2. • Select Peak to set the pilots and header to the outer ring of the transmitted constellation (QPSK, 8PSK, 16APSK or 32ASK). Not all commercially available demodulators will function well with the Peak pilot level. IMPORTANT Tx Frame Size: Long Short (E) The default value is Long. When Long is selected, the standard FECFRAME = 64,800 bits is enabled. If Short is selected, the 16,200 bit frame is enabled. Select Long or Short using the W X arrow keys, then press ENTER. 6–12 CDM-710G High-Speed Satellite Modem Front Panel Operation Revision 1 MN-CDM710G (CONFIG:) Tx Æ Code Tx CodeRate: 1/2 3/5 2/3 3/4 4/5 5/6 7/8 8/9 9/10 Refer to the Data Rate menu for valid code rates. IMPORTANT All possible choices are presented at all times. If an option is not installed (either Hardware or FAST) or is not valid, or if a code rate is not available for the Mode selected, the ◄ ► arrow keys will force the cursor to skip past the unavailable choice. Use the W X arrow keys to select the code rate, then press ENTER. If the Tx Code Rate selection gives an invalid data rate or symbol rate, the following menu will appear after the error message – it will query the configuration change for a valid configuration: Cfg TXMod=8PSK TxCR=2/3 TxSR=18.903085 Msps?Y N If ‘N’ (No) is selected, the unit returns to the original configuration. If ‘Y’ (Yes) is selected, the unit is configured with the displayed parameters. (CONFIG:) Tx Æ SymRate Data: 038.723635 Mbps Sym: 017.379483 Msps(E) Use the W X arrow keys to select the desired digit of the Symbol Rate, then use the ST arrow keys to change the value of the digit. Press ENTER when done. The Data Rate digits also change as the Symbol Rate values are edited. The value of the Data Rate depends upon the code rate, modulation type, and the Mode type selected. When modulation, code rate and other parameters are changed the modem attempts to maintain the same Symbol Rate, provided it is still in range when one of the other parameters is changed. The valid range of Symbol Rate and Data Rate Range for DVB-S2 are shown in the following table. When programming a new data or Symbol Rate the modulator will not accept it unless it is in the range, and it will turn off the Tx Carrier. If a new rate is not accepted, change the Modulator Code Rate or Mode. There is some round off in the Data Rate ranges in the last digit. The first table is for the standard FEC Frame and the second table is for the short frame. The tables are based on a 188-byte frame format; the 204-byte frame is not available. If Tx Symbol Rate selection gives an invalid data rate or symbol rate, the following menu appears after the error message to query the configuration change for a valid configuration: Cfg TXDR=70.00000 Mbps TxSR=18.903085 Msps?Y N If ‘N’ (No) is selected, the unit returns to the original configuration. If ‘Y’ (Yes) is selected, the unit is configured with the displayed parameters. 6–13 CDM-710G High-Speed Satellite Modem Front Panel Operation IMPORTANT Revision 1 MN-CDM710G G.703 fixed Data Rates E3 (34.368), T3 (44.736) and STS-1 (51.840) are set using the Int1 (CDI-10-1 Single G.703) menu. The Tx Symbol Rate is automatically entered from the selected Data Rate from modulation type, code rate, pilot and FEC frame setting. The Rx Symbol Rate is entered manually. HSSI maximum Data Rate (70 Mbps) may limit symbol maximum. Table 6-1. Symbol Rate / Data Rate Range – Standard FECFrame* and 188 Byte Format (QPSK 1/4, 1/3 and 2/3 data is for informational purposes only) Modulation QPSK 8PSK 16APSK 32APSK FEC Code LDPC+BCH LDPC+BCH LDPC+BCH LDPC+BCH Inner Code Rate Symbol Rate (Msps) Min Max Spectral Efficiency Pilot OFF Data Rate (Mbps) Pilot OFF Min Max Spectral Efficiency Pilot ON Data Rate (Mbps) Pilot ON Min Max 1/4 0.490243 0.490243 22.060942 0.478577 0.478577 21.535965 1/3 0.656448 0.656448 29.540166 0.640827 0.640827 28.837209 2/5 0.789412 0.789412 35.523546 0.770627 0.770627 34.678204 1/2 0.988858 1.000000 44.498615 0.965327 1.000000 43.439697 3/5 1.188304 1.188304 53.473684 1.160026 1.160026 52.201190 2/3 1.322253 1.322253 59.501385 1.290788 1.290788 58.085452 3/4 1.487473 1.487473 66.936288 1.452076 1.452076 65.343429 4/5 1.587196 1.587196 71.423823 1.549426 1.549426 69.724175 5/6 1.654663 1.654663 74.459834 1.615288 1.615288 72.687939 8/9 1.766451 1.766451 79.490305 1.724416 1.724416 77.598702 9/10 1.788612 1.788612 80.487535 1.746049 1.746049 78.572201 3/5 1.779991 1.779991 80.099585 1.739569 1.739569 78.280616 2/3 1.980636 1.980636 89.128631 1.935658 1.935658 87.104623 2.228124 2.228124 100.265560 2.177525 2.177525 97.988646 2.478562 2.478562 111.535270 2.422276 2.422276 109.002433 3/4 5/6 1 1 45* 45* 8/9 2.646012 2.646012 119.070539 2.585924 2.585924 116.366586 9/10 2.679207 2.679207 120.564315 2.618365 2.618365 117.826440 2/3 2.637201 2.637201 92.302026 2.574613 2.574613 90.111471 3/4 2.966728 2.966728 103.835482 2.896320 2.896320 101.371209 4/5 3.165623 3.165623 110.796808 3.090495 3.090495 108.167326 112.765192 5/6 1 35* 3.300184 3.300184 115.506446 3.221863 3.221863 8/9 3.523143 3.523143 123.310006 3.439530 3.439530 120.383555 9/10 3.567342 3.567342 124.856967 3.482680 3.482680 121.893803 3/4 3.703295 3.703295 103.692261 3.623332 3.623332 101.453291 4/5 3.951571 3.951571 110.643985 3.866247 3.866247 108.254911 112.856500 5/6 4.119540 4.119540 115.347126 4.030589 4.030589 8/9 1 28* 4.397854 4.397854 123.139923 4.302894 4.302894 120.481032 9/10 4.453027 4.453027 124.684751 4.356875 4.356875 121.992503 * Notes: 1. DVB-S2 - Standard FECFrame = 64,800 Bits. 2. For G.703 fixed Data Rates, limit maximum Symbol Rate to less than the maximum indicated in Table 6-1. For more information on this interface, see Chapter 12. SINGLE G.703 (E3/T3/STS-1) INTERFACE (CDI-10-1). 3. HSSI Data Rate limit of 70 Mbps may be reached before Symbol Rate limit is reached. For more information on this interface, see Chapter 13. HSSI INTERFACE (CDI-60). 6–14 CDM-710G High-Speed Satellite Modem Front Panel Operation 4. Revision 1 MN-CDM710G HSSI Data Rate Limit of 1 Mbps is violated with QPSK 1/2 at 1Msps, so the minimum symbol rate is 1.011270 Msps (pilot off) and 1.035920 Msps (pilot on). Table 6-2. Symbol Rate / Data Rate Range – Short FECFrame* and 188 Byte Format Modulation QPSK 8PSK 16APSK 32APSK FEC Code LDPC+BCH LDPC+BCH LDPC+BCH LDPC+BCH Inner Code Rate Symbol Rate (Msps) Min Max Spectral Efficiency Pilot OFF Data Rate (Mbps) Pilot OFF Min Max Spectral Efficiency Pilot ON Data Rate (Mbps) Pilot ON Min Max 1/4 0.365324 0.365324 16.439560 0.357467 0.357467 16.086022 1/3 0.629060 0.629060 28.307692 0.615532 0.615532 27.698925 2/5 0.760928 0.760928 34.241758 0.744564 0.744564 33.505376 1/2 0.848840 1.000000 38.197802 0.830585 1.000000 37.376344 3/5 1.156532 1.156532 52.043956 1.131661 1.131661 50.924731 2/3 1.288400 1.288400 57.978022 1.260693 1.260693 56.731183 3/4 1 45* 1.420269 1.420269 63.912088 1.389725 1.389725 62.537634 4/5 1.508181 1.508181 67.868132 1.475747 1.475747 66.408602 5/6 1.596093 1.596093 71.824176 1.561768 1.561768 70.279570 8/9 1.727961 1.727961 77.758242 1.690800 1.690800 76.086022 9/10 N/A N/A N/A N/A N/A N/A 3/5 1.725319 1.725319 77.639344 1.692033 1.692033 76.141479 2/3 1.922040 1.922040 86.491803 1.884959 1.884959 84.823151 3/4 5/6 1 45* 2.118761 2.118761 95.344262 2.077885 2.077885 93.504823 2.381056 2.381056 107.147541 2.335120 2.335120 105.080386 113.762058 8/9 2.577778 2.577778 116.000000 2.528046 2.528046 9/10 N/A N/A N/A N/A N/A N/A 2/3 2.548792 2.548792 89.207729 2.505223 2.505223 87.682811 3/4 2.809662 2.809662 98.338164 2.761633 2.761633 96.657170 4/5 2.983575 2.983575 104.425121 2.932574 2.932574 102.640076 5/6 1 35* 3.157488 3.157488 110.512077 3.103514 3.103514 108.622982 8/9 3.418357 3.418357 119.642512 3.359924 3.359924 117.597341 9/10 N/A N/A N/A N/A N/A N/A 3/4 3.493093 3.493093 97.806607 3.419165 3.419165 95.736626 4/5 3.709309 3.709309 103.860661 3.630805 3.630805 101.662551 5/6 3.925526 3.925526 109.914715 3.842446 3.842446 107.588477 8/9 1 28* 4.249850 4.249850 118.995796 4.159906 4.159906 116.477366 9/10 N/A N/A N/A N/A N/A N/A * Notes: 1. DVB-S2 - Short FECFrame = 16,200 Bits. 2. For G.703 fixed Data Rates, limit maximum Symbol Rate to less than the maximum indicated in Table 6-2. For more information on this interface, see Chapter 12. SINGLE G.703 (E3/T3/STS-1) INTERFACE (CDI-10-1). 3. HSSI Data Rate limit of 70 Mbps may be reached before Symbol Rate limit is reached. For more information on this interface, see Chapter 13. HSSI INTERFACE (CDI-60). 4. HSSI Data Rate Limit of 1 Mbps is violated with QPSK 1/2 at 1Msps so the minimum symbol rate is 1.178079 Msps (pilot off) and 1.203980 Msps (pilot on). 6–15 CDM-710G High-Speed Satellite Modem Front Panel Operation Revision 1 MN-CDM710G (CONFIG:) Tx Æ Frequency TX Freq: 0140.0000 MHz (E) To edit the TX IF Frequency, use the W X arrow keys to select the digit to be edited, then use the ST arrow keys to change the value of the digit. Press ENTER when done. Note the following: 70/140 MHz The ranges of frequencies are from 52 to 88 MHz and from 104 to 176 MHz with a resolution of 100 Hz. L-Band The range is 950 to 1950 MHz with 100 Hz resolution. CAUTION The bandwidth of the modulated Tx carrier must stay within the IF frequency range. The modem disallows settings that exceed the range, and will turn off the Tx Carrier. (CONFIG:) Tx Æ Pwr TX Power: Level On/Off Imped (E) Select Level, On/Off, or Imped using the W X arrow keys, then press ENTER. The Imped(ance) selection is only available/displayed when the 70/140 MHz Modulator card is installed. IMPORTANT If TX Power Æ Level is selected: TX Output Power Level: -10.0 dBm ( E) To edit the TX Power level, use the W X arrow keys to select the digit to be edited, then use the ST arrow keys to change the value of the digit. Press ENTER when done. Note the following: 70/140 MHz The range is from 0 to -20 dBm. L-Band The range is from -5 to -25 dBm. If TX Power Æ On/Off is selected: Tx Output State: Off On ( E) Select On or Off using the ◄ ► arrow keys, then press ENTER. 6–16 CDM-710G High-Speed Satellite Modem Front Panel Operation Revision 1 MN-CDM710G If TX Power Æ Imped(ance) is selected (this menu selection is available/displayed only when the 70/140 MHz Modulator card is installed): TX Impedance (Ohms): 50 75 ( E) Note the following: 70/140 MHz Select 50 or 75(Ω) using the arrow keys, then press ENTER. L-Band Not applicable. (CONFIG:) Tx Æ Scram Tx Scrambling Index: Gold-n = 000000 (▲ ▼ E) The Gold-n Index indicates the Physical Layer spreading sequence number, and can be set from 0 to 262,141. The default setting is all 0s. To edit, use the W X arrow keys to select the digit to be edited, then use the ST arrow keys to change the value of the digit. Press ENTER when done. 6.3.1.3 CONFIG: Rx Rx: FEC Dem Code SymRate Freq EbNo PLL (E) Select FEC, Dem(od), Code, SymRate, Freq, EbNo, or PLL using the W X arrow keys, then press ENTER. Note the following: IMPORTANT The CDM-710G operates only in DVB-S2 mode; this makes several Rx parameters read-only. These parameters are resolved automatically and do not need to be configured: • • • • Rx: Dem (Demodulation Type) Rx Dem Æ Inv (Spectrum Invert) Rx Dem Æ Pilot Rx: Code Rate (CONFIG:) Rx Æ FEC If Rx Æ FEC is selected: Rx FEC: LDPC + BCH (E) This is a read-only status message. Press ENTER or CLEAR to return to the previous menu. 6–17 CDM-710G High-Speed Satellite Modem Front Panel Operation Revision 1 MN-CDM710G (CONFIG:) Rx Æ Dem (Demod) Rx Demod: Type Inv Acq α Eq IQ-TP Pilot Scr (E) Select Type, Inv, Acq, α, Eq, IQ-TP, Pilot, or Scr using the W X arrow keys, then press ENTER. If Rx Demod: Æ Type is selected: Rx Dem: QPSK 8PSK 16QAM 16APSK 32APSK (E) This menu is read-only, as the type of modulation is determined automatically. Prior to synchronization of the Rx path, the cursor may reside in any position. After synchronization (Rx Traffic LED is Green), re-access the Rx Demod: Æ Type menu to update the display – the cursor rests under the modulation type. Note: While 16QAM is displayed in this menu, it is not selectable and not supported in DVB-S2 mode. If Rx Demod: Æ Inv is selected: Rx Spectrum:RX PARAMETERS AUTOMATICALLY SELECTED. This menu is read-only, as the demodulator automatically resolves frequency inversion. Normal or Inverted is not reported in the demodulation. Press ENTER or CLEAR to return to the previous menu. If Rx Demod: Æ Acq is selected: Demod Acquisition Range: +/-010 kHz (▲ ▼ E) The value entered here determines the amount of frequency uncertainty the demodulator will search over in order to find and lock to an incoming carrier. To edit the demodulator acquisition search range value, use the W X arrow keys to select the digit to be edited, then use the ST arrow keys to change the value of the digit. Press ENTER when done. The range varies from ±001 kHz to ±100 kHz. If Rx Demod: Æ α is selected: RX (α) Rolloff %: 20 25 35 (E) The rolloff or α dictates how fast the spectral edges of the carrier are attenuated beyond the 3 dB bandwidth. With 20% rolloff the edge falls off more quickly than with 25% and 35%. Select the value using the W X arrow keys, then press ENTER. The default Rolloff (α) setting is 20%; whenever the mode is changed, (α) reverts to 20% but can be modified to 25% or 35% using this menu. 6–18 CDM-710G High-Speed Satellite Modem Front Panel Operation Revision 1 MN-CDM710G If Rx Demod: Æ Eq is selected: Rx Adaptive Equalizer: Off On (E) The adaptive equalizer helps correct for linear distortion in the rest of the link. Linear distortion includes amplitude and phase that would occur due to imperfect filtering effects, but it does not include distortion due to non linear amplifiers. Select operation as Off or On using the W X arrow keys, then press ENTER. If Rx Demod: Æ IQ-TP is selected: Rx IQ TPs (J2-11,J2-3): Pre-EQ Post-EQ (E) This selection determines whether the IQ test point located on the Alarm Connector samples the IQ signal before or after the Adaptive Equalizer. J2-11 and J2-3 refer to the pins on the Alarm Connector that an oscilloscope is connected to monitor I and Q. Select Pre-Eq or Post-Eq using the W X arrow keys, then press ENTER. If Rx Demod: Æ Pilot is selected: Rx Demodulation Pilot: Off On (E) This menu is read-only, as the demodulator automatically determines if the pilots are On or Off. Press ENTER or CLEAR to return to the previous menu. If Rx Demod: Æ Scr (Descrambler) is selected: Rx Descrambling Index: Gold-n = 000000 (▲ ▼ E) The Gold-n Index indicates the Physical Layer spreading sequence number, and can be set from 0 to 262,141. The default setting is all 0s. To edit the index, use the W X arrow keys to select the digit to be edited, then use the ST arrow keys to change the value of the digit. Press ENTER when done. (CONFIG:) Rx Æ Code Code Rate: 1/2 3/5 2/3 3/4 4/5 5/6 7/8 8/9 9/10 This menu is read-only, as the demodulator automatically resolves the code rate. Press ENTER or CLEAR to return to the previous menu. 6–19 CDM-710G High-Speed Satellite Modem Front Panel Operation Revision 1 MN-CDM710G (CONFIG:) Rx Æ SymRate Data: DEMOD unlocked Sym: 017.379483 Msps (E) If the Rx Path is not locked, the message should as shown in the above example. To change the Symbol Rate, use the W X arrow keys to select the digit to be edited. Use the ST arrow keys to change the value of the digit, then press ENTER. The Data Rate digits also change as the Symbol Rate values are edited. The value of the Data Rate depends upon the code rate, modulation type. When programming a new Symbol Rate (or indirectly a Data Rate) the value is not accepted unless it is within a valid range. Note: G.703 Interface Data Rate is fixed. The user must enter the correct Symbol Rate. See the tables under the (CONFIG:) Tx Æ SymRate menu for the valid range of Symbol/Data Rates. ‘Demod unlocked’ appears while the Rx path is not synchronized. After synchronization the correct Data Rate appears in the display and the demodulator has automatically resolved the modulation type, code rate, pilots ON/OFF, FEC frame length, spectral inversion, etc. from the DVB-S2 carrier. The Symbol Rate is calculated using the equation SR = DR/SE, where: SR = Symbol Rate; DR = Data Rate; SE = Spectral Efficiency. The following example illustrates the Symbol Rate as calculated for 8PSK 3/4 and E3: SR = 34.368/2.22814 = 15.424524 Msps Refer to Tables 6-1 and 6-2 for Symbol Rate / Data Rate Range tablature. (CONFIG:) Rx Æ Freq RX Freq: 0140.0000 MHz (▲ ▼ E) Edit the RX IF Frequency. Use the W X arrow keys to select the digit to be edited. Use the ST arrow keys to change the value of the digit, then press ENTER. Note the following: 70/140 MHz The ranges of frequencies are from 52 to 88 MHz and from 104 to 176 MHz with a resolution of 100 Hz. L-Band The range is 950 to 1950 MHz with 100 Hz resolution. The bandwidth of the modulated carrier MUST stay within the IF frequency range, or the frequency is not accepted. IMPORTANT 6–20 CDM-710G High-Speed Satellite Modem Front Panel Operation Revision 1 MN-CDM710G (CONFIG:) Rx Æ Eb/No Eb/No Alarm: Threshold Alarm/Fault (E) Select Threshold, Alarm/Fault, or Masked using the W X arrow keys, then press ENTER. If Eb/No Alarm: Æ Threshold is selected: Eb/No Alarm Threshold: 2.0 dB Masked (▲ ▼ E) The range of Eb/No alarm point values is from 0.1 to 16.0 dB. If the Eb/No falls below the selected value, a receive traffic fault is generated. To edit the threshold, use the W X arrow keys to select the digit to be edited, then use the ▲ ▼ arrow keys to change the value of the digit. Press ENTER when done. If Eb/No Alarm: Æ Alarm/Fault is selected: Eb/No Alarm: Alarm Fault Mask (E) The available choices define the Eb/No Alarm as an Alarm, as a Fault, or to completely Mask the alarm. This choice affects operation in 1:1 redundancy. Select Alarm, Fault, or Masked using the W X arrow keys, then press ENTER. (CONFIG:) Rx Æ PLL Carrier PLL Bandwidth: 1x 2x (E) This selection is sometimes useful when high phase noise is present. 1x is the normal operating mode. Select 1x or 2x using the W X arrow keys, then press ENTER. 6–21 CDM-710G High-Speed Satellite Modem Front Panel Operation 6.3.1.4 Revision 1 MN-CDM710G CONFIG: Int1 (CDI-10-1 Single G.703 Interface Only) IMPORTANT Due to limitations of the backplane, the CDM-710G allows only one interface to be active. For example, if Interface 2 is active, and Interface 1 is then enable selected, the unit will automatically disable Interface 2. Note: The menu branch and submenus depicted in this section are dependent on the presence of the CDI-10-1 Single G.703 Interface card, installable in Interface Slot 1 only. There is a single Tx/Rx port pair on this interface; there is also a common reference that may be used as a Rx Buffer reference clock for either port. This selection will affect the reporting status in the event of loss of External Clock – and subsequently, the switching logic – when the modem is in a 1:1 redundancy configuration. Intfc1 E3/T3/STS1: Port1 Ext-Clk (E) Select Port1 or Ext-Clk using the W X arrow keys, then press ENTER. (CONFIG:) Intfc1 E3/T3/STS1 Æ Port1 Intfc1 Port1 E3/T3/STS1: Type Line-Code Tx Rx ( E) Select Type, Line-Code, Tx, or Rx using the W X arrow keys, then press ENTER. If Intfc1 Port1 E3/T3/STS1: Æ Type is selected: Intfc1 Port1 Type: E3 T3 STS1 34.368 Mbps ( E) This menu allows port type selection for the interface. The interface is data rate based with fixed data rates so the CDM-710G will automatically adjust the symbol rate. Although the data rate does not change, the symbol rate will with changes to any of the following: modulation, code rate, pilots, FEC frame. Select E3, T3, or STS1 using the W X arrow keys, then press ENTER. Upon entering the menu, the cursor blinks below the currently active interface and its Data Rate is shown: Port Type Selection Data Rate E3 34.368 Mbps T3 44. 768 Mbps STS1 51.84 Mbps 6–22 CDM-710G High-Speed Satellite Modem Front Panel Operation Revision 1 MN-CDM710G If Intfc1 Port1 E3/T3/STS1: Æ Line-Code is selected: Intfc1 Port1 E3CODE (HDB3S): On Off ( E) This display indicates which port type was selected for Port 1 under Intfc1 Port1 E3/T3/STS1: Æ Type and allows enabling or disabling of the line code specific to that selected port type. The appearance of the Line-Code menu display depends upon the selected port type. For each display, the port type is shown first, and the applicable line code appears in parentheses; the On or Off selections that follow enable or disable line coding. Selected Port Type (as displayed) Line Code (as displayed) E3 CODE (HDB3) T3 CODE (B3ZS) STS1 CODE (B3ZS) By selecting Off, the modem treats the data stream as alternate-mark-inversion (AMI) – that is, no line coding. After making the selection, press ENTER. If Intfc1 Port1 E3/T3/STS1: Æ Tx is selected: Intfc1 Port1 Tx: Inv Data Ena/Dis ( E) Select Inv, Data or Ena/Dis using the W X arrow keys, then press ENTER. If Intfc1 Port1 Tx: Æ Inv is selected: Intfc1 Port 1 Tx Data: Normal Inverted ( E) Select Normal or Inverted using the W X arrow keys, then press ENTER. If Intfc1 Port1 Tx: Æ Data is selected: Intfc1 Port 1 Data Rate Tx: 34.368000 Mbps (E) Intfc1 Port 1 Data Rate Tx: Disabled (E) This is a read-only status window to display the data selected via the Intfc1 Port1: Æ Type menu. When Port1 Tx is enabled or disabled via Intfc1 Port1 Tx: Æ Ena/Dis (see next section), that status is reflected in this display. Note the following: • When Port1 Tx is enabled, the Data Rate associated with Port 1 is displayed as shown in the top example. • When Port1 Tx is disabled, that status is reflected in this display as shown in the bottom example. Press ENTER or CLEAR to return to the previous menu. 6–23 CDM-710G High-Speed Satellite Modem Front Panel Operation Revision 1 MN-CDM710G If Intfc1 Port1 Tx: Æ Ena/Dis is selected: Intfc1 Port1 Status Enable Disable ( E) Using the W X arrow keys, select Enable to activate the transmit (Tx) side of Port1, or select Disable to de-activate the transmit (Tx) side of Port1 and change the Data Rate to 0, then press ENTER. If Intfc1 Port1 E3/T3/STS1: Æ Rx is selected: Intfc1 Port 1 Rx: Inv Data Buf Clk Ena/Dis Select Inv, Data, Buf, Clk, or Ena/Dis using the W X arrow keys, then press ENTER. If Intfc1 Port1 Rx: Æ Inv is selected: Intfc1 Port 1 Rx Data: Normal Inverted ( E) Select Normal or Inverted using the W X arrow keys, to control data inversion, then press ENTER. If Intfc1 Port1 Rx: Æ Data is selected: Intfc1 Port 1 Data Rate Rx: 34.368000 (E) Intfc1 Port 1 Data Rate Rx: Disabled (E) This is a read-only status window to display the data selected via the Intfc1 Port1: Æ Type menu. When Port1 Rx is enabled or disabled via Intfc1 Port1 Rx: Æ Ena/Dis (see next section), that status is reflected in this display. Note the following: • When Port1 Rx is enabled, the Data Rate associated with Port 1 is displayed, as shown in the top example. • When Port1 Rx is disabled, that status is reflected in this display, as shown in the bottom example. Press ENTER or CLEAR to return to the previous menu. If Intfc1 Port1 Rx: Æ Buf is selected: Intfc1 Port1 Rx Buffer: Frame-Type Size ReCenter Select Frame-Type, Size, or ReCenter using the W X arrow keys, then press ENTER. 6–24 CDM-710G High-Speed Satellite Modem Front Panel Operation Revision 1 MN-CDM710G If Intfc1 Port1 Rx Buffer: Æ Frame-Type is selected: Intfc1 Port1 Rx Frame: G.751 (1536 Bits) ( E) Select Frame-Type, Size, or ReCenter using the W X arrow keys, then press ENTER. The Frame Type and the number of bits in the frame displayed are dependent on the choice selected under Intfc1 Port1: Æ Type. In the above example, G.751 (1536 Bits) shows the frame when the Port Type is E3. The available Frame Type / (Bits) are as follows: Selected Port Type (as displayed) Frame Type (Frame Size, in bits, as displayed) E3 None - default G.751 (1536 Bits) G.753 (2148 Bits) T3 None - default G.752 (4760 Bits) STS1 None - default STS-1 (6480 Bits) The minimum buffer size is determined by the the number of bits in the frame and the maximum buffer size is based upon the integral number of frames that can fit in the buffer memory. If Intfc1 Port1 Rx Buffer: Æ Size is selected: Intfc1 Port1 Rx Buffer: 10.0 mSec (0344.064 Bits) The Rx Buffer is programmed in 0.5 ms steps rounded to the increment closest to an integral number of bits based upon the Frame Type. The maximum buffer size is: G.751 61 ms; G.752 44 ms; G.753 61 ms; STS-1 40 ms. The Rx buffer has a minimum value of 0.5 ms (default). Selecting the minimum value and programming Rx-CLK for Rx-SAT disables the buffer and sets it to minimum. Use the W X arrow keys to select the digit to be edited. Use the ST arrow keys to change the value of the digit, then press ENTER. If Intfc1 Port1 Rx Buffer: Æ ReCenter is selected: Intfc1 Port1 Rx Buffer: (65%) Re-Center (E) The percentage (65%) indicates the current buffer fill status. To reset the buffer to the midpoint (50%), select Re-Center using the W X arrow keys, then press ENTER. 6–25 CDM-710G High-Speed Satellite Modem Front Panel Operation Revision 1 MN-CDM710G If Intfc1 Port1 Rx Buffer: Æ Clk is selected: Intfc1 Port1 Rx Clk: Rx-Sat Tx-Terr Ext-Clk This selection determines which source clocks the output of the Rx Buffer for delivering data to the Rx port at the user interface. Select Rx-Sat, Tx-Terr or Ext-Clk using the W X arrow keys, then press ENTER. Note the following: Rx-Sat (default) Effectively disables the Rx Buffer because the input and output clocks are the same. Normally, the Rx Buffer is set for minimum when Rx-Sat is selected. Tx-Terr Uses the clock from the Tx input to clock out the Rx Buffer. Ext-Clk Derives a clock from a signal input to the Ext-Clk connector on the E3/T3/STS-1 Interface Card. If Intfc1 Port1 Rx: Æ Ena/Dis is selected: Intfc1 Port1 Rx Status Enable Disable (E) Using the W X arrow keys, select Enable to activate the receive side of Port1, or select Disable to de-activate the receive side of Port1 and change the Data Rate to 0. Press ENTER when done. (CONFIG:) Intfc1 E3/T3/STS1 Æ Ext-Clk Intfc1 Ext-Clk Freq: 1.000 Mbps ( E) Set the input frequency for the Ext-Clk connector on the E3/T3/STS-1 Interface Card by using the ST arrow keys, then press ENTER. Note the following: • The Ext-Clk Frequency source selections (in MHz) are: 0 (None), 1, 2, 5, 10, 2.048, 34.368, 44.736, and 51.84. • The input level ranges from 0.5 to 5.0 volts peak-to-peak. 6–26 CDM-710G High-Speed Satellite Modem Front Panel Operation 6.3.1.5 Revision 1 MN-CDM710G CONFIG: Int1 (CDI-60 HSSI Interface Only) Note: The menu branch and submenus depicted in this section are dependent on the presence of the CDI-60 HSSI Interface card, installable in Interface Slot 1 only. Intfc1 HSSI: Tx Rx CTS/RTS (E) Select Tx, Rx, or CTS/RTS using the W X arrow keys, then press ENTER. (CONFIG:) Intfc1 HSSI Æ Tx Intfc1 Tx Data Clock Enable (E) Select Data, Clock, or Enable using the W X arrow keys, then press ENTER. If Intfc1 Tx Æ Data is Selected: Intfc1 Tx Data: Datarate Invert (E) Select Datarate or Invert using the W X arrow keys, then press ENTER. If Intfc1 Tx Data: Æ Datarate is selected: Intfc1 Data Rate: Tx: 032.000000 Mbps This is a read-only status message that indicates the Data Rate of the transmit MPEG-2 transport stream. Press ENTER or CLEAR to return to the previous menu. If Intfc1 Tx Data: Æ Invert is selected: Intfc1 Tx Data Invert: Normal Inverted (E) To control data inversion (added for compatibility with certain older equipment), select Normal or Inverted using the W X arrow keys, then press ENTER. If Intfc1 Tx Æ Clock is Selected: Intfc1 Normal Tx Clock: Inverted (E) To control clock inversion (added for compatibility with certain older equipment), select Normal or Inverted using the W X arrow keys, then press ENTER. 6–27 CDM-710G High-Speed Satellite Modem Front Panel Operation Revision 1 MN-CDM710G If Intfc1 Tx Æ Enable is selected: Intfc1 Enable Tx Enable: Disable (E) Using the W X arrow keys, select Enable to activate the Tx side of this interface, or select Disable to de-activate the Tx side and set the Data Rate to 0. Press ENTER when done. (CONFIG:) Intfc1 HSSI Æ Rx Intfc1 Rx: Data Buffer Clock Enable Select Data, Buffer, Clock, or Enable using the W X arrow keys, then press ENTER. If Intfc1 Rx: Æ Data is selected: Intfc1 Rx Data: Datarate Invert (E) Select Datarate or Invert using the W X arrow keys, then press ENTER. If Intfc1 Rx Data: Æ Datarate is selected: Intfc1 Data Rate: Rx: 032.000000 Mbps This is a read-only status message that indicates the Data Rate of the received MPEG-2 transport stream. Press ENTER or CLEAR to return to the previous menu. If Intfc1 Rx Data: Æ Invert is selected: Intfc1 Rx Data Invert: Normal Inverted (E) To control data inversion (added for compatibility with certain older equipment), select Normal or Inverted using the W X arrow keys, then press ENTER. If Intfc1 Rx Æ Buffer is selected: Intfc1 Rx Buffer: Size Recenter (E) Select Size or Recenter using the W X arrow keys, then press ENTER. 6–28 CDM-710G High-Speed Satellite Modem Front Panel Operation Revision 1 MN-CDM710G If Intfc1 Rx Buffer: Æ Size is selected: Intfc1 Rx Buffer Size: 10.0 mSec (0343,680 Bits) The range of Rx Buffer Size values is from 5.0 to 32.0 mSec in 0.1 mSec increments. To edit, use the W X arrow keys to select the digit to be edited, then use the ST arrow keys to change the value of the digit. Press ENTER when done. If Intfc1 Rx Data: Æ Recenter is selected: Intfc1 Rx Buffer Fill: (046%) ReCenter (E) The percentage (046%) indicates the current buffer fill status. To reset the buffer to the midpoint (50%), select ReCenter using the ◄ ► arrow keys, then press ENTER. If Intfc1 Rx: Æ Clock is selected: Intfc1 Rx Clock: Source Invert (E) Select Source or Invert using the ◄ ► arrow keys, then press ENTER. If Intfc1 Rx Clock: Æ Source is selected: Intfc1 Rx Clock: Rx-Sat Tx-Terr Internal This selection determines which source clocks the output of the Rx Buffer for delivering data to the Rx port at the user interface. Select Rx-Sat, Tx-Terr, or Internal using the W X arrow keys, then press ENTER. Note the following: Rx-Sat (default) Effectively disables the Rx Buffer because the input and output clocks are the same. Normally, the Rx Buffer is set for minimum when Rx-Sat is selected. Tx-Terr Uses the clock from the Tx input (TT) to clock out the Rx Buffer. Internal Derives a clock from the internal 10 MHz reference clock. If Intfc1 Rx Clock: Æ Invert is selected: Intfc1 Rx Clock Invert: Normal Inverted (E) This selection controls clock inversion (added for compatibility with certain older equipment). Select Normal or Inverted using the W X arrow keys, then press ENTER. 6–29 CDM-710G High-Speed Satellite Modem Front Panel Operation Revision 1 MN-CDM710G If Intfc1 Rx: Æ Enable is selected: Intfc1 Rx Enable: Enable Disable (E) Using the W X arrow keys, select Enable to activate the Rx side of this interface, or select Disable to de-activate the Rx side and set the Data Rate to 0. Press ENTER when done. (CONFIG:) Intfc1 HSSI Æ RTS/CTS Intfc1 CTS/RTS: Normal Fault Select Normal or Fault using the W X arrow keys, then press ENTER. Note: CTS is the same as CA, and RTS is the same as TA. The selections operate as follows: 6.3.1.6 • Normal: CTS = RTS • Fault: CTS = RTS when no fault is present. CTS is not asserted when a fault is present. CONFIG: Int2 (CDI-70 Gigabit Ethernet Interface Only) Due to limitations of the backplane, the CDM-710G allows only one interface to IMPORTANT be active. For example, if Interface 1 is active, and Interface 2 is then enable selected, the unit will automatically disable Interface 2. For information on valid Ethernet network configuration connections, refer to Chapter 3. ETHERNET NETWORK CONFIGURATIONS. Note: The CDM-710G supports a single CDI-70 Gigabit Ethernet Interface (Intfc2), installable in Slot 2 only; there is a single RJ-45 port on the CDI-70 Gigabit Ethernet Interface. The menu branch and submenus depicted in this section show what is available when the CDI-70 Gigabit Ethernet Interface card is installed in Interface Slot 2. Intfc2 Gigabit Ethernet: Tx Rx Man Stats SWOP(E) Select Tx, Rx, Man, Stats, or SWOP using the W X arrow keys, then press ENTER. (CONFIG:) Intfc2 Gigabit Ethernet Æ Tx Intfc2 Tx: Data Enable (E) Select Data or Enable using the W X arrow keys, then press ENTER. If Intfc1 Tx: Æ Data is selected: Intfc2 Data Rate: Tx:075.000000 Mbps (E) 6–30 CDM-710G High-Speed Satellite Modem Front Panel Operation Revision 1 MN-CDM710G This display is read-only. If Tx: Disabled is displayed, the port is turned off: Intfc2 Data Rate: Tx: Disabled (E) Press ENTER or CLEAR to return to the previous menu. If Intfc2 Tx: Æ Enable is selected: Intfc2 Tx Enable: Enable Disable ( E) Using the W X arrow keys, select Enable to activate the transmit (Tx) side of this interface, or select Disable to de-activate the transmit side of this interface. Press ENTER when done. (CONFIG:) Intfc2 Gigabit Ethernet Æ Rx Intfc2 Rx: Data Enable ( E) Select Data or Enable using the W X arrow keys, then press ENTER. If Intfc2 Rx: Æ Data is selected: Intfc2 Data Rate: Rx:075.000000 Mbps (E) This display is read-only. If Rx: Disabled is displayed, the port is turned off: Intfc2 Data Rate: Rx: Disabled (E) Press ENTER or CLEAR to return to the previous menu. If Intfc2 Rx: Æ Enable is selected: Intfc1 Rx Enable: Enable Disable (E) Using the W X arrow keys, select Enable to activate the receive (Rx) side of this interface, or select Disable to de-activate the receive side of this interface. Press ENTER when done. (CONFIG:) Intfc2 Gigabit Ethernet Æ Man Intfc2 Management IP: 192.168.001.001/30 (▲ ▼ E) Edit the Gigabit Ethernet Interface Management IP Address and Mask Range. This is the IP address that can be used for one of two purposes: • First, PING can be used with this IP address as a diagnostic tool to ensure the interface is active and the external cabling in properly connected. 6–31 CDM-710G High-Speed Satellite Modem Front Panel Operation • Revision 1 MN-CDM710G Second, this is the IP address that will be used in the event that new firmware is provided by CEFD for the CDI-70 Gigabit Ethernet interface. To edit, use the W X arrow keys to select the digit, then use the ST arrow keys to change the value of the digit. Press ENTER when done. (CONFIG:) Intfc2 Gigabit Ethernet Æ Stats Intfc1 Statistics: View Clear (E) Select View or Clear using the W X arrow keys, then press ENTER. If Intfc1 Statistics: Æ View is selected: Intfc1 Statistics: FPGA LAN WAN MNG ALL Select FPGA, LAN, WAN, MNG, or ALL using the W X arrow keys, then press ENTER. The available statistics for the Gigabit Ethernet Interface, as depicted in these example screen shots, are shown in Table 6-3 – examples of these read only displays are as follows: If Intfc1 Statistics: Æ FPGA is selected: FPGA Link Errors 00000000000000000000 (▲ ▼ E) If Intfc1 Statistics: Æ LAN is selected: LAN Good Octets(Out) 00000000000000000000 (▲ ▼ E) If Intfc1 Statistics: Æ WAN is selected: WAN Good Octets(Out) 00000000000000000000 (▲ ▼ E) If Intfc1 Statistics: Æ MNG is selected: MNG Good Octets(In) 00000000000000000000 (▲ ▼ E) If Intfc1 Statistics: Æ ALL is selected: FPGA Link Errors 00000000000000000000 (▲ ▼ E) 6–32 CDM-710G High-Speed Satellite Modem Front Panel Operation Revision 1 MN-CDM710G Table 6-3. Statistics for the Gigabit Ethernet Interface GBEI Statistics Summary Category Message 1000Base-T Link Statistics FPGA Link Errors WAN Port Statistics Description Indicates the number of HDLC link errors that have occurred on the Rx WAN interface. If the FPGA Link Errors are incrementing while the Es/No or Eb/No is high, this often indicates the presence of interference in the link. FPGA Overrun Errors Indicates the number of times that a GBEI buffer overrun has occurred in the Rx direction. FPGA Rx Packets Indicates the number of Ethernet packets received from the WAN. FPGA Overflow Errors Indicates the number of times that a GBEI Rx buffer overrun condition has occurred. FPGA Tx Packet Count Indicates the number of Ethernet packets transmitted to the WAN. LAN Good Octets (In) The sum of lengths of all good Ethernet frames received from the LAN. LAN Bad Octets (In) The sum of lengths of all bad Ethernet frames received from the LAN. LAN Unicast (In) The sum of good frames received from the LAN that have a unicast destination MAC address. LAN Broadcast (In) The sum of good frames received from the LAN that have a broadcast destination MAC address. LAN Multicast (In) The sum of good frames received from the LAN that have a multicast destination MAC address. LAN Pause (In) The number of good flow control frames received from the LAN. LAN Undersize (In) Total frames received from the LAN with a length of less than 64 octets but with a valid FCS. LAN Fragments (In) Total frames received from the LAN with a length of less than 64 octets and an invalid FCS. LAN Oversize (In) Total frames received from the LAN with a length greater than the maximum size of octets but with a valid FCS. LAN Jabber (In) Total frames received from the LAN with a length greater than the maximum size of octets but with an invalid FCS. LAN Rx Err (In) Total frames received from the LAN for which an error was detected at the PHY. LAN FCS Err (In) Total frames received from the LAN with a CRC error that was not counted in the Fragments or Rx Err totals. LAN Octets (Out) The sum of the lengths of all Ethernet frames transmitted to the LAN. LAN Unicast (Out) The sum of frames transmitted to the LAN that have a unicast destination MAC address. LAN Broadcast (Out) The sum of frames transmitted to the LAN that have a broadcast destination MAC address. LAN Multicast (Out) The sum of frames transmitted to the LAN that have a multicast destination MAC address. WAN Octets (Out) The sum of the lengths of all Ethernet frames that are forwarded to the WAN. WAN Unicast (Out) The number of good frames with unicast destination MAC addresses that are forwarded to the WAN. WAN Broadcast (Out) The number of good frames with broadcast destination MAC addresses that are forwarded to the WAN. WAN Multicast (Out) The number of good frames with multicast destination MAC addresses that are forwarded to the WAN. WAN Good Octets (IN) The sum of lengths of all good Ethernet frames received from the IP encapsulation logic. WAN Unicast (IN) The sum of good frames received from the WAN IP encapsulation logic that have a unicast destination MAC address. WAN Broadcast (IN) The sum of good frames received from the WAN IP encapsulation logic that have a broadcast destination MAC address. WAN Multicast (IN) The sum of good frames received from the WAN IP encapsulation logic that have a multicast destination MAC address. 6–33 CDM-710G High-Speed Satellite Modem Front Panel Operation Revision 1 MN-CDM710G GBEI Statistics Summary Category Message Management Port Statistics Description Mng Good Octets (In) The sum of lengths of all good Ethernet frames received from the local GBEI management processor. Mng Bad Octets (In) The sum of lengths of all bad Ethernet frames received from local GBEI management processor. Mng Unicast (In) The sum of good frames received from the local GBEI management processor that have a unicast destination MAC address. Mng Broadcast (In) The sum of good frames received from the local GBEI management processor that have a broadcast destination MAC address. Mng Multicast (In) The sum of good frames received from the local GBEI management processor that have a multicast destination MAC address. Mng Oversize (In) Total frames received form the local GBEI management processor with a length greater than the maximum size of octets but with a valid FCS. Mng Jabber (In) Total frames received form the local GBEI management processor with a length greater than the maximum size of octets but with an invalid FCS. Mng Rx Err (In) Total frames received from the local GBEI management processor for that an error was detected by its physical interface. Mng FCS Err (In) Total frames received from the local GBEI management processor with a CRC error that was not counted in the Fragments or Rx Err totals. Mng Pause (In) The number of good flow control frames received from local GBEI management processor. Mng Undersize (In) Total frames received from the local GBEI management processor with a length of less than 64 octets but with a valid FCS. Mng Fragments (In) Total frames received from the local GBEI management processor with a length of less than 64 octets and an invalid FCS. Mng Octets (Out) The sum of the lengths of all Ethernet frames transmitted to the local GBEI management processor. Mng Unicast (Out) The sum of frames transmitted to the local GBEI management processor that have a unicast destination MAC address. Mng Broadcast (Out) The sum of frames transmitted to the local GBEI management processor that have a broadcast destination MAC address. Mng Multicast (Out) The sum of frames transmitted to the local GBEI management processor that have a multicast destination MAC address. (CONFIG:) Intfc2 Gigabit Ethernet Æ SWOP (SWitch OPeration) Intfc2 SWOP: AutoCx Learning (E) Select AutoCx or Learning using the W X arrow keys, then press ENTER. If Intfc2 SWOP: Æ AutoCx is selected: Intfc2 Auto Crossover: Enable Disable (E) Select Enable or Disable using the W X arrow keys, then press ENTER. If Enabled, the Gigabit Ethernet Interface automatically detects the type of connection and configures the interface appropriately as straight-through (MDI) or crossover (MDIX). If Disabled, the Gigabit Ethernet port is configured as straight-through (MDI). 6–34 CDM-710G High-Speed Satellite Modem Front Panel Operation Revision 1 MN-CDM710G If Intfc2 SWOP: Æ Learning is selected: Intfc2 Learning: Enable Disable ( E) Unit power must be cycled whenever Learning mode is enabled or disabled. IMPORTANT Learning is an Ethernet switch function that allows the LAN (user) side of the Gigabit Ethernet port to learn the MAC addresses of the equipment connected to the Gigabit port. Learning applies only to the LAN (user) side of the port. There is no learning on the WAN (modem) side of the Gigabit Ethernet port. If enabled, the interface is in LAN-to-WAN learning mode, and the Gigabit Ethernet Interface (GBEI) learns connections based on source MAC addresses and ingress ports. The hub thinks the remote site network nodes are local to the hub site network and does not send the traffic over the outbound carrier to the remote site. If disabled, the GBEI passes all packets from the LAN to the WAN. Select Enable or Disable using the W X arrow keys. Press ENTER, then cycle the unit power. 6.3.1.7 CONFIG: Ref Frequency Reference External 10 MHz ( E) External 10 MHz The unit phase locks to an external input at the BNC connector labeled EXT REF. Other selections are available for External 1, 2, 5, 10, or 20 MHz input. Note the following: • Internal selection is available at 10 MHz. • If there is a faulted/no External Reference In, the unit reverts to using an Internal Reference. 6–35 CDM-710G High-Speed Satellite Modem Front Panel Operation 6.3.1.8 Revision 1 MN-CDM710G CONFIG: Aux Redundancy Ena/Dis Force (1:1) ( E) Select Ena/Dis or Force (1:1) using the W X arrow keys, then press ENTER. If (Aux) Redundancy Æ Ena/Dis is selected: Redundancy Mode: Enable Disable ( E) The solid cursor indicates the current configuration choice. Select Enable to set up the unit for operation with the 1:1 IF switch. Internally, an auxiliary relay sets the alarms connector for the 1:1 operation mode. Note: Disable is selectable only when the unit is in Local mode. When the unit is in Remote mode and the user attempts to select Disable using the W X arrow keys, the following message displays (follow the prompt as shown): THIS UNIT IS CURRENTLY IN REMOTE MODE!! DO YOU WANT IN LOCAL MODE?ENT=Yes CLR=No Note: When 1:1 redundancy operation is selected, J5 becomes the active port – J4 is not available. For 1:N redundancy operation, either J4 or J5 is available. If (Aux) Redundancy Æ Force (1:1) is selected: Press ENT To Force Modem To Standby (1:1 Only) The Force (1:1) selection is only available for use with a 1:1 switch to force switchover, and only from the modem that is currently Online. The modem that is online is indicated by the Online LED on the front of the modem. To initiate switchover, press ENTER. 6–36 CDM-710G High-Speed Satellite Modem Front Panel Operation 6.3.1.9 Revision 1 MN-CDM710G CONFIG: Alarms Note: When the unit is in Remote mode and the user attempts to select an alarm state using the W X arrow keys, the following message displays (follow the prompt as shown): THIS UNIT IS CURRENTLY IN REMOTE MODE!! DO YOU WANT IN LOCAL MODE?ENT=Yes CLR=No Otherwise, the following menu is displayed: Alarm Mask: Tx Rx Intfc1 Intfc2 ( E) Select Tx, Rx, Intfc1, or Intfc2 using the W X arrow keys, then press ENTER. (CONFIG:) Alarm Mask: Æ Tx Tx Alarm Mask: None Currently, masking of Tx Alarms (associated with the modulator) is not allowed. (CONFIG:) Alarm Mask: Æ Rx Eb/No Threshold Alarm: Alarm Fault Mask ( E) Select Alarm, Fault, or Mask using the W X arrow keys, then press ENTER. (CONFIG:) Alarm Mask: Æ Intfc1 The appearance of the menu branch for CONFIG: Alarms (Alarm Mask:) Æ Intfc1 is dependent on whether the CDI-10-1 Single G.703 or the CDI-60 HSSI Interface card is installed into Interface Slot 1. Intfc1 E3T3STS1 Alarms: Tx Rx ExtClk ( E) Intfc1 HSSI Alarms: Port1 Ext-Clk ( E) 6–37 CDM-710G High-Speed Satellite Modem Front Panel Operation Revision 1 MN-CDM710G (CONFIG:) Alarm Mask: Æ Intfc1 (CDI-10-1 Single G.703 Interface Card) Intfc1 E3T3STS1 Alarms: Tx Rx ExtClk ( E) Select Tx, Rx, or ExtClk using the ◄ ► arrow keys, then press ENTER. If Intfc1 E3T3STS1 Alarms: Æ Tx is selected: Intfc1 Port1 Tx Alarms: Tx-Cable Tx-AIS ( E) To configure each as an Alarm or Fault condition or to mask the alarm, select Tx-Cable or Tx-AIS using the W X arrow keys, then press ENTER. If Intfc1 Port1 Tx Alarms: Æ Tx-Cable is selected: Tx Cable Alarm: Alarm Fault Mask ( E) Select Alarm, Fault, or Mask using the W X arrow keys, then press ENTER. The default selection is Alarm. If Intfc1 Port1 Tx Alarms: Æ Tx-AIS is selected: Tx-AIS Alarm: Alarm Fault Mask ( E) Tx-AIS Alarm affects the event reporting status upon detection of a Tx AIS condition, and subsequently the switching logic, when the modem is in a 1:1 redundancy configuration. Select Alarm, Fault, or Mask using the WX arrow keys, then press ENTER. The default selection is Alarm. If Intfc1 E3T3STS1 Alarms: Æ Rx is selected: Intfc1 Port1 Rx Alarms: Rx-AIS Buffer-Slip ( E) To configure each as an Alarm or Fault condition or to mask the alarm, select Rx-AIS or Buffer-Slip using the W X arrow keys, then press ENTER. If Intfc1 Port1 Tx Alarms: Æ Rx-AIS is selected: Rx-AIS Alarm: Alarm Fault Mask ( E) This selection affects the event reporting status upon detection of a Rx AIS condition, and subsequently the switching logic, when the modem is in a 1:1 redundancy configuration. Select Alarm, Fault, or Mask using the W X arrow keys, then press ENTER. The default selection is Alarm. 6–38 CDM-710G High-Speed Satellite Modem Front Panel Operation Revision 1 MN-CDM710G If Intfc1 Port1 Tx Alarms: Æ Buffer-Slip is selected: Buffer Slip Alarm: Alarm Fault Mask ( E) The default selection is Alarm. Select Alarm, Fault, or Mask using the ◄ ► arrow keys, then press ENTER. If Intfc1 E3T3STS1 Alarms: Æ Ext-Clk is selected: Intfc1 Ext-Clk Alarm: Alarm Fault Mask ( E) The default selection is Alarm. To configure the loss of External Clock as either an Alarm or a Fault condition or to mask the alarm, select Alarm, Fault, or Mask using the ◄ ► arrow keys, then press ENTER. (CONFIG:) Alarm Mask: Æ Intfc1 (CDI-60 HSSI Interface Card) Intfc1 HSSI Alarms: Tx Rx ( E) Select Tx or Rx using the ◄ ► arrow keys, then press ENTER. If Intfc1 HSSI Alarms: Æ Tx is selected: Intfc1 Tx Clock Alarm: Alarm Fault Mask ( E) Select Alarm, Fault, or Mask using the ◄ ► arrow keys, then press ENTER. The default selection is Alarm. If Intfc1 HSSI Alarms: Æ Rx is selected: Buffer Slip Alarm: Alarm Fault Mask ( E) Select Alarm, Fault, or Mask using the ◄ ► arrow keys, then press ENTER. The default selection is Alarm. (CONFIG:) Alarm Mask: Æ Intfc2 (CDI-70 GigE Interface Card) GBEI Tx Cable Alarm: Alarm Fault Mask ( E) Select Alarm, Fault, or Mask using the ◄ ► arrow keys, then press ENTER. The default selection is Alarm. 6–39 CDM-710G High-Speed Satellite Modem Front Panel Operation 6.3.2 Revision 1 MN-CDM710G SELECT: Monitor Monitor: Alarms Event-Log Rx_Stats Alarms are reported under three main categories: • Tx path alarms are displayed under the Tx Category • Rx path alarms are displayed under the Rx Category • Alarms common to the unit are available under the Unit selection Refer to Table 6-4 for a listing of alarms. Select Alarms, Rx_Stats, or Event-Log using the ◄ ► arrow keys, then press ENTER. 6.3.2.1 (SELECT:) Monitor Æ Alarms Live Alarms: Transmit Receive Unit ( E) Select Transmit, Receive, or Unit using the ◄ ► arrow keys, then press ENTER. If Live Alarms: Æ Transmit is selected: TX Traffic: GBEI Card PHY Not Connected (E) This will report only if there are modulator errors; otherwise, it will report “No Errors.” Press ENTER or CLEAR to return to the previous menu. NOTE: The alarm message depicted in the above example usually indicates that the Ethernet data cable is disconnected from the modem. If Live Alarms: Æ Receive is selected: RX Traffic: Demod Unlocked (E) This will report only if Demod is unlocked; otherwise, it will report “No Errors.” Press ENTER or CLEAR to return to the previous menu. If Live Alarms: ÆUnit is selected: Unit Fault: No Errors (E) This will report only if there are unit faults; otherwise, it will report “No Errors.” Press ENTER or CLEAR to return to the previous menu. 6–40 CDM-710G High-Speed Satellite Modem Front Panel Operation 6.3.2.2 Revision 1 MN-CDM710G (SELECT:) Monitor Æ Rx_Stats For DVB-S2 only: EsNo=14.0 EbNo=12.8 BUF=050% BER=1.0E-09 EbNo=12.8 BER=1.0E-09 ΔF=-000.2k RSL=-16 ΔF=-000.2k RSL=-16 Link_Margin=+10.4 When the demodulator is locked, this menu reports Eb/No, PER (packet error rate), ΔF (frequency offset of incoming carrier) and RSL (receive signal level). Link Margin = [Es/No (measured) – Es/No (threshold)]. Refer to Chapter 1. INTRODUCTION for threshold information. Additionally: Usable Es/No Range (Typical) 6.3.2.3 Modulation Es/No Range (dB) QPSK 0.0 to 14.0 8QPSK 4.5 to 18.5 16APSK 8.0 to 22.0 32APSK 11.5 to 25.00 (SELECT:) Monitor: Æ Event-Log Stored Events: View Clear-All (E) Select View or Clear-All using the ◄ ► arrow keys, then press ENTER. If Stored Events: Æ View is selected: Log015 23/05/06 09:27:15 Fault – No PHY Link () • • • • This window displays up to 253 Alarms. Use the ST arrow keys to display individual alarms. The Event-Log stores the live alarms, along with a timestamp for review and troubleshooting. The date is in international format: dd/mm/yy Refer to Table 6-4 for the listing of available alarms: 6–41 CDM-710G High-Speed Satellite Modem Front Panel Operation Revision 1 MN-CDM710G Table 6-4. Summary of Faults/Alarms (as reported per category) Unit Faults / Alarms Menu Mnemonic Description FPGA Load Framer Card Framer FPGA not loading +1.5V PSU Framer Card 1.5V Vdc Framer / FEC regulator exceeds +/- 5% +1.5V PSU Interface Card #1 1.5V Vdc Slot 1 regulator exceeds +/- 5% +1.5V PSU Interface Card #2 1.5V Vdc Slot 2 regulator exceeds +/- 5% +3.3V PSU Framer Card 3.3 Vdc Framer regulator exceeds +/- 10% +5 PSU Framer Card 5.0 Vdc Framer regulator exceeds +/- 10% +12V PSU Framer Card 12 Vdc Framer regulator exceeds +/- 10% -12V PSU Framer Card -12 Vdc Framer regulator exceeds +/- 10% +18V PSU Framer Card +18 Vdc Framer regulator exceeds +/- 10% FLASH Checksum Error Flash Load Error FPGA Load Decoder Card Decoder FPGA not loading FPGA Load Encoder Card Encoder FPGA not loading FPGA Load Interface Card #1 Slot 1 FPGA not loading FPGA Load Interface Card #2 Slot 2 FPGA not loading PLL Clock Framer – 192MHz 192MHz PLL Clock Framer failure PLL Clock Framer – Ext Ref External Reference PLL Clock Framer failure FPGA Temp Framer Card Framing FPGA temperature out of range Modem Ambient Temp Framing card (modem) ambient temperature out of range Modem Cooling Fans Framing card – sense cooling fan problem Intfc1 has been removed Slot 1 interface card removed Intfc2 has been removed Slot 2 interface card removed +1.5V PSU Modulator Card 1.5 Vdc regulator exceeds +/- 5% FPGA Load Modulator Card Mod FPGA not loading PLL Clock Symbol Rate Mod Symbol Rate defitter PLL unlocked over overflowing Tx Synth Unlocked Mod synthesizer unlocked Tx CDM Unlocked Mod Digital Clock Manager unlocked I & Q are inactive Mod I or Q no activity FPGA Temp Modulator Card Mod FPGA outside temperature range Nyq Filter Clipping Mod Nyquist filter clipping Modulator Faults / Alarms Menu Mnemonic Description Tx Clock Loss Slot 1 Transmit clock not present at Slot 1 Tx Clock Loss Slot 2 Transmit clock not present at Slot 2 GBEI Card DataRate > +200PPM Data rate from GBEI to modulator exceeds nominal by >+200PPM GBEI Card DataRate < -200PPM Data rate from GBEI to modulator exceeds nominal by <-200PPM GBEI Card PHY Not Connected Tx Ais Interface 1 Ethernet cable not connected to GBEI, or cable fault Tx Ais Interface 2 TX AIS Slot 2()Valid for G.703) Tx Cable Interface 1 Tx Cable Interface 1 TX AIS Slot 1 (Valid for G.703) Tx Cable Interface 2 Tx Cable Interface 2 Encoder FIFO Empty Transmit Encoder FIFO is empty Encoder FIFO Full Transmit Encoder FIFO is full SERDES Parity Errors SERDES parity errors have been detected 6–42 CDM-710G High-Speed Satellite Modem Front Panel Operation Revision 1 MN-CDM710G Demodulator Faults / Alarms Menu Mnemonic Description +1.5V PSU Demodulator Card 1.5 Vdc regulator exceeds +/- 5% FPGA Load Demodulator Card Demod FPGA not loading Demod Unlocked Demodulator is not locked FPGA Temp Demodulator Card Demod FPGA outside temperature range BER limit Exceeded Bit error rate limit exceeded AGC Level Out of Range AGC level is out of range Eb/No limit exceeded EB/No limit has been exceeded Demodulator Synth 1 PLL Demodulator Synth 1 PLL fault Demodulator Synth 2 PLL Demodulator Synth 2 PLL fault Demodulator SERDES Dmd->Framer Demodulator SERDES fault Demodulator SERDES Framer > FEC1 Demodulator SERDES fault Demodulator SERDES Framer > FEC2 Demodulator SERDES fault FAST option not installed FAST option for selected feature has not been installed Rx DCM Unlocked Demod Digital Clock Manager unlocked Intf1 Rx Buffer Underflow Rx buffer has underrun Slot 1 Intff Rx Buffer Overflow Rx buffer has overflowed Slot 1 Intf2 Rx Buffer Underflow Rx buffer has underrun Slot 2 Intf2Rx Buffer Overflow Rx buffer has overflowed Slot 2 SERDES Par Framer -> Intf1 SERDES parity error detected on framer FPGA interface 1 SERDES Par Framer ->Intf2 SERDES parity error detected on framer FPGA interface 2 Rx Clock Source Interface 1 Rx Clock Source fault Interface 1 Rx Clock Source Interface 2 Intf1 Rx AIS Slot 1 Port1 Rx Clock Source fault Interface 2 Intf2 RXAIS Slip Slot 2 Intf1 EXT Clock Slot1 Intf2 Clock Slot2 RX AIS slot1 RX AIS slot2 EXT Clock Slot1 EXT Clock Slot2 If Stored Events: ÆClear-All is selected: Clear All Stored Events No Yes (E) When In Local mode, use the ◄ ► arrow keys to select No to retain, or Yes to clear the buffer of all stored events, then press ENTER. Note: When the unit is in Remote mode, and the user attempts to select an option, the following message is displayed (follow the prompt as shown): THIS UNIT IS CURRENTLY IN REMOTE MODE!! DO YOU WANT IN LOCAL MODE? ENT=Yes CLR=No 6–43 CDM-710G High-Speed Satellite Modem Front Panel Operation 6.3.3 Revision 1 MN-CDM710G SELECT: Test Test: Mode (E) Test options for the Tx carrier are selected in this menu. Select Mode using the ◄ ► arrow keys, then press ENTER. (SELECT:) Test Æ Mode 6.3.3.1 Test: Normal RF Tx-CW Tx-1,0 IF I/O ( E) The CDM-710G supports many useful test modes. Not all modes are available in all configurations – they depend upon the modem configuration (Duplex, Rx-Only, Tx-Only) and the data interface(s). Select Norm, IF (Loop), I/O (Loop), RF (Loop), Tx-CW or Tx-1.0 using the ◄ ► arrow keys, then press ENTER. Each test mode option is further explained as follows: SELECTION DESCRIPTION Norm (Normal) This clears any test modes or loopbacks and places the unit back into an operational state. IF (IF Loop) This test mode invokes an internal IF loop. This is a particularly useful feature, as it permits the user to perform a quick diagnostic test without having to disturb external cabling. Furthermore, all of the Rx configuration parameters are temporarily changed to match those of the Tx-side. When Norm is again selected, all of the previous values are restored. I/O (Input / Output Loop) This test mode invokes two distinct loopbacks. The first Loopback is an inward loop that takes data being received from the satellite direction, and passes it directly to the modulator. Simultaneously, the outward loop is invoked, whereby data being fed to the Tx data interface is routed directly back out of the Rx data interface. RF (RF Loop) This RF loop is almost identical to the IF loop mode. All of the Rx configuration parameters (except Rx Spectrum Invert) are temporarily changed to match those of the Tx-side, however, no internal connection is made. This is useful for performing a satellite Loopback. When Norm is again selected, all of the previous values are restored. Tx-CW (Transmit CW) This test mode forces the modulator to transmit a pure carrier (unmodulated). Tx-1,0 (Tx 1, 0, 1, 0 Pattern) This is a test mode that forces the modulator to transmit a carrier modulated with an alternating 1,0,1,0 pattern, at the currently selected Symbol Rate. This causes single sideband spectral lines to appear, spaced at ± half the Symbol Rate, about the carrier frequency. This mode is used to check the carrier suppression of the Modulator. Also, it verifies quadrature and amplitude balance. 6–44 CDM-710G High-Speed Satellite Modem Front Panel Operation Revision 1 MN-CDM710G Framer Card Interface Card Mod Card FEC Card Tx FIFO Tx Data Buffer Data Driver Rx Doppler Buffer Rx Data Buffers Data Driver Tx Data Rx Data FEC Encode Modulator DeMod Card FEC Decode DeMod Normal Framer Card Interface Card Mod Card FEC Card Tx FIFO Tx Data Buffer Data Driver Rx Doppler Buffer Rx Data Buffers Data Driver Tx Data Rx Data FEC Encode Modulator DeMod Card FEC Decode DeMod I/O Loop (Available Some Interfaces) Figure 6-2. Traffic Data Flow – Loopback Block Diagrams 6–45 CDM-710G High-Speed Satellite Modem Front Panel Operation Revision 1 MN-CDM710G 6.3.4 SELECT: INFO Note: INFO screens provide read-only information on the current configuration of the modem without risking inadvertent changes. The user may only view, but not edit, an Info screen. INFO: Rem Tx Intfc1 Intfc2 Rx (E) Select Rem, Tx, Rx, Intfc1, or Intfc2 using the ◄ ► arrow keys, then press ENTER. (SELECT:) INFO Æ Rem 6.3.4.1 Remote M&C: 100BaseTx IP Addr: 192.168.001.006 This display provides the status, as applicable, of the Remote Monitor & Control configuration. (SELECT:) INFO Æ Tx 6.3.4.2 Tx: 0140.0000 17.379483 DVBS2 8P 3/4 -10.0 ON Using the example shown, a typical transmit data info screen may be broken down as follows: Value Description Tx: 0140.0000 Tx Frequency in MHz 17.379483 Data rate in Mbps DVBS2 Transmission mode 8P (Modulation:) QP=QPSK 8P=8-PSK 16A=16-APSK 32A=32-APSK 3/4 Code Rate -10.0 Tx Power level in dBm ON Tx Power: ON = On, OF = Off 6–46 CDM-710G High-Speed Satellite Modem Front Panel Operation Revision 1 MN-CDM710G (SELECT:) INFO Æ Rx 6.3.4.3 RX: 0140.0000 17.379483 DVBS2 QP 1/2 LF Using the example shown, a typical receive data info screen may be broken down as follows: Value Description RX: 0140.0000 Rx Frequency in MHz 17.279483 Data rate in Mbps DVBS2 Transmission mode 8P (Demodulation:) QP=QPSK 8P=8-PSK 16A=16-APSK 32A=32-APSK 1/2 Code Rate LF FECFrame Type: SF = Short Frame LF = Long Frame 6.3.5 SELECT: Save/Load Save/Load Configuration: Save Load (E) Note: When the unit is in Remote mode, and the user attempts to select an option, the following message is displayed: THIS UNIT IS CURRENTLY IN REMOTE MODE!! DO YOU WANT IN LOCAL MODE?ENT=Yes CLR=No When in Local mode: Select Save or Load using the ST arrow keys, then press ENTER. The Save and Load submenus permit the user to store or load up to 10 different modem configurations in a non-volatile memory of the modem. 6–47 CDM-710G High-Speed Satellite Modem Front Panel Operation 6.3.5.1 Revision 1 MN-CDM710G (SELECT:) Save/Load Æ Save Save Config to Loc: 9 Empty ( E) Using Loc 9: as the example, if Save is selected and no configuration has been saved, the second line reads ‘Empty’, as shown in the preceding example. However, if the selected Loc: 9 already contains data, what displays is similar to the next example: Save Config to Loc: 9 01:02:43 05/08/05 ( E) The user is shown the time and date stamp of the previously stored configuration, for identification purposes. Select the location where the current configuration is to be stored using the ST arrow keys, then press ENTER. There are 10 available locations, numbered 0 through 9. If the selected location does not contain a previously stored configuration, the following screen is displayed: New Config has been Saved to Loc 9 (E) However, if the selected location does contain a previously stored configuration, the following screen is displayed: Loc 0 Contains Data ! Overwrite? NO YES (E) Selecting Yes overwrites the existing configuration at the selected location. Select No or Yes using the W X arrow keys, then press ENTER. 6.3.5.2 (SELECT:) Save/Load Æ Load Load Config from Loc: 9 11:02:43 05/08/05 ( E) Using Loc: 9 as the example, if Load is selected and there is a configuration stored at the selected location, what displays is similar to the preceding example. Note that the stored configuration is identified with a date and time stamp. If the selected location contains no data, what displays is similar to the next example: Load Config from Loc: 9 Empty ( E) Select the location from where the current configuration is to be loaded using the ST arrow keys, then press ENTER. There are 10 locations numbered 0 through 9.. 6–48 CDM-710G High-Speed Satellite Modem Front Panel Operation Revision 1 MN-CDM710G If the selected location contains valid data, what displays is similar to the following example: New Config has been Loaded from Loc # (E) Press ENTER or CLEAR to return to the previous menu. If the selected location contains invalid data, what displays is similar to the next example: Warning! Loc 9 Contains No Data! (E) Press ENTER or CLEAR to return to the previous menu. 6.3.6 SELECT: Util (Utility) UTIL: RT-Clk Ref ID Display Firmware FAST Select RT-Clk, Ref, ID, Display, Firmware, or FAST using the W X arrow keys, then press ENTER. 6.3.6.1 (SELECT:) UTIL Æ RT-Clk Edit Real-Time Clock: 10:23:51 23/05/06 ( E) Edit the time and date settings of the real-time clock. Use the W X arrow keys to select the digit. Use the ST arrow keys to change the value of the digit, then press ENTER. Note: In accordance with international convention, the date is shown in DAY/MONTH/YEAR format. 6.3.6.2 (SELECT:) UTIL Æ Ref Internal 10 MHz Ref Freq Fine Adjust:+1911 This menu provides a fine adjustment for the internal 10 MHz reference. For ‘Tx Only’ or ‘Full Duplex’ units, use the Tx IF Carrier to check the reference frequency by first placing the unit in the Tx-CW mode from the Test menu. In ‘Rx Only’ units, 10 MHz is available at J6-8 or J6-9 only while within the Utility: Ref menu. 6–49 CDM-710G High-Speed Satellite Modem Front Panel Operation 6.3.6.3 Revision 1 MN-CDM710G (SELECT:) UTIL Æ ID Edit Circuit ID: ( E) ------------------------ To edit the Circuit ID string, select the cursor position on the bottom line using the W X arrow keys, then edit the selected character using the ST arrow keys. Note that only the bottom line (0 to 24 characters) is available. The following characters are available: <Space> ( ) * + - , . / 0-9 and A-Z When the string has been composed, press ENTER. 6.3.6.4 (SELECT:) UTIL ÆDisplay Edit Display Brightness: 100% ( E) Select a brightness levels of 25%, 50%, 75% or 100% using the ST arrow keys. Press ENTER when done. 6.3.6.5 (SELECT:) UTIL Æ Firmware IMPORTANT These commands are for DIAGNOSTIC PURPOSES ONLY. DO NOT CHANGE an image unless instructed to do so by Comtech EF Data customer service technicians. The sub-menus available through UTIL: Firmware allow viewing information about the CDM-710G internal firmware. The modem stores two complete firmware images, and the user can select which image will be loaded the next time the unit reboots. Firmware Images: Info Select ( E) Select either Info or Select using the W X arrow keys, then press ENTER. (Firmware:) Firmware Images Æ Info Firmware Info: Bootrom Image#1 Image#2 To view information on the Bootrom and the two images, select Bootrom, Image#1, or Image#2 using the W X arrow keys, then press ENTER to continue. 6–50 CDM-710G High-Speed Satellite Modem Front Panel Operation Revision 1 MN-CDM710G If Firmware Info: Æ Bootrom is selected: Bootrom: CDM710_Boot 07/17/06 1.1.1 This screen provides information on the installed Bootrom firmware. The release date is provided on the top line in DAY/MONTH/YEAR format; the bottom line identifies the installed Firmware by its release name/number and its version number. Note: The firmware information shown above is representative. Current status is obtained via the Firmware Info: Æ Bootrom submenu. Press ENTER or CLEAR to return to the previous menu. If Firmware Info: Æ Image#1 or Æ Image#2 is selected: Image#x: Bulk App Framer FEC Mod Demod Interfaces On the next page, Table 6-5 provides an overall summary of examples for each available firmware info screen. As shown, the first column for either Image provides the available selection; the second column provides an example of the information provided for that selection. Note: The information in this table is representative; the firmware numbers/revision letters/versions/release dates are subject to change. (Firmware:) Firmware Images Æ Select Current Active Image: #2 Next Reboot Image: #1 #2 The top line shows the active image. To select the active software image, on the second line, select the desired image using the W X arrow keys, then press ENTER. To make the selected image the active choice, power cycle the modem to reboot the new software. 6–51 CDM-710G High-Speed Satellite Modem Front Panel Operation Revision 1 MN-CDM710G Table 6-5. Summary of Firmware Info Screens (Image#1 and Image#2) Utility: Firmware Æ Info Æ Image#1 Bulk FEC Image#1: App Mod Utility: Firmware Æ Info Æ Image#2 Framer Interfaces Image#2 Image#2: Bulk App Framer FEC Mod Interfaces Bulk Bulk: FW00114- 09/04/08 5.1.1. Bulk Bulk: FW00114- 08/15/08 5.1.1 App App: FW00115- 10/16/06 5.1.1 App App: FW00115- 06/06/08 5.1.1 Framer Framer: 11/08/07 FW12548C 2.3.2 Framer Framer: 11/08/07 FW12548C 2.3.2 Enc-S2 Enc-S Dec-S2 FEC Enc-S2 Enc-S Dec-S2 FEC FEC: Enc-S2 DVB-S2 Enc FW12439C 09/19/07 1.2.1 FEC: Enc-S2 DVB-S2 Enc FW12439C 09/19/07 1.2.1 FEC: Enc-S DVB-S Enc FW12440A 04/03/07 1.0.2 FEC: Enc-S DVB-S Enc FW12440A 04/03/07 1.0.2 FEC: Dec-S2 DVB-S2 Dec FW12436B 12/12/07 1.1.3 FEC: Dec-S2 DVB-S2 Dec FW12436B 12/12/07 1.1.3 Mod Filters FPGA Filters FPGA Mod Mod: Filters Mod Filters: FW12695- 11/23/05 1.1.1 Mod: Filters Mod Filters: FW12695- 11/23/05 1.1.1 Mod: FPGA Mod FPGA FW12549B 09/12/07 2.2.1 Mod: FPGA Mod FPGA FW12549B 09/12/07 2.2.1 Filters UDD Equalizer Demod Demod: Filters Dem Filters: FW12694- 08/27/06 1.1.1 Demod: UDD UDD FPGA: FW12442C 06/12/07 2.4.0 Demod: Equalizer EQ FPGA: FW12441- 06/28/07 1.3.0 E3T3 GBEI HSSI Interfaces Intfc: E3T3 Intfc: GBEI Note 2 Intfc: HSSI Intfc2: GBEI (Slot 2 only) Note 2 Demod: Filters Demod: UDD Demod: Equalizer 03/21/06 1.0.2 Intfc: E3T3 GBEI: FW12738A 06/26/07 1.1.9 Intfc: GBEI HSSI: FW0000024A 11/02/07 1.0.1a Intfc: HSSI Dem Filters: FW12694- 08/27/06 1.1.1 UDD FPGA: FW12442C 06/12/07 2.4.0 EQ FPGA: FW12441- 06/28/07 1.3.0 E3T3 GBEI HSSI Interfaces E3T3STS1: FW10249A GBEI: FW12738A Filters UDD Equalizer Demod Note 2 E3T3STS1: FW10249A 03/21/06 1.0.2 GBEI: FW12738A 06/26/07 1.1.9 HSSI: FW0000024A 11/02/07 1.0.1a 6/26/07 1.1.9 Notes: 1. The following information is representative. Current status is obtained via the Firmware Info: Æ Image#x submenus. 2. The firmware for the CDI-70 Gigabit Ethernet Interface (GBEI) is installed on the interface itself; information is returned only when a CDI-70 module is installed in Slot 2. 6–52 CDM-710G High-Speed Satellite Modem Front Panel Operation 6.3.6.6 Revision 1 MN-CDM710G (SELECT:) UTIL Æ FAST FAST: Cnfg View MainBoard S/N: 333333333 Comtech EF Data’s FAST (Fully Accessible System Topology) system permits the purchase and installation of options through special authorization codes, entered remotely or through the front panel. FAST allows immediate implementation of different options through the user interface keypad. All FAST options are available through the basic platform unit. Select either Cnfg or View using the W X arrow keys, then press ENTER. (UTIL:) FAST ÆCnfg (Configuration) FAST Configuration Edit Code Demo Mode Select Edit Code or Demo Mode using the W X arrow keys, then press ENTER. If FAST Configuration: Æ Edit Code is selected: Edit 20 digit FAST Code: 00000000000000000000 ENT Enter the code carefully on the bottom line by using the W X arrow keys to move to each character position, then editing the character in that position by using the ST arrow keys. Once the 20-digit FAST Code has been correctly edited into place, press ENTER. The CDM-710G will respond with “Configured Successfully” if the new FAST option has been accepted: If FAST Configuration: Æ Demo Mode is selected: FAST Demo Mode: Off On 3888000 seconds remain The Demo Mode enables all FAST options for a limited time. For newer units with the latest firmware version, the Demo Mode lasts 45 days. Select Off or On using the W X arrow keys, then press ENTER. The display indicates the time remaining on the demo counter. The demo time may be paused either by turning demo mode off, or by unplugging the unit. However, whenever the unit is turned back on, the demo counter will resume. (UTIL:) FAST Æ View View Options: 01 () IF Modulator Installed Scroll through the available option numbers by using the ST arrow keys. The description of each option and its installation status (Installed or Not Installed) appears on the lower line of the display. 6–53 CDM-710G High-Speed Satellite Modem Front Panel Operation Revision 1 MN-CDM710G Notes: 6–54 Chapter 7. WEB SERVER INTERFACE 7.1 Overview This chapter describes the functionality of the CDM-710G High-Speed Satellite Modem Web Server (HTTP) Interface. Please refer to Chapter 6. FRONT PANEL OPERATION, and the Remote Commands Specifications tables found in Appendix A. REMOTE CONTROL for detailed descriptions of the configuration parameters featured on the individual Web pages shown in this chapter. This interface is available via the RJ-45 J4 10/100 Ethernet Remote Port Connector on the rear panel of the CDM-710G. Refer to Chapter 4. REAR PANEL CONNECTOR PINOUTS (Sect. 4.3.1) for details and pinout information. Note: Only one remote method can be in control of either Ethernet or Serial, while the other can be used for query. 7.1.1 Web Server Interface Introduction The embedded Web Server application provides the user with an easy to use interface to configure and monitor all aspects of the CDM-710G. These Web pages have been designed for optimal performance when using Microsoft’s Internet Explorer Version 5.5 or higher (the examples shown in this chapter use Internet Explorer Version 6.0). The user can fully control and monitor base operations of the CDM-710G from the Web Server Interface. By rolling the cursor over the navigation tabs located at the top of each page (right), the user can select from the available nested hyperlinks. 7–1 CDM-710G High-Speed Satellite Modem Web Server Interface 7.2 Revision 1 MN-CDM710G User Login The Web Server Interface is accessible, using a Web browser, by typing “http://www.xxx.yyy.zzz” in the browser’s Address box, where “www.xxx.yyy.zzz” is the IP address of the modem (as configured from the CDM-710G front panel menu: SELECT: CONFIG Æ Remote Æ Ethernet Æ Address. Refer to Chapter 6. FRONT PANEL OPERATION for further details). Additionally, confer with your network administrator to determine the appropriate IP address assignment for your modem. The user is prompted to type in a valid User Name and Password, similar to the dialogue box shown to the right: HTTP Login Access Levels, Default User Names and Passwords are defined as follows: CDM-710G High-Speed Satellite Modem HTTP Login Access Levels User Interface User Login Access Level Admin User Full Access to all Web Pages Web Read/Write User Read Only User No Access to Admin Web pages No Access to Admin or Web pages Full Access for all other Web Pages View Only Access for all other Web Pages CDM-710G High-Speed Satellite Modem Web Server Default Names/Passwords Admin User Read/Write User Read Only User comtech/comtech opcenter/1234 monitor/1234 Type the User Name and Password, then click [OK]. IMPORTANT The Ethernet option must be selected from the CDM-710G Front Panel prior to entering the correct Username and Password. Failure to configure the modem accordingly will cause the Login dialogue box to return the user to a blank window. 7–2 CDM-710G High-Speed Satellite Modem Web Server Interface Revision 1 MN-CDM710G Once the valid User Name and Password is accepted, the user will see the CDM-710G High-Speed Satellite Modem Web Server Interface top-level “splash” page: This splash page identifies the model in use as either the CDM-710G (70/140 MHz) or CDM-710GL (L-Band) Satellite Modem unit. This identification is also provided on each subsequent page under the Comtech EF Data logo at the lefthand top side (as shown at right): While the CDM-710G Web Server Interface is depicted throughout this chapter, the appearance and function of the CDM-710GL Web Server Interface is, for all purposes, otherwise identical to that of the CDM-710G Web Server Interface. 7.2.1 Web Server Menu Tree From the splash page, the user has access to five (5) navigation tabs. The following menu tree illustrates the options available through this interface: Home Admin Config Mdm Stats Maint Home Access Interface Modem Status Unit Info Contact Remote Modem Events & Statistics Support Modem Utilities Click any tab or hyperlink to continue. 7–3 CDM-710G High-Speed Satellite Modem Web Server Interface 7.3 Revision 1 MN-CDM710G Web Server Page Descriptions Refer to the following subsections in this chapter for further information about each page available under the tabs that comprise the Web Server Interface: Interface Tab Refer to: Home Sect. 7.3.1 Admin (Administration) Sect. 7.3.2 Config Mdm (Modem Configuration) Sect. 7.3.3 Stats (Status/Statistics) Sect 7.3.4 Maint (Maintenance) Sect 7.3.5 For a complete and detailed description of each configuration parameter available via each page under this interface, refer elsewhere in this manual to Chapter 6. FRONT PANEL OPERATIONS or Appendix A. REMOTE CONTROL. 7.3.1 Home Page 7.3.1.1 Home | Home Page Figure 7-1. CDM-710G Satellite Modem Home page From any location within the Web Server Interface, the user can select the Home tab and/or hyperlink to return back to this top-level page. 7–4 CDM-710G High-Speed Satellite Modem Web Server Interface 7.3.1.2 Revision 1 MN-CDM710G Home | Contact Page Figure 7-2. Home | Contact Information page Use the ‘Home | Contact’ page (Figure 7-2) to obtain basic contact information to reach Comtech EF Data Sales and Customer Support via phone or automated e-mail links. 7–5 CDM-710G High-Speed Satellite Modem Web Server Interface 7.3.1.3 Revision 1 MN-CDM710G Home | Support Page Figure 7-3. Home | Customer Support page Use the ‘Home | Support’ page (Figure 7-3) to compose an e-mail message for questions or problems with the modem. The Problem Report area of the display allows up to 256 characters maximum. The CDM-710G Support Web Page uses Simple Mail Transport Protocol (SMTP) to send E-mail to Comtech EF Data Modem Support ([email protected]). IMPORTANT For this page to operate correctly, the modem’s administrator is required to specify the SMTP server, domain name, and destination on the Admin | Remote page (see Sect. 7.3.2.2). Once the Contact Information is entered and a message composed in the Problem Report text window, click [Submit E-mail] to send the message. 7–6 CDM-710G High-Speed Satellite Modem Web Server Interface 7.3.2 Revision 1 MN-CDM710G Admin Pages The ‘Admin’ pages provide the means to set up the access parameters required to facilitate communication with the CDM-710G Web Server. The Admin pages are available only to users who have logged in using the Administrator Name and Password. IMPORTANT 7.3.2.1 Admin | Access Figure 7-4. Admin | Access page Use the ‘Admin | Access’ page (Figure 7-4) as the means to set up user names, passwords, the E-mail server, and the host IP addresses as needed to facilitate communication with the CDM-710G Web Server. Network Maintenance • MAC Address: This parameter is read-only and cannot be changed. • IP Gateway: This entry allows a user to specify the IP Gateway Address for the Ethernet M&C port for this unit. • IP Address: This entry allows a user to specify an IP address and a subnet mask to define a unique class of machines that are allowed access. System Account Access Information • Admin, Read/Write, Read Only Names and Passwords: The factory defaults for these names/passwords are: o Admin comtech/comtech o Read/Write opcenter/1234 7–7 CDM-710G High-Speed Satellite Modem Web Server Interface o Read Only Revision 1 MN-CDM710G monitor/1234 Note the following: o These Name fields can be any alphanumeric combination with a maximum length of 10 characters. o These Password fields can be any alphanumeric combination with a maximum length of 10 characters. • SMTP Server: Specify the mail server IP address from where you want to send the e-mail. • SMTP Domain Name / Destination: The Administrator can assign the SMTP Domain Name and Destination. This is required if the e-mail feature of the Support Page (Sect. 6.1.4.1.3) is to be used. o For SMTP Domain Name, specify the domain of the e-mail server (usually found to the right of the @ symbol in an e-mail address). o For SMTP Domain Destination,specify the e-mail recipient name (usually found to the left of the @ symbol in an e-mail address). Once the desired configuration settings have been made on this page, click [Submit Admin] to save these changes. 7–8 CDM-710G High-Speed Satellite Modem Web Server Interface 7.3.2.2 Revision 1 MN-CDM710G Admin | Remote Figure 7-5. Admin | Remote page Use the ‘Admin | Remote’ page (Figure 7-5) to set and return administration information for the CDM-710G Simple Network Management Protocol (SNMP) feature. The Administrator can assign up to two SNMP Trap IP addresses. The Administrator can assign a SNMP Trap Community String. The factory default for this parameter is public. The SNMP Trap Community String field can be any combination of characters and a length of 0 - 20 characters. For details pertaining to the configuration parameters available on this page, refer to Chapter 6. FRONT PANEL OPERATION and Chapter 8. SNMP INTERFACE. Once the desired configuration settings have been made on this page, click [Submit Admin] to save these changes. 7–9 CDM-710G High-Speed Satellite Modem Web Server Interface 7.3.3 Revision 1 MN-CDM710G Config Mdm (Configure Modem) The ‘Config Mdm’ pages (Figure 7-6 through Figure 7-9) are used to configure all modem parameters. 7.3.3.1 Config Mdm | Interface Figure 7-6. Config Mdm | Interface page Use the ‘Config Mdm | Interface’ page (Figure 7-6) to configure the modem’s installed data interfaces. The appearance of this page is dependent on the interfaces installed in Expansion Slot 1 (Intfc1) and Expansion Slot 2 (Intfc2). In the above example, a CDI-60 HSSI Interface Module has been installed in Expansion Slot 1, and a CDI-70 Gigabit Ethernet Interface (GBEI) Module has been installed in Expansion Slot 2 (for a table of the applicable interfaces and installable combinations, refer to Sect. 1.3.5 Allowable Data Interface Combinations). For either slot, the modem automatically detects the interface present and adjusts the appearance of this page accordingly. If needed, define the desired interface operating parameters, then click [Submit Changes] to save these changes. 7–10 CDM-710G High-Speed Satellite Modem Web Server Interface Revision 1 MN-CDM710G If there is no interface module present, as shown in Figure 7-7 the message “Interface Not Installed.” is displayed in place of an operable configuration window. In this example, a CDI-10-1 Single G.703 E3/T3/STS1 Interface Module has been installed in Expansion Slot 1, while Expansion Slot 2 is empty: Figure 7-7. Config Mdm | Interface Page (with Empty Slot) 7–11 CDM-710G High-Speed Satellite Modem Web Server Interface 7.3.3.2 Revision 1 MN-CDM710G Config Mdm | Modem Figure 7-8. Config Mdm | Modem page Use the ‘Config | Modem’ page (Figure 7-8) to configure modem DVB-S2 (Generic) operating (Tx / Rx) parameters. The Tx / Rx Interface Types and Framing Modes have higher priority than other parameters, and should be configured before setting other parameters. IMPORTANT For details pertaining to the configuration parameters available on this page, refer to Chapter 6. FRONT PANEL OPERATION. Once the desired configuration settings have been made on this page, click [Config Transmit], [Config Receiver], or [Config All] to save these changes. 7–12 CDM-710G High-Speed Satellite Modem Web Server Interface 7.3.3.3 Revision 1 MN-CDM710G Config Mdm | Modem Utilities Figure 7-9. Config Mdm | Modem Utilities page Use the ‘Config Mdm | Modem Utilities’ page (Figure 7-9) to perform the following Modem Utilities tasks: • Selecting the Boot Image; • Performing a Soft Reboot; • Saving and Loading Configurations; • Setting up Redundancy Operation; • Setting the Date and Time; • Setting the Clock Mode; • Selecting the Test Mode; • Re-centering the Buffer; • Assigning a Circuit ID; • Setting the Rx Alarm Masks. Once the desired configuration settings have been made in each section, click the action tab provided in that section (e.g., [Submit], [Save], [Load], etc.) to save those changes. For details pertaining to the configuration parameters available on this page, refer to Chapter 6. FRONT PANEL OPERATION. 7–13 CDM-710G High-Speed Satellite Modem Web Server Interface 7.3.4 Revision 1 MN-CDM710G Stats (Statistics) Pages The Stats pages provide the user with status, event logging, and operational statistics windows. 7.3.4.1 Stats | Modem Status Figure 7-10. Stats | Modem Status page Use the ‘Stats | Modem Status’ page (Figure 7-10) to review read-only status information pertaining to: • General modem operating and configuration information; • Alarms; • Tx and Rx Parameters; • Tx and Rx Installed options (Data Interfaces, FAST, etc.). Click [Refresh] as needed to execute update of the information provided on this page. 7–14 CDM-710G High-Speed Satellite Modem Web Server Interface 7.3.4.2 Revision 1 MN-CDM710G Stats | Events & Statistics Figure 7-11. Stats | Events & Statistics page Use the ‘Stats | Events & Statistics’ page (Figure 7-11) to review a scrollable text record of the modem’s stored events. • Read Next Five Events: Select to buffer the next group of five stored events into the scrollable Events window. • Clear Events Log: Select to wipe clean the stored events log. • Initialize Events Pointer: Select to reset the log’s internal pointer. • Unread Events: Displays the total number of unread stored events in the Events window. As stored event groups are displayed, this number adjusts downward accordingly. Once the desired settings have been entered, click [Submit] as needed to execute update of the scrollable window contents. 7–15 CDM-710G High-Speed Satellite Modem Web Server Interface 7.3.5 Revision 1 MN-CDM710G Maint | Unit Info Page Figure 7-12. Maint | Unit Info page Use the ‘Maint | Unit Info’ page (Figure 7-12) to review a read-only, scrollable status window which provides information about the currently loaded Bootrom; for Image 1 and Image 2, the user can scroll through information of all the constituent firmware blocks that make up the bulk. 7–16 Chapter 8. SNMP INTERFACE 8.1 SNMP Interface The Simple Network Management Protocol (SNMP) is an application-layer protocol designed to facilitate the exchange of management information between network devices. The CDM-710G SNMP agent supports both SNMPv1 and v2c. IMPORTANT 8.2 For proper SNMP operation, the CDM-710G MIB files must be used with the associated version of the CDM-710G modem M&C Software. Refer to the CDM-710G SW Release Notes for information on the required FW/SW compatibility. Management Information Base (MIB) Files MIB files are used for SNMP remote management and consist of Object Identifiers (OIDs). Each OID is a node that provides remote management of a particular function. A MIB file is a tree of nodes that is unique to a particular device. There are three MIB files associated with the CDM-710G: MIB File/Name Fw10874-2-.mib ComtechEFData MIB file Description ComtechEFData MIB file gives the root tree for ALL Comtech EF Data products and consists of only the following OID: Name: comtechEFData Type: MODULE-IDENTITY OID: 1.3.6.1.4.1.6247 Full path: iso(1).org(3).dod(6).internet(1).private(4).enterprises(1).comtechEFData(6247) Module: ComtechEFData Fw0000116-.mib CDM-710G Common MIB file CDM-710G High Speed modem family common components. Fw0000117-.mib CDM-710G Traps MIB file CDM-710G High Speed modem family Trap MIB file is provided for SNMPv1 traps These MIB files should be compiled in a MIB Browser or SNMP Network Monitoring System server. Note: The CDM-710G SNMP agent supports both SNMPv1 and v2c. The CDM-710G/ 710GL Traps file only needs to be compiled if SNMPv1 traps are to be used. 8–1 CDM-710G High-Speed Satellite Modem SNMP Interface 8.3 Revision 1 MN-CDM710G SNMP Community Strings The CDM-710G uses community strings as a password scheme that provides authentication before gaining access to the CDM-710G agent’s MIBs. In SNMP v1/v2c, the community string is sent unencrypted in the SNMP packets. Caution must be taken by the network administrator to ensure that SNMP packets travel only over a secure and private network if security is a concern. A packet sniffer can easily obtain the community string by viewing the SNMP traffic on the network. The community string is entered into the MIB Browser or Network Node Management software and is used to authenticate users and determine access privileges to the SNMP agent. The user defines three Community Strings for SNMP access: • • • 8.4 Read Community Write Community Trap Community default = public default = private default = comtech SNMP Traps The CDM-710G has the ability to send out SNMP traps when certain events occur in the modem. For example, the CDM-710G also sends out traps when an alarm or a fault occurs in the modem. These include unit faults, TX faults, and RX faults. A trap is sent both when a fault occurs and is cleared. The following SNMP traps are provided: • Unit Alarm • TX Traffic Alarm • RX Traffic Alarm • Clear Stored Events • Monitor Interface Redundancy Switch State 8–2 CDM-710G High-Speed Satellite Modem SNMP Interface 8.5 Revision 1 MN-CDM710G Common Private MIB The CDM-710G SNMP agent also implements private MIBs. The CDM-710G Common MIB holds all unit parameters not associated with Modulator, Demodulator, FEC, or Interface boards. For detailed OID information please refer to the actual MIB file. System Information Group Provides hardware configuration information as well as serial and model numbers Remote Serial Group Provides parameters to the legacy serial interface parameters Remote Ethernet Group Provides parameters of the Ethernet interface Ethernet SNMP Group Provides parameters necessary to configure the SNMP interface Interface TX Group Provides parameters that control the modulator options Interface RX Group Provides parameters that control the demodulator options Config Interface Group Provides parameters for selection of the modems frequency response Monitor Group Provides access to Alarm/Fault/Events log Save/Load Group Provides control of the unit configuration Store/Load capabilities Utilities Group Provides access to the units Real-Time clock, Internal Reference Adjustment, Circuit ID, and Front Panel Brightness Control Firmware Group Provides Revision Numbers, and Release Dates for all firmware within the unit Modulator Private MIB Provides access to all modulator specific functions such as redundancy, GigE Interface, HSSI Interface, and G.703 Interface 8–3 CDM-710G High-Speed Satellite Modem SNMP Interface Revision 1 MN-CDM710G Notes: 8–4 Chapter 9. TELNET INTERFACE 9.1 Telnet Interface The CDM-710G High-Speed Satellite Modem provides a Telnet interface for two primary functions: • Equipment M&C via the standard equipment Remote Control protocol. • Equipment M&C via Comtech Monitor and Control System (CMCS) application. The Telnet interface requires user login at the Administrator level and Read/Write level. The login process is shown in the following example: 9–1 CDM-710G High-Speed Satellite Modem Telnet Interface Revision 1 MN-CDM710G Once logged into the Telnet interface as the Administrator, the user can access the standard remote control interface defined in Appendix A. REMOTE CONTROL, as shown in this example: 9.2 Caution Using Windows Telnet Client There is a disadvantage when using Windows DOS as Telnet Client. Since Windows DOS cannot translate a ‘\r’ to a ‘\r\n’ for the messages coming from Telnet Server, the multi-line command response (for example, FRW? response) will be displayed as one line, with the latter lines overwriting the previous lines. In order to view the full response messages, CEFD recommends using HyperTerminal configured as Telnet Client. To do so, configure the HyperTerminal as following: 1. Connect using TCP/IP instead of COM1 or COM2 (see example shown at left). 2. ASCII setup: Check both the "Send line ends with line feeds" and "Append line feeds to incoming line ends" options (see example to right). 9–2 CDM-710G High-Speed Satellite Modem Telnet Interface Revision 1 MN-CDM710G The following screen captures depict examples of HyperTerminal configured as Telnet Client: 9–3 CDM-710G High-Speed Satellite Modem Telnet Interface 9.3 Revision 1 MN-CDM710G Using Telnet Please refer to Appendix A. REMOTE CONTROL in this manual for the syntax and list of commands and status queries for the modem. Telnet is implemented in the modem Ethernet M&C in a "Telnet wrapper". When the user Telnets to the modem, it emulates a local RS-232 (RS-485) serial connection to the modem. The user can then type the same command syntax that he would use from a serial remote terminal and the Ethernet M&C "unwraps" the Telnet packet and sends it on to the base modem processor which responds to it as if it was a serial remote command. To summarize: • Start of Packet is either a '<' or a '>' where '<' is used to send a command/query to the modem and '>' is the modem response. • Defines the address of the modem (always is 0 in RS-0232). • The 3 digit instruction code of the specific command/query. • Instruction Code Qualifier. When sending, = will set a parameter, ? is used to query. • The modem response will be either =, ?, !, *, #, or ~ (see the specific definitions in the Remote Control Section). • Optional argument. • End of packet (CR). 9.3.1 Telnet Examples 1. A controller sends the following command to the modem to program its Tx frequency: <0135/TFQ=0070.2345 {CR} The modem returns: >0135/TFQ= 2. The message below requests Tx frequency status: <0654/TFQ? The modem response is: >0654/TFQ= 0070.2345 {CR}{LF} 9–4 Chapter 10. CLOCK MODES 10.1 Introduction This chapter describes the various clocking options that are available with the CDM-710G HighSpeed Satellite Modem. The CDM-710G allows the operation of single ports on single data interfaces plugged into the two slots at the rear of the modem. For the most part, each port operates independently and generally does the clocking for each port. When dealing with satellite modems, the subject of clocking often becomes a complex issue. The CDM-710G is always Data Communications Equipment (DCE) and is normally connected to Data Terminal Equipment (DTE). Figure 10-1 presents a diagram of a typical interface; a general description of the clocking and clock modes is provided below. The particular clocking modes available depend upon the data interface and its characteristics. The available clocking for each data interface module is discussed in the chapter sections that follow. For further information about the specific interface, refer to its pertinent interface chapter in this manual. Ext Ref This signal is applied to J7 on the rear of the modem; it is located on the main part of the modem – not on a data interface module. The modem locks its internal IF synthesizers and signal processing circuitry to the Ext Ref signal. It is a low-phase noise, highly stable signal. When the Ext Ref is used, it replaces the internal reference (Int Ref) oscillator (10 MHz) inside the modem and it is the master reference for all signals in the modem. It is normally the source for ST clock. Ext Clk This input appears on some data interface modules. It is associated only with the clock circuitry in the data interface and is not linked to the internal IF synthesizers. When an Ext Clk signal is used in conjunction with a G.703 port, this is the signal used to derive a signal to clock out the Rx Buffer. Int Clk The Int Clk or Internal Clock is the actual signal used on the data interface module. It is derived from either the Ext Ref or Int Ref oscillator in the main part of the modem – not from the data interface. Tx-Terr The signal sent to the modem by equipment external to the modem is the Tx-Terr clock. It is SD on a G.703 interface, and TT on the HSSI interface. The modem dejitters and phase locks to this signal and uses it to clock data into the modem. Rx-Sat Rx-Sat is the clock derived from the signal received from the satellite. It is the signal sent from the distant end plus Doppler induced by the motion of the satellite. Rx-Sat is the clock exiting the modem (RD or RT) when the Rx Buffer is disabled. 10–1 CDM-710G High-Speed Satellite Modem Clock Modes Revision 1 MN-CDM710G Rx LoopTimed In Rx Loop-Timed applications, ST is derived from the Rx-Sat clock. Depending upon the interface, the Tx clock and Rx clock may be the same or different rates. Buffer Enabled When the Rx Buffer is enabled, one of several clocks is available to clock receive data out of the modem and send the received data to the DTE, depending upon the data interface. The Rx Buffer Clocks include Tx-Terr (TT or SD), Int Clk (derived from Int Ref or Ext Ref) or Ext Clk. Some interfaces require the Tx = Rx data rate and other allow Tx ≠ Rx. Ext Ref Tx Tx PLL PLL Int Clock Int Int Ref Ref TT (or G.703 SD) Tx-Sat Tx Tx PLL PLL ST ST ST Synth Synth Ext Clk Ext Ext Clk Clk PLL PLL Rest Of Modem Rx Rx Synth Synth RT (or G.703 RD) Rx Rx Buffer Buffer Rx-Sat Data Interface Card Figure 10-1. Typical Data Interface (Features Vary By Interface) 10–2 CDM-710G High-Speed Satellite Modem Clock Modes Revision 1 MN-CDM710G 10.2 CDI-10-1 Single G.703 Interface The CDI-10-1 Single G.703 interface has a single port that operates at an E3, T3, or STS-1 data rate. A port is a Tx/Rx pair. Figure 10-2 shows the interface. J3 Tx UNBAL E3/T3/STS -1 J2 Rx UNBAL UNBAL G.703 G.703 E1/T1 E1/T1 E2/T2 E2/T2 BNC Female 3 Places Processor Processor Loopback Mux Mux // Demux Demux PLLs PLLs Rx Rx Buffers Buffers J1 EXT Clk External Clock Ext Ext BAL BAL Clock Clock Clk & Data μC Modem Interface Interface Interface Loopback Loopback Single E3/T3/STS -1 Card Figure 10-2. CDI-10-1 Single G.703 Interface 10.2.1 CDI-10-1 Single G.703 Interface Transmit Clocking For the G.703 interface, the only clock allowed is the SD signal applied to the Tx input. Internal Clock and Rx Loop-Timed operation do not apply to G.703 applications. 10.2.2 CDI-10-1 Single G.703 Interface Receive Clocking When the Rx Buffer is disabled, the receive clock is the Rx-Sat. In this mode, ensure the Rx Buffer is set to minimum to reduce latency. When the Rx Buffer is enabled, the Rx clock selections are as follows: Rx-Sat (default) Selecting this clock disables the Rx Buffer because the input and output clocks are both Rx-Sat. Normally, the Rx Buffer is set for minimum when Rx-Sat is selected. Tx-Terr Uses the clock from the Tx input (SD) to clock out the Rx Buffer. The Tx and Rx data rates are the same on this interface, so asymmetrical data rates where Tx ≠ Rx is not permitted. The two data ports are independent, so Port 1 may have a different data rate than Port 2. Ext-Clk Derives a clock from a signal input to the Ext-Clk connector on the E3/T3/STS-1 Interface Module, not J7 on the modem. 10–3 CDM-710G High-Speed Satellite Modem Clock Modes Revision 1 MN-CDM710G 10.3 CDI-60 HSSI Interface The CDI-60 HSSI Interface has a single rate programmable port. Figure 10-3 shows the interface. J1 Tx Clock Input (External) TT Tx Data SD Processor Processor Output Clock (Rate Programmable) ST CA 50 Pin HSSI Female TA Clk & Data PLL PLL (RTS) Rx Rx Buffer Buffer μC Modem Interface (CTS) Interface Interface Loopback Loopback Control Control Rx Buffer Clock Rx-Sat Clock RT RD Mux Mux // Demux Demux Rx Data Rx Rx Buffer Buffer Common HSSI Interface Figure 10-3. CDI-60 HSSI Data Interface 10.3.1 CDI-60 HSSI Interface Transmit Clocking TT is the transmit clock source for the HSSI interface. It is sent in conjunction with the data, SD, by the DTE to the modem. The data interface dejitters and phase locks to the TT clock rate. Internal clocking – where ST is supplied to the DTE and TT is not returned to the modem – is not allowed. Programming the Tx data rate at the interface programs the clock rate for ST sent to the DTE. When operating with HSSI interfaces, always send ST to the DTE and assure that TT derived from ST is delivered to the DCE. Rx Loop-Timed – where ST is programmed to a rate derived from the Rx-Sat clock from the satellite – is not available. For loop timed operation, disconnect ST at the DTE and connect RT from the DCE (modem) to both RT and ST at the DTE. 10.3.2 CDI-60 HSSI Interface Receive Clocking When the Rx Buffer is disabled the receive clock is the Rx-Sat. In this mode make sure the Rx Buffer is set to minimum to reduce latency. 10–4 CDM-710G High-Speed Satellite Modem Clock Modes Revision 1 MN-CDM710G When the Rx Buffer is enabled the Rx clock selections are as follows: Rx-Sat (default) Effectively disables the Rx Buffer because the input and output clocks are the same. Normally, the Rx Buffer is set for minimum when Rx-Sat is selected. This is the selection usually used with routers. Tx-Terr Uses the clock from the Tx input (TT) to clock out the Rx Buffer. The Tx and Rx data rates may differ on this interface, and asymmetric clocking where data rate for Tx ≠ Rx is allowed. Internal The Internal Clock comes from the modem It is derived from either the Ext Ref (J7) or Int Ref oscillator in the main part of the modem, not from the data interface. 10.4 CDI-70 10/100/1000 Base-T Gigabit Ethernet (GigE) Interface There are no transmit or receive clocking options for the Gigabit Ethernet Interface: • The Tx or Rx data rate is programmed into the data interface and the established rate data is passed between the interface and the modem. • Transmit data is accepted at the data interface at the native Ethernet rate and placed in a buffer for transfer to the modulator at the programmed Tx data rate. • Rx data from the satellite is placed in a buffer and assembled into packets and sent to the terrestrial interface at the Ethernet rate. 10–5 CDM-710G High-Speed Satellite Modem Clock Modes Revision 1 MN-CDM710G Notes: 10–6 Chapter 11. FORWARD ERROR CORRECTION OPTIONS 11.1 Introduction DVB-S2 has defined a new generation of performance that boosts throughput by about 30% over the same transponders using a new type coding that exceeds the capability of concatenated Viterbi and Reed Solomon coding. The CDM-710G High-Speed Satellite Modem operates with error correction base upon the DVBS2 standard: QPSK, 8PSK, 16APSK and 32APSK with concatenated Low Density Parity Code (LDPC) and Bose-Chaudhuri-Hocquenghem (BCH). 11.2 LDPC and BCH LDPC and BCH is a concatenation technique. LDPC is a very powerful coding scheme with significant, Near-Shannon Bound Performance. In some cases, as the carrier-to-noise ratio increases, the LDPC error correction starts flaring toward an error floor so BCH error correction follows LDPC and eliminates the flare for any practical range of error rates. LDPC also functions differently than Viterbi decoding by using iterative decoding. In this process the data initially corrected by the LDPC decoder is re-encoded and run through the decoder again to correct additional errors. Key to this is the soft decision output from the LDPC decoder and a high-speed processor operating at a rate much higher than the data rate. The LDPC decoder runs the iterative process as many times as possible before corrected data is finally outputted to make way for a new block of data entering the decoder. LDPC also uses interleaving to spread the errors. In contrast, Viterbi error correction operates by passing data through the convolutional error correction process a single time. The error correcting capability of LDPC is improved by using large block sizes. This also increases latency. However, in one-way broadcast applications this is not a drawback. Links with LDPC normally operate at multi-megabit data rates where latency effects are reduced. The standard block size for LDPC is 64,800 bits, and for lower data rate applications there is a short frame block at 16,800 bits that suffers only a small error correcting loss (0.2 to 0.3 dB) compared to the standard block. 11–1 CDM-710G High-Speed Satellite Modem Forward Error Correction Options 11.2.1 Revision 1 MN-CDM710G Range of Data Rates For a detailed Data Rate Range refer to Sect. 1.6 SUMMARY OF SPECIFICATIONS. 11.2.2 Eb/No, Es/No Spectral Efficiency and Occupied Bandwidth Depending upon the operating mode DVB standard uses different modes of specifying performance with a modem in IF Loop and Additive White Gaussian Noise (AWGN): • DVB-S2 (QPSK, 8PSK, 16APSK and 32APSK with LDPC and BCH): PER (packet error rate) = 10-7 after LDPC and BCH at the specified Es/No. This is a theoretical value with perfect carrier recovery and symbol synchronization, and no modem oscillator phase noise. The manufacturer decides the implementation margin and specifies performance. The other difference is the use of PER (packet error rate) based upon a 188 or 204 byte MPEG frame size instead of BER (bit error rate). Note: The CDM-710G uses only a 188 byte MPEG frame size. Also, note the use of Es/No instead of Eb/No. When links operate at constant symbol rate so this is good method for comparing the performance of different modulation types and code rates. The relation between the two quantities is given by: Eb/No = Es/No - 10xLog(Spectral Efficiency) The tables that follow provide the spectral efficiency DVB-S2 schemes. Another useful parameter is the occupied bandwidth is the bandwidth between -10 dB points of the power spectral density, which are approximately: Occupied Bandwidth = 1.19 x Symbol Rate, for 35% Rolloff = 1.15 x Symbol Rate, for 25% Rolloff = 1.12 x Symbol Rate, for 20% Rolloff Figure 11-1 through Figure 11-4 illustrate the error performance characteristics. 11–2 CDM-710G High-Speed Satellite Modem Forward Error Correction Options Revision 1 MN-CDM710G Table 11-1. Occupied Bandwidth for DVB-S2 Standard FECFrame = 64, 800 bits (QPSK 1/4, 1/3 and 2/5 are for information purposes) Pilots Off Type Inner **Es/No FEC At PER = -7 10 Code Normalized Spectral Efficiency Symbol Rate (bps/Hz) (= Bit Rate x) Pilots On * Occupied BW for 10 Mbps (25% Rolloff) Spectral Efficiency (bps/Hz) Normalized Symbol Rate (= Bit Rate x) * Occupied BW for 10 Mbps (25% Rolloff) 24.030 QPSK 1/4 -1.85 0.490243 2.040 23.458 0.478577 2.090 QPSK 1/3 -0.74 0.656448 1.523 17.519 0.640827 1.560 17.946 QPSK 2/5 0.20 0.789412 1.267 14.568 0.770627 1.298 14.923 QPSK 1/2 1.50 0.988858 1.011 11.630 0.965327 1.036 11.913 QPSK 3/5 2.73 1.188304 0.842 9.678 1.160026 0.862 9.914 QPSK 2/3 3.60 1.322253 0.756 8.697 1.290788 0.775 8.909 QPSK 3/4 4.53 1.487473 0.672 7.731 1.452076 0.689 7.920 QPSK 4/5 5.18 1.587196 0.630 7.245 1.549426 0.645 7.422 QPSK 5/6 5.68 1.654663 0.604 6.950 1.615288 0.619 7.119 QPSK 8/9 6.70 1.766451 0.566 6.510 1.724416 0.580 6.669 QPSK 9/10 6.92 1.788612 0.559 6.430 1.746049 0.573 6.586 8PSK 3/5 6.20 1.779991 0.562 6.461 1.739569 0.575 6.611 8PSK 2/3 7.32 1.980636 0.505 5.806 1.935658 0.517 5.941 8PSK 3/4 8.61 2.228124 0.449 5.161 2.177525 0.459 5.281 8PSK 5/6 10.15 2.478562 0.403 4.640 2.422276 0.413 4.748 8PSK 8/9 11.49 2.646012 0.378 4.346 2.585924 0.387 4.447 8PSK 9/10 11.78 2.679207 0.373 4.292 2.618365 0.382 4.392 16APSK 2/3 9.97 2.637201 0.379 4.361 2.574613 0.388 4.467 16APSK 3/4 11.21 2.966728 0.337 3.876 2.896320 0.345 3.971 16APSK 4/5 12.03 3.165623 0.316 3.633 3.090495 0.324 3.721 16APSK 5/6 12.61 3.300184 0.303 3.485 3.221863 0.310 3.569 3.343 16APSK 8/9 13.89 3.523143 0.284 3.264 3.439530 0.291 16APSK 9/10 14.13 3.567342 0.280 3.224 3.482680 0.287 3.302 32APSK 3/4 13.73 3.703295 0.270 3.105 3.623332 0.276 3.174 32APSK 4/5 14.64 3.951571 0.253 2.910 3.866247 0.259 2.974 32APSK 5/6 15.28 4.119540 0.243 2.792 4.030589 0.248 2.853 32APSK 8/9 16.69 4.397854 0.227 2.615 4.302894 0.232 2.673 32APSK 9/10 17.05 4.453027 0.225 2.583 4.356875 0.230 2.640 * Taken at the -10 dB points on the plot of power spectral density, the occupied bandwidth is 1.19 x Symbol Rate for 35%, and 1.15 x Symbol Rate for 25%. ** Includes implementation loss. 11–3 CDM-710G High-Speed Satellite Modem Forward Error Correction Options Revision 1 MN-CDM710G Table 11-2. Occupied Bandwidth for DVB-S2 Short FECFrame = 16,200 bits* (QPSK 1/4, 1/3 and 2/5 are for information purposes) Pilots Off Type Inner ***Es/No FEC At PER = -7 10 Code Pilots On ** Occupied Normalized Spectral BW for Efficiency Symbol Rate 10 Mbps (bps/Hz) (= Bit Rate x) (25% Rolloff) Spectral Efficiency (bps/Hz) Normalized Symbol Rate (= Bit Rate x) ** Occupied BW for 10 Mbps (25% Rolloff) 0.365324 0.357467 2.797 32.171 QPSK 1/4 -1.55 2.737 31.479 QPSK 1/3 -0.44 0.629060 1.590 18.281 0.615532 1.625 18.683 QPSK 2/5 0.50 0.760928 1.314 15.113 0.744564 1.343 15.445 QPSK 1/2 1.80 0.848840 1.178 13.548 0.830585 1.204 13.846 QPSK 3/5 3.03 1.156532 0.865 9.944 1.131661 0.884 10.162 QPSK 2/3 3.90 1.288400 0.776 8.926 1.260693 0.793 9.122 QPSK 3/4 4.83 1.420269 0.704 8.097 1.389725 0.720 8.275 QPSK 4/5 5.48 1.508181 0.663 7.625 1.475747 0.678 7.793 QPSK 5/6 5.98 1.596093 0.627 7.205 1.561768 0.640 7.363 QPSK 8/9 7.00 1.727961 0.579 6.655 1.690800 0.591 6.802 QPSK 9/10 7.22 NA NA NA NA NA NA 8PSK 3/5 6.50 1.725319 0.580 6.665 1.692033 0.591 6.797 8PSK 2/3 7.62 1.922040 0.520 5.983 1.884959 0.531 6.101 8PSK 3/4 8.91 2.118761 0.472 5.428 2.077885 0.481 5.534 8PSK 5/6 10.45 2.381056 0.420 4.830 2.335120 0.428 4.925 8PSK 8/9 11.79 2.577778 0.388 4.461 2.528046 0.396 4.549 8PSK 9/10 12.08 NA NA NA NA NA NA 16APSK 2/3 10.27 2.548792 0.392 4.512 2.505223 0.399 4.590 16APSK 3/4 11.51 2.809662 0.356 4.093 2.761633 0.362 4.164 16APSK 4/5 12.33 2.983575 0.335 3.854 2.932574 0.341 3.921 16APSK 5/6 12.91 3.157488 0.317 3.642 3.103514 0.322 3.705 16APSK 8/9 14.19 3.418357 0.293 3.364 3.359924 0.298 3.423 16APSK 9/10 14.43 NA NA NA NA NA NA 32APSK 3/4 14.03 3.493093 0.286 3.292 3.419165 0.292 3.363 32APSK 4/5 14.94 3.709309 0.270 3.100 3.630805 0.275 3.167 32APSK 5/6 15.58 3.925526 0.255 2.930 3.842446 NA NA 32APSK 8/9 16.99 4.249850 0.235 2.706 4.159906 0.240 2.764 32APSK 9/10 17.35 NA NA NA NA NA NA * Es/No for short FECFrame is about 0.3 dB higher than the standard. Values in the table are approximate. ** Taken at the -10 dB points on the plot of power spectral density, the occupied bandwidth is 1.19 x Symbol Rate for 35% and 1.15 x Symbol Rate for 25% *** Includes implementation loss. 11–4 CDM-710G High-Speed Satellite Modem Forward Error Correction Options Revision 1 MN-CDM710G Figure 11-1. DVB-S2 QPSK Packet Error Rate versus Es/No (QPSK 1/4, 1/3, and 2/5, Information Only) 11–5 CDM-710G High-Speed Satellite Modem Forward Error Correction Options Revision 1 MN-CDM710G Figure 11-2. DVB-S2 8PSK Packet Error Rate versus Es/No 11–6 CDM-710G High-Speed Satellite Modem Forward Error Correction Options Revision 1 MN-CDM710G Figure 11-3. DVB-S2 16APSK Packet Error Rate versus Es/No 11–7 CDM-710G High-Speed Satellite Modem Forward Error Correction Options Revision 1 MN-CDM710G Figure 11-4. DVB-S2 32APSK Packet Error Rate versus Es/No 11–8 CDM-710G High-Speed Satellite Modem Forward Error Correction Options Revision 1 MN-CDM710G 11.3 End-to-End Processing Delay (Latency) For DVB-S2 operation with the Gigabit Ethernet and HSSI Data Interfaces, the effects of delay through the modulator and demodulator are more problematic at low data rates and generally negligible at higher data rates. Delay for the Gigabit Ethernet and HSSI interfaces is shown in Figure 11-5 and Figure 11-6 with the Rx Buffer (HSSI) at minimum. In packet networks, minimum Rx Buffer is the normal setting. Expected performance for the G.703 interface is similar to HSSI. Figure 11-5. CDM-710G Gigabit Ethernet Latency With Modem In IF Loopback 11–9 CDM-710G High-Speed Satellite Modem Forward Error Correction Options Revision 1 MN-CDM710G Figure 11-6. CDM-710G HSSI Latency With Modem In IF Loopback 11–10 Chapter 12. SINGLE G.703 (E3/T3/STS-1) INTERFACE (CDI-10-1) 12.1 Introduction The CDI-10-1 Single E3/T3/STS-1 Data Interface (Figure 12-1) is a plug-in module that is installed into the rear of the CDM-710G High-Speed Satellite Modem chassis. It provides physical and electrical connection between the external terrestrial device and the internal circuitry of the modulator or demodulator. Figure 12-1. CDI-10-1 Single G.703 (E3/T3/STS-1) Data Interface Module By convention, a modem is Data Communications Equipment (DCE) where Tx data enters the data interface and Rx data exits. The plug-in interface has full duplex capability. In addition, the module is automatically configured for simplex-transmit or simplex-receive operation when the module is plugged into a simplex chassis configured for ‘modulator only’ or ‘demodulator only’ operation. Slot 1 of the CDM-710G – located at the center right of the chassis rear panel – is filled with a data interface module first; Slot 2 – located at the right side end of the chassis rear panel – is assigned a blank panel or a CDI-70 10/100/1000 Base-T Gigabit Ethernet interface, depending upon configurations allowed at time of order. 12–1 CDM-710G High-Speed Satellite Modem Single G.703 (E3/T3/STS-1) Interface (CDI-10-1) Revision 1 MN-CDM710G For a table of the applicable interfaces and installable combinations, refer to Sect. 1.3.5 Allowable Data Interface Combinations. 12.2 Physical Description Figure 12-2 depicts the block diagram of the interface; Figure 12-3 shows the rear panel of the interface. The data interfaces provided here are as follows (left to right): • External Clock Input Port (J1) • The CDI-10-1 module provides a Single G.703 Interface Port – Rx / J2 (top) and Tx / J3 (bottom) – that is operable/selectable as E3, T3, STS-1 or OFF. Additionally, a Light-Emitting Diode (LED) labeled Active lights when G.703 data activity is sensed. Refer to the next section for connector information. J3 UNBAL E3/T3/STS - 1 J2 Tx Rx UNBAL UNBAL G.703 G.703 E1/T1 E1/T1 E2/T2 E2/T2 BNC Female 3 Places Processor Processor Loopback Mux Mux // Demux Demux PLLs PLLs Rx Rx Buffers Buffers J1 EXT Clk External Clock Ext Ext BAL BAL Clock Clock Clk & Data μC Interface Interface Loopback Loopback Single E3/T3/STS -1 Card Figure 12-2. CDI-10-1 Block Diagram Figure 12-3. CDI-10-1 Rear Panel View 12–2 Modem Interface CDM-710G High-Speed Satellite Modem Single G.703 (E3/T3/STS-1) Interface (CDI-10-1) 12.3 Revision 1 MN-CDM710G CDI-10-1 Connector Pinouts Connector Description Direction Ext Clk J1 In Rx J2 Data Out Tx J3 Data In 12–3 Connector Type BNC Female CDM-710G High-Speed Satellite Modem Single G.703 (E3/T3/STS-1) Interface (CDI-10-1) 12.4 Revision 1 MN-CDM710G Summary of Specifications Item Requirements Interfaces External Clock Input Interface Selection Rx Buffer: G.703 Frame Types General Minimum Buffer Size for any rate Maximum Buffer Size Clock Options Acquisition Range Test Hot Swap Capability G.703 Unbalanced: Connector Type Signals Supported Data Rate Tx and Rx Data Rates Line Coding Pulse Mask Jitter Impedance Interfaces External Clock Input Connector Impedance Input Amplitude Input Frequency Signal Characteristics Alarms Humidity Physical and Environmental 1 each Independent G.703 ports, E3, T3, and STS-1 1 input Each of the interfaces is individually enabled Type Bits Bytes G.751 1536 192 G.752 4760 595 G.753 2148 268.5 STS-1 6480 810 Note: Programmable in 0.5 ms increments. 0.5 ms G.751 61 ms G.752 44 ms G.753 61 ms STS-1 40 ms Tx Clock = Tx, Rx (satellite) or External Rx Clock = Tx, Rx, External or Internal Note: Asymmetric operation is not supported Programmed Tx data rate ± 100 ppm Baseband Loopback (at interface) Interface Loopback (through interface module) None 1 independent channel supporting G.703 E3, T3, and STS-1. BNC, female ITU-T-G.703 SD, RD 34.368, 44.736 and 51.84 Mbps Tx and Rx data rates are programmed the same HDB3 (for E3), B3ZS (for DS3 STS-1), AMI (Common) ITU-T-G.703 Bellcore GR-499 core For T3 and STS-1, G.823 for E3 75 Ω Per ITU-T-G.703 BNC, female 75 Ω ± 5% 0.5 to 5.0 V peak to peak 1, 2, 5, 10, 2.048, 34.368, 44.736, and 51.84 Sine wave or square with duty cycle of 50 ± 10% Loss of Signal All 1’s 0 to 50 °C (32 to 122°F) Environmental Temperature Dimensions 0 to 95% non-condensing 3.95 W x 8.14 D x 1.5 H inches (10.03 W x 20.67 D x 3.81H cm) 12–4 Chapter 13. HSSI INTERFACE (CDI-60) 13.1 Introduction The CDI-60 HSSI Data Interface (Figure 13-1) is a plug-in module that is installed into the rear of the CDM-710G High-Speed Satellite Modem chassis. It provides physical and electrical connection between the external terrestrial device and the internal circuitry of the modulator or demodulator. Figure 13-1. CDI-60 HSSI Data Interface Module By convention, a modem is Data Communications Equipment (DCE) where Tx data enters the data interface and Rx data exits. The plug-in interface has full duplex capability. In addition, the module is automatically configured for simplex-transmit or simplex-receive operation when the module is plugged into a simplex chassis configured for ‘modulator only’ or ‘demodulator only’ operation. Slot 1 of the CDM-710G – located at the center right of the chassis rear panel – is filled with a data interface module first; Slot 2 – located at the right side end of the chassis rear panel – is assigned a blank panel or a CDI-70 10/100/1000 Base-T Gigabit Ethernet interface, depending upon configurations allowed at time of order. For a table of the applicable interfaces and installable combinations, refer to Sect. 1.3.5 Allowable Data Interface Combinations. 13–1 CDM-710G High-Speed Satellite Modem HSSI Interface (CDI-60) 13.2 Revision 1 MN-CDM710G Physical Description Figure 13-2 depicts the block diagram for the interface. The HSSI data interface is implemented on a 3.95 x 7.022 inch (10.03 x 17.83 cm) PCB. Connection to the modem is provided when the 96-pin DIN connector is engaged into the modem slot. J1 Tx Clock Input (External) TT Tx Data SD Processor Processor Output Clock (Rate Programmable) ST CA 50 Pin HSSI Female TA Mux Mux // Demux Demux Clk & Data PLL PLL (RTS) Rx Rx Buffer Buffer μC Modem Interface (CTS) Interface Interface Loopback Loopback Control Control Rx Clock RT Rx Data RD Common HSSI Interface Figure 13-2. CDI-60 HSSI Data Interface Module Block Diagram Figure 13-3 shows the CDI-60 HSSI interface, looking towards the real panel. The 50-pin SCSI-2 connector serves as the data port, and a Light-Emitting Diode (LED), labeled Activity, is lit green when the interface is enabled. The CDI-60 HSSI interface provides: • A single HSSI interface; • DCE Connection; • ST clock is sourced to the terrestrial interface for use as reference by DTE; • TT is treated as an incoming External Clock, and the interface phase locks to it; • TA / CA is supported. The connector pinout for the interface is provided in Sect. 13-3; a summary of specifications for the interface is provided in Sect. 13-4. 13–2 CDM-710G High-Speed Satellite Modem HSSI Interface (CDI-60) Revision 1 MN-CDM710G Figure 13-3. CDI-60 HSSI Data Interface Module – Rear Panel View 13.3 Connector Pinout As shown in Figure 13-3, the CDI-60 HSSI data interface has a 50-pin female SCSI-2 (mini-D) connector; the pinout is as follows: CDI-60 HSSI/EIA-613 Interface Connector Pinout Signal Function Signal Ground HSSI Signal EIA-613 Circuit Pin # (+,-) SG 102 1, 26 Circuit Direction Comment Ground Receive Timing RT 115 2, 27 From DCE DCE Available CA 107 3, 28 From DCE Receive Data RD 104 4, 29 From DCE Loopback circuit C LC undefined 5, 30 From DCE Send Timing ST 114 6, 31 From DCE Signal Ground SG 102 7, 32 DTE Available TA 108/2 8, 33 to DCE Terminal Timing TT 113 9, 34 to DCE Loopback circuit A LA 143 10, 35 to DCE Send Data SD 103 11, 36 to DCE Loopback Circuit B LB 144 12, 37 to DCE Signal Ground SG Not used Ground Not used Not used 102 13, 38 Ground Not used undefined 14, 39 Not used TX DVALID undefined 15, 40 Not used reserved (to DCE) 16, 41 Not used reserved (to DCE) 17, 42 Not used reserved (to DCE) 18, 43 Not used Signal Ground SG 102 19, 44 Ground undefined 20 Not used undefined 45 Not used undefined 21 Not used 46 Not used reserved (to DTE) undefined 22, 47 from DCE Not used undefined 23, 48 from DCE Not used from DCE Not used Test Mode TM 142 24, 49 Signal Ground SG 102 25, 50 13–3 Ground CDM-710G High-Speed Satellite Modem HSSI Interface (CDI-60) 13.4 Revision 1 MN-CDM710G General Specifications Item Requirement Data Rate Range 1 to 70 Mbps Note: HSSI data rate limit of 70 Mbps may be reached before symbol rate limit is reached. Interfaces Per Module One HSSI Signals Supported ST, TT (or external) , SD, TA, CA, RT, RD, SG Connector DCE, 50-pin mini-D female per EIA-613 (HSSI) Electrical Per EIA-612 (10KH ECL compatible). Electrical Typical Differential output voltage: > 590 mV pp into 110 load Differential Input voltage: 150 to 1000 mV pp with 110 load Minimum Buffer Size 5.0 mS smallest buffer setting, 0.1 mS step size, 32 mS maximum size Impedance Rx 110 for TT, SD, TA Tx ST, CA, RT, RD will drive 110 and meet HSSI voltage levels Signal Characteristics The A terminal is negative with respect to the B terminal for a binary 0 (Space or OFF) state. The A terminal is positive with respect to the B Terminal for a binary 1 (Mark or ON) state. Clock / Data Relationship The data transitions occur during the OFF to ON transition of the clock. Data is stable during the ON to Off transition of the clock. Tx Clock Modes TT (Input clock) continuous. ST (output clock) is continuous output, programmable in 1 bps steps or phase locked to satellite clock Rx Clock Modes RT (output clock) is continuous from satellite, ST (internal clock), continuous from TT Gap Clock (See Figure 13-4) Not allowed – Send ST to external equipment so it will return a continuous clock Tx / Rx Clock Asymmetrical clocking with Rx Doppler buffer disabled Programmed Tx data rate ± 100 ppm Acquisition Range TA / CA Default CA looped to TA Selection: CA is asserted when there is no modem fault Test I/O Loopback per the Appendix Interface Loopback per the Appendix Operation Simplex (Tx only or Rx only) or full duplex Signal Sense Programmable Normal or Inverted for TT and TD, RT and RD Modules Per Modem The interface operates in Slot 1, Slot 2, or both slots. Cable Length to 52 Mbps 2 m (6 ft) nominal, up to 15 m (49 ft) maximum – Note higher data rates usually require shorter cable lengths. LED Green LED indicates channel is enabled Continuous Clock Gap Clock Figure 13-4. Continuous and Gap Clock at TT 13–4 CDM-710G High-Speed Satellite Modem HSSI Interface (CDI-60) 13.5 Revision 1 MN-CDM710G Environmental And Physical Specifications Item Requirement Operating Temperature 0 to 50ºC (32 to 122ºF) Storage Temperature -40 to +70ºC (-40 to 158ºF) Humidity 95% maximum, non-condensing Mechanical Compatible with CDM-700 / 800 slots Agency Approval CE in conjunction with the modem 13–5 CDM-710G High-Speed Satellite Modem HSSI Interface (CDI-60) Revision 1 MN-CDM710G Notes: 13–6 Chapter 14. 10/100/1000 Base-T GIGABIT ETHERNET (GigE) INTERFACE (CDI-70) 14.1 Introduction The CDI-70 10/100/1000 Base-T Gigabit Ethernet (GigE) Interface (Figure 14-1) – referred to hereafter as the CDI-70 or the GigE Interface – is a plug-in module that is installed into the rear of the CDM-710G High-Speed Satellite Modem chassis. It serves as an Ethernet bridge for data traffic. Monitor and Control (M&C) information is not supported on the GigE Interface but is available through the 10/100 Base-T remote port of the modem. Figure 14-1. CDI-70 10/100/1000 Base-T Gigabit Ethernet (GigE) Interface Module The GigE Interface provides 10/100/1000 Base-T connectivity and supports data rates from 1 Mbps to 155 Mbps. IP traffic entering the interface is encapsulated in HDLC protocol for transmission over the satellite link. In normal mode, the packets are passed unaltered. For VLAN mode, native VLAN processing and/or VLAN tagging is supported. HDLC CRS-16 verification is performed on all received (from WAN) HDLC frames. Slot 1 of the CDM-710G – located at the center right of the chassis rear panel – is typically filled with a blank panel or a data interface module first; however, due to backplane limitations, Slot 2 – located at the right side end of the chassis rear panel – serves as the dedicated slot for the CDI-70 10/100/1000 Base-T Gigabit Ethernet interface. For a table of the applicable interfaces and installable combinations, refer to Sect. 1.3.5 Allowable Data Interface Combinations. 14–1 CDM-710G High-Speed Satellite Modem 10/100/1000 Base-T Gigabit Ethernet (GigE) Interface (CDI-70) 14.2 Revision 1 MN-CDM710G Physical Description The CDI-70 data interface is implemented on a 3.95 x 7.022 inch (10.03 x 17.83 cm) PCB. Connectivity to the CDM-710G is implemented with a 96-pin DIN receptacle. The LAN interface consists of a single IEEE 802.3ab 1000 Base-T copper-compliant female RJ-45 connector – refer to Sect. 14.3 for the connector pinout. This connector features Light-Emitting Diode (LED) indicators for Link Status and Link Activity. Figure 14-2 shows a block diagram for the CDI-70 interface. Management Management Packet Packet Processor Processor Clk & Data J1 Ethernet RJ-45 Interface RJ-45 GE GE Layer Layer 22 Switch Switch Packet Packet Processor Processor μC Memory Memory Gigabit Ethernet Card Figure 14-2. CDI-70 Interface Module Block Diagram 14–2 Modem Interface CDM-710G High-Speed Satellite Modem 10/100/1000 Base-T Gigabit Ethernet (GigE) Interface (CDI-70) 14.3 Revision 1 MN-CDM710G J1 Connector Pinout, RJ45 The J1 LAN interface is comprised of one IEEE 802.3ab 1000Base-T copper compliant female RJ-45 connector. This connector features Light-Emitting Diode (LED) indicators labeled LINK STATUS and LINK ACTIVITY. The connector pinout is as follows: Pin # Description Direction 1 BI_DA+ bidirectional 2 BI_DA- bidirectional 3 BI_DB+ bidirectional 4 BI_DC+ bidirectional 5 BI_DC- bidirectional 6 BI_DB- bidirectional 7 BI_DD+ bidirectional 8 BI_DD- bidirectional 14–3 CDM-710G High-Speed Satellite Modem 10/100/1000 Base-T Gigabit Ethernet (GigE) Interface (CDI-70) 14.4 Revision 1 MN-CDM710G Specifications Specification Feature Description General Data Framing 10/100/1000 Base-T Interface: RFC-894 “Ethernet” Frame Size, Max 1632 bytes Data Framing Format (WAN) HDLC (Standard Single Channel) Connectors RJ-45 female, 100Ω Electrical Properties Per IEEE 802.3ab Monitor and Control (M&C) Packet Types Burst or distributed IPV4 Signal Types Serial data Voltage Level Per IEEE- 802.3ab Packet Latency 50 ms maximum Flow Control None Cable Length, Maximum 100 meters CAT 5 cable, patch cords and connecting hardware, per ISO/IEC 11801:1995 and ANSI/EIA/TIA-568-A (1995) Hot Pluggable (cable) Yes Hot Pluggable (card) NO LEDs Link status, link activity Data Rate 1.5 to 155.52 Mbps Packet Filtration Parameters (generic) IP address match value configuration for management packets; Optional VLAN processing, VLAN configuration, enabled VLID’s. 1000Base-T Link Statistics Ingress good octets Ingress bad octets Ingress unicast packets Ingress broadcast packets Ingress multicast packets Ingress pause packets Ingress undersize packets Ingress fragments Ingress oversize packets Ingress jabber Ingress Rx errors Ingress Frame Check Sequence Errors Egress oclets Egress unicast packets Egress broadcast packets Egress multicast packets WAN Port Statistics Ingress good oclets Ingress bad oclets Ingress unicast packets Ingress broadcast packets Ingress multicast packets Ingress pause packets Ingress undersize packets Ingress fragments Ingress oversize packets Ingress jabber Ingress Rx errors 14–4 CDM-710G High-Speed Satellite Modem 10/100/1000 Base-T Gigabit Ethernet (GigE) Interface (CDI-70) Specification Feature Description Monitor and Control (M&C) (continued) WAN Port Statistics (continued) Ingress Frame Check Sequence Errors Egress oclets Egress unicast packets Egress broadcast packets Egress multicast packets HDLC link errors Rx packet count Tx packet count Management Port Statistics Ingress good oclets Ingress bad oclets Ingress unicast packets Ingress broadcast packets Ingress multicast packets Ingress pause packets Ingress undersize packets Ingress fragments Ingress oversize packets Ingress jabber Ingress Rx errors Ingress Frame Check Sequence Errors Egress oclets Egress unicast packets Egress broadcast packets Egress multicast packets Controlled Functions TX data rate Rx data rate Tx enable/disable Rx enable/disable Management IP Address and Mask 14–5 Revision 1 MN-CDM710G CDM-710G High-Speed Satellite Modem 10/100/1000 Base-T Gigabit Ethernet (GigE) Interface (CDI-70) 14.5 Revision 1 MN-CDM710G Flash Upgrading the CDI-70 GigE Interface The CDM-710G’s CDI-70 GigE Interface module contains its own processor and memory. On occasion, CEFD may release new software to fix anomalies or add functionality to this interface. Both the CDM-710G and the CDI-70 GBEI module use ‘flash memory’ technology internally. This makes software upgrading very simple, and updates can now be obtained via the Internet (Figure 14-3), E-mail, or on CD. This section outlines the complete upgrading process as follows: • New firmware can be downloaded via the Internet to an external PC. • The upgrade can be performed without opening the unit by simply connecting the GigE Interface’s ‘J1’ 10/100/1000 Ethernet Traffic port to the Ethernet port of a computer. • Once downloaded, the firmware update is transferred using the CEFD application, CReflash.exe. For complete information about firmware numbers, file versions, and formats, see Chapter 5. FLASH UPGRADING. Figure 14-3. Flash Update via Internet 1. Download the Files a) Create a temporary directory (folder) on a PC: • Windows: Select File > New > Folder, then rename the New Folder to "temp" or another convenient, unused name. Assuming "temp" works, a "c:\temp" folder should now be created. Note: The c: is the drive letter used in this example. Any valid writable drive letter can be used. • CMD Prompt: At the command prompt (c:\>), type "mkdir temp” or “MD temp" without quotes (mkdir and MD stand for make directory). This is the same as 14–6 CDM-710G High-Speed Satellite Modem 10/100/1000 Base-T Gigabit Ethernet (GigE) Interface (CDI-70) Revision 1 MN-CDM710G creating a new folder from Windows. There should now be a "c:\temp" subdirectory created (where c: is the drive letter used in the example). b) Download the correct firmware file provided by Comtech EF Data: As shown in Figure 14-3: 1. Go online to: www.comtechefdata.com; 2. Click on: Support tab; 3. Click on: Software Downloads drop-down or hyperlink from Support page; 4. Click on: Download Flash and Software Update Files icon; 5. Click on: (Select a Product Line) Satellite Modems hyperlink; 6. Select the CDM-710G or, alternately, the CDM-700 product hyperlink; c) Select the desired GBEI firmware version hyperlink (the firmware number for the CDM710G’s CDI-70 Gigabit Ethernet Interface module is FW12738). d) Unzip the files in the temporary folder that was created in Step 1(a). At least four (4) files must be extracted (file naming is approximate): • FW12738x.bin – Bulk Image file, where "x" is the revision; • ReleaseNotes_FW12738_vxxx.pdf – Where "xxx" is the complete version; • readme_vxxx_GBEI.TXT – Installation notes text file; • CReflash.exe – The executable used to upload the firmware to the GBEI. 2. Connect the PC to the Interface a) Connect the client PC to the CDI-70 GBEI via an Ethernet hub or a switch, or directly to a PC with a crossover cable. b) Enable the GBEI on the CDM-710G to enable the PHY interface on the GBEI. GBEI firmware can only be loaded via the Ethernet Traffic port; do not use the J4 Ethernet M&C port. IMPORTANT 3. Reflash the Unit a) Double-click on CReflash.exe to start the Comtech Modem Reflash Application (shown at right): b) Type the IP Address assigned to the GBEI in the IP Address: field. c) Enter the bulk image load by either (1) typing the path and filename, or (2) using the [Browse] button to select the file. d) Leave the Remote Filename selection as “bulk:”. e) Click [Start]. 14–7 CDM-710G High-Speed Satellite Modem 10/100/1000 Base-T Gigabit Ethernet (GigE) Interface (CDI-70) Revision 1 MN-CDM710G f) The CReflash.exe executable automatically FTPs the filename to the IP address entered, and displays the progress of the update. IMPORTANT Once the CReflash.exe application has been started, the program will not respond to user input for approximately 5 minutes. During this time, a message indicating this progress phase will also display on the modem’s front panel. DO NOT CLOSE THE CREFLASH.EXE PROGRAM ON THE PC! DO NOT REBOOT THE MODEM! g) When the update is complete: The message 'Successful!' appears in the [ / ] status field of the CReflash.exe application window; a similar message displays on the modem’s front panel. h) Cycle power to the CDM-710G to have the new firmware loaded on the GBEI. i) Verify that the version update has successfully loaded upon reboot: • From the CDM-710G front panel: SELECT: UTILÆ FirmwareÆ InfoÆ Image# (Image1 or Image2)Æ InterfacesÆ GBEI • From the Serial Console port: View the GBEI information by selecting Operations, then selecting Maintenance/Unit Information. • From Telnet via the 10/100 Ethernet Traffic port: View the GBEI information by selecting Operations, then selecting Maintenance/ Unit Information. • From HTTP Web Server Inteface via the 10/100 Ethernet Traffic port: View the GBEI information by selecting the MAINT tab, then selecting the Unit Info hyperlink. 14–8 CDM-710G High-Speed Satellite Modem 10/100/1000 Base-T Gigabit Ethernet (GigE) Interface (CDI-70) 14.6 Revision 1 MN-CDM710G GigE Operational Setups The CDM-710G GigE Interface operates as a bridge device and passes traffic between hosts at different geographic locations on a common Local Area Network (LAN). The GigE Interface operates like a network hub device which means it acts like a “direct wire” connection and passes all Ethernet traffic and broadcasts. Figure 14-4 is an example of using the GigE Interface to bridge a remote host on a common LAN over the satellite. It also may be desirable to separate the M&C Ethernet port from the traffic on the GigE Interface ‘J1’ port. Figure 14-5 shows an example where the M&C Ethernet port has been assigned an IP address that is NOT on the common LAN. A router is in place at both locations to isolate access to the M&C port. Figure 14-4. GigE Interface Example: Bridging Remote Host on Common LAN Over Satellite 14–9 CDM-710G High-Speed Satellite Modem 10/100/1000 Base-T Gigabit Ethernet (GigE) Interface (CDI-70) Revision 1 MN-CDM710G Figure 14-5. M&C Port Assignment Example: IP Address NOT on Common LAN 14–10 Appendix A. REMOTE CONTROL A.1 Overview This appendix describes the protocol and message command set for remote monitor and control of the CDM-710G High-Speed Satellite Modem. The electrical interface is either an RS-485 multi-drop bus (for the control of many devices) or an RS-232 connection (for the control of a single device), and data is transmitted in asynchronous serial form, using ASCII characters. Control and status information is transmitted in packets of variable length, in accordance with the structure and protocol defined in later sections. A.2 RS-485 For applications where multiple devices are to be monitored and controlled, a full-duplex (or 4-wire) RS-485 is preferred. Half-duplex (2-wire) RS-485 is possible, but is not preferred. In full-duplex RS-485 communication there are two separate, isolated, independent, differentialmode twisted pairs, each handling serial data in different directions. It is assumed that there is a ‘controller’ device (a PC or dumb terminal) which transmits data, in a broadcast mode, via one of the pairs. Many ‘target’ devices are connected to this pair, which all simultaneously receive data from the controller. The controller is the only device with a line-driver connected to this pair; the target devices only have line-receivers connected. In the other direction, on the other pair each target has a tri-stateable line driver connected and the controller has a line-receiver connected. All the line drivers are held in high-impedance mode until one (and only one) target transmits back to the controller. Each target has a unique address, and each time the controller transmits, in a framed ‘packet’ of data, the address of the intended recipient target is included. All of the targets receive the packet, but only one (the intended) will reply. The target enables its output line driver, and transmits its return data packet back to the controller, in the other direction, on the physically separate pair. RS 485 (full duplex) summary: • • • Two differential pairs - one pair for controller to target, one pair for target to controller. Controller-to-target pair has one line driver (controller), and all targets have line-receivers. Target-to-controller pair has one line receiver (controller), and all targets have tri-state drivers. A–1 CDM-710G High-Speed Satellite Modem Remote Control A.3 Revision 1 MN-CDM710G RS-232 This a much simpler configuration in which the controller device is connected directly to the target via a two-wire-plus-ground connection. Controller-to-target data is carried, via RS-232 electrical levels, on one conductor, and target-to-controller data is carried in the other direction on the other conductor. A.4 Basic Protocol Whether in RS-232 or RS-485 mode, all data is transmitted as asynchronous serial characters, suitable for transmission and reception by a UART. In this case, the asynchronous character formats is 8N1. The baud rate may vary between 1200 and 57,600 baud. All data is transmitted in framed packets. The controller is assumed to be a PC or ASCII dumb terminal, which is in charge of the process of monitor and control. The controller is the only device which is permitted to initiate, at will, the transmission of data. Targets are only permitted to transmit when they have been specifically instructed to do so by the controller. All bytes within a packet are printable ASCII characters, less than ASCII code 127. In this context, the Carriage Return and Line Feed characters are considered printable. All messages from controller to target require a response (with one exception). This will be either to return data which has been requested by the controller, or to acknowledge reception of an instruction to change the configuration of the target. The exception to this is when the controller broadcasts a message (such as Set time/date) using Address 0, when the target is set to RS-485 mode. A.5 Packet Structure Controller-to-Target Start of Packet Target Address < ASCII code 60 (1 character) Example: (4 characters) Address De-limiter / ASCII code 47 Instruction Code (1 character) (3 characters) Code Qualifier Optional Arguments = or ? ASCII code 61 or 63 (1 character) End of Packet Carriage Return ASCII code 13 (n characters) (1 character) Optional Arguments End of Packet <0135/TFQ=0070.2345{CR} Target-to-Controller Start of Packet Target Address > ASCII code 62 (1 character) Example: (4 characters) Address De-limiter / ASCII code 47 Instruction Code (1 character) (3 characters) Code Qualifier =, ?, !, or * ASCII code 61, 63, 33 or 42 >0654/TFQ=0070.2345{CR}{LF} A–2 (1 character) (From 0 to n characters) Carriage Return, Line Feed ASCII code 13,10 (2 characters) CDM-710G High-Speed Satellite Modem Remote Control Revision 1 MN-CDM710G A.5.1 Start Of Packet Controller to Target: This is the character ‘<’ (ASCII code 60). Target to Controller: This is the character ‘>’ (ASCII code 62). Because this is used to provide a reliable indication of the start of packet, these two characters may not appear anywhere else within the body of the message. A.5.2 Address Up to 9,999 devices can be uniquely addressed. In RS-232 applications this value is set to 0. In RS-485 applications, the permissible range of values is 1 to 9999. It is programmed into a target unit using the front panel keypad. IMPORTANT The controller sends a packet with the address of a target - the destination of the packet. When the target responds, the address used is the same address, to indicate to the controller the source of the packet. The controller does not have its own address. A.5.3 Instruction Code This is a three-character alphabetic sequence which identifies the subject of the message. Wherever possible, the instruction codes have been chosen to have some significance. For example: TFQ for Transmit FreQuency, etc. This aids in the readability of the message, should it be displayed in its raw ASCII form. Only upper case alphabetic characters may be used (A-Z, ASCII codes 65 - 90). A.5.4 Instruction Code Qualifier This is a single character which further qualifies the preceding instruction code. Code Qualifiers obey the following rules: 1. From Controller to Target, the only permitted values are: = (ASCII code 61 The = (ASCII code 61) is used as the assignment operator, and is used to indicate that the parameter defined by the preceding byte should be set to the value of the argument(s) that follow it. For example: In a message from controller to target, TFQ=0070.0000 would mean ‘set the Transmit frequency to 70 MHz’ ? (ASCII code 63) The ? (ASCII code 63) is used as the query operator, and is used to indicate that the target should return the current value of the parameter defined by the preceding byte. For example: In a message from controller to target, TFQ? would mean ‘return the current value of the transmit frequency’. A–3 CDM-710G High-Speed Satellite Modem Remote Control Revision 1 MN-CDM710G 2. From Target to Controller, the only permitted values are: = (ASCII code 61) The = code (target to controller) is used in two ways: First, if the controller has sent a query code to a target (for example: TFQ?, meaning ‘what is the Transmit frequency?’), the target would respond with TFQ=xxxx.xxxx, where xxxx.xxxx represents the frequency in question. Second, if the controller sends an instruction to set a parameter to a particular value, then, providing the value sent in the argument is valid, the target will acknowledge the message by replying with TFQ= (with no message arguments). ? (ASCII code 63) The ? code (target to controller) is only used as follows: ! (ASCII code 33) The ! code (target to controller) is only used as follows: * (ASCII code 42) The * code (target to controller) is only used as follows: # (ASCII code 35) The # code (target to controller) is only used as follows: ∼ (ASCII Code 126) The ∼ code (target to controller) is only used as follows: If the controller sends an instruction to set a parameter to a particular value, then, if the value sent in the argument is not valid, the target will acknowledge the message by replying, for example, with TFQ? (with no message arguments). This indicates that there was an error in the message sent by the controller. If the controller sends an instruction code which the target does not recognize, the target will acknowledge the message by echoing the invalid instruction, followed by the ! character. Example: XYZ! If the controller sends an instruction to set a parameter to a particular value, then, if the value sent in the argument is valid, BUT the modem will not permit that particular parameter to be changed at that time, the target will acknowledge the message by replying, for example, with TFQ* (with no message arguments). If the controller sends a correctly formatted command, BUT the modem is not in remote mode, it will not allow reconfiguration, and will respond with TFQ#. If a message was sent via a local modem to a distant end device or ODU, the message was transmitted transparently through the local modem. In the event of the distant-end device not responding, the local modem would generate a response. Example: 0001/RET~, indicating that it had finished waiting for a response and was now ready for further comms. A.5.5 Message Arguments Arguments are not required for all messages. Arguments are ASCII codes for the characters 0 to 9 (ASCII 48 to 57), period (ASCII 46) and comma (ASCII 44). A.5.6 End Of Packet Controller to Target: This is the ‘Carriage Return’ character (ASCII code 13). Target to Controller: This is the two-character sequence ‘Carriage Return’, ‘Line Feed’. (ASCII code 13, and code 10.) Both indicate the valid termination of a packet. A–4 CDM-710G High-Speed Satellite Modem Remote Control A.6 Revision 1 MN-CDM710G Remote Commands and Queries Index Notes: Column ‘C’ = Command; Column ‘Q’ = Query; columns marked ‘X’ designate instruction code as Command only, Query only, Command/Query. CODE A AEQ B BFS BTH C CAE CID CLD CST C Q X X X PAGE E EBA EBN EFI EID ERF ESN ESW ETS F FLT FRW C Q GIP GMC GSW X PAGE A-16, A-33 A-16, A-28 A-16 X X X A-7, A-20, A-37 A-20, A-28 A-20, A-28 X X X X X A-6, A-16, A-34 A-6, A-16, A-34 A-6, A-16, A-34 A-7, A-17, A-34 X X X X X X X X X X X X X X X X X X A-7, A-17, A-34 A-17, A-34 A-18, A-34 A-18, A-34 A-19, A-28 A-8, A-18 A-10, A-19, A-37 A-19, A-37 A-7, A-19, A-37 A-20, A-28 A-9, A-30, A-35 A-7, A-19, A-37 CODE M MAC MGC MSK C Q PAGE X X X X X A-16, A-21, A-38 A-43 A-11, A-22 X A-17, A-22, A-39 N NUE H D DAY DLK CODE G CODE RGS RIE RMD RNE RPI RSL RSR RSW C X X X Q PAGE X A-25, A-41 X A-25, A-41 X A-15, A-33 X A-11, A-25, A-41 X X A-25, A-41 X A-26, A-42 X X A-16, A-33 X X A-26, A-42 CODE TMD TMP TPI TPL TSI TSR TST TXO C Q PAGE X X A-6, A-27 X A-14, A-27, A-42 X X A-14, A-31 X X A-14, A-32 X X A-14, A-32 X X A-6, A-27 X X A-14, A-43 X X A-15, A-32 O U I IEP IMG IMP IPA IPG ITF P X X X X X A-7, A-20, A-37 A-7, A-20, A-37 X X X X A-8, A-20, A-29 A-8, A-21, A-38 A-10, A-21, A-38 A-10, A-21, A-38 J K L LNK LRS X X X A-21, A-38 A-10, A-21, A-38 Q R RAR RBS RBT RCB RCI RCK RCR RDI RDR RED RFM RFO RFQ RFS RFT X X X X X X X X X X X X X X X X X X X X X X X X A-22, A-39 A-22, A-29, A-39 A-11, A-23, A-39 A-23, A-29 A-23, A-39 A-23, A-29 A-15, A-33 A-23, A-39 A-23, A-40 A-12, A-24, A-40 A-24, A-29 A-24, A-40 A-24, A-40 A-24, A-40 A-25, A-40 S SCX SLM X X X X A-12, A-26, A-42 A-12, A-26, A-42 SNO SWR X X A-12, A-26, A-42 A-12, A-26, A-42 V W T TAR TCI TCR TDI TDR TFQ TFS TFT TGS TIE TIM TLC TLP X X X X X X X X X X X X X X X X X X X X X X X X A-12, A-30 A-12, A-30 A-6, A-27 A-13, A-30 A-13, A-30 A-13, A-30 A-13, A-30 A-13, A-31 A-13, A-31 A-13, A-31 A-14, A-26, A-42 A-26, A-31 A-14, A-31 X Y Z Note: In the tabulature that follows, the following codes are used in the ‘Response to Command’ column (as per Sect. A.5.4 Instruction Code Qualifier): = ? * # Message ok Received ok, but invalid arguments found Message ok, but not permitted in current mode Message ok, but unit is not in Remote mode A–5 CDM-710G High-Speed Satellite Modem Remote Control Revision 1 MN-CDM710G A.6.1 Modulator Priority System = (Highest priority) TMD, TCR, and (Lowest Priority) TSR. Any change to a higher priority parameter can override any of the parameters of lower priority. Parameter Type Tx Modulation Type Tx FEC Code Rate Command (Instruction Code and Qualifier) TMD= Arguments for Command or Description of Arguments Response to Query 1 byte Command or Query. Tx Modulation type, where: 0=QPSK 1=8PSK 2=Reserved 3=16APSK 4=32APSK TCR= 1 byte Example: TMD=1 (which is 8PSK) Command or Query. Tx Code Rate, where: 0 = Rate 3/4 1 = Reserved 2 = Rate 3/5 3 = Rate 4/5 4 = Rate 5/6 5 = Rate 8/9 6 = Rate 9/10 7 = Rate 2/3 8 = Rate 1/2 Query (Instruction Code and Qualifier) TMD? TMD=x TCR= TCR? TCR* TCR# TCR? TCR=x TSR= TSR? TSR* TSR# TSR? TSR=ss.ssssss CAE= CAE? CAE* CAE# N/A N/A CID= CID? CID* CID# CID? CID=xxxxxxxxxxxxxxxxx xxxxxxx Response to Command TMD= TMD? TMD* TMD# Response to Query Example: TCR=0 (which is Rate 3/4) Tx Symbol Rate TSR= 9 bytes *NOTE: Please refer to Sect. 1.8 Summary of Specifications for a list of available code rates for each modulation type. Command or Query. Tx Symbol Rate, where: s=Symbol Rate in Msps Clear All Stored Events CAE= None Example: TSR=20.000000 (20 Msps.) Command Only. Forces the software to clear the software events log. Example: CAE= Circuit ID String CID= 24 bytes Note: This command takes no arguments Command or Query. Sets or queries the user-defined Circuit ID string, which is a fixed length of 24 characters. Valid characters include: Space ( ) * + – , . / 0 9 and A thru Z A–6 CDM-710G High-Speed Satellite Modem Remote Control Revision 1 MN-CDM710G Command (Instruction Code and Qualifier) CLD= Arguments for Command or Description of Arguments Response to Query 1 byte Command Only. Retrieves a previously stored configuration from the specified configuration location (0 to 9). Configuration Save CST= 1 byte Real-time Clock Date DAY= 6 bytes Enable Redundancy Switch Mode ESW= 1 byte, value of 0 or 1 Firmware Revisions N/A 1 byte Gigabit Management IP Address and Subnet GIP= 19 bytes Initialize Events Pointer IEP= None Boot Image IMG= 1 byte Parameter Type Configuration Load Example: CLD=4 (retrieve configuration from location 4) Command Only. Stores the current configuration in the specified configuration location (0 to 9). Example: CST=4 (store the current configuration in location 4) Command or Query. A date in the form ddmmyy, where: dd = day of the month (01 to 31), mm = month (01 to 12) yy = year (00 to 99) Example: DAY=240457 (April 24, 2057) Command or Query. Set redundancy mode, where : 0 = Disable 1 = Enable Example: ESW=1 (Enable redundancy mode) Query Only. Query the version information of the system, where: i = Bulk Image number (1 or 2) a = Firmware Image b = Firmware Revision c = Firmware Date Example: FRW?1 Command or Query. Gigabit Management IP address and subnet mask. s=Slot (1, 2) i=IP Address n=Netmask Command Only. Resets internal pointer to allow RNE? queries to start at the beginning of the stored events log. Command Only. Boot image selection, where n is the image number: 1=Image #1 2=Image #2 Example: IMG=1 (Selects Image #1 for booting.) A–7 Query (Instruction Code and Qualifier) N/A N/A CST= CST? CST* CST# N/A N/A DAY= DAY? DAY* DAY# DAY? DAY=ddmmyy ESW= ESW? ESW* ESW# ESW? ESW=x FRW? FRW* FRW# FRW?i FRW={CR}Boot:{CR}a,b, c{CR}Bulki:{CR}a,b,c{CR }a,b,c… GIP= GIP# GIP? GIP* GIP?s GIP=siii.iii.iii.iii.nn IEP= IEP? IEP* IEP# IMG= IMG? IMG* IMG# N/A N/A IMG? IMG=n Response to Command CLD= CLD? CLD* CLD# Response to Query CDM-710G High-Speed Satellite Modem Remote Control Parameter Type Tx Output Impendance Command (Instruction Code and Qualifier) IMP= IP Address IPA= Equipment ID N/A Revision 1 MN-CDM710G Arguments for Command or Description of Arguments Response to Query 1 byte Command or Query. Tx output impedance, where: 0=50 Ohm 1=75 Ohm Example: IMP=0 (Set impedance to 50 Ohms) * NOTE: Setting Tx Impedence is only possible on 70/140 Mhz units. 18 bytes Command or Query. Used to set the IP address and network prefix for the 10/100 BaseTx Ethernet management port, in the format: xxx.xxx.xxx.xxx.yy, where: xxx.xxx.xxx.xxx is the IP address, and yy is the network prefix (00..31) Example: IPA=010.006.030.001.24 23 bytes Query Only. Unit returns equipment identification and configuration, where: aaa = defines the modulator model number (71G) b = Modulator configuration: 1=70/140 Mhz, 2=L-Band c = Tx Symbol Rate S/W option: 0 = 15.0 Msps, 1 = 22.5 Msps, 2 = 30.0 Msps, 3 = 37.5 Msps (S1 and DSNG only), 4 = 45.0 Msps (S1 and DSNG only) d = S/W option Tx 8PSK: 0=Not installed, 1=Installed e = S/W option Tx 16-QAM: 0=Not installed, 1=Installed f = S/W option Tx 16APSK: 0=Not installed, 1=Installed g = S/W option Tx 32APSK: 0=Not installed, 1=Installed h = S/W option Tx DVB-S1: 0=Not installed, 1=Installed i = S/W option Tx DVB-DSNG: 0=Not installed, 1=Installed j = S/W option Tx DVB-S2: 0=Not installed, 1=Installed k = Demodulator configuration: 0=None, 1=70/140 Mhz, 2=L-Band l = Rx Symbol Rate S/W option: 0=15.0 Msps, 1 = 22.5 Msps, 2 = 30.0 Msps, 3 = 37.5 Msps (S1 & DSNG only), 4 = 45.0 Msps (S1 & DSNG only) m = S/W option Rx 8PSK: 0=Not installed, 1=Installed n = S/W option Rx 16-QAM: 0=Not installed, 1=Installed o = S/W option Rx 16APSK: 0=Not installed, 1=Installed p = S/W option Rx 32APSK: 0=Not installed, 1=Installed q = S/W option Rx DVB-S1: 0=Not installed, 1=Installed r = S/W option Rx DVB-DSNG:0=Not installed, 1=Installed s = S/W option Rx DVB-S2: 0=Not installed, 1=Installed t = Interface slot #1: 0 = None, 1 = Reserved, 2 = Gigabit Ethernet Interface, 3 = HSSI, 4 = E3T3STS1 u = Interface slot #2: 0 = None, 1 = Reserved, 2 = Gigabit Ethernet Interface, 3 = HSSI, 4 = E3T3STS1 A–8 Query (Instruction Code and Qualifier) IMP? IMP=x IPA= IPA? IPA* IPA# IPA? IPA= xxx.xxx.xxx.xxx.yy EID? EID* EID# EID? EID= aaabcdefghijklmnopqrstu Response to Command IMP= IMP? IMP* IMP# Response to Query Notes: Unit returns ‘Not Installed’ for Rx options if unit is modulator only. Unit returns ‘Not Installed’ for Tx options if unit is demodulator only. CDM-710G High-Speed Satellite Modem Remote Control Parameter Type Faults and Status Command (Instruction Code and Qualifier) N/A Revision 1 MN-CDM710G Arguments for Command or Description of Arguments Response to Query 4 bytes Query Only. Unit returns the current fault and status codes for the Unit (hardware), Tx Traffic and Rx Traffic, in the form abcd, where: a = Unit Faults: 0=No faults 1=Framer FPGA Load 2=Power supply fault, +1.5 Volts, Framer Card 3=Power supply fault, +1.5 Volts, Interface #1 4=Power supply fault, +1.5 Volts, Interface #2 5=Power supply fault, +3.3 Volts, Framer Card 6=Power supply fault, +5.0 Volts, Framer Card 7=Power supply fault, +12.0 Volts, Framer Card 8=Power supply fault, -12.0 Volts, Framer Card 9=Power supply fauilt, +18.0 Volts, Framer Card A=FLASH Checksum B=FEC1 Load C=FEC2 Load D=Interface #1 Load E=Interface #2 Load F=192 MHz PLL G=External Reference H=Framer Card Temperature I=Modem Temperature J=Cooling Fans K=Interface #1 Removed L=Interface #2 Removed b = Tx Traffic Status: 0=No faults 1= +1.5V Power Supply Unit (Modulator Card) 2= FPGA Failed to Load (Modulator Card) 3= Symbol Rate PLL Clock 4= Tx Synthesizer Unlocked 5= Tx Digital Clock Manager Unlocked 6= I & Q Baseband Channels are Inactive 7= FPGA Temperature (Modulator Card) 8= Reserved 9= TX Clock Failure (Interface 1) A= TX Clock Failure (Interface 2) B= GBEI Card Data rate > + 200 PPM C= GBEI Card Data rate < - 200 PPM D= GBEI No PHY Link E= Encoder FIFO Empty F= Encoder FIFO Full G= SERDES Parity Errors H=Reserved. A–9 Response to Command FLT? FLT* FLT# Query (Instruction Code and Qualifier) FLT? Response to Query FLT=abcd d=Change in fault status since last poll. Note: Each section has faults listed in order of priority. For each section, only the highest priority fault is returned. There maybe multiple faults for each section, but only the highest fault is returned. CDM-710G High-Speed Satellite Modem Remote Control Parameter Type Command (Instruction Code and Qualifier) Revision 1 MN-CDM710G Arguments for Command or Response to Query Faults and Status (cont.) Gateway Address IPG= 15 bytes Interface Type N/A 2 bytes Local/Remote Status LRS= 1 byte Unit MAC Address N/A 12 bytes Number of Unread stored Events N/A 3 bytes Description of Arguments I=Tx Ais Interface 1 J=Tx Ais Interface 2 K=Tx Cable Interface 1 L=Tx Cable Interface 2 c=Rx Traffic Status 0=No faults d=New Faults 0=No new faults 1=New faults, since last check Command or Query. Used to set the Gateway IP addess for the 10/100 Base Tx Ethernet management port, in the format: xxx.xxx.xxx.xxx, where: xxx.xxx.xxx.xxx is the IP address Example: IPG = 010.006.030.001 Query Only. Interface Type, where: s=Defines which interface slot (1 or 2) x=Defines the interface type, where: 0=Reserved 1=Reserved 2=Gigabit Ethernet 3=HSSI 4=E3T3STS1 Example: ITF?1 Command or Query. Local/Remote status, where: 0=Local 1=Serial 2=Reserved 3=Ethernet Example: LRS=1 (which is remote Serial) Query Only. MAC address of the unit, reported in hexadecimal. Example: MAC=0006B000D2A7 (The MAC address of the unit is 00:06:B0:00:D2:A7 ) Query Only. Unit returns the Number of stored Events, which remain Unread, in the form xxx. Note: This means unread over the remote control. Example: NUE=126 A–10 Response to Command Query (Instruction Code and Qualifier) Response to Query IPG= IPG? IPG* IPG# IPG? IPG = xxx.xxx.xxx.xxx ITF? ITF* ITF# ITF?s ITF=sx LRS= LRS? LRS* LRS# LRS? LRS=x MAC? MAC* MAC# MAC? MAC=AABBCCDDEEFF NUE? NUE* NUE# NUE? NUE=xxx CDM-710G High-Speed Satellite Modem Remote Control Revision 1 MN-CDM710G Command (Instruction Code and Qualifier) MSK= Arguments for Command or Description of Arguments Response to Query 13 bytes Command or Query. Alarm mask conditions, in form ab, where: a=Tx Cable Slot 1 b=Tx AIS Slot 1 c=Rx AIS Slot 1 d=Bufferslip Alarm Slot 1 e=External Clock Alarm Slot 1 f=Tx Cable Slot 2 g=Tx AIS Slot 2 h=Rx AIS Slot 2 i=Bufferslip Alarm Slot 2 j=External Clock Alarm Slot 2 k=EBNO Alarm L=Ber Alarm m=Rx AGC Alarm xxx -spares Mask (Alarm=0, Fault = 1,Masked =2)) Soft Reboot RBT=1 1 byte Retrieve next 5 unread Stored Events N/A 75 bytes Parameter Type Unit Alarm Mask Example: MSK=110101100000xxx ( alarm masks for Interface Slot 1 ,Slot 2 , Command Only. Soft Reboot. 1= Reboot System Query Only. Unit returns the oldest 5 Stored Events which have not yet been read over the remote control. Reply format: {CR}Sub-body{CR}Sub-body{CR}Sub-body{CR}Subbody{CR}Sub-body, where: Sub-body= ABCddmmyyhhmmss, A being the fault/clear indicator. F=Fault C=Clear I=Info B being the fault type where: 1=Unit 2=Rx Traffic 3=Tx Traffic 4=Log C is Fault Code numbers, as in FLT? or Info Code, which is: 0=Power Off 1=Power On 2=Log Cleared 3=Global Config Change 4=Redundancy Config Change If there are less than 5 events to be retrieved, the remaining positions are padded with zeros. If there are no new events, the response is RNE*. A–11 Response to Command MSK= MSK? MSK* MSK# RBT? RBT* RBT# RNE? RNE* RNE# Query (Instruction Code and Qualifier) MSK? MSK=abcdefghijkLmxxx N/A RBT= RNE? RNE={CR}ABCddmmyyh hmmss{CR}ABCddmmyy hhmmss{CR}ABCddmm yyhhmmss{CR}ABCddm myyhhmmss {CR}ABCddmmyyhhmm ss Response to Query CDM-710G High-Speed Satellite Modem Remote Control Revision 1 MN-CDM710G Command (Instruction Code and Qualifier) RED= Arguments for Command or Description of Arguments Response to Query 1 byte Command or Query. Unit returns the redundancy state of the unit, where: 0 = Offline 1 = Online *** This command can be used to force the unit offline, this is done by sending RED=0. This is only valid if redundancy mode is enabled. If redundancy is not enabled, then RED=0 will return an error. The unit cannot be forced online. *** If the unit is not in redundancy mode, then the unit will always be online. Gigabit Auto Autocrossover SCX 2 bytes Gigabit Learning Mode SLM 2 bytes Serial Number N/A 9 bytes Software Revision N/A 5 bytes Tx Alpha Rolloff TAR= 1 byte Tx Clock Invert TCI= 2 bytes Parameter Type Redundancy State Response to Command RED= RED? RED* RED# Query (Instruction Code and Qualifier) RED? Response to Query RED=x (see description of arguments) Example: RED=0 (force unit offline) Command or Query. s=Slot2 Only a= 1 GBEI Cable Auto Crossover Enabled. a=0 GBEI Cable Auto Crossover Disabled Command or Query. s=Slot2 Only a= 1 GBEI Learning Enabled. a=0 GBEI Learning Disabled Query Only. Used to query the unit 9-digit serial number. Unit returns its S/N in the form xxxxxxxxx. SCX= SCX# SCX? SCX* SLM= SLM# SLM? SLM* SNO? SNO* SNO# SCX?s SCX=a SLM?s SLM=a SNO? SNO=xxxxxxxxx Example: SNO=176500143 Query Only. Unit returns the value of the internal software revision installed in the unit, in the form: Boot:X.X.X Bulk1:Y.Y.Y Bulk2: Z.Z.Z SWR? SWR* SWR# SWR? SWR=Boot:X.X.X Bulk1:Y.Y.Y Bulk2:Z.Z.Z TAR= TAR? TAR* TAR# TAR? TAR=x TCI = TCI? TCI * TCI # TCI?s TCI =sx (see description of arguments) Example: SWR=Boot:1.0.3 Bulk1:1.0.1 Bulk2:1.0.0 Command or Query. Tx Alpha Rolloff, where: 0 = 20% 1 = 25% 2 = 35% Example: TAR=0 (which is a Tx Alpha Rolloff of 20%) Command or Query. Invert Transmit Clock, where: s=Defines which interface slot ( 1 or 2 ) x=Invert Transmit Clock, where: 0=Normal 1=Inverted Note: Command valid with HSSI or E3T3STS1) Example: TCI = 11 (selects Inverted TX Clock, Slot 1) A–12 CDM-710G High-Speed Satellite Modem Remote Control Parameter Type Tx Data Invert Command (Instruction Code and Qualifier) TDI= Revision 1 MN-CDM710G Arguments for Command or Description of Arguments Response to Query 2 bytes Command or Query. Invert Transmit Data, where: s=Defines which interface slot ( 1 or 2 ) x=Invert Transmit Data, where: 0=Normal 1=Inverted Response to Command TDI = TDI? TDI * TDI # Query (Instruction Code and Qualifier) TDI?sc Response to Query TDI =sx (see description of arguments) Note: Command valid with HSSI or E3T3STS1) Tx Data Rate N/A 10 bytes Tx Frequency TFQ= 9 bytes Tx Frame Size TFS= 1 byte Tx FEC Type N/A 1 byte Tx Gold Code TGS= Sequence Index 6 bytes Tx Interface Enable 2 bytes TIE= Example: TDI = 11 (selects Inverted TX Data) Query Only. Composite Tx Data rate, in kbps. Resolution=1 bps. Example: TDR=002047.999 (which is 2047.999 kbps) Command or Query. Tx Frequency (in MHz) 52 to 88 MHz, and 104 to 176 MHz (70/140 Modulator) 950 to 1950 MHz (L-Band Modulator) Resolution=100Hz. Example: TFQ=0950.0000 Command or Query. Tx Frame Size Long/Short selection, where: 0=Short, 1=Long Example: TFS =0 (which is Short FEC Frame Size) Query Only. Tx FEC coding type, where: 1=LDPC ( FEC is dependent on the TX Mode Type. ) Example: TFT=1 (which is LDPC coding) Command or Query. Tx Gold Code Sequence Index: xxxxxx = Gold Code Sequence index ( 0 to 262141 ) Example: TGS=189063 Command or Query. Interface Slot Enable/Disable, where: s=Defines which interface slot (1 or 2) x=Tx Interface Status, where: 0=Disabled 1=Enabled Example: TIE =11 (Enables transmit interface) A–13 TDR? TDR* TDR# TDR? TDR=xxxxxx.xxx TFQ= TFQ? TFQ* TFQ# TFQ? TFQ=xxxx.xxxx TFS = TFS? TFS * TFS # TFS? TFS =x TFT? TFT* TFT# TFT? TFT=x TGS= TGS? TGS* TGS# TGS? TGS=xxxxxx TIE= TIE? TIE* TIE# TIE?s TIE=sx CDM-710G High-Speed Satellite Modem Remote Control Revision 1 MN-CDM710G Command (Instruction Code and Qualifier) TIM= Arguments for Command or Description of Arguments Response to Query 6 bytes Command or Query. A time in the form hhmmss, indicating the time from midnight, where: hh = hours (00 to 23) mm = minutes (00 to 59) ss = seconds (00 to 59) Tx Location of the Pilot TLP= 1 byte Temperature N/A 3 bytes Tx Pilot On/Off TPI= 1 byte Tx Power Level TPL= 5 bytes Parameter Type Real-time Clock Time Response to Command TIM= TIM? TIM* TIM# Query (Instruction Code and Qualifier) TIM? TIM=hhmmss Response to Query Example: TIM=231259 (23 hours:12 minutes:59 seconds) Command or Query. Tx Pilot On/Off selection, where: 0=Average, 1=Peak TLP= TLP? TLP* TLP# TLP? TLP=x Example: TLP=0 (which is Pilot Average) Query Only. Unit returns the value of the internal temperature, in the form of sxxx (degrees C). Where s is the sign and and xxx is the number of degrees. TMP? TMP* TMP# TMP? TMP=sxxx Example: TMP=+026 Command or Query. Tx Pilot On/Off selection, where: 0=Off, 1=On TPI= TPI? TPI* TPI# TPI? TPI=x TPL= TPL? TPL* TPL# TPL? TPL=sxx.x TSI= TSI? TSI* TSI# TSI? TSI=x TST= TST? TST* TST# TST? TST=x Example: TPI=0 (which is Pilot Off) Command or Query. Tx Output power level, where: s=sign ( + / - ) xx.x = Tx Output power level, +05.0 and –20.0 dBm. L-Band: -25.0 to –05.0 dBm 70/140 MHz: -20.0 to +00.0 dBm Note: Beyond –20 dBm is beyond the specification. Tx Spectrum Invert TSI= 1 byte Unit Test Mode TST= 1 byte Example: TPL = -13.4 Command or Query. Tx Spectrum Invert selection, where: 0=Normal 1=Tx Spectrum Inverted Example: TSI=0 (which is normal) Command or Query. Test Mode, where: 0=Normal Mode (no test) 1=IF Loop 2=I/O Loop 3=RF Loop 4=Tx CW 5=Tx Alternating 1,0 Pattern Example: TST=4 (Tx CW) A–14 CDM-710G High-Speed Satellite Modem Remote Control Parameter Type Tx Carrier State Command (Instruction Code and Qualifier) TXO= Revision 1 MN-CDM710G Arguments for Command or Description of Arguments Response to Query 1 byte Command or Query. Tx Carrier State, where: 0=OFF due to front panel or remote control command 1=ON Response to Command TXO= TXO? TXO* TXO# Query (Instruction Code and Qualifier) TXO? Response to Query TXO=x Example: TXO=1 (Tx Carrier ON) A.6.2 Demodulator Priority System = (Highest priority) RMD, RCR, and (Lowest Priority) RSR. Any change to a higher priority parameter can override any of the parameters of lower priority. Parameter Type Rx Modulation Type Command (Instruction Code and Qualifier) N/A Arguments for Command or Description of Arguments Response to Query 1 byte Query only. Rx Modulation type, where: 0=QPSK 1=8PSK 2=Reserved 3=16APSK 4=32APSK Response to Command RMD? RMD* RMD# Query (Instruction Code and Qualifier) RMD? RMD=x RCR? RCR=x Response to Query Example: RMD=1 (which is 8PSK) Rx FEC Code Rate N/A 1 byte *NOTE: This command is query-only because the demodulation type is automatically detected, but if the unit is not locked, the query returns ‘x’. Query only. Rx Code Rate, where: 0 = Rate 3/4 1 = Reserved 2 = Rate 3/5 3 = Rate 4/5 4 = Rate 5/6 5 = Rate 8/9 6 = Rate 9/10 7 = Rate 2/3 8 = Rate 1/2 Example: RCR=0 (which is Rate 3/4) *NOTE: This command is query-only because the code rate is automatically detected, but if the unit is not locked, the query returns ‘x’. A–15 RCR? RCR* RCR# CDM-710G High-Speed Satellite Modem Remote Control Parameter Type Rx Symbol Rate Command (Instruction Code and Qualifier) RSR= Revision 1 MN-CDM710G Arguments for Command or Description of Arguments Response to Query 9 bytes Command or Query. Rx Symbol Rate, where: s=Symbol Rate in Msps Enable/Disable Adaptive Equalizer AEQ= 1 byte Buffer Fill State N/A 3 bytes Response to Command Query (Instruction Code and Qualifier) RSR? RSR=ss.ssssss Response to Query Example: RSR=20.000000 (20 Msps.) RSR= RSR? RSR* RSR# *NOTE: Please refer to Sect. 1.8 Summary of Specifications for a list of available code rates for each modulation type. Command or Query. Adaptive Equalizer status, where: 0=Disable 1=Enable AEQ= AEQ? AEQ* AEQ# AEQ? AEQ=x N/A BFS?s BFS=sxx BTH= BTH? BTH# BTH=a BTA=a CAE= CAE? CAE* CAE# N/A N/A CID= CID? CID* CID# CLD= CLD? CLD* CLD# CID? CID=xxxxxxxxxxxxxxxxx xxxxxxx N/A N/A Example: AEQ=1 (which is Enable) Query only. s=Defines which interface slot ( 1 or 2 ) xx = value of the buffer fill state, between 1 to 99%. Returns 00 if demodulator is unlocked. Note: Command not valid for Gigabit interface. Rx BER Alarm Threshold BTH 1bytes Clear All Stored Events CAE= None Example: BFS=133 (which is 33%, on interface slot 1 channel 1) Command or Query. Sets and Returns BerThreshold a=Ber Threshold 0= NONE 3= 1E10-3 4 =1E10-4 5= 1E10-5 6= 1E10-6 7= 1E10-7 8 =1E10-8 Example BTH=3(Sets Ber Alarm Threshold to 1E10-3) Command Only. Forces the software to clear the software events log. Example: CAE= Circuit ID String CID= 24 bytes Configuration Load CLD= 1 byte Note: This command takes no arguments Command or Query. Sets or queries the user-defined Circuit ID string, which is a fixed length of 24 characters. Valid characters include: Space ( ) * + – , . / 0 9 and A thru Z Command Only. Retrieves a previously stored configuration from the specified configuration location (0 to 9). Example: CLD=4 (retrieve configuration from location 4) A–16 CDM-710G High-Speed Satellite Modem Remote Control Revision 1 MN-CDM710G Command (Instruction Code and Qualifier) CST= Arguments for Command or Description of Arguments Response to Query 1 byte Command Only. Stores the current configuration in the specified configuration location (0 to 9). Real-time Clock Date DAY= 6 bytes Demodulator Lock Status N/A 1 byte Parameter Type Configuration Save Example: CST=4 (store the current configuration in location 4) Command or Query. A date in the form ddmmyy, where dd = day of the month (01 to 31), mm = month (01 to 12) yy = year (00 to 99) Example: DAY=240457 (April 24, 2057) Query only. Demodulator Lock Status, where: 0 = Demodulator Unlocked 1 = Demodulator Locked Example: DLK=1 ( Demodulator Locked) A–17 Query (Instruction Code and Qualifier) N/A N/A DAY= DAY? DAY* DAY# DAY? DAY=ddmmyy DLK? DLK* DLK# DLK? DLK=x Response to Command CST= CST? CST* CST# Response to Query CDM-710G High-Speed Satellite Modem Remote Control Parameter Type Equipment ID Eb/No AlarmPoint Command (Instruction Code and Qualifier) N/A EBA= Revision 1 MN-CDM710G Arguments for Command or Description of Arguments Response to Query 23 bytes Query Only. Unit returns equipment identification and configuration, where: aaa = defines the modulator model number (71G) b = Modulator configuration: 0 = None, 1=70/140 Mhz, 2=L-Band c = Tx Symbol Rate S/W option: 0 = 15.0 Msps, 1 = 22.5 Msps, 2 = 30.0 Msps, 3 = 37.5 Msps (S1 and DSNG only), 4 = 45.0 Msps d = S/W option Tx 8PSK: 0=Not installed, 1=Installed e = Reserved f = S/W option Tx 16APSK: 0=Not installed, 1=Installed g = S/W option Tx 32APSK: 0=Not installed, 1=Installed h = Reserved i = Reserved j = S/W option Tx DVB-S2: 0=Not installed, 1=Installed k = Demodulator configuration: 0=None, 1=70/140 Mhz, 2=L-Band l = Rx Symbol Rate S/W option: 0=15.0 Msps, 1 = 22.5 Msps, 2 = 30.0 Msps, 3 = 37.5 Msps (S1 & DSNG only), 4 = 45.0 Msps m = S/W option Rx 8PSK: 0=Not installed, 1=Installed n = Reserved o = S/W option Rx 16APSK: 0=Not installed, 1=Installed p = S/W option Rx 32APSK: 0=Not installed, 1=Installed q = Reserved r = Reserved s = S/W option Rx DVB-S2: 0=Not installed, 1=Installed t = Interface slot #1: 0 = None, 1 = Reserved, 2 = Gigabit Ethernet, Interface, 3 = HSSI, 4 = E3T3STS1 u = Interface slot #2: 0 = None, 1 = Reserved, 2 = Gigabit Ethernet, Interface, 3 = HSSI, 4 = E3T3STS1 4 bytes Command or Query. Eb/No alarm point in dB, with a range between 0.1 and 16 dB. Resolution=0.1 dB Rx Eb/No N/A 4 bytes Example: EBA=12.3 Query only. Unit returns the value of Eb/No, between 0 and 16 dB, resolution 0.1 dB. Returns 99.9 if demod is unlocked. Example: EBN=12.3 (which is Eb/No = 12.3 dB) For values greater than 16.0 dB, the reply will be: EBN=+016 A–18 Response to Command EID? EID* EID# Query (Instruction Code and Qualifier) EID? Response to Query EID= aaabcdefghijklmnopqrstu Note: Unit returns ‘Not Installed’ for Rx options if unit is modulator only. Unit returns ‘Not Installed’ for Tx options if unit is demodulator only. EBA= EBA? EBA* EBA# EBA? EBA=xx.x (see description of arguments) EBN? EBN* EBN# EBN? EBN=xxxx CDM-710G High-Speed Satellite Modem Remote Control Parameter Type Interface Reference Clock Command (Instruction Code and Qualifier) EFI= Revision 1 MN-CDM710G Arguments for Command or Description of Arguments Response to Query 2 bytes Command or Query. s=Defines which interface slot (1 or 2) x=EXT CLK (Data Rate Accuracy), where: 0 = 1 MHz 1 = 2 MHz 2 = 2.048 MHz 3 = 5 MHz 4 = 10 MHz 5 = 20 MHz 6 = 34.368 MHz 7 = 44.736 MHz 8 = 51.840 MHz Response to Command EFI= EFI? EFI* EFI# Query (Instruction Code and Qualifier) EFI?s Response to Query EFI=sx (see description of arguments) Note: Command valid only with CDI-10-1 G.703 interface External Reference Frequency ERF= 1 byte Rx Es/No N/A 4 bytes Example: EFI=14 (Selects 10MHz on slot 1) Command or Query. External Reference Frequency, where: 0=Internal 1=External 1 MHz 2=External 2 MHz 3=External 5 MHz 4=External 10 MHz 5=External 20 MHz Example: ERF=0 (External reference not used - uses internal) Query only. Unit returns the value of EsNo (when in DVB-S2 mode), between 0 and 16 dB, resolution 0.1 dB. ERF= ERF? ERF* ERF# ERF? ERF=x ESN? ESN* ESN# ESN? ESN=xxxx ESW= ESW? ESW* ESW# ESW? ESW=x FRW? FRW* FRW# FRW?i FRW={CR}Boot:{CR}a,b, c{CR}Bulki:{CR}a,b,c{CR }a,b,c… Returns 99.9 if demod is unlocked. Enable Redundancy Switch Mode ESW= 1 byte, value of 0 or 1 Firmware Revisions N/A 1 byte Example: ESN=12.3 (which is Es/No = 12.3 dB) For values greater than 22.0 dB, the reply will be: ESN=+022 Command or Query. Set redundancy mode, where : 0 = Disable 1 = Enable Example: ESW=1 (Enable redundancy mode) Query Only. Query the version information of the system. Where: i = Bulk Image number (1 or 2) a = Firmware Image b = Firmware Revision c = Firmware Date Example: FRW?1 A–19 CDM-710G High-Speed Satellite Modem Remote Control Parameter Type E3/T3/STS1 Mode Select Command (Instruction Code and Qualifier) ETS= Revision 1 MN-CDM710G Arguments for Command or Description of Arguments Response to Query 2 bytes Command or Query. Sets the E3/T3/STS1 interface card mode. s=Interface Slot (1 or 2) m=Mode 0=E3 1=T3 2=STS1 Query (Instruction Code and Qualifier) ETS?s ETS=sm GIP= GIP# GIP? GIP* GMC? GMC* GMC# GIP?s GIP=siii.iii.iii.iii.nn GMC?s Gigabit Interface Management MAC Address GSW? GSW* GSW# GSW?s Gigabit Interface Software Revision N/A IEP= Command or Query. Boot image selection, where n is the image number: 1=Image #1 2=Image #2 IEP= IEP? IEP* IEP# IMG= IMG? IMG* IMG# IMG? IMG=n Example: IMG=1 (Selects Image #1 for booting.) Command or Query. Tx output impedance, where: 0=50 Ohm 1=75 Ohm IMP= IMP? IMP* IMP# IMP? IMP=x Response to Command ETS= ETS? ETS# ETS* Response to Query Note: Command valid only with CDI-10-1 G.703 interface. This sets the selected G.703 DATA rate. The unit will adjust the symbol rate based on modulation type and code rate to keep the selected data rate. Gigabit Management IP Address and Subnet Gigabit Interface Management MAC Address GIP= 19 bytes GMC? N/A Gigabit Interface Software Revision GSW? Initialize Events Pointer IEP= None Boot Image IMG= 1 byte Tx Output Impendance IMP= 1 byte N/A Example: ETS=11 (sets Interface 1, Port 1 to T3 mode) Command or Query. Gigabit Management IP address and subnet mask. s= Slot2 Only i=IP Address n=Netmask Query Only. s=Defines Interface slot (2) Example: To get MAC address for Gigabit in Slot 1 GMC?2 GMC=2s0006B0004717 Query Only. s=Defines Interface slot (2) Example: To get Software Revision for Gigabit in Slot 2 GSW?2 GSW=2FW/12738-,1.1.8,02/16/07 Command Only. Resets internal pointer to allow RNE? queries to start at the beginning of the stored events log. Example: IMP=0 (Set impedance to 50 Ohms) * NOTE: Setting Tx Impedence is only possible on 70/140 Mhz units. A–20 CDM-710G High-Speed Satellite Modem Remote Control Revision 1 MN-CDM710G Command (Instruction Code and Qualifier) IPA= Arguments for Command or Description of Arguments Response to Query 18 bytes Command or Query. Used to set the IP address and network prefix for the 10/100 BaseTx Ethernet management port, in the format: xxx.xxx.xxx.xxx.yy, where: xxx.xxx.xxx.xxx is the IP address, and yy is the network prefix (00..31) Gateway Address IPG= 15 bytes Interface Type N/A 2 bytes Rx Link Margin N/A 4 bytes Local/Remote Status LRS= 1 byte Unit MAC Address N/A 12 bytes Parameter Type IP Address Example: IPA=010.006.030.001.24 Command or Query. Used to set the Gateway IP addess for the 10/100 Base Tx Ethernet management port, in the format: xxx.xxx.xxx.xxx, where: xxx.xxx.xxx.xxx is the IP address Example: IPG = 010.006.030.001 Query Only. Interface Type, where: s=Defines which interface slot (1 or 2) x=Defines the interface type, where: 0=Reserved 1=Reserved 2=Gigabit Ethernet 3=HSSI 4=E3T3STS1 Example: ITF?1 Query only. Unit returns the value of the Link Margin. Returns 00.0 if demod is unlocked. Example: LNK=12.3 Command or Query. Local/Remote status, where: 0=Local 1=Serial 2=Reserved 3=Ethernet Example: LRS=1 (which is remote Serial) Query Only. MAC address of the unit, reported in hexadecimal. Example: MAC=0006B000D2A7 (The MAC address of the unit is 00:06:B0:00:D2:A7 ) A–21 Query (Instruction Code and Qualifier) IPA? IPA= xxx.xxx.xxx.xxx.yy IPG= IPG? IPG* IPG# IPG? IPG = xxx.xxx.xxx.xxx ITF? ITF* ITF# ITF?s ITF=sx LNK? LNK* LNK# LNK? LNK=xxxx LRS= LRS? LRS* LRS# LRS? LRS=x MAC? MAC* MAC# MAC? MAC=AABBCCDDEEFF Response to Command IPA= IPA? IPA* IPA# Response to Query CDM-710G High-Speed Satellite Modem Remote Control Parameter Type Unit Alarm Mask Number of Unread stored Events Command (Instruction Code and Qualifier) MSK= N/A Revision 1 MN-CDM710G Arguments for Command or Description of Arguments Response to Query 13 bytes Command or Query. Alarm mask conditions, in form abcdefghijkLmxxx, where: a=Tx Cable Slot 1 b=Tx AIS Slot 1 c=Rx AIS Slot 1 d=Bufferslip Alarm Slot 1 e=External Clock Alarm Slot 1 f=Tx Cable Slot 2 g=Tx AIS Slot 2 h=Rx AIS Slot 2 i=Bufferslip Alarm Slot 2 j=External Clock Alarm Slot 2 k=EBNO Alarm L=BER Alarm m=Rx AGC Alarm xxx-spares. Mask ( Alarm=0, Fault = 1,Masked =2) 3 bytes Example: MSK=110101100000xxx ( Alarm masks for interface slot ,Slot 2 ,Ebno, Rx Agc) Query Only. Unit returns the Number of stored Events, which remain Unread, in the form xxx. Query (Instruction Code and Qualifier) MSK? MSK=abcdefghijkLmxxx NUE? NUE* NUE# NUE? NUE=xxx RAR= RAR? RAR* RAR# RAR? RAR=x RBS= RBS? RBS* RBS# RBS?s RBS=sxx.x (see description of arguments) Response to Command MSK= MSK? MSK* MSK# Response to Query Note: This means unread over the remote control. Rx Alpha Rolloff RAR= 1 byte Rx Buffer Size RBS= 5 bytes Example: NUE=126 Command or Query. Rx Alpha Rolloff, where: 0 = 20% 1 = 25% 2 = 35% Example: RAR=0 (which is a Rx Alpha Rolloff of 20%) Command or Query. Rx Buffer Size (in milliseconds), where: s=Defines which interface slot ( 1 or 2 ) xx.x= Rx Buffer Size, HSSI = 5.0 to 32.0 ms, in 0.1 ms steps E3T3STS1 E3 mode = 0.5 to 61.0 ms, in 0.5 ms steps T3 mode = 0.5 to 44.0 ms, in 0.5 ms steps STS1 mode = 0.5 to 40.0 ms, in 0.5 ms steps GBEI = N/A Example: RBS=130.0 (selects 30.0 ms on interface 1) A–22 CDM-710G High-Speed Satellite Modem Remote Control Revision 1 MN-CDM710G Soft Reboot Command (Instruction Code and Qualifier) RBT=1 Arguments for Command or Description of Arguments Response to Query 1 byte Command Only.. Soft Reboot. 1= Reboot System ReCenter Buffer RCB= 2 bytes Parameter Type Rx Clock Invert RCI= 2 bytes Command only. Forces the software to recenter the receive Plesiochronous/Doppler buffer. s=Defines which interface slot ( 1 or 2 ) Example: RCB=11 (ReCenter buffer on interface 1 channel 1) GBEI = N/A Command or Query. Invert Receive Clock, where: s=Defines which interface slot ( 1 or 2 ) x=Invert Receive Clock, where: 0=Normal 1=Inverted Query (Instruction Code and Qualifier) N/A RBT=x N/A N/A RCI = RCI? RCI * RCI # RCI?s RCI =sx (see description of arguments) RCK= RCK? RCK* RCK# RCK?s RCK=sx (see description of arguments) RDI = RDI? RDI* RDI# RDI?s RDI =sx (see description of arguments) RDR? RDR* RDR# RDR? RDR=xxxxxx.xxx Response to Command RBT= RBT? RBT* RBT# RCB= RCB? RCB* RCB# Response to Query Note: Command valid with HSSI Rx Clock Source RCK= 2 bytes Rx Data Invert RDI= 2 bytes Example: RCI=11 (selects Inverted RX Clock, Slot 1) Command or Query. Rx Clock Source (For Data Rate Accuracy), where: s=Defines which interface slot ( 1 or 2 ) x=Rx Clock Source, where: 0=Rx Satellite 1=Tx-Terrestrial 2=External Reference Clock 3=Internal (HSSI Only) Valid with HSSI and E3T3STS1. Example: RCK=11 (selects Tx-Terrestrial) Command or Query. Invert Receive Data, where: s=Defines which interface slot ( 1 or 2 ) x=Invert Receive Data, where: 0=Normal 1=Inverted Note: Command valid with HSSI or E3T3STS1. Rx Data Rate N/A 10 bytes Example: RDI=11 (selects Inverted RX Data) Query Only. Composite Rx Data rate, in kbps. Resolution=1 bps. Example: RDR=002047.999 (which is 2047.999 kbps) A–23 CDM-710G High-Speed Satellite Modem Remote Control Parameter Type Redundancy State Command (Instruction Code and Qualifier) RED= Revision 1 MN-CDM710G Arguments for Command or Description of Arguments Response to Query 1 byte, value of Command or Query. 0 or 1 Unit returns the redundancy state of the unit, where: 0 = Offline 1 = Online Response to Command RED= RED? RED* RED# Query (Instruction Code and Qualifier) RED? Response to Query RED=x (see description of arguments) *** This command can be used to force the unit offline, this is done by sending RED=0. This is only valid if redundancy mode is enabled. If redundancy is not enabled, then RED=0 will return an error. The unit cannot be forced online. *** If the unit is not in redundancy mode, then the unit will always be online. Restore Factory Defaults Rx Buffer Frame RFD= 0Bytes RFM= 3 bytes Example: RED=0 (force unit offline) Command Only Restore Modem to Factory Defaylts Command or Query. (G.703 Parameters) Rx Buffer Frame, where: s=Defines which interface slot ( 1 or 2 ) x=Rx Ternary Code, where: 0=None ( Valid for E3, T3, and STS-1 ) 1=G.751 (Valid for E3 ) 2=G.752 (Valid for T3 ) 3=G.753 (Valid for E3 ) 4=STS-1 (Valid for STS-1 ) RFD= RFD= N/A RFM= RFM? RFM* RFM# RFM?s RFM=sx (see description of arguments) RFO? RFO* RFO# RFO? RFO=sxxx.x RFQ= RFQ? RFQ* RFQ# RFQ? RFQ=xxxx.xxxx RFS? RFS # RFS? RFS =x Note: Command valid only with CDI-10-1l G.703 interface. Rx Frequency Offset N/A 5 bytes Rx Frequency RFQ= 9 bytes Rx Frame Size N/A 1 byte Example: RFM=11 (selects G.751 for slot #1, channel #1) Query only. Unit returns the value of the measured frequency offset of the carrier being demodulated. Values range from ± 0 to ± 100 kHz, 100 Hz resolution. Returns 999999 if the demodulator is unlocked. Example: RFO=+002.3 (which is + 2.3 kHz) Command or Query. Rx Frequency (in MHz) 52 to 88 MHz, and 104 to 176 MHz (70/140 Modulator) 950 to 1950 MHz (L-Band Modulator) Resolution=100Hz. Example: RFQ=0950.0000 Query Only. Rx Frame Size Long/Short selection, where: 0=Short, 1=Long Example: RFS =0 (which is Short Frame Size) *NOTE: This is automatically detected on demod acquisition, but if the unit is not locked, the query returns ‘x’. A–24 CDM-710G High-Speed Satellite Modem Remote Control Parameter Type Rx FEC Type Command (Instruction Code and Qualifier) N/A Rx Gold Code Sequence Index RGS= Rx Interface Enable RIE= Retrieve next 5 unread Stored Events N/A Rx Pilot On/Off N/A Revision 1 MN-CDM710G Arguments for Command or Description of Arguments Response to Query 1 byte Query Only. Rx FEC coding type, where: 1=LDPC ( FEC is dependent on the RX Mode Type. ) Example: RFT=1 (which is LDPC coding) 6 bytes Command or Query. Rx Gold Code Sequence Index: xxxxxx = Gold Code Sequence index ( 0 to 262141 ) Example: RGS=189063 2 bytes Command or Query. Interface Slot Enable/Disable, where: s=Defines which interface slot (1 or 2) x=Rx Interface Status, where: 0=Disabled 1=Enabled Example: RIE =11 (Enables receive interface) 75 bytes Query Only. Unit returns the oldest 5 Stored Events which have not yet been read over the remote control in the form: {CR}Sub-body{CR}Sub-body{CR}Subbody{CR}Sub-body{CR}Sub-body, where Sub-body= ABCddmmyyhhmmss, A being the fault/clear indicator. F=Fault C=Clear I=Info B being the fault type where: 1=Unit 2=Rx Traffic 3=Tx Traffic 4=Log C is Fault Code numbers, as in FLT? or Info Code, which is: 0=Power Off 1=Power On 2=Log Cleared 3=Global Config Change 4=Redundancy Config Change If there are less than 5 events to be retrieved, the remaining positions are padded with zeros. If there are no new events, the response is RNE*. 1 byte Query. Rx Pilot On/Off selection, where: 0=Off, 1=On Example: RPI=0 (which is Pilot Off) *NOTE: This is automatically detected on demod acquisition, but if the unit is not locked, the query returns ‘x’. A–25 Query (Instruction Code and Qualifier) RFT? RFT=x RGS= RGS? RGS* RGS# RGS? RGS=xxxxxx RIE= RIE? RIE* RIE# RIE?s RIE=sx RNE? RNE* RNE# RNE? RNE={CR}ABCddmmyyh hmmss{CR}ABCddmmyy hhmmss{CR}ABCddmm yyhhmmss{CR}ABCddm myyhhmmss {CR}ABCddmmyyhhmm ss RPI? RPI* RPI# RPI? RPI=x Response to Command RFT? RFT* RFT# Response to Query CDM-710G High-Speed Satellite Modem Remote Control Parameter Type Rx Signal Level Command (Instruction Code and Qualifier) N/A Rx Demod Acquisition Sweep Width RSW= Gigabit Auto Autocrossover SCX Gigabit Learning Mode SLM Serial Number N/A Software Revision N/A Real-time Clock Time TIM= Tx Line Code TLC= Revision 1 MN-CDM710G Arguments for Command or Description of Arguments Response to Query 3 bytes Query Only. Unit returns the value of the Rx signal level, in dBm, between +3.0 and – 99.0 dBm, where; xxx is the Rx signal level. Examples: RSL=+03 RSL=-41 3 bytes Command or Query. Rx ± acquisition sweep range of demodulator, in kHz, ranging from ± 1 to ± 100 kHz. Example: RSW=009 (selects ± 9 kHz) 2 bytes Command or Query. s=Slot2 Only a= 1 GBEI Cable Auto Crossover Enabled. a=0 GBEI Cable Auto Crossover Disabled 2 bytes Command or Query. s=Slot2 Only a= 1 GBEI Learning Enabled. a=0 GBEI Learning Disabled 9 bytes Query Only. Used to query the unit 9-digit serial number. Unit returns its S/N in the form xxxxxxxxx. Example: SNO=176500143 5 bytes Query Only. Unit returns the value of the internal software revision installed in the unit, in the form: Boot:X.X.X Bulk1:Y.Y.Y Bulk2: Z.Z.Z Example: SWR=Boot:1.0.3 Bulk1:1.0.1 Bulk2:1.0.0 6 bytes Command or Query. A time in the form hhmmss, indicating the time from midnight, where: hh = hours (00 to 23) mm = minutes (00 to 59) ss = seconds (00 to 59) Example: TIM=231259 (23 hours:12 minutes:59 seconds) 2 bytes Command or Query. (G.703 Parameters) Tx Line Code, where: s=Defines which interface slot ( 1 or 2 ) x=Defines Tx Line Code, where: 0=None ( Valid for E3, T3, and STS-1 ) 1=HDB3 (Valid for E3 ) 2=B3ZS ( Valid for T3 and STS-1) Note: Command valid only with CDI-10-1Single G.703 interface Example: TLC=11 (sets Line Code to HDB3 for interface 1 channel 1) A–26 Response to Command RSL? RSL* RSL# Query (Instruction Code and Qualifier) RSL? Response to Query RSL=xxx RSW= RSW? RSW* RSW# RSW? RSW=xxx (see description of arguments) SCX= SCX# SCX? SCX* SLM= SLM# SLM? SLM* SNO? SNO* SNO# SCX?s SCX=a SLM?s SLM=a SNO? SNO=xxxxxxxxx SWR? SWR* SWR# SWR? SWR=Boot:X.X.X Bulk1:Y.Y.Y Bulk2:Z.Z.Z TIM= TIM? TIM* TIM# TIM? TIM=hhmmss TLC= TLC? TLC* TLC# TLC?s TLC=sx (see description of arguments) CDM-710G High-Speed Satellite Modem Remote Control Command (Instruction Code and Qualifier) N/A Parameter Type Temperature A.6.3 Revision 1 MN-CDM710G Arguments for Command or Description of Arguments Response to Query 3 bytes Query Only. Unit returns the value of the internal temperature, in the form of sxxx (degrees C). Where s is the sign and and xxx is the number of degrees. Example: TMP=+026 Response to Command TMP? TMP* TMP# Query (Instruction Code and Qualifier) TMP? Response to Query TMP=sxxx Modem Priority System = (Highest priority) TMD, TCR, and (Lowest Priority) TSR. Any change to a higher priority parameter can override any of the parameters of lower priority. Command (Instruction Code and Qualifier) TMD= Arguments for Command or Response to Query 1 byte Tx FEC Code Rate TCR= 1 byte Tx Symbol Rate TSR= 9 bytes Parameter Type Tx Modulation Type Description of Arguments Query (Instruction Code and Qualifier) TMD? TMD=x TCR= TCR? TCR* TCR# TCR? TCR=x TSR= TSR? TSR* TSR# TSR? TSR=ss.ssssss Response to Command TMD= TMD? TMD* TMD# Command or Query. Tx Modulation type, where: 0=QPSK 1=8PSK 2=Reserved 3=16APSK 4=32APSK Example: TMD=1 (which is 8PSK) Command or Query. Tx Code Rate, where: 0 = Rate 3/4 1 = Reserved 2 = Rate 3/5 3 = Rate 4/5 4 = Rate 5/6 5 = Rate 8/9 6 = Rate 9/10 7 = Rate 2/3 8 = Rate 1/2 Example: TCR=0 (which is Rate 3/4) Command or Query. Tx Symbol Rate, where: s=Symbol Rate in Msps Example: TSR=20.000000 (20 Msps.) A–27 Response to Query CDM-710G High-Speed Satellite Modem Remote Control Command (Instruction Code and Qualifier) N/A Arguments for Command or Response to Query 3 bytes Interface Reference Clock EFI= 2 bytes E3/T3/STS1 Mode Select ETS= 2 bytes Gigabit Interface Management MAC Address GMC? N/A Gigabit Interface Software Revision GSW? N/A Parameter Type Buffer Fill State Revision 1 MN-CDM710G Description of Arguments Query only. s=Defines which interface slot ( 1 or 2 ) xx = value of the buffer fill state, between 1 to 99%. Returns 00 if demodulator is unlocked. Note: Command not valid for GbEI. Example: BFS=133 (which is 33%, on interface slot 1 channel 1) Command or Query. s=Defines which interface slot (1 or 2) x=EXT CLK (Data Rate Accuracy), where: 0 = 1 MHz 1 = 2 MHz 2 = 2.048 MHz 3 = 5 MHz 4 = 10 MHz 5 = 20 MHz 6 = 34.368 MHz 7 = 44.736 MHz 8 = 51.840 MHz Note: Command valid only with CDI-10-1 G.703 interface. Example: EFI=14 (Selects 10MHz on slot 1) Command or Query. Sets the E3/T3/STS1 interface card mode, where: s=Interface Slot (1 or 2) ) m=Mode 0=E3 1=T3 2=STS1 Note: Command valid only with CDI-10-1 G.703 interface. This sets the selected G.703 data rate. The unit will adjust the symbol rate based on modulation type and code rate to keep the selected data rate. Example: ETS=11 (sets Interface 1, Port 1 to T3 mode) Query Only. s= Slot 2 Only Example: To get MAC address for Gigabit in Slot 2 GMC?2 GMC=2;00-06-B0-00-47-17 Query Only. s= Slot 2 Only Example: To get Software Revision for Gigabit in Slot 2 GSW?2 GSW=2 FW/12738-,1.1.8,02/16/07 A–28 Response to Command N/A Query (Instruction Code and Qualifier) BFS?s Response to Query BFS=sxx EFI= EFI? EFI* EFI# EFI?s EFI=sx (see description of arguments) ETS= ETS? ETS# ETS* ETS?s ETS=sm GMC? GMC* GMC# GMC?s Gigabit Interface Management MAC Address GSW? GSW* GSW# GSW?s Gigabit Interface Software Revision CDM-710G High-Speed Satellite Modem Remote Control Command (Instruction Code and Qualifier) IMP= Arguments for Command or Response to Query 1 byte RBS= 5 bytes ReCenter Buffer RCB= 2 bytes Rx Clock Source RCK= 2 bytes Rx Buffer Frame RFM= 2 bytes Parameter Type Tx Output Impendance Rx Buffer Size Revision 1 MN-CDM710G Description of Arguments Command or Query. Tx output impedance, where: 0=50 Ohm 1=75 Ohm Example: IMP=0 (Set impedance to 50 Ohms) * NOTE: Setting Tx Impedence is only possible on 70/140 Mhz units. Command or Query. Rx Buffer Size (in milliseconds), where: s=Defines which interface slot ( 1 or 2 ) xx.x= Rx Buffer Size, HSSI = 5.0 to 32.0 ms, in 0.1 ms steps E3T3STS1 E3 mode = 0.5 to 61.0 ms, in 0.5 ms steps T3 mode = 0.5 to 44.0 ms, in 0.5 ms steps STS1 mode = 0.5 to 40.0 ms, in 0.5 ms steps Note: Command not valid for GBEI. Example: RBS=130.0 (selects 30.0 ms on interface 1) Command only. Forces the software to recenter the receive Plesiochronous/Doppler buffer. s=Defines which interface slot ( 1 or 2 ) Example: RCB=11 (ReCenter buffer on interface 1 channel 1) Note: Command not valid for GBEI. Command or Query. Rx Clock Source (For Data Rate Accuracy), where: s=Defines which interface slot ( 1 or 2 ) x=Rx Clock Source, where: 0=Rx Satellite 1=Tx-Terrestrial 2=External Reference Clock 3=Internal (HSSI Only) Example: RCK=11 (selects Tx-Terrestrial) Command or Query. (G.703 Parameters) Rx Buffer Frame, where: s=Defines which interface slot ( 1 or 2 ) x=Rx Ternary Code, where: 0=None ( Valid for E3, T3, and STS-1 ) 1=G.751 (Valid for E3 ) 2=G.752 (Valid for T3 ) 3=G.753 (Valid for E3 ) 4=STS-1 (Valid for STS-1 ) Note: Command valid only with CDI-10-1G.703 interface. Example: RFM=11 (selects G.751 for slot #1, channel #1) A–29 Response to Command IMP= IMP? IMP* IMP# Query (Instruction Code and Qualifier) IMP? Response to Query IMP=x RBS= RBS? RBS* RBS# RBS?s RBS=sxx.x (see description of arguments) RCB= RCB? RCB* RCB# N/A N/A RCK= RCK? RCK* RCK# RCK?s RCK=sx (see description of arguments) RFM= RFM? RFM* RFM# RFM?s RFM=sx (see description of arguments) CDM-710G High-Speed Satellite Modem Remote Control Command (Instruction Code and Qualifier) TAR= Arguments for Command or Response to Query 1 byte Tx Clock Invert TCI= 2 bytes Tx Data Invert TDI= 2 bytes Tx Data Rate N/A 10 bytes Tx Frequency TFQ= 9 bytes Tx Frame Size TFS= 1 byte Parameter Type Tx Alpha Rolloff Revision 1 MN-CDM710G Description of Arguments Command or Query. Tx Alpha Rolloff, where: 0 = 20% 1 = 25% 2 = 35% Example: TAR=0 (which is a Tx Alpha Rolloff of 20%) Command or Query. Invert Transmit Clock, where: s=Defines which interface slot ( 1 or 2 ) x=Invert Transmit Clock, where: 0=Normal 1=Inverted Note: Command valid with HSSI. Example: TCI = 11 (selects Inverted TX Clock, Slot 1) Command or Query. Invert Transmit Data, where: s=Defines which interface slot ( 1 or 2 ) x=Invert Transmit Data, where: 0=Normal 1=Inverted Note: Command valid with HSSI or E3T3STS1. Example: TDI = 11 (selects Inverted TX Data) Query Only. Composite Tx Data rate, in kbps. Resolution=1 bps. Example: TDR=002047.999 (which is 2047.999 kbps) Command or Query. Tx Frequency (in MHz) 52 to 88 MHz, and 104 to 176 MHz (70/140 Modulator) 950 to 1950 MHz (L-Band Modulator) Resolution=100Hz. Example: TFQ=0950.0000 Command or Query. Tx Frame Size Long/Short selection, where: 0=Short, 1=Long Example: TFS =0 (which is Short FEC Frame Size) A–30 Response to Command TAR= TAR? TAR* TAR# Query (Instruction Code and Qualifier) TAR? Response to Query TAR=x TCI = TCI? TCI * TCI # TCI?s TCI =sx (see description of arguments) TDI = TDI? TDI * TDI # TDI?sc TDI =sx (see description of arguments) TDR? TDR* TDR# TDR? TDR=xxxxxx.xxx TFQ= TFQ? TFQ* TFQ# TFQ? TFQ=xxxx.xxxx TFS = TFS? TFS * TFS # TFS? TFS =x CDM-710G High-Speed Satellite Modem Remote Control Parameter Type Tx FEC Type Command (Instruction Code and Qualifier) N/A Arguments for Command or Response to Query 1 byte Tx Gold Code TGS= Sequence Index 6 bytes Tx Interface Enable TIE= 2 bytes Tx Location of Pilot TLP= 1 byte Tx Line Code TLC= 2 bytes Tx Pilot On/Off TPI= 1 byte Revision 1 MN-CDM710G Description of Arguments Query Only. Tx FEC coding type, where: 0=Viterbi + Reed-Solomon 1=LDPC ( FEC is dependent on the TX Mode Type. ) Example: TFT=1 (which is LDPC coding) Command or Query. Tx Gold Code Sequence Index, where: xxxxxx = Gold Code Sequence index ( 0 to 262141 ) Example: TGS=189063 Command or Query. Interface Slot Enable/Disable, where: s=Defines which interface slot (1 or 2) x=Tx Interface Status, where: 0=Disabled 1=Enabled Example: TIE =11 (Enables transmit interface) Command or Query. Tx Pilot On/Off selection, where: 0=average, 1=Peak Example: TLP=0 (which is Pilot Average) Command or Query. (G.703 Parameters) Tx Line Code, where: s=Defines which interface slot ( 1 or 2 ) x=Defines Tx Line Code, where: 0=None ( Valid for E3, T3, and STS-1 ) 1=HDB3 (Valid for E3 ) 2=B3ZS ( Valid for T3 and STS-1) Note: Command valid only with CDI-10-1 G.703 interface. Example: TLC=11 (sets Line Code to HDB3 for interface 1 channel 1) Command or Query. Tx Pilot On/Off selection, where: 0=Off, 1=On Example: TPI=0 (which is Pilot Off) A–31 Query (Instruction Code and Qualifier) TFT? TFT=x TGS= TGS? TGS* TGS# TIE= TIE? TIE* TIE# TGS? TGS=xxxxxx TIE?s TIE=sx TLP= TLP? TLP* TLP# TLP? TLP=x TLC= TLC? TLC* TLC# TLC?s TLC=sx (see description of arguments) TPI= TPI? TPI* TPI# TPI? TPI=x Response to Command TFT? TFT* TFT# Response to Query CDM-710G High-Speed Satellite Modem Remote Control Command (Instruction Code and Qualifier) TPL= Arguments for Command or Response to Query 5 bytes Tx Spectrum Invert TSI= 1 byte Tx Carrier State TXO= 1 byte Parameter Type Tx Power Level Revision 1 MN-CDM710G Description of Arguments Command or Query. Tx Output power level, where: s=sign ( + / - ) xx.x = Tx Output power level, +05.0 and –20.0 dBm. L-Band: -25.0 to –05.0 dBm 70/140 MHz: -20.0 to +00.0 dBm Note: Beyond –20 dBm is beyond the specification. Example: TPL = -13.4 Command or Query. Tx Spectrum Invert selection, where: 0=Normal 1=Tx Spectrum Inverted Example: TSI=0 (which is normal) Command or Query. Tx Carrier State, where: 0=OFF due to front panel or remote control command 1=ON Example: TXO=1 (Tx Carrier ON) A–32 Query (Instruction Code and Qualifier) TPL? TPL=sxx.x TSI= TSI? TSI* TSI# TSI? TSI=x TXO= TXO? TXO* TXO# TXO? TXO=x Response to Command TPL= TPL? TPL* TPL# Response to Query CDM-710G High-Speed Satellite Modem Remote Control Revision 1 MN-CDM710G A.6.4 Priority System Priority System = (Highest priority) RMD, RCR, and (Lowest Priority) RSR. Any change to a higher priority parameter can override any of the parameters of lower priority. Parameter Type Command (Instruction Code and Qualifier) Arguments for Command or Response to Query Rx Modulation Type N/A 1 byte Rx FEC Code Rate N/A 1 byte Rx Symbol Rate RSR= 9 bytes Enable/Disable Adaptive Equalizer AEQ= 1 byte Description of Arguments Query Only. Rx Modulation type, where: 0=QPSK 1=8PSK 2=Reserved 3=16APSK 4=32APSK Example: RMD=1 (which is 8PSK) Returns RMD=x if Demodulator unlocked. This is automatically detected on demod acquisition. Query Only. Rx Code Rate, where: 0 = Rate 3/4 1 = Reserved 2 = Rate 3/5 3 = Rate 4/5 4 = Rate 5/6 5 = Rate 8/9 6 = Rate 9/10 7 = Rate 2/3 8 = Rate 1/2 Example: RCR=0 (which is Rate 3/4) Returns RCR=x if Demodulator unlocked. This is automatically detected on demod acquisition. Command or Query. Rx Symbol Rate, where: s=Symbol Rate in Msps Example: RSR=20.000000 (20 Msps.) *NOTE: Please refer to Sect. 1.8 Summary of Specifications for available symbol rates for each modulation. Command or Query. Adaptive Equalizer status, where: 0=Disable 1=Enable Example: AEQ=1 (which is Enable) A–33 Response to Command Query (Instruction Code and Qualifier) Response to Query N/A RMD? RMD=x N/A RCR? RCR=x RSR= RSR? RSR* RSR# RSR? RSR=ss.ssssss AEQ= AEQ? AEQ* AEQ# AEQ? AEQ=x CDM-710G High-Speed Satellite Modem Remote Control Parameter Type Command (Instruction Code and Qualifier) Arguments for Command or Response to Query Clear All Stored Events CAE= None Circuit ID String CID= 24 bytes Configuration Load CLD= 1 byte Configuration Save CST= 1 byte Real-time Clock Date DAY= 6 bytes Demodulator Lock Status N/A 1 byte Eb/No Alarm Point EBA= 4 bytes Rx Eb/No N/A 4 bytes Revision 1 MN-CDM710G Description of Arguments Command Only. Forces the software to clear the software events log. Example: CAE= Note: This command takes no arguments Command or Query. Sets or queries the user-defined Circuit ID string, which is a fixed length of 24 characters. Valid characters include: Space ( ) * + – , . / 0 9 and A thru Z Command Only. Retrieves a previously stored configuration from the specified configuration location (0 to 9). Example: CLD=4 (retrieve modulator configuration from location 4) Command Only. Stores the current modulator configuration in the specified configuration location (0 to 9). Example: CST=4 (store the current configuration in location 4) Command or Query. A date in the form ddmmyy, where dd = day of the month (01 to 31), mm = month (01 to 12) yy = year (00 to 99) Example: DAY=240457 (April 24, 2057) Query Only. Demodulator Lock Status, where: 0 = Demodulator Unlocked 1 = Demodulator Locked Example: DLK=1 ( Demodulator Locked) Command or Query. Eb/No alarm point in dB, with a range between 0.1 and 16 dB. Resolution=0.1 dB Example: EBA=12.3 Query only. Unit returns the value of Eb/No, between 0 and 16 dB, resolution 0.1 dB. Returns 99.9 if demod is unlocked. Example: EBN=12.3 (which is Eb/No = 12.3 dB) For values greater than 16.0 dB, the reply will be: EBN=+016 A–34 Response to Command Query (Instruction Code and Qualifier) Response to Query CAE= CAE? CAE* CAE# N/A N/A CID= CID? CID* CID# CLD= CLD? CLD* CLD# CID? CID=xxxxxxxxxxxxxxxxxx xxxxxx N/A N/A CST= CST? CST* CST# N/A N/A DAY= DAY? DAY* DAY# DAY? DAY=ddmmyy DLK? DLK* DLK# DLK? DLK=x EBA= EBA? EBA* EBA# EBA? EBA=xx.x (see description of arguments) EBN? EBN* EBN# EBN? EBN=xxxx CDM-710G High-Speed Satellite Modem Remote Control Parameter Type Faults and Status Command (Instruction Code and Qualifier) N/A Arguments for Command or Response to Query 5 Bytes Revision 1 MN-CDM710G Description of Arguments Query Only. Unit returns the current fault and status codes for the Unit (hardware), Tx Traffic and Rx Traffic, in the form abcd, where: a = Unit Faults: 0=No faults 1=Framer FPGA Load 2=Power supply fault, +1.5 Volts, Framer Card 3=Power supply fault, +1.5 Volts, Interface #1 4=Power supply fault, +1.5 Volts, Interface #2 5=Power supply fault, +3.3 Volts, Framer Card 6=Power supply fault, +5.0 Volts, Framer Card 7=Power supply fault, +12.0 Volts, Framer Card 8=Power supply fault, -12.0 Volts, Framer Card 9=Power supply fauilt, +18.0 Volts, Framer Card A=FLASH Checksum B=FEC1 Load C=FEC2 Load D=Interface #1 Load E=Interface #2 Load F=192 MHz PLL G=External Reference H=Framer Card Temperature I=Modem Temperature J=Cooling Fans K=Interface #1 Removed L=Interface #2 Removed M=Reserved(Unit Factory Fault) N=Interface1 Wrong Type O=Interface2 Wrong Type b = Tx Traffic Status: 0=No faults 1= +1.5V Power Supply Unit (Modulator Card) 2= FPGA Failed to Load (Modulator Card) 3= Symbol Rate PLL Clock 4= Tx Synthesizer Unlocked 5= Tx Digital Clock Manager Unlocked 6= I & Q Baseband Channels are Inactive 7= FPGA Temperature (Modulator Card) 8= Reserved 9= TX Clock Failure (Interface 1) A= TX Clock Failure (Interface 2) B= GBEI Card Data rate > + 200 PPM C= GBEI Card Data rate < - 200 PPM D= GBEI No PHY Link A–35 Response to Command FLT? FLT* FLT# Query (Instruction Code and Qualifier) FLT? Response to Query FLT=abcde d=Change in fault status since last poll. Note: Each section has faults listed in order of priority. For each section, only the highest priority fault is returned. There maybe multiple faults for each section, but only the highest fault is returned. e=Configuration Change CDM-710G High-Speed Satellite Modem Remote Control Parameter Type Faults and Status (cont.) Command (Instruction Code and Qualifier) Arguments for Command or Response to Query Revision 1 MN-CDM710G Description of Arguments E= Encoder FIFO Empty F= Encoder FIFO Full G= SERDES Parity Errors H=Reserved.I=Tx Ais Interface 1 J=Tx Ais Interface 2 K=Tx Cable Interface 1 L=Tx Cable Interface 2 c=Rx Traffic Status 0=No faults 1=+1.5V Demod Power Supply Unit (Demodulator Card) 2=FPGA Load (Demodulator Card) 3=Demod Unlocked 4=FPGA Temperature (Demodulator Card) 5=Ber Limit excedded 6=AGC Level Out of Range 7=Eb/No Limit Exceeded 8=Demodulator Synth 1 PLL 9=Demodulator Synth 2 PLL A=SERDES Demod to Framer B=SERDES Framer to FEC1 C=SERDES Framer to FEC2 D=Reserved(Fast Options) E=Rx DCM Unlocked F=Slot 1 Buffer Underflow G=Slot 1 Buffer Overflow H Slot 2 Buffer Underflow I Slot 2 Buffer Overflow J=Framer SERDES Rx Fault (Interface 1) K=Framer SERDES Rx Fault (Interface 2) L=Rx Clock Source Slot 1 M=Rx Clock Source Slot 1 N=Reserved. O=Rx AIS Slot 1 Port1 P=RXAIS Slip Slot 2 Port1, Q=EXT Clock Slot1,R EXT Clock Slot2 d=New Faults 0=No new faults 1=New faults, since last check e=Configuration Change 0= No Configuration Change 1=Configuration Change (cleared when read) A–36 Response to Command Query (Instruction Code and Qualifier) Response to Query CDM-710G High-Speed Satellite Modem Remote Control Parameter Type Command (Instruction Code and Qualifier) Arguments for Command or Response to Query External Reference Frequency ERF= 1 byte Rx Es/No N/A 4 bytes Enable Redundancy Switch Mode ESW= 1 byte Firmware Revisions N/A 1 byte Gigabit Management IP Address and Subnet GIP= 19 bytes Initialize Events Pointer IEP= None Boot Image IMG= 1 byte Revision 1 MN-CDM710G Description of Arguments Command or Query. External Reference Frequency, where: 0=Internal 1=External 1 MHz 2=External 2 MHz 3=External 5 MHz 4=External 10 MHz 5=External 20 MHz Example: ERF=0 (External reference not used - uses internal) Query only. Unit returns the value of EsNo (when in DVB-S2 mode), between 0 and 16 dB, resolution 0.1 dB. Returns 99.9 if demod is unlocked. Example: ESN=12.3 (which is Es/No = 12.3 dB) For values greater than 22.0 dB, the reply will be: ESN=+022 Command or Query. Set redundancy mode, where : 0 = Disable 1 = Enable Example: ESW=1 (Enable redundancy mode) Query Only. Query the version information of the system. Where: i = Bulk Image number (1 or 2) a = Firmware Image b = Firmware Revision c = Firmware Date Example: FRW?1 Command or Query. Gigabit Management IP address and subnet mask. s=Slot 2 Only i=IP Address n=Netmask Command Only. Resets internal pointer to allow RNE? queries to start at the beginning of the stored events log. Command or Query. Boot image selection, where n is the image number: 1=Image #1 2=Image #2 Example: IMG=1 (Selects Image #1 for booting.) A–37 Response to Command Query (Instruction Code and Qualifier) Response to Query ERF= ERF? ERF* ERF# ERF? ERF=x ESN? ESN* ESN# ESN? ESN=xxxx ESW= ESW? ESW* ESW# ESW? ESW=x FRW? FRW* FRW# FRW?i FRW={CR}Boot:{CR}a,b, c{CR}Bulki:{CR}a,b,c{CR }a,b,c… GIP= GIP# GIP? GIP* GIP?s GIP=siii.iii.iii.iii.nn IEP= IEP? IEP* IEP# IMG= IMG? IMG* IMG# N/A N/A IMG? IMG=n CDM-710G High-Speed Satellite Modem Remote Control Parameter Type Command (Instruction Code and Qualifier) Arguments for Command or Response to Query IP Address IPA= 18 bytes Gateway Address IPG= 15 bytes Interface Type N/A 2 bytes Rx Link Margin N/A 4 bytes Local/Remote Status LRS= 1 byte Unit MAC Address N/A 12 bytes Revision 1 MN-CDM710G Description of Arguments Command or Query. Used to set the IP address and network prefix for the 10/100 BaseTx Ethernet management port, in the format: xxx.xxx.xxx.xxx.yy, where: xxx.xxx.xxx.xxx is the IP address, and yy is the network prefix (00..31) Example: IPA=010.006.030.001.24 Command or Query. Used to set the Gateway IP addess for the 10/100 Base Tx Ethernet management port, in the format: xxx.xxx.xxx.xxx, where: xxx.xxx.xxx.xxx is the IP address Example: IPG = 010.006.030.001 Query Only. Interface Type, where: s=Defines which interface slot (1 or 2) x=Defines the interface type, where: 0=Reserved 1= Reserved 2= Gigabit Ethernet 3= HSSI 4= E3T3STS1 Example: ITF?1 Query only. Unit returns the value of the Link Margin. Returns 00.0 if demod is unlocked. Example: LNK=12.3 Command or Query. Local/Remote status, where: 0=Local 1=Serial 2=Reserved 3=Ethernet Example: LRS=1 (which is remote Serial) Query Only. MAC address of the unit, reported in hexadecimal. Example: MAC=0006B000D2A7 (The MAC address of the unit is 00:06:B0:00:D2:A7 ) A–38 Response to Command Query (Instruction Code and Qualifier) Response to Query IPA= IPA? IPA* IPA# IPA? IPA= xxx.xxx.xxx.xxx.yy IPG= IPG? IPG* IPG# IPG? IPG = xxx.xxx.xxx.xxx ITF? ITF* ITF# ITF?s ITF=sx LNK? LNK* LNK# LNK? LNK=xxxx LRS= LRS? LRS* LRS# LRS? LRS=x MAC? MAC* MAC# MAC? MAC=AABBCCDDEEFF CDM-710G High-Speed Satellite Modem Remote Control Parameter Type Command (Instruction Code and Qualifier) Arguments for Command or Response to Query Number of Unread stored Events N/A 3 bytes Rx Alpha Rolloff RAR= 1 byte Rx Buffer Size RBS= 5 bytes Soft Reboot RBT=1 1 byte Rx Clock Invert RCI= 2 bytes Rx Data Invert RDI= 2 bytes Revision 1 MN-CDM710G Description of Arguments Query Only. Unit returns the Number of stored Events, which remain Unread, in the form xxx. Note: This means unread over the remote control. Example: NUE=126 Command or Query. Rx Alpha Rolloff, where: 0 = 20% 1 = 25% 2 = 35% Example: RAR=0 (which is a Rx Alpha Rolloff of 20%) Command or Query. Rx Buffer Size (in milliseconds), where: s=Defines which interface slot ( 1 or 2 ) xx.x= Rx Buffer Size, HSSI = 5.0 to 32.0 ms, in 0.1 ms steps GBEI = N/A E3T3STS1= .5 TO 64 MS IN.5MS STEPS Example: RBS=130.0 (selects 30.0 ms on interface 1) Command Only. Soft Reboot. 1= Reboot System Command or Query. Invert Receive Clock, where: s=Defines which interface slot ( 1 or 2 ) x=Invert Receive Clock, where: 0=Normal 1=Inverted Note: Command valid only with HSSI. Example: RCI = 11 (selects Inverted RX Clock, Slot 1) Command or Query. Invert Receive Data, where: s=Defines which interface slot ( 1 ) x=Invert Receive Data, where: 0=Normal 1=Inverted Note: Command valid with HSSI or E3T3STS1. A–39 Response to Command Query (Instruction Code and Qualifier) Response to Query NUE? NUE* NUE# NUE? NUE=xxx RAR= RAR? RAR* RAR# RAR? RAR=x RBS= RBS? RBS* RBS# RBS?s RBS=sxx.x (see description of arguments) RBT= RBT? RBT* RBT# RCI = RCI? RCI * RCI # N/A RBT=x RCI?s RCI =sx (see description of arguments) RDI = RDI? RDI* RDI# RDI?sc RDI =sx (see description of arguments) CDM-710G High-Speed Satellite Modem Remote Control Parameter Type Command (Instruction Code and Qualifier) Arguments for Command or Response to Query Rx Data Rate N/A 10 bytes Redundancy State RED= 1 byte Revision 1 MN-CDM710G Description of Arguments Query Only. Composite Rx Data rate, in kbps. Resolution=1 bps. Example: RDR=002047.999 (which is 2047.999 kbps) Command or Query. Unit returns the redundancy state of the unit, where: 0 = Offline 1 = Online Response to Command Query (Instruction Code and Qualifier) Response to Query RDR? RDR* RDR# RDR? RDR=xxxxxx.xxx RED= RED? RED* RED# RED? RED=x (see description of arguments) RFO? RFO* RFO# RFO? RFO=sxxx.x RFQ= RFQ? RFQ* RFQ# RFQ? RFQ=xxxx.xxxx N/A RFS? RFS =x RFT? RFT* RFT# RFT? RFT=x *** This command can be used to force the unit offline, this is done by sending RED=0. This is only valid if redundancy mode is enabled. If redundancy is not enabled, then RED=0 will return an error. The unit cannot be forced online. *** If the unit is not in redundancy mode, then the unit will always be online. Rx Frequency Offset N/A 5 bytes Rx Frequency RFQ= 9 bytes Rx Frame Size N/A 1 byte Rx FEC Type N/A 1 byte Example: RED=0 (force unit offline) Query only. Unit returns the value of the measured frequency offset of the carrier being demodulated. Values range from ± 0 to ± 100 kHz, 100 Hz resolution. Returns 999999 if the demodulator is unlocked. Example: RFO=+002.3 (which is + 2.3 kHz) Command or Query. Rx Frequency (in MHz) 52 to 88 MHz, and 104 to 176 MHz (70/140 Modulator) 950 to 1950 MHz (L-Band Modulator) Resolution=100Hz. Example: RFQ=0950.0000 Query Only. Rx Frame Size Long/Short selection, where: 0=Short, 1=Long Example: RFS =0 (which is Short FEC Frame Size) Returns RFS=x if Demodulator unlocked. This is automatically detected on demod acquisition. Query Only. Rx FEC coding type, where: 1=LDPC ( FEC is dependent on the RX Mode Type.) Example: RFT=1 (which is LDPC coding) A–40 CDM-710G High-Speed Satellite Modem Remote Control Parameter Type Command (Instruction Code and Qualifier) Arguments for Command or Response to Query Rx Gold Code Sequence Index RGS= 6 bytes Rx Interface Enable RIE= 2 bytes Retrieve next 5 unread Stored Events N/A 75 bytes Rx Pilot On/Off N/A 1 byte Revision 1 MN-CDM710G Description of Arguments Command or Query. Rx Gold Code Sequence Index: xxxxxx = Gold Code Sequence index ( 0 to 262141 ) Example: RGS=189063 Command or Query. Interface Slot Enable/Disable, where: s=Defines which interface slot (1 or 2) x=Rx Interface Status, where: 0=Disabled 1=Enabled Example: RIE =11 (Enables receive interface) Query Only. Unit returns the oldest 5 Stored Events which have not yet been read over the remote control in the form: {CR}Sub-body{CR}Sub-body{CR}Subbody{CR}Sub-body{CR}Sub-body, where Sub-body= ABCddmmyyhhmmss: A being the fault/clear indicator. F=Fault C=Clear I=Info B being the fault type where: 1=Unit 2=Rx Traffic 3=Tx Traffic 4=Log C is Fault Code numbers, as in FLT? or Info Code, which is: 0=Power Off 1=Power On 2=Log Cleared 3=Global Config Change 4=Redundancy Config Change If there are less than 5 events to be retrieved, the remaining positions are padded with zeros. If there are no new events, the response is RNE*. QueryOnly . Rx Pilot On/Off selection, where: 0=Off, 1=On Example: RPI=0 (which is Pilot Off) Returns RPI=x if Demodulator unlocked. This is automatically detected on demod acquisition. A–41 Response to Command Query (Instruction Code and Qualifier) Response to Query RGS= RGS? RGS* RGS# RGS? RGS=xxxxxx RIE= RIE? RIE* RIE# RIE?s RIE=sx RNE? RNE* RNE# RNE? RNE={CR}ABCddmmyyh hmmss{CR}ABCddmmyy hhmmss{CR}ABCddmmy yhhmmss{CR}ABCddmm yyhhmmss {CR}ABCddmmyyhhmms s N/A RPI? RPI=x CDM-710G High-Speed Satellite Modem Remote Control Parameter Type Command (Instruction Code and Qualifier) Arguments for Command or Response to Query Rx Signal Level N/A 3 bytes Rx Demod Acquisition Sweep Width RSW= 3 bytes Gigabit Learning SLM Mode 2 bytes Gigabit Auto Autocrossover SCX 2 bytes Serial Number N/A 9 bytes Software Revision N/A 5 bytes Real-time Clock Time TIM= 6 bytes Temperature N/A 3 bytes Revision 1 MN-CDM710G Description of Arguments Query Only. Unit returns the value of the Rx signal level, in dBm, between +3.0 and – 99.0 dBm, where; xxx is the Rx signal level. Examples: RSL=+03 RSL=-41 Command or Query. Rx ± acquisition sweep range of demodulator, in kHz, ranging from ± 1 to ± 100 kHz. Example: RSW=009 (selects ± 9 kHz) Command or Query. s=Slot 2 Only a=1 GBEI Learning Enabled. a=0 GBEI Learning Disabled Command or Query. s=Slot 2 Only a=1 GBEI Cable Auto Crossover Enabled. a=0 GBEI Cable Auto Crossover Disabled Query Only. Used to query the unit 9-digit serial number. Unit returns its S/N in the form xxxxxxxxx. Example: SNO=176500143 Query Only. Unit returns the value of the internal software revision installed in the unit, in the form: Boot:X.X.X Bulk1:Y.Y.Y Bulk2: Z.Z.Z Example: SWR=Boot:1.0.3 Bulk1:1.0.1 Bulk2:1.0.0 Command or Query. A time in the form hhmmss, indicating the time from midnight, where: hh = hours (00 to 23) mm = minutes (00 to 59) ss = seconds (00 to 59) Example: TIM=231259 (23 hours:12 minutes:59 seconds) Query Only. Unit returns the value of the internal temperature, in the form of sxxx (degrees C). Where s is the sign and and xxx is the number of degrees. Example: TMP=+026 A–42 Response to Command Query (Instruction Code and Qualifier) Response to Query RSL? RSL* RSL# RSL? RSL=xxx RSW= RSW? RSW* RSW# RSW? RSW=xxx (see description of arguments) SLM= SLM# SLM? SLM* SCX= SCX# SCX? SCX* SNO? SNO* SNO# SLM?s SLM=a SCX?s SCX=a SNO? SNO=xxxxxxxxx SWR? SWR* SWR# SWR? SWR=Boot:X.X.X Bulk1:Y.Y.Y Bulk2:Z.Z.Z TIM= TIM? TIM* TIM# TIM? TIM=hhmmss TMP? TMP* TMP# TMP? TMP=sxxx CDM-710G High-Speed Satellite Modem Remote Control Parameter Type Unit Test Mode Command (Instruction Code and Qualifier) TST= Arguments for Command or Response to Query 1 byte Revision 1 MN-CDM710G Description of Arguments Response to Command TST= TST? TST* TST# Command or Query. Test Mode, where: 0=Normal Mode (no test) 1=IF Loop 2=I/O Loop 3=RF Loop 4=Tx CW 5=Tx Alternating 1,0 Pattern Example: TST=4 (Tx CW) A–43 Query (Instruction Code and Qualifier) TST? Response to Query TST=x CDM-710G High-Speed Satellite Modem Remote Control Revision 1 MN-CDM710G A.6.5 Modem Global Configuration (MGC) Command The MGC command can be used to configure the whole modem or parts of the modem. This command also contains spare bytes for future development, but the length of the command is fixed to 255 bytes. The MGC command can be used on modulator-only units, demodulator-only units, and modem units. A.6.5.1 MGC Format The format for the response to the MGC command/query is as follows: MGC=TRUSI[Tx Block][Rx Block][Unit Block][Interface Block]. For a query, the first 5 bytes indicates whether the corresponding block is present in the response: T – ‘T’ if transmit block is present in the response, ‘0’ means the block is not present and ‘x’s are returned. R – ‘R’ if receive block is present in the response, ‘0’ means the block is not present and ‘x’s are returned. U – ‘U’ if unit block is present in the response, ‘0’ means the block is not present and ‘x’s are returned. S – Indicates which interface slot is enabled. ‘1’ indicates that slot 1 is enabled. ‘2’ indicates that slot 2 is enabled. I – Indicates the interface type for the interface block. ‘4’ indicates G.703, ‘2’ indicates Gigabit Ethernet interface, ‘3’ indicates HSSI. For a set command, the first 5 bytes indicates whether the corresponding block should be reprogrammed: T – ‘T’ if transmit configuration should be changed, ‘0’ means the Tx configuration should be skipped over. R – ‘R’ if receive configuration should be changed, ‘0’ means the Rx configuration should be skipped over. U – ‘U’ if unit configuration should be changed, ‘0’ means the unit configuration should be skipped over. S – Indicates which slot should be enabled. ‘1’ indicates that slot 1 should be enabled. ‘2’ indicates that slot 2 should be enabled. I – Indicates the interface type for the interface block. ‘4’ indicates G.703, ‘2’ indicates Gigabit Ethernet interface, ‘3’ indicates HSSI. MGC HSSI Example: <0000/MGC=TRU111250.0000101.0000001070-10.0101000000001xxxxxxxxxx1250.0000101.00 0000107010101000000002.01xxxxxxxxxx00000xxxxxxxxxxxxxxx0000321.1xxxxxxxxxxxxxxxx xxxxxxxxxxxxxxxxxxxxxxxxxxxxxxxxxxxxxxxxxxxxxxxxxxxxxxxxxxxxxxxxxxxxxxxxxxxxxxxx xxxxxxxxxxxxxxxxxxxxxxxxx A–44 CDM-710G High-Speed Satellite Modem Remote Control Revision 1 MN-CDM710G [Tx Block] consists of 50 bytes for Transmit configuration. The format is: aaaa.aaaabcc.ccccccdefghhh.hijklmmmmmmnoxxxxxxxxxx aaaa.aaaa = Tx Frequency (in MHz) b = Tx Mode cc.cccccc = Tx Symbol Rate d = Tx FEC Type e = Tx Modulation type f = Tx FEC Rate g = Tx Spectrum Inversion hhh.h = Tx Power Level i = Tx Carrier State j = Tx Alpha Roll-off k = Tx Frame Size l = Tx Pilots mmmmmm = Tx Gold Code Sequence n = Tx Location of Pilot o = Tx Transport Stream xxxxxxxxxx = Spare bytes. same as TFQ (read-only) same as TSR same as TFT (read-only) same as TMD same as TCR same as TSI same as TPL same as TXO same as TAR same as TFS same as TPI same as TGS same as TLP (read-only) [Rx Block] consists of 50 bytes for Receive configuration. The format is: aaaa.aaaabcc.ccccccdefggghijkllllllmm.mnopxxxxxxxx aaaa.aaaa = Rx Frequency (in MHz) b = Rx Mode cc.cccccc = Rx Symbol Rate d = Rx FEC Type e = Rx Modulation Type f = Rx FEC Rate ggg = Rx Sweep Width h = Rx Adaptive Equalizer i = Rx Alpha Roll-off j = Rx Frame Size k = Rx Pilots llllll = Rx Gold Code Sequence mm.m = Rx EbNo Alarm Point n = Rx Transport Stream o=Rx PLL p=Ber Threshold xxxxxxxx = Spare bytes. same as RFQ (read-only) same as RSR same as RFT (read-only) same as RMD (read-only) same as RCR (read-only) same as RSW same as AEQ same as RAR same as RFS (read-only) same as RPI (read-only) same as RGS same as EBA (read-only) same as RPL same as BTH A–45 CDM-710G High-Speed Satellite Modem Remote Control Revision 1 MN-CDM710G [Unit Block] consists of 20 bytes for Unit Configuration. The format is: ab ccccccccccccccccdx a = Test Mode b = Reserved cccccccccccccccc = Alarm Mask d = External Reference Frequency x = Spare bytes. same as TST same as MSK same as ERF [Interface Block] consists of 130 bytes and contains the configuration of the current enabled interface on the unit. The format of the configuration bytes depend on the interface type indicated by the 5th byte in the MGC query or command. If E3T3STS1 interface, then format is: abcdeff.fx…xxx a = Tx Data Inversion b = Rx Data Inversion c = Rx Clock Source dd.d = Rx Buffer Size f= ET3STS1 Type e = E3T3STS1 Rx FRAME g= E3T3STS1 Tx Line Code h=E3T3STS1 External Ref same as TDI (omit interface slot parameter) same as RDI (omit interface slot parameter) same as RCK (omit interface slot parameter) same as RBS (omit interface slot parameter) same as ETS (omit interface slot parameter) same as RFM (omit interface slot parameter) same as TLC (omit interface slot parameter) same as EFI (omit interface slot parameter) If Gigabit Ethernet interface then format is: ab…xxxx a=autocrossover b=learning If HSSI interface, then format is: abcdeff.fx…xxx a = Tx Data Inversion b = Rx Data Inversion c = Tx Clock Inversion d = Rx Clock Inversion e = Rx Clock Source ff.f = Rx Buffer Size x…xxx = spare bytes same as TDI same as RDI same as TCI same as RCI same as RCK same as RBS (omit interface slot parameter) (omit interface slot parameter) (omit interface slot parameter) (omit interface slot parameter) (omit interface slot parameter) (omit interface slot parameter) A–46 Appendix B. Eb/No MEASUREMENT Although the CDM-710G calculates and displays the value of receive Eb/No on the front panel of the unit, it is sometimes useful to measure the value using a spectrum analyzer, if one is available. The idea is to accurately measure the value of (Co+No)/No, (Carrier density + Noise density/Noise density). This is accomplished by tuning the center frequency of the Spectrum analyzer to the signal of interest, and measuring the difference between the peak spectral density of the signal (the flat part of the spectrum shown) and the noise density. To make this measurement: • Use a vertical scale of 1 or 2 dB/division. • Set the Resolution Bandwidth of the Spectrum Analyzer to < 20 % of the symbol rate. • Use video filtering and/or video averaging to reduce the variance in the displayed trace to a low enough level that the difference can be measured to within 0.2dB. • Place a marker on the flat part of the signal of interest, then use the MARKER DELTA function to put a second marker on the noise to the side of the carrier. This value is (Co+No)/No, in dB. • Use this value of (Co+No)/No in the table on the following page to determine the Eb/No. You will need to know the operating mode to read from the appropriate column. • If the (Co+No)/No value measured does not correspond to an exact table entry, interpolate using the two nearest values. Note that the accuracy of this method degrades significantly at low values of (Co+No)/No (approximately less than 6 dB). B–1 CDM-710G High-Speed Satellite Modem Eb/No Measurement Revision 1 MN-CDM710G Example: In the diagram that follows, the (Co+No)/No measured is 4.6 dB. If Rate 1/2 QPSK is used, this corresponds to an Eb/No of approximately 2.8 dB (DVB-S2). The relationship used to derive the table values is as follows (only simple way for DVB-S2): Eb/No = 10 log10 (10 (Co+No/No )/10) -1) – 10 log10 (Spectral Efficiency) and: • Eb/No and (Co+No)/No are expressed in dB; • Spectral Efficiency includes the modulation type, code rate, overhead and framing and is shown in Tables B-1 and B-2. B–2 CDM-710G High-Speed Satellite Modem Eb/No Measurement Revision 1 MN-CDM710G Table B-1. CDM-710G Co+No/No to C/N (Es/No) and Eb/No (dB) for DVB-S2 QPSK and 8PSK (DVB-S2 uses C/N (Es/No), and Eb/No is shown for information) Code Rate QPSK 8PSK 0.490243 0.656448 0.789412 0.988858 1.188304 1.322253 1.487473 1.587196 1.654663 1.766451 1/4 1/3 2/5 1/2 3/5 2/3 3/4 4/5 5/6 8/9 C/N = Es/No Eb/No Eb/No Eb/No Eb/No Eb/No Eb/No Eb/No Eb/No Eb/No Eb/No 2.0 -2.3 0.8 -0.5 -1.3 -2.3 -3.1 -3.5 -4.1 -4.3 -4.5 2.5 -1.1 2.0 0.7 -0.1 -1.0 -1.8 -2.3 -2.8 -3.1 -3.3 3.0 0.0 3.1 1.8 1.0 0.0 -0.8 -1.2 -1.7 -2.0 -2.2 Spectral Efficiency (Co+No)/No 1.788612 1.779991 1.980636 2.228124 2.478562 2.646012 3/5 2/3 3/4 5/6 8/9 Eb/No Eb/No Eb/No Eb/No Eb/No Eb/No Eb/No -4.8 -4.9 -4.8 -5.3 -5.8 -6.3 -6.6 -6.6 -3.6 -3.6 -3.6 -4.1 -4.6 -5.0 -5.3 -5.4 -2.5 -2.5 -2.5 -3.0 -3.5 -4.0 -4.2 -4.3 9/10 2.679207 9/10 3.5 0.9 4.0 2.8 2.0 1.0 0.2 -0.3 -0.8 -1.1 -1.3 -1.5 -1.6 -1.6 -2.0 -2.5 -3.0 -3.3 -3.4 4.0 1.8 4.9 3.6 2.8 1.8 1.0 0.6 0.1 -0.2 -0.4 -0.7 -0.7 -0.7 -1.2 -1.7 -2.1 -2.4 -2.5 4.5 2.6 5.7 4.4 3.6 2.6 1.8 1.4 0.9 0.6 0.4 0.1 0.1 0.1 -0.4 -0.9 -1.3 -1.6 -1.7 5.0 3.3 6.4 5.2 4.4 3.4 2.6 2.1 1.6 1.3 1.2 0.9 0.8 0.8 0.4 -0.1 -0.6 -0.9 -0.9 5.5 4.1 7.2 5.9 5.1 4.1 3.3 2.8 2.3 2.1 1.9 1.6 1.5 1.6 1.1 0.6 0.1 -0.2 -0.2 6.0 4.7 7.8 6.6 5.8 4.8 4.0 3.5 3.0 2.7 2.6 2.3 2.2 2.2 1.8 1.3 0.8 0.5 0.5 6.5 5.4 8.5 7.2 6.4 5.4 4.7 4.2 3.7 3.4 3.2 2.9 2.9 2.9 2.4 1.9 1.5 1.2 1.1 7.0 6.0 9.1 7.9 7.1 6.1 5.3 4.8 4.3 4.0 3.8 3.6 3.5 3.5 3.1 2.6 2.1 1.8 1.8 7.5 6.6 9.7 8.5 7.7 6.7 5.9 5.4 4.9 4.6 4.5 4.2 4.1 4.1 3.7 3.2 2.7 2.4 2.4 8.0 7.3 10.3 9.1 8.3 7.3 6.5 6.0 5.5 5.2 5.1 4.8 4.7 4.7 4.3 3.8 3.3 3.0 3.0 8.5 7.8 10.9 9.7 8.9 7.9 7.1 6.6 6.1 5.8 5.7 5.4 5.3 5.3 4.9 4.4 3.9 3.6 3.6 9.0 8.4 11.5 10.2 9.4 8.5 7.7 7.2 6.7 6.4 6.2 5.9 5.9 5.9 5.4 4.9 4.5 4.2 4.1 9.5 9.0 12.1 10.8 10.0 9.0 8.2 7.8 7.3 7.0 6.8 6.5 6.5 6.5 6.0 5.5 5.0 4.8 4.7 10.0 9.5 12.6 11.4 10.6 9.6 8.8 8.3 7.8 7.5 7.4 7.1 7.0 7.0 6.6 6.1 5.6 5.3 5.3 10.5 10.1 13.2 11.9 11.1 10.1 9.3 8.9 8.4 8.1 7.9 7.6 7.6 7.6 7.1 6.6 6.2 5.9 5.8 11.0 10.6 13.7 12.5 11.7 10.7 9.9 9.4 8.9 8.6 8.5 8.2 8.1 8.1 7.7 7.2 6.7 6.4 6.4 11.5 11.2 14.3 13.0 12.2 11.2 10.4 10.0 9.5 9.2 9.0 8.7 8.7 8.7 8.2 7.7 7.2 7.0 6.9 12.0 11.7 14.8 13.5 12.7 11.8 11.0 10.5 10.0 9.7 9.5 9.2 9.2 9.2 8.7 8.2 7.8 7.5 7.4 12.5 12.2 15.3 14.1 13.3 12.3 11.5 11.0 10.5 10.2 10.1 9.8 9.7 9.7 9.3 8.8 8.3 8.0 8.0 13.0 12.8 15.9 14.6 13.8 12.8 12.0 11.6 11.1 10.8 10.6 10.3 10.3 10.3 9.8 9.3 8.8 8.6 8.5 13.5 13.3 16.4 15.1 14.3 13.4 12.6 12.1 11.6 11.3 11.1 10.8 10.8 10.8 10.3 9.8 9.4 9.1 9.0 14.0 13.8 16.9 15.7 14.9 13.9 13.1 12.6 12.1 11.8 11.6 11.4 11.3 11.3 10.9 10.3 9.9 9.6 9.5 14.5 14.3 17.4 16.2 15.4 14.4 13.6 13.1 12.6 12.3 12.2 11.9 11.8 11.8 11.4 10.9 10.4 10.1 10.1 15.0 14.9 18.0 16.7 15.9 14.9 14.1 13.6 13.1 12.9 12.7 12.4 12.3 12.4 11.9 11.4 10.9 10.6 10.6 15.5 15.4 18.5 17.2 16.4 15.4 14.6 14.2 13.7 13.4 13.2 12.9 12.9 12.9 12.4 11.9 11.4 11.1 11.1 16.0 15.9 19.0 17.7 16.9 15.9 15.1 14.7 14.2 13.9 13.7 13.4 13.4 13.4 12.9 12.4 11.9 11.7 11.6 16.5 16.4 19.5 18.2 17.4 16.5 15.7 15.2 14.7 14.4 14.2 13.9 13.9 13.9 13.4 12.9 12.5 12.2 12.1 17.0 16.9 20.0 18.7 17.9 17.0 16.2 15.7 15.2 14.9 14.7 14.4 14.4 14.4 13.9 13.4 13.0 12.7 12.6 17.5 17.4 20.5 19.3 18.4 17.5 16.7 16.2 15.7 15.4 15.2 15.0 14.9 14.9 14.5 13.9 13.5 13.2 13.1 18.0 17.9 21.0 19.8 19.0 18.0 17.2 16.7 16.2 15.9 15.7 15.5 15.4 15.4 15.0 14.5 14.0 13.7 13.7 18.5 18.4 21.5 20.3 19.5 18.5 17.7 17.2 16.7 16.4 16.3 16.0 15.9 15.9 15.5 15.0 14.5 14.2 14.2 19.0 18.9 22.0 20.8 20.0 19.0 18.2 17.7 17.2 16.9 16.8 16.5 16.4 16.4 16.0 15.5 15.0 14.7 14.7 Notes: 1. Eb/No = Es/No – 10 Log (Spectral Efficiency). 2. The Required C/N for QEF with FECFrame = 16,200 bits is typically 0.2 to 0.3 dB higher. B–3 3. Shaded values are high error rate or unusable. CDM-710G High-Speed Satellite Modem Eb/No Measurement Revision 1 MN-CDM710G Table B-2. CDM-710G Co+No/No to C/N (Es/No) and Eb/No (dB) for DVB-S2 16APSK and 32APSK (DVB-S2 uses C/N (Es/No), and Eb/No is shown for information) Code Rate 16APSK Spectral Efficiency 32APSK 2.637201 2.966728 3.165623 3.300184 3.523143 2/3 3/4 4/5 5/6 8/9 3.567342 9/10 3.703295 3.951571 4.119540 4.397854 3/4 4/5 5/6 8/9 4.453027 9/10 (Co+No)/No C/N = Es/No Eb/No Eb/No Eb/No Eb/No Eb/No Eb/No Eb/No Eb/No Eb/No Eb/No Eb/No 9.0 8.4 4.2 3.7 3.4 3.2 2.9 2.9 2.7 2.4 2.3 2.0 1.9 9.5 9.0 4.8 4.3 4.0 3.8 3.5 3.5 3.3 3.0 2.8 2.6 2.5 10.0 9.5 5.3 4.8 4.5 4.4 4.1 4.0 3.9 3.6 3.4 3.1 3.1 10.5 10.1 5.9 5.4 5.1 4.9 4.6 4.6 4.4 4.1 3.9 3.7 3.6 11.0 10.6 6.4 5.9 5.6 5.5 5.2 5.1 5.0 4.7 4.5 4.2 4.2 11.5 11.2 7.0 6.5 6.2 6.0 5.7 5.7 5.5 5.2 5.0 4.7 4.7 12.0 11.7 7.5 7.0 6.7 6.5 6.2 6.2 6.0 5.7 5.6 5.3 5.2 12.5 12.2 8.0 7.5 7.2 7.1 6.8 6.7 6.6 6.3 6.1 5.8 5.8 13.0 12.8 8.6 8.1 7.8 7.6 7.3 7.3 7.1 6.8 6.6 6.3 6.3 13.5 13.3 9.1 8.6 8.3 8.1 7.8 7.8 7.6 7.3 7.2 6.9 6.8 14.0 13.8 9.6 9.1 8.8 8.6 8.4 8.3 8.1 7.9 7.7 7.4 7.3 14.5 14.3 10.1 9.6 9.3 9.2 8.9 8.8 8.7 8.4 8.2 7.9 7.9 15.0 14.9 10.6 10.1 9.9 9.7 9.4 9.3 9.2 8.9 8.7 8.4 8.4 15.5 15.4 11.2 10.7 10.4 10.2 9.9 9.9 9.7 9.4 9.2 8.9 8.9 16.0 15.9 11.7 11.2 10.9 10.7 10.4 10.4 10.2 9.9 9.7 9.5 9.4 16.5 16.4 12.2 11.7 11.4 11.2 10.9 10.9 10.7 10.4 10.3 10.0 9.9 17.0 16.9 12.7 12.2 11.9 11.7 11.4 11.4 11.2 10.9 10.8 10.5 10.4 17.5 17.4 13.2 12.7 12.4 12.2 12.0 11.9 11.7 11.5 11.3 11.0 10.9 18.0 17.9 13.7 13.2 12.9 12.7 12.5 12.4 12.2 12.0 11.8 11.5 11.4 18.5 18.4 14.2 13.7 13.4 13.3 13.0 12.9 12.8 12.5 12.3 12.0 12.0 19.0 18.9 14.7 14.2 13.9 13.8 13.5 13.4 13.3 13.0 12.8 12.5 12.5 19.5 19.5 15.2 14.7 14.4 14.3 14.0 13.9 13.8 13.5 13.3 13.0 13.0 20.0 20.0 15.7 15.2 15.0 14.8 14.5 14.4 14.3 14.0 13.8 13.5 13.5 20.5 20.5 16.2 15.7 15.5 15.3 15.0 14.9 14.8 14.5 14.3 14.0 14.0 21.0 21.0 16.8 16.2 16.0 15.8 15.5 15.4 15.3 15.0 14.8 14.5 14.5 21.5 21.5 17.3 16.7 16.5 16.3 16.0 15.9 15.8 15.5 15.3 15.0 15.0 22.0 22.0 17.8 17.2 17.0 16.8 16.5 16.4 16.3 16.0 15.8 15.5 15.5 22.5 22.5 18.3 17.8 17.5 17.3 17.0 17.0 16.8 16.5 16.3 16.0 16.0 23.0 23.0 18.8 18.3 18.0 17.8 17.5 17.5 17.3 17.0 16.8 16.5 16.5 23.5 23.5 19.3 18.8 18.5 18.3 18.0 18.0 17.8 17.5 17.3 17.0 17.0 24.0 24.0 19.8 19.3 19.0 18.8 18.5 18.5 18.3 18.0 17.8 17.6 17.5 24.5 24.5 20.3 19.8 19.5 19.3 19.0 19.0 18.8 18.5 18.3 18.1 18.0 25.0 25.0 20.8 20.3 20.0 19.8 19.5 19.5 19.3 19.0 18.8 18.6 18.5 25.5 25.5 21.3 20.8 20.5 20.3 20.0 20.0 19.8 19.5 19.3 19.1 19.0 26.0 26.0 21.8 21.3 21.0 20.8 20.5 20.5 20.3 20.0 19.8 19.6 19.5 Notes: 1. Eb/No = Es/No – 10 Log (Spectral Efficiency). 2. The Required C/N for QEF with FECFrame = 16,200 bits is typically 0.2 to 0.3 dB higher. 3. Shaded values are high error rate or unusable. B–4 Appendix C. FAST ACTIVATION PROCEDURE C.1 Introduction Fully Accessible System Topology (FAST) is an enhancement feature available in Comtech EF Data products, enabling on-location upgrade of the operating feature set – in the rack – without removing a CDM-710G from the setup. This accelerated upgrade can be accomplished only because of FAST’s extensive use of programmable devices incorporating Comtech EF Data-proprietary signal processing techniques. These techniques allow the use of a unique access code to enable configuration of the available hardware. The access code can be purchased at any time from Comtech EF Data. Once obtained from Comtech EF Data Customer Support, the access code is manually loaded into the CDM-710G via the modem’s front panel keypad. The FAST options are linked to three option registers: • Register 1 is for Data Rate options • Register 2 is for L-Band, Modulation type and Framing options • Register 3 is reserved for future options When an unlock FAST code is obtained from Comtech EF Data, it is associated with a specifically purchased unit (as identified by the unit’s unique serial number); the FAST access code unlocks the pertinent options in all option registers. C–1 CDM-710G High-Speed Satellite Modem FAST Activation Procedure C.2 C.2.1 Revision 1 MN-CDM710G Activation Procedure Obtain Unit Serial Number Obtain the modem serial number as follows: a) From the front panel SELECT: (main) menu, select UTILITY Æ FAST, then press [ENTER]. b) The modem motherboard Serial Number is displayed on the bottom line, to the left: FAST: Cnfg View MainBoard S/N: 333333333 c) Record serial number: C.2.2 ________ View currently installed features To view the currently installed features, proceed as follows: a) From the UTILITY Æ FAST menu, select VIEW, then press [ENTER]. b) Scroll through the modem Options using the ▲▼ arrow keys, and note which options are ‘Installed’ or ‘Not Installed’. Any that are ‘Not Installed’ may be purchased as a FAST upgrade: View Options: 01 () IF Modulator Installed C.2.3 Purchase FAST Access Code Contact a Comtech EF Data sales representative to order features. You will be asked to provide the modem Serial Number. Comtech EF Data Customer Support will verify the order and provide an invoice, instructions, and a 20-character FAST access (configuration) code. C.2.4 Enter FAST Access Code Enter the FAST access code as follows: a) Press [CLEAR] to return to the UTILITY Æ FAST menu: FAST: Cnfg View MainBoard S/N: 333333333 b) Select Cnfg, then press [ENTER]: FAST Configuration: Edit Code Demo Mode c) Select Edit Code, then press [ENTER]. C–2 CDM-710G High-Speed Satellite Modem FAST Activation Procedure Revision 1 MN-CDM710G d) Enter the 20-character FAST code carefully. Use the ◄ ► arrow keys to move the cursor to each character, then use the ▲ ▼ arrow keys to edit that character: Edit 20 digit FAST Code: 00000000000000000000 ENT c) Press ENTER when done. The modem responds with “Configured Successfully” if the new FAST option is accepted: Configured Successfully (ENTER or CLEAR) Press [ENTER] or [CLEAR] as directed. The modem will then reset to its default configuration. d) If, on the other hand, the FAST code is not valid, the code is rejected and following message is displayed: FAST Code Rejected! (ENTER or CLEAR) e) Press [ENTER] or [CLEAR] as directed, then re-enter the FAST code. Contact Comtech EF Data Customer Support if the problem persists. C–3 CDM-710G High-Speed Satellite Modem FAST Activation Procedure C.3 Revision 1 MN-CDM710G Using FAST Demo Mode FAST Demo Mode may be enabled or disabled as follows: a. Press [CLEAR] to return to the FAST menu: FAST: Cnfg View MainBoard S/N: 333333333 b. Select Cnfg, then press [ENTER]: FAST Configuration: Edit Code Demo Mode c. Use the ◄ ► arrow keys to select Demo Mode, then press [ENTER]. FAST Demo Mode: Off On 604800 seconds remain d. Use the ◄ ► arrow keys to select Off or On. When On, the second line will display the under of seconds remaining available for the free Demo Mode. When enabled, Demo Mode allows access to ALL CDM-710G FAST options for 604800 seconds (7 full days). Demo Mode may be turned on and off an unlimited number of time until the 604800 seconds have expired. The seconds count is only decrement when the mode is On. When the Demo period expires the following menu is displayed: FAST Demo Mode: Off On Demo Period Expired IF THE DEMO MODE STATE (OFF/ON) IS CHANGED, OR IF DEMO MODE IS ENABLED AND THE TIMER EXPIRES, THE MODEM FIRMWARE WILL AUTOREBOOT AFTER 5 SECONDS. IMPORTANT NOTE THAT VALIDATION OF AUTHORIZED FAST OPTIONS OCCURS ON AUTOREBOOT; IF AN INVALID CONFIGURATION IS FOUND, THE MODEM CONFIGURATION WILL RESET TO DEFAULT VALUES. C–4 METRIC CONVERSIONS Units of Length Unit Centimeter Inch Foot Yard Mile Meter Kilometer Millimeter 1 centimeter — 0.3937 0.03281 0.01094 6.214 x 10⁻⁶ 0.01 — — 1 inch 2.540 — 0.08333 0.2778 1.578 x 10⁻⁵ 0.254 — 25.4 1 foot 30.480 12.0 — 0.3333 1.893 x 10⁻⁴ 0.3048 — — 1 yard 91.44 36.0 3.0 — 5.679 x 10⁻⁴ 0.9144 — — 1 meter 100.0 39.37 3.281 1.094 6.214 x 10⁻⁴ — — — 1 mile 1.609 x 10⁵ 6.336 x 10⁴ 5.280 x 10³ 1.760 x 10³ — 1.609 x 10³ 1.609 — 1 mm — 0.03937 — — — — — — 1 kilometer — — — — 0.621 — — — Temperature Conversions Temperature ° Fahrenheit ° Centigrade Formulas Water freezes 32 0 ° C = (F - 32) * 0.555 Water boils 212 100 ° F = (C * 1.8) + 32 Absolute 0 -459.69 -273.16 Units of Weight Unit Gram Ounce Avoirdupois Ounce Troy Pound Avoirdupois Pound Troy Kilogram 1 gram — 0.03527 0.03215 0.002205 0.002679 0.001 1 oz. avoir. 28.35 — 0.9115 0.0625 0.07595 0.02835 1 oz. troy 31.10 1.097 — 0.06857 0.08333 0.03110 1 lb. avoir. 453.6 16.0 14.58 — 1.215 0.4536 1 lb. Troy 373.2 13.17 12.0 0.8229 — 0.3732 1 kilogram 1.0 x 10³ 35.27 32.15 2.205 2.679 — 2114 WEST 7TH STREET TEMPE ARIZONA 85281 USA 480 • 333 • 2200 PHONE 480 • 333 • 2161 FAX