1
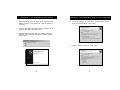
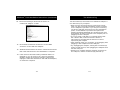
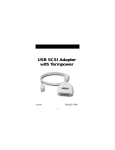
USB SCSI Adapter
with Termpower
P73417-A
F5U115-UNV
Introduction and System Requirements
Thank you for purchasing the Belkin Components® USB SCSI
Adapter. Now, you can easily add up to seven SCSI devices on
your Windows® 98 PC or Mac® through a USB port! No more
opening your computer case, no more IRQ conflicts or driver
problems! Simply plug it in!
Your PC must have:
•
•
•
•
486 processor or faster
16MB memory or more
A free USB port (on the computer or a hub)
Windows® 98, Windows® 98 SE, or Windows® 2000
Your Macintosh® must have:
• OS 8.6 or higher
• A free USB port (on the computer or at a hub)
Notes:
1.
It is NOT recommended that you plug in the USB SCSI
Adapter to the USB ports on the iMac™ keyboard. The
keyboard does not supply enough power, and is a
low-speed device.
2. If you own a non-iMac™ machine, such as a PowerMac or
G3, and wish to add USB ports, please obtain a Belkin USB
BusPort™ for Mac® (model # F5U005-MAC).
Your SCSI device must be able to supply termination power to
the USB SCSI Adapter. Some devices, such as Iomega
Zip® Drives and some brands of scanners, will not be able to
provide the required +5V termination power. In such an event,
a SCSI device that can provide termination power must be
connected to the device chain or an optional power supply
adapter, available for purchase from Belkin (Part# F5U115xPWR
can be used).
If you are going to plug the USB SCSI Adapter into a USB
Hub, make sure that it is a self-powered hub.
(A self-powered hub has its own power supply.)
1
Macintosh® Installation and Usage
Package Contents
• Belkin Components USB SCSI Adapter
• Windows and Macintosh driver software
• Registration card
• This manual
Note: Optional AC Adapter may be purchased directly
from Belkin. Ask for part #F5U115xPWR.
MACINTOSH® INSTALLATION:
1. Insert the Belkin USB SCSI Adapter Installation CD into
your CD-ROM drive.
2. Double-click on the CD icon that appears on the Mac OS
desktop. You will now see three folders: Mac OS Driver,
PC Driver, and Win2000. Double-click on the Mac OS
Driver folder.
3. Double-click the icon titled “USB SCSI Installer” and
follow the prompts to install the USB SCSI Adapter
system extensions.
USAGE:
1. After the system extensions are installed, shut down your
Mac, then connect a SCSI device or device chain to the
USB SCSI Adapter. Make sure that the devices are
powered up. See appendices for adapters and cables
you may need.
2. After restart, icons of your SCSI device(s) should appear
on your desktop.
Jack for Optional
AC Adapter
2
3
Macintosh® Installation and Usage (continued)
Note:
If you unplug the USB SCSI Adapter from the
computer, or the device(s) from the SCSI chain,
the operating system may not recognize this and
might think that the device(s) are still connected. In
the event that the device(s) and/or the USB SCSI
Adapter is unplugged from the computer and an
application tries to access the device(s), your
computer will hang. You must restart your computer
in order to recover from this error.
Hence, to disconnect a device from the SCSI chain,
always drag its icon to the TRASH first, then
disconnect the USB SCSI Adapter or devices.
4
Windows® 98 Installation Instructions
WINDOWS® 98 INSTALLATION:
1. Connect your SCSI device or device chain to the
USB SCSI Adapter. See appendices for adapters and
cables you may need. Make sure that the device(s) are
powered up.
2. Plug in the USB SCSI Adapter to a free USB port on
your computer, or USB Hub. A “New Hardware
Found…” dialog box will appear.
3. Click “Next”.
Note:
Even if the Adapter is plugged into your USB
port (or Hub), it must first be plugged into a SCSI
device that provides termination power before
Windows will detect and enumerate the Adapter
and the SCSI device(s). If your SCSI device(s)
does not provide termination power, contact
Belkin to purchase the optional AC Adapter
(part# F5U115xPWR).
5
Windows® 98 Installation Instructions (continued)
Windows® 98 Installation Instructions (continued)
4. On the screen that appears, select “Search for the best
driver for your device (Recommended)”, and then
click “Next”.
6. Windows will automatically find and install the drivers
from the CD-ROM, and display the next dialog box,
confirming it has loaded the correct files:
Click “Next”.
5. Windows will now prompt you for drivers. Insert the
Belkin USB SCSI Adapter CD-ROM in your CD-ROM
drive. Put a check mark in the box named “Specify a
location:”. Type D:\PC Driver. (In this example, D is the
driver letter for the CD-ROM drive; it may be different on
your computer, you may need to check it.) Click “Next”.
7. Lastly, Windows will display this final dialog box.
Click “Finish”.
8. Next, Windows will detect the attached device. Follow
the instructions that came with the device and the
installation is complete.
6
7
Windows® 2000 Installation Instructions
1. Turn on the External SCSI device and connect it to the
DB25 connector on the USB SCSI, using an adapter if
necessary.
Windows® 2000 Installation Instructions (continued)
4. Leave the selection on "Search for a suitable driver for my
device (recommended)". Click “Next”.
2. Connect the USB SCSI Adapter to the computer or an
attached hub with a USB A-B Cable.
3. Windows will detect the device as "Belkin USB SCSI
Adapter" and launch the Add New Hardware Wizard.
Click “Next”.
5. Select "Specify a location". Click “Next”.
8
9
Windows® 2000 Installation Instructions (continued)
6. You will now be prompted to insert the USB SCSI Adapter
installation CD into your CD-ROM drive. Type in the path to
your CD-ROM drive in the box labeled "Copy
manufacturer’s files from:" (typically D:\WIN2000). If you
prefer you may click on the "Browse" button and browse
to the "WIN2000" directory of the installation CD-ROM.
Click “OK.”
Windows® 2000 Installation Instructions (continued)
8. Windows will install the necessary drivers. Click “Finish.”
9.
7. Windows will locate the drivers for "Belkin USB SCSI
Adapter." Click “Next”.
10
The Adapter Properties window should list the device
as “eUSB SCSI Adapter”. Click on “Close” to close
the window.
11
Windows® 2000 Installation Instructions (continued)
10. The Device Manager should list the device as
“eUSB SCSI Adapter” as well.
11. Now attach the External SCSI device to the DB25
connector on the USB SCSI Adapter.
12. Windows should detect the device. Follow the directions
that came with the device and installation is complete.
Troubleshooting
The SCSI device(s) connected to the USB SCSI Adapter is
not detected by my computer.
• Make sure the SCSI device(s) are powered up and at
least one device provides termination power necessary
for the Adapter’s operation. If you are just connecting
one device and that device does not have termination
power, contact Belkin to purchase the optional AC
Adapter (part# F5U115xPWR). The SCSI device(s) must
be powered up AND connected to the Adapter prior to
plugging into the USB port.
• If you are using a USB Hub or composite device that
has a built-in hub, make sure that the device is
self-powered, providing the full 500mA of current
required by the Adapter.
• After shutting down your computer, try unplugging then
plugging in the Adapter from the USB port.
• Try unplugging the Adapter, turning the SCSI device(s)’
power off and back on, then plugging the Adapter back
into the USB port.
• Restart your computer with the Adapter connected to
the USB port, and the SCSI device(s) powered up.
13. If the device is NOT detected by Windows when it is
plugged in, you can click on the “Scan for Hardware
changes” button in the device manager, unplug and
replug the USB cable attached to the USB SCSI Adapter,
or restart the computer.
12
13
Belkin External SCSI Cross-Reference Table
Connectors
on Cable
DB25
Male
DB50
Male
(3 Row)
Cent 50
Male
Micro
DB50
Male
Micro
DB68
Male
VHDCI
Ultra Micro
Cent 68
Female
Micro
Cent 50
Male
HD130
Male
DB50 Male
(3 Row)
Cent 50
Male
Micro DB50
Male
Micro DB68
Male
VHDCI Ultra Micro
Cent 68 Male
Micro Cent
50 Male
Micro Cent
50 Male
SPECIAL
SPECIAL F2N954-XX F2N992-XX F2N1035-XX A2N1067-XX F2N998-XX F2N982-XX
F2N966-XX F2N964-XX F2N960-XX F2N997-XX SPECIAL
SPECIAL
SPECIAL
F2N954-XX F2N964-XX F2N956-XX F2N962-XX F2N973-XX A2N1064-XX F2N963-XX F2N984-XX
F2N992-XX F2N960-XX F2N962-XX F2N968-XX F2N977-XX A2N1065-XX F2N971-XX F2N983-XX
F2N1035-XX F2N997-XX F2N973-XX F2N977-XX F2N991-XX F2N1066-XX F2N1000-XX SPECIAL
A2N1067-XX SPECIAL A2N1064-XX F2N1065-XX F2N1066-XX SPECIAL
SPECIAL
SPECIAL
F2N998-XX
SPECIAL F2N963-XX F2N971-XX F2N1000-XX SPECIAL F2N961-XX SPECIAL
F2N982-XX
SPECIAL F2N984-XX F2N983-XX SPECIAL
SPECIAL
To uninstall the USB SCSI Adapter, do the following:
Note: Do not unplug the Belkin USB SCSI Adapter from
the computer before completing the following:
DB25 Male
F2A047-XX
Belkin USB SCSI Adapter Uninstall
SPECIAL
A. For PC
1. Right-click on the “My Computer” icon on your desktop.
Select “Properties” then “Device Manager”. Look for
“Universal Serial Bus Controller”, click on the “Plus” sign
beside it, highlight “Belkin USB SCSI Adapter”, then click
“Remove”. Click “OK”. Close Device Manager.
2. Click on “Start/Find/Files and Folders”. Under “Named”
type “Bel*.*”. Under “Look In” select the “C” drive then
click on “Find Now”. Delete the four items that will
appear, namely: “Beluscsi.sys, Belsmsd.pdr, Belsmsd, and
Belkin Component….”
3. You can now unplug the Belkin USB SCSI Adapter from
the computer. Restart your computer.
B. For Mac
1. Double-click on your “Hard Drive” icon and look for
“System Folder”. Double-click on “System Folder”.
2. In “System Folder”, look for another folder called
“Extensions”. Under “Extensions“ look for the following
files: “Belkin USB SCSI” and “Belkin USB SCSI SIM”.
Drag these 2 files to the Trash Bin.
3. You can now unplug the Belkin USB SCSI Adapter from
the computer. Restart your computer.
SPECIAL
This is only a partial listing of our most common SCSI Cable Assemblies. Contact your
Belkin sales representative for assistance in choosing the cable you need.
14
15
Compatibility List
A. Devices that work Standalone
n SCSI Hard Drives
• Seagate ST31220A - 2GB
• Seagate ST51080N - 1GB
• Microtech P-E-2000 - 2GB
n SCSI Removable Media Drives
• Coniglio MO 230MB ( FujitsuDrive M2512A )
• Fujitsu 640 Dyna MO - M2513A - F/W: 1300
• Fujitsu 640 Dyna MO SE - M2513EL - F/W: 0010
• Iomega Jaz - 1GB F/W J.66
• Iomega Jaz - 2GB F/W E.17
• Olympus 640 MO - S350 - F/W: 1.20
• SCSI - Panasonic PD device - LF 1000
• SyQuest SQ270 - 270MB
n SCSI CDD\CDR\CD Changers
• Sony 4X - CDU 76S SCSI CDD F/W 1.0a.
• NAKAMICHI 4-tray CD Changer - MJ 4.8
• NEC Multispin 4x - 7-tray CD Changer - NRC MBR - 7.4
• Sanyo CDR-254S F/W 1.02
• Philips Omniwriter26 (Ricoh) F/W 2.03
• Sony CDR CDU948S F/W 1.0h
• Philips CDD2600 F/W 1.07
• Plextor DX-327S F/W 1.02
• Teac CD-532S 1.0a
n SCSI Tape Drives
• Exabyte 8585S F/W 06M0
• Conner-TR4 CTT- 8000IS F/W 1.17
• HO-C1533A F/W 9503
16
Compatibility List (continued)
n
n
• Microtech MicroDAT 8000
SCSI Scanners
• HP 5P C5110A F/W 3638
• Pixelcraft Pro Image 2400 Scanner
• UMAX ProLook 2000
Other
• Microtech Digital PhotoAlbum - PC Card Reader
• Microtech Digital PhotoAlbum.p - PC Card Reader
• Microtech Digital PhotoAlbum Pro - PC Card Reader
• SCM Microsystems (Intermart) PCD-10
• SCM Microsystems (Intermart) PCD-15
• SCM Microsystems (Intermart) PCD-25
B. Devices that work on a SCSI chain or may require the
included power adapter and DB25 adapter
n SCSI Hard Drives
• Seagate ST31220A - 2GB
• Seagate ST51080N - 1GB
• Microtech P-E-2000 - 2GB
n SCSI Removable Media Drives
• Iomega Jaz - 1GB F/W J.66
• Iomega Jaz - 2GB F/W E.17
• Iomega Zip 100 (SCSI) F/W J.66
• Fujitsu 640 Dyna MO - M2513A - F/W: 1300
• Fujitsu 640 Dyna MO SE - M2513EL - F/W: 0010
• Olympus 640 MO - S350 - F/W: 1.20
17
Compatibility List (continued)
n
n
n
n
• SCSI - Panasonic PD device - LF 1000
• SyQuest SQ270 - 270MB
SCSI CDD\CDR\CD Changers
• Sony 4X - CDU 76S SCSI CDD F/W 1.0a.
• NAKAMICHI 4-tray CD Changer - MJ 4.8
• NEC Multispin 4x - 7-tray CD Changer - NRC MBR - 7.4
• Sanyo CDR-254S F/W 1.02
• Philips Omniwriter26 (Ricoh) F/W 2.03
• Sony CDR CDU948S F/W 1.0h
• Philips CDD2600 F/W 1.07
• Plextor DX-327S F/W 1.02
• Teac CD-532S 1.0a
SCSI Tape Drives
• Exabyte 8585S F/W 06M0
• Conner-TR4 CTT- 8000IS F/W 1.17
• HO-C1533A F/W 9503
• Microtech MicroDAT 8000
SCSI Scanners
• HP 5P C5110A F/W 3638
• Pixelcraft Pro Image 2400 Scanner
• UMAX Power Look 2000
• UMAX Astra 1220S
Other
• Microtech Digital PhotoAlbum - PC Card Reader
• Microtech Digital PhotoAlbum.p - PC Card Reader
• Microtech Digital PhotoAlbum Pro - PC Card Reader
• SCM Microsystems (Intermart) PCD-10
18
Compatibility List (continued)
• SCM Microsystems (Intermart) PCD-15
• SCM Microsystems (Intermart) PCD-25
C. Currently incompatible devices
n Nikon LS-2000 Film Scanner (Super Coolscan 2000)
n Microtech Digital PhotoAlbum P (Old MP01625)
n Microtech Digital PhotoAlbum (Old MP01610A)
n UMAX Power Look III
19
Information
FCC Statement
DECLARATION OF CONFORMITY WITH FCC RULES FOR
ELECTROMAGNETIC COMPATIBILITY
We, Belkin Components, of 501 West Walnut Street, Compton CA 90220,
declare under our sole responsibility that the product:
F5U115-UNV
to which this declaration relates:
Complies with Part 15 of the FCC Rules. Operation is subject to the following
two conditions: (1) this device may not cause harmful interference, and (2) this
device must accept any interference received, including interference that may
cause undesired operation.
CE Declaration of Conformity
We, Belkin Components, declare under our sole responsibility that the F5U115-UNV, to
which this declaration relates, is in conformity with Generic Emissions Standard EN50081-1
and with Generic Immunity Standard EN500A1-1 1992.
Belkin Components Limited Lifetime Product Warranty
Belkin Components warrants this product against defects in materials and workmanship for
its lifetime. If a defect is discovered, Belkin will, at its option, repair or replace the product at
no charge provided it is returned during the warranty period, with transportation charges
prepaid, to the authorized Belkin dealer from whom you purchased the product. Proof of
purchase may be required.
This warranty does not apply if the product has been damaged by accident, abuse, misuse,
or misapplication; if the product has been modified without the written permission of Belkin;
or if any Belkin serial number has been removed or defaced.
THE WARRANTY AND REMEDIES SET FORTH ABOVE ARE EXCLUSIVE IN LIEU OF ALL OTHERS,
WHETHER ORAL OR WRITTEN, EXPRESSED OR IMPLIED. BELKIN SPECIFICALLY DISCLAIMS
ANY AND ALL IMPLIED WARRANTIES, INCLUDING, WITHOUT LIMITATION, WARRANTIES OF
MERCHANTABILITY AND FITNESS FOR A PARTICULAR PURPOSE.
No Belkin dealer, agent, or employee is authorized to make any modification, extension,
or addition to this warranty.
BELKIN IS NOT RESPONSIBLE FOR SPECIAL, INCIDENTAL, OR CONSEQUENTIAL
DAMAGES RESULTING FROM ANY BREACH OF WARRANTY, OR UNDER ANY OTHER
LEGAL THEORY, INCLUDING BUT NOT LIMITED TO LOST PROFITS, DOWNTIME,
GOODWILL, DAMAGE TO, OR REPROGRAMMING, OR REPRODUCING ANY PROGRAM
OR DATA STORED IN OR USED WITH BELKIN PRODUCTS.
Some states do not allow the exclusion or limitation of incidental or consequential damages
or exclusions of implied warranties, so the above limitations of exclusions may not apply to
you. This warranty gives you specific legal rights, and you may also have other rights that
vary from state to state.
20
Belkin Components
501 West Walnut Street
Compton • CA • 90220 • USA
Tel: 310.898.1100
Fax: 310.898.1111
Tech Support • Tel: 800.223.5546 ext. 2263
e-mail: [email protected]
Belkin Components, Ltd.
Unit 13 • Gatelodge Close • Round Spinney
Northampton • Northants • NN3 8RX • United Kingdom
Tel: +44 (0) 1604678300
Fax: +44 (0) 1604678330
Tech Support • Tel: 0800 146881 +44 (0) 1604678300
e-mail: [email protected]
Belkin Components B.V.
Diamantlaan 8 • 2132 WV
Hoofddorp • The Netherlands
Tel: +31 (0) 235698765
Fax: +31 (0) 235612694
Tech Support • Tel: +31 (0) 235698765
e-mail: [email protected]
© 2000 Belkin Components. All rights reserved. All trade names are registered trademarks of
respective manufacturers listed.