1
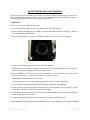
A
Q
U
I
C
K
S
T
A
R
T
G
U
I
D
E
Panasonic AJ-HPX3700 Varicam
and
Panasonic AJ-HPX2700 Varicam
An introduction to the Panasonic AJ-HPX3700 and AJ-HPX2700 Varicams with step by step guides for
reference in the field.
Clark Media
2 9 6 B r o d h e a d R d . B e t h l e h e m PA 1 8 0 1 7
Office: 610.694.9800
Table of Contents
1)!
Introduction to the AJ-HPX3700 and AJ-HPX2700 Varicams
2-5)!
Explanation of Clark Scene Files / Paint Settings
!
!
-Gamma Curves
!
!
-Clark Scene Files
!
!
-HPX-2700 Clark Paint Settings
!
!
-HPX-3700 Clark Paint Settings
6)!
Guide for Loading a Look into the 3700 and 2700
7-8)!
P2 Guide
!
!
-Do’s and Dont’s of P2
!
!
-Chart of Record Times and P2 Formats
9-10)! Metadata Guide
11-12)!Proxy Guide
13-17)!On set Preparation Guideline
!
!
-Condition
!
!
-External Settings
!
!
-Internal Settings
!
!
-Focus
!
!
-Sample Chart
!
!
-Verify
C l a r k M e d i a 6 1 0 . 6 9 4 . 9 8 0 0!
P a n a s o n i c Va r i c a m
i
Introduction:
AJ-HPX3700
The VariCam 3700 P2 camcorder offers full raster recording with its native 1920x1080
imager. It also provides 10-bit, 4:2:2 recording with the AVC-Intra 100 codec to record
to P2, as well as a Dual Link RGB 4:4:4 output. It also provides 8-bit recording to
DVCPRO HD. This 3-CCD Camera has a 2/3” 2.2 mega-pixel imager for recording
high resolution, independent frame HD images. The 3700 offers a choice of
progressive/interlace HD video formats including native 1080
23.98p/24.00p/25p/29.97p/30.00p, as well as 1080 50i and 1080 59.94i.
AJ-HPX2700
The VariCam 2700 P2 camcorder offers three 2/3 inch native HD imagers which provide true 720 images or can up-res. to a 1080 image. It also provides 10-bit, 4:2:2 recording with AVC-Intra 100 or 8-bit recording in DVCPRO HD. A single-step variable frame rate can range from 1 fps to 60 fps in 720p mode. Offers choice of
progressive/interlace HD video formats including 720 23.98p/24.00p/25p/29.97p / 50p /
59.94p, as well as 1080 23.98p/24.00p/25p/29.97p / 50i / 59.94i.
This guide will take you through explanations of P2 workflow and file integrity, explanations of the Clark Media stock scene files, steps for recording proxy files and
metadata, in addition to some of our suggestions and tips you can use in order to
please any DP/client.
C l a r k M e d i a 6 1 0 . 6 9 4 . 9 8 0 0!
P a n a s o n i c Va r i c a m
1
Explanation of Clark Scene Files:
Both the Panasonic HPX-2700 and HPX-3700 cameras come with various Clark Media stock scene files with varied
matrix and color correction adjustments. The following is an explanation of each one of these scene files and how
they could be applied in the field for desired looks.
THE FOLLOWING SETTINGS APPLY TO ALL SCENE FILES (NOT FACTORY):
-Reading a scene file will not affect your system mode. You must select your system settings independently.
-Scene files have matching values applied for all three L/M/H gain settings.
-Detail is set to on. (The default is a minimal amount of H/V detail)
-Gamma Mode Select is set to the HD gamma curve.
-Manual Knee is on.
Here is a description of all the gamma curves available in the Gamma Mode Select menu:
HD-This will produce an image with the highest contrast at the highest video output. This will give you the least
amount of latitude available in the gamma curves. Do not use this curve if there will be color correction in post.
(This curve is loaded as default for all of the clark stock scene flies).
SD-This will produce an image with a high contrast at a higher video output level than any other film like or rec
curve. This will give you a less amount of latitude therefore is not a good choice if there will be color correction
added in post.
FILMLIKE 1-There are 3 degrees of Filmlike curves. Filmlike1 has the most contrast. This will produce a noticeably lower contrast image than HD/SD with softer gradations especially in the mid-tones.
FILMLIKE 2- This curve will give a considerably less amount of contrast than Filmlike1. However it still produces soft gradations in the mid-tones.
FILMLIKE 3- There is a significant difference between Filmlike2 and Filmlike3 (Refer to diagram below). This is
also a much flatter curve where as your video level rises there is a softer grade of contrast change.
VIDEOREC- This curve will give you more latitude than the Film-like curves with a considerably lower contrast.
*All of the above gamma curves use knee point and knee slope. The knee function of the camera compresses highlights above your set knee point. The knee slope adjusts the actual amount of compression applied to your curve.
The higher the knee point is set, the more compression you will get in you highlight areas.*
FILMREC- Film-Rec gamma curve gives you the widest dynamic range therefore providing the most amount of
information in post. Your image will be very dark and flat looking with less saturation. You will want to apply this
curve if your product will be going to post for color correction. (Best if used with a look up table set in your monitor.)
*Film-Rec gamma curves apply a dynamic level setting from 100% (equivalent to an video curve with no knee) to
600% (most dynamic level the camera is capable of) which adjusts how flat you want your linear curve to be. Black
stretch is also applied to adjust the amount of detail in your shadows. Your knee functions do not exist in
Film-Rec.*
**Don't use Film-Rec when in DVCPRO HD (The 8 bit codec will not take advantage of the dynamic level)**
***Turn on test saw in MAIN MENU>PAINT>CAM SETTINGS to view changes in gamma curves and knee***
C l a r k M e d i a 6 1 0 . 6 9 4 . 9 8 0 0!
P a n a s o n i c Va r i c a m
2
Clark Scene Files:
Here is a description of the Clark stock scene files:
FACTORY:
This file sets the camera back to it's factory setting. It is not recommended to use this unless you are prepared to
paint your own look into the camera using this as a starting point.
CLARKSTD:
This file was created to maximize color accuracy by using the DSC Chroma Du Monde chart at the recommended
gain value of 2.0 on the vector scope and placing all the colors exactly in their target boxes. It's perfect to use as a
file that will hold the maximum amount of color without sacrificing form.
CLARKVIV:
This file was created at a gain value of 1.86 on the scope, thereby boosting chroma. Further boosting, as well as a
lessening of chroma, can be achieved by using the chroma control located in the Knee menu. This look is useful to
emulate the look of certain film emulsions, such as manufactured by Fuji that are richer in chroma.
CLARKTIM:
This file is for those who want to play it extra safe, lessening the chroma so as not to inadvertently over saturate. It
was created at a gain value of 2.22 on your vector scope. It produces very pleasing results used as is, but leaves a
little "chroma headroom" to allow for a margin of safety in post. Used in conjunction with a Film-Rec gamma curve
will give the widest range of color correction options in post.
REDSAT:
This file was created to give a warmer look to your scene. It was created with a gain value of 2.0 on the vector
scope over saturating the red values and under saturating the blues. This setting is very color inaccurate and should
only be used if looking
for this desired effect.
*You can apply any of the gamma curves mentioned on the previous page to any of the scene files listed above*
C l a r k M e d i a 6 1 0 . 6 9 4 . 9 8 0 0!
P a n a s o n i c Va r i c a m
3
C l a r k M e d i a 6 1 0 . 6 9 4 . 9 8 0 0!
P a n a s o n i c Va r i c a m
4
!
!
!
"
"
"
##
#
'
'
'
+'
'
,,
.
/
/
/
/
1
+1
+
.
1
1
'
'
'
1
1
'
$% $% &$%
( &
) * * *
( ( (
' ) ' ) ' )
,
-#*
&
0
)
))
0'2
()
02
02
)
)
)
( ( (
' ) ' ) ' )
,
-#*
&
0
)
))
0'2
()
02
02
2
*
' )
&2
2
)2
2
2
*
' )
&2
2
)2
2
)
)
) ( ( (
' ) ' ) ' )
,
-#*
&
0
)
))
0'2
()
02
02
2
*
' )
&2
2
)2
2
C l a r k M e d i a 6 1 0 . 6 9 4 . 9 8 0 0!
)
)
)
( ( (
' ) ' ) ' )
,
-#*
&
0
)
))
0'2
()
02
02
)
)
)
( ( (
' ) ' ) ' )
,
-#*
&
0
)
))
0'2
()
02
02
2
*
' )
&2
2
)2
2
2
*
' )
&2
2
)2
2
P a n a s o n i c Va r i c a m
5
Quick Start Guide for Loading a Look into the Panasonic Varicams
This guide explains how to load a custom look that you may have as a file saved on your computer. In order to load a custom look or scene into the HPX 3700 or 2700 camera you need to
have a properly formatted SD card. Please insure the card has been formatted in the camera or
by using the Panasonic SD formatter software.
NOTE: You can not simply format the SD card and drag the Set-up from a PC on the card. You
must first create a registry by saving a stock set up file on the card. This will create a folder
named”PRIVATE”.
Procedure for loading a look:
First, the SD card must be formatted in either the camera or the Panasonic formatter software.
If using the camera….
Step 1: -Insert the SD card into the 3700:
-Open the camera menu
-select File > SD card Read / Write > Card Config > Yes
This will format the card. The card is now blank and requires a menu structure (private folder) in
which the desired look can be stored and later off loaded to the camera. To create this menu
structure you must load a “stock scene” from the camera.
Next, in order to save a stock scene from the camera file onto the card….
Step 2: -Under W. Select, select file #8
-Under Title, name your file
-Select Write > Yes
You have now created the menu structure by loading a “stock scene” from the camera.
Next, you must load the new set-up files onto the SD card….
Step 3: - Insert the SD card into the PC containing the new set-up files
- Open the card
- The file sequence found on the card should be PRIVATE >
MEIGROUP > PAVCN > SBG > P2SD
- In the P2SD folder should be a text document titled “Scene F8”. (the
stock scene you saved from the camera). Just drag and drop your
custom scene files into this folder with “Scene F8”.
- Eject the SD card
Finally, insert the SD card back into the camera….
Step 4: - Open the camera menu
- Select File > SD card Read / Write > select the desired scene file >
select Read File > Yes
You have now loaded a custom “Look” into the HPX 3700 or 2700.
C l a r k M e d i a 6 1 0 . 6 9 4 . 9 8 0 0!
P a n a s o n i c Va r i c a m
6
P2 File Integrity
Here is a list of P2 Do's and Don'ts to help keep the integrity of your file transfers in tact:
Do:
-Turn on the record inhibit switch on the P2 card every time you insert it into a reader/
computer to offload.
-Check thumbnails of clips BEFORE your transfer. Repair any grey highlighted clips
using the camera/HPG-20's “Repair Clip” feature in the thumbnail menu.
-Use a utility such as Disk Utility to transfer your files. Do not simply drag and drop
your files. (You may leave behind necessary files.)
-Make sure to copy the entire “Contents” folder with all of the 6 sub folders.
-Format P2 cards before each use. Don't simply erase the contents.
-Use multiple busses when transferring data. Do not simply “Daisy chain” drives
together.
-Pull cards in the camera slot that are currently not in use. These cards are designed as
“hot swappable” which means that they can be pulled while the camera is recording on
another card.
-Shoot multiple formats and frame rates on the same card. The cards are frame rate
agnostic which means you are no longer restricted like you would be with a tape based
system.
Don't:
-Delete any folders within your contents folder, even if it appears to be empty.
-Rename folders, change any file names or move folders from there original location.
This includes the P2 card name as it appears on your desktop.
-Attach a P2 card reader into your system with a card inserted. Always attach the reader
first, then insert the P2 card. Failure to do so may cause errors in mounting your cards
properly.
-Transfer any data without verifying. All of our workflow systems (camera/HPG20/
Wrangler) allow you to verify the transfer to make sure that the data had all been
transferred with no error.
-Pull any cards that are active. A loss in data may occur.
C l a r k M e d i a 6 1 0 . 6 9 4 . 9 8 0 0!
P a n a s o n i c Va r i c a m
7
C l a r k M e d i a 6 1 0 . 6 9 4 . 9 8 0 0!
P a n a s o n i c Va r i c a m
8
Quick Start Guide for loading metadata
You can create metadata for the HPX-2700 or HPX-3700 in two ways. You can either enter metadata directly into the camera or use a software program such as P2 CMS to create a metadata
file on a SD card and upload it into the camera.
Using P2 CMS to create metadata files requires five steps:
1. Formatting the SD Card for upload
2. Creating and saving the metadata file
3. Renaming the metadata file(optional)
4. Uploading the metadata into the camera
5. Verifying that the metadata is properly loaded
Step 1: Formatting the SD Card for upload.
1. Insert the SD Card into the slot located under the flip down door on the side panel of
the camera.
2. Press the THUMBNAIL button to enter thumbnail mode.
3. Press the MENU button to enter the thumbnail menu.
4. Use the ARROW buttons to navigate to OPERATION, then press SET to enter the
OPERATION sub menu.
5. Use the ARROW buttons to navigate to FORMAT, then press SET to enter the
FORMAT sub menu.
6. Use the ARROW buttons to navigate to SD CARD, then press SET. Select YES and
press SET.
7. When finished the camera will display FORMAT COMPLETED! Press SET then
press THUMBNAIL to exit the thumbnail menu.
Step 2: Creating and saving the metadata file.
1. Insert your SD Card into your computer and open P2 CMS.
2. Under the TOOL menu select METADATA UPLOAD. A window will open with
several fields that you can use to enter information. The USER CLIP NAME has an
auto increment feature that allows you to name each clip sequentially. For example:
SCN_1_T will give you user clip names such as SCN_1_T0001,
SCN_1_T0002, etc. To use this feature METADATA>USER CLIP
NAME must be set to TYPE 2 under the thumbnail menu.
3. Click the check box in front of a field and then enter your information into that field.
After you have entered the information that you would like to save as metadata
click SAVE TO SD MEMO.
4. Select your SD Card from the pull down menu in the dialog box. Click on OK. When
finished “It preserved it” will be displayed. It will also display the name of the file.
The file name will be similar to this: MTDT01.P2
C l a r k M e d i a 6 1 0 . 6 9 4 . 9 8 0 0!
P a n a s o n i c Va r i c a m
9
Step 3: Renaming the metadata file.
1. Renaming metadata files requires you to navigate to the location that your files are
stored through Windows or Mac Finder.
2. The metadata files can be found in the following folder structure:
Private/meigroup/pavcn/sbg/p2sd
3. Highlight the file name and type the new name. The file can be renamed as long as
you keep the file extension as “.P2”
Step 4: Uploading the metadata into the camera.
1. Insert the SD Card into the slot located under the flip down door on the side panel of
the camera.
2. Press the THUMBNAIL button to enter thumbnail mode.
3. Press the MENU button to enter the thumbnail menu.
4. Use the ARROW buttons to navigate to METADATA, then press SET to enter the
METADATA sub menu.
5. Use the ARROW buttons to navigate to LOAD, then press SET. A list the files you
created appears. Use the ARROW buttons to select the file you would like to load and
press SET. Select YES and press SET. The metadata is now loaded into the camera.
Step 5: Verifying that the metadata is properly loaded.
1. In the thumbnail menu follow the path METADATA>PROPERTY
2. Press the SET button to open one of the metadata fields and verify that the correct
metadata is loaded.
Entering metadata directly into the camera.
1. Press the THUMBNAIL button to enter thumbnail mode.
2. Press the MENU button to enter the thumbnail menu.
3. Use the ARROW buttons to navigate to METADATA, then press SET to enter the
METADATA sub menu.
4. Use the ARROW buttons to navigate to PROPERTY, then press SET to enter the
metadata properties screen.
5. Use the ARROW buttons to navigate to the property you would like to change, then
press SET. Again use the ARROW keys to highlight the field you want to change and
press SET.
6. Type the information using the on screen display. Then enter OK. Use the ARROW
keys to highlight OK and press SET.
Important things to check in the thumbnail menu when using metadata:
! -Make sure METADATA>RECORD is set to ON
-Make sure METADATA>USER CLIP NAME is set to TYPE 2 (This setting allows the
USER CLIP NAME field to auto increment).
-When you want the auto increment count to reset go to METADATA>PROPERTY>USER
CLIP NAME and highlight COUNT RESET and press SET.
C l a r k M e d i a 6 1 0 . 6 9 4 . 9 8 0 0!
P a n a s o n i c Va r i c a m
10
Quick Start Guide for Proxies:
Panasonic's Proxy Encoder Card allows select P2 HD camcorders, including the AJ-HPX2700
and AJ-HPX3700 varicam camcorders to record MPEG4 proxy (low-resolution) data onto the P2
card in addition to the full-resolution data. Proxies can be recorded on both P2 and SD/SDHC
cards. These proxy files will allow you to playback your audio/video on a PDA, phone, and or
laptop. Proxy files allow for quick movement of low-resolution files through internal and webbased networks for quick logging and viewing of dailies or footage before it arrives at the local
station/post house. In order to make proxy recordings in the P2 cameras, you must have a Proxy
Video Encoder Card AJ-YAX800 installed in the camera. All of Clark's P2 cameras have proxy
video encoder cards installed in them as indicated on the top rear of the camera.
There are 4 steps to record proxy files:
-First you must decide on what media you would like to record your proxy file. (P2, or
both P2 and SD)
-Second you must format your SD card. (...if recording to SD)
-Third you can choose whether to record a timecode super (“window burn”) and where
you would like it in your frame. Keep in mind that this is not a real timecode track, just
characters.
-Fourth you must choose your record rate. (192kbps, 768 kbps, 1500 kbps)
Step 1: Choosing your recording media.
You can record your proxy files in your “contents” folder of the P2 card and/or an SD/SDHC
card.
1. Open the flip down door on the side panel of the camera.
2. Press the THUMBNAIL button to enter thumbnail mode.
3. Press the MENU button to enter the thumbnail menu.
4. Use the ARROW buttons to navigate to OPERATION, then press SET to enter the
OPERATION sub menu.
5. Use the ARROW buttons to navigate to DEVICE SETUP the press SET.
6. Press SET on PROXY.
7. Press SET on REC MEDIA
8. Select P2 or P2&SD
Step 2: Formatting SD card.
If recording to an SD card in addition to P2 you must format your SD card. Clark cameras come
with a 4GB card for recording proxy files. Refer to Chart for record times.
1. Insert your SD card into the side panel of the camera
2. Navigate to OPERATION>FORMAT>SD CARD press SET
C l a r k M e d i a 6 1 0 . 6 9 4 . 9 8 0 0!
P a n a s o n i c Va r i c a m
11
Step 3: Timecode super.
You can provide your proxy with a timecode super or “window burn” for taking editing notes.
1. Navigate to OPERATION>DEVICE SETUP>PROXY>TC SUPER press SET
2. Select OFF, UPPER, or LOWER. Upper will burn timecode in the top of the frame,
lower will insert in at the bottom.
Step 4: Record rate.
There are 3 different record rate settings for your proxies. 192 kbps is the lowest quality, 768
kbps is the mid quality and 1500 kbps is the highest quality. If recording at 192 kbps your video
will not play back at the proper frame rate, it will show you a “scrub” of the frames.
1. Navigate to OPERATION>DEVICE SETUP>PROXY>REC RATE press SET
2. Select your REC RATE
Your proxy files will be in MPEG4 format found in your “contents” folder under “proxy” on
both your P2 and SD cards.
Here is a chart of proxy record times:
C l a r k M e d i a 6 1 0 . 6 9 4 . 9 8 0 0!
P a n a s o n i c Va r i c a m
12
On Set Preparation and Guidelines
This is a guide of on set procedures for checking your cameras condition and settings to be more confident in knowing that your shoot will be a success. This list has been broken into 6 sections: Condition;
External Settings; Internal Settings; Focus; Sample Chart; Verify.
CONDITION:
Here is a list of items to check on the camera;
1) Check all external switches for debris and make sure they function properly.
2) Check all plugs including lens, mic, all BNC connectors and XLR connectors for damage. Make sure
all connections are seated properly.
3) Before mounting the lens, check the CCD filter to make sure it is clear of dust or smudges.
4) Clean both front and rear of the lens with lens cleaner and tissue.
5) Mount the lens to the camera. See that it fits snug with no play and that the plug clicks in with ease.
Make sure the knob on the B4 mount is secure and not bent.
6) Make sure that the CAC function of the camera reads the lens. You will see CAC in the upper left of
the screen if it is active. To make sure the function is turned on, go to:
MAIN MENU>MAINTENANCE>CAC ADJ
*Canon lenses require you to rack though zoom and focus before it will be registered.*
7) Check the battery mount to ensure the pins are not bent or the block is not damaged.
8) Check all screws on the camera body to make sure they are snug, but DO NOT over tighten. (Including the screws on the chrosziel shoe, viewfinder and handle).
9) Check the P2 card slot to ensure each slot is free from debris. Making sure the pins are not bent and
make a clean connection is crucial.
10) Camera should be powered for at least 20 minutes to warm up before being used.
*Titan cannot power camera with on board monitor such as an LH-900, power monitor separate*
C l a r k M e d i a 6 1 0 . 6 9 4 . 9 8 0 0!
P a n a s o n i c Va r i c a m
13
EXTERNAL SETTINGS:
1) Make sure that your color correction and ND filter wheels
are where you want them. (typically 1A when shooting in a
studio with 3200K lights.)
*Remember that the 2700 and 3700 are native 3200K cameras*
2) Make sure that your MON OUT / HD SDI A-B switches are
set as desired. When in MEM mode you will see playback
from that output. Character ON will send characters out of
you monitor output.
3) Make sure that the scene file SD card is in the SD slot. It can
be found in the SD kit in the camera bag if not in camera.
4) Most of the time you want to use the camera in save mode. (Switch is
indicated on the right). This will save the cameras battery life but will
require a couple of seconds in order to start recording. When ON, it
will also turn off your LCD display on the side of the camera. You
can avoid this by going to :
MAIN MENU>SYSTEM SETTING>OPTION MODE>SAVE SW(LCD)>OFF
5) The 3 user switches on the side of the camera can be customized by
going to:
MAIN MENU>CAM OPERATION>USER SW
6) When attaching the paintbox, make sure to power down camera while
plugging in to avoid any power surges.
7) Set timecode. Default setting is NDF but if doing DF time-of-day you can change by going to:
MAIN MENU>MAIN OPERATION>TC/UB>TC MODE
8) Always start in Gain (L)
9) Make sure Auto Knee is set to OFF
10) If using a Titan power supply, it is always a good idea to piggy back a battery on the Titan in
case of power failure
*If using an RC10 paintbox, the gain, CAM/BARS/AUTO KNEE, shutter and white balance
switches will be inactive.*
C l a r k M e d i a 6 1 0 . 6 9 4 . 9 8 0 0!
P a n a s o n i c Va r i c a m
14
INTERNAL SETTINGS:
This section is particularly sensitive to the order in which sets are done and there are a few questions that must be answered before you can do anything.
- If using the AJ-HPX2700: What Resolution are you shooting? 1080 or 720?
(3700 shoots 1080 only.)
-What codec are you shooting?
AVC-Intra 100: 10-bit/100 MB/4:2:2/square pixels (true 1920x1080)
AVC-Intra 50: 10-bit/50MB/4:2:0/anamorphic pixels (1440x1080)
DVCPRO HD: 8-bit/100MB/4:2:2/anamorphic pixels (1280x1080)
- What is your frame rate?
1) Set up you Chroma DuMonde chart in show lighting.
2) Frame your chip chart and perform your white balance either auto or manual.
If auto: Do an auto white, auto black, then another auto white.
If manual: Make sure to turn off knee first. Expose the luminance first and then
match your red and blue channels.
3) Load scene file from the SD card.
Remember that this does not effect your system mode, codec or frame rate. It will also put you
into the HD gamma curve....change if desired.
4) Select your system mode, resolution, codec and frame rate.
After you are white balanced and your format is selected, you are now ready to look at color.
Remember that color is all subjective. All of the clark standard scene files are just starting points
for building the desired look. ( For explanation of clark scene files, look at page 3.)
5) Use vector scope to make any color adjustments.
5) Turn on knee function (unless in Film-rec).
6) Make sure exposure is where you want it.
C l a r k M e d i a 6 1 0 . 6 9 4 . 9 8 0 0!
P a n a s o n i c Va r i c a m
15
FOCUS:
Both back and front focus are crucial to a shoot. This is why it is very important to be dead on
with both. When shooting green screens, the focus seems to be a little soft in a wide shot. This
is just the optics in the lens and the only thing that can be done to fix this is to add a touch of detail. Remember that reading a clark scene file will add a kiss
of detail automatically (refer to paint settings on pages 4-5).
Whether or not to use detail will need to be discussed with the
client, DP or preferably the editor.
The best way to check your back focus is by using you scope....
1) Check Front focus as usual
2) Pull out wide and select your WFM on the leader
scope. Turn on LINE SELECT. Place your
line on the edge of the chart like this...
3) Open Iris to full wide and turn on shutter. Adjust shutter
until properly exposed.
4) Once you’ve placed your line, select WFM. Here, you
will see the peaks of the chart....
5) Next, you want to magnify this in order to see the definition
between the white and black.
6) Tweak your back focus until the peaks look like this.
7) Check back focus at least twice a day (especially in
climate change).
8) Also remember that VF peaking is a useful tool with focus.
NOT LIKE THIS!!!!
LIKE THIS!!!!!!
C l a r k M e d i a 6 1 0 . 6 9 4 . 9 8 0 0!
P a n a s o n i c Va r i c a m
16
SAMPLE CHART:
Here is a sample of a DSC Chroma DuMonde Chart properly exposed using our Clark Standard
scene file. Notice how the points on the vector scope line up in each of the boxes. (It will not be
perfect every time because of varying factors but should be very close). Remember that color is
subjective, therefore you should use this only as a reference point for creating your look.
C l a r k M e d i a 6 1 0 . 6 9 4 . 9 8 0 0!
P a n a s o n i c Va r i c a m
17
VERIFY:
It is always a good idea to be sure of yourself before shooting to lower your margin of error. Below are a few things that can be done to check your work so that you are more confident in the
shoot. Remember that mistakes can cost time and money so anything you can do to avoid them
will help you to have a smooth shoot.
-Double check that your P2 cards are formatted.
- Always use software with a verify system to transfer P2 files.
-If there is an editor/DMT on set it is always a good idea to shoot a test clip and let them ingest
to make sure there will be no issues with the footage.
-There is a MODE CHECK button on the side of the camera. Pressing it will send you through a
series of summary pages when looking through the viewfinder. It is always a good idea to review this before shooting to confirm all of your settings.
-If there is ANY question about what to do, consult the client or call clark.
C l a r k M e d i a 6 1 0 . 6 9 4 . 9 8 0 0!
P a n a s o n i c Va r i c a m
18