1
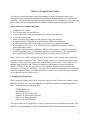
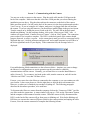
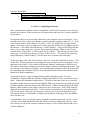
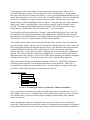
Observer IV
Wireless Internet Camera System
Quick Start Guide
Colorado Video, Inc.
Boulder, CO.
Revised 2/16/2005
Observer IV Quick Start Guide
The Observer camera has many features that enhance its ability to monitor remote areas.
Attempting to learn about these capabilities by wading through the manual can be tedious and
confusing. This tutorial provides step-by-step instructions for the first time user. By completing
these lessons, the user will quickly become familiar with the camera and support software.
What you need to complete this guide.
1.
2.
3.
4.
5.
6.
7.
8.
An Observer IV camera.
The CD that came with the Observer.
A serial cable with a male and a female 9-pin connector on either end.
A 5/64 hex-head wrench.
Either an approved AC adapter for the camera or 5 new AA batteries
An account with a GSM cellular provider that has GPRS data capabilities.
A SIM card for that GSM account and the associated access point name (APN).
An account on a FTP server. You will need the server address, the username, and the
password for the account.
9. A computer with an Internet connection. While a dial-up Internet connection will work, it
will be frustratingly slow. A broadband connection is recommended. The computer must
have a web browser installed. Internet Explorer, Netscape, or Opera will work.
Items 1 and 2 come with the original purchase of the camera. Items 3 and 4 can be obtained at
the local computer or hardware store. The AC adapter in item 5 is an accessory available from
the dealer, it is not required to operate the camera; batteries can be used. Your cellular service
provider supplies items 6 and 7 when you establish a cellular data account to use with the
camera. Colorado Video Inc. provides item 8 free for three months after the purchase of an
Observer IV (see Lesson 5 for details). Any other FTP account to which you have access may be
used. The computer (item 8) should be located near a window or at least by an exterior wall, in
an area that can receive cellular service.
Examining the CD contents
Before going any further, take a quick look at the contents of the CD that came with the camera.
Install the CD in the drive on your computer, go to the My Computer icon and display the CD
drive. You should see the following files;
FTPJPGReader.exe
InstallObserver.exe
Observer IV User’s Guide.pdf
Observer IV Quick Start Guide.pdf
Observer IV Applications.pdf
Observer IV Data Sheet.pdf
The first two files are PC applications, which you will install and use during these lessons. The
other files are documentation, in PDF format, describing the Observer camera and potential
2
applications. PDF files may be viewed and printed with Adobe Acrobat Reader version 4.0 or
higher. You may obtain a copy of the free Acrobat Reader software and installation instructions
for Windows from Adobe
If you are completely unfamiliar with the capabilities of the Observer Camera it may be helpful
to first read the short document “Observer IV Applications” as well as the first two pages of the
“Observer IV User’s Guide”, before continuing here. If you already have a rough idea of what
the camera can do, then forge ahead.
Getting Started
Once you have gathered everything listed above, finish in order, each lesson below. Each lesson
relies on the successful completion of the previous lesson. The entire tutorial will take about
forty-five minutes. Leave the CD in the drive, and this document displayed on your screen. You
can switch between the tasks to be performed and this lesson guide by minimizing one screen
when you want to view the other. That way you always have your lesson in front of you as you
work with the camera and accompanying software.
A good approach is to read each lesson first, before actually completing it. If something is
confusing, or if you wish more in-depth information, click on the references, surrounded by a
rectangle, cited under the For more information heading at the end of each lesson. This will take
you to the relevant portion of the “Observer IV User’s Guide”. When done reading that portion
of the guide, clicking on the back arrow at the top of Acrobat Reader will return you back to your
lesson. (Note that these hypertext links will work only if, both this “Quick Start Guide” and the
user’s guide resided in the same directory – leaving the files on the CD will work fine)
Lesson 1 – Unpacking and Setting Up the Camera
Unpack the camera. The contents should include;
1) Observer Camera
2) Antenna
3) CD with documentation and application software
Use a 5/64 hex head wrench to remove the four bolts holding the bottom plate on. Also remove
the two bolts holding the rear window in place. Make sure the power switch on the back of the
camera is set to OFF. Install the antenna on the camera. Place the SIM card associated with the
GPRS cellular account into the slot in the back of the camera. Note that the orientation of the
card is shown below the slot; the copper contacts should face down. The card will slide almost
all the way into the slot before a ‘click’ is heard. To remove the card, push it all the way in until
another click is heard. To complete these lessons the SIM card must be inserted.
Using the AC adapter.
To use an AC adapter to power the camera, make sure the switch in the battery compartment is
slid down towards the outside wall, away from the white dot. Replace the bottom plate, but
3
leave the four bolts only finger-tight. Next connect the AC adapter by lining up the small white
arrows on the two connectors and mating them by pushing gently. Next, plug the AC adapter
into the wall.
Using internal batteries.
To use AA cell batteries to power the camera, make sure the switch in the battery compartment is
slid up towards the middle, by the white dot. Install the batteries. Note that the correct polarity
is shown on the holders (the flat end of the battery goes towards the spring). Replace the bottom
plate and the four bolts, don’t tighten the bolts.
For more information:
•
•
•
•
•
•
•
•
If items are missing, contact the dealer where you purchased the camera.
The Camera Case and Controls
Removing the antenna
Removing the end caps
Replacing the batteries
The power selector switch
The back panel
Appendix C – Power Supply Considerations and Power Switch Settings
Lesson 2 – Installing the Communications Software
The camera communicates with a desktop PC over a serial port. This connection allows the
camera to be configured and tested. During this lesson you will install the software that creates
the connection, then you will establish communications with the Observer camera.
Find a file named “InstallObserver.exe” on the CD. This utility will set up the
camera connection on you PC. This utility will work for Windows 2000 and
Windows XP operating systems; it does not function for computers using
Windows 98. If you are using Windows 98, see the references under For More
Information. Place the CD that came with the camera in your computer, and in
the root directory click on InstallObserver.exe. Appendix G in the “Observer IV User’s Guide”
describes the use of this utility.
Once the utility has finished, or you have set up the connection manually, there will
be an icon titled “Observer on COM1(2)” on the desktop. You will use this icon to
establish communications with the Observer, whenever you need to change the
configuration or test its operation. You will not have to run the “InstallObserver”
utility again.
For More Information
• Communicating with the Camera
• Appendix D – Establishing Communications with Different Operating Systems
• Appendix G – Using the InstallObserver Utility.
4
Lesson 3 – Communicating with the Camera
You are now ready to connect to the camera. Plug the serial cable into the COM port on the
back of the computer. Make sure that this is the same COM port that you selected during the
installation process above. Plug the other end into the connector on the back of the camera.
Make sure that switch 1 (far left) on the back of the camera is in the down position and switches
2 and 3 are up. If you are using the AC adapter, make sure it is plugged into the wall and into
the camera. If you are using the batteries, you should have installed them in the previous lesson.
Turn the camera on by sliding the power switch to the left. The red LED on the back panel
should start blinking. On the computer desktop, click on the “Observer on COM1” icon. A
window will appear, titled “Connect Observer Camera”, click on “Dial” button. The connection
process takes a few seconds to complete. The LED’s on the back panel of the camera should
progress from red, to yellow, to green. As the connection is made you will see a message briefly
displayed that says “verifying username and password” and a small computer icon will show in
the lower right hand corner of your display. If the connection fails, the message below is
displayed.
For troubleshooting failed connections see the references below. Anytime you want to change
the Observer’s configuration or to test its operation use this procedure to establish
communications with the camera. Normally, you will not have to re-run the InstallObserver
utility (Lesson 2). To re-connect, just hook up the cable, turn the camera on, and click on the
“Observer on COM1” icon, that’s all there is to it.
For now, you want to leave the Observer connected to the computer so you can continue on with
your lessons. It does seem, however, like the right place to describe how to disconnect the
Observer, so when you’re finished you can shut everything off. The following paragraph
describes the disconnect procedure, to be used later.
To disconnect the Observer camera from the computer click on the “Camera on COM1” just like
you did to make the connection. A status window will pop up. Click on the ‘Disconnect’ button,
and the computer will disconnect from the camera. When the camera is fully disconnected the
LED’s on the back of the camera will go from green, to blinking red. Wait for the blinking red
LED then you can turn the camera off (power switch to the center position) and unplug the cable.
For now, leave the camera connected to complete the following lessons.
5
For More Information
• Communicating with the Camera
• Appendix D – Establishing Communications with Different Operating Systems
• Appendix G – Using the InstallObserver Utility
Lesson 4 - Configuring the Camera
.
Once communications with the camera is established, a web browser is used to view web pages
internal to the camera. In this section you will explore these pages and view a picture generated
by the camera.
Now that the Observer is successfully connected to your computer, open a web browser. Go to
the address bar in the web browser interface (usually at the top) and type in http://10.1.1.1. This
is the network address of the Observer IV camera. Click ‘Go’ and the first web page should
appear. This ‘home’ page is an index to the camera pages that will be used to configure and test
the Observer. Click on the first link that says “Camera Settings”. A page will be displayed that
allows you to set the image size, exposure, and compression settings. Make sure the “Large”
selection under “Picture Size” is selected and click on “Submit”. This will take you back to the
home page. At the bottom of the page, click on “Take a Picture”. The camera will capture an
image and display it on the desktop. Click the back arrow to return to the home page.
On the home page, above the “Take a Picture” link is the “Test and Troubleshoot” option. Click
on this link. This page presents several diagnostic tests, which are used in verifying the correct
operation of the camera. Click on the first link titled “Modem Configuration/Cellular Service”.
The camera will perform a diagnostic test on the cellular connection and display the results. This
may take up to two minutes to complete. Note that during these diagnostic tests the modem will
be transmitting and a minimum 20 cm (8 inch) separation distance between the antenna and the
human body must be maintained.
At the end of this test, a page is displayed that resembles that shown in the “Test and
Troubleshoot” chapter, under the “Modem Configuration/Cellular Service” section of the user’s
guide. Inspect the information displayed here. You will see the name of the service provider,
the phone number of the account associated with the SIM card you inserted (not displayed for all
providers) and the connection status to the GPRS network. Find the line that displays the IMEI
number, which is unique to this camera, and write it down for later use. If any of the fields are
displayed in red, the connection failed. Use the references listed below to correct the problem.
Click on the “Back” link at the top of the page to return to the “Test and Troubleshoot” page.
Note that the camera’s serial number is displayed at the bottom of this page Write this number
down for future use.
Congratulations! You’ve set up the camera, established communications with your PC, viewed
an image, and verified that the SIM card and cellular account are functioning correctly. In the
next section you will use the camera to transmit an image over the cellular network and view it
with the desktop PC.
6
For more information:
• Browsing the Camera’s Web Pages.
• Camera Settings
• Appendix E – Test and Troubleshoot.
• Appendix A – Rules, Regulations and Safety Concerns.
Lesson 5 - Transmitting a Picture
Here you will use the “Test and Troubleshoot” page to transmit an image over the cellular
network to the Internet. Then you can use the web browser to view the image. First you need to
go to three of the camera’s web pages and make sure the settings are correct.
Click on the back arrow at the top of the browser until you return to the home page. Here, click
on the “Network Settings” link. On this page, you will enter information about the FTP account
that will receive the images. The camera needs; 1) the Internet address of the FTP server, 2) the
user name of an available account, 3) the password for that account, and optionally 4) any
specific directory within that account that will hold the images.
Colorado Video Inc. provides free access to an FTP account for the first three months after the
purchase of an Observer Camera. You can use that FTP account, or if you have access to
another FTP account, that information can be entered instead. The procedure for entering the
applicable information is the same in either case. This example will use the Colorado Video
account information.
If you are using the account from Colorado Video, Inc., the FTP server address is ObserverIV.com. The username is always a combination of the letters ObIV (case is significant) and the
last six digits of the IEMI. The IEMI is displayed on a sticker on the inside of the bottom plate.
It is also displayed when the “Modem/Cellular Configuration” test is run in the “Test and
Troubleshoot” section (hopefully you wrote it down in the last lesson). The password is the last
six digits of the camera’s serial number. The serial number is displayed at the bottom of the
“Test and Troubleshoot” page. An example of the completed “Network Settings” page using a
hypothetical Colorado Video, Inc. account is shown.
Enter the FTP server address, username, password, and directory into the form. In most
instances the entry for the FTP directory can be left blank, the default directory works fine. For
7
the Colorado-Video account leave the directory field blank. Don’t worry about any other fields
on this page, click ‘Submit’ to send the information to the camera. Two more pages need to be
visited before the camera can transmit an image.
On the home page, click on the “Systems Setting” link. At the bottom of this page you will see a
field titled APN. This is the access point name required by the cellular network that the camera
will use. This is often a single word (e.g. PROXY) or it may look like an Internet Address (e.g.
internet2.voicestream.com). The cellular company with which you established an account
provides the APN. It should have been included with the SIM card that you received. Contact
the cellular provider if you aren’t sure what the correct APN is. Enter the APN in the field.
Note, the day, date, and time at the top of this page. The camera contains an internal clock and
calendar that is used for scheduling picture delivery. While on this page, make sure that the
Time, Date and Day fields are correct. Once set, you will not have to set them again. In the
middle of the page is a field titled “Picture File Name”. Enter a descriptive name for this
camera. (e.g.NewObserver). For this lesson make sure the “Constant Name” button is
highlighted. Click on the ‘Submit’ button. From the home page, click on the “Operating Mode”
link. Make sure the ‘FTP delivery’ option, at the top of the page, is highlighted; the other entries
on this page will not be used in this lesson. Click on ‘Submit’. The camera is now ready to
transmit an image.
From the home page, enter the “Test and Troubleshoot” page once again. Click on the “Image
Delivery Test” link. The camera will acquire an image and deliver it to the FTP server. This
may take up to 2-3 minutes to complete. As the test proceeds, status information will be
displayed on the web page. When the test is done, a successful delivery will display a page on
your computer that resembles that shown in the “Image Delivery Test” section of Appendix E in
the user’s guide. Different FTP servers may provide different feedback to the camera during this
test, therefore the results page that you obtained may not be exactly identical to that shown in the
user’s guide. If the image was successfully delivered “FILE TRANSFER TEST PASSED” will
be displayed at the top of the page. If the test failed “FILE TRANSFER TEST FAILED” is
shown. Utilize the references below for troubleshooting information. Click on the back arrow
and return to the “Test and Troubleshoot” page.
For More Information
• Network Settings
• System Settings
• Operating Mode
• Test and Troubleshoot
• Appendix F – Network Services and Cell Phone Access.
8
Lesson 6 -Viewing the Image
There are a few ways to view the image that has been just delivered to the FTP server. This
lesson will use the simplest approach; using the web browser. Leaving the Observer connected
to your PC, go to the address bar at the top of the browser. Type in ftp://observer-iv.com. This
is the address of the Colorado-video FTP server. If you configured the camera to utilize another
FTP server, use that address. Click on ‘Go’. A window will pop-up allowing you to enter the
username and password that you used to configure the FTP settings in the camera. Enter the
same values you used in Lesson 5 and click ‘OK’. The contents of that FTP account will then be
displayed. Hopefully, you see a file named the same as the camera name that you entered in the
“System Settings” in Lesson 5. The file will have a .jpg extension (e.g. NewObserver.jpg).
Click on the file name to see the image. If the file is not present see the references below for
troubleshooting ideas.
For more information:
•
How to Access FTP Sites Directly by Using Internet Explorer
Lesson 7 -Viewing Images with the FTPJPG Application
The FTPJPG application provides a powerful tool for handling incoming images from the
Observer. In this section you will install the application and use it to view the image previously
uploaded to our FTP server. For now, leave the Observer IV connected, you will return to it
shortly. Minimize the browser that you’ve been using by clicking on the “Minimize” box in the
upper right hand corner. Now you will install the FTPJPG viewer application.
Insert the CD that came with the camera into the computer drive. On the CD
find the file FTPJPGReaderInstall.exe. Click on this file and follow the
installation instructions.
The installation procedure will leave the FTPJPG icon on the desktop. Click
on this icon to launch the application. At the top of the application, select
File->Configure. This will bring up the configuration window. Select
“Continuous Mode”. Check the boxes titled “Alert when image refreshed”
and “Archive Path”, then “OK”. Now select File->FTP JPG this will bring up the FTP Access
window. Enter the FTP Address, user ID and password that you used in Lesson 5. When the
FTP information is entered click on “Connect”. The application will access the FTP server and
display all the files that reside there. The example below shows the settings for the NewObserver
camera for the hypothetical Colorado-Video, Inc. FTP account setup in Lesson 5.
9
If the image delivery test in lesson
5 completed successfully the
transmitted image will be listed.
Check the box next to the file
name (NewObserver.jpg) and click
on ‘Open’ at the bottom of the
window. The main page will
appear and the selected image will
be displayed. Note the flashing
camera icon in the upper left hand
corner; this indicates that a new
image has just been retrieved.
For more information:
• Using the FTPJPG Application
Lesson 8 - Configure the Camera for Independent Operation
In this section you will configure the camera to come on every 15 minutes, deliver an image,
then shut off. In the previous lessons you prompted the Observer to place an image on the FTP
server by running a test in the “Test and Troubleshoot” section. In this lesson you will configure
the camera to do this automatically. Minimize the FTPJPG Reader application by clicking on the
“Minimize” box in the upper right. You will come back to that application after this lesson.
The Observer should still be connected to your computer from Lesson 5. If you disconnected
from the camera, perform the connect process as outlined in Lesson 3. If you’re still connected,
return to the web browser by clicking on the minimized browser icon at the bottom of the screen.
If the FTP window with the Observer image, from Lesson 5, is still showing, use the back arrow
at the top, to return to the Observer home page.
From the camera’s home page go to the “Operating Mode” page, and click on the “Schedule”
link located in the paragraph titled “Activation”. This new page will display the days of the
week, hours and 15 minute intervals, that you will use to create a schedule. You can select the
days and the times you want the camera to turn on and deliver a picture. The time (hours and
minutes) will be the same for all days that you choose. To choose a single item in the list, click
on it. To choose multiple items within a list (days, hours or minutes) use the ‘control’ key in
conjunction with a right mouse click.
10
For the purpose of this lesson, choose the next quarter hour time for today. That is, if it’s
currently Wednesday at about 1:30 in the afternoon, choose Wednesday at 13:45 (the quarter
hour time expressed with a 24 hour clock format). In fact, get brazen and highlight the next four
quarter hour increments (13:45, 14:00, 14:15 and 14:30 in this example). You’ve worked hard to
get this far, you might as well get four pictures for your efforts. Once the days, hours and
minutes that you want are highlighted, click on ‘Submit’. This will return you to the ‘Operating
Mode’ page. On the “Operating Mode” page, make sure that the “Enable Schedule” box is
checked. This turns on the schedule that you just defined. The FTP delivery button, under
Image Delivery, should still be selected, from Lesson 5. Click on ‘Submit’.
You’ll probably feel better going to the “Systems” page and checking that the Time, Date, and
Day settings are all properly set and that the FTP settings on the “Network Settings” page still
show the proper account information. All information on these pages should remain as you set it
in Lesson 5, even if you’ve shut the camera off between then and now.
That’s all the camera needs to turn on automatically and deliver a picture; the correct date and
time, the desired schedule, and the correct FTP parameters. Briefly go back to Lesson 3 and read
the last paragraph pertaining to disconnecting the camera. Now disconnect the camera and turn
it off by sliding the switch to the Off (center) position. Find a safe location, preferably a
window with a nice view, to place the camera. Slide the power switch to the Auto (right-most)
position. The camera will turn on at the next scheduled time. Leave the camera to do its own
thing and return to the computer. Click on the FTPJPG application that you installed, configured
and minimized in Lesson 7. Your first picture from Lesson 5 should still be displayed.
Shortly the camera will turn on and transmit an image to the server. The FTPJPG application
will bring it down and place it on the display and archive it to the hard disk. While you’re
waiting for this to happen, go on and read Lesson 9. If your computer is equipped with sound
you’ll hear a nifty little ding-a-ling when the picture is retrieved.
For more information:
• Operating Mode
• System Settings
• Network Settings
• Schedule
• Power mode options
Lesson 9 - Preparing the Observer Camera for Outdoor Installation
Now’s a good time to read about the proper assembly of the camera for outdoor use. If you’ve
just finished Lesson 8, you’re waiting for the camera to deliver its pictures to your PC. For now
just read this lesson, you can practice the proper assembly and disassembly later, when the
camera is not in use.
Before installing the camera in an outside location, you need to make sure it is completely
assembled. When properly assembled, the camera will withstand the harsh outdoor environment.
During the first lesson, you removed the back window and loosened the four bolts that hold the
11
bottom plate on. This was necessary to access the battery compartment and the controls and
connector on the back plate. Reassemble the camera by replacing the back window with the
rubber gasket facing the inside of the camera. Replace the two bolts that secure the window and
use the hex-head wrench to tighten the bolts about ½ turn beyond finger-tight. Use the same
procedure to replace the front window, whenever it has been removed. Finally, tighten the four
bolts holding the bottom plate on. Again, use the wrench to tighten them about ½ turn beyond
finger tight.
Note that the front and rear windows are held securely by the two bolts that pull them into the
camera body as well as by pressure from a well secured bottom plate. Therefore, the front and
rear windows are removable only after these main bolts have been removed and the bottom plate
bolts are slightly loosened. Conversely, the front and rear windows will be weather-tight
following re-assembly only after the two main bolts as well as the bottom plate bolts have been
re-tightened. Do not over-tighten any bolts; about ½ turn beyond finger tight is sufficient.
When properly assembled, the Observer can withstand inclement weather. It is not made to
survive immersion or extreme conditions.
For More Information
• The Camera Case and Controls
• Removing the end caps
• Installation
Lesson 10 – Are We There Yet?
If its been more that 15 minutes since you concluded Lesson 8, the camera should have turned on
and delivered a picture by now. Upon delivery of a new image the FTPJPG application will
retrieve and display it on the desktop as well as store it on the hard drive. Maximize the FTPJPG
application that you left running in Lesson 8. You should see the new image and a blinking
camera in the upper corner of the picture. Click on the picture and the camera icon will go away,
its used to signify that you’re looking at new image. If your computer has sound and the ‘Alert
When New Image” box is checked in the file->configure menu, you will also get a bell-like
sound when the new image is delivered.
If it seems like more then 15 minutes, be patient. Depending on exactly when the schedule was
set, the camera may skip what would seem like should be the first time, and start with the next
scheduled time. This occurs if the first scheduled time was set too close to the actual time.
Since it takes a few seconds to set the schedule internally after ‘Submit’ and to allow the camera
to be shut off, the first time may be skipped, and the second time then becomes the starting point.
If that’s about as clear as mud to you, don’t worry about it. Just remember that sometimes the
very first scheduled time may be missed, after that, the schedule will be faithfully followed.
Now if it has been more than 30 minutes and still no picture, then something’s not right. See the
troubleshooting references below. Hopefully, the image has appeared. They will continue to
appear on schedule as long as the Observer’s power switch is in the Auto mode. In this
configuration the camera is actually turning itself on and off on schedule. The batteries can last
12
a very long time, delivering up to 500 pictures, unattended, over the course of many months or
even a year.
Note that the FTPJPG application will retrieve and store pictures only while it is running on your
computer. If you close the application, the retrieval process stops. The Observer will still turn
on as scheduled and deliver the images to the FTP server, however each new image will
overwrite the previous one on the server, the older images will be lost. To have a complete
record of the series of images captured, FTPJPG must be running while the camera is operating.
For More Information
•
Using the FTPJPG application
Commencement
You’re now a proud graduate of the Observer IV Quick Start Guide. Lets review your
accomplishments. You’ve mastered the following;
Disassembling and assembling the camera to ensure weather-tight outdoor operations.
Setting up the camera for battery or AC adapter operation.
Installing the camera communication software and using it to establish a connection to
the camera.
Browsing the web pages internal to the camera, and setting configuration parameters.
Using the “Test and Troubleshoot” section to upload an image to an FTP account.
Configuring the camera for ‘standalone’ scheduled operations.
Installing and using the FTPJPG Reader application.
Although, you now have a good understanding of how the camera operates, there is more.
Additional features exist that provide the camera with even more capability to address a wide
variety of monitoring situations. These issues are covered in the “Observer IV User’s Guide”.
There’s no hurry. Use what you learned in these lessons to set the camera up outside and deliver
several pictures daily. Practice using the FTPJPG Reader application to capture and review
those images.
13