1
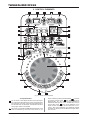
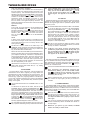
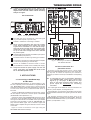
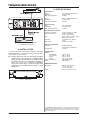
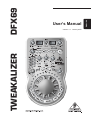
Version 1.0 January 2004 ENGLISH DFX69 TWEAKALIZER Users Manual TWEAKALIZER DFX69 IMPORTANT SAFETY INSTRUCTIONS DETAILED SAFETY INSTRUCTIONS: 1) Read these instructions. 2) Keep these instructions. 3) Heed all warnings. 4) Follow all instructions. CAUTION: WARNING: To reduce the risk of electric shock, do not remove the top cover (or the rear section). No user serviceable parts inside; refer servicing to qualified personnel. To reduce the risk of fire or electric shock, do not expose this appliance to rain and moisture. This symbol, wherever it appears, alerts you to the presence of uninsulated dangerous voltage inside the enclosurevoltage that may be sufficient to constitute a risk of shock. This symbol, wherever it appears, alerts you to important operating and maintenance instructions in the accompanying literature. Please read the manual. 5) Do not use this apparatus near water. 6) Clean only with dry cloth. 7) Do not block any ventilation openings. Install in accordance with the manufacturers instructions. 8) Do not install near any heat sources such as radiators, heat registers, stoves, or other apparatus (including amplifiers) that produce heat. 9) Do not defeat the safety purpose of the polarized or grounding-type plug. A polarized plug has two blades with one wider than the other. A grounding type plug has two blades and a third grounding prong. The wide blade or the third prong are provided for your safety. If the provided plug does not fit into your outlet, consult an electrician for replacement of the obsolete outlet. 10) Protect the power cord from being walked on or pinched particularly at plugs, convenience receptacles, and the point where they exit the unit. 11) Only use attachments/accessories specified by the manufacturer. 12) Use only with the cart, stand, tripod, bracket, or table specified by the manufacturer, or sold with the apparatus. When a cart is used, use caution when moving the cart/apparatus combination to avoid injury from tipover. 13) Unplug this apparatus during lightning storms or when unused for long periods of time. 14) Refer all servicing to qualified service personnel. Servicing is required when the apparatus has been damaged in any way, such as power supply cord or plug is damaged, liquid has been spilled or objects have fallen into the apparatus, the apparatus has been exposed to rain or moisture, does not operate normally, or has been dropped. 2 TWEAKALIZER DFX69 TWEAKALIZER High-End DJ Effects Processor with Real-Time Control DFX69 s Desktop DJ effects machine with 6 simultaneous functions and super-intuitive user interface s Incredible real-time scratch function for any input signal s Super-fast and accurate auto-BPM counter s Virtually inaudible Pitch Transposer to correct track speed adjustments s Breathtaking LFO-controlled effects section including delay and flanger s Awesome filter effects with 3 filter types (low, high and band pass), 3 filter modes (auto, manual, LFO) and separate resonance control s Groove- and BPM-related loop sampler with up to 16 seconds of memory s Ultra-steep 3-band kill EQ (-40 dB) with separate cut buttons per band s Switchable phono/line input with built-in high-precision phono preamplifier for connecting turntables and CD sources s Flexible Signal/Effect balance and input gain control s Ultimate sonic resolution with ultra high-resolution 24-bit A/D and D/A converters and high-performance 24/48-bit DSP s Gold-plated RCA connectors for excellent audio quality s Ultra-rugged construction ensures long life, even under most demanding conditions s Designed in Germany. Manufactured under ISO9000 certified management system 3 TWEAKALIZER DFX69 FOREWORD Dear Customer, Welcome to the team of TWEAKALIZER users and thanks for expressing your confidence in BEHRINGER products by purchasing the DFX69. Writing this foreword for you gives me great pleasure, because it represents the culmination of many months of hard work delivered by our engineering team to achieve a very ambitious goal: to design an outstanding DJ effects processor that offers remarkable functions as well as maximum flexibility and performance. The task of designing our new TWEAKALIZER represented a great deal of responsibility, which we surmounted by focusing on you, the discerning user and DJ. Meeting your expectations also meant a lot of work and night shifts. But it was fun, too. Developing a product usually brings a lot of people together, and what a great feeling it is when everyone who participated can be proud of what theyve achieved. It is our philosophy to share our enjoyment with you, because you are the most important member of the BEHRINGER team. With your highly competent suggestions for new products youve made a significant contribution to shaping our company and making it successful. In return, we guarantee you uncompromising quality (manufactured under ISO9000 certified management system) as well as excellent technical and audio properties at an extremely reasonable price. All of this will enable you to give free rein to your creativity without being hampered by budget constraints. We are often asked how we manage to produce such highquality devices at such unbelievably low prices. The answer is quite simple: its you, our customers! Many satisfied customers mean large sales volumes, enabling us to get better purchasing terms for components, etc. We think its only fair to pass this benefit on to youafter all, your success is our success! I would like to thank all of those who have made the TWEAKALIZER possible. You have all made your own personal contributions, from the developers and the many other employees at this company to you, the BEHRINGER user. My friends, its been worth the effort! Thank you very much, Uli Behringer 4 TABLE OF CONTENTS 1. INTRODUCTION ......................................................... 5 1.1 Before you get started ................................................... 5 1.1.1 Shipment ............................................................... 5 1.1.2 Initial operation ...................................................... 5 1.1.3 Warranty .............................................................. 5 1.2 The users manual .......................................................... 5 2. CONTROL ELEMENTS ............................................... 6 2.1 Input section ................................................................... 6 2.2 Sampler ........................................................................... 7 2.3 Effects section ............................................................... 7 2.3.1 FILTER ................................................................... 7 2.3.2 FLANGER ............................................................. 8 2.3.3 DELAY .................................................................. 8 2.3.4 SCRATCH ............................................................. 8 2.3.5 BPM COUNTER ..................................................... 8 2.4 Connections .................................................................... 9 3. APPLICATIONS .......................................................... 9 3.1 Connecting to the effects loop of a DJ mixer ................ 9 3.2 Direct connection of a phono/line source ...................... 9 4. INSTALLATION ......................................................... 10 5. SPECIFICATIONS ..................................................... 10 6. WARRANTY .............................................................. 11 TWEAKALIZER DFX69 1.1.2 Initial operation 1. INTRODUCTION The BEHRINGER TWEAKALIZER DFX69 is a flexible DJ effects processor that gives you an important edge for your mixes and performances. Its unique features let you work in completely new and creative ways. The TWEAKALIZER can be used in many ways and is breeze to operate, allowing you to expand your creativity. Times are changing quickly and you have to stay ahead of the game if you dont want to be left behind. To this end, we have developed an excellent DJ effects processor with the most popular new features and technologies. It is perfectly suited for use in dance clubs or for DJ systems. Be honest: who really likes to read manuals? We know you want to get started right away, but we strongly suggest that you take the time to read these instructions so that you fully understand and are able to properly use all the features your TWEAKALIZER has to offer. The few minutes it takes you will be well worth it. + The following users manual is intended to familiarize you with the units control elements, so that you can master all the functions. After having thoroughly read the users manual, store it at a safe place for future reference. + + + + A power supply unit that meets the necessary safety requirements is enclosed for connecting the TWEAKALIZER to the mains. When the DFX69 is connected to the mains via the power supply unit it is automatically switched on. + + Never connect the TWEAKALIZER to a power supply unit that is already plugged into the mains! Always connect the DFX69 to the power supply unit first and then plug the power supply into the mains. Please make sure that the unit is grounded at all times. For your own protection, you should never tamper with the grounding of the cable or the unit itself. 1.1.3 Warranty 1.1 Before you get started Please take a few minutes and send us the completely filled out warranty card within 14 days of the date of purchase to assure trouble-free warranty processing in the future. You may also register online at www.behringer.com. The serial number needed for the registration is located at the top of the unit. Failure to register your product may void future warranty claims. 1.1.1 Shipment 1.2 The users manual The TWEAKALIZER was carefully packed at the assembly plant to assure secure transport. If the condition of the cardboard box suggests that damage may have occurred, please inspect the unit immediately and look for physical indications of damage. + Please make sure the unit is provided with sufficient ventilation. To avoid overheating, never place the TWEAKALIZER on top of an amplifier or in the vicinity of a heater. Damaged equipment should NEVER be sent directly to us. Please inform the dealer from whom you acquired the unit immediately as well as the transportation company from which you took delivery of the unit. Otherwise, all claims for replacement/repair may be rendered invalid. This users manual gives you an overview of the functions and control elements of your TWEAKALIZER and offers detailed information about possible applications. To facilitate quick reference, control elements have been described in groups according to their function. Should you need detailed information about specific topics not covered in this manual, please visit our website at www.behringer.com. To assure optimal protection of your DFX69 during transport, we recommend utilizing a carrying case. If the unit needs to be shipped, please always use the original packaging to avoid damage. Never let unsupervised children play with the DFX69 or with its packaging. Please dispose of all packaging materials in an environmentally-friendly fashion. 1. INTRODUCTION 5 TWEAKALIZER DFX69 2. CONTROL ELEMENTS Fig. 2.1: DFX69 control elements 2.1 Input section The IN LEVEL control adjusts the level of the input signal. The OVERLOAD LED (below the control) illuminates when the signal level is too high. Adjust the input signal level so that the LED does not illuminate. Occasional illumination during signal peaks is acceptable. The DISPLAY indicates the BPM (Beats Per Minute) of the music as detected by the built-in beat counter. If you 6 select an effect by pressing the ENCODER or operate the sampler PITCH control , the effect type will be displayed (DLy, FLg, FLt, PIt). If you have selected the SCRATCH effect (see ch. 2.3.4 SCRATCH) and you turn the MIX control SCr will be displayed. If you adjust the filter sensitivity in AUTO mode (see ch. 2.3.1 Filter), SEn will be displayed. If no additional changes are made, the display shows the BPM value again after a few seconds. 2. CONTROL ELEMENTS TWEAKALIZER DFX69 The MIX control adjusts the volume ratio between the original signal and the effects signal. When the control is turned all the way to the left, you hear only the original (DRY) signal; turning it all the way to the right you hear only the selected effects (WET) signal. To change the mix ratio of a previously activated effect, ) or DELAY ( ) key. The LED first tap the FLANGER ( of the respective ON switch ( or ) will then blink rapidly. You can also adjust the mix ratio when the SCRATCH function is active. + The MIX control adjusts the mix between the original signal and the effects signal of the most recently selected effect (indicated by rapid blinking of the ON key of the corresponding effect). To adjust the mix ratio of a previously activated effect, first dial up this effect using the corresponding effects key (see , and ). The PITCH control lets you change the pitch of the input signal (+/-12%). PITCH value (from -12 to +12%) DISPLAY. If you press ) to switch between different the ENCODER (see effects, the editable time parameter is briefly shown. The remaining recording time of a sample and the sampler PITCH value are also shown here (see also ch. 2.2 Sampler). If no additional changes are made, your DFX69 automatically returns to PITCH display mode after a few seconds. 2.2 Sampler The BEAT keys select the length of the sample you want to record. You can choose between 1, 2, 4, 8 or 16 bars, whereby the actual length of the sample is detected on the basis of the current BPM value. The corresponding LED will illuminate to display the selected number of bars. Once you start recording, it will automatically end at the end of the selected length of recording time. You can also define your own sample length by stepping through all bar values until the right LED (16) blinks. You can now start and stop recording at will (see ) for any length of sample up to 16 bars. REC starts recording a sample; the remaining recording time of the selected sample length is shown in the left display (see ). Pressing REC again ends the recording. The sampler records the signal connected to the input of your DFX69. PLAY/STOP plays the sample you just recorded (PLAY: the sample signal is played in a continuous loop). If you hit PLAY/STOP again, the loop stops (STOP). If you press REC to start recording a sample and press PLAY/STOP during recording, the sample is recorded in full length and then directly played back. + If you select one of the sample lengths (1, 2, 4, 8 or 16) and end the recording using the REC key before the selected number of bars has played, the remaining time is filled with silence. Therefore, the actual sample length remains unchanged. To define your own sample length, you must use the method described above (see ). SHOT plays the sample as long as you keep the SHOT key pressed. FX determines whether the sampler signal is routed to the effects processor. When the FX button is in (depressed), only the sampler signal is fed to the effects path (the input signal bypasses the effects processor; it remains dry). When the FX button is out, only the input signal is routed to the effects processor; the sampler signal remains dry. The REV key reverses the sample. When depressed (in), the sample will be played backwards when you press the PLAY/STOP or SHOT key. PITCH adjusts the sample tempo and pitch (-12 to +12%). The PITCH value is indicated in the display . When you are finished adjusting the sample pitch, the display once again shows the PITCH value of the input signal. 2.3 The effects section The DFX69 features a 3-band kill EQ (LOW, MID and HIGH). That means that you can attenuate (cut or lower) individual frequency bands to a much greater extent (-40 dB) than you can increase them (+12 dB). In addition to the EQ controls, each frequency band features a CUT key. Pressing CUT will immediately attenuate the respective frequency band by -40 dB, allowing you to create very interesting sound effects. The ENCODER has two functions: By pressing the ENCODER, you select an effect to be edited. This effect is then shown in the display . By turning the ENCODER, you can now continuously adjust the LFO and delay times ). (in contrast to the BEAT keys located beneath; see The parameter value is always shown in the display while you are editing. Explanation: LFO stands for Low Frequency Oscillator. This is a low-frequency signal that modulates effect parameters such as delay time, flanger resonance frequency and filter frequency. The BEAT keys also let you dial up LFO and delay times, but in this case there are predetermined increments (rather than continuous adjustment). These times always refer to the current BPM value. The LFO and delay times are shown on the corresponding LEDs located above the ENCODER. 2.3.1 FILTER The filter effect is a special feature of the DFX69. It offers three different filter types that can be operated in three different modes. The filter types and modes are explained in detail under and . ON activates/deactivates the FILTER effect of the DFX69. The LEDs around the DATAWHEEL (see ) indicate the current filter frequency. TYPE selects the filter you wish to use: LOW PASS (LP): The low pass filter attenuates (cuts or lowers) frequencies above a cut-off frequency by 24 dB/octave. The cut-off frequency is determined by the selected filter ) that creates the filter effect. mode (see HIGH PASS (HP): The high pass filter attenuates frequencies below a cut-off frequency by 24 dB/octave. Here, the cut-off frequency is also determined by the selected filter mode (see ). BAND PASS (BP): The band pass filter attenuates all frequencies except for those defined by an adjustable middle frequency. It has a rating of 12 dB/octave. The middle frequency is determined by the filter mode here as well (see ). MODE selects a filter mode. The following three modes are available: LFO mode, MANUAL mode and AUTO mode. Press the MODE key briefly to alternate between the LFO and MANUAL modes. To activate the AUTO mode, keep the MODE key pressed for a few seconds. Pressing MODE again briefly reactivates LFO mode. 2. CONTROL ELEMENTS 7 TWEAKALIZER DFX69 LFO (Low Frequency Oscillator) In this mode, the LFO modulates the cut-off frequency from the lowest to the highest frequency and back to the lowest frequency. The modulation speed can be either adjusted continuously using the ENCODER or incrementally and ). The increments using the BEAT keys (see available via the BEAT keys are always relative values expressed in beats. For example, if you enter 2, it will take two beats for the cut-off frequency to modulate from the lowest to the highest frequency and back. The DFX69 calculates the time on the basis of the current BPM signal automatically. + 2.3.3 DELAY The DELAY effect lets you create repetitions of the input signal, resulting in various effects, from subtle to wild. The time gap between the original signal and the repetitions depends on the delay time you set. MANUAL In this mode, the cut-off frequency can be adjusted using the large DATAWHEEL (see ). This also allows realtime filter modulation. You can adjust the reaction time of the filter using the ENCODER or the BEAT keys located beneath it (see and ). The shorter the reaction time, the quicker the filter reacts to the DATAWHEEL movement. ON activates/deactivates the DELAY effect of the DFX69. To set up the delay time, first dial in the desired DELAY ). Now, use the BEAT effect using the ENCODER (see keys located beneath it to select one of the predetermined delay times. For example, a value of 2/1 will result in a half-note delaythe repeats will be 2 beats or quarter notes apart. If you select 1/2, the repeats will be half a beat or an eighth note apart, and so on. The actual length of a beat always depends on the current BPM value. By turning the ENCODER, you can select other times, for example to create triplet delays. AUTO In AUTO mode, the filter frequency is modulated via the level of the music signal. In this mode, it is important to set up the filter sensitivity so that it correctly reacts to the input signal (see ). FILTER has a function similar to the SHOT key in the SAMPLER section. Pressing and holding the FILTER key activates the FILTER effect. As soon as you release the key, the FILTER effect is deactivated. When in AUTO mode, the FILTER key has an extra function: keeping it pressed while turning the DATAWHEEL allows you to adjust the sensitivity of the filter to compensate for varying levels between tracks, which will cause the filter to react differently to various tracks. For example, if the volume of one track is lower than that of a previous track, you should increase the filter sensitivity so that the filter will react appropriately to the rhythm. RESONANCE increases the cut-off frequency of the LOW PASS and the HIGH PASS filter (0 - 10), adding presence to the effect. The DELAY key activates the effect and keeps it active as long as you keep the key pressed. When you release the key, the effect is deactivated. + 2.3.4 SCRATCH SCRATCH activates/deactivates the SCRATCH function. The word flange means tape spool, and this explains the characteristics of the effect. Originally, the flanger effect was generated with two tape recorders that ran synchronously. The same audio signal was recorded and played back on both machines (e.g. a guitar solo). Applying pressure on the left spool of one of the machines caused the spool and thus the playback speed to slow down. The generated delay resulted in phase shifting of the signals. ON activates/deactivates the FLANGER effect on the DFX69. To determine the speed of the effect, first dial up the FLANGER effect by pressing the ENCODER (see ). Then, use the BEAT keys located beneath it to dial up one of the predetermined speed values. This value is a relative value that is calculated based on the current BPM value. By turning the ENCODER, you can continuously adjust the flanger speed. By turning the DATAWHEEL while the effect is active (see ), you can create additional FLANGER modulation. Holding the FLANGER key and turning the DATAWHEEL creates a feedback modulation which smoothly appears/disappears within four beats. The FLANGER key keeps the effect active as long as the key is pressed. Releasing the key deactivates the effect. 8 If DELAY is the most recently activated effect (indicated by rapid blinking of the ON key LED), you can use the MIX control (see ) to adjust the mix between the delay effect and the original signal. This applies to all effects (see ch. 2.1). This effect simulates the scratching that turntablists are known for. Your DFX69 continuously records a sample of four to eight bars (depending on the tempo of the music) that will be used for ) lets you this effect. Turning the big DATAWHEEL (see achieve the scratched sound. + 2.3.2 FLANGER If the FLANGER effect is the most recent effect you dialed in (indicated by rapid blinking of the ON key ) to set LED), you can use the MIX control (see up the volume ratio between this effect and the original signal. This applies to all effects (see ch. 2.1). After activating the SCRATCH function (the SCRATCH key blinks), you can use the MIX control (see ) to adjust the mix between the scratch signal and the original signal. This also applies to all effects (see ch. 2.1). When in SCRATCH mode, turning the DATAWHEEL lets you scratch the input signal, just like you would on a turntable. 2.3.5 BPM COUNTER The DFX69s BPM counter is used to synchronize the effects with the original signal. It detects a tracks tempo and displays it in BPM (beats per minute). The BPM counter can be used in two different ways: manually or automatically. The current BPM value is shown in the display . BPM-TAP switches the BPM counter into manual mode. If you tap this key repeatedly in rhythm with the music, an average BPM value is detected and a value is set. You can readjust the BPM value by tapping in rhythm with the music again. The AUTO key activates the automatic mode. The BPM counter automatically detects the BPM value based on the input signal. + Whenever you power up your DFX69, the BPM counter is initially in AUTO mode. 2. CONTROL ELEMENTS + TWEAKALIZER DFX69 If there is no signal present (or the signal is too weak), the BPM display begins to blink. This also happens when the beat counter cannot accurately analyze the signal. 2.4 Connections Fig. 2.2: The rear panel connections The LINE input is for connection of a line-level signal (e. g. the main outputs of your DJ mixer). + PHONO is intended for connecting a turntable. Never connect equipment with line-level signals to the highly sensitive phono inputs! The output signal level of turntables is in the millivolt range, while CD players and tape decks have signal levels measuring in volts. Simply put, line-level signals are up to 100 times stronger than those intended for phono inputs. PHONO/LINE selects between the PHONO inputs (button out) and LINE inputs (button in). The GND connector is used for grounding your turntable. The OUTPUT connectors are used for feeding an amplifier or a DJ mixer (depending on intended use). Fig. 3.1: Connecting to the effects loop of the PRO MIXER VMX1000 Use the AC POWER IN connector socket to connect your DFX69 with the mains via the included power supply. + Always disconnect the power supply unit from the power outlet when your DFX69 will not be in use for an extended period of time. 3. APPLICATIONS 3.2 Direct connection of a phono/line source Of course, you can also connect a line or a phono signal directly to the TWEAKALIZER without using a mixer. In this case, you only have to connect the outputs of your turntable or CD player (or another line source) to the DFX69s corresponding inputs. + 3.1 Connecting to the effects loop of a DJ mixer The TWEAKALIZER DFX69 is an optimal addition to any DJ mixer, especially if the mixer features an integrated effects loop. BEHRINGER offers a wide range of mixers that are particularly well suited for these kinds of applications. An example of such mixers would be our professional VMX series of DJ mixers. To insert your DFX69 into the effects loop of a DJ mixer, connect the send outputs of the mixer to the line inputs of the DFX69 (PHONO/LINE button depressed or in). Connect the outputs of the TWEAKALIZER to the return inputs of the mixer, so that the effects signal is mixed with the mixers main signal. It makes sense to turn the MIX control of your DFX69 all the way to the right (WET), so that the TWEAKALIZER only plays back the effects signal. The mix between original and effects signals is adjusted using the send and/or return controls on the mixer. To eliminate the risk of permanently damaging your TWEAKALIZER, please never connect line signals (e. g. a CD player, an MD player or a tape deck) to the highly sensitive phono inputs. The phono inputs are exclusively for connecting turntables. The output signal of the DFX69 can now be connected to the input of a power amplifier, recording device, etc. In this application, you will need to use the MIX control to attain the desired balance between the original signal and the effects signal. The following illustration shows the direct wiring of the TWEAKALIZER with a turntable and a HiFi amplifier. Please be sure that the PHONO/LINE switch of your DFX69 is in its correct position (not depressed or out). Figure 3.1 shows a connection of this type using the PRO MIXER VMX1000 as an example: 3. APPLICATIONS 9 TWEAKALIZER DFX69 5. SPECIFICATIONS AUDIO INPUTS Type Impedance Max. input signal level Line, 0 dB gain, unbalanced 47 kΩ @ 1 kHz 22 dBu Type Impedance Max. input signal level Phono, 40 dB, unbalanced 47 kΩ @ 1 kHz -30 dBu AUDIO OUTPUTS Type Impedance Max. output signal level Line, unbalanced 100 Ω @ 1 kHz 12 dBu SYSTEM SPECIFICATIONS Frequency response Signal-to-noise ratio THD Crosstalk Fig. 3.2: Direct connection of a turntable to the TWEAKALIZER DFX69 4. INSTALLATION For audio connections, you will need a standard, commercially available RCA cable. For optimal results, always use high-quality cables, adapters and connectors. + Always make sure that only technically qualified people install and operate your TWEAKALIZER. During and after the installation, all those handling the equipment need to be sufficiently grounded in order to avoid the potentially damaging electrostatic discharge or similar damage that could have a permanent adverse effect on your equipment. Gain range DIGITAL PROCESSING Converter 10 Hz to 22 kHz, +1/-3 dB 98 dBu, a-weighted, 22 Hz - 22 kHz (Line) 0,007 % typ. @ +6 dBu, 1 kHz, amplification 1 (Line) < -83 dB, 22 Hz - 22 kHz (Line) -20 dBu to +10 dBu Sampling rate 24-Bit Delta-Sigma, 64/128 times oversampling 44.1 kHz POWER SUPPLY Voltage USA/Canada U.K./Australia Europe Japan Power consumption Fuses 120 V~, 60 Hz 240 V~, 50 Hz 230 V~, 50 Hz 100 V~, 50 - 60 Hz see adapter labels! external PSU DIMENSIONS/WEIGHT Dimensions Weight approx. 3 1/5" (81 mm) x 6 3/5" (169 mm) x 12 1/5" (309 mm) approx. 1 kg (2 lbs. 2 oz.) Fig. 4.1: RCA cable BEHRINGER makes every effort to ensure the highest standard of quality. Necessary modifications are carried out without notice. Thus, the specifications and design of the device may differ from the information given in this manual. 10 5. SPECIFICATIONS TWEAKALIZER DFX69 6. WARRANTY § 1 WARRANTY CARD/ONLINE REGISTRATION To be protected by the extended warranty, the buyer must complete and return the enclosed warranty card within 14 days of the date of purchase to BEHRINGER Spezielle Studiotechnik GmbH, in accordance with the conditions stipulated in § 3. Failure to return the card in due time (date as per postmark) will void any extended warranty claims. Based on the conditions herein, the buyer may also choose to use the online registration option via the Internet (www.behringer.com or www.behringer.de). § 2 WARRANTY 1. BEHRINGER (BEHRINGER Spezielle Studiotechnik GmbH including all BEHRINGER subsidiaries listed on the enclosed page, except BEHRINGER Japan) warrants the mechanical and electronic components of this product to be free of defects in material and workmanship for a period of one (1) year* from the original date of purchase, in accordance with the warranty regulations described below. If the product shows any defects within the specified warranty period that are not excluded from this warranty as described under § 4, BEHRINGER shall, at its discretion, either replace or repair the product using suitable new or reconditioned parts. In the case that other parts are used which constitute an improvement, BEHRINGER may, at its discretion, charge the customer for the additional cost of these parts. 2. If the warranty claim proves to be justified, the product will be returned to the user freight prepaid. 3. Warranty claims other than those indicated above are expressly excluded. § 3 RETURN AUTHORIZATION NUMBER 1. To obtain warranty service, the buyer (or his authorized dealer) must call BEHRINGER (see enclosed list) during normal business hours BEFORE returning the product. All inquiries must be accompanied by a description of the problem. BEHRINGER will then issue a return authorization number. 2. Subsequently, the product must be returned in its original shipping carton, together with the return authorization number to the address indicated by BEHRINGER. 3. Shipments without freight prepaid will not be accepted. § 4 WARRANTY REGULATIONS 1. Warranty services will be furnished only if the product is accompanied by a copy of the original retail dealers invoice. Any product deemed eligible for repair or replacement under the terms of this warranty will be repaired or replaced. 2. If the product needs to be modified or adapted in order to comply with applicable technical or safety standards on a national or local level, in any country which is not the country for which the product was originally developed and manufactured, this modification/adaptation shall not be considered a defect in materials or workmanship. The warranty does not cover any such modification/adaptation, irrespective of whether it was carried out properly or not. Under the terms of this warranty, BEHRINGER shall not be held responsible for any cost resulting from such a modification/adaptation. 3. Free inspections and maintenance/repair work are expressly excluded from this warranty, in particular, if caused by improper handling of the product by the user. This also applies to defects caused by normal wear and tear, in particular, of faders, crossfaders, potentiometers, keys/buttons, tubes, guitar strings and similar parts. 4. Damages/defects caused by the following conditions are not covered by this warranty: s improper handling, neglect or failure to operate the unit in compliance with the instructions given in BEHRINGER user or service manuals. s connection or operation of the unit in any way that does not comply with the technical or safety regulations applicable in the country where the product is used. s damages/defects caused by force majeure or any other condition that is beyond the control of BEHRINGER. 5. Any repair or opening of the unit carried out by unauthorized personnel (user included) will void the warranty. 6. If an inspection of the product by BEHRINGER shows that the defect in question is not covered by the warranty, the inspection costs are payable by the customer. 7. Products which do not meet the terms of this warranty will be repaired exclusively at the buyers expense. BEHRINGER will inform the buyer of any such circumstance. If the buyer fails to submit a written repair order within 6 weeks after notification, BEHRINGER will return the unit C.O.D. with a separate invoice for freight and packing. Such costs will also be invoiced separately when the buyer has sent in a written repair order. § 5 WARRANTY TRANSFERABILITY This warranty is extended exclusively to the original buyer (customer of retail dealer) and is not transferable to anyone who may subsequently purchase this product. No other person (retail dealer, etc.) shall be entitled to give any warranty promise on behalf of BEHRINGER. § 6 CLAIM FOR DAMAGES Failure of BEHRINGER to provide proper warranty service shall not entitle the buyer to claim (consequential) damages. In no event shall the liability of BEHRINGER exceed the invoiced value of the product. § 7 OTHER WARRANTY RIGHTS AND NATIONAL LAW 1. This warranty does not exclude or limit the buyers statutory rights provided by national law, in particular, any such rights against the seller that arise from a legally effective purchase contract. 2. The warranty regulations mentioned herein are applicable unless they constitute an infringement of national warranty law. * Customers in the European Union please contact BEHRINGER Germany Support for further details. Technical specifications and appearance subject to change without notice. The information contained herein is correct at the time of printing. The names of companies, institutions or publications pictured or mentioned and their respective logos are registered trademarks of their respective owners. Their use neither constitutes a claim of the trademarks by BEHRINGER® nor affiliation of the trademark owners with BEHRINGER®. BEHRINGER® accepts no liability for any loss which may be suffered by any person who relies either wholly or in part upon any description, photograph or statement contained herein. Colors and specifications depicted may vary slightly from product. No part of this book may be reproduced or transmitted in any form or by any means, electronic or mechanical, including photocopying and recording of any kind, for any purpose, without the express written permission of BEHRINGER Spezielle Studiotechnik GmbH. BEHRINGER® is a registered trademark. ALL RIGHTS RESERVED. © 2004 BEHRINGER Spezielle Studiotechnik GmbH. BEHRINGER Spezielle Studiotechnik GmbH, Hanns-Martin-Schleyer-Str. 36-38, 47877 Willich-Münchheide II, Germany Tel. +49 2154 9206 0, Fax +49 2154 9206 4903 6. WARRANTY 11