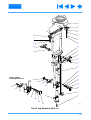
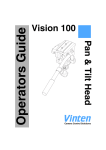
1
Contents
Next
Page
Previous
View
pro-touch
Vinten
Camera Control Solutions
Contents
First
Page
Previous
Page
Next
Page
Previous
View
protouch
Pro-10 System
MAINTENANCE MANUAL
AND
ILLUSTRATED PARTS LIST
PUBLICATION PART No. 3809-9
ISSUE 3
Copyright © Vinten Broadcast Limited 2005
All rights reserved throughout the world. No part of this document may be stored in a retrieval system,
transmitted, copied or reproduced in any way including, but not limited to, photocopy, photograph, magnetic or
other record without the prior agreement and permission in writing of Vinten Broadcast Limited.
Vinten is a registered trademark of Vinten Broadcast Limited.
2
Contents
First
Page
Previous
Page
Next
Page
Previous
View
Foreword
This manual provides full and detailed maintenance and spare parts information for the Vinten® protouch Pro10 system, comprising a Pro-10 pan and tilt head, a Pozi-Loc tripod, floor spreader and case.
WARNING!: Read the Safety Section on page 5 before using this pan and tilt head or
attempting any adjustment or repair.
It is recommended that this manual is read carefully and the illustrations studied prior to operating or servicing
the equipment. Attention to the details contained herein will ensure that the equipment will operate efficiently
with the minimum of attention over a long service life. Particular attention must be paid to cleaning, especially
after use in adverse conditions.
To order spare parts or to obtain further information, application should be made to Vinten Broadcast Limited
or to your local distributor, or visit our website at www.vinten.com.
NOTE:
Information contained in this document is subject to change.
Vinten Broadcast Ltd reserves the right, without notice, to make changes in equipment
design or performance as progress in engineering, manufacturing or technology may
warrant.
Associated Publication
protouch Pro-10 System Operators Guide
Publication Part No. 3809-8
3
Contents
First
Page
Previous
Page
Next
Page
Previous
View
Notes to readers
This is the on-line version of ‘protouch Pro-10 System Maintenance Manual’ (3809-9). Readers should be
aware that the pagination differs between on-line and printed versions.
Navigation
Clicking the mouse on any blue text will move you around the document. For example, if you click on one of
the blue call-outs on an exploded drawing, you will be taken to the appropriate line in the relevant parts list.
Contents
Clicking here will take you to the Contents Page.
Clicking here will take you to the first page.
Clicking here will take you to the previous page.
Clicking here will take you to the next page.
Click here to go back to the previous view.
Alternatively, you may use the Acrobat Reader navigation buttons.
4
Contents
First
Page
Previous
Page
Next
Page
Previous
View
Safety - Read This First!
Warning symbols in this maintenance manual
Where there is a risk of personal injury, injury to others, or damage to the system or
associated equipment, comments appear, highlighted by the word WARNING! and
supported by the warning triangle symbol.
Critical data
Mass
Pro-10 pan and tilt head (complete with pan bar and bowl clamp)
2.7 kg (5.9 lb)
Pozi-Loc tripod
3.2 kg (7.0 lb)
Floor spreader
0.7 kg (1.5 lb)
Load
Pro-10 pan and tilt head
Optimum payload
7.5 kg (16.5 lb)
Maximum payload
10 kg (22 lb)
Pozi-Loc tripod - maximum payload
25 kg (55 lb)
5
First
Page
Previous
Page
Next
Page
Previous
View
Contents
Page
Foreword . . . . . . . . . . . . . . . . . . . . . . . . . . . . . . . . . . . . . . . . . . . . . . . . . . . . . . . . . . . . . . . . . . . . . . . . . . . . 3
Notes to readers . . . . . . . . . . . . . . . . . . . . . . . . . . . . . . . . . . . . . . . . . . . . . . . . . . . . . . . . . . . . . . . . . . . . . . 4
Safety - Read This First! . . . . . . . . . . . . . . . . . . . . . . . . . . . . . . . . . . . . . . . . . . . . . . . . . . . . . . . . . . . . . . . . 5
Abbreviations . . . . . . . . . . . . . . . . . . . . . . . . . . . . . . . . . . . . . . . . . . . . . . . . . . . . . . . . . . . . . . . . . . . . . . . . 8
Technical Specification . . . . . . . . . . . . . . . . . . . . . . . . . . . . . . . . . . . . . . . . . . . . . . . . . . . . . . . . . . . . . . . . 9
Design Improvements. . . . . . . . . . . . . . . . . . . . . . . . . . . . . . . . . . . . . . . . . . . . . . . . . . . . . . . . . . . . . . . . . 10
Introduction and Description
Introduction . . . . . . . . . . . . . . . . . . . . . . . . . . . . . . . . . . . . . . . . . . . . . . . . . . . . . . . . . . . . . . . . . . . . . . . 11
Description . . . . . . . . . . . . . . . . . . . . . . . . . . . . . . . . . . . . . . . . . . . . . . . . . . . . . . . . . . . . . . . . . . . . . . . . 11
Operation
General . . . . . . . . . . . . . . . . . . . . . . . . . . . . . . . . . . . . . . . . . . . . . . . . . . . . . . . . . . . . . . . . . . . . . . . . . . 15
Assembly . . . . . . . . . . . . . . . . . . . . . . . . . . . . . . . . . . . . . . . . . . . . . . . . . . . . . . . . . . . . . . . . . . . . . . . . . 15
Mounting the camera . . . . . . . . . . . . . . . . . . . . . . . . . . . . . . . . . . . . . . . . . . . . . . . . . . . . . . . . . . . . . . . . 16
Pan and tilt brakes . . . . . . . . . . . . . . . . . . . . . . . . . . . . . . . . . . . . . . . . . . . . . . . . . . . . . . . . . . . . . . . . . . 16
Pan and tilt drag . . . . . . . . . . . . . . . . . . . . . . . . . . . . . . . . . . . . . . . . . . . . . . . . . . . . . . . . . . . . . . . . . . . . 17
Tools and Materials. . . . . . . . . . . . . . . . . . . . . . . . . . . . . . . . . . . . . . . . . . . . . . . . . . . . . . . . . . . . . . . . . . . 18
Servicing
General . . . . . . . . . . . . . . . . . . . . . . . . . . . . . . . . . . . . . . . . . . . . . . . . . . . . . . . . . . . . . . . . . . . . . . . . . . 19
Cleaning. . . . . . . . . . . . . . . . . . . . . . . . . . . . . . . . . . . . . . . . . . . . . . . . . . . . . . . . . . . . . . . . . . . . . . . . . . 19
Routine maintenance . . . . . . . . . . . . . . . . . . . . . . . . . . . . . . . . . . . . . . . . . . . . . . . . . . . . . . . . . . . . . . . . 19
Adjustments . . . . . . . . . . . . . . . . . . . . . . . . . . . . . . . . . . . . . . . . . . . . . . . . . . . . . . . . . . . . . . . . . . . . . . . 21
Repair
General . . . . . . . . . . . . . . . . . . . . . . . . . . . . . . . . . . . . . . . . . . . . . . . . . . . . . . . . . . . . . . . . . . . . . . . . . . 26
‘Pozi-Loc’ tripod leg clamp adjustment
Disassembly . . . . . . . . . . . . . . . . . . . . . . . . . . . . . . . . . . . . . . . . . . . . . . . . . . . . . . . . . . . . . . . . . . . . 27
Assembly . . . . . . . . . . . . . . . . . . . . . . . . . . . . . . . . . . . . . . . . . . . . . . . . . . . . . . . . . . . . . . . . . . . . . . 29
Assembly
General . . . . . . . . . . . . . . . . . . . . . . . . . . . . . . . . . . . . . . . . . . . . . . . . . . . . . . . . . . . . . . . . . . . . . . . . 32
Replacing tripod legs . . . . . . . . . . . . . . . . . . . . . . . . . . . . . . . . . . . . . . . . . . . . . . . . . . . . . . . . . . . . . 32
Replacing the components of the top clamp assembly. . . . . . . . . . . . . . . . . . . . . . . . . . . . . . . . . . . . 33
Replacing the components of the bottom clamp assembly. . . . . . . . . . . . . . . . . . . . . . . . . . . . . . . . . 33
Illustrated Parts List
Introduction . . . . . . . . . . . . . . . . . . . . . . . . . . . . . . . . . . . . . . . . . . . . . . . . . . . . . . . . . . . . . . . . . . . . . . . 36
Ordering spare parts . . . . . . . . . . . . . . . . . . . . . . . . . . . . . . . . . . . . . . . . . . . . . . . . . . . . . . . . . . . . . . . . 36
Main assembly part numbers. . . . . . . . . . . . . . . . . . . . . . . . . . . . . . . . . . . . . . . . . . . . . . . . . . . . . . . . . . 37
6
Contents
First
Page
Illustrations
Previous
Page
Next
Page
Previous
View
Page
Fig 1.1 Pro-10 pan and tilt head . . . . . . . . . . . . . . . . . . . . . . . . . . . . . . . . . . . . . . . . . . . . . . . . . . . . . . . . . 12
Fig 1.2 Pozi-Loc tripod and floor spreader . . . . . . . . . . . . . . . . . . . . . . . . . . . . . . . . . . . . . . . . . . . . . . . . . 14
Fig 2.1 Balance graph. . . . . . . . . . . . . . . . . . . . . . . . . . . . . . . . . . . . . . . . . . . . . . . . . . . . . . . . . . . . . . . . . 17
Fig 4.1 Battery replacement . . . . . . . . . . . . . . . . . . . . . . . . . . . . . . . . . . . . . . . . . . . . . . . . . . . . . . . . . . . . 20
Fig 4.2 Pan brake knob and camera slide plate knob adjustment . . . . . . . . . . . . . . . . . . . . . . . . . . . . . . . 21
Fig 4.3 ‘Pozi-Loc’ tripod leg - top clamp adjustment . . . . . . . . . . . . . . . . . . . . . . . . . . . . . . . . . . . . . . . . . . 23
Fig 6.1 Pro-10 System . . . . . . . . . . . . . . . . . . . . . . . . . . . . . . . . . . . . . . . . . . . . . . . . . . . . . . . . . . . . . . . . 38
Fig 6.2 Pro-10 Pan and Tilt Head - Main Castings and Platform . . . . . . . . . . . . . . . . . . . . . . . . . . . . . . . . 40
Fig 6.3 Pro-10 Pan and Tilt Head - RH Side Plate, Tilt Drag and Pan Bar . . . . . . . . . . . . . . . . . . . . . . . . . 43
Fig 6.4 Pro-10 Pan and Tilt Head - Pan Drag and Ball Base . . . . . . . . . . . . . . . . . . . . . . . . . . . . . . . . . . . 45
Fig 6.5 Pozi-Loc Two-Stage Tripod (3819-3). . . . . . . . . . . . . . . . . . . . . . . . . . . . . . . . . . . . . . . . . . . . . . . . 47
Fig 6.6 Leg Assembly (3819-11). . . . . . . . . . . . . . . . . . . . . . . . . . . . . . . . . . . . . . . . . . . . . . . . . . . . . . . . . 49
Fig 6.7 Floor Spreader (3818-3) . . . . . . . . . . . . . . . . . . . . . . . . . . . . . . . . . . . . . . . . . . . . . . . . . . . . . . . . . 52
7
Contents
First
Page
Previous
Page
Next
Page
Previous
View
Abbreviations
The following abbreviations are sued in this publication:
ac
alternating current
lb
pound (weight)
Amps
LF
Lubricated Friction
AF
across flats
LH
left hand
A/R
as required
MISO
A
ASME
assy
American Society of Mech Engineers
assembly
BS
British Standard
BA
British Association thread
m
mm
N
NPT
NI
metric thread
metre
millimetre
Newton
National Pipe thread
not illustrated
BSF
British Standard Fine thread
BSP
British Standard Parallel Pipe thread
No.
number
BSW
British Standard Whitworth thread
OD
outside diameter
btn
button
PCB
printed circuit board
chs
cheese
PCD
pitch circle diameter
centre of gravity
pozi
Pozidriv
C of G
comp
compression
psi
csk
countersunk
pt
cu
cubic
PTFE
c/w
complete with
PVC
dc
direct current
RH
dia
diameter
ft
hd
hex
foot
head
hexagon
pounds per square inch
point
Polytetrafluoroethylene
Polyvinyl chloride
right hand
sect
section
skt
socket
SWG
thk
standard wire gauge
thick
Hz
Hertz (frequency)
UNC
Unified Coarse thread
IC
integrated circuit
UNF
Unified Fine thread
ID
inside diameter
V
Volts
in.
inch
W
Watts
kg
kilogram
8
Contents
First
Page
Previous
Page
Next
Page
Previous
View
Technical Specification
Pro-10 pan and tilt head
Weight
Head
2.32 kg (5.1 lb)
Pan bar
0.28 kg (0.6 lb)
Bowl clamp
Height to mounting face
Length
Width
Load capacity
Tilt range
Pan range
Tripod fixing
0.1 kg (0.2 lb)
13.8 cm (5.4 in.)
16 cm (6.3 in.)
15.8 cm (6.2 in.)
10 kg (22 lb)
+90° -60°
360°
75 mm ball
Pozi-Loc tripod
Levelling bowl diameter
75 mm
Maximum height with floor spreader
156.2 cm (61.5 in.)
Minimum height with floor spreader
41.6 cm (16.4 in.)
Weight
Transport length
Recommended maximum load
3.2 kg (7.0 lb)
71 cm (28.0 in.)
25 kg (55 lb)
Floor spreader
Maximum leg radius
77 cm (22.5 in.)
Minimum leg radius
38 cm (15 in.)
Weight
0.7 kg (1.5 lb)
9
Contents
First
Page
Previous
Page
Next
Page
Previous
View
Design Improvements
DETAILS
Improvements to tripod bottom clamp adjuster
SERIAL No.
INFORMATION
Tripod 3810-03515
10
Contents
First
Page
Previous
Page
Next
Page
Previous
View
Section 1
Introduction and Description
Contents
Para
Introduction . . . . . . . . . . . . . . . . . . . . . . . . . . . . . . . . . . . . . . . . . . . . . . . . . . . . . . . . . . . . . . . . . . . . . . . . . . 1
Description
Pro-10 pan and tilt head. . . . . . . . . . . . . . . . . . . . . . . . . . . . . . . . . . . . . . . . . . . . . . . . . . . . . . . . . . . . . . . 2
Pozi-Loc tripod . . . . . . . . . . . . . . . . . . . . . . . . . . . . . . . . . . . . . . . . . . . . . . . . . . . . . . . . . . . . . . . . . . . . . . 9
Floor spreader . . . . . . . . . . . . . . . . . . . . . . . . . . . . . . . . . . . . . . . . . . . . . . . . . . . . . . . . . . . . . . . . . . . . . 11
Introduction
1
The protouch Pro-10 system from Vinten comprises a Pro-10 pan and tilt head, a Pozi-Loc two-stage
tripod, an adjustable floor spreader and a soft case.
Description
Pro-10 pan and tilt head
2
The Pro-10 pan and tilt head (Fig 1.1) is designed to support the latest professional digital video
cameras, up to 10 kg (22 lb) in weight. It embodies fluid drag assemblies for pan and tilt motions with brakes
on each axis to lock the head in any position. An illuminated levelling bubble is fitted to the rear of the head
and a quick-release, adjustable slide plate is provided for camera mounting. A single fixed pan bar is supplied.
Balance
3
The balance spring in the Pro-10 pan and tilt head is set for an optimum payload of 7.5 kg (16.5 lb) at a
centre of gravity (C of G) height of 12.5 cm (4.9 in.), but the head will support a payload of up to 10 kg (22 lb).
Pan and tilt drag
4
Both the pan and tilt mechanisms incorporate fluid drag assemblies to ensure smooth movement of the
camera about these axes and are fitted with control knobs (8)(17) to adjust the drag setting.
Pan and tilt brakes
5
Brakes (4)(11) on each axis are provided to lock the head in any position.
Illuminated levelling bubble
6
To enable the head to be levelled, an illuminated levelling bubble (10) is fitted to the rear of the head.
When the switch (13) is pressed, the bubble will be illuminated for approximately 15 seconds. The battery for
the illuminated bubble is contained in a battery compartment (16).
11
Contents
First
Page
Previous
Page
Next
Page
Previous
View
(18)
(1)
(17)
(2)
(16)
(3)
(15)
(4)
(14)
(5)
(13)
(6)
(12)
(7)
(11)
(8)
(10)
(9)
Fig 1.1 Pro-10 pan and tilt head
12
Contents
First
Page
Previous
Page
Next
Page
Previous
View
Camera mounting
7
The camera is attached to the head by means of a slide plate (14), which is provided with a springloaded locating pin (5) and 1/4 in. (18) and 3/8 in. (1) screws. When not in use the screws are stowed in the
camera mounting platform (6). A clamp (7) is provided to hold the slide plate in position and a lock (2) prevents
its inadvertent removal from the head.
Pan bar
8
Pan bar mounting points (12) are located at the rear of the head, on either side of the camera mounting
platform. The pan bar is attached using a pan bar clamp, with angular adjustment available on the mount
serrations. A single fixed pan bar (3) is supplied. A second pan bar may be fitted.
Pozi-Loc tripod
9
The Pozi-Loc two-stage tripod (Fig 1.2) has aluminium legs and a 75 mm levelling bowl (19). It is fitted
with the highly-efficient Pozi-Loc leg clamps (20), which provide quick set-up and easy adjustment.
10
An optional ‘Spread-Loc’ mid-level spreader may be fitted to mounting points (25) on the legs.
Floor spreader
11
The floor spreader (Fig 1.2) increases rigidity of the tripod. Being flexible, the spreader compensates for
uneven ground, protects floors and carpets and prevents the tripod legs sinking into soft ground. It should be
used at all times.
12
Each arm is of the spreader is adjustable for length (22) and the tripod feet are secured by rubber
straps (24).
13
Contents
First
Page
(26)
Previous
Page
Next
Page
Previous
View
(19)
(25)
(20)
(24)
(23)
(22)
(21)
Fig 1.2 Pozi-Loc tripod and floor spreader
14
Contents
First
Page
Previous
Page
Next
Page
Previous
View
Section 2
Operation
Contents
Para
General. . . . . . . . . . . . . . . . . . . . . . . . . . . . . . . . . . . . . . . . . . . . . . . . . . . . . . . . . . . . . . . . . . . . . . . . . . . . . . 1
Assembly
Tripod and spreader . . . . . . . . . . . . . . . . . . . . . . . . . . . . . . . . . . . . . . . . . . . . . . . . . . . . . . . . . . . . . . . . . . 3
Pan and tilt head . . . . . . . . . . . . . . . . . . . . . . . . . . . . . . . . . . . . . . . . . . . . . . . . . . . . . . . . . . . . . . . . . . . . 9
Mounting the camera . . . . . . . . . . . . . . . . . . . . . . . . . . . . . . . . . . . . . . . . . . . . . . . . . . . . . . . . . . . . . . . . . 11
Pan and tilt brakes . . . . . . . . . . . . . . . . . . . . . . . . . . . . . . . . . . . . . . . . . . . . . . . . . . . . . . . . . . . . . . . . . . . 18
Pan and tilt drag . . . . . . . . . . . . . . . . . . . . . . . . . . . . . . . . . . . . . . . . . . . . . . . . . . . . . . . . . . . . . . . . . . . . . 20
General
1
To identify components, please refer to Fig 1.1 and Fig 1.2.
Assembly
2
If not already done, assemble the system as follows:
Tripod and spreader
3
Lift the tripod out of the case using the finger holes just below the top clamps.
4
Release the leg tie strap (24) and spread the legs.
5
Secure the spreader to the tripod feet with the rubber straps (23).
NOTE:
Once assembled, keep the spreader attached to the tripod
6
Adjust the operating height by undoing the leg clamps (20) and pulling the tripod up to the desired
height. Adjust the spreader (22) if necessary.
7
Tighten the clamps (20) until an audible click is heard and the knob is in the horizontal, locked position.
8
In adverse conditions secure the tripod using the tie-down hook (26), or suspend a weight from the
hook.
WARNING!: Use care when the tripod is fully extended and the floor spreader is in the
closed position, as stability will be reduced.
15
Contents
First
Page
Previous
Page
Next
Page
Previous
View
Pan and tilt head
9
The Pro-10 pan and tilt head is supplied with a removable 75 mm ball mount. Adaptors are available
which enable the head to be installed on tripods or pedestals fitted with other mountings. These are listed
under ‘Optional Accessories’.
10
To install the head, remove the bowl clamp assembly (9) from the head, position the head on the tripod
and refit the bowl clamp assembly from below. Level the head with the aid of the level bubble (10) and tighten
the bowl clamp. The level bubble may be illuminated by pressing the switch (13). The light will extinguish after
approximately 15 seconds.
Mounting the camera
11
The balance spring in the Pro-10 pan and tilt head is set for an optimum payload of 7.5 kg (16.5 lb) at a
centre of gravity (C of G) height of 125 mm (4.9 in.), but the head will support a payload of up to 10 kg (22 lb).
The balance graph (Fig 2.1) shows the relationship between C of G height and payload for optimum
performance.
12
Remove the slide plate (14) from the head by releasing the slide plate clamp (7), pressing the slide lock
release (2) and pulling the plate out to the rear.
13
Install the required camera fixing screw (1) or (18) in the slide plate and retain with the rubber bung
(15). Stow the unused screw in the appropriate stowage (6) in the platform
14
Attach the slide plate to the camera or camera mounting plate under the approximate centre of the
camera's weight using the mounting screw and locating pin (5)(if appropriate).
15
Set the platform level and apply both the pan (11) and tilt brakes (4).
16
Push the slide plate and camera into the track in the platform, ensuring the slide lock release (2) snaps
into position.
17
Tighten the slide plate clamp (7).
Pan and tilt brakes
18
Brakes on each axis allow the head to be locked at any chosen position. The operating lever for the pan
brake (11) is at the rear of the head. The tilt brake (4) is operated by a lever on the left-hand side of the head.
19
To apply the brake, turn the lever fully clockwise. To release the brake, turn the lever counter--clockwise.
WARNING!: When the brakes are not in use, always turn the levers counter-clockwise.
DO NOT use the brakes to supplement drag.
16
Contents
First
Page
Previous
Page
Next
Page
Previous
View
in. mm
8
200
190
Centre of Gravity (C of G) Height
7
180
170
160
6 150
140
5
130
120
110
4 100
90
80
3
70
60
2
50
4
2
3
6
4
8
5
10
6
12
8
7
14
16
18
9
10 kg
20
2 2 lb
Payload
Fig 2.1 Balance graph
Pan and tilt drag
20
Both the pan and tilt mechanisms incorporate a fluid drag system to ensure smooth movement of the
camera about these axes.
21
The tilt drag adjustment knob (8) is on the right -hand side of the head, the pan drag knob (17) is on the
top of the body.
22
To increase drag, turn the appropriate knob clockwise. To decrease drag, turn the knob counterclockwise.
NOTE:
Reduce drag to a minimum when the head is out of use for long periods.
17
Contents
First
Page
Previous
Page
Next
Page
Previous
View
Section 3
Tools and Materials
Special tools
1
No special tools are required.
Consumable materials
2
The following consumable materials are required for certain procedures detailed in Sections 4 and 5.
Item
Use
AGIP PV (NLGI 2) grease (white)
General lubrication
Kluberlub BE41-501 grease (black)
General lubrication
Shell Darina R2 grease (yellow)
General lubrication
PTFE dry lubricant (Aerosol)
Pan drag ball bearing
Optalus A0 140
Pan and tilt friction
White bearing grease (Vinten Part No. Z150-085)
Tripod clamps
Loctite 221 (Vinten Part No. Z002-026)
Screw locking
18
Contents
First
Page
Previous
Page
Next
Page
Previous
View
Section 4
Servicing
Contents
Para
General. . . . . . . . . . . . . . . . . . . . . . . . . . . . . . . . . . . . . . . . . . . . . . . . . . . . . . . . . . . . . . . . . . . . . . . . . . . . . . 1
Cleaning . . . . . . . . . . . . . . . . . . . . . . . . . . . . . . . . . . . . . . . . . . . . . . . . . . . . . . . . . . . . . . . . . . . . . . . . . . . . . 2
Routine maintenance . . . . . . . . . . . . . . . . . . . . . . . . . . . . . . . . . . . . . . . . . . . . . . . . . . . . . . . . . . . . . . . . . . 4
Battery replacement. . . . . . . . . . . . . . . . . . . . . . . . . . . . . . . . . . . . . . . . . . . . . . . . . . . . . . . . . . . . . . . . . . 6
Adjustments
Pan brake knob adjustment . . . . . . . . . . . . . . . . . . . . . . . . . . . . . . . . . . . . . . . . . . . . . . . . . . . . . . . . . . . . 9
Camera slide plate knob adjustment . . . . . . . . . . . . . . . . . . . . . . . . . . . . . . . . . . . . . . . . . . . . . . . . . . . . 11
‘Pozi-Loc’ tripod leg clamp adjustment. . . . . . . . . . . . . . . . . . . . . . . . . . . . . . . . . . . . . . . . . . . . . . . . . . . 13
General
1
Protouch products are robustly made to high engineering standards and little attention is required to
maintain serviceability save regular cleaning. Attention to the following points will ensure a long and useful
service life with minimum need for repair.
Cleaning
2
During indoor use, the only cleaning required should be a regular wipe over with a lint-free cloth. Dirt
accumulated during storage may be removed using a semi-stiff brush. Particular attention should be paid to
the ball mounting face of the head, the space between the tilting assembly and the base and the mounting
bowl of the tripod.
3
Use out-of-doors under adverse conditions will require special attention. Salt spray should be washed
off with fresh water at the earliest opportunity. Sand and dirt acts as an abrasive and should be removed using
a semi-stiff brush or vacuum cleaner.
NOTE:
Use only detergent-based cleaners. DO NOT use solvent- or oil-based cleaners, abrasives
or wire brushes to remove accumulations of dirt, as these damage the protective surfaces.
Routine maintenance
4
During use, check the following:
4.1
Check the illumination of the level bubble. Replace battery if necessary.
4.2
Check the effectiveness of the pan brake. Reset as necessary.
4.3
Check the effectiveness of the camera slide plate clamp. Reset as necessary.
4.4
Check the effectiveness of the tripod leg clamps. Reset as necessary.
19
Contents
First
Page
Previous
Page
Next
Page
Previous
View
4.5 Check for ageing and cracking of the rubber foot securing straps on the spreader and renew if
necessary.
5
No further routine maintenance is required.
Battery replacement
6
The battery illuminates the level bubble (10) when the switch (13) is pressed. The level bubble remains
lit for approximately 15 seconds.
7
The battery should be replaced yearly or whenever the illumination is considered inadequate.
8
To replace the battery (Fig 4.1):
8.1
Tilt the head backwards to allow access to the battery cover (16) and apply the tilt brake (4).
8.2
Push down on the top of the battery cover (16) and pull forward.
8.3
Pull the battery (16.1) out of the battery compartment.
8.4 Push the replacement battery into the battery compartment, observing the correct polarity, as
indicated on the inside of the compartment
8.5
Refit the battery cover (16).
8.6
Press the switch (13) and ensure that the level bubble (10) is lit for approximately 15 seconds.
(4)
(16.1)
(16)
Fig 4.1 Battery replacement
20
Contents
First
Page
Previous
Page
Next
Page
Previous
View
Adjustments
Pan brake knob adjustment
9
Because its movement is restricted, the pan brake knob (11) may require adjustment after prolonged
use.
10
To adjust the pan brake knob (Fig 4.2):
10.1 Remove the securing screw (11.1) and pull the knob (11) off the shaft (11.2).
10.2 Turn the shaft (11.2) clockwise until the pan brake is fully applied.
10.3 Install the knob (11) on the shaft (11.2) approximately at right angles to the body of the head.
10.4 Turn the knob fully counter-clockwise and ensure the brake is released. Turn the knob clockwise
and ensure the brake is applied before the knob reaches the end of it travel.
10.5 Readjust as necessary and secure the knob with the screw (11.1).
(11.1)
(7.2)
(11)
(7)
(11.2)
(7.1)
Fig 4.2 Pan brake knob and camera slide plate knob adjustment
21
Contents
First
Page
Previous
Page
Next
Page
Previous
View
Camera slide plate knob adjustment
11
To prevent interference with the payload, the camera slide plate knob (7) should be at or below the
horizontal when applied.
12
To adjust the camera slide plate knob (Fig 4.2):
12.1 Remove the securing screw (7.1) and pull the knob (7) off the shaft (7.2).
12.2 Turn the shaft (7.2) clockwise until the slide plate clamp is fully applied.
12.3 Install the knob (7) on the shaft (7.2) approximately at or below the horizontal.
12.4 Turn the knob fully counter-clockwise and ensure the slide plate clamp is released before the
stop is reached. Turn the knob clockwise and ensure the clamp is applied before the knob reaches the
horizontal.
12.5 Readjust as necessary and secure the knob with the screw (7.1).
‘Pozi-Loc’ tripod leg clamp adjustment
13
Bedding-in occurs with ‘Pozi-Loc’ leg clamps, which may necessitate resetting the clamp. Check the
effectiveness of each leg clamp as follows:
13.1 Extend all three tripod legs fully and apply the clamp(s).
13.2 Position each leg in turn vertically on a set of weighing scales.
13.3 Gradually apply body weight to the leg until either or both clamps begin to slip. Note the reading
on the scales at which this occurs.
13.4 A reading of less than 35 kg (77 lb) will necessitate adjustment.
Top clamp
14
Adjust the top clamp as follows (Fig 4.3):
14.1 Turn the clamp knob (20) to the vertical, ‘off’ position
14.2 Remove screw (20.1). Using a suitable peg spanner, back off the threaded insert (20.2) slot by
slot until the leg is free to move under its own weight.
14.3 While sliding the leg in and out, gradually tighten the threaded insert (20.2) until the clamp begins
to grip.
14.4 If not aligned, back off the threaded insert (20.2) until a slot aligns with the hole for screw (20.1).
14.5 Back off the threaded insert (20.2) a further three slots
14.6 Install screw (20.1) to secure the threaded insert (20.2).
22
Contents
First
Page
Previous
Page
Next
Page
Previous
View
(20)
(20.2)
(20.1)
Fig 4.3 ‘Pozi-Loc’ tripod leg - top clamp adjustment
Bottom clamp
15
The design of the bottom clamp changed at tripod Serial No. 03515. Identify version as follows (Fig
4.4):
15.1 Turn the clamp knob (20) to Position 1 (fully ‘on’).
15.2 Using a suitable instrument, such as a flat-bladed screwdriver, carefully remove the knob cap
(20.6).
15.3 Remove the retaining screw (20.5) and washer (20.4) and pull off the clamp knob (20).
15.4 Examine the shaft (20.3).
15.4.1 Earlier clamps have a smooth shaft and are fitted with locking and adjusting
grubscrews. Loctite is used on these screws.
15.4.2 Later clamps have a groove machined in the shaft and are fitted with a single, longer,
adjusting grubscrew, retained by a locking thread insert.
23
Contents
Previous
Page
Next
Page
Previous
View
PO
S
ITI
ON
2
First
Page
(20.3)
(20)
IDENTIFICATION
GROOVE
90°
POSITION 1
(20.4)
(20.5)
(20.6)
(20.3)
(20.7)
(20.3)
(20.8)
(20.9)
(20)
(20)
(20.8)
(20.4)
(20.4)
(20.5)
(20.5)
(20.6)
(20.6)
Earlier clamp - two grubscrews
Later clamp - One grubscrew
Fig 4.4 ‘Pozi-Loc’ tripod leg - bottom clamp adjustment
16
Adjust an earlier clamp as follows (Fig 4.4):
16.1 Replace the clamp knob (20) and rotate to position 2.
16.2 Using a 2.5 mm hexagonal wrench, remove the locking grubscrew (20.8) from the shaft (20.3).
16.3 Using a 2.5 mm hexagonal wrench, slacken the adjusting grubscrew (20.7) until the leg is free to
move under its own weight.
16.4 With the knob still in Position 2, slide the leg in and out and gradually tighten the adjusting
grubscrew (20.7) until the clamp begins to grip.
24
Contents
First
Page
Previous
Page
Next
Page
Previous
View
16.5 Back off the adjusting grubscrew (20.7) by a quarter-turn (90°).
16.6 Turn the clamp knob (20) to Position 1 (fully ‘on’).
16.7 Replace and tighten the locking grubscrew (20.8), using Loctite 221 and allow 15 minutes for the
Loctite to set.
16.8 Secure the clamp knob (20) with the washer (20.4) and retaining screw (20.5). Refit the knob cap
(20.6).
17
Adjust a later clamp as follows (Fig 4.4):
17.1 Replace the clamp knob (20) and rotate to position 2.
17.2 Using a 2.5 mm hexagonal wrench, slacken the grubscrew (20.9) until the leg is free to move
under its own weight.
17.3 With the knob still in Position 2, slide the leg in and out and gradually tighten the grubscrew
(20.9) until the clamp begins to grip.
17.4 Back off the grubscrew (20.9) by a quarter-turn (90°).
17.5 Secure the clamp knob (20) with the washer (20.4) and retaining screw (20.5). Refit the knob cap
(20.6).
25
Contents
First
Page
Previous
Page
Next
Page
Previous
View
Section 5
Repair
Contents
Para
Repair . . . . . . . . . . . . . . . . . . . . . . . . . . . . . . . . . . . . . . . . . . . . . . . . . . . . . . . . . . . . . . . . . . . . . . . . . . . . . . 26
Repair
Disassembly
Ball clamp assembly . . . . . . . . . . . . . . . . . . . . . . . . . . . . . . . . . . . . . . . . . . . . . . . . . . . . . . . . . . . . . . . 3
Platform. . . . . . . . . . . . . . . . . . . . . . . . . . . . . . . . . . . . . . . . . . . . . . . . . . . . . . . . . . . . . . . . . . . . . . . . . 4
Centre cover . . . . . . . . . . . . . . . . . . . . . . . . . . . . . . . . . . . . . . . . . . . . . . . . . . . . . . . . . . . . . . . . . . . . . 6
Left flange assembly . . . . . . . . . . . . . . . . . . . . . . . . . . . . . . . . . . . . . . . . . . . . . . . . . . . . . . . . . . . . . . . 7
Right flange assembly. . . . . . . . . . . . . . . . . . . . . . . . . . . . . . . . . . . . . . . . . . . . . . . . . . . . . . . . . . . . . . 8
Pan brake . . . . . . . . . . . . . . . . . . . . . . . . . . . . . . . . . . . . . . . . . . . . . . . . . . . . . . . . . . . . . . . . . . . . . . 10
Pan drag mechanism . . . . . . . . . . . . . . . . . . . . . . . . . . . . . . . . . . . . . . . . . . . . . . . . . . . . . . . . . . . . . 11
Assembly
Lubrication . . . . . . . . . . . . . . . . . . . . . . . . . . . . . . . . . . . . . . . . . . . . . . . . . . . . . . . . . . . . . . . . . . . . . 12
Pan drag mechanism . . . . . . . . . . . . . . . . . . . . . . . . . . . . . . . . . . . . . . . . . . . . . . . . . . . . . . . . . . . . . 13
Pan brake . . . . . . . . . . . . . . . . . . . . . . . . . . . . . . . . . . . . . . . . . . . . . . . . . . . . . . . . . . . . . . . . . . . . . . 14
Right flange assembly. . . . . . . . . . . . . . . . . . . . . . . . . . . . . . . . . . . . . . . . . . . . . . . . . . . . . . . . . . . . . 16
Left flange assembly . . . . . . . . . . . . . . . . . . . . . . . . . . . . . . . . . . . . . . . . . . . . . . . . . . . . . . . . . . . . . . 17
Centre cover . . . . . . . . . . . . . . . . . . . . . . . . . . . . . . . . . . . . . . . . . . . . . . . . . . . . . . . . . . . . . . . . . . . . 18
Platform. . . . . . . . . . . . . . . . . . . . . . . . . . . . . . . . . . . . . . . . . . . . . . . . . . . . . . . . . . . . . . . . . . . . . . . . 19
Ball clamp assembly . . . . . . . . . . . . . . . . . . . . . . . . . . . . . . . . . . . . . . . . . . . . . . . . . . . . . . . . . . . . . . 21
Repair
General . . . . . . . . . . . . . . . . . . . . . . . . . . . . . . . . . . . . . . . . . . . . . . . . . . . . . . . . . . . . . . . . . . . . . . . . . . 22
Replacing tripod legs . . . . . . . . . . . . . . . . . . . . . . . . . . . . . . . . . . . . . . . . . . . . . . . . . . . . . . . . . . . . . . . . 23
Replacing the components of the top clamp assembly . . . . . . . . . . . . . . . . . . . . . . . . . . . . . . . . . . . . . . 26
Replacing the components of the bottom clamp assembly . . . . . . . . . . . . . . . . . . . . . . . . . . . . . . . . . . . 28
General
1
This section details procedures for disassembly and assembly of the Pro-10 pan and tilt head and PoziLoc tripod. Reference is made in the procedures to figures in Section 6 - Illustrated Parts List.
2
The head and tripod are constructed from precision components, many of which are of aluminium alloy.
Several of the assembly procedures require the use of specific sealants, adhesives or lubricants. It is advised
that only experienced and properly equipped personnel with access to all necessary materials and tools
should attempt to overhaul, repair or replace components on these heads and tripods. The consumable
materials required for work on heads and tripods are listed in Section 3 - Tools and Materials.
26
Contents
First
Page
Previous
Page
Next
Page
Previous
View
Pro-10 pan and tilt head
Disassembly
Ball clamp assembly
3
Remove the ball clamp assembly as follows (Fig 6.4):
3.1
Unscrew and remove the bowl knob (6).
3.2
Remove three grub screws (5.2).
3.3
Unscrew the ball clamp assembly (5.1) from the pan base.
Platform
4
Remove the platform as follows (Fig 6.2):
NOTE:
4.1
Do not remove the slide plate assembly (1) prior to removing the platform. This will retain
the clamping and release components during removal.
If fitted, remove the camera mounting screws (1.1) and (1.2) from their stowage in the platform.
4.2 Remove two screws (4.1) and two screws (4.2) securing platform (4.3) to left-hand and righthand side covers. Remove platform from head.
5
To dismantle the platform (Fig 6.2):
5.1 Slacken the slide plate lock knob (2) and push in the slide release (14). Pull the slide plate
assembly (1) to the rear.
5.2
Remove the slide plate release (14.2) and spring (14.1) from the underside of the platform.
5.3 Free the slide plate clamp arm (3). Remove the screw (2.1) and pull the slide plate lock knob
(2.2) off the slide clamp lock insert (2.3). Screw the lock insert out of the platform.
Centre cover
6
Remove the centre cover as follows (Fig 6.2):
6.1
Carefully prise off the self-adhesive pan drag knob label (5.1).
6.2 Remove the nut (5.2) and pull the pan drag knob (5.5), washer (5.4) and bearing (5.3) off the pan
drag adjuster (Fig 6.2, item 3.2).
6.3 Remove two screws (6.2) securing the centre cover assembly (6.3) to the centre housing (10.2)
and pull off the centre cover assembly.
27
Contents
First
Page
Previous
Page
Next
Page
Previous
View
Left flange assembly
7
Remove the left flange assembly as follows (Fig 6.2):
7.1 Remove two screws (10.3) securing the left flange assembly (11) to the centre housing (10.2)
and pull off the left flange assembly.
7.2
If required, screw out the tilt brake knob (12.2). Remove the bearing (12.1).
Right flange assembly
8
Remove the right flange assembly as follows (Fig 6.2):
8.1 Remove two screws (10.3) securing the right flange assembly (8) to the centre housing (10.2)
and pull off the right flange assembly.
9
If required, dismantle the tilt drag control as follows (Fig 6.3):
9.1
Carefully prise off the tilt drag knob boot (2.1).
9.2
Using a spanner on the hexagon of the tilt drag knob (2.3) to stop it turning, remove the nut (2.2).
9.3 Unscrew the tilt drag knob (2.3) from off the tilt drag adjuster stud (4.2) and remove the bearing
(2.4).
9.4
Remove two screws (4.4) securing the tilt drag adjuster arm (4.3) to the right flange assembly (3).
9.5 Remove the tilt drag adjuster arm (4.3), the tilt drag adjuster stud (4.2) and disc spring (4.1) from
the right flange assembly (3). Note the orientation of components.
Pan brake
10
Remove components of the pan brake as follows (Fig 6.4):
10.1 Turn the pan brake knob (4.1.2) fully counter-clockwise.
10.2 Remove the screw (4.1.1) and pull off the pan brake knob.
10.3 Unscrew and remove the pan brake knob insert (4.2). Remove shim (4.3).
10.4 Pull the coach bolt (4.7), clamp plate (4.6), friction pad (4.5) and release spring (4.4) out of the
centre housing (1.2).
Pan drag mechanism
11
Remove the pan drag mechanism as follows:
11.1 Referring to Fig 6.2, screw the threaded sleeve (7.1) out of the pan drag adjuster bridge (7.3).
11.2 Remove two screws (7.2) securing the pan drag adjuster bridge to the adjustable drag disc (Fig
6.4, item 3.1).
11.3 Pull off the pan drag adjuster bridge (7.3) and the pan drag adjuster clip (7.4). Note orientation of
clip.
28
Contents
First
Page
Previous
Page
Next
Page
Previous
View
11.4 Remove the nut (9.1), the bearing (9.2) and the washer (9.3) from the shaft of the pan base (Fig
6.4, item 3.2).
11.5 Referring to Fig 6.4, pull the pan base (3.2) and associated components (pan bearing (2) and
drag disc (3.1)) out of the centre housing (1.2). Ensure two springs (7.2) and two drag adjustment
shoes (7.1) are retained.
NOTE:
The adjustable drag disc (3.1) contains 5 grams of Optalus A0 140 drag fluid. If required,
separate the components of the adjustable drag disc and clean.
11.6 Pull off the pan bearing sleeve (1.4). Examine the sleeve for wear and replace if necessary.
Assembly
Lubrication
12
During assembly, lubricate components as follows:
12.1 Shell Darina R2 (yellow) grease
12.1.1
The threaded part of the shaft of the pan base spares assembly (Fig 6.4 Item 5.2).
12.1.2
The smaller thread of the tilt equalizer stud (Fig 6.3 Item 5.2).
12.1.3
The pivot of the slide plate clamp arm (Fig 6.2 Item 3)
12.2 AGIP PV (NLGI 2) (white) grease
12.2.1
The pan bearing (Fig 6.4 Item 2).
12.3 Kluberlub BE41-501 (black) grease
12.3.1
The larger thread of the tilt equalizer stud (Fig 6.3 Items 5.2).
12.3.2
The threads of the pan drag adjuster sleeve (Fig 6.2 Items 7.1).
12.3.3
The thread of the slide plate lock insert (Fig 6.2 Item 2.3)
12.4 PTFE dry lubricant
12.4.1
The pan shaft ball bearing (Fig 6.2 Items 9.2)
Pan drag mechanism
13
Install the pan drag mechanism as follows (Fig 6.4):
13.1 If necessary, separate the components of the adjustable drag disc (3.1) and apply 5 grams of
Optalus A0 140 drag fluid.
13.2 Install the pan bearing sleeve (1.4) on the centre housing (1.2).
13.3 Install the pan bearing (2) on the pan base (3.2).
29
Contents
First
Page
Previous
Page
Next
Page
Previous
View
13.4 Install two springs (7.2) and two drag adjustment shoes (7.1) in the slots in the centre housing
(1.2).
13.5 Position the adjustable drag disc (3.1) over the pan drag adjuster stud (3.2) with the legs of the
disc through the slots in the centre housing (1.2).
13.6 Install the pan base (3.2) in the centre housing (1.2). Referring to Fig 6.2 secure with the washer
(9.3), the bearing (9.2) and the nut (9.1).
13.7 Referring to Fig 6.2, install the pan drag adjuster clip (7.4) and the pan drag adjuster bridge (7.3)
on the shaft of the pan base, in orientation noted during disassembly and secure the bridge to the
adjustable drag disc with two screws (7.2).
13.8 Screw the threaded sleeve (7.1) into the pan drag adjuster bridge (7.3).
Pan brake
14
Install the pan brake as follows (Fig 6.4):
14.1 Position the release spring (4.4), friction pad (4.5) and the clamp plate (4.6) on the coach bolt
(4.7) and install in the centre housing (1.2).
14.2 Install the shim (4.3) on the coach bolt (4.7) and screw the pan brake knob insert (4.2) down
finger tight until the pan brake is fully applied.
14.3 Install the pan brake knob (4.1.2) on the pan brake knob insert (4.2), approximately at right
angles to the body of the head.
14.4 Turn the knob fully counter-clockwise and ensure the brake is released. Turn the knob clockwise
and ensure the brake is applied before the knob reaches the end of it travel.
14.5 Readjust as necessary and secure the knob with the screw (4.1.1)
Right flange assembly
15
If dismantled, assemble the tilt drag control as follows (Fig 6.3):
15.1 Install the tilt drag adjuster arm (4.3) on the tilt drag adjuster stud (4.2) and position, with disc
spring (4.1), on the right flange assembly (3) as noted during disassembly.
15.2 Secure the tilt drag adjuster arm (4.3) to the right flange assembly (3) with two screws (4.4).
15.3 Install the bearing (2.4) on the tilt drag adjuster stud (4.2).
15.4 Prevent the tilt drag adjuster stud from rotating and screw the tilt drag knob (2.3) on to the tilt drag
adjuster stud as far as it will go, then back off one-quarter of a turn (90°).
15.5 Secure the tilt drag knob (2.3) with the nut (2.2), using Loctite 221. Hold the tilt drag knob with a
spanner on the hexagon while tightening nut.
15.6 Refit the tilt drag knob boot (2.1).
16
Install the right flange assembly as follows (Fig 6.2):
16.1 Position the right flange assembly (8) on the centre housing (10.2)
30
Contents
First
Page
Previous
Page
Next
Page
Previous
View
16.2 Secure with two screws (10.3).
Left flange assembly
17
Install the left flange assembly as follows (Fig 6.2):
17.1 If removed, install the bearing (12.1) on the shaft of the tilt brake knob (12.2) and screw the tilt
brake knob into the left flange assembly (11).
17.2 Position the left flange assembly (11) on the centre housing (10.2)
17.3 Secure with two screws (10.3).
Centre cover
18
To install the centre cover (Fig 6.2):
18.1 Position the centre cover assembly (6.3) on the centre housing (10.2) and secure with two
screws (6.2).
18.2 Install the pan drag knob (5.5), washer (5.4) and bearing (5.3) on the pan drag adjuster (Fig 6.4,
item 3.2) and secure with nut (5.2).
18.3 Apply the self-adhesive pan drag knob label (5.1).
Platform
19
To assemble the platform (Fig 6.2):
19.1 Screw the slide clamp lock insert (2.3) into the platform (4.3).
19.2 Position the slide plate clamp arm (3), the slide plate release (14.2) and the spring (14.1) on the
underside of the platform.
19.3 Push the slide plate assembly (1) in from the rear to retain these components.
20
To install the platform (Fig 6.2):
20.1 Position the assembled platform on the left and right flanges, ensuring the spigot on the slide
plate clamp arm (3) is correctly positioned.
20.2 Secure platform with two screws (4.1) and two screws (4.2).
20.3 Screw in the slide clamp lock insert (2.3) until the slide plate clamp is fully applied.
20.4 Install the knob (2.2) on the insert approximately at or below the horizontal.
20.5 Turn the knob fully counter-clockwise and ensure the slide plate clamp is released before the
stop is reached. Turn the knob clockwise and ensure the clamp is applied before the knob reaches the
horizontal.
20.6 Readjust as necessary and secure the knob with the screw (2.1).
Ball clamp assembly
31
Contents
First
Page
21
Previous
Page
Next
Page
Previous
View
Install the ball clamp assembly as follows (Fig 6.4):
21.1 Screw the stud of the ball clamp assembly (5.1) into the pan base.
21.2 Install three grub screws (5.2) and tighten to lock the ball clamp assembly.
21.3 Install the bowl clamp (6).
Pozi-loc tripod
General
22
The tripod legs are constructed using adhesive processes. The following procedures are the limit of
component replacement.
Replacing tripod legs
23
The legs are secured in the bowl assembly by pivot clamps. Each clamp is secured by a single screw.
Removal
24
Remove the tripod leg as follows (Fig 6.6):
24.1 If necessary, remove the hook (6), which passes through one of the leg pivot clamps (2) and
screws into the bowl assembly (1).
24.2 Remove the screws (4) and leg pivot washers (3) securing the leg pivot clamps (2) to the bowl
assembly (1).
24.3 Pull off the tripod leg. Note orientation and remove two leg pivot friction rings (7) and two leg pivot
washers (8).
Installation
25
Install the tripod leg as follows (Fig 6.6):
25.1 Install two leg pivot friction rings (7) and two leg pivot washers (8) on the tripod leg, oriented as
noted in removal
NOTE:
Do not apply any lubricant to the bowl, the leg trunnions, leg pivot friction rings or
washers.
25.2 Position the leg in the bowl assembly (1), ensuring that the leg pivot friction rings (7) are correctly
seated.
25.3 Install the leg pivot clamps (2) and secure with screws (4) and leg pivot washers (3), using Loctite
221. Tighten screws to a torque of 4.5 Nm (40 lbf in.).
25.4 If required, install the hook (6), using Loctite 221.
32
Contents
First
Page
Previous
Page
Next
Page
Previous
View
Replacing the components of the top clamp assembly
Dismantling
26
Dismantle the top clamp as follows (Fig 6.6):
26.1 Turn the clamp (28) counter-clockwise to the ‘OFF’ position.
26.2 Remove screw (14). Using a suitable peg spanner, unscrew and remove the threaded insert (13).
26.3 Remove the clamp assembly (12) from the top clamp moulding.
26.4 Remove the clamp knob (28) and the clamp insert (27). Pull the clamp insert off the shaft of the
clamp knob.
Assembly
27
Assemble the top clamp as follows (Fig 6.6):
27.1 Apply white bearing grease to the cam surface of the clamp insert (27) and the thread of the
clamp knob (28).
27.2 Install the clamp insert (27) on the clamp knob (28) and position in the top clamp moulding. Turn
the clamp knob (28) to the vertical, ‘off’ position
27.3 Install the clamp assembly (120 in the top clamp moulding.
27.4 Screw the threaded insert (13) onto the shaft of the clamp knob (28).
27.5 While sliding the leg in and out, gradually tighten the threaded insert (13) until the clamp begins
to grip.
27.6 If not aligned, back off the threaded insert (13) until a slot aligns with the hole for screw (14).
27.7 Back off the threaded insert (13) a further three slots and install screw (14) to secure the
threaded insert.
Replacing the components of the bottom clamp assembly
Dismantling
28
To dismantle the bottom clamp it is necessary to remove the oval leg.
NOTE:
The design of the bottom clamp has been modified
At Serial No. 03515, the shaft was fitted with a locking thread insert and the 2 x M5
grubscrews, were changed to 1 x M5 x 10 mm
Dismantling - current clamps
29
Remove the clamp knob as follows (Fig 6.6):
29.1 Turn the clamp knob (23) counter-clockwise to the ‘OFF’ position.
33
Contents
First
Page
Previous
Page
Next
Page
Previous
View
29.2 Using a suitable instrument, such as a flat-bladed screwdriver, carefully remove the knob cap
(26).
29.3 Remove the screw (25), washer (24) and clamp knob (23).
29.4 Remove the grubscrew (16).
30
Remove the oval leg as follows (Fig 6.6):
30.1 Remove the screw (21) securing the foot (22) to the oval leg tube (15).
30.2 Slide the leg upwards until the T-piece is at about the midway position.
30.3 Flex the leg tubes outwards and disengage the T-piece towards the rear. Pull the oval leg
backwards and upwards out of the bottom clamp.
31
Remove the bottom clamp as follows (Fig 6.6):
31.1 Remove the lower clamp assembly (20), the cam moulding (19), the bottom clamp shaft (18) and
the washer (17) from the bottom clamp moulding.
Assembly - current clamps
32
Install the bottom clamp as follows (Fig 6.6):
32.1 Apply white bearing grease to the cam surface of the cam moulding (19) and the washer (17).
32.2 Install the washer (17), the bottom clamp shaft (18), the cam moulding (19) and the lower clamp
assembly (20) in the bottom clamp moulding.
33
Install the oval leg as follows (Fig 6.6):
33.1 Working from the rear, insert the oval leg (15) in the bottom clamp moulding, taking care not to
damage the surface of the lower clamp assembly (20).
33.2 Push the leg down until the T-piece is at about the midway position. Flex the leg tubes outwards
and engage the T-piece with the legs.
33.3 Refit the foot (22) on the oval leg tube (15) and secure with the screw (21).
34
Install the clamp knob as follows (Fig 6.6)
34.1 Position the clamp knob (23) on the bottom clamp shaft (18) and turn the knob counter-clockwise
to the ‘OFF’ position
34.2 Install the grubscrew (16) in the bottom clamp shaft (18).
35
Adjust the clamp (See ‘Pozi-Loc’ tripod leg clamp adjustment on page 22).
Dismantling - earlier clamps
36
Remove the clamp knob as follows (Fig 6.6):
36.1 Turn the clamp knob (23) counter-clockwise to the ‘OFF’ position.
34
Contents
First
Page
Previous
Page
Next
Page
Previous
View
36.2 Using a suitable instrument, such as a flat-bladed screwdriver, carefully remove the knob cap
(26).
36.3 Remove the screw (25), washer (24) and clamp knob (23).
36.4 Remove the locking and adjusting grubscrews (30).
37
Remove the oval leg as follows (Fig 6.6):
37.1 Remove the screw (21) securing the foot (22) to the oval leg tube (15).
37.2 Slide the leg upwards until the T-piece is at about the midway position.
37.3 Flex the leg tubes outwards and disengage the T-piece towards the rear. Pull the oval leg
backwards and upwards out of the bottom clamp.
38
Remove the bottom clamp as follows (Fig 6.6):
38.1 Remove the lower clamp assembly (20), the cam moulding (19), the bottom clamp shaft (29) and
the washer (17) from the bottom clamp moulding.
Assembly - earlier clamps
39
Install the bottom clamp as follows (Fig 6.6):
39.1 Apply white bearing grease to the cam surface of the cam moulding (19) and the washer (17).
39.2 Install the washer (17, the bottom clamp shaft (29), the cam moulding (19) and the lower clamp
assembly (20) in the bottom clamp moulding.
40
Install the oval leg as follows (Fig 6.6):
40.1 Working from the rear, insert the oval leg (15) in the bottom clamp moulding, taking care not to
damage the surface of the lower clamp assembly (20).
40.2 Push the leg down until the T-piece is at about the midway position. Flex the leg tubes outwards
and engage the T-piece with the legs.
40.3 Refit the foot (22) on the oval leg tube (15) and secure with the screw (21).
41
Install the clamp knob as follows (Fig 6.6)
41.1 Position the clamp knob (23) on the bottom clamp shaft (29) and turn the knob counter-clockwise
to the ‘OFF’ position
41.2 Install a grubscrew (30) in the bottom clamp shaft (29).
41.3 Adjust the clamp (See ‘Pozi-Loc’ tripod leg clamp adjustment on page 22).
35
Contents
First
Page
Previous
Page
Next
Page
Previous
View
Section 6
Illustrated Parts List
Contents
Para
Introduction . . . . . . . . . . . . . . . . . . . . . . . . . . . . . . . . . . . . . . . . . . . . . . . . . . . . . . . . . . . . . . . . . . . . . . . . . . 1
Ordering spare parts. . . . . . . . . . . . . . . . . . . . . . . . . . . . . . . . . . . . . . . . . . . . . . . . . . . . . . . . . . . . . . . . . . . 3
Main assembly part numbers. . . . . . . . . . . . . . . . . . . . . . . . . . . . . . . . . . . . . . . . . . . . . . . . . . . . . . . . . . . . 7
Illustrations
Page
Fig 6.1 Pro-10 System . . . . . . . . . . . . . . . . . . . . . . . . . . . . . . . . . . . . . . . . . . . . . . . . . . . . . . . . . . . . . . . . 38
Fig 6.2 Pro-10 Pan and Tilt Head - Main Castings and Platform . . . . . . . . . . . . . . . . . . . . . . . . . . . . . . . . 40
Fig 6.3 Pro-10 Pan and Tilt Head - RH Side Plate, Tilt Drag and Pan Bar . . . . . . . . . . . . . . . . . . . . . . . . . 43
Fig 6.4 Pro-10 Pan and Tilt Head - Pan Drag and Ball Base . . . . . . . . . . . . . . . . . . . . . . . . . . . . . . . . . . . 45
Fig 6.5 Pozi-Loc Two-Stage Tripod (3819-3). . . . . . . . . . . . . . . . . . . . . . . . . . . . . . . . . . . . . . . . . . . . . . . . 47
Fig 6.6 Leg Assembly (3819-11). . . . . . . . . . . . . . . . . . . . . . . . . . . . . . . . . . . . . . . . . . . . . . . . . . . . . . . . . 49
Fig 6.7 Floor Spreader (3818-3) . . . . . . . . . . . . . . . . . . . . . . . . . . . . . . . . . . . . . . . . . . . . . . . . . . . . . . . . . 52
Introduction
1
This parts list is issued for the protouch Pro-10 system, manufactured for Vinten Broadcast Limited,
Western Way, Bury St. Edmunds, Suffolk, IP33 3TB, England.
2
The system comprises a Pro-10 pan and tilt head, a Pozi-Loc two-stage tripod, an adjustable floor
spreader and soft case (see page 37).
Ordering spare parts
3
Always quote the head serial number.
4
Spare parts for the Pro-10 pan and tilt head are supplied as sub-assemblies. Individual components are
not available.
5
When ordering a spare part, please quote the part number, NOT the item number.
6
Due to restrictions placed on the transportation of adhesives and other materials, please obtain
supplies of consumable materials from your local distributor.
36
Contents
First
Page
Previous
Page
Next
Page
Previous
View
Main assembly part numbers
7
Ensure that the correct serial and part numbers are quoted when ordering main assemblies.
Assembly
Part No.
Pro-10 pan and tilt head, comprising:
3809-3
Pro-10 pan and tilt head - main unit assembly
3809-11
Pan bar assembly
3219-104
Bowl clamp assembly
3330-35
Camera slide plate
3809-900SP
Battery - 12V, MN21 or equivalent
C550-021
Tripod
3819-3
Spreader
3818-3
Case
U005-190
37
Contents
First
Page
Previous
Page
Next
Page
Previous
View
1
2
3
Fig 6.1 Pro-10 System
38
Contents
First
Page
Previous
Page
Next
Page
Previous
View
Fig 6.1 Pro-10 System
Item
No.
Part
No.
Nomenclature
Qty
1
3809-3
Pro-10 pan and tilt head (Fig 6.2)
1
2
3819-3
Pozi-Loc two-stage tripod (Fig 6.5)
1
3
3818-3
Floor spreader (Fig 6.7)
1
39
Contents
First
Page
Previous
Page
Next
Page
Previous
View
1
1.1
1.2
2.1
1.3
2.2
1.4
2.3
2
4.1
3
4.2
4.3
4
14
5.1
5.2
5.3
5.4
5.5
14.1
14.2
5
6
13
6.1
6.2
7
6.3
7.1
Fig 6.3
7.2
7.3
7.4
9.1
8
9.2
9.3
9
10.1
10.2
12.1
10.3
12.2
10.4
10
10.3
12
11
Fig 6.4
PRO10IP03
Fig 6.2 Pro-10 Pan and Tilt Head - Main Castings and Platform
40
Contents
First
Page
Previous
Page
Next
Page
Previous
View
Fig 6.2 Pro-10 Pan and Tilt Head - Main Castings and Platform
Item
No.
Part
No.
Nomenclature
Qty
1
3809-900SP
Camera plate for Pro-10
1
1.1
Screw, camera mounting, 1/4 in. BSW
2
1.2
Screw, camera mounting, 3/8 in. BSW
2
1.3
Slide plate
1
1.4
Plug, camera screw blanking
1
2
R503-216
Assembly, lock lever
1
2.1
Screw, countersunk head, socket, M4 x 8 mm long
1
2.2
Knob, slide plate lock
1
2.3
Insert, slide plate lock
1
3
R516-08
Assembly, plate brake
1
4
R516-203
Assembly, top base
1
4.1
Screw, cap head, socket, M5 x 12 mm long
2
4.2
Screw, cap head, socket, M5 x 16 mm long
2
4.3
Platform
1
5
R503-212
Assembly, top friction control knob
1
5.1
Label, pan drag knob
1
5.2
Nut, M6, nyloc, lock
1
5.3
Bearing, ball, thrust, 6 mm ID x 14 mm OD x 4.7 mm long
1
5.4
Washer, plain, large, M6
1
5.5
Knob, pan drag
1
6
R516-205
Assembly, cover
1
6.1
Lid, battery compartment
1
6.2
Screw, csk head, socket, M4 x 8 mm long
2
6.3
Assembly, centre cover spares
1
7
R516-12
Assembly, balance
1
7.1
Threaded sleeve, pan drag adjuster
1
7.2
Screw, cap head, socket, M5 x 16 mm long
2
7.3
Bridge, pan drag ad
1
7.4
Clip, pan drag adj
1
8
R516-201
Assembly, right flange
1
9
R516-91
Assembly, nut+bearing+washer
1
41
Contents
First
Page
Previous
Page
Next
Page
Previous
View
Fig 6.2 Pro-10 Pan and Tilt Head - Main Castings and Platform (Cont)
Item
No.
Part
No.
Nomenclature
Qty
9.1
Nut, M10, nyloc, thin
1
9.2
Bearing, ball, thrust, 10 mm ID x 17 mm OD x 4.7 mm long
1
9.3
Washer, stainless steel, 11 mm ID x 30 mm OD x 2.5 mm thick
1
10
R516-206
Assembly, base casting
1
10.1
Assembly, bubble
1
10.2
Assembly, centre housing spares
1
10.3
Screw, low profile, cap head, socket, M6 x 16 mm long
4
10.4
Sleeve, pan bearing
1
11
R516-202
Assembly, left flange
1
12
R516-215
Assembly, locking knob
1
12.1
Knob, tilt brake
1
12.2
Bearing, ball, thrust, 6 mm ID x 14 mm OD x 4.7 mm long
1
13
C550-021
Battery, 12 Volts
1
14
R516-210
Assembly, safety lever
1
14.1
Spring, slide plate release
1
14.2
Catch, slide plate release
1
42
Contents
First
Page
Previous
Page
Next
Page
2.1
Previous
View
1
2.2
2.3
2.4
2
4.1
4.2
3
4.3
4.4
4
Fig 6.2
5
6.1.1
6.1.2
6.1.3
5.1
6
6.1.4
6.1.5
5.2
5.3
6.1
5.4
6.2
5.3
Fig 6.4
PRO10IP04
Fig 6.3 Pro-10 Pan and Tilt Head - RH Side Plate, Tilt Drag and Pan Bar
43
Contents
First
Page
Previous
Page
Next
Page
Previous
View
Fig 6.3 Pro-10 Pan and Tilt Head - RH Side Plate, Tilt Drag and Pan Bar
Item
No.
Part
No.
Nomenclature
Qty
1
R516-08
Assembly, plate brake
1
2
R503-220
Assembly, friction knob
1
2.1
Boot, tilt drag knob
1
2.2
Nut, M6, standard (hex), full
1
2.3
Knob, tilt drag
1
2.4
Bearing, ball, thrust, 6 mm ID x 14 mm OD x 4.7 mm long
1
3
R516-201
Assembly, right flange
1
4
R516-13
Assembly, tilt balance
1
4.1
Spring, disc, 6.2 mm ID x 12 mm OD x 0.5 mm thick
2
4.2
Stud, tilt drag adjust
2
4.3
Arm, tilt drag adjust
1
4.4
Screw, cap head, socket, M5 x 16 mm long
2
5
R516-206
Assembly, base casting
1
5.1
Assembly, bubble
1
5.2
Assembly, centre housing spares
1
5.3
Screw, low profile, cap head, socket, M6 x 16 mm long
4
5.4
Sleeve, pan bearing
1
6
3219-104
6.1
3219-102
Pan bar
Pan bar clamp assembly
1
1
6.1.1
Pan bar clamp knob assembly
1
6.1.2
Sleeve, insulation, head diameter 18 mm, body diameter 10.9
mm
1
6.1.3
Washer, plain, heavy, M8
1
6.1.4
Pan bar clamp
1
6.1.5
Snap ring, external, standard, 8 mm shaft dia. x 0.8 mm thick
1
6.2
3219-103
Pan bar
1
44
Contents
First
Page
Previous
Page
Next
Page
Previous
View
Fig 6.2
1.1
Fig 6.3
1.2
1.3
1.4
Fig 6.2
1
1.3
2
3.1
3
4.1
4.1.1
7
4.1.2
7.1
4.2
7.2
4.3
7.1
4.4
4
4.5
4.6
3.2
4.7
5
5.1
5.2
6
PRO6IP08
Fig 6.4 Pro-10 Pan and Tilt Head - Pan Drag and Ball Base
45
Contents
First
Page
Previous
Page
Next
Page
Previous
View
Fig 6.4 Pro-10 Pan and Tilt Head - Pan Drag and Ball Base
Item
No.
Part
No.
Nomenclature
Qty
1
R516-206
Assembly, base casting
1
1.1
Assembly, bubble
1
1.2
Assembly, centre housing spares
1
1.3
Screw, low profile, cap head, socket, M6 x 16 mm long
4
1.4
Sleeve, pan bearing
1
2
R3-2185
Bearing f/516 head
1
3
R516-01
Assembly, base plate
1
3.1
Drag disc, adjust
1
3.2
Pan base spares assembly
1
4
R516-99
4.1
R503-214
Assembly, brake knob with screws
Assembly, brake knob
1
1
4.1.1
Screw, countersunk head, socket, M4 x 8 mm long
1
4.1.2
Knob, pan brake
1
4.2
Insert, pan brake knob
1
4.3
Shim, 8 mm ID x 14 mm OD x 0.30 mm thick
1
4.4
Spring, pan brake release
1
4.5
Friction pad, pan brake
1
4.6
Clamp plate, pan brake
1
4.7
Bolt, dome head, coach, M 6 x 20 mm long
1
5
R351-02
Ball casting with rod
1
5.1
Assembly, ball clamp
1
5.2
Grubscrew, slotted, M6 x 8 mm long
3
6
3330-35
Bowl clamp assembly
1
7
R501-57
Assembly, pad with spring
1
7.1
Spring, drag adjust shoe
2
7.2
Shoe, drag disc adjust
2
46
Contents
First
Page
Previous
Page
Next
Page
Previous
View
1
2
4
3
Fig 6.5 Pozi-Loc Two-Stage Tripod (3819-3)
47
Contents
First
Page
Previous
Page
Next
Page
Previous
View
Fig 6.5 Pozi-Loc Two-Stage Tripod (3819-3)
Item
No.
Part
No.
Nomenclature
Qty
1
3774-15
Bowl assembly (75mm)
1
2
3498-322
Hook
1
3
3819-11
Two-stage leg assembly
3
4
3310-12
Strap assembly
1
48
Contents
First
Page
Previous
Page
Next
Page
Previous
View
1
8
7
2
8
7
3
2
4
3
5
4
6
28
10
27
11
12
13
14
15
16
17
Earlier tripods two M5 grubscrews
26
18
25
24
19
23
25
20
24
23
9
30
22
21
17
29
19
20
3770_3_IP
Fig 6.6 Leg Assembly (3819-11)
49
Contents
First
Page
Previous
Page
Next
Page
Previous
View
Fig 6.6 Leg Assembly (3819-11)
Item
No.
Part
No.
Item
1
3774-15
Bowl assembly (75mm)
1
2
3498-321
Leg Pivot Clamp
3
3
3498-338
Spherical Washer
6
4
M007-506
Screw, button head, socket, M6 x 20 mm long
3
5
J550-112
Cap, tube, dome type, to fit over 3.2 mm diameter
1
6
3498-322
Hook
1
7
3498-226
Leg Pivot Friction Ring
6
8
3498-229
Leg Pivot Washer.
6
9
3310-12
Strap assembly
1
3819-11
Leg assembly - replaceable parts as follows
Qty
10
M600-106
Washer, plain, light, M8
1
11
J532-076
Spring, compression, 0.625 in. free length, 0.480 in. OD x 0.500 in.
hole dia., 22.00 lbf/in. rate
1
12
3513-13
Upper clamp assembly
1
13
3392-205
Threaded insert (upper rear)
1
14
L101-026
Screw, self-tapping, pan head, pozidrive, M4 x 1/4 mm long, type bt
1
15
3819-901SP
Centre leg tube assembly
1
16
M006-813
Screw, grub, dog point, socket head, M5 x 10 mm long
1
17
3770-213
Washer-Lower clamp
1
18
3770-18
Clamp shaft assembly (lower)
1
19
3770-17
Clamp cam follower
1
20
3770-13
Lower clamp assembly
1
21
3770-16
Two-stage foot assembly
1
22
M101-003
Screw, self-tapping, pan head, pozidrive, M4 x 25 mm long
1
23
3770-229
Bottom Clamp Knob (Two Stops)
1
24
M601-010
Washer, shakeproof, internal, M5
1
25
M006-515
Screw, button head, socket, M5 x 8 mm long
1
26
3770-206
Knob cap
1
27
3770-219
Top clamp cam insert
1
28
3770-14
Upper clamp knob assembly
1
50
Contents
First
Page
Previous
Page
Next
Page
Previous
View
Fig 6.6 Leg Assembly (3819-11) (Cont)
Item
No.
NOTE:
Part
No.
Item
Qty
The design of the bottom clamp has been modified
At Serial No. 03515, the shaft was fitted with a locking thread insert and the 2 x M5
grubscrews, were changed to 1 x M5 x 10 mm
Earlier tripods - two M5 grubscrews
17
3770-213
Washer-Lower clamp
1
19
3770-17
Clamp cam follower
1
20
3880-17
Lower clamp cam assembly
1
23
3770-229
Bottom Clamp Knob (Two Stops)
1
24
M601-010
Washer, shakeproof, internal, M5
1
25
M006-515
Screw, button head, socket, M5 x 8 mm long
1
29
3770-231
Bottom Clamp Shaft (M5)
1
30
M006-814
Screw, grub, flat point, skt head, M5 x 5 mm long
2
51
Contents
First
Page
Previous
Page
Next
Page
Previous
View
1
2
3
16
4
15
5
14
6
13
7
12
8
11
9
10
Fig 6.7 Floor Spreader (3818-3)
52
Contents
First
Page
Previous
Page
Previous
View
Fig 6.7 Floor Spreader (3818-3)
Item
No.
Part
No.
Nomenclature
1
3313-219
Split ring
1
2
3363-201
Centre moulding
1
3
3313-211
Hinge pin
3
4
M701-054
'E'-Clip, crescent ring (“e”-clip variation), 4 mm shaft dia. x 0.40 mm
thick
3
5
3363-202
Leg moulding inner (female)
3
6
3313-214
Friction pad
3
7
3313-213
Clamp stud
3
8
3363-203
Leg moulding outer (male)
3
3363-901SP
Foot assembly (spares) - black, comprising one each of:
3
Qty
9
3313-218
Foot hinge pin
3
10
3313-212
Foot pad
3
11
3363-215
Foot support moulding
3
12
3313-216
Strap
3
13
L803-002
Pin, mills, 1/16 in. dia. x 1/4 in. long, gp2
6
14
M600-020
Washer, form “c”, large, 20.5/21 mm ID x 8.4/8.7 mm OD x 1.4/1.8 mm
thick
3
15
3313-204
Clamp knob moulding
3
16
M500-081
Nut, M5, standard (hex), full
3
53