1
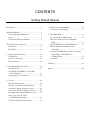
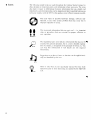
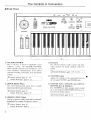
Congratulations!
Your SY35 Music Synthesizer offers extraordinary musical versatility and control with a “vector synthesis” system than combines Yamaha’s advanced AWM
sample playback technology with high-performance FM tone generation.
Vector synthesis allows you to create and control synthesized sound with
unprecedented ease — in a very intimate, “human” way, putting you more
closely in touch with your instrument and music. The vector control lets you
blend sounds manually in real time, and dynamic vectors let you “ r e c o r d ”
dynamic vector sweeps that will play automatically whenever you play a note.
For even more expressive capability, the SY35 keyboard features both velocity
sensitivity and after-touch response that can be assigned to a number of musical
parameters. The more you play the SY35, the more you’ll find that “vectors”
will become an indispensable part of your musical repertoire.
●
●
●
●
●
●
●
●
●
●
●
●
●
●
●
●
Yamaha AWM and FM tone generators for superior sound and tonal versatility.
2-element or 4-element voice architecture brings AWM and FM waveforms
together.
Vector control for 2-axis control of element level and detuning.
Dynamic level and detune vectors can be recorded easily in real time.
128 preset AWM waveforms and 256 preset FM waveforms — all in an
extended waveform ROM for superior sound quality — provide an extensive
library of sonic “building blocks” from which to create new voices.
64 preset voices plus 64 editable internal voice memory locations containing
an additional 64 voices.
External memory cards provide limitless backup and storage capability.
Easy-edit features make creating new voices quick and virtually programming-free.
Detailed programming parameters for in-depth programming when
necessary.
Fully programmable 8-part multi-play mode is perfect for sequencer-driven
applications, layered multi-voice performance, and split keyboard effects.
16 preset multi-play setups plus 16 editable internal multi-play memory
locations containing an additional 16 multi-play setups.
16 internal digital effects including reverb and delay and distortion.
Overlapping voice selection capability for seamless voice transitions.
Velocity and after-touch sensitive keyboard.
Pitch bend and modulation wheels.
Stereo output.
CONTENTS
Getting Started Manual
Precautions............................................................3
About the Manuals.................................................5
The Getting Started Manual ..............................5
Icons.................................................................6
The Feature Reference Manual..........................7
The Controls & Connectors ..................................8
Front Panel .......................................................8
Rear Panel.......................................................12
1. Setting Up Your System..................................14
Connections....................................................14
Power-on Procedure........................................14
Play the Demo ................................................15
4. Instant Voice Programming............................ 31
For Serious Voice Editing ….......................... 33
5. The Multi Mode............................................. 34
Try Out the Preset Multi Setups...................... 34
When You Want To Create an Original
Multi …....................................................... 37
The INTERNAL and CARD Memories........... 37
Multi Polyphony & Dynamic Voice
Allocation ................................................... 37
Using the [STORE] Key to Store Voices and
Multi Setups in INTERNAL or
CARD Memory........................................... 38
Conclusion..................................................... 40
Glossary.............................................................. 41
2. Selecting And Playing Voices ..........................16
Play the Presets ...............................................16
The PRESET, INTERNAL, and CARD
Voice Memories...........................................19
Overlapping Voice Selection...........................20
3. Vectors ...........................................................21
Manual Vector Control ...................................21
How the VECTOR CONTROL Works..............22
Advanced Control: Dynamic Vectors ..............24
Try Out the SE*Elect Dynamic Vector ...........24
Recording An Original Dynamic Vector .........25
Store Your Voice & Vector
In INTERNAL Memory...............................28
For More Detailed Vector Control … ..............30
Index .................................................................. 44
Getting
Started Manual
Precautions
!! PLEASE READ THIS BEFORE PROCEEDING !!
1. AVOID EXCESSIVE
HEAT, HUMIDITY,
DUST AND VIBRATION
Keep the SY35 away from locations where it is likely to be exposed to high
temperatures or humidity — such as near radiators, stoves, etc. Also avoid locations which are subject to excessive dust accumulation or vibration which could
cause mechanical damage.
2. AVOID PHYSICAL
SHOCKS
Strong physical shocks to the SY35 can cause damage. Handle it with care.
3. DO NOT OPEN THE
CASE OR ATTEMPT
REPAIRS OR
MODIFICATIONS
YOURSELF
This product contains no user-serviceable parts. Refer all maintenance to qualified Yamaha service personnel. Opening the case and/or tampering with the
internal circuitry will void the warranty.
4. MAKE SURE POWER IS
OFF BEFORE MAKING
OR REMOVING
CONNECTIONS
Always turn the power OFF prior to connecting or disconnecting cables.
5. HANDLE CABLES
CAREFULLY
Always plug and unplug cables by gripping the connector, not the cord.
6. CLEAN WITH A SOFT
DRY CLOTH
Never use solvents such as benzine or thinner to clean the unit. Wipe clean with
a soft, dry cloth.
7. ALWAYS USE THE
CORRECT POWER
SUPPLY
Always use the supplied AC Adaptor to power your SY35 or, if the original
adaptor is lost or broken, a replacement or equivalent type obtained from your
Yamaha dealer. Also, make sure that the adaptor you have is appropriate for the
AC mains supply voltage in the area where you intend to use the SY35 (the
correct INPUT voltage is marked on the adaptor).
8. ELECTRICAL
INTERFERENCE
Since the SY35 contains digital circuitry, it may cause interference and noise if
placed too close to TV sets, radios or similar equipment. If such a problem does
occur, move the SY35 further away from the affected equipment.
9. MIDI CABLES
When connecting the SY35 to MIDI equipment, be sure to use high-quality
cables made especially for MIDI data transmission. Also avoid cables longer
than about 15 meters, as longer cables can pick up electrical noise that can
causes data errors.
3
10. MEMORY BACKUP
The SY35 contains a special backup battery that will retain the contents of the
internal RAM memory for up to approximately five years from the date of
manufacture. When the battery finally fails the contents of the RAM memory
will be lost, so we recommend that you make regular backup copies of
important data by transferring the data to external memory cards (see page 41
of the Feature Reference manual for information on card data storage). For
even greater security (memory card data can be lost due to battery failure,
accidental erasure, etc.) save your data to floppy disk via a MIDI data filer unit
such as the Yamaha MDF2.
Have the backup battery replaced by qualified Yamaha service personnel
(see your Yamaha dealer) after approximately 5 years.
IMPORTANT!: Yamaha cannot be held responsible for data loss caused by
backup failure or improper operation of the SY35!
11. THIRD-PARTY
SOFTWARE
4
Yamaha can not take any responsibility for software produced for this product
by third-party manufacturers. Please direct any questions or comments about
such software to the manufacturer or their agents.
About the Manuals
The SY35 comes with two manuals — Getting Started and Feature Reference.
●
The Getting Started
Manual (this manual)
In addition to an overview of the SY35 controls and connectors (page 8), the
Getting Started manual contains five separate tutorials that take you step-by-step
through the main procedures you will need to know to become familiar with
your SY35:
1. Setting Up Your System [Page 14]
Basic system connections.
2. Selecting And Playing Voices [Page 16]
Selecting and playing voices from the PRESET, INTERNAL and CARD
voice banks.
3. Vectors [Page 21]
Using and understanding manual and dynamic vectors.
4. Instant Voice Programming [Page 31]
The fast way to create an unlimited range of new voices for the SY35.
5. The Multi Mode [Page 34]
Play several voices simultaneously, or control multiple SY35 voices from an
external MIDI sequencer.
We recommend that you go through the tutorials in sequence while actually
carrying out procedures on your SY35. Once you’ve gone through the entire
TUTORIALS section in this way, you should be familiar enough with the SY35
to need only the Feature Reference manual in future.
5
●
The Feature
Reference Manual
The Feature Reference manual is the “nuts and bolts” reference for the SY35,
individually describing its many functions in detail. The Feature Reference
manual is divided into eight main sections, each describing the various functions
within a particular SY35 edit or utility mode.
1.
2.
3.
4.
5.
6.
7.
8.
VOICE COMMON [Page 3]
VOICE VECTOR [Page 9]
ELEMENT TONE [Page 15]
ELEMENT ENVELOPE [Page 25]
MULTI [Page 33]
UTILITY SETUP [Page 39]
UTILITY RECALL [Page 47]
UTILITY MIDI [Page 51]
Once you have become familiar with the way the SY35 works by going through
the Getting Started manual, you should only need to refer to the Feature
Reference manual from time to time to get details on functions you’ve never
used before, or refresh your memory about functions that you don’t use very
often.
Each section of the Feature Reference manual has its own table of contents,
so you should be able to locate any particular function quickly and easily.
Functions and references can also be located by referring to the index at the
back of the manual.
7
2. Selecting And Playing Voices
The first thing you’ll want to do with your SY35 is select and play some of its outstanding voices … this section
will show you how to do just that. We’ll also look at the overall SY35 voice memory configuration.
Play the Presets
Although the SY35 can access three different voice memories — PRESET,
INTERNAL, and CARD — let’s begin by selecting and playing some of the
preset voices.
1
Select the Voice Play Mode
If the MODE [VOICE] key indicator is lit, then the Voice Play mode is
already selected and you can go directly to the next step. If it isn’t, press
the [VOICE] key to select it.
The words “VOICE PLAY” also appear on the top line of the LCD panel
when the Voice Play mode is selected.
VOICE PLAY
P11 AP:Rock
2
16
Select the PRESET Voice Memory
If the MEMORY [PRESET] key indicator is already lit, then the PRESET
voice memory is already selected and you can go straight to the next step.
If it isn’t, press the [PRESET] key to select it.
PRESET VOICE LIST
No.
Voice Name
No.
Voice Name
No.
Voice Name
No.
Voice Name
11
12
13
14
15
16
17
18
AP:Rock
AP:Clsic
AP*Chors
AP:HTonk
AP:Soft
AP*Pf&St
AP:Blend
AP*Bell
31
32
33
34
35
36
37
38
BR:Trmpt
BR:Mute
BR:Tromb
BR:Flugl
BR:FrHrn
BR*Sect1
BR*Sect2
BR*Fanfr
51
52
53
54
55
56
57
58
BA:Wood
BA:Frtls
BA*Slap
BA:Fingr
BA:Pick
BA:Synth
BA:Tchno
BA:Groov
71
72
73
74
75
76
77
78
PL:Gypsy
PL:Folk
PL*Wide
PL*Mute
PL:Rock
PL*Dist
PL:Chrng
PL:Sitar
21
22
23
24
25
26
27
28
EP*Tine
EP:Light
EP:Old
EP*Malet
KY*Clav1
KY:Clav2
KY:Celst
KY:Hrpsi
41
42
43
44
45
46
47
48
ST*Arco1
ST:Arco2
ST:Cello
ST*SlwAt
ST*Pizz
ST*Treml
ST*OrchB
ST*OrchS
61
62
63
64
65
66
67
68
WN:Sax
WN:Flute
WN:Clari
WN:Oboe
WN *PanFl
WN *SaxEm
WN *Ensmb
WN *Orch
81
82
83
84
85
86
87
88
CH *Pure
CH *Itopy
CH *Uhh-CH *Angel
CH *Bell
CH *Snow
CH *Vcodr
CH *Marin
INTERNAL VOICE LIST
No.
Voice Name
No.
Voice Name
No.
Voice Name
No.
Voice Name
11
12
13
14
15
16
17
18
SP*Warm
SP*Resnc
SP*Full!
SP*Bell
SP*Filtr
SP*Deep
SP*Fog
SP*Dyna
31
32
33
34
35
36
37
38
SL*Saw
SL:Squar
SL*Sync
SL*Power
SL*Whstl
SL*2VCO
SL*Fat
SL*AnaSy
51
52
53
54
55
56
57
58
BR*Punch
BR*Power
BR*Fat
BR:Lite
ST*Modrn
ST*Soft
ST*Mild
ST:Lite
71
72
73
74
75
76
77
78
ME*Wide!
ME*Drama
ME*SlwSg
ME*Grand
ME*Typhn
ME*Tzone
ME*Space
ME*Memry
21
22
23
24
25
26
27
28
SC*Dgcrd
SC*Elgnt
SC*sFz<
SC*Coin
SC*Brash
SC:Water
SC*Sand
SC*Reso
41
42
43
44
45
46
47
48
OR:Tango
OR:Paris
OR*Rock1
OR*Rock2
OR*Rock3
OR*Cat
OR*Big
OR*Combo
61
62
63
64
65
66
67
68
SE*Hit
SE*Start
SE*Who?
SE*Open
SE*Emgsy
SE*Elect
SE*GoUp!
SE*and>?
81
82
83
84
85
86
87
88
PC:Vibe
PC*Marim
PC:M.Box
PC:Timp
PC*Batl
PC*Human
DR *Auto
DR:Kit
Note that the voices are arranged in categories for easier access. For example,
preset bank 1 contains acoustic piano voices, preset bank 2 contains electric
piano and other keyboards, bank 3 is all brass, bank 4 is strings, and so on. The
category of each voice is identified by a two-character prefix, as follows:
AP = Acoustic Piano
EP = Electric Piano
KY = Keyboard
BR = Brass
ST = Strings
BA = Bass
WN = Wind
PL = Plucked
CH = Chorus
SP = Synth Pad
SC = Synth Comp
SL = Synth Lead
OR = Organ
SE = Sound Effect
ME = Musical Effect
PC = Percussive
DR = Drums
Also note that the delimiter which separates the category prefix from the voice
name indicates whether the voice is a 2-element or 4-element type: colon (:) =
2-element voice, asterisk (*) = 4-element voice.
A more detailed voice list is provided in the Feature Reference manual
appendix, on page 59.
18
3. Vectors
Vectors are a versatile musical tool. You can simply use the VECTOR CONTROL as an expressive controller
while playing, or spend some time programming sophisticated “dynamic vectors” that play automatically.
Manual Vector Control
Before we get into the details of vector synthesis, try using the VECTOR
CONTROL with some of the preset voices to get a feel for what this versatile
feature can do.
1
Select the Vector Play LEVEL Mode
While in the Voice Play mode (see the preceding section if you don’t
know how to select the Voice Play mode), turn the Vector Play mode ON
by pressing the VECTOR PLAY [ON/OFF] key so that either the [LEVEL]
or [DETUNE] indicator lights, then press the [LEVEL/DETUNE] key to
select the [LEVEL] indicator (the [LEVEL] and [DETUNE] indicators are
selected alternately when the key is pressed).
2
Select the SP* Bell Voice
The SP* Bell voice (INTERNAL bank 1, number 4) is a good choice to
experiment with the VECTOR CONTROL.
VOICE PLAY
I14 SP*Bell
3
Move the Vector Control While Playing
Try moving the VECTOR CONTROL vertically, sideways, and in circles
while you play on the keyboard, and listen carefully to how the sound
changes.
VECTOR CONTROL
A
A
D
C
B
D
C
B
21
4
Try DETUNE Vector Control …
Press the VECTOR PLAY [LEVEL/DETUNE] key so that the [DETUNE]
indicator lights, move the VECTOR CONTROL while playing, and listen
for the difference in sound.
5
Also Try the Vector Control With These Voices …
The following voices also effectively demonstrate the power of the
VECTOR CONTROL. Select them and apply LEVEL and DETUNE vector
control as you play:
l
l
l
How the VECTOR
CONTROL Works
P68 WN* Orch
I74 ME * Grand
I78 ME * Memry
SY35 voices can have either a “2-element” or “4-element” configuration.
Each element is actually an independent sound or “waveform,” and vector
control allows the 2 or 4 different waveforms in a voice to be blended and
detuned in a variety of ways — manually or automatically.
The “ A , ” “B,” “C,” and “ D ” markings around the VECTOR
CONTROL correspond to the voice elements. A 2-element voice uses only
elements A and B, while a 4-element voice uses all four elements — A, B, C and
D.
VECTOR CONTROL
A
D
A
C
B
C
D
B
For the sake of clarity, we'll represent the SY35 vector control by asimple graph like the one
shown to the right for the rest of the tutorial.
22
LEVEL OR PITCH CHANGE
VECTOR CONTROL MOTION
A
LEVEL OR PITCH
A
B
D
C
C
B
D
TIME
Advanced Control: Dynamic
Vectors
In addition to the manual vector control capability described so far, the SY35
features advanced automatic vector recording and playback capability.
Automatic vectors are called “dynamic vectors” in the SY35, and these play
automatically whenever you play a note on the keyboard. Dynamic vectors can
be recorded in real time via the VECTOR CONTROL by using the procedure
described in the “Recording an Original Dynamic Vector” section, below.
While manual vector control is possible whenever the VECTOR PLAY mode is
ON — i.e. when either the VECTOR PLAY [LEVEL] or [DETUNE] indicator is
lit, dynamic vectors operate only when the VECTOR PLAY mode is OFF — i.e.
when both the VECTOR PLAY [LEVEL] and [DETUNE] indicators are out.
Try Out the SE* Elect
Dynamic Vector
Before we dive in and record an original dynamic vector, spend a few minutes
familiarizing yourself with the SE* Elect voice and its preset dynamic vector.
1
Select the SE* Elect Voice
The SE* Elect voice (I66) features a distinct dynamic vector that will serve
as an ideal foundation for a few initial experiments.
VOICE PLAY
I66 SE*Elect
2
Turn Vector Play OFF and Play the Voice
Make sure the manual VECTOR PLAY mode is turned OFF, using the
VECTOR PLAY [ON/OFF] key to turn it off if necessary (neither the
[LEVEL] or [DETUNE] indicators should be lit).
Play a nice long note or chord. Notice how the various elements are gradually brought in and blended automatically — this is the result of a
dynamic vector.
24
3
Turn Vector Play ON
Now press the VECTOR PLAY [ON/OFF] key to turn the VECTOR PLAY
mode ON, and select [LEVEL] control.
Since Vector Play is ON, the dynamic vector will not play. Set the
VECTOR CONTROL to center position and play another note or chord.
You should hear all 4 elements at the same time, in approximately equal
proportions. Play with the VECTOR CONTROL a bit to get a feel for this
particular combination of elements.
VECTOR CONTROL
A
D
A
C
B
Recording An Original
Dynamic Vector
D
C
B
Now we’ll go ahead and record an original dynamic level vector for the
SP* Bell voice.
1
Select the VOICE VECTOR Edit Mode
The first step is to enter the VOICE VECTOR edit mode, which we do by
pressing the [EDIT/UTILITY] key and then the [VOICE VECTOR] key.
2
Select the LEVEL SPEED Function
If the LEVEL SPEED function does not appear immediately when you
enter the VOICE VECTOR edit mode, press the [VOICE VECTOR] key a
few times until it does appear (Feature Reference manual, page 11).
VV>LEVEL SPEED
Vector Rate 30ms
25
4
Select the LEVEL REC Function
Press the [VOICE VECTOR] key once to move ahead to the LEVEL REC
display.
Use the [4] and [6] cursor keys to move the cursor to the STBY (standby)
parameter. (The VECTOR PLAY LEVEL LED will light.)
At this point the VECTOR CONTROL will be active in the level control
mode, and you can rehearse the level vector you are about to record.
5
Select REC
Move the cursor to the REC parameter (press the CURSOR [6] key).
6
Record the Dynamic Vector
Vector recording will begin the instant you play a note on the keyboard.
Play a note (or chord), and begin moving the VECTOR CONTROL.
VECTOR CONTROL
Í
A
D
C
B
27
1
Turn Memory Protect OFF
To turn the memory protect function off, press the [UTILITY SETUP] key
a few times until the MEM. PROTECT function appears.
Move the cursor to the INT parameter and press the [–1/NO] or [+1/YES]
key to turn the internal memory protection off.
2
Press [VOICE]
Now press the [VOICE] key to return to the VOICE PLAY mode. Before
actually returning you to the VOICE PLAY mode, however, the SY35 will
ask you whether you want to store the voice you have just edited into one
of the INTERNAL memory locations.
You can skip this step and go straight to the VOICE PLAY mode by
pressing the [–1/NO] key, or you can press [+1/YES] to initiate the voice
storage procedure.
3
Press [+1/YES] If You Want to Store the Voice
If you press [+1/YES], a display similar to the following will appear:
The number of the voice you edited will be shown to the left of the lower
display line, and the cursor will be placed to the right of the arrow.
29
4. Instant Voice Programming
Although the SY35 allows you to program voices in considerable detail, in this section we’ll present a simple way
to create an unlimited range of new and useful voices.
Detailed parameters for programming individual elements are available in the ELEMENT TONE and
ELEMENT ENVELOPE edit modes described in the Feature Reference manual, beginning on pages 15 and 25,
respectively. Everything we need to have loads of fun — and to create some very serious voices — is available in
the VOICE COMMON edit mode.
1
Select a Preset Voice To Start With
Select any preset voice while in the VOICE PLAY mode to serve as a
“platform” for your new voice. ST * Arco1 (P41) is a good choice to start
with.
VOICE PLAY
P41 ST*Arco1
2
Select the VOICE COMMON Edit Mode
Select the VOICE COMMON edit mode by pressing the [EDIT/UTILITY]
key and then the [VOICE COMMON] key.
3
Select the RANDOM Function
Press the [VOICE COMMON] key a few times until “RANDOM” appears
on the top display line. As long as the cursor is on the top display line next
to the function name, it is also possible to scroll backward and forward
through the function list by using the [–1/NO] and [+1/YES] keys.
If the “ELEMENT” parameter does not appear in the RANDOM display,
as pictured above, use the CURSOR [4] and/or [6] keys to move the cursor
to the left-hand parameter on the lower display line (this will either be
ELEMENT, LEVEL VEC, or DETUNE VEC) and, if necessary, select
“ELEMENT” using the [–1/NO] and [+1/YES] keys.
31
For Serious Voice
Editing …
You’re now equipped to create a world of vibrant and very useful new voices
with very little actual programming indeed. If you do want to get deep into the
details and fine tune your voices until they are perfect, please take the time to
read through the Feature Reference manual. In it, each editing function is described individually, often with a few helpful hints that will help you use it most
effectively.
33
Conclusion
40
In the preceding tutorials we’ve covered quite a lot of ground, and by now you
should be quite familiar with the SY35. You know how to select and play the
voices, how to use manual vector control, how to record dynamic vectors and
store the results in memory, how to quickly create new voices, and how to use
the multi mode. When you get the urge to go further, please take the time to
read through the Feature Reference manual … or at least the section or sections
that pertain directly to what you want to do. The more you program and play,
the easier it will be!
Glossary
If you’re relatively new to electronic music, you might be confused by some of the jargon you run across in the
literature you read (such as this manual). The following is a very brief glossary of some terms that are unique to
this field.
Aftertouch
Aftertouch response refers to the capability to vary the sound of a note after the
note has been struck on the keyboard. This is normally accomplished by
varying finger pressure on the key. Depending on the synthesizer, aftertouch
can be used to bend the pitch of a note, apply modulation, or apply just about
any other effect. In the SY35 aftertouch can be assigned to pitch bend, level
control, pitch modulation, or amplitude modulation.
AWM Synthesis
AWM stands for “Advanced Wave Memory,” Yamaha’s sophisticated sampling
technology that allows high-fidelity reproduction of digitally recorded “live”
sound.
Cent
Just as a cent coin is one-hundredth of a dollar, a cent in musical lingo is onehundredth of a semitone. The cent is a useful unit when dealing with very small
changes in pitch — such as in synthesizer tuning or detuning functions.
Element
Normally the word “element” refers to a part of something larger. The same
applies in synthesizers. In Yamaha synthesizers, an element is an individually
controllable part of a voice. In the SY35, each voice can have two or four elements. Each element is actually an independent waveform, so you could have a
4-element voice that is made up of a piano element, a brass element, a strings
element, and a wind element.
Envelope
You’ll hear the terms “envelope” and “envelope generator” quite a lot in synthesizer talk. Like the envelope that encloses a letter, a synthesizer envelope
“encloses” the sound, mainly in one of two ways. An amplitude envelope
determines the overall “shape” of the sound — i.e. the speed and shape of the
attack, how fast the sound decays, etc. A pitch envelope determines how the
pitch of a note changes over time. Next to the basic waveform, the amplitude
and pitch envelopes are the most important factors in determining how a voice
sounds.
FM Synthesis
FM is Yamaha’s proven Frequency Modulation synthesis technology which is
capable of creating extraordinarily warm, vibrant simulations of actual instruments, as well as an infinite variety of original sounds. The reason for the
“ F M ” name is that this tone generator system employs a number of
independent oscillator blocks known as “operators,” that are arranged in a
variety of configurations known as “algorithms.” Depending on their positions
in the algorithm, each operator functions either as a “modulator,” or a
“carrier” that is modulated by a modulator. Since modulators modulate the
frequency of carriers, the system is a form of frequency modulation —
therefore, “FM Synthesis.”
41
LFO
LFO stands for “Low Frequency Oscillator.” This is the oscillator, usually with
a frequency variable from about 0.1 to 20 hertz, that is responsible for creating
the periodic variation in tremolo, vibrato, chorus, phasing, and other modulation
type effects.
MIDI
“MIDI” is an acronym standing for “Musical Instrument Digital Interface.”
MIDI allows musical instruments, sequencers, signal processing devices, computers, and other devices to communicate and control each other via a simple
cable connection. The introduction of MIDI has revolutionized the music field,
making control of the music production process easier and more efficient than
ever before.
Modulation
In synthesizers, the term “modulation” usually means to vary the amplitude or
frequency of a sound in accordance with some other signal. This “other
signal” is most commonly the output from the synthesizer’s LFO (described
above), although in Yamaha FM synthesis (also see above) it can also be the
signal from a modulator operator in an FM algorithm.
Multi
Although normally a prefix, as in “multi-talented,” the term “multi” on its
own has come to refer to multi-timbre setups in the synthesizer world. A multi is
usually a group of 8 or 16 voices that can be played simultaneously either from
the instrument’s keyboard, sometimes in split-keyboard configurations, or via
MIDI. For MIDI control each voice receives on a different MIDI channel
number, allowing multi to be handled as multiple tone generators by the
controlling sequencer or computer. Multis also allow a number of parameters to
be programmed individually for each voice: volume, pitch, effects, etc.
Pan
The word “pan” is derived from the “pan pot” controls found on mixing
consoles, which is in turn derived from “panoramic potentiometer.” A pan
control or parameter determines the position of a specific sound — e.g. an
element of a voice or a drum instrument — within the output stereo sound field.
Panning to the left means that more of the corresponding sound is delivered via
the left channel than the right channel, and vice versa. The listener then hears
the sound at the appropriate position between the stereo speakers or
headphones.
Preset
A “preset” can be any unit of data — a voice or multi (see above), for example
— that is pre-programmed by the manufacturer and provided with a
synthesizer. Presets make life easier for beginning synthesizer users as well as
performance-oriented players who simply want to select a sound and play
without having to do any programming of their own. The quality of the presets
included with an instrument is therefore critical to the value of the instrument.
Vector
Mathematically speaking, a “vector” is a physical quantity with both
magnitude and direction. This applies in a similar way to vector synthesis in that
the vector control controls the magnitude and direction of a quantity that can be
pitch or level.
42
Velocity
Normally, velocity is simply defined as speed. In a synthesizer, however, it
generally refers specifically to the speed with which the keys are played. When
we think of playing a keyboard we normally think of playing the keys softer or
harder to produce softer and louder notes with the attendant timbre variations.
In reality, however, the instrument is responding to how fast the keys are played
— therefore the term “velocity response.” A synthesizer that has velocity
response lets the player produce expressive dynamics and timbre variations
according to the way he or she plays the keys.
Voice
Although this term is used in slightly different ways by different manufacturers,
at Yamaha a “voice” is any basic sound that can be selected and played on a
synthesizer. This is in contrast to a “performance” which is a combination of
two or more voices, and a “multi” (see above) which is a group of several
voices that can be controlled independently via the MIDI interface.
43
Index
–1/NO and +1/YES keys
9, 17
K
Keyboard
8
A
AWM
23, 41
B
Bank keys
11, 17
L
LED display
Level rec function
Level speed function
Level vectors
Liquid crystal display
C
Card key
Card multi memory
Card slot
Card voice memory
Connections
Cursor keys
10
37
13
20
14
9
D
DC 10V-12V in jack
Demo
Demo key
Detune vectors
Dynamic vectors
Dynamic voice allocation
12
15
11
22
24
37
M
Manual vector control
Memory backup
Memory protect
MIDI cables
MIDI conectors
Modulation wheel
Multi key
Multi list
Multi play mode
Multi polyphony
N
23, 41
12
I
Icons
Internal key
Internal multi memory
Internal voice memory
44
11, 17
O
9
31
31
31
22, 41
F
FM
Foot volume jack
21
3
29, 38
3
13
8, 19
9
36
34
37
Number/multi part select keys
E
Edit/utility/compare key
Element envelope edit mode
Element parameter
Element tone edit mode
Elements
10
27
25
21
10
6
10
34, 37
17, 20
Output jacks
Overlapping voice selection
12
20
P
Phones jack
Pitch bend wheel
Power supply
Power switch
Power-on procedure
Preset key
Preset multi memory
Preset voice memory
12
8, 19
3
12
14
10
34, 37
16, 19
R
Random function
31
S
Store
Store key
Sustain jack
28
10, 38
13
V
Vector control
Vector play keys
Vector rate
Vectors
Voice categories
Voice common edit mode
Voice key
Voice list
Voice play mode
Voice vector edit mode
Volume control
8, 21
8, 21, 22
26
21, 42
18
31
9
18
16
25
8
45