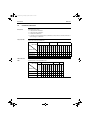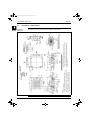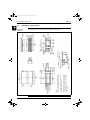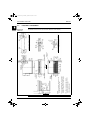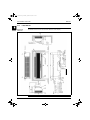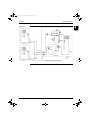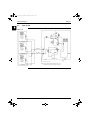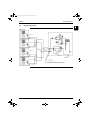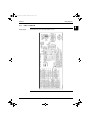
1
RZQ - Final.book Page 1 Monday, September 20, 2004 11:24 AM
ESIE04-01
Service Manual
RZQ71~125B7V3B
Sky-Air Inverter R-410A B series
RZQ - Final.book Page 2 Monday, September 20, 2004 11:24 AM
RZQ - Final.book Page i Monday, September 20, 2004 11:24 AM
ESIE04-01
Table of Contents
1
1
Introduction
1.1
1.2
1.3
About This Manual ..................................................................................
Combination Overview ............................................................................
Precautions on handling new refrigerants...............................................
i–i
i–ii
i–iv
Part 1
System Outline
1
3
General Outline: Outdoor Units
1.1
1.2
1.3
1.4
2
What Is in This Chapter? ........................................................................
RZQ71: Outlook and dimensions ...........................................................
RZQ100 and RZQ125: Outlook and dimensions ....................................
RZQ71, RZQ100 and RZQ125: Installation and Service Space .............
1–3
1–4
1–6
1–8
5
General Outline: Indoor Units
2.1
2.2
2.3
2.4
2.5
2.6
2.7
2.8
2.9
2.10
2.11
2.12
2.13
2.14
2.15
2.16
Table of Contents
What Is in This Chapter? ........................................................................
FCQ35B7V1 ~ FCQ71B7V3B.................................................................
FCQ100~125B7V3B ...............................................................................
FFQ35~60BV1B......................................................................................
FBQ35B7V1 & FBQ50B7V1 ...................................................................
FBQ60B7V1 & FBQ71B7V3B .................................................................
FBQ100B7V3B & FBQ125B7V3B ..........................................................
FDQ125B7V3B .......................................................................................
FHQ35BUV1 & FHQ50BUV1..................................................................
FHQ60BUV1 & FHQ71BUV1B ...............................................................
FHQ100BUV1B.......................................................................................
FHQ125BUV1B.......................................................................................
FUQ71BUV1B.........................................................................................
FUQ100~125BUV1B...............................................................................
FAQ71BUV1B .........................................................................................
FAQ100BUV1B .......................................................................................
4
1–11
1–12
1–14
1–16
1–18
1–20
1–22
1–24
1–26
1–28
1–30
1–32
1–34
1–36
1–38
1–40
i
RZQ - Final.book Page ii Monday, September 20, 2004 11:24 AM
ESIE04-01
1
3
3
3.1
3.2
3.3
3.4
3.5
3.6
3.7
3.8
3.9
4
5
1–43
1–44
1–47
1–48
1–49
1–50
1–51
1–52
1–53
What Is in This Chapter? .........................................................................
Pair system .............................................................................................
Twin System ............................................................................................
Triple System ...........................................................................................
Double Twin System ................................................................................
Indoor piping ...........................................................................................
Pipe connection diameters ......................................................................
Re-using existing field piping ...................................................................
Piping Components .................................................................................
1–55
1–56
1–58
1–60
1–61
1–62
1–64
1–65
1–71
What Is in This Chapter? .........................................................................
RZQ71B7V3B ..........................................................................................
RZQ100B7V3B ........................................................................................
FCQ35B7V1 ~ FCQ71B7V3B..................................................................
FCQ100~125B7V3B ................................................................................
FFQ35~60BV1B ......................................................................................
FBQ35B7V1 ~ FBQ125B7V3B ................................................................
FDQ125B7V3B ........................................................................................
FHQ35BUV1 ~ FHQ125BUV1B ..............................................................
FUQ71~125BUV1B .................................................................................
FAQ71BUV1B..........................................................................................
FAQ100BUV1B........................................................................................
1–73
1–74
1–75
1–76
1–77
1–78
1–79
1–80
1–81
1–82
1–83
1–84
Switch Box Layout
5.1
5.2
5.3
5.4
5.5
5.6
5.7
5.8
5.9
5.10
5.11
5.12
ii
What Is in This Chapter? .........................................................................
RZQ71, RZQ100 and RZQ125 ................................................................
FCQ .........................................................................................................
FFQ..........................................................................................................
FBQ .........................................................................................................
FDQ .........................................................................................................
FHQ .........................................................................................................
FUQ .........................................................................................................
FAQ .........................................................................................................
Functional Diagrams
4.1
4.2
4.3
4.4
4.5
4.6
4.7
4.8
4.9
4
5
Specifications
Table of Contents
RZQ - Final.book Page iii Monday, September 20, 2004 11:24 AM
ESIE04-01
6
7
Wiring Diagrams
6.1
6.2
6.3
6.4
6.5
6.6
6.7
6.8
6.9
6.10
6.11
6.12
6.13
6.14
6.15
What Is in This Chapter? ........................................................................
RZQ71B7V3B .........................................................................................
RZQ100~125B7V3B ...............................................................................
FCQ35~60B7V1......................................................................................
FCQ71~125B7V3B .................................................................................
FFQ35~60BV1B......................................................................................
FBQ35~60B7V1......................................................................................
FBQ71B7V3B .........................................................................................
FBQ100~125B7V3B ...............................................................................
FDQ125B7V3B .......................................................................................
FHQ35~60BUV1 .....................................................................................
FHQ71~125BUV1B.................................................................................
FUQ71~125BUV1B.................................................................................
FAQ71BUV1B .........................................................................................
FAQ100BUV1B .......................................................................................
1–85
1–86
1–87
1–88
1–89
1–90
1–91
1–92
1–93
1–94
1–95
1–96
1–97
1–98
1–99
7.1
7.2
7.3
7.4
7.5
7.6
7.7
7.8
7.9
7.10
7.11
7.12
7.13
7.14
What Is in This Chapter? ........................................................................
RZQ71B7V3B .........................................................................................
RZQ100B7V3B .......................................................................................
FCQ35~60B7V1......................................................................................
FCQ71~125B7V3B .................................................................................
FFQ35~60BV1B......................................................................................
FBQ35~60B7V1......................................................................................
FBQ100~125B7V3B ...............................................................................
FDQ125B7V3B .......................................................................................
FHQ35~60BUV1 .....................................................................................
FHQ71~125BUV1B.................................................................................
FUQ71~125BUV1B.................................................................................
FAQ71BUV1B .........................................................................................
FAQ100BUV1B .......................................................................................
1–101
1–102
1–104
1–106
1–107
1–108
1–109
1–110
1–111
1–112
1–113
1–114
1–115
1–116
PCB Layout
Table of Contents
iii
1
3
4
5
RZQ - Final.book Page iv Monday, September 20, 2004 11:24 AM
ESIE04-01
1
Part 2
Functional Description
1
1.1
1.2
1.3
1.4
1.5
1.6
1.7
1.8
1.9
1.10
1.11
1.12
1.13
1.14
1.15
1.16
1.17
1.18
3
4
5
General Functionality
2
What Is in This Chapter? .........................................................................
Thermostat Control .................................................................................
Drain Pump Control ................................................................................
Condensation Avoidance Control ...........................................................
Draft Avoidance Control 1........................................................................
Draft Avoidance Control 2........................................................................
Fan and Flap Operations ........................................................................
Indoor unit fan control .............................................................................
2–25
2–26
2–27
2–29
2–30
2–31
2–32
2–33
Outdoor Unit Functional Concept
3.1
3.2
3.3
3.4
3.5
iv
2–3
2–4
2–6
2–8
2–9
2–10
2–11
2–12
2–13
2–14
2–15
2–16
2–17
2–18
2–20
2–21
2–22
2–23
Indoor Unit Functional Concept
2.1
2.2
2.3
2.4
2.5
2.6
2.7
2.8
3
What Is in This Chapter? .........................................................................
Functions of Thermistors .........................................................................
Forced Operating Mode (Emergency Operation).....................................
Outdoor Unit Identification Function ........................................................
Simulated Operation Function .................................................................
Restart Standby .......................................................................................
Automatic Restart ....................................................................................
Using Conditions for Remote Controller Thermostat ...............................
Forced Thermostat OFF ..........................................................................
Test run control .......................................................................................
4-way Valve Control.................................................................................
Pump Down Residual Operation ............................................................
Pump Down Operation ...........................................................................
Defrost Operation ...................................................................................
Freeze Prevention Function.....................................................................
PMV Control ...........................................................................................
Preheating Operation Control ..................................................................
Crankcase Heater Control ......................................................................
What Is in This Chapter? .........................................................................
Function Outline.......................................................................................
Frequency Regulating Functions ............................................................
Expansion Valve Regulating Functions ..................................................
Outdoor Unit Fan Speed Control ............................................................
2–35
2–36
2–39
2–55
2–59
Table of Contents
RZQ - Final.book Page v Monday, September 20, 2004 11:24 AM
ESIE04-01
Part 3
Troubleshooting
1
Troubleshooting
1.1
1.2
1.3
1.4
1.5
1.6
1.7
1.8
1.9
1.10
1.11
2
1
What Is in This Chapter? ........................................................................
General Troubleshooting Flowchart ........................................................
Overview of General Problems ...............................................................
Procedure of Self-Diagnosis by Remote Controller ................................
Fault-diagnosis by Wired Remote Controller ..........................................
Fault-diagnosis by Wireless Remote Controller ......................................
Overview of Error Codes.........................................................................
Troubleshooting by LED Indications .......................................................
Troubleshooting by Remote Controller Display / LED Display................
Overview of the Outdoor Safety Devices ...............................................
Overview of the Indoor Safety Devices ..................................................
3–3
3–4
3–5
3–24
3–25
3–26
3–30
3–32
3–34
3–37
3–38
4
Error Codes: Indoor Units
2.1
2.2
2.3
2.4
2.5
2.6
2.7
2.8
Table of Contents
What Is in This Chapter? ........................................................................
Malfunctioning Indoor PCB ..............................................................(A1)
Malfunction of Drain Water Level System ........................................(A3)
Malfunctioning Drain System .......................................................... (AF)
Indoor Unit Fan Motor Lock .............................................................(A6)
Malfunctioning Capacity Setting .......................................................(AJ)
Thermistor Abnormality ...................................................... (C4, C5, C9)
Malfunctioning Remote Controller Air Thermistor ............................ (CJ)
3
3–39
3–40
3–41
3–44
3–46
3–48
3–50
3–52
v
5
RZQ - Final.book Page vi Monday, September 20, 2004 11:24 AM
ESIE04-01
1
3
3.1
3.2
3.3
3.4
3.5
3.6
3.7
3.8
3.9
3.10
3.11
3.12
3.13
3.14
3.15
3.16
3.17
3.18
3
4
5
Error Codes: Outdoor Units
3.19
3.20
3.21
3.22
3.23
4
4.3
4.4
4.5
4.6
3–78
3–80
3–82
3–84
3–85
3–86
What Is in This Chapter? .........................................................................
Malfunction of Transmission between Indoor and
Outdoor Unit ..........................................................................(U4 or UF)
Malfunction of Transmission between Indoor Unit and
Remote Controller ............................................................................(U5)
Malfunction of Transmission between MAIN Remote Controller
and SUB Remote Controller
(U8)
Malfunctioning Field Setting Switch ................................................ (UA)
Centralized Address Setting Error .................................................. (UC)
3–89
3–90
3–92
3–93
3–94
3–96
Additional Checks for Troubleshooting
5.1
5.2
5.3
5.4
5.5
5.6
5.7
5.8
5.9
5.10
5.11
vi
3–53
3–54
3–55
3–56
3–58
3–60
3–62
3–63
3–65
3–67
3–68
3–69
3–70
3–71
3–72
3–74
3–76
Error Codes: System Malfunctions
4.1
4.2
5
What Is in This Chapter? .........................................................................
Actuation of Protection Device .........................................................(E0)
Failure of Outdoor Unit PC Board ....................................................(E1)
Abnormal High Pressure (Detected by the HPS) .............................(E3)
Actuation of Low Pressure Sensor ..................................................(E4)
Compressor Motor Lock ..................................................................(E5)
Malfunction of Outdoor Unit Fan Motor ............................................(E7)
Malfunction of Electronic Expansion Valve ......................................(E9)
Malfunctioning in Discharge Pipe Temperature ............................... (F3)
Malfunctioning HPS System ............................................................ (H3)
Malfunction of Outdoor Fan Motor Signal ........................................(H7)
Malfunction of Thermistor System ................................. (H9, J3, J5, J6)
Malfunction of Suction Pipe Pressure Sensor .................................(JC)
Radiation Fin Temperature Increased ............................................. (L4)
DC Output Overcurrent (Instantaneous) .......................................... (L5)
Electronic Thermal (Time Lag) ......................................................... (L8)
Stall Prevention (Time Lag) ............................................................. (L9)
Malfunction of Transmission system
(Between Control PCB and Inverter PCB)
(LC)
Open Phase..................................................................................... (P1)
Malfunction of Radiator Fin Temperature Thermistor ..................... (P4)
Failure of Capacity Setting .............................................................. (PJ)
Gas Shortage (Malfunction) ............................................................ (U0)
Abnormal Power Supply Voltage .................................................... (U2)
What Is in This Chapter? .........................................................................
Indoor Unit: Checking the Fan Motor Hall IC ...........................................
Indoor Unit: Checking the Power Supply Wave Form..............................
Outdoor unit: Checking the Installation Condition....................................
Outdoor Unit: Checking the Expansion Valve..........................................
Checking the Thermistors ........................................................................
Resistance Conversion Table (Ambient, Coil, Fin) ..................................
R3T: Resistance Conversion Table (Discharge Pipe Sensor) .................
Evaluation of abnormal high pressure .....................................................
Evaluation of abnormal low pressure.......................................................
Checks .....................................................................................................
3–97
3–98
3–99
3–100
3–101
3–102
3–103
3–104
3–105
3–106
3–107
Table of Contents
RZQ - Final.book Page vii Monday, September 20, 2004 11:24 AM
ESIE04-01
Part 4
Commissioning and Test Run
1
Pre-Test Run Checks
1.1
1.2
1.3
2
What Is in This Chapter? ........................................................................
Test Run Checks ....................................................................................
Setting the Wireless Remote Controller ..................................................
4–3
4–4
4–5
3
Field settings
2.1
2.2
2.3
2.4
2.5
2.6
2.7
2.8
2.9
2.10
2.11
2.12
2.13
2.14
2.15
2.16
3
1
What Is in This Chapter? ........................................................................
How to Change the Field Settings with the Wired Remote Controller.....
How to Change the Field Settings with the Wireless
Remote Controller ...................................................................................
Overview of the Field Settings on the Indoor Units .................................
Overview of the Factory Settings on the Indoor Units.............................
Setting the Ceiling Height .......................................................................
Setting the Filter Counter ........................................................................
MAIN/SUB Setting when Using Two Remote Controllers .......................
Setting the Centralized Group No. ..........................................................
The Field Setting Levels .........................................................................
Overview of the Field Settings on the Outdoor Units ..............................
Overview of the Factory Settings on the Outdoor Units ..........................
Silent Operation .....................................................................................
I-Demand Function ................................................................................
Setting for Low Humidity Application .....................................................
Defrost start setting .................................................................................
4–9
4–10
4–12
4–13
4–14
4–15
4–16
4–17
4–18
4–20
4–23
4–25
4–26
4–28
4–30
4–36
Test Run and Operation Data
3.1
3.2
Table of Contents
General Operation Data ..........................................................................
Operation Range.....................................................................................
4–38
4–41
vii
4
5
RZQ - Final.book Page viii Monday, September 20, 2004 11:24 AM
ESIE04-01
1
Part 5
Disassembly and Maintenance
1
Disassembly and Maintenance: Outdoor Units
1.1
1.2
3
2
5
viii
5–3
5–4
Disassembly and Maintenance: Indoor Units
2.1
2.2
2.3
2.4
2.5
2.6
2.7
2.8
2.9
2.10
2.11
2.12
4
What Is in This Chapter? .........................................................................
RZQ71~125B7V3B ..................................................................................
What Is in This Chapter? ......................................................................... 5–17
FCQ35B7V1 ~ FCQ71B7V3B.................................................................. 5–18
FCQ100~125B7V3B ................................................................................ 5–20
FBQ35~50B7V1....................................................................................... 5–22
FBQ60B7V1 ~ FBQ71B7V3B .................................................................. 5–24
FBQ100~125B7V3B ................................................................................ 5–26
FDQ125B7V3B ........................................................................................ 5–28
FFQ35~60BV1B ...................................................................................... 5–30
FHQ35~125BUV1(B) ............................................................................... 5–67
FUQ71~125BUV1B ................................................................................. 5–82
FAQ71BUV1B.......................................................................................... 5–99
FAQ100BUV1B........................................................................................ 5–110
Table of Contents
RZQ - Final.book Page i Monday, September 20, 2004 11:24 AM
ESIE04-01
Introduction
Part 0
1
Introduction
1.1
About This Manual
Target group
This service manual is intended for and should only be used by qualified engineers.
Purpose of this
manual
This service manual contains all the information you need to do the necessary repair and maintenance
tasks for the Sky Air RZQ-series.
Five parts
This service manual consists of an introduction, five parts and an index:
Introduction
overview
Part
See page
Part 1–System Outline
1–1
Part 2–Functional Description
2–1
Part 3–Troubleshooting
3–1
Part 4–Commissioning and Test Run
4–1
Part 5–Disassembly and Maintenance
5–1
4
5
The introduction contains the following topics:
Topic
See page
1.2–Combination Overview
ii
1.3–Precautions on handling new refrigerants
iv
3
i
RZQ - Final.book Page ii Monday, September 20, 2004 11:24 AM
Introduction
Combination Overview
Introduction
FCQ, FFQ, FBQ
3
P
“2” stands for twin combination.
P
“3” stands for triple combination.
P
“4“ double twin combination.
P
“P” and “M” are allowed and guaranteed combinations, but they will not be officially mentioned as
such in catalogues or databooks.
The table below contains the possible combinations between indoor units (FCQ, FFQ and FBQ) and
outdoor units of the Sky Air RZQ-series.
950 x 950 Cassette
600 x 600 Cas.
Duct
FCQ35B7V1
FCQ50B7V1
FCQ60B7V1
FCQ71B7V3B
FCQ100B7V3B
FCQ125B7V3B
FFQ25BV1B
FFQ35BV1B
FFQ50BV1B
FFQ60BV1B
FBQ25B7V1
FBQ35B7V1
FBQ50B7V1
FBQ60B7V1
FBQ71B7V3B
FBQ100B7V3B
FBQ125B7V3B
Indoor unit
4
RZQ71B7V3B
2
–
–
P
–
–
–
2
–
–
–
2
–
–
P
–
–
RZQ100B7V3B
3
2
–
–
P
–
–
3
2
–
–
3
2
–
–
P
–
RZQ125B7V3B
4
3
2
–
–
P
–
4
3
2
–
4
3
2
–
–
P
Outdoor unit
FDQ, FHQ, FUQ,
FAQ
The table below contains the possible combinations between indoor units (FDQ, FHQ, FUQ and FAQ)
and outdoor units of the Sky Air RZQ-series.
LD
Ceiling suspended
FHQ60BUV1
FHQ71BUV1B
FHQ100BUV1B
FHQ125BUV1B
FUQ71BUV1B
FUQ100BUV1B
FUQ125BUV1B
FAQ71BUV1B
FAQ100BUV1B
RZQ71B7V3B
–
2
–
–
P
–
–
P
–
–
P
–
RZQ100B7V3B
–
3
2
–
–
P
–
–
P
–
–
P
RZQ125B7V3B
P
4
3
2
–
–
P
–
–
P
–
–
Outdoor unit
ii
Wall
FHQ50BUV1
Indoor unit
C.S. Cas.
FHQ35BUV1
5
In the tables in this section:
FDQ125B7V3B
1
1.2
ESIE04-01
RZQ - Final.book Page iii Monday, September 20, 2004 11:24 AM
ESIE04-01
Introduction
Combination Matrix
Possible indoor combination
Simultaneous operation
Outdoor models
RZQ71B7V3B
Triple
Double Twin
35-35
–
–
50-50
35-35-35
–
(KHRQ22M20TA7)
(KHRQ127H7)
60-60
50-50-50
35-35-35-35
(KHRQ22M20TA7)
(KHRQ127H7)
(3 x KHRQ22M20TA7)
(KHRQ22M20TA7)
RZQ100B7V3B
RZQ125B7V3B
Notes:
Twin
1
3
4
Possible indoor types:
P
FCQ35-60
P
FFQ35-60
P
FHQ35-60
P
FBQ35-60
2
When different indoor models are used in combination, designate the remote controller that is
equipped with the most functions as the main unit. In note 1 are the indoor units mentioned in order
of the possible function (most functions are on FCQ , less functions are on FBQ).
3
Between brackets are the required Refnet kits mentioned, that are necessary to install the
combination.
iii
5
RZQ - Final.book Page iv Monday, September 20, 2004 11:24 AM
Introduction
1
ESIE04-01
1.3
Precautions on handling new refrigerants
1.3.1
Outline
About Refrigerant
R410A
P
Characteristics of new refrigerant, R410A
1
Performance
Almost the same performance as R22 and R407C.
2
Pressure
Working pressure is approx. 1.4 times more than R22 and R407C.
3
Refrigerant composition
Few problems in composition control, since it is a Quasi-azeotropic mixture refrigerant.
3
HFC units (Units using new refrigerants)
Refrigerant name
Composing
substances
4
Design pressure
Refrigerant oil
Ozone destruction
factor (ODP)
Combustibility
Toxicity
5
R407C
R410A
Non-azeotropic mixture Quasi-azeotropic mixof HFC32, HFC125 and ture of HFC32 and
HFC134a (*1)
JFC125 (*1)
4.15 Mpa (gauge pressure)
3.2 Mpa (gauge pres2
= 42.3 kgf/cm2
sure) = 32.6 kgf/cm
Synthetic oil (Ether)
0
0
None
None
None
None
HCFC units
R22
Single-component refrigerant
2.75Mpa (gauge pressure)
= 28.0 kgf/cm2
Mineral oil (Suniso)
0.05
None
None
*1. Non-azeotropic mixture refrigerant: mixture of two or more refrigerants having different boiling
points.
*2. Quasi-azeotropic mixture refrigerant: mixture of two or more refrigerants having similar boiling
points.
*3. The design pressure is different at each product. Please refer to the installation manual for each
product.
(Reference) 1 Mpa
1 0.19716 kgf / cm2
Pressure-Enthalpy curves of HFC-32/125 (50/50wt%)
iv
RZQ - Final.book Page v Monday, September 20, 2004 11:24 AM
ESIE04-01
Introduction
P
Thermodynamic characteristic of R410A
Temperature
( )
Steam pressure
(kPa)
Liquid
Vapor
Density
(kg/m3 )
Liquid
Vapor
Specific heat at constant
pressure (kJ/kgK)
Liquid
Vapor
Specific enthalpy
(kJ/kg)
Liquid
Vapor
Specific entropy
(kJ/KgK)
Liquid
Vapor
3
4
5
v
RZQ - Final.book Page vi Monday, September 20, 2004 11:24 AM
Introduction
1
1.3.2
ESIE04-01
Refrigerant Cylinders
Cylinder
specifications
P
The cylinder is painted refrigerant color (pink).
P
The cylinder valve is equipped with a siphon tube.
Cylilinder
Siphon tube
3
4
5
P
Handling of
cylinders
vi
Note:
1
Refrigerant can be charged in liquid state with cylinder in upright position.
2
Do not lay cylinder on its side during charging, since it causes refrigerant in gas state to enter
the system.
1
Laws and regulations
R410A is liquefied gas, and the High-Pressure Gas Safety Law must be observed in handling
them. Before using, refer to the High-Pressure Gas Safety Law.
The Law stipulates standards and regulations that must be followed to prevent accidents with
high-pressure gases. Be sure to follow the regulations.
2
Handing of vessels
Since R410A is high-pressure gas, it is contained in high-pressure vessels.
Although those vessels are durable and strong, careless handling can cause damage that can lead
to unexpected accidents. Do not drop vessels, let them fall, apply impact or roll them on the ground.
3
Storage
Although R410A is not flammable, it must be stored in a well-ventilated, cool, and dark place in the
same way as any other high-pressure gases.
It should also be noted that high-pressure vessels are equipped with safety devices that releases
gas when the ambient temperature reaches more than a certain level (fusible plug melts) and when
the pressure exceeds a certain level (spring-type safety valve operates).
RZQ - Final.book Page vii Monday, September 20, 2004 11:24 AM
ESIE04-01
1.3.4
Introduction
Service Tools
R410A is used under higher working pressure, compared to previous refrigerants (R22,R407C).
Furthermore, the refrigerating machine oil has been changed from Suniso oil to Ether oil, and if oil
mixing is occurred, sludge results in the refrigerants and causes other problems. Therefore, gauge
manifolds and charge hoses that are used with a previous refrigerant (R22,R407C) can not be used
for products that use new refrigerants.
Be sure to use dedicated tools and devices.
P
Tool compatibility
Compatibility
Tool
HFC
R410A
HCFC
R407C
Charging cylinder
Gas detector
P
Do not use the same tools for R22
and R410A.
P
Thread specification differs for
R410A and R407C.
P
Weighting instrument used for
HFCs.
The same tool can be used for
HFCs.
To use existing pump for HFCs,
vacuum pump adaptor must be
installed.
X
X
O
O
X
Vacuum pump
P
P
(pump with reverse flow
preventive function)
O
Weighting instrument
Charge mouthpiece
O
O
Torque wrench
Pipe cutter
O
O
Pipe expander
Pipe bender
O
O
Pipe assembling oil
Refrigerant recovery
device
Refrigerant piping
X
4
5
P
Seal material is different between
R22 and HFCs.
P
Thread specification is different
between R410A and others.
P
For R410A, flare gauge is
necessary.
P
Torque-up for 1/2 and 5/8
P
Due to refrigerating machine oil
change. (No Suniso oil can be used.)
P
Only φ19.1 is changed to 1/2H
material while the previous material is
"O".
X
Flaring tool (Clutch
type)
3
R22
Gauge manifold
Charge hose
Reasons for change
Check your recovery device.
See the chart below.
As for the charge mouthpiece and packing, 1/2UNF20 is necessary for mouthpiece size of charge
hose.
vii
RZQ - Final.book Page viii Monday, September 20, 2004 11:24 AM
Introduction
1
ESIE04-01
Copper tube
material and
thickness
R407C
Pipe size
3
R410A
Material
Thickness
tmmj
Material
Thickness
tmmj
φ6.4
O
0.8
O
0.8
φ9.5
O
0.8
O
0.8
φ12.7
O
0.8
O
0.8
φ15.9
O
1.0
O
1.0
φ19.1
O
1.0
1/2H
1.0
* O: Soft (Annealed)
H: Hard (Drawn)
Flaring tool
4
5
Flare gauge
P
•
Specifications
Dimension A
Nominal size
viii
A +0
-0.4
Tube O.D.
Do
Class-2 (R410A)
Class-1 (Conventional)
1/4
6.35
9.1
9.0
3/8
9.52
13.2
13.0
1/2
12.70
16.6
16.2
5/8
15.88
19.7
19.4
3/4
19.05
24.0
23.3
RZQ - Final.book Page ix Monday, September 20, 2004 11:24 AM
ESIE04-01
Introduction
P
•
Differences
Change of dimension A
Dimension A
For class-1: R407C
For class-2: R410A
Conventional flaring tools can be used when the work process is changed. (change of work process)
Previously, a pipe extension margin of 0 to 0.5mm was provided for flaring. For R410A air
conditioners, perform pipe flaring with a pipe extension margin of 1.0 to 1.5 mm. (For clutch type only)
Conventional tool with pipe extension margin adjustment can be used.
3
Torque wrench
4
P
•
Specifications
Dimension B
5
Unit:mm
Nominal size
Class-1
Class-2
Previous
1/2
5/8
24
27
26
29
24
27
No change in tightening torque
No change in pipes of other sizes
P
•
Differences
Change of dimension B
Only 1/2", 5/8" are extended
For class-1: R407C
For class-2: R410A
Dimension B
ix
RZQ - Final.book Page x Monday, September 20, 2004 11:24 AM
Introduction
1
ESIE04-01
Vacuum pump with
check valve
Vacuum pump adaptor
(Reverse flow preventive
vacuum adaptor)
P
•
3
•
P
•
•
4
Specifications
Discharge speed
50 l/min (50Hz)
60 l/min (60Hz)
Suction port UNF7/16-20(1/4 Flare)
UNF1/2-20(5/16 Flare) with adaptor
Maximum degree of vacuum
–100.7 kpa ( 5 torr – 755 mmHg)
Differences
Equipped with function to prevent reverse oil flow
Previous vacuum pump can be used by installing adaptor.
Leak tester
5
P
•
•
P
•
Specifications
Hydrogen detecting type, etc.
Applicable refrigerants
R410A, R407C, R404A, R507A, R134a, etc.
Differences
Previous testers detected chlorine. Since HFCs do not contain chlorine, new tester detects
hydrogen.
Refrigerant oil (Air
compal)
P
•
•
P
•
x
Specifications
Contains synthetic oil, therefore it can be used for piping work of every refrigerant cycle.
Offers high rust resistance and stability over long period of time.
Differences
Can be used for R410A and R22 units.
RZQ - Final.book Page xi Monday, September 20, 2004 11:24 AM
ESIE04-01
Introduction
Gauge manifold for
R410A
P
•
•
•
•
•
P
•
•
Specifications
High pressure gauge
- 0.1 to 5.3 MPa (-76 cmHg to 53 kg/cm2)
Low pressure gauge
- 0.1 to 3.8 MPa (-76 cmHg to 38 kg/cm2)
1/4" → 5/16" (2min → 2.5min)
No oil is used in pressure test of gauges.
→ For prevention of contamination
Temperature scale indicates the relationship between pressure and temperature in gas saturated
state.
Differences
Change in pressure
Change in service port diameter
Charge hose for
R410A
3
4
5
(Hose with ball valve)
P
•
•
•
P
•
•
•
Specifications
Working pressure 5.08 MPa (51.8 kg/cm2)
Rupture pressure 25.4 MPa (259 kg/cm2)
Available with and without hand-operate valve that prevents refrigerant from outflow.
Differences
Pressure proof hose
Change in service port diameter
Use of nylon coated material for HFC resistance
xi
RZQ - Final.book Page xii Monday, September 20, 2004 11:24 AM
Introduction
1
ESIE04-01
Charging cylinder
Can not be used
P
•
3
P
•
Specifications
Use weigher for refrigerant charge listed below to charge directly from refrigerant cylinder.
Differences
The cylinder can not be used for mixed refrigerant since mixing ratio is changed during charging.
When R410A is charged in liquid state using charging cylinder, foaming phenomenon is
generated inside charging cylinder.
4
Weigher for
refrigerant charge
5
P
•
•
•
P
•
Specifications
High accuracy
TA101A (for 10-kg cylinder) = ± 2g
TA101B (for 20-kg cylinder) = ± 5g
Equipped with pressure-resistant sight glass to check liquid refrigerant charging.
A manifold with separate ports for HFCs and previous refrigerants is equipped as standard
accessories.
Differences
Measurement is based on weight to prevent change of mixing ratio during charging.
Charge mouthpiece
P
•
•
P
•
•
xii
Specifications
For R410A, 1/4"→ 5/16" (2min → 2.5min)
Material is changed from CR to H-NBR.
Differences
Change of thread specification on hose connection side (For the R410A use)
Change of sealer material for the HFCs use.
RZQ - Final.book Page 1 Monday, September 20, 2004 11:24 AM
ESIE04-01
1
4
Part 1
System Outline
What is in this part?
Part 1 – System Outline
3
This part contains the following chapters:
Chapter
See page
1–General Outline: Outdoor Units
1–3
2–General Outline: Indoor Units
1–11
3–Specifications
1–43
4–Functional Diagrams
1–55
5–Switch Box Layout
1–73
6–Wiring Diagrams
1–85
7–PCB Layout
1–101
4
5
1–1
RZQ - Final.book Page 2 Monday, September 20, 2004 11:24 AM
ESIE04-01
11
3
5
1–2
Part 1 – System Outline
RZQ - Final.book Page 3 Monday, September 20, 2004 11:24 AM
ESIE04-01
General Outline: Outdoor Units
Part 1
1
General Outline: Outdoor Units
1.1
What Is in This Chapter?
Introduction
General outline
Part 1 – System Outline
This chapter contains the following information on the outdoor units:
P
Outlook and dimensions
P
Installation and service space
P
Components
1
3
This chapter contains the following general outlines:
General outline
See page
1.2–RZQ71: Outlook and dimensions
1–4
1.3–RZQ100 and RZQ125: Outlook and dimensions
1–6
1.4–RZQ71, RZQ100 and RZQ125: Installation and Service Space
1–8
4
5
1–3
RZQ - Final.book Page 4 Monday, September 20, 2004 11:24 AM
General Outline: Outdoor Units
11
1.2
ESIE04-01
RZQ71: Outlook and dimensions
Outlook and
dimensions
The illustration below shows the outlook and the dimensions of the unit (mm).
Installation and
service space
See page 1–8.
3
4
5
1–4
Part 1 – System Outline
RZQ - Final.book Page 5 Monday, September 20, 2004 11:24 AM
ESIE04-01
Components
General Outline: Outdoor Units
1
The table below contains the different components of the unit.
No.
Component
1
Gas pipe connection
2
Liquid pipe connection
3
Service port (inside the unit)
4
Grounding terminal M5 (inside the switch box)
5
Refrigerant piping intake
6
Power supply wiring intake
7
Control wiring intake
8
Drain outlet
3
4
5
Part 1 – System Outline
1–5
RZQ - Final.book Page 6 Monday, September 20, 2004 11:24 AM
General Outline: Outdoor Units
11
1.3
ESIE04-01
RZQ100 and RZQ125: Outlook and dimensions
Outlook and
dimensions
The illustration below shows the outlook and the dimensions of the unit (mm).
Installation and
service space
See page 1–8.
3
4
5
1–6
Part 1 – System Outline
RZQ - Final.book Page 7 Monday, September 20, 2004 11:24 AM
ESIE04-01
Components
General Outline: Outdoor Units
1
The table below contains the different components of the unit.
No.
Component
1
Gas pipe connection
2
Liquid pipe connection
3
Service port (inside the unit)
4
Electronic connection and grounding terminal M5 (inside the switch box)
5
Refrigerant piping intake
6
Power supply wiring intake
7
Control wiring intake
8
Drain outlet
3
4
5
Part 1 – System Outline
1–7
RZQ - Final.book Page 8 Monday, September 20, 2004 11:24 AM
General Outline: Outdoor Units
11
1.4
ESIE04-01
RZQ71, RZQ100 and RZQ125: Installation and Service Space
Non stacked
The illustrations and table below show the required installation and service space (mm). The values in
brackets are for the 100 and 125 class.
3
4
5
Suction side obstacle
1
In these cases, close the bottom
of the installation frame to
prevent discharged air from being
bypassed
2
In these cases, only 2 units can
be installed
Discharge side obstacle
Left side obstacle
Right side obstacle
This situation is not allowed
Top side obstacle
Obstacle is present
1–8
Part 1 – System Outline
RZQ - Final.book Page 9 Monday, September 20, 2004 11:24 AM
ESIE04-01
Stacked
General Outline: Outdoor Units
The illustration below shows the required installation and service space (mm). The values in brackets
are for the 100 and 125 class.
P
Do not stack more than one unit.
P
± 100 mm is required as the dimension for laying the upper outdoor unit’s drain pipe.
P
Get the portion A sealed so that air from the outlet does not bypass.
Obstacles exist in front of the outlet side
1
Obstacles exist in front of the air inlet
3
4
Multiple rows
The illustration below shows the required installation and service space (mm). The values in brackets
are for the 100 and 125 class.
Installation of one unit per row
Installing multiple units (2 units or more)
in lateral connection per row
5
Relation of dimensions of H, A and L are shown in the table below.
L≤H
H<L
Part 1 – System Outline
L
A
0 < L ≤ 1/2H
150 (250)
1/2H < L
200 (300)
installation impossible
1–9
RZQ - Final.book Page 10 Monday, September 20, 2004 11:24 AM
General Outline: Outdoor Units
ESIE04-01
11
3
4
5
1–10
Part 1 – System Outline
RZQ - Final.book Page 11 Monday, September 20, 2004 11:24 AM
ESIE04-01
General Outline: Indoor Units
Part 1
2
General Outline: Indoor Units
2.1
What Is in This Chapter?
Introduction
General outline
Part 1 – System Outline
This chapter contains the following information on the indoor units:
P
Outlook and dimensions
P
Components
1
3
This chapter contains the following general outlines:
General outline
See page
2.2–FCQ35B7V1 ~ FCQ71B7V3B
1–12
2.3–FCQ100~125B7V3B
1–14
2.4–FFQ35~60BV1B
1–16
2.5–FBQ35B7V1 & FBQ50B7V1
1–18
2.6–FBQ60B7V1 & FBQ71B7V3B
1–20
2.7–FBQ100B7V3B & FBQ125B7V3B
1–22
2.8–FDQ125B7V3B
1–24
2.9–FHQ35BUV1 & FHQ50BUV1
1–26
2.10–FHQ60BUV1 & FHQ71BUV1B
1–28
2.11–FHQ100BUV1B
1–30
2.12–FHQ125BUV1B
1–32
2.13–FUQ71BUV1B
1–34
2.14–FUQ100~125BUV1B
1–36
2.15–FAQ71BUV1B
1–38
2.16–FAQ100BUV1B
1–40
4
5
1–11
see note 3
1–12
Branch duct
connection
mo
re
or
mo
re
Branch duct
connection
Prepared hole
or
mo
re
VIEW D
REQUIRED INSTALLATION SPACE
WHEN THE DISCHARGE GRILL IS CLOSED,
THE REQUIRED SPACE IS 200 mm OR MORE.
or
VIEW B
Branch duct
connection
4. When the conditions exceed 30°C and RH 80% in the ceiling or fresh air is
inducted into the ceiling, an additional insulation is required (polyethylene foam,
thickness 10mm or more).
or
mo
re
General Outline: Indoor Units
2. When installing an optional accessory, refer to the installation drawings.
- For the fresh air intake kit ..... an inspection port is necessary
- For the high efficiency filter ..... an inspection port is necessary
- For the branch duct chamber .... an inspection port is necessary
(Ceiling opening)
Prepared hole
(Suspension position)
3. In case of using a wireless remote controller, this position will be a signal
receiver. Refer to the drawing of the wireless remote controller for more details.
or less
(Ceiling opening)
5
(Suspension position)
4
NOTES:
1. Location of the nameplates:
- Unit body: on the bell mouth at the inside of the suction grill.
- Decoration panel: on the panel frame at the inside of the suction grill.
VIEW C
Prepared hole
3
Hanging bolt
VIEW A
Prepared hole
Outlook and
dimensions
Adjustable
2.2
or more
Installation space
11
For fresh air intake kit
connection (direct
installation type)
RZQ - Final.book Page 12 Monday, September 20, 2004 11:24 AM
ESIE04-01
FCQ35B7V1 ~ FCQ71B7V3B
The illustration below shows the outlook and the dimensions of the unit (mm).
Part 1 – System Outline
RZQ - Final.book Page 13 Monday, September 20, 2004 11:24 AM
ESIE04-01
Components
General Outline: Indoor Units
1
The table below contains the different components of the unit.
No.
Component
1
Liquid pipe connection
2
Gas pipe connection
3
Drain pipe connection
4
Power supply connection
5
Transmission wiring connection
6
Air discharge grille
7
Air suction grille
8
Water supply intake
9
Corner decoration cover
10
Drain hose
3
4
5
Part 1 – System Outline
1–13
see note 3
1–14
(Suspension position)
(Ceiling opening)
or
re
or
mo
re
or
mo
re
VIEW D
or
mo
REQUIRED INSTALLATION SPACE
WHEN THE DISCHARGE GRILL IS CLOSED,
THE REQUIRED SPACE IS 200 mm OR MORE.
mo
or
re
mo
Branch duct
connection
Prepared hole
4. When the conditions exceed 30°C and RH 80% in the ceiling or fresh air is
inducted into the ceiling, an additional insulation is required (polyethylene foam,
thickness 10mm or more).
3. In case of using a wireless remote controller, this position will be a signal
receiver. Refer to the drawing of the wireless remote controller for more details.
Branch duct
connection
Prepared hole
VIEW B
Prepared hole
Branch duct
connection
re
General Outline: Indoor Units
2. When installing an optional accessory, refer to the installation drawings.
- For the fresh air intake kit ..... an inspection port is necessary
- For the high efficiency filter ..... an inspection port is necessary
- For the branch duct chamber .... an inspection port is necessary
NOTES:
1. Location of the nameplates:
- Unit body: on the bell mouth at the inside of the suction grill.
- Decoration panel: on the panel frame at the inside of the suction grill.
Branch duct
connection
Prepared hole
(Suspension position)
4
Hanging bolt
VIEW A
or less
5
(Ceiling opening)
3
VIEW C
Prepared hole
Outlook and
dimensions
Adjustable
2.3
or more
Installation space
11
For fresh air intake kit
connection (direct
installation type)
RZQ - Final.book Page 14 Monday, September 20, 2004 11:24 AM
ESIE04-01
FCQ100~125B7V3B
The illustration below shows the outlook and the dimensions of the unit (mm).
Part 1 – System Outline
RZQ - Final.book Page 15 Monday, September 20, 2004 11:24 AM
ESIE04-01
Components
General Outline: Indoor Units
1
The table below contains the different components of the unit.
No.
Component
1
Liquid pipe connection
2
Gas pipe connection
3
Drain pipe connection
4
Power supply connection
5
Transmission wiring connection
6
Air discharge grille
7
Air suction grille
8
Water supply intake
9
Corner decoration cover
10
Drain hose
3
4
5
Part 1 – System Outline
1–15
1–16
Adjustable
or less
NOTE) 4.
*
*
or more
*
*WHEN THE DISCHARGE GRILL IS CLOSED,
THE REQUIRED SPACE IS 200 mm OR MORE.
or more
*
Outdoor air intake
(Direct connection)
Ceiling
General Outline: Indoor Units
4. Though the installation is acceptable up to maximum of 660mm square ceiling
opening, keep the clearance of 45mm or less between the main unit and the
ceiling opening so that the panel overlap allowance can be ensured.
3. When the temperature and humidity in the ceiling exceed 30°C and RH 80% or
the fresh air is inducted into the ceiling or the unit continues 24 hour operation,
an additional insulation (thickness 10mm or more of glasswool or polyethylene
form) is required.
2. In case of using wireless remote controller, this position will be a signal receiver.
Refer to the drawing of wireless remote controller in detail.
NOTES:
1. Sticking location for manufacture’s label
Manufacture’s label for indoor unit : on the bell mouth inside suction grill
Manufacture’s label for decoration panel : on the inner frame inside suction grill
or less
or more
or more
B ARROW VIEW
•REQUIRED SPACE
hole
3
Suspension bolt
A ARROW VIEW
Pipe connection side
Drain connection side
NOTE) 2.
(Ceiling opening space)
(Suspension position)
4
(Suspension position)
or more
(Required space)
Outlook and
dimensions
or more
(Ceiling opening space)
5
2.4
From the floor side
or more
FOR HEIGHT INSTALLATION
11
or less
RZQ - Final.book Page 16 Monday, September 20, 2004 11:24 AM
ESIE04-01
FFQ35~60BV1B
The illustration below shows the outlook and the dimensions of the unit (mm).
Part 1 – System Outline
RZQ - Final.book Page 17 Monday, September 20, 2004 11:24 AM
ESIE04-01
Components
General Outline: Indoor Units
1
The table below contains the different components of the unit.
No.
Component
1
Liquid pipe connection
2
Gas pipe connection
3
Drain pipe connection
4
Power supply connection
5
Remote control code and control wiring connection
6
Air discharge grille
7
Suction grille
8
Drain hose
3
4
5
Part 1 – System Outline
1–17
1–18
(On circumference)
(Knock out hole)
VIEW C
Fresh air intake position
General Outline: Indoor Units
3. For maintenance of the air filter, it is necessary to
provide a service access panel according to the
installation method. (Refer to the ‘Filter installation
method’ drawing)
2. The required ceiling depth varies according to the
configuration of the specific system.
P.C.D.
5
NOTES:
1. Refer to ‘Outlook drawing for installing optional
accessories’ when installing optional accessories.
3
(Air suction panel center)
Outlook and
dimensions
or more
(Service space)
Suspension bolt
4
VIEW B
2.5
VIEW A
11
(Suspension position)
RZQ - Final.book Page 18 Monday, September 20, 2004 11:24 AM
ESIE04-01
FBQ35B7V1 & FBQ50B7V1
The illustration below shows the outlook and the dimensions of the unit (mm).
Part 1 – System Outline
RZQ - Final.book Page 19 Monday, September 20, 2004 11:24 AM
ESIE04-01
Components
General Outline: Indoor Units
1
The table below contains the different components of the unit.
No.
Component
1
Liquid pipe connection
2
Gas pipe connection
3
Drain pipe connection
4
Remote controller wiring connection
5
Power supply connection
6
Drain hole
7
Air filter
8
Air suction side
9
Air discharge side
10
Nameplate
3
4
5
Part 1 – System Outline
1–19
1–20
(On circumference)
(Knock out hole)
VIEW C
General Outline: Indoor Units
3. For maintenance of the air filter, it is necessary to
provide a service access panel according to the
installation method. (Refer to the ‘Filter installation
method’ drawing)
2. The required ceiling depth varies according to the
configuration of the specific system.
5
Fresh air intake position
4
NOTES:
1. Refer to ‘Outlook drawing for installing optional
accessories’ when installing optional accessories.
(Service space)
(Air suction panel center)
Outlook and
dimensions
or more
Suspension bolt
3
VIEW B
2.6
VIEW A
11
(Suspension position)
RZQ - Final.book Page 20 Monday, September 20, 2004 11:24 AM
ESIE04-01
FBQ60B7V1 & FBQ71B7V3B
The illustration below shows the outlook and the dimensions of the unit (mm).
Part 1 – System Outline
RZQ - Final.book Page 21 Monday, September 20, 2004 11:24 AM
ESIE04-01
Components
General Outline: Indoor Units
1
The table below contains the different components of the unit.
No.
Component
1
Liquid pipe connection
2
Gas pipe connection
3
Drain pipe connection
4
Remote controller wiring connection
5
Power supply connection
6
Drain hole
7
Air filter
8
Air suction side
9
Air discharge side
10
Nameplate
3
4
5
Part 1 – System Outline
1–21
1–22
(On circumference)
(Knock out hole)
VIEW C
Fresh air intake position
or more
(Service Space)
General Outline: Indoor Units
3. For maintenance of the air filter, it is necessary to
provide a service access panel according to the
installation method. (Refer to the ‘Filter installation
method’ drawing)
2. The required ceiling depth varies according to the
configuration of the specific system.
5
Suspension bolt
4
VIEW B
Outlook and
dimensions
VIEW A
2.7
NOTES:
1. Refer to ‘Outlook drawing for installing optional
accessories’ when installing optional accessories.
(Suspension position)
11
(Suspension position)
RZQ - Final.book Page 22 Monday, September 20, 2004 11:24 AM
ESIE04-01
FBQ100B7V3B & FBQ125B7V3B
The illustration below shows the outlook and the dimensions of the unit (mm).
3
Part 1 – System Outline
or more
(Installlation Space)
RZQ - Final.book Page 23 Monday, September 20, 2004 11:24 AM
ESIE04-01
Components
General Outline: Indoor Units
1
The table below contains the different components of the unit.
No.
Component
1
Liquid pipe connection
2
Gas pipe connection
3
Drain pipe connection
4
Remote controller wiring connection
5
Power supply connection
6
Drain hole
7
Air filter
8
Air suction side
9
Air discharge side
10
Nameplate
3
4
5
Part 1 – System Outline
1–23
RZQ - Final.book Page 24 Monday, September 20, 2004 11:24 AM
General Outline: Indoor Units
11
2.8
ESIE04-01
FDQ125B7V3B
The illustration below shows the outlook and the dimensions of the unit (mm).
VIEW A
Outlook and
dimensions
3
4
NOTE:
SERVICE SPACE
VIEW A
5
1–24
Part 1 – System Outline
RZQ - Final.book Page 25 Monday, September 20, 2004 11:24 AM
ESIE04-01
Components
General Outline: Indoor Units
1
The table below contains the different components of the unit.
No.
Component
1
Power supply intake
2
Drain connection
3
Gas pipe connection single union
4
Liquid pipe connection single union
5
Filter
3
4
5
Part 1 – System Outline
1–25
1–26
(Required space)
(Required space)
For height installation
Drain pipe
connection
(For left piping)
or more
Brand name plate
(Note 2)
(Service Space)
Position: Hole of wall for taking out in piping back
(View from the front)
General Outline: Indoor Units
3. The remote control code is the standard
<about 3m outside the machine> attached.
(0.5mm² x 2wicks x O.D. ø 5.4)
(It is not attached to VRV.)
2. In case of using wireless remote controller, this
position will be a signal receiver. Refer to the
drawing of wireless remote controller in detail.
NOTES:
1. Location of unit’s Name plate: Bottom of fan
housing inside the suction grill.
Floor side
Obstacle
The front
(Hanging position)
5
(Hanging position)
or more
(Service Space)
Hanging bolt
4
or more
3
From the floor side
Outlook and
dimensions
or more
2.9
(Required space)
11
Position slit hole for taking out in piping back
(View from the front)
RZQ - Final.book Page 26 Monday, September 20, 2004 11:24 AM
ESIE04-01
FHQ35BUV1 & FHQ50BUV1
The illustration below shows the outlook and the dimensions of the unit (mm).
Part 1 – System Outline
RZQ - Final.book Page 27 Monday, September 20, 2004 11:24 AM
ESIE04-01
Components
Part 1 – System Outline
General Outline: Indoor Units
1
The table below contains the different components of the unit.
No.
Component
1
Air discharge grille
2
Air suction grille
3
Air filter
4
Gas pipe connection
5
Liquid pipe connection
6
Drain pipe connection
7
Earth terminal (Inside the electric components box)
8
Suspention bracket
9
Backward piping and wiring connection opening lid
10
Upward piping and wiring connection opening lid
11
Right side pipe connection
12
Left back drain pipe connection
13
Left side drain pipe connection
14
Right side drain pipe connection
15
Hole of wall for taking out in piping back
16
Upward drain pipe connection
17
Upward gas pipe connection
18
Upward liquid pipe connection
3
4
5
1–27
1–28
Drain pipe
connection
(For left piping)
(Required space)
or more
From the floor side 2500 or more
(Required space)
For height installation
Brand name plate
(Note 2)
Position: Hole of wall for taking out in piping back
(View from the front)
General Outline: Indoor Units
3. The remote control code is the standard
<about 3m outside the machine> attached.
(0.5mm² x 2wicks x O.D. ø 5.4)
(It is not attached to VRV.)
2. In case of using wireless remote controller, this
position will be a signal receiver. Refer to the
drawing of wireless remote controller in detail.
5
Floor side
The front
or more
4
(Service Space)
3
NOTES:
1. Location of unit’s Name plate: Bottom of fan
housing inside the suction grill.
Obstacle
(Hanging position)
Outlook and
dimensions
(Hanging position)
or more
(Service Space)
Hanging bolt
2.10
(Required space)
11
Position slit hole for taking out in piping back
(View from the front)
RZQ - Final.book Page 28 Monday, September 20, 2004 11:24 AM
ESIE04-01
FHQ60BUV1 & FHQ71BUV1B
The illustration below shows the outlook and the dimensions of the unit (mm).
Part 1 – System Outline
RZQ - Final.book Page 29 Monday, September 20, 2004 11:24 AM
ESIE04-01
Components
Part 1 – System Outline
General Outline: Indoor Units
1
The table below contains the different components of the unit.
No.
Component
1
Air discharge grille
2
Air suction grille
3
Air filter
4
Gas pipe connection
5
Liquid pipe connection
6
Drain pipe connection
7
Earth terminal (Inside the electric components box)
8
Suspention bracket
9
Backward piping and wiring connection opening lid
10
Upward piping and wiring connection opening lid
11
Right side pipe connection
12
Left back drain pipe connection
13
Left side drain pipe connection
14
Right side drain pipe connection
15
Hole of wall for taking out in piping back
16
Upward drain pipe connection
17
Upward gas pipe connection
18
Upward liquid pipe connection
3
4
5
1–29
1–30
(Required space)
or more
Floor side
Drain pipe
connection
(For left piping)
For height installation
From the floor side 2500 or more
(Required space)
Brand name plate
(Note 2)
Position: Hole of wall for taking out in piping back
(View from the front)
General Outline: Indoor Units
3. The remote control code is the standard
<about 3m outside the machine> attached.
(0.5mm² x 2wicks x O.D. ø 5.4)
(It is not attached to VRV.)
2. In case of using wireless remote controller, this
position will be a signal receiver. Refer to the
drawing of wireless remote controller in detail.
The front
4
or more
(Service Space)
3
NOTES:
1. Location of unit’s Name plate: Bottom of fan
housing inside the suction grill.
Obstacle
(Hanging position)
Outlook and
dimensions
(Hanging position)
or more
(Service Space)
Hanging bolt
2.11
(Required space)
11
Position slit hole for taking out in piping back
(View from the front)
RZQ - Final.book Page 30 Monday, September 20, 2004 11:24 AM
ESIE04-01
FHQ100BUV1B
The illustration below shows the outlook and the dimensions of the unit (mm).
5
Part 1 – System Outline
RZQ - Final.book Page 31 Monday, September 20, 2004 11:24 AM
ESIE04-01
Components
Part 1 – System Outline
General Outline: Indoor Units
1
The table below contains the different components of the unit.
No.
Component
1
Air discharge grille
2
Air suction grille
3
Air filter
4
Gas pipe connection
5
Liquid pipe connection
6
Drain pipe connection
7
Earth terminal (Inside the electric components box)
8
Suspention bracket
9
Backward piping and wiring connection opening lid
10
Upward piping and wiring connection opening lid
11
Right side pipe connection
12
Left back drain pipe connection
13
Left side drain pipe connection
14
Right side drain pipe connection
15
Hole of wall for taking out in piping back
16
Upward drain pipe connection
17
Upward gas pipe connection
18
Upward liquid pipe connection
3
4
5
1–31
1–32
(Required space)
or more
Floor side
Drain pipe
connection
(For left piping)
(Hanging position)
or more
(Required space)
For height installation
Position: Hole of wall for taking out in piping back
(View from the front)
Brand name plate
(Note 2)
General Outline: Indoor Units
3. The remote control code is the standard
<about 3m outside the machine> attached.
(0.5mm² x 2wicks x O.D. ø 5.4)
(It is not attached to VRV.)
2. In case of using wireless remote controller, this
position will be a signal receiver. Refer to the
drawing of wireless remote controller in detail.
The front
or more
(Service Space)
4
NOTES:
1. Location of unit’s Name plate: Bottom of fan
housing inside the suction grill.
Obstacle
(Hanging position)
3
or more
(Service Space)
Hanging bolt
Outlook and
dimensions
From the floor side
2.12
(Required space)
11
Position slit hole for taking out in piping back
(View from the front)
RZQ - Final.book Page 32 Monday, September 20, 2004 11:24 AM
ESIE04-01
FHQ125BUV1B
The illustration below shows the outlook and the dimensions of the unit (mm).
5
Part 1 – System Outline
RZQ - Final.book Page 33 Monday, September 20, 2004 11:24 AM
ESIE04-01
Components
Part 1 – System Outline
General Outline: Indoor Units
1
The table below contains the different components of the unit.
No.
Component
1
Air discharge grille
2
Air suction grille
3
Air filter
4
Gas pipe connection
5
Liquid pipe connection
6
Drain pipe connection
7
Earth terminal (Inside the electric components box)
8
Suspention bracket
9
Backward piping and wiring connection opening lid
10
Upward piping and wiring connection opening lid
11
Right side pipe connection
12
Left back drain pipe connection
13
Left side drain pipe connection
14
Right side drain pipe connection
15
Hole of wall for taking out in piping back
16
Upward drain pipe connection
17
Upward gas pipe connection
18
Upward liquid pipe connection
3
4
5
1–33
1–34
*
General Outline: Indoor Units
3. When closing the discharge grill (2 or 3 way discharge), direction of
pipe connecion will be limited, please refer to Installation manual.)
discharge grill, the
required space is 30mm
or more. (Note 3)
*
or more
or more
*When closing the
Height of suspension bracket
*
or more
Suspension bolt
*
or more
or more
(Required space)
4
2. This is where the signal of wireless remote controller is received.
Refer to the drawing of wireless remote controller in detail.
NOTES:
1. Location for manufacture’s label: on bell mouth.
be raised up to 350mm from the top surface of the product.
Brand name plate ( Note 2)
3
Required space
Outlook and
dimensions
*Drain pipe can
Drain
connection
location for rear
piping
2.13
Suspension position
11
Drain
connection
location for
upper piping
RZQ - Final.book Page 34 Monday, September 20, 2004 11:24 AM
ESIE04-01
FUQ71BUV1B
The illustration below shows the outlook and the dimensions of the unit (mm).
5
Part 1 – System Outline
RZQ - Final.book Page 35 Monday, September 20, 2004 11:24 AM
ESIE04-01
Components
General Outline: Indoor Units
1
The table below contains the different components of the unit.
No.
Component
1
Liquid pipe connection
2
Gas pipe connection
3
Drain pipe connection
4
Air outlet
5
Air suction grille
6
Corner decoration cover
7
Right pipe/wiring connection
8
Rear pipe/wiring connection
9
Pipe through cover
10
Accessory drain elbow
3
4
5
Part 1 – System Outline
1–35
1–36
*
General Outline: Indoor Units
3. When closing the discharge grill (2 or 3 way discharge), direction of
pipe connecion will be limited, please refer to Installation manual.)
discharge grill, the
required space is 30mm
or more. (Note 3)
*
or more
or more
*When closing the
Height of suspension bracket
*
or more
Suspension bolt
*
or more
or more
(Required space)
4
2. This is where the signal of wireless remote controller is received.
Refer to the drawing of wireless remote controller in detail.
NOTES:
1. Location for manufacture’s label: on bell mouth.
Brand name plate ( Note 2)
raised up to 350mm
from the top surface of the product.
3
Required space
Outlook and
dimensions
*Drain pipe can be
Drain
connection
location for rear
piping
2.14
Suspension position
11
Drain
connection
location for
upper piping
RZQ - Final.book Page 36 Monday, September 20, 2004 11:24 AM
ESIE04-01
FUQ100~125BUV1B
The illustration below shows the outlook and the dimensions of the unit (mm).
5
Part 1 – System Outline
RZQ - Final.book Page 37 Monday, September 20, 2004 11:24 AM
ESIE04-01
Components
General Outline: Indoor Units
1
The table below contains the different components of the unit.
No.
Component
1
Liquid pipe connection
2
Gas pipe connection
3
Drain pipe connection
4
Air outlet
5
Air suction grille
6
Corner decoration cover
7
Right pipe/wiring connection
8
Rear pipe/wiring connection
9
Pipe through cover
10
Accessory drain elbow
3
4
5
Part 1 – System Outline
1–37
Mounting Location
5
1–38
Approx.
Approx.
Approx.
Name plate (Note 2)
50 OR MORE
(Required space)
2500 OR MORE
For installation in
50 or more
(Required space) high spaces
hole
(Piping and
Wiring intake)
Piping
direction
4
2. In case of using wireless remote
controller, this position will be a
signal receiver. Refer to the drawing
of wireless remote controller in
detail.
hole
Piping
direction
3
50 or more
(Required space)
Dimensions for
full open front
panel.
120 or less
Outlook and
dimensions
Outside line
NOTES
1. Location of unit’s Name Plate: Right
side surface of casing
Approx.
2.15
30 or more
(Required space)
11
Piping direction
RZQ - Final.book Page 38 Monday, September 20, 2004 11:24 AM
General Outline: Indoor Units
ESIE04-01
FAQ71BUV1B
The illustration below shows the outlook and the dimensions of the unit (mm).
Part 1 – System Outline
RZQ - Final.book Page 39 Monday, September 20, 2004 11:24 AM
ESIE04-01
Components
General Outline: Indoor Units
1
The table below contains the different components of the unit.
No.
Component
1
Front panel
2
Front grille
3
Air outlet
4
Gas pipe
5
Liquid pipe
6
Drain hose
7
Grounding terminal
8
Right side pipe connection hole
9
Left side pipe connection hole
3
4
5
Part 1 – System Outline
1–39
or more
1–40
Mounting Location
hole
(Piping and
Wiring intake)
or more
2. In case of using wireless remote
controller, this position will be a
signal receiver. Refer to the drawing
of wireless remote controller in
detail.
NOTES:
1. Location general rated name plate
Right side plate outside surface
(Service space
for air filter)
General Outline: Indoor Units
Detail A
(Mounting hole for installation plate)
Hole (For wood bolt)
Approx.
Approx.
Approx.
5
Hole (For wood screw)
Ceiling surface
Oval hole (For wood screw)
Direction for air
filter draw out
3
Oval hole (For wood screw)
Brand name plate
(Note 2)
50 or more
(Required space)
4
(Required space)
Outlook and
dimensions
or more
2.16
(Required space)
11
Piping direction
RZQ - Final.book Page 40 Monday, September 20, 2004 11:24 AM
ESIE04-01
FAQ100BUV1B
The illustration below shows the outlook and the dimensions of the unit (mm).
Part 1 – System Outline
RZQ - Final.book Page 41 Monday, September 20, 2004 11:24 AM
ESIE04-01
Components
General Outline: Indoor Units
1
The table below contains the different components of the unit.
No.
Component
1
Front grille
2
Air filter
3
Discharge outlet
4
Gas piping connection
5
Gas piping connection
6
Drain piping connection
7
Earth terminal
8
Slit hole for right side piping connection
9
Slit hole for left side piping connection
3
4
5
Part 1 – System Outline
1–41
RZQ - Final.book Page 42 Monday, September 20, 2004 11:24 AM
General Outline: Indoor Units
ESIE04-01
11
3
4
5
1–42
Part 1 – System Outline
RZQ - Final.book Page 43 Monday, September 20, 2004 11:24 AM
ESIE04-01
Specifications
Part 1
3
Specifications
3.1
What Is in This Chapter?
Introduction
Outdoor units
Indoor units
Part 1 – System Outline
This chapter contains the following information:
P
Technical specifications
P
Electrical specifications
P
Electrical data
1
3
This chapter contains the following specifications:
Specifications
See page
3.2–RZQ71, RZQ100 and RZQ125
1–44
This chapter contains the following specifications:
Specifications
See page
3.3–FCQ
1–47
3.4–FFQ
1–48
3.5–FBQ
1–49
3.6–FDQ
1–50
3.7–FHQ
1–51
3.8–FUQ
1–52
3.9–FAQ
1–53
1–43
4
5
RZQ - Final.book Page 44 Monday, September 20, 2004 11:24 AM
Specifications
11
3.2
ESIE04-01
RZQ71, RZQ100 and RZQ125
Technical
specifications
The table below contains the technical specifications.
Specification
Compressor
RZQ71B7V3B
RZQ100B7V3B
RZQ125B7V3B
Model
2YC63BXD
JT100FCVD
Type
Hermetically sealed swing
compressor
Hermetically sealed scroll compressor
1800 W
2200 W
Crankcase heater
Motor output
33 W
Speed
Length
3
866 mm
No. of rows
Fin pitch
No. of passes
Face area
857 mm
2
2.00 mm
5
10
0.648 m²
1.131 m²
Heat exchanger
No. of stages
34
Tube type
4
Fin type
Non-symmetric waffle louvre
Fin treatment
Anti-corrosion treatment (PE)
Empty tubeplate hole
0
Type
Propeller
Discharge direction
No. of fans
5
60
Hi-XSS(8)
Horizontal
1
2
Nominal air flow rate (230 V) cooling
54.50 m³/min
103.00 m³/min
99.00 m³/min
Nominal air flow rate (230 V) heating
48.10 m³/min
101.00 m³/min
100.00 m³/min
Fan
Fan motor model
KFD-325-70-8A
Fan speed (nominal at 230 V) No. of steps
8
Fan speed (nominal at 230 V) cooling
813 rpm
802 rpm
772 rpm
Fan speed (nominal at 230 V) heating
721 rpm
787 rpm
779 rpm
Drive
direct drive
Type
Charge
R410A
3.20 kg
4.30 kg
Refrigerant circuit
Control
Expansion valve (electronic type)
No. of circuits
1
Safety and functional devices
High pressure switch
Fan motor thermal protector
Fuse
Heat insulation
Weight
1–44
Both liquid and gas pipe
Machine weight
61 kg
106 kg
Gross weight
65 kg
111 kg
Part 1 – System Outline
RZQ - Final.book Page 45 Monday, September 20, 2004 11:24 AM
ESIE04-01
Specifications
Electrical
specifications
1
The table below contains the electrical specifications.
Specification
RZQ71B7V3B
Unit
RZQ100B7V3B
Name
RZQ125B7V3B
V3
Phase
1~
Voltage
230V
Frequency
50 Hz
Wire connections for power supply
See installation manual 4PW16864-1
Wire connections for connection with indoor
See installation manual 4PW16864-1
Power supply intake
Outdoor unit only
Compressor
Starting method
Inverter driven
Fan motor
No. of motors x output
1 x 70 W
2 x 70 W
3
Electrical data
Unit combination
Power supply
Voltage range
Compressor
OFM
IFM
Indoor unit
Outdoor unit
Hz-Volts
MCA
TOCA
MFA
MSC
RLA
kW
FLA
kW
FCQ71B7V3B
RZQ71B7V3B
50-230
17.1
17.1
20
16.2
16.2
0.07
0.3
0.045
FLA
0.6
FCQ35B7V1x2
RZQ71B7V3B
50-230
17.7
17.7
20
16.2
16.2
0.07
0.3
0.045x2
0.6x2
FFQ35BV1Bx2
RZQ71B7V3B
50-230
17.7
17.7
20
16.2
16.2
0.07
0.3
0.055x2
0.6x2
FBQ71B7V3B
RZQ71B7V3B
50-230
17.4
17.4
20
16.2
16.2
0.07
0.3
0.125
0.9
FBQ35B7V1x2
RZQ71B7V3B
50-230
17.5
17.5
20
16.2
16.2
0.07
0.3
0.065x2
0.5x2
FHQ71BUV1B
RZQ71B7V3B
50-230
17.1
17.1
20
16.2
16.2
0.07
0.3
0.062
0.6
FHQ35BUV1Bx2
RZQ71B7V3B
50-230
17.7
17.7
20
16.2
16.2
0.07
0.3
0.062x2
0.6x2
0.3
Max.50Hz-253V
Min.50Hz-207V
FAQ71BUV1B
RZQ71B7V3B
50-230
16.8
16.8
20
16.2
16.2
0.07
0.3
0.043
FUQ71BUV1B
RZQ71B7V3B
50-230
17.2
17.2
20
16.2
16.2
0.07
0.3
0.045
0.7
FCQ100B7V3B
RZQ100B7V3B
50-230
21.0
21.0
30
19.4
19.4
0.07+0.07
0.3+0.3
0.090
1.0
FCQ50B7V1x2
RZQ100B7V3B
50-230
21.2
21.2
30
19.4
19.4
0.07+0.07
0.3+0.3
0.045x2
0.6x2
FCQ35B7V1x3
RZQ100B7V3B
50-230
21.8
21.8
30
19.4
19.4
0.07+0.07
0.3+0.3
0.045x3
0.6x3
FFQ50BV1Bx2
RZQ100B7V3B
50-230
21.4
21.4
30
19.4
19.4
0.07+0.07
0.3+0.3
0.055x2
0.7x2
0.6x3
FFQ35BV1Bx3
RZQ100B7V3B
50-230
21.8
21.8
30
19.4
19.4
0.07+0.07
0.3+0.3
0.055x3
FBQ100B7V3B
RZQ100B7V3B
50-230
21.0
21.0
30
19.4
19.4
0.07+0.07
0.3+0.3
0.135
1.0
FBQ50B7V1x2
RZQ100B7V3B
50-230
21.4
21.4
30
19.4
19.4
0.07+0.07
0.3+0.3
0.085x2
0.7x2
0.5x3
Max.50Hz-253V
Min.50Hz-207V
FBQ35B7V1x3
RZQ100B7V3B
50-230
21.5
21.5
30
19.4
19.4
0.07+0.07
0.3+0.3
0.065x3
FHQ100BUV1B
RZQ100B7V3B
50-230
20.7
20.7
30
19.4
19.4
0.07+0.07
0.3+0.3
0.130
0.7
FHQ50BUV1Bx2
RZQ100B7V3B
50-230
21.2
21.2
30
19.4
19.4
0.07+0.07
0.3+0.3
0.062x2
0.6x2
FHQ35BUV1Bx3
RZQ100B7V3B
50-230
21.8
21.8
30
19.4
19.4
0.07+0.07
0.3+0.3
0.062x3
0.6x3
FAQ100BUV1B
RZQ100B7V3B
50-230
20.4
20.4
30
19.4
19.4
0.07+0.07
0.3+0.3
0.049
0.4
FUQ100BUV1B
RZQ100B7V3B
50-230
21.1
21.1
30
19.4
19.4
0.07+0.07
0.3+0.3
0.090
1.1
Part 1 – System Outline
1–45
4
5
RZQ - Final.book Page 46 Monday, September 20, 2004 11:24 AM
Specifications
11
3
ESIE04-01
Unit combination
Power supply
Compressor
OFM
IFM
FCQ125B7V3B
RZQ125B7V3B
50-230
25.0
25.0
30
23.4
23.4
0.07+0.07
0.3+0.3
0.090
1.0
FCQ60B7V1x2
RZQ125B7V3B
50-230
25.2
25.2
30
23.4
23.4
0.07+0.07
0.3+0.3
0.045x2
0.6x2
FCQ50B7V1x3
RZQ125B7V3B
50-230
25.8
25.8
30
23.4
23.4
0.07+0.07
0.3+0.3
0.045x3
0.6x3
FCQ35B7V1x4
RZQ125B7V3B
50-230
26.4
26.4
30
23.4
23.4
0.07+0.07
0.3+0.3
0.045x4
0.6x4
FFQ60BV1Bx2
RZQ125B7V3B
50-230
25.4
25.4
30
23.4
23.4
0.07+0.07
0.3+0.3
0.055x2
0.7x2
FFQ50BV1Bx3
RZQ125B7V3B
50-230
26.1
26.1
30
23.4
23.4
0.07+0.07
0.3+0.3
0.055x3
0.7x3
FFQ35BV1Bx4
RZQ125B7V3B
50-230
26.4
26.4
30
23.4
23.4
0.07+0.07
0.3+0.3
0.055x4
0.6x4
FBQ125B7V3B
RZQ125B7V3B
50-230
25.4
25.4
30
23.4
23.4
0.07+0.07
0.3+0.3
0.225
1.4
FBQ60B7V1x2
RZQ125B7V3B
50-230
25.8
25.8
30
23.4
23.4
0.07+0.07
0.3+0.3
0.125x2
0.9x2
FBQ50B7V1x3
RZQ125B7V3B
50-230
26.1
26.1
30
23.4
23.4
0.07+0.07
0.3+0.3
0.085x3
0.7x3
FBQ35B7V1x4
RZQ125B7V3B
50-230
26.0
26.0
30
23.4
23.4
0.07+0.07
0.3+0.3
0.065x4
0.5x4
FHQ125BUV1B
RZQ125B7V3B
50-230
24.7
24.7
30
23.4
23.4
0.07+0.07
0.3+0.3
0.130
0.7
FHQ60BUV1Bx2
RZQ125B7V3B
50-230
25.2
25.2
30
23.4
23.4
0.07+0.07
0.3+0.3
0.062x2
0.6x2
FHQ50BUV1Bx3
RZQ125B7V3B
50-230
25.8
25.8
30
23.4
23.4
0.07+0.07
0.3+0.3
0.062x3
0.6x3
FHQ35BUV1Bx4
RZQ125B7V3B
50-230
26.4
26.4
30
23.4
23.4
0.07+0.07
0.3+0.3
0.062x4
0.6x4
FUQ125BUV1B
RZQ125B7V3B
50-230
25.1
25.1
30
23.4
23.4
0.07+0.07
0.3+0.3
0.090
1.1
FDQ125B7V3B
RZQ125B7V3B
50-230
28.2
28.2
30
23.4
23.4
0.07+0.07
0.3+0.3
0.500
4.2
4
Symbols:
Max.50Hz-253V
Min.50Hz-207V
MCA: Min. Circuit Amps
TOCA: Total Over-current Amps
MFA: Max. Fuse Amps (see note 7)
MSC : Max. current during the starting compressor
RLA : Rated Load Amps
OFM : Outdoor Fan Motor
IFM : Indoor Fan Motor
5
FLA : Full Load Amps
kW : Fan Motor Rated Output
Notes:
1–46
1
RLA is based on the following conditions:
P
Power supply: 50Hz 230V
P
Indoor temp. - cooling: 27°C DB/19.0°C WB
P
Indoor temp. - heating: 20.0°C DB
P
Outdoor temp. - cooling: 35.0°C DB
P
Outdoor temp. - heating: 7.0°C DB/6.0°C WB
2
TOCA means the total value of each OC set.
3
Voltage range
Units are suitable for use on electrical systems where voltage
supplied to unit terminals is not below or above listed range limits.
4
Maximum allowable voltage variation between phases is 2%.
5
MCA represents maximum input current.
MFA represents capacity which may accept MCA. (Next lower standard fuse rating, minimum 15A)
6
Select wire size based on the larger value of MCA or TOCA.
7
MFA is used to select the circuit breaker and the ground fault circuit interruptor. (earth leakage circuit breaker)
Part 1 – System Outline
RZQ - Final.book Page 47 Monday, September 20, 2004 11:24 AM
ESIE04-01
3.3
Specifications
FCQ
1
Technical
specifications
The table below contains the technical specifications.
Specification
Heat exchanger
FCQ35B7V1
FCQ50B7V1
FCQ60B7V1
Rows x stages x fin pitch
2x8x1.5
Face area
0.331 m²
Tube type
FCQ125B7V3B
0.497 m²
HIXA diam. 7
HiXSS diam. 7
Rhombus
Air flow rate cooling (high)
14 m³/min
15 m³/min
18 m³/min
18 m³/min
28 m³/min
31 m³/min
Air flow rate cooling (low)
10 m³/min
11 m³/min
14 m³/min
14 m³/min
21 m³/min
24 m³/min
Air flow rate heating (high)
14 m³/min
15 m³/min
18 m³/min
18 m³/min
28 m³/min
31 m³/min
Air flow rate heating (low)
10 m³/min
11 m³/min
14 m³/min
14 m³/min
21 m³/min
24 m³/min
Qty x model
1 x QTS46B14M
Fan speed
1 x QTS46A17M
2 steps (direct drive)
Fan type
Refrigerant
FCQ100B7V3B
2x12x1.5
Fin type
Fan
FCQ71B7V3B
Turbo fan
Type
R410A
Safety and functional devices
Fan motor thermal protector
Fan motor thermal fuse
Drain pump fuse
Air filter
Resin net (with mold resistant)
Optional
Computerized control
Microprocessor thermostat for cooling and heating
Heat
Foamed polystyrene
Both liquid and gas pipes
Sound absorbing
Foamed polystyrene
Temperature control
Insulation
Weight
Unit
23 kg
Fan motor
29 kg
33.0 kg
5
The table below contains the electrical specifications.
Specification
Unit
FCQ35B7V1
FCQ50B7V1
Phase
FCQ60B7V1
FCQ71B7V3B
Voltage
230V
Frequency
50 Hz
0.6 A
Power consumption
140 W
No. of motors x output
Part 1 – System Outline
FCQ100B7V3B
FCQ125B7V3B
1~
FLA (Full Load Amps)
4
27.0 kg
Gross
Electrical
specifications
3
1 x 45 W
1–47
RZQ - Final.book Page 48 Monday, September 20, 2004 11:24 AM
Specifications
11
3.4
ESIE04-01
FFQ
Technical
specifications
The table below contains the technical specifications.
Specification
Heat exchanger
FFQ35BV1B
Rows x stages x fin pitch
FFQ50BV1B
FFQ60BV1B
2x10x1.5
Face area
Tube type
HiXSS diam. 7
Fin type
Fan
3
Multi louver fin
Air flow rate cooling (high)
10.0 m³/min
12.0 m³/min
15.0 m³/min
Air flow rate cooling (low)
6.5 m³/min
8.0 m³/min
10.0 m³/min
Air flow rate heating (high)
10.0 m³/min
–
15.0 m³/min
Air flow rate heating (low)
6.5 m³/min
–
10.0 m³/min
Qty x model
1 x D16P52A23
Fan speed
2 steps
Fan type
Refrigerant
Turbo fan
Type
R410A
Insulation
Heat
Both liquid and gas pipes
Weight
Unit
Safety and functional devices
Air filter
4
Temperature control
Microcomputer control
Sound absorbing
17.5 kg
Gross
5
Electrical
specifications
21 kg
The table below contains the electrical specifications.
Specification
Unit
FFQ35BV1B
Phase
1~
Voltage
230V
Frequency
Fan motor
FFQ60BV1B
50 Hz
Running current (cooling)
0.40 A
0.49 A
0.61 A
Running current (heating)
0.36 A
–
0.56 A
Power consumption (cooling)
84 W
97 W
120 W
Power consumption (heating)
76 W
–
111 W
No. of motors x output
1–48
FFQ50BV1B
1 x 55 W
Part 1 – System Outline
RZQ - Final.book Page 49 Monday, September 20, 2004 11:24 AM
ESIE04-01
3.5
Specifications
FBQ
1
Technical
specifications
The table below contains the technical specifications.
Specification
Heat exchanger
FBQ35B7V1
FBQ50B7V1
FBQ60B7V1
Rows x stages x fin pitch
0.132 m²
Tube type
0.221 m²
Hi-XSS diam. 7
Rhombus
Air flow rate cooling (high)
11.5 m³/min
14.0 m³/min
19.0 m³/min
19.0 m³/min
27.0 m³/min
35.0 m³/min
Air flow rate cooling (low)
9.0 m³/min
10.0 m³/min
14.0 m³/min
14.0 m³/min
20.0 m³/min
24.0 m³/min
Air flow rate heating (high)
11.5 m³/min
14.0 m³/min
19.0 m³/min
19.0 m³/min
27.0 m³/min
35.0 m³/min
Air flow rate heating (low)
9.0 m³/min
10.0 m³/min
14.0 m³/min
14.0 m³/min
20.0 m³/min
24.0 m³/min
Qty x model
–
Fan speed
2x
2 steps
R410A
–
Air filter
Optional
Computerized control
Microprocessor thermostat for cooling and heating
Heat
Both liquid and gas pipes
Sound absorbing
Flame and heat resistant foamed
polyethylene, regular foamed
polyethylene and foamed PU
30 kg
31 kg
41 kg
41 kg
51 kg
52 kg
Gross
41 kg
42 kg
50 kg
47 kg
58 kg
59 kg
FBQ71B7V3B
FBQ100B7V3B
FBQ125B7V3B
1 x 135 W
1 x 225 W
The table below contains the electrical specifications.
FBQ35B7V1
FBQ50B7V1
FBQ60B7V1
Phase
1~
Voltage
230 V
Frequency
Fan motor
Nominal running current
Power consumption
No. of motors x output
Part 1 – System Outline
50Hz
0.5 A
0.7 A
4
Foamed
Polyurethane
Unit
Specification
Unit
Fan motor thermal use
Resin net (with mold resistant)
Temperature control
Electrical
specifications
3
Sirocco
Type
Safety and functional devices
Weight
3x
3 steps (direct drive)
Fan type
Insulation
FBQ125B7V3B
0.338 m²
HI-XA diam. 7
Fin type
Refrigerant
FBQ100B7V3B
3 x 14 x 1.75
Face area
Fan
FBQ71B7V3B
0.9 A
65 W
85 W
125 W
1 x 65 W
1 x 85 W
1 x 125 W
1 x 125 W
1–49
5
RZQ - Final.book Page 50 Monday, September 20, 2004 11:24 AM
Specifications
11
3.6
ESIE04-01
FDQ
Technical
specifications
The table below contains the technical specifications.
Specification
Heat exchanger
FDQ125B7V3B
Rows x stages x fin pitch
0.338 m²
Tube type
Hi-XSS diam. 7
Fin type
Fan
3
43.0 m³/min
Air flow rate cooling (low)
43.0 m³/min
Air flow rate heating (high)
43.0 m³/min
Air flow rate heating (low)
43.0 m³/min
Fan speed
Fan type
Type
Safety and functional devices
R410A
Microprocessor thermostat for
cooling and heating
Heat
Both liquid and gas pipes
Sound absorbing
Weight
5
Sirocco
Optional
Temperature control
Insulation
1 x DPA216-178NB
Phase cut control (direct drive)
Fan motor thermal use
Air filter
4
Rhombus
Air flow rate cooling (high)
Qty x model
Refrigerant
3 x 14 x 1.75
Face area
Electrical
specifications
Unit
59.0 kg
Gross
80.0 kg
The table below contains the electrical specifications.
Specification
Unit
Fan motor
FDQ125B7V3B
Phase
1~
Voltage
230 V
Frequency
50Hz
Nominal running current
Power consumption
No. of motors x output
1–50
1 x 500 W
Part 1 – System Outline
RZQ - Final.book Page 51 Monday, September 20, 2004 11:24 AM
ESIE04-01
3.7
Specifications
FHQ
1
Technical
specifications
The table below contains the technical specifications.
Specification
Heat exchanger
Rows x stages x fin pitch
FHQ35BUV1B
FHQ50BUV1B
FHQ60BUV1B
2 x 12 x 1.75
3 x 12 x 1.75
2 x 12 x 1.75
Face area
0.182 m²
FHQ100BUV1B
FHQ125BUV1B
3 x 12 x 1.75
0.233 m²
Tube type
0.293 m²
0.341 m²
N-Hix
Fin type
Fan
FHQ71BUV1B
Multi louver
Air flow rate cooling (high)
13.0 m³/min
17.0 m³/min
17.0 m³/min
24.0 m³/min
30.0 m³/min
Air flow rate cooling (low)
10.0 m³/min
13.0 m³/min
14.0 m³/min
20.0 m³/min
25.0 m³/min
Air flow rate heating (high)
13.0 m³/min
16.0 m³/min
17.0 m³/min
24.0 m³/min
30.0 m³/min
Air flow rate heating (low)
10.0 m³/min
13.0 m³/min
14.0 m³/min
20.0 m³/min
25.0 m³/min
3 x 3D12K2AA1
4 x 4D12K2AA1
Qty x model
3 x 3D12K1AA1
4 x 4D12K1AA1
Fan speed
2 steps
Fan type
Sirocco
Type
R410A
Insulation
Heat
Foamed polystyrene / Foamed polyethylene
Weight
Unit
24 kg
25 kg
27 kg
32 kg
35 kg
Gross
31 kg
32 kg
35 kg
41 kg
45 kg
Refrigerant
3
Safety and functional devices
4
Air filter
Temperature control
Sound absorbing
Electrical
specifications
FHQ35BUV1B
FHQ50BUV1B
FHQ60BUV1B
FHQ71BUV1B
Phase
1~
Voltage
220-240 V
Frequency
Fan motor
5
The table below contains the electrical specifications.
Specification
Unit
Foamed polyurethane / Glass wool
No. of motors x output
Part 1 – System Outline
FHQ125BUV1B
50Hz
FLA (Full load amps)
Power consumption
FHQ100BUV1B
0.6 A
111 W
0.7 A
115 W
1 x 62 W
117 W
135 W
144 W
1 x 130 W
1–51
RZQ - Final.book Page 52 Monday, September 20, 2004 11:24 AM
Specifications
11
3.8
ESIE04-01
FUQ
Technical
specifications
The table below contains the technical specifications.
Specification
Heat exchanger
FUQ71BUV1B
Rows x stages x fin pitch
Face area
0.265 m²
0.353 m²
N-Hix
Fin type
3
Multi louver
Air flow rate cooling (high)
19.0 m³/min
29.0 m³/min
32.0 m³/min
Air flow rate cooling (low)
14.0 m³/min
21.0 m³/min
23.0 m³/min
Air flow rate heating (high)
19.0 m³/min
29.0 m³/min
32.0 m³/min
Air flow rate heating (low)
14.0 m³/min
21.0 m³/min
23.0 m³/min
Qty x model
1 x QTS48A10M
Fan speed
1 x QTS50B15M
2 steps
Fan type
Refrigerant
FUQ125BUV1B
3 x 8 x 1.5
Tube type
Fan
FUQ100BUV1B
3 x 6 x 1.5
Turbo fan
Type
R410A
Safety and functional devices
Air filter
4
5
Resin net (with mold resistant)
Temperature control
Insulation
Heat
Heat resistant foamed polyethylene,
regular foamed polyethylene
Weight
Unit
25 kg
31 kg
Gross
31 kg
38 kg
Sound absorbing
Electrical
specifications
–
The table below contains the electrical specifications.
Specification
Unit
FUQ71BUV1B
Phase
50 Hz
Frequency
220-240 V
FLA (Full load amps)
0.6 A
1.0 A
Power consumption (Cooling)
180 W
289 W
Power consumption (Heating)
No. of motors x output
1–52
FUQ125BUV1B
1~
Voltage
Fan motor
FUQ100BUV1B
160 W
269 W
1 x 45 W
1 x 90 W
Part 1 – System Outline
RZQ - Final.book Page 53 Monday, September 20, 2004 11:24 AM
ESIE04-01
3.9
Specifications
FAQ
Technical
specifications
1
The table below contains the technical specifications.
Specification
Heat exchanger
FAQ71BUV1B
FAQ100BUV1B
2 x 16 x 1.4
2 x 12 x 1.4
Face area
0.289 m²
0.332 m²
Tube type
Hi-XA
Rows x stages x fin pitch
N-Hix
Fin type
Fan
Multi louver
Air flow rate cooling (high)
19.0 m³/min
Air flow rate cooling (low)
15.0 m³/min
19.0 m³/min
Air flow rate heating (high)
19.0 m³/min
23.0 m³/min
Air flow rate heating (low)
Qty x model
15.0 m³/min
19.0 m³/min
1 x QCL9686M
1 x QCL1163MA +
QCL1163MB
Fan speed
3
2 steps
Fan type
Refrigerant
23.0 m³/min
Cross flow fan
Type
R410A
Insulation
Heat
Foamed polystyrene /
foamed polyethylene
Weight
Unit
13 kg
26 kg
Gross
17 kg
34 kg
Safety and functional devices
Air filter
4
Temperature control
Sound absorbing
Electrical
specifications
–
Specification
Unit
FAQ71BUV1B
Fan motor
FAQ100BUV1B
Phase
1~
Voltage
220-240 V
Frequency
50 Hz
FLA (Full load amps)
Power consumption
No. of motors x output
Part 1 – System Outline
5
The table below contains the electrical specifications.
0.4 A
68 W
101 W
1 x 43 W
1 x 49 W
1–53
RZQ - Final.book Page 54 Monday, September 20, 2004 11:24 AM
Specifications
ESIE04-01
11
3
4
5
1–54
Part 1 – System Outline
RZQ - Final.book Page 55 Monday, September 20, 2004 11:24 AM
ESIE04-01
Functional Diagrams
Part 1
4
Functional Diagrams
4.1
What Is in This Chapter?
Introduction
Functional
diagrams
Part 1 – System Outline
This chapter contains the following information:
P
Functional diagrams
P
Pipe connection diameters.
1
3
This chapter contains the following functional diagrams:
Functional diagram
See page
4.2–Pair system
1–56
4.3–Twin System
1–58
4.4–Triple System
1–60
4.5–Double Twin System
1–61
4.6–Indoor piping
1–62
4.7–Pipe connection diameters
1–64
4.8–Re-using existing field piping
1–65
4
5
1–55
RZQ - Final.book Page 56 Monday, September 20, 2004 11:24 AM
Functional Diagrams
11
4.2
ESIE04-01
Pair system
RZQ71
6
14a
14a
8
10
14a
7
14a
5a
3
8
9
7
15
4
16
16
11
14a
1a
8
5
Liquid piping
Gas piping
10
1a
4
1a
12
Outdoor unit
Indoor unit
Heating
Cooling
2b & 3
1–56
Part 1 – System Outline
RZQ - Final.book Page 57 Monday, September 20, 2004 11:24 AM
ESIE04-01
Functional Diagrams
1
RZQ100~125
6
14a
14a
14a
14a
8
8
7
5a
17
9
3
10
7
15
8
16
11
1a
8
Gas piping
4
12
Liquid piping
10
1a
4
1a
Indoor unit
Outdoor unit
2b & 3
Part 1 – System Outline
5
Heating
Cooling
1–57
RZQ - Final.book Page 58 Monday, September 20, 2004 11:24 AM
Functional Diagrams
11
4.3
ESIE04-01
Twin System
RZQ71
6
7
14a
14a
8
7
10
14a
14a
5a
13
3
8
1a
9
1a
Indoor unit
16
7
4
15
16
11
14a
Liquid piping
10
19
Gas piping
5
4
13
1a
1a
Indoor unit
1–58
1a
12
Outdoor unit
Heating
Cooling
2b & 3
NOTE: The press between the branch and the indoor units
should have the same size as the indoor connections.
Part 1 – System Outline
RZQ - Final.book Page 59 Monday, September 20, 2004 11:24 AM
ESIE04-01
Functional Diagrams
1
RZQ100~125
6
7
14a
14a
8
8
7
14a
14a
5a
13
17
1a
9
10
3
1a
Indoor unit
15
7
8
11
12
16
Liquid piping
Gas piping
Outdoor unit
1a
1a
Part 1 – System Outline
1a
4
13
Indoor unit
4
10
19
Heating
Cooling
5
2b & 3
NOTE: The press between the branch and the indoor units
should have the same size as the indoor connections.
1–59
RZQ - Final.book Page 60 Monday, September 20, 2004 11:24 AM
Functional Diagrams
11
4.4
ESIE04-01
Triple System
RZQ100~125
6
7
14a
14a
8 8
8
13
3
7
1a
Indoor unit
14a
1a
14a
5a
17
9
10
7
Liquid piping
4
13
1a
8
Gas piping
Indoor unit
15
1a
11
12
16
1a
1a
10
19
4
7
5
Outdoor unit
Heating
Cooling
2b & 3
13
Indoor unit
1–60
1a
1a
NOTE: The press between the branch and the indoor units
should have the same size as the indoor connections.
Part 1 – System Outline
RZQ - Final.book Page 61 Monday, September 20, 2004 11:24 AM
ESIE04-01
4.5
Functional Diagrams
Double Twin System
1
RZQ100~125
7
6
Indoor unit
1a
14a
14a
8
13
8
1a
7
14a
14a
5a
7
3
17
9
Indoor unit
10
1a
13
15
1a
Liquid piping
8
19
11
12
1a
7
Indoor unit
16
4
Gas piping
10
1a
4
13
Outdoor unit
1a
7
Indoor unit
1a
13
Heating
Cooling
5
2b & 3
NOTE: The press between the branch and the indoor units
should have the same size as the indoor connections.
1a
Part 1 – System Outline
1–61
RZQ - Final.book Page 62 Monday, September 20, 2004 11:24 AM
Functional Diagrams
11
4.6
ESIE04-01
Indoor piping
FFQ
7
3
1a
Liquid piping
4
To outdoor unit
Gas piping
1a
Indoor unit
5
FHQ, FUQ, FAQ
7
1a
Liquid piping
To outdoor unit
Gas piping
1a
Indoor unit
1–62
Part 1 – System Outline
RZQ - Final.book Page 63 Monday, September 20, 2004 11:24 AM
ESIE04-01
Functional Diagrams
1
FCQ, FBQ, FDQ
7
Heating
Cooling
Liquid piping
8
3
1a
Gas piping
1a
4
Indoor unit
5
Part 1 – System Outline
1–63
RZQ - Final.book Page 64 Monday, September 20, 2004 11:24 AM
Functional Diagrams
11
4.7
ESIE04-01
Pipe connection diameters
Outdoor units
The table below contains the refrigerant pipe connection diameters.
Model
RZQ71B7V3B
∅ Gas pipe (flare)
∅ Liquid pipe (flare)
15.9 mm
9.52 mm
RZQ100B7V3B
RZQ125B7V3B
3
Indoor units
The table below contains the refrigerant pipe connection diameters.
∅ Gas pipe (flare)
∅ Liquid pipe (flare)
FCQ35B7V1
9.5 mm
6.4 mm
FCQ50~60B7V1
12.7 mm
6.4 mm
FCQ71~125B7V3B
15.9 mm
9.5 mm
FFQ35BV1B
9.5 mm
6.4 mm
FFQ50~60BV1B
12.7 mm
6.4 mm
FBQ35B7V1
9.5 mm
6.4 mm
FBQ50~60B7V1
12.7 mm
6.4 mm
FBQ71~125B7V3B
15.9 mm
9.5 mm
FDQ125B7V3B
15.9 mm
9.5 mm
FHQ35BUV1B
9.5 mm
6.4 mm
FHQ50~60BUV1B
12.7 mm
6.4 mm
FHQ71~125BUV1B
15.9 mm
9.5 mm
FUQ71~125BUV1B
15.9 mm
9.5 mm
FAQ71~100BUV1B
15.9 mm
9.5 mm
Model
4
5
1–64
Part 1 – System Outline
RZQ - Final.book Page 65 Monday, September 20, 2004 11:24 AM
ESIE04-01
4.8
Functional Diagrams
Re-using existing field piping
Introduction
1
When installing a system using an RZQ outdoor unit, existing or pre-installed piping can be used
according to below specified conditions.
In all circumstances where these conditions can not be fully met, new piping has to be installed.
How to re-use
existing piping?
Check the existing
pipe size.
Non-standard
size
Standard size
Check the existing pipe size and thickness
referring to the "(1) SELECTION OF PIPING
on page
1–66.
MATERIAL" (on
the next
page).
Check the following item in
"(2) REFRIGERANT PIPE SIZE" and
"(3) ALLOWABLE PIPE LENGTH AND
on the
page
1–67.
HEIGHT DIFFERENCE" (on
next
page)
Not listed
Beyond
allowable
length range
See if the length requirements for re-using
the existing piping are as specified.
All satisfactory
See if the reduction of cooling capacity
may cause any problem.
Check the existing pipe length.
No tolerance
for capacity
reduction
Reuse
of
existing
pipe
not
allowed
Longer than 50 m
3
4
50 m or less
See if the already installed air conditioner can operate and perform a
pump-down operation.
Operation not possible
Pump-down operation
not possible
5
Both operation and pump-down are possible
After 30 minutes of cooling operation, proceed with pump-down operation
without interruption.
Remove the existing air conditioner.
Check the compressor (of the existing air conditioner) for fault records.
Exist
None
See if the contamination inside the existing pipe is acceptable.
NO
OK
Rework the flare. (For R410A: See table on page 1–69. )
Use the supplied flare nut.
Existing piping work for new air conditioner
Notes:
Oil contamination can be checked using the Daikin “Oil Checker Card”.
Caution:
P
If copper piping is corroded, existing piping re-use is not allowed.
P
Single side thermal insulation is not allowed for re-use.
P
See further notes in this section for Twin, Triple and Double Twin applications.
Part 1 – System Outline
1–65
RZQ - Final.book Page 66 Monday, September 20, 2004 11:24 AM
Functional Diagrams
Do not allow anything other than the designated refrigerant to get mixed into the freezing cycle (air,
moisture,... ). If any refrigerant gas leaks while working on the unit, ventilate the room thoroughly
immediately.
P
Use R410A only when adding refrigerant.
P
Make sure all installation tools are designed for use on R410A refrigerant to withstand the
pressure.
P
Vacuum pump. Use a 2-stage vacuum pump with a non-return valve. Make sure the pump oil does
not flow oppositely into the new system while the pump is not working. Use a vacuum pump which
can evacuate to -100.7 kPa (5 Torr, -755 mmHg).
P
Check welded connections for gas leaks, if the local piping has welded connections.
P
Main piping (L1) can be re-used, size up & size down is allowed (see further in this section for
restrictions).
P
Re-use of branch piping is not allowed.
P
Branch piping (L2~L7) can be re-used, but standard pipe size only.
Pair
4
Triple
Double twin
L2
Selection of piping
material
L1
L3
L1
L4
L5
L1
L3
L7
H1
L1
L4
L6
H1
L3
H2
L2
L2
H1
5
Twin
H2
Notes for Twin,
Triple and Double
Twin
P
H1
3
Precautions on
refrigerant piping
H2
11
ESIE04-01
P
Construction material: phosphoric acid deoxidized seamless copper for refrigerant.
P
Temper grade: use piping with temper grade in function of the pipe diameter as listed in table
below.
P
The pipe thickness of the refrigerant piping should comply with relevant local and national
regulations. The minimal pipe thickness for R410A piping must be in accordance with the table
below.
Pipe φ
Temper grade of piping material
Minimal thickness t(mm)
6.4 / 9.5 / 12.7
Ο
0.80
15.9
O
1
19.1
1/2H
1
Ο = Annealed
1/2H = Half hard
1–66
Part 1 – System Outline
RZQ - Final.book Page 67 Monday, September 20, 2004 11:24 AM
ESIE04-01
Refrigerant pipe
size
Functional Diagrams
P
1
Pipe size down and pipe size up is available for main piping (L1) only.
Refrigerant pipe size
Gas pipe
Model
RZQ71B7V3B
RZQ100 & 125B7V3B
Size-down
φ 12.7
––
Standard size
φ 15.9
Size-up
––
φ 19.1
Liquid pipe
Model
RZQ71~125B7V3B
P
Size-down
Standard size
Size-up
φ 6.4
φ 9.5
φ 12.7
Not using the standard pipe size may result in capacity decrease. It is up to the installer to judge
on this phenomenon carefully in function of the complete installation.
3
4
5
Part 1 – System Outline
1–67
RZQ - Final.book Page 68 Monday, September 20, 2004 11:24 AM
Functional Diagrams
11
Allowable pipe
length and heigth
difference
ESIE04-01
When re-using existing piping, refer to below table for allowable piping length and heigth difference
(figures in brackets are equivalent lengths).
Model RZQ-B7
Liquid pipe
size
71
100
125
Maximum allowable piping length (*)
Pair: L1
Twin and triple: L1 + L2
Double twin: L1 + L2 + L4
3
size-down
10 m (15 m)
standard
50 m (70 m)
50 m (70 m)
50 m (70 m)
size-up
25 m (35 m)
35 m (45 m)
35 m (45 m)
Maximum total one-way piping length
Twin: L1 + L2 + L3
Triple: L1 + L2 + L3 + L4
50 m
––
Double twin:
L1 + L2 + L3 + L4 + L5 + L6 + L7
4
50 m
––
50 m
––
Maximum branch piping length
Twin: L2
Double twin: L2 + L4
20 m
––
Maximum difference between branch lengths
5
10 m
Twin: L2 - L3
Triple: L2 - L4
––
Double twin: L2 - L3, L4 - L5,
L6 - L7, (L2 + L4) - (L3 + L7)
––
10 m
10 m
––
Maximum heigth between indoor and outdoor
All: H1
––
30 m
––
0.5 m
size-down
10 m
standard
30 m
size-up
15 m
Maximum heigth between indoors
Twin, triple and double twin: H2
Chargeless length
All:
L1 + L2 + L3 + L4 + L5 + L6 + L7
1–68
Part 1 – System Outline
RZQ - Final.book Page 69 Monday, September 20, 2004 11:24 AM
ESIE04-01
Caution for flare
connections
Functional Diagrams
P
Refer to below table for correct flare dimensions and tightening torques. Too high tightening force
may cause refrigerant leak because of flare cracking:
Flare nut
tightening torque
A dimensions for
processing flares (mm)
Ø 6.4
14.2~17.2 N·m
(144~176 kgf·cm)
8.7~9.1
Ø 9.5
32.7~39.9 N·m
(333~407 kgf·cm)
12.8~13.2
Ø 12.7
49.5~60.3 N·m
(504~616 kgf·cm)
16.2~16.6
Ø 15.9
61.8~75.4 N·m
(630~770 kgf·cm)
19.3~19.7
Ø 19.1
97.2~118.6 N·m
(989.8~1208 kgf·cm)
23.6~24.0
Piping size
P
1
Flare shape
90°±0.5
45 ±
° 2
A
R=0.4~0.8
3
When connecting the flare nut, apply refrigerating machine oil to the flare (inside and outside) and
first screw the nut 3 or 4 turns by hand. Coat the indicated surfaces using ether or ester oil:
4
P
Part 1 – System Outline
After completing the installation, carry out an inspection of the piping connections by pressure test
using nitrogen.
1–69
5
RZQ - Final.book Page 70 Monday, September 20, 2004 11:24 AM
Functional Diagrams
ESIE04-01
11
3
4
5
1–70
Part 1 – System Outline
ESIE04-01
4.9
Components
The table below contains the different components of the functional diagrams.
No.
Component
Function / remark
1a
Flare connection
See pipe connection diameter.
2a
Liquid stop valve
The liquid stop valve is used as shut-off valve in case of a pump-down.
2b
Liquid stop valve
with service port
3
Gas stop valve with
service port
The gas stop valve is used as shut-off valve in case of a pump-down.
4
Compressor
The compressor can restart after 3 min from last stop.
5a
Capillary tube
The capillary tube allows pressure equalization during a compressor OFF-cycle.
5b
The capillary tube expands the liquid to enable evaporation in the evaporator.
6
Electronic expansion valve
The expansion valve expands the liquid to enable evaporation in the evaporator. The opening
degree is controlled to obtain the optimum discharge temperature.
7
Heat exchanger
The heat exchanger is of the multi louvre fin type. Hi-X -tubes and coated waffle louvre fins are
used.
8
Filter
The filter is used to collect impurities, which may enter the system during installation and is also
used to avoid blockage of the capillaries and other fine mechanical parts of the unit.
9
Liquid receiver
The liquid receiver is used to make sure only completely liquefied refrigerant is sent to the expansion valve. It is also used as a container in which surplus refrigerant is stored.
10
Check valve with
service port
The check valve allows you to connect a gauge.
11
Low-pressure switch
The low-pressure switch stops the operation of the unit when the pressure becomes abnormally
low.
12
High-pressure
switch
The high-pressure switch stops the operation of the unit when the pressure becomes abnormally
high.
13
Propeller fan and fan
motor
The propeller fan creates air displacement across the heat exhanger.
14a
One-way valve
The one-way valve is used to force the refrigerant liquid to flow through the receiver and the
expansion valve in the same direction both in cooling and heating.
14b
15
The one-way valve is used to release overpressure in the liquid receiver during stand-still.
4-way valve
The 4-way valve is used to select refrigerant flow in cooling or heating mode.
(reversing solenoid
valve)
When the 4-way valve switches from ON to OFF, a timer starts counting up to 150 as soon as the
cooling or defrosting operation is stopped. This delay time is to eliminate the switching sound.
16
Muffler
The muffler is used to absorb the refrigerant noise from the compressor.
17
Solenoid valve
P
Y1S: Capacity control solenoid valve
P
Y3S: Liquid injection solenoid valve
P
SV: Solenoid valve (Purge liquid receiver)
P
R1T: Air thermistor
P
R2T: Coil thermistor
P
R3T: Discharge pipe thermistor
18
19
Part 1 – System Outline
Part 1
Piping Components
Thermistor
Branch pipe
1–71
ESIE04-01
1–72
Part 1 – System Outline
RZQ - Final.book Page 73 Monday, September 20, 2004 11:24 AM
ESIE04-01
Switch Box Layout
Part 1
5
Switch Box Layout
5.1
What Is in This Chapter?
Introduction
This chapter shows the switch box components.
Outdoor units
This chapter contains the following switch box layouts:
Indoor units
Part 1 – System Outline
1
3
Switch box layout
See page
5.2–RZQ71B7V3B
1–74
5.3–RZQ100B7V3B
1–75
4
This chapter contains the following switch box layouts:
PCB layout
See page
5.4–FCQ35B7V1 ~ FCQ71B7V3B
1–76
5.5–FCQ100~125B7V3B
1–77
5.6–FFQ35~60BV1B
1–78
5.7–FBQ35B7V1 ~ FBQ125B7V3B
1–79
5.8–FDQ125B7V3B
1–80
5.9–FHQ35BUV1 ~ FHQ125BUV1B
1–81
5.10–FUQ71~125BUV1B
1–82
5.11–FAQ71BUV1B
1–83
5.12–FAQ100BUV1B
1–84
5
1–73
RZQ - Final.book Page 74 Monday, September 20, 2004 11:24 AM
Switch Box Layout
11
5.2
ESIE04-01
RZQ71B7V3B
The illustration below shows the switch box layout:
A2P
3
A1P
4
5
X1M
1–74
Item
Description
A1P
Printed circuit board (control)
A2P
Printed circuit board (inverter)
X1M
Terminal strip
Part 1 – System Outline
RZQ - Final.book Page 75 Monday, September 20, 2004 11:24 AM
ESIE04-01
5.3
Switch Box Layout
RZQ100B7V3B
1
The illustration below shows the switch box layout:
A1P
3
4
A2P
5
X1M
Part 1 – System Outline
Item
Description
A1P
Printed circuit board (control)
A2P
Printed circuit board (inverter)
X1M
Terminal strip
1–75
RZQ - Final.book Page 76 Monday, September 20, 2004 11:24 AM
Switch Box Layout
11
5.4
ESIE04-01
FCQ35B7V1 ~ FCQ71B7V3B
The illustration below shows the switch box layout:.
T1R
PCB
C1R
3
4
X1M
5
1–76
X2M
Item
Description
PCB
Printed circuit board
T1R
Transformer
C1R
Fan motor capacitor
X1M
Terminal strip (for remote control P1/P2)
X2M
Terminal strip (interconnection wiring)
Part 1 – System Outline
RZQ - Final.book Page 77 Monday, September 20, 2004 11:24 AM
ESIE04-01
5.5
Switch Box Layout
FCQ100~125B7V3B
1
The illustration below shows the switch box layout:
X2M
X1M
3
PCB
C1R
Part 1 – System Outline
Item
Description
PCB
Printed circuit board
T1R
Transformer
C1R
Fan motor capacitor
X1M
Terminal strip (for remote control P1/P2)
X2M
Terminal strip (interconnection wiring)
4
T1R
5
1–77
RZQ - Final.book Page 78 Monday, September 20, 2004 11:24 AM
Switch Box Layout
11
5.6
ESIE04-01
FFQ35~60BV1B
The illustration below shows the switch box layout:
C1R
3
T1R
X17A
4
X1M
PCB
X2M
5
1–78
Item
Description
PCB
Printed circuit board
T1R
Transformer
C1R
Fan motor capacitor
X1M
Terminal strip (for remote control P1/P2)
X2M
Terminal strip (interconnection wiring)
Part 1 – System Outline
RZQ - Final.book Page 79 Monday, September 20, 2004 11:24 AM
ESIE04-01
5.7
Switch Box Layout
FBQ35B7V1 ~ FBQ125B7V3B
1
The illustration below shows the switch box layout:.
PCB
3
C1R
4
T1R
X1M
X2M
5
Part 1 – System Outline
Item
Description
PCB
Printed circuit board
T1R
Transformer
C1R
Fan motor capacitor
X1M
Terminal strip (for remote control P1/P2)
X2M
Terminal strip (interconnection wiring)
1–79
RZQ - Final.book Page 80 Monday, September 20, 2004 11:24 AM
Switch Box Layout
11
5.8
ESIE04-01
FDQ125B7V3B
The illustration below shows the switch box layout:
PCB
C1R
3
4
T1R
X1M
X2M
5
1–80
Item
Description
PCB
Printed circuit board
T1R
Transformer
C1R
Fan motor capacitor
X1M
Terminal strip (for remote control P1/P2)
X2M
Terminal strip (interconnection wiring)
Part 1 – System Outline
RZQ - Final.book Page 81 Monday, September 20, 2004 11:24 AM
ESIE04-01
5.9
Switch Box Layout
FHQ35BUV1 ~ FHQ125BUV1B
1
The illustration below shows the switch box layout:
C1R
PCB
Part 1 – System Outline
Item
Description
PCB
Printed circuit board
T1R
Transformer
C1R
Fan motor capacitor
X1M
Terminal strip (for remote control P1/P2)
X2M
Terminal strip (interconnection wiring)
X1M
T1R
3
X2M
4
5
1–81
RZQ - Final.book Page 82 Monday, September 20, 2004 11:24 AM
Switch Box Layout
11
5.10
ESIE04-01
FUQ71~125BUV1B
The illustration below shows the switch box layout:
PCB
3
T1R
4
X2M
X1M
C1R
5
1–82
Item
Description
PCB
Printed circuit board
T1R
Transformer
C1R
Fan motor capacitor
X1M
Terminal strip (for remote control P1/P2)
X2M
Terminal strip (interconnection wiring)
Part 1 – System Outline
RZQ - Final.book Page 83 Monday, September 20, 2004 11:24 AM
ESIE04-01
5.11
Switch Box Layout
FAQ71BUV1B
1
The illustration below shows the switch box layout:
3
X2M
PCB
4
5
X1M
Part 1 – System Outline
Item
Description
PCB
Printed circuit board
X1M
Terminal strip (for remote control P1/P2, F1/F2, T1/T2)
X2M
Terminal strip (interconnection wiring)
1–83
RZQ - Final.book Page 84 Monday, September 20, 2004 11:24 AM
Switch Box Layout
11
5.12
ESIE04-01
FAQ100BUV1B
The illustration below shows the switch box layout:
PCB
X1M
X2M
3
4
5
1–84
Item
Description
PCB
Printed circuit board
T1R
Transformer
C1R
Fan motor capacitor
X1M
Terminal strip (for remote control P1/P2)
X2M
Terminal strip (interconnection wiring)
Part 1 – System Outline
RZQ - Final.book Page 85 Monday, September 20, 2004 11:24 AM
ESIE04-01
Wiring Diagrams
Part 1
6
Wiring Diagrams
6.1
What Is in This Chapter?
Introduction
This chapter contains the wiring diagrams of the outdoor and indoor units.
Outdoor units:
This chapter contains the following wiring diagrams:
Indoor units:
Part 1 – System Outline
1
3
Wiring diagram
See page
6.2–RZQ71B7V3B
1–86
6.3–RZQ100~125B7V3B
1–87
4
This chapter contains the following wiring diagrams:
Wiring diagram
See page
6.4–FCQ35~60B7V1
1–88
6.5–FCQ71~125B7V3B
1–89
6.6–FFQ35~60BV1B
1–90
6.7–FBQ35~60B7V1
1–91
6.8–FBQ71B7V3B
1–92
6.9–FBQ100~125B7V3B
1–93
6.10–FDQ125B7V3B
1–94
6.11–FHQ35~60BUV1
1–95
6.12–FHQ71~125BUV1B
1–96
6.13–FUQ71~125BUV1B
1–97
6.14–FAQ71BUV1B
1–98
6.15–FAQ100BUV1B
1–99
5
1–85
RZQ - Final.book Page 86 Monday, September 20, 2004 11:24 AM
Wiring Diagrams
11
6.2
ESIE04-01
RZQ71B7V3B
Wiring diagram
The illustration below shows the wiring diagram of the unit.
3
4
5
1–86
Part 1 – System Outline
RZQ - Final.book Page 87 Monday, September 20, 2004 11:24 AM
ESIE04-01
6.3
Wiring Diagrams
RZQ100~125B7V3B
Wiring diagram
1
The illustration below shows the wiring diagram of the unit.
3
4
5
Part 1 – System Outline
1–87
RZQ - Final.book Page 88 Monday, September 20, 2004 11:24 AM
Wiring Diagrams
11
6.4
ESIE04-01
FCQ35~60B7V1
Wiring diagram
The illustration below shows the wiring diagram of the unit.
3
4
5
1–88
Part 1 – System Outline
RZQ - Final.book Page 89 Monday, September 20, 2004 11:24 AM
ESIE04-01
6.5
Wiring Diagrams
FCQ71~125B7V3B
Wiring diagram
1
The illustration below shows the wiring diagram of the unit.
3
4
5
Part 1 – System Outline
1–89
RZQ - Final.book Page 90 Monday, September 20, 2004 11:24 AM
Wiring Diagrams
11
6.6
ESIE04-01
FFQ35~60BV1B
Wiring diagram
The illustration below shows the wiring diagram of the unit.
3
4
5
1–90
Part 1 – System Outline
RZQ - Final.book Page 91 Monday, September 20, 2004 11:24 AM
ESIE04-01
6.7
Wiring Diagrams
FBQ35~60B7V1
Wiring diagram
1
The illustration below shows the wiring diagram of the unit.
3
4
5
Part 1 – System Outline
1–91
RZQ - Final.book Page 92 Monday, September 20, 2004 11:24 AM
Wiring Diagrams
11
6.8
ESIE04-01
FBQ71B7V3B
Wiring diagram
The illustration below shows the wiring diagram of the unit.
3
4
5
1–92
Part 1 – System Outline
RZQ - Final.book Page 93 Monday, September 20, 2004 11:24 AM
ESIE04-01
6.9
Wiring Diagrams
FBQ100~125B7V3B
Wiring diagram
1
The illustration below shows the wiring diagram of the unit.
3
4
5
Part 1 – System Outline
1–93
RZQ - Final.book Page 94 Monday, September 20, 2004 11:24 AM
Wiring Diagrams
11
6.10
ESIE04-01
FDQ125B7V3B
Wiring diagram
The illustration below shows the wiring diagram of the unit.
3
4
5
1–94
Part 1 – System Outline
RZQ - Final.book Page 95 Monday, September 20, 2004 11:24 AM
ESIE04-01
6.11
Wiring Diagrams
FHQ35~60BUV1
Wiring diagram
1
The illustration below shows the wiring diagram of the unit.
3
4
5
Part 1 – System Outline
1–95
RZQ - Final.book Page 96 Monday, September 20, 2004 11:24 AM
Wiring Diagrams
11
6.12
ESIE04-01
FHQ71~125BUV1B
Wiring diagram
The illustration below shows the wiring diagram of the unit.
3
4
5
1–96
Part 1 – System Outline
RZQ - Final.book Page 97 Monday, September 20, 2004 11:24 AM
ESIE04-01
6.13
Wiring Diagrams
FUQ71~125BUV1B
Wiring diagram
1
The illustration below shows the wiring diagram of the unit.
3
4
5
Part 1 – System Outline
1–97
RZQ - Final.book Page 98 Monday, September 20, 2004 11:24 AM
Wiring Diagrams
11
6.14
ESIE04-01
FAQ71BUV1B
Wiring diagram
The illustration below shows the wiring diagram of the unit.
3
4
5
1–98
Part 1 – System Outline
RZQ - Final.book Page 99 Monday, September 20, 2004 11:24 AM
ESIE04-01
6.15
Wiring Diagrams
FAQ100BUV1B
Wiring diagram
1
The illustration below shows the wiring diagram of the unit.
3
4
5
Part 1 – System Outline
1–99
RZQ - Final.book Page 100 Monday, September 20, 2004 11:24 AM
Wiring Diagrams
ESIE04-01
11
3
4
5
1–100
Part 1 – System Outline
RZQ - Final.book Page 101 Monday, September 20, 2004 11:24 AM
ESIE04-01
PCB Layout
Part 1
7
PCB Layout
7.1
What Is in This Chapter?
Introduction
Outdoor units
Indoor units
Part 1 – System Outline
This chapter contains the following information:
P
It describes which unit uses which PCB types
P
It shows the PCB connectors.
1
3
This chapter contains the following PCB layouts:
PCB layout
See page
7.2–RZQ71B7V3B
1–102
7.3–RZQ100B7V3B
1–104
This chapter contains the following PCB layouts:
PCB layout
See page
7.4–FCQ35~60B7V1
1–106
7.5–FCQ71~125B7V3B
1–107
7.6–FFQ35~60BV1B
1–108
7.7–FBQ35~60B7V1
1–109
7.8–FBQ100~125B7V3B
1–110
7.9–FDQ125B7V3B
1–111
7.10–FHQ35~60BUV1
1–112
7.11–FHQ71~125BUV1B
1–113
7.12–FUQ71~125BUV1B
1–114
7.13–FAQ71BUV1B
1–115
7.14–FAQ100BUV1B
1–116
1–101
4
5
RZQ - Final.book Page 102 Monday, September 20, 2004 11:24 AM
PCB Layout
11
7.2
ESIE04-01
RZQ71B7V3B
Control PCB
The illustration below shows the PCB connectors.
X3A
X64A
X26A
X18A
X17A
3
X19A
X20A
X6A
X12A
4
X77A
5
X22A
X1A
Connectors
The table below describes the PCB connectors.
Connector
Connected to
Description
X1A
X1M
Terminal strip connector
X3A
X205A on
inverter PCB
X6A
For optional PCB KRP58M51
X12A
Y1E
Expansion valve
X17A
R3T
Discharge thermistor
X18A
R4T
Suction thermistor
X19A
R2T
Coil thermistor
X20A
R1T
Air thermistor
X22A
Y1S
4-way valve
X26A
X64A
X77A
1–102
Connector for spare part adaptor
S1NPL
Low pressure sensor
For optional PCB KRP58M51
Part 1 – System Outline
RZQ - Final.book Page 103 Monday, September 20, 2004 11:24 AM
ESIE04-01
Inverter PCB
PCB Layout
1
The illustration below shows the PCB connectors.
3
X60A
4
X201A
X205A
5
X206A
Connectors
Part 1 – System Outline
X207A
The table below describes the PCB connectors.
Connector
Connected to
Description
X60A
S1PH
High pressure switch
X201A
M1C
Compressor motor
X205A
X3A on control
PCB
X206A
M1F
Fan motor
X207A
R5T
Power module thermistor
1–103
RZQ - Final.book Page 104 Monday, September 20, 2004 11:24 AM
PCB Layout
11
7.3
ESIE04-01
RZQ100B7V3B
Control PCB
The illustration below shows the PCB connectors.
X3A
X64A
X26A
X18A
X17A
X19A
X20A
3
X6A
X12A
4
X77A
X28A
X25A
X22A
5
X1A
Connectors
The table below describes the PCB connectors.
Connector
Connected to
Description
X1A
X1M
Terminal strip connector
X3A
X205A on
inverter PCB
X6A
For optional PCB KRP58M51
X12A
Y1E
Expansion valve
X17A
R3T
Discharge thermistor
X18A
R4T
Suction thermistor
X19A
R2T
Coil thermistor
X20A
R1T
Air thermistor
X22A
Y1S
4-way valve
X25A
J1HC
Crankcase heater
X26A
X28A
Y2S
Solenoid valve
X64A
S1NPL
Low pressure sensor
X77A
1–104
Connector for spare part adaptor
For optional PCB KRP58M51
Part 1 – System Outline
RZQ - Final.book Page 105 Monday, September 20, 2004 11:24 AM
ESIE04-01
Inverter PCB (A2P)
PCB Layout
1
The illustration below shows the PCB connectors.
3
4
X60A
X205A
5
X206A X207A
Connectors
Part 1 – System Outline
The table below describes the PCB connectors.
Connector
Connected to
Description
X60A
S1PH
High pressure switch
(U, V, W, N)
M1C
Compressor motor
X205A
X3A on control
PCB
X206A
M1F
Fan motor
X207A
M2F
Fan motor
1–105
RZQ - Final.book Page 106 Monday, September 20, 2004 11:24 AM
PCB Layout
11
7.4
ESIE04-01
FCQ35~60B7V1
PCB
The illustration below shows the PCB connectors.
X20A X27A X11A
X10A
X33A
X19A
X60A X61A
X5A
X35A
X24A
3
X15A
X25A
4
Connectors
5
1–106
X18A
X36A
X40A
X17A
The table below describes the PCB connectors.
Connector
Connected to
Description
X5A
X1M
Terminal strip for P1/P2
X10A
T1R
Transformer secondary side
X11A
T1R
Transformer primary side
X15A
33H
Float switch
X17A
R3T
Coil thermistor
X18A
R2T
Coil thermistor (liquid)
X19A
R1T
Air thermistor
X20A
M2F
Fan motor (power supply)
X24A
X2A on A3P
X24A is connected when the wireless remote control is used.
X25A
M3P
Drain pump motor
X27A
X2M
Power supply & communication
X33A
X1A on KRP1B
Connector for wiring adaptor KRP1B
X35A
X1A on KRP4
Connector to group control adaptor power supply (16VDC) for
optional PCB KRP4
X36A
M1A
Swing flap motor
X40A
–
Connector for remote ON/OFF, Forced OFF
X60A
X1A on DTA112
Connector for interface adaptor
X61A
X2A on DTA112
Connector for interface adaptor
Part 1 – System Outline
RZQ - Final.book Page 107 Monday, September 20, 2004 11:24 AM
ESIE04-01
7.5
PCB Layout
FCQ71~125B7V3B
PCB
1
The illustration below shows the PCB connectors.
X27A X11A
X10A
X33A X19A
X60A X61A
X5A
X35A
X20A
X24A
X15A
X18A
X25A
Connectors
Part 1 – System Outline
X36A
3
X40A
4
The table below describes the PCB connectors.
Connector
Connected to
Description
X5A
X1M
Terminal strip for P1/P2
X10A
T1R
Transformer secondary side
X11A
T1R
Transformer primary side
X15A
S1L
Float switch
X18A
R2T
Coil thermistor (liquid)
X19A
R1T
Air thermistor
X20A
M2F
Fan motor (power supply)
X24A
X2A on A3P
X24A is connected when the wireless remote control is used.
X25A
M3P
Drain pump motor
X27A
X2M
Power supply & communication
X33A
X1A on KRP1B
Connector for wiring adaptor KRP1B
X35A
X1A on KRP4
Connector to group control adaptor power supply (16VDC) for
optional PCB KRP4
X36A
M1A
Swing flap motor
X40A
–
Connector for remote ON/OFF, Forced OFF
X60A
X1A on DTA112
Connector for interface adaptor
X61A
X2A on DTA112
Connector for interface adaptor
5
1–107
RZQ - Final.book Page 108 Monday, September 20, 2004 11:24 AM
PCB Layout
11
7.6
ESIE04-01
FFQ35~60BV1B
PCB
The illustration below shows the PCB connectors.
X27A
X11A
X10A
X33A
X60A X61A
X19A
X20A
X5A
X35A
X24A
3
X15A
X25A
X18A
X36A X40A
X17A
4
Connectors
5
1–108
The table below describes the PCB connectors.
Connector
Connected to
Description
X5A
X1M
Terminal strip for P1/P2
X10A
T1R
Transformer secondary side
X11A
T1R
Transformer primary side
X15A
S1L
Float switch
X17A
R3T
Coil thermistor (gas). Not used on 71~125 class.
X18A
R2T
Coil thermistor (liquid)
X19A
R1T
Air thermistor
X20A
M1F
Fan motor (power supply)
X24A
X2A on A3P
X24A is connected when the wireless remote control is used.
X25A
M1P
Drain pump motor
X27A
X2M
Power supply & communication
X33A
X1A on KRP1B
Connector for wiring adaptor KRP1B
X35A
X1A on KRP4
Connector to group control adaptor power supply (16VDC) for
optional PCB KRP4
X36A
M1S
Swing flap motor
X40A
–
Connector for remote ON/OFF, Forced OFF
X60A
X1A on DTA112
Connection for interface adaptor
X61A
X2A on DTA112
Connection for interface adaptor
Part 1 – System Outline
RZQ - Final.book Page 109 Monday, September 20, 2004 11:24 AM
ESIE04-01
7.7
PCB Layout
FBQ35~60B7V1
PCB
1
The illustration below shows the PCB connectors.
X61A X60A
X33A
X11A
X25A
X27A
X15A
X18A
X19A
X21A
3
X17A
4
X10A
X35A
Connectors
Part 1 – System Outline
X5A
X40A
The table below describes the PCB connectors.
Connector
Connected to
Description
X5A
X1M
Terminal strip for P1/P2
X10A
T1R
Transformer secondary side
X11A
T1R
Transformer primary side
X15A
33H
Float switch
X17A
R3T
Coil thermistor
X18A
R2T
Coil thermistor (liquid)
X19A
R1T
Air thermistor
X21A
M1F
Fan motor (power supply)
X25A
M1P
Drain pump motor
X27A
X2M
Power supply & communication
X33A
X1A on KRP1B
Connector for wiring adaptor KRP1B
X35A
X1A on KRP4
Connector to group control adaptor power supply (16VDC) for
optional PCB KRP4
X40A
–
Connector for remote ON/OFF, Forced OFF
X60A
X1A on DTA112
Connection for interface adaptor
X61A
X2A on DTA112
Connection for interface adaptor
5
1–109
RZQ - Final.book Page 110 Monday, September 20, 2004 11:24 AM
PCB Layout
11
7.8
ESIE04-01
FBQ100~125B7V3B
PCB
The illustration below shows the PCB connectors.
X61A X60A
X33A
X11A
X25A
X27A
X15A
3
X18A
X21A
X19A
4
X10A
X35A
Connectors
5
1–110
X40A
X5A
The table below describes the PCB connectors.
Connector
Connected to
Description
X5A
X1M
Terminal strip for P1/P2
X10A
T1R
Transformer secondary side
X11A
T1R
Transformer primary side
X15A
S1L
Float switch
X18A
R2T
Coil thermistor (liquid)
X19A
R1T
Air thermistor
X21A
M1F
Fan motor (power supply)
X25A
M1P
Drain pump motor
X27A
X2M
Power supply & communication
X33A
X1A on KRP1B
Connector for wiring adaptor KRP1B
X35A
X1A on KRP4
Connector to group control adaptor power supply (16VDC) for
optional PCB KRP4
X40A
–
Connector for remote ON/OFF, Forced OFF
X60A
X1A on DTA112
Connection for interface adaptor
X61A
X2A on DTA112
Connection for interface adaptor
Part 1 – System Outline
RZQ - Final.book Page 111 Monday, September 20, 2004 11:24 AM
ESIE04-01
7.9
PCB Layout
FDQ125B7V3B
PCB
1
The illustration below shows the PCB connectors.
X61A
X33A
X11A
X27A
X60A
X31A
X18A
X19A
X21A
X40A
X10A
X35A
Connectors
Part 1 – System Outline
3
4
X5A
The table below describes the PCB connectors.
Connector
Connected to
Description
X5A
X1M
Terminal strip for P1/P2
X10A
T1R
Transformer secondary side
X11A
T1R
Transformer primary side
X18A
R2T
Coil thermistor (liquid)
X19A
R1T
Air thermistor
X21A
K1F
Magnetic contactor of fan motor
X27A
X2M
Power supply & communication
X31A
A3P
PCB
X33A
X1A on KRP1B
Connector for wiring adaptor KRP1B
X35A
X1A on KRP4
Connector to group control adaptor power supply (16VDC) for
optional PCB KRP4
X40A
–
Connector for remote ON/OFF, Forced OFF
X60A
X1A on DTA112
Connection for interface adaptor
X61A
X2A on DTA112
Connection for interface adaptor
5
1–111
RZQ - Final.book Page 112 Monday, September 20, 2004 11:24 AM
PCB Layout
11
7.10
ESIE04-01
FHQ35~60BUV1
PCB
The illustration below shows the PCB connectors.
X61A X60A
X33A
X11A X27A
X14A
X15A
X40A
X20A
3
X23A
X29A
X18A
X25A
X19A
X17A
4
X35A
Connectors
5
1–112
X10A X5A
X24A
X26A
The table below describes the PCB connectors.
Connector
Connected to
Description
X5A
X1M
Terminal strip for P1/P2
X10A
T1R
Transformer secondary side
X11A
T1R
Transformer primary side
X14A
S1Q
Limit switch (Swing flap)
X15A
–
Connector for float switch. When installing the drain pump,
remove the jumper connector of X15A and carry out the additional wiring for float switch and drain pump.
X17A
R3T
Coil thermistor (gas). Not used on 71~125 class.
X18A
R2T
Coil thermistor (liquid)
X19A
R1T
Air thermistor
X20A
M1F
Fan motor (power supply)
X24A
X2A on A3P
X24A is connected when the wireless remote control is used.
X25A
–
Drain pump (option)
X26A
M1F
Fan motor (feedback signal)
X27A
X2M
Power supply & communication
X29A
M1S
Swing flap motor
X33A
X1A on KRP1B
Connector for wiring adaptor KRP1B
X35A
X1A on KRP4
Connector to group control adaptor power supply (16VDC) for
optional PCB KRP4
X40A
–
Connector for remote ON/OFF, Forced OFF
X60A
X1A on DTA112
Connection for interface adaptor
X61A
X2A on DTA112
Connection for interface adaptor
Part 1 – System Outline
RZQ - Final.book Page 113 Monday, September 20, 2004 11:24 AM
ESIE04-01
7.11
PCB Layout
FHQ71~125BUV1B
PCB
1
The illustration below shows the PCB connectors.
X61A X60A
X33A
X11A X27A
X14A
X15A
X40A
X20A
X29A
X18A
X25A
X19A
X35A
Connectors
Part 1 – System Outline
X10A X5A
X24A
3
4
X26A
The table below describes the PCB connectors.
Connector
Connected to
Description
X5A
X1M
Terminal strip for P1/P2
X10A
T1R
Transformer secondary side
X11A
T1R
Transformer primary side
X14A
S1Q
Limit switch (Swing flap)
X15A
–
Connector for float switch. When installing the drain pump,
remove the jumper connector of X15A and carry out the additional wiring for float switch and drain pump.
X18A
R2T
Coil thermistor (liquid)
X19A
R1T
Air thermistor
X20A
M1F
Fan motor (power supply)
X24A
X2A on A2P
X24A is connected when the wireless remote control is used.
X25A
–
Drain pump (option)
X26A
M1F
Fan motor (feedback signal)
X27A
X2M
Power supply & communication
X29A
M1S
Swing flap motor
X33A
X1A on KRP1B
Connector for wiring adaptor KRP1B
X35A
X1A on KRP4
Connector to group control adaptor power supply (16VDC) for
optional PCB KRP4
X40A
–
Connector for remote ON/OFF, Forced OFF
X60A
X1A on DTA112
Connection for interface adaptor
X61A
X2A on DTA112
Connection for interface adaptor
5
1–113
RZQ - Final.book Page 114 Monday, September 20, 2004 11:24 AM
PCB Layout
11
7.12
ESIE04-01
FUQ71~125BUV1B
PCB
The illustration below shows the PCB connectors.
X61A X60A
X11A
X27A
X14A
X15A
X20A
3
X29A
X18A
X25A
X19A
4
X35A
Connectors
5
1–114
X10A X5A
X24A
The table below describes the PCB connectors.
Connector
Connected to
Description
X5A
X1M
Terminal strip for P1/P2
X10A
T1R
Transformer secondary side
X11A
T1R
Transformer primary side
X14A
S1Q
Limit switch swing flap
X15A
S1L
Float switch
X18A
R2T
Coil thermistor (liquid)
X19A
R1T
Air thermistor
X20A
M1F
Fan motor (power supply)
X24A
X2A on A3P
X24A is connected when the wireless remote control is used.
X25A
M1P
Drain pump motor
X27A
X2M
Power supply & communication
X29A
M1S
Swing flap motor
X35A
X1A on KRP4
Connector to group control adaptor power supply (16 VDC) for
optional PCB KRP4
X60A
X1A on DTA112
Connector for interface adaptor
X61A
X2A on DTA112
Connector for interface adaptor
Part 1 – System Outline
RZQ - Final.book Page 115 Monday, September 20, 2004 11:24 AM
ESIE04-01
7.13
PCB Layout
FAQ71BUV1B
PCB
1
The illustration below shows the PCB connectors.
X27A
X20A
3
X30A
X36A
X18A
X19A
Connectors
Connected to
X15A
Part 1 – System Outline
5
X35A
X15A
X24A
The table below describes the PCB connectors.
Connector
4
Description
Connector float switch
X18A
R2T
Coil thermistor (liquid)
X19A
R1T
Air thermistor
X20A
M1F
Fan motor (power supply)
X24A
X2A on A2P
Wireless remote controller connector
X27A
X2M
Power supply & communication
X30A
X1M
Terminal strip for P1/P2
X35A
X1A on KRP4
Connector to group control adaptor power supply (16 VDC) for
optional PCB KRP4
X36A
M1S
Swing flap motor
1–115
RZQ - Final.book Page 116 Monday, September 20, 2004 11:24 AM
PCB Layout
11
7.14
ESIE04-01
FAQ100BUV1B
PCB
The illustration below shows the PCB connectors.
X61A X60A
X27A
3
X11A
X19A
4
5
X98A
X20A
X24A X35A
X25A X29A
X5A X10A
Connectors
X14A X15A
X18A
The table below describes the PCB connectors.
Connector
Connected to
Description
X5A
X1M
Terminal strip for P1/P2
X10A
X2A on A2P
Transformer PCB (secondary side)
X11A
X1A on A2P
Transformer PCB (primary side)
X14A
S1Q
Limit switch swing flap
X15A
1–116
X26A
Connector float switch
X18A
R2T
Coil thermistor (liquid)
X19A
R1T
Air thermistor
X20A
M1F
Fan motor (power supply)
X24A
X2A on A3P
X24A is connected when the wireless remote control is used.
X25A
M1P
Drain pump motor
X26A
M1F
Fan motor( feedback signal)
X27A
X2M
Power supply & communication
X29A
M1S
Swing flap motor
X35A
X1A on KRP4
Connector to group control adaptor power supply (16 VDC) for
optional PCB KRP4
X60A
X1A on DTA112
Connector for interface adaptor
X61A
X2A on DTA112
Connector for interface adaptor
X98A
C1
Capacitor for fan motor
Part 1 – System Outline
RZQ - Final.book Page 1 Monday, September 20, 2004 11:24 AM
ESIE04-01
4
Part 2
Functional Description
What is in this part?
This part contains information on the functions used to control the system. Understanding these
functions is vital when diagnosing a malfunction that is related to the functional control.
Overview
This part contains the following chapters:
2
3
Chapter
See page
1–General Functionality
2–3
2–Indoor Unit Functional Concept
2–25
3–Outdoor Unit Functional Concept
2–35
4
5
Part 2 – Functional Description
2–1
RZQ - Final.book Page 2 Monday, September 20, 2004 11:24 AM
ESIE04-01
1
2
3
5
2–2
Part 2 – Functional Description
RZQ - Final.book Page 3 Monday, September 20, 2004 11:24 AM
ESIE04-01
General Functionality
Part 2
1
1
General Functionality
2
1.1
What Is in This Chapter?
Introduction
This chapter will explain all functions not related to the compressor frequency control, outdoor unit fan
control and expansion valve control. These functions have been programmed to ensure the unit's
reliability and lifetime, enable the operation in case of malfunction, or increase the customer's comfort.
Overview
This chapter contains the following topics:
Topic
See page
1.2–Functions of Thermistors
2–4
1.3–Forced Operating Mode (Emergency Operation)
2–6
1.4–Outdoor Unit Identification Function
2–8
1.5–Simulated Operation Function
2–9
1.6–Restart Standby
2–10
1.7–Automatic Restart
2–11
1.8–Using Conditions for Remote Controller Thermostat
2–12
1.9–Forced Thermostat OFF
2–13
1.10–Test run control
2–14
1.11–4-way Valve Control
2–15
1.12–Pump Down Residual Operation
2–16
1.13–Pump Down Operation
2–17
1.14–Defrost Operation
2–18
1.15–Freeze Prevention Function
2–20
1.16–PMV Control
2–21
1.17–Preheating Operation Control
2–22
1.18–Crankcase Heater Control
2–23
Part 2 – Functional Description
3
4
5
2–3
RZQ - Final.book Page 4 Monday, September 20, 2004 11:24 AM
General Functionality
1
1.2
ESIE04-01
Functions of Thermistors
Locating the
thermistors
.
Remark
Sensor R3T on indoor coil of FCQ35~60B7V1, FFQ35~60BV1, FBQ35~60B7V1 & FHQ35~60BUV1
is not used when the indoor units are connected to RZQ outdoor units.
2
3
4
5
Functions of the
thermistors
Thermistor
1
Location
Indoor
heat
exchanger
Wiring
symbol
Mode
Function
R2T
Cooling
P
Compressor frequency control (target Te)
P
Inverter current protection control
P
Freeze-up control
P
Compressor frequency control (target Tc)
P
Inverter current protection control
P
Hot start control
P
Peak cut-off
P
Thermostat control
P
PMV control
P
General frequency control
P
Thermostat control
P
PMV control
P
General frequency control
Cooling
P
Inverter current protection control
Heating
P
Inverter current protection control
P
Defrost control
Heating
2
Indoor air
return
R1T
Cooling
Heating
3
2–4
Outdoor
heat
exchanger
R2T
Part 2 – Functional Description
RZQ - Final.book Page 5 Monday, September 20, 2004 11:24 AM
ESIE04-01
General Functionality
Thermistor
4
Location
Outdoor
ambient
Wiring
symbol
Mode
Function
R1T
Cooling
P
Outdoor fan speed control
P
PMV control
P
Pressure difference control
P
Overall current protection control
P
Preheating operation control (RZQ71)
P
Defrost control
P
PMV control
P
Forced thermostat OFF
P
Overall current protection control
P
Preheating operation control (RZQ71)
P
Discharge superheat control
P
Expansion valve control
P
Crankcase heater / preheating control
P
Expansion valve control
P
Crankcase heater / preheating control
Cooling
P
Expansion valve control (SH control)
Heating
P
Expansion valve control (SH control)
P
Suction pipe superheat protection control
P
Outdoor fan speed control
P
Inverter fin temperature control
P
Pressure difference control
P
Inverter fin temperature control
Heating
5
Discharge
pipe
R3T
Cooling
Heating
6
7
Suction
pipe
Inverter
power
module
R4T
R5T
Cooling
Heating
Part 2 – Functional Description
1
2
3
4
5
2–5
RZQ - Final.book Page 6 Monday, September 20, 2004 11:24 AM
General Functionality
1
1.3
ESIE04-01
Forced Operating Mode (Emergency Operation)
Purpose
The table below describes the purpose of the forced operating mode.
If...
2
3
Starting conditions
Then...
P
R/C is defective
P
Indoor PCB is defective
P
Outdoor PCB is defective
Forced operating mode can be used to go to cooling or heating. In forced operating mode, the compressor is forced to
operate until the defective indoor or outdoor PCB is back
online.
You can operate the system manually by changing the emergency switch on the indoor and outdoor
PCB from "normal" to "emergency". When the system is operating in "emergency" it can not control
the room temperature.
Both the indoor and outdoor unit must be set to "emergency" while the power is off.
4
Ending conditions
You can end the emergency operation by changing the "emergency" switch back to "normal" while the
power is OFF.
Emergency
operation
Below table explains what will happen when the switch is set to "emergency":
5
Changing the switch to "emergency" for the…
Switches ON the…
Indoor unit
P
Indoor fan§
P
Drain pump
P
Compressor§
P
Outdoor fan(s)
Outdoor unit
How to set
Emergency
Operation
To set emergency operation, proceed as follows:
Step
Action
1
Turn OFF the power.
2
Switch ON the emergency switch (SS1) on the indoor PCB.
Normal
Emergency
2–6
Part 2 – Functional Description
RZQ - Final.book Page 7 Monday, September 20, 2004 11:24 AM
ESIE04-01
General Functionality
Step
Action
3
Switch ON the emergency switch on the outdoor PCB.
1
2
4
Set the emergency switch on the outdoor PCB to the forced mode you prefer (Cooling or
Heating).
3
4
5
Turn ON the power supply.
5
Active components
Additional info
Component
Forced cooling
Forced heating
Forced defrosting
Compressor
ON
ON
ON
4-way valve
OFF
ON
OFF
Outdoor unit fan
H fan speed
H fan speed
OFF
Indoor unit fan
H fan speed
H fan speed
H fan speed
Drain pump
ON
OFF
ON
P
During emergency operation, do not attempt to operate the equipment from the remote controller.
The remote controller shows "88" while the emergency operation is active on the indoor unit
P
If a safety device is activated during emergency, all actuators are turned OFF
P
In cooling, the unit runs for 20min and then stops for 10min in order to avoid freeze-up of the indoor
coil.
P
In heating, defrost is activated for 3 minutes once every hour.
P
Emergency operation can not be carried out when the PCB board itself is defective.
P
Be sure to set the emergency switch on both the outdoor and indoor unit.
P
The unit will not regulate the temperature during emergency operation.
P
Change the position of the emergency switch only when the power is turned off.
Part 2 – Functional Description
2–7
RZQ - Final.book Page 8 Monday, September 20, 2004 11:24 AM
General Functionality
1
2
1.4
ESIE04-01
Outdoor Unit Identification Function
Purpose
The purpose of the outdoor unit identification function is to enable the indoor unit to automatically
determine which operating mode has to be set in function of the type of connected outdoor unit (c/o or
h/p).
Operating modes
The possible operating modes are:
Outdoor unit
Operating modes
h/p
P
Fan
P
Cooling
P
Dry keep
P
Heating
P
Fan
P
Cooling
P
Dry keep
3
c/o
4
Used input
5
The outdoor unit identification function uses the following inputs:
Input
Connection on
indoor PCB
Connection on
outdoor PCB
Indoor PCB
TC & RC
—
Outdoor PCB
—
TC & RC
TC: Transmission circuit
RC: Receiving circuit
2–8
Part 2 – Functional Description
RZQ - Final.book Page 9 Monday, September 20, 2004 11:24 AM
ESIE04-01
1.5
General Functionality
Simulated Operation Function
1
Outline
When a malfunction on one of the below thermistors occurs, operation will continue while displaying
the applicable alarm on the remote-controller. Fin thermistor malfunction is only displayed when
pressing the "Inspection" button on the remote-controller.
Sensors
P
Outside temperature thermistor
P
Outdoor heat exchanger thermistor
P
Fin thermistor
P
Discharge pipe thermistor
P
Indoor unit air suction thermistor
P
Indoor heat exchanger thermistor
Remark
2
3
Simulated operation will not be conducted in case the low pressure sensor or suction thermistor is
malfunctioning.
4
5
Part 2 – Functional Description
2–9
RZQ - Final.book Page 10 Monday, September 20, 2004 11:24 AM
General Functionality
1
1.6
Outline
2
ESIE04-01
Restart Standby
To prevent the compressor from frequently turning ON and OFF and allow pressure equalization,
forced thermostat OFF will be conducted for 3 minutes after compressor stopping (compressor guard
timer).
Graph
Thermostat OFF
Compressor
Restart standby
complete
ON
OFF
3
Electronic expansion valve
OFF
Oudoor unit fan
4
Moves to “Stop” or
“Starting control” after
completion of “Restart
standby”.
ON
OFF
Residual
operation
For 3 minutes
5
2–10
Part 2 – Functional Description
RZQ - Final.book Page 11 Monday, September 20, 2004 11:24 AM
ESIE04-01
1.7
General Functionality
Automatic Restart
Purpose
1
The purpose of the auto-restart function is to automatically resume the same operating mode as when
the unit was operating when the power supply is restored after a power failure.
Do not use the "Automatic Restart" function to daily start/stop the unit.
Precautions when
turning OFF power
P
When you have to turn OFF the power supply in order to carry out maintenance, make sure to turn
the remote control's ON/OFF switch OFF firstly.
P
If you turn OFF the power supply while the remote control's ON/OFF switch is still ON, the
"automatic restart function" automatically starts the indoor fan immediately and the outdoor unit fan
starts automatically 3 minutes after the power supply is turned back ON.
P
Do not start/stop the unit by disconnecting the power supply.Stop the unit by stop commando from
the remote controller or optional controller before disconnecting the power supply. Be sure that the
compressor and the outdoor fans are stopped before disconnecting the power supply so the
"Refrigerant Recovery function" has been finished correctly.
P
When restarting the unit after the power was disconnected for a longer period leave the unit OFF
with the power supply connected for about half an hour (See "Crankcase Heater Control" &
"Preheating Operation Control").
2
3
4
5
Part 2 – Functional Description
2–11
RZQ - Final.book Page 12 Monday, September 20, 2004 11:24 AM
General Functionality
1
2
1.8
Using Conditions for Remote Controller Thermostat
Applicable
The remote control thermostat is only available in wired remote controls.
Method
Unlike with VRV units, the remote control sensor is standard disabled for sky-air units. The use of the
remote control sensor can be enabled by changing field setting 10(20)-2-02 to 10(20)-2-01.
Conditions
The table below contains the condition in which the remote control thermostat is not used:
3
4
ESIE04-01
Cooling
Condition
The remote controller thermostat is not used when...
1
The remote controller thermostat malfunctions.
2
Group control is used.
3
The set temperature / air suction temperature combination is out of range. (See
below graph)
The diagram below shows the operation range of the set temperature / air suction temperature
combination in cooling operation:
ts: Set temp.
(°C)
Remote controller thermostat
operation range
5
Differential zone
th: Suction air temp.
(°C)
Heating
The diagram below shows the operation range of the set temperature / air suction temperature
combination in heating operation:
ts: Set temp.
(°C)
Remote controller thermostat
operation range
Differential zone
th: Suction air temp.
(°C)
2–12
Part 2 – Functional Description
RZQ - Final.book Page 13 Monday, September 20, 2004 11:24 AM
ESIE04-01
1.9
General Functionality
Forced Thermostat OFF
Outline
The unit will perform the forced thermostat off function in following conditions:
Condition 1
(cooling)
Thermostat off due to freeze-up prevention.
1
Prevent the indoor unit heat exchanger from freezing in cooling operation when one of the below
conditions is applicable:
Condition 2
(heating)
P
Indoor unit heat exchanger temperature < -5°C for 1 minute continuously.
P
Indoor unit heat exchanger temperature < -1°C for 40 minutes accumulated.
Thermostat off due to high outdoor temperature.
When the outside temperature is > 30°CDB in heating mode, the unit will conduct a forced thermostat
off operation to protect the system.
Reference
"Freeze Prevention Function". Refer to page 2-20.
2
3
4
5
Part 2 – Functional Description
2–13
RZQ - Final.book Page 14 Monday, September 20, 2004 11:24 AM
General Functionality
1
2
1.10
ESIE04-01
Test run control
Purpose
When operating the RZQ units for the first time after installation, the unit will - depending on the
selected operation mode - perform a test run operation first.
Situation 1
Cooling - first operation after installation in "Cooling mode"
Cooling thermostat
ON
3
Situation 2
4
Situation 3
5
Situation 4
Cooling operation in
"Test run mode" for 3
minutes
Cooling operation in
forced thermostat
ON.
Heating - first operation after installation in "Heating mode"
Heating thermostat
ON
Cooling operation in
test run mode for 3
minutes
Normal heating
operation
Heating - first operation after installation in "Test run mode"
Heating Operation by
Test run button
2–14
Normal cooling
operation
Cooling - first operation after installation in "Test run mode"
Cooling Operation by
Test run button
Remarks
Cooling operation in
"Test run mode" for 3
minutes
Cooling operation in
test run mode for 3
minutes
Heating operation in
forced thermostat
ON.
P
When running in test run mode, the unit will sense on site installation parameters (e.g.: failure to
open stop valves,..) and indicate the applicable malfunction code if required.
P
If the remote controller shows E3, E4 or L8 as an error code, there is possibility that either the stop
valve is closed or the air flow outlet is obstructed.
P
Check the inter unit branch wiring connection (1-2-3 wiring) when the error code U4 or UF is
displayed on the remote controller.
P
This "Test Run Control" function is only performed after first power on at installation or after first
power on after a pump down by using the pump down switch is.
Part 2 – Functional Description
RZQ - Final.book Page 15 Monday, September 20, 2004 11:24 AM
ESIE04-01
1.11
General Functionality
4-way Valve Control
Purpose
Method
Time chart
1
The purpose of the 4-way valve control is to control how the superheated refrigerant passes through
the 4-way valve. The 4-way valve control carries out the changeover switching of the 4-way valve. This
changeover switching is only carried out during operation, because a certain pressure difference is
required to move the internal cylinder.
When...
Then the 4-way valve connects the outlet of the compressor with...
Cooling
Outdoor heat exchanger
Heating
Indoor heat exchanger
3
The table below describes the 4-way valve control operation.
In...
The 4-way valve is...
Heating, except for defrosting
ON
P
Cooling
P
Dry keep
P
Defrosting
2
OFF
4
The time chart below illustrates the 4-way valve control.
Compressor
Unit mode
Cooling/Dry
Heating
Defrosting
ON
OFF
4-way valve
ON
OFF
Part 2 – Functional Description
5
ON
OFF
2–15
RZQ - Final.book Page 16 Monday, September 20, 2004 11:24 AM
General Functionality
1
1.12
Pump Down Residual Operation
Outline
2
ESIE04-01
The unit will conduct a pump down residual operation after each compressor stop command.
Purpose of this function is to collect the refrigerant in the liquid receiver and outdoor heat exchanger
in order to prevent liquid refrigerant from remaining in the indoor heat exchanger.
Parameters
Compressor
3
Expansion valve
RZQ71B
RZQ100~125B
38 Hz
41 HZ
85 to 0 pulses (after 20 seconds)
Graph
4
5
Ending condition
P
30 seconds have elapsed since start of residual operation
OR
2–16
P
LP < 1 bar (in cooling)
P
LP < 0.2 bar (in heating)
Part 2 – Functional Description
RZQ - Final.book Page 17 Monday, September 20, 2004 11:24 AM
ESIE04-01
1.13
General Functionality
Pump Down Operation
Outline
1
Whenever the units need to be moved or removed, perform a pump-down operation before
disconnecting the field piping. By performing a pump-down operation, all of the refrigerant will be
collected in the outdoor unit.
2
Procedure
Procedure
1
Start "Fan only operation" from the remote
controller.
Confirm that both the liquid and gas stop
valves are open.
2
Push the pump-down button BS1 on the
outdoor PCB.
Compressor and outdoor fan will start
automatically.
3
Once the operation stops (after 3~5 minutes) close the liquid gas stop valve first
and then the gas stop valve.
After the "Pump Down Operation" has
been finished the wired remote controller
screen may be blank or show "U4" error
indication.It will not be able to start the unit
from the remote controller without switching OFF the power supply first.
Cautions
Precautions
3
Make sure the stop valves are opened
before restarting the unit.
4
P
Pressing the pump down switch (BS1) on the outdoor PCB may cause the outdoor and indoor fan
to start operating automatically.
P
Be sure to open the stop valves after the pipe work has been finished. Be sure not to operate the
unit with closed stop valves, or the compressor may brake down.
Part 2 – Functional Description
2–17
5
RZQ - Final.book Page 18 Monday, September 20, 2004 11:24 AM
General Functionality
1
2
1.14
ESIE04-01
Defrost Operation
Outline
When the unit is operating in heating mode, a defrost operation will be conducted in order to avoid ice
formation on the outdoor unit heat exchanger.
Defrost starting
conditions
Defrost will start when the following conditions have been realized:
P
3
Integrated compressor running time is 25 minutes or more since
the completion of the previous defrost operation.
&
P
Defrost upper limit time A is met.
P
Low pressure saturated temperature (Te) is within the
defrost requesting area.
P
Outdoor unit heat exchanger area temperature (Tb) is
within the defrost requesting area.
OR
4
Defrost prohibiting area
Evaporating temperature Te (°C)
or
Outdoor unit heat exchanger temperature Tb (°C)
5
Outdoor
Temp. TA °C
When slightly quick defrost
starting is set
Factory setting
When slightly slow defrost
starting is set
When slightly quick defrost
starting is set
Factory setting
When slightly quick defrost
starting is set
Defrost permitting area
Defrost requesting area
Areas
2–18
Defrost upper limit A
When quick defrost
starting is set
16(26)-3-03
Factory setting
16(26)-3-01
When slow defrost
starting is set
16(26)-3-02
Outdoor temperature
> -5°C
40 minutes
3 hours
6 hours
Outdoor temperature
≤ -5°C
40 minutes
6 hours
8 hours
Part 2 – Functional Description
RZQ - Final.book Page 19 Monday, September 20, 2004 11:24 AM
ESIE04-01
General Functionality
1
Defrost control
Defrosting complete
Defrosting start
Previous control
A Hz
B Hz
Compressor
2
C Hz
4-way valve
ON
ON
OFF
Motorized valve
150 pls
480 pls
0 pls (5~60 seconds)
Outdoor unit fan
3
(wet protection control)
ON
0 pls (15 seconds)
ON
4
OFF
Indoor fan
ON
ON
OFF
Defrost ending
condition
RZQ71
RZQ100&125
A Hz
162 Hz
174 Hz
B Hz
122 Hz
164 Hz
C Hz
48 Hz
72 Hz
5
The defrost cycle will be ended when one of the following conditions have been reached minimum 1
minute after defrost start :
P
Outdoor unit heat exchanger temperature ≥ 10°C
P
High pressure ≥ 24.5 bar (calculated from LP, inv frequency and PI)
P
10 minutes have elapsed since start of defrost operation
Part 2 – Functional Description
2–19
RZQ - Final.book Page 20 Monday, September 20, 2004 11:24 AM
General Functionality
1
2
1.15
ESIE04-01
Freeze Prevention Function
Purpose
In order to avoid formation of ice on the indoor unit heat exchanger in cooling and dry mode, the
system automatically starts up a freeze prevention cycle when a number of specific conditions are
fulfilled.
Freeze Prevention
start conditions
Freeze prevention start decided by the indoor unit (factory setting):
P
Indoor coil temperature ≤ -1°C for 40 minutes accumulated
OR
&
3
Freeze Prevention
stop conditions
4
Indoor coil temperature < A°C for 1 minute continuous
P
Compressor is running for minimum 8 minutes since
operation start or end of previous freeze up cycle.
Freeze prevention stop decided by the indoor unit (factory setting):
P
Indoor coil temperature > 7°C for 10 minutes continuous
Parameters
A
5
P
Reference
2–20
FAQ
FHQ
All except FAQ & FHQ
-1°C
-3°C
-5°C
Please refer to "Outdoor Field Settings" in Part 4 "Commissioning and Test Run" for details on possible
use of EDP room settings in case of low latent heat applications. (See page 4-23)
Part 2 – Functional Description
RZQ - Final.book Page 21 Monday, September 20, 2004 11:24 AM
ESIE04-01
1.16
Outline
General Functionality
PMV Control
1
When the automatic mode is selected on the remote-controller, the unit will automatically activate the
PMV control.
The PMV index is a calculated average comfort level.
2
Refer to ISO 7730 for details.
Function
An optimized indoor temperature will be calculated using the following inputs:
P
Outdoor air temperature
P
Indoor air temperature
P
Remote controller set temperature
3
In practice, the set point will be moved with 1 or 2 degrees whenever the conditions change. This will
result in a combination of power saving and increased comfort level.
PMV control can be disabled by changing the field settings:
From: 11(21)-4-01 to: 11(21)-4-02
4
5
Part 2 – Functional Description
2–21
RZQ - Final.book Page 22 Monday, September 20, 2004 11:24 AM
General Functionality
1
2
1.17
ESIE04-01
Preheating Operation Control
Applicable units
RZQ71
Outline
After the compressor has been turned off, the preheating operation will be activated in order to avoid
refrigerant from dissolving in the compressor oil.
Trigger conditions
3
Starting conditions &
4
Ending conditions or
P
Power supply ON to First operation
60 minutes or more elapsed after compressor stop
P
or
P
T2 (Discharge pipe temperature) < 20°C
P
Ta (Outside temperature) < 20°C
P
T2 (Discharge pipe temperature) > 23°C
P
Ta (Outside temperature) > 23°C
P
Thermostat ON confirmation
P
5
2–22
Part 2 – Functional Description
RZQ - Final.book Page 23 Monday, September 20, 2004 11:24 AM
ESIE04-01
1.18
General Functionality
Crankcase Heater Control
1
Applicable units
RZQ100 & 125
Outline
After the compressor has been turned off, the crankcase heater control will be activated in order to
avoid refrigerant from dissolving in the compressor oil.
2
Trigger conditions
ON
3
OFF
70°C
75°C
Discharge pipe temperature
4
5
Part 2 – Functional Description
2–23
RZQ - Final.book Page 24 Monday, September 20, 2004 11:24 AM
General Functionality
ESIE04-01
1
2
3
4
5
2–24
Part 2 – Functional Description
RZQ - Final.book Page 25 Monday, September 20, 2004 11:24 AM
ESIE04-01
Indoor Unit Functional Concept
Part 2
2
1
Indoor Unit Functional Concept
2
2.1
What Is in This Chapter?
Introduction
This chapter will explain more details about the various functions that are programmed for the Sky-Air
R410A inverter indoor units.
Overview
This chapter contains the following topics:
Topic
See page
2.2–Thermostat Control
2–26
2.3–Drain Pump Control
2–27
2.4–Condensation Avoidance Control
2–29
2.5–Draft Avoidance Control 1
2–30
2.6–Draft Avoidance Control 2
2–31
2.7–Fan and Flap Operations
2–32
2.8–Indoor unit fan control
2–33
Part 2 – Functional Description
3
4
5
2–25
RZQ - Final.book Page 26 Monday, September 20, 2004 11:24 AM
Indoor Unit Functional Concept
1
2
2.2
ESIE04-01
Thermostat Control
Purpose
Based on the information received from the air return sensor, the thermostat control will decide the
required operation status of the system.
Thermostat control
Cooling mode:
Set point
Thermostat ON
–0.5 K
+1 K
Thermostat OFF
3
Heating mode:
Set point
Thermostat ON
4
+0.5 K
Thermostat OFF
–1 K
Cool / heat changeover in automatic mode:
Set point
5
–2 K
Automatic heating
Preventing
thermostat OFF
conditions
Remark:
Automatic cooling
+2 K
The thermostat control prevents the thermostat from turning OFF in the following conditions:
P
Initial operation for the first 2.5 minutes, or
P
Defrosting, or
P
Forced operating mode
The thermostat control will be changed when using field settings for low humidity applications, setting
16(26)-2-03 & 16(26)-2-04.
See "Part 4–Commissioning and Test Run" for details.
2–26
Part 2 – Functional Description
RZQ - Final.book Page 27 Monday, September 20, 2004 11:24 AM
ESIE04-01
2.3
Indoor Unit Functional Concept
Drain Pump Control
1
Purpose
Control the water draining from the drain pan.
Starting conditions
The drain pump control starts the drain pump motor when one of the following conditions is fulfilled:
Normal control
P
Cooling operation is activated
P
Abnormal high water level is detected in the drain pan
2
In normal control, the drain pump is turned ON at compressor starting and turned OFF 5 minutes after
the compressor has stopped (residual operation).
3
5 min
ON
Drain pump
OFF
4
ON
Compressor
OFF
Float switch
activation during
thermostat OFF
5
When an abnormal drain level is detected in the drain pan, the float switch opens:
1
The thermostat stays forced OFF.
2
The drain pump starts to operate for minimum 10 minutes (even if abnormality is solved within the
10 minutes).
3
If the float switch closes again within 80 seconds, cooling operation can restart within the 10
minutes recovery period.
Water level
abnormality
Float switch
Normal
ON
Compressor
Drain pump
OFF
ON
OFF
5 min
5s
5 min
Abnormal
Error processing
Part 2 – Functional Description
Normal
1 min 20
2–27
RZQ - Final.book Page 28 Monday, September 20, 2004 11:24 AM
Indoor Unit Functional Concept
1
Float switch
activation during
thermostat ON
ESIE04-01
1
The thermostat is immediately turned OFF.
2
The drain pump continues to operate for minimum 10 minutes (even if abnormality is solved within
the 10 minutes).
3
If the float switch closes again within 80 seconds, cooling operation can restart within the 10
minutes recovery period.
2
Water level
abnormality
Float switch
Normal
ON
Compressor
3
OFF
ON
Drain pump
OFF
5 min
5s
5 min
Abnormal
Error processing
4
Normal
Used inputs
Input
Connection on indoor PCB
Float switch (33H)
X15A
Connection on outdoor PCB
—
5
2–28
Part 2 – Functional Description
RZQ - Final.book Page 29 Monday, September 20, 2004 11:24 AM
ESIE04-01
2.4
Indoor Unit Functional Concept
Condensation Avoidance Control
1
Purpose
Avoid condensation on the swing flap when the most downward position of the swing flap (position 4)
is selected on the remote controller.
Applicable units
This function is applicable for the FHQ units only.
Method
The condensation avoidance control will function in the following operating modes:
Method
P
Cooling (automatic)
P
Dry keep.
2
3
To avoid condensation on the swing flap, the condensation avoidance control is activated:
Stage
Description
1
The fan operates in cooling mode with the blade in downward position (set on the remote
control).
5
2
After 30 min, the blade moves to a horizontal position.
3
After 1 h operation in horizontal position, the blade moves back to its downward position
for 30 min.
4
The unit operation is reset by:
Part 2 – Functional Description
P
Changing the operating mode into “heating” or “fan”
P
Changing the air flow direction
P
Turning the unit operation OFF and ON.
4
2–29
RZQ - Final.book Page 30 Monday, September 20, 2004 11:24 AM
Indoor Unit Functional Concept
1
2
2.5
ESIE04-01
Draft Avoidance Control 1
Purpose
Avoid draft for the customer by delaying transfer of the flap to the Po0 (horizontal) position for a certain
amount of time when defrosting and in heating thermostat OFF.
Heating thermostat
OFF
The time chart below illustrates the draft avoidance control 1 in heating thermostat OFF.
When the flap starts to move, there can be
a draft. The fan speed decreases to LL
speed but it takes some time because of
its inertia.
Setting
Fan
3
LL
Setting
Flap
Po0
Po0
20 s
ON
Thermostat
Flap motor starts
to drive the flap.
OFF
Flap moves from
setting position to Po0
4
Defrosting
5
The time chart below illustrates the draft avoidance control 1 in defrosting.
Fan
Flap
When the flap starts to move, there can be
a draft. The fan speed decreases to LL
speed but it takes some time because of
its inertia.
Setting
Off
Setting
Po0
Po0
20 s
Defrosting
Used inputs
2–30
Yes
Flap motor starts
to drive the flap.
No
Flap moves from
setting position to Po0
The draft avoidance control 1 uses the following inputs:
Input
Connection on
indoor PCB
Connection on
outdoor PCB
Limit switch for flap
33S
—
No. of fan turns
X26A
—
Outdoor heat exchanger thermistor (defrost control)
—
R2T
Part 2 – Functional Description
RZQ - Final.book Page 31 Monday, September 20, 2004 11:24 AM
ESIE04-01
2.6
Indoor Unit Functional Concept
Draft Avoidance Control 2
1
Purpose
The purpose of the draft avoidance control 2 is to avoid draft when the flap is moving.
Starting conditions
The draft avoidance control 2 is activated when:
Time chart
P
Hot start is finished, or
P
Cold air prevention control is finished.
2
If the fan speed is set to "H", the fan turns at low speed for a certain amount of time.
Fan
3
H
L
OFF/LL
Flap
Setting
T = 24 s
FCQ: T = 5s
Po0
T
4
Hot start finished
Used input
Draft avoidance control 2 uses the following inputs:
Input
Connection on
indoor PCB
Connection on
outdoor PCB
Limit switch for flap
33S
—
No. of fan turns
X26A
—
Part 2 – Functional Description
2–31
5
RZQ - Final.book Page 32 Monday, September 20, 2004 11:24 AM
Indoor Unit Functional Concept
1
2.7
Fan and Flap Operations
Cooling operation
2
3
4
ESIE04-01
Function
The table below contains the fan and flap operations.
In…
Thermostat ON
in Dry Keep
Mode
Swing operation
Thermostat
OFF in Dry
Keep Mode
Swing operation
Thermostat
OFF in Cooling
Mode
Swing operation
Stop (Error)
Swing operation
Fan
L
Airflow direction setting
OFF
Airflow direction setting
Set
Airflow direction setting
OFF
Airflow direction setting
Freeze-prevention
Swing operation
OFF(*)
Airflow direction setting
Flap (FCQ and
FHQ)
Flap (FAQ)
Remote control
indication
Swing
Swing
Swing
Set position
Set position
Set position
Horizontal
Horizontal
Swing
Set position
Set position
Set position
Horizontal
Horizontal
Swing
Set position
Set position
Set position
Horizontal
Downward
---
Set position
Downward
Horizontal
Horizontal
Swing
Set position
Set position
Set position
(*) LL operation on cassette type units
5
Heating operation
Function
The table below contains the fan and flap operations.
In…
Fan
OFF
Flap (FCQ and
FHQ)
Horizontal
Flap (FAQ)
Horizontal
Remote control
indication
Hot start after
defrost
Swing operation
Swing
Airflow direction setting
Set position
Defrost
Swing operation
Swing
Airflow direction setting
Set position
Thermostat
OFF
Swing operation
LL
Airflow direction setting
Set position
Hot start after
thermostat OFF
(cold air prevention)
Swing operation
Swing
Airflow direction setting
Set position
Stop (error)
Swing operation
OFF
Airflow direction setting
Overload thermostat OFF
2–32
Swing operation
Airflow direction setting
Swing
Fully closed (horizontal)
---
Fully closed
LL
Horizontal
Swing
Set position
Part 2 – Functional Description
RZQ - Final.book Page 33 Monday, September 20, 2004 11:24 AM
ESIE04-01
2.8
Indoor Unit Functional Concept
Indoor unit fan control
Outline
Before compressor
stop
1
During compressor start and stop control, the indoor fan will receive instruction from the outdoor unit
in order to protect the compressor from receiving liquid and to assure a smooth compressor start up:
P
Indoor fan control before compressor stop
P
Indoor fan control during compressor stop
P
Indoor fan control before compressor startup
P
Indoor fan control at compressor startup
2
After thermostat off or remote-controller signal off has been sent from the outdoor unit to the indoor
unit, the compressor will keep on running for a period of time in order to execute the "residual pump
down operation". During this pump down operation, the indoor fan will keep on operating.
Purpose:
P
Cooling: Minimize the remaining refrigerant amount in indoor unit heat exchanger
P
Heating: Lower the high pressure by avoiding high temperature build up around the indoor unit heat
exchanger.
Indoor fan tap
Indoor cooling / Automatic
cooling
Thermostat OFF
L
Remote controller OFF
LL
Indoor heating / Automatic
heating
Thermostat OFF
LL
Remote controller OFF
LL
Indoor drying
Thermostat OFF
LL
Remote conntrolle OFF
LL
Indoor fan tap
Thermostat OFF
Remote controller setting
Indoor heating / Automatic
heating
Thermostat OFF
Remote controller OFF
OFF
Indoor drying
Thermostat OFF
OFF
Remote controller OFF
OFF
Remote controller OFF
OFF
LL
Before compressor
startup
Indoor fan tap
Indoor cooling / Automatic cooling
Remote controller setting
Indoor heating / Automatic heating
OFF
Indoor drying
Part 2 – Functional Description
4
5
During compressor
stop
Indoor cooling / Automatic
cooling
3
L
2–33
RZQ - Final.book Page 34 Monday, September 20, 2004 11:24 AM
Indoor Unit Functional Concept
1
At compressor
startup
2
ESIE04-01
P
In cooling: The indoor fan is operated at low speed until the low-pressure value reaches 6 bar.
P
In heating: Hot startup controlWhen performing a startup, or after the defrosting cycle has been
completed, the indoor fan will be controlled as to prevent cold air draft and secure the starting
performance (quick pressure build-up).
Indoor unit fan: OFF
Heating operation is turend on with remote controller.
Indoor unit fan: LL tap
3
Condition A is met.
Indoor unit fan: L tap
4
Condition B is met.
Indoor unit fan: M tap
(Continuing L tap on indoor unit without M tap equipped)
Condition C is met.
5
Indoor unit fan: Set fan speed
2–34
Condition A
Condition B
Condition C
Indoor unit h/e temp > 34°C
O
O
O
Indoor unit h/e temp > indoor suction air temp
+17°C (+12°C if outside temperature is < 5°C)
O
O
---
Indoor unit h/e temp > indoor suction air temp
+22°C (+20°C if outside temperature is < 5°C)
---
---
O
3 minutes elapsed after compressor startup
O
---
---
5.5 minutes elapsed after compressor startup
---
O
---
10.5 minutes elapsed after compressor startup
---
---
O
Part 2 – Functional Description