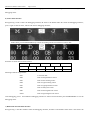
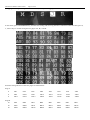
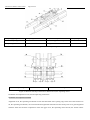
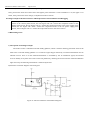
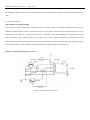
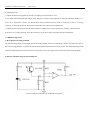
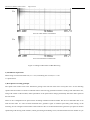
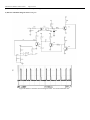
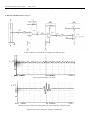
1
Standalone Bill Counter
Maintenance Manual
Version No.: 1.0 Category No.: 1.0
CTcoin A/S
Denmark
Maintenance Manual of Bill Counter
Contents
Overview ................................................................................................................................................................................... 4
Required Tools and Instruments for Maintenance ..................................................................................................................... 4
Introduction to the Whole Unit .................................................................................................................................................. 5
3.1Technical Specification of the Whole Unit ................................................................................................................... 6
3.2 Principle and function of the bill rubbing mechanism ................................................................................................. 7
3.3 Function of the conveyance mechanism ...................................................................................................................... 7
3.4 Sensors and detection of their signals.......................................................................................................................... 7
3.5 Handling and control of signals by the single-chip computer ..................................................................................... 8
3.6 Power supply and power system ................................................................................................................................. 8
Operation and Application ......................................................................................................................................................... 9
4.1 Key functions............................................................................................................................................................... 9
4.2 Operation method ........................................................................................................................................................ 9
4.3 Functional setting ...................................................................................................................................................... 10
4.4 Machine Debugging Interface ................................................................................................................................... 11
4.5 Interfaces for special operational functions ............................................................................................................... 17
4.7 Method for uploading data ........................................................................................................................................ 22
Disassembly Process of the Whole Unit .................................................................................................................................. 22
Installation Requirements for the Mechanical Part and Adjustment of Parameters ................................................................ 23
6.2 Synchronization of the Friction Wheel and Feeding Wheel ...................................................................................... 25
6.3 Positioning of the “Bill Feeding Gate” Adjustment Knob (see Figure 9).................................................................. 25
Working Principle of the Electrical Part and Requirement of its Installation and Debugging ................................................ 26
7.1 Bill feeding sensor ..................................................................................................................................................... 26
7.2 Left/Right Counting Sensors and Left/Right Penetration Sensors ............................................................................ 29
7.3 Fluorescence sensor ................................................................................................................................................... 31
7.4 Bill Receiving Sensor ................................................................................................................................................ 33
7.5 Speed sensor .............................................................................................................................................................. 34
7.6 Magnetic ink sensor ................................................................................................................................................... 36
7.7 Safety line detection sensor ....................................................................................................................................... 38
7.8 Dimension Detection Sensor ..................................................................................................................................... 41
7.9 Power Supply Parameters .......................................................................................................................................... 45
Inspection, test and fault finding for general failures .............................................................................................................. 45
8.1 General failures of sensors ........................................................................................................................................ 45
8.2 Bill feeding motor doesn’t work ................................................................................................................................ 48
8.3 The main motor doesn’t work or is hard to be started ............................................................................................... 48
8.4 Machine working but display abnormally ................................................................................................................. 49
8.5 No response after being started ................................................................................................................................. 49
8.6The other failures ........................................................................................................................................................ 49
Maintenance and routine inspection ........................................................................................................................................ 49
9.1 Weekly maintenance task........................................................................................................................................... 49
9.2 Semiannual maintenance task .................................................................................................................................... 49
Appendix 1 Structure and assembly relationship of the mechanical part ................................................................................ 50
Appendix 1.1 Relation Schema for assembly of structural components ......................................................................... 50
Appendix 1.2 Part list for Relation Schema of assembly for the structural components................................................. 55
Page 2 of 84
Maintenance Manual of Bill Counter
Appendix 2 Structural Relation Schema of the Electrical Part (for reference only)............................................................... 59
Appendix 2.1 Electric schematic ..................................................................................................................................... 59
Appendix 2.2 Electrical Wiring Diagram ....................................................................................................................... 67
Appendix 2.3 Position Marking Diagram of Circuit Board............................................................................................ 68
Appendix 3 List of Electrical Components (for reference only) ............................................................................................ 76
Appendix 3.1 Component list of control panels ............................................................................................................. 76
Appendix 3.2 Component list of the power panel .......................................................................................................... 80
Appendix 3.3 Component list of display panels ............................................................................................................. 81
Appendix 3.4 Component list of external display panels ............................................................................................... 82
Page 3 of 84
Maintenance Manual of Bill Counter
Page 4 of 84
Overview
Dolphin Series Bill Counter is a kind of intelligent high-speed discriminator for sorting and counting bank notes. It’s of
a standalone design. It separates bank notes with the effect of friction capability and is controlled by a single chip
microcomputer with multiple functions. In order to make the bill counter an accurate, reliable, practical and convenient
product, thoughtful design and system optimization have been achieved.
This manual has provided necessary methods and suggestions to the engineers and technicians who perform repair and
maintenance to DOLPHIN Bill Counter.
Required Tools and Instruments for Maintenance
20M oscilloscope
solder sucker
tweezers
digital multimeter
monkey wrench
diagonal pliers
wire stripper
flat screwdriver set and electric iron
long nosed pliers
Phillips screwdriver set
Figure 1a Appearance of the Machine (front)
1. lifting handle component
6. sensor of left counter
10. bill receiving sensor
2. bill linkage baffle component
7. component of receiving wheel shield
11. right counting sensor
3. left shield
8. bill receiving wheel
4. film panel
9. bill receiving baffle
5. bed plate component
12. monitor
13. right shield
Maintenance Manual of Bill Counter
Page 5 of 84
Figure 1b Appearance of the Machine (upper part)
14. upper cover board
16. stacker sensor
18. adjusting turner
15. feeding wheel
17. bill feeding gate
43. bill feeding platform
Figure 1c Appearance of the Machine (front)
19. external display, interface for computer communication
21. power socket
20. nameplate
22. power switch
23. rear upper cover board
Introduction to the Whole Unit
Dolphin Series Bill Counter consists of two parts, a mechanical and an electrical. The mechanical part includes the
frame, structural parts, shell, bill rubbing mechanism and conveyance mechanism. The core of the mechanical part is
the bill rubbing and conveyance mechanism. The electrical part includes various sensors and the acquisition amplifying
circuit, single-chip microprocessor, power and power system for their input signals, as well as the control to input and
output signals of the single-chip microprocessor, the analysis treatment to the signals and the control of such operation
process.
Maintenance Manual of Bill Counter
Page 6 of 84
3.1Technical Specification of the Whole Unit
Bill counting capability: feeds 200~300 bills; receives 200 bills
Sizes of bills: 0.05mm~0.2mm x 50mm~90mm x 120mm~175mm (thickness x width x length)
Manner of display: LCD or LED monitor
Power supply: 220V/50HZ/110V/60HZ
Power: about 40W
Environment parameters: temperature 0 ~35 ; relative humidity: 20%~80%
Volume: 290mm x 250mm x 250mm
Weight: 5.5 kilograms
Bill counting speed: 600 turns/minute, 900 t/m, 1200t/m, 1500t/m (the bill counting speeds vary according to different
models and bills)
Figure 3 Diagram with upper cover, left and right shield removed
24.separation mechanism
27. synchronous belt
30. conveyance baffle component
33. auxiliary pinch wheel
25.feeding wheel component
28. speed sensor
31. control panel component
34. lower conveyance
wheel
26. friction wheel
29.bill receiving wheel
32. upper conveyance wheel
component
Figure 3 Diagram of left and right shields after removal of the upper cover
Maintenance Manual of Bill Counter
Page 7 of 84
3.2 Principle and function of the bill rubbing mechanism
The bill rubbing mechanism consists of 15, the feeding wheel and 26, the friction wheel and 24, the separation
mechanism, including two parts, the feeding and separation of bank notes. This is the key for a bill counter to be able to
count bank notes accurately.
Counting of the bank notes is the process that the machine intermittently generates a friction thrust to the bank notes
through rotation of the parts inside the machine. This action is jointly completed by 15, the feeding wheel and 32, the
upper conveyance wheel and 26, the friction wheel and 33, the auxiliary pinch wheel.
Separation of the bank notes is the process that the machine separates a deck of bank notes into many single bank notes,
which is jointly completed by 26, the friction wheel and 24, the separation mechanism. 24, the mechanism has two
functions. One is, in the progress of part rotation inside the machine, the “bill feeding gate, 17” is formed by the
interaction of the rubber-free circle surface of 26, the friction wheel and 24, the separation wheel. This action only
allows one bank note to go through the gate; the other is to push the bottom bank note into the machine with the joint
effect of the intermittent thrust generated on the rubber surface of 15, the feeding wheel and 26, the friction wheel and
the resistance generated by 34, the separation wheel which rotates in single direction and stays static intermittently.
3.3 Function of the conveyance mechanism
The conveyance mechanism includes two parts, conveyance and receiving of bank notes.
Conveyance of bank notes is jointly completed by two sets of conveyance wheels, the upper and lower wheels. The
function of 32, the upper conveyance wheel, is to swiftly speed up separated bank notes. The function of 34, the lower
conveyance wheel, is to enable the bank notes become flat and free of any sliding movement and then go through
sensors at a certain speed to guarantee the reliability of data acquisition by the sensors.
Receiving of bank notes is jointly completed by 8, the bill receiving wheel and 9, the bill receiving baffle. 8, the bill
receiving wheel makes slow-speed movement along with running of the machine; 9, the bill receiving baffle is installed
behind 8, the bill receiving wheel. The high-speed bank notes passed through 34, the lower conveyance wheel, are sent
to 8, the bill receiving wheel, and do mid-speed movement from there; when they move to the lower part of 8, the bill
receiving wheel, will be collected and piled up at 9, the bill receiving baffle.
3.4 Sensors and detection of their signals
Dolphin Series Bill Counter has five groups of basic sensors and three of which are basic measurement sensors and two
of which are basic control sensors. They form a basic detection system. According to difference of machine function
Maintenance Manual of Bill Counter
Page 8 of 84
and requirement of bank note detection, many more other kinds of detection sensors can also be added.
The basic measurement sensors include two sets. Each set consists of a 6, the left counting sensor and an 11, the right
counting sensor, whose functions are to detect status of a bank note and identify position of a bank note. They are
installed next to 34, the lower conveyance wheel. A pair of speed sensors, the 28, which are for measurement of rotation
speed of the machine parts, are installed in the left end of the machine.
The basic control sensors include 16, the stacker sensor and 10, the bill receiving sensor. 16, the stacker sensor is a
reflective photoelectric device, which is installed onto 43, the bill feeding platform; 10, the bill receiving sensor, is a set
of infrared-lit and light-sensitive parts, which is installed in the middle of 9, the bill receiving baffle.
The other measurement sensors for bank notes include H02, the fluorescent sensor, for measuring fluorescence reaction
characteristic of paper quality of bank notes; H12, the magnetic detection sensor, for measuring distribution of magnetic
ink on bank notes; H07, the safety line detection sensor, for detecting signal of the safety line on a bank note; H04, the
sensor for detecting length and size of a bank note; H04B, the infrared ink sensor, for detecting signal of infrared ink on
a bank note; these measurement sensors are installed at different positions under baffle of the lower conveyance wheel
according to different application requirements and that's the approach to discriminate if a bank note is real or fake.
3.5 Handling and control of signals by the single-chip computer
Data analysis to a bank note by the bill counter and control to running status of the machine are completed by the
single-chip computer inside the machine. The whole control process is divided into few steps: handling of operational
command and control signal; acquisition and calculation of information from measurement sensors and then conversion
from analog quantity to digital quantity; performance of fuzzy analysis and handling to digital quantity; control to the
machine according to analysis result and operational requirements.
Running of the bill counter is controlled by the single-chip computer. The single-chip computer executes pre written
program inside the machine. Therefore, in progress of actual usage, the user should strictly operate the machine
according to the operation manual and this manual.
3.6 Power supply and power system
The power supply system is a device converts 220V or 110V DC current into the DC currents required by all parts of
the bill counter.
The DC currents required by all parts of the bill counter include +5V, +6V, ±5V and +24V. +5V is to be provided and
used by single chip digital circuits. ±5V is to be provided and used by single chip analog circuits. +24V is to be
provided and used by the main motor.
Maintenance Manual of Bill Counter
Page 9 of 84
Power of the bill counter is provided by Rare Earth Permanent Magnet (REPM) DC motor (main motor) and DC speed
reducing motor (small motor). The small motor provides the power needed by 8, the bill receiving wheel; the main
motor provides power for all other parts of the machine.
Operation and Application
4.1 Key functions
Sorting and counting: starts counting from 0 for each time of counting
Accumulating: starts counting from value of the first bill contact with the machine for each time of counting
Presetting number of bills: counts bills according to preset number of bills
Auto start: the machine automatically starts counting as long as bank note exist on 43, the bill feeding platform
Manual start: if 43, the bill feeding platform has any bank note, you can only start the counting by pressing the
START/RESET button
Width detection: detects bank notes of different widths
Length detection: detects bank notes of different lengths
Speed adjusting: there are four levels of speeds can be selected
Contents of detection: half of a bank note; overlapping bank notes; multiple bank notes; single bank note
Methods for anti-fake identification: fluorescence identification, magnetic ink identification, safety line identification,
identification with infrared characteristic, size identification (configure contents of identification according to different
models)
4.2 Operation method
Connect the machine to power supply; switch 22, the power switch from OFF to ON position and then the machine will
perform a 2-second self-checking. After the status becomes normal and starting of the machine, the display window will
display 0 and it’s ready to count.
1) Adjust the “bill feeding gate, 17”
Proper adjustment of the “bill feeding gate, 17” should be performed according to age and thickness of bills. When
often encounter stop of the running during any counting action due to re-counting of bills; or that the number of bills is
too large; users should reduce number of bills at the “bill feeding gate, 17”; when fluency level becomes lower, users
should increase number of bills at the “bill feeding gate, 17”. Turn in clockwise direction at the “bill feeding gate, 17”
to have more bills and anticlockwise to have less.
Maintenance Manual of Bill Counter
Page 10 of 84
2) Identification to the gap of the “bill feeding gate, 17"
First turn the axis of 15, the feeding wheel to enable the smooth surface of 15 to face upward; and then respectively
insert two new bills into the left and right “bill feeding gate, 17” and then move them back and forth and you should
feel obvious resistance; otherwise adjust the gap of the “bill feeding gate, 17”. While the adjustment range exceeds
designed range, re-identify position of the adjustment knob of the “bill feeding gate, 17” according to the description in
6.3.
4.3 Functional setting
Diagram of Dolphin Operation Panel
1) Operation of basic functions
Directly enter setting status according to corresponding functions. (According to users' needs, when some machines
enter certain functions, it's required to use the preset functional key to enter setting status.)
Fluorescence identification switch which detects fluorescence reacting characteristic of paper
UV
ON/OFF
MG
ON/OFF
Magnetic ink identification switch which detects the magnetic ink characteristic of a bank note.
ON/OFF
Safety line identification switch which detects the magnetic or metal characteristic of safety line on
MT
materials of bank notes.
a bank note.
DD
ON/OFF
Width detection switch for detecting width dimension of a bank note.
WD
ON/OFF
Length detection switch for detecting length dimension of a bank note.
DE
Grade
Grade setting key for detecting grade of repeated bill; choose different repeated bills for
N
1~16
identification of sensitivity.
600/900
Counting speed setting key for selecting different rotating speed.
SP
200/1500
AD
D
MU
L
ON/OFF
ON/OFF
Sort and count/accumulate switch for; select display manner for showing counting result.
Manual/Auto switch for selecting work mode of the machine.
Maintenance Manual of Bill Counter
EU
R
VA
L
ON/OFF
ON/OFF
Page 11 of 84
Euro (currency) selection key for selecting the identification function for coding of safety line for
Euro bank notes.
Selection key for sorting and counting certain amount.
Remove key. Remove currently sorted and counted number of bank notes and number of preset
CL
bills.
R
STA
Start/Reset key for return from parameter setting status; remove contents on the display window for
RT
counting result; manual bill counter machine is now started.
2) Functional operation for parameter setting
Use the setting key, which is for presetting number of bills to be counted, to enter the password 127, and then press
relevant keys to enter the operation of parameter setting. You can set sensitivity grade here. Smaller number, higher
sensitivity, high capability for identifying fake bank note, higher possibility of wrong report. When the sensitivity grade
is set to be “0”, corresponding identifying functions are turned off.
UV
Grade 0~16
Fluorescence identifying sensitivity, Grade 0~16
MG
Grade 0~16
Magnetic ink identifying sensitivity, Grade 0~16
MT
Grade 0~16
Safety line identifying sensitivity, Grade 0~16
DD
Grade 1~16
Width detecting sensitivity, Grade 1~16
WD
Grade 1~16
Length detecting sensitivity, Grade 1~16
Note: sensitivity grades of some models are different from the table above, which won’t be described here.
3) Operation for the function of preset number of bills
Different preset numbers of bills to be counted can be preset using Key 0~9 for their presetting function; the machine
stops when present number of bills is counted and sorted.
4.4 Machine Debugging Interface
There are two debugging interfaces according to different models
1) The fist kind of debugging interface
Includes memory data interface, sensor data interface and interface of dimensional detection data.
a) Memory data interface
Keep pressing 1 until the machine enters its debugging interface; M status is the default when entering the debugging
interface, namely the memory data interface;
Maintenance Manual of Bill Counter
Page 12 of 84
In this status, press the START/RESET key and enter the waiting status for reading and accessing of data; and then
press 2 or 3 to switch the two memory data windows and then the memory data will be accessed and read on the screen;
In the memory, positions of data are shown below:
MD1
MD2
MD3
MD4
MD5
MD13
MD14
MD15
MD16
MD25
MD26
MD27
MD37
MD38
MD49
MD61
MD6
MD7
MD8
MD9
MD10
MD11
MD12
MD17 MD18
MD19
MD20
MD21 MD22
MD23
MD24
MD28
MD29 MD30
MD31
MD32
MD33 MD34
MD35
MD36
MD39
MD40
MD41
MD42
MD43
MD44
MD45
MD46
MD47
MD48
MD50
MD51
MD52
MD53
MD54
MD55
MD56
MD57
MD58
MD59
MD60
MD62
MD63
MD64
MD65
MD66
MD67
MD68
MD69
MD70
MD71
MD72
Meaning of data at some key positions:
Position
Data Content
MD1
Par value codes of Euro
MD2
MD3
MD4
Par value codes of Euro
Remark
E1=5 Euros E2=10 Euros E3=20 Euros E4=50
Euros E5=100 Euros E6=200 Euros E7=500
D1=5 Euros D2=10 Euros D3=20 Euros D4=50
Euros D5=100 Euros D6=200 Euros D7=500
Par value codes of Euro
C1=5 Euros C2=10 Euros C3=20 Euros C4=50
Euros C5=100 Euros C6=200 Euros C7=500 Euros
Number of safety line
Maintenance Manual of Bill Counter
Page 13 of 84
MD5
UV value of the last bank note
MD6
Standard value of UV
High position of left magnetic data for
Model 4011
MD7
Maximum value of left counting sensor
for Model 6015
Lowest position of left magnetic data
for Model 4011
MD8
Mid value of left counting sensor for
Model 6015
High position of right magnetic data
for Model 4011
MD9
Minimum value of left counting sensor
for Model 6015
Low position of right magnetic data for
Model 4011
MD10
Maximum value of right counting
sensor for Model 6015
Number of left magnetic pulses for
Model 4011
MD11
Mid value of right counting sensor for
Model 6015
Number of right magnetic pulses for
Model 4011
MD12
Minimum value of right counting
sensor for Model 6015
MD13
Codes for par value
MD14
Codes for Euro par value
MD15
Width codes for par value
MD16
Length codes for par value
MD17
MD18
MD19
High position of data for rotation speed
of machine parts
Low position of data for rotation speed
of machine
Data indicates lean of bank note
Maintenance Manual of Bill Counter
Page 14 of 84
MD20
Data for lean of bank note
MD23
Data for overlapping bills
MD24
Data for overlapping bills
MD30
Standard value of length
MD31
Data for the length of the last bill
MD33
Standard value of width
MD34
Data for the width of the last bill
MD35
MD36
Categories of errors for shutdown of
machine
Sequential number for error data
Maximum value of left counting sensor
for Model 4011
MD37
High position of left magnetic data for
Model 6015
Mid value of left counting sensor for
Model 4011
MD38
Low position of left magnetic data for
Model 6015
Minimum value of left counting sensor
for Model 4011
MD39
High position of right magnetic data
for Model 6015
Maximum value of right counting
sensor for Model 4011
MD40
Low position of right magnetic data for
Model 6015
Mid value of right counting sensor for
Model 4011
MD41
Number of left magnetic pulses for
Model 6015
Minimum value of right counting
sensor for Model 4011
MD42
Number of right magnetic pulses for
Model 6015
Maintenance Manual of Bill Counter
Page 15 of 84
After the debugging, press 1 key to enable the debugging interface to enter R status; press START/RESET key to exit
debugging status.
b) Sensor data interface
Keep pressing 1 until it enters the debugging interface; M status is the default when first enter the debugging interface;
press 1 again to enter S status, which is the sensor debugging interface;
In this status, press START/RESET key to enter the reading and access interface of sensor data.
Positions of sensor data are shown below:
M
D
S
J
R
SD1
SD2
SD3
SD4
SD5
SD6
SD7
SD8
SD9
SD10
SD11
SD12
Meaning of data at key positions:
SD1
UV sensor data
SD2
Data of left penetration sensor
SD3
Data of left counting sensor
SD4
Data of right counting sensor
SD5
Data of right penetration sensor
SD8
Data of safety line sensor
SD9
Data of left magnetic ink sensor
SD10
Data of right magnetic ink sensor
After debugging, press 1 and enable the debugging interface to enter R status and then press START/RESET to exit the
debugging status.
c) Dimension detection data interface
Keep pressing 1 until the machine enters the debugging interface; M status is the default status when it first enters the
Maintenance Manual of Bill Counter
Page 16 of 84
debugging interface; press 1 again and enter J status, namely the debugging interface for dimension sensor;
In this status, press START/RESET key and enter the reading and accessing interface of dimension detection data; press 2,
3, 4 and 5 keys to switch among the five pages of A, B, C and D.
Positions and significance of the four pages are shown below:
Page A:
A
AD1
AD2
AD3
AD4
AD5
AD6
AD7
AD8
A
AD9
AD10
AD11
AD12
AD13
AD14
AD15
AD16
A
AD17
AD18
AD19
AD20
AD21
AD22
AD23
AD24
B
BD1
BD2
BD3
BD4
BD5
BD6
BD7
BD8
B
BD9
BD10
BD11
BD12
BD13
BD14
BD15
BD16
B
BD17
BD18
BD19
BD20
BD21
BD22
BD23
BD24
Page B:
Maintenance Manual of Bill Counter
Page 17 of 84
Page C:
C
CD1
CD2
CD3
CD4
CD5
CD6
CD7
CD8
C
CD9
CD10
CD11
CD12
CD13
CD14
CD15
CD16
C
CD17
CD18
CD19
CD20
CD21
CD22
CD23
CD24
D
DD1
DD2
DD3
DD4
DD5
DD6
DD7
DD8
D
DD9
DD10
DD11
DD12
DD13
DD14
DD15
DD16
D
DD17
DD18
DD19
DD20
DD21
DD22
DD23
DD24
Page D:
Among them, Page A and B represent the data detected by the left sensor; A represents the data detected from the left to
the side by the left dimension sensor; B represents the data detected in the middle by the left dimension sensor;
Among them, Page C and D represent the data detected by the right sensor; C represents the data detected in the middle by
the right dimension sensor; D represents the data detected from the right to the other side by the right dimension sensor;
The following picture shows the corresponding positions for the data detected and displayed on the four pages, A, B, C
and D.
After debugging, press 1 to enable the debugging interface to enter R status; press START/RESET key to exit the
debugging status.
2) The second kind of debugging interface
Includes memory data interface, sensor data interface, data interface of detected dimension;
a) Keep pressing ADD key for 3 seconds to enter the memory data interface; press 1 or 2 to switch the two memory data
windows; the operation method and display contents for memory interface are the same as 4.4 1) a).
After the debugging, press START/RESET key to exit the debugging status.
b) Keep pressing MUL key for 3 seconds to enter the sensor debugging interface; adjust corresponding potentiometers on
the main control panel to see parameter changes; the operation method and display contents for the sensor debugging
interface are the same as 4.4 1) b).
After the debugging, press START/RESET key to exit the debugging status.
c) Keep press 1 for 3 seconds to enter the display interface for dimension sensor; switch among the four pages by pressing
1, 2, 3 and 4 (or 2~5); the operation month and display contents for the debugging interface of dimension sensor are the
same as 4.4 1) c).
4.5 Interfaces for special operational functions
a) Keep pressing the 0 key for 3 seconds to display version number, as shown below
Maintenance Manual of Bill Counter
Page 18 of 84
Position and meaning of data:
Software Version
Control
VD1
VD2
VD3
VD4
Display
VD5
VD6
VD7
VD8
Among them, Control represents version number of control software, Display represents version number of display
software; see the meanings of data below:
Data Code
Meaning
VD1,VD5
Critical revision number of version
VD2,VD6
Partial revision number of version
VD3,VD7
Chip code
VD4,VD8
Model code
b) After appearance of error, keep pressing ADD key for 3 seconds to display memory data and view relevant contents.
4.6 Program downloading method (this function is only available for the 4011, 6011 and 6015 motherboards)
1) The machine can perform remote downloading. Required devices: PC computer, DB9 serial cable
a) Use DB9 serial cable to connect the bill counter with a computer
b) Start the PC and bill counter
c) Install the download&upload downloading program; installation process as general Windows program
2) Download program: frist check if the jumper on the control panel is in its download status:
a) dsp4011_D control panel; connect the two bonding pads at the right side of J1 and connect the other two at the right
side of J2.
Maintenance Manual of Bill Counter
Page 19 of 84
b) Connect the two jumpers of dsp4011_E and dsp4011_On control panels onto them
c) Connect the L04-1.40E/D/C jumpers under them
d) Start the DOWNLOAD software
e) Judge if the motherboard program to be downloaded is already downloaded: after empowering the motherboard, if the
program indicator to the left keeps blinking, the program is already downloaded; otherwise not.
f) If this batch of motherboard program does not contain downloaded ones, directly proceed the (g) operation; otherwise,
as shown on the diagram below, click on the Handshake button.
Maintenance Manual of Bill Counter
Page 20 of 84
After successful handshake (the program indicator on the motherboard will go off)
g) As shown below, single click the DOWNLOAD button at the right
h) This dialogue will then pops up. Select the HEX file to be downloaded and then single click the Open botton.
,
i) Start downloading software
Maintenance Manual of Bill Counter
Page 21 of 84
3) Download with a laptop
a) Connect the transmission cable USB TO RS232 with the PC, as shown below:
a) Find the COM port (com 3 or 4) assigned for USB by the PC on the Device Manager interface.
b) Open the Download interface.
c) Click on the Config option.
e) Modify Port option and make it be accordant with the assigned COM port, click OK and then close the Download
interface.
f) Restart the software and perform the downloading as 4.6 2).
Maintenance Manual of Bill Counter
Page 22 of 84
4.7 Method for uploading data
Upload a file
After clicking the
button, the dialogue box above will appear.
When uploading a file, you need to enter or select file name of the file to be uploaded; extension name of the file to be
uploaded should be (but not limited to) .DAT; you can select a file name or enter a file name in the Name of File box;
when the input file name does not include an extension name, the program will automatically add .DAT to it.
If the file is already there, the system will prompt the following message.
If you select YES, then the existing file will be overwritten and will not be recovered. We advise you to first back up the
existing file and then overwrite it unless the file is no longer needed. If the file is not already there, then it will be created.
After confirming for all of these, the program will start reading and accessing the built-in program inside the bill counter
and store it into the file.
Disassembly Process of the Whole Unit
1)
Unscrew the two M4 x 8 bolts on 23, the rear upper cover board; remove 23; give force upward and take off 14,
the upper board; unscrew M3 screw on the two side boards 401.407 with screw driver set; loosen the two shields
by removing the 4 M4 x 8 bolts; take off the left and right shields 3.13.
2)
Unplug all connector plugs or pins on the control panel and take off the control panel.
3)
Use screw driver set to loosen the four mounting bolts at both ends of the panel component and take off the
Maintenance Manual of Bill Counter
Page 23 of 84
panel component.
4)
Loosen the two M4 x 8 bolts under 9, the bill receiving baffle; take off 9, the bill receiving baffle and the bill
receiving shield.
5)
Remove the two M4 x 8 bolts at both ends of the separation mechanism and take off 24, the separation
mechanism.
6)
Loosen the 4 M3 x 12 bolts at both ends of the rear-lower cover board; pull out the board; unplug connector
plugs connected with the power supply panel; remove the 2 M4 x 8 bolts of the installed transformer on the
bottom; take off the power supply component.
7)
Remove two M4 x 8 bolts of the installed small motor on the bottom; unplug connector plugs on the power
supply panel, which are connected with the small motor; take off 8, the bill receiving wheel.
8)
Use a flat screwdriver to remove the E ring at both ends of the feeding component; take off 27, the synchronous
belt; remove the small auxiliary wheel; take off the feeding component.
9)
Remove the M5 bolt at the left end of 34, the lower conveyance wheel; take off tachometer disc; take off 27, the
synchronous belt; remove the small belt wheel.
10) Remove the belt wheels and E rings at both ends; remove the bolts at both ends of the conveyance baffle;
remove the bolts at both sides of the lower baffle; remove all the other transmission shafts.
11) Remove the other installation parts.
Installation Requirements for the Mechanical Part and Adjustment of Parameters
6.1 Installation and adjustment of the bill separating mechanism (see Figure 9 and 10)
The function of 24, the bill separating mechanism, is to separate a deck of bank notes into single ones and send them
into the machine. This is realized by the joint effect of the intermittent friction generated by 26, the rotating friction wheel,
and the direction-reversed resistance generated by 34, the separating wheel.
In process of the work, the rubber part of 26, the friction wheel, and B, C, the side gaps of 34, the separating wheel,
will affect the friction thrust; therefore, in process of the debugging, it’s required that the gap of 26, the friction wheel, and
34, the separating wheel, should be equal, namely, B=B’ and C=C'.
If process of the work, the gaps of 26, the friction wheel, and 34, the separating wheel, normally, A and A’, will affect
the separating resistance; if the distances of A and A’ are unequal, it will cause no lean and revulsion of a bank note.
Therefore, the gaps (the bill feeding gate, 17) formed by the rubber-free part of the two sets of friction wheels, 26, and 34,
the separating wheel, should be equal, normally, A=A’.
Maintenance Manual of Bill Counter
Page 24 of 84
32.adjusting spring
35.spacing board
38.pinch wheel part
33.bracket adjusting base
36.bracket die cast
39.auxiliary pinch wheel part
34.separating wheel
37.bracket fixed axis
40.upper baffle
41.adjusting bolt
Figure 9 Position Drawing of 24, the bill separating mechanism
34.separating wheel
26.friction wheel
42.rotation testing wheel
Figure 10 Position and Gap of the Friction Wheel and 34, the separating wheel
Installation and adjustment of 24, the bill separating mechanism
Installation and adjustment method:
Alignment of 24, the separating mechanism: loosen the fixed bolts of the spacing rings at the left of the fixed axis to
24, the separating mechanism; move 24 leftward and rightward and make sure the whole parts are in good alignment
and then fasten and fix them. Adjustment of the side gaps of 34, the separating wheel and 26, the friction wheel:
Maintenance Manual of Bill Counter
Page 25 of 84
loosen the two bolts of 34, the fixed separating wheel; move 34 leftward and rightward and make it that the rubber
part of 26 equals to the side gap of 34; and then fix and fasten them. The left and right gaps of the “bill feeding gate,
17” are the same; turn the adjustment knob for bill thickness to enable the “bill feeding gate, 17” to let exactly one
bill to go through; test status of the left and right gaps; base on test result, loosen the bolts on the fixed bracket
(normally loosen 3 and the fourth stay still), knock gently until it meets installation needs; finally, fix and fasten the
bolts; certain level of skill is required for doing the work above, it requires many times of tests and adjustment.
6.2 Synchronization of the Friction Wheel and Feeding Wheel
The function of 15, the feeding wheel, is to provide an additional friction thrust to 24, the bill separating mechanism
and hence enable the bill to enter 24, the separating mechanism in good order. The additional friction thrust is realized by
the block rubbers on 15, the feeding wheel. If move action time of the block rubber forward, the additional friction thrust
effect will become larger; if the time is delayed, the additional friction thrust effect will become smaller. Therefore,
position of the block rubber functions to perform fine adjustment to the friction thrust of the bill rubbing mechanism.
Installation and adjustment method:
Keep turning 15, the feeding wheel, along the bill incoming direction, until the highest point from Point A to surface
of 43, the bill feeding platform, has been reached; and the distance between the tangent point of 26, the friction wheel and
34, the separating wheel, and the rubber part of 26, the friction wheel, becomes 3~5mm; this can be achieved by adjusting
position of the serrated belt.
2~3 teeth
43.bill feeding platform
26 friction wheel
15 feeding wheel
34 separating wheel
44 friction rubber
45 feeding rubber
Figure 11 Position Drawing of 26, the Friction Wheel and 15, the Feeding Wheel
6.3 Positioning of the “Bill Feeding Gate” Adjustment Knob (see Figure 9)
Installation and adjustment method:
Fix the positioning bolt on the adjustment knob in advance; adjust the gap of the “bill feeding gate, 17” with a
Maintenance Manual of Bill Counter
Page 26 of 84
bank note; when a bank note passes through the gate, obvious resistance should be felt; and then loosen its fixed
bolts; position the small dot of the knob at the highest point and fasten it. After installation of 14, the upper cover
board, if the position has some change, re-adjustment needs to be done.
Working Principle of the Electrical Part and Requirement of its Installation and Debugging
In this part of the electrical schematic diagrams, the code begins with “M-“ means this component
locates in the control panel section; the one begins with “D-“ means this component locates in the
display panel section; the one begins with “P-“ means this component locates in the power supply panel
section; the one begins with “UVP-“ means this component locates in the UV power supply panel
section; the one begins with “S-“ means this component locates in the sensor section.
7.1 Bill feeding sensor
1) Description of Working Principle
The stacker sensor is installed on the bill feeding platform, which is used for detecting placement status of the
bank notes on the bill feeding platform. It’s a reflective light chopper formed by an infrared illumination and an
infrared receiver. Turn on of the infrared illumination is controlled by the VI modulation signal; the infrared
receiver identify if any bank note exists on the bill platform by detecting the status when the infrared modulation
light sent out by the detecting illumination is reflected by the bill.
2) Electronic schematic diagram and oscillogram
Figure 12 Electric Schematic of the Bill Feeding Part
Maintenance Manual of Bill Counter
Page 27 of 84
VI
Vb
When there’s no reflection from bank note Vb≤80mV
Vc
Figure 13-1 Waveform for each point when no reflection from bank note
VI
Maintenance Manual of Bill Counter
Page 28 of 84
Vb
Vb has the peak value of 750-800mV when use black object for reflection
Vc
Figure 13-2 Waveform of each point for reflection by black object
Figure 13 Waveform of the bill feeding part
3) Debugging
A. Debugging instruction
Turn the potentiometer RA1 in clockwise direction and Va, the voltage generated by photo current should increase; Turn
the potentiometer RA1 in clockwise direction and Va, the voltage generated by photo current should decrease and Vb
should change accordingly as Va changes.
B. Debugging Steps
a) First turn the potentiometer RA1 to the end in anti-clockwise direction; in irradiation of strong light, when the stacker
sensor is not covered, fluctuation quality of the reflection signal received by the sensor, Vb should be ≤80mV. At this
moment, the machine can’t start.
b) When placing a wholly black object onto the sensor surface, adjust RA1 potentiometer and make the peak value of the
reflection signal generated by the sensor, Vb be 750~800mV; now the peak value of Vc should be ≥4.3V and the machine
should be normally running.
c) If test with bank notes, it should run normally.
Maintenance Manual of Bill Counter
Page 29 of 84
7.2 Left/Right Counting Sensors and Left/Right Penetration Sensors
1) Description of Working Principle
The left and right counting sensors are a kind of infrared sensor. They're located on both sides of the lower conveyance
wheel. They’re for detection of status signal of bank notes. The left and right counting sensors consist of two pairs of
infrared emission and receiving sensors, which are respectively installed at both sides of the bill conveyance path; when a
bill passes through a counting sensor, the counting sensor will have parameter change to generate change of electric signal
and hence be able to perform bill counting and discrimination of overlapping bills. The left and right penetration sensors
are absolutely the same sensors as the left and right counting sensors. They’re installed in the upper part of the path at the
same horizontal position as UV. Its function is to detect the position signal when a bank note passes through UV sensor. It
can also be used to detect the penetration characteristic of a bank note.
2) Electric schematic diagram and oscillogram
Figure 14 Electric Schematic of the Infrared Sensors
Ua
Waveform when no passing through of bank note
Maintenance Manual of Bill Counter
Page 30 of 84
Ua
Waveform when there's continues passing through of bank note
Figure 15 Output oscillogram for the infrared sensors
3) Installation requirement
Adjust installation positions of the left and right counting sensors and penetration sensors and make the output voltage of
the receiving tube be Va≥4V when no bank note passes through any counting sensor.
4) Debugging
A. Debugging instruction
Adjusting the RA3 potentiometer can change sensitivity of the left counting sensor; clockwise to decrease and anticlockwise to increase;
B. Debugging steps
a) Enter the sensor debugging interface shown below according to the description at 4.4.b
b) Use standard 80g white coated art paper and place it at a corresponding position which interact with the path of the
counting sensor; and then make base line of the paper and the base line of the lower conveyance baffle at the same surface
and at the same level; and then adjust corresponding potentiometers to make 3C or 3D the data of SD2, SD3, SD4 and
SD5.
c) After full adjustment, take out the paper and then press the 1 key for few times until the R option is selected and then
press START/RESET key to exit.
Note: the parameters above (3C or 3D) has something to do with specification of the coated art paper; in actual operation,
you can test the paper to be tested on an adjusted machine and identify its testing value and then use this testing value as a
Maintenance Manual of Bill Counter
Page 31 of 84
benchmark for adjustment of the machine to be done.
The debugging method for the two pairs of penetration sensors and the infrared counting sensors on the other side are the
same.
7.3 Fluorescence sensor
1) Description of working principle
The Fluorescence sensor locates in the middle of the lower conveyance wheel or the middle of dimension sensor. It’s for
identifying the fluorescence reaction of a bank note when it’s in a UV light. It consists of an UV light emission dvice and a
fluorescence receiving device. UV light emission device is oscillated via the 800V/50KHZ DC current generated by its
step-up oscillatory circuit, which activates the UV light to work. The UV light is installed in a confined space to emit
ultraviolet light. The fluorescence receiver device consists of multi-layer glass and silicon photo cell. Multi-layer glass
forms an optical filter; the silicon photo cell detects fluorescence signal generated from a bank note.
2) Electric schematic diagram and oscillogram
Electric schematic for UV emission
Maintenance Manual of Bill Counter
Page 32 of 84
Electric schematic for fluorescence receiving
Figure 16 Electric schematic of the fluorescence receiving part
Counting signal
UV
Waveform when fluorescence reflection exist (2 is the waveform when sorting and counting the testing paper which has a
little fluorescence characteristic)
Counting signal
UV
Waveform when no fluorescence reflection (2 is the waveform for counting the real bank notes)
Figure 17 Waveform change for fluorescence test
3) Debugging
A. Debugging instruction
Adjusting the RA6 potentiometer can change the fluorescence reflection sensitivity of the machine; clockwise to decrease
Maintenance Manual of Bill Counter
Page 33 of 84
and anti-clockwise to increase.
B. Debugging steps
a) Adjust the fluorescence grade into Grade 1 according to the instruction in 4.3.2.
b) Use bank notes and let the bill counter count 500 pieces and the wrong reporting of fake note should be within 1 to 3
times. If it’s larger than 3 times, you should adjust the RA6 fluorescence to lower its sensitivity. If there’s no wrong
reporting, increase the sensitivity. Recount the bank notes until it has met the requirements.
c) Adjust the fluorescence grade into Grade 6 and there’s should be no wrong reporting for counting 1,000 bank notes.
d) If there’s any wrong reporting, lower the sensitivity; repeat above steps until it has met the requirements.
7.4 Bill Receiving Sensor
1) Description of working principle
The bill receiving sensor locates inside the bill receiving bracket, which is for detecting if there’s any bank note exist on
the bill receiving platform. It consists of infrared emitting diode and infrared receiving sensor. The infrared emitting diode
generates infrared signal and the infrared receiving sensor receives the signal sent out from the infrared emitting diode.
2) Electric schematic diagram and oscillogram
Figure 18 Electric Schematic for the Bill Receiving Part
Maintenance Manual of Bill Counter
Page 34 of 84
Ua
Ua>4.3V when there’s no bank note
Ua
Ua<0.3V when there is a bank note
Figure 19 Change of Waveform for Bill Receiving
3) Installation requirement
When being covered with a bank note, Ua>4.3V; when being not covered, Ua<0.3V.
7.5 Speed sensor
1) Description of working principle
The speed sensor locates next to the tachometer grating at the left end of the lower conveyance axis. It's for detecting
speed of the bill counter. It consists of infrared emitter and receiving germinate transistors. Grating of the tachometer disc,
along with rotation of the machine, makes parameters of the speed sensor change periodically and hence detect speed of
the bill counter.
There are two configurations for speed sensors according to different machine model. The first is a tachometer disc of 19
teeth and the other 157. The 19-tooth tachometer disc generates signal of rotation speed along with running of the
matching. It’s for testing the rotation status of the machine. The 157-tooth tachometer disc generates sync pulse of rotation
speed along with running of the machine, which goes through a doubling circuit, and then further increase number of sync
Maintenance Manual of Bill Counter
Page 35 of 84
pulses. This is for precise measurement and positioning of status of a bank note.
2) Electric schematic diagram and oscillogram
U
Figure 20 Electric schematic and oscillogram of the 157-tooth tachometer disc
Maintenance Manual of Bill Counter
Page 36 of 84
U
Figure 21 Electric schematic and oscillogram of the 19-tooth tachometer disc
3) Installation requirement
When the tachometer grating is not covering the sensor, U>4.3V (normally, the peak value of U on the work flow should
be >4.3V); when the tachometer grating is covering the sensor, U>0.3V (normally, the valley value of U on the work
flow should be >0.3V);
7.6 Magnetic ink sensor
1) Description of working principle
The magnetic ink sensor is a kind of magneto-dependent sensor, which is installed under the component of the lower
conveyance wheel. It’s for detecting ink characteristic of designated position on a bank note. When a bank note with
magnetic ink goes through a sensor, there will be a tiny change for the output signal of the magnetic ink sensor; the signal
of such change will be amplified through the amplifying system and transmitted to the detection system. The detection
Maintenance Manual of Bill Counter
Page 37 of 84
system will judge weather it’s a real bank note or note according to the signal characteristic of the magnetic ink.
2) Electric schematic and oscillogram
Figure 22 Electric schematic of the magnetic ink detection part
L_CT
Noise signal when there’s no paper
L_CT
Waveform when a bank note with magnetic ink goes through the magnetic sensor
Figure 23 Waveform change for magnetic ink detection
Maintenance Manual of Bill Counter
Page 38 of 84
3) Installation requirements
a) The gap between surface of the sensor and pinch rim of the magnetic head should be 0.1~0.15m. Test it with a bank
note and obvious resistance should be felt.
b) When there’s no paper pass through the sensor, output of L_CT should have noise signal only and the noise ≤200mV.
Figure 24 Schematic diagram of assembly for the magnetic ink sensor
4) Debugging
A. Debugging instruction
a) Turn RA9 in clockwise direction and reduce sensitivity of magnetic detection of the left magnetic ink sensor; turn in
anti-clockwise direction and increase the sensitivity.
b) When there’s paper with magnetic ink pass through the sensor, the waveform change for L_CT output will be shown as
Figure 23. When there’s no paper with magnetic ink pass through the sensor, there will be no magnetic signal for the
L_CT output but noise.
B. Debugging steps
a) First adjust the detection sensitivity of the magnetic ink sensor to the lowest point; and then use a testing bank note
without magnetic ink to test the bill counter and there’s should be no alarm; after that, slowly increase the detection
sensitivity of the magnetic ink sensor until the alarm for bank note with magnetic ink activate and the machine should stop
then.
Remark: the installation and debugging method for the other side of the magnetic ink sensor is the same.
7.7 Safety line detection sensor
1) Description of working principle
Safety line detection sensor is also a kind of magnetic detection sensor. It’s installed in the lower part of the lower
conveyance baffle. It’s for detecting the safety line of a bank note or the magnetic characteristic of the middle area of a
bank note. When a bank note with magnetic ink passes through the sensor, there will be a tiny change in output of the
Maintenance Manual of Bill Counter
Page 39 of 84
sensor and the signal for this change will be amplified by the amplifying system and sent to the detection system. The
detection system will judge if the bank note is real or fake according to characteristic of the signal from the magnetic ink.
2) Electric schematic diagram and oscillogram
Figure 25 Partial Electric Schematic of the Safety Line Detection
D_CT
Noise signal when there’s no paper
D_CT
Waveform for testing of 200 Euros
Figure 26, Partial Waveform Change for Safety Detection
Maintenance Manual of Bill Counter
Page 40 of 84
3) Installation requirement
a) The gap between surface of the sensor and pinch rim of the magnetic head should be 0.1~0.15m. Test it with a bank
note and obvious resistance should be felt.
b) When there’s no paper pass through the sensor, output of L_CT should have noise signal only and the noise ≤200mV.
Figure 27 Schematic Diagram of Assembly for Safety Line Detection Sensor
4) Debugging
A. Debugging Instruction
a) Turn RA11 in clockwise direction to lower sensitivity of the safety line detection; turn RA11 in anti-clockwise direction
to increase the sensitivity.
b) When a bank note with magnetic ink passes through the sensor, the D_CT output will have the change shown as Figure
26. When a paper without magnetic ink goes through the sensor, there will be no magnetic signal for the D_CT output but
noise.
B. Debugging steps
a) Fist decrease sensitivity of the safety line detection; keep decreasing until wrong reporting happen when test with a
bank note with safety line.
b) Increase sensitivity of the safety line detection; keep increasing until the wrong reporting disappears. After that, use the
bill counter to count bank notes without safety lines and the counter should alarm.
c) Repeat these for many times according to a) b) until a real bank note can pass through without alarm and alarm when a
fake one passes through.
Maintenance Manual of Bill Counter
Page 41 of 84
7.8 Dimension Detection Sensor
1) Description of working principle
The dimension detection sensor is installed on both sides of the conveyance path. It’s for verifying dimension of a bank
note. It consists of an emitter sensor and a receiver sensor. The emitter sensor sends out light signal through infrared
illumination array, which penetrates a bank note or directly arrives in the receiver sensor. The detection system judges
dimension of the bank note according to characteristic of the signal it received.
2) Electric schematic diagram and oscillogram
Emitting principle of the dimension detection
Maintenance Manual of Bill Counter
Page 42 of 84
Principle of the dimension detection
Signal process principle of the dimension detection
Figure 28 Schematic diagram of the dimension detection part
WD-L
Waveform when no paper covers the sensor
WD-L
Waveform when uses a bank note partially cover the dimension sensor
Maintenance Manual of Bill Counter
Page 43 of 84
WD-L
Waveform when uses a bank note fully cover the dimension sensor
Figure 29 Waveform of dimension detection
3) Installation requirements
a) Enter the display interface for dimension sensor according to requirement of 4.4 c.
b) Decrease sensitivity of dimension sensor and achieve the value of 80 also when the sensor is not covered with any bank
note.
c) Move the emitting or receiving part of the dimension sensor and select a position of average and larger value for final
installation.
d) Repeat the adjustment for few times until the above requirements are met.
4) Debugging
1. The first kind of debugging month (only for usage of the circuit boards of dsPIC30F4011_E, dsPIC30F4011_G and
dsPIC30F6010_B1)
A. Debugging instruction
Adjusting the RA7 potentiometer can change sensitivity of the left dimension sensor; clockwise to decrease and anticlockwise to increase.
Adjusting the RA8 potentiometer can change sensitivity of the right dimension sensor; clockwise to decrease and anticlockwise to increase.
B. Debugging steps
a) First remove any bank note in the path and make sure there’s no bank note on the path.
b) Enter the debugging interface of the dimension sensor according to description of 4.4.c.
Maintenance Manual of Bill Counter
Page 44 of 84
M
D
J
S
R
X0
X1
X2
X3
X4
X5
Y0
Y1
Y2
Y3
Y4
Y5
Data of Row 1 shows parameters of the left dimension sensor; data of Row 2
shows the right dimension sensor; among them; X0=A3 and Y0=B3 is the mark bit.
X1, Y1 is the saturated magnitude of voltage of the sensor
X2, Y2, the maximum unsaturated and voltage difference of the sensor
X3, Y3, number of the unsaturated points of the sensor
X4, Y4, number of bad points of the sensor
X5, Y5, has empty value and temporally not being used
c) According to the sequence from left to right, one by one, adjust the data; first adjust the X1 parameter; after meeting the
parameter requirement; this must be done: in the situation that the X1 parameter has met the requirement, adjust the X2
parameter; following this example and adjust the other parameters. Here are requirements for all the parameters:
(X1,Y1)>B0---------otherwise adjust the potentiometer in anti-clockwise direction
05<(X2,Y2)<30-----clockwise to decrease and anti-clockwise to increase
0F<(X3,Y3)<1F----clockwise to decrease and anti-clockwise to increase
(X4,Y4)<03 --------after meeting requirements for all the above parameters, if the requirement of this item cannot be met,
replace the sensor.
After full adjustment, keep pressing the 1 key and select the R option and then press START/RESET key to exit.
2. The second kind of debugging method (universally for use by the L04-1.40D, L04-1.40E and L04-1.15B motherboards)
A. Debugging instruction
Adjusting the RA4 potentiometer can change sensitivity of the left dimension sensor; clockwise to decrease and anticlockwise to increase.
B. Debugging steps
Maintenance Manual of Bill Counter
Page 45 of 84
a) Enter the debugging interface of the dimension sensor according to instruction at 4.4.c.
b) Perform fine adjustment of RA4 and make the AD1-AD24 and BD1-BD24 values on the A and B pages into a value
higher than 70; besides, values of the saturated points for the A and B pages should be 93 and 94 and there are total 1 to 5
for these.
Remark: the debugging method for the other side of the dimension sensor is the same.
7.9 Power Supply Parameters
1) Input voltage of transformer 220V±10%/50HZ or 110V±10%/60HZ.
2) Output voltage of transformer 9V,9.5V,21V,25V.
3) Voltage sent out from the power panel to the control panel 5V±5% (digital power supply), ±5V±5% (analog power
supply).
4) Working voltage for the UV light of the power panel 6V±10%; high frequency output 800V, 50KHZ.
5) Voltage for running of the small motor 9V (LD60E1B,98004G power panel) or 6V (POWER0404-E power panel)
6) Voltage for running of the main motor 10V~20V (speed adjustment).
Inspection, test and fault finding for general failures
8.1 General failures of sensors
1) Failure of 16, the bill feeding sensor
Phenomenon: start the machine and it displays FE1 (CHECK HOPPER SERSOR) or automatically starts when there’s no
bank note on the machine.
Method of fault finding: Step 1: check if 43, the bill feeding platform (on 16, the bill feeding sensor) is covered by any
object.
Step 2: check if light of the working environment is too strong.
Step 3: start the machine and check if FE1 displays; or if the matching starts automatically when there’s no bank note on it
and if it can’t start when there's bank note; adjust RA1 in clockwise direction.
Step 4: check if the welding line on 16, the bill feeding sensor is in an open circuit.
Step 5: it should be failure of parts at 16, the bill feeding sensor.
2) Failure of the left and right counting sensor
Phenomenon: start the machine and it displays CHECK LOWER LEFT IR, CHECK LOWER RIGHT IR; or it appears
abnormally during bill counting process.
Method of fault finding: Step 1: check if any bank note or paper is covering surface of 11, the left and right counting
sensor.
Maintenance Manual of Bill Counter
Page 46 of 84
Step 2: check if connection of the emitting lines of the left and right counting parts, the receiving lines for the left and
right counting and the control panel is loosen or has bad contact.
Step 3: after starting the machine, check the voltage between Pin 1 (red wire) and Pin 3 (white wire) of JP12, which
should be about 1.2V; if there’s an obvious gap for the voltage, check if the receiving lines for the left and right counting
is in an open circuit (stop at the welding point); if this is normal then it should be a failure of certain part of the receiving
tube.
Step 5: use standard coated art paper to cover the left and right counting tubes, and then measure the voltage between Pin
1 and Pin 3 of JP14, which should be smaller than 1.5V; if there’s no change in the voltage compared to the status before
the covering, check if there’s any short circuit at welding points of the receiving tube; if this is normal, then it should be a
failure in a certain part of the receiving tube.
3)
Failure of 28, the speed sensor
Phenomenon: start the machine and it displays CHECK SPEED SENSOR.
Method of fault finding: Step 1: check if connection of the wire of 10, the bill feeding speed sensor and control panel,
tachometer circuit board (SPEED-C) is loosen or has bad contact.
Step 2: check if the installation position of 10, the bill feeding speed sensor (SPEED-C) is correct; it’s required that teeth
of the tachometer disc should face right opposite the sensor and can fully cover the light axis (see the attached figure).
Step 3: check if running of the main motor is normal.
Step 4: check corresponding circuits on the control panel.
4)
Failure of 10, the bill receiving sensor
Phenomenon: start the machine and it displays CHECK STACKER SENSOR.
Method of fault finding: Step 1: check if any bank note or paper is covering 10, the bill receiving sensor.
Step 2: check if the connection between the lead of 10, the tachometer bill receiving sensor and the control panel is loosen
or has any bad contact.
Step 3: check that the voltage of Pin 1 of JP6 should be larger than 4.5V, Pin 2 should be 5V (voltage of power supply),
Pin 3 should be about 1.2 and Pin 4 should be 0V (earth). If the Pin 3 voltage is abnormal, the emitting tube for bill
feeding should be broken; if the voltage of Pin 1 is abnormal, there should be something wrong in the emitting tube or
corresponding circuits on the control panel.
Step 4: check corresponding circuits on the control panel.
Maintenance Manual of Bill Counter
5)
Page 47 of 84
Failure of the fluorescence sensor
Phenomenon: start the machine and it displays CHECK UV SENSOR; or it frequently displays: Suspect UV Check again.
Method of fault finding: Step 1: check if the UV sensor is covered by any plain paper.
Step 2: adjust the RA6 potentiometer in clockwise direction.
Step 3: check if there’s any problem with the corresponding circuits on the control panel.
6)
Failure of the dimension sensor
Phenomenon: in progress of bill counting, it frequently displays: Suspect Length Check again or Suspect Width Check
again.
Method of fault finding: Step 1: check the emitting lead of the length sensor; receiving lead of the length sensor and
control panel; check connection and plugging of the length detecting (emitting and receiving) circuit board.
Step 2: press the 1 key and enter detection status for length detection; the value should read above 70 when there’s no
plain paper cover the sensor and 20~40 when there is.
Step 3: check as Step 2 describes; if certain value reads very small, certain part of the length sensor must have failure.
Step 4: if, when there’s no plain paper covering the sensor, all groups of values are the same; and, the values are still the
same when there’s plain paper covering, or no change of the values, check the emitting lead of the length sensor; check if
there’s any problem with the receiving lead of the length sensor and welding of the length detecting circuit board.
Step 5: check corresponding circuits on the control panel.
7)
Failure of the safety line sensor
Phenomenon: in progress of bill counting, it frequently displays: Suspect MT Check again.
Method of fault finding: Step 1: check if connection of lead of the big magnetic head and the control panel is loosen or has
bad contact.
Step 2: unplug and take off wire of the big magnetic head; check that the voltages of Pin 1 and 4 of JP25 of the control
panel should be respectively about 2.5V and their earth wire and signal line there should be about -2.5V; if this is
abnormal, check corresponding circuits on the control panel.
Step 3: plug wire of the big magnetic head into JP25 on the control panel; check that the Pin 1~4 voltages should be
respectively about 2.5V at JP25 and the earth wire and signal line about -2.5V; if this is abnormal, the big magnetic had
has problem.
Step 4: adjust the RA11 potentiometer on the control panel.
Maintenance Manual of Bill Counter
8)
Page 48 of 84
Failure of the magnetic ink sensor
Phenomenon: in progress of bill counting, Suspect MG Check again frequently appears.
Method of fault finding: Step 1: check if connection of the lead of the small magnetic head and the control panel is loosen
or has bad contact.
Step 2: unplug wire of the small magnetic head from the control panel, and then check if the voltages of Pin 1 and 8 at
JP24 on the control panel are respectively about -2.5V and +2.5V, and their signal lines and earth wires about -2.5V and
+2.5V; if they’re abnormal, check corresponding circuits on the control panel.
Step 3: plug wire of the small magnetic head into JP24 on the control panel, and then check if the voltages of Pin 1 and 4
at JP24 on the control panel are respectively about -2.5V and +2.5V, and their signal wires and earth wires -2.5V; if
they’re abnormal, check corresponding circuits on the control panel; if the circuits are abnormal, it should be a problem of
the small manager head.
9)
Failure of the left and right position sensors.
Phenomenon: start the machine and it displays Left count sensor error.
Method of fault finding: Step 1: check if connections of the double barreled emitting lead, double barreled receiving lead
and the control panel are loosen or have bad contact.
Step 2: check if positive voltage of the emitting tube is about 1.2V; if the voltage is too much different, it should be a
problem of the emitting tube.
Step 3: check the voltages of Pin 1 and 3 at JP7; when the sensor is covered with plain paper, adjust the RA9 and RA10
potentiometers until the voltages of Pin 1 and 3 become 0.5V; and then take out the plain paper and check if the voltage of
Pin 3 is larger than 3V; if lower then 3V, replace the emitting tube or receiving tube.
Step 4: check if Pin 1 and 4 at JP7 are electrically connected with Pin 4 of the single chip.
8.2 Bill feeding motor doesn’t work
Please check output signal of the control panel and Pin 3 of JP3 of the motherboard. When the motor is working, it should
be in low level (>0.6V); when it is not working, it should be in high level (>3.6V). Check the power supply status.
Disassemble the bill feeding shield and then check if wire of the small motor is properly plugged onto the 4JP4 of the
power panel.
8.3 The main motor doesn’t work or is hard to be started
Check control signal of the main motor and output voltage status at the Pin 5 socket of JP3 on the motherboard. When the
motor is working, it should be square wave. When the motor is not working, it should be high level (>3.6V). Check if the
Maintenance Manual of Bill Counter
Page 49 of 84
two 9014s and TIP122s on the power panel have become ineffective. Check input and output status of RIF640.
8.4 Machine working but display abnormally
If there's interrupted display or darkened image, check if J6 (or J3J4) is well plugged or has bad contact.
If pressing of any key is ineffective, check if J5 on the display panel is well plugged; for 2 x 4 pin plug, you should plug
from Pin 1.
8.5 No response after being started
Turn off the machine immediately and check input and output requirement for the power supply section.
8.6The other failures
1) Shutoff protection
Turn off the power, more the machine to a place where is free of any disturbance, restart the machine.
2) Communication error
Step 1: restart the machine
Step 2: check if the connection wire is loosen or has bad contact
Step 3: check if version name of the software meets requirement of the factory setting
Maintenance and routine inspection
9.1 Weekly maintenance task
Remove dust; clean dirt and ink spill.
9.2 Semiannual maintenance task
Check worn condition of the machine
Check connection status of all plugs
Maintenance Manual of Bill Counter
Page 50 of 84
Appendix 1 Structure and assembly relationship of the mechanical part
Appendix 1.1 Relation Schema for assembly of structural components
Attached figure J1 Relation Schema for assembly of the machine
Relation Schema for assembly of the machine J2
Maintenance Manual of Bill Counter
Page 51 of 84
Relation Schema for assembly of the machine J3
Attached figure J4 relationship for assembly of the machine
Maintenance Manual of Bill Counter
Page 52 of 84
Attached figure J5 assembly relationship for rotation wheels
Attached figure J6 assembly relationship for the lower conveyance wheels
Attached figure J7 assembly relationship for the power panel
Attached figure J8 assembly relationship for the upper conveyance board
Maintenance Manual of Bill Counter
Page 53 of 84
Attached figure J9 assembly relationship for the lower rear cover board
Attached figure J10 assembly relationship for the bill linkage baffle
Attached figure J11 assembly relationship of bed plate
Maintenance Manual of Bill Counter
Page 54 of 84
Attached figure J12. Assembly relationship of the big motor
Attached figure J13 Assembly relationship of the friction wheels
Attached figure J14. Assembly relationship of the bill feeding wheels
Attached figure J15 Assembly relationship of the separating mechanism
Attached figure J16 Assembly relationship of the bill feeding wheel
Maintenance Manual of Bill Counter
Page 55 of 84
Attached figure J17 Assembly relationship of the lower conveyance baffle
Appendix 1.2 Part list for Relation Schema of assembly for the structural components
No.
Name of Part
Quantity
5
Bed plate component
1
3
Left shield
1
6
Shield component of bill receiving wheel
1
9
Bill receiving baffle
1
34
Component of control panel
1
11
Right shield
1
107
Component of rear lower cover board
1
20
Rear upper cover board
1
21
Separating structure
1
2
Component of bill linkage baffle
1
1
Handle component
1
30
Bracket component
1
203
Guard board
1
33
Component of rotating wheel
1
25
Component of the lower conveyance baffle
1
301
Cylindrical pinφ3x12
1
302
Small belt wheel (synchronous belt 52MXL025)
1(1)
303
Leakage synchronous belt wheel
1
304
Tachometer disc
1
305
Plain cushionφ5x12
1
306
Small dual synchronous belt wheel
1
307
synchronous belt 80MXL025
1
308
synchronous belt 53MXL019
1
Remark
Maintenance Manual of Bill Counter
Page 56 of 84
309
Motor component
1
310
Component of tachometer sensor
1
311
Sensor bracket
1
312
Component of left upper conveyance baffle
1
31
Component of power panel
1
32
Component of lower conveyance wheel
1
315
Component of right upper conveyance baffle
1
316
Feeding wheel component
1
317
Friction wheel component
1
401
Left side board
1
402
Left torsional spring ordination axis
1
403
Fixing bracket of rear upper cover boards
2
404
Spacing pins
2
405
Bottom board
1
406
Pins
4
407
Right side board
1
408
Supporting block
1
501
Rotating wheel axis
1
502
Fixed axises of pinch wheel bracket
2
503
Pinch wheel brackets
2
504
Left torsional spring of pinch wheel
1
505
Rotating wheels
2
506
Right torsional spring of pinch wheel
1
601
Rubber rings of lower conveyance wheel
2
602
Pinch rims of magnetic head
6
603
Wheel bases of lower conveyance wheel
2
604
Axix of lower conveyance wheel
1
605
Flexible cylindrical pinφ3x12
2
701
Heat elimination block
1
702
Pressing sleeve
3
703
Circuit board
1
801
Left upper conveyance baffle
1
802
Pan head screws with cross recess M3x5
3
803
Part of emitting circuit board of upper conveyance baffle
1
804
Part of counting circuit board of upper conveyance baffle
1
Maintenance Manual of Bill Counter
Page 57 of 84
805
Dust proof glass of illumination
1
806
Dust proof glass
1
901
Rear lower cover board
1
902
Selector switch part
1
903
Power switch part
1
904
Power socket part
1
905
External display cable
1
A01
Left heightening board
1
A02
Fixing board
1
A03
Gear
1
A04
Built-in block of fixing board
1
A05
Right lightening board
1
12
Upper cover board
1
A07
Rack cover board
1
B01
Bed plate
1
B02
Component of display panel
1
B03
Component of LCD control panel
1
B04
Part of bill feeding sensor
1
C01
Big motor
1
C02
Small belt wheel
1
C03
E ringφ6
1
D01
Friction wheel bodies
2
D02
Parts of friction blocks
2
D03
E ringφ8
2
D04
Friction wheel axis
1
D05
Flexible cylindrical pinφ3x12
2
D06
Upper conveyance wheel body
1
D07
Big rubber ring
1
E01
Feeding friction blocks
2
E02
Feeding wheel bodies
2
E03
Feeding wheel axis
1
F01
Pinch wheel reed
1
F02
Pinch wheel side boards
2
F03
Bracket die cast
1
38
Spacing rings
2
Maintenance Manual of Bill Counter
Page 58 of 84
37
Bracket fixing axis
1
F06
Bearing cap
1
F07
Bearing F688
1
F08
Pinch wheel
1
F09
Auxiliary pinch wheel
1
33
Auxiliary pinch wheel
1
F11
Separating wheel bodies
2
40
Upper baffle
1
F13
Separating wheel blocks
2
F14
Auxiliary pinch side boards
2
35
Separating axle
1
F16
Single-direction bearing HF0812
1
F17
Adjusting bolt
1
15
Adjusting knob
1
G01
Small motor component
1
G02
Bracket of feeding wheel
1
G03
Cotter pinφ2.5x6
1
G04
E ringφ6
3
G05
Flexible Cylindrical pinφ3x12
2
G06
Shaft liner
1
G07
Axis of feeding wheel
1
7
Bill feeding wheel
2
H01
Lower conveyance baffle
1
H02
Bar magnets
2
H03
UV light part
1
H04
Parts of receiving circuit board of lower conveyance baffle
2
H05
Part of circuit board of right magnetic head
1
H06
Cover of sensor
1
H07
Big magnetic head
1
H08
Counting and receiving parts
2
H09
Cover board of the big magnetic head
1
H10
Part of circuit board of left magnetic head
1
H11
Left base of magnetic head
1
Maintenance Manual of Bill Counter
Page 59 of 84
Appendix 2 Structural Relation Schema of the Electrical Part (for reference only)
Appendix 2.1 Electric schematic
1) Schematic diagram of the control panel
Attached figure D1 Schematic diagram of the L04-1.40E control panel
Maintenance Manual of Bill Counter
Page 60 of 84
Attached figure D2 Schematic diagram of the L04-1.15B control panel
Maintenance Manual of Bill Counter
Page 61 of 84
Attached figure D3 Schematic diagram of the MAIN0408-A control panel
Maintenance Manual of Bill Counter
Page 62 of 84
2) Schematic diagram of power panel
Attached figure D4 Schematic diagram of the POWER0404_e power panel
Maintenance Manual of Bill Counter
Page 63 of 84
3) Schematic diagram of display panel
Attached figure D5 Schematic diagram of the dspDIS0508-A digital display panel
Maintenance Manual of Bill Counter
Page 64 of 84
Attached figure D6 Schematic diagram of the L02-03-2.BA1 LCD display panel
4) Schematic diagram of display panel
Attached figure D7. Schematic diagram of the L09-4 external display panel
Maintenance Manual of Bill Counter
Page 65 of 84
Maintenance Manual of Bill Counter
Page 66 of 84
Attached figure D8. Schematic diagram of the XSQ02-A external display panel
Maintenance Manual of Bill Counter
Page 67 of 84
Appendix 2.2 Electrical Wiring Diagram
Attached figure D9 Electrical wiring diagram
Maintenance Manual of Bill Counter
Page 68 of 84
Appendix 2.3 Position Marking Diagram of Circuit Board
1) Position marking diagram of control panel
Attached figure D10 Position marking diagram of the L04-1.40E control panel
Attached figure D11 Position marking diagram of the L04-1.15B control panel
Maintenance Manual of Bill Counter
Page 69 of 84
Attached figure D12 Position marking diagram of the MAIN0408-A control panel
Maintenance Manual of Bill Counter
Page 70 of 84
2) Position marking diagrams of power panels
Maintenance Manual of Bill Counter
Page 71 of 84
Attached figure D13 Position marking diagram of the POWER0404_e power panel
3) Position marking diagrams of display panels
Maintenance Manual of Bill Counter
Page 72 of 84
Attached figure D14 Position marking diagram of the dspDIS0508-A display panel
Maintenance Manual of Bill Counter
Page 73 of 84
Attached figure D15 Position marking diagram of the L02-03-2.BA1 LCD display panel
Maintenance Manual of Bill Counter
Page 74 of 84
4) Position marking diagrams of display panels
Attached figure D16 Position marking diagram of the L09-4 external display panel
B
Maintenance Manual of Bill Counter
Page 75 of 84
Attached figure D17 Position marking diagram of the XSQ02-A external display panel
B
Maintenance Manual of Bill Counter
Page 76 of 84
Appendix 3 List of Electrical Components (for reference only)
Appendix 3.1 Component list of control panels
1) Component list of the L04-1.40E control panel
L04-1.40E
No.
1
2
3
4
5
Quantity
2
1
1
2
1
Making and Description
JT1,JT2
JP2
DZ1
L2,L3
L1
7
EC1,EC2,EC5,EC6,EC7,EC8,EC9
2
EC3,EC4
8
Name
pin
pin
regulator tube
bead
inductance
electrolytic
condenser
electrolytic
condenser
potentiometer
1
RA1
9
potentiometer
6
RA2,RA3,RA4,RA5,RA6,RA11
10
11
12
13
14
15
16
17
18
19
20
21
22
potentiometer
diode
LBD
crystal oscillator
integrated block
integrated block
integrated block
integrated block
integrated block
prover pipe
integrated block
integrated block
prover pipe
2
1
2
1
1
1
1
1
1
1
2
1
1
23
pin
5
24
25
26
27
28
29
30
31
32
33
cross jumper
nylon socket
nylon socket
nylon socket
nylon socket
nylon socket
nylon socket
IDC socket
IDC socket
SMD capacitor
2
1
1
3
2
2
1
1
1
11
34
SMD capacitor
15
35
36
37
38
39
SMD capacitor
SMD capacitor
SMD capacitor
SMD capacitor
SMD capacitor
2
1
2
2
1
RA9,RA10
D1
D2,D3
T1
U1
U3
U2
U31
U6
U4
U8,U9,U10
U21
U4
Respectively one in the lower and upper parts of L2,D_CT(upper part of
R9),L_CT,R_CT(upper part of R44)
JT1,JT2
JP16
JP1
JP12,JP14,JP25(weld from Pin 1 to Pin 4)
JP6,JP24
JP3,JP5
JP17和JP18(Pin 1 of JP17 suspended)
JP22
JP20
C1,C2,C3,C4,C5,C6,C7,C8,C9,C10,C39
C13,C14,C15,C16,C17,C20,C22,C23
C25,C26,C35,C40,C42,C48,C49
C11,C12
C37
C28,C36
C30,C34
C41
6
7
Maintenance Manual of Bill Counter
Page 77 of 84
40
41
SMD capacitor
SMD capacitor
5
4
42
SMD resistor
11
43
44
45
46
47
48
49
SMD resistor
22
SMD resistor
SMD resistor
SMD resistor
SMD resistor
SMD resistor
2
6
3
6
1
50
SMD resistor
19
51
SMD resistor
5
52
SMD resistor
1
53
SMD resistor
3
54
SMD resistor
1
55
SMD resistor
3
56
SMD resistor
1
57
SMD resistor
1
58
SMD resistor
1
59
SMD resistor
2
60
SMD resistor
6
61
Control circuit board
1
2) Component list of the L04-1.15B control panel
C18,C21,C27,C31,C32
C19,C29,C24,C33
R3,R4,R8,R10,R11,R12,R13
R14,R32,R88,R98
R1,R2,R15,R16,R17,R18,R19,R20,R21,R23,R24
R25,R26,R27,R28,R29,R30,R31,R42,R45,R113,R114
R62,R63
R33,R34,R47,R66,R79,R93
R55,R57,R83,R162,R163
R39,R53,R56,R71,R73,R118
R54
R22,R46,R49,R50,R52,R64,R65,R67,R70
R72,R76,R81,R82,R84,R85,R94,R95,R105,R102
R35,R37,R41,R5,R58
R38
R96,R36,R106
R40
R51,R74,R92
R48,R68,R75,R90,R91
R69
R77
R43,R108
Remove R6,R7,R44,R110,R109,R111
L04-1.40E
L04-1.15B
No.
Name
1
2
3
4
5
pin resistor
pin
regulator tube
bead
inductance
electrolytic
condenser
electrolytic
condenser
potentiometer
potentiometer
potentiometer
diode
LBD
Crystal oscillator
integrated block
integrated block
integrated block
integrated block
integrated block
prover pipe
6
7
8
9
10
11
12
13
14
15
16
17
18
19
Quant
ity
1
1
1
2
1
Marking and Description
RN1
JP2
DZ1
L2,L3
L1
7
EC1,EC2,EC5,EC6,EC7,EC8,EC9
2
EC3,EC4
1
6
2
1
2
1
1
1
1
1
1
1
RA1
RA2,RA3,RA4,RA5,RA6,RA11
RA9,RA10
D3
D1,D2
T1
U1
U3
U2
U31
U6
U4
Maintenance Manual of Bill Counter
20
21
22
integrated block
integrated block
integrated block
Page 78 of 84
1
1
1
U9,U10
U8
U21
Respectively one in the lower and upper parts of L2,D_CT(upper part of
23
pin
3
R13),L_CT,R_CT(upper part of R44)
24
nylon socket
1
JP16
25
nylon socket
1
JP1
26
nylon socket
2
JP12,JP14,JP25(weld from Pin 1 to 4)
27
nylon socket
1
JP6,JP24
28
nylon socket
2
JP3,JP5
29
nylon socket
1
JP17和JP18(Pin 1 of JP17 is suspended)
30
IDC socket
1
JP22
31
IDC socket
1
JP20
32
SMD capacitor
11
C1,C3,C4,C5,C6,C7,C8,C9,C10,C20,C39
C2,C13,C14,C15,C16,C17,C22,C23,C25
33
SMD capacitor
17
C26,C35,C38,C40,C42,C48,C49,C50
34
SMD capacitor
2
C11,C12
35
SMD capacitor
1
C37
36
SMD capacitor
1
C18,C21,C27,C31,C32
37
SMD capacitor
2
C28,C36
38
SMD capacitor
2
C30,C34
39
SMD capacitor
1
C41
40
SMD capacitor
4
C19,C29,C24,C33
R3,R4,R13,R17,R18,R19,R24
41
SMD resistor
13
R25,R88,R98,R129,R130,R134
R1,R2,R8,R9,R10,R11,R20,R22,R23,R30,R45
42
SMD resistor
31
R95,R99,R100,R113,R114,R126,R128,R131,R138,R143
R144,R145,R146,R150,R151,R152,R153,R155,R156,R157
43
SMD resistor
2
R62,R63
44
SMD resistor
5
R33,R34,R47,R66,R93
45
SMD resistor
5
R55,R57,R83,R162,R163
46
SMD resistor
9
R16,R21,R39,R53,R56,R71,R73,R97,R118
47
SMD resistor
1
R54
R42,R46,R49,R50,R52,R64,R65,R67,R70
48
SMD resistor
18
R72,R76,R81,R82,R84,R85,R94,R105,R164
49
SMD resistor
2
R135,R136
50
SMD resistor
5
R35,R37,R41,R5,R58
51
SMD resistor
1
R38
52
SMD resistor
2
R96,R36
53
SMD resistor
1
R40
54
SMD resistor
2
R51,R74,R92
55
SMD resistor
1
R48,R68,R75
56
SMD resistor
1
R69
57
SMD resistor
1
R77
58
SMD resistor
2
R78,R79
59
SMD resistor
3
去除R109,R110,R111
60
Control circuit board
1
L04-1.15B
3) Component list of the DCJMAIN0408_A control panel
DCJMAIN0408_A
Maintenance Manual of Bill Counter
No.
1
2
3
4
5
6
7
8
9
10
11
Page 79 of 84
Quantity
1
2
8
1
3
5
7
2
2
1
1
Marking and Description
R69
R1,R2
R3,R8,R20,R24,R26,R28,R70,R71
R72
R15,R18,R22
R17,R19,R21,R23,R27
R4,R6,R7,R9,R11,R12,R16
R5,R10
R14,R68
R13
R25
2
C32,C33
1
C10
14
15
16
17
18
19
20
21
22
Name
resistor
resistor
resistor
resistor
resistor
resistor
resistor
resistor
resistor
resistor
resistor
multilayer ceramic
capacitor
multilayer ceramic
capacitor
porcelain capacitor
porcelain capacitor
porcelain capacitor
porcelain capacitor
porcelain capacitor
electrolytic condenser
electrolytic condenser
diode
Crystal oscillator
1
5
7
1
1
1
4
1
1
23
bead
1
24
pin
2
25
26
27
28
29
30
31
32
33
34
35
36
37
38
39
potentiometer
potentiometer
potentiometer
integrated block socket
integrated block socket
integrated block socket
integrated block socket
integrated block
integrated block
integrated block
Single chip
Storage
Single chip
nylon socket
nylon socket
2
3
1
1
1
1
1
1
1
1
1
1
1
1
1
40
nylon socket
2
41
42
43
44
45
nylon socket
nylon socket
nylon socket
nylon socket
Control panel
1
1
1
2
1
C34
C11,C12,C14,C15,C16
C1,C2,C3,C4,C5,C8,C9
C31
C13
EC8
EC1,EC6,EC7,EC9
D7
T1
Corresponding hole position in the left side of JP11 (connection to
digital and analog earth)
One spot underneath the bead (anolog earth); one spot in the right
side of EC1 (digital earther)
RA9,RA10
RA2,RA3,RA4
RA1
IC6
IC4
IC2
IC5
IC3
IC1
IC6
IC4
IC2
IC5
JP6
JP11
JP1,JP3,JP7,JP17(LCD display only and equipped with application
for external display machine)
JP12,JP14
JP15
JP16
JP4,JP5
DCJMAIN0408_A
12
13
Maintenance Manual of Bill Counter
Page 80 of 84
Appendix 3.2 Component list of the power panel
POWER0404_e
No.
1
2
3
4
5
6
7
8
9
10
11
12
13
14
15
16
17
18
19
20
21
22
23
24
25
26
27
28
29
30
31
32
33
34
35
36
37
38
39
40
41
42
43
44
Name
resistor
resistor
resistor
resistor
resistor
resistor
resistor
resistor
potentiometer
capacitor
capacitor
capacitor
capacitor
capacitor
capacitor
capacitor
diode
diode
diode
diode
thyratron
thyratron
field effect tube
three-end regulator tube
three-end regulator tube
Rectification Bridge
nylon socket
nylon socket
nylon socket
nylon socket
nylon socket
power circuit board
pressing sleeve
support column
Heat elimination board
Heat elimination board
insulating piece
insulating lining
Pan head screws with cross recess
Pan head screws with cross recess
Flat padding
Pan head screws with cross recess
Pan head screws with cross recess
hexagon nut
Quantity
1
2
2
5
1
1
2
2
1
1
3
1
1
2
1
4
4
4
5
2
5
4
2
2
1
1
1
1
1
1
3
1
4
1
1
2
3
3
1
4
3
1
1
1
Marking and Description
4R14
4R5,4R11
4R12,4R7
4R1,4R2,4R3,4R10,4R15
4R8
4R4
4R6,4R9
4R13,4R16
4RA1
4EC5
4EC1,4EC2,4EC3
4EC9
4EC8
4EC10,4EC11
4C3
4C1,4C2,4C4,4C5
4D9,4D10,4D11,4D12
4D1,4D2,4D3,4D4
4D13,4D14,4D17,4D20,4D21
4D5,4D6
4Q1,4Q5,4Q8,4Q10,4Q11
4Q2,4Q3,4Q4,4Q7
4Q6,4Q9
4Q12,4T2
4T1
4BQ1
4JP1
4JP3
4JP2
4JP6
4JP4,4JP5,4JP7
POWER0404-E
Maintenance Manual of Bill Counter
Page 81 of 84
Appendix 3.3 Component list of display panels
1) Component list of dspDIS0508-A display panel
dspDIS0508-A
No.
1
2
3
4
5
6
7
8
9
10
11
12
13
14
15
16
17
Name
Quantity
resistor
8
resistor
1
resistor
1
resistor
1
resistor
3
capacitor
2
capacitor
2
capacitor
1
Crystal
1
LBD
7
thyratron
1
nexie tube
1
nexie tube
1
buzzer
1
nylon socket
1
nylon socket
1
nylon socket
1
integrated block
18
1
socket
19
integrated block
1
20
integrated block
1
Circuit board for
21
1
LED display
2) Component list of L02-03-2.BA1 LCD display panel
Marking and Description
R1,R2,R3,R4,R5,R6,R7,R8
2R2
R17
R12,R18
R9,R10,R11
C1,C2
C3,C4
EC1
T1
2L1,2L2,2L3,2L4,2L5,2L6,2L7
Q4
2LED1
2LED2
U1
JP1
JP2
2JP3
IC1
IC2
IC1
dspDIS0508-A
L02-03-2.BA1
No.
1
2
3
4
5
6
7
8
9
10
11
12
13
14
Name
resistor
resistor
resistor
electrolytic
condenser
electrolytic
condenser
electrolytic
condenser
porcelain capacitor
porcelain capacitor
pin resistant
Crystal
thyratron
integrated block
socket
Buzzer
nylon socket
Quantity
1
2
2
Marking and Description
R2
R5,R6
R3,R4
2
E1,E4(bend pin into 90 degrees and lay it down for welding)
1
E3
1
E2 (bend pin into 90 degrees and lay it down for welding)
2
2
1
1
1
C1,C2 (pin has to be inserted to the bottom)
C3,C4 (pin has to be inserted to the bottom)
RA1
T1
Q1
1
U1
1
1
U3
J2EE
(bend pin into 90 degrees and lay it down for welding)
Maintenance Manual of Bill Counter
Page 82 of 84
15
nylon socket
1
double-row crooked
16
1
pin
HARP bracket of
17
double-row crooked
1
pin
18
integrated block
1
LCD display circuit
19
1
board
Appendix 3.4 Component list of external display panels
1) Component list of the L09-4 external display panel.
J8
J5
J6
U1
L02-03-2.BA1
L09-4
No.
1
2
3
4
5
6
7
8
9
10
11
12
13
14
15
16
Name
resistor
resistor
resistor
resistor
resistor
porcelain capacitor
porcelain capacitor
multilayer ceramic
capacitor
electrolytic
condenser
diode
thyratron
Crystal
nexie tube
nexie tube
integrated block
socket
Single chip
Quantity
7
2
7
1
4
1
1
Marking and Description
R2,R3,R4,R5,R6,R7,R8
R20,R21
R9,R10,R11,R12,R13,R14,R15
R1
R16,R17,R18,R19
C1
C4
2
C2,C3
1
EC1
2
7
1
2
1
D1,D2
Q1,Q2,Q3,Q4,Q5,Q6,Q7
T1
LED1,LED2
LED3
1
IC1
1
IC1
SGND(black wire),VCC(red wire),RXD(green wire),TXD(yellow
17
Connection wire
1
wire)
18
PCB board
1
L09-4
2) Component list of the XSQ02-A external display panel
XSQ02-A
No.
1
2
3
4
5
6
7
8
9
10
Name
resistor
resistor
capacitor
capacitor
Crystal
thyratron
capacitor
nexie tube
nylon socket
integrated block
socket
Quantity
8
3
2
1
1
3
1
1
1
Marking and Description
R2,R3,R4,R5,R6,R7,R8,R12
R14,R15,R16
C1,C2
C3
T1
Q1,Q2,Q3
EC1
2LED1
JP1
1
IC1
Maintenance Manual of Bill Counter
11
12
integrated block
Circuit board for
external display
Page 83 of 84
1
IC1
1
XSQ02-A