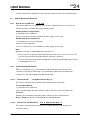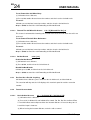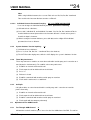
1
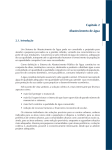
EG
USER MAUNAL
1
2
3
4
24
General Description..................................................................................................... 1
System Specification & Function................................................................................ 2
2.1 Components Description ................................................................................... 2
2.2 System Configuration......................................................................................... 3
2.3 Electrical & Other Specifications....................................................................... 3
2.4 System Features List ......................................................................................... 4
Preparation & Note for the System Installation......................................................... 5
3.1 Preparation for System Installation................................................................... 5
3.2 Special Requirements for Installation Environment ........................................ 5
3.3 Equipment Remarks .......................................................................................... 5
3.4 Safety Warnings ................................................................................................. 5
EG-24 PCB & Cabinet Layout.................................................................................... 6
4.1 Three-view Drawing Of EG24 ........................................................................... 6
4.2 EG-24 Mother Board Unit (W8MBUA) ............................................................. 7
4.3 4 CO Trunk Unit (W8TKUA) .............................................................................. 7
4.4 GSM Line Card (W8GMBA) .............................................................................. 8
4.5 GSM Module Card (W8GM1B) ......................................................................... 8
4.6 GSM Power Supply Board (W8GMPA ......................................................... 9
4.7 GSM FAX Card (W8FAXA)................................................................................ 9
System Program Setting ........................................................................................... 10
5.1 Enter the System Program Mode ................................................................... 10
5.2 System Reset ................................................................................................... 10
5.3 CO line connection setting .............................................................................. 10
5.4 Answer Mode for CO line incomings .............................................................. 11
5.5 Record/Play of the Voice Announcement ...................................................... 11
5.6 Ringing Extension Assignment ....................................................................... 12
5.7 1st Operator Extension Setting........................................................................ 12
5.8 2nd Operator Extension Setting] ...................................................................... 12
5.9 Extension COS (Class of Service) Assignment............................................. 12
5.10 Extension No. Length Setting ......................................................................... 13
5.11 Extension Number Setting............................................................................... 13
5.12 System Password Changing ........................................................................... 13
5.13 CO Line Hunting Code Setting........................................................................ 14
5.14 Availability of Ext. to Access CO Line............................................................. 14
5.15 Prohibited Code Setting................................................................................... 14
5.16 Special Local Call No. Setting......................................................................... 14
5.17 Forced Account Setting.................................................................................... 15
5.18 1st Landline Prefixed Number Setting............................................................. 15
5.19 2nd Landline Prefixed Number Setting............................................................ 15
5
Aristel
Group
CONTENT
EG
6
24
USER
MAUNAL
5.20 Flash/Hold time Duration Setting.................................................................... 15
5.21 Internal/External Music Resources Switch .................................................... 16
5.22 Fax Extension Setting...................................................................................... 16
5.23 Door Phone Setting.......................................................................................... 16
5.24 Transfer Indication Tone Selecting ................................................................. 16
5.25 System On-hold Music Selecting.................................................................... 17
5.26 Auto Attendant Response Time Setting ......................................................... 17
5.27 DISA No Dialing Processing Mode................................................................. 17
5.28 Manager and Secretary Pair Setting .............................................................. 17
5.29 Emergency call Setting .................................................................................... 18
5.30 Multiple CO Hunting Code Setting.................................................................. 18
5.31 Intercom Hot Line setting................................................................................. 18
5.32 Reserved........................................................................................................... 19
5.33 Speed Dialing Setting....................................................................................... 19
5.34 Reserved........................................................................................................... 19
5.35 Enable/Disable 1st Prefixed Number .............................................................. 19
5.36 Reserved........................................................................................................... 19
5.37 Empty The Extension No................................................................................. 19
5.38 Extension Group Setting.................................................................................. 19
5.39 Reserved........................................................................................................... 20
5.40 Turn on/off CLI Number On Outgoing Calls................................................... 20
5.41 Receiving Level of GSM Channel................................................................... 20
5.42 Sending level of GSM Channel....................................................................... 20
5.43 GSM Voice Rate Setting.................................................................................. 20
5.44 Working Mode of 1st GSM Channel................................................................ 21
5.45 GSM Channel Prefixed Number ..................................................................... 21
5.46 Remote programming ...................................................................................... 21
SLT Extension Operation .......................................................................................... 22
6.1 Make An Intercom Call..................................................................................... 22
6.1.1 Common Intercom Call .......................................................................... 22
6.1.2 Call The Operator Extension................................................................. 22
6.1.3 Intercom Callback................................................................................... 22
6.1.4 Call The Extension Group ..................................................................... 22
6.2 Make An Outside Call ...................................................................................... 22
6.2.1 CO Line Hunting..................................................................................... 23
6.2.2 Trunk Queuing Callback ........................................................................ 23
6.2.3 Last Number Redialing .......................................................................... 23
6.2.4 CO Line Flash......................................................................................... 23
6.3 Call Transfer / Call Pickup / Call Hold / Retrieve The Held Call .................. 24
CONTENT
Aristel
Group
USER MAUNAL
7
EG
24
6.3.1 Transfer ................................................................................................... 24
6.3.2 Directed Call Pickup............................................................................... 24
6.3.3 General Call Pickup ............................................................................... 24
6.3.4 Call Hold / Retrieve The Held Cal......................................................... 24
6.4 Special Operation of Extension....................................................................... 25
6.4.1 Auto-Accessing CO Line ....................................................................... 25
6.4.2 Call Forward/Do-Not-Disturb................................................................. 25
6.4.3 Ext. Port No. & Ext. No. Inquiring ......................................................... 26
6.4.4 Forced Account Code ............................................................................ 26
6.4.5 System Software Version Inquiring....................................................... 27
6.4.6 Three-Way Conference.......................................................................... 27
6.4.7 Call Split .................................................................................................. 27
6.5 Operation Of The GSM Channel .................................................................... 27
6.5.1 Fax Through GSM Channel .................................................................. 27
6.5.2 Inquiry Of GSM Signal Strength............................................................ 28
6.5.3 Inquiry Of The Status Of GSM Channel ............................................... 28
Appendix: Instructions Table of Settings and Operations...................................... 29
Aristel
Group
CONTENT
USER MAUNAL
1
EG
24
General Description
Thanks for choosing our EverwiseEG-24 GSM access telephone switching system.
Based on the Aristel traditional telephone system, EG-24 not only provides 4 PSTN line
connections but also 4 GSM channels optionally. At some particular areas where the PSTN
lines are not supported or not easy for installation but are covered by the GSM networks,
such as remote jungles or mountains, the mobile offices, moving vehicles, this device is the
best and the most economical method to use the telecommunication facility.
Moreover the Service Providers can increase their marketing shares of GSM networks by
installing this PABX at the users’ sites.
The basic capacity of EG-24 is 16 Single Line stations, and can be expanded with 4 analog
CO line connections such as PSTN landline, and a maximum of 4 GSM access channels.
This User manual gives clear descriptions of all the steps for installation and operation. If
you have any queries, please contact your authorized agent for help.
Aristel
Group
1
EG
2
24
USER
MAUNAL
System Specification & Function
2.1
Components Description
Model No.
Description
Remarks
W8-016F
KEY SERVICE UNIT, consisting of (Plastic Cabinet + W8MBUA + W8PWUA,
with 1 Channel 40 seconds Auto Attendant)
Standard
Shipment
W8-416F
KEY SERVICE UNIT, consisting of (W8-016F + W8TKUA, with 1 Channel 40
seconds Auto Attendant and 4 channels Caller ID feature)
Standard
Shipment
W8-216M
KEY SERVICE UNIT, consisting of (W8-016F + W8GMBA + W8GSMA +
2×W8GM1B, with 1 Channel 40 seconds Auto Attendant )
Standard
Shipment
W8-616M2
KEY SERVICE UNIT, consisting of (W8-016F + W8TKUA + W8GSMA +
W8GMPA + 2×W8GSMM2, with 1 Channel 40 seconds Auto Attendant )
Standard
Shipment
W8-616M3
KEY SERVICE UNIT, consisting of (W8-016F + W8TKUA + W8GSMA +
W8GMPA + 2×W8GSMM3, with 1 Channel 40 seconds Auto Attendant )
Standard
Shipment
W8MBUA
MOTHER BOARD UNIT, consisting of (16 Single Line Station Ports, with 1
Channel 40 seconds Auto Attendant and interface for W8TKUA)
Spare Part
W8PWUA POWER ADAPTOR, for Key Service Unit
Spare Part
W8TKUA
4 CO TRUNK UNIT, with 4 channel Caller ID
Expansion Card
W8GSMA
GSM / 3G LINE CARD, providing 4 interfaces for GSM or 3G modules card
(W8GSMM2 / W8GSMM3 / W83GMM1 / W83GMM2)
Expansion Card
Necessary Part
if using W8GMBA
W8GMPA GSM POWER SUPPLY BOARD, for GSM / 3G LINE CARD
W8GSMM2
GSM MODULE CARD, supporting GSM 900/1800/1900 MHz with 1 antenna
and one channel Caller ID feature.
Expansion Card
W8GSMM3
GSM MODULE CARD, supporting GSM 850/900/1800/1900 MHz with 1
antenna and one channel Caller ID feature
Expansion Card
W83GMM1
3G MODULE CARD, supporting W-CDMA 900/2100 MHz and GSM
850/900/1800 MHz with 1 antenna and one channel Caller ID feature.
W83GMM2
3G MODULE CARD, supporting W-CDMA 850/1900/2100 MHz and GSM
850/900/1800/1900 MHz with 1 antenna and one channel Caller ID feature.
W8FAXA
GSM FAX BOARD, enabling the 1ST GSM Channel to provide FAX function
2
Expansion Card
(Under
Development)
Expansion Card
(Under
Development)
Optional Card
(Under
Development)
Aristel
Group
EG
USER MAUNAL
2.2
24
System Configuration
EG-24
Basic Capacity
Expansion Capacity
Maximum Capacity
Analog CO Line
0
4
4
Single Line Station
16
0
16
Built-in Auto Attendant
1
0
1
GSM access channel
0
1
4
0
4
4
Power Failure Transfer
Phone (PFT)
2.3
Electrical & Other Specifications
EG Series
Power Adapter
EG-24
Input
AC220V ±15
Output
25V 1A & 75V 0.02A
System
Power Consumption
22W
GSM
2W
SLT
Dialing
Outgoing Dialing
DTMF
Signal
Intercom Dialing
DTMF
Wiring Installation
CO Line
2 wires
System Dimension mm
Working Temperature
Working Humidity
Switch Mode
Aristel
SLT
0.85W
2 wires
306×205×70mm
Subject
50Hz
-10 ~40
≤85
SDM
non-condensing
Space Division Matrix
to the changes without notice.
Group
3
EG
2.4
24
USER
MAUNAL
System Features List
Features Of GSM Access:
Support 3G W-CDMA 850/900/2100 MHz and GSM 850/900/1800/1900MHz at option.
Sending and receiving volume adjustment
Inquiry of GSM signal strength.
Prefixed number dialing for outgoing call through GSM access channel
GSM Fax (Optional)
Special Features:
Flexible Extension Numbering with 2 to 4 digits length and the first digit is 1 - 8 at option.
The Caller ID number will be displayed no matter from the incoming lines or intercom. This
number also can be forwarded to other extension.
Up to 16 ringing extensions for the incoming calls can be assigned and display CID number.
Virtual Extension for system speed dialing and Calling Extension Group
Power Failure Transfer Phone (PFT) for 4 Analog CO Lines.
Built-in Auto Attendant function for greeting message up to 40 seconds.
Built-in PBX trunk line access code while EG-24 connected behind external PBX.
Provides 40 groups Force Account Code in total for Toll call management.
Multi-level Toll Restriction programmable: Internal calls, Local calls, Long Distance calls and
International calls.
Provides 20 sets programmable restricted code for outgoing calls.
Self-checking of port number and extension number to facilitate the installation.
EEPROM Memory Design to ensure the programming can be saved even power failed.
Other features:
Call Pickup/ Transfer/ Forward
Three-way Conference
Call Split
Multiple CO Line Hunting Code
Intercom Hot Line
4
Aristel
Group
EG
USER MAUNAL
3
3.1
24
Preparation & Note for the System Installation
Preparation for System Installation
Please check whether the system capacity is suitable.
Please prepare the necessary wires and instruments for installation.
Please carefully read this manual before installation and follow up the procedures of
installation on this manual.
3.2
Special Requirements for Installation Environment
Input AC Voltage: AC220V±15
Wiring Requirements
CO Line: 2-conductor wiring
SLT Extension: 2-conductor wiring
External Music Source: 2-conductor wiring
3.3
Equipment Remarks
The system should be installed at a clean, dry and secure place, 10 centimeters above the
ground to avoid the vibration.
The location must have adequate ventilation and a temperature range between
-10 ~40
with a ≤85% non-condensing relative humidity.
The installation site should have sufficient room to mount the System along with the
necessary connecting blocks and ancillary equipment. The installation site should not be at
the area with static electricity (e.g. Dry copiers), or vibration (e.g. Heavy duty machinery).
This system must use the independent power input. The power should better not share
with other power-consumption equipment, for example: huge power-consumption machine
and be controlled directly by main switch. In addition, the location must be far away from
high frequency & noise soundings to avoid the interference from radiation
EMI .
Voltage Stabilizer is recommended if the electricity supply is not so stable.
Please use the lightening-protection equipment to guarantee system’s stability.
Suggest using twist wires for CO line & station line to avoid noise and interruption.
SLT wiring must be away from some other disturbance (e.g.
radio wave). Otherwise a
separate earth is required in addition to the third earth wire on the AC circuit.
3.4
Safety Warnings
Avoid using the device in areas where wireless transmission equipment is prohibited such
as hospitals, health care facilities and on board aircraft.
Aristel
Avoid using the device in petrol stations, bunkers or places of chemical storage.
Group
5
EG
4
USER
MAUNAL
EG-24 PCB & Cabinet Layout
4.1
6
24
Three-view Drawing Of EG24
Aristel
Group
USER MAUNAL
4.2
EG-24 Mother Board Unit (W8MBUA)
EG
24
1 Extension Ports 11-26: 4 pcs of RJ45 connectors. Among 8 pins of each RJ45, each pair of
pin1 and pin2, pin3 and pin4, pin5 and pin6, pin7 and pin8 connects with one extension
respectively.
2 CO Ports 1-4: RJ45 connector with 8 pins, among which each pair of pin1 and pin2, pin3 and
pin4, pin5 and pin6, pin7 and pin8 connects with one CO line respectively.
3 System power connector (USB form)
4 For connections with W8TKUA
5 For connections with W8GMPA
6 For connection with W8GMBA
7 Power indicator Light
8 Fuse
4.3
4 CO Trunk Unit (W8TKUA)
1
Aristel
For connection with W8MBUA-4
Group
7
EG
4.4
24
USER
MAUNAL
GSM Line Card (W8GMBA)
1 For connection with W8GSMM /W83GMM,the 1st GSM channel
2 For connection with W8GSMM/W83GMM,the 2nd GSM channel
3 For connection with W8GSMM/W83GMM,the 3rd GSM channel
4 For connection with W8GSMM/W83GMM,the 4th GSM channel
5 For connection with W8GMPA
6 For connection with W8MBUA-6
7 For connection with W8FAXA
8 For connection with antenna 1/2/3/4 corresponding to GSM channel 1/2/3/4
4.5
GSM Module Card (W8GSMMW83GMM)
1 For connection with W8GMBA-1/2/3/4
2 SIM card holder Always switch the power off before installing or removing the SIM
8
card. Press the slider of the holder and move in the direction marked “Open” to release the
lock and open the card holder. Insert the SIM card with the gold-colored contacts facing
Aristel
Group
EG
USER MAUNAL
24
down and the beveled corner facing outward. Then close the holder, press the slider and
move it in the opposite direction until a click sound is heard.
3 Indicator Light: blinking quickly (about every 1 second) to indicate being registering with the
networks; blinking slowly (about every 5 seconds) to indicate successful registration with
the networks
4.6
GSM Power Supply Board (W8GMPA
4.7
For connection with W8GMBA-5
GSM FAX Card (W8FAXA)
1 For connection with W8GMBA-7
Aristel
Group
9
EG
5
24
USER
MAUNAL
System Program Setting
5.1
Enter the System Program Mode
# * 10
[System Password]
All settings are available only under the system program mode and can be done by any
extension. To enter the system program mode:
(1) Off hook to hear the dial tone;
(2) Press # * 10, enter the System Password (5 digits);
(3) The system comes into the program mode while hearing the dial tone again;
(4) Operate the required setting. Hear the dial tone when setting is successful;
(5) Repeat Step (4) to continue other settings.
Note:
The default system password is 00000; Please reset the system before commencing system
program for the first time.
During the system programming, a dial tone indicates that the setting is successful and other
settings can be continued. However, if the setting failed, you will hear a busy tone, then
please “hook flash” or press the “Flash” Key to hear a dial tone and continue the settings.
** is to indicate all the extensions (*** for 3 digits extension number and **** for 4
digits);
The system provides up to 8 channels of CO line connections, among which 4 channels are
for GSM access and the other 4 channels are for analog trunk such as PSTN. Hereinafter
where the CO line No. is needed in the settings, 1 to 4 is to indicate the four GSM access
channels, 5 to 8 to indicate the four analog trunks and 9 to indicate all the CO lines.
5.2
System Reset
# * 20
[System Password]
This setting is to restore all the setting values to factory default.
(1) Under the system program mode, Press # * 20, enter the System Password (5-digits);
(2) Dial tone is heard to confirm successful reset after a pause of about three seconds.
5.3
CO line connection setting
#*11
[CO Line No.]
[0/1]
When one channel of CO lines is not used, it must be set as not connected to keep the user
away from the access to a non-existent CO line.
(1) Under the system program mode, Press # * 11, CO Line No., then press M;
M = 0, not connected.
M = 1, connected;
(2) Hear dial tone while setting successfully.
Note: The default setting for all the CO lines is as connected;
10
Aristel
Group
EG
USER MAUNAL
5.4
Answer Mode for CO line incomings
# * 12
[CO Line No.]
24
[Answer Mode M]
Each CO line can be assigned as either of the two modes to answer the incoming calls: Ring
the assigned extension or Answered by auto-attendant.
(1) Under the system program mode, Press # * 12, CO Line No. and M;
M = 0 Ring the assigned extension;
M = 1 Answered by Auto-attendant.
(2) Hear dial tone while setting successfully.
Note:
Mode of ringing the assigned extension is the factory default setting;
5.5
Record/Play of the Voice Announcement
# * 13 + [Record/Play: M] + [Segment: N]
When in auto-attendant mode, the system will provide voice announcement for the outside
caller to directly access an extension. The users can record the message as they preferr. Totally
there are three segments of voice announcement. The first is greeting message, the second is
“Extension Busy” Announcement and the third is “No answer” Announcement.
M = 1 to Record message;
M = 2 to Play message.
N indicates the Segment, N=1~3
Operation of recording the first segment:
1) Under the system program mode, Press # * 13, 1 (indicates to record) and 1 (indicates the
Segment 1);
(2) Begin the recording of the first segment of message after hearing a prompt sound “Di”;
(3) On-hook to finish recording;
(4) Repeat the above three steps to record the massage of Segment 2 and Segment 3.
Note:
Always begin recording after the “Di” sound is heard.
The first segment is for greeting message such as “Please dial the extension number. For
operator please dial 0.” The second is for “Extension Busy” Announcement, such as “The
extension you dialed is busy now, please dial later or call other extension”. The third segment
is for “No answer” Announcement, such as “The extension you dialed is no answer, please
dial later or call other extension”.
The Segment 2 and Segment 3 will be erased when the first Segment 1 is recorded; The
Segment 3 will be erased when the Segment 2 is recorded.
Please refer to the following suggestions while recording the message.
a. Choose a quiet environment
b. Always use handset instead of microphone (handsfree)
c. Press the hook on instead of hanging down the handset after finished recording.
Aristel
Group
11
EG
5.6
24
USER
Ringing Extension Assignment
# * 14
[Ext. No.]
[CO Line No.]
MAUNAL
[1/0]
Under the mode of Ringing assigned extension for incoming calls, when there is an incoming
call, the assigned extension will ring; The operator extension will ring if no ringing extension is
assigned. If the1st operator extension is not answered within 25 seconds, the 2nd one will ring
st
nd
together. While if the 1 one is busy, the 2 one will ring immediately.
To assign the Ringing Extension:
(1) Under the system program mode, Press # * 14, extension No., CO Line No., then 1;
(2) When the dial tone is heard, the extension is set as the ringing extension for the
corresponding Co line.
To disable the Ringing Extension:
Press # * 14 extension No., CO Line No., then 0.
To disable all the Ringing Extension:
Press # * 14 and ** (or ***,or **** depending on the ext. No. length), CO Line No., then 0.
Note:
An extension can be set as ringing extension for more than one CO line and one CO line can
be assigned more than one ringing extension as well.
5.7
1st Operator Extension Setting
# * 15
[Extension No.]
One extension can be set as operator extension. Extension 11 serves as the 1st operator
extension under factory default setting
(1) Under the system program mode, Press # * 15, then the extension No.
(2) Hear dial tone while setting successfully.
Note: Press # * 15 then # to cancel the 1st attendant extension setting.
5.8
2nd Operator Extension Setting
# * 16
[Extension No.]
nd
The 2 operator extension serves as the backup of the 1st attendant extension.
(1) Under the system program mode, Press # * 16, then press the extension No.
(2) Hear dial tone while setting successfully.
Note: Press # * 16 then # to cancel the 2nd attendant extension setting.
5.9
Extension COS (Class of Service) Assignment
# * 17
[Ext. No.]
[Ext. COS]
Each Extension can be assigned one of the six COSs.
(1) Under the system program mode, Press # * 17, Extension No., then Ext. COS M;
M = 1 can dial intercom calls only;
M = 2 can dial local call (number not prefixed by 0) except Special local call and restricted
by Prohibited Code;
M = 3 can dial all the local call, but restricted by Prohibited Code;
12
M = 4 can dial domestic long distance call (number prefixed by 0 except 00), but restricted
by Prohibited Code;
Aristel
Group
EG
USER MAUNAL
24
M = 5 Only restricted by Prohibited Code;
M = 6 No dialing restriction.
(2) Hear dial tone while setting successfully.
Note:
1 to 5 are all restricted by Prohibited Code. Please refer to 5.15 the Prohibited Code setting.
The default value of all the extension’s COS is 5.
5.10 Extension No. Length Setting
# * 18 + [Ext. No. Length I] + #
The extension number length can be set as 2 digits, 3 digits or 4 digits.
(1) Under the system program mode, Press # * 18, and I, then #
I = 2 the extension number length is 2 digits;
I = 3 the extension number length is 3 digits;
I = 4 the extension number length is 4 digits.
(2) Hear dial tone while setting successfully.
Note:
When the setting is done, all the extension number are restored to factory default value:
Extension No. 11~26 for 2 digits, 801~816 for 3 digits, while 8001~8016 for 4 digits.
The default value of extension number length is 2 digits.
5.11 Extension Number Setting
# * 19 + [Ext. Port No. 1] + [Ext. No. 1]+*+ [Ext. Port No.
2] + [Ext. No. 2]+*+…+ [Ext. Port No. N] + [Ext. No. N]+*+#
This setting is to assign an extension number to each extension port. Extension number can be
flexibly assigned within 10 to 89, 100 to 899, or 1000 to 8999 after the extension number length
is defined.
(1) Under the system program mode, Press # * 19, Extension Port No. and Extension No., then *
to finish the setting of current Extension Port and to the setting of next Extension Port.
Repeat the above process to continue the other Extension Ports setting
(2) Press # to exit the Extension Number Setting and hear the dial tone.
Note:
The Extension Port Number is a fixed number from 11 to 26.
A busy tone is heard to deny the current extension port setting if the extension number has
already been assigned to other extension port. When this happen, just Flash to hear the dial
tone and remain in program mode.
5.12 System Password Changing
#*21
[New System Password]
(1) Under the system program mode, Press # * 21, then enter 5-digits new password.
(2) Hear dial tone while setting successfully.
Aristel
Group
13
EG
24
USER
5.13 CO Line Hunting Code Setting
MAUNAL
# * 22 + [9 or 0]
The CO line hunting code can be set as 9 or 0. The default setting is 9.
(1) Under the system program mode, Press #*22, then 9 or 0;
(2) Hear dial tone while setting successfully.
Note: When either 9 or 0 is set as CO line hunting code, the other digit is automatically set as
access code for operator extension.
5.14 Availability of Ext. to Access CO Line
# * 23 + [Ext. No.] + [CO Line No.] + [1/0]
This setting is to define the availability of an extension to access a specific CO line.
To enable the availability:
(1) Under the system program mode, Press # * 23, Extension No., CO Line No. then 1;
** is to indicate all the extensions (*** for 3 digits extension number and **** for 4 digits);
while 9 is to indicate all the CO lines;
(2) Hear dial tone while setting successfully.
To disable the availability:
(1) Under the system program mode, Press # * 23, Extension NO., CO Line No. then 0;
(2) Hear dial tone while setting successfully.
Note: Each extension is entitled to access all the CO Line when factory out.
5.15 Prohibited Code Setting
# * 24 + [Group No.] + [Prohibited Code] + #
This system provides Maximum 20 groups of prohibited code.
(1) Under the system program mode, Press # * 24, Group No. (01~20), Prohibited Code, then #;
(2) Hear dial tone while setting successfully.
Note:
To cancel one group of prohibited code: Press # * 24, Group No., then #.
To cancel all the prohibited code: Press # * 24, **, then #.
5.16 Special Local Call No. Setting
#*25 + [Group No.] + [Special Local Call No.] + #
The system provides Maximum 30 groups of special local call number with a maximum length of
5 digits.
(1) Under the system program mode, Press # * 25, Group No (01~30), special local call number,
then #;
(2) Hear dial tone while setting successfully.
Note:
14
To cancel one group of special Local Call: Press # * 25, Group No, then #.
To cancel all the special Local Call: Press # * 25, **, then #.
Aristel
Group
EG
USER MAUNAL
5.17 Forced Account Setting
24
# * 26 [Individual ID] [Individual PW] + [COS]
Forced account consists of a 2-digits ID and a 4-digits Password. Each forced account is
assigned a Class of Service Level. Forced account let you temporarily override an extension’s
toll restriction. This system provides Maximum 40 groups of forced account.
(1) Under the system program mode, Press # * 26, Individual ID (01~40) , individual
password
then COS;
(2) Hear dial tone while setting successfully.
Note:
Pls refer to 5.0 Extension COS Assignment for COS definition.
To cancel all the forced account: # * 26 + ** + #.
st
5.18 1 Landline Prefixed Number Setting
st
# * 27 + [1 Landline Prefixed Number] + #
This setting is to set a prefixed number, which can be automatically added to the front of all the
dialed outgoing number through analog CO line (CO Line 5 to CO Line 9).
(1) Under the system program mode, Press # * 27, entering the 1st landline prefixed Number
(Maximum 4 digits), then #;
(2) Hear dial tone while setting successfully.
Note:
The factory default value of 1st landline prefixed number is None.
To cancel the 1st landline prefixed number: # * 27 + #.
5.19 2nd Landline Prefixed Number Setting
# * 28 + [2nd Landline Prefixed Number] + #
Besides the 1st prefixed number, this setting is to set 2nd prefixed number, which can be
automatically added to the front of the dialed number with 0 initial, that is long distance call. The
2nd prefixed number is added after the 1st prefixed number and only for the outside call through
analog CO line (CO Line 5 to CO Line 9)
(1) Under the system program mode, Press # * 28, entering the 2nd landline prefixed Number
(Maximum 10 digits then #;
(2) Hear dial tone while setting successfully.
Note:
* can be inserted between the prefixed number to stand for a pause of 2 seconds.
The factory default value of 2nd landline prefixed number is None.
To cancel the 2nd landline prefixed number: # * 28 + #.
5.20 Flash/Hold time Duration Setting
# * 29 + [Duration]
(1) Under the system program mode, Press # * 29, then I, I is to indicate the duration: I = 3
4 …
9 and stands for 0.3 0.4 … 0.9 second respectively;
(2) Hear dial tone while setting successfully.
Aristel
Group
15
EG
24
USER
MAUNAL
Note: The factory default value is 0.6 second.
5.21 Internal/External Music Resources Switch
# * 30 + [0/1]
This setting is to choose Internal or External Music Resources.
(1) Under the system program mode, Press # * 30, then I;
I = 0 Internal Music Resources
I = 1 External Music Resources
(2) Hear dial tone while setting successfully.
Note: The Factory Default is internal music resources.
5.22 Fax Extension Setting
# * 31 [Fax Ext. No.]
When a fax extension is set, the outside caller can dial 9 to directly access the fax extension
under auto-attendant voice announcement.
(1) Under the system program mode, Press # * 31, then Fax Extension Number;
(2) Hear dial tone while setting successfully.
Note:
No fax extension is set when factory out. To cancel Fax Extension: # * 31 + #.
After a fax extension is set, you’re suggested to add the message of “for fax please dial 9”
into the Voice Announcement.
Only the facsimile machine connected with the fax extension port can receive the FAX from
the 1st GSM channel
5.23 Door Phone Setting
# * 32 + [Door Phone Ext. No.]
When an extension is set as door phone, it will call the attendant extension immediately while
off hook.
(1) Under the system program mode, Press # * 32, then the door phone extension No. ;
(2) Hear dial tone whilst setting successfully.
Note: To Cancel Door Phone: # * 32, then #.
5.24 Transfer Indication Tone Selecting
# * 33 + [CO Line No.] + [0/1]
When a outside call comes in, the transfer indication Tone can be either the On-hold Music or
the Ring Back Tone.
(1) Under the system program mode, Press # * 33, CO Line No. (9 is to indicate all the CO
lines), then I
I = 0:
To set the Indication Tone as Ring Back Tone
I = 1:
To set the Indication Tone as On-hold Music
(2) Hear dial tone while setting successfully.
16
Note: The factory default value is Ring Back Tone.
Aristel
Group
EG
USER MAUNAL
5.25 System On-hold Music Selecting
24
# * 34 + [Music No. M]
The system provides 6 kinds of On-hold music, and the user can select one of them at their
discretion.
(1) Under the system program mode, Press # * 34, then the Music No. M M = 1-8
(2) Hear dial tone while setting successfully.
Note: The user may enjoy all the On-hold music before selecting: Off hook, press * 7, and the
Music No. M (M = 1-8).
5.26 Auto Attendant Response Time Setting
# * 35+ [CO Line No.] + [ Time ]
When there is no CID function needed, this setting can be used to accelerate the response of
auto attendant. When the Time is set as 0, the auto-attendant will response once the ring
current is detected and ignore the detection of the CLI number. The time is also used as the
maximum CLI number detection time.
(1) Under the system program mode, Press # * 35, then CO Line No. and Time. Time = 0 1
2 …,9 seconds.
(2) Hear dial tone while setting successfully.
Note: The default value of the time is 6 seconds.
5.27 DISA No Dialing Processing Mode
# * 36 + [0/1]
If DISA call is answered by the system and no digits are entered, the system will transfer the call
to the operator or terminate the call according to the setting.
(1) Under the system program mode, Press # * 36, then the Processing Mode (Mode = 0 or 1
Mode = 0, Transfer the call to the operator (default M = 0)
Mode = 1, Terminate the call
When Mode = 0, the system will terminate the call if no digits are entered for 3 times
consecutively under voice announcement.
(2) Hear dial tone while setting successfully.
Note: The default value is 0 (Transfer the call to the operator)
5.28 Manager and Secretary Pair Setting
# * 37+ [ Manager Ext. No.] + [Secretary Ext.
No.]
When two extensions are set as manager and secretary pair, an outside call through auto
attendant to the manager extension will be transferred to the secretary extension while the
internal call is done as normal.
(1) Under the system program mode, Press # * 37, then Manager Ext. No. and Secretary Ext.
No.
(2) Hear dial tone while setting successfully.
To cancel Manager and Secretary Pair
Under the system program mode, Press # * 37, then Manager Ext. No. and #
Aristel
Group
17
EG
24
USER
5.29 Emergency call Setting
MAUNAL
# * 38 + [Group No.] + [Emergency No.] + #
Up to 5 groups of Emergency call can be set. Each extension can dial emergency No. even
being assigned a COS of being restricted to intercom only.
The default value of five groups of emergency No. is as follow:
01: 110
02: 119
03: 120
04: 122
05: None
They can be substituted to match the emergency call of different country.
(1) Under the system program mode, Press # * 38, Group No. (0105) ,then Emergency No.
and #
(2) Hear dial tone while setting successfully.
5.30 Multiple CO Hunting Code Setting
# * 39 + [CO Hunting code] + [CO Line No. 1] +
[CO Line No, 2]… + [CO Line NO.N] + #
Except for 9 (or 0) as fixed CO hunting code, up to 3 more CO hunting code can be set. This
function is to enable the user to seize different CO line group by dialing corresponding CO
hunting code.
(1) Under the system program mode, Press # * 39, CO Hunting Code, then corresponding CO
line No.(s) and #
(2) Hear dial tone while setting successfully.
Note:
9 and o are defaulted as CO Hunting Code and Access code for operator correspondingly
CO Hunting Code can’t be used as the initial digit of Ext. No. and vice versa.
The fixed CO Hunting Code 9 or 0 is defaulted to correspond to all the CO lines. If
modification is needed, please do the setting here.
5.31 Intercom Hot Line setting
# * 40 + [Ext. No.] + [Hot Line Ext. No.]
Intercom hot line allows an extension to call another extension automatically without dialing
any digits each time if it is hook off.
(1) Under the system program mode, press # * 40, then Extension No. and Hot Line Extension
No.
(2) Hear dial tone while setting successfully.
To cancel Intercom hot line setting
Under the system program mode, press # * 40, then Ext. No. and #.
Note:
18
When an extension is set to hot line calling to another one, the extension is unable to call
other extension, make outside call or program any more until the hot line is cancelled. Thus
Aristel
Group
EG
USER MAUNAL
24
at least one extension can’t be set as hot line calling in the system.
The extension being set as hot line calling can’t do the Hold operation.
5.32 Reserved
# * 41
5.33 Speed Dialing Setting
#*42+[Group No.]+[Virtual Extension No.]+[External No.]+#
The setting is to bundle a virtual extension No. with an external No. The user can make a
speed dial by dialing the virtual extension number to call the correspondent external No.
(1) Under the system program mode, press # *42, then Group No.(01-20), virtual extension
No., External No. and #.
(2) Hear dial tone while setting successfully.
Note:
The virtual extension number should not conflict with the extension number, otherwise the
setting will fail
All the virtual extension number are cleared when the extension number length are
changed
5.34 Reserved
#*4
# * 47
5.35 Enable/Disable 1st Prefixed Number
# * 48 + [CO Line No.] + [1/0]
This setting is to determine whether to add the prefixed number to the outside call through
some CO line.
(1) Under the system program mode, press # * 48, then CO line No. and I
I = 1: Enable prefixed number to the CO line
I = 0: Disable prefixed number to the CO line
(2) Hear dial tone while setting successfully.
5.36 Reserved
# * 49
# * 51
5.37 Empty The Extension No.
# * 521
(1) Under the system program mode, press # * 521
(2) Hear dial tone while setting successfully.
Note: This setting is to reset all the extension number to 00 or 000 or 0000 depending on the
extension number length. The setting is used to avoid extension number collision during
the Extension No. setting
5.38 Extension Group Setting
# * 53+[ Group No.] + [Virtual Ext. No.] + [Ext. No. 1] +
[ Ext. No. 2] +…+ [ Ext. No. n] + [0/1]
This setting is to bundle a virtual extension number with a group of extensions. When the user
Aristel
Group
19
EG
24
USER
MAUNAL
dial the virtual extension number, the first free extension will ring according to the sequence in
the setting.
(1) Under the system program mode, press # *53, group No. (1-4), virtual extension No., Ext.
No.1, Ext. No.2,…., Ext. No. n (Maximum n=8) and I
I = 0:
To untie the set extension(s) from the virtual extension number
I = 1: To bundle the set extension(s) with the virtual extension number
(2) Hear dial tone while setting successfully.
5.39 Reserved
# * 54
# * 80
5.40 Turn on/off CLI Number On Outgoing Calls
# * 81 + [0/1]
CLI stands for calling line identification.
(1) Under the system program mode, Press # * 81, then I
I = 0:
Turn off CLI number on outgoing calls
I = 1:
Turn on CLI number on outgoing calls
(2) Hear dial tone while setting successfully.
Note:
The function depends on the carrier service
The default setting is to turn on the CLI number
5.41 Receiving Level of GSM Channel
# * 82 + [GSM Channel No.] + [Receiving Level]
Totally there are 8 receiving levels for the GSM module, ranging from 0 to 7. The larger the
digit, the higher the volume.
(1) Under the system program mode, press # * 82, then GSM Channel No.(1-4) and
Receiving Level (0-7)
(2) Hear dial tone while setting successfully.
Note: The default value for the receiving level is 4
5.42 Sending level of GSM Channel
# * 83 + [ GSM Channel No.] + [Sending level]
Totally there are 15 sending levels for the GSM module, ranging from 1 to 15. The larger the
digit, the higher the volume
(1) Under the system program mode, press # * 83, then GSM Channel No.(1-4) and Sending
Level (1-15)
(2) Hear dial tone while setting successfully.
Note: The default value for the sending level is 2
5.43 GSM Voice Rate Setting
20
# * 84 + [GSM Channel No.] + [0/1]
This setting is to adjust the GSM voice rate
(1) Under the system program mode, Press # * 84, GSM channel NO.(=1-4), then R
Aristel
Group
EG
USER MAUNAL
R=0:
Adaptive Multi Rate (AMR)
R=1:
Full Rate (FR)
24
(2) Hear dial tone while setting successfully.
Note: The default value for the voice rate is AMR (adaptive multi rate)
st
5.44 Working Mode of 1 GSM Channel
# * 85 + [0/1]
The system provides fax function through GSM channel. But only the first GSM channel can
be used for fax. To have this function work, you maybe have to subscribe to the carrier.
(1) Under the system program mode, Press # * 86, then M:
M=0: The first channel can be used for fax only
M=1: The first channel can be user for both voice and Fax
(2) Hear dial tone while setting successfully.
5.45 GSM Channel Prefixed Number
# * 86 + [Prefixed number] + #
This setting is to set a prefixed number which can be automatically added to the front of the
dialed outgoing number with 0 initial through GSM channel.
(1) Under the system program mode, Press # * 85 and the Prefixed Number (Maximum 4 digits),
then #;
(2) Hear dial tone while setting successfully.
Note:
The factory default value of prefixed number is None.
To cancel prefixed number: # * 85 + #
5.46 Remote programming
EG-24 provides remote programming to facilitate the distributor’s after-sales service. The
function is available no matter the CO line answering mode is set as DISA answering mode or
ringing the assigned extension
a. DISA answering mode
The outside caller call in on a DISA CO line using a DTMF telephone set.
(1) The auto attendant response with voice announcement
(2) To start up remote programming, the outside caller dial # * 10 +system password (00000 as
default value) to enter system programming while dial tone is heard.
(3) Enter required setting item as a local extension would do in programming mode.
(4) “Di” is heard to indicate a successful setting or “Di Di” to indicate a failing setting. No matter
whether “Di” or “Di Di” is heard, another setting item can be proceeded to.
b. Ringing the assigned extension Mode
(1) The extension user is talking with the outside party.
(2) The extension user does the Flash operation and hear dialing tone.
Aristel
Group
21
EG
24
USER
MAUNAL
(3) The extension user dial ** and hangs up.
(4) The outside party hears the voice announcement and can do the remote programming just
as under DISA answering mode.
Note: Remote programming is not available for voice announcement recording.
6
SLT Extension Operation
6.1
6.1.1
Make An Intercom Call
Common Intercom Call
[Extension No. ]
Off Hook to hear a dial tone, then dial extension number.
6.1.2
Call The Operator Extension
0
Off Hook and hear a dial tone, then dial 0
Note: If 0 is set as CO Hunting Code, 9 is the code to call the operator extension.
6.1.3
Intercom Callback
*5
An extension user may activate the “Callback For Intercom Call” function when calling to a
busy extension. As soon as the busy extension becomes idle, the calling party will ring, and
after the calling party lifts the handset, the called party will ring together.
(1) Off Hook, dial extension number, hearing a busy tone;
(2) Operate “Flash” to hear a dial tone;
(3) Press * 5 to hear “Do, Do, Do…” confirmed Tone.
(4) On Hook.
Note:
The Callback For Intercom Call becomes void in one of following three cases
6.1.4
The calling party lifts the handset before the system calls back.
The calling party doesn’t lift the handset after ringing back lasts 20 seconds
The called party lifts the handset during the ring back to the calling party.
Call The Extension Group
[Virtual Extension Number]
Off Hook to hear a dial tone, then dial virtual extension number. The first free extension will
ring according to the sequence in the extension group
6.2
22
Make An Outside Call
Aristel
Group
EG
USER MAUNAL
6.2.1
CO Line Hunting
24
9 / 0 or # 4 + [CO Line No.]
This system provides two methods to hunt CO Line.
Automatic CO Line Hunting:
(1) Off hook to hear a dial tone;
(2) Dial CO line hunting code 0 or 9, hear CO line dial tone, then dial
Designated CO Line Hunting:
(1) Off hook to hear a dial tone;
(2) Press # 4, CO Line No. (1 4), hear CO line dial tone, then dialing.
6.2.2
Trunk Queuing Callback * 5
When there is no idle CO line, the user can use “CO Line Queuing” function to make an
appointment for the CO line. As soon as any line becomes idle, the extension will ring, then
off hook to hear a CO line dial tone and begin dialing the telephone number.
(1) Off Hook, Hunt a CO line, Hear busy tone;
(2) Flash to hear a dial tone;
(3) Press*5, hear “Do, Do, Do…” Confirmed Tone; then on hook.
Note:
If the user hunt a designated CO line, the ringing back CO line is the designated CO Line.
Callback For Trunk Queuing becomes void in one of following three cases
a. The user lifts the handset before the system calls back.
b. The user doesn’t lift the handset after ringing back lasts 45 seconds
c. There is an incoming call through the CO line being ringing back to the user.
6.2.3
Last Number Redialing
[ “Redial” Key]
(1) Off Hook to hear a dial tone;
(2) Press the “Redial” Key of SLT.
6.2.4
CO Line Flash
# 59
This feature is to send Flash signal to the CO line to complete some function provided by the
carrier such as call waiting.
(1) While talking with a CO line, Hook flash or press “Flash” Key;
(2) When hear a dial tone, press # 59.
Note:
Users are permitted to operate the “CO Line flash” only when 16 seconds later after
dialing a Minimum 4-digits number;
If the extension is not set any prefixed code, and is also not restricted by special local or
prohibited code, the user is permitted to operate the “CO Line flash” without any waiting
after dial a Minimum 6-digits number.
Aristel
Group
23
EG
6.3
6.3.1
24
USER
MAUNAL
Call Transfer / Call Pickup / Call Hold / Retrieve The Held Call
Transfer
[Hook Flash / “Flash” Key] + [Extension No.]
This system provides two kinds of Call Transfer. Announced Transfer and Unannounced
Announced Transfer:
Announced Transfer means the transferring extension can notify the receiving extension
before actually sending the call.
(1) While Party A talking with Party B (either CO Line or Extension), Flash to hear a dial tone,
then calls Party C.
(2) Party A notify Party C when Party C answers
(3) After Party A hang up, Party B talks with Party C.
Unannounced Transfer
Unannounced Transfer lets an extension to transfer the call directly to the receiving
extension without prior notification:
(1) While Party A talking with Party B (either CO Line or Extension), Flash to hear a dial tone.
(2) Party A calls Party C to hear the Ring Back Tone, then Party A hangs up before Party C
answers.
(3) When Party C hook-off, Party B talks with Party C
Note:
During transferring, if Party C is busy, Party A can Flash to call another extension or Flash
twice to retrieve the call with Party B.
If Party C doesn’t answer within 25 seconds, Party B will recall Party A
6.3.2
Directed Call Pickup
*3
[Extension No.]
Directed Call Pickup allows the user to answer call that is ringing on another extension
(1) While another extension ringing, the user off hook to hear a dial tone.
(2) Press * 3, then ringing extension’s number to pick up the call.
6.3.3
General Call Pickup
*0
This function allows user to pick up call on any ringing extension without need to know the
extension number.
(1) While any extension ringing, the user off hook to hear a dial tone.
(2) Press * 0 to pick up the call.
6.3.4
Call Hold / Retrieve The Held Call
[Hook Flash / “Flash” Key]
(1) While Party A talking with Party B, Party A Flash to place Party B on hold.
(2) Party A hears the dial tone and can do other operation while Party B listens to the On-Hold
24
music.
Aristel
Group
EG
USER MAUNAL
24
(3) After Party A finishes operation, Party A can Flash again to retrieve the call with Party B.
6.4
Special Operation of Extension
6.4.1
Auto-Accessing CO Line
*9
[1/0]
This feature allows the user to access a free CO line automatically once he /she lifts the
handset and doesn’t need to dial CO Line Hunting Code.
Enable Auto-Accessing CO Line:
(1) Off Hook to hear a dial tone;
(2) Press * 91, then hear the On-Hold music while setting successfully.
Disable Auto-Accessing CO Line:
(1) Off Hook to hear a CO Line dial tone;
(2) Flash to hear a dial tone;
(3) Press * 90, then hear the On-Hold music while setting successfully.
Note:
When the extension is enabled Auto-Accessing CO Line:
If the user hears the busy tone when hook-off, that means there is no free CO Line. The
user can Flash to hear the intercom dial tone and make a intercom.
The user can Flash to hear the intercom dial tone and do internal operation after a CO line
is automatically accessed.
6.4.2
Call Forward/Do-Not-Disturb
When an extension is set as Call Forward or Do-Not-Disturb, each time when the
extension is on hook, the confirm tone is heard before the dialing tone to indicate the
extension is in the Call Forward or Do-Not-Disturb status.
6.4.2.1
Forward All Call
# 7 1 [Directed Ext. No.] + #
This feature is to forward all incoming calls to another directed extension.
To set Forward All Call:
(1) Off hook to hear a dial tone;
(2) Press # 71, another directed extension number, and then hear the On-hold music.
To cancel:
Off hook, press # 71, local extension number, and then hear the On-hold music.
Or press # 760, to cancel the Call-Forwarding and Do-Not-Disturb.
6.4.2.2
Forward The Call When Busy
#72
[Directed Ext. No.] + #
This feature is to forward the incoming calls to another directed extension when the
extension is busy.
Aristel
Group
25
EG
24
USER
MAUNAL
To set Forward the Call When Busy:
(1) Off hook to hear a dial tone;
(2) Press # 72, another directed extension number, and then hear the On-hold music.
To cancel:
Off hook, press # 71, local extension number, and then hear the On-hold music.
Or press # 760, to cancel the Call-Forwarding and Do-Not-Disturb.
6.4.2.3
Forward The Call When No Answer
# 73
[Directed Ext. No.] + #
This feature is to forward the incoming calls to another directed extension when the call is not
answered.
To set Forward The Call When No Answer:
(1) Off hook to hear a dial tone;
(2) Press # 73, another directed extension number, and then hear the On-hold music.
To cancel:
Off hook, press # 71, local extension number, and then hear the On-hold music.
Or press # 760, to cancel the Call-Forwarding and Do-Not-Disturb.
6.4.2.4
Do-Not-Disturb
# 76 + [1/2]
Enable Do-Not-Disturb:
(1) Off hook to hear a dial tone;
(2) Press # 761, and then hear the On-hold music.
Disable Do-Not-Disturb:
Off hook, press # 762, and then hear the On-hold music.
Or press # 760, to cancel the Call-Forwarding and Do-Not-Disturb.
6.4.3
Ext. Port No. & Ext. No. Inquiring
*6
Off Hook to hear a dial tone, press * 6 to hear the On-hold music, and then hook on
The extension will ring and, the LCD displays this extension’s port No. and the extension
number.
6.4.4
6.4.4.1
Forced Account Code
Use Individual Account
# 7 * + [Individual ID] + [Individual PW]
(1) Off hook to hear a dial tone;
(2) Press # 7 *, Individual ID, and Individual Password, “Do, Do, Do, Do” Confirmed Tone
is heard to indicate correct input and then the intercom dial tone is heard, or busy tone is
heard if the input is incorrect.
26
(3) When hearing the intercom dial tone, make the call as normal
Aristel
Group
EG
USER MAUNAL
24
Note:
While using individual account, the user can Flash to hear “Do, Do, Do, Do” Confirmed
Tone and then the intercom dial tone to make a nEG call .
6.4.4.2
Individual Account Password Changing
# 7 * # # + [NEW Individual PW]
Users can change the Individual Account password, operation as following:
(1) Off hook to hear a dial tone;
(2) Press # 7 *, Individual ID, and Individual Password, “Do, Do, Do, Do” Confirmed Tone is
heard to indicate correct input and then the intercom dial tone is heard, or busy tone is
heard if the input is incorrect.
(3) When hearing the intercom dial tone, press # 7 * # #, and a 4-digits nEG Individual
password, then hear a dial tone.
6.4.5
System Software Version Inquiring
*#
(1) Off Hook to hear a dial tone;
(2) Press * #, hear “Do, Do, Do…” Confirmed Tone; then hook on;
(3) The SLT Extension ringing once, while the LCD displays the system’s Software Version.
6.4.6
Three-Way Conference
Three-way conference enables an extension to talk with1 outside party and 1 extension or 2
outside parties simultaneously. To establish a three-way conference
(1) Establish an internal call or outside call.
(2) Flash to put the call on hold and hear the dial tone
(3) Press * 8
(4) Dial tone is heard
(5) Establish second call with another outside party or extension
(6) Flash and the conference is established.
6.4.7
Call Split
Call split enables an extension to talk with 1 outside party and 1 extension or 2 outside
parties alternately.
(1) Establish an internal call or outside call
(2) Flash to put the call on hold and hear the dial tone
(3) Establish second call with another outside party or extension l
(4) Flash to talk with the two party alternately
6.5
6.5.1
Operation Of The GSM Channel
Fax Through GSM Channel
*8
Off-hook the facsimile machine, press *8 to seize the first GSM channel for FAX. To send fax
Aristel
Group
27
EG
24
USER
MAUNAL
from GSM channel, the facsimile machine can be installed under any extension port, but only
the facsimile machine installed under the extension port assigned in Setting Item # * 31 can
receive the FAX through GSM channel.
6.5.2
Inquiry Of GSM Signal Strength
* 4 + [GSM Channel No.]
(1) Off Hook to hear a dial tone.
(2) Press *4 and GSM channel No.(1-4), hear “Do, Do, Do…” Confirmed Tone; then hook on.
3) The SLT Extension ringing once, while the LCD displays 4 digits XXYY. The first two digits
XX indicate the signal strength. The larger XX, the stronger the strength. The last two
digits YY indicate the bit error ratio. The larger YY, the more bit error ratio. If the
XXYY=9999, it means failed inquiry.
6.5.3
Inquiry Of The Status Of GSM Channel
#9
1) Off Hook to hear a dial tone.
(2) Press #9, hear “Do, Do, Do…” Confirmed Tone; then hook on.
(3) The SLT Extension ringing once, while the LCD displays 4 digits of which each indicates
the status of one GSM channel respectively. The digit of 1 indicates failed GSM access or
the channel is disabled, while the digit of 0 means the channel works.
28
Aristel
Group
EG
USER MAUNAL
7
24
Appendix: Instructions Table of Settings and Operations
Basic
Setting
Special
Setting
GSM
Setting
Aristel
Feature
Enter the System Program Mode
CO line connection setting
Answer Mode for CO line incomings
Record/Play of the Voice Announcement
Ringing Extension Assignment
1st Operator Extension Setting
2nd Operator Extension Setting
Extension COS Assignment
Extension No. Length Setting
Extension Number Setting
System Reset
Flash/Hold time Duration Setting
System Password Changing
CO Line hunting Code Setting
Availability of Ext. to access CO line
Prohibited Code Setting
Special Local Call No. Setting
1st Landline Prefixed Number Setting
2nd Landline Prefixed Number Setting
Flash/Hold time Duration Setting
Operation
# * 10 + [System Password]
# * 11 + [CO Line No.]+[0/1]
# * 12 + [CO Line No.]+[answer mode M]
# * 13 + [Record/Play1/2]+[ Segment 1/2/3]
# * 14 + [Ext. No.]+[ CO Line No.]+[1/0]
# * 15 + [Extension No.]
# * 16 + [Extension No.]
# * 17 + [Ext. No.]+[ Ext. Grade M]
# * 18 + [Ext. No. Length]+#
# * 19 + [Ext. Port No.]+ [Ext. No.]+*+…+#
# * 20 + [System Password]
# * 29 + [Duration]
# * 21 + [New System Password]
# * 22 + [9/0]
# * 23 + [Ext. No.]+ [CO Line No.] + [0/1]
# * 24 + [Group No.]+[Prohibited Code]+[#]
# * 25 + [Group No.]+[Special Local Call No.]+[#]
# * 27+ [1st Landline Prefixed Number] + #
# * 28 + [2nd Landline Prefixed Number] + #
# * 29+ [Duration]
Internal/External Music Resources
Switch
# * 30 + [0/1]
Fax Extension Setting
Door Phone Setting
Transfer Indication Tone Selecting
System On-hold Music Selecting
Auto Attendant Response Time Setting
DISA No Dialing Processing Mode
Manager And Secretary Pair Setting
Emergency Call Setting
Multiple CO Hunting Code Setting
Intercom Hot Line Setting
Reserved
# * 31+ [Fax Ext. No.]
# * 32 + [Door Phone Extension No.]
# * 33 + [CO Line No.] + [0/1]
# * 34 + [Music No. M]
# * 35 + [CO Line No.] + [Time]
# * 36 + [0/1]
# * 37 + [Manager Ext. No.] + [Secretary Ext. No]
# * 38 + [Group No.] + [Emergency No.]
# * 39+[CO Hunting Code]+[CO Line No.]+…+#
# * 40 + [Ext. No.] + [Hot Line Ext. No.]
# * 41
Speed Dialing Setting
# * 42 + [Group No.] + [Virtual Ext. No.] +
[External No.] + #
Reserved
Enable / Disable 1st Prefixed Number
Reserved
Empty The Extension No.
# * 43-#*47
# * 48 + [CO Line No.] + [0/1]
# * 49-# * 51
# * 521
Extension Group Setting
# * 53 + [Group No.] + [Virtual Ext. No.]+[Ext. No
1]+[Ext. No. 2] + … + [Ext. No. N] + [0/1]
Reserved
Turn On/Off CLI No. On Outgoing Calls
Receiving Level Of GSM Channel
Sending Level Of GSM Channel
GSM Voice Rate Setting
# * 54- # * 80
# * 81 + [0/1]
# * 82 + [GSM Channel No.] + [Receiving Level]
# * 83 + [GSM Channel No.] + [Sending Level]
# * 84 + [GSM Channel No.] + [R]
Group
29
EG
24
GSM
Setting
Forced
Account
Make An
Intercom
Call
Make An
Outside
Call
Transfer
/Pickup
/Hold
Call
Forward
Inquiry
GSM
Operation
30
USER
st
MAUNAL
Working Mode Of 1 GSM Channel
GSM Channel Prefixed Number
Initiate a Forced account
Individual Account using
# * 85 + [0/1]
# * 86 + [Prefixed Number]+ #
# * 26 + [ Individual ID]+[ Individual PW]+[Class]
# 7 *+ [Individual ID] + [Individual PW]
Individual Account Password Changing
Under Individual Account using mode
#7*##+[ New Individual PW]
Common Intercom Call
Call The Operator Extension
Intercom Callback
Call The Extension Group
CO Line Hunting
Trunk Queuing Callback
Last Number Redialing
Auto-Accessing CO Line
CO Line Flash
Transfer
Directed Call Pick-Up
General Call Pick-Up
Call Hold / Retrieve The Held Call
Forward All Call
Forward The Call When Busy
Forward The Call When No Answer
Do-Not-Disturb
Cancel Call Forwarding / Do-Not-Disturb
Ext. Port No. & Ext. No. Inquiring
System Software Version Inquiring
FAX Through GSM Channel
Inquiry Of The GSM Signal Strength
Inquiry Of The Status Of GSM Channel
Extension No.
0 or 9
*5
Virtual Extension Number
9 /0 or # 4+ [CO Line No.]
*5
[“Redial” Key]
* 9 + [1/0]
# 59
[Hook Flash/“Flash” Key]+ [Extension No.]
* 3 + [Extension No.]
*0
[Hook Flash/“Flash” Key]
# 71 + [Directed Ext. No.] + #
# 72 + [Directed Ext. No.] + #
# 73 + [Directed Ext. No.] + #
# 76 + [1/2]
# 760
*6
*#
*8
* 4 + [GSM Channel No.]
#9
Aristel
Group
EG-24
USER MANUAL
GSM ACCESS TELEPHONE SWITCHING SYSTEM
Aristel
Group
DOC : EG-24 USER MANUAL
Part No.: 82W8IMIN02
Date : 2010/11/01
This document contains proprietary information
and may not be reproduced in any form without
the express written consent of Arista Systems
Corporation.
The information contained here in is subject to
change without notice at the discretion of Arista
Systems Corporation.
c
Copyright 2010 by EVERWISE
All rights reserved
Group
http://www.aristel.com.tw
Aristel