1
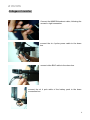
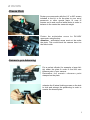
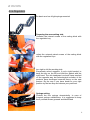
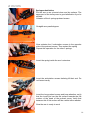
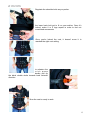
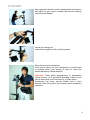
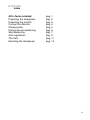
User Manual
Kitʼs items included
ONE: 1 vest
1 basic arm with 4 light springs
1 sled with telescopic post, monitor bracket and 1
v-lock plate
1 Cheese plate
1 C-Stand
1 Docking plate
1 7” lcd monitor with AV-power cable
1 1/4” screw
1 3/8” screw
1 Trolley case
TOO: all kit ONE
4 hard springs
1 double pivoting battery pack
FREE: all from kit ONE and TOO
upper e down multiple connections boxes
1
Preparing the steadycam
Put the sled on the docking plate, positioning the gimbal handle inside the 5/8” pin of the
docking plate.
Place the battery (opt.) on the v-lock plate (or Gold mount opt.) of the batterypack.
Preparing the Monitor
Fasten the monitor on its
bracket
2
Regulate your position as you prefer, moving and
pivoting the arm bracket, unfastening and
fastening the screws with the regulation key
In version Free with monitor rods arm, regulate the
right up/down position fastening/unfastening the
rear screws with the regulation key
Regulate front/back position fastening/unfastening
the 2 lateral screws with the regulation key
To modify the inclination of the lcd monitor fasten/
unfasten the 2 lateral screws
3
Collegare il monitor.
Connect the MINIDIN breakout cable, following the
arrows for right connection
connect the xlr 4 poles power cable to the down
box
connect video BNC cable to the down box
connect the xlr 4 pole cable of the battery pack to the down
connection box
4
Cheese Plate
Fasten your camcorder with the 1/4” or 3/8” screws
included in the kit, or fix the plate to your sony/
panasonic or other special plate. In case of
camera not in axis use the lateral holes in order to
balance in the center the cameraʼs weight
Fasten the antirotation screw for DV-HDV
camcorder using the key.
Attention: antirotation screw must not be under
the plate. This could block the camera insert on
the side to side
Cameraʼs pre balancing
Put a perfect cilinder (for example a large felttip) under the plate in order to find the zero
balance point of your camera.
Remember the numeric reference point
stamped on the plate
unfasten the 2 lateral locking screws on the side
to side and enlarge the positioning in order to
receive the cheese plate
5
Insert your camera on the side to side
Attention: Thereʼs a security blocking pin wich
avoid the accidental camera exit from the side to
side. Pull down the pin during inserting or
extracting your camera
on the side to side thereʼs a notch that got to fit
with the zero balance point youʼve signed in the
cheese plate. Once fitted this points, fasten the 2
knurled screws using the regulation key. Use a
very low force in fastening those screws
Connect all video and power cable to your camera
Attention: Video cable accepts HDSDI signal, but
the standard lcd monitor accepts only SD video
signal. The power DC cable transmits the exact vlock batteries voltage wich is approximately about
15v. So you have to verify the right voltage
operative range of your camcorder.
Mindfilm snc declines all responsability in case of
wrong connections. Mindfilm suggests to his
customers to buy the Multi connection box wich
stabilite exactly power DC out at 12v and 7,2. In
case of TOO or FREE kit you could buy optional
battery pack with 24v output. You have to try that all power and video connections works
properly. You can fit your right video signal balancing, luminosity, contrast, flip, mirror,
language, 4.3 or 16:9 aspect ratio
6
Sled Balancing
Unfasten the upper screws of the rod clamps, for
positioning the battery pack in order to have the
sled right balanced.
Regulate the side to side for finding a right preregulation setting: this is an important operation
wich allows to execute rightly next step
Unfasten the screw of the cilindrical knurnel
handle of the gimbal and move the entire gimbal
telescopically on the post. Move the gimbal right
to the camcorder or right to the battery pack until
the sled falls down with 2,5 seconds time of fall.
Once youʼve regulated the right time of falling, you
can center the camcorder on the side to side
mouving the knobs millimetrically.
Attention: this kind of centering is not universal,
but itʼs the most used balancing. The types of sled
balancing depend on the camcorder used, the
way of shooting, types of batteries etc etc... Only
official Easysteady courses unveal tips and tricks
of the pro steady operator.
Once the sled is balanced, ensure that all the
screws and knobs are properly fasten
7
This is an example of right balanced sled.
The sled doesnʼt fall down in any directions
Raise up the sled from the 5/8” docking plate pin and put
the sled on the other side of the docking plate, Lodging the
gimbal on the fork and locking it with the security pin.
Now the sled is ready to work
8
Arm Regulation
The basic arm has 4 light springs mounted
Preparing the arm working side
Unfasten the internal screws of the mating block with
the regulation key
unfast the external paired screws of the mating block
with the regulation keys
turn right or left the working side.
Easysteady school suggests, if youʼre right handed, to
keep the arm on the left and hold the gimbal with the
right hand. The old steadycamʼs schools have teached
on the opposite way, but technological evolution of the
products have developed concrete theory on the new
posture. By the way if you have doubt on your right
position try the two way and choose your preferred. .
Springs setting
Preload the four springs simmetrically, In case of
frequent springs substitutions, it is suggested to keep
the 4 preload screws greased and lubrificated
9
Springs substitution
Put the arm on an orizontal clean and dry surface. The
upper part of the trolley case is good alternative if youʼre
outside.
Unfasten all the 4 springs preload screws
Straighth arm parallelogram
Now unfasten the 2 antirotation screws in the opposite
side of the preload screws. Then extract the spring
Repeat this operation for the other 3 springs.
Insert the spring inside the armʼs structure.
Insert the antirotation screws fastining till their end. Do
not fasten hardly
insert the long preload screws and keep attention: verify
that the insert pin has the flat surface towards the flat
surface of the head of the preload screw. Verify that
between this 2 flat surface will be a white teflon washer.
Now the arm is ready to work
10
The Vest
There are 5 size available: XS, S, M,
L, XL
Regulate the right or left mating block poition. for
example: if someone is using the sled with his right
hand, he got to keep the mating block on his left side.
Regulate the desidered height
regulate the right height of the frontal medium breast
plat. this plate gives the operator maximum fitting to
the posterior tailored part of the vest
Itʼs possible to lenghten or to shorten the vest mother
plate along its defined positions . Easysteady
suggests to lenghten one position for people more
than 190 cm, and tho shorten of one position for
people under 160cm
Steadycam Movement Precision and sensibility start from a right vest setting
11
Fasten the upper buckles and entering the vest with the
head
Fasten the upper crick pump buckles
Fasten the lower crick pump buckles
the lowwer belt has a posterior regulation in order to let
the crick pump buckles works properly at the right
distance and not to the end of their road
12
Regulate the shoulder belts as you preferr
the lower back belt got to fit on your ankles. Once itʼs
locked, make 2 or 3 legs squats in order to feel not
constricted movements
Once youʼve locked the vest, it doesnʼt move it is
reached the right vest setting
to unfasten the
crick pump
buckle, pull up
the black double drafts towards back external
direction
Now the vest is ready to work
13
Mounting the steadycam
Take your arm and lock it on the vest mating block
With you back in the right position, regulate the mating
block knobs and screws in order the arm fall quitely up to
you.
this regulation got to be made fastening and unfastening
the opposite external knobs
to regulate the right or left arm positioning on your posture
faste or unfasten the opposite internal mating block screws
this is the result obtained from a right arm balancing.
You can proove bending your back forward or backward or
left side or right side. The complete steadycam control
depends on the operators back
14
Now approach the sled on the docking plate and make a
little squat on your legs to simplify the arm pin entering
inside the sled handle
unlock the security pin
Load all the weight and lift up all the system
Now you have your steadycam
Once youʼre carring on your steadycam you could need
to regulate better your system in order to reach the
perfect balancing of back/arm/sled
Attention: Think about partecipating to easysteady
official courses. Itʼs a good think spending 2 days of your
time to learn what you could learn in 10 years alone.
Steadycam has many secrets hidden that if youʼll
discover them they will let you became good steadycam
operators.
15
index
Kitʼs items included Preparing the steadycam
Preparing the monitor Connect the Monitor
Cheese plate Camcorder pre balancing
Sled Balancing
Arm regulations The Vest
Mounting the steadycam
pag. 1
pag. 2
pag. 2
pag. 4
pag. 5
pag. 5
pag. 7
pag. 9
pag. 11
pag. 14
16

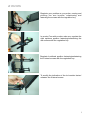


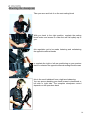


![[UK] Saver NG Data Sheets A1-2013](http://vs1.manualzilla.com/store/data/005759312_1-088a9b2c9a495b4ddfffe35115070dd1-150x150.png)