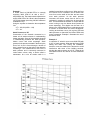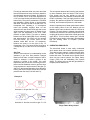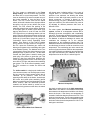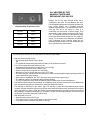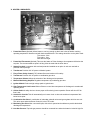
1
Direct Fired Gas Heated Make Up Air Unit
Operation/Installation Manual
WARNING! Improper installation, adjustment, alteration, service or maintenance can cause property
damage, injury or death. Read the installation, operating and maintenance instructions thoroughly before
installing or servicing this equipment.
FOR YOUR SAFETY
If you smell gas:
1. Open windows.
2. Don’t touch electrical switches.
3. Extinguish any open flame.
4. Immediately call your gas supplier.
FOR YOUR SAFETY
The use and storage of gasoline or other
flammable vapors and liquids in open containers in
the vicinity of this appliance is hazardous.
Acme Engineering & Manufacturing Corp.
P.O. Box 978
Muskogee, OK 74402
918/682-7791 918/682-0134 FAX
[email protected] www.acmefan.com
December 2000
Form 610590
CONTENTS
I.
GENERAL INFORMATION · · · · · · · · · · · · · · · · · · · · · · · · · · 2
Receiving Equipment
Direct Fired Heating
II.
INTRODUCTION AND OVERVIEW · · · · · · · · · · · · · · · · · · · · · · 3
III.
APPLICATIONS · · · · · · · · · · · · · · · · · · · · · · · · · · · · · · · · 3
IV.
THEORY · · · · · · · · · · · · · · · · · · · · · · · · · · · · · · · · · · · · 3
Temperature vs. Heat
Static Pressure vs. Horsepower
Gas Flow
V.
OPERATION PRINCIPLES · · · · · · · · · · · · · · · · · · · · · · · · · · 5
VI.
COMPONENTS · · · · · · · · · · · · · · · · · · · · · · · · · · · · · · · · 8
VII. INSTALLATION PROCEDURE · · · · · · · · · · · · · · · · · · · · · · · · 9
VIII. START UP · · · · · · · · · · · · · · · · · · · · · · · · · · · · · · · · · · 11
IX.
TROUBLE SHOOTING· · · · · · · · · · · · · · · · · · · · · · · · · · · · 12
X.
ELECTRICAL DIAGRAMS· · · · · · · · · · · · · · · · · · · · · · · · · · 14
XI.
CANADIAN NOTES · · · · · · · · · · · · · · · · · · · · · · · · · · · · · 18
XII. MAINTENANCE · · · · · · · · · · · · · · · · · · · · · · · · · · · · · · · 18
XIII. PULLEY COMBINATION CHART · · · · · · · · · · · · · · · · · · · · · · 19
WARRANTY · · · · · · · · · · · · · · · · · · · · · · · · · · · · · · · · · 20
I.
GENERAL INFORMATION
Receiving Equipment
Inspect for damage upon receipt of equipment.
The manufacturer thoroughly inspects and tests
all units before shipping. When a freight carrier
signs for a shipment, they are acknowledging
receipt of the shipment and the number of pieces
contained in the shipment as compared to the
freight bill. When you receive the shipment,
carefully read the freight bill and verify that all
pieces are received. Note at this time any
damaged or missing items on the freight bill before
signing. You should get the driver’s signature to
confirm any damaged or missing pieces (a
photograph is a sure way to document this).
Most heaters have options that need to be field
installed. Be sure all these are accounted for
2
before the delivering carrier leaves. Check all
items received with the packing list enclosed with
the unit.
Inspection for any internal damage should also be
made. Any missing parts or damage discovered
at a later date may prevent you from having a
valid claim with the carrier. If the equipment is not
going to be installed immediately, proper storage
will prevent damage.
Direct Fired Heating
This Direct Fired Heater is a make up air unit. It is
only to be used for installations requiring frequent
air changes. Some examples are commercial
kitchens, factories, foundries, and paint booths.
This unit is NOT designed for space heating. All
units can be used with either natural gas or LP
gas. Read this manual before beginning
installation. Direct fired heaters are designed to
operate in a fresh flowing air stream. If the airflow
stops or is different from the factory settings, the
unit will shut down or perform below its design
capability. It is important to follow the installation
and start-up procedures to maximize the heater’s
performance. The manufacturer has designed a
unit that is easy to install, start up and service. If
you have any questions, call the Service
Department at 1-800-334-9256.
II. INTRODUCTION AND OVERVIEW
There are many types of heaters available for
commercial use. We will concern ourselves with
100% fresh air (make up air) Direct Fired Gas units
for commercial kitchen and industrial use. The
advantages of direct fired gas heaters include:
• Low cost per BTU of heating
• Readily available
• Most efficient heat transfer
There are two general types of gas-fired heaters,
direct and indirect. Indirect fired heaters, like a
residential furnace, burn gas inside a metal tube
called a heat exchanger. The air that is used to
heat the application is heated indirectly when it is
passed around the tubes. This air never comes in
contact with the flame. The combustion products
from the flame inside the tubes are exhausted
through a flue pipe to the atmosphere. A direct
fired heater burns the gas directly in the air stream.
The products of combustion are included in the air
that is used to heat the application.
III. APPLICATIONS
These direct fired heaters are well suited for a
wide range of uses in the commercial and
industrial field. For kitchen ventilation, where
heated make up air is needed in large volume in
cool climates, the direct fired unit is a prime choice.
It is able to handle large volumes of air with
substantial temperature rise at minimal expense.
The units are reliable, and most replacement parts
are readily available in the field.
Industrial plants and processes where there is a
large amount of air being exhausted are excellent
candidates for direct fired units. Where welding
hoods and plasma tables are used, the direct fired
unit can provide fresh outside air at a comfortable
temperature for occupants. Today the trend is
3
toward less user interaction with the heater units.
Most customers prefer the unit to sit on the roof, turn
on, and run by itself with no user interaction
(temperature selection, summer-winter selection,
etc.). This means that the field installation has to be
done properly; no user interaction can cover up
installation problems. Now, more than ever,
installation and start up is critical to customer
satisfaction and product operation.
IV. THEORY
Energy (heat) must be added to a specific volume of
air in order to change its temperature. Direct fired gas
heaters create heat by burning gas. Heat is measured
in BTU’s (British Thermal Units), which is a measure
of heat, not temperature.
Temperature vs. Heat
The temperature changes when the energy of a
specific volume of air increases or decreases. Energy
(in the form of heat) is added to a volume of air and
changes the temperature. When this energy is added
to different volumes of air, different temperatures are
achieved. To further illustrate this point, let’s look at
how to calculate temperature rise, i.e., the difference
between the air temperature after it is heated and
before it is heated.
BTU’s
∆T = -------------CFM X 1.08
This equation shows that if the CFM’s increase and
the BTU’s remain constant, the temperature rise will
decrease. Conversely, if the CFM’s decrease and
the BTU’s remain constant, the temperature rise will
increase. (See following examples).
Example 1
A heater rated at 200,000 BTU’s is currently
supplying 3000 CFM of air with a 62° F
temperature rise. The heater needs adjustment to
supply 4500 CFM of air. What is the temperature
rise for this heater (assuming 200,000 maximum
available BTU’s)?
Using the equation to determine the temperature
rise:
∆ T = 200,000/(4500 x 1.08)
∆ T = 41°
Static Pressure vs. HP
Construction of the ductwork connected to a
heater unit is another element in understanding
heater operation. Some of the essential elements
in understanding ductwork are static pressure,
blower curves and motor amperage. Static
pressure is the pressure created in the duct by the
flow of air. As air is forced through a section of
duct, it exerts forces on the walls of the ductwork
containing it. The measurement of this force is
static pressure and is commonly measured in
inches water column using a device called a
manometer. As a rule, air travels easily in a
4
straight line and does not like to turn. When we force
air in a duct to turn or transition, the air exerts even
more force on the walls of the duct and we create
more static pressure. As the static pressure
increases, the blower moves less air due to the
resistance in pushing (or pulling) the air through the
duct. This decreases the amount of current that the
motor is using to turn the blower wheel (lowers the
motor amperage). This relation can be seen on a
blower curve, which plots CFM’s vs. static pressure as
a function of blower RPM and motor horsepower.
Looking at the blower curve, pick a given CFM and
static pressure to determine the blower RPMs and
motor horsepower. Example 2 illustrates the use of
the blower curve.
Example 2
A unit with a 15” wheel is set to run at 4000 CFM with
0.125” of static pressure. What was the factory RPM
setting and motor HP? During the installation,
however, turns were added to the ductwork to avoid
interference with some of the building structure,
bringing the static pressure up to 0.25”. What do the
new RPM’s need to be, and do we need a different
motor?
First we can determine what size motor and what
This is important because the incoming gas pressure
blower RPM has been set by the factory based on
is often measured when the heater is not running.
the initial static pressure numbers. By looking on
Even though the line may appear to have the
the 15” Blower Curve, we pick the intersection of
appropriate pressure, the pressure will drop when the
0.125” (from the left axis) and 4000 CFM (from the
heater is operating. If the gas supply system is sized
bottom axis). This point is just below the 700 RPM
properly, the upstream regulator will compensate for
line indicating a blower speed of approximately
the drop, and increase the pressure to the heater.
690 RPM. This point is also to the left of the 1.5
horsepower line, indicating a 1.5 horsepower
Another important part of heater performance relates
motor was probably supplied. Next, we can
to the heating value of the fuel. Natural gas has
determine the new blower RPM and what motor
Methane as its main constituent, while LP consists of
will be needed. By looking at the 15” Blower Curve
Propane. The same heater is capable of burning both
again, pick the intersection of the 0.25” static
of these fuels, however, the volume required for LP is
pressure at 4000 CFM’s. This point is halfway
roughly half the volume required for natural gas for the
between the 700 and 800 RPM curves, indicating
same BTU’s. This is because natural gas (-380,000
that approximately 750 RPM’s will be required
BTU/lbmol) has a heating value that is approximately
from the blower. The correct motor for this
half the heating value of Propane (-955,000
situation would NOT be the 1.5 horsepower,
BTU/lbmol).
because the point is to the right of the 1.5
horsepower curve. The correct choice would be a V. OPERATION PRINCIPLES
2 horsepower (it is to the left of the 2 horsepower
line).
The direct-fired heater is most easily understood
when broken down into smaller individual systems.
Gas Flow
There are two main systems, a make-up air fan and a
Another critical element in understanding heater
heater. The make-up air fan consists of a heavy-duty
operation is gas flow. Gas pressure changes
blower and motor. The heater may be further broken
based on flow rates. A simple example of this is
down into two control systems, the Flame Safety
shown in example 3, where a portion of the
Control (FSC) and the Modulating Gas System
plumbing is smaller in the middle. This could
(MGS). The burner mixes air with the gas (Natural or
represent a device in the line such as a gas valve.
Propane) which heats the air.
Note in the first illustration, with no gas flow, there
is equal pressure in both sections of the pipe (P1
and P2). In the second illustration, where the gas is
flowing, the second section of pipe has much less
pressure than the first (P2 is less than P1).
Example 3
Illustration 1: No gas flow. P1 = P2
Illustration 2: Gas flow from left to right. P1 > P2
Fireye Flame Safety Control
5
The first system to understand is the Flame
Safety Control. The FSC is there only to monitor
the flame NOT to control temperature. The FSC
uses an ultraviolet (UV) sensor mounted on top of
the burner assembly to view the flame in the
burner. The FSC is also wired into an airflow
switch, which tells it whether there is proper airflow
through the unit (not just any airflow, but proper
airflow). The FSC controls the opening of the
redundant solenoid gas valves and the operation
of the spark ignitor to initiate a pilot flame upon
start-up. When there is a call for heat, the OPR
CTRL light will turn on indicating that the unit has
power. Next, the airflow light will come on if there is
proper airflow through the unit. Third, the unit will
pause ten (10) seconds to purge any gasses or
combustible vapors before attempting flame
ignition. Then, there is a Pilot Trial for Ignition
(PTFI) and the PTFI light comes on. During PTFI,
the FSC opens the redundant gas valves and
allows gas to bypass to the modulating valve (part
of the Maxitrol system). The Maxitrol valve is not
yet energized, so there is a minimal amount of gas
passing through it (called “low fire”). At the same
moment, the spark igniter is started, causing the
spark plug in the burner to ignite the gas. This
results in a low fire or pilot flame. When the UV
sensor detects the flame it turns on the flame light,
turns off the PTFI light, and powers the modulating
gas system. This is the normal operating mode.
The FSC continues to monitor the flame and
airflow.
The airflow switch is a single pole double throw
(one common contact, one normally open contact,
and one normally closed contact) switch that is
“switched” by air pressure. There are two
opposing airflow tubes in the heater, located near
the burner and profile plate assembly (profile
plates surround the burner and channel air into the
burner section). With the differential pressure
created in the airflow switch by suction on one
tube and velocity pressure on the other, the switch
Airflow Switch With Cover Removed
6
will change state, indicating airflow. In the case of
clogged filters or a blocked intake, a differential
pressure is not achieved, not allowing the airflow
switch to close. With high static pressure or lack of
blower movement, no suction is placed on the
rearward-facing port and a differential pressure is
again not achieved. The airflow switch may need to
be adjusted for different pressures that occur at
different CFM’s.
The other system, the Maxitrol modulating gas
system, consists of a temperature selector dial, a
discharge air sensor, an amplifier, and a modulating
gas valve. The two types of Maxitrol systems found on
these units are the Maxitrol 14 and the Maxitrol 44.
The Maxitrol 14 utilizes a discharge air sensor and
modulates the discharge air to the selected
temperature on the temperature selector dial. The
Maxitrol 44 utilizes a room temperature sensor as well
as a discharge air sensor in order to control the room
temperature. The modulating gas valve controls the
amount of gas to the burner based on the temperature
rise needed. When the modulating gas valve is all the
way open and achieving the maximum BTU’s and
temperature rise of the unit, it is called “high fire”.
Maxitrol 14 Amplifier
One back up safety device is the high temperature
limit switch. This switch is a mechanical thermostat
that measures the temperature inside the unit directly
above the burner. If the factory set temperature is
exceeded, it will shut down the power to the FSC. This
requires a manual reset. The pre-set temperature that
the factory uses is based on the temperature above
the burner when the outlet temperature is 185° F. The
settings are as follows:
ALL HEATERS BY THIS
MANUFACTURER HAVE
REDUNDANT GAS VALVES.
Heaters set for less than 700,000 BTU’s use a
combination gas valve. The combination gas valve
has redundant solenoids and a regulator built into one
body. Larger heaters use a regulator and two
separate solenoid valves. The redundant gas valves
shut gas flow off to the burner in case of a
malfunction, no call for heat, or power outage. They
are normally closed, and are energized by the Fireye
FSC. The regulator controls the gas pressure going
into the gas train from the supply line. The “high fire”
setting for the heater unit (maximum temperature
rise) is adjusted by the regulator before the two
redundant solenoid valves or on the combination gas
valve (whichever the case may be).
Honeywell High Temperature Limit
#1 Size
160° F
#2 Size
150° F
#3 Size
225° F
#4 Size
245° F
#5 Size
150° F
The following is a summary of a normal start for a direct fired gas heater:
• With the blower already running
ü The summer-winter switch is set to winter
OR
ü The outside air temperature falls below the setting of the outside air override
• The FSC is energized and the following occurs:
Indicates that it has power by turning on the “Opr Ctrl” light
Verifies airflow and turns on the “Airflow” light
Pauses 10 seconds to purge the air in the heater
Begins Pilot Trial for Ignition and turns on the “PTFI” light
The redundant gas solenoid valves are opened, the Honeywell spark igniter begins sparking and the UV
sensor watches for flame initiation
ü When flame is established, the “PTFI” light turns off and the “Flame” light turns on
ü The Maxitrol system is powered and the unit begins heating
ü The FSC monitors the flame while the Maxitrol system adjusts to the selected temperature
• The Maxitrol system checks the discharge air temperature (and the room temperature for the Maxitrol 44)
and regulates the gas going to the burner to satisfy the temperature setting.
ü
ü
ü
ü
ü
• The last light on the Fireye is the “Alarm” light. This will turn on when the Fireye determines an unsafe
condition, and won’t allow the unit to recycle for heat until it has been properly reset. Anytime the Fireye flame
safety has gone into “Alarm” mode, the problem must be diagnosed and corrected to avoid future lockouts
after resetting. To begin troubleshooting, or to reset the Fireye, the following procedure must be used (just
pushing the reset button does NOT reset the unit)
• With the power to the unit
ü Push the reset button on the Fireye
ü Turn power off (the 5 Amp circuit breaker is convenient for this)
ü Turn power back on and allow the heater to start up
7
VI. HEATER COMPONENTS
2
9
7
1
4
10
8
5
11
3
12
6
15
13
14
1. Freeze-Stat Timer (Optional) Allows heater to run long enough so that it won’t shut off before reaching
operating temperature. Must be used with the thermostat below. The settings should be on the yellow scale:
Time sector - 30m
Time value - 10m
Red Switch to Right
2. Freeze-Stat Thermostat (Optional) This turns the heater off if the discharge air temperature falls below the
set point. The recommended set point is 40 deg. Must be used with the timer above.
3. Starter/Overload A contractor with overload protection installed as an option in units not used with a
prewired control package.
4. Transformer Provides 24V AC power to Maxitrol system.
5. Fireye Flame Safety Control (FSC) Initiates flame and monitors it for safety.
6. Transformer Provides 24V AC power to combination gas valve.
7. Temperature Selector Allows the selection of the discharge air temperature.
8. Maxitrol Modulating Amplifier Regulates temperature by modulating gas valve.
9. Ignition Module Produces high voltage spark to ignite burner.
10. High Temperature Limit Control Shuts off burner control when temperature of discharge air exceeds safe
operating levels.
11. Airflow Switch A safety device to insure proper air flow during burner operation. Burner will shut off if air
flow is lost.
12. Outside Air Override This will automatically turn heater circuit on when the outside air temperature falls
below its set point.
13. Combination Gas Valve A combination of redundant solenoid valves and gas regulator built into one unit.
This valve opens when the Burner Control is in the PTFI mode.
14. Modulating Gas Valve After a successful pilot, this valve is opened and modulates to provide the desired
discharge air temperature.
15. Inlet Gas Pressure Tap Inlet gas pressure should be measured here when the heater is locked in high fire.
8
VII. HEATER INSTALLATION
PROCEDURE
NOTICE!
Refer to the heater rating plate for
determining the minimum gas supply pressure
for obtaining the maximum gas capacity for
which this
heater is specified.
When separate technicians perform these
installations, please leave this manual for the next
technician to perform their installation. When the
final start-up is completed, you must return the
Warranty form to activate the warranty.
Service Department
117 Franklin Park Ave
Youngsville, NC 27596
919-554-4605 Fax
It is imperative that this unit is operated with the
designed airflow, electrical and gas supply in
accordance with the following installation sections.
If there are any questions about any items, please
call the service department at 1-800-334-9256
before performing them.
CAUTION!
This heater requires at least 4 CFM
outside air per 1,000 BTU per hour. For details
and recirculation application limitations, see
manufacturers instructions.
Plumbing Installation
This unit is designed for a constant 7” W.C. Natural
gas supply, (LP should be 11”) when the unit is in high
fire. If the gas supply exceeds 14” W.C. it will damage
the internal components and if it is below 7” W.C. it
may not perform to specifications. Insure that all
connections are well sealed, and the factory supplied
external ball valve is installed to shut down the gas
supply. The incoming pipe should be sized to match
the connections on the outside of the unit. Avoid
multiple taps in the gas supply so the unit has a steady
supply of gas at all times. Blow out the gas line to
remove debris before making connections. Purge line
to remove air before attempting to start unit.
Mechanical Installation
The following tools are necessary for installation
and start-up:
Manometer
Volt/Ohm Meter
Amp Meter
Tachometer
Thermometer
Standard Hand Tools
The label for this unit specifies the tested CFM and
static pressure. For the gas and electrical
components to function properly it is important that
the unit produce the designed airflow. The
ductwork attached to this unit will significantly
affect the airflow performance. DO NOT use
flexible ductwork, square turns, and plenum boxes.
These will increase the static pressure and reduce
airflow. Carefully raise the unit to its installation
point. The unit should be installed on a curb and/or
rail elevated not less than 14” above any surface.
Make sure the unit is mounted level, and all
attachments are properly sealed with silicone
caulking. If there is a motorized damper make sure
any wires are routed for the job site electrician.
Pipe sizes are listed below:
Model
Pipe Size (NPT)
“
#1
3
#2
1”
#3
1”
#4
1 14”
#5
1 14”
4
Electrical Installation
This unit uses two separate circuits. The controls are
run from a dedicated 120V circuit. The 120V circuit
only requires 5 Amps of service, however, a dedicated
20 Amp service is recommended. The motor circuit
should be supplied by a dedicated branch circuit with
short circuit protection according to the National
Electric Code. Two flexible conduits are provided
exiting the floor of the unit inside the curb. One
contains the motor circuit wires and the other the
control circuit wires. Refer to the performance label for
incoming power requirements. Make sure the interior
9
of the heater is free of loose debris or shipping
materials. Verify that the blower is rotating in the
right direction. For 3 Phase motors, interchange
any two leads to reverse rotation. For single phase
motors refer to instructions on motor.
There are four wires that are standard with every unit. They are as follows:
H
Black
120V Hot
N
White
120V Neutral
1
Blue
120V Supply to remote starter and/or heat shut off switch.
2
Brown
120V Return wire from remote heat shut off switch.
The H and N wires are required for all units to supply power to the control circuit. Without these
wires the heat function will not work! Wires 1 and 2 should be individually capped off if there is no
remote starter or heat shut off switch.
There may be some additional option wires with this unit. They are as follows:
8
11
33
T4 & T5
Gray
Red
Yellow
Red/Black
120V Airflow indication (may be used for exhaust interlock)
120V Burner on indication
120V Safety lockout indication
DC shielded cable for remote temperature control
All the previous wires are for the control circuit and are located in the control conduit.
The following are the designations for the motor wires
Black
Motor line voltage
White
120V Neutral (If single Phase)
Green
Earth ground
Please consult the factory if you have any questions or concerns before applying power to the unit.
10
VIII.START-UP PROCEDURE
NOTE: The start up procedure should
be followed in the order outlined at
left. Failure to do so may result in
unit not performing properly. Follow
procedures to make adjustments.
These adjustments should be made
after Ventilation System has been
balanced.
Adjust Air Flow Switch
To Adjust Air Flow Switch:
With heater in HEAT mode, slowly turn
air flow switch adjustment until air flow
light goes out on FSC. Then turn back
one half turn.
Lock unit into high fire.
Is incoming gas
pressure 7”?
No
Adjust
incoming gas
pressure.
Yes
Is high fire at least
a 70° temp rise?
No
Adjust
high fire.
Setting Incoming Pressure:
Pressure must be measured at first “T”
in supply gas line before the first gas
valve.
Adjusting High Fire:
Remove wire #4 from the Maxitrol
amplifier. This will drive the valve into its
full open position. Adjust high fire with
the regulator inside the unit. Turn
clockwise to increase.
Yes
Lock unit into low fire.
Is low fire approximately
a 10° F temp rise?
No
Adjust
low fire.
Yes
Start up complete
11
Adjusting Low Fire:
Remove terminal #5 from the Maxitrol
amplifier. This will drive the valve into its
lowest position. Adjust the low fire by
turning the low fire bypass on the side of
the modulating valve for M511 and
M611 models. For MR212D, the low and
high fire are both inside the valve. Refer
to the included Maxitrol literature.
IX. TROUBLE SHOOTING CHART
Blower runs
but there is
no heat
Is S/W switch or
Outside Air
Override closed?
Select Heat on S/W
switch or adjust temp
on OSAOR
No
Yes
No
Is there Power to
switch?
Check Building
Breaker
Yes
Yes
Is 5 Amp
Breaker Tripped?
No
Is there power at
terminal #1?
Yes
Is Air Flow
Switch Closed?
Reset
No
Check Wiring
No
Adjust
or Replace
Yes
Refer to Fireye
Guide
Burner lights but
heater stays in
Low Fire
Is there voltage
on Terminal #5
on Flame Safety
Control
No
Replace
FSC
Yes
Does transformer No
have 24V
output?
Replace
Yes
With wires 3 & 4 removed from the No
Maxitrol Amplifier, is there 9.5K - 11K
ohms between the wires?
Replace
Discharge Air
Sensor
Yes
Remove Terminal #4 from the
Maxitrol Amplifier. Does the heater
go into High Fire?
No
No
Yes
Replace
Amplifier
With wires 1 & 2 removed from the
Maxitrol Amplifier, is there 9.5K - 11K
ohms between the wires?
12
No
Is there a short or open
circuit in Modulating
Valve? Should be
45-55 ohms
Yes
Replace
Modulating Valve
Replace
Temperature
Selector
Burner lights but heater
stays in High Fire
Is there a jumper between
terminals 2 & 3 on the
Maxitrol Amplifier?
No
Install
Jumper
Yes
Is there a short circuit in the Yes
Remote Temperature
Selector or wiring?
Repair short or replace
Temperature Selector
No
Is there an open circuit in
the Discharge Air Sensor
or wiring?
Yes
Repair circuit or
replace the
Discharge Air
Sensor
No
Is Plunger in the Modulating
Valve jammed? Inspect and
clean. It should operate
freely in the sleeve.
No
Foreign object holding
valve open. Remove
bottom plate and inspect
valve and seat. Clean or
replace valve.
Nothing Happens
No
Is Fire System
Installed & Armed?
Is Overload tripped Yes
on starter?
Activate
Reset & measure FLA
on motor. Is it higher
than rating?
No
Yes
Is Freeze-Stat
open?
Adjust or Replace
No
Is limit switch on No
Motorized Damper
closed?
13
Adjust or Replace
Yes
Adjust or
change
Pulley
X. ELECTRICAL DIAGRAMS
Typical Wiring Diagram for Heater with Remote Starters
14
Typical Pre-Wire for Exhaust Fan and Make Up Air Heater
15
Typical Heater Remote Panel
16
Typical Heater Wiring Diagram With Starter/Overload in Unit
17
XI. OPERATION AND INSTALLATION NOTES FOR
CANADIAN UNITS ONLY
• Keep this owners manual in an accessible place to
answer questions about the unit.
• A low temperature limit control is needed for areas
where the ambient air temperature is below -40° F at
the controls (Freeze-Stat)
• The unit shall be installed in accordance with the
installation code for gas burning appliances and
equipment, CGA B149, and applicable provincial
regulations for the class; which should be carefully
followed in all cases. Authorities having jurisdiction
should be consulted before installations are made.
• The unit shall be installed such that no source of
flammable vapor gasses or dust shall be within 20 ft
horizontally of any unit unless that source is separated
from the unit by an enclosure of fire and vapor
resistive materials.
• The unit shall be installed to prevent snow, rain or
deleterious material from entering the unit.
into a booth, the total air discharge capacity shall not
exceed the exhaust capacity of that booth.
• The unit shall be installed such that in the event the
unit creates a hazard to other fuel burning equipment
in the building, the unit shall be interlocked to open
balancing inlet air dampers.
• The unit shall be electrically interlocked such that it will
operate only when the associated exhaust system(s)
is energized. An exhaust flow proving device must be
installed, except on multiple exhaust systems where a
measuring device electrically interlocked with the unit
may perform both functions.
• The unit shall be installed such that the content of toxic
vapors and gasses in the tempered air at the point of
discharge into the building will not cause irritating
effects during normal operation, and the installation
shall not be considered acceptable if the discharged
toxic products are known to exceed the limits listed
below:
Acetaldehyde -10 ppm
Formaldehyde - .25 ppm
Carbon dioxide- 2500 ppm Nitrogen dioxide - 1 ppm
Carbon monoxide- 10 ppm
Sulfur dioxide - .5 ppm
• All air shall be brought directly from the outdoors.
• The unit shall be used solely for replacing exhausted
inside air with heated outside air.
• The total air discharge capacity of the unit shall not
exceed by more than 10% the total discharge capacity • The unit shall be installed such that the temperature of
of the exhaust system(s) in conjunction with which it is
used. Where the tempered air is discharged directly
• Re-Setting of the Unit
XII. MAINTENANCE
• Monthly
ü Remove and clean the filters using a mild degreaser
and water.
ü Check belt tension and pulley alignment.
• Yearly
ü Check for gas leaks and repair as needed.
ü Check all controls for proper operation.
ü Clean flame sensor (for an ultraviolet sensor, wipe
the lense with a damp cloth. For a flame rod, rub with
steel wool to remove any rust build-up.
ü Clean burner with a wire brush and ensure the
burner ports are free of debris. Then wipe down with
a clean rag.
STAND ALONE
If the flame safety control is locked out (alarm light
on), reset the unit by:
1. Pressing the reset button on the FIREYE BURNER
control.
2. Turn off power to unit.
3. Wait 10 seconds and turn power back on.
• Emergency Shut-Down
To shut down the unit in the event of an emergency, do
the following:
1. Turn power off the unit from downstairs.
2. At the unit, turn the external disconnect switch to the
off position.
3. At the unit, close the inlet gas valve located on the
heater.
• Prolonged shut down of the unit
FILTER SIZES
UNIT
any adjacent combustible materials shall not exceed
90° F above an ambient temperature of 77° F.
ROOF TOP PKG
QTY
SIZE
QTY
SIZE
#1
2
16 X 20
1
20 X 25
#2
3
16 X 25
2
20 X 25
#3
6
16 X 20
6
16 X 20
#4
8
20 X 25
8
20 X 25
#5
10
20 X 25
--
---
For prolonged shutdown, the following steps should
be done:
1. At the unit, turn the external disconnect switch to the
off position.
2. At the unit, close the inlet gas valve located on the
heater.
• To restart the unit, the following steps should be
done:
1. At the unit, turn the external disconnect switch to the
on position.
2. At the unit, open the gas valve located on the heater.
18
XIII.PULLEY SELECTION CHART
1. Choose the motor pulley based on the HP of the motor.
2. Look up the RPMs needed in the white area as close to the center as possible.
3. Read the blower pulley from the left column.
4. Read the number of turns to set the motor pulley for the desired RPMs. (0 turns is when the motor
pulley is adjusted clockwise until it is tight.
0 to 2 HP
MOTOR PULLEY
Using A Belts
IVL40
Pd1
Pd2
2.4
3.4
Turns on Motor Pulley
Blower Pulley
Pd
0
1
1
1 12
2
2 12
3
3 12
4
4 12
5
AK32
3
2012
1953
1893
1834
1775
1716
1657
1598
1538
1479
1420
AK39
3.5
1724
1674
1623
1572
1521
1471
1420
1369
1319
1268
1217
AK46
4.2
1437
1395
1352
1310
1268
1226
1183
1141
1099
1057
1014
AK54
5
1207
1172
1136
1101
1065
1030
994
959
923
888
852
AK66
6.2
973
945
916
888
859
830
802
773
744
716
687
AK79
7.5
805
781
757
734
710
686
663
639
615
592
568
AK94
9
671
651
631
611
592
572
552
533
513
493
473
AK114
11
549
533
516
500
484
468
452
436
420
403
387
3 to 20 HP
MOTOR PULLEY
Using BX Belts
2VP60
2
Pd1
Pd2
4.3
5.5
Turns on Motor Pulley
1
1 12
2
2 12
3
3 12
4
4 12
5
2809
2746
2683
2621
2558
2495
2433
2370
2308
2245
2712
2653
2593
2534
2475
2416
2357
2298
2238
2179
2120
3.9
2503
2449
2394
2339
2285
2230
2176
2121
2066
2012
1957
2BK50H
4.4
2219
2170
2122
2074
2025
1977
1928
1880
1831
1783
1735
2BK55H
4.9
1992
1949
1905
1862
1818
1775
1732
1688
1645
1601
1558
2BK60H
5.4
1808
1768
1729
1690
1650
1611
1571
1532
1492
1453
1413
2BK65H
5.9
1655
1619
1582
1546
1510
1474
1438
1402
1366
1330
1294
2BK70H
6.4
1525
1492
1459
1426
1392
1359
1326
1292
1259
1226
1193
2BK80H
7.4
1319
1290
1262
1233
1204
1175
1147
1118
1089
1060
1031
2BK90H
8.4
1162
1137
1111
1086
1061
1035
1010
985
959
934
909
2BK100H
9.4
1039
1016
993
971
948
925
903
880
857
835
812
2BK110H
10.4
939
918
898
877
857
836
816
795
775
754
734
2BK120H
11.4
856
838
819
800
782
763
744
726
707
688
670
2BK130H
12.4
787
770
753
736
719
701
684
667
650
633
616
2BK140H
13.4
729
713
697
681
665
649
633
617
601
585
570
2BK160H
15.4
634
620
606
592
579
565
551
537
523
509
496
Blower Pulley
Pd
0
1
2BK36H
3.4
2871
2BK40H
3.6
2BK45H
2
19
TERMS AND CONDITIONS
DESIGN CHANGES Acme reserves the right to
make changes in design, improvements and
additions in and to its products any time without
imposing any liability or obligations to itself to
apply or install the same in any product manufactured by it.
TITLE The title and right of possession of the
equipment sold herein shall remain with the
Company and such equipment shall remain
personal property until all payments herein (in-
cluding deferred payments whether evidenced
by notes or otherwise) shall have been made in
full in cash and the Purchaser agrees to do all
acts necessary to perfect and maintain such
right and title in the Company.
SAFETY ACCESSORIES The Company manufactures equipment designed to serve multiple
applications and offers a wide range of safety
equipment, including guards and other devices,
as may be required to meet customer specifica-
tions. Without exception, the Company recommends that all orders include applicable safety
devices. Equipment ordered without applicable
safety devices is clearly the responsibility of the
Purchaser. Further, the Purchaser warrants
that he has determined and acquired any and
all safety devices required for equipment sold
by the Company. Weather covers and guards
for motor and V-belt drives, couplings, shafts
and bearings, along with inlet and outlet
screens, are optional accessories noted in the
price list.
These instructions cover the usual installation, operation and maintenance methods for which the product(s) was designed. They do not purport to
cover all details or variations in the product(s) nor to provide for every possible contingency that might be met in connection with the installation, operation and maintenance. For any departures from these instructions, or should particular problems arise which are not covered sufficiently for the purchaser’s purpose, the matter should be referred to the Company.
WARNING Acme products are designed and manufactured to provide reliable performance but they are not guaranteed to be 100% free of defects.
Even reliable products will experience occasional failures and this possibility should be recognized by the User. If these products are used in a life support ventilation system where failure could result in loss or injury, the User should provide adequate back-up ventilation, supplementary natural ventilation or failure alarm system, or acknowledge willingness to accept the risk of such loss or injury.
WARNING DO NOT use in HAZARDOUS ENVIRONMENTS where fan’s electrical system could provide ignition to combustible or flammable materials
unless unit is specifically built for hazardous environments.
CAUTION Guards must be installed when fan is within reach of personnel or within seven (7) feet (2.134 m) of working level or when deemed advisable
for safety.
DISCLAIMER The Company has made a diligent effort to illustrate and describe the products in this literature accurately; however, such illustrations and
descriptions are for the sole purpose of identification, and do not express or imply a warranty that the products are merchantable, or fit for a particular
purpose, or that the products will necessarily conform to the illustrations or descriptions or dimensions.
LIMITED WARRANTY
WARRANTY AND DISCLAIMER:
The
Company extends this limited warranty to the
original buyer and warrants that products
manufactured by the Company shall be free
from original defects in workmanship and materials for one year from date of shipment, provided same have been properly stored, installed, serviced, maintained and operated.
Warranty Start-Up sheet must be returned
within 30 days of start-up. This warranty shall
not apply to products which have been altered
or repaired without the Company’s express
authorization, or altered or repaired in any way
so as, in the Company’s judgment, to affect its
performance or reliability, nor which have been
improperly installed or subjected to misuse,
negligence, or accident, or incorrectly used in
combination with other substances. The Buyer
assumes all risks and liability for results of use
of the products. Warranties on purchased parts,
such as but not limited to bearings, sheaves,
belts, couplings, electric motors, pumps and
controls are limited to the terms of warranty extended by our supplier.
Polyethylene tubing and cooling pads are warranted to be free of defects in material and
workmanship for a period of 90 days from date
of shipment and a like warranty applies to the
cross fluted cellular type cooling cells for a period of two years from date of shipment provided same have been properly handled,
stored, installed, serviced, maintained and operated. And further, not subjected to excessive
heat, corrosive agents or chemicals, or mechanical abuse that may cause tearing, crushing or undue deterioration nor used on a system or in a manner other than that for which it
was designed as explained in the product literature.
LIMITATION OF REMEDY AND DAMAGES:
All claims under this warranty must be made in
writing and delivered to P. O. Box 978, Muskogee, Oklahoma, 74402, within 15 days after discovery of the defect and prior to the expiration
of one year from the date of shipment by the
Company of the product claimed defective, and
Buyer shall be barred from any remedy if Buyer
fails to make such claim within such period.
Within 30 days after receipt of a timely claim,
the Company shall have the option either to inspect the product while in Buyer’s possession
or to request Buyer to return the product to the
Company at Buyer’s expense for inspection by
the Company. The Company shall replace, or
at its option repair, free of charge, any product
it determines to be defective, and it shall ship
the repaired or replacement product to Buyer
F.O.B. point of shipment; provided, however, if
circumstances are such as in the Company’s
judgment to prohibit repair or replacement to
remedy the warranted defects, the Buyer’s sole
and exclusive remedy shall be a refund to the
Buyer of any part of the invoice price, paid to
the Company, for the defective product or part.
The Company is not responsible for the cost of
removal of the defective product or part, damages due to removal, or any expenses incurred
in shipping the product or part to or from the
Company’s plant, or the installation of the repaired or replaced product or part.
Implied warranties, when applicable, shall commence upon the same date as the express warranty provided above, and shall, except for warranties of title, extend only for the duration of
the express warranty. Some states do not allow
limitations on how long an implied warranty
lasts, so the above limitation may not apply to
you. The only remedy provided to you
ACME ENGINEERING AND
under an applicable implied warranty
MANUFACTURING CORPORATION and the express warranty shall be the
remedy provided under the express
P.O. Box 978
warranty, subject to the terms and conMuskogee, Oklahoma 74402
918/682-7791 Fax: 918/682-0134 ditions contained therein. The Company
shall not be liable for incidental and
[email protected]
consequential losses and damages unwww.acmefan.com
der the express warranty, any applica-
Member Air Movement and Control Association
ble implied warranty, or claims for negligence,
except to the extent that this limitation is found
to be unenforceable under applicable state law.
Some states do not allow the exclusion or limitation of incidental or consequential damages,
so the above limitation or exclusion may not apply to you. This warranty gives you specific legal rights, and you may also have other rights
which vary from state to state.
No employee, agent, dealer, or other person is
authorized to give any warranties on behalf of
the Company or to assume for the Company
any other liability in connection with any of its
products except in writing and signed by an officer of the Company.
REPLACEMENT PARTS If replacement parts
are ordered, buyer warrants that the original
components in which these replacement parts
will be placed are in satisfactory working condition, and when said replacement parts are installed, the resultant installation will operate in
a safe manner, at speeds and temperatures for
which the original equipment was purchased.
TECHNICAL ADVICE AND RECOMMENDATIONS, DISCLAIMER: Notwithstanding any
past practice or dealings or any custom of the
trade, sales shall not include the furnishing of
technical advice or assistance or system design. Any such assistance shall be at the Company’s sole option and may be subject to additional charge.
The Company assumes no obligation or liability
on account of any recommendations, opinions
or advice as to the choice, installation or use of
products. Any such recommendations, opinions
or advice are given and shall be accepted at
your own risk and shall not constitute any warranty or guarantee of such products or their
performance.
GENERAL In no event shall any claim for consequential damages be made by either party.
The Company will comply with all applicable
Federal, State, and local laws.
December 2000
Form 610590