1
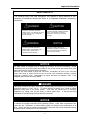
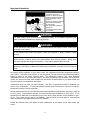
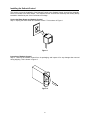
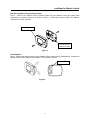
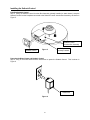
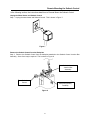
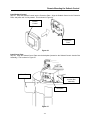
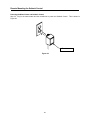
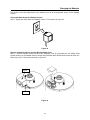
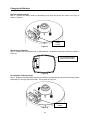
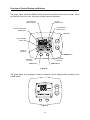
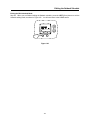
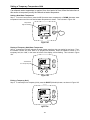
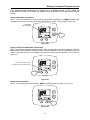
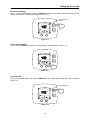
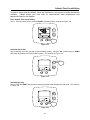
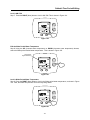
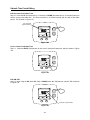
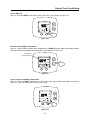
SETBACK CONTROL
This manual must be used in
conjunction with the Installation and
Operation Manual for the water heater.
Ambler, PA 19002
www.bradfordwhite.com
Tech. Service.......................... (800) 334-3393
Service Parts ......................... (800) 538-2020
Warranty Department ............ (800) 531-2111
-
Do not store or use gasoline or other
flammable vapors and liquids in the
vicinity of the water heater or any
other appliance.
-
What to do if you smell gas:
• Do not try to light any appliance.
• Do not touch any electrical switch;
do not use any phone in your
building.
• Immediately call your gas supplier
from a neighbor phone. Follow
the gas supplier instructions.
• If you cannot reach your gas
supplier, call the fire department.
-
For your family comfort, safety and
convenience, it is recommended this
Setback Control be installed and
serviced by a plumbing professional.
INSTALLATION & OPERATION MANUAL
With Troubleshooting Guide
PLACE THESE INSTRUCTIONS ADJACENT TO WATER HEATER AND NOTIFY OWNER TO KEEP FOR FUTURE REFERENCE
238-47808-00A 7/09
Important Information
CONGRATULATIONS!
You have just purchased one of the finest water heater accessories on the market today!
This Installation and Operation Manual will explain in detail how to install and operate your
new Setback Control. We strongly recommend you contact a plumbing professional for the
installation of this new control.
We require that you carefully read this manual and the manual supplied with the water heater
when questions arise. If you have any specific questions concerning your warranty, please
consult the plumbing professional from whom your Setback Control was purchased. For
your records, we recommend that you write the installation date for this control in the back of
this manual.
This manual should be kept with the Setback Control.
Water Heater Setback Control:
This Setback Control works with the water heater gas control. It has the capability to adjust the
setpoint of the water heater during periods where little or no hot water is required for use. The
Setback Control adjusts the setpoint of a water heater similarly to the way a programmable
thermostat does for a furnace.
Setback Control Features:
• 7 day / 4 period programming
• Conserves energy
• Hot water capacity indicator (provides an estimate of available hot water)
• Battery back-up stores programming during a power outage
• Can be programmed to comply with Sabbath requirements
• Similar interface to furnace / air conditioning thermostats
• Precision control of water temperature
-2-
Important Information
READ CAREFULLY
The following terms are used throughout this manual to bring attention to the
presence of hazards at various risk levels, or to important information concerning
product life.
DANGER
CAUTION
Indicates an imminently hazardous
situation, which, if not avoided, will result
in death, serious injury or substantial
property damage.
Indicates potentially hazardous situation,
which, if not avoided, may result in
moderate or minor injury or property
damage.
WARNING
NOTICE
Indicates special instructions on
installation, operation or maintenance,
which are important but not related to
personal injury hazards.
Indicates a potentially hazardous
situation, which, if not avoided, could
result in death, serious injury or
substantial property damage.
NOTICE
This water heater is equipped with an energy cut out device to prevent overheating. Should
overheating occur or the gas supply fails to shut off, turn off the manual gas control valve to the
water heater and call a qualified service technician.
Whenever the water heater is filled with cold water, condensate will form on the cool tank
surface and drops of water will fall on the hot burner and combustion chamber surfaces
producing a “sizzling” noise. Condensation is normal and does not indicate a leak. It will
disappear when the tank becomes heated.
DANGER
Hotter water increases the risk of scald injury. Scalding may occur within five (5) seconds at a
temperature setting of 140°F (60°C). To protect against hot water injury, install an ASSE
approved mixing valve in the water system. This valve will reduce point of discharge
temperature by mixing cold and hot water in branch water lines. A licensed plumbing
professional or local plumbing authority should be consulted.
NOTICE
The lower the temperature setting, the greater the energy efficiency, both to heat the water and
to maintain the storage temperature during standby periods. Lower water temperatures also
extend tank life. Remember, no water heating system will provide exact temperatures at all
times. Allow a few days of operation at this setting to determine the correct temperature setting
consistent with the requirements for the installation.
-3-
Important Information
Water temperature over 125°F
can cause severe burns
instantly or death from scalds.
Children, disabled and elderly
are at highest risk of being
scalded.
Review this instruction manual
before setting temperature
at water heater.
Feel water before bathing or
showering.
Temperature limiting valves
are available.
CAUTION
This water heater, when set at a lower temperature setting, is not capable of producing hot
water of sufficient temperature for sanitizing purposes.
WARNING
Do not operate the water heater or Setback Control without the Setback Control Junction Box
Assembly cover in place.
Do not operate water heater and Setback Control with jumpered or absent controls or safety
devices.
Turn off or disconnect the electrical power supply to the water heater and Setback Control
before servicing. Label all wires prior to disconnection when servicing controls. Wiring errors
can cause improper and dangerous operation. Verify proper operation after servicing.
All electrical wiring must be installed and grounded in accordance with local codes, or in the
absence of local codes, the National Electrical Code, ANSI/NFPA 70 and/or CSA C22. Electrical
Code.
For energy efficient operation of your water heater, the suggested initial water temperature setting is
120˚F (49˚C). During the winter season, or any cold period, you may desire a higher water temperature
setting to adjust for the colder incoming water. This adjustment, however, may cause additional
condensation to form on the cooler tank surface. This does not mean the tank is leaking. During summer
months, the warmer incoming water temperatures will benefit the performance of your water heater and
reduce the amount of condensation developed.
Condensation does not mean your tank is leaking. Over 40% of reported tank leaks on installation are
proven to be condensation. To avoid unnecessary expense and inconvenience, make sure the tank is
leaking before calling a service technician.
As was stated previously, the recommended water temperature during periods when hot water is required
is 120˚F (49˚C). During setback periods, the recommended water temperature is 85°F (29°C). If it is
possible that hot water will be needed during the Leave and/or Sleep periods, set the Setback to 105°F
(41°C). This control may be used for the Sabbath. Please consult your local rabbi for recommended
water temperatures and appropriate times for the Sabbath.
Initially, the Setback Control will default all water temperatures to the setpoint on the water heater gas
control.
-4-
Table of Contents
Page
Installing the Setback Control........................................................ 6
Remote Mounting the Setback Control.......................................... 9
Changing the Batteries ................................................................ 21
Overview of Control Display and Buttons .................................... 24
Display Key ................................................................................. 25
Display Features ......................................................................... 25
Reference Time / Water Temperature Table............................... 26
The Start-up Procedure ............................................................... 27
Setting the Setback Control Schedule – Initial Set-up................. 31
Editing the Setback Schedule ..................................................... 40
Setting a Temporary Temperature Hold ...................................... 50
Setting a Permanent Temperature Hold...................................... 51
Editing the Clock / Day ................................................................ 52
Sabbath Time Period Editing....................................................... 55
Diagnostic Codes ........................................................................ 65
-5-
Installing the Setback Control
This section covers the installation of the Setback Control to the Setback Control Junction Box Assembly,
which is mounted to the water heater. The Setback Control Junction Box Assembly was already factory
installed or installed as part of the Performance Package.
Unplug the Water Heater and Setback Control
Step 1: Unplug the water heater and Setback Control. This is shown in Figure 1.
Figure 1
Inspection of Setback Control
Step 2: Remove the Setback Control from its packaging, and inspect it for any damage that occurred
during shipping. This is shown in Figure 2.
Figure 2
-6-
Installing the Setback Control
Removal of Setback Control Protective Plate
Step 3: Remove the Setback Control Protective Plate from the Setback Control by pulling these
components in opposite directions, as shown in Figure 3. Retain the protective plate if the Setback
Control will be remote mounted.
Setback Control
Setback Control
Protective Plate
Figure 3
Install Batteries
Step 4: Remove the battery holder from the Setback Control, and install (2) AAA batteries. Replace the
battery holder after the batteries are installed. This is shown in Figure 4.
Battery Holder
Figure 4
-7-
Installing the Setback Control
Installing Setback Control
Step 5: Using the Setback Control Junction Box Assembly (already installed on water heater), snap the
Setback Control into the backplate connected to the Setback Control Junction Box Assembly, as shown in
Figure 5.
Setback Control
Junction Box Assembly
Setback Control
Figure 5
Backplate
already installed
Powering the Water Heater and Setback Control
Step 6: Plug in the water heater and the transformer to power the Setback Control. This is shown in
Figure 6.
Transformer
Figure 6
-8-
Remote Mounting the Setback Control
In the following section, the instructions detail how to Remote Mount the Setback Control.
Unplug the Water Heater and Setback Control
Step 1: Unplug the water heater and Setback Control. This is shown in Figure 7.
Figure 7
Remove the Setback Control from the Backplate
Step 2: Remove the Setback Control from the backplate attached to the Setback Control Junction Box
Assembly. Some force may be required. This is shown in Figure 8.
Setback Control
Junction Box
Assembly
Setback
Control
Backplate (already
installed)
Figure 8
-9-
Remote Mounting the Setback Control
Prepare the Backplate for Wiring
Step 3: Loosen the (3) slotted screws on the backplate attached to the Setback Control Junction Box
Assembly. This is shown in Figure 9.
Slotted head
screws
Slotted head
screwdriver
Setback Control
Junction Box
Assembly
Backplate (already
installed)
Figure 9
Mount the Protective Plate
Step 4: Mount the Setback Control Protective Plate in a desired location. Be sure that the Setback
Control will not be direct sunlight, as the display may be difficult to read. This is shown in Figure 10.
Drill
Wall
Protective
Plate
Figure 10
-10-
Remote Mounting the Setback Control
Measure Wire for Remote Mounting
Step 5: Measure and cut (3) pieces of 18 AWG wire to a sufficient length to reach from the backplate on
the Setback Control Junction Box Assembly to the Setback Control Protective Plate. This is shown in
Figure 11.
18 AWG
Wire
Figure 11
Label the Wires for Remote Mounting
Step 6: Label the (3) cut wires (A), (B), and (C) respectively. Label both ends of the wires. This is shown
in Figure 12. Masking tape can be used to label the wires.
Figure 12
-11-
Label Each
Wire
Remote Mounting the Setback Control
Prepare the Wires for Installation
Step 7: Strip approximately ¼” of the wire’s insulation from each end of the three wires. This is shown in
Figure 13.
Strip
Approximately ¼”
from Each End of
All (3) Wires
Figure 13
Install Wire (A) – Backplate
Step 8: Using wire (A), insert one end into the top terminal location on the backplate (located on the
Setback Control Junction Box Assembly). This is shown in Figure 14. Be sure that the wire already
located in this location is not dislodged.
Wire (A)
Backplate
Wires Already
Installed
Figure 14
-12-
Remote Mounting the Setback Control
Fasten Wire (A) into its Designated Location – Backplate
Step 9: Tighten the slotted screw in the top terminal location on the backplate (located on the Setback
Control Junction Box Assembly). This is shown in Figure 15.
Wire (A)
Setback Control
Junction Box Assembly
Slotted head
screwdriver
Figure 15
Backplate
Install Wire (B) – Backplate
Step 10: Using wire (B), insert one end into the middle terminal location on the backplate (located on the
Setback Control Junction Box Assembly). This is shown in Figure 16. Be sure that the wire already
located in this location is not dislodged.
Wire (B)
Wire (A)
Wires Already
Installed
Backplate
Figure 16
-13-
Remote Mounting the Setback Control
Fasten Wire (B) into its Designated Location – Backplate
Step 11: Tighten the slotted screw in the middle terminal location on the backplate (located on the Setback
Control Junction Box Assembly). This is shown in Figure 17.
Wire (A)
Wire (B)
Backplate
Slotted head
screwdriver
Figure 17
Install Wire (C) – Backplate
Step 12: Using wire (C), insert one end into the bottom terminal location on the backplate (located on the
Setback Control Junction Box Assembly). This is shown in Figure 18. Be sure that the wire already located in
this location is not dislodged.
Wire (A)
Wire (B)
Wires Already
Installed
Setback Control
Junction Box Assembly
Wire (C)
Backplate
Figure 18
-14-
Remote Mounting the Setback Control
Fasten Wire (C) into its Designated Location – Backplate
Step 13: Tighten the slotted screw in the bottom terminal location on the backplate (located on the
Setback Control Junction Box Assembly). This is shown in Figure 19.
Wire (A)
Wire (B)
Wire (C)
Setback Control
Junction Box Assembly
Slotted head
screwdriver
Figure 19
Route Wires to Protective Plate
Step 14: Route all three wires to the Setback Control Protective Plate.
-15-
Backplate
Remote Mounting the Setback Control
Install Wire (A) – Protective Plate
Step 15: Using wire (A), insert one end into the top terminal location on the Protective Plate. This is
shown in Figure 20.
Wire (A)
Protective
Plate
Figure 20
Fasten Wire (A) into its Designated Location – Protective Plate
Step 16: Tighten the slotted screw in the top terminal location on the Protective Plate. This is shown in
Figure 21.
Wire (A)
Slotted head
screwdriver
Figure 21
-16-
Protective
Plate
Remote Mounting the Setback Control
Install Wire (B) – Protective Plate
Step 17: Using wire (B), insert one end into the middle terminal location on the Protective Plate. This is
shown in Figure 22.
Wire (A)
Wire (B)
Protective
Plate
Figure 22
Fasten Wire (B) into its Designated Location – Protective Plate
Step 18: Tighten the slotted screw in the middle terminal location on the Protective Plate. This is shown in
Figure 23.
Wire (A)
Wire (B)
Figure 23
-17-
Slotted head
screwdriver
Protective
Plate
Remote Mounting the Setback Control
Install Wire (C) – Protective Plate
Step 19: Using wire (C), insert one end into the bottom terminal location on the Protective Plate. This is
shown in Figure 24.
Wire (A)
Wire (B)
Protective
Plate
Wire (C)
Figure 24
Fasten Wire (C) into its Designated Location – Protective Plate
Step 20: Tighten the slotted screw in the bottom terminal location on the Protective Plate. This is shown
in Figure 25.
Wire (A)
Wire (B)
Wire (C)
Protective
Plate
Figure 25
-18-
Slotted head
screwdriver
Remote Mounting the Setback Control
Install Setback Control
Step 21: Snap the Setback Control into the Protective Plate. Align the Setback Control to the Protective
Plate, and press until it is fully seated. This is shown in Figure 26.
Setback
Control
Protective
Plate
Figure 26
Install Cover Plate
Step 22: Snap the Setback Cover Plate onto the backplate (located on the Setback Control Junction Box
Assembly). This is shown in Figure 27.
Cover Plate
Setback Control
Junction Box
Assembly
Backplate
Figure 27
-19-
Remote Mounting the Setback Control
Powering the Water Heater and Setback Control
Step 23: Plug in the water heater and the transformer to power the Setback Control. This is shown in
Figure 28.
Transformer
Figure 28
-20-
Changing the Batteries
This section covers the replacement of the batteries used as a back-up power source for the Setback
Control.
Unplug the Water Heater and Setback Control
Step 1: Unplug the water heater and Setback Control. This is shown in Figure 29.
Figure 29
Removal of Setback Control Junction Box Assembly Cover
Step 2: Remove Setback Control Junction Box Assembly cover by unscrewing the two Philips head
screws holding it to the Setback Control Junction Box Assembly base. Retain these screws for later use.
Remove the cover. This process is shown in Figure 30.
Cover
Screw
Figure 30
-21-
Changing the Batteries
Removal of Battery Holder
Step 3: Remove the battery holder by depressing its top edge and pulling the holder to the right, as
shown in Figure 31.
Battery
Holder
Figure 31
Replacement of Batteries
Step 4: Replace the two batteries with (2) AAA batteries. The batteries should be oriented, as shown in
Figure 32.
Top of Setback Control
(seen from back side)
Figure 32
Re-installation of Battery Holder
Step 5: Replace the battery holder with the new batteries by depressing the top side of the battery holder
and pushing on the right side of the holder. This is shown in Figure 33.
Battery
Holder
Figure 33
-22-
Changing the Batteries
Re-installation of Setback Control Junction Box Assembly Cover
Step 6: Place the cover back on the Setback Control Junction Box Assembly and reinstall the Philips
head screws previously removed, as shown in Figure 34.
Figure 34
Powering the Water Heater and Setback Control
Step 7: Plug in the water heater and transformer to power the Setback Control. This is shown in Figure
35.
Transformer
Figure 35
-23-
Overview of Control Display and Buttons
The image, below, shows the Setback Control with all of its options shown on the screen. When
the Setback Control is in use, only some of these items will be shown.
Estimated Hot
Water Capacity
12-Hour
Display Area
Period Status
Display Area
Time & Temperature
Display Area
UP Button
Control Display
Status Area
Day(s) of
the Week
DOWN Button
Right Button
Functions
Left Button
Functions
LEFT Button
RIGHT Button
Figure 36
The image below is an example of what the Setback Control displays while operating in the
HOME screen.
Figure 37
-24-
Display Key and Features
Display Key:
Wake: the time when the water heater setpoint should be raised to an appropriate temperature
for its use.
Leave: the time when the water heater setpoint should be lowered when little to no hot water is
needed.
Return: the time when the water heater setpoint should be raised for your return and eventual
need for hot water.
Sleep: the time when the water heater setpoint should be lowered when no hot water is needed
for the day.
Stdby (Standby): the water heater is not calling for heat (the water heater burner is not on).
On: the water heater is calling for heat (the water heater burner is on).
Low Bat (Low Battery): the Setback Control batteries are low and should be changed.
Service Needed: a fault has occurred and a serviceable issue needs to be addressed on the
water heater or control. Contact a qualified service technician.
Display Features:
When the Setback Control is operating normally and is operating in its set schedule (no
temporary or permanent hold set), the water temperature setpoint and time will be alternately
shown. The current period water temperature setpoint will be shown for approximately five
seconds, followed by the current time for approximately five seconds.
If the Setback Control has been set to a different water temperature, as part of a temporary or
permanent hold, the hold water temperature will only be shown.
One of the features on the Setback Control is the display of the approximate hot water volume
contained in the water heater. A sophisticated algorithm in the Setback Control determines the
hot water volume based on the water heater gas control setpoint. The capacity shown is not
based on the setpoints that are a part of the Setback Control schedule. The capacity is based
off from the setpoint on the gas control. A maximum of six bars can be shown.
If six bars are shown, this means the maximum hot water is available for use given the current
control setpoint. Alternatively, if only two bars are shown, this means that only one-third of the
maximum hot water is available for use given the current control setpoint. The Setback Control
assumes hot water over 90°F (32°C) is of sufficient temperature to be used.
The Setback Control water temperatures can be set to a maximum temperature the same as
that set on the gas control.
-25-
Sunday
Saturday
Friday
Thursday
Wednesday
Tuesday
Monday
Start Time
Leave
Return
Sleep
Water
Water
Water
Water
Start Time
Start Time
Start Time
Temperature
Temperature
Temperature
Temperature
Wake
Reference Time / Water Temperature Table
The table, shown below, can be filled out with your schedule for future reference.
-26-
The Start-up Procedure
This section covers what steps need to be performed when the Setback Control is installed on a
water heater.
Screen When Power is Applied
Step 1: Initially, all the segments on the screen are shown when the Setback Control is powered up.
This is shown in Figure 38.
Figure 38
Revision Level Screen
Step 2: After a few seconds, the software revision level of the Setback Control is shown. An example is
shown in Figure 39.
Figure 39
Select the Correct Hour
Step 3: The hour digit or digits will begin to flash initially. Using the UP (increase hour) or DOWN
(decrease hour) buttons, change the hour until the correct hour is shown. This is shown in Figure 40.
Hour digit(s) are
flashing
Figure 40
-27-
The Start-up Procedure
Locking in the Correct Hour
Step 4: When the correct hour is shown, press the RIGHT (Next) button. This is shown in Figure 41.
Figure 41
Select the Correct Minute
Step 5: Using the UP (increase minute) or DOWN (decrease minute) buttons, adjust the minute until the
correct minute is shown. This process is shown in Figure 42.
Minute digits are flashing
Figure 42
Lock in the Correct Minute
Step 6: When the correct minute is shown, press the RIGHT (Next) button. This is shown in Figure 43.
Figure 43
-28-
The Start-up Procedure
Select AM / PM
Step 7: Next, the AM / PM symbol will begin to flash. Using the UP (index AM / PM) or DOWN (index AM
/ PM) buttons, select AM / PM. See Figure 44.
"AM"/"PM" flashes
Figure 44
Lock in AM / PM
Step 8: Press the RIGHT (Next) button to proceed. This is shown in Figure 45.
Figure 45
Select the Day
Step 9: Finally, select the day. A day will be flashing initially. Using the UP (increase one day) or DOWN
(decrease one day) buttons, change the day until the correct day is shown. See Figure 46.
Day of the week flashes
Figure 46
-29-
The Start-up Procedure
Finishing the Start-up Procedure
Step 10: Press the LEFT (Done) button, as shown in Figure 47. This completes the Setback Control
Start-up Procedure. You will now be taken to the HOME screen.
Figure 47
-30-
Setting the Setback
Control Schedule – Initial Set-up
Once the Setback Control Start-up procedure has been performed, the Setback schedule must
be entered. This section gives step-by-step instructions on how to enter the Setback schedule.
Setting the Schedule
Step 1: From the Home screen, press the RIGHT (Schedule) button, as shown in Figure 48.
Figure 48
Select the Day
Step 2: Monday is flashing initially. Press the RIGHT (Next) button to proceed to the Wake Period for
Monday. This is shown in Figure 49. When the remaining days of the week are to be programmed, the
UP (increase day) or DOWN (decrease day) buttons must be used to change the day.
"Mon" flashes
Figure 49
Select the Wake Period Start Time
Step 3: Press the UP (increase time) or DOWN (decrease time) buttons until the wanted time is shown.
This is shown in Figure 50.
Hour & minutes
digits are flashing
Figure 50
-31-
Setting the Setback
Control Schedule – Initial Set-up
Lock in Wake Period Start Time
Step 4: Press the RIGHT (Next) button to lock in the Wake Period start time, as shown in Figure 51.
Figure 51
Select AM / PM
Step 5: Using the UP (index AM / PM) or DOWN (index AM / PM) buttons, select AM / PM, as shown in
Figure 52.
"AM"/"PM" flashes
Figure 52
Lock in AM / PM
Step 6: Press the RIGHT (Next) button to lock in AM / PM. This is shown in Figure 53.
Figure 53
-32-
Setting the Setback
Control Schedule – Initial Set-up
Select the Wake Period Water Temperature
Step 7: Using the UP (increase water temperature) or DOWN (decrease water temperature) buttons,
select the desired water temperature. This is shown in Figure 54.
Temperature
digits are flashing
Figure 54
Lock in Wake Period Water Temperature
Step 8: Press the RIGHT (Next) button to lock in the Wake period water temperature, as shown in Figure
55.
Figure 55
Select the Leave Period Start Time
Step 9: Press the UP (increase time by 15 minutes) or DOWN (decrease time by 15 minutes) buttons to
select the Leave period start time. The time increments in 15-minute intervals just as it did for the Wake
period. This is shown in Figure 56.
Hour & minutes
digits flash
Figure 56
-33-
Setting the Setback
Control Schedule – Initial Set-up
Lock in Leave Period Start Time
Step 10: Press the RIGHT (Next) button to set the Leave start time, which is shown in Figure 57.
Figure 57
Select AM / PM
Step 11: Next, using the UP (index AM / PM) or DOWN (index AM / PM) buttons, select AM / PM, as
shown in Figure 58.
"AM"/"PM" flashes
Figure 58
Lock in AM / PM
Step 12: Press the RIGHT (Next) button to lock in AM / PM. This is shown in Figure 59.
Figure 59
-34-
Setting the Setback
Control Schedule – Initial Set-up
Select the Leave Period Water Temperature
Step 13: Using the UP (increase water temperature) or DOWN (decrease water temperature) buttons,
select the desired water temperature for the Leave period. This is shown in Figure 60.
Temperature
digits are flashing
Figure 60
Lock in Leave Period Water Temperature
Step 14: Press the RIGHT (Next) button to lock in the Leave period water temperature, as shown in
Figure 61.
Figure 61
Select the Return Period Start Time
Step 15: Press the UP (increase time by 15 minutes) or DOWN (decrease time by 15 minutes) buttons to
select the Return period start time. The time increments in 15-minute intervals just as it did for the other
periods. This is shown in Figure 62.
Hour & minutes
digits are flashing
Figure 62
-35-
Setting the Setback
Control Schedule – Initial Set-up
Lock in Return Period Start Time
Step 16: Press the RIGHT (Next) button to set the Return period start time, which is shown in Figure 63.
Figure 63
Select AM / PM
Step 17: Next, using the UP (index AM / PM) or DOWN (index AM / PM) buttons, select AM / PM, as
shown in Figure 64.
"AM"/"PM" flashes
Figure 64
Lock in AM / PM
Step 18: Press the RIGHT (Next) button to lock in AM / PM. This is shown in Figure 65.
Figure 65
-36-
Setting the Setback
Control Schedule – Initial Set-up
Select the Return Period Water Temperature
Step 19: Using the UP (increase water temperature) or DOWN (decrease water temperature) buttons,
select the Return period water temperature. This is shown in Figure 66.
Temperature
digits are flashing
Figure 66
Lock the Return Period Water Temperature
Step 20: Press the RIGHT (Next) button to lock in the Return period water temperature, as shown in
Figure 67.
Figure 67
Select the Sleep Period Start Time
Step 21: Press the UP (increase time by 15 minutes) or DOWN (decrease time by 15 minutes) buttons to
select the Sleep period start time. The time increments in 15-minute intervals just as it did for the
previous periods. This is shown in Figure 68.
Hour & minutes
digits are flashing
Figure 68
-37-
Setting the Setback
Control Schedule – Initial Set-up
Lock the Sleep Period Start Time
Step 22: Press the RIGHT (Next) button to set the Sleep period start time, which is shown in Figure 69.
Figure 69
Select AM / PM
Step 23: Next, using the UP (index AM / PM) or DOWN (index AM / PM) buttons, select AM / PM, as
shown in Figure 70.
"AM"/"PM" flashes
Figure 70
Lock in AM / PM
Step 24: Press the RIGHT (Next) button to lock in AM / PM. This is shown in Figure 71.
Figure 71
-38-
Setting the Setback
Control Schedule – Initial Set-up
Select Sleep Period Water Temperature
Step 25: Using the UP (increase water temperature) or DOWN (decrease water temperature) buttons,
select the desired Sleep period water temperature. This is shown in Figure 72.
Temperature
digits are flashing
Figure 72
Lock in Sleep Period Water Temperature
Step 26: Press the RIGHT (Next) button, as shown in Figure 73. Now, the Sleep time period is set for
Monday. This completes the one day of the Setback schedule. To set the schedule for the remaining
days of the week, repeat the procedures beginning at Step 2 on page 31 for Tuesday through Sunday
schedules. Otherwise, proceed to Step 27.
Figure 73
To set the schedule for the remaining days of the week, repeat the procedures beginning at Step 2
on page 31 for Tuesday through Sunday schedules. Otherwise, proceed to Step 27.
Finishing the Setback Schedule
Step 27: Press the LEFT (Done) button to finish the Setback schedule, as shown in Figure 74.
Figure 74
-39-
Editing the Setback Schedule
If the Setback schedule needs to be modified at any point, the instructions in this section can be
followed to edit the previously entered water temperatures and times.
Enter Editing the Schedule Mode
Step 1: From the Home screen, press the RIGHT (Schedule) button, as shown in Figure 75.
Figure 75
Select the Day to Edit
Step 2: Monday is flashing initially. Using the UP (increase day) or DOWN (decrease day) buttons, scroll
until the day that needs to be edited is shown. This is shown in Figure 76.
Day of the week flashes
Figure 76
Lock in the Day to Edit
Step 3: Press the RIGHT (Next) button to edit a particular day water temperatures and times. This is
shown in Figure 77.
Figure 77
-40-
Editing the Setback Schedule
Edit the Wake Period Start Time
Step 4: Press the UP (increase time by 15 minutes) or DOWN (decrease time by 15 minutes) buttons
until the wanted time is shown. This is shown in Figure 78.
Hour & minutes
digits are flashing
Figure 78
Lock in the Wake Period Start Time
Step 5: Press the RIGHT (Next) button to lock the Wake period start time for the day selected, as shown
in Figure 79.
Figure 79
Edit AM / PM
Step 6: Next, using the UP (index AM / PM) or DOWN (index AM / PM) buttons, select AM / PM, as
shown in Figure 80.
"AM"/"PM" flashes
Figure 80
-41-
Editing the Setback Schedule
Lock in AM / PM
Step 7: Press the RIGHT (Next) button to select AM / PM. This is shown in Figure 81.
Figure 81
Edit the Wake Period Water Temperature
Step 8: Using the UP (increase water temperature) or DOWN (decrease water temperature) buttons,
select the Wake period desired water temperature. This is shown in Figure 82.
Temperature
digits are flashing
Figure 82
Lock in the Wake Period Water Temperature
Step 9: Press the RIGHT (Next) button to lock in the Wake period water temperature, as shown in Figure
83. Now, the Wake time period is set for the day being edited.
Figure 83
-42-
Editing the Setback Schedule
Edit the Leave Period Start Time
Step 10: Press the UP (increase time by 15 minutes) or DOWN (decrease time by 15 minutes) buttons to
edit the Leave period start time. The time increments in 15-minute intervals just as it did for the Wake
period. This is shown in Figure 84.
Hour & minutes
digits flash
Figure 84
Lock in the Leave Period Start Time
Step 11: Press the RIGHT (Next) button to lock in the Leave period start time, which is shown in Figure
85.
Figure 85
Edit AM / PM
Step 12: Next, using the UP (index AM / PM) or DOWN (index AM / PM) buttons, select AM / PM, as
shown in Figure 86.
"AM"/"PM" flashes
Figure 86
-43-
Editing the Setback Schedule
Lock in AM / PM
Step 13: Press the RIGHT (Next) button to lock in AM / PM. This is shown in Figure 87.
Figure 87
Edit the Leave Period Water Temperature
Step 14: Using the UP (increase water temperature) or DOWN (decrease water temperature) buttons, set
the Leave period desired water temperature. This is shown in Figure 88.
Temperature
digits are flashing
Figure 88
Lock in the Leave Period Water Temperature
Step 15: Press the RIGHT (Next) button to lock in the Leave period water temperature, as shown in
Figure 89. Now, the Leave time period is set for the day being edited.
Figure 89
-44-
Editing the Setback Schedule
Edit the Return Period Start Time
Step 16: Press the UP (increase time by 15 minutes) or DOWN (decrease time by 15 minutes) buttons to
edit the time that this period becomes active. The time increments in 15-minute intervals just as it did for
the Wake period. This is shown in Figure 90.
Hour & minutes
digits are flashing
Figure 90
Lock in the Return Period Start Time
Step 17: Press the RIGHT (Next) button to lock in the Return period start time, which is shown in Figure
91.
Figure 91
Edit AM / PM
Step 18: Next, using the UP (index AM / PM) or DOWN (index AM / PM) buttons, select AM / PM, as
shown in Figure 92.
"AM"/"PM" flashes
Figure 92
-45-
Editing the Setback Schedule
Lock in AM / PM
Step 19: Press the RIGHT (Next) button to lock in AM / PM. This is shown in Figure 93.
Figure 93
Edit the Return Period Water Temperature
Step 20: Using the UP (increase water temperature) or DOWN (decrease water temperature) buttons,
select the Return period desired water temperature. This is shown in Figure 94.
Temperature
digits are flashing
Figure 94
Lock in Return Period Water Temperature
Step 21: Press the RIGHT (Next) button to lock in the Return period water temperature, as shown in
Figure 95. Now, the Return time period is set for day being edited.
Figure 95
-46-
Editing the Setback Schedule
Edit the Sleep Period Start Time
Step 22: Press the UP (increase time by 15 minutes) or DOWN (decrease time by 15 minutes) buttons to
edit the Sleep period start time. The time increments in 15-minute intervals just as it did for the previous
periods. This is shown in Figure 96.
Hour & minutes
digits are flashing
Figure 96
Lock in the Sleep Period Start Time
Step 23: Press the RIGHT (Next) button to lock in the Sleep period time, which is shown in Figure 97.
Figure 97
Edit AM / PM
Step 24: Next, using the UP (index AM / PM) or DOWN (index AM / PM) buttons, select AM / PM, as
shown in Figure 98.
"AM"/"PM" flashes
Figure 98
-47-
Editing the Setback Schedule
Lock in AM / PM
Step 25: Press the RIGHT (Next) button to lock in AM / PM. This is shown in Figure 99.
Figure 99
Edit the Sleep Period Water Temperature
Step 26: Using the UP (increase water temperature) or DOWN (decrease water temperature) buttons,
select the Sleep period desired water temperature. This is shown in Figure 100.
Temperature
digits are flashing
Figure 100
Lock in the Sleep Period Water Temperature
Step 27: Press the RIGHT (Next) button, as shown in Figure 101. Now, the Sleep time period is set for
the day being edited. This completes the editing of one day of the Setback schedule. To change the
schedule for the remaining days of the week, repeat the procedures beginning at Step 2 on page 40, for
Tuesday through Sunday schedules. Otherwise, proceed to Step 28.
Figure 101
-48-
Editing the Setback Schedule
Exiting the Edit Schedule Mode
Step 28: When you are finished editing the Setback schedule, press the LEFT (Done) button to exit the
Schedule editing mode, as shown in Figure 102. You will now return to the HOME screen.
Figure 102
-49-
Setting a Temporary Temperature Hold
If an alternate water temperature is required for a short period of time, follow the instructions in
this section to temporarily modify the Setback set water temperature.
Setting a New Water Temperature
Step 1: From the Home screen, press the UP (increase water temperature) or DOWN (decrease water
temperature buttons until the new desired water temperature is shown. This is shown in Figure 103.
Temperature
digits are flashing
Figure 103
Display of Temporary Hold Water Temperature
Step 2: A temporary hold will maintain the water heater setpoint at the new setting for two hours. Then,
the Setback Control will revert back to its programmed schedule. When the Setback Control is in a
temporary hold, the “Hold,” in the lower left corner of the display, will be flashing. This is shown in Figure
104.
"Hold" flashes
for a Temporary Hold
Figure 104
Exiting a Temporary Hold
Step 3: To manually exit a Temporary Hold, press the RIGHT (Schedule) button, as shown in Figure 105.
Figure 105
-50-
Setting a Permanent Temperature Hold
If an alternate water temperature is required for an indefinite amount of time, follow the
instructions in this section to modify the Setback water temperature for an open ended amount
of time.
Setting a New Water Temperature
Step 1: From the Home screen, press the UP (increase water temperature) or DOWN (decrease water
temperature buttons until the new desired water temperature is shown. This is shown in Figure 106.
Temperature
digits are flashing
Figure 106
Display of Permanent Hold Water Temperature
Step 2: A permanent hold will maintain the water heater setpoint at the new setting indefinitely. Press the
LEFT (Hold) button to establish a permanent hold. When the Setback Control is in a permanent hold, the
“Hold,” in the lower left corner of the display, will be shown continuously (not flashing). This is shown in
Figure 107.
"Hold" is continuously shown
(not flashing) for a Permanent Hold.
Figure 107
Exiting a Permanent Hold
Step 3: To exit a Permanent Hold, press the RIGHT (Schedule) button, as shown in Figure 108.
Figure 108
-51-
Editing the Clock / Day
This section covers how to change the Setback Control clock, as well as the day. This may
become useful when time changes for daylight savings.
Enter Clock / Day Editing Mode
Step 1: From the Home screen, press the LEFT (Set Clock / Day) button, as shown in Figure 109.
Figure 109
Select Correct Hour
Step 2: Using the UP (increase hour) or DOWN (decrease hour) buttons, select the correct hour. This is
shown in Figure 110.
Hour digit(s) flashes
Figure 110
Lock in Correct Hour
Step 3: Press the RIGHT (Next) button to set the hour, which is shown in Figure 111.
Figure 111
-52-
Editing the Clock / Day
Select Correct Minute
Step 4: Using the UP (increase minute) or DOWN (decrease minute) buttons, adjust the minute until the
correct one is shown. This process is shown in Figure 112.
Minute digits are
flashing
Figure 112
Lock in Correct Minute
Step 5: Press the RIGHT (Next) button to set the minute, which is shown in Figure 113.
Figure 113
Select AM / PM
Step 6: Using the UP (index AM / PM) or DOWN (index AM / PM) buttons, select AM / PM, as shown in
Figure 114.
"AM"/"PM" flashes
Figure 114
-53-
Editing the Clock / Day
Lock in AM / PM
Step 7: Press the RIGHT (Next) button to proceed, which is shown in Figure 115.
Figure 115
Select Correct Day
Step 8: Using the UP (increase day) or DOWN (decrease day) buttons, select the correct day. This
process is shown in Figure 116.
Day of the week flashes
Figure 116
Lock in Correct Day & Complete Editing Clock / Day Mode
Step 9: Press the LEFT (Done) button, which is shown in Figure 117. This completes the procedure for
editing the Setback clock and day.
Figure 117
-54-
Sabbath Time Period Editing
In order to comply with the Sabbath, follow the instructions in this section to modify the Setback
schedule. Please consult your local rabbi for recommended water temperatures and
appropriate times for the Sabbath.
Enter Sabbath Time Period Editing
Step 1: From the Home screen, press the RIGHT (Schedule) button, as shown in Figure 118.
Figure 118
Select the Day to Edit
Step 2: Monday is the first day that is shown flashing initially. Using the UP (increase day) or DOWN
(decrease day) buttons, scroll until Friday is shown. This is shown in Figure 119.
Figure 119
Start Editing Friday
Step 3: Press the RIGHT (Next) button to edit the schedule water temperatures and times. This is shown
in Figure 120.
Figure 120
-55-
Sabbath Time Period Editing
Edit the Wake Period Start Time
Step 4: Press the UP (increase time by 15 minutes) or DOWN (decrease time by 15 minutes) buttons
until the wanted time is shown. This is shown in Figure 121.
Hour & minutes
digits are flashing
Figure 121
Lock in Wake Period Start Time
Step 5: Press the RIGHT (Next) button to lock in the Wake period start time, as shown in Figure 122.
Figure 122
Edit AM / PM
Step 6: Next, using the UP (index AM / PM) or DOWN (index AM / PM) buttons, select AM / PM. This is
shown in Figure 123.
"AM"/"PM" flashes
Figure 123
-56-
Sabbath Time Period Editing
Lock in AM / PM
Step 7: Press the RIGHT (Next) button to lock in AM / PM. This is shown in Figure 124.
Figure 124
Edit the Wake Period Water Temperature
Step 8: Using the UP (increase water temperature) or DOWN (decrease water temperature) buttons,
select the Wake period desired water temperature. This is shown in Figure 125.
Temperature
digits are flashing
Figure 125
Lock in Wake Period Water Temperature
Step 9: Press the RIGHT (Next) button to lock in the Wake period water temperature, as shown in Figure
126. Now, the Wake time period is set for the day being edited.
Figure 126
-57-
Sabbath Time Period Editing
Edit the Leave Period Start Time
Step 10: Press the UP (increase time by 15 minutes) or DOWN (decrease time by 15 minutes) buttons to
edit the Leave period start time. The time increments in 15-minute intervals just as it did for the Wake
period. This is shown in Figure 127.
Hour & minutes
digits are flashing
Figure 127
Lock in Leave Period Start Time
Step 11: Press the RIGHT (Next) button to lock in the Leave period start time, which is shown in Figure
128.
Figure 128
Edit AM / PM
Step 12: Next, using the UP (index AM / PM) or DOWN (index AM / PM) buttons, edit AM / PM, as shown
in Figure 129.
"AM"/"PM" symbol flashes
Figure 129
-58-
Sabbath Time Period Editing
Lock in AM / PM
Step 13: Press the RIGHT (Next) button to lock in AM / PM. This is shown in Figure 130.
Figure 130
Edit Leave Period Water Temperature
Step 14: Using the UP (increase water temperature) or DOWN (decrease water temperature) buttons,
select the Leave period desired water temperature. This is shown in Figure 131.
Temperature
digits are flashing
Figure 131
Lock in Leave Period Water Temperature
Step 15: Press the RIGHT (Next) button to lock in the Leave period water temperature, as shown in
Figure 132. Now, the Leave time period is set for Friday.
Figure 132
-59-
Sabbath Time Period Editing
Edit the Return Period Start Time
Step 16: Press the UP (increase time by 15 minutes) or DOWN (decrease time by 15 minutes) buttons to
edit the time the Return period start time. The time increments in 15-minute intervals just as it did for the
Wake period. This is shown in Figure 133.
Hour & minutes
digits are flashing
Figure 133
Lock in Return Period Start Time
Step 17: Press the RIGHT (Next) button to lock in the Return period start time, which is shown in Figure
134.
Figure 134
Edit AM / PM
Step 18: Next, using the UP (index AM / PM) or DOWN (index AM / PM) buttons, select AM / PM, as
shown in Figure 135.
"AM"/"PM" symbol flashes
Figure 135
-60-
Sabbath Time Period Editing
Lock in AM / PM
Step 19: Press the RIGHT (Next) button to lock in AM / PM. This is shown in Figure 136.
Figure 136
Edit Return Period Water Temperature
Step 20: Using the UP (increase water temperature) or DOWN (decrease water temperature) buttons,
select the Return period desired water temperature. This is shown in Figure 137.
Temperature
digits are flashing
Figure 137
Lock in Return Period Water Temperature
Step 21: Once the water temperature for the Return time period is selected, press the RIGHT (Next)
button to lock in the Return period water temperature, as shown in Figure 138. Now, the Return time
period is set for day being edited.
Figure 138
-61-
Sabbath Time Period Editing
Edit Sleep Period Start Time
Step 22: Press the UP (increase time by 15 minutes) or DOWN (decrease time by 15 minutes) buttons to
edit the Sleep period start time. The time increments in 15-minute intervals just as it did for the previous
periods. This is shown in Figure 139.
Hour & minutes
digits are flashing
Figure 139
Lock in Sleep Period Start Time
Step 23: Press the RIGHT (Next) button to lock in the Sleep period start time, which is shown in Figure
140.
Figure 140
Edit AM / PM
Step 24: Next, using the UP (index AM / PM) or DOWN (index AM / PM) buttons, select AM / PM, as
shown in Figure 141.
"AM"/"PM" symbol flashes
Figure 141
-62-
Sabbath Time Period Editing
Lock in AM / PM
Step 25: Press the RIGHT (Next) button to lock in AM / PM. This is shown in Figure 142.
Figure 142
Edit the Sleep Period Water Temperature
Step 26: Using the UP (increase water temperature) or DOWN (decrease water temperature) buttons,
select the Sleep period desired water temperature. This is shown in Figure 143.
Temperature
digits are flashing
Figure 143
Lock the Sleep Period Water Temperature
Step 27: Press the RIGHT (Next) button to lock in the Sleep period water temperature, as shown in
Figure 144. Now, the Sleep time period is set for Friday.
Figure 144
-63-
Sabbath Time Period Editing
Continuing with Sabbath Time Period Editing
To edit the schedule for Saturday, return to Step 2 on page 55 and follow the same procedure. When you
are finished changing the Setback schedule, press the LEFT (Done) button, as shown in Figure 145.
Figure 145
-64-
Diagnostic Codes
In this section, the table details what the diagnostic codes on the Setback Control mean. The
diagnostic codes that can be displayed are different and depend on the gas valve / control that
is connected to the Setback Control.
Diagnostic
Code #
Description
58
59
60
61
62
Setback Control not connected to gas valve / control or
improperly wired together.
Pressure switch failed to open (stuck closed).
Weak pilot signal detected.
Pilot signal detected out of sequence.
Internal gas valve fault detected.
Failed to light pilot.
Pilot signal detected out of sequence (before it should).
Pilot signal detected out of sequence (after it should).
Pressure switch failed to close (stuck open).
Upper tank sensor out of specification.
Lower tank sensor out of specification.
Damper failed to close (stuck open).
Damper failed to open (stuck closed).
False ground in pilot assembly detected. Replace pilot
assembly.
Internal gas valve fault detected.
Line voltage out of acceptable range.
Wiring issue, transformer out of phase.
Internal gas valve fault detected.
Ignition failed, maximum number of tries. Soft lockout.
63
64
65
Conn
Gas Valve / Control Model
WV8840
Accessory
(standing
S9360B S9380B
Module
pilot gas
control)
x
x
x
x
x
x
x
x
x
x
x
x
x
x
x
x
x
x
x
x
x
x
x
x
x
x
x
x
x
x
x
x
x
x
x
x
Ignition successful, but flame lost during run cycle. Soft lockout.
x
x
x
x
x
x
x
x
87
89
93
95
96
143
Internal gas valve fault detected.
Excessive tank temperature.
Soft Lockout due to maximum number of recycles exceeded,
last recycle was from pressure switch open
A manual reset is required due to Rollout Limit
Equipment missing or improperly wired together.
Internal gas valve fault detected.
Flammable vapor sensor fault detected, see warning label.
Flammable vapor sensor out of specification, possible short.
Water heater tank leak detected.
145
Leak sensor improperly installed or leak sensor resistor missing.
2
4
6
18
20
23
24
29
31
32
55
56
57
85
-65-
x
x
WV4460E
(intermittent
pilot gas
control)
x
x
x
x
x
x
x
x
x
x
x
x
x
x
x
x
x
x
x
x
x
Notes
-66-
Notes
-67-
Ambler, PA
For U.S. and Canada field service,
contact your professional installer or
local Bradford White sales representative.
Sales/800-523-2931
Fax/215-641-1670
Parts Fax/215-641-2108
Technical Support/800-334-3393
Fax/269-795-1089
Warranty/800-531-2111
Fax/269-795-1089
International:
Telephone/215-641-9400
Telefax/215-641-9750
Mississauga, ON
Sales/866-690-0961
905-238-0100
Fax/905-238-0105
Technical Support/800-334-3393
Email:
[email protected]
[email protected]
www.bradfordwhite.com