1
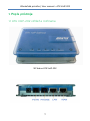
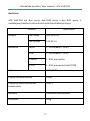
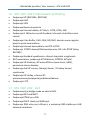
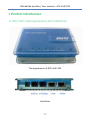
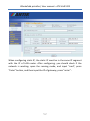
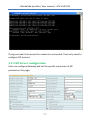
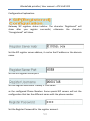
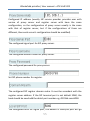
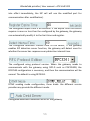
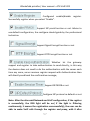
Užívateľská príručka / User manual – ATK VoIP-202
1
Užívateľská príručka / User manual – ATK VoIP-202
Obsah
Nakladanie s elektrozariadením................................................................. 6
Bezpečnostné upozornenia ....................................................................... 6
1. Popis prístroja ........................................................................................ 9
1.1 ATK VoIP-202 vzhľad a rozhrania .................................................. 9
1.2 ATK VoIP-202 Podporované protokoly: ...................................... 11
1.3 ATK VoIP-202 : sieť ..................................................................... 11
1.4 ATK VoIP-202 pokročilé funkcie: ................................................. 12
1.5 Konfigurácia, ovládanie, údržba.................................................. 13
2. Inštalácia .............................................................................................. 14
2.1 Obsah balenia ............................................................................. 14
2.2 Inštalácia..................................................................................... 14
2.3 Indikátor aktuálneho pripojenia ................................................. 15
3.Konfigurácia cez web ......................................................................... 16
3.1 Priradenie IP adresy .................................................................... 16
3.2 Konfigurácia cez Web ................................................................. 16
3.2.1 Prihlásenie ............................................................................. 17
3.2.2 Nastavenia siete .................................................................... 18
3.2.3 SIP nastavenia ....................................................................... 20
3.2.4 IAX2 nastavenia ..................................................................... 25
3.3 Uloženie a vymazanie nastavení ................................................. 27
2
Užívateľská príručka / User manual – ATK VoIP-202
4. Nastavenia hovorov ............................................................................. 28
4.1 Dial number ................................................................................ 28
4.2 Call transfer: prepojenie na slepo, prepojenie po zdvihnutí ........ 28
4.2.1 Prepojenie na slepo ............................................................... 28
4.2.2 Prepojenie po zdvihnutí ........................................................ 28
4.3 Konferenčný hovor troch ............................................................ 28
5. Nastavenia pomocou tlačidiel ........................................................... 29
5.1 Nastavenie presmerovania ......................................................... 29
5.2 Nastavenie IP adresy.................................................................. 30
6. Výrobné nastavenia ............................................................................. 31
7. FAQ ...................................................................................................... 32
7.1 Prečo brána nedostáva WAN IP alebo LAN IP? ......................... 32
7.2 Prečo počujem obsadzovací tón keď zdvihnem slúchadlo? .......... 32
Záručný list .............................................................................................. 33
Electronic Equipment Manipulation ........................................................ 38
Safety notices .......................................................................................... 39
3
Užívateľská príručka / User manual – ATK VoIP-202
USER MANUAL
1. Product introduction............................................................................ 42
1.1 ATK VoIP-202 appearance and interfaces..................................... 42
1.2 ATK VoIP-202 Supported protocol: ............................................... 44
1.3 ATK VoIP-202 Network Features: ................................................. 45
1.4 ATK VoIP-202 Advanced Functions: .............................................. 45
1.5 Configuration, manage and maintain mode ................................. 46
2. Installation ........................................................................................... 46
2.1 Standard Package ......................................................................... 46
2.2 Installation.................................................................................... 47
2.3 Display and status indicators ........................................................ 48
3.Configuration with Web..................................................................... 49
3.1 Get the gateway IP address .......................................................... 49
3.2 Configuration with Web ............................................................... 49
3.2.1 Login and user Verification ..................................................... 50
3.2.2 Network Configuration ........................................................... 51
3.2.3 SIP Server configuration .......................................................... 53
3.2.4 IAX2 Configuration .................................................................. 58
3.3 Save and clear the configuration .................................................. 60
4. How to use ........................................................................................... 61
4.1 Dial number .................................................................................. 61
4
Užívateľská príručka / User manual – ATK VoIP-202
4.2 Call transfer: blind transfer, attend transfer ................................ 61
4.2.1 blind transfer .......................................................................... 61
4.2.2 attend transfer ........................................................................ 61
4.3 Three way call............................................................................... 61
5. Config via Phone Keyboard ................................................................. 63
5. 1 Basic Config ................................................................................. 63
5.2 Call farward config........................................................................ 63
5.3 IP address config .......................................................................... 64
6. Default Factory Setting ........................................................................ 65
7. FAQ ...................................................................................................... 66
7.1 The gateway can’t assign WAN or LAN IP ..................................... 66
7.2 After configure the WAN static IP, why it return to the primary IP
when confirm the modified local IP.................................................... 66
7.3 Why can’t log in gateway by Telnet .............................................. 66
7.5 Why does it encounter busy tone when pick up phone?.............. 66
Guarantee Certificate .............................................................................. 68
5
Užívateľská príručka / User manual – ATK VoIP-202
Nakladanie s elektrozariadením
•
•
•
•
•
Nefunkčné, vyradené, resp. opotrebované (podľa
Vášho zváženia) elektronické zariadenie, je
potrebné odovzdať na miestach na to určených.
Elektronické zariadenie je potrebné separovať od nevytriedeného
komunálneho odpadu a odovzdať ho v celku (myslí sa tým aj
s batériou, prípadne nabíjačkou).
Pokiaľ sa so starým elektronickým zariadením nebude nakladať
podľa uvedených bodov, môže dôjsť k negatívnemu vplyvu na
životné prostredie a taktiež na zdravie ľudí.
Ak však staré elektronické zariadenie odovzdáte na miestach na to
určených, samotný spracovateľ garantuje jeho zhodnotenie
(materiálové, alebo iné), čím aj Vy prispievate k opätovnému
použitiu jednotlivých súčastí elektronického zariadenia a k ich
recyklácii.
Všetky informácie na tomto letáku sú zhrnuté pod symbolom
uvedeným na každom elektronickom zariadení. Účel tohto
grafického symbolu spočíva v spätnom odbere a oddelenom zbere
elektroodpadu. Nevyhadzovať v rámci komunálneho odpadu!
Odpad je možné spätne odobrať na miestach na to určených!
Bezpečnostné upozornenia
Aby sa používaním brány ATK VoIP-202 predišlo nebezpečenstvu požiaru,
úrazu, poraneniu osôb prípadne poškodeniu majetku, je potrebné
dodržiavať nasledujúce bezpečnostné pokyny:
•
•
Nepokúšajte sa prístroj otvoriť, ak je potrebná oprava alebo zásah
do prístroja, obráťte sa na poskytovateľa služby ktorý zabezpečí
odstránenie vady kvalifikovaným pracovníkom.
K napájaniu prístroja používajte výlučne iba schválený sieťový
adaptér.
6
Užívateľská príručka / User manual – ATK VoIP-202
•
•
•
•
•
•
•
•
•
•
Neumiestňujte telefónny prístroj do blízkosti tepelného zdroja,
zdroja prachu alebo otrasov, v blízkosti vody, napr. pri sprche,
umývadle, na mokrom podklade, alebo pri bazéne.
S telefónnym prístrojom zaobchádzajte opatrne, hrubým
zaobchádzaním môže dôjsť k poškodeniu prístroja alebo jeho
nefunkčnosti.
Na čistenie prístroja nepoužívajte agresívne chemikálie, čistiace
prostriedky obsahujúce chemikálie, ani silné saponáty.
Prístroj nefarbite, farba môže zaniesť pohyblivé časti prístroja
a znemožniť jeho správne fungovanie.
Ak je niektorá časť prístroja poškodená, prístroj neopravujte,
odpojte sieťový adaptér a urýchlene kontaktujte poskytovateľa
služby.
Prístroj neinštalujte ani nepoužívajte pri búrke. Hrozí
nebezpečenstvo úrazu elektrickým prúdom.
Napájací kábel starostlivo umiestnite tak, aby naň nikto nemohol
stúpiť ani oň zakopnúť.
Nepoužívajte telefónny prístroj v agresívnych prostrediach, napr.
lakovňa.
Nefunkčné, vyradené alebo opotrebované zariadenie je potrebné
separovať od komunálneho odpadu a odovzdať ho poskytovateľovi
služby, ktorý bezplatne zabezpečí likvidáciu alebo recykláciu
nepoužiteľných súčastí prístroja.
Oboznámte s týmito bezpečnostnými pokynmi všetkých
potenciálnych užívateľov IP telefónneho prístroja v mieste jeho
pripojenia.
7
Užívateľská príručka / User manual – ATK VoIP-202
ATK VoIP-202 je plne kompatibilný s odporúčaniami VoIP ISO. Podporuje
SIP a IAX2 protokol, komunikuje s väčšinou štandardných IP telefónov ale
aj so softwarovými aplikáciami používajúcimi SIP zariadenia, SIP server a
SIP multigateway.
Pre lepšie využitie funkcií prístroja odporúčame prečítať tento manuál
ešte pred pripojením a používaním ATK VoIP-202. Prosím uschovajte pre
prípad ďalšej potreby.
Tento manuál je pre bránu ATK VoIP-202 , popisuje inštaláciu, základné
funkcie a špecifiká prístroja. Mal by vám uľahčiť jeho používanie.
Upozornenie: V prípade neaktuálnosti manuálu v dôsledku zmien po
aktualizácii firmwaru na prístroji, nebudeme o týchto užívateľa
informovať. Prosím pre aktuálnu verziu manuálu, ďalšie informácie
a podrobnosti navštívte našu stránku
8
Užívateľská príručka / User manual – ATK VoIP-202
1. Popis prístroja
1.1 ATK VoIP-202 vzhľad a rozhrania
SIP brána ATK VoIP-202
9
Užívateľská príručka / User manual – ATK VoIP-202
Rozhrania
ATK VoIP-202 má štyri porty: dva RJ45 porty a dva RJ11 porty. V
nasledujúcej tabuľke sú zhrnuté technické špecifikácie prístroja.
Položka
Adaptér
Rozhrania
Špecifikácia
Na vstupe
100-240V AC
Na výstupe
12V DC 1A
WAN
1 10/100Base T RJ-45
LAN
1 10/100Base T RJ-45
Telefón
1 RJ11 pre telefón
PSTN
1 RJ11 pre pevnú linku (PSTN)
Výkon
3.5W/1.8W
Prípustná teplota okolia
0-40C
Prípustná vlhkosť okolia bez
kondenzácie
5-95%
Rozmery
180mmx120mmx60mm
Hmotnosť
520g
10
Užívateľská príručka / User manual – ATK VoIP-202
1.2 ATK VoIP-202 Podporované protokoly:
•
•
•
•
•
•
•
•
•
•
•
•
•
•
•
Podporuje SIP (RFC3261, RFC2543)
Podporuje IAX2
Podporuje VPN
Podporuje Reverznú polaritu
Podporuje hlasové kodeky: G711A/u, G729, G726, iLBC
Podporuje G.168 echo cancell štandard, účinnosť až do 96ms echo
cancell
Podporuje Jitter Buffer, VAD, CNG, SIP/IAX2, domain name register,
point to point komunikáciu.
Podporuje hlasovú komunikáciu cez RTP a RTCP.
Podporuje DTMF Inbound/Outbound prenos; SIP info, DTMF Relay,
RFC2833
Podporuje štandard vyzváňania v rôznych krajinách a regiónoch.
NAT penetration, podporuje STUN klienta, CITRON, AVS atď.
Podporuje SIP doménu, SIP autentifikáciu (none basic, MD5),
parsovanie názvu domény.
Podporuje dva SIP servery (Verejný Server / Privátny Server)
synchronne
Podporuje SIP služby, vrátane SIP
presmerovanie/prepojenie/podržanie/čakanie.
Podporuje L2TP
1.3 ATK VoIP-202 : sieť
•
•
•
•
•
Podporovaný je bridge mode na oboch RJ45.
Podporuje NAT and NAPT
Podporuje PPPoE pre xDSL
Podporuje DHCP client pre WAN port
Podporuje DNS relay pre LAN port, a poskytuje DNS službu pre LAN
network zariadenia.
11
Užívateľská príručka / User manual – ATK VoIP-202
•
•
•
•
•
•
•
Používa pokročilú technológiu DSP pre zabezpečenie vysokej kvality
hlasu.
Používa pokročilú technológiu buffer pre obmedzenie straty alebo
omeškania komunikačných paketov.
Podporuje sieťové nástroje vrátane ping, trace a telnet klienta.
Podporuje tri módy siete WAN pre IP adresu: statický (statické
nastavenie IP adresy pre LAN), DHCP (dynamické priradenie IP pre
LAN) a PPPoE (dynamické priradenie pre ADSL)
Poskytuje firewall kontrolu na LAN porte pre malú LAN
Poskytuje komunikáciu pre PRI pre malú LAN na LAN porte
Podporuje QOS (802.1p)
1.4 ATK VoIP-202 pokročilé funkcie:
•
•
•
•
•
•
•
•
•
•
Brána umožňuje registráciu na dvoch rozdielnych SIP účtoch, jednom
IAX2 účte a na jednom normálnom PSTN telefónnom čísle. To
znamená že brána umožňuje používať štyri rozdielne telefónne čísla.
Čakajúci hovor, podržanie hovoru, prepojenie hovoru, konferenčný
hovor troch, presmerovanie hovoru
Jednoduché prepínanie medzi VOIP účtami a PSTN.
Signalizácia prichádzajúceho hovoru, blokovanie odchádzajúcich
hovorov, blokovanie všetkých prichádzajúcich hovorov, automatické
vytočenie čísla po zdvihnutí
Nastavenie listu blokovaných hovorov prichádzajúcich aj
odchádzajúcich
Podpora priamych volaní point to point
Nastavenie fixnej dĺžky čísla pre vytáčanie.
Podpora potláčania ticha, VAD (Voice Activity Detection)
Podpora CNG (Comfort Noise Generation)
Podpora potláčania echa a AGC (Automatic Gain Control)
12
Užívateľská príručka / User manual – ATK VoIP-202
•
Podpora detekcie pripojenia, obsadzovací ton v prípade odpojenej
linky
1.5 Konfigurácia, ovládanie, údržba
•
•
•
•
Bezpečnostný mód poskytuje spoľahlivosť
Konfigurácia cez web, telnet a pomocou klávesnice pripojeného
telefónu. Možnosť ovládania a konfigurovania brány cez HTTP,
Aktualizácia firmware cez HTTP, FTP alebo TFTP.
Modifikovateľné prístupové práva; používateľ môže ovládať bránu
cez Telnet, cez NAT/Firewall.
13
Užívateľská príručka / User manual – ATK VoIP-202
2. Inštalácia
2.1 Obsah balenia
•
•
•
•
Jeden kus ATK VoIP-202 brána
Jeden adaptér
Používateľská príručka
Prepojovací kábel
Upozornenie: Napájanie pre bránu ATK VoIP-202 spĺňa UL štandard. K
tomuto výrobku môže byť použitý iba adaptér, ktorý bol súčasťou
balenia. Na škody spôsobené iným napájacím zdrojom sa nevzťahuje
záruka výrobku. Za škody spôsobené nesprávnym, neschváleným
zdrojom neručí dodávateľ, resp. výrobca. Prosím pripojte bránu do siete
adaptérom, ktorý je súčasťou balenia.
2.2 Inštalácia
14
Užívateľská príručka / User manual – ATK VoIP-202
•
•
•
•
•
Zapojte RJ-45 Ethernet kábel do WAN portu na bráne, presvedčte sa
či brána je pripojená do internetu
Na LAN porte môžete pripojiť PC
Ak na bráne chcete využívať vašu pôvodnú PSTN linku potom pripojte
telefónnu linku na porte PSTN, analógový telefón potom pripojte na
porte Phone.
Na pripojenie analógového telefónu použite RJ11 kábel spájajúci
telefón s PHONE portom brány.
Pripojte 12V/1A adaptér
2.3 Indikátor aktuálneho pripojenia
WAN: WAN port indikátor LED. Ak LED svieti je brána pripojená správne
do WAN.
LAN: LAN port indikátor LED. Svietiaca LED indikuje pripojenie medzi
bránou a LAN.
PHONE: LED pre telefón. LED sa rozsvieti pri zdvihnutí slúchadla
analógového telefónu.
REG: Indikátor registrácie LED. Neprerušovane svietiaca LED indikuje
úspešnú registráciu VOIP. Blikajúca LED indikuje neúspešnú registráciu
VOIP.
POWER: Indikátor napájania LED. Táto LED indikuje že brána je napájaná
zo zdroja.
15
Užívateľská príručka / User manual – ATK VoIP-202
3.
.Konfigurácia cez web
3.1 Priradenie IP adresy
Brána má dva porty : WAN a LAN, obe sú prednastavené na DHCP mode.
Používateľ môže konfigurovať bránu cez WAN IP a LAN IP podľa použitej
siete.
•
Ak vaša sieť podporuje DHCP a IP adresa sa priraďuje automaticky,
potom po zapojení brány LED indikátor WAN začne svietiť, tzn. brána
obdržala IP adresu. Ďalej môžete nastavovať
pri použití
nasledujúceho postupu : po zapojení ethernetového káblu do WAN
portu pripojte PSTN telefón na port Phone, na telefóne zadajte
#*111#, po vytočení budete v slúchadle počuť IP adresu. Adresu
zadajte do internetového prehliadača, po zadaní prístupového hesla
môžete bránu konfigurovať. Detaily nastavovania cez web nájdete v
nasledujúcom texte.
3.2 Konfigurácia cez Web
Konfiguračné rozhranie pozostáva z konfiguračného menu vľavo
a konfiguračného rozhrania vpravo. Vyberte príslušné menu podľa
nasledujúcich obrázkov.
16
Užívateľská príručka / User manual – ATK VoIP-202
Kliknutím na položky v hlavnom menu sa otvorí príslušné submenu.
Ďalším kliknutím na submenu ho otvoríte.
3.2.1 Prihlásenie
Po vložení IP adresy brány do prehliadača (možno si ju vypočuť pomocou
vytočenia #*111#) alebo pomocou IP z LAN portu (prednastavená je
192.168.10.1) sa zobrazí okno prístupu.
Po zadaní prístupových údajov môžete konfigurovať telefón.
17
Užívateľská príručka / User manual – ATK VoIP-202
Upozornenie: po zadaní mena a hesla stlačte,, Logon“ pre vstup.
3.2.2 Nastavenia siete
Upozornenia: až po správnom nastavení IP pre WAN sa brána môže
pripojiť do Internetu
Ak vo vašej sieti je zabezpečené automatické priradenie IP adresy
pomocou DHCP, potom brána bez konfigurácie siete obdrží adresu,
prednastavený mod siete je DHCP. V opačnom prípade je potrebné
nastaviť parametre siete.
18
Užívateľská príručka / User manual – ATK VoIP-202
Pri nastavovaní IP adresy sa presvedčte či je z rovnakého IP segmentu ako
brána siete. Po nastavení overte konektivitu : zadaním “cmd” do
príkazového riadku sa po potvrdení otvorí okno DOS.
Po zadaní príkazu ping a adresy brány stlačte “enter”. Ak sú odozvy ako
dole na obrázku, potom je brána dostupná a je možné nastaviť VOIP účet.
19
Užívateľská príručka / User manual – ATK VoIP-202
3.2.3 SIP nastavenia
Na tejto stránke môže používateľ nastaviť SIP účet na bráne IAD.
20
Užívateľská príručka / User manual – ATK VoIP-202
Popis nastavení:
- Indikátor aktuálneho nastavenia
SIP. Príznak ‘Registered” ukazuje či je brána úspešne registrovaná.
V opačnom prípade má príznak “Unregistered”.
- Nastavte IP adresu SIP servera, prípadne názov domény.
- Nastavte číslo portu registračného SIP servera.
- Nastavte registračné meno. Spravidla je to telefónne číslo. Niektoré
špecifické SIP servery majú registračné meno rozdielné od telefónneho
čísla.
- Nastavte registračné heslo SIP účtu.
- Nastavte IP adresu (Spravidla poskytovateľ VOIP ma registračný server
a proxy server totožný . V prípade že majú rôzne adresy je potrebné
nastaviť aj proxy zvlášť.
- Port pre SIP signalizáciu.
21
Užívateľská príručka / User manual – ATK VoIP-202
- Nastavenie mena účtu pre proxy server.
- Nastavenie hesla pre proxy server.
- Nastavte SIP číslo pre registráciu.
- Nastavenie SIP registračnej domény realm. Tá musí zodpovedať adrese
registračného servera.
- Nastavenia SIP signálneho portu, prednastavený je 5060. V prípade
smerovania hovorov na iný port je potrebné nastaviť.
Prednastavený čas pre vypršanie registrácie je 60 sekúnd. Ak server
vyžaduje iný čas, brána automaticky zmení čas registrácie.
Prednastavený detekčný interval servera, ak na bráne je povolená funkcia
detekcie SIP servera potom vždy detekuje server podľa nastavenia času
pre odpoveď.
22
Užívateľská príručka / User manual – ATK VoIP-202
Používaná verzia štandardu pre protokol. Ak bude brána komunikovať so
zariadením používajúcim SIP 1.0 ako je CISCO5300, potom je potrebné
nastaviť RFC2543 . Prednastavený je RFC2543.
Mód zasielania DTMF, tri možnosti. Rôzny poskytovatelia môžu
poskytovať rozdielny mód.
Nastavenie detekčného servera.
Nastavenie registrácie povolená/zakázaná.
Úspešne sa zaregistruje ak odkliknete enable.
Podpora SIP
prack funkcie. Doporučujeme
defaultne nastavenie.
Použitie tejto funkcie vyžaduje profesionálne znalosti.
Podpora Encrypt funkcie.
Podpora RTP Encrypt funkcie.
23
Užívateľská príručka / User manual – ATK VoIP-202
Podpora priamej autorizácie,
po povolení brána pri odoslaní požiadavky na registráciu obdrží
potvrdzujúcu správu bez autorizácie.
Podpora RFC4028.
Podpora SIP protokolu ako
predvoleného protokolu.
Upozornenie: Po nastavení siete a VOIP, ak je brána registrovaná
úspešne, REG led svieti (ak led bliká pravidelne potom registrácia je
neúspešná). Používateľ môže vykonávať VOIP hovory pomocou # po
vytočení čísla. Ak sú potrebné pokročilé nastavenia, pozrite si prosím
sprievodcu pokročilými nastaveniami.
24
Užívateľská príručka / User manual – ATK VoIP-202
3.2.4 IAX2 nastavenia
- IAX2 adresa servera môže byť názov domény
- IAX2 port servera
- Meno vášho IAX účtu
- Heslo vášho IAX účtu
25
Užívateľská príručka / User manual – ATK VoIP-202
- Telefónne číslo IAX účtu
- Lokálny signalizačný IAX port.
- Ak IAX používaný vo vašej sieti podporuje číslo odkazovej schránky, ale
užívateľské meno vašej schránky obsahuje písmena, ktoré sa nedajú zadať
na bráne, potom používateľské meno nahraďte číslom.
- Ak IAX vo vašej sieti podporuje textový formát hlasovej správy, potom tu
nastavte názov domény vašej hlasovej schránky.
- Ak je echo test v textovom formáte a platforma podporuje echo test
číslo, potom nahraďte echo test číslom. Táto funkcia môže byť použitá
pre zistenie echa počas hovoru z ústredne na IP bránu.
- Echo test číslo v textovom formáte
26
Užívateľská príručka / User manual – ATK VoIP-202
- IAX čas pre obnovenie registrácie
- Povoliť registráciu
- Nastaviť IAX ako prednastavený
protokol. To znamená po výbere tohto príznaku, hovory sa budú
uskutočňovať cez IAX 2 protokol. Ak si prajete uskutočňovať simultánne
hovory aj pomocou SIP potom nastavte v Dial pláne príslušnú voľbu.
- Povoliť kodek G.729
3.3 Uloženie a vymazanie nastavení
Po vstupe cez web interface do menu IP brány: V hlavnom menu voľbou
“Ďalšie nastavenia „ v submenu ,,Uložiť nastavenia“ príkazom uložíte
vaše aktuálne nastavenia.
Po vsupe cez webinterface do menu IP brány: V hlavnom menu voľbou
“Ďalšie nastavenia „ v submenu ,,Vymazať nastavenia“ zadaním voľby
vymažete aktuálne nastavenia, brána obdrží prednastavenú konfiguráciu.
27
Užívateľská príručka / User manual – ATK VoIP-202
4. Nastavenia hovorov
Ak brána je úspešne registrovaná môžeme uskutočňovať hovory.
4.1 Dial number
Zvoľte číslo napr. 055+ číslo a vytočte pomocou “#”
Pri použití klasickej pevnej linky najprv stlačte “*”, po zaznení tónu
môžete voliť prostredníctvom vašej pevnej linky.
Pre volania priamo z IP na IP voľte napr.
vytočenie IP adresy 192.168.1.179.
#192*168*1*179#
pre
4.2 Call transfer: prepojenie na slepo, prepojenie po
zdvihnutí
4.2.1 Prepojenie na slepo
Stlačte “Flash” potom * a zamýšľané číslo, po zložení vašej linky volanie
pokračuje na linke volaného.
4.2.2 Prepojenie po zdvihnutí
Stlačte “Flash” pre podržanie hovoru, vytočte číslo kam chcete prepojiť.
Po vytočení a zdvihnutí na tretej strane môžete položiť hovor bude
pokračovať medzi prvým a tretím účastníkom. V prípade že tretia strana
nezdvihne môžete sa stlačením “Flash ” vrátiť k prvému hovoru.
4.3 Konferenčný hovor troch
Pri rozhovore troch : Podržte hovor s prvým stlačením tlačítka ” Flash”,
potom vytočte číslo tretieho, po nadviazaní hovoru s tretím účastníkom
slačte tlačidlo ”*” pre zostavenie konferenčného hovoru.
28
Užívateľská príručka / User manual – ATK VoIP-202
Upozornenie:
SIP server musí podporovať prepájanie hovoru,
presmerovanie hovoru, konferenčný hovor. Okrem toho je potrebné
povoliť tieto služby v menu brány. V opačnom prípade nie je možné
využívať tieto funkcie brány.
5. Nastavenia pomocou tlačidiel
Zadajte #****# a reštartujte bránu
Zadajte #*000# a vymažte nastavenia
Zadajte #*100# pre nastavenie pevného módu siete
Zadajte #*101# a brána pracuje v DHCP móde
Zadajte #*102# a prepnite bránu do PPPOE módu
Zadajte #*103# a prepnite bránu do režimu Bridge
Zadajte #*104# a brána bude pracovať v režime Router
Zadajte #*111# a zistite IP adresu brány pomocou hlasovej správy
Zadajte #*222# a zistite telefónne číslo nastavené na bráne pomocou
hlasovej služby
5.1 Nastavenie presmerovania
Napr.ak chcete presmerovať prichádzajúce hovory z brány na číslo 800
#*91800# po zadaní príkazu v tomto tvare sa presmerujú všetky hovory
ak je telefón obsadený.
29
Užívateľská príručka / User manual – ATK VoIP-202
#*92800# po zadaní sa presmeruje hovor, v prípade že nikto nedvíha.
#*93800# po zadaní sa presmeruje hovor vždy.
#*90#
zadaním tohto príkazu sa deaktivuje služba presmerovania.
5.2 Nastavenie IP adresy
Najprv vytočte “#*100#”, prepnite bránu do režimu statickej IP adresy
a postupujte podľa nasledujúcich krokov :
Ak chcete na bráne nastaviť IP adresu 192.168.1.77 zadajte pomocou
tlačidiel telefónu a vytočte #*50192*168*1*77#
Pre nastavenie brány siete 192.168.1.1 zadajte pomocou tlačidiel
#*51192*168*1*1#
Pre nastavenie statickej DNS 192.168.1.1 zadajte pomocou tlačidiel
a vytočte #*52192*168*1*1#
Pre nastavenie masky siete 255.255.255.0 zadajte #*53255*255*255*0#
Po nastavení parametrov pre nastavenie IP reštartujte zariadenie pre
aktiváciu nastavení.
30
Užívateľská príručka / User manual – ATK VoIP-202
6. Výrobné nastavenia
•
•
•
•
Prednastavený režim pridelenia IP adresy je DHCP, po prepnutí do
režimu statickej IP adresy je IP adresa 192.168.1.179
Prednastavený protokol je SIP, prednastavený SIP port 5060
Prednastavený HTTP port je 80, TELNET port je 23
Pre vytočenie čísla je prednastavené tlačidlo “#’
31
Užívateľská príručka / User manual – ATK VoIP-202
7. FAQ
7.1 Prečo brána nedostáva WAN IP alebo LAN IP?
Keď brána je v režime NAT , nenastavujte WAN a LAN IP z rovnakého
segmentu. Ak je napr. LAN IP adresa 192.168.1.X, nezapisujte WAN
adresu na rovnakom segmente 192.168.1.X
7.2 Prečo počujem obsadzovací tón keď zdvihnem
slúchadlo?
Brána ATK VoIP-202 má funkciu detekcie linky, v prípade že je linka
odpojená, brána upozorňuje na nemožnosť volať obsadzovacím signálom.
Ak sa stretnete s problémom pri používaní nášho produktu , napíšte na
adresu: [email protected].
32
Užívateľská príručka / User manual – ATK VoIP-202
Záručný list
Vážený zákazník,
ďakujeme Vám za dôveru, ktorú ste nám preukázali kúpou, alebo
zapožičaním brány ATK VoIP-202. Získali ste kvalitný prístroj, ktorý bude
pri správnom používaní dlhodobo spoľahlivo slúžiť.
Ak budete potrebovať radu alebo pomoc, naši technici sú Vám k dispozícii
od 8:00 do 16:30 na telefónnom čísle 055/ 6234400. Kontakt možno
taktiež nadviazať na e-mailovej adrese: [email protected]. Naši technickí
pracovníci Vám poradia, prípadne odporučia doručiť Váš prístroj do
servisného strediska na adrese:
Antik Technology
Čárskeho 10
040 01 Košice
33
Užívateľská príručka / User manual – ATK VoIP-202
Záručné podmienky:
1. Záruka sa vzťahuje na bezporuchovú prevádzku telefónu, ako aj jeho
príslušenstva v trvaní dvadsaťštyri (24) mesiacov. Napájací zdroj,
slúchadlo a slúchadlový kábel sú štandardne dodávané príslušenstvo k
telefónu. Záručná doba začína plynúť dňom prevzatia telefónu a
príslušenstva kupujúcim. Dátum musí byť vyznačený na záručnom liste.
2. Záruka bude uznaná, iba ak k tomuto úplne a riadne vyplnenému
záručnému listu bude priložený doklad o zaplatení.
3. Záruka je neplatná, ak typ výrobku alebo výrobné číslo bolo zmenené
alebo odstránené.
4. V prípade uplatnenia záručnej opravy príslušenstva, ktoré bolo
inštalované, bude záruka uznaná, len ak kupujúci zároveň predloží Zmluvu
o poskytovaní Verejnej telefónnej služby Antik.
5. Záruka sa nevzťahuje na chyby zapríčinené:
•
•
•
•
•
•
používaním výrobku, ktoré je v rozpore s návodom na obsluhu
mechanickým poškodením
kontaktom výrobku s vodou či inými tekutinami, ktoré vtiekli do
vnútra
opravou vykonanou neautorizovaným servisným strediskom
nevhodným skladovaním a používaním mimo tepelného rozsahu
uvedenom v návode na obsluhu
skladovaním a používaním výrobku vo vlhkom, prašnom, chemicky
alebo ináč agresívnom prostredí - oxidácia
34
Užívateľská príručka / User manual – ATK VoIP-202
Záruka sa nevzťahuje na poruchy vzniknuté:
pri živelných pohromách.
6. Za chybu predávanej veci sa považujú nedostatky jej vlastností alebo
prejavu, ktoré najmä vzhľadom na obsah zmluvy o predaji v obchode
alebo vyhlásenie predávajúceho o zaručených vlastnostiach, alebo
vzhľadom na ustanovenia právnych predpisov, či technických noriem by
mala predávaná vec mať. Za chybu veci sa považuje aj nedostatok
vlastnosti alebo prejavu, ktoré sa pri veciach tohto druhu predávaných v
obchode všeobecne predpokladajú. Záruka sa nevzťahuje na bežné
opotrebovanie výrobku vzniknuté v dôsledku jeho používania.
7. Ak ide o chybu, ktorú možno odstrániť, má kupujúci právo, aby bola
bezplatne odstránená. Kupujúci môže namiesto odstránenia chyby
požadovať výmenu veci, alebo ak sa chyba týka len súčasti veci, výmenu
súčasti, iba vtedy, ak tým predávajúcemu nevzniknú neprimerané náklady
vzhľadom na cenu tovaru alebo závažnosť poruchy.
8. Doba od uplatnenia práva zo zodpovednosti za chyby až do doby, keď
kupujúci po skončení opravy bol povinný vec prevziať, sa do záručnej
doby nepočíta.
35
Užívateľská príručka / User manual – ATK VoIP-202
Na tento prístroj sa poskytuje záruka po dobu dvadsaťštyri (24) mesiacov
odo dňa jeho prevzatia kupujúcim.
Záruka sa uplatňuje u predajcu.
Typ prístroja .........................................................................................
(vyplní predajca)
Dátum predaja ......................................................................................
(vyplní predajca)
Pečiatka a podpis predajcu:
36
Užívateľská príručka / User manual – ATK VoIP-202
Záznam servisného strediska o vykonaní záručných opráv:
Ref. číslo
opravy
Dátum príjmu
Dátum
opravy
Nové
Pečiatka a
výrobné číslo podpis
servisu
Ref. číslo
opravy
Dátum príjmu
Dátum
opravy
Nové
Pečiatka a
výrobné číslo podpis
servisu
Ref. číslo
opravy
Dátum príjmu
Dátum
opravy
Nové
Pečiatka a
výrobné číslo podpis
servisu
Ref. číslo
opravy
Dátum príjmu
Dátum
opravy
Nové
Pečiatka a
výrobné číslo podpis
servisu
37
Užívateľská príručka / User manual – ATK VoIP-202
Electronic Equipment Manipulation
It is necessary to deliver non-functional, discarded, or
worn-out (at your discretion) electronic equipment to
places determined for it.
It is necessary to separate electronic equipment from unseparated
municipal waste and deliver it bodily (it is understood together with the
battery or charger).
Unless old electronic equipment is treated according to the stated points,
negative impact on environment and also people’s health may occur.
However, if you deliver old electronic equipment to places determined
for it, the processer himself guarantees its utilization (material or other),
by which means you
also contribute to reutilization of individual part of the electronic
equipment and their recycling.
All information in this brochure is abridged under the symbol stated on
every electronic equipment.
The purpose of this graphic symbol is based on back removal and
separate collection of electronic waste. Do not throw away with
municipal waste! It is possible to remove the waste at places determined
for it!
38
Užívateľská príručka / User manual – ATK VoIP-202
Safety notices
To prevent risk of fire, accident, personal injury, or damage to property
in using IP telephone gateway, it is necessary to comply with the
following safety instructions:
1. Do not try to open the gateway; if it is necessary to carry out its repair
or interference with the gateway, contact the service provider who shall
provide the error removal by qualified personnel.
2. Use only approved network adapter for the gateway power supply.
3. Do not place the telephone gateway near heat, dust or vibration
sources, near water, such as showers, basins, on wet surfaces or at a
swimming pool.
4. Handle the telephone gateway with care; rough handling may cause
damage to the gateway of its malfunction.
5. For cleaning the gateway do not use aggressive chemicals, detergents
containing chemicals, or strong detergents.
6. Do not paint the gateway; the paint may clog moving parts of the
gateway and disable its proper functioning.
7. If any gateway part is damaged, do not repair the gateway;
disconnect the network adapter and immediately contact the service
provider.
8. Do not install or use the gateway during a storm. There is a risk of
injury due to electric current.
39
Užívateľská príručka / User manual – ATK VoIP-202
9. Place the power supply cable with care so that nobody can step on it or
tumble over it.
10. Do not use the telephone gateway in aggressive environment, such as
a paint shop.
11. It is necessary to separate non-functional, discarded, or worn-out
equipment from municipal waste and deliver it to the service provider
who shall provide for free disposal or recycling of non-utilizable gateway
parts.
12. Inform all potential users of the IP telephone gateway at the place of
its connection with these safety instructions.
40
Užívateľská príručka / User manual – ATK VoIP-202
USER MANUAL
Thank you for choosing the ATK VoIP-202 Gateway.
ATK VoIP-202 if fully compatible with the VOIP introduced by the ISO
(International Organization for Standardization). It embeds the SIP and
IAX2 protocols and can communicates with most of the standard IP
phone, voice software that base on the SIP device, SIP compliant devices,
SIP register server and SIP multi-gateways in the market.
To ensure you can get the professional service with the product, you
should read and understand this manual before you attempt to install or
operate the ATK VoIP-202.Please keep it for your future reference.
This manual is for the ATK VoIP-202 gateway and includes the installation,
basic functions and special futures. Hope it can help you to understand
and operate in short time.
Note: The user manual will change as the product upgrades, we shall
not be warranty to inform user for the changes, please find the further
information and details on our company website.
41
Užívateľská príručka / User manual – ATK VoIP-202
1. Product introduction
1.1 ATK VoIP-202 appearance and interfaces
The appearance of ATK VoIP-202
Interfaces
42
Užívateľská príručka / User manual – ATK VoIP-202
ATK VoIP-202 gateway has 4 ports: two RJ45 ports and two RJ11 ports.
The following table provides the hardware specifications for the ATK
VoIP-202:
Items
Power Adaptor
Specification
Interfaces
Specification
Input
Voltage
100-240V AC
Output
Voltage
12V DC 1A
WAN
1 10/100Base T RJ-45
LAN
1 10/100Base T RJ-45
Phone
1 RJ11 for phone
Lifeline
1 RJ11 for Lifeline (PSTN)
Device Power
3.5W/1.8W
Ambient Temperature
0~40℃
Ambient Humidity
5~95%
Size
180mmx120mmx60mm
Weight
520g
43
Užívateľská príručka / User manual – ATK VoIP-202
1.2 ATK VoIP-202 Supported protocol:
•
•
•
•
•
•
•
•
•
•
•
•
•
•
•
•
Support SIP (RFC3261, RFC2543)
Support IAX2
Support VPN
Support Reverse polarity
Support voice code: G711A/u, G729, G726, iLBC
Support G.168 echo cancellation standard, compliant 96ms echo
cancellation with speaker
Support Jitter Buffer, VAD, CNG, SIP/IAX2, domain name register,
point to point communication.
Support the voice communication through RTP and RTCP.
Support the DTMF Inbound/Outbound transmission; SIP info, DTMF
Relay, RFC2833
Support standards of the ring in different countries and regions.
NAT penetration, support STUN client, CITRON, AVS etc..
Support
SIP
domain,SIP
Authentication(none,basic,
MD5),Domain name explain
Support SIP domain, SIP Authentication (none basic, MD5), domain
name parse.
Support two SIP servers (Public Server / Private Server)
synchronously, make a call by either proxy.
Support
SIP
application,
including
SIP
Call
forward/transfer/holding/waiting.
Support L2TP protocol
44
Užívateľská príručka / User manual – ATK VoIP-202
1.3 ATK VoIP-202 Network Features:
•
•
•
•
•
•
•
•
•
•
•
•
Support two models: Bridge and Router, and integrates the router
functions of these two ports.
Support basic NAT and NAPT
Support PPPoE for xDSL, and support redial automatically when its
offline
Support DHCP client for WAN port
Support DNS relay for LAN port, and provide DNS service for LAN
network devices.
Use the advanced technology DSP to ensure high quality voice
Use the advanced buffer technology to avoid the information
package delay too long or lost.
Support Network Tools that includes ping, trace route and telnet
client
Support 3 methods to configure the WAN IP: Static (static
configuration for LAN), DHCP (Dynamic query through LAN) and
PPPoE (Dynamic query through ADSL)
Provide firewall control for small size of LAN port
Provide the communication PRI available for the small LAN of LAN
port
Support Qos (802.1p) for the second Layer
1.4 ATK VoIP-202 Advanced Functions:
•
•
It can register on the two SIP systems, one IAX2 systems and one
normal PSTN phone number, and can get 2 VOIP numbers and a
normal phone number, that means you can get 4 phone numbers for
the same phone.
Call waiting, hold, call transfer, 3-way conference call, call forward in
many modes
45
Užívateľská príručka / User manual – ATK VoIP-202
•
•
•
•
•
•
•
•
•
•
The 3 phone numbers can be switched freely between VOIP and
PSTN
Incoming call display, forbid dialing out, Do-Not-disturb, and
automatically call while picking up the handset
Set blacklist number and limited number
Support point to point call
Set the mode accepting numbers for the gateway
Set the fixed dialing mode for the phone numbers.
Support silence suppression, VAD (Voice Activity Detection)
Support CNG (Comfort Noise Generation)
Support Line Echo Cancellation and AGC (Automatic Gain Control)
Support line detection, busy tone when no line available
1.5 Configuration, manage and maintain mode
•
•
•
•
Safe mode provide reliability, can upgrade via safety mode
Configure by Web, telnet and keypad management. Can manage and
configure the gateway by HTTP, and can filter limit the IP client
Upgrade firmware through HTTP, FTP or TFTP.
Adjustable user password and super password and set multiple
administers; User can manage the IP phone by Telnet, going through
NAT/FIREWALL
2. Installation
2.1 Standard Package
•
•
One ATK VoIP-202 gateway;
One universal power adapter (different model per area); One user
manual and one Lifeline accessory
46
Užívateľská príručka / User manual – ATK VoIP-202
Warning: The ATK VoIP-202 series gateway, the power follows UL
standard. This product can only use the power adapter that shipped
with the packaging. Damage to the gateway cause by using unsupported
power adapter would not be covered by manufacture’s warranty.
Warning: The power for the ATK VoIP-202 series gateway complies with
UL Standard. Please use the power adaptor that ships with the package.
We are not warranty for any damaged that caused by using any
unsupported power adaptors. Please install and operate follow the user
manual. We are not warranty for any damaged caused by the changes
or disassembling the products that haven’t been confirmed by the
factory.
2.2 Installation
47
Užívateľská príručka / User manual – ATK VoIP-202
•
•
•
•
•
Insert the RJ-45 Ethernet Cable to WAN port on the gateway, ensure
the gateway connects into the internet
For the LAN port, you can connect it to the PC
Connect a phone cable between the PSTN and the PSTN port on the
gateway as the lifeline.
Use a RJ11 phone cable to connect between the phone and the
PHONE port on the gateway.
Insert the 12V/1A power adapter
2.3 Display and status indicators
WAN: WAN port indicator LED. When lit this LED indicates that the
connection between the Gateway and WAN has been satisfied.
LAN: LAN port indicator LED. When lit this LED indicates that the
connection between the Gateway and LAN has been satisfied.
PHONE: Phone status LED. The LED lit when the handset has been picked
up or it turns off when the handset has been hanged up.
REG: Register indicator LED. A continuously lit LED indicates the resister
has been success. A flashing LED warns the resistor has been failed.
POWER: Power supply indicator LED. This LED indicates that the Power for
the gateway is available.
48
Užívateľská príručka / User manual – ATK VoIP-202
3.
.Configuration with Web
3.1 Get the gateway IP address
The gateway has two ports: WAN and LAN, both of them has been set to
the default DHCP mode. User can configure the gateway through the
WAN IP and LAN IP according the network they using.
•
If your network supports the DHCP to distribute IP address
automatically, after connecting the gateway, you will see the
indicator light of the WAN port is on and stop glittering, it means
you get the IP address already, you can be set up quickly
according to the following operation: after connecting Ethernet
cable to WAN port, connect PSTN phone to FXS port, press
#*111#, you could hear IP address of gateway WAN port, input
the WAN IP address on the browser, you can configure the
gateway.( To know more details , please see the advanced
manual)
3.2 Configuration with Web
The web configuration interface mainly consists of the configuration
menu on the left and configuration interface on the right, enter the
corresponding configuration interface to configure by selecting the menu,
please see as below:
49
Užívateľská príručka / User manual – ATK VoIP-202
Before using, the main menu consists Network part (configure IP address,
default route, DNS, etc.), VoIP part (SIP server and Phone Number).
If the menu has submenu, press it to see all the parts. Press once to open
the menu, and press twice to close the menu.
3.2.1 Login and user Verification
Users inputs the IP address of WAN port (dial #*111# to get the IP by
dialogue machine) or the LAN port (default IP is 192.168.10.1) in the IE
browser to login the system by WEB, user can select the login mode
according to the real situation.
Administrator account: the default user name and password both are
“admin”; this user can configure the system.
50
Užívateľská príručka / User manual – ATK VoIP-202
Note: after inputting username and password, user press “Enter” directly
to enter the page.
3.2.2 Network Configuration
Note: after configuring the IP of WAN correctly, gateway can connect
Internet
If your LAN router opens DHCP server function, WAN IP of gateway can
get IP address without needing make network configuration (the default
configuration for WAN is DHCP client mode,You need configure the WAN
port to the static IP address.
51
Užívateľská príručka / User manual – ATK VoIP-202
When configuring static IP, the static IP must be in the same IP segment
with the IP of LAN router. After configuring, you should check if the
network is working: open the running mode, and input “cmd”, press
“Enter” button, and then input the IP of gateway, press “enter”:
52
Užívateľská príručka / User manual – ATK VoIP-202
If ping succeed, that means the network is connected. Then only need to
configure SIP account.
3.2.3 SIP Server configuration
User can configure Gateway and set the specific parameter of SIP
protocol on this page:
53
Užívateľská príručka / User manual – ATK VoIP-202
Configuration Explanation:
Gateway SIP registers status indictor. The character ‘Registered” will
show after you register successful, otherwise the character
“Unregistered” will show.
Set the SIP register server address, it can be the IP address or the domain
name.
Set the SIP register server port.
Set the register username. Usually it’s the same
as the configured Phone Number. Some special SIP servers will set the
configuration that has the different name with the phone number.
Set the Register Password for the register account.
54
Užívateľská príručka / User manual – ATK VoIP-202
Configured IP address (usually SIP service provider provides user with
service of proxy server and register server with have the same
configuration, so the configuration of proxy server usually is the same
with that of register server, but if the configurations of them are
different, then each server’s configuration should be modified)
The configured signal port for SIP proxy server.
The configured account name for proxy server.
The configured password for proxy server.
Set SIP phone number for register.
The configured SIP register domain realm. It must be accordant with the
register server address. If the SIP terminal port is not default 5060, the
back should be need add the detail port number e.g.:0101hk.com:6058.
The configured local SIP signal port, the default is 5060(this port will go
55
Užívateľská príručka / User manual – ATK VoIP-202
into effect immediately; the SIP call will use the modified port for
communication after modification).
The configured expire time is 60 seconds. If the expire time that server
requires is more or less than the configured by the gateway, the gateway
can automatically modify it to the limit time and register.
The configured detection interval time of the server, if the gateway
enables SIP detection server function, the gateway will detect once for
whether the server has response every detection internal time.
The configured using protocol version. When the gateway needs to
communicate with the gateway using SIP1.0 such as CISCO5300, the
RFC2543 configuration is necessary, and then the communication will be
normal. The default is using RFC3261.
DTMF sending mode configuration, three kinds: the different service
provider may provide the different mode.
Configured automatic detection server of the gateway.
56
Užívateľská príručka / User manual – ATK VoIP-202
Configured enable/disable
Successfully register when you select “Enable”.
register.
Support SIP prack function or not. Advise to
use default configuration, the configure should guide by the professional
technician.
Support Signal Encrypt function or not
Support RTP Encrypt function or not
Whether let the gateway
support and register to take authentication to send directly, in this way
the devices does not need to do the authentication with the server each
time any more, server receives register request with Authentication then
will directly send back the confirmative message;
Support RFC4028 or not
Configure SIP protocol as default or not
Note: After the aforesaid Network and VoIP configuration, if the register
is successfully, the REG light will be on( if the light is flittering
continuously, it means the registration unsuccessfully), the user can be
able to make VoIP calls through the register and proxy, with # after
57
Užívateľská príručka / User manual – ATK VoIP-202
finish dialing number. If you need to advanced configuration, please see
the details in advanced configuration manual for you reference.
3.2.4 IAX2 Configuration
IAX2 server address can be domain name
IAX2 server port (register port of public server)
Account name (user name of your SIP account)
58
Užívateľská príručka / User manual – ATK VoIP-202
Account
password
(password
for
your
IAX2account)
Register phone number (phone number of your IAX
account)
Local IAX monitor port (signal port of local)
If the IAX supports the voice mail number, but
your username of the voice mail is letters which you can not input with
gateway, then use the number to replace your username.
If IAX support voice mail text, configure the domain
name of your voice mail here.
If Echo test number and number is test form,
configure the test number to replace the next format. This function can
be tested by platform or terminal to see if the call is normal or not from
terminal system.
Echo test number in text format
59
Užívateľská príručka / User manual – ATK VoIP-202
IAX register refresh time
Enable or disable register to the server
Set IAX2 as the default protocol. That
means if choose this option, user picks up and dial number, it will be
communicated through IAX2 protocol. The default of gateway is SIP
protocol; this configuration it means when you make a phone call, the
receiver wouldn’t be affected. If user configures this item, it won’t be
used SIP, but IAX, if user wants to give a call by SIP simultaneously, then
can configure the function of prefix substitution in the item of Dial peer
and achieve the SIP call.
Enable / disable to G729 (using G729 speech
coding mandatory consultations)
3.3 Save and clear the configuration
Enter into WEB page, “Config Manage->Save Confi to save the
configuration
Enter into WEB page, Config Manage->Clear Confi to clear the
configuration, come back to default configuration.
60
Užívateľská príručka / User manual – ATK VoIP-202
4. How to use
After gateway register successfully we can make phone call
4.1 Dial number
•
•
•
Dial VOIP number according to dial peer, for example: code +
telephone, 0 + mobile number, end up with “#”
Use lifeline to dial the PSTN number, press “*” first and transfer to
the lifeline, after hear the dialing tone, then dial the PSTN
number.
Dial IP address, for example, you can press #192*168*1*179# to
dial IP address 192.168.1.179.
4.2 Call transfer: blind transfer, attend transfer
4.2.1 blind transfer
•
Press “Flash+*+B’s number” to transfer the call from A directly.
4.2.2 attend transfer
•
Press “Flash” or “forked spring” to lock the call with temperarily, then
call me to attend and ask whether to anser A’s incoming call.
Middleman can hang up directly to finish the call transfer. So B now
can talk with A. If B say no, just press “Flash” or “forked spring” to
switch the call back and talk with A again.
4.3 Three way call
When calling A, press” Flash” to lock the calling with A, then call B, after
putting through with B, press “Flash” again and turn back the calling with
A, at last press”*” to complete the three way call.
61
Užívateľská príručka / User manual – ATK VoIP-202
Note: The SIP server must be support when using the call transfer and
three way call, and make sure to enable the options “Enable call
transfer, Enable call waiting, Enable three way calls.
62
Užívateľská príručka / User manual – ATK VoIP-202
5. Config via Phone Keyboard
5. 1 Basic Config
Input #****# Reboot the gateway
Input #*000# Clear configuration
Input #*100# Gateway works at static IP mode
Input #*101# Gateway works at DHCP mode
Input #*102# Gateway works at PPPOE mode
Input #*103# Gateway works at Bridge mode
Input #*104# Gateway works at Router mode
Input #*111# Get the WAN IP address from the voice message
Input #*222# Get the gateway’s IP phone number from the voice
message
5.2 Call farward config
#*91800# Config call farwarded to 800 when busy tone.
#*92800# Config call farwarded to 800 when no answer.
#*93800# Config call farwarded to 800 always.
#*90#
Disable call farward function.
63
Užívateľská príručka / User manual – ATK VoIP-202
5.3 IP address config
•
•
•
•
•
Firstly dial “#*100#”, switch into statistic IP address mode and config
IP address by following steps:
#*50192*168*1*77# Config wan statistic IP as 192.168.1.77
#*51192*168*1*1#
Config wan statistic’s gateway default as
192.168.1.1
#*52192*168*1*1# Config wan statistic DNS as 192.168.1.1
#*53255*255*255*0#
Config wan statistic subnet mask as
255.255.255.0
After finishing IP config, reboot the gateway to activate the config.
64
Užívateľská príručka / User manual – ATK VoIP-202
6. Default Factory Setting
•
•
•
•
•
WAN defaults to get IP address through the DHCP mode, if it’s
switched to Static mode, the IP address is 192.168.1.179
Default protocol is SIP, default SIP port is 5060
Default HTTP port is 80, default TENLET port is 23
Default to end the dialing number with “#’
Default user is admin and guest
65
Užívateľská príručka / User manual – ATK VoIP-202
7. FAQ
7.1 The gateway can’t assign WAN or LAN IP
When the gateway is in the NAT mode (no bridge mode), please don’t
assign the WAN and LAN IP with the same net segment e.g., if the LAN IP
address is 192.168.1.X, don’t set the WAN address in the same segment
of 192.168.1.X
7.2 After configure the WAN static IP, why it return to
the primary IP when confirm the modified local IP
The cause may be that the WAN and LAN are in the same net segment.
Try to change the LAN IP address to the other segment.
7.3 Why can’t log in gateway by Telnet
Maybe because of the private address in the gateway and PC, but the two
IP address aren’t in the same net segment, e.g. the gateway uses the
address 192.168.1.179, the PC uses the address 192.168.10.180, try to
add a IP 192.168.1.xx for PC
7.5 Why does it encounter busy tone when pick up
phone?
Our new edition ATK VoIP-202 gateway add line ditection function, when
not any account is registered or without connecting with PSTN line,
gateway will suggest a busy tone prompt to warn that users cannot make
calls normally.
66
Užívateľská príručka / User manual – ATK VoIP-202
If you meet any problem when you using our product, please visit our
website www.antiktech.sk the technological FAQ page to find out the
answer which you need, if not, please send your request by mail or
telephone to our technical support department for help, thanks.
67
Užívateľská príručka / User manual – ATK VoIP-202
Guarantee Certificate
Dear customer,
Thank you for your trust proven in purchase of the ATK VoIP-202
gateway. You have obtained a quality device which provided that used
properly will serve for a long time.
Should you need any advice or help, our technicians are available to
you during working hours on the telephone number 055 / 30 12345.
You may also contact us by e-mail on the e-mail address:
[email protected].
Our technicians will give you any advice or will recommend delivering
your gateway to the service centre at the address:
Antik Technology
Čárskeho 10
040 01 Košice
68
Užívateľská príručka / User manual – ATK VoIP-202
Conditions of Guarantee:
1. The guarantee relates to failure-free operation of the telephone as well
as its accessories for the period of twenty-four (24) months. The power
supply unit and receiver cable are supplied as standard accessories to the
telephone. The period of guarantee starts on the date of taking over the
telephone and its accessories by the purchaser. The date must be
indicated in the Guarantee Certificate.
2. The guarantee shall be confirmed only if the certificate of payment is
provided with this fully and duly filled-in Guarantee Certificate.
3. The guarantee does not apply if the type of the product or its serial
number has been changed or removed.
4. In case of claiming the guarantee repair of the accessories which have
been installed, the guarantee shall be confirmed only if the purchaser at
the same time submits the Contract on Providing Public Telephone
Service by Antik.
5. The guarantee does not relate to errors caused due to:
• using the product which is in conflict with the operation manual,
• mechanical damage,
• the product’s contact with water or other liquids which leaked inside,
• repair carried out by an unauthorized service centre,
• improper storage and usage out of the heat range stated in the
operation manual,
69
Užívateľská príručka / User manual – ATK VoIP-202
• storing and using the product in humid, dusty, chemically or otherwise
aggressive environment - oxidation. The guarantee does not relate to
failure caused due to:
• natural disasters.
6. A defect of the purchased item shall be any imperfections of its
properties or demonstration which especially regarding the contents of
the contract on purchase in the store or the seller’s statement on
guaranteed properties, or regarding the provisions of legal regulations
or technical standards the purchased item should have. A defect of
the item is also imperfection of its property or demonstration which are
generally expected with items of this kind which are sold in the store. The
guarantee does not relate to common wear and tear of the product due
to using it.
7. If it is a defect which can be removed, the purchaser has the right to
have it removed for free. The purchaser may instead of removing the
defect require changing the item or, if the defect relates only to a part of
the item, changing the part only when no unreasonable costs regarding
the price of the goods or error severity accrue to the seller.
8. The period from claiming the right in relation to responsibility for
defects up to the time when the purchaser was obliged to take over the
item after repair completion is not included in the period of guarantee.
70
Užívateľská príručka / User manual – ATK VoIP-202
Guarantee is provided for this gateway for the period of twenty-four (24)
months from the date of receiving by the purchaser.
Guarantee is to be applied with the seller.
Gateway type .........................................................................................
(Filled by the seller)
Date of purchase ......................................................................................
(Filled by the seller)
Stamp and signature of the seller:
71
Užívateľská príručka / User manual – ATK VoIP-202
Reference
number
Date of
receiving
Date of the New serial
servis
number
Stamp and
signature of
the servis
Reference
number
Date of
receiving
Date of the New serial
servis
number
Stamp and
signature of
the servis
Reference
number
Date of
receiving
Date of the New serial
servis
number
Stamp and
signature of
the servis
Reference
number
Date of
receiving
Date of the New serial
servis
number
Stamp and
signature of
the servis
72