1
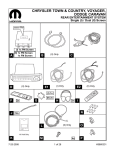
Wireless G
All-In-One
Print Server
User Manual
F1UP002
Table of Contents
1
Introduction . . . . . . . . . . . . . . . . . . . . . . . . . . . . . . . . . . . . . . . . . . . . . 4
Product Features . . . . . . . . . . . . . . . . . . . . . . . . . . . . . . . . . . . . . . . . . X
AIO-PS (All-In-One Print-Server) Mode . . . . . . . . . . . . . . . . . . . . . . . . X
PS (Print-Server) Mode . . . . . . . . . . . . . . . . . . . . . . . . . . . . . . . . . . . . . X
Package Contents. . . . . . . . . . . . . . . . . . . . . . . . . . . . . . . . . . . . . . . . . X
2
Getting to Know your Print Server . . . . . . . . . . . . . . . . . . . . . . . . . . . X
LEDs . . . . . . . . . . . . . . . . . . . . . . . . . . . . . . . . . . . . . . . . . . . . . . . . . . . X
Reset Button . . . . . . . . . . . . . . . . . . . . . . . . . . . . . . . . . . . . . . . . . . . . . X
3
Placement of the Print Server . . . . . . . . . . . . . . . . . . . . . . . . . . . . . . X
Placement on a Flat Surface . . . . . . . . . . . . . . . . . . . . . . . . . . . . . . . . X
Mounting on a Printer . . . . . . . . . . . . . . . . . . . . . . . . . . . . . . . . . . . . . . X
4
Installation Procedure
Step 1. Connecting Devices to your Print Server . . . . . . . . . . . . . . . . . X
Step 2. Installing Software . . . . . . . . . . . . . . . . . . . . . . . . . . . . . . . . . . X
Step 3. Configuring Wireless Settings . . . . . . . . . . . . . . . . . . . . . . . . . X
Step 4. Installing MFP Drivers/Utilities . . . . . . . . . . . . . . . . . . . . . . . . . X
Adding New Client Computers to Print-Server Setup . . . . . . . . . . . . . X
5
Operating Print Server & Using the MFPs. . . . . . . . . . . . . . . . . . . . . X
Share Print . . . . . . . . . . . . . . . . . . . . . . . . . . . . . . . . . . . . . . . . . . . . . . X
Share Scan . . . . . . . . . . . . . . . . . . . . . . . . . . . . . . . . . . . . . . . . . . . . . . X
Share Card Reader . . . . . . . . . . . . . . . . . . . . . . . . . . . . . . . . . . . . . . . . X
Fax a File. . . . . . . . . . . . . . . . . . . . . . . . . . . . . . . . . . . . . . . . . . . . . . . . X
6
All-In-One Print Manager . . . . . . . . . . . . . . . . . . . . . . . . . . . . . . . . . . X
Print Server List . . . . . . . . . . . . . . . . . . . . . . . . . . . . . . . . . . . . . . . . . . X
My Favorite . . . . . . . . . . . . . . . . . . . . . . . . . . . . . . . . . . . . . . . . . . . . . . X
Auto Connect List . . . . . . . . . . . . . . . . . . . . . . . . . . . . . . . . . . . . . . . . . X
Quick Setup . . . . . . . . . . . . . . . . . . . . . . . . . . . . . . . . . . . . . . . . . . . . . X
General Settings . . . . . . . . . . . . . . . . . . . . . . . . . . . . . . . . . . . . . . . . . . X
7
Print Server Manager . . . . . . . . . . . . . . . . . . . . . . . . . . . . . . . . . . . . . X
Introduction. . . . . . . . . . . . . . . . . . . . . . . . . . . . . . . . . . . . . . . . . . . . . . X
Search for Print Servers . . . . . . . . . . . . . . . . . . . . . . . . . . . . . . . . . . . . X
Status of Print Servers . . . . . . . . . . . . . . . . . . . . . . . . . . . . . . . . . . . . . X
Set Up the All-In-One Print Server . . . . . . . . . . . . . . . . . . . . . . . . . . . . X
Table of Contents
General Configuration. . . . . . . . . . . . . . . . . . . . . . . . . . . . . . . . . . . . . . X
TCP/IP Configuration . . . . . . . . . . . . . . . . . . . . . . . . . . . . . . . . . . . . . . X
System Configuration . . . . . . . . . . . . . . . . . . . . . . . . . . . . . . . . . . . . . . X
Wireless Configuration . . . . . . . . . . . . . . . . . . . . . . . . . . . . . . . . . . . . . X
Print-Server Management. . . . . . . . . . . . . . . . . . . . . . . . . . . . . . . . . . . X
Report . . . . . . . . . . . . . . . . . . . . . . . . . . . . . . . . . . . . . . . . . . . . . . . . . . X
8
Web Management . . . . . . . . . . . . . . . . . . . . . . . . . . . . . . . . . . . . . . . . . X
Introduction. . . . . . . . . . . . . . . . . . . . . . . . . . . . . . . . . . . . . . . . . . . . . . X
Login . . . . . . . . . . . . . . . . . . . . . . . . . . . . . . . . . . . . . . . . . . . . . . . . . . . X
Device Settings . . . . . . . . . . . . . . . . . . . . . . . . . . . . . . . . . . . . . . . . . . . X
Setup Server . . . . . . . . . . . . . . . . . . . . . . . . . . . . . . . . . . . . . . . . . . . . . X
Wireless . . . . . . . . . . . . . . . . . . . . . . . . . . . . . . . . . . . . . . . . . . . . . . . . X
Setup TCP/IP . . . . . . . . . . . . . . . . . . . . . . . . . . . . . . . . . . . . . . . . . . . . X
Utilities . . . . . . . . . . . . . . . . . . . . . . . . . . . . . . . . . . . . . . . . . . . . . . . . . X
Home|Help|Logout . . . . . . . . . . . . . . . . . . . . . . . . . . . . . . . . . . . . . . . . X
9
LPR Printing . . . . . . . . . . . . . . . . . . . . . . . . . . . . . . . . . . . . . . . . . . . . . X
10
RAW Printing. . . . . . . . . . . . . . . . . . . . . . . . . . . . . . . . . . . . . . . . . . . . . X
11
IPP Printing
Introduction. . . . . . . . . . . . . . . . . . . . . . . . . . . . . . . . . . . . . . . . . . . . . . X
System Setup . . . . . . . . . . . . . . . . . . . . . . . . . . . . . . . . . . . . . . . . . . . . X
12
Print-Server Installation in Windows 98SE/Me/NT . . . . . . . . . . . . . X
Software-Installation Procedure. . . . . . . . . . . . . . . . . . . . . . . . . . . . . . X
Network-Port Setup . . . . . . . . . . . . . . . . . . . . . . . . . . . . . . . . . . . . . . . X
Add Printer . . . . . . . . . . . . . . . . . . . . . . . . . . . . . . . . . . . . . . . . . . . . . . X
13
UNIX/Linux-System Network . . . . . . . . . . . . . . . . . . . . . . . . . . . . . . . X
Introduction. . . . . . . . . . . . . . . . . . . . . . . . . . . . . . . . . . . . . . . . . . . . . . X
Setup and Configuration. . . . . . . . . . . . . . . . . . . . . . . . . . . . . . . . . . . . X
14
Print-Server Installation in Mac OS . . . . . . . . . . . . . . . . . . . . . . . . . . X
15
Troubleshooting . . . . . . . . . . . . . . . . . . . . . . . . . . . . . . . . . . . . . . . . . . X
16
Certifications . . . . . . . . . . . . . . . . . . . . . . . . . . . . . . . . . . . . . . . . . . . . X
17
Warranty . . . . . . . . . . . . . . . . . . . . . . . . . . . . . . . . . . . . . . . . . . . . . . . . X
sec tion
Introduction
1
2
3
4
5
Thank you for purchasing and using our Wireless G (the Print Server).
This innovative product easily shares your standard printer or all-inone, multifunction printer (MFP) on your network. Unlike many print
servers, it can communicate with MFPs and standard printers as if
connected directly to your computer. Advanced features let you print,
scan, read media cards, and fax through the network. The Print Server
offers bidirectional communication with MFPs and standard printers,
to help monitor important details such as ink and paper levels.
The Print Server supports print, scan, card-reader, and fax-sharing
functions for most popular operating systems such as Windows® 2000
SP4 and higher, and XP SP1 and higher. It also supports Windows XP
scanning utility and MFP vendors’ scanning utilities.
6
7
8
9
10
11
This product can also be used as a traditional print server. It supports
Transmission Control Protocol/Internet Protocol (TCP/IP), Line Printer
Remote (LPR) technology, Read-After-Write (RAW), and Internet
Printing Protocols (IPPs). It can share print functions in the various
common network operating systems including Windows 98SE, Me,
NT®, 2000, XP, and 2003; UNIX®; Linux®; and Mac OS® X v10.2.x
and above.
This Print Server provides IEEE 802.11g/b wireless LAN (up to 54Mbps
data-transfer rate), an Ethernet network port (10/100Mbps Ethernet),
and one USB 2.0/1.1 port for MFPs or standard printers. The Print
Server can be easily connected to your 802.11g/b wireless or wired
network.
Product Features
The Print Server simultaneously supports dual functionalities: All-InOne-Print-Server mode (AIO-PS mode) and Print-Server mode (PS
mode). Users can choose one of the modes in which to share MFP or
standard-printer functions through the Print Server.
4
Introduction
Mac OS
LPR
1
Linux
LPR
2
3
4
Windows 98SE/Me/NT
LPR
5
MFP / Print server
Printer
OR
All-in-one Printer
6
7
Windows XP/2000
Click “connect” or IPP or LPR
8
9
AIO-PS (All-In-One Print-Server) Mode
The Print Server can communicate with MFPs and standard printers
as if it is connected directly to your computer. This enables users
to connect to MFPs for sharing print, scan, card-reader, and fax
functions. If the Print Server is connected to a standard printer but
not to an MFP, users still can share the printing function through
the operation mode. In this mode, the supported operating system
is Windows 2000 SP4 and above, and Windows XP SP1 and above.
AIO-PS mode doesn’t support Windows 98SE, Me, or NT; Linux /
UNIX; or Mac OS. For the detailed applications, refer to the following
chapters:
•
Installation Procedure”
on page xx
•
Operating All-In-One Print Server &
Using the MFPs”
on page xx
•
All-In-One Print Manager”
on page xx
5
10
11
[VERIFY ACTUAL
PAGE NUMBERS]
sec tion
Wireless Computers
sec tion
Introduction
1
2
3
4
PS (Print-Server) Mode
The Print Server also supports LPR, IPP, and RAW printing protocols,
which enable users to share the print function from an MFP or a
standard printer. The supported operating systems are Windows
98SE, Me, NT, 2000, XP, and 2003; UNIX; Linux; and Mac OS
X v10.2.x and above. For the detailed applications, refer to the
following chapters:
•
LPR Printing
5
•
RAW Printing
•
IPP Printing
6
•
All-In-One Print Server Installation in Windows 98SE/Me/NT
•
UNIX-System Network
7
•
All-In-One Print Server Installation in Mac OS
8
9
10
11
Package Contents
This package contains the following components:
•
Belkin Wireless G All-In-One Print Server
•
Detachable Antenna
•
Power Adapter
•
Quick Installation Guide
•
RJ45 CAT5e Ethernet Cable
•
Self-Attaching Mounting Kit
•
CD-ROM (Including all the software
utilities, drivers, and User Manual)
6
Getting to Know your Print Server
LEDs
1
2
3
4
(a) Wireless-Connection LED
Solid Blue
The Print Server is connected to a wireless
access point (AP) or station.
Blinking Blue The Print Server is trying to connect
to the AP or station.
Off
The wireless mode of the Print Server is disabled.
5
6
7
(b) Print-Server and Printer-Status LED
Solid Blue
Firmware is being upgraded to the Print Server. (If the
Print Server upgrade fails, the LED will light steadily.)
8
9
Blinking Blue The printer is connected (blinks regardless
of whether or not print jobs are being
processed by the Print Server).
10
Off
11
No link is established with the printer,
or the printer is turned off.
(c) LAN-Link/Activity LED
Solid Blue
The L AN cable is connected to Print Server.
Blinking Blue Data is being transmitted and
received through this port.
Off
No link is established.
7
sec tion
The Print Server features three LEDs that provide information about
a) your wireless connection, b) your Print Server and printer status,
and c) your L AN activity.
sec tion
Getting to Know your Print Server
1
2
Reset Button
Reset (Press the “Reset” button with a
pencil tip for less than 5 seconds)
•
While the Reset button is pressed, the Wireless-Connection,
and Print-Server and Printer-Status LEDs will be OFF,
awaiting the user to the release the button to reboot.
•
When the Print Server is rebooting, the WirelessConnection, and Print-Server and Printer Status
LEDs will briefly turn ON and then OFF.
3
4
5
6
7
8
Reset to factory default (Press the “Reset” button with a pencil tip
for longer than 5 seconds)
•
When the Print Server is reset to default, the WirelessConnection, and Print-Server and Printer-Status
LEDs will be OFF in the beginning and then briefly
turn ON and then back OFF. After rebooting, the
Print Server will reset to factory-default settings
9
10
11
8
Placement of the Print Server
The Print Server can be placed on a flat surface or mounted on an
MFP or standard printer.
1.
Make sure the Print Server is placed in an
area that allows for proper ventilation.
2.
Place on a flat surface.
4
5
Mounting on a Printer
2.
3
Attach the self-adhesive, double-sided mounting kit
to the back of the Print Server. Make sure not to stick
the adhesive side over the ID label of the Print Server.
You might need to refer back to the ID label for the
MAC-address and serial-number information.
Place the Print Server on the side or the
back of the printer as shown here
6
7
8
9
10
11
9
sec tion
2
Placement on a Flat Surface
1.
1
Installation Procedure
1
Step 1. Connecting Devices to
your Print Server
2
sec tion
Before you start, you should have:
3
•
One computer with Windows 2000 SP4 or
above, or Windows XP SP1 or above
4
•
One MFP or standard printer with a USB
port and an installation CD
5
•
One Category 5 Ethernet cable
•
One USB cable (not included—usually comes with printer)
1.
Unpack the Print-Server package and verify
that all the items listed are provided.
2.
Connect the Print Server to your network by attaching one
end of the network cable to the Print Server’s network
port and the other to an available port on your router.
3.
Plug one end of the power adapter to the Print Server and the
other into an electrical outlet. The Print Server will perform a
Power-On Self-Test (POST ) after it is powered on. When the
Status LED light
goes off, the Print Server is ready.
6
7
8
9
10
11
10
Installation Procedure
Note:
1. You must use the power adapter shipped along with the
Print Server; do NOT use any other power adapter.
To prevent compatibility problems, power on the
Print Server before powering on the printer.
3.
Before connecting the standard printer via USB cable,
read the printer’s manual. Some printers require users
to install drivers and utilities before connecting to the
computer. Some printers also require users to connect
the printer to the computer during installation.
Step 2. Installing Software
Before you start, verify your computer’s operating system. This
program can be run in Windows 2000 SP4 or above, and Windows XP
SP1 or above.
1.
Insert the included CD into your CD-ROM drive. The
autorun.exe program should start automatically. If it does
not, run autorun.exe manually from your CD-ROM drive.
To do this, manually navigate to your CD-ROM drive and
double-click on “autorun.exe” to start the install.
2
3
4
5
6
7
8
9
10
2.
The following
screen will
be displayed.
Click “Install”
to launch the
Installation
Wizard.
11
11
sec tion
2.
1
Installation Procedure
1
3. The Belkin All-In-One Print Server - InstallShield
Wizard appears. Click “Next”.
sec tion
2
3
4
5
6
7
8
9
4.
Click “Next” to install the Print-Server utilities in the
default folder (recommended), or click “Change”
to specify the destination folder where you would
like to install the Print-Server utilities.
10
11
12
Installation Procedure
5.
The system starts installing the Print-Server utilities.
1
2
4
5
6
7
6.
The “Server Configuration” screen will appear. To
configure the Print Server, click “Next” (recommended
for first install) and go to step 7, following.
If you do not want to configure the Print Server at this point,
select “No, please skip this setup”. Then, click “Next” to
complete the installation (when adding a new client computer
to share a preexisting print-server setup). Indicate whether
or not you want to run the Belkin All-In-One Print Manager
utility automatically when Windows starts. We recommend
that you run the Print Manager when Windows starts.
13
8
9
10
11
sec tion
3
Installation Procedure
The following steps are for Print-Server
configuration upon choosing “Yes, I would like
to configure my All-In-One Print Server”.
1
sec tion
2
3
4
5
6
7
8
9
7.
The Print Server List will search for Print Servers
on the network. Select the “Wireless G AllIn-One Print Server” and click “Next”.
10
11
14
Installation Procedure
8.
Enter the user name and password of the Print Server
you have selected to log in. The default user name
is “admin”; the default password is “1234”.
1
2
4
5
9.
Set the alias name and description of the
Print Server here. Click “Next”.
6
7
8
9
10
11
Note: You can define the printer’s location or other
information about it in the “MFP Server Description” field.
15
sec tion
3
Installation Procedure
1
10. To set up the IP address of the Print Server, the default
is set to “DHCP” for the TCP/IP configuration.
sec tion
2
3
4
5
6
7
8
9
10
The Print Server by default will try to get an IP
address from the connected Belkin Router running
the Dynamic Host Configuration Protocol (DHCP)
server and the following screen will appear.
11
The newly assigned TCP/IP settings will be displayed in the
“TCP/IP Configuration” window for your reference. Click
“Next” to continue on to step 3 in the installation process.
16
Installation Procedure
1
2
4
5
6
If the DHCP server is unavailable or not found, the user
will be prompted to configure the TCP/IP settings of the
Print Server manually by clicking “Yes” on the screen
below. Clicking “No” will make the Print Server search for
the IP address from a DHCP server on the network.
7
8
9
10
11
Select “Yes” to configure the TCP/IP settings in the “Manual
IP” section. The default TCP/IP-address information in
the Manual-IP mode will be what is shown below.
IP Address: 192.168.2.253
Subnet Mask: 255.255.255.0
Default Gateway: 192.168.2.1
DNS : 0.0.0.0
Make sure that the TCP/IP information configured here is
correct and matches your network settings. Click “Next”
to continue on to step 3 in the installation process.
17
sec tion
3
Installation Procedure
1
sec tion
2
3
4
5
6
7
8
9
10
The Print Server will check if the manually configured IP
address in “TCP/IP Configuration” is in the same subnet
as the connected computer running the installation utility.
If the TCP/IP-address settings configured manually
are in a different IP subnet than that of the connected
computer, the user will be prompted by the alert message
shown below. Click “OK” to go back and configure the
correct IP-address settings for the Print Server.
11
Note: If you want to change the TCP/IP settings of the Print
Server at some point after the installation, you can use the
Server-Manager utility’s TCP/IP- configuration option.
18
Installation Procedure
Step 3. Configuring Wireless Settings
1.
The “Wireless Network Settings” screen of the Print Server
will automatically scan the wireless networks nearby. Select
the wireless network to which you would like to connect
and click “Next”. Alternatively, you can manually enter
the wireless-network information (“Manual” mode).
The default wireless settings are as follows:
Mode: Infrastructure
2
3
4
5
6
7
8
9
SSID: Default
Channel: 11
10
11
19
sec tion
2.
The default wireless setting is “Auto” mode. The Print Server
will detect a connection to a wired-L AN network through
the attached Ethernet cable. If the Print Server is connected
to a wired network, it will work in that network. To enable
wireless mode, the Ethernet cable must be disconnected
after final configurations. However, the Ethernet cable needs
to stay plugged in for the required wireless configurations
in this section. For more detailed information about wireless
settings, refer to the “Wireless Configuration” section.
1
Installation Procedure
1
3.
If you choose to connect to an encrypted network, the
“Wireless Security Settings” screen will appear. Select
“Security Mode” and enter the security settings of your wireless
network. You can select one of several security settings:
“None”, “WEP”, or “WPA” with cipher mode “TKIP” or “AES”.
4.
The configurations are now finished. Click
“Finish” to confirm your new settings.
5.
Click “Finish” to complete the installation.
20
sec tion
2
3
4
5
6
7
8
9
10
11
Installation Procedure
1
2
4
5
6
7
8
Note: If the Windows XP firewall in your system has
been enabled, the Print Server will automatically open
some necessary ports for the Print-Server program
to run smoothly on your system. These ports will only
be opened for computers in your own local IP network
and will not jeopardize safety of your system.
6.
Indicate whether or not you want to run the Belkin
All-In-One Print Manager utility automatically when
Windows starts. We recommend that you do run
the Print Manager when Windows starts.
You will now start seeing the
Print-Server logo on your
computer’s system tray.
21
9
10
11
sec tion
3
Installation Procedure
sec tion
1
2
At this point, disconnect the Ethernet cable between your Print
Server and your router to enable the wireless functionality of your
Print Server.
3
Store the Ethernet cable in a safe place in case it is needed to
reconfigure the Print Server at some point in the future.
4
5
6
7
8
9
All-In-One Print Server Utilities
After the installation is completed, there will be three utilities and a
text file in the Print Server’s Program folder.
All-In-One Print Manager – Allows you to manage the
connection between the printer and your computer
for sharing the printer’s various functions.
10
Server Configuration – Allows you to configure the Print
Server’s IP address, network protocols, and other advanced
features. It also allows you to manage the Print Server.
11
Uninstall – Assistant for removing all installed
Print-Server software programs.
About Version – Display the version of each utility
including in the Print-Server software programs
22
Installation Procedure
Step 4. Installing MFP Drivers/Utilities
2
3
4
5
6
7
8
9
Before you start to install the printer selected from the Print Server
List, check your computer’s printer-installation status.
•
Printer drivers/utilities have not been installed
on your computer; refer to section 4.1.
•
Printer drivers/utilities have been already installed
on your computer; refer to section 4.2.
4.1 Printer drivers/utilities have not been installed
Before the installation, read the printer’s manual. Some printers
require users to install the drivers/utilities before connecting
the printer to your computer. Some printers require connecting
the printer to your computer during the installation. Refer to the
illustration below of “HP All-In-One Series,” which is the screen
displayed during the installation.
23
10
11
sec tion
When the Print-Server installation is complete, the “Belkin All-In-One
Print Manager” window will appear. Once a printer is connected to
the Print Server via a USB cable, the Print Manager will automatically
display its name in the Print Server List.
1
Installation Procedure
1
sec tion
2
3
4
5
6
7
8
9
10
To connect the printer to your computer through the Print Server just
like you have directly connected the printer to your computer through
the USB cable, you can follow the steps below.
1.
Select the printer that you want to install in the PrintServer list and click the “Connect” button.
11
24
Installation Procedure
2.
After you have completed the printer installation,
you will see the printer is added to “Printers and
Faxes” under your Windows operating system.
1
2
3
4
5
6
7
8
9
10
11
25
sec tion
3.
Windows will detect the new hardware and prompt to
install the Print-Server drivers and then the printer drivers.
When the system stops prompting, the drivers are all
installed. If the system cannot find the printer drivers,
insert the printer’s installation CD to find the drivers.
Installation Procedure
1
4.2 Printer drivers/utilities have been installed
sec tion
2
3
1.
To bind the already-installed printer drivers/utilities
with the Print Server, follow the steps below. Select
the printer that you want to install in the PrintServer list and click the “Connect” button.
2.
Windows will detect the new hardware and prompt to
install the Print-Server drivers and then the printer drivers.
When the system stops prompting, the drivers are all
installed. If the system cannot find the printer drivers,
insert the printer’s installation CD to find the drivers.
3.
After the installation, a copy of the printer will be added to
“Printers and Faxes” under your Windows operating system.
4
5
6
7
8
9
10
11
26
Installation Procedure
1
2
4
5
6
7
8
9
10
11
Depending upon the previous configuration of your computer,
duplicate system-tray icons or desk top shor tcuts for scanners or
camera-card readers may also appear. Use the copies of the icons
and shor tcuts as your defaults for use in conjunction with your
Print Ser ver.
27
sec tion
3
Installation Procedure
1
sec tion
2
3
Enabling Auto-Timeout Settings
After the printer-driver installation is complete, check the “Auto
release when idle time is over” option in the “Belkin All-In-One Print
Manager” screen with a 5-minute idle timeout setting.
4
5
6
7
8
9
10
11
28
Installation Procedure
Adding New Client Computers to Print-Server Setup
When adding a new client computer to share the print, scan, copy,
fax, and card-reader functionality in a preexisting Print-Server
network, only follow Step 2 from items 1 to 6, and Step 4.2
1
2
4
5
6
7
8
9
10
11
29
sec tion
3
Operating Print Server & Using the MFPs
1
2
sec tion
3
4
5
6
7
Operating Print Server & Using the MFPs
After you have followed the Installation Wizard to finish the printer
installation, the printer is now connected to your computer. You can
start sharing print, scan, card-reader, or fax functions provided by
the MFP.
Tip 1: If you have finished using the printer, click
“Disconnect” to release the printer. Another user
cannot use the printer until it is released.
Tip 2: We recommend that you enable the “Idle Timeout”
setting. The Print Server will automatically release your
connection to the printer after a period of idle time that you
have assigned. This allows the printer to not be occupied too
long and other users to share the printer frequently. Refer to
the “All-In-One Print Manager” section for more information.
8
9
10
11
Share Print
The printer will be added to “Printers and Faxes” in Windows after
the printer is installed. When you have connected to the printer by
clicking “Connect” in the Belkin All-In-One Print Manager, the Print
Server will automatically create the connection between the printer
and your computer, and then you can print a document following the
same steps as usual.
30
Operating Print Server & Using the MFPs
Tip: If you have sent a print job to the printer while it is still
connected to a user, you may be prompted that the device
was not found or the document has failed to print. Resend the
printing job after the printer is idle or released by another user.
1
2
3
5
6
7
8
Share Scan
Most of the printers with built-in scanners provide a scan utility for
users. You can scan pictures or documents through the utility. In
Windows XP, users can also scan from the Windows XP scanning
utility. You can also use third-party scanning utilities such as
Photoshop®, PhotoImpact®, Paint Shop Pro®, etc.
An example: HP 1600 Series Utilities
31
9
10
11
sec tion
4
Operating Print Server & Using the MFPs
Windows XP Scanning Utility
1
2
sec tion
3
4
5
6
7
8
9
Share Card Reader
If your printer has built-in media-card readers, you can read the files
from the plugged card reader through the Print Server.
10
11
32
Operating Print Server & Using the MFPs
Fax a File
If your printer has a fax function, you can fax files from your
computer to the fax number you designated.
1
An example: Fax through HP Officejet 5600 Series
2
After the printer is installed, a fax device will be added to “Printers
and Faxes” in Windows. When you have connected to the printer by
clicking “Connect” in the Belkin All-In-One Print Manager, you can
fax a file through the Print Server to the fax device.
1.
In Microsoft® Office or other programs,
select “Print” from the “File” menu.
2.
When the following screen pops up, select
the fax device and then click “Print”.
4
5
6
7
8
9
10
11
33
sec tion
Procedures to Fax a File
3
Operating Print Server & Using the MFPs
1
2
3.
The “Send Fax” screen appears. Configure the file and enter
the fax number, and then click “Send Fax” to fax the file.
sec tion
3
4
5
6
7
8
9
10
11
34
All-In-One Print Manager
1
Print Server List
The Belkin All-In-One Print Manager can automatically find the Print
Server in the network and show it in the Print Server List. Users can
select a printer and click “Connect” to connect the printer as if they
have directly connected the printer to their computer through a USB
cable. It also displays the information of the connection status.
If you unplug the USB cable or turn off the printer while using it,
the device will not display in the list. After you reconnect the USB
cable or turn on the printer, you have to click the “Refresh” and
“Connect” buttons in the Belkin All-In-One Print Manager to recover
the connection.
3
4
5
6
7
8
9
10
11
35
sec tion
When you don’t want to use the printer, click “Disconnect” so that
other users can use the device. Or, you can enable the “Idle Timeout”
setting, so that the Print Server will release your connection after a
period of idle time that you have assigned.
2
All-In-One Print Manager
1
2
Print Server
List
The Print Server List will show all the Print Servers
within the network. You can find the Print Server’s
information including “All-In-One Print Server
Name”, “MAC ID”, “IP Address”, and the device
that is connected to the Print Server.
All-In-One
Print Server/
MultifunctionPrinter (MFP)
Information
When you click on the Print Server in the PrintServer list, you will see the “All-In-One Print Server
Description” and the “Idle Timeout” setting for that
Print Server.
All-In-One
Print Server
Description
This description helps users identify the location
and the name of the Print Server.
Idle Timeout
From here, each user can know his/her idletimeout setting. To avoid occupying the printer
overtime, each user can set the “Idle Timeout”
from “Option\General Setting”. It is used to
disconnect the connection after the printer is idle
for a specified period of time. By default, there is
no timeout setting.
3
4
sec tion
5
6
7
8
9
10
11
When you click on the printer in the Print-Server
list, you will see information including “Status”,
“Computer Name”, and “Contact Information”.
Status
This displays the status of the printer including
“Connected”, “Idle”, and “Busy”. When the
status is “Connected”, it indicates that you are
connecting the MFP. When the status is “Idle”, it
indicates that the printer is not being used. When
the status is “Busy”, it indicates that another user
is using the printer to scan, print, etc.
36
All-In-One Print Manager
1
It display the computer name of the user who is
connecting to the printer.
Contact
Information
When the current user has set his “Contact
Information”, you can see it here. You can contact
with the current user for asking to disconnect the
printer.
Refresh
Refreshes the Print-Server list immediately.
Connect
Allows printer connection to your computer.
Disconnect
Disconnects the selected printer.
Add to “My
Favorite” list
Adds the Print Servers that you frequently use to
the “My Favorite” list.
Auto Release
when idle
time is over
xx minutes
(5–255)
To avoid occupying the printer for too long, you
can set up and idle-timeout setting. It is used to
disconnect the current connection after the printer
is idle for a specified period of time. By default,
there is no timeout setting. We recommend that
you enable the idle-timeout setting after the printer
and Print Server are installed completely so that
the printer resource will not be occupied easily.
2
3
4
5
6
7
8
9
10
11
37
sec tion
Computer
Name
All-In-One Print Manager
1
2
3
My Favorite
You can add the frequently used Print Servers to the “My Favorite”
list. The Print Server in the list will be added to the quick-link list
when you right-click the Print-Server icon in the system tray. Refer
to the “Quick Setup” section to know more about the quick-setup
functions.
4
sec tion
5
6
7
8
9
10
11
38
All-In-One Print Manager
1
“My Favorite” List
2
The “My Favorite” list will show your favorite
Print Servers. You can find the Print Server’s
information including its name, MAC ID, IP
address, and any connected devices.
All-In-One
Print
Server/MFP
Information
The information listed here is the same as the Print
Server List. Refer to the “Print Server List” section
for more information.
Refresh
Refreshes the Print Server List immediately.
Connect
Allows printer connection to your computer.
Disconnect
Disconnects the selected MFP.
Delete
Deletes the selected Print Server from the “My
Favorite” list.
Auto Release
when idle
time is over
xx minutes
(5–255)
To avoid occupying the printer for too long, you
can set up an idle-timeout setting. It is used
to disconnect the current connection after the
printer is idle for a specified period of time.
By default, there is no timeout setting. We
recommend that you enable an idle-timeout
setting after the printer and Print Server are
installed completely so that the printer resource
will not be occupied easily.
Auto Connect List
To let the system occupy the Print Server automatically when you
want to print a document, just like the behavior of using a traditional
print server, you can add the printer into your Auto Connect List. The
system will send the printing jobs to the printer when the Print Server
is idle and there is no connection.
39
3
4
5
6
7
8
9
10
11
sec tion
“ My Favorite”
List
All-In-One Print Manager
1
2
To add the printer to the Auto Connect List, follow the steps below.
1.
Click “Add” from the Auto Connect List.
2.
The Print Servers within the network will be
displayed in the following screen. Select the Print
Server you would like to add to the list.
3
4
sec tion
5
6
7
8
9
10
11
40
All-In-One Print Manager
3.
Select the printer that is connected to the selected
Print Server. Click “OK”. Note that in some cases, new
printing jobs cannot be printed because the printer is
already disconnected. It will cause unformatted messages
to be printed out. “Keep connecting for 30 second (s)
after printing has been finished (5-60)” is enabled by
default. It will help to avoid this kind of situation.
1
2
3
4
6
7
8
4.
The setup
is finished.
9
10
11
41
sec tion
5
All-In-One Print Manager
1
2
3
Quick Setup
Right-click on the Print-Server icon in the system tray so you can
see the Print Servers that you have designated to the “My Favorite”
list. You can directly connect or disconnect the printer and check the
printer information from there easily.
4
sec tion
5
6
7
8
9
10
11
42
All-In-One Print Manager
1
Quick Setup
Status
2
The current status of the printer will be
displayed here. “Connected” indicates that you
are connecting to the printer. “Busy” indicates
that the printer is being used. “Idle” indicates
that the printer is free to use by any users.
If the printer is free to use, the “Connect” button
will be available to click for occupying the
printer. Otherwise, it will be grayed out.
Disconnect
Disconnects the selected printer. The
“Disconnect” button will be available only for
the current user.
Information
To check more information about the Print
Server and the printer, click this button. The
information will be listed as in the illustration
above.
4
5
6
7
8
9
10
General Settings
11
43
sec tion
Connect
3
All-In-One Print Manager
1
2
General Setting
3
Start Control
Manager on
Windows startup
Executes the Belkin All-In-One Print
Manager when Windows starts every time.
By default, it is enabled.
4
Minimized when start
Control Manager
Minimizes the Belkin All-In-One Print
Manager to an icon in the system tray
when you start the Belkin All-In-One Print
Manager. By default, it is disabled.
Refresh status every
xx seconds. (5~300)
Sets up the refresh interval for devicestatus update. By default, it is disabled.
Your Contract
Information
Enter your contact information here. When
you connect to the printer, your contact
information will be displayed in the right
side of the program for other users to
contact you.
sec tion
5
6
7
8
9
10
11
Search for All-In-One Print Server
If the Print Server is not in the network as your computer, you can
enter the IP address of the Print Server to do the remote search. The
Print Server in the Remote MFP Server List will be added to the Print
Server List for you to configure.
44
Print Server Manager
1
Introduction
This chapter introduces the Print Server’s system-configuration
utility in a Windows environment. This utility provides the most
complete management and configuration functions on the PrintServer side. This utility only provides configuration functions for the
Print Server itself; it does not include configuration functions for the
client side or other file server in the network environment.
The configuration utility provides the following
configuration and management functions:
2
3
4
5
Search All-In-One Print Server: Searches all
available Print Servers on the network.
•
Status: Displays Print Server’s network status.
•
Setup: Shows configuration settings for the Print Server.
•
General Configuration : Configure general settings about
the Print Server such as server name, password, etc.
•
TCP/IP Configuration : IP-address and
DHCP-server configuration.
•
System Configuration : Print Server’s networkability setting and firmware upgrades.
10
•
Wireless Configuration : Searches for available
wireless networks and configures the wireless settings
of the Print Server for the wireless connection.
11
•
All-In-One Print Server Management : Allows the
administrator to manage the Print Server. Administrator can
force-disconnect the current connection of the Print Server.
•
Report : Lists the information of all available
Print Servers on the network.
We will explain each function separately in the following section.
45
7
8
9
sec tion
6
•
Print Server Manager
1
Search for Print Servers
2
3
4
sec tion
5
6
7
8
9
10
11
Every time you run the “Server Manager” configuration utility,
click the “Search” icon on the tool bar. The configuration utility
will delay for several seconds because the utility is using the
system’s available network protocols to search for all Print
Servers on the network. All available Print Servers will be
listed under “Server Group” on the left side of the window.
You must select the Print Server you would like to configure from
the list. The system will, at the same time, display the selected Print
Server’s status on the right side of the window.
46
Print Server Manager
1
Status of Print Servers
2
3
4
5
7
8
Clicking the “Status” icon on the tool bar will show
the status of the currently selected Print Server on the
right side of the window. The Print-Server information
displayed includes the MAC ID, model type, firmware
version, port status, IP address, subnet mask, default
gateway, and supported printing protocols.
You can refresh the Print Server’s status
by pressing the “Refresh” button
You can restart the Print Server by
pressing the “Reboot” button
47
9
10
11
sec tion
6
Print Server Manager
1
Set Up the All-In-One Print Server
2
3
4
sec tion
5
6
7
8
9
10
11
Clicking the “Setup” icon on the tool bar will show the selected
Print Server’s setup items on the right side of the window.
Double-click one of the icons to set up the selected Print
Server. A screen pops up to verify the Print Server’s
user name and password. The default values are:
User Name: admin
Password : 1234
Tip: When you have finished selecting the settings, click “ ”
to restart the Print Server to allow the settings to take effect
48
Print Server Manager
1
General Configuration
2
3
4
5
7
8
9
Double-click the “General” icon and the “General” configuration
window will appear. You can view basic Print-Server information in
this page. You also can configure the server name, user name, and
Password here.
Server Name: the name of the Print Server. You can
use this name to identify the Print Server when you are
searching for it with the “Server Manger” utility.
User Name / Password : used to authenticate the administrator
to log in to the Print Server for configuring it from the “Server
Manger” utility or the web-management tool. Also note that
passwords cannot exceed more than seven characters.
49
10
11
sec tion
6
Print Server Manager
1
TCP/IP Configuration
2
3
4
sec tion
5
6
7
8
9
10
11
Double-click the “TCP/IP” icon and the “TCP/IP” configuration
window opens. You can configure the Print Server to automatically
get an IP address from a DHCP server (enabled by default), or
manually specify static-IP configurations. The Print Server also has a
built-in DHCP server (disabled by default).
50
Print Server Manager
1
IP Settings
Click the “IP” button to enter the IP-setting page. By default, “Auto
IP” is selected to enable the Print Server to automatically get an IP
address from a DHCP server.
2
3
4
5
7
8
9
The window will show the IP-address information acquired from a
DHCP server for user reference.
10
11
51
sec tion
6
Print Server Manager
1
2
3
If the DHCP server is unavailable or not found, the user will be
prompted to configure the TCP/IP settings of the Print Server
manually by clicking “Yes” on the screen below. Clicking “No” will
make the Print Server search for the IP address from a DHCP server
on the network.
4
sec tion
5
6
7
8
9
10
You can select “Static IP” to manually assign the IP address, subnet
mask, and gateway for the Print Server. The default TCP/IP-address
information in the “Static IP” mode will be:
IP Address: 192.168.2.253
Subnet Mask: 255.255.255.0
Gateway: 192.168.2.1
Make sure that the TCP/IP information configured here is correct and
matches your network settings, as it may be used as an alternative if
a DHCP server on the network is ever unavailable or not found.
11
52
Print Server Manager
The Print Server will check if the manually configured IP address is in
the same subnet as the network or connected computer. If the TCP/
IP-address settings configured manually are in a different IP subnet
than that of the connected networking devices, the user will be
prompted by the alert message shown below. Click “OK” to go back
and configure the correct IP-address settings for the Print Server.
1
2
3
4
5
Internal DHCP Server
Click the “DHCP Server” button to enter into the internal DHCP
server’s setting page. You can enable/disable the DHCP server and
assign a range of IP addresses here. By default, the DHCP server is
disabled (recommended). When it comes to assigning an IP address
to the Print Server, the internal DHCP server takes lower precedence
to either getting an IP address from an external DHCP server or using
the configured static IP address. Both options are described in the
“IP Settings” section above.
7
8
9
10
11
53
sec tion
6
Print Server Manager
1
2
3
4
sec tion
5
6
7
8
9
10
If the DHCP server is enabled, you have to assign a valid range of IP
addresses. Fill in the “Starting Address”, “Range”, “Subnet Mask”,
“Gateway”, and “DNS” fields; then the Print Server will assign a
unique IP address to each DHCP client. However, the Print Server
itself will get an IP address from the external DHCP server or use
the configured static IP address, if the Print Server is configured for
either of these two options as described in the “IP Settings” section
above. Otherwise, the internal DHCP server will assign the first IP
address to itself if no external DHCP server is found and the Print
Server is not set up to use a static IP.
There is another option called “Auto” for the internal DHCP server.
“Auto” means that the Print Server will first search for and detect
DHCP servers within the network automatically. If a DHCP server
exists on the network, the internal DHCP server will stay idle
(disabled) and would not respond back to DHCP requests that it
receives from clients. If a DHCP server doesn’t exist on the network,
the Print Server will turn on its own internal DHCP server and assign
IP addresses to clients. In this case, the internal DHCP server will
also assign the first IP address to itself only if the Print Server is not
set for a static IP as described in the “IP Settings” section above, as
static IP takes precedence. Fill in the “Starting Address”, “Range”,
“Subnet Mask”, “Gateway”, and “DNS” fields; then the Print Server
will assign a unique IP to each DHCP client.
11
54
Print Server Manager
1
System Configuration
Double-click the “System” icon and the “System” configuration
window pops up.
2
3
4
5
7
8
In the System configuration page, you can see all available printing
protocols and upgrade the new firmware for this Print Server.
Upgrade Firmware: You can use this “Upgrade Firmware” tool to
update the newest firmware of the Print Server. Click the “...” button
and select the correct firmware in your computer. After selecting
the firmware file, click the “Upgrade” button to finish the firmwareupdate process.
Tip: Before you upgrade the firmware, make sure
that the IP-address settings of the Print Server
are in the same network as your computer.
Load Default: If you want to reset the Print Server to default factory
settings, click “Load Default”.
55
9
10
11
sec tion
6
Print Server Manager
1
2
3
4
sec tion
5
6
7
8
9
10
11
Wireless Function: You can select to enable or disable the wireless
function manually. If you manually enable wireless function, the Print
Server’s wireless L AN will be always enabled and Ethernet will be
always disabled. If you manually disable the wireless function, the
Print Server’s wireless L AN will be always disabled and Ethernet will
be always enabled. You can also select “Auto” to let the Print Server
automatically decide to enable or disable the wireless function. The
Print Server only can work in either Ethernet or wireless-L AN mode.
It cannot work in both Ethernet and wireless-L AN mode at the same
time. When the Print Server starts up, it will automatically detect if
the L AN port is connected to an active network by an Ethernet cable.
If the Print Server is connected to an active network by Ethernet
cable when starting up, the Print Server will run in Ethernet mode. If
the Print Server is not connected to an active network by Ethernet
cable when starting up, the Print Server will run in wireless-L AN
mode. The Print Server’s default is in “Auto” mode.
Domain Country: The wireless channels are different from country
to country. Generally, the channels are from 1 to 11 in the USA and
from 1 to 13 in Europe. The operating channel will be set to the Print
Server before importing. If you are in a different country, make sure
that you have set the available channels according to your location
Wireless Configuration
If you want to use the Print Server through a wireless L AN, set it
up through Ethernet first and make sure your wireless-L AN setting
is correct. After setting up the wireless L AN, unplug the Ethernet
cable and restart the Print Server. You can start to use the Print
Server through a wireless L AN. If the wireless configuration does
not work, plug in the Ethernet cable again, restart the Print Server,
and configure it through Ethernet until the wireless-L AN settings are
correct.
56
Print Server Manager
The default settings of the Print-Server
wireless function are as follows:
•
Mode: Infrastructure
•
SSID: Default
•
Channel: 11
1
2
3
4
5
7
8
9
10
11
Double-click the “Wireless” icon and the “Wireless” configuration
window pops up. If you use an access point to build up your wireless
network, you have to select “Infrastructure Mode”. If you do not have
an access point and want to use a peer-to-peer connection to build
up your wireless network, you have to select “Ad-Hoc Mode”. After
selecting the operation modes of the wireless function, click “Next”
to go to further detailed configuration.
57
sec tion
6
Print Server Manager
1
2
Infrastructure
Mode:
3
4
sec tion
5
6
7
8
In the Infrastructure mode, you have to allow the Print Server to
associate with an access point. You can choose to let the Print
Server scan for an available access point automatically, or you can
manually assign the SSID of the access point you want to use.
9
If you select to
allow the Print
Server to scan
for an available
access point, the
following window
will pop up.
10
11
The table will list the available access points near the Print Server.
Select an access point from the list and click “Next”. If you cannot
find the access point that you want to use, click “Scan” to allow the
Print Server to scan again.
58
Print Server Manager
1
Ad-Hoc Mode:
2
3
4
5
In the Ad-Hoc mode, you can allow the Print Server to automatically
associate with another wireless station, or you can manually assign
the SSID of your wireless network. You can allow the Print Server
to automatically select the channel that is the same as the wireless
station with which you want to connect, or you can manually assign a
channel.
If you select to
allow the Print
Server to scan
for an active
wireless station,
the following
window will pop
up
7
8
9
10
11
The list shows
the scanned
active wireless
stations. Select a
wireless station
from the list and
click “Next”. If you cannot find the wireless station with which you
want the Print Server to communicate, click “Scan” to allow the Print
Server to scan again.
59
sec tion
6
Print Server Manager
1
2
3
Both Infrastructure and Ad-Hoc modes have to go through the
following procedure:
Wireless
Security:
4
sec tion
5
6
7
8
9
10
11
This Print Server supports Wired Equivalent Privacy (WEP) and WiFi® Protected Access-Pre-Shared Key (WPA-PSK) security modes.
If you want to use WEP encryption to protect your wireless network,
you have to select “WEP(ASCII)” or “WEP(HEX)”. If you want to use
60
Print Server Manager
WPA-PSK, you have to select “WPA-shared key” or “WPA-None”
specified for Ad-Hoc mode. The wireless-security setting should be
the same as the other wireless devices in the same network. WPA
currently supports cipher modes Temporal Key Integrity Protocol
( TKIP) and Advanced Encryption Standard (AES).
1
2
3
4
WEP Security Mode:
5
7
8
9
10
11
61
sec tion
6
62
63
Wireless G
All-In-One
Print Server
Belkin Lifetime Product Warranty
For the life of the product, Belkin warrants that this
product shall be free of defects in design, assembly,
material, and workmanship (free replacement).
Belkin Ltd.
Express Business Park
Shipton Way, Rushden
NN10 6GL, United Kingdom
+44 (0) 1933 35 2000
+44 (0) 1933 31 2000 fax
Belkin SAS
130 rue de Silly
92100 Boulogne-Billancourt
France
+33 (0) 1 41 03 14 40
+33 (0) 1 41 31 01 72 fax
Belkin GmbH
Hanebergstrasse 2
80637 Munich
Germany
+49 (0) 89 143405 0
+49 (0) 89 143405 100 fax
Belkin B.V.
Boeing Avenue 333
1119 PH Schiphol-Rijk
Netherlands
+31 (0) 20 654 7300
+31 (0) 20 654 7349 fax
Belkin Iberia
Avda. Cerro del Aguila 3
28700 San Sebastián de los Reyes
Spain
+34 9 16 25 80 00
+34 9 02 02 00 34 fax
Belkin Italy & Greece
Via Carducci, 7
Milano 20123
Italy
+39 02 862 719
+39 02 862 719 fax
Belkin Sweden
Knarrarnäsgatan 7
164 40 Kista
Sweden
+46 (0) 8 5229 1870
+46 (0) 8 5229 1874 fax
Belkin Nordics & Baltics
Roskildevej 522
2605 Brøndby
Denmark
+45 (0) 3612 6000
+45 (0) 3612 6010 fax
Belkin LTD
Al Thuraya Tower 1, Office suite 201
Dubai Internet City,
Dubai, UAE
+971 (0) 4 369 2705
+971 (0) 4 368 8402 fax
© 2004 Belkin Corporation. All rights reserved. All trade names are registered trademarks of respective
manufacturers listed. Apple, AirPort, Mac, Mac OS, and AppleTalk are trademarks of Apple Computer,
Inc., registered in the U.S. and other countries. The mark “Wi-Fi” is a registered mark of the Wi-Fi Alliance. 54g is a trademark of Broadcom Corporation.
P75192