1
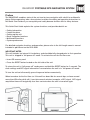
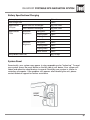
XNAV3500P
PORTABLE GPS NAVIGATION SYSTEM
QUICK START GUIDE
XNAV3500P PORTABLE GPS NAVIGATION SYSTEM
TABLE OF CONTENTS
Page
Preface . . . . . . . . . . . . . . . . . . . . . . . . . . . . . . . . . . . . . . . . . . . . . .
Safety Information/Precautions . . . . . . . . . . . . . . . . . . . . . . . . . .
Introduction . . . . . . . . . . . . . . . . . . . . . . . . . . . . . . . . . . . . . . . . . .
Package Contents . . . . . . . . . . . . . . . . . . . . . . . . . . . . . . . . . . . . .
Control Locations . . . . . . . . . . . . . . . . . . . . . . . . . . . . . . . . . . . . . .
Getting Started . . . . . . . . . . . . . . . . . . . . . . . . . . . . . . . . . . . . . . . .
Main Menu Screen . . . . . . . . . . . . . . . . . . . . . . . . . . . . . . . . . . . . .
Transferring Files . . . . . . . . . . . . . . . . . . . . . . . . . . . . . . . . . . . . .
Pre-loaded Maps . . . . . . . . . . . . . . . . . . . . . . . . . . . . . . . . . . . . . .
Alternate Maps . . . . . . . . . . . . . . . . . . . . . . . . . . . . . . . . . . . . . . . .
Navigation Overview . . . . . . . . . . . . . . . . . . . . . . . . . . . . . . . . . . . .
Starting Navigation . . . . . . . . . . . . . . . . . . . . . . . . . . . . . . . . . . . . .
Entering Addresses . . . . . . . . . . . . . . . . . . . . . . . . . . . . . . . . . . . .
Selecting Points of Interest . . . . . . . . . . . . . . . . . . . . . . . . . . . . . .
Searching . . . . . . . . . . . . . . . . . . . . . . . . . . . . . . . . . . . . . . . . . . . .
Additional Functions . . . . . . . . . . . . . . . . . . . . . . . . . . . . . . . . . . .
Warranty . . . . . . . . . . . . . . . . . . . . . . . . . . . . . . . . . . . . . . . . . . . . .
Battery Information . . . . . . . . . . . . . . . . . . . . . . . . . . . . . . . . . . .
1
2
3
4
5
6
7
12
13
14
15
17
19
19
24
26
28
29
XNAV3500P PORTABLE GPS NAVIGATION SYSTEM
Preface
The XNAV3500P combines state-of-the-art turn-by-turn navigation with a built-in multimedia
player. Before operating, take a few minutes to review the safety and operating instructions in
this Quick Start Guide so you can quickly and safely become familiar with its many features.
This Quick Start Guide explains the system functions, and provides details on:
• Safety information
• Control locations
• Setting up the unit
• Basic navigation functions
• Multimedia functions
• System preferences
For detailed navigation functions and operation, please refer to the full-length owner’s manual
included in .pdf format on the DVD-ROM.
IMPORTANT NOTES:
This unit includes an internal Li-ion battery, and should be fully charged prior to first operation.
This unit is shipped in “full power off” mode. To activate the unit for first time use:
• Insert SD memory card
• Press the RESET button located on the left side of the unit
To return the unit to “full power off” mode, press and hold the RESET button for 3 seconds. The
clock settings and GPS signal information is erased when the unit is in “full power off” mode.
To turn the unit on/off normally, press the power button momentarily.
When turned on for the first time (or if the unit has been idle for several days, or been moved
more than 250 miles while off), it can take several minutes to acquire a GPS signal. GPS signal
acquisition times will be typically less than a minute when the unit is turned on again.
RESET
button
POWER
1
XNAV3500P PORTABLE GPS NAVIGATION SYSTEM
Safety Information and Precautions
WARNING! PLEASE READ AND FOLLOW THE FOLLOWING SAFETY PRECAUTIONS. FAILURE
TO FOLLOW THE INSTRUCTIONS BELOW MAY INCREASE YOUR RISK OF COLLISION AND
PERSONAL INJURY.
The warning screen is displayed each time the Navi Icon is selected as a reminder to make
use of the system’s navigational aids in a safe manner. Before using the XNAV3500P, read
this entire Quick Start Guide. Make sure that you are familiar with the features and know how
to operate the system.
Proper use of the XNAV3500P includes the following guidelines: The navigation system is not
a substitute for your personal judgment. The route suggestions should never supersede any
local traffic regulation or your personal judgment and /or knowledge of safe driving practices.
Prior to completing any maneuvers suggested by your navigation system (for example, a Uturn or a left turn), verify that you can legally and safely complete the maneuver. Do not follow
route suggestions if they direct you to perform an unsafe or illegal maneuver, would place you
in an unsafe situation, or would route you into an area that you consider unsafe. Glance at the
screen only when necessary and safe to do so. Let the voice guide you. If prolonged viewing is
necessary, pull off the road to a safe location.
The database may not include all emergency service providers. Use your own best judgment
and ask for directions in these situations. If the vehicle is in motion, only a passenger should
program the unit. The driver should not program the unit unless the vehicle is parked in a
safe location. The map database provides information on suggested routes without regard
to factors that may affect your driving experience or the time required to arrive at your
destination. For example, the system does not reflect road detours, closures or construction,
some road characteristics (e.g., road surface, slope or grade, weight or height restrictions,
etc.), temporary traffic congestion, weather conditions, and similar factors.
2
XNAV3500P PORTABLE GPS NAVIGATION SYSTEM
Introduction to your Navigation System
As you travel, your navigation system functions as your co-pilot, providing turn-by-turn visual
and voice assistance to direct you to your selected destination. Because the system knows
where you are and where you want to go, it can quickly calculate step-by-step directions that
provide a route to any destination available on the included navigation map. The map includes
millions of roadway and mapping destinations, and pre-programmed point of interest (POI)
locations in several different categories. Simply enter your desired destination into your
navigation system, and its advanced intelligence does the rest.
With your navigation system, if you deviate from the planned route, the navigation system will
automatically recalculate the route to determine a new one from your current location.
The navigation system uses Global Positioning System (GPS) satellites, and a digital roadway
map database to calculate and display travel directions. The system’s GPS antenna receives
signals from a constellation of 24 satellites orbiting the earth and uses the strongest of
signals to determine your position to within meters. The navigation system’s sophisticated
software provides the highly accurate positioning necessary to provide real-time, accurate,
turn-by-turn route guidance.
Vehicle Position
The navigation system’s computer considers vehicle speed and heading changes, together
with longitude and latitude information, to accurately determine vehicle heading and
position on a digital map. This information is relayed to you as you proceed to your selected
destination through audible suggestions, turn symbols, and the on-screen map.
Signals from GPS satellites are used to determine the vehicle location. Three (good) or four
(best) satellites must be received to accurately determine location. The GPS reception status is
indicated by the GPS satellite indicator on the map. See the GPS indicator section on page 16
for more information.
Map and Information Database
The map database used by your navigation system was created using high-resolution aerial
and land based data collection and is stored on a memory card. This data is enhanced with
useful travel information, such as freeway signage and approximately two million points of
interest locations in several different categories, such as tourist attractions, gas stations,
airports, and restaurants. While the database was judged to be as accurate as possible at
the time of its release, a map database can never be 100% accurate. Road information that is
maintained in the map databases, such as turn restrictions or road names, may change over
time. In addition, points of interests, such as restaurants, hotels, and gas stations, also change
over time. The complexity of keeping this directory current means that some information may
be missing or out-of-date at times.
3
XNAV3500P PORTABLE GPS NAVIGATION SYSTEM
Package Contents
XNAV3500P
PORTABLE GPS NAVIGATION SYSTEM
QUICK START GUIDE
XNAV3500P
12VDC Adapter
Microsoft® ActiveSync®
Software Disc
1GB SD Memory Card
USB Cable
Map Database DVD-ROM
Carry Bag
4
Quick Start Guide
Windshield Mount
Stylus
XNAV3500P PORTABLE GPS NAVIGATION SYSTEM
Control Locations
5
XNAV3500P PORTABLE GPS NAVIGATION SYSTEM
Getting Started
Inserting an SD Card
Your device has an SD card slot located in the top of the unit. Digital maps and other data
including MP3 files, .avi files and image files can be added. To use the memory card, insert
it with the connector pointing down into the slot, and the label facing the front of the device.
To remove the card, power off the unit, slightly push down on the top of the card to release it,
then pull it out of the slot.
Mounting and Connecting Power
1. First, clean the windshield.
Then push the center of
the suction cup onto the
windshield before pressing
the suction lever down.
6
2. Slide the rectangular head
of the suction cup mount
into the corresponding
mount at the bottom rear
of the unit.
3.Connect the supplied DC
power adapter to the
12VDC connector located
on the right side of the
unit. Plug the other end
into a standard vehicle
cigarette outlet to charge
the internal battery.
XNAV3500P PORTABLE GPS NAVIGATION SYSTEM
Main Menu Screen
Overview
When you turn on the XNAV3500P the main menu screen appears as shown below. At the
top right corner is a battery status indicator, indicating the actual percentage of charge
remaining. The time is shown in the top left corner.
On the main menu, you will find the six modes of operation (NAVI, MUSIC, MOVIE, PICTURE,
GPS and BRIGHTNESS). By tapping on the down arrow on the right, two more modes (TIME
SET, & CALIBRATE) appear.
Each button represents a software function (NAVI, MUSIC, MOVIE or PICTURE) or a user setup
function (GPS, BRIGHTNESS, TIME SET, or CALIBRATE). To access any of the modes, just tap
the corresponding icon. Press the NavAtlas button to return to the main menu.
7
XNAV3500P PORTABLE GPS NAVIGATION SYSTEM
Navigation
This function guides you to your destination using voice prompts and mapping, showing
crossroads, city names and much more. It also provides various map-guiding modes and the
approximate time left until you arrive at your destination. For your safety, it also lets you know
when to make a turn by blinking LEDs on the left/right side.
Touch the ‘NAVI’ icon on the main menu screen, and wait for the navigation program to load
all the necessary data. For instructions on basic navigating, skip to page 17.
Music
Want to listen to your favorite music on the go? Since the XNAV3500P includes a built-in MP3
player, just download and save your favorite MP3s to the root folder of any SD card and play.
Touch the ‘MUSIC’ icon on the main menu screen. Once the MP3 player skin loads, the screen
will display a playlist from which you can select a specific music track. You can also use the
slide control at the lower right to select a specific point of the track.
Additional buttons are visible in the lower section of the player skin, including rewind,
play/pause, and repeat. Press the NavAtlas button to return to the main menu.
IMPORTANT NOTE: Multimedia functions are not accessible during navigation.
8
XNAV3500P PORTABLE GPS NAVIGATION SYSTEM
Movies
The XNAV3500P includes a built-in video player. Download and save your favorite .avi video
files to the root folder of any SD card, then enjoy them on the XNAV3500P. Touch the ‘MOVIE’
icon on the main menu screen. Once the movie player skin loads, the screen will display a
playlist from which you can select a specific movie file. A movie file can also be selected using
the ‘up/down’ arrow buttons. Simply tap the ‘Play’ button at the bottom center.
During video playback, if you want to go back to a specific point, touch the screen, and it
will freeze to allow you to move the slider along the bottom to a specific part of the movie.
Touching the screen again will resume playback. Press the NavAtlas button to return to the
main menu.
IMPORTANT NOTE: Movies are best viewed at 320 x 240 resolution.
Pictures
The XNAV3500P includes a built-in image viewer. Download and save image files to the root
folder of any SD card, then view them on the XNAV3500P. Touch the ‘PICTURE’ icon on the
main menu screen.
Once the image viewer skin loads, you will see a frame with an image on the left and various
buttons to the right. The left arrow goes back to the previous image while the right arrow
advances to the next image. If you want to view a picture in full screen mode, touch the screen
anywhere on the image, and it will automatically enter the full screen mode. The ‘+’ button
adds the currently viewed image to your photo album, and the ‘My’ button takes you to the
photo album. The photo album viewer changes images every 5 seconds - creating a slideshow
effect. In the photo album screen, the ‘X’ button deletes the image from the album and the
double right arrow enters full screen mode. Press the NavAtlas button to return to the main
menu.
IMPORTANT NOTE: Images are best viewed at 320 x 240 resolution.
9
XNAV3500P PORTABLE GPS NAVIGATION SYSTEM
GPS
If the navigation appears to be unstable or erratic, check the satellite acquisition signal
strength received by the GPS antenna. You can also reset the GPS receiver by going into the
‘GPS’ menu from the main menu screen and pressing ‘RESET’.
Touch the ‘GPS’ icon on the main menu screen. Once in the GPS diagnostic screen, ‘State’
displays the overall performance of the GPS antenna in terms of acquiring satellite signals.
V indicates failure, and 2D/3D indicates the performance is satisfactory for navigating.
‘Satellite’ indicates which satellite signals are being acquired from all that are available. PDOP
(Positional Dilution of Precision), HDOP (Horizontal Dilution of Precision), and VDOP (Vertical
Dilution of Precision) indicate the accuracy of the acquired signal. At the bottom, cells with
unique numbers represent the satellites, and graphic bars show the current detailed status in
obtaining a signal from each satellite. Press the NavAtlas button to return to the main menu.
Brightness
The XNAV3500P brightness is set to a default setting of high. You may select another level by
using any of three available brightness settings.
Touch the ‘BRIGHTNESS’ icon on the main menu screen. Three icons will appear, each
indicating a different level of brightness. The one at the left provides the darkest LCD, the
middle gives a moderately lit LCD, and the right produces the brightest LCD screen. Tap the
desired level to change the brightness. Touch the ‘OK’ button to exit, or undo the change by
tapping ‘Cancel ’.
IMPORTANT NOTE: The brightness setting defaults to high every time the unit is plugged
directly into 12VDC.
10
XNAV3500P PORTABLE GPS NAVIGATION SYSTEM
Time Set
To set the time, touch the ‘TIME SET’ button on the main menu screen. See page 7 for
additional information on accessing the time set screen.
You will see up/down arrows over/under the first set of double figures; these will increase or
decrease the ‘hours.’ Up/down arrows over/under the next two single-digit figures adjust the
minutes. A small AM/PM section is at far right; touching it will toggle between the two. Touch
the ‘OK’ button to save the time and exit, or undo the change by tapping ‘Cancel ’.
Calibrate
If the touch screen of your device is operating incorrectly, you can adjust it with the
‘CALIBRATE’ mode. Touch the ‘CALIBRATE’ icon on the main menu screen. See page 7 for
additional information on accessing the calibrate screen.
To begin the calibration, tap and hold the center of the target. When the target moves to
another position, tap and hold again. Repeat the same step to complete the adjustment. Once
the calibration is complete, a new screen with a message reading “New calibration settings
have been measured” will appear. If you want to keep the changed settings, tap the screen, or
press the NavAtlas button located on the front to return to the main menu.
11
XNAV3500P PORTABLE GPS NAVIGATION SYSTEM
Transferring Files
Using Microsoft® ActiveSync® with the USB Cable
You will need to install the included Microsoft ActiveSync software on a PC in order to
transfer maps, music, or movie files onto the SD card. Insert the Microsoft ActiveSync disc
in your PC and follow the on-screen instructions.
Next, connect the mini-USB end of the USB cable to the mini USB connector located at the
top left rear side, and the other end to a USB port on your computer. Make sure ActiveSync
is running and press the sync button at the bottom left to synchronize the XNAV3500P to
your PC.
Browse to the SD storage card by going to [My Computer], [Mobile Device] and finally
[Storage Card]. Select and copy your desired files/folders from your PC to [My Computer][Mobile Device]-[Storage Card].
My Computer
Mobile Device
Storage Card
Visit the Microsoft website for more information at:
www.microsoft.com/windowsmobile/downloads/activesync37.mspx
Using an SD Card Reader (not included)
Insert the SD memory card into an SD card reader. Once the SD reader recognizes your
SD card, move the desired files/folders to the SD card. Refer to the instructions provided
with your SD card reader for more information.
12
XNAV3500P PORTABLE GPS NAVIGATION SYSTEM
Pre-Loaded Map Regions
Your XNAV3500P includes the following map regions pre-loaded on the included SD Card.
MAJOR 1
MAJOR 2
MAJOR 3
MAJOR 4
MAJOR 5
MAJOR 6
Major 1
Major 2
Major 3
Major 4
Major 5
Washington
Minnesota
Oregon
Iowa
California
Nevada
Arizona
Alabama
West Virginia
Maryland
New York
Mississippi
Michigan
Virginia
Connecticut
Nebraska
Louisiana
Ohio
District of Columbia
Rhode Island
South Dakota
Arkansas
Indiana
North Carolina
New Jersey
North Dakota
Oklahoma
Kentucky
South Carolina
Pennsylvania
Montana
Texas
Pennsylvania
Georgia
Massachusetts
Wyoming
New Mexico
Tennessee
Florida
Vermont
Idaho
Delaware
Major 6
Maine
Colorado
New Hampshire
Utah
Delaware
Wisconsin
Illinois
Missouri
Kansas
Oklahoma
13
XNAV3500P PORTABLE GPS NAVIGATION SYSTEM
Alternate Map Regions
The following alternate map regions are located on the Map Database DVD-ROM.
MAJOR 7
MAJOR 8
MAJOR 9
MAJOR 10
MAJOR 11
MAJOR 12
Major 7
Major 8
Major 9
Major 10
Major 11
Major 12
Canada
Washington
Wisconsin
Tennessee
Maryland
New York
Iowa
Illinois
Alabama
Virginia
Pennsylvania
Nebraska
Michigan
North Carolina
District of Columbia
New Jersey
South Dakota
Indiana
South Carolina
North Carolina
Delaware
North Dakota
Kentucky
Georgia
Kentucky
Montana
Tennessee
Florida
Tennessee
Wyoming
Missouri
West Virginia
Idaho
Pennsylvania
Colorado
Delaware
Utah
Oregon
Nevada
Missouri
Kansas
Arizona
New Mexico
Arkansas
Oklahoma
14
Hawaii
XNAV3500P PORTABLE GPS NAVIGATION SYSTEM
Operating the Navigation Software
Hardware Keys
Zoom in/Zoom out key – Functions only in map view mode.
Volume control – Rotate the control upward to increase the volume; downward to decrease.
Software keyboard
A software keyboard appears at the bottom of the screen when text entries are necessary.
Only capital letters can be entered.
Keyboard entries – You can carry out all entries by tapping with the stylus or your finger on the
software keyboard.
Switching between character and number entry – Tap the icon
to enter numbers (for
example, a zipcode). Tap the
icon to return to the character entry mode.
Enter a space character, delete a single character – Tap the
key to insert a space character;
tap the
key to delete the character to the left of the insertion mark.
Special characters – When you tap a key, a line above the software keyboard appears that lists
all characters that may be entered by this key. The active character is highlighted.
Moving the cursor – To delete a character other than the one to the left of the cursor position,
or insert a character at a place other than at the end of the text, move the cursor by tapping the
location where you want it.
Command buttons
Icons – The following buttons appear at the right of every navigation screen:
Return – Tap this icon to return to the previous screen.
This icon is not available on the Main Screen.
Main Screen – Tap this icon to open the main screen.
This icon is not available on the Main Screen.
15
XNAV3500P PORTABLE GPS NAVIGATION SYSTEM
Global Positioning Satellite Status Icon and Screen
GPS – The GPS symbol is placed at the top right corner of the screen.
The color of this icon and the number displayed have the following significance:
Red – A GPS receiver is not connected or the power supply is interrupted.
Orange + number of received satellites – A GPS receiver is connected, but the received
signals are not strong enough for navigation purposes (for example, inside a tunnel).
Green + number of received satellites – Strong signal; navigation may begin.
Tap the GPS icon to display the current GPS status:
GMT – Greenwich Mean Time (time in London, without daylight saving time).
Longitude /Latitude – current position; indication of east longitude and north latitude.
Satellites – Number of received satellites. At least three satellites must be received for
navigation purposes.
HDOP – Horizontal Dilution of Precision indicates the quality of position determination.
Theoretically, any value from 0 to 50 can occur. The smaller the value, the more accurate the
position.
Speed – Indicates your vehicle’s current speed.
Position – Indicates the address of your current position.
Save – Tap this button to add the current address to the saved destinations list.
Quit – Tap this button to exit navigation and return to the Main Menu Screen.
Command Buttons with Caption
Command buttons – You will find command buttons with captions on almost every screen.
There are three groups of command buttons:
1. Command buttons with a defined functionality. These buttons are designed to execute
a functionality, which is indicated by their caption: Save, OK, Cancel, Select map, One
destination, etc.
2. Buttons to select one of two functions. Use these buttons to select one of two options.
The current state is indicated by the caption of the button: User mode, Yes-No, On-Off.
When you tap one of these buttons, the caption switches to the other function. Confirm this
change by clicking another button (OK or Save) before the current screen closes.
3. Buttons to enter data. These buttons will be referred to as entry fields throughout this guide.
The caption is either your last entry or <please select>: City, Street, Category (of a POI), etc.
When you tap an entry field, another screen with a software keyboard, a list, or both opens
where you can make entries. Confirm this entry by clicking another button (OK or Save)
before the entry screen closes. Your entry then becomes the caption of the entry field.
IMPORTANT NOTE: When turned on for the first time (or if the unit has been idle for several
days, or been moved more than 250 miles while off), it can take several minutes to acquire a
GPS signal.
GPS signal acquisition times will be typically less than a minute when the unit is turned on
again.
16
XNAV3500P PORTABLE GPS NAVIGATION SYSTEM
A Note on Standard Mode:
Standard mode is the default, and provides reduced functionality to allow quicker access
to simple operations. Work in Standard mode if you do not need such functions as Route
Planning, or indicating a destination on the map. These Quick Start Guide instructions are for
Standard mode only. For detailed navigation functions and Extended mode operation, please
refer to the full-length owner’s manual included in .pdf format on the DVD-ROM.
Starting Navigation
Initial Operation:
1. Turn on the XNAV3500P. Tap the NAVI icon.
The navigation software will load in approx. 25
seconds. The first time you select the NAVI icon
the following safety message will appear:
2. Tap the I accept button. If you tap the I refuse
button, the unit will return to the main menu. If
you select I accept, the “select navigation map”
screen will appear:
3. Select Yes; the available navigation maps will
appear (based on the maps currently loaded
on the SD card). Select the desired major map
region (see page 13-14 for additional details on
major map regions).
4. Tap Ok. When the selected map region is loaded,
the MAIN SCREEN appears.
17
XNAV3500P PORTABLE GPS NAVIGATION SYSTEM
Subsequent Operation
At each subsequent navigation software launch,
the following safety message appears:
Note: When you turn the unit on by using the power button, it shows the screen which was
displayed when the unit was last turned off. You can still access the Main Screen from all
other screens by tapping:
New destination – Tap this button to indicate a destination for navigation.
Navigate home – Tap the Home button
to navigate to your home address. NOTE: To
enter your home address, go to the SETTINGS screen.
Saved destinations – Tap the Saved destinations
a saved destination.
button to select
Recent destinations – Tap the Recent destinations
a recent destination.
button to select
Select map – Tap the Map button
Settings – Tap this button
Quit – Tap this button
to select another map from the memory card.
to modify the settings.
to quit navigating and return to the XNAV3500P main menu.
Entering a Destination
In the MAIN MENU, tap New destination. The DESTINATION screen appears:
Tap the Region entry field and select the destination state or province/territory.
Note: Only states that are at least partly represented on the currently loaded map can be
selected.
18
XNAV3500P PORTABLE GPS NAVIGATION SYSTEM
Entering an Address
1. In the DESTINATION screen, tap Address. The ADDRESS screen appears.
2. Enter the name of the destination city into the City/ZIP entry field. For cities in the United
States you may also enter the Zip code. Press Ok to confirm.
3. Enter the destination street into the Street entry field. Press Ok to confirm.
4. Enter a house number into the House number field at the right hand side of the street if
possible. Note: You do not need to enter a street suffix, or a street type to get a search
result. For example, if you are looking for a street called “S Main Avenue”, simply type in
“MAIN”. If the house numbers of the selected street are stored in the database, you may
tap the field next to the Street field. If the house numbers are not stored in the database,
the necessary field will be deactivated, and the software will navigate to the selected
street. Press Ok to confirm.
5. Enter the name of a crossroad into the Intersection entry field if you want to define an
intersection as a destination point (e.g., because the house number is not available).
Enter the name of a crossroad into the Intersection entry field. Press Ok to confirm.
Selecting a Point of Interest
Points of Interest – also referred to as POIs – are stored in the database of places and may
be displayed on the map. Ports, airports, restaurants, hotels, gas stations, public buildings
and others are considered Points of Interest. They may be selected as destinations for
navigation purposes.
Point of Interest - Nearby Position
Important Note: You may only select points of interest nearby position when the GPS signal
strength is sufficient.
1. On the DESTINATION screen, tap Nearby position. The POI NEARBY screen appears.
.
19
XNAV3500P PORTABLE GPS NAVIGATION SYSTEM
Selecting a Point of Interest - Nearby Position
2. Enter the radius around your current position in which you want to search for points of interest
into the Radius entry field.
3. Select the main category of points of interest to search for from the left of the two Category
list fields, e.g., “Garage”. Only points of interest situated within the indicated radius will be
displayed.
4. Select the Subcategory of points of interest to search for from the right of the two Category
list fields. Note: If you leave the Subcategory field empty, all points of interest matching with
the selected main category will be listed in the Point of Interest list field.
5. Select the correct destination from the Point of Interest list field.
Point of Interest in Another City
1. On the DESTINATION screen, tap Nearby browsed city.
The NEARBY CURRENT GPS screen appears.
2. Enter the name of the city in which you want to search for points of interest into the City field.
3. Select the main category of points of interest to search for from the Category list field
(e.g., Culture). Only categories matching your City entry are listed.
4. Select the Subcategory of points of interest (to the right of the Category) to search for one
of the subcategories of the two Category list fields (e.g., Museum).
5. Select the desired destination from the Point of Interest list field.
Note: You do not need to make entries into the Category and Subcategory fields. Their purpose is
only to shorten the Point of Interest list. This list may become extensive, especially in major cities.
20
XNAV3500P PORTABLE GPS NAVIGATION SYSTEM
Starting Navigation
1. Enter a destination.
2. Tap Start navigation. The system calculates the route. The map screen appears. Your
current position is indicated by a red arrow. The route is highlighted in green.
Note: Navigation will start automatically when a GPS signal is available.
Note: When you start navigation after having planned or loaded an itinerary, your current
position is the start point of the route. The first indicated route point is then the first stage
point of your route.
Working with the Map
Selecting a map
The included DVD-ROM contains additional US maps as well as Canada and Hawaii. To
use these maps, copy them to the SD memory card by means of a card reader or by using
ActiveSync software. Refer to page 12 for more details.
To load a map region that is not available on the currently inserted memory card, proceed
as follows:
1. Go to the MAIN SCREEN and tap the Quit button. The main menu screen appears.
2. Remove the SD memory card. Load new maps using an SD card reader, or use Microsoft
ActiveSync.
3. Insert the memory card containing the desired map and press RESET on the unit.
4. From the main manu screen, tap the NAVI icon to begin.
21
XNAV3500P PORTABLE GPS NAVIGATION SYSTEM
Working with the Map
To load a map that is on the currently inserted memory card, proceed as follows:
1. From the the MAIN SCREEN, tap the Map button. The AVAILABLE MAPS screen appears:
2. Tap the desired map, then tap Ok.
3. The unit will prompt for a restart anytime maps are changed. Tap OK.
After the selected map is loaded, the main menu appears. Tap the NAVI icon to begin.
Icons
The following icons are displayed on the map:
Tap the Zoom/Scroll icon
or
to switch between Zoom and Scroll mode.
Zoom
In Zoom mode (the icon appears white) you may scale the map size up or down. Zoom in by
selecting a rectangular area on the map, beginning with the upper left corner. Zoom out by
beginning with the lower right corner.
Scrolling
In Scroll mode (the icon appears red) you may scroll the map. Tap on the screen and drag to
the desired direction.
Itinerary planning
This icon is active when a calculated itinerary is loaded. Tap the Itinerary icon to display the
whole itinerary. Tapping this icon again will display the previous map view.
Map in driving direction/north oriented
Tap the In driving direction/North oriented icon
/
to switch between the two
available modes of map orientation (North orientation or orientation in driving direction).
North orientation
Tap this icon to orientate the map north up (the icon appears white).
In driving direction
Tap this icon to orientate the map in driving direction (the icon appears red).
22
XNAV3500P PORTABLE GPS NAVIGATION SYSTEM
Working with the Map
3D view (GPS signal necessary)
Tap the 3D icon to display the map in 3D mode. The icon becomes the 2D icon. Tap the 2D icon
to return to the 2D mode (standard). The icon becomes the 3D icon.
Center (GPS signal necessary)
Tap the Center icon to center your current position on the map.
Zoom bar
Tap one of the zoom bar segments or use the zoom in/out button to modify the scale of the
map.
Auto mode (GPS signal necessary)
Tap the Auto icon to display the standard representation of the map after you have modified
the view. The settings of North orientation and auto zoom mode will be applied. Your current
position will be centered. The icons will autohide. Tap anywhere on the screen to reveal the
icons and resume manual display mode.
Selecting an entry from a list
There are many situations in which it is necessary to select an entry from a list. For example,
if you have not completely entered the name of a city before tapping OK, a list appears that
contains all cities beginning with your entry or including it in the name. The postcode of the
cities is also indicated in order to allow you to choose the correct one if there is more than one
city with the same name.
Highlighted entry
One of the entries is highlighted as the focus. This entry is written in bold and is positioned
more at the left than the other entries of the list. There may be additional information on the
entry listed underneath. The list of cities includes the county of each entry.
Icons
At the right hand side of lists, there are three icons:
OK: Tap this icon to confirm the selection of the highlighted entry (placed directly at the
left of the OK icon).
Up: Tap this icon to scroll the list one item up.
Down: Tap this icon to scroll the list one item down.
23
XNAV3500P PORTABLE GPS NAVIGATION SYSTEM
Working with the Map - Searching for an Address
Example: Search for ORLANDO.
1. In the MAIN MENU tap New destination. The DESTINATION screen appears.
2. Tap Address. The ADDRESS screen appears.
3. Tap the City/ZIP entry field. The software keyboard appears, and the cursor is blinking in an
empty entry field.
4. Enter the letters OR.
5. Tap Ok. All cities beginning with OR or having OR in their names are listed.
24
XNAV3500P PORTABLE GPS NAVIGATION SYSTEM
Working with the Map - Searching for an Address
6. When the list is very long, you may enter one more letters in order to shorten the list.
Enter L.
7. Tap OK. All cities beginning with ORL or having ORL in their name are listed. Tap the
Down icon repeatedly until ORLANDO appears directly under the white entry field.
The entry ORLANDO is highlighted.
8. Tap OK. The ADDRESS screen reappears. 32801 Orlando is entered into the City/ZIP field.
9. Enter the desired street and/or house number or, press Start Navigation to begin
navigating.
25
XNAV3500P PORTABLE GPS NAVIGATION SYSTEM
Additional Functions
In map view mode, tap the
icon to display the ADDITIONAL FUNCTIONS screen.
The availability of some functions depends on whether you are navigating or not.
The ADDITIONAL FUNCTIONS screen appears:
Tap the Day icon to adjust the brightness of the screen to daylight conditions.
Tap the Night icon to adjust the brightness of the screen to night conditions.
Tap the Speaker Mute icon to mute the audio.
Tap the Speaker icon again to resume audio.
26
XNAV3500P PORTABLE GPS NAVIGATION SYSTEM
Additional Functions - Map Display in Navigation Mode
Navigation mode provides assistance for navigation, itinerary information and display of an
additional command button.
The following assistance for navigation is displayed at the left and at the bottom of the map:
1
2
3
4
5
6
Field Information
1. If there are two maneuvers to be executed quickly one after the other, the small upper
arrow field indicates the maneuver to be executed immediately after the first maneuver.
2. The red arrow indicates your current position on the map. Because the displayed sector of
the map constantly changes, your current position is centered on the map whenever
possible (moving map).
3. The larger arrow field indicates the next maneuver to be executed.
4. The distance field indicates the distance to the next maneuver. When you approach, the
representations change into a distance bar:
5. The greater the number of bars that are displayed, the closer you are to the place where
the next maneuver must be executed.
6. The upper street field indicates the name of the next street to turn on.
7. The lower street field indicates the name of the street you are currently on.
Information on the Itinerary
At the right of the map, the following information on the itinerary is displayed:
Field information
This symbol means “stage.” All
information displayed below refers
to the next stage point.
ETA (Estimated Time of Arrival).
Remaining time to arrival
(estimated).
Remaining distance to arrival
(estimated).
Tap this icon to repeat the last
spoken instruction. All available
information will be displayed.
27
XNAV3500P PORTABLE GPS NAVIGATION SYSTEM
Limited One-Year Warranty
This warranty gives you specific legal rights.
You may also have other rights which vary
from state to state.
Dual Electronics Corp. warrants this product to
the original purchaser to be free from defects
in material and workmanship, under normal
conditions, for a period of one year from the
date of the original purchase.
Dual Electronics Corp. agrees, at our option,
during the warranty period, to repair any defect
in material or workmanship or to furnish an
equal new or renewed product in exchange
without charges, subject to verification of the
defect or malfunction and proof of the date of
purchase.
During the One-Year Warranty Period:
For One Year from the date of purchase,
your product will be replaced with a new,
renewed or comparable product (whichever is
deemed necessary) if it becomes defective or
inoperative. This is done without charge to you.
Replacement products are warranted for the
balance of the original warranty period.
Who is covered? This warranty is extended
to the original retail purchaser for products
purchased and used in the U.S.A.
What is covered? This warranty covers all
defects in material and workmanship in
this product. The following are not covered:
installation/removal costs, damage resulting
from accident, misuse, abuse, neglect, product
modification, improper installation, incorrect
line voltage, unauthorized repair or failure to
follow instructions supplied with the product,
or damage occurring during return shipment
of the product.
28
What to do?
1. Before you call for service, review your
owner’s manual. A slight adjustment of
any custom controls or connections may
save you a service call.
2. If you require service during the
warranty period, you must carefully
pack the product (preferably in the
original package) and ship it by prepaid
transportation with a copy of the original
receipt from the retailer to an authorized
service center.
3. Please describe your problem in
writing and include your name, a return
UPS shipping address (P.O. Box not
acceptable), and a daytime phone number
with your shipment.
4. For more information and for the location
of the nearest authorized service center
please contact us by one of the following
methods:
• Call us toll-free at 1-866-429-1628
• Email us at [email protected]
Exclusion of Certain Damages: This
warranty is exclusive and in lieu of any and
all other warranties, expressed or implied,
including without limitation the implied
warranties of merchantability and fitness
for a particular purpose and any obligation,
liability, right, claim or remedy in contract
or tort, whether or not arising from the
company’s negligence, actual or imputed.
No person or representative is authorized to
assume for the company any other liability
in connection with the sale of this product.
In no event shall the company be liable
for indirect, incidental or consequential
damages.
XNAV3500P PORTABLE GPS NAVIGATION SYSTEM
Battery Specifications/Charging
Battery Capacity
1500mAh
Full Charge Time
3.5hrs
Approximate
Lifespan
More Than 80% Discharged
Avg. 300 Times
Less Than 50% Discharged
Avg. 500 Times
Approximate
Time
Maximum
Brightness
Navigation
3.0hrs
Playing Audio
3.0hrs
Playing Video
2.5hrs
Menu Screen
4.0hrs
Navigation
4.0hrs
Playing Audio
4.0hrs
Playing Video
3.5hrs
Menu Screen
6.0hrs
Minimum
Brighness
Sleep Mode (Power Off)
Avg. 12 days
System Reset
Occasionally, your system may appear to stop responding or be “locked up”. To reset
your system, press the reset button on the left side of your device. Your system will
reboot and operation should return to normal. Resetting your system is similar to
restarting a computer. If the problem still appears after resetting the unit, please
contact technical support for further assistance.
RESET
button
29
XNAV3500P PORTABLE GPS NAVIGATION SYSTEM
Specifications
Display
General
Size: 3.5” (88.9 mm) diagonal measurement
Format: Standard 4:3
View area: 2.76” W 2.07” H (70 x 52.5 mm)
Display system: Transmissive TFT LCD panel
Resolution: 320RGB x 240
Elements: 76,800
Brightness: (cd/m2): 250
Contrast ratio: 300:1
Colors: 16.7M
Operating voltage: 12VDC
DC adapter fuse rating: 3A
Antenna system: 12 channel parallel GPS
Memory interface: SD card slot
Unit dimensions: 5.1” W x 3.2” H x 2.1” D
Weight: 9.5 ounces
Battery: Internal lithium ion
Dual Electronics Corporation
Technical Support: 1-866-429-1628
www.dualav.com
NSA0605-V03
Quick Start Guide Version 3.0
Copyright© 2005 All rights reserved.
©
2005 NAVTECH All rights reserved.
Design and specifications subject to change without notice.
Microsoft® and ActiveSync® are registered trademarks of Microsoft Corporation
in the United States and or other countries.
This document and the software described in it are furnished under license and may be used or copied only
in accordance with such license. Except as permitted by such license, the contents of this document may not
be disclosed to third parties, copied, or duplicated in any form, in whole or in part, without the prior written
permission of Dual Electronics, Inc.