1
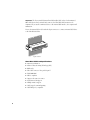
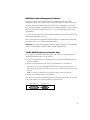
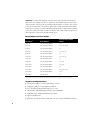
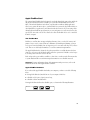
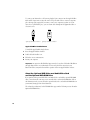
New Features Update Includes important information about new options for Power Macintosh G3 minitower and desktop computers About Your Power Macintosh G3 Computer Congratulations on purchasing your Macintosh computer. This update addresses the new optional features and components that have become available for Power Macintosh G3 computers since the original manual was printed. It also includes information about features and components that may have been added to your computer as part of Apple Computer’s Build-To-Order program. About New Options for Power Macintosh G3 Computers Not all of the options covered in this update are available for all models of Power Macintosh G3 computers. In addition, certain options are only available in specific regions or online through The Apple Store. For more information about features and components available for the Power Macintosh G3, see the Apple Web site at http://www.apple.com/. Where to Find Information About Your Computer m For general information about your Power Macintosh computer, such as setup instructions, connecting equipment, and installing additional memory, see the manual, Setting Up Your Power Macintosh. m For general specifications of your Power Macintosh, see the Power Macintosh G3 Technical Information booklet. m If the feature or component that you want to find out about is not covered in the setup manual or Technical Information booklet, look in this update. m If you still cannot find the information, look on the Internet. Try the following two sites: m Apple Tech Info Library at http://til.info.apple.com/ m The Apple Store at http://store.apple.com/ Important Information About Software In most cases, all of the software needed to support your Power Macintosh computer has already been installed for you. However, the software to support certain hardware components — such as additional storage devices or PCI expansion cards ordered as part of Apple’s Build-To-Order program — may need to be installed. This software is provided on one or more CDs that came with your computer. This additional software is not included on your Power Macintosh G3 CD. Follow the instructions provided with the CDs to install any necessary software. 3 10/100Base-T Network Connection If your computer came with the 10/100Base-T Ethernet option, a 10/100Base-T Ethernet card is installed in one of your computer’s PCI slots. You can connect a cable for a 10Base-T or a 100Base-T Ethernet network to this card. 10/100Base-T Ethernet port (RJ-45) Note: The type of twisted-pair cable you use depends on whether you connect to 10Base-T or 100Base-T Ethernet. Category 5 twisted-pair cable must be used to connect to 100Base-T if you want to get the maximum speed from this connection. Checking the Status of a 10/100Base-T Network Connection If you connect your computer to a network using the 10/100Base-T Ethernet card, you can check the card’s LED indicators to monitor network activity. There are four indicators: m ACT (Activity): Blinks when the 10/100Base-T Ethernet card is active m COL (Collision): Glows when a network collision has occurred (a temporary condition that occurs when two computers on a network try to send data simultaneously) m LNK (Link): Glows when a reliable 10 megabit (Mbit) or 100 Mbit network connection has been established m 100Mb: Glows when a reliable 100 Mbit link is established via the 10/100Base-T Ethernet card Specifications m Open Transport: Mac OS 7.5.2 or later, AppleShare, AppleTalk, NetWare for Macintosh, TCP/IP m Connector: RJ-45 (for 10Base-T and 100Base-T) m Media, 10Base-T: Cat 3, 4, or 5 UTP on 2 pairs up to 100 meters (m) m Media, 100Base-T: Cat 5 UTP on 2 pairs up to 100 m m Bus interface: PCI revision 2.0 and 2.1, share interrupt A m Channel speeds: IEEE Auto Negotiation of 10Base-T and 100Base-T m Communications: IEEE 802.3u 100Base-T; IEEE 802.3i 10Base-T m Controllers: DECchip 21140, 32-bit internal processor per channel m Power: 1.2 amperes (A) @ 5 volts (V ) typical 4 Ultra Wide SCSI Hard Disk Drive and PCI Card If your computer came with an Ultra Wide SCSI hard disk drive, it includes some or all of the following components: m in certain configurations, additional internal Ultra Wide SCSI hard disk drives m an Ultra Wide SCSI card in one of your computer’s PCI slots m an internal Ultra Wide SCSI cable that supports up to three internal devices (including your pre-installed Ultra Wide hard disks) Do not connect any SCSI devices to the external 68-pin SCSI-3 connector or to the internal 50-pin SCSI-2 connector on the PCI card that supports the internal hard disk. Connecting even one external SCSI device to the external 68-pin connector extends the overall cable length of the SCSI bus beyond the limit for which error-free operation can be guaranteed; the combined length of the internal cable and the external cable reduces the reliability of all the devices connected to the Ultra Wide SCSI bus. Connecting a device to the internal 50-pin SCSI-2 connector will cause your Ultra Wide SCSI devices to transfer data at the slower, SCSI-2 rate. Warning About the Ultra Wide SCSI Bus Up to three internal devices can be connected to the Ultra Wide SCSI bus on this card. All devices on the same SCSI bus must have unique ID numbers, but devices on different SCSI buses may use the same SCSI ID number. (For example, you could have a removable media drive with ID number 3 connected to the computer’s built-in regular SCSI-1 bus and a hard disk with ID number 3 connected to the Ultra Wide SCSI-3 bus.) The hard disks installed in your computer at the factory and the SCSI card have reserved certain SCSI ID numbers on the Ultra Wide SCSI bus. Other ID numbers are available for assignment to SCSI devices that are added later, as described in the following table. Ultra Wide SCSI ID Number Device 0 Factory-installed hard disk drive (terminated) 1 through 6 Available1 7 SCSI PCI card (terminated) 8 through 15 Available 1 If your computer came with two or more Ultra Wide SCSI hard disk drives, use the System Profiler program (available in the Apple menu) to find out the SCSI ID numbers of your drives. 5 The factory-installed internal hard disk and the SCSI card are both terminated. Other SCSI devices that you install and connect to the Ultra Wide SCSI bus must not be terminated. If you attach a terminated device to the internal SCSI interface, the computer will malfunction. Important You use the internal ribbon cable with the 68-pin connector to connect an internal SCSI device to the Ultra Wide SCSI bus. 68-pin connector Ultra Wide SCSI Card Specifications m m m m m m m m m m m 6 Automatic termination Advanced Data Streaming Technology (ADS) RAID-ready Ultra SCSI connector: Fine pitch 68-pin “P” Flash ROM BIOS PCI 2.1 compliant Supports disconnect/reconnect Asynchronous I/O support Multiple initiator support SCSI-3 tagged command queuing SCSI Manager 4.3 compatible RAID Disk Volume Management Software Certain Power Macintosh G3 configurations may be available with RAID disk volume management software. This software enables your hard disk drives to be striped or mirrored. The Power Macintosh G3 RAID Software CD can be used as a startup disk. You can start up your computer from it and use the RAID application to initialize and stripe or mirror your hard disks. You can also use the RAID Installer to place a copy of the RAID application on one of your hard disks. To restart your computer from the Power Macintosh G3 RAID Software CD, insert the CD and hold down the C key while you restart. Refer to the documentation supplied on the Power Macintosh G3 RAID Software CD for full instructions on how to set up and maintain RAID volumes. Drive Setup, the disk utility from Apple Computer, should not be used with RAID volumes. You must manage your RAID volumes using the RAID application. Important 128-Bit 2D/3D Graphics Accelerator Card If your computer came with an additional graphics card, you have the following options for connecting an external monitor to your computer: m Connect an external monitor to the built-in monitor port (shown in the manual that came with your computer) m Connect an external monitor to the graphics card installed in one of the PCI slots There are two ports on the optional graphics card. One is the type found on the back of most Macintosh computers; the other is a VGA port so you don’t need an adapter for a VGA monitor. Note: You cannot use both ports on the optional graphics card at the same time. m Connect two external monitors to your computer You can connect one monitor to the built-in monitor port and the other monitor to one of the ports on the graphics card, which is installed in one of the PCI slots. Apple monitor port VGA monitor port 7 Important To capture video using the video input ports on the optional Power Macintosh Audio/ Video card, a monitor needs to be connected to the built-in monitor port. If you have only one monitor connected to the optional 128-bit 2D/3D graphics accelerator card, you will not be able to capture video. If you want to capture video, switch your monitor to the built-in monitor port or connect a second monitor. When performing video capture with two monitors connected to your Power Macintosh, make sure that the video capture window is displayed on the monitor that is connected to the built-in monitor port. Display Modes and Color Depths Resolution1 Color Depths Vertical Refresh Rate (Hertz) 512 x 384 256, thousands, millions 60 640 x 480 256, thousands, millions 60, 67, 75, 85, 120 640 x 870 256, thousands, millions 75 800 x 600 256, thousands, millions 60, 72, 75, 85 832 x 624 256, thousands, millions 75 1024 x 768 256, thousands, millions 60, 70, 75, 85 1152 x 870 256, thousands, millions 75 1280 x 960 256, thousands, millions 60, 75, 85 1280 x 1024 256, thousands, millions 60, 75, 85 1600 x 1024 256, thousands, millions 76 1600 x 1200 256, thousands, millions 60, 65, 70, 75, 85 1920 x 1080 256, thousands, millions 60, 72 1920 x 1200 256, thousands 76 1 The resolutions that appear in the Monitors & Sound control panel depend on the type of monitor you are using. Graphics Card Specifications m m m m m m m 8 260 megabytes (MB) per second sustained image scroll rate 4.2 gigabytes (GB) per second sustained color fill rate Up to 1.2 million Gouraud shaded polygons per second 240 megahertz (MHz) RAM digital-to-analog converter (RAMDAC) 8 MB VRAM (Note: Additional VRAM cannot be added.) Supports QuickDraw 3D QuickTime video playback (video scaling and color space conversion handled in software) Apple FireWire Card The optional Apple FireWire Card is designed to work with digital video camcorders and decks that use the DV format and have a FireWire port (sometimes marked IEEE 1394 or DV IN/ OUT). The included hardware and software, together with a nonlinear editing application, allow you to capture DV movie clips to your hard disk. You can view the clips in MoviePlayer or other QuickTime 3.0 applications, and edit and render the DV movies. If you are using a video editing application with an export function, you can send (print or record) movies back to the tape in your camcorder or deck. The software also allows the FireWire device to be controlled from the computer. The FireWire Bus FireWire is a serial bus that can support high-performance devices, such as DV cameras and printers. Devices can be connected in any combination of branching and chaining, as long as no loops are formed. A FireWire bus can support up to 16 consecutive cable hops of 4.5 meters each. There are no SCSI-style ID numbers to set and no termination requirements. The Apple FireWire Card is designed to keep the network alive even if the Macintosh is shut down. Loss of power to the Macintosh will not affect the operation of a FireWire card as long as it can draw power from other cards on the bus. Each card provides power which is available to other devices on the network. This means that a system shutdown will not result in interrupted transmission over a FireWire network. For more information about cable management and power issues, refer to the FireWire Read Me file on the Apple FireWire Card CD. Important Apple FireWire Hardware If you ordered the Apple FireWire Card with your computer, you have received the following items: m the Apple FireWire Card, installed in one of your computer’s PCI slots m a FireWire cable, 4-pin to 6-pin, 2 meters long m a FireWire software installation CD Your Apple FireWire Card has three FireWire ports, as shown in the following illustration. 9 To connect your Macintosh to a DV camera, plug the 6-pin connector into the Apple FireWire Card and the 4-pin connector into the camera’s DV port. Both of these connectors snap into place when properly engaged. If you want to connect two computers together (or if your device has a 6-pin FireWire port), you can obtain cables through an AV equipment retailer or electronics store. 4-pin 1394 (FireWire) connector 6-pin 1394 (FireWire) connector Apple FireWire Card Software To install the Apple FireWire Card software: 1 Insert the Apple FireWire Card CD. 2 Double-click the Installer icon. 3 Follow the onscreen instructions. 4 Restart your computer. Important An extension called FireWire Support may be located in a folder titled FireWire in the Apple Extras folder on your Macintosh. Do not move this older extension to your Extensions folder; it may interfere with the operation of the new Apple FireWire software. About the Optional DVD-Video and Audio/Video Card and the Optional DVD-ROM Drive If you purchased the optional DVD-Video and Audio/Video card and the optional DVD-ROM drive, you use them the same way you use an audio/video card and a CD-ROM drive. Follow the instructions in the sections about the optional audio/video card and the CD-ROM drive in your manual, Setting Up Your Power Macintosh. The technical specifications for the DVD-ROM drive appear in the following section, “About the Optional DVD-ROM Drive.” 10 The technical specifications for the DVD-Video and Audio/Video card are not included in the Technical Information booklet that came with your computer. You can find the specifications in Apple’s Tech Info Library at http://til.info.apple.com/. The software you need to use the DVD-Video and Audio/Video card is installed on your computer. However, if you ever reinstall your system software, you must reinstall the software for the card separately. The software is on a CD included in your computer’s accessory kit. Important Using the Card to View Movies on a Digital Video Disc To view a digital video disc, insert a disc in the DVD-ROM drive and open the application Apple DVD Player, which is available in the Apple menu. Note: Your computer must have a DVD-ROM drive and the DVD-Video and Audio/Video card installed for Apple DVD Player to work. You can view DVD-Video discs designed to play in Region 1 (United States and Canada) and Region 0 (International). If you have trouble using a DVD-Video disc, check the region code on the disc’s packaging. You can view the content of a DVD-Video disc on your monitor or on a television. However, many digital video discs have built-in copy protection that prevents the computer or a VCR from recording any part of the movie. Note: If you open a DVD-Video disc file and see a message asking if you want to purchase QuickTime Pro, look in your accessory kit for the CD containing software for the DVD-Video and Audio/Video card. A document accompanying the CD contains instructions and a pre-paid registration number you use to unlock QuickTime Pro, which is part of your purchase. For important additional information on using and troubleshooting the DVD-Video and Audio/Video card, see the Read Me file that accompanies the Apple DVD Player application on your hard disk or on the CD containing the card’s software. To find the Read Me file and the application on your hard disk, double-click the hard disk icon, then open the Applications folder and the Apple DVD Player folder. 11 About the Optional DVD-ROM Drive If you purchased the optional DVD-ROM drive, you use it the same way you use a CD-ROM drive. Follow the instructions in the sections about the CD-ROM drive in your manual, Setting Up Your Power Macintosh. DVD-ROM Drive Specifications Disc formats supported The DVD-ROM drive is used in the same way as a CD-ROM drive and is fully compatible with existing CD media. However, the DVD-ROM drive allows you to use a wider range of disc formats: m DVD-ROM (One- or two-layer, one- or two-sided) m CD-ROM (Modes 1 and 2) m CD-ROM XA (Mode 2, Forms 1 and 2) m CD-I (Mode 2, Forms 1 and 2) m CD-Audio m Photo CD m Video CD m CD-RW m CD-R m CD-I Ready m CD-I Bridge m CD-Extra Disc speed Disc speeds and capacities vary depending upon the type of disc used. m CD: 20x maximum m DVD: 2x constant linear velocity (CLV ) Disc diameter supported m 12 cm (4.7 inches) 12 Data capacity m CD m 656 megabytes (MB), Mode 1 m 748 MB, Mode 2 m DVD m 4.70 gigabytes (GB), single-sided, single-layer m 8.54 GB, single-sided, double-layer m 9.40 GB, double-sided, single-layer m 17.08 GB, double-sided, double-layer Laser for CD-ROM drive m Type: Semiconductor AlGaAs laser m Wavelength: 775–815 nanometers (nm) (typical 790 nm) m Output Power: m Laser Power: 3.3 milliwatts (mW ) m Power out of object lens: 0.2 mW (typical), 0.5 mW (maximum) m Beam divergence: m Horizontal: 8º–16º (typical 12º) m Vertical: 20º–55º (typical 35º) Laser for DVD-ROM drive m Type: Semiconductor GaAs laser m Wavelength: 650–668 nm (typical 658 nm) m Output Power: m Laser Power: 6 mW m Power out of object lens: 0.95 mW (typical), 2 mW (maximum) m Beam divergence: m Horizontal: 7º–11º (typical 8.5º) m Vertical: 19º–32º (typical 27º) 13 K Apple Computer, Inc. © 1998 Apple Computer, Inc. All rights reserved. Under the copyright laws, this manual may not be copied, in whole or in part, without the written consent of Apple. Your rights to the software are governed by the accompanying software license agreement. The Apple logo is a trademark of Apple Computer, Inc., registered in the U.S. and other countries. Use of the “keyboard” Apple logo (Option-Shift-K) for commercial purposes without the prior written consent of Apple may constitute trademark infringement and unfair competition in violation of federal and state laws. Every effort has been made to ensure that the information in this manual is accurate. Apple is not responsible for printing or clerical errors. Apple Computer, Inc. 1 Infinite Loop Cupertino, CA 95014-2084 408-996-1010 http://www.apple.com/ Apple, the Apple logo, AppleShare, AppleTalk, FireWire, Mac, Macintosh, Power Macintosh, QuickDraw, and QuickTime are trademarks of Apple Computer, Inc., registered in the U.S. and other countries. The Apple Store is a trademark of Apple Computer, Inc. Helvetica is a registered trademark of Linotype-Hell AG and/or its subsidiaries. The following copyright and patent information pertains to the DVD-Video and Audio/Video card and the Apple DVD Player: Manufactured under license from Dolby Laboratories. “Dolby,” “Pro Logic” and the double-D symbol are trademarks of Dolby Laboratories. Confidential Unpublished Works., © 1992-1997 Dolby Laboratories, Inc. All rights reserved. The product described in this manual incorporates copyright protection technology that is protected by method claims of certain U.S. patents and other intellectual property rights owned by Macrovision Corporation and other rights owners. Use of this copyright protection technology must be authorized by Macrovision Corporation and is intended for home and other limited viewing uses only unless otherwise authorized by Macrovision Corporation. Reverse engineering or disassembly is prohibited. Apparatus Claims of U.S. Patent Nos. 4,631,603, 4,577,216, 4,819,098 and 4,907,093 licensed for limited viewing uses only. Simultaneously published in the United States and Canada. www.apple.com 033-1042-A Printed in U.S.A.