1
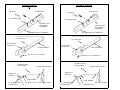
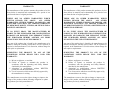
Owner’s Manual and Operating Instructions
Owner’s Manual and Operating Instructions
Model CSR-150
Model CSR-150
20” Walk-Behind Pneumatic Concrete Saw
20” Walk-Behind Pneumatic Concrete Saw
CS Unitec, Inc.
CS Unitec, Inc.
Printed in U.S.A.
Copyright
CS Unitec, Inc. 2006
Printed in U.S.A.
Copyright
CS Unitec, Inc. 2006
CS Unitec Model CSR-150
20” Walk-Behind Pneumatic Concrete Saw
CS Unitec Model CSR-150
20” Walk-Behind Pneumatic Concrete Saw
Congratulations on your purchase. We consider the CS Unitec
Model CSR-150 20” pneumatic concrete saw to be among the finest
concrete saws in the world. It has been engineered to withstand the
construction environment and will last many years with the proper
care and maintenance.
Congratulations on your purchase. We consider the CS Unitec
Model CSR-150 20” pneumatic concrete saw to be among the finest
concrete saws in the world. It has been engineered to withstand the
construction environment and will last many years with the proper
care and maintenance.
The heart of the CSR-150 is a newly developed pneumatic motor coupled
with a heavy-duty gear drive. Our motor runs at a higher speed than most
conventional saws and attains its amazing horsepower from this optimum
speed. The gear drive then reduces the speed attaining the maximum
horsepower.
The heart of the CSR-150 is a newly developed pneumatic motor coupled
with a heavy-duty gear drive. Our motor runs at a higher speed than most
conventional saws and attains its amazing horsepower from this optimum
speed. The gear drive then reduces the speed attaining the maximum
horsepower.
FIRST AND FOREMOST:
FIRST AND FOREMOST:
The use of blades, oil, and replacement parts other than those supplied by
CS Unitec may compromise your saw’s performance, operator safety, and
also lead to higher-than-normal maintenance and repair requirements.
The use of blades, oil, and replacement parts other than those supplied by
CS Unitec may compromise your saw’s performance, operator safety, and
also lead to higher-than-normal maintenance and repair requirements.
ADDITIONALLY:
ADDITIONALLY:
1. Pneumatic tool lubrication is critical to achieving the maximum
performance and life from your pneumatic tool. We strongly suggest
lubrication through the air inlet. When using an in-line oiler, install it
as close to the motor as possible. One drop of oil per minute is
adequate lubrication for most pneumatic motors.
2. It is also recommended that, when the saw is going to be shut down at
the end of the day, the air line be shut off and the saw disconnected.
Pour approximately 1/2 oz. of CS Unitec Air Tool Lubricant into the
line, then reconnect the line to the saw and give the throttle about a 2second burst. This procedure will coat the internal parts of the motor
displacing any moisture and will prevent any rust or corrosion.
3. All CS Unitec pneumatic tools should be operated and maintained in
accordance with American National Standards Institute Safety Code
for Portable Air Tools (ANSI B186.1) and any other applicable safety
codes and regulations. B186.1 information is available from the
National Standards Institute, Inc., 11 West 42nd Street, New York, NY
10036.
CS Unitec, Inc.
CS Unitec, Inc.
22 Harbor Ave., Norwalk CT 06850
Phone (800) 700-5919 or (203) 853-9522 ♦ Fax (203) 853-9921
Website: http:/www.csunitec.com ♦ e-mail: [email protected]
22 Harbor Ave., Norwalk CT 06850
Phone (800) 700-5919 or (203) 853-9522 ♦ Fax (203) 853-9921
Website: http:/www.csunitec.com ♦ e-mail: [email protected]
-1-
-1-
OPERATIONAL AND SAFETY INSTRUCTIONS:
OPERATIONAL AND SAFETY INSTRUCTIONS:
BE SURE TO READ ALL INSTRUCTIONS BEFORE ASSEMBLING
AND OPERATING THIS EQUIPMENT.
BE SURE TO READ ALL INSTRUCTIONS BEFORE ASSEMBLING
AND OPERATING THIS EQUIPMENT.
* All CS Unitec pneumatic saws are designed to be operated @ 90 P.S.I.
min. (6.2 bar) air pressure, 85 CFM min., with a minimum 1/2” (13 mm)
I.D. air hose. Using higher pressure to attain more horsepower will
drastically shorten tool life.
* All CS Unitec pneumatic saws are designed to be operated @ 90 P.S.I.
min. (6.2 bar) air pressure, 85 CFM min., with a minimum 1/2” (13 mm)
I.D. air hose. Using higher pressure to attain more horsepower will
drastically shorten tool life.
* The Saw motor is factory pre-set at 2900 RPM. Be sure your blade will
operate at that speed.
* The Saw motor is factory pre-set at 2900 RPM. Be sure your blade will
operate at that speed.
* After every 40 hours of operation, or as experience indicates, inject 1 to
2 cc’s (2-3 pump strokes) of a quality gear grease into the saw’s zerk
fittings.
* After every 40 hours of operation, or as experience indicates, inject 1 to
2 cc’s (2-3 pump strokes) of a quality gear grease into the saw’s zerk
fittings.
W A R N I N G S !!
W A R N I N G S !!
* Always turn off the air supply and disconnect the air supply hose before
installing, removing, or adjusting any accessory on this tool — especially
the cutting blade — or before performing any maintenance on this tool.
Failure to do so could result in serious injury or death!
* Always turn off the air supply and disconnect the air supply hose before
installing, removing, or adjusting any accessory on this tool — especially
the cutting blade — or before performing any maintenance on this tool.
Failure to do so could result in serious injury or death!
* Pneumatic tools can vibrate during use. Repetitive motions,
* Pneumatic tools can vibrate during use. Repetitive motions,
uncomfortable positions and vibrations can cause injury to hands, fingers,
or wrists. STOP using any tool if discomfort, a tingling feeling, or pain
occurs. Seek your supervisor’s advice before resuming use.
uncomfortable positions and vibrations can cause injury to hands, fingers,
or wrists. STOP using any tool if discomfort, a tingling feeling, or pain
occurs. Seek your supervisor’s advice before resuming use.
* Projectile Hazard - Always wear safety glasses to prevent eye injury
or loss of sight when operating power tools. The most important safety
device for this tool or any power tool is YOU! Your care and good
judgment are the best protection against injury.
* Projectile Hazard - Always wear safety glasses to prevent eye injury
or loss of sight when operating power tools. The most important safety
device for this tool or any power tool is YOU! Your care and good
judgment are the best protection against injury.
* Hearing loss can result from prolonged exposure to excessive sound
levels. ALWAYS use approved hearing protection.
* Hearing loss can result from prolonged exposure to excessive sound
levels. ALWAYS use approved hearing protection.
* Dust mask should be worn when using this saw in dry-cutting
applications.
* Dust mask should be worn when using this saw in dry-cutting
applications.
* Wear safety shoes during equipment use. DO NOT wear loose clothing
which could get caught in equipment.
* Wear safety shoes during equipment use. DO NOT wear loose clothing
which could get caught in equipment.
-2-
-2-
OPERATIONAL AND SAFETY INSTRUCTIONS - continued
OPERATIONAL AND SAFETY INSTRUCTIONS - continued
♦
Check the area to be cut; be sure it is free of all loose debris, and be
sure no-one is standing in the cut line.
♦
Check the area to be cut; be sure it is free of all loose debris, and be
sure no-one is standing in the cut line.
♦
Use only CS Unitec-approved diamond blades that have been rated
for this saw’s r.p.m. Inspect all blades for damage before use. Do
not under any circumstance use a bent or warped blade, or a blade
with a missing segment, as an out-of-balance condition could result
in the blade coming apart.
♦
Use only CS Unitec-approved diamond blades that have been rated
for this saw’s r.p.m. Inspect all blades for damage before use. Do
not under any circumstance use a bent or warped blade, or a blade
with a missing segment, as an out-of-balance condition could result
in the blade coming apart.
♦
Always check arbor bearing for end play.
♦
Always check arbor bearing for end play.
♦
Check that the guard is secure and undamaged.
♦
Check that the guard is secure and undamaged.
♦
Check to see that all nuts and bolts are tight.
♦
Check to see that all nuts and bolts are tight.
♦
Never cut material for which the blade is not designed.
♦
Never cut material for which the blade is not designed.
♦
Do not start, run or operate the equipment near combustible
materials.
♦
Do not start, run or operate the equipment near combustible
materials.
ASSEMBLY INSTRUCTIONS
ASSEMBLY INSTRUCTIONS
1.
Slip handle assembly over the two 3/4” handle pins. Tighten the two
3/8” set bolts to secure the handle.
1.
Slip handle assembly over the two 3/4” handle pins. Tighten the two
3/8” set bolts to secure the handle.
2.
Connect height control jack assembly on the handle to the top of the
motor mount with the 3/8”x 3/4” bolt supplied. Raise the jack to full
up position to install blade.
2.
Connect height control jack assembly on the handle to the top of the
motor mount with the 3/8”x 3/4” bolt supplied. Raise the jack to full
up position to install blade.
3.
Connect the air hose from the center of the handle to the in-line oiler
on the motor. Fill the oiler with CS Unitec Air Tool Lubricant.
3.
Connect the air hose from the center of the handle to the in-line oiler
on the motor. Fill the oiler with CS Unitec Air Tool Lubricant.
4.
Connect the clear water hose from the handle assembly to the water
spray head on top of the guard.
4.
Connect the clear water hose from the handle assembly to the water
spray head on top of the guard.
5.
Install blade. This saw rotates in a clockwise direction when viewed
from the right side of the saw. Be careful that the arrow on the blade
goes in the same (clockwise) direction. Place blade on the hub of
the inner flange and then secure the outer flange and 5/8”-11 lefthand nut. Use the two wrenches supplied to tighten the blade, and
spin the blade by hand to see that it is running true. Check that all
nuts and bolts are tight.
-3-
-3-
ASSEMBLY DIAGRAM
ASSEMBLY DIAGRA
M
SET BOLT
PUSH DOWN
3/4” HANDLE PINS
PUSH DOWN
SET BOLT
3/4” HANDLE PINS
SQUARE TUBE
ON HANDLE
ASSEMBLY
SQUARE TUBE
ON HANDLE
ASSEMBLY
SQUARE TUBE ON CARRIAGE
SQUARE TUBE ON CARRIAGE
3/8-16 HEX NUT
3/8-16 HEX NUT
JACK MOUNT
ON MOTOR
JACK ASSEMBLY
JACK MOUNT
ON MOTOR
JACK ASSEMBLY
3/8 X 3/4” HEX BOLT
CLEAR PLASTIC
WATER HOSE
3/8 X 3/4” HEX BOLT
CLEAR PLASTIC
WATER HOSE
WATER SPRAY HEAD
NIPPLE ON
HANDLE
NIPPLE ON
HANDLE
HOSE BARBS
3/4” WATER HOSE
CONNECTION
WATER SPRAY HEAD
WATER VALVE
HOSE BARBS
HOLES IN GUARD
3/4” WATER HOSE
CONNECTION
HOLES IN GUARD
WATER VALVE
PRE-OPERATING INSTRUCTIONS
PRE-OPERATING INSTRUCTIONS
Check air supply for correct pressure (90 PSI min.) and sufficient
flow (85 CFM min.). Daily, blow out air line to dislodge any
debris, moisture or foreign matter from the air line and the
Check air supply for correct pressure (90 PSI min.) and sufficient
flow (85 CFM min.). Daily, blow out air line to dislodge any
debris, moisture or foreign matter from the air line and the
compressor. WARNING! Use extreme caution when blowing
out pressurized air lines and or air hoses. Expelled particles can
cause severe injury.
Connect water hose for wet-cutting
applications, or vacuum hose for dry-cutting applications. Connect
air supply hose to saw. Check for leaks.
compressor. WARNING! Use extreme caution when blowing
out pressurized air lines and or air hoses. Expelled particles can
cause severe injury.
Connect water hose for wet-cutting
applications, or vacuum hose for dry-cutting applications. Connect
air supply hose to saw. Check for leaks.
OPERATING INSTRUCTIONS
OPERATING INSTRUCTIONS
Under no circumstances should this saw be operated by
personnel who have not been trained in the operation of saw
cutting.
Under no circumstances should this saw be operated by
personnel who have not been trained in the operation of saw
cutting.
Make sure the blade is in the raised position and not in contact with
the surface being cut. Squeeze the throttle. When the saw has
attained full speed, slowly engage it into the cut. Because the saw
cuts in a clockwise direction, it will pull itself into the cut . A
small amount of resistance should be applied when first entering
the cut. Do not under any circumstance force the blade into the
cut, as forcing could bend or break the blade. When finishing the
cut, slowly raise the jack until the blade is clear of the cut. Release
the trigger and let the motor come to a complete stop.
______________
______________
Saws returned to CS Unitec for warranty consideration must be
shipped prepaid, along with proof of date of purchase, a brief
description of the problem, and a CS Unitec Return Goods
Authorization (RGA) number issued by CS Unitec’s Customer
Service Department.
Saws returned to CS Unitec for warranty consideration must be
shipped prepaid, along with proof of date of purchase, a brief
description of the problem, and a CS Unitec Return Goods
Authorization (RGA) number issued by CS Unitec’s Customer
Service Department.
-5-
-5-
WARRANTY
WARRANTY
The manufacturer of this product warrants this product to be free
from defects in materials and workmanship for a period of one
year from the date of original purchase.
The manufacturer of this product warrants this product to be free
from defects in materials and workmanship for a period of one
year from the date of original purchase.
THERE ARE NO OTHER WARRANTIES WHICH
EXTEND BEYOND THE ABOVE.
ALL OTHER
WARRANTIES, EITHER EXPRESS OR IMPLIED, ARE
EXCLUDED, INCLUDING ANY IMPLIED WARRANTY
OF MERCHANTABILITY, FITNESS, OR FITNESS FOR A
PARTICULAR PURPOSE.
THERE ARE NO OTHER WARRANTIES WHICH
EXTEND BEYOND THE ABOVE.
ALL OTHER
WARRANTIES, EITHER EXPRESS OR IMPLIED, ARE
EXCLUDED, INCLUDING ANY IMPLIED WARRANTY
OF MERCHANTABILITY, FITNESS, OR FITNESS FOR A
PARTICULAR PURPOSE.
IN NO EVENT SHALL THE MANUFACTURER BE
LIABLE TO THE PURCHASER FOR CONSEQUENTIAL
DAMAGES OR DAMAGES FOR PERSONAL INJURY.
THE PURCHASER HEREBY ASSUMES ALL RISKS
INVOLVED IN THE USE OF THIS PRODUCT.
IN NO EVENT SHALL THE MANUFACTURER BE
LIABLE TO THE PURCHASER FOR CONSEQUENTIAL
DAMAGES OR DAMAGES FOR PERSONAL INJURY.
THE PURCHASER HEREBY ASSUMES ALL RISKS
INVOLVED IN THE USE OF THIS PRODUCT.
Any part of the product that is found by the manufacturer to be
defective during the warranty period above will be replaced or
repaired, at the manufacturer’s sole discretion, without charge for
such repair or replacement.
Any part of the product that is found by the manufacturer to be
defective during the warranty period above will be replaced or
repaired, at the manufacturer’s sole discretion, without charge for
such repair or replacement.
SUBJECTING THE PRODUCT TO ANY OF THE
CONDITIONS LISTED BELOW WILL VOID THIS
WARRANTY:
SUBJECTING THE PRODUCT TO ANY OF THE
CONDITIONS LISTED BELOW WILL VOID THIS
WARRANTY:
A. Misuse, negligence, or accident.
B. Failure to operate or maintain the product in
accordance with the Operating and Safety Manual
furnished by the manufacturer.
C. Alterations or modifications without WRITTEN
permission from the manufacturer.
D. Use of accessories which are not officially approved by
the manufacturer in writing.
The manufacturer reserves the right to change or improve the
design of the product without assuming obligation to update
any products previously manufactured.
The manufacturer reserves the right to change or improve the
design of the product without assuming obligation to update
any products previously manufactured.
-6-
-6-
-7-7-
Saw Body Assembly
20” Guard Assembly
Handle Assembly
Motor w/ Gear Box Asbly.
Stub Handle
Jack Assembly
Wrenches (2 req.)
6” x 2” Wheel (3 req.)
Inner Blade Flange
Outer Blade Flange
Motor Retainer Snap Ring
Clear Water Hose
Wheel Flange Nut
Air Supply Hose
Throttle
Oiler Assembly
Jack Axle
Saw Body Assembly
20” Guard Assembly
Handle Assembly
Motor w/ Gear Box Asbly.
Stub Handle
Jack Assembly
Wrenches (2 req.)
6” x 2” Wheel (3 req.)
Inner Blade Flange
Outer Blade Flange
Motor Retainer Snap Ring
Clear Water Hose
Wheel Flange Nut
Air Supply Hose
Throttle
Oiler Assembly
Jack Axle
-- continued on next page --
1.
2.
3.
4.
5.
6.
7.
8.
9.
10.
11.
12.
13.
14.
15.
16.
17.
CSR150-001
CSR150-002
CSR150-003
CSR150-004
CSR150-005
CSR150-006
CSR150-007
CSR150-008
CSR150-009
CSR150-010
CSR150-011
CSR150-012
CSR150-013
CSR150-014
CSR150-015
CSR150-016
CSR150-017
CSR150-001
CSR150-002
CSR150-003
CSR150-004
CSR150-005
CSR150-006
CSR150-007
CSR150-008
CSR150-009
CSR150-010
CSR150-011
CSR150-012
CSR150-013
CSR150-014
CSR150-015
CSR150-016
CSR150-017
CS Unitec
CSR-150 Parts List w/ Part Numbers
-- continued on next page --
1.
2.
3.
4.
5.
6.
7.
8.
9.
10.
11.
12.
13.
14.
15.
16.
17.
CS Unitec
CSR-150 Parts List w/ Part Numbers
CSR150-027
CSR150-028
CSR150-029
CSR150-020
CSR150-021
CSR150-022
CSR150-023
CSR150-024
CSR150-025
CSR150-026
CSR150-018
CSR150-019
18. 3/8” NPT Ball Valve
19. Spray Bar Assembly
20. Water Hose Connection
Fitting
21. Water Hose Fittings (2 req.)
22. Guide Wheel
23. 3/4” Washers (6 req.
24. 3/8” Washers (6 req.)
25. 3/8” x 1” bolts (2 req.)
26. 1/8” Cotter Pin (3 req.)
27. Push Caps for Jack Axle
(2 req.)
28. 3/8”x 1-1/2” Bolt
29. 3/8” Nuts (3 required)
CSR150-027
CSR150-028
CSR150-029
CSR150-020
CSR150-021
CSR150-022
CSR150-023
CSR150-024
CSR150-025
CSR150-026
CSR150-018
CSR150-019
CS Unitec
CSR-150 Small Parts List w/ Part Numbers
continued from page 7
18. 3/8” NPT Ball Valve
19. Spray Bar Assembly
20. Water Hose Connection
Fitting
21. Water Hose Fittings (2 req.)
22. Guide Wheel
23. 3/4” Washers (6 req.
24. 3/8” Washers (6 req.)
25. 3/8” x 1” bolts (2 req.)
26. 1/8” Cotter Pin (3 req.)
27. Push Caps for Jack Axle
(2 req.)
28. 3/8”x 1-1/2” Bolt
29. 3/8” Nuts (3 required)
CS Unitec
CSR-150 Small Parts List w/ Part Numbers
continued from page 7
CS Unitec, Inc.
22 Harbor Ave., Norwalk CT 06850
Phone (800) 700-5919 or (203) 853-9522 ♦ Fax (203) 853-9921
Website: http:/www.csunitec.com ♦ e-mail: [email protected]
CS Unitec, Inc.
22 Harbor Ave., Norwalk CT 06850
Phone (800) 700-5919 or (203) 853-9522 ♦ Fax (203) 853-9921
Website: http:/www.csunitec.com ♦ e-mail: [email protected]