1
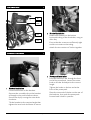
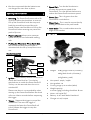
™
OWNER’S HANDBOOK
Contents
1.
2.
3.
4.
5.
6.
7.
8.
9.
10.
11.
Safety Procedures
Introduction
Safety Procedures
Parts Description
Installation Instructions
Disassembly and Transportation
Battery Charging and Care
Operating the PowerStroll
Troubleshooting
Specification
Warranty
Compatibility with Drive Wheelchairs
•
The PowerStroll must not be used solely by
the wheelchair user under any
circumstances.
•
Ensure the PowerStroll is installed as far to
the rear of the wheelchair as is comfortable
for the attendant to do so.
•
Operate the PowerStroll at a speed that is
both comfortable for the operator and
wheelchair user.
•
When connecting / disconnecting the
battery from the motor or the charger make
sure both the power to the charger and
PowerStroll handcontrol are switched off.
Introduction
•
The PowerStroll is designed as an aid to a
wheelchair attendant providing power to
aid pushing in otherwise strenuous
situations such as up steep hills, etc.
•
Ensure the PowerStroll is secured in transit.
It is also recommended that the battery is
disconnected.
•
The PowerStroll features some ingenious
concepts to help the installation and
operation of the device. Some these are
covered by a pending patent GB 0723584.9
•
Ensure that the battery is charged only with
the battery charger supplied with the
PowerStroll. Using another battery charger
may cause damage or injury.
•
The PowerStroll is designed to work in
conjunction with most wheelchairs with seat
widths between 16” and 20” (40cm – 50cm).
The PowerStroll will also fit some narrow
width wheelchairs such as Drive Medical’s
Lightweight Aluminium. An optional
extension bar is available to fit to
wheelchairs with 22” (55cm) seat widths.
•
•
Single-wheel (for manoeuvrability) and dualwheel (for added stability and traction)
versions of the PowerStroll are available.
Whilst the PowerStroll has been EMC
tested, it may be susceptible to certain
types of electromagnetic waves. Avoid
close proximity to mobile phones,
commercial broadcast towers and
emergency services’ radios. Other
household appliances are not known to
pose any such risk. If involuntary movement
occurs, switch off of the PowerStroll and
report this to your dealer.
•
The PowerStroll is to be controlled by an
attendant with a manual wheelchair and
user up to a combined weight of 21 stone
(135kg).
•
•
The PowerStroll uses a 24V 12ah battery
pack, and has a range of up to ten miles
between charges.
The PowerStroll should not be used when it
is snowing or during heavy rain. This may
cause damage to the PowerStroll. The
PowerStroll should not be exposed to damp
conditions or direct sunlight.
•
Note: Wheelchairs fitted with attendant
cable brakes. On such wheelchairs, the
attendant brake levers should be removed
prior to fitting. If the attendant brakes do
not have a separate parking brake facility,
then parking brakes should be added to the
wheelchair.
•
The PowerStroll is manufactured by Drive
Medical Ltd and is CE marked. Drive
Medical Ltd is an ISO 9001 and ISO 13485
certified Medical Device Manufacturer.
PowerStroll Owner’s Handbook
Page 2 of 8
Part Code: Z24000
Parts Description
HAND
SET
LIFT UP
STRAP
2.
BATTERY
PACK
Bracket Installation
Install both brackets on the bottom
horizontal tubing of the wheelchair, using an
Allen Key.
POWER
PACK
Ensure that the screws are sufficiently tight
and do not rotate on the tubing.
Attach the two sections of Velcro together.
Installation Instructions
3.
Powerpack Installation
Feed the telescopic bar through the front
end of the powerpack. Loosen the tristar
knob on the bar and adjust to the correct
length.
1.
Tighten the knobs on the bar and at the
front of the powerpack.
Handset Installation
Loosen both knobs on the handset.
Place the two ends of the bar on the rear of
the brackets, then push the powerpack
forward until it locks in position.
Squeeze the crocodile clip on the handset
and apply to the push handle as shown.
Secure the clip by turning the outer knob
clockwise.
Tilt the handset to the required angle then
tighten the inner knob clockwise to secure.
PowerStroll Owner’s Handbook
Page 3 of 8
Part Code: Z24000
5.
4.
Remove the powerpack by pulling the
Velcro strap whilst pulling the powerpack
from the rear of the brackets (see the photo
below).
Battery Pack Installation
Place the battery pack in to the battery tray
as shown in the photograph.
Secure the battery pack using the two
Velcro strips on the side of the plastic
battery tray.
6. Place all items in the carry holdall supplied.
Notes:
• The battery supplied with the PowerStroll is
classified as safe for air travel by compliance
with IATA special provision A67.
• The battery pack and power pack have fabric
handles to make them easier to carry.
Battery Charging and Care
5.
Final Connection
Connect the cable from the powerpack in to
the underneath of the handset.
Place the top loop of the lift-up strap around
the opposite push handle to the handset.
Disassembly and Transportation
1.
2.
3.
4.
Switch the PowerStroll off at the ignition.
Disconnect / unclip the powerpack
connector from underneath the handset.
Remove the lift-up strap from the push
handle.
Lift the battery pack out of the battery tray.
PowerStroll Owner’s Handbook
Page 4 of 8
Follow the procedure below step by step:
1. Turn the power switch to (OFF)
2. Lift out the battery pack using the handle
on the pack.
3. Plug the charger’s power cord into the
mains.
4. Plug the charger’s round plug into the
charging socket of the battery pack
5. Switch on the plug socket.
6. The charger’s LED will illuminate orange to
indicate the batteries are charging. The
charging duration is about 8 hours. To
ensure optimum performance a 12-hour
charge is recommended.
7. The orange LED will turn green when
charging is complete.
8. Turn off the charger, disconnect the power
cord and the round plug from the battery
pack.
Part Code: Z24000
)
Suggestion
1.
Do not disconnect the charger cord
if charging is not completed. The
battery life will be seriously
shortened or decayed if the
battery is repeatedly used without
being fully charged. Therefore be
sure to charge the battery fully
every time.
2.
Always complete the charging until
the LED light turns green. NEVER
stop charging before it is complete.
3. When fully charged, the battery
charger will still trickle charge the
battery to ensure optimum range.
4. If you do not use your powerpack
for a long time, it should be
charged at least every week to
keep the battery in a fully usable
condition.
5. The ambient temperature will
affect charging time. Charging time
will be longer in the winter.
6. After charging, do not leave the
charger socket plugged in to the
scooter, as this will cause a power
drain on the powerpack and
temporarily reduce its range.
7. The batteries carry a twelve-month
manufacturer's
warranty.
This
warranty only covers issues relating
to manufacturing faults, and not
faults relating to failure to recharge
the batteries as instructed above.
Attention: Please follow the rules below
to avoid accidents while charging.
1. Only use the supplied charger, and
recharge the battery to its full
capacity every time. You may
damage the battery if you use a
charger which is not to the correct
specification.
2. Never disassemble or modify the
charger.
3. Please charge in a well-ventilated
space where there is no direct
exposure to the sunlight. Do not
charge in surroundings where it is
humid, raining or dewy.
4. Do not charge in temperatures less
than -10°C or higher than +50°C as
the charger may not work well &
batteries may become damaged.
PowerStroll Owner’s Handbook
Page 5 of 8
1
Warning
1. Keep away from flammable objects
while charging as this may lead to
fire or battery explosion.
2. Do not smoke while charging as the
battery may release hydrogen gas.
Always charge your battery in a
well-ventilated space.
3. Never connect or disconnect the
plug or cord with wet hands whilst
charging. Do not connect or
disconnect the plug or cord when
they are wet, it may lead to electric
shock.
Charger
The charger supplied has an LED which changes
colour depending on its status:
• If the LED is lit ORANGE then the charger is
switched on and charging
• If the LED is lit GREEN then the charger is
switched on and has finished the bulk of its
charging and the batteries can be used. However,
we recommend that you leave the charger
charging for a couple of hours after the green
LED has lit. This will maintain and probably
increase the capacity of your batteries.
• The LED will also illuminate GREEN if the charger
is switched on but not connected to the
batteries.
Batteries
• Do not expose the battery pack to temperatures
below -10º or above 50ºC when charging or
storing.
• The batteries are maintenance free and there is
no need to inspect the battery liquid or refill with
water.
• You are required to charge the batteries on a
regular basis. Even if the powerpack is not used,
it should be charged at least once a week.
• The battery pack contains two 12V 12ah batteries.
• The battery supplied with the PowerStroll is
classified as safe for air travel by compliance with
IATA special provision A67.
Charging the Batteries
• Using the charger supplied, the charging duration
is about 8 hours.
• However, to ensure optimum performance we
recommend a 12-hour charge.
Part Code: Z24000
• We also recommend that the batteries are
not charged for more than 24 hours.
• Speed Dial – Turn the dial clockwise to
increase the maximum speed of the
PowerStroll. Turn the dial anticlockwise to
reduce the PowerStroll’s maximum speed.
Operating the PowerStroll
• Reversing. The PowerStroll comes with a liftup strap to allow the wheelchair to reverse.
Lift up the PowerStroll with the strap and
hook the second loop around the push
handle. Please note that failure to lift up the
PowerStroll when reversing may cause the
pack to flip over.
• Maximum Speed. Always set a maximum
speed which you are comfortable walking
with.
• Power Eye – This is lit green when the
PowerStroll is switched on.
• Outer Knob – This is used to secure the clip
holding the handset to the push handle
• Inner Knob – This is used to determine the
angle of the handset.
Specification
• Pushing the Wheelchair When Not In Use.
We recommend that the powerpack is
restrained with the lift-up strap when not in
use.
Handset Operation
INNER
KNOB
POWER
EYE
IGNITION
OUTER
KNOB
TRIGGER
•
SPEED
DIAL
• Ignition – Insert the key and turn clockwise to
switch the PowerStroll on. Turn the key
anticlockwise to switch the PowerStroll off.
The key can be removed when the unit is
switched off.
Please note there is a 2-second delay when
starting up the PowerStroll before the wheel
will move. Wait 2 seconds before sequeezing
the trigger.
Weight: 10.8kg (single wheel w/o battery)
11.8kg (dual wheel w/o battery)
9.2kg (battery pack)
•
•
•
•
•
•
•
Max speed: 4mph / 6.4kph
Max gradient: 8º
Cruising range up to 10 miles (16km)
Weight capacity:
21 stone (135kg) including wheelchair & user
Motor: 24V 150W D.C.
Battery: 2x 12V 12ah Sealed Lead Acid
Charger: 2A 24V output
• Trigger – Squeeze the trigger to propel the
PowerStroll. The more the trigger is
squeezed, the faster the PowerStroll will
travel. Release the trigger to stop the
PowerStroll.
PowerStroll Owner’s Handbook
Page 6 of 8
Part Code: Z24000
the warranty period, parts will be
supplied free of charge.
TroubleShooting
Wheelchair does not move when trigger is pressed.
Note: The guarantee is not transferable.
Possible Solutions:
• Check the PowerStroll is switched on.
4.
• Check the battery is fully charged.
• Check the connection between the battery and
motor is correct.
5.
• Check the wheelchair brakes are not applied.
• Check the drive wheel is in contact with the
ground.
6.
Wheelchair is difficult to push manually.
Possible Solutions:
• Check the wheelchair brakes are not applied.
• Remove PowerStroll.
7.
The PowerStroll is too fast / slow.
• Try varying the speed with speed dial.
• Try recharging the batteries (if too slow).
• Check the wheelchair brakes are not applied.
8.
Warranty
To improve the safety and lifespan of your
PowerStroll, it is recommended that you have it
serviced on a regular basis. Recommended
Service Schedules for PowerStrolls are available
to service agents.
There is a comprehensive twelve-month
warranty from the date on which your new
PowerStroll is delivered. The warranty covers
the PowerStroll for replacement parts during
this period. For more detail, please see the
warranty conditions below:
1.
Any work or replacement part
installation must be carried out by an
authorised Drive Medical dealer /
service agent.
2. To apply the warranty should your
PowerStroll require attention please
contact the outlet from which you
purchased the PowerStroll.
3. Should any part of the PowerStroll
require repair or full or part
replacement, as a result of a
manufacturing or material defect within
PowerStroll Owner’s Handbook
Page 7 of 8
Any repaired or replaced parts will be
covered by the balance of the warranty
period on the PowerStroll.
Parts replaced after the original warranty
has expired will be covered by a threemonth warranty.
Consumable items supplied will not
generally be covered during the normal
warranty period unless such items require
repair or replacement clearly as a direct
result of a manufacturing or material
defect. Such items include (among others):
upholstery and tyres.
The above warranty conditions apply to a
brand new PowerStrolls. Ex-demonstration
PowerStrolls supplied directly by Drive
Medical carry a six-month warranty period.
If you are unsure whether your PowerStroll
is covered contact your dealer.
Under normal circumstances, no
responsibility will be accepted where the
PowerStroll has required assistance as a
direct result of:
a. the PowerStroll part not having been
maintained in accordance with the
manufacturers recommendations
b. failure to use the manufacturer’s
specified parts
c. the PowerStroll or part having been
damaged due to neglect, accident or
improper use
d. the PowerStroll or part having been
altered from the manufacturer’s
specification or repairs having been
attempted before the dealer is notified
In the event of your PowerStroll requiring
attention, please contact your service agent /
dealer and give all relevant details so
they can act quickly.
The manufacturer reserves the right to alter
without notice any weights, measurements or
other technical data shown in this manual. All
figures, measurements and capacities shown
in this manual are approximate and do not
constitute specifications.
Part Code: Z24000
Compatibility with Drive Wheelchairs
Compatibility with Other Wheelchairs
The PowerStrolls are compatible with following
Drive wheelchairs:
The PowerStroll is suitable for most folding wheelchairs:
•
Budget Steel Wheelchairs
(product codes: CS1142SP and CS1142TS)
Steel Chair Wheelchairs – self propel
(product codes: SSP16, SSP18, SSP18E and SUSP18)
•
with a distance between tubing edges (W) of
14½ ” to 20” (37cm – 50cm). This is usually, but
not always, the same as the wheelchair seat
width
a round tubing diameter (D) between 7/8” 1” (22mm – 25mm)
Steel Chair Wheelchairs – transit
(product codes: STS16, STS18, STS18E and SUTS18)
w
Lightweight Aluminium Wheelchairs
(product codes: LAWC001 and LAWC002*)
Standard Aluminium Wheelchairs
(product codes: XSAWCSP18, XSAWCTS18*,
XSAWCSP20 and XSAWCTS20*)
Super Deluxe Wheelchairs
(product codes: XSSDSP16/18/20 & XSTS16/18/20*)
Spirit Wheelchairs (product code: XSES18)
*
D
The wheelchairs marked with ‘*’ will require
the attendant brake levers and cable
removing from the wheelchair prior to use.
The actual brake unit can still be used as a
parking brake with these parts removed.
Please note that you should check with your dealer
and/or the wheelchair manufacturer. Drive Medical
does not accept any responsibility for other
manufacturer’s wheelchairs, and in some
circumstances a risk assessment should be carried
out prior to installation.
Manufacturer Details
The above list is current at time of printing, and the
omission of a Drive wheelchair from this list does not
mean that the PowerStroll is incompatible with it.
For more information please contact your local Drive
Medical dealer.
Drive Medical Ltd,
Ainley’s Industrial Estate,
Elland, GB HX5 9JP.
+44 (0) 1422 314488
[email protected]
www.drivemedical.co.uk
PowerStroll Owner’s Handbook
Page 8 of 8
Part Code: Z24000