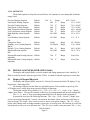
1
OPERATIONS MANUAL TELCOM CLIMATEWATCH SYSTEM MODEL TCS22-***-003 Manual: 2100-444-003A Supersedes: 2100-444-003 File: Vol. III, Tab 19 Table Of Contents 1.0 INTRODUCTION ........................................................................................................... 1 1.1 Shipping Damage .........................................................................................................................1 1.2 Package Contents .........................................................................................................................1 1.3 Additional Requirements ............................................................................................................1 1.4 Copyright Notice ..........................................................................................................................1 1.5 General..........................................................................................................................................2 1.5.1 Building Points to be Monitored:...........................................................................................2 1.5.2 Wallmount Points to be Monitored for Each Unit:................................................................2 1.5.3 Building Points to be Controlled: ..........................................................................................2 1.5.4 System Points to be Controlled:.............................................................................................3 1.5.5 Wallmount Points to be Controlled: ......................................................................................3 1.5.6 Alarm Points: .........................................................................................................................3 1.6 Model Nomenclature....................................................................................................................5 2.0 SPECIFICATIONS......................................................................................................... 5 2.1 Electrical Specifications...............................................................................................................5 2.2 Mechanical Specifications ...........................................................................................................5 2.3 Environmental Specifications .....................................................................................................5 2.4 Sensor Specifications ...................................................................................................................6 2.4.1 Temperature Sensors..............................................................................................................6 2.4.2 Humidity Sensors...................................................................................................................6 2.4.3 Compressor Current Sensor ...................................................................................................6 2.4.4 Dirty Filter Sensor..................................................................................................................6 2.4.5 Blower Airflow Switch ..........................................................................................................7 3.0 INSTALLATION........................................................................................................... 11 3.1 Mounting.....................................................................................................................................11 3.2 Wiring .........................................................................................................................................11 3.2.1 High Voltage Wiring............................................................................................................11 3.2.2 Wiring - Low Voltage ..........................................................................................................12 2100-444-003A Page ii 3.2.3 3.2.4 3.2.5 3.2.6 3.3 Wiring - Sensors ..................................................................................................................12 Wiring – Inputs & Outputs...................................................................................................13 Wiring - Telephone Line......................................................................................................14 Wiring - Ethernet .................................................................................................................14 Installation Check List ..............................................................................................................18 3.4 System Startup ...........................................................................................................................19 3.4.1 Wallmount Startup Checklist...............................................................................................19 3.4.2 TCS22 Startup Checklist .....................................................................................................20 4.0 OPERATION................................................................................................................ 21 4.1 General........................................................................................................................................21 4.2 Sequence of Operation...............................................................................................................21 4.2.1 Cooling Sequence with Economizers ..................................................................................21 4.2.2 Heating Sequence.................................................................................................................21 4.2.3 Fan Sequence .......................................................................................................................21 4.2.4 Occupied / Unoccupied Mode Sequence .............................................................................22 4.2.5 Alarm Sequence ..................................................................................................................22 4.2.6 Dehumidification sequence..................................................................................................24 4.2.7 Thermal Shock Protection Sequence ...................................................................................24 4.2.8 Modem Sequence.................................................................................................................24 4.2.9 Power Management Sequence .............................................................................................24 4.2.10 Setpoints...............................................................................................................................25 5.0 DISPLAY & KEYPAD OPERATION (DAK) ................................................................. 25 5.1 Display & Keypad Physicals .....................................................................................................25 5.2 Power Up.....................................................................................................................................26 5.3 Menu Tree...................................................................................................................................26 5.3.1 Buildings Status Screen .........................................................................................................27 5.3.1.1 Room Temperature ..............................................................................................................28 5.3.1.2 Room Humidity ...................................................................................................................28 5.3.1.3 Outdoor Temperature...........................................................................................................28 5.3.1.4 Outdoor Humidity................................................................................................................28 5.3.1.5 Active Cooling Setpoint.......................................................................................................28 5.3.1.6 Active Heating Setpoint .......................................................................................................28 5.3.1.7 Free Cooling On / Off ........................................................................................................29 5.3.1.8 Room Occupied Yes/No ...................................................................................................29 5.3.1.9 Outdoor Enthalpy................................................................................................................29 2100-444-003A Page iii 5.3.2 Unit Status Screen..................................................................................................................30 5.3.2.1 Unit #1 Economizer .............................................................................................................30 5.3.2.2 Unit #1 Compressor .............................................................................................................30 5.3.2.3 Unit #1 Heater......................................................................................................................30 5.3.2.4 Unit #1 Blower.....................................................................................................................30 5.3.2.5 Unit #1 FILTER ...................................................................................................................31 5.3.2.6 Unit #1 Discharge Air Temperature.....................................................................................31 5.3.3 Alarms Menu ..........................................................................................................................31 5.3.3.1 Space Temp Alarm .............................................................................................................32 5.3.3.2 Space Humidity Alarm........................................................................................................32 5.3.3.4 #1 Compressor Alarm .........................................................................................................33 5.3.3.5 #1 Filter Alarm....................................................................................................................33 5.3.3.6 Utility Power Fail................................................................................................................33 5.3.3.7 Fire Trouble .....................................................................................................................34 5.3.3.8 Fire Alarm ...........................................................................................................................34 5.3.3.9 Outdoor Temp Alarm..........................................................................................................34 5.3.3.10 Outdoor Humidity Alarm.................................................................................................34 5.3.3.11 Door Alarm ......................................................................................................................34 5.3.4 Setpoints Screen ............................................................................................................................35 5.3.4.1 Occupied Cooling Setpoint ..................................................................................................36 5.3.4.2 Unoccupied Cooling Setpoint ..............................................................................................36 5.3.4.3 Occupied Heating Setpoint ..................................................................................................37 5.3.4.4 Unoccupied Heating Setpoint ..............................................................................................37 5.3.4.5 High Temperature Alarm Setpoint.......................................................................................37 5.3.4.6 Low Temperature Alarm Setpoint .......................................................................................37 5.3.4.7 High Humidity Alarm Setpoint............................................................................................37 5.3.4.8 Low Humidity Alarm Setpoint ............................................................................................37 5.3.4.9 Dehumidification Setpoint ...................................................................................................37 5.3.4.10 Free Cooling Enthalpy Setpoint .......................................................................................38 5.3.4.11 Free Cooling Dry Bulb Setpoint ......................................................................................38 5.3.5 Overrides Unit #1 Screen .............................................................................................................39 5.3.5.1 #1 Blower Override..............................................................................................................40 5.3.5.2 #1 Economizer Override ......................................................................................................41 5.3.5.3 #1 Compressor Override ......................................................................................................41 5.3.5.4 #1 Heater Override...............................................................................................................41 5.3.5.5 Continuous Blower ..............................................................................................................42 5.3.6 Enables Menu ...............................................................................................................................43 5.3.6.1 Economizer Operation .........................................................................................................44 5.3.6.2 Free Cooling Enthalpy Changeover .....................................................................................44 5.3.6.3 Dry Bulb Temperature Changeover .....................................................................................44 5.3.6.4 Daylight Savings Time.........................................................................................................44 2100-444-003A Page iv 5.3.6.5 5.3.6.6 5.3.7 50HZ Clock..........................................................................................................................44 Zone Humidity Sensor .........................................................................................................44 Password Operation...............................................................................................................45 5.4 Keyboard Map ...........................................................................................................................46 6.0 PC SOFTWARE OPERATION .................................................................................... 48 6.1 ClimateWatch System Software Overview.............................................................................48 6.2 Installation ..................................................................................................................................48 6.2.1 Hardware Requirements.......................................................................................................48 6.2.2 Software Installation ............................................................................................................48 6.3 ASI Expert / Bard ClimateWatch Software ............................................................................49 6.3.1 Screen Overview ..................................................................................................................49 6.3.2 TCS communications...........................................................................................................51 6.4 TCS Controller Information Screens.......................................................................................59 6.4.1 Main Screen Tab ..................................................................................................................60 6.4.2 Set Point Tab........................................................................................................................62 6.4.3 Override #1 Tab ...................................................................................................................66 6.4.4 Alarms Tab...........................................................................................................................70 6.4.5 Alarm Log Tab.....................................................................................................................74 6.4.6 Offsets Tab...........................................................................................................................75 6.4.7 Misc. Tab .............................................................................................................................76 6.4.8 Trend Tab.............................................................................................................................79 6.4.9 Dial Out Tab ........................................................................................................................80 6.4.10 Notes Tab .............................................................................................................................82 7. MAINTENANCE & TROUBLESHOOTING ........................................................................ 83 7.1 Routine Maintenance.................................................................................................................83 7.2 Troubleshooting .........................................................................................................................83 7.2.1 TCS22 Troubleshooting......................................................................................................83 7.2.2 Wallmount quick troubleshooting Guide.............................................................................89 2100-444-003A Page v Table of Figures and Tables Figure 1 Front Cover ......................................................................................................................8 Figure 2 Control Location ............................................................................................................9 Figure 3 Mounting Template ....................................................................................................10 Table 1 Low Voltage Wire Size ..............................................................................................12 Figure 4 External Wiring ............................................................................................................15 Figure 5 Internal Wiring .............................................................................................................16 Figure 6 Power Backup System ..............................................................................................16 Table 2. Enthalpy Lookup Table ............................................................................................39 Table 3 Humidity Sensor Output ............................................................................................87 Table 4 Thermistor Resistance Vs. Temperature Table. .............................................88 2100-444-003A Page vi 1.0 1.1 INTRODUCTION Shipping Damage Upon receipt of equipment, the carton should be checked for external signs of shipping damage. If damage is found, the receiving party must contact the carrier immediately, preferably in writing, requesting inspection by the carrier's agent. 1.2 Package Contents 11111- 1.3 TCS22 Outdoor Humidity Sensor Outdoor Temperature Sensor TCS22 Operations Manual TCS Software Package Additional Requirements This controller is suitable for use with 1 1/2 ton through 6 ton Bard WallMount airconditioners. The Bard WallMount must be equipped with the "V" control module for proper operation of the TCS22. Air-conditioner model numbers used with the TCS22 should contain the letter "V" in the 15th position of the model number. The TCS22 can be used with or without economizers. If economizers are to be used the units should be ordered with the “D” vent option. The air-conditioner with economizer used with the TCS22 should contain the letter "D" in the 10th position of the model number. Additionally, to utilize the Power Failure Management portion of the controller an Inverter and battery backup system should be installed in the shelter. This provides for ventilation of the structure in case of utility power failure, alarming of the power failure condition, and acts as an uninterruptible power supply for the TCS22. See Figure 6. If the inverter and battery backup system is not used disregard the power failure management sequence later in this manual. The power transfer relays shown in Figure 3 are field supplied items and are needed if ventilation of the structure is required during power outages. The field supplied power transfer relays should be sized to handle the MCA of the unit being controlled. Single phase units will require a 4 pole contactor with 2 normally open and 2 normally closed contacts. Three phase units will require either a six pole contactor or two 3 pole relays with 3 normally closed and three normally open contacts. Square D, DLine or F-Line contactors or equivalent are recommended. If ventilation of the structure is not required during power outages these may be omitted. The TCS22 will still dial out and alarm the power failure condition although no ventilation will be provided. 1.4 Copyright Notice All materials contained in this manual originated from and are the property of Bard Manufacturing Co. Any reproduction of the text, drawings, or wiring diagrams contained in this manual is forbidden without the written consent of Bard Manufacturing Co. 2100-444-003A Page 1 All SOFTWARE supplied with this product is the property of Bard Manufacturing Co. You may not modify, disassemble, de-compile, reverse engineer, or create derivative works from this SOFTWARE. Bard Manufacturing Co. licenses the purchaser of this product to use two copies of this SOFTWARE on two computer systems, one remote computer system and one on site computer system. If installed on a network server, additional software licenses should be purchased for each computer on the network using the SOFTWARE. 1.5 General The Telcom Climate Watch System (TCS) is a building monitoring and control system used in conjunction with one (1) Bard Wall-Mount air-conditioners. The system consists of a state of the art direct digital controller, the TSC22, one (1) Bard Wall-Mount air-conditioners, and a special "V" control module that is added to the Bard Wall-Mount air-conditioners. This system provides the following features. 1.5.1 BUILDING POINTS TO BE MONITORED: Space Temperature Space Humidity Outdoor Temperature Outdoor Humidity Occupancy Override Switch Main Power to Building Fire Alarm Circuit Fire Trouble Circuit Door Alarm Circuit 1.5.2 WALLMOUNT POINTS TO BE MONITORED FOR EACH UNIT: Blower Airflow Discharge Air Temperature Valid Compressor Current Sensor Compressor Lockout Relay Dirty Filter Sensor 1.5.3 BUILDING POINTS TO BE CONTROLLED: Power Transfer Relay Shelter Alarm Circuit Door Alarm 2100-444-003A Page 2 1.5.4 SYSTEM POINTS TO BE CONTROLLED: Modem Power 1.5.5 WALLMOUNT POINTS TO BE CONTROLLED: Blower Unit #1 Economizer Unit #1 Compressor Unit #1 Heating Unit #1 Blower Unit #2 1.5.6 ALARM POINTS: High Space Temperature Low Space Temperature High Space Humidity Low Space Humidity Blower Failure Unit #1 Compressor Lockout Unit #1 Compressor Current Failure Unit #1 Dirty Filter Unit #1 Main Power Failure Fire Alarm Fire Trouble Door Alarm 2100-444-003A Page 3 INPUTS 1 Indoor Temperature Sensor 2 Indoor Humidity Sensor 3 -0 Unit #1 Blower Airflow Sensor -1 Unit #1 Compressor Lockout Relay -2 Unit #1 Dirty Filter Sensor 4 Unit #1 Discharge Air Sensor 5 Spare 6 Spare 7 Unit #1 Compressor Current Switch 8 Spare 9 Fire Trouble 10 Fire Alarm 11 Spare 12 Door Alarm 13 Main Power Sensor 14 Occupied Override Switch 15 Outdoor Temperature Sensor 16 Outdoor Humidity Sensor Required (Standard in TCS22) Optional (Optional in TCS22) Required (Standard in "V" Module) Required (Standard in "V" Module) Optional (Standard in "V" Module) Optional (Standard in "V" Module) Required (Standard in "V" Module) Optional Optional Optional Optional Required Required Required OUTPUTS 1 Spare 2 Cycle Power To Modem 3 Power Transfer Switch 4 Unit #1 Economizer (Y1) 5 Unit #1 Compressor (Y2) 6 Unit #1 Heater (W1) 7 Unit #1 Blower (G) 8 Spare 9 Spare 10 Spare 11 Spare 12 Shelter Alarm Circuit 13 Unit #1 is Lead Unit 14 Spare 15 Free Cooling 16 Power Failure 2100-444-003A Page 4 (Standard in TCS22) (Standard in TCS22) (Standard in TCS22) 1.6 Model Nomenclature TCS2 2 - H D M - 001 BASIC MODEL SOFTWARE REVISION NUMBER SENSORS H- Humidity & Temperature T - Temperature Only 2.0 2.1 ---- REMOTE COMMUNICATIONS DISPLAY M - With D - With X - Without X – Without E - Ethernet SPECIFICATIONS Electrical Specifications Supply Voltage 208/240 VAC +/- 10% 50/60 HZ Minimum Circuit Ampacity 3 Amp Overcurrent Protection Internal Circuit Breaker - 3 Amp 2.2 Controller Analog Inputs Resolution Voltage Range Current Rating 16 8 bits/ 0.4% Full Scale 0 Vdc to +10 Vdc 5.0 mA at +10 Vdc Binary Relay Outputs Type Contact Rating 12 Form "A" Relay SPST N.O. 24 VAC, 5 A Resistive 24 VAC, 2 A Inductive Mechanical Specifications Height Width Depth Material Mounting Mounting Area Required Weight 2.3 26.25 in., (667 mm.) 17.00 in., (432 mm.) 5.50 in., (140 mm.) 18 ga galvanized steel with Beige baked polyester enamel. Vertical 27 in. high by 18 in. wide, (686 mm. high by 457 mm. wide) 27 lb., (12.3 kilograms) Environmental Specifications Operating Temperature Range Operating Humidity Range Storage Temperature Range Storage Humidity Range 32 to 130 o F (0 to 55o C) 10 to 95%, non condensing -35 to 180 o F (-37 to 82o C) 5 to 95%, non condensing 2100-444-003A Page 5 2.4 Sensor Specifications 2.4.1 TEMPERATURE SENSORS Indoor and Outdoor Type Ohms Temperature Range Interchangeability Thermistor 3000 Ω at 77o F (25o C) -40 to 302 o F (-40 to 150o C) .2 Deg Celsius Discharge 2.4.2 Type Ohms Temperature Range Interchangeability HUMIDITY SENSORS Type Output Supply Voltage Accuracy Sensitivity Repeatability Long Term Stability Interchangeability Temperature Range Humidity Range Thermistor 10000 Ω at 77o F (25o C) -40 to 302 o F (-40 to 150o C) .2 Deg Celsius Bulk Polymer 0-5 Vdc 24 Vac, +/- 15% +/- 5% 0.1% RH 0.5% RH Less than 1% per year +/- 3% -40 to 130 o F (-40 to 76o C) 0 to 99%, non condensing 2.4.3 COMPRESSOR CURRENT SENSOR Type Solid State DC Switch Output Form "A" solid state DC switch Supply Voltage Self Powered Trip Current Range 1 to 175 Amps Maximum Load 150 mA, at 30 VDC Temperature Range -58 to 149 o F (-50 to 65o C) Dimensions 2.125 in. high, 3.25 in. wide, 1 in. deep (54 mm. high, 83 mm. wide, 26 mm. deep) 2.4.4 DIRTY FILTER SENSOR Type Output Supply Voltage Maximum Load Temperature Range Pressure Range Dimensions Mechanical Airflow Switch Form "A" Contact Self Powered 1.5A, at 24 VAC 0 to 170 o F (-18 to 77o C) 0.1 to 0.7 in. wc. 3 1/4 in. high, 2 1/4 in. wide, 2 in. deep (83 mm. high, 57 mm. wide, 51 mm. deep) 2100-444-003A Page 6 2.4.5 BLOWER AIRFLOW SWITCH Type Output Supply Voltage Maximum Load Temperature Range Pressure Range Dimensions Mechanical Airflow Switch Form "C" Contact Self Powered 300 VA, at 24 VAC -40 to 180 o F (-40 to 82o C) 0.07 to 0.12 in. wc 6.125 high, 4.125 wide, 3.188 deep (156 mm. high, 105 mm. wide, 81 mm. deep) 2100-444-003A Page 7 Figure 1 Front Cover 2100-444-003A Page 8 Figure 2 Control Location 2100-444-003A Page 9 Figure 3 Mounting Template 16.000 9.356 7.856 6.356 4.856 3.356 1.288 1.000 HIGH VOLTAGE WIRING 22.288 MIS-866 2100-444-003A Page 10 3.0 INSTALLATION This section discusses mounting and wiring of the TCS22 into the building. Also included is an installation checklist to be completed by the installing contractor. See installation instructions supplied with the Bard Wall-Mount air conditioners for information on installing the air conditioners. This controller should be installed and serviced by a qualified service technician only. 3.1 Mounting TCS22 should be mounted on a flat vertical surface four (4) to six (6) feet from the floor of the building. When choosing a suitable location take into consideration that the electrical connections can be made from the back or top of the TCS22. See Figure 3 for rear electrical entrance locations. The TCS22 is secured to the wall with four (4) - 1/4 inch fasteners with flat washers. Hollow wall anchors or lag bolts are suitable as dictated by the wall construction. See Figure 3 for a bolt pattern layout drawing. ! WARNING _________________________________ •HAZARD OF ELECTRIC SHOCK. •ELECTRIC SHOCK CAN RESULT IN SERIOUS INJURY OR DEATH. •DISCONNECT THE REMOTE ELECTRIC POWER SUPPLIES BEFORE SERVICING. 3.2 Wiring Never connect or disconnect wiring from the controller with power connected to the controller or to either of the Bard Wall-Mount airconditioners. 3.2.1 HIGH VOLTAGE WIRING IMPORTANT: High voltage wiring must not be run in the same conduit as low voltage control or sensor wiring. Failure to comply with this requirement will result in poor or no remote communication and/or in inaccurate sensor reading. Supply power is 208/240 VAC, 50/60 Hz, 1 Phase at 3 amps minimum circuit ampacity. A 3 amp circuit breaker is supplied as part of the TCS22. This circuit breaker is for internal circuit protection only and cannot be used as a disconnect. Supply wire size should be 18 ga. or larger. Use Copper Conductors Only. All wiring must comply with the applicable sections of the National Electrical Code ( NEC) and any applicable local codes. The TCS22 is shipped for 240 VAC operation . For 208 Volt operation change both transformer primaries in the TCS22 to the 208 volt tap. See Wiring Diagram. The acceptable operating voltage ranges for the 240 and 208 volt taps are: Tap Range 240 208 253-216 220-187 Connect the high voltage power supply to Terminal Block TB2. Connect ground wire to the ground connector provided. TCS22 must be grounded for proper operation. Failure to ground the controller may cause erratic controller operation and inaccurate sensor operation. See Figure 2 and the wiring diagram. Electrical connections can be made from the back or top of the TCS22. All wiring should exit the TCS22 in conduit. Use the supplied wire ties and cable holders to route unit low voltage, communication, and sensor wiring neatly. Avoid looping excess wire. See Figure 2 for suggested conduit connections. 2100-444-003A Page 11 3.2.2 WIRING - LOW VOLTAGE IMPORTANT: High voltage wiring must not be run in the same conduit as low voltage control or sensor wiring. Failure to comply with this requirement will result in poor or no remote communication and/or in inaccurate sensor reading. Sixteen (16) wires should be run from each Bard Wall-Mount to the low voltage terminal block in the TCS22. An eight pair shielded cable with 20 gauge copper conductors, such as National Wire & Cable Corporation NQP series cable or equivalent, is recommended for distances up to 45 feet. See Table 1 for distances more than 45 feet. The connection points are shown in Figure 5. Table 1 Low Voltage Wire Size Wire Gauge 20 gauge, 0.50 mm2 18 gauge, 0.75 mm2 17 gauge, 1.00 mm2 16 gauge, 1.50 mm2 14 gauge, 2.50 mm2 12 gauge, 4.00 mm2 Maximum Distance in Feet ( meter) 45 (14) 60 (18) 75 (23) 100 (30) 160 (49) 250 (76) 3.2.3 WIRING - SENSORS IMPORTANT: High voltage wiring must not be run in the same conduit as low voltage control or sensor wiring. Failure to comply with this requirement will result in poor or no remote communication and/or in inaccurate sensor reading. 3.2.3.1 Outdoor Temperature Sensor (OTS) The Outdoor Temperature Sensor (OTS) is supplied as part of the TCS22 package. The Outdoor Temperature Sensor (OTS) is a thermistor type device. The sensor is mounted in a weatherproof junction box suitable for connection to conduit. This sensor is a two (2) wire device. The Outdoor Temperature Sensor (OTS) should be mounted on the exterior of the structure at a height above any expected accumulation of snow. It is recommended that the box be mounted securely to the outside wall of the structure and all wiring to the sensor be made through conduit. A one (1) pair shielded cable with 20 gauge copper conductors, such as National Wire & Cable Corporation NQP series cable or equivalent, is recommended for connection to the sensor for distances up to 45 feet. See Table 1 for distances more than 45 feet. Use wire nuts to connect the cable to the blue and yellow sensor leads in the sensor housing. Polarity is not critical with this sensor. The connection points for the sensor inside the TCS22 are shown in Figure 4. 3.2.3.2 Outdoor Humidity Sensor (OHS) The Outdoor Humidity Sensor (OHS) is supplied as part of the TCS22 package. The Outdoor Humidity Sensor (OHS) is a bulk polymer type device. The sensor is mounted in a weatherproof junction box suitable for connection to conduit. This sensor is a four (4) wire device, 1 to 5 Vdc output. The Outdoor Humidity Sensor (OHS) should be mounted on the exterior of the structure at a height above any expected accumulation of snow. It is recommended that the box be mounted securely to the outside wall of the structure and all wiring to the sensor be made through conduit. A two (2) pair shielded cable with 20 gauge copper conductors, such as National Wire & Cable Corporation NQP series cable or equivalent, is recommended for connection to the sensor for distances up to 45 feet. See Table 1 for distances more than 45 feet. Connect the cable to the terminal blocks in the sensor housing. Polarity is critical with this sensor. The connection points for the sensor inside the TCS22 are shown in Figure 4. 3.2.3.3 Zone Temperature Sensor (ZTS) The Zone Temperature Sensor (ZTS) is supplied as part of the TCS22 package. The Zone Temperature Sensor (ZTS) is a thermistor type device. The sensor is premounted to the front door of the TCS22. No wiring is required. 2100-444-003A Page 12 3.2.3.4 Zone Humidity Sensor (ZHS) (Optional) The Zone Humidity Sensor (ZHS) is supplied as part of the TCS22 package (Optional). The Zone Humidity Sensor (ZHS) is a bulk polymer type device. If so equipped, the sensor is premounted to the front door of the TCS22. No wiring is required. 3.2.4 WIRING – INPUTS & OUTPUTS A shielded cable with 20 gauge copper conductors, such as National Wire & Cable Corporation NQP series cable or equivalent, is recommended for connection to the inputs and outputs of the TCS22 for distances up to 45 feet. See Table 1 for distances more than 45 feet. inverter to provide emergency ventilation of the shelter during power failures. Consult the power failure management sequence, section 4.2.10 and section 1.3, for more details. 3.2.4.3 Power Failure Sense Input The Power Failure Sense is an input into the Controller. A normally open set of contacts is connected across these inputs. When power is lost to the shelter these contacts should close indicating that the building has lost normal utility power. These contacts can be used in conjunction with an inverter and power transfer switch to provide emergency ventilation of the shelter during power failures. Consult the power failure management sequence, section 4.2.10 and section 1.3, of this manual for more details.. This is a dry contact input only. Do not connect any voltage source to these terminals. Do not connect utility power to these terminals. 3.2.4.1 Shelter Alarm Output The Shelter Alarm Output (SA) is a normally open set of contacts that closes whenever an alarm condition exists as sensed by the TCS22 controller. See the alarm section of this manual for an explanation of the various conditions that will send a shelter alarm. The Form "A" contacts are SPST N.O. rated at 24 VAC, 5 A Resistive, or 24 VAC, 2 A Inductive. These rating should not be exceeded under any conditions. These contacts may be used to trigger an alarm in the shelter or a remote alarm. 3.2.4.2 Power Transfer Switch Output (PTS) The Power Transfer Switch Output is a normally open set of contacts that closes two (2) minutes after a power failure is sensed by the TCS22 controller. See the alarm section of this manual for an explanation of the power failure alarm. The Form "A" contacts are SPST N.O. rated at 24 VAC, 5 A Resistive, or 24 VAC, 2 A Inductive. These rating should not be exceeded under any conditions. These contacts can be used to energize a power transfer switch when used in conjunction with an 3.2.4.4 Fire Alarm Input The Fire Alarm is an input into the Controller. A set of normally open contacts is connected across these inputs. These contacts should close when fire alarm system has sensed a fire. This is a dry contact input only. Do not connect any voltage source to these terminals. Do not connect utility power to these terminals. 3.2.4.5 Fire Trouble Input The Fire Trouble is an input into the Controller. A set of normally open contacts is connected across these inputs. These contacts should close when the fire alarm system senses a problem with the fire alarm system. This is a dry contact input only. Do not connect any voltage source to these terminals. Do not connect utility power to these terminals. 3.2.4.6 Door Alarm Input The Door Alarm is an input into the Controller. A set of normally open contacts is connected across these inputs. These contacts 2100-444-003A Page 13 should close when door is closed. If a door switch is not used a jumper should be placed across this input. This is a dry contact input only. Do not connect any voltage source to these terminals. Do not connect utility power to these terminals. 3.2.5 WIRING - TELEPHONE LINE When the TCS22 is equipped with a modem, an analog phone line should be connected to the back of the modem in the jack labeled LINE. This jack accepts a standard a RJ-11 six (6) position modular phone plug. 3.2.6 WIRING - ETHERNET When the TCS22 is equipped with an Etherlink communications module, The LAN/WAN should be connected to the back of the module in the jack labeled Ethernet. This jack accepts a standard a RJ-11 eight (8) position modular phone plug. The Etherlink communications module requires a dedicated IP address. This must be programmed by the end user via a computer and RS232 cable at the time of connection to the network. The cable is provided with the TCS22. Specific configuration information is provided with the EtherLink Module in a separate document. 2100-444-003A Page 14 Figure 4 External Wiring 2100-444-003A Page 15 Figure 5 Internal Wiring Figure Power 6 2100-444-003A Page 16 Backup System 2100-444-003A Page 17 3.3 Installation Check List TCS22 securely mounted to wall and all conduit connections tight. Main power wiring is NOT in same conduit as low voltage or sensor wiring Main power wires are copper conductors TCS22 is grounded. Check supply voltage. Change both transformer taps if necessary. See Sec. 3.21 Carefully recheck all low voltage wiring for correct connection points . Carefully recheck all sensor connections for correct connection points. Recheck analog telephone wire connection to modem if so equipped. Make sure modem power switch is on if so equipped. Connect jumper between terminals DA if a door switch is not used. 2100-444-003A Page 18 3.4 System Startup 3.4.1 WALLMOUNT STARTUP CHECKLIST Operation Bypassing TCS22 Controller Apply power to both Wall-mounts Compressor Test Blower Test Economizer Test Heater Test Disconnect Power to WallMount AirConditioners Procedure Disconnect power to the TCS22. Unplug the plug in connectors J4 and J5 from the controller Follow recommended startup procedure in the WallMount installation instructions. Compressor damage could occur if startup procedures are not followed. Connect jumper wire on A/C unit low voltage terminals from R to Y and observe Compressor operation (There will be a Time delay between the installation of the jumper and the starting of the Compressor. The Compressor Time Delay relay will determine the time delay period.). After the Compressor starts, the jumper wire can be removed. Connect a jumper wire on A/C unit low voltage terminals R to G and observe Blower operation (The Blower will continue to run for One (1) minute after the jumper is removed). Connect a jumper wire on A/C unit low voltage terminals R to G and observe Blower operation. After Blower operation is confirmed, the Economizer can be tested. Leave the jumper in place from the previous step. Connect a separate jumper on the A/C unit low voltage terminals from E to F and observe the Economizer operation (Never connect power to terminals E or F). Connect a jumper wire on A/C unit low voltage terminals R to W1. The Heating contactor will engage when the jumper is connected. The Blower will also operate while this jumper is in place. To check the operation of the Heater, you will have to check the Discharge Air temperature of the A/C unit. Disconnect power to WallMount air conditioners. Reconnect plug-in connectors J4 and J5 to the controller. Go to TCS22 Startup Checklist 2100-444-003A Page 19 3.4.2 TCS22 STARTUP CHECKLIST Apply power to Apply power to WallMount air-Conditioners. Wait two minutes for WallMount airwallmount time delays to expire. Conditioners Apply power to TCS22 Apply power to TCS22 and monitor LEDs on the front of the controller. The controller performs a self test on startup. Upon application of power, 9 LEDs will light. System Power led will light and stay lit Unit #1 is Lead Unit, Unit #2 is Lead Unit, Free Cooling, Power Failure LEDs will light for 5 seconds and then resume normal operation System Rx and Tx and Local Rx and Tx will all flash on, flash off, flash on and then flash off during this five seconds and will then resume normal operation . This completes the self test and controller will now start controlling per the sequence of operation. Connect to Controller Use the DAK or Laptop PC to connect to controller to change setpoints. See Section 5.0 for DAK operation procedures. See Section 6.0 for direct connect PC operation. 2100-444-003A Page 20 4.0 OPERATION This section describes the sequence of operation of the controller. The tools available for monitoring and controlling the air-conditioners for both on-site and remote operations are explained. The remote trending, alarming, and site setup software are detailed. 4.1 General This section will describe the sequence of operation of the controller. Cooling , heating, dehumidification, and alarm sequences are explained. 4.2 Sequence of Operation This sequence of operation is for the TCS22-002 software package. Different software packages have different sequences of operation. Check the last three numbers of the TCS22 model number on the serial plate to verify that the sequence installed is "002" 4.2.1 COOLING SEQUENCE WITH ECONOMIZERS Free cooling setpoint, that is, the outdoor conditions at which cooling is handled by the economizer, can be configured to use either enthalpy or dry bulb temperature. Outdoor Enthalpy or Temperature is calculated from Outdoor Temperature and/or Outdoor Humidity sensors. If the outdoor enthalpy or temperature is below the free cooling setpoint, free cooling is enabled and Output #15, Free Cooling is lit. Active Cooling Setpoint is compared to Space Temperature . If Space temperature is above Active Cooling Setpoint, stage 1 cooling is enabled. If Free Cooling is enabled, Economizer and Blower of the Unit are energized. If Free Cooling is inhibited, Compressor and Blower of the Unit are energized. If the Space Temperature is above Active Cooling Setpoint plus 2 deg Fo, stage 2 cooling is enabled. If Free Cooling is enabled, Compressor and Blower of the Unit are energized. 4.2.2 HEATING SEQUENCE Active Heating Setpoint is compared to Space Temperature. If Space temperature is below Active Heating Setpoint , Stage 1 heating is enabled. Heater and Blower of the Unit are energized. 4.2.3 FAN SEQUENCE The Evaporator Fan is programmed for continuous operation. Operator can change continuous operation to cycle on demand. Lag unit fan will cycle on demand. 2100-444-003A Page 21 4.2.4 OCCUPIED / UNOCCUPIED MODE SEQUENCE In heating mode, activation of the Occupancy Override Button will change the Active Heating Setpoint from Unoccupied Heating Setpoint to Occupied Heating Setpoint for a period of two hours. In cooling mode, activation of the Occupancy Override Button will change the Active Cooling Setpoint from Unoccupied Cooling Setpoint to Occupied Cooling Setpoint for two hours. 4.2.5 ALARM SEQUENCE The controller will alarm on the following failures. Modem dial-out is initiated when any of the following alarms occur. High Space Temperature When Space Temperature is above High Temperature Alarm Setpoint a critical alarm is logged in the Event List and Output 12, Shelter Alarm, is energized. This is a self clearing alarm. Low Space Temperature When Space Temperature is below Low Temperature Alarm Setpoint a critical alarm is logged in the Event List and Output 12, Shelter Alarm, is energized. This is a self clearing alarm. High Space Humidity When Space Humidity is above High Humidity Alarm Setpoint a critical alarm is logged in the Event List and Output 12, Shelter Alarm, is energized. This is a self clearing alarm. Low Space Humidity When Space Humidity is below Low Humidity Alarm Setpoint a critical alarm is logged in the Event List and Output 12, Shelter Alarm, is energized. This is a self clearing alarm. Blower Failure Unit #1 If Blower operation is called for the blower airflow sensor is checked. If the airflow sensor does not confirm that there is airflow, Output 7, Unit #1 Blower, is de-energized. After 30 seconds the blower is energized again. If airflow is not sensed, Output 7, Unit #1 Blower, is de-energized. After another 30 seconds the blower is energized again. If airflow is not sensed, Output 7, Unit #1 Blower, is de-energized and locked out. A critical alarm is logged in the Event List and Output 12, Shelter Alarm, is energized. Lead unit switches to lag unit. The Output Alarm must be cleared to resume operation. 2100-444-003A Page 22 Compressor Lockout Failure Unit #1 If Compressor operation is not verified because the High or Low Pressure Lockout Relay has been energized, Output 5, Unit #1 Compressor, is de-energized and locked out. A critical alarm is logged in the Event List and Output 12, Shelter Alarm, is energized. Lead unit switches to lag unit .The Output Alarm must be cleared to resume operation. Verify is tried 3 times before the output is locked out. Compressor Operation is verified by Unit #1 Compressor Lockout Relay and Unit #1 Compressor Current Switch. Compressor Current Failure Unit #1 If Unit #1 Compressor is on and Unit #1 Compressor Current Switch is not valid , a critical alarm is logged in the Event List and Output 12, Shelter Alarm, is energized. Lead unit switches to lag unit. The Output Alarm must be cleared to resume operation. Verify is tried 3 times before the output is locked out. Compressor Operation is verified by Unit #1 Compressor Lockout Relay and Unit #1 Compressor Current Switch. Dirty Filter Unit #1 If Unit #1 Dirty Filter Switch is closed, a low priority alarm is logged in the Event List and Output 12, Shelter Alarm, is energized. This alarm must be reset at the unit. Utility Power Failure If Input #13, Power Sense, is closed indicating a utility power failure, a critical priority alarm is logged in the Event list and Output 12, Shelter Alarm, is energized. All unit outputs are deenergized. Two minutes after the alarm, Output #3, Power Transfer Switch, is energized . Three minutes after the alarm, Lead Unit Blower and Lead Unit Economizer are energized continuously until Utility Power Failure Alarm is cleared. This is a self clearing alarm. Fire Trouble If Input #9, Fire Trouble, is closed indicating a problem with the Fire Alarm System, a medium priority alarm is logged in the Event list and Output 12, Shelter Alarm, is energized. Fire Alarm If Input #10, Fire Alarm, is closed indicating a fire in the Zone, a critical priority alarm is logged in the Event list and Output 12, Shelter Alarm, is energized. All unit outputs are de-energized. 2100-444-003A Page 23 Door Alarm If Input #9,Door Alarm, is open for more than three minutes indicating an open door, a medium priority alarm is logged in the Event list and Output 12, Shelter Alarm, is energized. The door must be opened continuously for more than three minutes for the alarm to be logged. This is a self clearing alarm. 4.2.6 DEHUMIDIFICATION SEQUENCE Dehumidification Setpoint is compared to Space Humidity. If Space Humidity is above Dehumidification Setpoint , Stage 1 cooling is enabled. Compressor and Blower of the Unit are energized. During dehumidification Active Heating Setpoint and Active Cooling Setpoint are changed to 70o and 72o respectively and cannot be changed. This prevents coil freeze up during dehumidification. If Space temperature is cooled below Active Heating Setpoint by the dehumidification, Stage 1 heating is enabled. Heater and Blower of the Unit are energized. 4.2.7 THERMAL SHOCK PROTECTION SEQUENCE The thermal shock protection sequence protects equipment in the structure from being subjected to rapid changes in temperature after a power outage. The thermal shock routine limits the rate of change in the zone temperature to less than 15 degrees F per hour. This is accomplished by making incremental changes to a temporary setpoint every 8 minutes until the desired setpoint is reached. If the room temperature is more then 6 degrees above the setpoint the thermal shock routine is active. 4.2.8 MODEM SEQUENCE The power to the modem will be cycled off for one minute every day at midnight. 4.2.9 POWER MANAGEMENT SEQUENCE If Input #13, Power Sense, is closed indicating a utility power failure, a critical priority alarm is logged in the Event list and Output 12, Shelter Alarm, is energized. All unit outputs are de-energized. Two minutes after the alarm, Output #3, Power Transfer Switch, is energized. Three minutes after the alarm, Lead Unit Blower and Lead Unit Economizer are energized continuously until Utility Power Failure Alarm is cleared. The economizer modulates to maintain a 55 degree F entering air temperature. This is a self clearing alarm. 2100-444-003A Page 24 4.2.10 SETPOINTS The default setpoint for all points are listed below. All setpoints are user changeable within the ranges listed. Occupied Heating Setpoint Unoccupied Heating Setpoint Occupied Cooling Setpoint Unoccupied Cooling Setpoint High Temperature Alarm Setpoint Low Temperature Alarm Setpoint High Humidity Alarm Setpoint RH Low Humidity Alarm Setpoint RH Changeover Hours Enthalpy / Free Cooling Setpoint Btu/lb Drybulb / Free Cooling Setpoint Dehumidification Setpoint RH Dehumidification Heating Setpoint adjustable Dehumidification Cooling Setpoint adjustable 5.0 Default Default Default Default Default Default Default 70.0 Fo Range 68.0 Fo 75.0 Fo 80.0 Fo 90.0 Fo 56.0 Fo 60 % RH Range Range Range Range Range Range Default 20 % RH Range 5 % - 35 % Default Default 24 Hrs 23.0 Btu/lb Range Range 24 - 168 Hrs 5.00 – 40.00 Default Default 48.0 Fo 50 % RH Range Range 40.0 - 80.0 Fo 50 % - 70 % Default 70.0 Fo Range Fixed, Not Default 73.0 Fo Range Fixed, Not 60.0 - 70.0 Fo 55.0 - 70.0 Fo 72.0 - 80.0 Fo 72.0 - 85.0 Fo 80.0 - 100.0 Fo 45.0 - 67.0 Fo 55 % - 85 % DISPLAY & KEYPAD OPERATION (DAK) The display and keypad (DAK) is used to monitor and change parameters in the controller. If DAK is needed it must be ordered as part of the TCS22. It cannot be ordered separately at a later date. 5.1 Display & Keypad Physicals The display and keypad (DAK) consists of a 4 line by 20 character backlit LCD display, 13 key keypad and 5 indicating LEDs. All messages displayed on the DAK are uploaded from the 7040 controller at power up. The LCD display uses a simple page menu system to display all functions. The keypad consists of keys labeled <F1 >, <F2>, <F3>, <F4>, <//>, <Left>, <Up>, <Down>, <Right>,and <Enter>. The specific function of these keys is preprogrammed and not user configurable. The <?>, <|>, and <I> keys are not programmed and serve no function in this application.. In general the keys have the following functions. The <Up>, <Left>, <Down>, <Right> keys are used to navigate through the 7 screens, increment or decrement values, and choose which digit or letter to change. The <Enter > Key is used to select a choice or accept the changes. The < F1 > key is used to enter change mode to change setpoints, passwords, or lead/ lag units. The function of each of the keys depends on were you are in the menu tree. The <F2> key is used to enter passwords. The <//> key 2100-444-003A Page 25 cancels any operation. The double arrow LED is lit when the DAK is receiving or transmitting data normally. It will flash if there is a communication error. The DAK plugs into the 7040 controller through a pre-wired cord set. All communication signals are sent through this cord set to the DAK. The display and keypad (DAK) communicates with the 7040 controller via an RS485 communication bus using a proprietary communication protocol. The DAK will only function when plugged into the 7040 controller. The DAK uses a separate 24VDC power supply which has a 1 amp fuse on board. 5.2 Power Up Upon applying power, the DAK will establish communications with the controller and begin requesting data. The first information screen to appear Building Status screen. Each screen consists of up 32 lines of data. Each line can have up to 16 characters. The first four lines of the Building Status screen will be displayed at power up. The current controller date and time will be displayed on the first line of the display. Alarm status is shown on the second line. This line indicates the status of any alarms. If there are no alarms the line will say "NO ALARMS". If one or more alarms are present it will flash ALARM NOW. 12/01/03 8:45 AM NO ALARMS BUILDING STATUS Use the <Down> key to scroll down through the 32 lines of buiding status information. The display will then scroll to the first display list entry of the Building Status menu. The name of the point being displayed will on the first line of the display, in this case Zone Temperature. The current zone temperature will be displayed in the second line of the display. This screen will also be displayed for 5 seconds and then the display will scroll back to the time & date. These two displays will continue to scroll until a key is pressed. 5.3 Menu Tree The DAK consists of seven main screens. Menu Screen Name Building Status Unit Status Alarms Setpoints Overrides Unit #1 2100-444-003A Page 26 Enables Each of these screens has up to 32 lines of data in it. Study the Keypad Map in section 5.4 to become familiar with the menu tree structure. This is a handy reference and includes all keystrokes needed to get to any display or function. Pressing the <Right > key once from the Building Status screen will take you to the next screen, the Unit Status screen . The screen name will be displayed on the second line. Use the right and left arrows to scroll back and forth through the seven screens. UNIT STATUS From this display press the <Down> key to scroll down the screen information. Not all items in every screen are available to every user to change. Some screens are password protected. If your password gives you the required authority level, you will be able to access the screenu to make changes. See the Password section for a discussion of the authority levels. 5.3.1 Buildings Status Screen Authority Level Required to Make Changes - Does not apply. No changes can be made from this screen. The Building Status screen displays the following information about the shelter environment. Room Temperature Room Humidity Outdoor Temperature Outdoor Humidity Active Cooling Setpoint Active Heating Setpoint Free Cooling Shelter Power Room Occupied Outdoor Enthalpy Value DegF Value RH Value DegF Value RH Value DegF Value DegF YES/NO UTIL/BAT YES/NO Value Btu/Lb Pressing the <Up> or <Down> key will scroll up or 2100-444-003A Page 27 12/01/03 8:45 AM NO ALARMS BUILDING STATUS ROOM TEMP. ROOM RH OD TEMP. OUTDOOR RH ACTIVE CLG.SP ACTIVE HTG.SP FREE COOLING LEAD UNIT SHELTER POWER ROOM OCCUPIED OD ENTHALPY 75.59F 39.4RH 73.11F 40.9RH 80.00F 68.00F NO 2 UTIL NO 25.44 down respectively through the above screen showing four lines at a time. 5.3.1.1 ROOM TEMPERATURE The room temperature item displays the current temperature inside the structure. 5.3.1.2 ROOM HUMIDITY The room humidity item displays the current humidity inside the structure. This is an optional sensor and may or may not be present in your system. The current value will read one percent, "1 %" if no sensor is present. 5.3.1.3 OUTDOOR TEMPERATURE The outdoor temperature item displays the current temperature outside the structure. 5.3.1.4 OUTDOOR HUMIDITY The outdoor humidity item displays the current humidity outside the structure. 5.3.1.5 ACTIVE COOLING SETPOINT The Active Cooling Setpoint displays the current cooling setpoint that the controller using to determine whether cooling is required or not. If the Zone temperature is above the Active Cooling Setpoint, Stage One Cooling will be on. The Active Cooling Setpoint will be one of three values. If the controller is in occupied mode, the Active Cooling Setpoint will be the same as the Occupied Cooling Setpoint. If the controller is in unoccupied mode, the Active Cooling Setpoint will be the same as the Unoccupied Cooling Setpoint. Occupancy is determined from the After-hours Occupancy Override Button located on the temperature sensor on the front of the TCS22. If the controller is in Dehumidification mode, the Active Cooling Setpoint will be 73o the same as the fixed Dehumidification Cooling Setpoint. 5.3.1.6 ACTIVE HEATING SETPOINT The Active Heating Setpoint displays the current heating setpoint that the controller using to determine whether heating is required or not. If the Zone Temperature is below the Active Heating Setpoint, Stage One Heating will be on. The Active Heating Setpoint will be one of three values. If the controller is in occupied mode, the Active Heating setpoint will be the same as the Occupied Heating Setpoint. If the controller is in unoccupied mode, the Active Heating Setpoint will be the same as the Unoccupied Heating Setpoint. Occupancy is determined from the After-hours Occupancy Override Button located on the temperature sensor on the front of the TCS22. If the controller is in Dehumidification mode, the Active Heating 2100-444-003A Page 28 Setpoint will be 70o the same as the fixed Dehumidification Heating Setpoint. 5.3.1.7 FREE COOLING ON / OFF This display item indicates whether outside conditions are suitable to allow the use of outside air to provide free cooling inside the structure. The controller calculates the either outside temperature or enthalpy from the Outdoor Temperature and Outdoor Humidity and compares this value with the Free Cooling Setpoint. The Free cooling setpoint can be either a dry bulb temperature or enthalpy. This is user selectable. If outdoor temperature or enthalpy, whichever the user has selected, is less than the Free cooling setpoint then Free Cooling is ON. If the temperature or enthalpy of the outside air is more than the Free Cooling Setpoint then Free Cooling is Off. 5.3.1.8 ROOM OCCUPIED YES/NO This display indicates the status of the After-hours Occupancy Override Button. If the display shows "NO", the controller is in the unoccupied mode and the unoccupied setpoints prevail. If the display shows "YES", the controller is in the occupied mode and the occupied setpoints prevail. Depressing the Occupancy Override Switch on the Zone Temperature Sensor for one second triggers the Occupied mode for two (2) hours. 5.3.1.9 OUTDOOR ENTHALPY This outdoor enthalpy displays the calculated outdoor air enthalpy. The outdoor enthalpy is calculated from the outdoor temperature and outdoor humidity sensors and is used to determine wether the air is suitable for free cooling or not. 2100-444-003A Page 29 5.3.2 Unit Status Screen Authority Level Required to Make Changes - Does not apply. No changes can be made from this screen. The Unit Status screen displays the following information about both air-conditioners. Unit #1 Economizer Unit #1 Compressor Unit #1 Heater Unit #1 Blower Unit #1 Filter Unit #1 Discharge Air Temperature On/Off On/Off On/Off On/Off Clean/Dirty Value DegF UNIT STATUS UNIT#1 ECON. UNIT#1 COMP. UNIT#1 HEAT UNIT#1 BLOWER UNIT#1FILTER U#1 SUPPLY AIR OFF OFF ON OFF CLEAN 90.24 Pressing the <Up> or <Down> key will scroll up or down respectively through the above screen showing four lines at a time. 5.3.2.1 UNIT #1 ECONOMIZER This display item will show "Off" if the unit #1 economizer output of the controller is not energized. This display item will show "On" if the unit #1 economizer output of the controller is energized. 5.3.2.2 UNIT #1 COMPRESSOR This display item will show "Off" if the unit #1 compressor output of the controller is not energized. This display item will show "On" if the unit #1 compressor output of the controller is energized. 5.3.2.3 UNIT #1 HEATER This display item will show "Off" if the unit #1 heater output of the controller is not energized. This display item will show "On" if the unit #1 heater output of the controller is energized. 5.3.2.4 UNIT #1 BLOWER This display item will show "Off" if the unit #1 blower output of the controller is not energized. This display item will show "On" if the unit #1 blower output of the controller is energized. 2100-444-003A Page 30 5.3.2.5 UNIT #1 FILTER This display item will show "Clean" if the unit #1 dirty filter alarm of the controller is not energized. This display item will show "Dirty" if the unit #1 filter alarm is energized. 5.3.2.6 UNIT #1 DISCHARGE AIR TEMPERATURE This display will show the current discharge air temperature in the supply air duct of Unit #1 in Fo. 5.3.3 Alarms Menu The Alarm menu set displays the following information about the controller. Space Temp Alarm Space Humidity Alarm #1 Blower Fail #1 Compressor Alarm #1 Filter Alarm #2 Blower Fail #2 Compressor Alarm #2 Filter Fail Utility Power Fail Fire Trouble Fire Alarm Outdoor Temperature Alarm Outdoor Humidity Alarm Door Alarm ALARMS F1 = EDIT MODE ENTER TO EDIT NOP = NO OPERATION ACK = ACKKNOWLEDGE CRAM= CLEAR ALR RAM ACKA= ACKKNOWLEDGE ALL CAF = CLEAR ALR FLAG ALARM TYP ACK A ZONE TEMP H A -ZONE HUMID -U1 BLOWER -U1 COMP -From this menu the current alarm status of an item is U1 FILTER -displayed and, with the proper authorization, the alarm can be -acknowledged Acknowledging an alarm resets the shelter alarm UTL POW FAIL FIRE ALARM -output so that if another alarm is registered the shelter alarm FIRE TROUBLE -will reenergize to indicate a new alarm. Acknowledging the OUTDOOR TEMP F -alarm does not clear the alarm. The fault condition must be -corrected before the alarm is cleared. The values displayed for OUTDOOR HUM. DOOR ALARM -each of these points is updated every ten (10) seconds. Pressing the <Up> or <Down> key will scroll forward or backward respectively through the screen showing four lines at a time. Three types of alarms are displayed. H signifies a high alarm. L signifies a low alarm. F signifies a fault alarm. To acknowledge an alarm , scroll up or down until the alarm that is to be acknowledged is visible 2100-444-003A Page 31 on the screen. Press the <F1> key. Use the <Up> key to highlight the dashes next to the alarm item to be acknowledged. Press <Enter> to enter edit mode. If you do not have authority to acknowledge alarms the dashes will not be highlighted. An Engineer authority level is required to override outputs. If you have authority to dashes will be highlighted after pressing the <F1> key. There are five (5) actions now available, NOP = No Operation, ACK = Acknowledge the alarm, CRAM = Clear alarm ram, ACKA = Acknowledge all alarms, CAF = Clear alarm flag. Use the <Up> and <Down> keys to choose ACK to acknowledge the alarm. Once the desired action is displayed press the <Enter> key to initiate the action. If the action was accepted the screen will show an A next to the alarm type. The display will then revert to the list item display and within 10 seconds the new action will be updated. 5.3.3.1 SPACE TEMP ALARM The space temperature alarm item will show one of four different alarm messages. A No alarm message indicates that the Zone Temperature Sensor is functioning normally. A Fault alarm message indicates that the Zone Temperature Sensor is sensing a value above 120 Fo or below -20 Fo. This probably indicates a faulty sensor. When a Space Temperature Fault alarm is detected the Zone Temperature value defaults to 74 degrees effectively shutting down heating and cooling until the sensor is replaced. An Alarm (High) or Alarm (Low) message indicates that the sensor is sensing a temperature above or below, respectively, the High Temperature Alarm Setpoint or Low Temperature Alarm Setpoint. The Fault alarm takes precedence over the Alarm (High) or Alarm (Low) message. If the Sensor is failed high or low the Alarm (High) or Alarm (Low) alarms will also be activated but only the Fault alarm will be displayed because this is the actual condition causing the other alarms. These are all self-clearing alarms and will reset themselves when the alarm condition no longer exists. This is a critical alarm. 5.3.3.2 SPACE HUMIDITY ALARM The Space Humidity Alarm item will show one of four different alarm messages. A No alarm message indicates that the Zone Humidity Sensor is functioning normally. A Fault alarm message indicates that the Zone Humidity Sensor is sensing a value above 99 % RH or below 2 % RH. This probably indicates a faulty sensor. When a Space Humidity Fault alarm is detected, the Zone Humidity value defaults to 50 % RH until the sensor is replaced. An Alarm (High) or Alarm (Low) message indicates that the sensor is sensing humidity above or below, respectively, the High Humidity Alarm Setpoint or Low Humidity Alarm Setpoint. 2100-444-003A Page 32 The Fault alarm takes precedence over the Alarm (High) or Alarm (Low) message. If the Sensor is failed high or low the Alarm (High) or Alarm (Low) alarms will also be activated but only the Fault alarm will be displayed because this is the actual condition causing the other alarms. These are all self-clearing alarms and will reset themselves when the alarm condition no longer exists. This is a medium priority alarm. 5.3.3.3 #1 BLOWER ALARM The Blower Fail alarm item will show one of two different alarm messages. A "No Alarm" message indicates that the blower airflow sensor contacts have closed and the blower is functioning normally. A Fault alarm message indicates that the blower airflow sensor contacts have not closed. A faulty blower motor, wheel or sensor could cause this alarm. This alarm must be cleared before operation of the blower can resume. Use the Clr Verify Alr action in the Override menu to clear the alarm. This is a critical alarm. 5.3.3.4 #1 COMPRESSOR ALARM The Compressor Alarm item will show one of two different alarm messages. "No Alarm" message indicates that the compressor verify circuit contacts have closed and the compressor is functioning normally. A Fault alarm message indicates that the compressor verify circuit contacts have not closed. A Trip on High or Low pressure, no compressor current, failed blower, or faulty compressor current sensor could cause this alarm. This alarm must be cleared before operation of the compressor can resume. Use the Clr Verify Alr action in the Override menu to clear the alarm. This is a critical alarm. 5.3.3.5 #1 FILTER ALARM The Filter alarm item will show one of two different alarm messages. "No Alarm" message indicates that the filter is clean enough to operate. A Fault alarm message indicates that the filter is dirty and needs replaced. This is a self-clearing alarm and will reset itself when the alarm condition no longer exists. The filter sensor is a manually reset device and must be reset once the filter is changed to clear the alarm condition. This is a low priority alarm. 5.3.3.6 UTILITY POWER FAIL The Utility Power Fail alarm item will show one of two different alarm messages. A "None" alarm message indicates that no alarm is present and that utility power is present at the site. A "Fault" alarm message indicates that an alarm is present and the system is operating on backup power. This feature will operate only if the TCS22 is connected to an uninterruptible power supply. This is a self-clearing alarm and will reset itself when the alarm condition no longer exists. This is a critical priority alarm. 2100-444-003A Page 33 5.3.3.7 FIRE TROUBLE The Fire Trouble alarm item monitors the fire alarm system in the structure. A "None" alarm message indicates that no alarm is present and that the fire alarm system is operating normally. A "Fault" alarm message indicates that an alarm is present and the fire alarm system is malfunctioning. This is a self-clearing alarm and will reset itself when the alarm condition no longer exists. This is a medium priority alarm. 5.3.3.8 FIRE ALARM The Fire Alarm item monitors the fire alarm system in the structure. A "None" alarm message indicates that no alarm is present and that the fire alarm system has not detected a fire. A "Fault" alarm message indicates that an alarm is present and that the fire alarm system has detected a fire in the structure. This is a self-clearing alarm and will reset itself when the alarm condition no longer exists. This is a critical priority alarm. 5.3.3.9 OUTDOOR TEMP ALARM The Outdoor temperature alarm item will show one of two different alarm messages. A No alarm message indicates that the Outdoor Temperature Sensor is functioning normally. A Fault alarm message indicates that the Outdoor Temperature Sensor is sensing a value above 120 Fo or below -20 Fo. This probably indicates a faulty sensor. These are all self-clearing alarms and will reset themselves when the alarm condition no longer exists. This is a critical alarm. 5.3.3.10 OUTDOOR HUMIDITY ALARM The Outdoor Humidity Alarm item will show one of two different alarm messages. A No alarm message indicates that the Outdoor Humidity Sensor is functioning normally. A Fault alarm message indicates that the Outdoor Humidity Sensor is sensing a value above 99 % RH or below 2 % RH. This probably indicates a faulty sensor. When a Outdoor Humidity Fault alarm is detected, the Outdoor Humidity value defaults to 50 % RH until the sensor is replaced. These are all self-clearing alarms and will reset themselves when the alarm condition no longer exists. This is a medium priority alarm. 5.3.3.11 DOOR ALARM The Door Alarm item monitors the door switch in the structure. A "None" alarm message indicates that no alarm is present and that the door is closed. A "Fault" alarm message indicates that an alarm is present and that the door in the structure is open. This is a self-clearing alarm and will reset itself when the alarm condition no longer exists. This is a critical priority alarm. 2100-444-003A Page 34 5.3.4 Setpoints Screen The Setpoints screen displays the following information about the controller. Occupied Cooling Setpoint Unoccupied Cooling Setpoint Occupied Heating Setpoint Unoccupied Heating Setpoint High Temperature Alarm Setpoint Low Temperature Alarm Setpoint High Humidity Alarm Setpoint Low Humidity Alarm Setpoint Dehumidification Setpoint Free Cooling Enthalpy Setpoint Free Cooling Dry Bulb Setpoint Current Setpoint Current Setpoint Current Setpoint Current Setpoint Current Setpoint Current Setpoint Current Setpoint Current Setpoint Current Setpoint Current Setpoint Current Setpoint From this menu you can display the current setpoint and, with the proper authorization, change the current setpoints. The values displayed for each of these points is updated every ten (10) seconds. Pressing the <Up> or <Down> key will scroll up or down respectively through the screen on page 39 showing four lines at a time. To change a set point scroll up or down until the setpoint that is to be changed is visible on the screen. Press the <F1> key. If more then one setpoint is shown on the screen use the <Up> and <Down > keys to highlight the setpoint to be changed. Press enter. Use the <Left> and <Right> keys to move the underline to the digit you wish to change. Use the <Up> and <Down > keys to increment or decrement the digit to the correct value. Once done with changing the digits press <Enter> to accept the change. If the value was accepted the new setpoint will be shown. If the setpoint was not accepted the value will flash all asterisks. This indicates that the value downloaded was out of the acceptable range for this setpoint. See section 4.2.11 for the setpoint ranges or the individual sections below. If you do not have authority to change the setpoints the setpoint value will not be highlighted. A supervisor authority level is required to change any setpoints. If you have authority to change the setpoint the setpoint value will be highlighted after pressing the <F1> key. To enter a password, press <F2> key at any time. See the password section in this manual for proper password entry method. 2100-444-003A Page 35 SETPOINTS F1 = EDIT MODE ENTER TO EDIT Occ. Cooling SP 75.00 F Unocc. Clg. SP 80.00 F Occ. Heating SP 70.00 F Unocc. Htg. SP 68.00 F Hi Temp Alarm SP 87.00 F Lo Temp Alarm SP 56.00 F Hi Humidity SP 80.0 RH Low Humidity SP 20.0 RH Dehum. Setpoint 60.0 RH FC Enth Setpoint 23.00 BTU/LB FC DB Setpoint 48.00 F 5.3.4.1 OCCUPIED COOLING SETPOINT The occupied cooling setpoint requires an authority level of Supervisor or higher to change. Anyone may view the setpoint value. The Occupied Cooling Setpoint Range is from 72.0 to 80.0 Fo. The default value is 75.0 Fo 5.3.4.2 UNOCCUPIED COOLING SETPOINT The unoccupied cooling setpoint requires an authority level of Supervisor or higher to change. Anyone may view the setpoint value. The Unoccupied Cooling Setpoint Range is from 72.0 to 85.0 Fo. The default value is 80.0 Fo 2100-444-003A Page 36 5.3.4.3 OCCUPIED HEATING SETPOINT The occupied heating setpoint requires an authority level of Supervisor or higher to change. Anyone may view the setpoint value. The Occupied Heating Setpoint Range is from 68.0 to 70.0 Fo. The default value is 70.0 Fo 5.3.4.4 UNOCCUPIED HEATING SETPOINT The unoccupied heating setpoint requires an authority level of Supervisor or higher to change. Anyone may view the setpoint value. The Unoccupied Heating Setpoint Range is from 60.0 to 70.0 Fo. The default value is 68.0 Fo 5.3.4.5 HIGH TEMPERATURE ALARM SETPOINT The high temperature alarm setpoint requires an authority level of Supervisor or higher to change. Anyone may view the setpoint value. The High Temperature Alarm Setpoint Range is from 80.0 to 100.0 Fo. The default value is 90.0 Fo. The high alarm setpoint should always be set at least 7 degrees higher then the unoccupied cooling setpoint. Nuisance alarms could occur if this requirement is not followed. 5.3.4.6 LOW TEMPERATURE ALARM SETPOINT The low temperature alarm setpoint requires an authority level of Supervisor or higher to change. Anyone may view the setpoint value. The Low Temperature Alarm Setpoint Range is from 45.0 to 67.0 Fo. The default value is 56.0 Fo. The low alarm setpoint should always be set at least 4 degrees lower then the unoccupied heating setpoint. Nuisance alarms could occur if this requirement is not followed. 5.3.4.7 HIGH HUMIDITY ALARM SETPOINT The high humidity alarm setpoint requires an authority level of Supervisor or higher to change. Anyone may view the setpoint value. The High Humidity Alarm Setpoint Range is from 55.0 to 85 % RH. The default value is 60.0 % RH. 5.3.4.8 LOW HUMIDITY ALARM SETPOINT The low humidity alarm setpoint requires an authority level of Supervisor or higher to change. Anyone may view the setpoint value. The Low Humidity Alarm Setpoint Range is from 5.0 to 35 % RH. The default value is 20.0 % RH. 5.3.4.9 DEHUMIDIFICATION SETPOINT The dehumidification setpoint setpoint requires an authority level of Supervisor or higher to 2100-444-003A Page 37 change. Anyone may view the setpoint value. The dehumidification setpoint range is from 50 to 65 % RH. The default value is 50 % RH. 5.3.4.10 FREE COOLING ENTHALPY SETPOINT The Enthalpy Setpoint is used to determine if the outside air is suitable to use for cooling the structure. The default value for this point is 23.00 BTU/ lb. of dry air. Consult the Enthalpy Lookup Table to adjust this value for the specific conditions that you wish to maintain in the structure. Read down the relative humidity column under the percentage RH you wish to maintain. Read across the inside temperature row to where it intersects the RH column. Enter this value into the Enthalpy Setpoint Display. This will ensure that economizer will never bring in outside air that is too humid. 5.3.4.11 FREE COOLING DRY BULB SETPOINT The Dry Bulb Setpoint is used to determine if the outside air is suitable to use for cooling the structure. The default value for this point is 48 Fo.This will ensure that the economizer will never bring in outside air that is to warm to provide cooling. 2100-444-003A Page 38 Table 2. Enthalpy Lookup Table Desired Indoor Temp. Desired Indoor Temp. 85 84 83 82 81 80 79 78 77 76 75 Desired Indoor % Relative Humidity 35% 23.00 22.50 22.00 21.50 20.75 20.25 20.00 19.50 19.00 18.50 18.00 40% 25.00 24.50 24.00 23.50 22.00 22.25 21.50 21.00 20.50 20.25 19.50 45% 27.25 26.75 26.25 25.25 24.50 24.25 23.75 23.00 22.50 22.00 21.50 50% 29.50 29.00 28.25 27.50 26.75 26.25 25.50 25.00 24.50 24.00 23.25 55% 31.50 30.75 30.25 29.50 29.00 28.25 27.50 27.00 26.25 25.50 25.00 60% 33.50 32.75 32.00 31.50 30.75 30.00 29.25 28.50 28.00 27.25 26.50 65% 35.75 35.00 34.25 33.25 32.50 31.75 30.00 30.25 29.75 29.00 28.25 70% 37.75 36.75 36.00 35.00 34.25 33.25 32.50 31.75 31.00 30.25 29.50 5.3.5 Overrides Unit #1 Screen Caution: Overrides remain in effect until they are either cleared by the operator or power is cut to the controller. Use with caution. Note: Outputs cannot be overridden until alarms have been cleared. This applies to blowers and compressors. The Overrides menu set displays the following information about the controller: #1 Blower Override O/R On, O/R Off, Clr Verify Alr, Clr O/R #1 Economizer Override O/R On, O/R Off, Clr Verify Alr, Clr O/R #1 Compressor Override O/R On, O/R Off, Clr Verify Alr, Clr O/R #1 Heater Override O/R On, O/R Off, Clr Verify Alr, Clr O/R Continuous Blower On/Off Change Lead Unit ***/CHG From this menu you can display the current status of the item and, with the proper authorization, override the item. The values displayed for each of these points is updated every ten (10) seconds. Pressing the <Up> or <Down> key will scroll up or down respectively through the screen on page 43 showing four lines at a time. To override an output, scroll up or down until the output that is to be changed is visible on the 2100-444-003A Page 39 screen. Press the <F1> key. To override the displayed item press the <Change> key again. There are seven (7) actions now available, On, Off, Reset, O/R On, O/R OFF, Clr Verify Alr, and Clear O/R. Use the <Up> and <Down> keys to choose 1 of the 7 actions available. Not all actions are available for each item. The available actions are shown above. Once the desired action is displayed press the <Enter> key to initiate the action. If the action was accepted the screen will show the changed output or override status. If you do not have authority to override the outputs will not be highlighted. A supervisor authority level is required override outputs. If you have authority to override the value will be highlighted after pressing the <F1> key. To enter a password, press <F2> key at any time. See the password section in this manual for proper password entry method. OVERRIDES UNIT #1 F1 = EDIT MODE ENTER TO EDIT BLOWER OFF OVR STATUS AUTO VERIFY ALR STAT OK ACTION NO OPER. ECON OUTPUT OFF OVR STATUS AUTO ACTION NO OPER COMP. OUTPUT OFF OVR STATUS AUTO VERIFY ALR STAT OK ACTION NO OPER HEAT OUTPUT OFF OVR STATUS AUTO ACTION NO OPER LEAD UNIT IS 1 CHANGE LEAD UNIT *** CONT. BLOWER 5.3.5.1 #1 BLOWER OVERRIDE 2100-444-003A Page 40 OFF This list item uses the Clr Verify Alr, O/R On, O/R Off, and Clr O/R actions. The Clr Verify Alr action clears a blower failure alarm in the alarm object. In the event of a unit #1 blower failure alarm, the output of the controller will be disabled until the problem is corrected and the alarm is cleared. Once the problem is corrected use the Clr Verify Alr action to re-enable normal operation of the output. Any alarm of the Unit #1 Blower must be cleared before an override is accepted. Once overridden the output will remain overridden until the Clr O/R action is sent to the output or power is interrupted to the controller. Entering the O/R On action will turn on the blower output to unit #1 and it will remain on until cleared. Entering the O/R Off action will disable the output to the unit #1 blower and it will remain disabled until cleared. Use the Clr O/R to cancel an override action and resume normal operation. A supervisor authority level is needed to use this item. 5.3.5.2 #1 ECONOMIZER OVERRIDE This list item uses the Clr Verify Alr, O/R On, O/R Off, and Clr O/R actions. The Clr Verify Alr has no effect on this item. Entering the O/R On action will turn on the economizer output to unit #1 and it will remain on until cleared. Entering the O/R Off action will disable the output to the unit #1 economizer and it will remain disabled until cleared. Once overridden the output will remain overridden until the Clr O/R action is sent to the output or power is interrupted to the controller Use the Clr O/R to cancel an override action and resume normal operation. A supervisor authority level is needed to use this item. 5.3.5.3 #1 COMPRESSOR OVERRIDE This list item uses the Clr Verify Alr, O/R On, O/R Off, and Clr O/R actions. The Clr Verify Alr action clears a compressor failure alarm in the alarm object. In the event of a unit #1 compressor failure alarm, the output of the controller will be disabled until the problem is corrected and the alarm is cleared. Once the problem is corrected use the Clr Verify Alr action to re-enable normal operation of the output. Any alarm of the Unit #1 compressor must be cleared before an override is accepted. Once overridden the output will remain overridden until the Clr O/R action is sent to the output or power is interrupted to the controller. Entering the O/R On action will turn on the compressor output to unit #1 and it will remain on until cleared. Entering the O/R Off action will disable the output to the unit #1 compressor and it will remain disabled until cleared. Use the Clr O/R to cancel an override action and resume normal operation. A supervisor authority level is needed to use this item. 5.3.5.4 #1 HEATER OVERRIDE This list item uses the Clr Verify Alr, O/R On, O/R Off, and Clr O/R actions. The Clr Verify Alr has no effect on this item. 2100-444-003A Page 41 Entering the O/R On action will turn on the heater output to unit #1 and it will remain on until cleared. Entering the O/R Off action will disable the output to the unit #1 heater and it will remain disabled until cleared. Once overridden the output will remain overridden until the Clr O/R action is sent to the output or power is interrupted to the controller. Use the Clr O/R to cancel an override action and resume normal operation. A supervisor authority level is needed to use this item. 5.3.5.5 CONTINUOUS BLOWER This item uses the On and Off action items. Overriding the continuous blower item to On causes the Blower Output to the lead unit to be energized continuously. Overriding the continuous blower item to Off causes the Blower Output to the lead unit to cycle on and off as there are calls for heating or cooling. An operator authority level is needed to use this item. 2100-444-003A Page 42 5.3.6 Enables Menu The Enables menu set displays the following information about the controller. Economizer Operation Enabled / Disabled ENABLES Free Cooling DB Changeover Enabled / Disabled F1 = EDIT MODE Free Cooling Enthalpy Changeover Enabled / Disabled ENTER TO EDIT Daylight Savings Time Enabled / Disabled 50 HZ Clock Enabled / Disabled Enable Econ. Zone Humidity Sensor Enabled / Disabled ENABLED Zone Dehumidification Enabled / Disabled FC DB CHANGEOVER From this menu you can display the current status of the DISABLED above options and, with the proper authorization, change the current status. The values displayed for each of these points is updated FC ENTH.CHANGEOVER every ten (10) seconds. This screen will display as follows: ENABLED Pressing the <Up> or <Down> key will scroll forward or backward respectively through the above list. Once the desired item is shown on line two of the display, pressing enter will display the current value of the item. This value will be updated every ten (10) seconds. DAYLIGHT SAVINGS TIME ENABLED 50HZ CLOCK DISABLED Pressing the <Up> or <Down> key will scroll forward or ZONE HUMID. SENSOR backward respectively through the above list displaying the list item ENABLED on line one and the status on line two. ZONE DEHUMID CONTROL To change the displayed status, press the <Change> key. If DISABLED you do not have authority to change the status the display will read; A supervisor authority level is required to change any options in this menu. If you have authority to change the status the display will read. Use the <UP> and <Down> keys to move the status up or down. Once the new status is displayed press the <Enter> key to accept the new setpoint. The DAK will respond briefly with: TCS MODEL NO. ********************* TCS SERIAL NUMBER ********************* The display will then revert to the list item display and within 10 seconds the new status will be updated. 2100-444-003A Page 43 5.3.6.1 ECONOMIZER OPERATION If the air-conditioners controlled by the TCS do not have economizers, economizer operation should be disabled. This disables two stages of cooling that are normally used to energize the economizers if free cooling is available. Factory default for this value is enabled. 5.3.6.2 FREE COOLING ENTHALPY CHANGEOVER The economizer changeover scheme is selectable between enthalpy changeover or dry bulb temperature changeover. The default for this is enable. When economizers are used the economizers will be used as 1st and 2nd stage cooling as long as the outdoor enthalpy is below the Enthalpy changeover setpoint. If the changeover scheme has been changed to dry bulb temperature changeover and you wish to change it back to enthalpy changeover use this item. 5.3.6.3 DRY BULB TEMPERATURE CHANGEOVER The economizer changeover scheme is selectable between enthalpy changeover or dry bulb temperature changeover. The default dry bulb temperature changeover is disabled. If you wish to change the economizer changeover scheme to dry bulb temperature changeover use this item. When economizers are used the economizers will be used as 1st and 2nd stage cooling as long as the outdoor temperature is below the dry bulb temperature changeover setpoint. 5.3.6.4 DAYLIGHT SAVINGS TIME If the area of the country where the TCS22 is located uses Daylight Savings Time, daylight savings time should be enabled for accurate clock readings. Factory default for this value is enabled. 5.3.6.5 50HZ CLOCK If the area of the country where the TCS22 is located uses 50 HZ power, 50 HZ Clock should be enabled for accurate clock readings. Factory default for this value is disabled. 5.3.6.6 ZONE HUMIDITY SENSOR The TCS can be ordered without an indoor humidity sensor. The model number will have a “T” th in the 7 position of the model number if no humidity sensor was ordered. Factory default for this value is enabled. If the TCS does not have an indoor humidity sensor disable this feature. 5.3.6.7 Zone Dehumidification The TCS22 can provide zone dehumidification by running the air conditioners and cycling electric heat on and off to maintain room temperature. Factory default for this value is disabled. Enable this feature if dehumidification is required. Note: The air-conditioner circuit breakers and wiring must be sized for concurrent operations air-conditioning and electric heat. Special dehumidification models are available for use with this feature. These models have circuit breakers and special MCA and MOP ratings that allow concurrent operation of the air conditioners and electric heat. These are special, dedicated code models ending in D053, D061, D062, D064, or D066. Consult your Bard representative for more information. 2100-444-003A Page 44 5.3.7 Password Operation The DAK is password protected. A password screen is used to control the active change authorization level of the DAK . Each password is a 4 digit number. There are four security levels within the DAK. Display Only Operator Supervisor Engineer Each level has one password associated with it. Everyone has some access to the DAK. All current values can be looked at by anyone. Display Only -All screens have the "Display Only" security level by default. Display Only level has no password associated with it. No changes can be made from Display Only level. All screens can be vieved from the Display only level. Higher levels of authority are required to make any changes. Operator – Operator level is allowed to view screens one through 7. Operator level may acknowledge alarms on screen three. Operator password is 2222. Supervisor - Supervisor level is allowed to view screens one through 7. Supervisor level may change any values on screens 1 through 6. This includes acknowledging alarms, changing setpoints, and overriding outputs. Supervisor password is 3333. Engineer –Engineer level is allowed to view screens one through 7. Engineer level may change any values on screens 1 through 7. This includes acknowledging alarms, changing setpoints, overriding outputs and changing enabled feature. Supervisor password is 4444. Passwords cannot be changed from the DAK. 5.3.7.1 Entering Password To enter a password which will give access to make changes in the controller press the <F2> key from any screen. The password screen will appear. Password: _ The password must me entered in a specific order. The left most digit is entered first. Press the <Left Arrow >key to begin password entry. The display will change to a zero for a second or two and then just flash the box. Use the <Up Arrow> key to increment the display to equal the value of the first digit of the password. Press the <Left Arrow >key to shift this digit left. The first digit will disappear and a flashing box will appear to the left. A new box will flash and the second digit can now be entered. Use the <Up Arrow> key to increment the display to equal the value of the second digit of the password. Press the <Left Arrow >key to shift the first and second digits left. A new flashing box will appear to the 2100-444-003A Page 45 left of the first two digits. Use the <Up Arrow> key to increment the display to equal the value of the third digit of the password. Press the <Left Arrow >key to shift the first, second and third digits left. A new flashing box will appear to the left of the first three digits. Use the <Up Arrow> key to increment the display to equal the value of the fourth digit of the password. Press the enter key to send the completed password to the controller. For instance, The password 1234 would be entered with the following keystrokes. <F2>, <Left Arrow>, <Up Arrow>, <Left Arrow>, <Up Arrow>, <Up Arrow>, <Left Arrow>, <Up Arrow>, <Up Arrow>, <Up Arrow>, <Left Arrow>, <Up Arrow>, <Up Arrow>, <Up Arrow>, <Up Arrow>, <Enter> If an invalid password is entered the display will flash all asterisks and the authority level will remain as "Display Only". If a proper password is entered the DAK will revert to the last screen displayed before the <F2> key was pressed. Access will now be granted to all items that can be changed with your authority level. See the Setpoints, Alarms, and Override sections above for the required authority level required to make changes. Password validation times out after 10 minutes. To return the authority level to Display Only, reenter the Password as "0000" this is the default password for display only and is an invalid password in any other level. 5.4 Keyboard Map The Keyboard map shows all keystrokes needed to access all options and displays. 2100-444-003A Page 46 Screen 1 12/01/96 Screen 2 Screen 3 Screen 4 Screen 5 Screen 6 Screen 7 8:45 AM NO ALARMS UNIT STATUS BUILDING STATUS UNIT#1 ECON. OFF ALARMS SETPOINTS OVERRIDES OVERRIDES ENABLES F1 = EDIT MODE F1 = EDIT MODE UNIT #1 UNIT #2 F1 = EDIT MODE ENTER TO EDIT ENTER TO EDIT ENTER TO EDIT F1 = EDIT MODE F1 = EDIT MODE ROOM TEMP. 75.59F UNIT#1 COMP. OFF Occ. Cooling SP ENTER TO EDIT ROOM RH 39.4RH UNIT#1 HEAT ON NOP = NO OPERATION 75.00 F BLOWER OFF BLOWER OFF OD TEMP. 73.11F UNIT#1 BLOWER OFF ACK = ACKNOWLEDGE Unocc. Clg. SP OVR STATUS AUTO OVR STATUS AUTO OUTDOOR RH 40.9RH UNIT#1FILTER CLEAN CRAM= CLEAR ALR RAM 80.00 F VERIFY ALN STAT OK VERIFY ALN STAT OK FC DB CHANGEOVER ACTIVE CLG.SP 80.00F U#1 SUPPLY AIR 90.24 ACKA= ACKNOWLEDGE ALL Occ. Heating SP ACTION ACTION DISABLED ACTIVE HTG.SP 68.00F CAF = CLEAR ALR FLAG 70.00 F FREE COOLING NO UNIT#2 ECON. OFF LEAD UNIT 2 NO OPER. Enable Econ. NO OPER. ENABLED Unocc. Htg. SP ECON OUTPUT OFF ECON OUTPUT OFF FC ENTH. CHANGEOVER AUTO OVR STATUS AUTO ENABLED UNIT#2 COMP. OFF ALARM 68.00 F OVR STATUS SHELTER POWER UTIL UNIT#2 HEAT OFF ZONE TEMP Hi Temp Alarm SP ACTION ROOM OCCUPIED NO UNIT#2 BLOWER OFF ZONE HUMID 87.00 F OD ENTHALPY UNIT#2 FILTER U1 BLOWER Lo Temp Alarm SP COMP. OFF COMP. OFF U1 COMP 56.00 F OVR STATUS AUTO OVR STATUS AUTO U1 FILTER Hi Humidity SP VERIFY ALN STAT OK VERIFY ALN STAT OK 50HZ CLOCK U2 BLOWER 80.0 RH ACTION ACTION DISABLED U2 COMP Low Humidity SP U2 FILTER 20.0 RH HEAT OUTPUT OFF HEAT OUTPUT OFF ZONE HUMID. SENSOR UTL POW FAIL Dehum. Setpoint OVR STATUS AUTO OVR STATUS AUTO ENABLED FIRE ALARM 60.0 RH ACTION FIRE TROUBLE Changeover Time 25.44 CLEAN TYP ACK A ENTER TO EDIT NO OPER. ACTION DAYLIGHT SAVINGS TIME NO OPER. NO OPER. ACTION NO OPER. ENABLED NO OPER. ZONE DEHUMID CONTROL OUTDOOR TEMP. 24 HRS OUTDOOR HUM. FC Enth Setpoint LEAD UNIT IS DOOR ALARM 23.00 BTU/LB DISABLED CHANGE LEAD UNIT 2 *** FC DB Setpoint 48.00 F NO OPER. TCS MODEL NUMBER ************ CONT. BLOWER OFF TCS SERIAL NUMBER ************ 2100-444-003A Page 47 6.0 PC SOFTWARE OPERATION The TCS22 system can be remotely or directly controlled through a personal computer. Bard supplies a software system, the Telcom ClimateWatch System Software, to communicate with and control the TCS22 controller from a personal computer. 6.1 ClimateWatch System Software Overview The ClimateWatch system software consists of ASI Expert software and custom TCS22 controller programs and Screens designed to provide easy access to the features of the TCS22 controller. The software program allows setup of a control file that specifies site names and additional information for remote access. It also creates directories and sets up files for the storage of the trend information. The program is used to dial up, monitor, and control the on-site air-conditioners. It is also used to upload trend information from the sites and store it in a database file to be viewed from Microsoft Access or Excell. The program is used to display the alarm history for troubleshooting purposes. 6.2 Installation 6.2.1 HARDWARE REQUIREMENTS Personal Computer running Windows 98 or higher. 32 MB of Available RAM memory 10 MB of Available Hard disk space Hayes Compatible modem operating at 9600 Baud capable of direct asynchronous communications with no error checking or data compression. Needed for remote site access to the TCS. A phone line must be connected to the TCS modem and the remote computer modem. A 25/9 pin female to 9 pin male RS232 cable. Needed for direct connect access to the TCS22 with a Laptop or portable PC. This cable should be connected to the computer serial port to the 9 pin RS-232 Monitor port of the TCS direct digital controller. 6.2.2 SOFTWARE INSTALLATION 1. Start Windows. 2. Insert TCS22 Master Controller Software CD into CD Drive 3. Follow instructions on the inside cover of the CD to complete setup. 2100-444-003A Page 48 6.3 ASI Expert / Bard ClimateWatch Software Start the Expert software by double clicking on the Expert icon in the ASI Program Group. The Expert program can be used to communicate remotely or directly with the TCS22 or TCS22 controller. 6.3.1 SCREEN OVERVIEW The program will begin with the screen shown below. At the top of the initial screen there is a Menu Bar. Below the menu bar is the Tool Bar. The status bar is at the very bottom of the screen. The left side of the screen displays the Project Folders and the right side is the Controller Information Area. Expert uses projects to group information about different TCS controllers. Each site or building should have its own project. The project can be named the same as the building for convenience. 6.3.1.1 Menu Bar The menu bar contains five drop down menus; Project, Options, View, Device, Help. The Project menu allows you to open, close, save and create projects. It also contains a Quick Launch item that remembers the last four projects that were accessed. The Project menu also contains the Print Setup and Print items. The Controller Information Area can be printed at any time by using the Print item on this menu. Clicking the Exit item will close the program. 2100-444-003A Page 49 The Options menu contains system options and dial out and hang up items. System options include baud rate and serial port selection for dial out sites and other advanced system options. The View menu allows the tool bar and stats bar to be turned on and off and user preferences to be changed. User preferences include default project directory and modem options. The Device menu allows device configurations to be saved and loaded for each specific site. Configuration reports can be crested and saved for later viewing or printing. The Help menu gives access to the ASI Expert User’s Guide. Software revision information and hard drive serial number information is also found in this menu. 6.3.1.2 Tool Bar The Tool Bar provides an easy way to access many of the most frequently used menu items. Functions that are not available are grayed out. A list of the available functions in order of appearance and their corresponding menu item or function follows. System Options Print Screen Project Browser Dial Out Net Search Project Reports Save Device Archive Save As Device Archive Load Device Archive Project Home Configure Device Generate Report Auto Trend Options / System Options Projects / Print Returns Screen to Projects View Options / Dialout View / Net Search – Not Used Allows Viewing of Custom Designed Reports Device / Save Device / Save As Device / Load Returns Screen to Initial Project Screen View / Configuration Device / Report Not Used 6.3.1.3 Status Bar The status bar at the bottom of the display indicates uploads of information (yellow moving bar), communications errors (flashing red), modem status (“Modem” displayed), and user errors. 6.3.1.4 Controller Information Area This area will contain information down loaded from the TCS22 once connected to the controller. Eleven different custom designed TCS controller information screens are available to view, download, and upload all needed information to and from the controller. 6.3.1.5 Project Folders The project folder area of the screen lets you create a different folder for each site. The controller configuration including setpoints, options, phone numbers, etc. are stored in this folder. Trend data can 2100-444-003A Page 50 also be stored in this folder for future evaluation. Once a project folder has been created for a site, setpoints, options, phone numbers, etc. can be updated and saved. This creates a backup configuration in case of hardware failure. 6.3.2 TCS COMMUNICATIONS Communications with the TCS panel can be established either remotely through a phone connection or directly through a computer cable connection. 6.3.2.1 Software Setup The communication ports and baud rates must be configured to allow communications with the controller. Settings must be set for both remote and direct communication modes if they are to be used. To configure settings for the modem start the ASI Expert program and View | Preferences on the menu bar. Under the modem setup portion of the screen, set the baud rate to 9600 Baud. The modem initialization string should be “&F&K0&D0Q0&W0” without the quotes. Set the COM Port to match the COM Port number used by your computer’s modem. The COM port used by the modem can be found by going to Windows Start / Settings / Control Panel / Modems. The COM port used by your modem will be documented here. 2100-444-003A Page 51 To configure settings for the direct communications, start the ASI Expert program and go to Options | System options on the menu bar. Under the baud rate portion of the screen, set the baud rate to 9600 Baud. Set the COM Port to match the COM Port number you are using to connect directly to the controller. Make sure “Use 2 stop bits” is NOT checked. Set response time out to 800. Communications can now be established with the controller either directly or remotely via a modem. For direct communication, a cable should be connected between the computer Com port specified in the above step and to the 9 pin RS-232 Monitor port of the TCS direct digital controller. The cable end connecting to the TCS must be a 9 pin male connecter. The computer end of the cable will depend on the configuration of the computer COM port. 6.3.2.2 Creating a New Project & Establishing Communications A project must be created for each TCS controller. To create a new project, double click on New ASI Project by the red arrow in the Project Folder portion of the screen. A Create New Project window will appear. 2100-444-003A Page 52 Type a new name for the project. Add any comments about the project. If a short cut is desired on the Windows desktop check the Create Project Shortcut on Windows Desktop box. Check the Dial Out checkbox even if this is a direct connect site. A dial out project can also be used to direct connect to the site. Click OK. The Connect to Project Window will appear. 6.3.2.3 Direct Connection This section deals with directly connecting to the TCS controller via a computer cable. For remote connection information skip to section 6.3.2.4. For direct connection to the TCS controller, check the direct connect check box and then click OK. The Find It screen will appear. Make sure the ASIC/2 button is checked. Click the Find It button to establish communications with the controller. Go to section 6.3.2.5 Downloading Controller Information. 2100-444-003A Page 53 6.3.2.4 Remote Connection For remote connection to the TCS controller type in the phone number of the site including any dialing prefixes. If the phone number is to be saved in the project folder click the Save Modified Phone Number check box. Clicking OK will dial the phone number. The Dialing Screen will appear and the phone number will be dialed. 2100-444-003A Page 54 Once the modems have connected the window will change to the Find It screen. . Make sure the ASIC/2 button is checked. Click the Find It button to establish communications with the controller. 2100-444-003A Page 55 6.3.2.5 Downloading Controller Information The ASIC/2-7040 Device Profile window will appear. If communications have been established the status bar at the bottom of the window will show “ASIC/2-7040 Online…”. If the status bar is flashing red communication have not been established. Check COM port settings and troubleshooting section. 2100-444-003A Page 56 Clicking OK will start the downloading of data from the controller to the computer. Once the preliminary information has been downloaded the TCS New project setup Screen will appear in the Controller information area of the screen. The TCS software version will be displayed for all TCS22 models. Nothing will be displayed for TCS22 models. For TCS22 models refer to the serial plate inside the front cover to determine the software version that is installed. The last three numbers of the model number indicate the software version. Click on the appropriate button to create the new project folder and copy needed files to this folder. Once the files have been copied the Main Screen Tab screen will be displayed and live data will be shown on the Main screen. At this point it is a good idea to save the project. Click Project | Save on the menu bar. 2100-444-003A Page 57 Now that a project has been created for a site It will appear under the projects folder section of the display. Once the project is created and saved it can be accessed by double clicking on the project name under the projects folder. 2100-444-003A Page 58 6.3.2.6 Saving TCS Configuration While saving project information saves computer settings, site names and controller type information it does not save information specific to each individual controller. A project may have more than one TCS controller and each controller can have it’s own configuration, setpoints, etc. Individual controller information is saved by creating a device archive. A device archive uploads all information from the TCS controller and stores it in a file. This file includes the controller configuration and setpoints. After all setpoints and options are changed to the desired configuration click on the Save Device Archive button on the tool bar to save the device archive. All of the controller information will be uploaded from the controller and saved to a file. If any changes are made to the TCS configuration you will be asked before exiting if you would like to save the device configuration. If you want to save the changes click OK otherwise click cancel. 6.3.2.7 Loading TCS Configuration. To reload the device configuration to the setting stored in the device archive click on the load device archive button. The device archive will be downloaded to the controller and all setting will be restored to the setting stored in the device archive. If a special configuration is to be loaded Click on the load device archive button and use the appropriate button on the load configuration file screen to find the special configuration. Special configuration files are stored on the TCS22 Master Controller Software CD under a folder named for the special project. A text file will also be in this folder detailing the changes made to the special configuration. 6.4 TCS Controller Information Screens Each screen displays different related information about the TCS22 and connected air conditioners. There are eleven different information screens. Clicking on the labeled tabs changes displayed screen and data The eleven screens tabs are: Main Setpoints Override #1 Alarms Alarm Log Offsets Misc. Trend DialOut Notes 2100-444-003A Page 59 6.4.1 MAIN SCREEN TAB 6.4.1.1 Conditions The Zone Temperature is the current Temperature inside the structure. This, and all the other points being monitored on this screen are updated once a second. The Zone Humidity is the Humidity Level inside of the structure. The Outdoor Temperature and Humidity are the current outdoor conditions at the structure being monitored. The Free Cooling is a Yes or No condition based on an Enthalpy calculation of the Outdoor conditions. This is used to determine if the Economizer can be opened to take advantage of a Free Cooling condition. When a Technician enters the structure, he/she may decide to press the Occupancy Override button on the front of the TCS22. This changes the active setpoint to that of an Occupied Mode that is set to make conditions in the structure more comfortable for the Technician inside. The Building Power condition is monitoring the power source to the Controller. This condition will show ON, for utility power, or OFF, for battery or generator backup power if there is a utility power failure. Outdoor Enthalpy is a calculated point based on outdoor temperature and humidity. 2100-444-003A Page 60 6.4.1.2 Unit #1 Status The Blower status will show if Blower operation is On or Off. The Filter status will show if the Filter is OK or Dirty. The Economizer will show if Economizer operation is On or Off. The Compressor status will show if the Compressor is On or Off. The Heater status will show the status of the Electric Heat Strip, either On or Off. The Supply Air Temperature is the temperature of the Air leaving the unit. This temperature will be Cooler than Zone Temperature when the unit is in the Cooling Mode, and Warmer the Zone Temperature when the unit is in the Heating Mode. The Lead/Lag status indicates if the unit is the Lead or the Lag unit. The Lead unit is the Primary conditioning unit for the structure. The Lag unit will be the Secondary conditioning unit for the structure 6.4.1.3 Unit #2 Status Same as Unit #1 status above except for Unit #2 6.4.1.4 Time & Place The site name that is stored in the controller is displayed and can be changed by clicking on the name. Site Time and Date are the time and date in the TCS controller. Click the Time Date Sychronize button to set the controller time and date to the current time and date of the computer communicating with the controller. 2100-444-003A Page 61 6.4.2 SET POINT TAB The Setpoint screen will allow the user to adjust the Occupied Heating and Cooling, Unoccupied Heating and Cooling, High and Low, Temperature and Humidity Alarm Setpoints. The Lead/Lag Changeover hours and the Enthalpy or Dry Bulb Changeover Setpoints can be adjusted from this screen. Dehumidification setpoint is also changed from this screen. The Continuous Blower may be Enabled or Disabled from this screen. The lead unit can be changed from this screen. Active cooling, heating, and dehumidification stages can be monitored. 6.4.2.1 Occupied Cooling Setpoint The Occupied Cooling Setpoint is used to lower the cooling setpoint to a lower temperature if the structure is occupied. The Occupied Cooling Setpoint will be the active setpoint if the occupancy override timer has been triggered and if the zone temperature is above the Occupied Cooling Setpoint. Once the occupied timer is started the Occupied Cooling Setpoint will be active for two (2) Hours and then will reset to the Unoccupied Cooling Setpoint. Occupancy override can be canceled after 5 minutes by pressing the occupancy override button again. Next to the Occupied Cooling Setpoint value is a scroll bar. Clicking on the right arrow will increase the Occupied Cooling Setpoint by 0.50 degrees Fahrenheit until the maximum allowed setpoint of 80.0 Degrees is reached. Clicking on the left arrow will decrease the Occupied Cooling Setpoint by 0.50 degrees Fahrenheit until the minimum allowed setpoint of 72.0 Degrees is reached. 2100-444-003A Page 62 6.4.2.2 Unoccupied Cooling Setpoint The Unoccupied Cooling Setpoint is the default cooling setpoint for a normally unoccupied structure. Cooling of the Structure will begin if the zone temperature is above this setpoint. The Unoccupied Cooling Setpoint will be the active setpoint whenever the occupied override has not been started. The Unoccupied Cooling Setpoint may be adjusted by clicking the right or left arrows next to the Unoccupied Cooling Setpoint Text box. Clicking on the right arrow will increase the Unoccupied Cooling Setpoint by 0.50 degrees Fahrenheit until the maximum allowed setpoint of 85.0 degrees is reached. Clicking on the left arrow will decrease the Unoccupied Cooling Setpoint by 0.50 degrees Fahrenheit until the minimum allowed setpoint of 72.0 degrees is reached. 6.4.2.3 Occupied Heating Setpoint The Occupied Heating Setpoint is used to raise the heating setpoint to a higher temperature if the structure is occupied. The Occupied Heating Setpoint will be the active setpoint if the occupancy override timer has been triggered and if the zone temperature is below the Occupied Heating Setpoint. Once the occupied timer is started the Occupied Heating Setpoint will be active for two (2) Hours and then will reset to the Unoccupied Heating Setpoint. Occupancy override can be canceled after 5 minutes by pressing the occupancy override button again. Next to the Occupied Heating Setpoint value is a scroll bar. Clicking on the right arrow will increase the Occupied Heating Setpoint by 0.50 degrees Fahrenheit until the maximum allowed setpoint of 70.0 degrees is reached. Clicking on the left arrow will decrease the Occupied Heating Setpoint by 0.50 degrees Fahrenheit until the minimum allowed setpoint of 68.0 degrees is reached. 6.4.2.4 Unoccupied Heating Setpoint The Unoccupied Heating Setpoint is the default heating setpoint for a normally unoccupied structure. Heating of the structure will begin if the zone temperature is below this setpoint. The Unoccupied Heating Setpoint will be the active setpoint whenever the Occupied Override has not been started. The Unoccupied Heating Setpoint may be adjusted by clicking the right or left arrows next to the Unoccupied Heating Setpoint text box. Clicking on the right arrow will increase the Unoccupied Heating Setpoint by 0.50 degrees Fahrenheit until the maximum allowed setpoint of 70.0 Degrees is reached. Clicking on the left arrow will decrease the Unoccupied Heating Setpoint by 0.50 degrees Fahrenheit until the minimum allowed setpoint of 60.0 degrees is reached. 6.4.2.5 High Temperature Alarm SetPoint The High Alarm Setpoint is the temperature at which the high temperature alarm will trigger for the structure. If the zone temperature of the structure exceeds the High Alarm Setpoint then an alarm event is logged in the alarm log and a shelter alarm is generated. Next to the High Temperature Alarm value is a scroll bar. Clicking on the right arrow will increase the High Temperature Alarm Setpoint by 0.50 degrees Fahrenheit until the maximum allowed setpoint of 100.0 degrees is reached. Clicking on the left arrow will decrease the High Temperature 2100-444-003A Page 63 Alarm Setpoint by 0.50 degrees Fahrenheit until the minimum allowed setpoint of 80.0 degrees is reached. 6.4.2.6 Low Temperature Alarm SetPoint The Low Alarm Setpoint is the temperature at which the low temperature alarm will trigger for the Structure. If the zone temperature of the structure is below the Low Alarm Setpoint then an alarm event is logged in the alarm log and a shelter alarm is generated. Next to the Low Temperature Alarm value is a scroll bar. Clicking on the right arrow will increase the Low Temperature Alarm Setpoint by 0.50 degrees Fahrenheit until the maximum allowed setpoint of 67.0 degrees is reached. Clicking on the left arrow will decrease the Low Temperature Alarm Setpoint by 0.50 degrees Fahrenheit until the minimum allowed Setpoint of 45.0 degrees is reached. 6.4.2.7 High Humidity Alarm SetPoint The High Humidity Setpoint is the humidity level at which a high humidity alarm will trigger for the structure. If the zone humidity of the structure exceeds the High Humidity Setpoint then an alarm event is logged in the alarm log and a shelter alarm is generated. Next to the High Humidity Alarm value is a scroll bar. Clicking on the right arrow will increase the High Humidity Alarm Setpoint by 1 percent relative humidity until the maximum allowed setpoint of 85% RH is reached. Clicking on the Left arrow will decrease the High Humidity Alarm Setpoint by 1 percent relative humidity until the minimum allowed setpoint of 55% RH is reached. 6.4.2.8 Low Humidity Alarm SetPoint The Low Humidity Setpoint is the humidity level at which a Low humidity alarm will trigger for the structure. If the zone humidity of the structure is below the Low Humidity Setpoint then an alarm event is logged in the alarm log and a shelter alarm is generated. Next to the Low Humidity Alarm value is a scroll bar. Clicking on the Right Arrow will increase the Low Humidity Alarm Setpoint by 1 percent relative humidity until the maximum allowed setpoint of 35% RH is reached. Clicking on the Left arrow will decrease the Low Humidity Alarm Setpoint by 1 percent relative humidity until the minimum allowed setpoint of 5% RH is reached. 6.4.2.9 Enthalpy Changeover Setpoint The Enthalpy Setpoint is used to determine if the outside air is suitable to use for cooling the structure. The default value for this point is 23.00 BTU/ lb. of dry air. Consult the enthalpy lookup table to adjust this value for the specific conditions that you wish to maintain in the structure. Read down the relative humidity column under the percentage RH you wish to maintain. Read across the inside temperature row to where it intersects the RH column. Enter this value into the Enthalpy Setpoint Display. This will ensure that economizer will never bring in outside air that is too humid. Next to the enthalpy value is a scroll bar. Clicking on the Right Arrow will increase the Enthalpy 2100-444-003A Page 64 Setpoint by .25 BTU / lb. until the Maximum allowed Setpoint of 60 BTU / lb. is reached. Clicking on the Left arrow will decrease the Enthalpy Setpoint by .25 BTU / lb. until the Minimum allowed Setpoint of 5 BTU / lb. is reached. This setpoint may or may not be active and visible depending on the economizer changeover scheme chosen in the Misc. tab. 6.4.2.10 Dry Bulb Changeover Setpoint The Dry Bub Setpoint is used to determine if the outside air is suitable to use for cooling the structure. The default value for this point is 48 Fo.This will ensure that the economizer will never bring in outside air that is too warm to provide cooling. Next to the Dry bulb Changeover Setpoint value is a scroll bar. Clicking on the Right Arrow will increase the Enthalpy Setpoint by 1.0 degree until the maximum allowed Setpoint of 80 degrees is reached. Clicking on the Left arrow will decrease the Dry bulb Changeover Setpoint by 1.0 degree until the minimum allowed setpoint of 40 degrees is reached. This setpoint may or may not be active and visible depending on the economizer changeover scheme chosen in the Misc. tab. 6.4.2.11 Dehumidification Setpoint The dehumidification setpoint requires an authority level of Supervisor or higher to change. Anyone may view the setpoint value. The Dehumidification Setpoint Range is from 50 to 70 % RH. The default value is 50 % RH. 6.4.2.12 Continuous Blower Enable The Continuous Blower Enable will run the lead unit blower continuously for the entire Lead/Lag period. This means that one of the blowers will always be running. The Continuous Blower operation is either set to Yes (with the box checked), or set to No (with the box unchecked). 6.4.2.13 Active Cooling Setpoint The Active Cooling Setpoint displays the current cooling setpoint that the controller using to determine whether cooling is required or not. If the Zone temperature is above the Active Cooling Setpoint, Stage One Cooling will be on. The Active Cooling Setpoint will be one of three values. If the controller is in occupied mode, the Active Cooling Setpoint will be the same as the Occupied Cooling Setpoint. If the controller is in unoccupied mode, the Active Cooling Setpoint will be the same as the Unoccupied Cooling Setpoint. Occupancy is determined from the After-hours Occupancy Override Button located on the temperature sensor on the front of the TCS22. If the controller is in Dehumidification mode, the Active Cooling Setpoint will be 73o the same as the fixed Dehumidification Cooling Setpoint. 6.4.2.14 Active Heating Setpoint The Active Heating Setpoint displays the current heating setpoint that the controller using to 2100-444-003A Page 65 determine whether heating is required or not. If the Zone Temperature is below the Active Heating Setpoint, Stage One Heating will be on. The Active Heating Setpoint will be one of three values. If the controller is in occupied mode, the Active Heating setpoint will be the same as the Occupied Heating Setpoint. If the controller is in unoccupied mode, the Active Heating Setpoint will be the same as the Unoccupied Heating Setpoint. Occupancy is determined from the After-hours Occupancy Override Button located on the temperature sensor on the front of the TCS22. If the controller is in Dehumidification mode, the Active Heating Setpoint will be 70o the same as the fixed Dehumidification Heating Setpoint. 6.4.2.15 Active Dehumidification Setpoint The Active Dehumidification Setpoint displays the current dehumidification setpoint that the controller using to determine whether dehumidification is required or not. If the Zone Humidity is above the Active Dehumidification Setpoint, Stage One Cooling will be on. This point may or may not be active and visible depending on the Enable Zone Dehumidification checkbox condition in the Misc. tab. 6.4.2.16 Stage Indicators The stage indicators at the bottom of the screen are used to indicate which stages of cooling, heating, or dehumidification are energized. These are displayed used for troubleshooting purposes. 6.4.3 OVERRIDE #1 TAB 2100-444-003A Page 66 The Override #1 Tab will switch to the screen containing the override information for the Controller. The Override screen will allow the User to override Blower, Economizer, Compressor, and Heater operation of Unit #1. There are three (3) possible override modes. The first mode would be Automatic (Auto). This mode allows the operations to be controlled automatically by the controller and is the normal mode of operation. The second mode would be the Override Off mode. This means that when operation is called for by the controller, the operation has been suspended manually in the Off mode, and cannot operate. The third mode is the Override On mode. When this mode is selected, the operation is manually set to the On mode. The controller cannot turn the operation Off automatically when in this mode. All overrides status boxes should read “NO” for normal operation of the controller. Any outputs that have been overridden on or off will remain that way until the output is manually returned to normal operation or until the controller loses power. Any overridden output will have “OVR” displayed next to the output status on the Main Tab screen. 2100-444-003A Page 67 6.4.3.1 Unit #1 Compressor The override status box displays the current override condition of the Unit #1 Compressor. It will read “Yes” if the output has been overridden on or off. The output value box displays the current condition of the Unit #1 Compressor. It will read either on or off. The Verify Alarm Status box displays the current condition of the Unit #1 Compressor verify alarm. It will read either OK or Alarm. If the Verify Alarm Status is alarm the output cannot be overridden on or off until the alarm is cleared. The verify alarm will be logged as a Comp. #1 L/O in the alarm log tab and as a Unit #1 Compressor Alarm, Fault Alarm on the Alarms Tab. To Clear the Verify Alarm click the Output Verify Action button. Select “Clear Verify Alarm Flag” then click the OK button. This will clear the verify alarm and the Unit #1 Compressor may now be overridden on or off. To override the Unit #1 Compressor on click the Output Verify Action button. Select the “Override Output ON” item and click OK. The override status box will display yes and the Output status will display On. To override the Unit #1 Compressor off click the Output Verify Action button. Select the “Override Output OFF” item and click OK. The override status box will display yes and the Output status will display OFF. To clear an override, click the Output Verify Action button. Select “Clear RAM Override Flag, Resume Application” and click OK. 6.4.3.2 Unit #1 Blower The override status box displays the current override condition of the Unit #1 Blower. It will read “Yes” if the output has been overridden on or off. The output value box displays the current condition of the Unit #1 Blower. It will read either on or off. The Verify Alarm Status box displays the current condition of the Unit #1 Blower verify alarm. It will read either OK or Alarm. If the Verify Alarm Status is in alarm the output cannot be overridden on or off until the alarm is cleared. The verify alarm will be logged as a #1 Blower Fail in the alarm log tab and as a Unit #1 Blower Alarm, Fault Alarm on the Alarms Tab. To Clear the Verify Alarm click the Output Verify Action button. Select “Clear Verify Alarm Flag” then click the OK button. This will clear the verify alarm and the Unit #1 Blower may now be overridden on or off. To override the Unit #1 Blower on click the Output Verify Action button. Select the “Override Output ON” item and click OK. The override status box will display yes and the Output status will display On. To override the Unit #1 Blower off click the Output Verify Action button. Select the “Override Output OFF” item and click OK. The override status box will display yes and the Output status will display OFF. To clear an override, click the Output Verify Action button. Select “Clear RAM Override Flag, Resume Application” and click OK. . 2100-444-003A Page 68 6.4.3.3 Unit #1 Economizer The override status box displays the current override condition of the Unit #1 Economizer. It will read “Yes” if the output has been overridden on or off. The output value box displays the current condition of the Unit #1 Economizer. It will read either on or off. To override the Unit #1 Economizer on click the Output Verify Action button. Select the “Override Output ON” item and click OK. The override status box will display yes and the Output status will display ON. To override the Unit #1 Economizer off click the Output Verify Action button. Select the “Override Output OFF” item and click OK. The override status box will display yes and the Output status will display OFF. To clear an override, click the Output Verify Action button. Select “Clear RAM Override Flag, 6.4.3.4 Unit #1 Heater The override status box displays the current override condition of the Unit #1 Heater. It will read “Yes” if the output has been overridden on or off. The output value box displays the current condition of the Unit #1 Heater. It will read either ON or OFF. To override the Unit #1 Heater on click the Output Verify Action button. Select the “Override Output ON” item and click OK. The override status box will display yes and the Output status will display ON. To override the Unit #1 Heater off click the Output Verify Action button. Select the “Override Output OFF” item and click OK. The override status box will display yes and the Output status will display OFF. To clear an override, click the Output Verify Action button. Select “Clear RAM Override Flag, 2100-444-003A Page 69 6.4.4 ALARMS TAB The Alarms Tab will switch to the screen containing the Alarm information from the Controller. The Alarm screen will allow the user to check the alarm status of the Zone Temperature, Zone Humidity, Outdoor Temperature, Outdoor Humidity, Main Power, Door Alarm, Fire Alarm and Fire Trouble. Blower, Compressor, and Filter alarms of the conditioning units can also be monitored. Several alarms can be enabled or disabled by checking the alarm enable check box. Do not disable an alarm that is in alarm. Doing so will lock the alarm on and it will not be able to be cleared or acknowledged until the alarm is re-enabled. All alarms can be acknowledged. Acknowledging an alarm resets the shelter alarm output to normally open so that any new alarm will re-close the output and signify a new alarm. Most alarms are self-clearing alarms. Once the condition that caused the alarm is corrected or goes away the alarm resets. The compressor and blower alarms are not self clearing alarms and must be manually cleared from the Override screen . These are the verify alarms. An alarm can also be used to initiate a dial-out alarm call to a pager or printer. Clicking the Dialout enable check box enables dial-out alarms. The dial-out phone numbers are maintained under the Dial Out tab. 2100-444-003A Page 70 6.4.4.1 Unit #1 Filter Alarm If a Filter becomes too Dirty, the Shelter Alarm indicator on the main screen will flash, the Unit #1 Filter Status will indicate “Fault Alarm” and an alarm event will be logged in the alarm log. To acknowledge the alarm click the Alarm Action button . Pick the Acknowledge This Alarm & Clear COS Alarm item and click OK. This resets the Shelter Alarm indicator and allows it to capture and indicate any new incoming alarms. Repair personnel should be dispatched to the Site to service the filter in #1 Unit. This is a Self Clearing Alarm. Once the Filter has been replaced and the dirty filter switch in the unit reset, the Alarm will be removed. 6.4.4.2 Unit #1 Compressor Alarm If a Compressor failure occurs, the Shelter Alarm indicator on the Main Screen will flash, the Unit #1 Compressor Status will indicate “Fault Alarm” and an alarm event will be logged in the alarm log.. To acknowledge the alarm click the Alarm Action button . Pick the Acknowledge This Alarm & Clear COS Alarm item and click OK. This resets the Shelter Alarm indicator and allows it to capture and indicate any new incoming alarms. Repair personnel should be dispatched to the Site to repair the Compressor. Acknowledgment of the failure does not clear the alarm. Once the Compressor has been fixed, the alarm should be cleared to allow the Compressor to resume normal operation. The alarm can be cleared from the Unit #1 Override tab. See Section 5.3-2.1. Clearing the Alarm before the Compressor can be fixed will cause the Compressor to fail again and another Shelter Alarm to be sent 6.4.4.3 Unit #1 Blower Alarm If a Blower failure occurs, the Shelter Alarm indicator on the Main Screen will flash, the Unit #1 Blower Status will indicate “Fault Alarm” and an alarm event will be logged in the alarm log.. To acknowledge the alarm click the Alarm Action button . Pick the Acknowledge This Alarm & Clear COS Alarm item and click OK. This resets the Shelter Alarm indicator and allows it to capture and indicate any new incoming alarms. Repair personnel should be dispatched to the Site to repair the Blower. Acknowledgment of the failure does not clear the alarm. Once the Blower has been fixed, the alarm should be cleared to allow the Blower to resume normal operation. The alarm can be cleared from the Unit #1 Override tab. See Section 5.3-2.1. Clearing the Alarm before the Blower can be fixed will cause the Blower to fail again and another Shelter Alarm to be sent. 6.4.4.4 Zone Temperature Alarm If the Zone Temperature exceeds the High or Low Alarm Temperature setpoints, then the Shelter Alarm indicator on the Main Screen will flash. A High or Low Alarm will be shown in the Alarm status textbox on the Alarm Screen. The Shelter Alarm indicator on the Main Screen will flash until the Alarm has been acknowledged or the Zone Temperature is no longer in Alarm. Once the alarm has been acknowledged, the Shelter Alarm will no longer flash for the Zone Temperature Alarm. This 2100-444-003A Page 71 allows the Shelter Alarm indicator to be reset to capture and indicate any new incoming Alarms. The Zone Temperature and Humidity have four possible states. The first of which is OK and indicates that the values are with in the set ranges. The second state would be a High Alarm condition, stating that the value is above the High Alarm setpoint for that value. The third possible state would be the Low Alarm condition, stating that the value is below the Low Alarm setpoint. The last alarm state is fault alarm indicating that the sensor is reading an out of bounds condition. 6.4.4.5 Zone Humidity Alarm If the Zone Humidity exceeds the High or Low Alarm Humidity setpoints, then the Shelter Alarm indicator on the Main Screen will flash. A High or Low Alarm will be shown in the Alarm status textbox on the Alarm Screen. The Shelter Alarm indicator on the Main Screen will flash until the Alarm has been acknowledged or the Zone Humidity is no longer in Alarm. Once the alarm has been acknowledged, the Shelter Alarm will no longer flash for the Zone Humidity Alarm. This allows the Shelter Alarm indicator to be reset to capture and indicate any new incoming Alarms. The Zone Temperature and Humidity have four possible states. The first of which is OK and indicates that the values are with in the set ranges. The second state would be a High Alarm condition, stating that the value is above the High Alarm setpoint for that value. The third possible state would be the Low Alarm condition, stating that the value is below the Low Alarm setpoint. The last alarm state is fault alarm indicating that the sensor is reading an out of bounds condition. 6.4.4.6 Outdoor Temperature Alarm If the Outdoor Temperature sensor exceeds the High or Low Fault setpoints, then the Shelter Alarm indicator on the Main Screen will flash. A Fault Alarm will be shown in the Alarm status textbox on the Alarm Screen. The Shelter Alarm indicator on the Main Screen will flash until the Alarm has been acknowledged or the Outdoor Temperature Sensor is no longer in a fault conditions. Once the alarm has been acknowledged, the Shelter Alarm will no longer flash for the Outdoor Temperature Alarm. This allows the Shelter Alarm indicator to be reset to capture and indicate any new incoming Alarms. 6.4.4.7 Outdoor Humidity Alarm If the Outdoor Humidity exceeds the High or Low Fault setpoints, then the Shelter Alarm indicator on the Main Screen will flash. A High or Low Alarm will be shown in the Alarm status textbox on the Alarm Screen. The Shelter Alarm indicator on the Main Screen will flash until the Alarm has been acknowledged or the Outdoor Humidity Sensor is no longer in a fault condition. Once the alarm has been acknowledged, the Shelter Alarm will no longer flash for the Outdoor Humidity Alarm. This allows the Shelter Alarm indicator to be reset to capture and indicate any new incoming Alarms. 6.4.4.8 Main Power Alarm If Main Power fails, the Shelter Alarm indicator on the Main Screen will flash. The Shelter 2100-444-003A Page 72 Alarm indicator on the Main Screen will flash until the Alarm has been acknowledged or the Power Failure Condition is no longer valid. This is a Self Clearing Alarm. Once the Main Power has been restored, the Alarm will be cleared. 6.4.4.9 Fire Alarm If a Fire Alarm occurs, the Shelter Alarm indicator on the Main Screen will flash. The Fire Alarm can be acknowledged. This will allow the shelter alarm to be reset to capture and indicate any new incoming Alarms. This is a Self Clearing Alarm. Once the Fire Alarm system has been reset the Alarm will be removed. 6.4.4.10 Fire Trouble Alarm If a Fire Trouble Alarm occurs, the Shelter Alarm indicator on the Main Screen will flash. The Fire Trouble Alarm can be acknowledged. This will allow the shelter alarm to be reset to capture and indicate any new incoming Alarms. This is a Self Clearing Alarm. Once the Fire Trouble Alarm system has been reset the Alarm will be cleared. 6.4.4.11 Door Alarm If a Door Alarm occurs, the Shelter Alarm indicator on the Main Screen will flash. The Door Alarm can be acknowledged and this will clear the shelter alarm and allow it to be reset to capture and indicate any new incoming alarms. This is a Self Clearing Alarm. Once the Door is closed the Alarm will be removed. 2100-444-003A Page 73 6.4.5 ALARM LOG TAB The Alarm Log Tab has the capability to acquire the last thirty (30) Alarm conditions that the controller has sensed. The alarm log is a rotating file. This means that the oldest data will be overwritten by the newest data if the file is full. Clicking the Alarm tab causes the alarm information to be brought into the program from the controller. As the information is collected, it will be displayed. The alarm conditions are brought into the Alarm Log screen for viewing and analysis. Once the data has been gathered, the user may print the file by clicking the print screen button or save the file by right clicking anywhere on the alarm log and then picking “Save Summary to File”. The file can then be named and saved. The alarm log stores the last 30 alarm events in memory for troubleshooting purposes. If the Alarm is enabled on the Alarms tab it will create an entry into the alarm log if an alarm occurs. The Alarm Log can be cleared by going to the Misc. Tab. Click the Event Manager Button and then pick “Reset Event log”. This will clear the Alarm information that is currently stored in the controller 2100-444-003A Page 74 6.4.6 OFFSETS TAB The Offset screen will allow the User to adjust the sensor offsets to calibrate for sensor tolerances. Click on the offset value to enter a new value. 6.4.6.1 Zone Temperature Offset The Zone Temperature will add the value seen in the textbox from the Zone Temperature to calibrate the sensor 6.4.6.2 Zone Humidity Offset The Zone Humidity Offset will add the value seen in the textbox from the Zone Humidity to calibrate the sensor 6.4.6.3 Outdoor Temperature Offset The Outdoor Temperature Offset will add the value seen in the textbox from the Outdoor Temperature to calibrate the sensor 2100-444-003A Page 75 6.4.6.4 Outdoor Humidity Offset The Outdoor Humidity Offset will add the value seen in the textbox from the Outdoor Humidity to calibrate the sensor. 6.4.6.5 Unit #1 Supply Air Temperature Offset The Unit #1 Supply Air Temperature Offset will add the value seen in the textbox from the Unit #1 Supply Air Temperature to calibrate the sensor. 6.4.7 MISC. TAB The misc tab displays several options that are available in the TCS firmware and other information about the controller hardware. The options that can be disabled or enabled include economizer operation, daylight savings time, 50 hz operation, zone humidity sensor, and zone dehumidification sequence. The economizer changeover scheme can be change to either enthalpy or dry bulb temperature and the alarm log can be cleared from this screen. 2100-444-003A Page 76 Also included is access to an area of the controller where the TCS model and serial number can be stored. The controller software and firmware version are also displayed. 6.4.7.1 Clear Alarm Event Log Clicking this button erases any old information in the alarm log and resets all of the messages to the default “OK - No Alarm” condition. 6.4.7.2 Enable Economizer Operation. Checking this check box enables economizer operation. If the air-conditioners controlled by the TCS do not have economizers economizer operation should be disabled. This disables two stages of cooling that are normally used to energize the economizers if free cooling is available. Factory default for this value is enabled. 6.4.7.3 Economizer Changeover Scheme The economizer changeover scheme is selectable between enthalpy changeover or dry bulb temperature changeover. The default for this is enabled. When enthalpy changeover scheme is used the economizers will be used as 1st and 2nd stage cooling as long as the outdoor enthalpy is below the Enthalpy changeover setpoint. When dry bulb temperature scheme is used the economizers will be used as 1st and 2nd stage cooling as long as the outdoor temperature is below the dry bulb temperature changeover setpoint. Clicking the button will change to the opposite changeover scheme. 6.4.7.4 Enable Daylight Savings Time This checkbox enables daylight saving time for the controller hardware clock. If the site location is in an area that does not use daylight savings time during the summer uncheck this box. The default setting for daylight savings time is enabled. 6.4.7.5 Enable 50 hz Clock This checkbox enables 50hz clock operation. If the site location is in an area has 50 hz power supplies check this box. This assumes correct operation of the hardware clock. The default setting for Enable 50 hz clock is disabled. 6.4.7.6 Enable Zone Humidity Sensor The TCS can be ordered without an indoor humidity sensor. The model number will have a “T” in the 7th position of the model number if no humidity sensor was ordered. Factory default for this value is enabled. If the TCS does not have an indoor humidity sensor disable this feature. 2100-444-003A Page 77 6.4.7.7 Enable Zone Dehumidification The TCS can provide zone dehumidification by running the air conditioners and cycling electric heat on and off to maintain room temperature. Factory default for this value is disabled. Note: The airconditioner circuit breakers and wiring must be sized for concurrent operations air-conditioning and electric heat. Special dehumidification models are available for use with this feature. These models have circuit breakers and special MCA and MOP ratings that allow concurrent operation of the air conditioners and electric heat. These are special, dedicated code models ending in D053, D061, D062, D064, or D066. Enable this feature if dehumidification is required. Consult your Bard representative for more information. 6.4.7.8 Model Number Click on the text box and enter the model number from the TCS serial plate. The model number is stored in the controller and can be accessed for troubleshooting and parts replacement purposes. 6.4.7.9 Model Serial Number Click on the text box and enter the serial number from the TCS serial plate. The serial number is stored in the controller and can be accessed for troubleshooting and parts replacement purposes 6.4.7.10 Software The factory installed software version is displayed and is required for troubleshooting purposes. 6.4.7.11 Firmware The factory installed firmware version is displayed and is required for troubleshooting purposes. 2100-444-003A Page 78 6.4.8 TREND TAB The Trend Logger will access the Remote Site and Acquire the site information stored in the controller. This information is stored in a comma separated value file. The information stored is the Zone Temperature, Zone Humidity, OutDoor Temperature, OutDoor Humidity, Unit #1 Supply Air Temperature, Unit #2 Supply Air Temperature, Mechanical Run Time, and Economizer Run Time. The controller will store all of these values once per hour and will hold up to 128 hours of data. Once the data register has been filled, the new data will overwrite the oldest data in the register. The Data should be acquired at least every 128 hours to make sure that none of the data is overwritten without being stored. To save or graph the stored information, click on the graph button at the side of the desired information. A graph of the stored information will appear and it can then be printed or saved to a file of your choice for later reference. 2100-444-003A Page 79 6.4.9 DIAL OUT TAB 2100-444-003A Page 80 The Dial-Out Screen displays the Site name and Site phone number. The site name is included with other information when the TCS dials out and connects to a Printer. When the TCS dials out to a pager it sends the phone number of the site to the pager so the technician can call in to the site to see what the problem is. The site name that is stored in the controller is displayed and can be changed by clicking on the name The Site phone number is the phone number of the site for modem connection. This number can be up to 25 characters long. The number may contain hyphens or commas, but they are not necessary for operation. The Primary number is the first phone number that will be dialed for Alarm notification. This number can be up to 25 characters long. The number may contain hyphens or commas, but they are not necessary for operation. The Secondary number is the second phone number that will be dialed for Alarm notification. This number can be up to 25 characters long. The number may contain hyphens or commas, but they are not necessary for operation. The primary message format is the type of Alarm message that will be sent for Alarm notification. The message will be a printer message or pager message. The secondary message format is the type of Alarm message that will be sent for Alarm notification. The message will be a printer message or pager message. The Send to Both option will allow the controller to dial one or both of the phone numbers for Alarm notification. 2100-444-003A Page 81 6.4.10 NOTES TAB The notes tab is just a group of 8 message boxes that can be used to make notes about the controller or leave messages concerning the controller for the next technician. Clicking on one of the message boxes allows you to type a message up two 32 characters long. 2100-444-003A Page 82 7. MAINTENANCE & TROUBLESHOOTING 7.1 Routine Maintenance The TCS22 requires minimal maintenance. Once every 4 years replace the battery under the controller cover. This battery powers the hardware clock during power outages. Check sensor calibration once every two years. 7.2 Troubleshooting 7.2.1 TCS22 TROUBLESHOOTING Problem Check Out Points TCS22 Fails to operate Procedure Check 240 Volt Power Check TCS22 Circuit breaker Check 24 Volt Power Remove power connector from controller and Check for 24 volt Power from pin 1 to pin 3 on plug Check Internal Fuse Remove screws from the four corner of the front panel of the controller. The fuse is located in upper left hand corner of the controller. Blower #1 light is On but Check A/C unit 24 Volt power Blower fails to operate from C to G Check controller switch Remove junction connector J5. Check for continuity from pin #3 to pin #6 on controller with the Blower light ON. Check wiring and connections Compressor #1 light is On but Check A/C unit 24 Volt power Compressor fails to operate from C to Y Check controller switch Remove junction connector J5. Check for continuity from pin #2 to pin #5 on controller with the Compressor light ON. Check wiring and connections Heater #1 light is On but Check A/C unit 24 Volt power Heater fails to operate from C to W1 Check controller switch Remove junction connector J5. Check for continuity from pin #8 to pin #11 on controller with the Compressor light ON. Check wiring and connections Economizer #1 light is On but Check controller switch Disconnect E from the terminal strip on Economizer fails to operate the TCS22. Check for continuity from E 2100-444-003A Page 83 Check operation of the Economizer Modem not responding Zone Temperature Sensor Check status of lights on Modem Check Sensor output Zone Humidity Sensor Check Sensor Input Check Sensor Output OutDoor Temperature Sensor Check Sensor Output OutDoor Humidity Sensor Check Sensor Input Check Sensor Output 2100-444-003A Page 84 to F on the terminal strip on controller with the Unit #1 Economizer light ON. Connect a jumper wire on the A/C unit low voltage terminal strip from R to G. Connect another jumper wire on the A/C unit low voltage terminal strip from E to F (Never connect power to these terminals) and check for Economizer operation. Reset Modem Determine the Temperature of the structure. Remove plug in connector J1 from the TCS22 controller. With a Digital VOM, check the resistance between pins #3 and #6 in the plug. The resistance will correspond with the Temperature of the sensor according to Table 6. Check the AC voltage supply to the Sensor output board, inside the door of the TCS22. The voltage should be 24 Volts AC Check the DC output voltage from the sensor output board, inside the door of the TCS22. The voltage should be between 1 and 5 Volts DC. The Output voltage will correspond with the Humidity according to Table 7. Determine the Outdoor Temperature. Remove plug in connector J1 from the TCS22 controller. With a Digital VOM, check the resistance between pins #13 and #14 in the plug. The resistance will correspond with the Temperature of the sensor according to Table 6. Check the AC voltage supply to the Sensor output board, inside the sensor housing. The voltage should be 24 Volts AC Check the DC output voltage from the sensor output board, inside the sensor housing. The voltage should be between 1 and 5 Volts DC. The Output voltage Discharge Air Sensor #1 or #2 Check Sensor Output Dirty Filter Sensor #1 or #2 Check Output Compressor Current Sensor #1 or #2 Check Sensor Output Blower Airflow Sensor #1 or Check Sensor Output #2 2100-444-003A Page 85 will correspond with the Humidity according to Table 7. Determine the Temperature of the discharge air. Remove plug in connector J2 from the TCS22 controller. With a Digital VOM, check the resistance between Terminal #4 and Terminal #5 on the low voltage terminal block of the A/C unit. The resistance will correspond with the Temperature of the sensor according to Table 6. Remove plug in connector J2 from the TCS22 controller. Observe Filter flag status of the A/C unit. If the Change Filter flag is not visible, then there should be no continuity between terminals #6 and #7 of the A/C unit low voltage terminal block. If the Change Filter flag is visible, then there should be continuity between terminals #6 and #7 of the A/C unit. voltage terminal block. Remove plug in connectors J1, J2 and J4 from the TCS22 controller. Connect a jumper wire between R and G of the A/C unit low voltage terminal block to operate the blower. Observe the status of the compressor current sensor LED. The LED should not be on. Connect a jumper wire between R and Y of the A/C unit low voltage terminal block to operate the compressor. When the compressor is running, the LED should flash rapidly (Approx. 4 times per second). If the Led is flashing slowly (Approx. 2 times per second), adjust potentiometer on the sensor until the LED begins flashing rapidly when compressor is running. Remove plug in connectors J1, J2 and J4 from the TCS22 controller. Check continuity between terminal #8 and #9 of the A/C unit low voltage terminal block. This should be an Open circuit with the Blower off. Connect a jumper wire between R and G of the A/C unit low voltage terminal block to operate the blower. Check continuity between terminal #8 and #9 of the A/C unit low voltage terminal block. This should be a Closed circuit with the Blower running. 2100-444-003A Page 86 Table 3 Humidity Sensor Output Volts DC vs % RH Humidity % RH Output Volts DC 5.00 10.00 15.00 20.00 25.00 30.00 35.00 40.00 45.00 50.00 55.00 60.00 65.00 70.00 75.00 80.00 85.00 90.00 95.00 100.00 0.25 0.50 0.75 1.00 1.25 1.50 1.75 2.00 2.25 2.50 2.75 3.00 3.25 3.50 3.75 4.00 4.25 4.50 4.75 5.00 2100-444-003A Page 87 Table 4 Thermistor Resistance Vs. Temperature Table. Temp Temp Deg C -20.00 -15.00 -10.00 -5.00 0.00 5.00 10.00 15.00 20.00 25.00 30.00 35.00 40.00 45.00 50.00 55.00 60.00 Deg F -4.00 5.00 14.00 23.00 32.00 41.00 50.00 59.00 68.00 77.00 86.00 95.00 104.00 113.00 122.00 131.00 140.00 10000 Ω Resistance Ohms 79050 61020 47630 37400 29560 23500 18790 15150 12290 10020 8206 6754 5599 4662 3898 3273 2759 2100-444-003A Page 88 3000 Ω Resistance Ohms 29,092 21,868 16,589 12,694 9,795 7,619 5,971 4,714 3,748 3,000 2,417 1,959 1,597 1,310 1,080 896.00 746.00 7.2.2 WALLMOUNT QUICK TROUBLESHOOTING GUIDE. Operation Procedure ByPassing TCS22 Controller Disconnect power to the TCS22. Unplug the plug in connectors J4 and J5 from the controller Compressor Test Connect jumper wire on A/C unit low voltage terminals from R to Y and observe Compressor operation (There will be a Time delay between the installation of the jumper and the starting of the Compressor. The Compressor Time Delay relay will determine the time delay period.). After the Compressor starts, the jumper wire can be removed. Blower Test Connect a jumper wire on A/C unit low voltage terminals R to G and observe Blower operation (The Blower will continue to run for One (1) minute after the jumper is removed). Economizer Test Connect a jumper wire on A/C unit low voltage terminals R to G and observe Blower operation. After Blower operation is confirmed, the Economizer can be tested. Leave the jumper in place from the previous step. Connect a separate jumper on the A/C unit low voltage terminals from E to F and observe the Economizer operation (Never connect power to terminals E or F). Heater Test Connect a jumper wire on A/C unit low voltage terminals R to W1. The Heating contactor will engage when the jumper is connected. The Blower will also operate while this jumper is in place. To check the operation of the Heater, you will have to check the Discharge Air temperature of the A/C unit. Restarting TCS22 Remove All jumper wires and reconnect the plug in connectors J4 and J5 to the controller. Reapply power to the TCS22 2100-444-002A Page 89