1
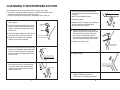
Before Putting Into Use
Important
• Before connecting the appliance to the power supply, let it stand for about 2
hours, which will reduce a possibility of malfunctions in the cooling system due
to transport handling.
• If you have bought this appliance to replace an old one equipped with a lock that
cannot be opened from inside (lock, bolt), make sure that the lock is broken.
This will make it impossible for children to lock themselves inside the appliance
and suffocate.
• Clean the appliance, and be thorough, especially in the interior (See Cleaning
and Maintenance).
• In case the interior accessories are not correctly placed, rearrange them as
described in chapter “NAME OF THE PARTS”.
Instructions for Use
These instruction for use are intended for the user. They describe the appliance
and its correct and safe use. They were prepared for various types/modes of
refrigerators therefore you may find in it description of some functions and
accesories that your appliance does not have.
• The appliance must be correctly connected to the power supply. (See: How to
install)
• Do not touch the cooled surfaces while the appliance operates, especially not
with wet hands, because the skin may stick to the cold surfaces.
• Do not freeze bottles containing liquid, especially not soft drinks, such as
mineral water, sparkling wine, beer, cola etc., because liquid expands during
freezing and the glass bottle is very likely to blow up.
• Do not eat frozen food (bread, fruit, vegetables), because you can get
frostbites.
• If the food has strange smell or color, throw it away, because it is very likely
that it is spoiled and therefore dangerous to eat.
Tips for Energy Savings
• Disconnect the appliance from the power supply before repairing it (only a
qualified technician should repair it), before cleaning.
• Try not to open the door too often, especially when the weather is wet and hot.
Once you open the door, mind to close it as soon as possible.
• Every now and then check if the appliance is sufficiently ventilated (adequate
air circulation behind the appliance).
• Set thermostat from higher to lower settings as soon as possible (depends on
how loaded the appliance is ambient temperature etc).
• Before loading the appliance with packages of fresh foods, make sure they
are cooled to ambient temperature.
• Do not defrost the appliance with other electric devices (hair dryer etc.) and
never scrape the ice or frost layer with sharp tools.
• The rating plate is inside the appliance or outside on the rear wall.
DANGER: Risk of child entrapment. Before you throw away your old
refrigerator or freezer: Take off the doors and leave the shelves
in place so that children may not easily climb inside.
• Ice and frost layer increase energy consumption, so do clean the appliance as
soon as the layer is 1/8” thick.
1
2
NAMES OF THE PARTS
HOW TO OPERATE
Starting your new Refrigerator
1. Clean the refrigerator thoroughly. Wipe the outside with a soft dry cloth, the
interior with a clean moist cloth.
2. Insert the power supply cord into the socket.
3. Turn the thermostat dial to “7”. Close the door and let the refrigerator
operate for 15-20 minutes.
When opening the door,Be careful not to get
your fingers caught in door.
Temperature control
1. Evaporator
7. Usable rack
2. Defrost drip tray
8. Bottle rack
(use of Defrost Only)
9. Salad crisper bin
3. Temperature control
10. Shelf
4. Evaporator cover
11. Crisper lid
5. Magnetic door seal
To control the internal temperature, adjust
the thermostat dial. The dial is numbered
from 1-7. Number 1 is the warmest setting,
number 7 the coldest.
The dial may be set any place on the scale.
It does not have to be set exactly on a
number. To make ice cubes in the freezer
compartment, adjust the thermostat to the
coldest setting.
7
1
4
NOTE: Wait 3-5 minutes before restarting if you unplug the refrigerator.
The unit may fail to operate properly if restarted too quickly.
6. Small rack
How to defrost
Defrost the refrigerator when the frost accumulated on the evaporator is about
5mm (1/5inch) thick.
Set the thermostat dial to “OFF”. Remove frozen or perishable foods. keep drip
tray in place. Defrosting usually takes a few hours. To defrost quickly remove all
foods from the refrigerator and leave the door open. Never use a knife or other
metal instrument to scrape ice/frost from the evaporator. After defrosting,
empty water from drip tray and return the thermostat dial to the desired position.
3
4
HOW TO CLEAN
WHAT TO DO...
Cleaners : Never use harsh, abrasive cleaners, heavy-duty cleaners, or solvents
on any surface.
Exterior : Wipe with damp, sudsy cloth, rinse and dry. For stubborn stains
and for periodic waxing, use silicon wax.
Freezer : When refrigerator needs defrosting turn thermostat dial to “OFF”.
Do not use sharp instruments to scrape off ice/frost.
Refrigeration Section : Wash shelves and other removable parts in warm
sudsy water, rinse and dry. Wash interior with baking soda solution (3
Tablespoons to 1 Liter of water) or warm sudsy water, rinse and dry.
Magnetic Door Seals : Wash with warm sudsy water.
The Finishing Touch : Replace all parts and return thermostat dial to desired
setting.
When the fridge is not in use for a prolonged period:
• Remove the power plug from the power point.
• Remove all contents from the fridge.
• Dry the interior and leave the door open for a few days.
When you wish to move the fridge:
• Secure all movable parts and contents.
(Package them separately if necessary.)
• Transport the fridge only in an upright position. In any other position you
may damage the compressor.
Before calling service, please follow the checklist below.
This may save you an expensive service call.
HOW TO INSTALL
Install refrigerator in a convenient location away from extreme heat and cold.
Allow sufficient clearance between the refrigerator and side wall so the door
will open without obstruction. Refrigerator is not designed for recessed
installation.
Select a space with strong level floor.
Allow 5 inches of space between the
refrigerator’s side and the wall.
If the refrigerator seems too warm inside:
• Check that the door has not been opened too frequently or for too long.
• Check that the interior circulation is not obstructed by having too many
goods stored. (The fridge is overloaded)
• Did you store anything hot, without first cooling it to room temperature?
• Is there sufficient clearance around all sides and above the fridge?
If the fridge starts making any unusual noises:
• Is it wobbling? Re-level it and check if it now operates normally.
• Have any objects fallen behind the fridge? If so, remove them and check if
operation is now normal.
• Are any containers inside the fridge vibrating or resonating? If so, rearrange
them then check to see if operation has returned to normal.
POWER CORD REPLACEMENT
If the refrigerator’s power cord is damaged, have it replaced by a qualified
repair agent.
5
WARNING-Improper use of the grounding plug can result in a risk of electric
shock. If it is necessary to use an extension cord, use only a 3-wire
extension cord that has a 3-blade grounding plug and a 3-slot receptacle that
will accept the plug on the appliance. The marked rating of the extension
cord should be AC115-120V, 10A, or more. If a grounding adapter is used,
make sure the receptacle box is fully grounded.
6
CHANGING THE REVERSIBLE DOOR
This refrigerator has been built with the door hinges on the right.
If you wish to change the opening direction, follow the instruction below:
• Unplug the refrigerator from its electrical outlet.
• Empty everything in the refrigerator, including shelves, food, etc.
7. Insert the bottom hinge at the left side
using the two screws previously removed
in step 6.
NOTE: Do not tighten screws.
8. Stand the cabinet.
1. Remove the hinge cover on the right top
of the cabinet.
9. Replace the door making sure the bottom
socket enters the bottom hinge pin.
Be sure washer is in place.
2. Remove the two screws (using a ratchet
tool with a 8MM socket) that hold the top
hinge to the cabinet. Keep these screws
for later use.
10. While holding the door in the closed
position, secure the top hinge at the left
side using the two screws previously
removed at the beginning in step 2.
Do not tighten the screws until the top of
the door is leveled with the top cabinet.
3. Lift the top hinge straight up to free the pin
from the socket on the top of the door.
4. Lift the door and place it on a padded
surface to prevent scratching it.
11. Replace the hinge cover.
5. Remove the plug buttons from the upper
left holes as illustrated and transfer them
to the uncovered holes at the right side.
Be sure to press the plug buttons firmly
into the holes.
6. Lay the cabinet on its side down on the
floor. Remove the two screws that hold
the bottom hinge to the cabinet using a
10MM socket. Keep these screws and
washer for later use.
Plug button
12. Replace plugs.
Bottom hinge
13. Tools required:
-8MM & 10MM socket-ratchet.
-Putty knife or thin-blade screwdriver.
7
8
Model No.
FR-15A/FR-15B/FR-15S
FR-15A/FR-15B/FR-15S
Before using this refrigerator,please read this manual carefully.
Always remove the drip tray while this refrigerator is running.
Removing the drip tray will enhance the cooling power and save your elactric cost.
Blowing Agent : CYCLO-PENTANE.