1
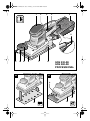
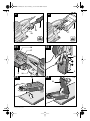
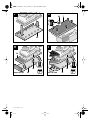
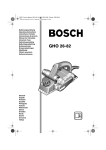
2 609 932 440.book Seite 1 Montag, 13. Dezember 2004 11:06 11
GSS 230 A
GSS 230 AE
GSS 280 A
GSS 280 AE
PROFESSIONAL
Bedienungsanleitung
Operating instructions
Instructions d’emploi
Instrucciones de servicio
Manual de instruções
Istruzioni d’uso
Gebruiksaanwijzing
Betjeningsvejledning
Bruksanvisning
Brukerveiledningen
Käyttöohje
Οδηγία χειρισµού
Kullan∂m k∂lavuzu
* Des idées en action.
2 609 932 440.book Seite 2 Montag, 13. Dezember 2004 11:06 11
METAL
PVC
GSS 230 A/AE GSS 280 A/AE
2 608 000 213 2 608 000 215
(92 x 182 mm) (114 x 282 mm)
GSS 230 A/AE
2 608 000 189
2 608 000 202 2 608 000 204
(92 x 182 mm) (114 x 282 mm)
P 40–P 400
GSS 230 A/AE GSS 280 A/AE
–––
2 608 190 009
2 608 000 190
2 608 190 016 2 608 190 017
2 605 411 113 (3 x)
2 605 411 114 (10 x)
2 602 026 070
2 605 411 112
2 605 438 368
2 605 411 147
2 600 306 007
2 • 2 609 932 440 • 04.12
Ø 19 mm
3 m 2 600 793 009
5 m 1 610 793 002
2 605 190 266
1 609 200 933
GAS 25/50/50 M
2 609 932 440.book Seite 3 Montag, 13. Dezember 2004 11:06 11
1
2
3
4
5
11
11
10
9
8
7
A
6
GSS 230 AE
GSS 280 AE
PROFESSIONAL
B
8
6
12
3 • 2 609 932 440 • 04.12
13
2 609 932 440.book Seite 4 Montag, 13. Dezember 2004 11:06 11
C
D
14
18
15
17
16
E1
19
E2
17
20
5
5
16
E3
5
E4
21
4 • 2 609 932 440 • 04.12
2 609 932 440.book Seite 5 Montag, 13. Dezember 2004 11:06 11
F
G
23
7
22
H
I
27
24
28
26
GSS 230 A/AE
5 • 2 609 932 440 • 04.12
25
27
GSS 230 A/AE
23
12
2 609 932 440.book Seite 1 Montag, 13. Dezember 2004 11:06 11
Tool Specifications
Orbital sander GSS ...
PROFESSIONAL
Article number
Dust box included
in delivery scope
Rated input power
Output power
Oscillating
rate selection
Orbit frequency
230 A
230 AE
230 AE
280 A
280 AE
280 AE
0 601
… 292 0.. … 292 7.. … 292 6.. … 293 0.. … 293 7.. … 293 6..
[W]
[W]
–
300
90
–
300
90
●
300
90
–
330
100
[opm]
–
22 000
[rpm]
11 000
Orbit diameter
Sanding plate
Sanding sheet:
Velcro attachment
Clamping attachment
Weight according
to EPTA-Procedure
01/2003
Protection class
[mm]
[mm]
2.4
92 x 182
●
11 000 –
22 000
5 500 –
11 000
2.4
92 x 182
–
22 000
No-load speed
●
11 000 –
22 000
5 500 –
11 000
2.4
92 x 182
[mm]
[mm]
93 x 185
93 x 230
93 x 185
93 x 230
93 x 185
93 x 230
115 x 230 115 x 230 115 x 230
115 x 280 115 x 280 115 x 280
[kg]
2.3
2.3
2.3
2.6
/ II
/ II
/ II
–
330
100
●
11 000 –
22 000
11 000
5 500 –
11 000
2.4
2.4
114 x 226 114 x 226
2.6
/ II
●
330
100
●
11 000 –
22 000
5 500 –
11 000
2.4
114 x 226
2.6
/ II
/ II
The values given are valid for nominal voltages [U] of 230/240 V. For lower voltages and models for specific countries, these
values can vary.
Please observe the article number on the type plate of your machine. The trade names of the individual machines may vary.
Machine Elements
The numbering of the machine elements refers to
the illustration of the machine on the graphics
page.
While reading the operating instructions, unfold
the graphics page for the machine and leave it
open.
1 Gripping surface
2 Thumb wheel for oscillating rate selection
(GSS 230 AE/GSS 280 AE)
3 On/Off switch
4 Lock-on button for On/Off switch
5 Dust box (micro filtersystem)*
6 Clamping lever
7 Sanding plate
8 Clamping strip
9 Allen screw
10 Auxiliary handle
11 Allen key
12 Sanding sheet (Velcro attachment) *
13 Sanding sheet (without Velcro attachment) *
11 • 2 609 932 440 • TMS • 03.12.04
14
15
16
17
18
19
20
21
22
23
24
25
26
27
28
Vacuum hose*
Extraction adapter*
Outlet piece
Plastic slider
Dust bag*
Holder for dust box*
Latching lever*
Filter element (micro filtersystem)*
Perforating tool*
Sanding plate screw
Sanding plate, thin, extended*
Sanding sheet, extended*
Screw for extended sanding plate *
Triangular sanding sheet*
Triangular sanding plate, extended *
* Not all of the accessories illustrated or described are
included as standard delivery.
English - 1
2 609 932 440.book Seite 2 Montag, 13. Dezember 2004 11:06 11
Noise/Vibration Information
Measured values determined according to
EN 60 745.
Typically the A-weighted sound pressure level of
the machine is 76 dB (A). Measurement uncertainty K=3 dB.
When working, the noise level can exceed
85 dB (A).
Wear hearing protection!
The typically weighted acceleration is 3 m/s2.
For Your Safety
■ Warning. Fire hazard! Avoid overheating of
the material being sanded and of the power
tool, and always empty the dust collector
before taking breaks. Sanding dust in the
dust bag, microfilter, paper bag (or in the filter
bag or filter of the vacuum cleaner) can self-ignite under unfavourable conditions such as
from sparking while sanding metals. Especially
when it is mixed with particles of varnish or
polyurethane or other chemical materials, and
when the material being sanded is hot after
prolonged operation.
Intended Use
Read all instructions. Failure to
follow all instructions listed below
may result in electric shock, fire
and/or serious injury.
The machine is intended for the dry sanding of
surfaces of wood, plastic and filler as well as for
painter surfaces.
Replacing the Sanding Sheet
Additionally, the general safety instructions either
in the enclosed booklet or those added in the
centre of these operating instructions must be observed.
SAVE THESE INSTRUCTIONS.
■ Secure the workpiece. A workpiece clamped
with clamping devices or in a vice is held more
securely than by hand.
■ Take protective measures when dust can
develop during working that is harmful to
one’s health, combustible or explosive. Example: Some dusts are regarded as carcinogenic. Work with dust/chip extraction and
wear a dust mask.
■ Keep your workplace clean. Material mixtures are particularly dangerous. Dust of light
metal can be inflammable or explode.
■ Do not work materials containing asbestos. Asbestos is considered carcinogenic.
■ Do not use a machine with a damaged
mains cable. Do not touch the damaged cable and pull the mains plug when the cable
is damaged while working. Damaged cables
increase the risk of an electric shock.
■ Connect machines that are used in the
open via a residual current device (RCD).
■ Use the machine only for dry sanding. Water penetrating the power tool increases the
risk of an electric shock.
12 • 2 609 932 440 • TMS • 03.12.04
■ Before any work on the machine itself, pull the
mains plug.
Selecting the Sanding Sheet
Depending on the material to be worked, different
sanding sheet qualities are to be used:
for the working of all wooden materials.
for the working of paint/enamel coats or primers
and fillers.
Replacing the Sanding Sheet
Before placing on a new sanding sheet, free the
sanding plate from dust and dirt.
To ensure optimum dust extraction, the holes of
the sanding sheet must match with those of the
sanding plate.
Sanding Sheet with Velcro Backing
(see figure A )
The sanding sheets are placed directly onto the
sanding plate. The hole pattern in the sanding
plate and sanding sheet must match.
Before placing on the sanding sheet, free the Velcro backing of the sanding plate from dust /debris
by lightly tapping against it.
English - 2
2 609 932 440.book Seite 3 Montag, 13. Dezember 2004 11:06 11
Sanding Sheets without Velcro Backing
(see figure B )
Lightly lift the clamping lever 6 and unlatch it.
Slide the sanding sheet 13 under the open
clamping bracket 8 (➊) and reinsert the clamping
lever 6 (➋).
Make sure that the sanding sheet 13 faces firmly
against the sanding plate. Fold the sanding sheet
around and clamp the other end in the same
manner.
Sanding sheets without holes, e. g. from rolls or
by the meter, can be punctured with the perforating tool 22* for use with dust extraction (see
figure F ).
Replacing the Sanding Plate
(see figure G )
The standard sanding plate 7 with velcro backing
can be exchanged against various specialty
sanding plates (accessories).
For this, unscrew the six screws 23 with a screwdriver and remove the sanding plate.
Attach the desired sanding plate and insert
screws 23, or 26 respectively, when using the
thin, extended sanding plate 24.
External Dust Extraction
(see figure C )
Slide the extraction adapter 15 onto the outlet
piece 16 and make sure that the latches engage.
To remove, press the latches together at the rear
and pull off the extraction adapter.
The vacuum cleaner must be suitable for the material to be worked.
When vacuuming dry dust that is especially detrimental to health or carcinogenic, use a special
vacuum cleaner.
Dust Bag (see figure
)
For clean working, a dust bag 18 (accessory) can
be used.
Pull out the plastic slider 17 at the bottom side of
the handle completely and attach the dust bag 18
onto the extraction neck. The plastic slider 17
must be inserted into the holder on the dust box.
13 • 2 609 932 440 • TMS • 03.12.04
Attaching the dust box:
Before assembling the dust box 5, pull out the
plastic wedge 17. Place the dust container onto
the outlet piece 16 and allow it to notch; make
sure that the holder 19 grips the plastic
wedge 17.
Emptying the dust box:
Actuate the latching lever 20 and pull off the dust
box 5 toward the bottom.
Before opening the dust box 5, it is recommended to loosen the dust from the filter element
by gently striking it against a firm support.
Grasp the dustbox by the recessed grip, fold the
filter element (micro filtersystem) 21 upwards and
empty the dust box 5. Clean the thin plates of the
filter system with a soft brush.
Starting Operation
Observe correct mains voltage: The voltage of
the power source must agree with the voltage
specified on the nameplate of the machine.
Equipment marked with 230 V can also be connected to 220 V.
Switching On and Off
Dust/Chip Extraction
D
Internal Vacuuming with Dust Box
(see figure E1-E4 )
To start the machine, press the On/Off switch 3
and keep it depressed.
Lock the pushed On/Off switch 3 by pressing the
lock-on button 4.
To switch off the machine, release the On/Off
switch 3 or, when locked on with the lock-on button 4, briefly press the On/Off switch 3 and then
release.
Oscillating Rate Selection
(GSS 230 AE/GSS 280 AE)
With the knob 2, the required oscillation rate can
be selected (also while running).
The required oscillation rate is dependent on the
material and is to be determined by a practical
trial (See the applications table at the end of the
operating instructions).
After longer periods of working at low speed, allow the machine to cool down by running it for approx. 3 minutes at maximum speed with no load.
English - 3
2 609 932 440.book Seite 4 Montag, 13. Dezember 2004 11:06 11
Gripping Surface
Operating Instructions
The gripping surface 1, attached on the upper
side of the machine, increases the safety against
slipping off thus supplying a better grip and handling of the machine.
At the same time, the rubber coating achieves a
vibration-absorbing effect.
Auxiliary Handle
The auxiliary handle 10 can be removed for improved machining in narrow, hard-to-reach locations.
Remove screw 9 with the hex key 11 and take off
the auxiliary handle.
Assembly is carried out in reverse order.
Specialty Sanding Plates
Maintenance and Cleaning
Extended Sanding Plate,
Rectangular, Thin (GSS 230 A/
GSS 230 AE) (see figure H )
Use of the rectangular, thin, extended sanding
plate 24 enables sanding at hard-to-reach locations and narrow interspaces, e. g. on window
and door sills, grooves or behind radiators or water pipes.
Extended Sanding Plate,
Triangular (GSS 230 A/GSS 230 AE)
(see figure I )
Use of the extended triangular sanding plate 28
is especially suitable for sanding in edges and
corners, such as on furniture, stairs or doors.
For special applications, the top side of the triangular sanding plate can also be fitted with a sanding sheet. When fitted on both sides, slots or surfaces closely opposite to each other can be machined in one work step.
Finish-sanding plate (without velcro
backing) (GSS 230 AE/GSS 280 AE)
(see figure B )
When operating mainly with standard sanding
sheets without velcro backing, it is recommended
to use the finish-sanding plate without velcro
backing.
Due to its plane sanding plate surface, optimum
results are reached, particularly for finish sanding.
14 • 2 609 932 440 • TMS • 03.12.04
■ Always wait until the machine has come to
a complete stop before placing it down. The
tool insert can jam and lead to loss of control
over the power tool.
The removal performance when sanding is determined primarily by the selection of the sanding
sheet and the oscillation rate (GSS 230 AE/
GSS 280 AE).
Excessive sanding pressure does not lead to increased sanding capacity, but to increased wear
of the machine and the sanding sheet.
A sanding sheet that has been used for metal
should not be used for other materials.
Use only original Bosch sanding sheets and accessories.
■ Before any work on the machine itself, pull the
mains plug.
■ For safe and proper working, always keep the
machine and its ventilation slots clean.
If the machine should fail despite the care taken
in manufacturing and testing procedures, repair
should be carried out by an authorized after-sales
service centre for Bosch power tools.
In all correspondence and spare parts orders,
please always include the 10-digit article number
given on the nameplate of the machine.
WARNING! Important instructions for connecting a new 3-pin plug to the 2-wire cable.
The wires in the cable are coloured according to
the following code:
strain relief
live = brown
neutral = blue
To be fitted
by qualified
professional only
Do not connect the blue or brown wire to the
earth terminal of the plug.
Important: If for any reason the moulded plug is
removed from the cable of this machine, it must
be disposed of safely.
English - 4
2 609 932 440.book Seite 5 Montag, 13. Dezember 2004 11:06 11
Environmental Protection
Service and
Customer Assistance
Exploded views and information on spare
parts can be found under:
www.bosch-pt.com
Recycle raw materials instead of disposing as
waste
The machine, accessories and packaging should
be sorted for environmental-friendly recycling.
These instructions are printed on recycled paper
manufactured without chlorine.
The plastic components are labelled for categorised recycling.
Great Britain
Robert Bosch Ltd. (B.S.C.)
P.O. Box 98
Broadwater Park
North Orbital Road
Denham-Uxbridge
Middlesex UB 9 5HJ
✆ Service ............................ +44 (0) 18 95 / 83 87 82
✆ Advice line .................... +44 (0) 18 95 / 83 87 91
Fax ............................................. +44 (0) 18 95 / 83 87 89
Ireland
Beaver Distribution Ltd.
Greenhills Road
Tallaght-Dublin 24
✆ Service ................................... +353 (0)1 / 414 9400
Fax .................................................... +353 (0)1 / 459 8030
Australia and New Zealand
Robert Bosch Australia Pty. Ltd.
RBAU/SPT
1555 Centre Road
P.O. Box 66
3168 Clayton/Victoria
✆ ............................................. +61 (0)1 / 3 00 30 70 44
Fax ............................................. +61 (0)1 / 3 00 30 70 45
www.bosch.com.au
Declaration of Conformity
We declare under our sole responsibility that this
product is in conformity with the following standards or standardization documents: EN 60 745
according to the provisions of the directives
89/336/EEC, 98/37/EC.
Dr. Egbert Schneider
Senior Vice President
Engineering
Dr. Eckerhard Strötgen
Head of Product
Certification
Robert Bosch GmbH, Geschäftsbereich Elektrowerkzeuge
Subject to change without notice
15 • 2 609 932 440 • TMS • 03.12.04
English - 5