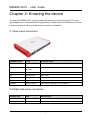
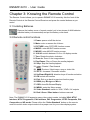
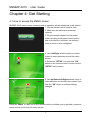
1
ENMMP-X210
Digital Media Player for TV and Computer
User Guide
ENMMP-X210 - User Guide
User’s Notice
This manual is provided “as is” without warranty of any kind, either express or implied,
including but not limited to the implied warranties or conditions of merchantability or fitness
for a particular purpose. In no event shall we, its directors, officers, employees or agents
be liable for any indirect, special, incidental, or consequential damages (including
damages for loss of profits, loss of business, loss of use or data, interruption of business),
even if we have been advised of the possibility of such damages arising from any defect or
error in this manual or product.
Specifications and information contained in this manual are furnished for information use
only, and are subject to change at any time without notice, and should not be construed as
a commitment by us. We assume no responsibility or liability for any errors or inaccuracies
that may appear in this manual, including the products and software described in it.
No part of this manual, including the products and software described in it, may be
reproduced, transmitted, transcribed, stored in a retrieval system, or translated into any
language in any form or by any means, except documentation kept by the purchaser for
backup purposes, without the express written permission of us.
Product warranty or service will not be extended if: (1) the product is repaired, modified or
altered, unless such repair, modification of alteration is authorized in writing by us; or (2)
the serial number of the product is defaced or missing.
Products and corporate names appearing in this manual may or may not be registered
trademarks or copyrights of their respective companies, and are used only for identification
or explanation and to the owners’ benefit, without intent to infringe.
z Windows, MS-DOS, and DirectX are registered trademarks of Microsoft Corporation.
z Adobe and Acrobat are registered trademarks of Adobe Systems Incorporated.
The product name and revision number are both printed on the product itself. Manual
revisions are released for each product design represented by the digit before and after
the period of the manual revision number. Manual updates are represented by the third
digit in the manual revision number.
Copyright © 2009 ENCORE ELECTRONICS, INC. All Rights Reserved.
2
ENMMP-X210 - User Guide
Contents:
Chapter 1: Introduction..................................................................................................................................... 4
1.1 Package Contents ................................................................................................................. 4
1.2 System Requirements........................................................................................................... 4
Chapter 2: Knowing the device ........................................................................................................................ 5
2.1 Rear panel connectors .......................................................................................................... 5
2.2 Right side panel connectors ................................................................................................. 5
2.3 Wires connection.................................................................................................................. 6
Chapter 3: Knowing the Remote Control ......................................................................................................... 7
3.1 Installing Batteries ............................................................................................................... 7
3.2 Remote control functions..................................................................................................... 7
Chapter 4: Get Starting..................................................................................................................................... 8
4.1 How to access the MENU screen......................................................................................... 8
4.2 System Settings.................................................................................................................... 9
4.3 Select the Source of Multimedia Files ............................................................................... 10
4.4 Running the Movie Player ................................................................................................. 11
4.5 Running the Music Player.................................................................................................. 12
4.6 Running the Photo Browser ............................................................................................... 13
4.7 Running the Text Reader.................................................................................................... 14
4.8 Running the File Browser .................................................................................................. 15
Chapter 5: Frequently Asked Questions ........................................................................................................ 16
Chapter 6: Technical Support ......................................................................................................................... 18
3
ENMMP-X210 - User Guide
Chapter 1: Introduction
The ENCORE ENMMP-X210 Digital Media Player for TV and Computer is a digital
multimedia player in palm size. It could play your favorite multimedia files stored in the
memory cards, USB flash drive or USB external hard disk storage onto your home
entertainment system with the remote control.
It supports to play music, photos and video files stored in many current multimedia file
formats. It supports one card reader for reading multimedia files from different memory
card formats and two USB ports for connections to USB flash drive or USB external hard
disk storages. It supports the VGA, CVBS and YPbPr connections for outputs of audio and
video to your home entertainment system.
The ENMMP-X210 is the simplest multimedia player you would ever have. It connects
your home entertainment center and enables you to enjoy music, photos and videos files
stored in your personal storages on your television and stereo system.
1.1 Package Contents
Please confirm the following parts are included when open the package. If not, please
contact your distributor or dealer.
z
z
z
z
z
z
z
ENMMP-X210 device
5V power adapter
AV / Audio cable
YPbPr cable
Batteries (optional)
Remote control
User manual
1.2 System Requirements
z
z
TV display unit or CRT / LCD monitor with YPbPr, CVBS or VGA connector.
Independent of OS (operating system) and no need of software driver installation.
4
ENMMP-X210 - User Guide
Chapter 2: Knowing the device
To setup the ENMMP-X210 to work is easy with some wire connections only. The most
typical application is illustrated as the figures below. Please follow the illustration to do wire
connections with all the connected devices in power off condition.
2.1 Rear panel connectors
CONNECTOR
TYPE
DESCRIPTION
DC 5V
5mm, - ---(o--- +
Power in jack for AC power adapter with DC 5V/2A output
VGA
15-pin D-Sub
Video output to CRT/LCD monitor
connector
Pr
Red RCA Jack
Video output
Pb
Blue RCA Jack
Video output
AV / Y
Green RCA Jack
Video output / CVBS Video (AV) output
L-Audio
Red RCA Jack
Audio output to speaker or TV AV audio in
R-Audio
White RCA Jack
Audio output to speaker or TV AV audio in
2.2 Right side panel connectors
CONNECTOR
TYPE
DESCRIPTION
USB
USB 2.0 host ports
Connects to USB flash drive or USB hard disk storage
SD/MMC/MS/XD
4 in 1 Card Reader
Supports to read SD/MMC/MS/XD memory card
5
ENMMP-X210 - User Guide
2.3 Wires connection
There is no special sequential order for those cables to be connected. But, it is strongly
suggested that, please leave the power cord of the AC adapter to be the last one to be
connected.
6
ENMMP-X210 - User Guide
Chapter 3: Knowing the Remote Control
The Remote Control allows you to operate ENMMP-X210 remotely. Aim the front of the
Remote Control at the Remote Control Receiver and press the control buttons as you
would.
3.1 Installing Batteries
Remove the battery cover of remote control, put in two pieces of AAA batteries
(alkaline battery recommended) and put the battery cover back.
3.2 Remote control functions
1. Power: power on/off the device
2. Mute: mute or resume the Volume
3. PICTURE: enter PICTURE function screen
4. MUSIC: enter MUSIC function screen
5. MOVIE: enter MOVIE function screen
6. 16:9/4:3: switch between 16:9 or 4:3 display modes
7. Turn: Rotate the photo clockwise
8. Zoom In: Zoom in the image shown
9. Play/Pause: Play or Pause the media playback
10. Stop: Stop the media playback
11. / : Rewind / Fast forward
12. / : Previous / Next image, song or video title
13. Vol +/-: Increase / Decrease volume
14. Up/Down/Right/Lift: direction keys of function selection
15. OK: select and confirm
16. Exit: Exit or go back to previous function page
16. BGM: play Background Music
17. OSD: show On Screen Display
18. MENU: enter the Menu screen
19. Video Standard: switch to VGA / YPbPr / AV outputs
20. Red / Green / Blue button: buttons reserved
Note: The ENMMP-X210 supports many video output modes, including VGA, NTSC
Interlace, NTSC Progressive, PAL Interlace, PAL Progressive, NTSC Composite, PAL
Composite and HD mode. Please utilize the “Video Standard” button on the remote
control to switch video output mode to the proper one for your video display system.
7
ENMMP-X210 - User Guide
Chapter 4: Get Starting
4.1 How to access the MENU screen
ENMMP-X210 menu screen accessing and its operation will be introduced in this section.
1. Get the remote control ready to work.
2. Make sure all cables are connected
correctly.
3. Plug the power adapter into the power
outlet, and plug in the power cord to power
jack on the device. And then, the device is
ready to work or to be configured.
4. Use Left/Right direction keys on remote
control to make selection around the menu
screen.
5. Select the “SETUP” icon and click “OK”
button on the remote control to enter into the
“SETUP” menu screen.
6. Use Up/Down/Left/Right direction keys to
make selection around the menu screen, and
click the “OK” button to confirm settings
changed.
Either the “Menu” or “OK” key on the remote control could help you to get back to previous
menu screen or exit from the menu screen.
8
ENMMP-X210 - User Guide
Notes:
1. If the logo or menu screen does not show on your video display system, please utilize
the “Video Standard” button on the remote control to switch to proper video output mode
for your video display system. You will go through the video output modes supported as
the sequence following: VGA mode, NTSC Interlace, NTSC Progressive, PAL Interlace,
PAL Progressive, NTSC Composite, PAL Composite, HD mode and then go back to
VGA mode.
2. Here are the relationships between video output modes supported and those video
output connectors:
z
AV (CVBS) output connector: NTSC Composite and PAL Composite
z
YPbPr output connectors: NTSC Interlace, NTSC Progressive, PAL Interlace,
PAL Progressive and HD mode (YPbPr)
z
VGA output D-Sub connector: VGA mode
4.2 System Settings
Language: English, Simplified Chinese or
Spanish
Slideshow Duration: the time to show a
picture in the slideshow
Slideshow Mode: slideshow display mode
Music Repeat Mode: music playback mode
Movie Repeat Mode: movie playback mode
Display Mode: 16:9 or 4:3 display mode
TV system: video output modes
Default: reset the system to default settings
If you have changed the video output mode from its default setting, please utilize the
“Video Standard” button on the remote control to switch to proper video output mode for
your video display system.
9
ENMMP-X210 - User Guide
4.3 Select the Source of Multimedia Files
1. Power on your device.
2. Plug in your USB flash drive or external
hard disk storage device, or insert your
memory card into the card reader slot. Then,
the system will show the devices available on
the screen.
3. Select the storage device icon available
and click “OK” button on the remote control.
10
ENMMP-X210 - User Guide
4.4 Running the Movie Player
1. Click the “MOVIE” button on the remote
control or select the “MOVIE” icon on the
screen, and then click the “OK” button on the
remote control.
2. Find your movie file and click “OK” button
on the remote control to playback the movie.
3. Use remote control to control playback of
the movie.
11
ENMMP-X210 - User Guide
4.5 Running the Music Player
1. Click the “MUSIC” button on the remote
control or select the “MUSIC” icon on the
screen, and then click the “OK” button on the
remote control.
2. Find your music file and click “OK” button
on the remote control.
3. Use the remote control to control the
playback of the music.
12
ENMMP-X210 - User Guide
4.6 Running the Photo Browser
1. Click the “PICTURE” button on the remote
control or select the “PICTURE” icon on the
screen, and then click the “OK” button on the
remote control.
2. Find your photo file and click “OK” button
on the remote control.
3. Click “Play” button on the remote control to
start the slideshow.
13
ENMMP-X210 - User Guide
4.7 Running the Text Reader
1. Select to the “TXT” icon on the screen and
click the “OK” button on the remote control.
2. Find your file and click “OK” button on the
remote control.
3. It will show the text on the screen.
14
ENMMP-X210 - User Guide
4.8 Running the File Browser
1. Select to the “FILE” icon on the screen and
click “OK” button on the remote control.
2. Find your file and click “OK” button on the
remote control.
15
ENMMP-X210 - User Guide
Chapter 5: Frequently Asked Questions
Q1. How to do the firmware upgrade?
A1.
1. Please download the latest firmware file
from our website if available.
2. Please unzip the firmware file to USB flash
drive or Memory Card, and plug it into the
device.
3. Select the “USB” icon or
“SD/MMC/MS/XD” icon as shown on the
screen, and then press “OK” button on the
remote control.
4. Select “FILE” icon and press “OK” button
on the remote control to enter file browser.
5. Use Up/Down/Left/Right keys to select
the firmware image file, and then press “OK”
button on the remote control to select the file.
It will then pop up a dialog box. Please use
Left/Right keys to select “V”, and then press
“OK” button on the remote control to upgrade
the firmware.
6. Please do not power off the device or do
anything else when it is upgrading the
firmware. Once it finished, it will reboot itself
automatically.
16
ENMMP-X210 - User Guide
Q2: How do I create subtitle files in SMI, SSA, SRT, ASS format with ANSI encoding?
A2: Since the player supports only subtitle files in ANSI encoding format, please follow the
steps below:
Please open the subtitle file with Notepad (a
simple text editing software that comes with
your Windows Operating System), click on
the Files Menu and select the “Save As”
option. Please change the Encode option to
ANSI encoding and click Save to proceed.
Q3: What video output modes are supported by the ENMMP-X210 device?
A3: The ENMMP-X210 supports many video output modes, including VGA, NTSC
Interlace, NTSC Progressive, PAL Interlace, PAL Progressive, NTSC Composite, PAL
Composite and HD mode. Please use the “Video Standard” button on the remote control
to switch video output mode to the proper one for your video display system.
17
ENMMP-X210 - User Guide
Chapter 6: Technical Support
For more details of product information and supports available, please check our website
http://www.encore-usa.com.
18
ENMMP-X210 - User Guide
NOTES:
_______________________________________________________________________
_______________________________________________________________________
_______________________________________________________________________
_______________________________________________________________________
_______________________________________________________________________
_______________________________________________________________________
_______________________________________________________________________
_______________________________________________________________________
_______________________________________________________________________
_______________________________________________________________________
_______________________________________________________________________
_______________________________________________________________________
19
V085N090731