1
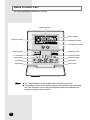
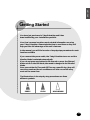
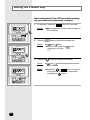
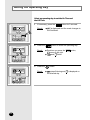
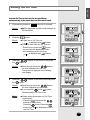
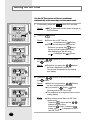
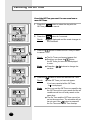
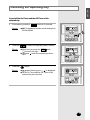
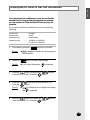
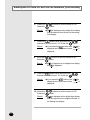
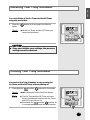
ENGLISH ESPAÑOL FRANÇAIS RUSSIAN E§§HNIKA DEUTSCH System Air Conditioner Aire acondicionado sistemático Climatiseur numérique multifonctionnel Sistema Aria Condizionata Sistema Ar Condicionado Klimaanlage System ™‡ÛÙËÌ· ∫ÏÈÌ·ÙÈÛÌÔ‡ ëËÒÚÂÏÌ˚È ÇÓÁ‰Û¯Ì˚È äÓ̉ˈËÓÌ ITALIANO 7-day Scheduler MWR-BS00 PORTUGUÊS OWNER’S INSTRUCTIONS MANUAL DE INSTRUCCIONES MANUEL D’UTILISATION ISTRUZIONI PER L’USO MANUAL DE INSTRUÇÕES GEBRAUCHSANWEISUNG √¢∏°π∂™ Ã∏™∆∏ àçëíêìäñàü èéãúáéÇÄíÖãü E S F I P D G R A DB98-20339A(1) Safety Precautions ● Before using the 7-day Scheduler, read the instructions carefully. reading the instructions, keep this owner's instructions and the installation manual in a handy and safe place. ● Never attempt to install the air conditioner or to move the 7-day Scheduler by yourself. ● After WARNING CAUTION E-2 ◆ Do not attempt to install or repair the 7-day Scheduler by yourself. ◆ Always consult an authorized service personnel for repair. ◆ When moving, consult an authorized service personnel for disconnection and reinstallation of the 7-day Scheduler. ◆ Ensure that the wall is strong enough to support the weight of the 7-day Scheduler. ◆ The 7-day Scheduler must be installed with the rated power supply. ◆ In the event of a malfunction (burning smell, etc.), turn off the electrical breaker immediately, and consult an authorized service personnel. ◆ Do not use inflammable gases near the 7-day Scheduler. ◆ Do not let water into the 7-day Scheduler. ◆ Do not operate the 7-day Scheduler with wet hands. ◆ Do not install the 7-day Scheduler in a location where it will come into contact with combustible gases, machine oil, sulphide gas, etc. ◆ Do not press the buttons with a sharp object. ◆ Do not pull or bend the 7-day Scheduler cable excessively. ◆ Do not use the 7-day Scheduler for other purpose. ◆ Do not spray insecticide or other combustible substances on the 7-day Scheduler. ◆ Do not clean the 7-day Scheduler with benzene, solvents or other chemicals. ◆ Do not apply excessive force to the 7-day Scheduler or disassemble it by yourself. ENGLISH Contents ◆ NAME OF EACH PART 4 ◆ GETTING STARTED 5 ◆ SETTING THE PRESENT DAY 6 ◆ SETTING THE PRESENT TIME 7 ◆ SETTING THE OPERATING DAY 8 ◆ SETTING THE ON TIME 9 ◆ SETTING THE OFF TIME 10 ◆ CANCELING THE ON TIME 11 ◆ CANCELING THE OFF TIME 12 ◆ CANCELING THE OPERATING DAY 13 ◆ CHECKING YOUR TIME SETTINGS 14 ◆ EXAMPLES OF HOW TO SET THE SCHEDULES 15 ◆ RESETTING YOUR 7-DAY SCHEDULER 17 ◆ LOCKING YOUR 7-DAY SCHEDULER 17 E-3 Name of Each Part The 7-day Scheduler is installed on the wall. Digital time display Set/Lock display Analog time display Operating day display Time adjustment buttons Select day button On Time button Present time button Off Time button Present day button Enter button Reset button Delete button Return button Note E-4 Set/Monitor button ◆ The 7-day Scheduler must be installed with a wired remote control. ◆ The schedule function of the wireless remote control, wired remote control and the 7-day Scheduler can be used simultaneously and the air conditioner will operate according to each schedule. ENGLISH Getting Started You have just purchased a 7-day Scheduler and it has been installed by your installation specialist. Your User’s manual contains much valuable information on using your 7-day Scheduler. Please take the time to read them as they will help you take full advantage of the unit’s features. In the manual, you will find a series of step-by-step procedures for each function available. If you connect the power cable, the 7-day Scheduler turns on and the Monitor Mode is selected automatically. If you do not press any button for 20 seconds or press the [Return] button while in the Set Mode, the mode is changed to the Monitor Mode. Once you set the On Time and Off Time on a specific day, they will run every week and the air conditioner will turn on and off every week on the same time. The illustrations in the step-by-step procedures use three different symbols: PRESS PUSH HOLD DOWN E-5 Setting the Present Day Before setting the On Time, Off Time and the operating day, you should set the present day in advance. 1 If necessary, press the Result: : ◆ 2 Press the Result: 3 E-6 button for 3 seconds. is displayed and the mode changes to the Set Mode. button to select the present day. ◆ and flicker. ◆ Each time you press the moves to the right. Press the button, button to complete the setting. Result: ◆ Note ◆ Press the or button to cancel it during setting. You cannot cancel after pressing the button. and stop flickering and the present day is selected. ENGLISH Setting the Present Time Before setting the On Time, Off Time and the operating day, you should set the present time in advance. 1 If necessary, press the Result: : ◆ 2 is displayed and the mode changes to the Set Mode. Press the button to select the present time. Result: : ◆ 3 button for 3 seconds. Press the the button. is displayed and flickers. buttons to set the hour and press Result: : ◆ Each time you press the buttons, the time is adjusted by one hour. ◆ If you press the button, and flicker. 4 Press the the button. buttons to set the minute and press Result: : ◆ Each time you press the buttons, the time is adjusted by one minute. ◆ If you press the button, stops flickering and the set time is displayed. Note ◆ Press the or button to cancel it during setting. You cannot cancel after pressing the button. E-7 Setting the Operating Day Select an operating day to set the On Time and the Off Time. 1 If necessary, press the Result: : ◆ 2 Press the Result: 3 E-8 is displayed and the mode changes to the Set Mode. button to select the operating day. ◆ Each time you press the moves to the right. ◆ and flicker. Press the Result: button for 3 seconds. button, button. ◆ stops flickering and the selected day. is displayed on ENGLISH Setting the On Time Set the On Time to turn on the air conditioner automatically at the same day and time each week. 1 If necessary, press the Result: : ◆ 2 button for 3 seconds. is displayed and the mode changes to the Set Mode. Press the button. Result: : ◆ If there are no On Time set is displayed and flickers. ◆ If there is more than one On Time set - Each time you press the button, the set times are displayed in order. After displaying all the set times, is displayed and flickers. 3 Press the the button. buttons to set the hour and press Result: : ◆ Each time you press the buttons, the time is adjusted by one hour. The set time is displayed on the analog time display. 4 Press the the button. buttons to set the minute and press Result: : ◆ Each time you press the buttons, the time is adjusted by one minute. ◆ If you press the button, stops flickering and the On Time is set. Note ◆ When setting more than one On Time continuously - Press the and press the buttons to set the time. Press the button. Press the button until is displayed to set a new On Time. E-9 Setting the Off Time Set the Off Time to turn off the air conditioner automatically at the same day and time each week. 1 If necessary, press the Result: : ◆ 2 3 is displayed and the mode changes to the Set Mode. Press the Result: button for 3 seconds. button. ◆ If there are no Off Time set is displayed and flickers. ◆ If there is more than one Off Time set - Each time you press the button, the set times are displayed in order. After displaying all the set times, is displayed and flickers. Press the the button. buttons to set the hour and press Result: : ◆ Each time you press the buttons, the time is adjusted by one hour. The set time is displayed on the analog time display. 4 Press the the button. buttons to set the minute and press Result: : ◆ Each time you press the buttons, the time is adjusted by one minute. ◆ If you press the button, stops flickering and the Off Time is set. ◆ The respective hour segment flickers on the analog display. Note E-10 ◆ When setting more than one Off Time continuously - Press the and press the buttons to set the time. Press the button. Press the button until is displayed to set a new Off Time. ENGLISH Canceling the On Time Cancel the On Time you want. You can cancel one or more On Time. 1 Press the button to select the day with the On Time you want to cancel. 2 Press the button for 3 seconds. Result: : ◆ 3 Press the to cancel. is displayed and the mode changes to the Set Mode. button to select the On Time you want Result: : ◆ The On Times you have set appear. ◆ Each time you press the button, the On Times you have set are displayed in order. Note 4 Press the ◆ Press the set time. buttons to change the button to cancel the selected On Time. Result: : ◆ Other On Times you have set appear. If you have canceled all the On Times, is displayed. Note ◆ Once you set the On Time on a specific day, the On Time will run every week and the air conditioner will turn on every week on the same time. ◆ The On Time and the Off Time can not be set on the same time. The schedule will not be set even if the button is pressed if the On Time and the Off Time overlap. E-11 Canceling the Off Time Cancel the Off Time you want. You can cancel one or more Off Times. 1 Press the button to select the day with the Off Time you want to cancel. 2 Press the button for 3 seconds. Result: : ◆ 3 4 Press the to cancel. is displayed and the mode changes to the Set Mode. button to select the Off Time you want Result: ◆ The On Times you have set appear first. ◆ Each time you press the button, the Off Times you have set are displayed in order. Note ◆ Press the set time. Press the buttons to change the button to cancel the selected Off Time. Result: : ◆ Other Off Times you have set appear. If you have canceled all the Off Times, is displayed. Note E-12 ◆ Once you set the Off Time on a specific day, the Off Time will run every week and the air conditioner will turn off every week on the same time. ◆ The On Time and the Off Time can not be set on the same time. The schedule will not be set even if the button is pressed if the On Time and the Off Time overlap. ENGLISH Canceling the Operating Day Cancel all the On Times and the Off Times of the selected day. 1 If necessary, press the Result: : ◆ 2 Press the button for 3 seconds. is displayed and the mode changes to the Set Mode. to select the operating day to cancel. Result: : ◆ Each time you press the button, moves to the right. ◆ and under the selected day flicker. 3 Press the button. Result: : ◆ stops flickering and is displayed. ◆ All the On Times and the Off Times of the selected day are canceled. E-13 Checking Your Time Settings You can check the On Time and the Off Time settings on the display. 1 Press the button in the Monitor Mode. Result: : ◆ Each time you press the button, moves to the right. ◆ The first On Time of the selected day you have set is displayed on the digital time display. All the On Times and the Off Times of the selected day you have set are displayed on the analog time display. ◆ If the On Time is not set, is displayed. Press the button to check the Off Time. 2 Press the Result: 3 button after checking the time settings. ◆ The present day and time is displayed. Cancel the On Time or the Off Time if needed. Result: : ◆ Press the button for 3 seconds to cancel the On Time or the Off Time set. Refer to pages 11 and 12 for further details. ◆ Press the button for 3 seconds to cancel the selected operating day. Refer to page 13 for further details. E-14 ENGLISH Examples of How to Set the Schedules You can set your air conditioner to turn on or off at the desired time. As long as the set time does not overlap, you can set the On Time and the Off Time as many as possible. If you want to set the air conditioner to turn on and off as following: Present day Present time Operating day Operating time 1 If necessary, press the Result: : ◆ 2 Monday 06:00 Wednesday 08:00(On)/12:00(Off) 13:00(On)/16:00(Off) button for 3 seconds. is displayed and the mode changes to the Set Mode. Press the button to select Wednesday. Result: : ◆ If you select Wednesday, is displayed. 3 Press the button and press the buttons to set the hour to '08'. Press the button. 4 Press the Press the buttons to set the minute to '00'. button. Result: : ◆ and 5 is displayed on the digital time display is displayed. Press the button and press the to set the hour to '12'. Press the button. buttons E-15 Examples of How to Set the Schedules (Continued) 6 Press the Press the Result: : ◆ 7 buttons to set the minute to '00'. button. is displayed on the digital time display and the selected time flickers on the analog time display. Press the button twice and press the buttons to set the hour to '13'. Press the button. Result: : ◆ If you press the button once, displayed and if you press it twice, displayed. 8 Press the Press the buttons to set the minute to '00'. button. Result: : ◆ and 9 is displayed on the digital time display is displayed. Press the button twice and press the buttons to set the hour to '16'. Press the button. Result: : ◆ If you press the button once, displayed and if you press it twice, displayed. 10 Press the Press the Result: : ◆ E-16 is is is is buttons to set the minute to '00'. button. is displayed on the digital time display and the respective hour segment flickers on the analog time display. ENGLISH Resetting Your 7-day Scheduler You can initialize all the On Times and the Off Times using only one button. 1 Press the Mode. button for 5 seconds in the Monitor Result: : ◆ All the On Times and the Off Times you have set are deleted. CAUTION ◆ Once you initialize your settings, the previous setting cannot be restored. Locking Your 7-day Scheduler You can lock the 7-day Scheduler to stop running the On Times and the Off Times without deleting all. 1 Press both the Result: : ◆ Note and the buttons for 3 seconds. is displayed on the Set/Lock display. ◆ The On Time and the Off Time you have set are not deleted. However the On Times and Off Times will not run. ◆ Press both the and the buttons for 3 seconds again to cancel the lock function. E-17 ELECTRONICS