1
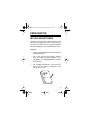
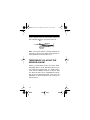
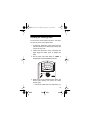
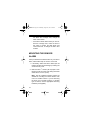
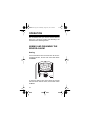
49-329.fm Page 1 Wednesday, August 18, 1999 4:23 PM Cat. No. 49-329 OWNER’S MANUAL Please read before using this equipment. Passive Infrared Sensor Alarm with Keychain Remote 49-329.fm Page 2 Wednesday, August 18, 1999 4:23 PM FEATURES Your RadioShack Passive Infrared Sensor Alarm is a high-quality, battery-operated security device. It uses a passive infrared (PIR) motion sensor to detect intruders and activate a built-in alarm. The sensor alarm’s features include: Wireless RF (Radio Frequency) Operation — provides maximum reliability with no wiring required. Built-In PIR Sensor — detects motion up to 30 feet (9.1 meters) away and from an angle of up to 110 degrees. Built-In Alarm Siren — activates when the sensor detects an intruder, then automatically shuts down and resets after about 2 minutes. User-Programmable Security Code — lets you set your own disarm code. Entry/Exit Delay — gives you 30 seconds to disarm the sensor alarm after you enter the protected area, and gives you 10 seconds to leave the protected area after you arm the alarm. © 1998 Tandy Corporation. All Rights Reserved. RadioShack is a registered trademark used by Tandy Corporation. 2 49-329.fm Page 3 Wednesday, August 18, 1999 4:23 PM Chime — lets you select a more pleasant sounding doorbell-type chime as the audible alarm. Panic Alarm — sounds the alarm immediately if you press PANIC on the main unit or if you press both ARM and DISARM (at the same time) on the remote control. RF Remote Control Keychain — gives you simple handheld control of your sensor alarm up to 50 feet (15.2 meters). Battery-Operated — works even when electrical power is off. 3 49-329.fm Page 4 Wednesday, August 18, 1999 4:23 PM CONTENTS Preparation .......................................................... 5 Installing Batteries .......................................... 5 Setting the Security Code .............................. 8 Main Unit ................................................. 8 Remote Control ..................................... 10 Resetting the Security Code ........................ 12 Installation ......................................................... Choosing a Mounting Location ..................... Temporarily Placing the Sensor Alarm ......... Checking the Coverage Area ................ Mounting the Sensor Alarm .......................... 13 13 14 15 16 Operation ........................................................... 18 Arming and Disarming the Sensor Alarm ..... 18 Arming .................................................. 18 Disarming .............................................. 20 Using the Chime Alarm ................................ 21 Using the Panic Alarm .................................. 22 Care .................................................................... 23 Replacing the Remote Control’s Battery ...... 23 FCC Statement ............................................ 25 Specifications .................................................... 27 4 49-329.fm Page 5 Wednesday, August 18, 1999 4:23 PM PREPARATION INSTALLING BATTERIES The main unit of your sensor alarm requires four AA batteries (not supplied) for power. For the best performance and longest life, we recommend alkaline batteries (available at your local RadioShack store). Cautions: • Use only fresh batteries of the required size and recommended type. • Do not mix old and new batteries, different types of batteries (standard, alkaline, or rechargeable), or rechargeable batteries of different capacities. 1. Use a Phillips screwdriver to remove the two screws from the battery compartment cover, then lift off the cover. 5 49-329.fm Page 6 Wednesday, August 18, 1999 4:23 PM 2. Place the batteries in the compartment and on top of the attached ribbon, as indicated by the polarity symbols (+ and –) marked inside. Note: As soon as you press the last battery in place, the alarm sounds a loud chirp and both the red and the green indicators light briefly. 3. Replace the cover, then reinsert and tighten the screws. Notes: • The alarm is disarmed after batteries are installed. • Replacing the main unit’s batteries automatically resets the security code to 1234. Any time you replace these batteries, be sure to apply the current security code to the remote control 6 49-329.fm Page 7 Wednesday, August 18, 1999 4:23 PM so the sensor alarm will recognize the remote signals (see “Remote Control” on Page 10). When the main unit’s LOW BATT indicator flashes about every 5 seconds, or if the sensor alarm stops operating properly, replace the batteries. ARM CHIME INSTANT DELAY LOW BATT PROG Cautions: • Dispose of old batteries promptly and properly. Do not burn or bury them. • Always remove old or weak batteries. Batteries can leak chemicals that can destroy electronic parts. 7 49-329.fm Page 8 Wednesday, August 18, 1999 4:23 PM SETTING THE SECURITY CODE Main Unit You can use a four-digit security code to disarm the alarm. The default code is 1234. Follow these steps to set a new security code at any time. Red Indicator Green Indicator INSTANT DELAY ARM CHIME LOW BATT PROG PANIC ARM CODE LEARN PROG 1 2 3 4 5 6 7 8 9 0 1. Set the slide switch to either of the ARM settings. 8 49-329.fm Page 9 Wednesday, August 18, 1999 4:23 PM 2. If necessary, disarm the sensor alarm (the red indicator should not be flashing) by entering the current security code. 3. Press PROG. The sensor alarm beeps once and the green PROG indicator lights. 4. Press CODE. The sensor alarm beeps twice and the PROG indicator flashes slowly. 5. Enter the current four-digit security code. The sensor alarm beeps three times and the PROG indicator flashes quickly. 6. Enter your new four-digit security code. The PROG indicator lights steadily and the sensor alarm chirps to show that it stored the new security code. 7. Press PROG. The PROG indicator turns off. Note: If you don’t press a button for about 30 seconds, the sensor alarm beeps, the PROG indicator turns off automatically, and (if you have not completed Step 5) the security code remains unchanged. Try arming and disarming your sensor alarm from the main unit to be sure the security code works (see “Arming and Disarming the Sensor Alarm” on Page 18). 9 49-329.fm Page 10 Wednesday, August 18, 1999 4:23 PM Remote Control Each time you remove and replace the batteries in the main unit, you must program the main unit to recognize the remote control’s signals. If you change the security code, there is no need to reprogram the main unit; it will still recognize the remote signals. Follow these steps to program the main unit so you can use your remote control. 1. Set the slide switch to either of the ARM settings. 2. Press PROG. The sensor alarm beeps once and its green PROG indicator lights. 3. Press LEARN . The sensor alarm beeps twice and its PROG indicator flashes slowly. PROG PANIC ARM CODE LEARN PROG 1 2 3 4 5 6 7 8 9 0 4. Enter your four-digit security code. The sensor alarm beeps three times and its PROG indicator flashes quickly. 10 49-329.fm Page 11 Wednesday, August 18, 1999 4:23 PM 5. Press ARM or DISARM on your remote control. The alarm’s PROG indicator lights steadily and the sensor alarm chirps, indicating that it received the remote signal. ARM DISARM PANIC 6. Press PROG. The sensor alarm’s PROG indicator turns off. Note: If you do not press a button for about 30 seconds, the sensor alarm beeps, its PROG indicator turns off automatically, and (if you have not completed Step 4) the sensor alarm does not recognize the remote signals. Start over at Step 1. Try arming and disarming your sensor alarm from the remote control to be sure the sensor alarm recognizes the remote signals (see “Arming and Disarming the Sensor Alarm” on Page 18). 11 49-329.fm Page 12 Wednesday, August 18, 1999 4:23 PM RESETTING THE SECURITY CODE If you ever forget your security code, you can easily reset it to the default code (1234) by removing and reinstalling the main unit’s batteries (see “Installing Batteries” on Page 5). Remember that after removing and reinstalling batteries in the main unit, you must program the main unit to recognize the remote control’s signals (see “Remote Control” on Page 10). Note: The alarm is disarmed after batteries are installed. 12 49-329.fm Page 13 Wednesday, August 18, 1999 4:23 PM INSTALLATION To help you avoid false alarms, mount your sensor alarm’s main unit: • where it will not be in direct sunlight • away from heat sources, such as space heaters, radiators, and exposed light bulbs • out of strong drafts, like those caused by central heating vents or air conditioners or air movement around fireplaces, exterior walls and windows, and refrigerators • so it does not detect your pet’s movements CHOOSING A MOUNTING LOCATION The sensor alarm’s main unit is designed to be mounted on a smooth, flat wall surface. Select a mounting location where the alarm is most likely to detect an intruder. We recommend mounting it at a height of about 51/2 feet (1.7 meters). At this height, the sensor alarm detects motion up to 30 feet (9.1 meters) away and from an angle of up to 110 de- 13 49-329.fm Page 14 Wednesday, August 18, 1999 4:23 PM grees. However, there is a blind area of about 10 feet (3 meters) directly in front of the main unit. Coverage Area (Side View) 1/ feet 5 1/2 5Feet 2 SIDE VIEW "A" ZONE 10 feet "C" ZONE Blind Area (10 Feet) "B" ZONE Note: Your sensor alarm’s coverage depends on how high you mount it, the shape of the room(s), furniture placement in the area, and so on. TEMPORARILY PLACING THE SENSOR ALARM Before you permanently mount the sensor alarm, temporarily place it at the selected location so you can check the coverage area. You might need to check several different locations to find the best one. Place the main unit on a stepladder (for example) at the recommended height, then move the stepladder to various locations in the room(s) you want to protect. 14 49-329.fm Page 15 Wednesday, August 18, 1999 4:23 PM Checking the Coverage Area To be sure the sensor detects motion in the areas you want to protect, follow these steps. 1. If necessary, disarm the sensor alarm (the red indicator should not be flashing) by entering the current security code. 2. Confirm that the area is clear of anything that might trigger the alarm (such as people and pets). 3. Set the main unit’s slide switch to CHIME. A doorbell-type chime immediately sounds. ARM CHIME INSTANT DELAY LOW BATT PROG 4. Walk around in the protected area. When the sensor alarm detects your motion, the chime sounds again. • If the sensor alarm does not chime when you 15 49-329.fm Page 16 Wednesday, August 18, 1999 4:23 PM are within the coverage area, change the main unit’s location. • If the sensor alarm chimes when you are outside the coverage area, check the area to see what is causing the false alarm and remove the item, or change the main unit’s location. MOUNTING THE SENSOR ALARM After you determine the best location for your sensor alarm, follow these steps to mount it on the wall. 1. If necessary, disarm the sensor alarm (the red indicator should not be flashing) by entering the current security code. 2. Drill two holes 13/8 inches (35 mm) apart. Then thread a screw into each hole, letting the heads extend about 3/16 inch (5 mm). Note: The two supplied mounting screws are suitable for mounting the sensor alarm’s main unit on a wooden surface. If you are mounting the main unit on drywall, masonry, or another type of surface, use the appropriate mounting hardware (not supplied). 16 49-329.fm Page 17 Wednesday, August 18, 1999 4:23 PM 3. Turn the main unit about 30 degrees counterclockwise, then slide the left screw head into the horizontal groove on the back of the unit. Curved Groove Horizontal Groove 4. Turn the main unit clockwise (so the right screw head slides into the curved groove) until it is secure. TT BA W LO OG PR NT TA INS AY L DE M AR OG IM CH PR N AR LE E 5 D CO E 4 M AR 0 3 IC N PA 9 2 8 1 7 6 17 49-329.fm Page 18 Wednesday, August 18, 1999 4:23 PM OPERATION We recommend that you test the sensor alarm at least once a month by arming and disarming it as described in the following section. ARMING AND DISARMING THE SENSOR ALARM Arming To have the alarm’s siren sound as soon as the sensor detects motion, set the main unit’s slide switch to INSTANT. ARM CHIME INSTANT DELAY LOW BATT PROG To have the alarm’s siren sound about 30 seconds after the sensor detects motion, set the slide switch to DELAY. 18 49-329.fm Page 19 Wednesday, August 18, 1999 4:23 PM To arm the sensor alarm, press ARM on the main unit or on the remote control. At either the INSTANT or DELAY settings, you have 10 seconds to leave the sensor alarm’s coverage area. During this exit delay, the main unit beeps every second and its red indicator flashes. At the end of the 10-second delay, the main unit beeps twice, the indicator flashes about every 5 seconds, and the sensor alarm is armed. PROG PANIC ARM CODE LEARN PROG 1 2 3 4 5 6 7 8 9 0 If you arm the sensor alarm in the INSTANT setting, when the alarm detects motion in the protected area, the alarm siren sounds immediately and the indicator stays on. If you arm the sensor alarm in the DELAY setting, when the alarm detects motion in the protected area, the indicator flashes every second for about 30 seconds, then the alarm siren sounds and the indicator stays on. 19 49-329.fm Page 20 Wednesday, August 18, 1999 4:23 PM The alarm siren sounds for up to 2 minutes. To stop it sooner, disarm the alarm (see “Disarming”). If you do not disarm the alarm, the sensor alarm is still armed and the siren will sound again the next time the sensor detects motion. Disarming To disarm the sensor alarm and stop the alarm from sounding, enter your four-digit security code. The main unit beeps twice when you enter the correct code. To temporarily silence the alarm using the remote control, which gives you time to enter your security code, follow these steps. 1. Press DISARM on the remote control. The alarm stops sounding for about 30 seconds. During this pause, the main unit beeps every second and its red indicator flashes. 2. Enter your four-digit security code within 30 seconds. Otherwise, the alarm will sound again. Notes: • You can temporarily silence the alarm only once each time you disarm it. 20 49-329.fm Page 21 Wednesday, August 18, 1999 4:23 PM • If entering your security code does not disarm the sensor alarm, try entering the default code (1234). If that code does not disarm the alarm either, remove the sensor alarm from the wall and remove and reinstall the batteries. This resets the security code to 1234. USING THE CHIME ALARM If you prefer to hear a chime instead of a siren when the sensor alarm detects motion, follow these steps. 1. If necessary, disarm the sensor alarm (the red indicator should not be flashing) by entering the current security code. 2. Set the slide switch on the main unit to CHIME. A doorbell-type chime immediately sounds. 3. When the sensor detects any motion, the chime sounds again. Note: There is no need to arm or disarm the alarm when using the CHIME setting because the chime sounds every time the sensor detects motion. To turn off the chime, set the slide switch to either INSTANT or DELAY. 21 49-329.fm Page 22 Wednesday, August 18, 1999 4:23 PM USING THE PANIC ALARM If you want to startle an intruder (for example) by instantly sounding the alarm siren, simply press PANIC on the main unit or press ARM and DISARM on the remote control at the same time. The siren alarm immediately sounds, even if the sensor alarm was set to CHIME or not armed at all. The alarm sounds for up to 2 minutes. To stop it sooner, enter your current security code. PROG 22 PANIC ARM CODE LEARN PROG 1 2 3 4 5 6 7 8 9 0 49-329.fm Page 23 Wednesday, August 18, 1999 4:23 PM CARE To enjoy your RadioShack Passive Infrared Sensor Alarm for a long time: • Keep the sensor alarm and remote dry. If they do get wet, wipe them dry immediately. • Use and store the sensor alarm and remote only in normal temperature environments. • Handle the sensor alarm and remote gently and carefully. Don’t drop them. • Keep the sensor alarm and remote away from dust and dirt. • Wipe the sensor alarm and remote with a damp cloth occasionally to keep them looking new. Modifying or tampering with the sensor alarm’s or remote’s internal components can cause a malfunction and invalidate the system’s warranty. If your sensor alarm system is not performing as it should, take it to your local RadioShack store for assistance. REPLACING THE REMOTE CONTROL’S BATTERY Your sensor alarm’s remote control uses the supplied 12V alkaline battery for power. When the remote control’s indicator lights dimly or not at all 23 49-329.fm Page 24 Wednesday, August 18, 1999 4:23 PM when you press ARM or DISARM, or if the remote control stops operating properly (the main unit cannot receive the remote control’s signals), replace the battery. We recommend you replace it with an alkaline battery (available at your local RadioShack store). Cautions: Use only a fresh battery of the required size and recommended type. Follow these steps to replace the battery. 1. Using a Phillips screwdriver, remove the screw from the back of the remote control, then lift off the back case. 2. Remove the old battery, then place a fresh battery inside the back cover, as indicated by the polarity symbols (+ and –) marked inside. 3. Be sure the small loop on one end of the keychain fits over the post inside the back cover, then replace the cover. Reinsert and tighten the screw. Note: You do not need to reset the remote control or main unit after replacing the remote’s battery. 24 49-329.fm Page 25 Wednesday, August 18, 1999 4:23 PM Cautions: • Dispose of the old battery promptly and properly. Do not burn or bury it. • Always remove an old or weak battery. Batteries can leak chemicals that can destroy electronic parts. FCC STATEMENT This equipment has been tested and found to comply with the limits for a Class B digital device, pursuant to Part 15 of the FCC Rules. These limits are designed to provide reasonable protection against harmful interference in a residential installation. This equipment generates, uses, and can radiate radio frequency energy and, if not installed and used in accordance with the instructions, may cause harmful interference to radio communications. However, there is no guarantee that interference will not occur in a particular installation. If this equipment does cause harmful interference to radio or television reception, which can be determined by turning the equipment off and on, the user is encouraged to try to correct the interference by one or more of the following measures: 25 49-329.fm Page 26 Wednesday, August 18, 1999 4:23 PM • Reorient or relocate the receiving antenna. • Increase the separation between the equipment and receiver. Consult your local RadioShack store if the problem still exists. Changes or modifications not expressly approved by RadioShack may cause interference and void the user’s authority to operate the equipment. 26 49-329.fm Page 27 Wednesday, August 18, 1999 4:23 PM SPECIFICATIONS MAIN UNIT Power Source ..................... 4 AA Alkaline Batteries (Not Included) Battery Life .......... About 2 Months in Disarm Mode Operating Ambient Temperature .............. 32–122F (0–50C) Operating Relative Humidity ........... Less than 95% Auto Alarm Reset Time ................. 120 ±5 Seconds Siren Output Sound Pressure Level: About 108 dB at 1 Foot (34 cm) Internal PIR Detection Area ............ 30 Feet (9.1 m) at a 110 Angle Entry Delay Time ............................ 30 ±3 Seconds Exit Delay Time ............................... 10 ±2 Seconds KEYCHAIN REMOTE CONTROL Power Source ........ 12V Alkaline Battery (Included) Battery Life ................. About 1 Year of Normal Use RF Frequency ................................... 312 ±0.5 MHz Remote Control Distance .... Up to 50 Feet (15.2 m) Specifications are typical; individual units might vary. Specifications are subject to change and improvement without notice. 27 49-329.fm Page 28 Wednesday, August 18, 1999 4:23 PM Limited Ninety-Day Warranty This product is warranted by RadioShack against manufacturing defects in material and workmanship under normal use for ninety (90) days from the date of purchase from RadioShack company-owned stores and authorized RadioShack franchisees and dealers. EXCEPT AS PROVIDED HEREIN, RadioShack MAKES NO EXPRESS WARRANTIES AND ANY IMPLIED WARRANTIES, INCLUDING THOSE OF MERCHANTABILITY AND FITNESS FOR A PARTICULAR PURPOSE, ARE LIMITED IN DURATION TO THE DURATION OF THE WRITTEN LIMITED WARRANTIES CONTAINED HEREIN. EXCEPT AS PROVIDED HEREIN, RadioShack SHALL HAVE NO LIABILITY OR RESPONSIBILITY TO CUSTOMER OR ANY OTHER PERSON OR ENTITY WITH RESPECT TO ANY LIABILITY, LOSS OR DAMAGE CAUSED DIRECTLY OR INDIRECTLY BY USE OR PERFORMANCE OF THE PRODUCT OR ARISING OUT OF ANY BREACH OF THIS WARRANTY, INCLUDING, BUT NOT LIMITED TO, ANY DAMAGES RESULTING FROM INCONVENIENCE, LOSS OF TIME, DATA, PROPERTY, REVENUE, OR PROFIT OR ANY INDIRECT, SPECIAL, INCIDENTAL, OR CONSEQUENTIAL DAMAGES, EVEN IF RadioShack HAS BEEN ADVISED OF THE POSSIBILITY OF SUCH DAMAGES. Some states do not allow the limitations on how long an implied warranty lasts or the exclusion of incidental or consequential damages, so the above limitations or exclusions may not apply to you. In the event of a product defect during the warranty period, take the product and the RadioShack sales receipt as proof of purchase date to any RadioShack store. RadioShack will, at its option, unless otherwise provided by law: (a) correct the defect by product repair without charge for parts and labor; (b) replace the product with one of the same or similar design; or (c) refund the purchase price. All replaced parts and products, and products on which a refund is made, become the property of RadioShack. New or reconditioned parts and products may be used in the performance of warranty service. Repaired or replaced parts and products are warranted for the remainder of the original warranty period. You will be charged for repair or replacement of the product made after the expiration of the warranty period. This warranty does not cover: (a) damage or failure caused by or attributable to acts of God, abuse, accident, misuse, improper or abnormal usage, failure to follow instructions, improper installation or maintenance, alteration, lightning or other incidence of excess voltage or current; (b) any repairs other than those provided by a RadioShack Authorized Service Facility; (c) consumables such as fuses or batteries; (d) cosmetic damage; (e) transportation, shipping or insurance costs; or (f) costs of product removal, installation, set-up service adjustment or reinstallation. This warranty gives you specific legal rights, and you may also have other rights which vary from state to state. RadioShack Customer Relations, Dept. W, 100 Throckmorton St., Suite 600, Fort Worth, TX 76102 We Service What We Sell 11A98 3/97 09045520201 Printed in Hong Kong