1
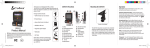
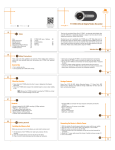
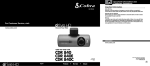
Thank you for purchasing Drive HD, by Cobra.
The CDR 810 is a 1080P HD Digital Video Recorder and
Dash Cam designed to protect your vehicle and give you
peace of mind.
CDR 810 Functions
1
2
3
Mounting the CDR 810
3
9
Package Contents Include:
• CDR 810 Dash Cam (not shown)
11
9
15
12
10
13
• Product Manual
14
16
• Heavy Duty Suction Cup Mount
• 8GB Micro SD Card
CDR 810
Product Manual
NOTE: This device complies with part 15 of FCC rules: Operation is subject to the following
two conditions: (1) This device may not cause harmful interference, and (2) This device must
accept any interference received including interference that may cause undesired operation.
CAUTION: Modifications or parts not approved by Cobra Electronics Corporation may violate
FCC Rules and void authority to operate this equipment.
This device complies to Canadian Standard ICES-003.
CAN ICES-3B/NMB-3B.
• Cigarette Lighter Adapter
• USB Cable
• AV Cable
Please take a moment to read through
this product manual to fully understand
how to properly mount and operate
your CDR 810.
6
7 4 5
Suction Cup Bracket
8
1. Menu
2. Photograph/Playback
3. File Lock/Enter
4. Record/Up
5. Microphone/Down
6. REC Indicator Light
7. Charging Indicator Light
8. MIC Indicator Light
9. AV Out
10. Microphone
12.
13.
13.
14.
MicroSD Card Slot
USB Interface
Reset
On/Off Button/
Toggle iR LEDs
15. LED Display
16. Camera Lens
The CDR 810 should be mounted to the windshield
using the included Suction Cup Mount. Make sure
to line the unit up so that it has a clear view of the
road. If you are rotating the camera to view the cab,
make sure to change the Rotate Setting to ON in the
Tools Menu.
Operation
Turn on/off: press the on/off button to turn the unit on, press
and hold the on/off button to turn the unit off.
Continuous Cyclical Recording: Cyclical recording means
that once the memory card is full this camera will continuously
overwrite the oldest footage recorded. To protect a clip so that it
will not be overwritten, press the Lock File Button. The
icon will show on the screen.
Navigating the Menu: Press the Menu Button to enter into
menu. Press the Menu Button again to cycle through basic and
mode specific settings lists. To navigate through the menus
use the Up and Down buttons, which double as Rec and Mic
respectively. Press the File Lock/Enter Button to enter specific
settings and select specific options. Pressing the Menu Button
again will exit the menu screen.
Video: In recording mode, press the Record Button to start
recording with the REC indicator light flashing, press the
Record Button again to stop recording and the file will be saved
automatically.
Photograph: Press the Photograph/Playback Button to enter
photograph mode. Press the button again to snap still photos.
To return to video mode press the Record Button.
COBRA LASER DETECTORS
Operation
View Videos and Photographs: Enter Playback Mode by pressing and holding the Photograph/Playback Button. You can then
cycle through your recordings using the up/down arrows and play
or stop a clip by pressing the File Lock/Enter Button.
G-Sensor: The G-Sensor is an accelerometer that can detect if
you are in an accident. If the G-Sensor is triggered, the current
video segment will automatically be locked so that it is not overwritten by cyclical recording. The sensitivity of the G-Sensor can
be adjusted in settings. LED Headlight: To turn on the LED highlights simply tap the ON/
OFF button while in recording mode.
AV OUT: Plugging the AV Cable into the AV OUT port allows you to
broadcast the Dash Cam’s screen on a TV or monitor that accepts
AV Signals. The Dash Cam will operate normally. The unit outputs
an NTSC signal that works with most analog TV inputs.
Battery: The battery in this unit is intended to operate the unit
for 15 seconds after power loss due to an accident or crash.
If the unit is turned on without the Cigarette Lighter Adapter
attached you can manually start recording and the camera will
operate for approximately 1.5 hours on battery power. Note that
the screen will turn off after 30 seconds to conserve battery.
Operation
USB: USB is used to power DVR as well as allow connection to
PC for file transfers. Connect the product to your computer with
the included USB cord to view and manage video and image files.
Choose Mass Storage to view files or USB Charge if you just want
to power the unit. If Mass Storage is selected you will be able to
navigate to “Removable Disk” on your computer. Video files are
AVI format and can be played using most video players.
Reset: Use a sharp point to press this button if the unit freezes
or does not turn on for any reason. Reset will not erase video
recordings or customized settings.
Specifications
Visual Angle............................. 140 degrees
Lens Degrees Rotation............. 200 degrees
Sensor..................................... 5.0 megapixels
Video resolution ....................... 1080P/1080PHD/720P/WVGA
Video Format ........................... VGA
VGA ......................................... 720P/30fps/WVGA/30fps
Picture Format ......................... JPEG
Picture Resolution.................... 2592 x 1944 (Max. 12M)
Highlight.................................. Supported
Web Camera............................ Supported
Motion Detection ..................... Supported
Removable Disk....................... Supported
Sound Recording ..................... Synchronous video and sound
record/only video without sound
(optional)
MicroSD Card .......................... 8GB included
Storage Temperature ............... -20 - 60C
Operation Temperature ............ -10 - 60C
Player Software ....................... Windows Media Player/KM Player
USB Interface........................... USB 2.0
Display Screen......................... 2.0 TFT
Capacity of Battery .................. 250-450 mAh
Charging Current ..................... 200-300MA
Charging Time ......................... 1 hour
AV Output ................................ NTSC/PAL Analog Video & Audio
GPS RADAR DETECTOR