1
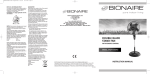
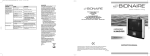
BU1300WIUK06EM1.qxd
9/18/06
11:24 AM
Page 1
NOTE: If the terminals in the plug are not
marked or if you are unsure or in doubt about
the installation of the plug please contact a
qualified electrician. If a 13A 3-pin plug is fitted,
it must be an ASTA approved plug, conforming
to BS1363 standard. Replacement 3A fuse
must be BSI or ASTA BS1362 approved.
•
GUARANTEE
PLEASE KEEP YOUR RECEIPT AS THIS WILL
BE REQUIRED FOR ANY CLAIMS UNDER
THIS GUARANTEE.
• This product is guaranteed for 2 years.
• In the unlikely event of breakdown, please
take it back to the place of purchase, with
your till receipt and a copy of this
guarantee.
• The rights and benefits under this
guarantee are additional to your statutory
rights which are not affected by this
guarantee.
• The manufacturer undertakes within the
specific period, to repair or replace free of
charge, any part of the appliance found to
be defective provided that
• We are promptly informed of the defect.
•
•
ULTRASONIC
HUMIDIFIER
The appliance has not been altered in any
way or subjected to misuse or repair by a
person other than a person authorised by
the manufacturer.
No rights are given under this guarantee to
a person acquiring the appliance second
hand or for commercial or communal uses.
Any repaired or replaced appliance will be
guaranteed on these terms for the
remaining portion of the guarantee.
BU1300W
THIS PRODUCT IS MANUFACTURED TO
COMPLY WITH THE E.E.C. DIRECTIVES
73/23/EEC, 89/336/EEC AND 98/37/EEC.
Waste electrical products should not be
disposed of with Household
waste. Please recycle where
facilities exist. Check on the
following website for further
recycling and WEEE information:
www.jardencs.com or
e-mail [email protected]
Holmes Products (Europe) Ltd
1 Francis Grove
London SW19 4DT
England
Fax: +44 (0)20 8947 8272
Email: [email protected]
Website address: www.jardencs.com
UK - Free phone Customer Service Helpline – 0800 052 3615
© 2006 Sunbeam Products, Inc. doing business as Jarden Consumer Solutions. All Rights Reserved.
9100030004271
BU1300WIUK06EM1
INSTRUCTION MANUAL
BU1300WIUK06EM1.qxd
9/18/06
11:24 AM
Page 5
ENGLISH
BU1300W
CONGRATULATIONS
By choosing a Bionaire® humidifier, you have
chosen one of the finest humidifiers on the
market today
Fig. 1
READ AND RETAIN THE FOLLOWING
FOR FUTURE REFERENCE.
GENERAL DESCRIPTION (SEE FIG. 1)
A Mist Nozzle
B Power/Night Light
C Humidity Control Switch
D Base
E Water Tank
A
E
B
C
D
IMPORTANT SAFEGUARDS
Please read this manual carefully before using
this appliance, as correct use will give you the
best possible performance.
When using electrical appliances, basic safety
precautions should always be followed, including
the following:
• Read all instructions before using.
• Close supervision is necessary when any
appliance is used near children. Appliance
must be kept out of the reach of children.
• Appliance must be used by a responsible
adult.
• Unplug from outlet when not in use, before
putting on or taking off parts, and before
cleaning.
• Do not operate any appliance with a
damaged cord or plug, or after the appliance
malfunctions or has been dropped or
damaged in any manner. If the cord is
damaged, it must be replaced by the
manufacturer or a service agent in order to
avoid hazard.
• The use of accessory attachments not
recommended or sold by Bionaire® may
result in fire, electric shock or personal
injury.
• Do not use outdoors.
• Do not let cord hang over edge of table or
counter, or touch hot surface including the
stove.
• Do not use appliance for other than intended
use.
• Always disconnect the appliance from the
supply if it is left unattended and before
assembling, disassembling or cleaning.
• In the event of a momentary electrical
disturbance, the product may malfunction
and require user to reset the product.
•
•
•
•
•
•
•
•
•
•
•
•
•
•
•
Check the operating voltage shown on the
back of the unit. Do not operate at higher
voltage than shown.
Never turn on, plug in or unplug the
humidifier while your hands are wet in order
to avoid electric shock.
Ensure humidifier is level. If the humidifier is
not level always turn the power off before
handling it.
Do not disassemble the humidifier while it is
plugged in to avoid electric shocks.
If you need to replace the plug or cable
always refer to the instructions.
Do not operate appliance with a damaged
cord or if the appliance has been dropped or
damaged. To avoid the risk of electric shock
never disassemble the appliance. Take
appliance to a qualified repair centre for
examination and repair. Incorrect re-assembly
can cause a risk of electric shock when
used.
If the power supply cord is damaged, it must
be replaced by the qualified persons in order
to avoid a hazard.
Do not place humidifier in front of ventilating
outlets and keep away from furniture and
other electrical appliances.
Do not add water directly into the mist
nozzle outlet.
Unplug the humidifier from the mains if it is
not to be used for any length of time.
Do not pour water into the mist nozzle outlet
while the humidifier is plugged into the
mains.
When the water tank is full the humidifier
can be used for 8-10 hours without refilling.
NOTE: Please note that the output level will
vary depending on the humidity and
temperature of the room.
Always place humidifier on a firm, flat, level
surface. A waterproof mat or pad is
recommended for under the humidifier.
NEVER place it on a surface that may
become damaged by exposure to water and
moisture (i.e. finished floor).
DO NOT allow the Moisture Outlet to directly
face the wall. Moisture could cause damage,
particularly to wallpaper.
NEVER tilt, move, or attempt to empty unit
while it is operating. Shut off and unplug
before removing the water tank and moving
the unit. DO NOT attempt to remove the
water tank within 15 minutes after the
humidifier is turned off and unplugged.
Serious injury may result.
•
•
Excessive humidity in a room can cause water
condensation on windows and some furniture.
If this happens, turn the humidifier OFF
Do not use humidifier in an area where
humidity level is in excess of 55%.
PRE-OPERATING INSTRUCTIONS
1. Be sure the humidifier is disconnected from
the wall outlet and humidity control switch
(C) is in the off position (
).
2. Remove the tank lid and fill with cool, fresh
tap water.
3. Replace the lid.
4. Place the water tank (E) on the base (D).
5. Ensure humidifier is level. If the humidifier is
not level always turn the power off before
handling it.
OPERATING INSTRUCTIONS
1. Plug the power cord into a convenient
electrical outlet.
2. Power/Night light (B) will illuminate when the
unit is operating. When the unit is out of
water or when the unit is switched off, the
Power/Night light will not be working.
3. Turn your humidifier on by rotating the
humidity control switch (C) to the high
position
It will take a few minutes before
full moist air output is obtained. Please note
the mist will only be visible and humidifying
between the moisture droplet marks shown
on your humidifier (Min
- Max
).
4. Power/night light (B) will illuminate when
humidifier is connected to main electrical
power and the humidifier is switched on.
5. To reduce the speed at which the vapour is
emitted, turn the humidity control switch
towards the low position (
).
6. Rotate the humidity control switch from low
to high to regulate the mist output.
7. Rotate the mist nozzle (A) to the desired
mist direction.
8. When the unit runs out of water, the
transducer will automatically shut off.
9. Turn the humidity control switch anti-clockwise
to the off ( ) position, then unplug the unit.
10. Before refilling the tank, empty any residual
water and follow the Daily maintenance
instructions.
11. Refill the water tank with cool tap water and
replace onto the base.
12. Plug power cord into the electrical outlet and
turn the humidity control switch clockwise to
the desired humidity level.
13. DO NOT move the humidifier with water in
the tank on the humidifier base. This may
cause the humidifier to function
intermittently, or stop emitting mist
altogether. Should this occur, simply remove
excess water from the humidifier base.
IMPORTANT: If you do not plan to use your
humidifier for two or more days, make sure any
residual water is drained from the tank and base
to prevent any bacteria growth in stagnant water.
CARE AND CLEANING
Humidifiers provide comfort by adding moisture
to dry, heated indoor air. To get the most benefit
from the humidifier and to avoid product misuse,
follow all instructions carefully, specifically the
operation, care and maintenance guidelines.
Please note this is an electrical appliance and
requires attention when in use.
Cleaning your humidifier every one or two
weeks, depending on the water conditions is
important in order to maintain efficient, healthy,
odour-free operation. Water quality varies widely
and, combined with build-up of mineral scale in
your humidifier, may under certain conditions
promote the growth of micro-organisms in the
water tank.
Before cleaning, Please note the
following:
• DO NOT use soap, detergents, abrasives,
gasoline, glass or furniture polish, or boiling
water to clean any part of your Ultrasonic
Humidifier. These will interfere with the
proper operation of your unit and may affect
its appearance.
• DO NOT use sharp or metal objects to clean
mineral deposits in the reservoir. Contact
with sharp objects can result in damage to
the plastic.
• Mineral deposits should be soaked for up to
20 minutes in Bionaire® "Clean-Away"
solution or in plain vinegar and water to help
with their removal.
• NEVER mix "Clean-Away" solution with any
other fluid!
• DO NOT clean any part of your humidifier in
the dishwasher.
Daily maintenance:
1. Before cleaning, set the humidity control
switch to the Off position (
) and unplug
the unit from the electrical outlet.
2. Lift off the tank of the humidifier.
3. Carry the base and the tank to the sink, then
drain and rinse the base and tank thoroughly
to remove any sediment or dirt. Wipe clean
and dry with a clean cloth or paper towel.
TROUBLE SHOOTING
PROBLEM
Power light is off.
CAUSE
SOLUTION
Humidifier is not plugged in or Plug into power socket and turn the
humidity control switch is on the humidity control switch clockwise.
off (
) position.
No water in tank. Humidity
control switch is on the
off (
) position.
Fill the tank with water. Turn the humidity
control switch clockwise.
Pour some of the water from the water
tank inlet and replace the tank.
The water level is too high.
Power light is on but
no mist being emitted.
Humidity level is set too low.
Select a humidity setting between the Min
(
) and Max (
) humidity range.
Mist has bad odour.
The machine is new or the
water is not clean.
Open the water tank and place the
appliance in a cool area for 12 hours.
Wash the tank out or change the water.
Little mist being
emitted.
The humidity control has scale,
the water is dirty or has not
been changed for some time.
Wash the humidity control and change the
water.
Scale covers the transducer
Clean the transducer softly with a damp
cotton ball. Transducer surface is delicate,
avoid applying excessive pressure.
Humidity level is set too low.
Increase the humidity level by turning the
Humidity Control Knob from Min ( ) to
Max (
).
4. Refill the tank with cool tap water as
instructed in “Operating Instructions”. Do not
over fill.
5. If moisture forms on walls or window, turn
the humidifier off.
STORAGE TIPS
If you do not plan to use your unit for an
extended period of time, (i.e. during the summer
months), it is important that you follow these
instructions to help prevent stagnation of water
in the unit.
1. Turn the unit off and disconnect from the
outlet. Remove the water tank, then empty
the tank and the base completely. Clean the
humidifier as instructed in the cleaning
instruction section.
2. Dry the unit thoroughly. DO NOT leave any
water in the unit when storing.
3. Pack the humidifier in its original carton and
store in a cool, dry place.
For U.K. and Ireland only:
If the plug is not suitable for the socket outlets in
your home, it can be removed and replaced by a
plug of the correct type. Please refer to
"Installation of a plug" below.
Installation of a plug
Applicable to U.K. and Ireland
The wires in the mains lead are coloured as such:
BROWN
LIVE
BLUE
NEUTRAL
Please note that the colour of these mains wires
may not correspond with the colour markings
that identify the terminals in your plug. Please
proceed as follows:
The BROWN coloured wire must be connected
to the terminal, which is marked with the letter
"L" or is coloured RED.
The BLUE coloured wire must be connected to
the terminal, which is marked with the letter "N"
or is coloured BLACK.
DO NOT CONNECT either of these wires to the
earth terminal in the plug. The earth terminal
plug is marked with the letter "E", or with the
earth symbol
or coloured GREEN and
YELLOW.
3 amp