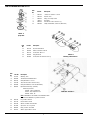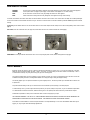
1
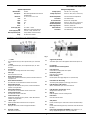
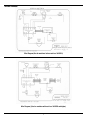
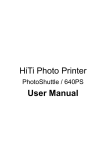
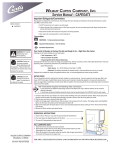
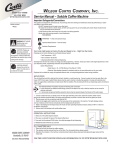
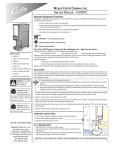
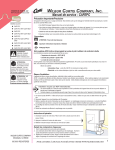
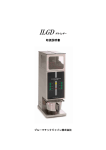
With Programmable Clock/Timer and Lighted Display
Models: 1033519
20333 S. Normandie Ave. Torrance, CA 90502
Tel. (310) 787-5444 • (800) 421-6860 • Fax (310) 787-5412
U.S.A. E-Mail: [email protected]
Int’l E-Mail: [email protected]
Website: brewmatic.com
FM CS135 REV. F 8-22-07-Condensed
Parts & Service
B.I.C.A.
Built-In Coffee Appliance
CONTENTS:
Important Information
Page 2
Appliance Information
Page 3
Control Location & Description
Page 3
Wiring Diagram
Page 4
Trouble Shooting Guide
Page 5 - 6
Parts Diagram & Parts List
Page 7 - 8
Programming ( For Machines made starting from Serial No. 3432583 and Higher) Page 9 - 10
Programming ( For Machines made before Serial No. 3432583)
Page 11
Programming your Built In Coffee Appliance
(Setting the Clock, Setting the volume, Setting the brewing time)
Adjustments
Page 12
Adjusting The Temperature
Resetting The Hi-Limit Thermostat
Removing The Thermistor Sensor
Installing the Thermistor Sensor
Maintenance & Cleaning
Page 13
Limited Warranty
Page 13
IMPORTANT INFORMATION
Read all instructions and safeguards included in the packaging carefully and completely before installing or operating this equipment. Save all instructions for
future reference.
To reduce the risk of fire or electric shock, do not remove covers. There are no user serviceable parts inside. Repairs should be done by authorized service
personnel only. If this appliance should fail to operate properly, contact Brewmatic direct at 800-421-6860.
Only Authorized Replacement Parts Should Be Used. Part substitutions could create a fire hazard and the risk of personal injury. The use of replacement parts or
accessory attachments not recommended by Brewmatic may be hazardous.
Do Not By-Pass Any Safety Mechanisms Or Operate This Appliance Without Covers In Place. Brewmatic requires that all safety devices and covers be in place
and functioning at all times to guard against a fire hazard and the risk of personal injury.
Brewmatic Does Not Recommend, And Will Not Furnish Anyone With Information For Changing The Electrical Rating Of Any Appliance Distributed By
Brewmatic. Brewmatic will not approve of any unauthorized changes to the basic design of this appliance. Any modification or alteration to the appliance may
create a fire hazard, may create a risk of personal injury, may void the safety listings and may void the warranty.
All procedures, diagrams and specifications contained in this manual are based on the latest information available at the time of publication. Information, parts and
specifications are subject to change without notice.
Due to periodic reviews and changes in listing standards, listings and approvals may change at any time. For current listing and approval information contact
Brewmatic.
Plumbing connections - All plumbing connections to water supply lines and drains should be performed by a licensed plumber complying with all applicable
plumbing codes having jurisdiction.
Electrical connections - With the exception of cords with plugs already attached, all electrical connections or alterations to the power supply should be performed
by a licensed electrician complying with all applicable electrical codes having jurisdiction. When calling for information, parts or service, have the following
information available:
Model Number: ___________________ Serial Number: __________________________
Voltage: ___________ Wattage: _______________Amps: _________Phase:_________
Date Of Purchase: _________________
Electrical information may be obtained from the electrical information nameplate located on the appliance.
2
APPLIANCE INFORMATION
Appliance Specifications:
Model Numbers:
Descriptions:
Dimensions:
Volts:
Watts:
Amps:
Hertz:
Phase:
Power Supply Cord:
Plug:
Power Supply Required:
Wall Receptacle Required:
Listing:
Settings And Adjustments:
1033519
BICA With Programmable Clock/Timer and
LIGHTED Display
13” W x 3-9/16” H x 9-3/16” D
120
1600
13.6
60
1
4 Ft. 3 Wire + Ground
NEMA 5-15P. Furnished and attached
120Volts, 15 Amp, dedicated circuit.
15Amp. NEMA 5-15R. Not furnished
ETL Electrical & Sanitation
Brewing Capacity:
Brewing Temperature:
58 to 64 oz. on 12 cup setting
Brewcone: 192ºF (89ºC) to 196ºF (91ºC)
Thermostat Adjustment:
Flow Control:
Hi-Limit Thermostat:
Brewing Temperature:
Thermostat Adjustment:
Water Supply Required:
Water Connection:
Flow Control:
See Service Manual For Adjustments.
.065 GPM Flow Rate
Manual reset. Not adjustable.
Brewcone: 192ºF (89ºC) to 196ºF (91ºC)
See Service Manual For Adjustments.
30 PSI min., 80 PSI max.
1/4” Plastic Fitting., Palastic Nut Supplied
.065 GPM Flow Rate
CONTROL LOCATIONS AND DESCRIPTIONS
Fig. 1
1.
“+” Button
Press to adjust the clock (hr) and or adjust the time (hr) for “Brew Start
Time”.
14.
Toggle Switch (On-Off-Fill)
Turns ON the power to the coffee appliance and fills the tank prior to use.
2.
“-” Button
Press to adjust the time (min.) and or adjust the time (min.) for “Brew
Start Time”.
15.
Circuit Breaker
Breaks the power to the coffee appliance
3.
Program Button.
Press this button to change the time and selection settings.
16.
Power Supply Cord
Connect this cord to appropriate wall receptacle.
4.
Power Light.
When lit, indicates unit is in ON.
17.
5.
Quarter Brew Selection Light
Will light when Quarter Brew selection is pressed or flash when selection is
in program mode.
18.
Rear Mounting Bracket
Holds the rear of the machine
Plastic Nut Fitting
Insert the plastic water supply tubing thru here. (See item #26)
6.
Quarter Brew Selection Button
Press this button to select Quarter Brew selection to brew coffee.
19.
Plastic Water Inlet Elbow Fitting
The incoming tube polyethylene (water supply) connects here.
7.
Half Brew Selection Light.
Will light when Half Brew selection is pressed, or flash when Half Brew
selection is in Program Mode.
20.
LIGHT Dot Display (“PM” Indicator)
When lit, indicates time is past 12 O’clock in afternoon.
8.
Half Brew Selection Button
Press this button to select Half Brew selection to brew coffee.
21.
LIGHT Dot Display “Brew time SET” Indicator
Will light when a “Brew time” is Set.
9.
Full Brew Selection Button
Press this button to brew a full decanter
22.
Wing Nut
Holds the Appliance to the rear mounting bracket
10.
Full Brew Selection Light
Will light when Full Brew selection is pressed, or flash. When Full Brew
selection is in Program Mode.
23.
Panel Bracket
Mount this under the cabinet.
11.
“Service” Light
Indicates problem with the machine and service is required.
24.
Safety Bracket
Prevents accidental dry fire. Remove the screw after the initial tank fill up.
12.
Display Window
Displays the time in hours, minutes and program information
25.
13.
Brew Cone Guide Rails
Slide the brew cone in here.
26.
Screw
Prevents switch from being pushed up. Remove the screw after the initial
tank fill up.
Plastic Tubing (Polyethylene) NOT SHOWN - Tubing supplied is 7’, cut
tubing to appropriate length before connecting to water inlet.
3
WIRING DIAGRAM
*For Fuse see page 7, Item 75
*
Wire Diagram (Use for machines before serial no. 3432583)
Wire Diagram ((Use for machines with serial no. 3432583 and higher)
4
TROUBLESHOOTING
SERVICE SHOULD BE PERFORMED BY QUALIFIED SERVICE PERSONNEL ONLY.
WARNING: Turn off the "Power-Fill” toggle switch. Unplug the power supply cord and allow the coffee appliance to cool before servicing unless electrical testing is required.
WARNING: Make sure installation instructions have been followed before attempting to test this coffee appliance.
Note: Allow the coffee appliance to heat up to brewing temperature BEFORE testing the temperature, water volume or the hi-limit thermostat.
Symptom
1. The coffee appliance will
not turn ON when the
power switch is turned
ON.
Possible Causes
Remedies
The power supply cord is not plugged in.
Plug the power supply cord into an appropriate wall receptacle.
No power at the wall outlet.
Test the wall receptacle and the circuit breaker in the building.
Call for service assistance.
The hi-limit thermostat has set.
Reset Circuit Breaker on rear of machine.
The machine circuit breaker has tripped.
2. The coffee appliance
trips the building’s
circuit breaker.
Too many appliances are connected on one electrical
circuit.
Remove any other coffee appliances from the current circuit or call an
electrician to correct this problem.
The electrical circuits amperage rating is too low.
Locate a correctly rated circuit, or call an electrician to correct this problem.
3. The water for brewing is
not hot enough.
The brewing temperature has not been adjusted correctly.
Call for service assistance.
4. The water for brewing is
too hot.
The brewing temperature has not been adjusted correctly.
Call for service assistance.
5. Incorrect or inconsistent
beverage level.
The water supply pressure may not meet requirements.
Test the incoming water supply pressure. Water pressure should be between
30 and 80 psi. If the water pressure exceeds 80 psi, install a water pressure
regulator and reduce the water pressure to 50 psi.
6. The hi-limit thermostat
keeps activating.
Defective Hi-Limit.
Call for service assistance.
The brewing temperature exceeds temp setting #1, or temp
setting #1 not regulated
Check for clogged filter. Make sure the shut-off valve is completely open.
Defective Temp. Sensor
Not enough water entering the machine.
7. The coffee appliance is
making unusual noises.
The water supply tube may be touching the coffee
appliance, counter top or walls.
Adjust the copper tubing so it does not touch the coffee appliance, counter
top or wall.
Test the incoming water supply pressure. Water pressure should be between
30 and 80 psi. If the water pressure exceeds 80 psi, install a water pressure
regulator and reduce the water pressure to 50 psi.
The water pressure may be excessive.
8. Service Light comes on
at power on.
Call for service assistance.
Defective Temp. Sensor.
Defective Control Board
Temp. Sensor not connected to
Control Board
Hot water temperature exceeds the
“Set Temperature”.
Water inlet was open for longer
than 15 – 20 minutes.
9. Water continuously
flowing from the spray
head and will not stop
Call for service assistance.
Defective Inlet Valve.
Defective Control Board
Defective Power Supply Board
5
Symptom
Possible Causes
Remedies
10. Poor tasting coffee.
Water deposits are
plugging the spray head or
siphon tubing.
Water deposits are plugging the spray head or siphon tube.
Clean the spray head and use the clean out spring. See the Maintenance And
Cleaning section.
The brewing temperature has not been adjusted correctly.
The amount of coffee being used may not be correct.
Change the amount of coffee being used.
Use only one paper filter for each brew cycle.
See the Maintenance And Cleaning section.
More than one paper filter was used when brewing.
The coffee appliance should be cleaned regularly.
11. There are coffee
grounds in the brewed
coffee.
Call for service assistance.
Using too much coffee or coffee that has been ground too
fine.
Incorrect type of paper filter being used.
Adjust the amount of ground coffee being used or adjust the grind of the
coffee. Too much coffee or coffee that is ground too fine may slow the flow
of the water through the coffee.
Make sure that the paper filter being used is correct for this type of coffee
appliance.
Use only one paper filter per brew cycle.
Two paper filters may have been used accidentally.
If the steps in this trouble shooting guide should fail to solve your problem, unplug the coffee appliance and contact Brewmatic at 800-421-6860.
This trouble-shooting guide is for the installers use only.
Operator should refer to the operating instruction only.
6
PARTS DIAGRAM & PARTS LIST – Final Assy.
Some Items have been removed for clarification
Item
No.
1
2
2a
3
Part No.
Description
Item
No.
Part No.
Description
24
9903591
Clamp, Hose Double Tang
1031354
Weld Assy., Shell Elect. BICA
(Use for machines with serial # 3432508 and higher)
Weld Assy., Shell Elect. BICA
(Use for machines before serial # 3432508)
26
9303104
Washer, Lock W/Int Tooth #8
1031355
32
1031357
Plate, Power Supply Assy.
9902423
*1041003
Board, Control Electronic *
(Must use with 1041003 - Switch, Membrane)
35
1031367
Cover, Top
42
1031368
Mounting Plate
9902396
Board, Control Electronic *
*1040878
(Must use with 1040878 - Switch, Membrane)
9903620
43
9001122
Screw, Mach. Rd. Hd. #8-32 x 3/8” Lg
44
1040137
Bracket, Support
Cable, Ribbon BICA (NOT SHOWN)
51
9001120
Screw, Mach. 14-20 x .5”Lg. Brass
8
9922288
Valve, Inlet
52
9003115
Screw, Flat #6-32 x .25 Undercut
9
9923227
Washer, Slinger 21/32 OD x 1/4 ID
59
9301153
Washer, .625 OD x .282 ID x .040 Thk.
10
9001107
Screw, Mach. Rd. Hd. #8-32 x 1/2” Lg.
60
9914381
Nut, Hex 1/4-20
11
9906598
Fitting, Elbow 90, 1/4 Plastic With Plastic Nut
61
1034272
Plate, Bushing
12
1031381
Tube, ¼” OD Polyethylene (7 Ft. Long)
63
9205102
Nut, Well #8-32 Neoprene
14
9919425
Switch, Toggle, On/Off/Mom
71
6000861
Bracket, Switch Safety
15
9902329
Bushing, Strain Relief Black
72
9001228
Screw, Mach. Rd. Hd. #6-32 x 1-1/4” Lg
16
9903531
Cord, Power Supply
73
9203104
Wing Nut #6-32
75
9903651
Circuit Breaker 20A
(For machines before serial no. 3432508, use Fuse#
9906568 & Fuse Holder #9906566)
17
See Pg 8
Tank Assy, BICA
22
1012134
Spacer, Control Board
76
1031378
Stainless Steel Brew Cone (NOT SHOWN)
23
9201145
Nut, Hex Std. #8-32 S/S
77
9904533
Decal, Encapsulated (Brewmatic) (NOT SHOWN)
7
PARTS DIAGRAM AND PARTS LIST
Item
No.
Part No.
4
9907223
Description
Gasket, S/S 13/32 ID x 11/16 OD
5
9202120
Nut, Hex 1/8-27
6
6000792
Fitting, 1/8 Str. Pipe x 5/16H
7
1030617
Spray Head
18
6000736
Tube, Silicone .5 OD x .297 ID x 2” Lg.
25
9903490
Clamp, Hose Miniature, 7/32 to 5/8 (Worm Drive)
DETAIL -A
Spray Head
Item
No.
Part No.
Item
No.
Part No.
Description
23
9201145
Nut, Hex Std #8-32 S/S
26
9303104
Washer, Lock W/Int. Tooth #8
28
9001110
29
9203105
Screw, Mach. #8-32 x 1”
Wing, Nut #8-32
54
9001208
Screw, Mach. Rd. Hd. #8-32 x 5/8” Lg.
DETAIL- B
Mounting & Ground Screw
Description
17
1031374
Weld Assy, Tank
19
9920436
Thermostat, Hi-Limit Manual Reset
20
9903176
Clamp, Worm Drive 1-1/16 x 2
21
1032180
Tube, Silicone .50 OD x .297 ID x 5.25 Lg
25
31
9903490
6000937
Clamp, Hose Miniature, 7/32 to 5/8 (Worm Drive)
Replacement Sensor Assy. (See Note)
Sensor Assy Consist of:
9919526 - Sensor, Temperature
9914317 – Nut, Compression 1/8”
9919353 - Sleeve, 1/8”
TANK ASSY & DETAIL- C
Note: If P/N 6000937 is not available, use P/N 9919526, Sensor
Assy. & item #3a 9906166, Fit’g 1/8 MPT 1/8 Ferrule
31a
9906166
Fit’g 1/8 MPT 1/8 Ferrule
53
9201152
Nut, Hex #6-32 x .25 OD
62
9303103
Washer, Lock W/Int. Tooth #6 NPS
65
9919536
Spacer, Dia. .25 x .15 Lg. Brass
68
6000887
Fitting, 1/8 NPT x 1/2-20 UNF
69
9907212
Washer, Copper .520 ID x .70 OD
8
PROGRAMMING YOUR BREWMATIC: (See Fig. 7) (ALL MACHINES STARTING FROM SERIAL NO. 3432583 AND HIGHER)
SETTING THE CLOCK:
Fig. 7
1.
Press and Hold the “PROGRAM” button for approximately 3 seconds to enter Program Mode. The colon (:) on the display will begin to flash and a
beep is emitted by the brewer to confirm that it is has entered Program Mode.
2.
3.
To set hours, press and hold the plus (+) button; hours on display will advance from 00 to 12pm. PM time is set when the green dot is lit next to the
“PM” in the upper left corner of the display box.
To set minutes press and hold the minus (-) button; minutes will advance from 00 to 59.
4.
After setting the clock, press the “PROGRAM” button four (4) times to exit the Program Mode.
RESETTING THE VOLUME: (Amount of Coffee to be brewed)
NOTE: This machine is preset at the factory for the following settings:
FACTORY PRESET SETTINGS:
Volume Settings:
Full Brew: (64 oz) 7:00 Minutes
Half Brew (32 oz): 3:30 Minutes
Qtr. Brew (16 oz): 1:45 Minutes
NOTE: When making volume adjustments, always be sure an empty container with 64 ounces capacity is under the brew cone and the power is ON.
The volume of water dispensed, may vary slightly depending on water pressure or other factors.
1. Press and Hold the “PROGRAM” button for approximately 3 seconds to enter Program Mode. The colon (:) on the display will begin to flash and a
beep is emitted by the brewer to confirm that it is has entered Program Mode.
2. Press the “PROGRAM” button two (2) times. The display window will now show “----“.
3. Press the “FULL BREW SELECTION” button. Note the display will start counting minutes and seconds and water will start to flow into the container.
When desired volume has been reached, press the “FULL SELECTION” button to stop the water flow. If more water is needed, press the “FULL
SELECTION” BUTTON repeatedly until desired level is reached. After the “SELECTION” button is programmed, press the “PROGRAM” button once to
exit the Program mode.
4. To program the “HALF BREW SELECTION”, follow steps 1 & 2 instructions above using the “HALF BREW SELECTION” button. After the
“SELECTION” button is programmed, press the “PROGRAM” button once to exit the Program mode.
5. To program the “QTR. BREW SELECTION”, follow steps 1 & 2 instructions above using the “QTR. BREW SELECTION” button. After the
“SELECTION” button is programmed, press the “PROGRAM” button once to exit the Program mode.
SETTING AUTOMATIC BREW TIME: (Note: The clock must be set in order to have “Brew Start Time” functioning.)
Note: Once set, “Brew Start Time” is stored in the brewer’s internal memory and will be the default “Brew Start Time” unless
changed or the unit is reset.
1.
2.
3.
4.
5.
6.
Press and Hold the “PROGRAM” button for approximately 3 seconds to enter Program Mode. The colon (:) on the display will begin to flash and a
beep is emitted by the brewer to confirm that it is has entered Program Mode.
Press the “PROGRAM” button one (1) time. The display window will show “0:00” or the default brew time and the set light will flash in the upper
right corner of the display window. (Note: you have 30 seconds to begin entering the brew time.)
To set hours, press and hold the (+) button; hours on the display will advance from 00 to 12pm. PM time is set when the green dot is lit next to the
“PM” in the upper left corner of the display box.
To set minutes, press and hold the minus (-) button; minutes will advance from 00 to 59.
To set the volume option, (amount of coffee to be brewed at a selected time), press the button that corresponds to the amount desired (full pot, half
pot, quarter pot options). The light will light when the button is selected.
After setting the brew time, press the program button three (3) times to exit from the menu. The display will show the current time, the set light will
be illuminated in the upper right corner of the display window and the light corresponding to the volume selection button will be flashing.
9
To Cancel the Programmed Brew Time
1.
2.
3.
Press and Hold the “PROGRAM” button for approximately 3 seconds to enter Program Mode. The colon (:) on the display will begin to flash and a
beep is emitted by the brewer to confirm that it is has entered Program Mode.
Press the “PROGRAM” button one (1) time. Display will show the actual programmed brewing time
To cancel the Programmed Brew Time, press the flashing “VOLUME SELECTION BUTTON”, the light will turn off. Press the “PROGRAM” button
three (3) times to exit the Program Mode. The display will show the current time and both the set light and “VOLUME SELECTION BUTTON” will no
longer be illuminated.
To Re-Program a Different “VOLUME SELECTION” Brew Button Option
1.
2.
Press and hold the “PROGRAM” button for approximately 3 seconds until the display changes and the colon (:) flashes. A beep is emitted by the
brewer to confirm that it is in Program Mode. Press the “PROGRAM” button one (1) time. Display will show the actual programmed brewing time
Press a different “VOLUME SELECTION BUTTON” to change the current volume option. The previous assigned “VOLUME SELECTION BUTTON” light
will turn off. Press the “PROGRAM” button three (3) times to exit the Program Mode. The display will show the current time and the new “VOLUME
SELECTION BUTTON” light will be illuminated.
Note: Brewing coffee while the “Brew Start Time” is set, will cancel the current “Brew Start Time”, repeat steps 1 - 6 above, in
“SETTING AUTOMATIC BREW TIME:
WARNING: Always make sure an empty container such as a glass decanter, stainless steel decanter or thermos is placed directly
beneath the coffee appliance brew cone when a “Brew Start Time” is set.
If this coffee appliance should fail to function properly, unplug it and contact Brewmatic at 800-421-6860
RE-SETTING AUTOMATIC BREW TIME: (FOR THE NEXT DAY)
Note: The clock must be set in order to have “Brew Start Time” functioning.
1.
2.
3.
4.
Press and Hold the “PROGRAM” button for approximately 3 seconds to enter Program Mode. The colon (:) on the display will begin to flash
and a beep is emitted by the brewer to confirm that it is has entered Program Mode.
Press the “PROGRAM” button one (1) time. Display will show the default brew time (previous brew start time).
USING DEFAULT (PREVIOUS BREW START TIME): Press the desired “VOLUME SELECTION BUTTON” and press “PROGRAM” button three
(3) times to exit the Program Mode. Your brewer is now set.
NEW BREW TIME: Follow the above instructions (“SETTING AUTOMATIC BREW TIME”) steps 1 thru 6.
CHANGING BREW TEMPERATURE SETTINGS
Note: The Brewer brews coffee at a preset factory temperature setting of Level #2 (t2). The brewing temperature can be adjusted
lower or higher depending upon your personal preference. Level #1 (t1) is the lowest temperature setting while Level #5 (t5) is
highest. The temperature increment between each setting (t1 to t5) is about 2 to 3 degrees. This coffee maker is designed to
maintain an accurate brewing temperature and compensate at a certain degree for outside influential factors.
Note: for high altitude areas we recommend a lower temperature setting.
1.
2.
3.
4.
Press and Hold the “PROGRAM” button for approximately 3 seconds to enter Program Mode. The colon (:) on the display will begin to flash
and a beep is emitted by the brewer to confirm that it is has entered Program Mode.
Press the “PROGRAM” button three (3) times. The display window will show the letter “t°” followed by a number. The number (1 to 5)
represents the current temperature setting of the unit.
To set temperature range, press and hold the plus (+) button or (-) button to scroll between t1 – t5.
After selecting the desired range, press the program button once to exit from the menu.
WARNING: Hot coffee can cause serious burns. Make sure that the coffee has stopped coming out of the
brew cone before you remove it from the coffee appliance. HANDLE HOT COFFEE CAREFULLY AND
PRACTICE CARE WHEN DRINKING.
RESETTING YOUR COFFEE BREWER TO FACTORY DEFAULTS
Note: Resetting the brewer to factory defaults will clear all settings previously programmed and restore default settings programmed at the
factory for brew volume and temperature range. Clock Time, Automatic Brew Time, Volume Selections and Temperature Range Setting will be
cleared.
To Reset Brewer back to Factory Defaults
1. Turn the power OFF from the main power switch in the back of unit.
2. Press and hold “PROGRAM” button.
3. Keeping “PROGRAM” button depressed, turn the power ON from the main power switch in the back of the unit.
4. Release the PROGRAM button. Clock will flash and now read “00:00”.
10
PROGRAMMING: ALL MACHINES MADE BEFORE SERIAL NO. 3432583)
PROGRAMMING YOUR ELECTRONIC BUILT IN COFFEE APPLIANCE: (See Fig. 2 for Control Location)
SETTING THE CLOCK:
1.
Press and hold the program button for 3 seconds; the display will first show
the brew time, press once again and the display will show the clock time as
indicated by the flashing colon (:).
2.
To set hours press and hold the plus (+) button; hours on display will
advance from 00 to 12pm. PM time is set when the green dot is lit next to the
“PM” in the upper left corner of the display box
3.
To set minutes, press and hold the minus (-) button; minutes will advance
from 00 to 59.
4.
After setting the clock, press the program button twice to exit from the menu.
CHANGING THE PRESET THE VOLUME: (Amount of Coffee to be brewed)
NOTE: When making volume adjustments, always be sure an empty container
with 64 ounces capacity is under the brew cone.
Fig. 2
1.
Press and Hold the “PROGRAM” button approximately 3 seconds and press “PROGRAM” button two (2) times. The display will now be blank.
2.
Press the “FULL BREW SELECTION” button. Note the display will start counting minutes and seconds and water will start to flow into the container. When
desired volume has been reached, press the “FULL SELECTION” button to stop the water flow. If more water is needed, press the “FULL SELECTION” BUTTON
repeatedly until desired level is reached.
3.
To program the “HALF BREW SELECTION”, press the “HALF BREW SELECTION” button and follow step 2 instructions.
4.
To program the “QTR. BREW SELECTION”, press the “QTR. BREW SELECTION” button and follow step 2 instructions.
5.
After all the “SELECTION” buttons are programmed; press the “PROGRAM” button to exit the Program mode.
SETTING BREWING TIME: NOTE: The clock must be set in order to have “Brew Start Time” functioning.
1.
Press and hold the “PROGRAM ” button for 3 seconds, the display will show 00:00 or the default brew time and the set light will flash. (Note: you have
seconds to begin entering the brew time.)
30
2.
To set hours, press and hold the (+) button; hours on the display will advance from 00 to 12 pm. PM time is set when the green dot is lit next to the “PM” in the
upper left corner of the display box.
3.
To set minutes, press and hold the minus (-) button; minutes will advance from 00 to 59.
4.
To set the volume option, (amount of coffee to be brewed), press the icon that corresponds to the amount desired (full pot, half pot, quarter pot options). The light
will light when the button is selected.
5.
After setting the brew time, press the program button once to exit from the menu. The display will show the current time and the light next to the volume
selection button will be lit.
To cancel the programmed Brew Time, press and hold the “PROGRAM” button. Release button when the program display will show the actual programmed brewing
time, press the flashing LIGHT VOLUME “SELECTION” button, the light will turn off and same for the “Set” light. Press the “PROGRAM” button again to exit the
Program Mode.
6.
7.
To re-program a different “VOLUME SELECTION” brew button option: Press and hold “PROGRAM” button. Release button after the display shows the
programmed brewing time. Press a different “VOLUME SELECTION” brew button to change the existing programmed brew button. The previous assigned
“VOLUME SELECTION” brew light will turn off. Press the “PROGRAM” button to save the change and to exit the Program Mode.
Note: Brewing coffee while the “Brew Start Time” is set, will cancel the current “Brew Start
Time”, repeat steps 1 through 5 to re-program.
Note: “Brew Start Time” is set for one brew cycle only. This coffee maker will not automatically revert to the preset brew time. This function must be re-programmed each
time.
WARNING: Always make sure an empty container such as a glass decanter; stainless steel decanter or thermos is placed directly beneath the coffee appliance brew cone
when a “Brew Start Time” is set.
If this coffee appliance should fail to function properly, unplug it and contact Brewmatic at 800-421-6860
RE-SETTING AUTOMATIC BREW TIME: (FOR THE NEXT DAY)
Note: The clock must be set in order to have “Brew Start Time” functioning.
5. Press and hold the “PROGRAM “ button for 3 seconds; the display will show 00:00 or the default brew time (previous brew start time)
6. USING DEFAULT (PREVIOUS BREW START TIME): Press the desired volume setting and press program button again to exit the menu and your brewer is set.
7. NEW BREW TIME: Follow the above instructions (“SETTING AUTOMATIC BREW TIME”) steps 1 thru 5.
11
ADJUSTMENTS
CAUTION: Only those persons trained and qualified in equipment repair should attempt to open this coffee appliance. Make certain the appliance is not in brewing mode
before making adjustment to the coffee appliance.
Note: The brewing temperature of this appliance is preset at the factory. To adjust the temperature to a different setting, follow instructions below.
ADJUSTING THE TEMPERATURE: (Fig. 3) (For Machines Made Before Serial Numbers 3432508)
1.
Unscrew the wing nut at the back securing the appliance. (Page 3, Item #22)
2.
Slowly slide the appliance forward until the complete appliance is out of the
mounting bracket.
3.
Remove the top cover and locate the control board. (See fig. 3)
4.
Press the “Temp Control Adjustment” button to select the brewing temperature
desired.
RESETTING THE HI LIMIT THERMOSTAT: (Fig. 4)
5.
Unplug the appliance from the power supply.
6.
Unscrew the wing nut at the back securing the appliance to the “L” bracket.
(Page 3, Item #22)
Fig. 3
The light will light indicating the brewing temperature selected
7.
Slowly slide the appliance forward until the complete appliance is out of the mounting
plate.
8.
Remove the top cover and locate the Hi-Limit Thermostat. (Fig. 4)
9.
10.
Push the Red Reset Button on the Hi-Limit Thermostat. Visually inspect the appliance for any
loose wires or fittings.
Install the top cover and slide appliance on the mounting plate and secure with the wing nut.
11.
Plug in the appliance to the power supply.
Fig. 4
Press red button to reset the hi-limit thermostat
12
MAINTENANCE & CLEANING
CAUTION:
CAUTION:
Note:
Note:
Only those persons trained and qualified in equipment repair should attempt to open and clean the inside of this coffee appliance.
Turn the power switch off, unplug the power supply cord and allow the coffee appliance to cool before cleaning.
Do not use abrasive or harsh cleaners as they may damage the finish of this coffee appliance.
Failure to follow these cleaning instructions may damage this coffee appliance and may void the warranty.
As needed, clean stainless steel surfaces with a mild, non-abrasive stainless steel cleaner. Other surfaces can be cleaned with a soft damp cloth or mild liquid detergent.
The brew cone should be rinsed with water after each brew cycle. At least once a week the brew cone should be washed by hand with a mild detergent. Rinse well after
washing.
As necessary, the area between the brew cone rails and above the brew cone should be wiped clean with a damp cloth as coffee oils will gradually collect on these surfaces.
(Fig. 6)
Once a week, more often in hard water areas, the spray head, located above the brew cone, should be removed and cleaned. (Fig 7)
Fig. 6
Fig. 7
Please Note: The Factory recommends that when this unit is not in use for prolonged periods of time, that the coffee appliance be unplugged
LIMITED WARRANTY
Brewmatic warrants this product to be free of defects in material and workmanship for a period of one (1) year from the original date of purchase.
Within this warranty period, Brewmatic will repair or replace, at its option, any part providing it's defective in material or workmanship. Labor is
included within this warranty only during the first ninety (90) days of the warranty period.
This warranty excludes defects caused by negligence, misuse, alteration, accident, prior service by unauthorized persons, and failure to follow the
installation and operating instructions, including without limitation use of improper voltage or wiring and improper cleaning.
This warranty applies only to new products and extends only to the original purchaser. This warranty is valid only in the United States of America and
its possessions.
The product warranted hereby is sold only for commercial use and is not intended for personal, family, or household purposes.
To obtain warranty service, you must notify and deliver the product at your expense, with proof of purchase, to your local Brewmatic representative
or to the Brewmatic Customer Service Division, within the warranty period. The repaired product will be returned to you at Brewmatic's expense.
No Brewmatic representative or other person is authorized to add to or alter the foregoing in any respect.
THE FOREGOING WARRANTY IS IN LIEU OF ALL OTHER WARRANTIES EXPRESSED OR IMPLIED, INCLUDING ANY IMPLIED WARRANTIES FOR
MERCHANTABILITY AND FITNESS FOR A PARTICULAR PURPOSE. THIS WARRANTY EXCLUDES CONSEQUENTIAL DAMAGES.
Some states do not allow limitation or exclusion of implied warranties or consequential damages. In such cases the limitations stated above may not
apply to you, and your rights will be determined by applicable law.
13
20333 S. Normandie Ave., Torrance, CA 90502
(310) 787-5444 • (800) 421-6860 • Fax (310) 787-5412
USA E-mail: [email protected]
Int’l E-mail: [email protected]
Website: brewmatic.com