1
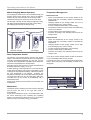
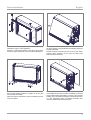
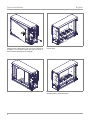
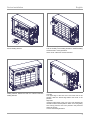
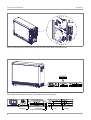
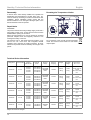
VFMQ
ThermoComfort mechanic
Storage Heater
English
Installation and
Operating Instructions
Contents
Operating Instructions
Condition as Received, Installation
Device Installation
Electrical Connection
Technical Device Information
Warranty, After-Sales Service
2
4
5
9
10
11
459292.66.01 06/10/A
Operating Instructions for Users
General Information
For installation, operation and maintenance, please observe
these instructions. This unit should only be installed and
repaired by an experienced technician.
Repairs which are improperly carried out can endanger the
safety of the user.
The installation and operating instructions must always be
available and should be given to the technician working on
the device for his/her information.
We therefore request that these installation and operating
instructions be passed on to the new tenant or owner should
there be a change in occupancy.
During renovation works with dust accumulation, the device
must only be operated with the fan switched off.
!Warnings!
• Note! The surface temperatures can exceed 176° F ( 80°
C) during operation.
• The minimum clearances indicated must be kept.
The clearances must not be reduced by hanging objects.
English
• Do not insert any objects into the device or bring any
objects into contact with the device. This could lead to
malfunctions or the objects might ignite.
• Any objects which have fallen behind the storage heater
must be removed immediately.
• Ensure that small children or persons with impaired health
do not touch the device surface, especially the air outlet
grid.
• Care must be taken that no objects such as e.g. curtains,
paper, aerosol cans etc. are placed against, in front of or
on the device or directly in the path of hot air.
• Electric storage heaters must not be operated in rooms
with - even temporarily - potentially explosive substances
of any kind such as gases, vapours or dust. This is also
true for volatile solvents (such as Tri, Tetra). In such
cases, ensure that the storage heater has cooled down to
room temperature.
• Do not use steam cleaners to clean the storage heater.
• This device must not be operated by persons (including
children) with limited physical, sensory or mental abilities
or lacking the necessary experience or knowledge unless they are under the supervision of the person
responsible for their safety or have been instructed in the
use of the device.
• Children must be supervised to ensure that they do not
play with the device.
Function
• Any objects must be at a distance of at least 12“ (300 mm)
from the air outlet grid. This is also true for deep-pile
carpet.
• Do not cover the device
• Covering the device with objects can lead to heat build-up
and thus increased temperatures on the device surface
and the objects.
During the night the storage heater stores the thermal energy
required for the day in the storage core. This way low-priced
electrical energy can be stored at times during which the
distribution networks of the utility companies are not working
under full load.
In some areas with very low external temperatures additional
thermal energy can be stored at specific times during the
day.
Even if additional storage takes place during the day,
however, most of the thermal energy required is still stored
during the night.
Occasional clicking sounds during operation are due to
temperature changes in the storage core.
Initial Heating Up
As with all new devices, some unpleasant odours may occur
during first use. Please ensure sufficient ventilation.
Charging with Charge Control
The charging of the storage heater is controlled via an
atmospherically-controlled charge control.
The thermal energy to be stored is determined using the
external temperature and the remaining thermal energy in
the storage heater.
In this operating mode, the charging adjuster at the storage
heater is set to maximum charging - clockwise to the righthand stop. (factory setting).
2
Operating Instructions for Users
English
Manual Charging (Manual Operation)
Temperature Management
If the charging of the device is to be controlled manually, the
charging knob must be placed on the axis of the adjuster.
Remove the cap at the front panel of the storage heater.
The thermal energy to be stored can be set via the knob.
On extremely cold days choose setting III (right-hand stop),
with higher external temperatures choose a lower setting.
No charging takes place at the left-hand stop.
Room Too Cold
• Check the breaker/fuses for the storage heaters in the
supply panel and, if necessary, replace or reactivate the
breaker/fuses.
• Charging adjuster at the storage heater set too low
(manual charging only). Correct setting.
• Incorrect room thermostat setting. Correct setting.
• The windows and doors are open and/or the neighbouring
rooms are not heated.
• Incorrect setting of the central charge control.
Correction according to the operating instructions of the
charge control.
Room Too Hot
Maximum charging
No charging
• Check the breaker/fuse for the charge control in the
supply panel and, if necessary, replace or reactivate the
breaker/fuse.
• Charging adjuster at the storage heater set too high
(manual charging only). Correct setting.
• Incorrect room thermostat setting. Correct setting.
• Incorrect central charge control setting:
Correction according to the operating instructions of the
charge control.
Room Temperature Control
The transfer of the thermal energy stored in the storage
heater is automatically controlled via the room temperature
controller. The desired temperature, e.g. 68° F (20 °C) is set
on a scale. Room temperature controllers can be either wallmounted or integrated into the storage heater.
During the night or when a room is not used, the temperature
should be lowered by roughly 7° F (4° C).
A further lowering of the temperature is not recommended,
as this causes excessive cooling of the room's walls. In case
of changes of the temperature settings, it will take a while for
the room temperature to be reached. Therefore, the
temperature lowering must be cancelled some time (at least
one hour) before the room is to be used again. With many
controllers this can be carried out automatically with a
setback thermostat.
During longer absences frost protection must be taken into
consideration.
If you cannot correct the fault, please contact an electrician
or your nearest after-sales service provider.
To process your order, we require the model number (E-No.)
and the data code (FD). This information is listed on the
rating plate.
Maintenance
Occasional vacuum-cleaning in the area of the air outlet grid
and the lower slot rows of the right side panel is
recommended.
As part of the maintenance cycle, it is recommended to test
the correct functioning of the controlling and regulating
devices. This test must be carried out every 10 years at the
latest to prevent unnecessary energy consumption.
Rating plate
3
Condition as Received, Installation
English
Condition as Received
The casing, heating element set and storage bricks are
supplied in individual packaging.
- The heating element set comprises the following
components:
- 3 heating elements,
- 1 heating element rating label (not for VFMQ range),
- 1 charging knob,
- 1 screw, dowel, washer for tilt protection,
- 6 mounting screws for the wall spacers.
The wall spacers lie on top of the polystyrene frames of the
device packaging.
Please check the delivery for completeness. Complaints
about damage during transport are to be made according to
the instruction sheet. Minor damage to the storage bricks
does not affect device operation.
Installation
Storage heaters may not be used:
- In rooms with air that is potentially explosive,
- In rooms where corrosive air is to be expected.
The load-bearing capacity of the floor must be sufficient to
carry the weight of the heaters.
The installation surface must be smooth and level. The
devices can be installed on any conventional flooring,
however, the colour of PVC (linoleum) or parquet floor or
light-coloured carpeting can change in the area of the
supporting feet due to pressure and heat exposure. Wall or
carpet skirtings touching the rear panel of the device must be
removed.
Supporting boards (special accessories) must be
used:
- In case of heat-sensitive flooring, which cannot reliably
withstand temperatures of 80 °C.
- If it can be expected that the supporting feet may sink into
the flooring, so that the air exchange below the storage
heater is obstructed.
Dimensions of cable entry
Type
VFMQ 20
VFMQ 30
VFMQ 40
VFMQ 50
VFMQ 60
VFMQ 70
4
Dimension A
24 5/8“ (626 mm)
30 1/2“ (776 mm)
36 1/2“ (926 mm)
42 3/8“ (1076 mm)
48 1/4“ (1226 mm)
54 1/4“ (1376 mm)
Device Installation
1. Remove the packaging. Dispose of the packaging
material according to local regulations.
Screw the 2 lateral wall spacers to the device back panel.
Screw the upper wall spacer to the two lateral wall spacers.
2. Loosen the screws of the two side panels.
Push the side panels upwards by roughly 1/4“ (5 mm) and
remove them horizontally.
After removing the side panels, loosen the fastening screws
of the front panel.
English
3. Swing open the front panel to the front and remove it from
the upper edging. Insert the electrical connecting lines and
provide strain relief.
Shorten the lines so that they do not touch any hot device
surfaces during operation. Do not route any cable loops
behind or below the device.
4. All heaters must be secured against tilting.
The installed device must be able to withstand a horizontal
pull of at least 45 lbf ( without tilting or moving. If the required
stability cannot be achieved using the accessories provided,
e.g. with light-weight walls, the heating technician must
choose a suitable wall fastening method.
5
Device Installation
English
5. Remove the core room cover. Remove the central
fastening screw, slightly lift the core room cover, swivel it out
and pull it out to the right. Position the core room cover so
that the thermal insulation is not damaged.
7. Place the lower row of bricks into the core room starting
from the right.
6. Remove the transport support (folding cardboard).
8. Insert the heating element through the openings in the
thermal insulation of the side panels.
6
Device Installation
English
9. Position the second and third rows of bricks. Insert the
second heating element.
11. Position the top row of bricks in the same way.
10. After positioning the fourth row of bricks, insert the upper
heating element. Position the fifth row of bricks under the
heating element.
12. Reinsert the core room cover.
Test the mobility of the heating elements. Jammed heating
elements lead to noise generation.
Clean the air outlet area and the switchbox.
Left side:
The upper edge of the core room cover must rest on the
partition. Slide the lateral edge behind the bevel of the
partition.
Right side:
Insert the lateral edge of the core room cover between the
thermal insulation and the partition. Watch out for the guiding
slots. Firmly press the core room protection into place and
fasten the screws.
Connect the heating elements.
7
Device Installation
English
13. The partition and the heating element connecting leads are marked with numbers (1-6).
Plug the connecting leads onto the heating element ends. Fasten loose cables to the cable harness.
14. If using an alternative heating element kit (see section „Technical Device Information“ on page 10), attach the extra rating
label supplied with the heater accessories onto the marked field of the rating plate.
Charging
8
Discharging
Supplementary heating
Fan
Weight
Electrical Connection
English
15. Carry out the electrical connection to the terminal strip of the device.
Connection example: With heating contactor and wall-mounted thermostat.
Circuit diagram legend
A1/Z1, A2/Z2
K1
L1, L2, L3
LE
LH
M1
N
PE
R1-R3
- Control signal AC charge control
- Heating contactor
- External conductors
- Fan control
- Supplementary heating control
- Fan motor
- Neutral conductor
- Protective conductor
- Heating elements
R7
R8
R9
RTR
STR1, STR2
TB
TR
TR9
TRG
- Series resistor for fan (not all types)
- Control resistors (charging)
- Supplementary heating (accessories)
- Room temperature controller (accessories)
- Safety temperature controller
- Temperature limiter
- Charge controller
- Supplementary heating temperature
controller
- Ventilation grid temperature controller
Please observe your local technical connection requirements.
The product must be installed on a properly sized dedicated circuit.
Reinsert the front and side panels and fasten the screws. Reverse dismounting procedure.
9
Start-Up, Technical Device Information
English
Reassembly
Resetting the Temperature Limiter
If devices which were already installed and operated are
dismantled and reassembled in another place, they, too,
must be started-up according to the above instructions after
installation. During installation please ensure that the
thermal insulation is not damaged. Damaged parts of the
thermal insulation must be replaced.
Repair Notice
!WARNING!
The product contains both a high voltage supply circuit and a
high voltage control circuit. Ensure both circuits have been
isolated before opening the enclosure.
Electric storage heaters may only be repaired by qualified
personnel. Repairs which are improperly carried out can
endanger the safety of the user.
The devices have a high-grade thermal insulation. Only
remove the core room cover with integrated thermal
insulation when replcaing the heating elements. All other
electrical components can be accessed by removing the side
panels.
Note on Disposal
Do not dispose of the unit with general household
waste. The device must be taken to a local waste
disposal plant.
Technical Device Information
Designation
Brick bundles
Nominal
power
Nominal
voltage
Nominal
charging
Weight
Transport
weight
1.02/1.36 kW
1.31/1.74 kW
1.64/2.18 kW
2.21/2.94 kW
L1/L2/GND
~208/240V
60Hz
16 kWh
216 lbs
98 kg
75 lbs
34 kg
Dimensions
WxHxD
VFMQ 20
4 x 25
HFi 212
HFi 216
HFi 220
HFi 227
VFMQ 30
6 x 25
HFi 318
HFi 324
HFi 330
HFi 340
1.51/2.01 kW
1.96/2.61 kW
2.45/3.27 kW
3.27/4.36 kW
L1/L2/GND
~208/240V
60Hz
24 kWh
301 lbs
137 kg
88 lbs
40 kg
30 1/2“ x 26 1/2“
x 9 7/8“
776 x 672 x 250
mm
VFMQ 40
8 x 25
HFi 425
HFi 432
HFi 440
HFi 452
2.04/2.72 kW
2.62/3.48 kW
3.27/4.36 kW
4.25/5.66 kW
L1/L2/GND
~208/240V
60Hz
32 kWh
387 lbs
176 kg
101 lbs
46 kg
36 1/2“ x 26 1/2“
x 9 7/8“
926 x 672 x 250
mm
VFMQ 50
10 x 25
HFi 540
HFi 550
HFi 564
3.27/4.36 kW
4.09/5.44 kW
5.23/6.97 kW
L1/L2/GND
~208/240V
60Hz
40 kWh
473 lbs
215 kg
114 lbs
52 kg
42 3/8“ x 26 1/2“
x 9 7/8“
1076 x 672 x 250
mm
VFMQ 60
12 x 25
HFi 648
HFi 660
HFi 676
3.93/5.23 kW
4.91/6.53 kW
6.22/8.28 kW
L1/L2/GND
~208/240V
60Hz
48 kWh
559 lbs
254 kg
128 lbs
58 kg
48 1/4“ x 26 1/2“
x 9 7/8“
1226 x 672 x 250
mm
VFMQ 70
14 x 25
HFi 756
HFi 770
HFi 790
4.58/6.10 kW
5.72/7.62 kW
7.36/9.80 kW
L1/L2/GND
~208/240V
60Hz
56 kWh
645 lbs
293 kg
141 lbs
64 kg
54 1/4“ x 26 1/2“
x 9 7/8“
1376 x 672 x 250
mm
Subject to technical changes
10
Heating
element set
24 5/8“ x 26 1/2“
x 9 7/8“
626 x 672 x 250
mm
Warranty, After-Sales Service
English
Products to which this limited warranty applies
This limited warranty applies to the following models of your newly purchased Dimplex electric heater. This limited warranty applies
only to purchases made in any province of Canada except for Yukon Territory, Nunavut, or Northwest Territories or in any of the 50
States of the USA (and the District of Columbia) except for Hawaii and Alaska. This limited warranty applies to the original purchaser
of the product only and is not transferable.
Products excluded from this limited warranty
Light bulbs are not covered by this limited warranty and are the sole responsibility of the owner/purchaser. Products purchased in
Yukon Territory, Nunavut, Northwest Territories, Hawaii, or Alaska are not covered by this limited warranty. Products purchased in
these States, provinces, or territories are sold AS IS without warranty or condition of any kind (including, without limitation, any implied
warranties or conditions of merchantability or fitness for a particular purpose) and the entire risk of as to the quality and performance
of the products is with the purchaser, and in the event of a defect the purchaser assumes the entire cost of all necessary servicing or
repair.
What this limited warranty covers and for how long
Products covered by this limited warranty have been tested and inspected prior to shipment and, subject to the provisions of this warranty, Dimplex warrants such products to be free from defects in material and workmanship for a period of 5 years from the date of the
first purchase of such product.
The limited 5 year warranty period also applies to any implied warranties that may exist under applicable law. Some jurisdictions do
not allow limitations on how long an implied warranty lasts, so the above limitation may not apply to the purchaser.
What this limited warranty does not cover
This limited warranty does not apply to products that have been repaired (except by Dimplex or its authorized service representatives)
or otherwise altered. This limited warranty does further not apply to defects resulting from misuse, abuse, accident, neglect, incorrect
installation, improper maintenance or handling, or operation with an incorrect power source.
What to do when your unit ceases to operate as described in this manual
Defects must be brought to the attention of Dimplex Technical Service by contacting Dimplex North America Limited at 1-888-346-7539,
or 1367 Industrial Road, Cambridge Ontario, Canada N1R 7G8. Please have proof of purchase, catalogue/model and serial numbers
available when calling. Limited warranty service requires a proof of purchase of the product.
What Dimplex will do in the event of a defect
In the event a product or part covered by this limited warranty is proven to be defective in material or workmanship during the 5 year limited
warranty period you have the following rights:
•
•
•
•
Dimplex will in its sole discretion replace such defective part(s) without charge, or if part replacement proves not to be commercially
practicable or cannot be timely made, Dimplex may, in lieu of replacing part(s) choose to replace the unit.
This limited warranty does not entitle the purchaser to on-site or in-home services. On-site or in-home services may be performed
at the purchaser’s specific request and expense at Dimplex's then-current rates for such services.
The purchaser is responsible for removal and transportation of such product or part (and any repaired or replacement product or
part) to and from the authorized dealer’s or service agent’s place of business.
Dimplex will not be responsible for, and the limited warranty services shall not include, any expense incurred for installation or
removal of the product or part (or any replacement product or part) or any labour or transportation costs. Such costs shall be the
purchaser’s responsibility.
What Dimplex and its dealers and service agents are also not responsible for:
IN NO EVENT WILL Dimplex, or ITS DIRECTORS, OFFICERS, OR AGENTS, BE LIABLE TO the PURCHASER OR ANY THIRD PARTY, WHETHER IN CONTRACT, IN TORT, OR ON ANY OTHER BASIS, FOR ANY INDIRECT, SPECIAL, PUNITIVE, EXEMPLARY,
CONSEQUENTIAL, OR INCIDENTAL LOSS, COST, OR DAMAGE ARISING OUT OF OR IN CONNECTION WITH THE SALE, MAINTENANCE, USE, OR INABILITY TO USE THE PRODUCT, EVEN IF Dimplex OR ITS directors, officers, or AGENTS HAVE BEEN
ADVISED OF THE POSSIBILITY OF SUCH LOSSES, COSTS OR DAMAGES, OR IF SUCH LOSSES, COSTS, OR DAMAGES ARE
FORESEEABLE. IN NO EVENT WILL Dimplex, or ITS OFFICERS, DIRECTORS, OR AGENTS BE LIABLE FOR any DIRECT LOSSES, COSTS, OR DAMAGES THAT EXCEED THE PURCHASE PRICE OF THE PRODUCT.
SOME JURISDICTIONS DO NOT ALLOW THE EXCLUSION OR LIMITATION OF INCIDENTAL OR CONSEQUENTIAL DAMAGES,
SO THE ABOVE LIMITATION OR EXCLUSION MAY NOT APPLY TO THE PURCHASER.
How State and Provincial law apply
This limited warranty gives you specific legal rights, and you may also have other rights which vary from jurisdiction to jurisdiction.
The provisions of the United Nations Convention on Contracts for the Sale of Goods shall not apply to this limited warranty or the sale
of products covered by this limited warranty.
11
Address
Dimplex North America Limited
1367 Industrial Road
Cambridge ON
Canada N1R 7G8
12
Tel. 1-800-668-6663
Internet: www.dimplex.com