1
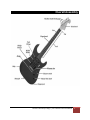
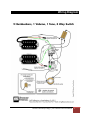
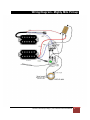
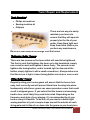
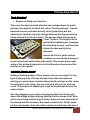
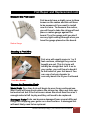
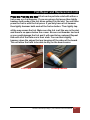
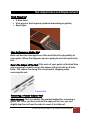
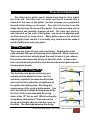
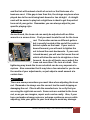
Sinclair Community College
Engineering Design
Electric Guitar Service Manual
Written by:
Sam Schulze, Brian Stebbins, Henry Merrill
Sinclair Community College | ETD 110 Guitar Service Manual
1
Contents:
pg. 3
� Overall Assembly
� Wiring Diagram
� Parts List
pg. 4
pg. 5-6
�
�
�
�
�
�
�
�
�
�
�
�
�
�
�
pg. 7
pg. 9
pg. 11
pg. 13
pg. 15
pg. 23
pg. 26
pg. 28
pg. 30
pg. 32
pg. 34
pg. 36
pg. 37
pg. 39
pg. 40
Re-string
Tuner Repair
Pickup Adjustment/Repair
Pickup Selector
Fret Repair
Action Adjustment
Bridge and Intonation adjustment
Nut Repair
Strap Button Repair/Replacement
String Buzzing
Pot Repair and Replacement
Common Electronic Problems
Truss Rod
Finish Repair
Soldering
Sinclair Community College | ETD 110 Guitar Service Manual
2
Recommended Tools:
For routine maintenance only a set of basic hand tools is required.
However for jobs such as nut and tuner repair, specialty tools may
be required for correct results. If the special tool is required, it will
be noted on the page describing the repair process. If you do not feel
comfortable attempting any of these repairs, we recommend taking
your guitar to a professional luthier in your area to have the work
done.
�
�
�
�
�
�
�
�
�
�
�
�
�
�
�
�
Small hammer
Variety of screwdrivers (Regular and mini sizes)
English and Metric open-end wrenches
Calipers (dial or digital)
Long nose pliers
Wire strippers
Variety of drill bits
T-Pins (available at crafts stores)
Electronic multi-meter
Wood chisels
Quick release clamps (12” and 18”)
Sewing machine oil
Rubber sanding blocks
Extra guitar strings
Guitar tuner
Fret dots
� Gun stock finish oil
� Bona finish and sealer (available through flooring stores)
� Concentrated wood stain
Sinclair Community College | ETD 110 Guitar Service Manual
3
Overall Assembly:
Sinclair Community College | ETD 110 Guitar Service Manual
4
Wiring Diagram:
Sinclair Community College | ETD 110 Guitar Service Manual
5
Wiring Diagram - Mighty Mite Pickup:
Sinclair Community College | ETD 110 Guitar Service Manual
6
Restring:
Restringing a guitar is one of the most common repairs you will
have to do to keep your guitar in top playing condition. It is very
simple to do and should take no more than a half hour to complete.
�
�
�
�
Guitar strings
Wire cutters
Powdered graphite (optional)
Tuner
1.) Loosen the strings by slowly turning each of the tuners on the
headstock clock-wise. Only loosen each string, do not remove yet.
2.) Take hold of the middle of each string and cut each with the wire
cutters, the strings should be loose enough that they don’t snap
when cut. Now remove each string half, unwind the top half from
each tuner and pull the bottom half out from the underside of the
guitar below the saddle.
3.) Take the new strings out of their package, but keep the
packaging as it shows what strings go where. Thread the strings up
through the saddle as the package shows. Make sure to thread all 6
strings before moving to the next step.
4.) Once all 6 strings have been installed and checked to make sure
location is correct, begin threading the strings through the tuners,
starting with the 6th string (thickest), and thread it through the tuner
from the inside out. Once you have pulled the string through, give
about 2 inches of slack before you begin tightening. Turn the wing
nut while plucking the string until it sounds, then move to the next
string. Make sure each string has at least 3 wraps on the tuning post
before continuing.
Sinclair Community College | ETD 110 Guitar Service Manual
7
5.) Continue threading each string from the 5th to the 1st. Make sure
not to over tighten any strings as they will snap.
6.) Trim the long ends of the strings above the tuning posts. Tune
your guitar and play away!
Sinclair Community College | ETD 110 Guitar Service Manual
8
Tuner Repair and Replacement:
� Philips screwdriver
� Sewing machine oil
� Calipers
There are two ways to easily
maintain your tuners to
ensure that they will operate
properly for the life of your
guitar: Keep them tight and
keep them oiled. Before you
perform any maintenance,
be sure to first remove the strings from the tuners.
There are two screws on the tuners that will need to be tightened.
The first is a nut that tightens the tuner on to the headstock, simply
use a small wrench and tighten it down firmly. The second screw
tightens the tuning button, and is located right on the end of the
button, simply tighten it with a small screwdriver. Always make sure
that this screw is tight, a loose tuning button can strip or even crack.
Regularly oiling your tuners gears will ensure that the tuners turn
easy, lock correctly and will prevent them from freezing into place.
Inadequately oiled tuner gears can cause premature wear that could
result in stripped gears. If you notice that the tuners are becoming
hard to turn, most likely they need to be oiled. Depending on the
frequency and style of your playing, it’s recommended to oil your
tuners every 6-8 months. To do this, all you need is a bottle light
sewing machine oil, put a couple drops around the outside of each
string pole and let the oil run down into the gears as you slowly turn
Sinclair Community College | ETD 110 Guitar Service Manual
9
the tuning button. Your gears should turn smoothly now, and last for
the life of your guitar.
Generally there are only 2 parts you’ll have to replace tuner-wise,
those being the tuner button, or the entire tuner assembly.
Replacing the tuner button is simple, all you have to do is take out
the screw that holds the tuner button in place and the button will
slide off its post. Simply slide the new one on and put the screw back
in place and you’re done.
Before you can replace your tuners you’ll have to get a new set, this
can be a somewhat overwhelming process as there and many
different types and sizes of tuners on the market. The simplest way
to make sure everything will work correctly is just to buy the exact
same tuners that were on the guitar already.
If you are looking to upgrade however, you will have to take a few
measurements to ensure proper fit of the new tuners. Measurements
needed are: thickness of the headstock, height of the string post,
and size of the hole that the string post sits in. You will also need to
decide on a gear ratio. Most tuners have a 14:1 gear ratio, but there
are units available from the regular 14:1 to 25:1 for extreme fine
tuning, but overboard unless you’re a serious guitarist.
Once you have decided on a tuner set, replacing the tuner is simple,
just unscrew the nut on top of the headstock and slide the tuner out
through the back. Reverse the process for the new one and you’re
done. Be sure to double check that the new tuners are set tight on
the headstock.
Sinclair Community College | ETD 110 Guitar Service Manual
10
Pickup Adjustment:
� Regular or Philips screwdriver
There are literally hundreds of styles and configurations for guitar
pickups, the majority of which are called “floating pickups”, named
because they do not mount directly to the guitar body but are
attached to a pickup ring with springs between the ring and pickup
frame holding the pickup in place. The springs allow the pickup to
“float” in place. The height can be
adjusted by tightening or loosening
the mounting screws, and thus also
allows the tone quality to be
adjusted.
Almost all electric guitar pickup
problems are caused by damage or
incorrect pickup height and/or placement. This means that proper
setup of the pickup is imperative to the life and performance of the
pickups on your guitar.
Setting a floating pickup is fairly simple, and you can adjust for any
type of playing style. Pickups are basically small microphones
picking up sound waves reverberating from the strings, so the closer
the pickup is to the string, the more sound it will pick up, and vice
versa. The purpose of adjusting is to get all the pickups to have the
same volume.
Start by plugging in your guitar and playing the low E string right
above the bridge pickup and pay attention to the volume level. Next,
do the same thing with the high E string. Raise or lower each side of
the pickup until the volume is the same on both sides. Do the same
for the neck pickup, then check the volume level between the two, if
Sinclair Community College | ETD 110 Guitar Service Manual
11
there is any difference; adjust until the bridge and neck pickups are
the same volume.
Another way to easily check if the pickups are adjusted correctly is
to measure the height of the strings on each side of the pickup and
adjust till they are the same height on each side. Fine tuning can now
be done my testing the volume just like we did before.
Sinclair Community College | ETD 110 Guitar Service Manual
12
Pickup Selector Repair:
� Screwdriver
� Wire clippers/strippers
� Soldering iron and solder
The pickup selector is simply a toggle switch that is used to control
which pickups are being used when playing the guitar. Since most
guitars have at least 2 separate pickups, the pickup selector switch
is crucial to finding the perfect sound to suit your playing style. While
there are various types of pickup selectors available, the ones used
in our guitar are known as a 3-way selector.
A pickup selector is a simple electronic
switch that is hardwired to both the
guitar pickups and eventually the guitar
jack. When the switch is flipped in a
direction, the switch connects the lugs
wired to the pickups and the jack
completing the circuit. This is how the
pickups are selected. While one or a
combination of pickups is selected, the
other pickups are deselected by the
same means.
Sinclair Community College | ETD 110 Guitar Service Manual
13
Pickup Selector Repair:
Pickup selectors can wear out over time. The lugs and the rotating
switch can lose their tight connection with years of use. Replacing
the switch is pretty simple and only requires a few steps.
Most pickup selectors are either mounted to the top of the guitar
through a cavity routed in the back of the body or mounted to a pick
guard. For pickup selectors that are mounted to the top of the body,
simply take a screwdriver and unscrew the pickup selector. You will
have to remove the knob on the end of the level before you can slide
the selector through the channel and out of the cavity. For pick
guard mounted selector, like Fender Stratocasters, you will need to
remove the entire pick guard to remove the selector. Simply
unscrew the pick guard from the body, flip it over, and rest it on the
top of the body. The pick guard will still be wired to the body, so you
can't go very far with it. Then, unscrew the selector. It is important
that you take note of what wires are soldered to what lugs before you
in this manual for
remove the selector. Refer to the
assistance. Once you know where everything has been wired, cut
the wires close to the lugs and remove the old selector.
Once the old selector is removed, screw the new selector in place.
Follow your wiring notes from the old pickup selector, strip the wires
with a pair of wire strippers, and solder the wires to the correct lugs.
After everything is soldered in place and checked for correct layout,
reattached the cavity cover or pick guard, plug in the guitar and
check operation. For more information about how to solder wiring,
section.
see the
Sinclair Community College | ETD 110 Guitar Service Manual
14
Fret Repair and Replacement:
�
�
�
�
�
�
�
�
�
�
�
�
X-Acto knife
Calipers
Feeler gauge
Radius gauge
Fret wire bender (optional)
Fret press
Fret hammer
Screwdrivers (various sizes and types)
Fret bevel
End nippers
Chisel
Guitar Wax
The
is the
part of the fret that comes
into contact with the strings
at the top of the fret.
The
is the bottom of
the fret wire that is set into
the fret board.
The
are the
protrusions that stick out of
the fret tang to hold the fret wire in the fret slot.
Not all guitars have the same size fret wire. Different sized in the fret
wire will result in different sounds. This leaves it up to the player to
decide what kind of sound they would like to get out of their guitar.
Sinclair Community College | ETD 110 Guitar Service Manual
15
Fret Repair and Replacement cont:
Fret wires are commonly made out of
nickel and stainless steel, although
they can be made out of several kinds
of materials. Stainless steel is much
denser than nickel which helps
prevent wear. On the other hand
stainless steel is much harder to
install than nickel due to its density.
Nickel is often recommended for the
average player.
After your frets have been removed
from the guitar you need to measure the size of the crown. Using a
pair of calipers, you can measure the height and width of the crown.
If the fret was
glued into the slot then will need to
clean out the glue that is left in the
slot. This will help you get accurate
measurements when measuring the
fret slot.
After the fret
slot is completely clean, you can take
a feeler gauge and insert it into the slot. Frets will range from .023”
to .050” in width.
After you have the measurements of the fret
slots, you will then be able to choose the correct fret wire. When
selecting a wire, the only thing that needs to be a certain size is the
tang. The tang must be .002” smaller then the width of the fret slot.
This will let it lay snug in the slot. The bead of crown can either be
the same size as the previous wire or different.
Sinclair Community College | ETD 110 Guitar Service Manual
16
Fret Repair and Replacement cont:
Fret boards have a slight curve to them
known as the radius and this will have
to be measured if you want to install
new fret wire. To measure the radius,
you will have to take the strings off and
place a radius gauge against the
board. Turn the gauge until you don’t
see any light coming through when you
have the gauge placed on the board.
Radius Gauge
Fret wire will usually come in 1 or 2
foot sections, although they can be
bought pre-cut. This fret wire will
initially be straight but to fit it on to
your guitar, your will have to bend it
to the radius of your fret board. You
can use a fret wire bender to
correctly bend it to fit your fret board
Fret Wire Bender
- Over time frets will begin to wear from continued use.
Worn frets will have divots where the strings lay. Worn out frets can
be leveled out but if the fret is worn down too much than there isn’t
enough material left to play and they will need to be replaced.
Frets can become damaged from several different
things like dropping your guitar on a hard surface. A damaged fret
will most likely need to be replaced.
Sinclair Community College | ETD 110 Guitar Service Manual
17
Fret Repair and Replacement cont:
A fret that is improperly seated in the fret
board will most likely cause string buzzing. To tell if a fret is seated
properly you can look at the base of the crown and the fret board.
The crown should lay flat against the fret board so there is no space
in between. If the fret is improperly seated then it needs to be
removed and reseated properly.
Guitar frets are usually glued into the fret slot although there are
some manufactures that make the fret slot so tight that friction is
what holds the fret in place. It is important to know how the frets on
your guitar are kept in the fret slots. There also may be a certain way
that the frets need to be taken out.
Frets in early Fenders
were slid in from the side making it very hard, if not impossible to
remove them from the top. So they easiest way to remove the frets
are by pulling them out from the sides. Here are the steps you should
take when removing the frets from an early style fender.
1. Remove the strings from the guitar
2. Unscrew the neck and remove it from its pocket on the body.
3. Clamp the neck down and start to remove the frets. Take a
hammer and a nail set to remove each fret. Lightly hammer the
nail set into the side of the fret to slowly remove it. Make sure
not to chip any of the fret board, but if you do you can glue it
back on after the fret has been removed.
4. Clean the slot and replace the fret.
Sinclair Community College | ETD 110 Guitar Service Manual
18
Fret Repair and Replacement cont:
Unlike early Fender’s,
today the frets are directly place into the slots in Fender guitars.
They also held into place by glue so that will have to be heated up to
be able to remove the fret. Here are the steps for moving this kind of
guitar.
1. Remove the strings from the guitar
2. Unscrew the neck and remove it from its pocket on the body.
3. Take a soldering gun and file a notch in the so that it can fit the
fret wire in.
4. Run the tip of the gun across the top of the fret. Make sure that
you do not heat the fret too much. You just want it hot enough
so that the glue is loose enough to allow the fret to come out.
5. Take a pair of end nippers and place them on the fret board.
When you clamp on the fret, it should come and without you
having to actually pull it out.
6. Clamp the fret in 1/8” increments until it is completely out of the
slot.
7. Clean the slot and replace the fret.
Sinclair Community College | ETD 110 Guitar Service Manual
19
Fret Repair and Replacement cont:
With these
types of guitars, the frets are usually installed before the lacquer in
put on. This means that if you try to directly remove the frets than
you could create cracks in the lacquer. To prevent this, score the
edges around the base of the fret with an Xacto-knife. Now when you
remove the fret, it won’t be attached to the lacquer and cause it to
crack or chip. The rest of the steps for removing the fret are the
same as above.
Before you start
installing the frets you are going to want to
wax the fret board. The wax will prevent the
glue from hardening on the board. Try to
keep the wax from getting into the slots. If
was does manage to get into the slots then
you can clean it out with a knife. Note that
you do not need to wax finished fret boards.
Guitar Wax
(On unfinished boards) run a bead of super-glue into
the fret slot. Not much glue is needed, just a small bead across the
top of the slot. Once you put the glue into the slot, immediately place
the fret into the slot. You do not want to let the glue sit for very long,
and to prevent this only put glue in one slot at a time.
(On finished boards) Unlike on an unfinished board, you do not want
to use super glue to apply the frets. Super glue will cause problems
with the finish on you board. Instead, use common wood glue. Like
before, don’t let the glue sit for a while and only put glue into one slot
at a time.
Sinclair Community College | ETD 110 Guitar Service Manual
20
Fret Repair and Replacement cont:
A fret can be put into a slot with either a
fret press or a fret hammer. If you are using a fret press then lightly
hammer both ends of the fret when setting it in the slot. You can then
press the fret in with the fret press. If you only have a fret hammer
then lightly hammer both ends of the fret as before. Then lightly tap
all the way across the fret. Make sure the fret is all the way in the slot
and there is no space below the crown. Be sure not hammer too hard
or you could damage the fret and it will need to be replaced. Repeat
this until all of the frets are in their slots. You can then slightly
hammer down the edges that are hanging off the sides of the board.
This will allow the frets to be able to stay on the board easier.
Fret Press
Fretting hammer
Sinclair Community College | ETD 110 Guitar Service Manual
21
Fret Repair and Replacement cont:
Make sure you
remove the excess glue on the fret
board before it dries. To do this take a
dull chisel and scrape it off, this can be
done on both finished, and unfinished
fret boards
Chisel
After the glue has
dried, you can take a pair of end
nippers and cut off the edged of the
frets that are hanging off the sides.
After they are nipped off, you should
take a file and smooth down the edges.
Make sure to file downwards on the
side of the board. If you file upward
then you risk loosening your frets.
End Nippers
To make your fret
rounded on the edges you can use a
fret bevel. Use a 35 degree bevel to
get a 35 degree angle around the edge
of the fret. Beveling will usually leave
burrs, so use a three-cornered file to
remove the burr. After the burr has
been removed, sand the edge with a
320-grit, 600-frit, 800-grit, and 1,000grit sandpaper.
Fret Bevel
Sinclair Community College | ETD 110 Guitar Service Manual
22
Action Adjustment:
� Feeler gauge
� Allen wrench to adjust truss rod
� Radius gauge
The action is the height of the strings from the fret board and
is usually measured at the 1st or 12th fret. Strings that are set high
above the fret board are known as
“High-action” the opposite goes for
strings that are set low. The Action of a
guitar is important when determining
its playability. If the action is too low,
then it can cause string buzzing. If the
action is too high then it will start to
become uncomfortable and difficult to
play. So it’s good to find a median
where it is high enough to not cause
string buzzing but also low enough to be comfortable. Picking an
action adjustment will also depend on the preference of the player
Drastic changes in the temperature will
either cause the wood in your guitar to shrink or expand. As a result
the neck will start to slightly bow which caused the action of the
strings to change.
If you change the tension of your strings from high to
low and vice-versa then it could result in neck bowing and have a
similar effect as temperature changes.
Extended use can cause the nut of your guitar to
wear down. When this happens, it could affect the action of your
guitar.
Sinclair Community College | ETD 110 Guitar Service Manual
23
Action Adjustment cont:
Most of the time adjusting the action can be as simple as adjusting
the truss rod. For more serious action problems you may have to
adjust the nut or bridge of your guitar. Just know that the three main
areas to go for adjusting the action is the truss rod, nut and bridge.
Adjusting the truss rod will straighten and
flatten out the neck which will bring your action back to its normal
level. Remember that straightening the neck too far may cause
string buzzing so leave a slight amount of action on your strings (for
details see truss rod adjustment). If this does not fix the problem
then you are going to want to look at the nut and bridge.
To check if the nut is causing the issue,
use a feeler gauge to measure the distance between the bottom of
the strings and the first fret. The standard distance is .06”, if the
string is higher than this then you are going to want to file down the
nut until it reaches this length.
Over the years there
have been many different styles of Fender guitars. Through all these
different styles, the basic design of the bridge has mostly stayed the
same. Each string is mounted on top of a saddle piece and is strung
through the body or bridge. Each saddle piece can be individually
adjusted at the body or fret board. To adjust the action you will have
to adjust the height of the saddles at the bridge. Here are the steps
for doing that.
1. Tune your guitar to pitch
2. Check the back-bow and relief of the neck
3. Adjust the truss rod to straighten the neck
4. Retune your guitar and check the back-bow and relief again
5. Check and adjust the action at the nut
6. Measure the high and low E string at the 12th fret by placing a
precision ruler on the 12th fret
Sinclair Community College | ETD 110 Guitar Service Manual
24
Action Adjustment cont:
7. The distance between the bottom of the high E string and the
top 12th fret should be set to 2/32”. If the string is higher or
lower than 2/32” then you will have to adjust the saddle piece
with an Allen wrench.
8. Set the low E string to 3/32” at the 12th fret by raising or
lowering the saddle.
9. Place a radius gauge that corresponds to the radius of the fret
board radius on the strings. The gauge should sit on the low
and high E strings while touching the middle strings. If the
middle strings are higher or lower than the gauge, you will need
to adjust the strings’ height relative to the outside strings.
When the gauge is placed on the outer strings, the rest of the
strings should be touching the gauge but not holding it off the
outer strings.
Retune the guitar and check the action of the outer strings at
the 12th fret.
Sinclair Community College | ETD 110 Guitar Service Manual
25
Bridge and Intonation Repair
� Small Philips screwdriver or 1.5mm Allen wrench
There are many different styles of bridges. All bridges are
made of hard metal; therefore, they are extremely durable and rarely
have to be repaired. Most often you can maintain the function of your
bridge with just proper set up. In this manual we will discuss the
Fender style guitar bridge. The bridge consists of a base plate and
six saddles. These saddles can adjust the string height and
intonation of your strings.
With the Fender style bridge,
and with many others, the strings are
strung through the body and mounted
on top of each saddle. This type of
bridge is often referred to as the
Tremolo style bridge. This type of
bridge is most common not only
because of its stylish look, but also
because of its adjustability and
durability.
The saddle pieces on the bridge can be adjusted closer or
farther away from the body, which in turn adjusts the string height or
action. Each saddle has a small screw on it that adjusts its height (as
seen right). With most Fender style bridges all you will need is a
1.5mm Allen wrench. Tightening the screw will move it closer to the
body, while loosening the screw will add to its height.
Sinclair Community College | ETD 110 Guitar Service Manual
26
Bridge and Intonation cont:
Poor intonation is when your strings sound out of tune as you
play up or down fret board. The best way to adjust the intonation of
your guitar is to adjust the scale length of each string. Before we talk
about adjusting intonation with the bridge, we must first define scale
length. Scale length on a guitar refers to the distance between the
edge of the nut and the top of each saddle piece. The most common
scale length on most Fender is 25.5 inches. Gibson and others are
24.75”. You can check the
intonation by playing a fretted
note on the 12th fret and then a
harmonic on the 12th fret. These
notes should sound exactly the
same. If the note sounds sharp or
flat, the intonation will need to be
adjusted. At the bottom of each
saddle is a screw that adjusts the
saddle closer or farther away
from the fret board. No matter what type of bridge you have, the
saddles can most often be adjusted the same way. The screw will
need to be tightened or turned clockwise if the fretted note sounds
sharp. The saddle pieces will move away from the fret board the
tighter the screw is turned. If the fretted note sounds flat, you will
need to loosen or turn the screw counterclockwise to move the
saddle toward the fret board. You may then check the intonation
again, but remember to always adjust in small increments.
Another way of checking intonation is through computer
software. Here is a link for a free download of a frequency analyzer.
You simply plug your guitar into the computer and the software
allows you to check the frequency of your strings to determine if
your intonation is set up correctly.
Sinclair Community College | ETD 110 Guitar Service Manual
27
Nut Adjustment and Replacement:
� X-Acto knife
� Vice grips or End nippers (optional depending on guitar)
� Super glue
Nuts can become damaged over time and affect the playability of
your guitar. When this happens you are going to want to replace the
nut.
If the neck of your guitar is finished then
you are going to want to score the edges of the nut with an X-acto
knife. The reason for doing this is to prevent chipping when
removing the nut.
X-acto Knife
This is probably the easiest method for removing a
guitar nut. After you have scored the edges of the nut, you can
slightly tap the nut from the side to cause it to slide out.
Sinclair Community College | ETD 110 Guitar Service Manual
28
Nut Adjustment and Replacement:
The pull method is a little more risky as it can cause
chipping in the fret board. To pull the nut out use a pair of fret
nippers or vice grips and pull it out slowly and carefully. To prevent
chipping of the fret board, put protective tape of both sides of the
nut.
If you can’t manage to get the fret out with the previous
two methods then you are going to have to cut it out. Using the cut
method will destroy the nut so try to use the other methods if
possible. To cut the nut out take a thin saw and cut down the middle
of the nut. While you are cutting be sure not to cut down into the fret
board. After the middle has been cut out you can break out each side
separately.
You are going to want to clean the slot
out of any glue that was left behind before you install the new one.
You will need a thin file that can fit into the slot. Make sure that you
don’t file down the sides of the slot as it has to stay straight. After the
slot is cleaned out you can lay the nut into the slot. If the nut hangs
off the edges at all, you are going to want to file them down until they
are smooth.
Before you actually glue the nut into place, you are going to
want to test putting the not into the slot and seeing how it fits and
how you are going to clamp it down while gluing.
You can use either wood glue or
super glue to hold the nut into place. You will only need a small
amount of glue. You don’t want the glue to seep out the sides and if
you have to remove the nut again, a lot of glue will make it difficult.
When setting the nut into place, make sure the nut is flat on the fret
board and that it doesn’t hang off the edges.
You will need to clean the slot out just
like before. Put the nut into the slot and mark where the screws are
going to be. Then remove the nut and drill holes at the marks that are
Sinclair Community College | ETD 110 Guitar Service Manual
29
slightly smaller and shorter than the screw. After you have drilled the
holes you can put the nut back in the slot and screw it into place.
Strap Button Repair
� Screwdriver
� Wood glue
� Dowel rods or toothpicks (depending on
situation)
� Sandpaper (400 grit+)
One thing that doesn’t come up much when talking about guitar
maintenance, but is extremely important, is strap button repair. The
last think you want is your guitar to fly off while you are playing.
Strap buttons loosen up gradually just from everyday wear and tear.
If a strap button loosens or pops out while playing, your guitar will
fall to the floor which may severely damage it. Strap buttons can be
repaired easily but you must pay attention to detail.
First of all if your strap button can easily be pulled out, the only
way to fix it is to plug and re-drill. The hole has likely been stripped
out which means you must find a dowel or a plug that will snugly fit in
the hole. You must first measure the hole left by the screw. You will
likely be able to find the correct size dowel at any local hardware
store. Use a small amount of wood glue such as Tight-Bond to glue
the dowel in the hole and then cut off the excess. Once it has dried
you may sand it down flush to the body.
! Once you are
done sanding re-drill the hole and now you may screw in your strap
button and enjoy the new, snug fit. Remember, always be careful not
to scratch or chip your guitar.
Sinclair Community College | ETD 110 Guitar Service Manual
30
Strap Button Repair
If your strap button is just slightly loose, there are a couple of ways
you can go about fixing it. The golden rule when repairing your strap
button is NEVER GLUE THE SCREW IN THE HOLE, as this can cause
major damage down the road. One way of fixing it is simply by using
a toothpick. Unscrew the strap button and place a thin toothpick in
the hole. When you screw the button back in the toothpick will give
the threads something to hold on to and this may fix the problem.
Another method that works really well is building up the hole or
making it smaller. Unscrew the strap button and carefully brush a
small amount of superglue around the walls of the hole. Remember
to allow this to dry completely before screwing in the strap button. A
few coats may be needed to build the hole up enough, but it is very
effective. This simple fix should keep your strap button from
wiggling around or coming loose.
Sinclair Community College | ETD 110 Guitar Service Manual
31
String Buzzing:
One of the most annoying problems to have when playing your
guitar is string buzzing. It is not a very difficult problem to solve, but
locating the cause may be easier said than done. Before you start
doing any major work on your guitar, inspect it thoroughly to
determine the exact location where
the buzzing is coming from. String
buzzing may occur when the neck is
warped, the frets are uneven, the slots
in the nut are too low, the action is too
low, or it is just set up poorly. Either
way this problem can likely be fixed in
no time at all, or you’ll be back to
hearing that clean sound that you love.
First try to play each open string to see if it buzzes. Make sure not to
fret any of the strings. If string buzzing does occur the problem is
likely coming from your nut. The slots may be too low or just worn
down. The string action will be too low at this point which will cause
the buzzing. If you hear the buzzing you will need to repair the nut or
just replace it all together (see Nut Replacement for details).
If no buzzing occurs on the open strings, try to fret them at various
points along the neck. If buzzing occurs at only a few frets and not
others, your frets may be uneven. You will need to replace the frets
on your guitar to fix the buzzing. If the buzzing occurs at all frets,
your action is likely too low. This can be solved with a simple action
adjustment (see Action Adjustment).
Sinclair Community College | ETD 110 Guitar Service Manual
32
String Buzzing:
Most other problems are not as serious and do not require any
repair work. These problems can likely be solved with proper setup.
The following is a chart that may help with any other buzzing
problems that might occur.
Symptom
Possible Cause(s)
Remedy
Open String Buzz
Nut
Buzzes when played open, stops
when string is fretted.
One Spot Buzz
Worn or poorly cut nut slot is placing the
strings too close to the frets near the nut.
Frets
Replace nut or shim to add
height. Set up instrument
properly.
Buzzes on one note, or one area
but stops when moving away
from that spot.
Frets are not level, one or more is too
high/low. Loose or sprung fret is rising out
of the fingerboard. Hump in fingerboard.
Wear or deep grooves in frets.
Set Up
Buzzes When I Strum Hard
Buzzing occurs when strumming
or picking aggressively but can
be silenced when playing lightly.
Buzzes Everywhere
Secure all loose frets, level and
dress. Fret leveling and/or
replacement of worn frets.
Adjust truss rod.
Insufficient relief in the neck.
Set up instrument properly.
Poor set up.
Use heavier strings.
String gauge too light.
Frets
Replace frets.
Buzzes nearly everywhere even
though it is set up properly, will
often disappear if string is fretted
hard or closer to the fret and
plucked softly.
Frets Out
Frets may be worn out or too low.
Neck
Set up instrument properly.
Buzzes nearly everywhere all the
time, strings are literally
touching the frets in the center or
other area of the fingerboard.
Truss rod may be way too tight back
bowing the neck.
Adjust truss rod for more relief.
Very small fret wire used.
Neck could be a warped, or have excess
back bow even after truss rod is loosened.
Use heavier strings if relief
cannot be created thru truss rod
adjustment
*courtesy of fretnotguitarrepair.com
Sinclair Community College | ETD 110 Guitar Service Manual
33
Pot Repair and Replacement:
�
�
�
�
Screwdriver
Wire cutters
Guitar pick (optional)
Soldering iron and solder
One of the parts commonly
mentioned on electric guitars are
the pots, but what exactly is a pot?
Pot is actually short for
potentiometer, a small device that
controls the flow of electric current
making it basically a glorified
resistor. A guitar will usually have 2
pots; one is for volume and the other
for tone. On the bottom of each pot
there are three lugs; the 2 outer lugs carry electric current to and
from the pickups, while the middle lug resists the voltage. When the
knob on the pot gets turned, the middle lug will resist more or less
voltage which causes the volume to either decrease or increase. The
only difference between the 2 pots is that the tone pot has a
capacitor installed that prevents high frequencies from reaching the
output jack and the amplifier.
Just like any other electronic component on a guitar, pots will
eventually wear out or break, and will need to be replaced.
Replacing a pot is simple, and very similar to replacing a pickup
selector.
1. Remove the knob
Sinclair Community College | ETD 110 Guitar Service Manual
34
Pot Repair and Replacement:
First, you need to remove the knob for the pot/s that you want to
replace. Some knobs are held on by set screws so look for one
before you attempt to remove it. If there is no set screw, the knob
is on a split shaft, meaning that it is held on by friction and
pressure and can usually be remove by pulling up on the knob. If
it’s stuck, try prying it up with a thick guitar pick. Once removed
be careful not to drop it on your guitar.
2. Unscrew retaining nut
Once the knob is removed, you will see a nut on the pot’s shaft,
simply unscrew that to allow the pot to drop out the bottom of the
guitar.
3. Replace the pot
To access the pot you will need to remove the electronics cover
on the back of the guitar. Once inside, you’ll be able to remove the
old pot. Before you cut any wires take note of which wires are
soldered to which lugs (refer to the wiring diagram). Once you
have the wiring checked, cut the wires close to the lugs and
remove the pot. Bolt the new pot in place, solder the wires to the
correct lugs, place the electronics cover on the back of the guitar
body and put the knob back on.
If you are unsure about the soldering process, refer the
page.
Sinclair Community College | ETD 110 Guitar Service Manual
35
………….Common Electronics Problems and Repairs:
If your guitar is constantly cutting out, it’s a very
common symptom of a simple wiring issue, usually caused by a faulty
solder joint in the electronics. The most common reason for this is
the output jack becoming loose in its socket and rotating, causing
the connections inside to break off. This is why it’s very important to
make sure your output jack is always tight. Fortunately, loose wiring
connections are simple to fix, the trouble is finding them.
1. Plug your guitar in and toggle all the switches and knobs. If your
guitar still plays fine, the connection problem is internal.
2. For non-Stratocaster style guitars, remove the cavity covers on
the back of the guitar. Strum the strings and move the wires that are
soldered to the switches, pots, and output jack. You will probably
find your loose connection when the guitar cuts out again. For
Stratocaster style guitars, you will need to remove the pickguard and
manually check each connection point to make sure the solders are
solid.
3. Re-solder the loose wire and screw the cavity covers or pickguard
back on.
Guitar
crackling is a very common issue but rarely has to do with wiring.
Typically, if your guitar crackles when adjusting the volume and/or
tone knobs, it’s because the pots are dirty. To clean the pots, simply
remove the knob and spray some electronic contact cleaner into the
pot around the shaft and wipe off excess before replacing the knob.
If crackling persists, you may have to replace your pots.
Sinclair Community College | ETD 110 Guitar Service Manual
36
Truss Rod Adjustment:
One thing every guitar owner should know how to do is adjust
the truss rod. The truss rod is a metal rod that is inserted into a
channel in the neck of the guitar. Its main purpose is to counteract
the pull of the strings on the neck. Over time the tension from the
stings tend to warp the neck of the guitar. The neck can warp due to
temperature and humidity changes as well. The truss rod, which is
also adjusted on the neck of the guitar, can easily be adjusted with
an Allen wrench or screw driver. Many guitar owners are afraid of
adjusting the truss rod but it is actually very simple and can make a
world of difference with your guitar.
There are two types of truss rods used today. Single action truss
rods will bend the neck backwards when tightened. When loosened,
this truss rod will not actually bend the neck forward; it just relieves
its pressure and allows the strings to bend the neck. A dual action
truss rod will actually bend the neck backwards when tightened and
forward when loosed.
The first step is to decide which way you
actually need to adjust the truss rod. It is
extremely important to understand that the
truss rod will only adjust the straightness of
the guitar and nothing else. Checking the
concaveness of the neck is quite simple. You
start by holding the Bass E string down at the
first fret. At the same time hold the string
down at the 12th fret as well. While holding the
string down, look at the 6th fret and use the
string as a straight edge to read the curve on
the neck. The ideal gap between the string
Sinclair Community College | ETD 110 Guitar Service Manual
37
and the fret will be about a tenth of an inch or the thickness of a
business card. If the gap is less than this, the strings may buzz when
played due to the neck being back bowed or too straight. A straight
neck will be easier to play but a slight bow is ideal to get the perfect
tone out of your guitar. Remember you can always adjust to your
specific playing style.
As mentioned, the truss rod can easily be adjusted with an Allen
wrench or a screw driver. First you must locate the nut for the truss
rod. The location varies on different guitars
but is usually located at the end of the neck or
behind a plate on the head. If your neck is
bowed forward, you will want to tighten the
nut to bend the neck backwards. If your neck
is back-bowed, you will want to loosen the nut
which will allow the neck to straighten or bow
forward. As a rule of thumb, never adjust the
truss rod more than 1/8th turn at a time. Over
tightening may break the truss rod which can be very expensive to
replace. Also remember that it may take a few minutes for you to see
the results of your adjustments, so just adjust a small amount at a
certain time.
There are some precautions you must take when adjusting the truss
rod. Remember to always use the correct tool to avoid stripping or
damaging the nut. Check with the manufacturer to verify that you
are using the right side wrench. Some nuts are welded to the truss
rod, so as you can imagine, repair work can be costly. Also, if your
truss rod makes strange noises or extreme resistance occurs while
adjusting, take your guitar to your local shop to avoid any damage.
Sinclair Community College | ETD 110 Guitar Service Manual
38
Finish Repair:
Over the years, your guitars finish can experience many different
problems. This is mainly due to the use and abuse on your guitar.
You can re-finish your guitar but it tends to be a hard thing to, so you
want to be careful.
Drastic changes in temperature will usually be the
cause of cracks in the lacquer. When
the temperature is changing, the wood
will want to expand and contract. The
lacquer will want to stay stiff, so when
the wood is changing shape, the
lacquer will crack. Lacquer cracks
from the inside, so they will feel smooth
if you run your finger across them if
they haven’t cracked all the way
through.
Guitar scratches are very common and hard
to avoid. These scratches can be both shallow and deep and there
are different ways to deal with both.
The best way to get rid of shallow scratches is to wet sand, buff, and
then polish. Wet a piece of 1000-grit sand paper with soap and
water. Lightly sand down the area of scratches and make sure you
only remove a slight portion of the lacquer. Then take a buffer or rag
and rub in some buffing compound. After you have buffed the area,
polish it down to make it shine.
Deep scratches are much harder to remove and are usually best just
left alone. If you try to sand out the scratch then you will have to go
deep and may even sand off the paint. At this point it would have to
be refinished.
This is caused by an improper finish where the
top coat does not stick to the sealer coat. When this occurs, you will
need to strip the finish off and refinish the guitar. Simply spraying
more lacquer on the guitar will just make this problem come up again
later.
Sinclair Community College | ETD 110 Guitar Service Manual
39
How to Solder:
Being able to solder your own electronics is something every
guitarist should know how to do. You never know when you may have
to repair a broken wire, replace your pickups, pots, or whatever else
may break or wear out over the life of your guitar. Soldering is very
easy and only requires a little practice to become good at.
Soldering is the joining of two metals by using a third metal, such as
attaching a wire to a pot using the third metal which is the solder.
The solder itself is a metal alloy with a very low melting point, when
melted it will flow quickly over the piece you are working on and
solidify quickly once the soldering iron is removed, and will fuse the
two pieces together.
1. Soldering Iron
Soldering irons are fairly simple devices and relatively inexpensive.
Basically it’s just a device that uses electric current to heat a metal
tip. They come in a wide variety of
wattage levels, some being
adjustable. For a basic soldering
iron, I recommend getting one
between 30 and 60 watts so that it
will have enough to melt the solder
quickly, but not too hot to damage
the components you’re working
with. Some will come with interchangeable tips, which is nice for
different types of soldering.
Sinclair Community College | ETD 110 Guitar Service Manual
40
2. Solder
Choosing solder is very important since
it is what will hold your wiring together.
For this type of work, you will want to get
a 60-40 rosin core tin/lead solder. It’s the
industry standard for electronics
soldering and will melt quickly and
produce a solid joint. This type does give
off toxic lead fumes when used, so many
companies produce a rosin core solder
that is lead free. Either of the two types
will work fine for your guitar.
3. Damp sponge or paper towel
You will need something to clean the tip of the soldering iron and
wipe up any excess solder afterwards. You can use either a wet
sponge, rag, or a folded paper towel wetted down to do this. It’s also
handy for keeping the iron from overheating.
4. Wire strippers
Wire strippers are used to remove the
rubber insulation from wiring before
we solder it. Because of the small size
of the wires we are dealing with, you
should get a pair of small gauge wire
strippers. Most will cover a range of
wire from around 10 gauge all the way
down to 22 or 24 gauge wire.
Sinclair Community College | ETD 110 Guitar Service Manual
41
How to Solder Electronics:
Soldering is very simple and easy to learn, however it will take some
practice to fully grasp. I recommend that you gain some practice
before you dig into your guitar if this is your first time soldering. You
may realize it will be nice to have an extra set of hands in some
cases, if that’s not available just take your time and go steady. This is
a step by step, how-to on making a clean solder joint.
1. Strip the wire
As mentioned before, stripping the wire refers to removing the
protective rubber insulation from the actual wire underneath. Start
by taking your wire strippers and inserting the wire into the slot
marked for the size wire you’re using. Squeeze the handles to cut
through the insulation, and then slide strippers away from you to
remove the insulation. Usually it works best to remove about ¼ inch
of the insulation, just enough to solder the wire to the lug without
leaving any extra exposed.
2. Tin the tip of the soldering iron
Tinning the tip of the soldering iron means to coat it with a thin layer
of solder. Having the tip tinned helps to transfer heat to the
workpiece more efficiently. Start by plugging in your soldering iron
and letting it heat up for about 10 minutes. Once hot, wipe the tip
with a wet paper towel or sponge to clean off any old, oxidized
solder. Now take your solder spool, and melt a thin coat of solder on
the tip, not too much, just enough to cover the tip. Immediately wipe
the tip again with the wet towel before the solder and flux can
become solid. You’re now ready to start soldering the wire.
3. Tin the end of the wire
Tinning the wire helps to hold all the small wire strands together and
will make it easier to make the final solder joint. Simply heat the
exposed wire end with the iron, melt some solder on to the wire and
wipe off the excess.
Sinclair Community College | ETD 110 Guitar Service Manual
42
4. Soldering the joint
Now take the piece that you will be soldering to, such as the back of
a pot. Take the soldering iron and move it slowly around on the pot
until it is heated just enough to melt the solder. Now take your tinned
wire and hold it on the pot until the solder melts. This is where
another hand comes in handy. While holding the wire on the pot,
don’t remove the iron, take your spool of solder and melt a little on
top of the wire until it flows evenly across the wire. When you have
enough solder applied, remove the spool of solder, and then the iron.
The solder joint will solidify quickly, once it has become solid give
the wire a small tug to ensure it has bonded well. If it checks good,
you’re done.
When soldering the back of a pot, or any other electronic device,
make sure not to get them too hot as it will cause damage to the
components inside.
This is a link to a soldering tutorial video that clearly shows the
process involved and some good tips for making a clean joint:
Sinclair Community College | ETD 110 Guitar Service Manual
43
Sinclair Community College | ETD 110 Guitar Service Manual
44