1
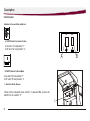
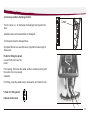
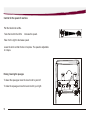
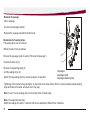
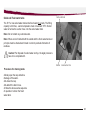
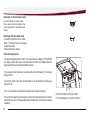
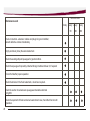
User Manual
Table of Contents
Instruction Manual
Preface..........................................................................................................................................................03
Introduction................................................................................................................................................... 05
Proper use ....................................................................................................................................................05
Acceptance of the machine ..........................................................................................................................06
General for safety Instructions
Operation.......................................................................................................................................................07
Transport.......................................................................................................................................................10
Handling of line cords....................................................................................................................................10
Principle of operation.....................................................................................................................................11
How to take the machine into Operation
Assembly ......................................................................................................................................................12
Description
Controls ........................................................................................................................................................13
Control panel ................................................................................................................................................14
Brushes / Pads .............................................................................................................................................17
Installation of brush ..................................................................................................................................... 17
Removal of brush..........................................................................................................................................18
Squeegee......................................................................................................................................................19
Mounting of Squeegee (First time)................................................................................................................19
Removal of Squeegee...................................................................................................................................20
Replacement of Sealing Strips......................................................................................................................20
Filling of Water...............................................................................................................................................21
Taking into Operation
Operating Procedure.....................................................................................................................................21
Soiled and Fresh water tanks........................................................................................................................23
Draining of tanks...........................................................................................................................................23
Electrical Equipment.....................................................................................................................................24
Technical Specification..............................................................................................................................26
Maintenance.................................................................................................................................................27
Maintenance Work........................................................................................................................................27
2
Preface
Dear customer,
It is our desire that the excellent properties of the E 17e should justify the confidence you demonstrated
Making this purchase. Before first operation of your E 17e read these instructions carefully. They will inform
E 17e machine is an ideal machine to clean floors in large and medium areas like Offices, Hospital,
Restaurant, Shopping Complexes and many commercial applications.
The exclamation mark symbol
has been used in this manual at several places and identifies particular areas that are if essence for your safety.
Please pass all safety instructions on to other persons operating this machine.
The symbol,
has been used in the manual in several places and identifies particular areas that the operator should be cautious.
The symbol,
has been used in the manual in several places and identifies particular areas that the operator should note at the
Time of operation.
3
Prior to first operation, read the manual carefully and strictly comply with the instructions contained.
Please be advised explicitly that we cannot accept any legal claims out of the contents of this manual.
2
If repair work has to be performed, make sure that only genuine spare parts are used since genuine spare parts
only may guarantee continuous and dependable operation of your machine.
Valid as for Nonember 2008
Minuteman International 14N845 U.S Route 20 Pinegree Grove, Illinois 60140 USA
Phone 1-800-323-9420
E-Mail: www.minutemanintl.com
4
Introduction
Proper Use
The E 17e machine has been exclusively designed for floor cleaning, such as wet scrubbing and vacuuming .Whatever sort of
use beyond the specified range will be deemed improper use: the manufacturer can not be held liable for consequential
damages.
The term of proper use also includes compliance with the manufacturer’s instructions about operation, maintenance and repair.
The E 17e may be used , serviced and repaired by persons only that are familiar with the machine and are aware of possible
hazards involved. The appropriate Accident Prevention Regulations as well as applicable general regulations about safety and
health at work will have to be complied with.
Modifications made to the E 17e in absence of the manufacturer’s consent will relieve the manufacturer from a possible liability
for consequential damage.
This machine is not suitable for evacuation of dusts, which are explosive or dangerous to health.
5
Notes on Warranty
The terms of the sales contract apply. Damages are not subject to warranty if they are due to non-compliance with the
maintenance and service provisions.
Any maintenance work has to be performed by an authorized Minuteman service workshop and confirmed in the
“Maintenance certificate “which is the warranty document.
The following is excluded from warranty:
Natural wear and tear after overload, blown fuses and damages caused by inexpert handling and unauthorized
modification of the machine.
Moreover, any claim for warranty expires if damages at the machine are caused by fitting of parts or accessories without
Minuteman’s prior and explicit consent or by non-compliance with the maintenance instructions.
Acceptance of the machine
Upon arrival, check your consignment for possible transit damage. Please have the railway authorities or the freight
forwarder confirm such damage and mail your damage report and waybill to:
Ours Address :
Minuteman International 14N845 U.S Route 20,Pinegree Grove,Illinois USA 60140
Phone 1-800-323-9420
E-Mail: www.minutemanintl.com
6
General Safety Instructions
General Safety Instructions
Apart from the information contained in this manual, the generally applicable legal provisions for safety and prevention of
accidents must be adhered to. Do not put this manual aside without having read it, even if you did already operate similar
ground cleaning equipment before. Allow yourself the time to do so in order to safe time at a later moment. The operator is
responsible for all persons in the working area. Children have to keep clear of the E 17e in operation. Nobody is allowed to
stay in the zone of danger.
The warning and instruction plates attached to the E 17e give important advice about safe operation .Replace lost or
illegible stickers. Before starting to work, the operator has to check that the E 17e and its working implements are in proper
and safe operating condition.
Machines with known defects must not be used. It is important to familiarize yourself with all accessories and controls, as
well as their functions, before you start working. Avoid the mess of having to reading this book while trying to run the
machine.
Operation
Ground cleaning machines may be run by qualified personnel only;
The machine may be used for cleaning such surfaces approved by the owner or this authorized representative.
7
Turn the motors off to protect the machine against unintended movements before leaving it unattended. Use
genuine spare brushes as specified by the manufacturer. Use of other than the indicated brush types may affect
Safety.
When transporting the E 17e, shut down the motors of the working implements. The operator has to use the machine in
accordance to its intended fields of application. During operation, he has to take account of the local conditions (stairs,
obstacles) and of other persons, in particular to children. Turn off the machine before any passage over dormers.
Use cleaning agents only, which are suitable for automatic machines (low foaming), and adhere to the instructions for use,
disposal and to the precautions specified by the manufacturer of the cleaning agent.
Make sure to connect the E 17e to a socket equipped with earthed protective wire
and to mains of adequate voltage and frequency.
Never collect explosive fluids, undiluted acids and solvents! This includes e.g. gasoline, paint thinners or fuel
oil, which-when penetrating the air being taken in may form explosive vapors or mixtures; moreover acetone,
undiluted acids and solvents if they should be aggressive to the material used for the machine components.
The machine may be used only on indoor hard floorings and for operation on level grounds with a maximum
inclination of up to 2 %
8
Using the machine on public roads and places is not admitted. Qualified personnel only are admitted to perform
maintenance and repair work .
Turn the machine off and disconnect the mains plug before cleaning and maintaining the machine, when replacing parts or
when change over to another function.
Do not clean the machine by means of vapour jet or high pressure cleaning equipment. Do not allow water to
penetrate the electrical parts.
The machine is splash-water proof (IPX3).
Use of the machine in areas endangered by explosion hazard is not admitted.
9
Transport
Transport
In order for the easy transportation of E 17e, it is recommended to lift up the brush head and squeegee as represented
before transporting the machine.
Handling of line cords
Make sure that the line cords are not damaged by running over, squeezing, dragging , etc. The line cords shall be checked
regularly with regard to damage and ageing. The machine must not be used unless the line cords are in proper condition.
Use only original extension cables, the maximum admissible length being = 25 m.
When using or replacing line cords, it is necessary to adhere to the type ST cable 14 AWG/3 Core (UL/CSA approved) with
10m length. When replacing coupler plugs of line cords or connecting leads, splash -proof protection and mechanical
strength must be guaranteed.
10
Principle of Operation
E 17e
A squeegee and suitable brushes or pads are required for wet cleaning of hard
floorings. The rotating brush scrubs the floor thoroughly, removing the dirt by means
of suds, thus cleaning the floor. The soiled water is drawn in during the same cycle
by means of the squeegee. This way the floor can be stepped on immediately
afterwards, it is dry and clean.
Useful advice for perfect work
Prior to wet cleaning it is necessary to clean the floor. This way, not only the cleaning
efficiency is improved, but wear of the brush will be substantially reduced at the
same time. If floors are particularly dirty or it wax has to be removed (basic cleaning).
The floor should be treated twice. During the first cycle, the floor is scrubbed with the
cleaning agent selected according to the degree of dirt encountered, the squeegee
remaining lifted.
Allow the cleaning agent to act on the floor for approx. 5 or 10 minutes, complying with the manufacturer's instructions,
then scrub the floor once again while the squeegee is lowered.
Comply with the instructions for correct dosage of detergent. Correct dosage will help you to save money and to
take care of the environment. If there is much foam, this will affect the performance of the machine.
.
Actually it indicates that there is excessive dosage or improper suitability of detergent for the existing kind of dirt.
Detergent particles contained in the soiled water and not being used will cause formation of foam. Instructions for dosage
are given on the detergent tank. Please take those manufacturers recommendation as a first basis. Tests made by
yourself in practice then soon will make you find the ideal type of detergent and the perfect dosage applicable to it.
11
How to take the Machine into operation
Assembly
When being supplied to you, the E 17e is packed in a cardboard box. The floor consists of a wooden platform
where the machine is fixed by means of plastic straps.
Open the box from its bottom side and remove it by pulling upwards. After detaching the plastic wraps, you now
can follow the below 4 instructions.
Rubber cap
& screw
I
Owner’s personnel is not allowed to open the machine.
Preparing for use
1. Tilt the body of the machine after removing rubber caps & allen
screws(on both sides) in order to Gain access to the inside of the
machine.
Tie bolt
2. The brush motor is fastened to its guide ways by a screw in order to
prevent unwanted movement during transport. Remove this screw and
check for the up-and-down movement of brush motor. Also remove the tie
bolt indicated in the picture.
Screw
12
Description
3. Close the body back and secure it with screws and Rubber caps.
Remove the two tie-bolts outside the body of the Machine .
4. Take the machine out of the pallette carefully. Fit the drain hoses
(2 Nos.) ensuring the position of hooked end of the hoses. Take the
power cord through the cable retainer.
You now can take machine from the platform.
Tie bolt
IMPORTANT - If the supply cord is damaged, it must be replaced by a special cord available from the
manufacturer or an authorised service agent.
Description
Controls
1.Adjustable handle
2.Knob - handle
3.Lever for lifting the squeegee
4.Switch to unlock the brush
2
1
3
4
13
Description
Control panel
Switches for Vacuum Motor and Brush
A. ON/OFF Switch for Suction Turbine
Is on when “A” is at position “ I “
Is off when “A” is at position “ o“
A
B. ON/OFF Switch for Brush Motor
Is on when “B” is at position “ I “
Is off when “B” is at position “ o“
C. Switch for Brush Release
Brush will be released when switch C is pressed But, ensure the
switch B is at position “ 0 “
C
14
B
2. Cleaning solution discharge control
Turn the lever up , to discharge the detergent and position the
lever
4
suitably to achieve the desired flow of Detergent.
2
Lever
3
1
Turn down to close the detergent flow.
0
Important! Do not over-exert the lever; A gentle force is enough to
close/open.
Pedal for lifting the brush
is used to lift and lower the
brush.
For lowering, first press the pedal a little to outside (unlock) and
then allow it to move slowly
Upwards.
For lifting, press the pedal slowly downwards and make it Lock.
1.Pedal for lifting brush
2.Speed control lever
2
1
15
Control for the speed of machine
Pull the black knob a little.
Take the knob to the left to
increase the speed.
Take it to the right to decrease speed.
Leave the knob so that it locks in its place. The speed is adjustable
in 4 steps.
Raising / lowering the squeegee
To lower the squeegee move the lever knob to your left.
To raise the squeegee move the lever knob to your right.
16
Brushes/pads
The E17e must be equipped with brushes from the accessories kit, as
required by the degree of dirti and kind of ground.
Installation of brush
The tank should be empty.
Lift the squeegee.
Place the brush in front of the machine.
Lower the brush head.
Press the machine downwards at the rear end and move to above the brush so that the
catch is positioned, as close as possible, over the center of the brush
Lower the front end of the machine so that the catch is centred in the brush.
17
Turn on switch "B" for a short time in order to allow locking
.
Note: The brush must snap in immediately. A rattling noise indicates that the brush head is not correctly
centered. Turn off switch "B”, correct position of brush head and turn on switch 'C' for locking. Now the brush is
locked. repeat locking operation.
Removal of brush
Empty the tanks.
Lift the squeegee and the brush.
Turn on switch "B” for unlocking of Brush.
Turn off the machine
Press the rear end of the machine
downwards.
pull the machine towards the rear,
Brush is now lying in front of the machine.
18
Squeegee
The E 17e is equipped with a squeegee with a working
width of 750mm. The squeegee bracket group fixed to the
E 17e, allowing swiveling and the oscilating movements.
The squeegee, protruding at the side, evades obstacles in
The machines path and is made swivel backwards.
Note: Before starting to work, check the squeegee for
possibly collected foreign matter and for proper condition.
Mounting of squeegee
(first time)
3
1
2
1. Knurled nuts
2. supporting strip
3. sealing strip
Lift squeegee bracket group (3)
Mount squeegee (1) to squeegee bracket group (3) as shown in
figure.
Attach suction hose to the tubular socket of the squeegee.
Note: The supporting wheel under the squeegee bracket group
has been adjusted by the factory.
19
Removal of squeege
Lift the squeege
Un screw the squeege knob(2)
Removal the squeege towards the bottom side
2
Replacement of sealing strips
The sealing strips can be removed
Without needs of tools, as follows
Remove the squeegee (refer to section "Removal of squeegee")
3
Unscrew the knob lip.(1)
1
Remove the supporting strips (2)
And the sealing strips (3).
Mount the new sealing strips by inverse sequence of operation.
1.squeegee
2.squeegee knob
3.squeegee bracket group
Tightening of the knurled nuts (just slightly, by hand) has to be done starting from the center towards outside (sealing
strips with slots to frontside, and plain one to the rear)
Note: If worn, the rear sealing strip can be turned at the frontside edge.
Note: The supporting strip may
Modify the sealing strip effect, hard-soft, and thus be adapted to different floor conditions.
20
Taking into operation
Filling of water
Before starting to work, fill-in fresh water and detergent as described
Below:
Open the tank lid and tilt it to the Rear.
max. 50°C
Fill the fresh water tank with water (max 50°C) as required by the work and add
to be done, detergent as specified by the manufacturer.
Note: Use only detergent suitable for automatic machines (low foaming) if not, the suction
turbine Can damage by formation of excessive quantities of foam.
We recommend using our agents for cleaning and care, which are
adapted to the E 17e. Those products comply with the provisions
of the Detergents Act.
When the E 17e is being pushed, squeegee and brush drive plate must be lifted.
Operating Procedure
Turn on switch "B” the brush is rotating .
Turn the lever up , to discharge the detergent and position the lever
suitably to achieve the desired flow of Detergent.
Lower the brush head.
Lower the squeegee.
Turn on switch A the suction turbine is running.
21
Note: After lowering the brush move The E 17e immediately;
Otherwise the brush might leave traces on the floor. Lift the squeegee during reverse travel.
During work, the power supply cable
Should be lying behind the operator.
When passing over dormers with a height of more than 0.70in =10mm,
The brush drive must be turned off and the brush must be lifted up.
Caution : Danger when passing over the power supply cable while the brush is rotating.
Cleaning of floor areas starts from the outlet socket and is effected stripe by stripe. In case of unoccupied areas it will
be useful to clean at first the border areas, passing with the machine along those areas in counterclockwise sense.
Cleaning of the remaining areas then should be effected stripe by stripe, starting from the outlet socket.
Partially occupied areas should be subdivided into single working areas, within reach of the power Supply cable.
Within short time, the operator will learn how to avoid unnecessary encumberments caused by the cable.
When work is finished:
Stop the machine and lift the brush head.
Lift the squeegee.
Drain and rinse the soiled water
tank (refer to section "Soiled add
fresh water tanks" )
Clean the sealing strips at the
squeegee.
Check the strainer upstream of the
intake opening in the fresh water tank; clean if required, as otherwise the suction efficiency will be affected.
Note: The machine must not becleaned by water jet or high pressure cleaning equipment, as
this will endanger its proper working function.
22
Soiled and Fresh water tanks
Fresh water tank
The E 17e has soiled water tank and a fresh water (lye) tank. The filling
capacity is 22 litres; . water temperature must not exceed 50°C .Soiled
water is fed via the suction hose into the soiled water tank.
Note: Do not collect any external water.
Note: When work is finished both the soiled and the fresh water tanks on
principle must be drained and rinsed in order to preclude formation of
residues.
Caution! For disposal of soiled water and lye, the legal provisions
have to be compiled with.
Strainer
Soiled water tank
Procedure for draining tanks
·Slowly open the cap and allow
drainage of the water.
·Re-close the cap.
·Re-attach the drain hose.
·Follow the above same sequence
of operation to drain the fresh
water tank.
23
Draining of Soiled water tank
Is used to drain the soiled water.
Note : when work is completed, the
soiled water tank to be drained and
rinsed
Draining of Fresh water tank
Is used to drain the fresh water.
Note : The tank requires rinsing at
regular intervals
Please follow the below
Electrical Equipment
The electrical equipment of the E 17e uses a mains voltage of 115 V/60 Hz
AC. Easy access to brush motor and vacuum motor is possible after the
upper part of the unit has been titled to upside.
The vacuum motor has been provided with a circuit breaker (F ) having a
rating of 10A.
The brush motor has been provided with a circuit breaker (E) having a
rating of 12A.
The circuit breakers should be manually reset incase of tripping.
The circuit breakers can be reset by pressing the transparent dome on the
electrical box cover. Please allow approximately 30 seconds time before
resetting.
24
E
F
E Circuit breaker for Brush motor
F. Circuit breaker for Suction Turbine
Suction turbine require little maintance only;just the carbon brushes must be
checked -renewed-after every 200 service hours.
If there should be repeated cases of failure, look for the reason. Any work at the electrical system has to be
carried out by specialized electricians only.
Whenever performing work at the electrical system, disconnect the mains supply plug on principle. When
work at the electrical system is finished, a safety test as per VDE 0701, sections 1 and 3, has to be performed.
25
Technical Specification
Model
E 17e
Model No
M 17115
Length with squeegee
Width without/with Squeegee
Height
Brush Head
Squeegee
1000 mm
450/750 mm
807/870 mm
430 mm
750 mm
1700 m 2/h
Theoretical Performance
Driving Speed
Main wheel,dia/width
Rear wheel,dia/width
Volume of Fresh water tank
Volume of soiled water tank
Pump throughput, max
Dead weight of machine
Total weight, ready to operate,wet
No of Brushes
Brush Dia
Brush Speed
Brush contact pressure,max upto
Vacuum-Air throughput
Vacuum pressure
Service Voltage
Frequency
Nominal power,total,max
Circuit Breaker for brush motor
Circuit Breaker for suction turbine
Brush Motor (Rated)
Vacuum Motor (Rated)
Noise Level
26
Upto 4 km/h
75/28 mm
150/30 mm
22 lts
22 lts
1.7 lts
184 LBS
241.4 LBS
1
17 inches
260 rpm
48.5 LBS
43 L/Sec
1630 mm of H 2O
115 V/AC
60 Hz
1800 W
12 A
10 A
800 W
900 W
75 db(A)
Maintenance
Maintenance work
Compliance with our recommendations concerning maintenance work will give you the certitude always having a
machine at your disposal, which is ready to work and in good operating condition.
It is better to take precautions than to repair damages - and less expensive! Please contact your local Minuteman
distributor; the people there will be glad to perform that work for you. There well trained personnel and genuine
Minuteman spare parts are at your disposal. In case of any inquiries or orders for spare parts, please always quote
the machine's serial number mentioned on the nameplate. The name plate is fixed in the rear side of the machine.
When cleaning or servicing the machine, and when replacing any parts, shut off the machine and on principle
disconnect the power plug from the power supply. For reasons of safety during cleaning and/or maintenance work in
or on the tank, the tank lid - when lifted - must be secured so as to prevent accidental closing or tilting down. The
machine may be taken into operation only if all guarding devices are fitted and in protective position. As far as
possible, cleaning should not be done by hand, but using appropriate tools or equipment. Maintenance and repair
work may be carried out only by means of suitable tools and by the people trained in the factory. For reasons of safety,
only genuine Minuteman spare parts may be used.
Before performing the maintenance, inspection and/or repair work described below, check all operating
elements and components of the machine for proper operation, and identify any possible
Malfunctions.
27
Service hours
Maintenance work
Daily
every every
50
Check connection -extension cables and plugs for good condition;
discard defective cables immediately.
Empty and clean (rinse) the soiled water tank
Check the sealing strips of squeegee for good condition.
Check the squeegee for possibly collected foreign matter and clean it, if required
Check the float for proper operation.
Check the strainer in the fresh water tank , clean it as required..
Check the suction hose between squeegee and soiled water tank
for tight fit.
Check the caps both of fresh and soiled water drain hose; check them for smooth
Operation.
28
100
every
200
Service hours
Maintenance work
Daily
every
50
every
every
100
200
Check the squeegee sealing strips for wear; renew them if required.
Check the brush for tight fit and wear; renew them if required.
Check the tank lid seal; renew it if required.
Check the fresh water infeed to the brushes.
Remove carbon dust from the suction motor ,Check the carbon brushes for easy
Operation and wear, renew the carbon brushes as required.
Caution : Prior to any maintenance and repair work, remove the power
Supply plug from the power supply.
29
Minuteman International 14N845 U.S Route 20 Pinegree Grove, Illinois 60140 USA
Phone 1-800-323-9420
www.minutemanintl.com
A Member of the Hako Group